Embed Size (px)
Citation preview

Digital Multifunctional System
User Manual
Océ TDS400

Copyright
Océ-Technologies B.V. Venlo, The Netherlands © 2001 All rights reserved. No part of this work may be reproduced, copied, adapted, or transmitted in any form or by any means without written permission from Océ.
Océ-Technologies B.V. makes no representation or warranties with respect to the contents hereof and specifically disclaims any implied warranties of merchantability or fitness for any particular purpose. Further, Océ-Technologies B.V. reserves the right to revise this publication and to make changes from time to time in the content hereof without obligation to notify any person of such revision or changes.
Edition 1.2
Océ-Technologies B.V.
GB
This manual contains a description of the Océ TDS400 and the copying that can be done with it. The introduction (chapter 1) contains a general description of the working methods for using the copier and it is recommended that you read at least this chapter.
TrademarksProducts in this manual are referred to by their trade names. In most, if not all cases, these designations are claimed as trademarks or registered trademarks of their respective companies.
Safety informationThis manual contains the following safety information:■ Appendix B lists ‘Instructions for safe use’. You are advised to read this
information before you start to actually use the copier. Technical safety information such as safety data sheets can also be found in appendix B.
■ Where applicable, cautions and warnings are used throughout this manual to draw your attention to safety precautions to be taken.
InternetCheck Océ on the internet at www.oce.com for:■ the latest drivers■ the latest user manuals■ product development

Contents 3
Contents
Chapter 1IntroductionAbout this manual 10The Océ TDS400 12The Océ TDS400 concept and components 13
The Océ TDS400 printer 13The Océ TDS400 scanner 13The Océ Power Logic® controller 14Océ TDS400 options 15
Océ TDS400 users 17User interaction 17
The data flow to the Océ TDS400 19
Chapter 2Use the Océ TDS400 to printPrinter operator panel 22
Display 23Menu level indicator 23Buttons 24
How to turn on and turn off the Océ TDS400 printer 25Cancel a print 26
Menu structure 27Media type and size on the printer 27Manual feed 29Cut media 30
Print info 31Print the configuration report 31Print the menu card 31Print the demo print 32
Configuration 33Select a language 33Network settings 33Paper series 35
System menu 37Clear set memory 37Diagnostic mode 37Status messages 38

4 Océ TDS400 Digital Multifunctional System User Manual
Error messages 39Menu structure of the printer 41
Chapter 3Use the Océ TDS400 to copyScanner operator panel 44
The buttons 45The display 46Menu level indicator 47
Copy jobs 48Turn on and turn off the Océ TDS400 scanner 49Start the copy process 50Make copies 50Number of copies 51Select the use of roll 1 or roll 2 or manual feed 52Select the input mode 52To copy sets 53Specify the zoom factor 53The exposure settings 54Deliver originals after scanning 56Enable automatic feed of the original 56Define settings for the next original 57Copy on pre-cut sheets 57Stop a copy job 59Set synchro or standard cut 59Adjust the leading or the trailing strip 60Mirror-image copies 63Release original 63
Menu structure of the scanner 64
Chapter 4Use the Océ TDS400 to ScanIntroduction 66Make a scan 67Settings to scan 68
Destination 68Check print 69Resolution 69File format 70Optimisation 71
Menu structure Océ TDS400 Scanner 72Scan Manager 73

Contents 5
Tree view 74Table view 74
Actions from the Scan Manager 76Destinations 76Scanned files 79Manage the temporary store 81
How to retrieve scanned files? 82Get files via FTP 83
Océ View Station (LT) 84Menu options 85Function buttons 86View error 87
Chapter 5Océ Power Logic®: The Settings EditorIntroduction 90How to start up and shut down the controller 91Settings Editor 92
General structure 93Menu bar 94Top toolbar 94Left toolbar 96Settings area 96Status bar 97How to access the Settings Editor 98Start Océ Settings Editor 98How to perform actions from the Settings Editor 99
Key Operator settings 101System Administrator settings 102
Chapter 6Océ Power Logic®: System Control PanelIntroduction 106
Structure 106Icons 108
User operations 109
Chapter 7Océ Power Logic®: Queue ManagerIntroduction 112

6 Océ TDS400 Digital Multifunctional System User Manual
Structure 112Modes 114Icons 116
Managing print jobs 117
Chapter 8Océ Power Logic®: Remote LogicIntroduction 120Installation procedure for MS Windows® systems 121Installation procedure for Unix systems 123
IBM AIX 124HP-UX 124Linux 124
Installation procedure for Other systems 125Use Océ Remote Logic® 126User modes 127
Log in 128Log out 128To change the password 129Automatic login 129Language 129Help 130Command line parameters 130
How to use the remote system 132
Chapter 9Océ Print Exec® LT WebIntroduction to Océ Print Exec® LT Web 134
Basic concepts 134Requirements for the user browser software 134Requirements for the network infrastructure 134How to connect to the Print Exec® LT Web 134
Chapter 10Océ Power Logic®: Account LoggingThe account logging option 138
1 Enable the Account logging option 1382 The account log file 1383 Make copy, print, or scan jobs 1394 How to retrieve the account files 140

Contents 7
5 Use the generated accounting file 142Account information in the log file 144
Account information for the media format 144Account information for the media weights 145Structure of the account file 146Description of all the parameters in the account log file 146
Chapter 11Printer supplies and scanner maintenanceMedia 152
The paper rolls 153How to program media settings 158
How to refill toner 159Maintenance of the glass platen and the reference roller of the scanner 162
Chapter 12How to solve problemsIntroduction 166Original jams in scanner 167
How to clear a paper jam 168How to solve a jam in the fuser section 169
Appendix ASummary and tablesThe Océ TDS400 172Printer operator panel 173Scanner operator panel 174Product specifications Océ TDS400 175List of available material types and sizes 180
Material types 180Automatic format selection 182
Summary of standard zoom formats 183
Appendix BSafety informationInstructions for safe use 186Safety data sheets 188
Safety data sheet Océ TDS400 printer 189Safety data sheet Océ TDS400 printer and scanner 190

8 Océ TDS400 Digital Multifunctional System User Manual
Safety data sheet Océ B5 toner 191Safety data sheet Océ D5 Developer 193Safety data sheet Océ OPC drum 195Safety data sheet Océ Cleaner A 197
EPA Energy Star® 199
Appendix CMiscellaneousNotation conventions 202Reader’s comment sheet 203Addresses of local Océ organisations 205Index 207

9
Océ TDS400Digital Multifunctional System
User Manual
Chapter 1Introduction
This chapter contains a general introduction to the Océ TDS400. This chapter describes the main features, the options and the software applications provided with the system.

10 Océ TDS400 Digital Multifunctional System User Manual
About this manual
This manual contains the following chapters
Chapter 1: Introduction Contains a general introduction to the Océ TDS400 system, a general description of the main features, delivery options and software applications provided with the system.
Chapter 2: Use the Océ TDS400 to print Contains a short description of how to use the printer.
Chapter 3: Use the Océ TDS400 to copy Contains a description of how to use the scanner to make copies.
Chapter 4: Use the Océ TDS400 to scan Describes how to scan the originals to a file.
Chapter 5: Océ Power Logic®: The Settings Editor Gives information about the Settings Editor. For details about specific settings, refer to the Help on the Settings Editor.
Chapter 6: Océ Power Logic®: The System Control Panel Describes how to look at the system status of the Océ TDS400.
Chapter 7: Océ Power Logic®: The Queue Manager Describes how to view and manage jobs in the Océ TDS400 print queue, inbox queue, and history queue. It shows how to cancel the active print and how to delete the prints, how to hold the print jobs in the queue, how to restart the jobs, and how to move jobs to top.
Chapter 8: Océ Power Logic®: Remote Logic describes the installation and the functionality of the Océ TDS400 remote controller applications.
Chapter 9: Océ Print Exec® LT Web describes an optional job submission application which allows you to send print jobs to a printer from your web browser.
Chapter 10: Océ Power Logic®: Account logging describes an optional feature that enables you to track how many jobs you make for a customer. This chapter describes how you use the accounting functionality for this purpose.

Introduction 11
Chapter 11: Printer supplies and scanner maintenance Describes how to load paper and how to refill the toner, and how to provide maintenance to the scanner.
Chapter 12: How to solve problems Describes the problems that can occur when you use the Océ TDS400.
Appendix A: Summary and tables Contains the product specifications for the Océ TDS400, a list of available material types and sizes.
Appendix B: Safety information Contains the approved weight limits, instructions for safe use, the available safety data sheets and the correct ENERGY STAR® specifications.
Appendix C: Miscellaneous Contains the notation conventions, a reader’s comment sheet and the addresses of local Océ organisations.

12 Océ TDS400 Digital Multifunctional System User Manual
The Océ TDS400
The Océ TDS400 is a wide format, black and white, multifunctional system to print, to scan and to copy wide format documents. The system includes a printer (1 or 2 rolls) a controller and an optional scanner.
[1] Océ TDS400

Introduction 13
The Océ TDS400 concept and components
The Océ TDS400 printer
The Océ TDS400 printer is available with an automatic 1- or 2-roll unit and manual feed.Use manual feed when you want to print a job on a media type and/or size that is not available on one of the paper rolls.
Note: The manual feed is a special slot just above the paper drawers on the engine. You can insert cut sheet material in this slot, one sheet at a time.Refer to ‘Copy on pre-cut sheets’ on page 57 on how to copy on pre-cut sheets.
Note: Only use material as specified in ‘List of available material types and sizes’ on page 180.
The Océ TDS400 is a 600 DPI LED printer with a speed of 3 meters per minute.
You can perform a number of activities at the Océ TDS400 printer. You can set the media type and size, stop a print job or select your preferred language from the printer operator panel (see chapter 2, ‘Use the Océ TDS400 to print’ on page 21 for more details).
The Océ TDS400 is delivered with drivers and job submission software to enable you to print from AutoCad®, Windows® or Macintosh® applications.
The Océ TDS400 scanner
The Océ TDS400 scanner supports a wide range of copy activities. It provides a large number of functions for defining original and copy related settings. You can specify particular media, feeding and quality enhancement options from the scanner operator panel. In combination with the Océ TDS400 printer it forms a powerful productivity tool.
The scanner scans your originals. You can print the originals (copy job) or you can store the scanned original in a file (Océ Scan Logic®). The scanner has different quality modes which are provided by Océ Image Logic®.

14 Océ TDS400 Digital Multifunctional System User Manual
■ Green button principleThe Océ TDS400 is easy to use. Press the green button on the scanner operator panel to start the basic copy jobs. If you have difficult copy jobs, you change the default copy settings with the help of the other settings on the scanner operator panel.
The Océ Power Logic® controller
The Océ TDS400 is equipped with a controller to process the print jobs and the copy jobs. The controller can have Océ Remote Logic® to control your print jobs, make your default printer settings and monitor the printer status.
The Océ Power Logic® controller processes the print jobs and the copy jobs. It also processes the optional scan to file jobs.
■ Set processingWhen you send a file to the printer, the file is processed once and can be printed many times. The Océ TDS400 has a set memory to store a maximum of 135 A0s which allows you to create the same sets that are sorted either by page or by set.
■ Spool memoryThe Océ TDS400 has a spool memory which provides a queuing system for files you want to print. The spool memory allows many users to send the print jobs to the Océ TDS400 at the same time. The print jobs are put in the print queue where they wait to be printed. The job that is put first into the queue is printed first.
■ Network connectivityThe Océ TDS400 controls a number of common network protocols. The Océ TDS400 can be used in may networks like TCP/IP, NetBEUI® and Novell® .
Settings Editor The Settings Editor allows you to set the default settings of the Océ TDS400 according to your companies requirements.
Refer to ‘Océ Power Logic®: The Settings Editor’ on page 89, for complete information about the Settings Editor application.
System Control Panel The Océ System Control Panel (SCP) application provides you with status information about the system.

Introduction 15
Refer to ‘Océ Power Logic®: System Control Panel’ on page 105, for complete information about the System Control Panel.
Queue Manager The Queue Manager (QM) application gives a graphical design of the print queue. You can manage jobs in the print queue, history queue, or inbox queue.
Refer to ‘Océ Power Logic®: Queue Manager’ on page 111, for complete information about the Queue Manager.
Océ Remote Logic® enables you to:■ View system status (Océ System Control Panel).■ Manage print jobs (Océ Queue Manager).Change settings (Océ Settings Editor).
Océ TDS400 options
By default, the Océ TDS400 has an automatic 1 roll unit and is equipped with a receiving tray as the output delivery device. The receiving tray is the rack on the bottom of the printer (see figure 1 on page 12).
Automatic 2-roll unit The Océ TDS400 is available with an automatic 2-roll unit. Each of the rolls can be loaded with print material of a different size or type. The size and type of the available media are indicated on the operating panel.
Compact output stacker The optional compact output stacker offers a smart and efficient disposition of printed or copied drawings (up to 100 prints) on PPC material and some other materials.
Copy Delivery tray Collects copies at the rear of printers as they are printed.

16 Océ TDS400 Digital Multifunctional System User Manual
[2] Copy Delivery Tray
Graphical User Interface The Graphical User Interface (GUI) consists of a screen, a mouse, a keyboard and software. You use the screen, mouse and keyboard to interact with the graphical user interface of the controller. With the GUI you can perform Key Operator and System Administrator tasks in a graphical way. Settings are visible within one window so that it is much easier to view and change them.
Océ Scan Logic® Enables you to scan a document to file for later (re)use. You can use the files in other applications or print them out.
■ Scan Manager with Océ View Station (LT)The Scan Manager is an application available only locally on the controller. With the Scan Manager you can: ■ configure the destinations for scan to file■ increase your productivity with automatic file naming■ view the scans
Refer to ‘Use the Océ TDS400 to Scan’ on page 65 for complete information about the Scan Manager application.
Adobe® PostScript® 3/PDF The Océ TDS400 fully supports Adobe® PostScript® 3. For Japanese 5 extra fonts are optional. They can be enabled with a password in the Settings Editor.
Océ Print Exec® LT Web Optional software which allows you to create and send a set of plots or drawing files to an Océ TDS printer. You can send the settings for these jobs from your workstation, using your web browser.
Account logging An optional feature that enables you to track how many jobs you make for a customer. This chapter describes how you use the accounting functionality for this purpose.

Introduction 17
Océ TDS400 users
The Océ TDS400 has the following user types:
System administrator The Océ TDS400 system administrator installs and makes the configuration for Océ TDS400. The system administrator defines the printer-language settings, pen settings and Automatic Language Sensing (ALS) settings. The system administrator can help the users who need to install the printer drivers on their workstations. See chapter 10, ‘Océ Power Logic®: Account Logging’ on page 137 for complete information. The configuration information is in the Océ TDS400 Connectivity Manual provided with the Océ TDS400.
Key operator The Océ TDS400 key operator is responsible for the daily maintenance of the Océ TDS400. The key operator replenishes toner when necessary, loads media as needed and defines the default printer settings for recurring print jobs. Also, the key operator defines all time settings, such as panel time out and sleep mode time out. See ‘Océ Print Exec® LT Web’ on page 133 for more information.
Repro operator The repro operator is responsible for the daily operations on the Océ TDS400. The Repro Operator settings are a subset of the Key Operator settings. The Repro Operator has no rights to change settings in the Settings Editor. In the Queue Manager and the System Control Panel the repro operator has the same user rights as the Key Operator and System Administrator.
Anonymous user Typically, an anonymous user on the Océ TDS400 can be either a PC user who has remote access to the system through one or more drivers (Windows® driver, AutoCAD® ADI/HDI or PostScript®) or the remote applications (Océ Queue Manager, Océ System Control Panel and Océ Settings Editor), or the print submission/print management applications, or a user performing a copy job at the scanner.
Service operator The Océ TDS400 service operator is responsible for installation and maintenance of the Océ TDS400.
User interaction
You can operate the Océ TDS400 from different locations: local and remote:

18 Océ TDS400 Digital Multifunctional System User Manual
■ Operator panelsThe Océ TDS400 has two operator panels to make the settings for the print jobs and the copy jobs. See ‘Printer operator panel’ on page 22 and ‘Scanner operator panel’ on page 44 for complete information.
■ Océ Remote Logic®Use the remote logic to make the default key operator and system administrator settings (Settings Editor). To see the status of the jobs in the print queue you use the Queue Manager. The ‘System Control Panel’ shows the status of the complete system.
■ Océ Scan Logic®With ‘Scan Manager’ and ‘Océ View Station (LT) you can define all important settings for scanning.
■ Printer driversWith the Océ TDS400 one or more printer drivers can be used, including Print Exec® LT Web, Windows® driver, AutoCad® ADI/HDI and PostScript®. With these drivers PC users can access the Océ TDS400 remotely, from their applications, to print their files. More information about installing, configuring and use of the drivers can be found in the documentation provided with the drivers. All Océ drivers (except Postscript) can be freely downloaded from the Web at www.oce.com.
■ Use a Remote Control Format (RCF) file or an Océ Job Ticket (OJT) to give instruction to the Océ TDS400 how to manage a remote print job. You can make the special settings on an operator panel, or with the user interface (UI) on a workstation or PC. The RCF file or the job ticket describe the input sets, the output sets and the processing to form the outputs. See the ‘Remote Control Format Reference Manual’ and the ‘Océ Job Ticket Reference Manual’ for complete information about Remote Control Format (RCF) files or Océ Job Ticket (OJT).

Introduction 19
The data flow to the Océ TDS400
Connect the Océ TDS400 to a host environment, which can be a stand alone PC/Workstation or a PC/Workstation connected to a network. It accepts different standard format vector and raster data files from the host environment and converts these into high quality prints ((see figure 3)).
[3] Data flow to the Océ TDS400
When an Océ TDS400 receives vector, raster, Adobe® PostScript® or PDF (optional, Adobe® PostScript® 3™)data it will generate a print with the settings as specified in the Settings Editor.
Each print job has remote control commands to indicate the settings for a job. This so called header contains the job and the file defined settings in Océ Job Ticket (OJT). The OJT settings overwrite the settings defined in the Settings Editor. Except for pen settings and job management which have priority over the Océ Job Ticket settings.
ApplicationSoftware
Océ TDS400
Printfile + RCFPrint
JobSettings
PrintFile

20 Océ TDS400 Digital Multifunctional System User Manual
To compose such a header, you can:■ Compose the header within your application. Please refer to the Océ Job
Ticket (OJT) manual.■ Use an Windows® and/or AutoCad® HDI driver to generate both a plottable
file (e.g. HP-RTL, HP-GL/2) and the appropriate header with RCF-commands. Please refer to the Windows® / Autocad® Driver documentation.
■ Use the Océ Job submission software like Océ Print Exec® LT Web in order to compose jobs of plottable files in a very flexible and user friendly way (see chapter 5, ‘Océ Power Logic®: The Settings Editor’ on page 89).

21
Océ TDS400Digital Multifunctional System
User Manual
Chapter 2Use the Océ TDS400 to print
This chapter explains how to print with the Océ TDS400.

22 Océ TDS400 Digital Multifunctional System User Manual
Printer operator panel
The operator panel on the right hand side is easy to use (see figure 4). The panel has buttons and a display.
[4] Printer operator panel
next/select
previous
on-line stopStop button
On linebutton
Browse buttons
Next/selectbutton
Previousbutton
Alphanumeric display

Use the Océ TDS400 to print 23
DisplayThe display shows the feedback about print job status and error messages see page 38and page 39 in normal mode. In off-line mode it shows the ‘off-line’ menu (see figure on page 41).
Menu level indicator
The menu level indicator indicates the current position in the menu. Press the ‘Previous’ button to scroll through the menu.
24 Océ TDS400 Digital Multifunctional System User Manual
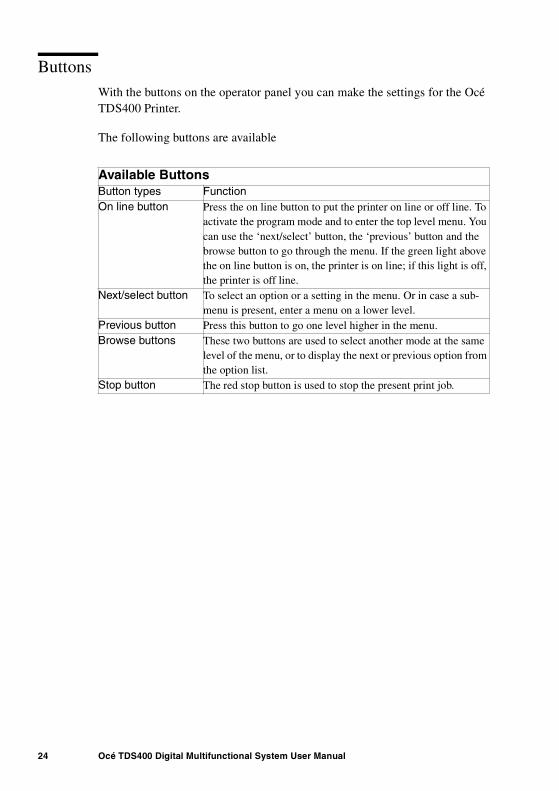
Buttons With the buttons on the operator panel you can make the settings for the Océ TDS400 Printer.
The following buttons are available
Available ButtonsButton types FunctionOn line button Press the on line button to put the printer on line or off line. To
activate the program mode and to enter the top level menu. You can use the ‘next/select’ button, the ‘previous’ button and the browse button to go through the menu. If the green light above the on line button is on, the printer is on line; if this light is off, the printer is off line.
Next/select button To select an option or a setting in the menu. Or in case a sub-menu is present, enter a menu on a lower level.
Previous button Press this button to go one level higher in the menu.Browse buttons These two buttons are used to select another mode at the same
level of the menu, or to display the next or previous option from the option list.
Stop button The red stop button is used to stop the present print job.

Use the Océ TDS400 to print 25
How to turn on and turn off the Océ TDS400 printer
To turn on the system:■ turn on the printer. ■ turn on the scanner (see page 49).■ turn on the controller(see page 26).
When you turn on the system, it is ready for operation. In this state, the machine is in the stand-by mode.
If the system is not in use for more than 1 minute, the operator panel returns automatically to the stand-by mode. The operator panel of the scanner is activated in the following conditions:■ you feed an original ■ a button on the operator panel is pressed
▼▼▼▼ Turn on the printer
1 Set the ON/OFF switch at the rear of the printer to position ‘1’ (see figure 5). If the power supply is connected, the green switch lights.
[5] On/off switch of the printer
Note: When ‘Ready’ is displayed on the operator panel, the printer is ready for use.

26 Océ TDS400 Digital Multifunctional System User Manual
▼▼▼▼ Turn off the printer
1 Set the ON/OFF switch at the rear of the printer to position ‘0’ (see figure 4).
Attention: If you switch off the printer during a print job, it is possible that you loose information or that a paper jam occurs.
▼▼▼▼ Turn on the controller
1 Press the button on the front of the controller.
▼▼▼▼ Turn off the controller
1 Select the ‘Shut down’ option from the System Control Panel. You can do this through both the controller and through Remote Logic®.
2 Switch off the controller and the monitor.
Cancel a print
Cancel a print before you start the print or during the print.
▼▼▼▼ Cancel a print
1 Press the ‘stop’ button.The printer stops. When the printer runs, the paper is cut.The paper is always ejected.

Use the Océ TDS400 to print 27
Menu structure
On the Océ TDS400 printer operator panel, you can do a number of actions. These actions include: ■ Media settings (material and size).■ Print info (configuration report, menu card and demo print).■ Configuration (connectivity issues).■ System (clear set memory and diagnostic mode).
Media type and size on the printer
One of the features of the Océ TDS400 printer is the automatic media change function. This function allows the printer to take another roll of the same format and copy material when the roll becomes empty when you print. You must configure this setting in the Settings Editor (see ‘Océ Power Logic®: The Settings Editor’ on page 89).
If you activate this function the machine automatically switches to the other roll, if the used one becomes empty. The switch only occurs if the kind of media and the width of the material is the same for both rolls.
Note: The Océ TDS400 Printer can not identify the copy material type and format. Fill the media and indicate the type and the size as described in ‘Media’ on page 152.
See ‘List of available material types and sizes’ on page 180 for a summary of all materials for the use with the Océ TDS400 Printer.
If you insert a new roll with another material or with a different width, you have to program the new roll specifications. Refer to ‘List of available material types and sizes’ on page 180.
Note: The machines switches automatically to the other roll if the used roll becomes empty, if you activate this function in the Settings Editor.

28 Océ TDS400 Digital Multifunctional System User Manual
▼▼▼▼ Set the media width settings
1 Press the ‘on line’ button to put the printer off line.2 Select the ‘Media settings’ item with the or button.3 Press ‘next/select’ to enter the ‘Media settings’ menu.4 Select ‘Roll 1’or ‘Roll 2’ with the or button.5 Press ‘next/select’ to enter the ‘Roll’ or ‘Manual feed’ menu.6 Select the ‘Width’ item with the or button.7 Press ‘next/select’ to enter the ‘Width’ menu.8 Select the desired width with the or button.9 Press ‘next/select’ to confirm the selected width.
10 Press ‘on line’ to put the printer on line again.
▼▼▼▼ Set the media type settings
1 Press the ‘on line’ button to put the printer off line. 2 Select the ‘Media settings’ item with the or button.3 Press ‘next/select’ to enter the ‘Media settings’ menu.4 Select ‘Roll 1’, ‘Roll 2’, ‘Manual feed’ with the or button.5 Press ‘next/select’ to enter the ‘Roll’ or ‘Manual feed’ menu.6 Select the ‘Material’ item with the or button.7 Press ‘next/select’ to enter the ‘Material’ menu.8 Select the desired media material with the or button.9 Press ‘next/select’ to confirm the selected media material.
10 Press ‘on line’ to put the printer on line again.

Use the Océ TDS400 to print 29
Manual feedThere are two possibilities to select manual feed:■ via remote control commands added to the print file (by means of Plot
Director or drivers).■ choose ‘manual feed’ on the scanner operator panel.
[6] Manual feed
If you want to use manual feed, you must:1 program the media settings (material and feed time out) on the printer2 send the file3 feed the sheet of material4 hold the material until the printer pulls in the first part of the material.
If you select manual feed, the printer will inform you to feed the sheet into the printer. There is a time out between 1 and 10 minutes. Default is 1 minute.
▼▼▼▼ Set the time-out for manual feed
Default is 1 minute.
1 Press ‘on line’ to put the printer off line.2 Select the ‘Media settings’ item with the or button.3 Press ‘next/select’ to enter the ‘Media settings’ menu.4 Select ‘Manual feed’ with the or button.5 Press ‘next/select’ to enter the ‘Manual feed’ menu.6 Select the ‘Time out’ with the or button. 7 Press ‘next/select’ to enter the ‘Time out’ menu.8 Select the desired time out with the or button.9 Press ‘next/select’ to confirm the selected time-out.
10 Press ‘on line’ to put the printer on line again.

30 Océ TDS400 Digital Multifunctional System User Manual
Cut mediaIf the material does not have a straight leading edge, you can cut the material at right angles from the roll.
▼▼▼▼ Cut the material from roll 1 or roll 2
1 Open the drawer.2 Feed the paper manually until it is 5 cm above the top drawer.3 Press the ‘on line’ button to put the printer off line.4 Close the paper drawer.5 Select the ‘Media settings’ item with the or button.6 Press ‘next/select’ to enter the ‘Media settings’ menu.7 Select ‘Cut media’ with the or button.8 Press ‘next/select’ to cut the paper.9 Open the paper drawer.
10 Remove the scrap of material.11 Feed the material until you can see the material and put the material into
position ((see figure 57 on page 153) and 61 on page 155).12 Close the drawer.13 Press the ‘on line’ button to put the printer on line again.
Use the Océ TDS400 to print 31
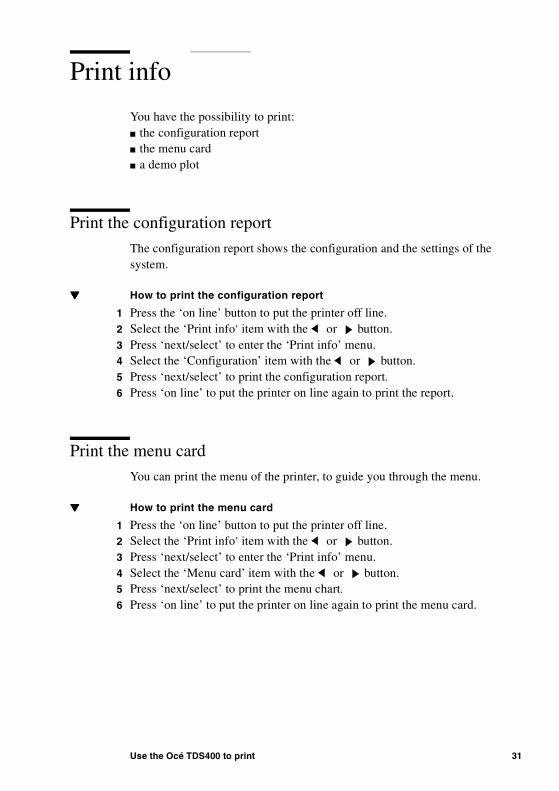
Print info
You have the possibility to print:■ the configuration report■ the menu card■ a demo plot
Print the configuration report
The configuration report shows the configuration and the settings of the system.
▼▼▼▼ How to print the configuration report
1 Press the ‘on line’ button to put the printer off line.2 Select the ‘Print info’ item with the or button.3 Press ‘next/select’ to enter the ‘Print info’ menu.4 Select the ‘Configuration’ item with the or button.5 Press ‘next/select’ to print the configuration report.6 Press ‘on line’ to put the printer on line again to print the report.
Print the menu card
You can print the menu of the printer, to guide you through the menu.
▼▼▼▼ How to print the menu card
1 Press the ‘on line’ button to put the printer off line.2 Select the ‘Print info’ item with the or button.3 Press ‘next/select’ to enter the ‘Print info’ menu.4 Select the ‘Menu card’ item with the or button.5 Press ‘next/select’ to print the menu chart.6 Press ‘on line’ to put the printer on line again to print the menu card.

32 Océ TDS400 Digital Multifunctional System User Manual
Print the demo printAfter the installation of the Océ TDS400, you can print the demo print, to check the printer and the controller.
▼▼▼▼ Make a demo print
1 Press the ‘on line’ button to put the printer off line.2 Select the ‘Print info’ item with the or button.3 Press ‘next/select’ to enter the ‘Print info’ menu.4 Select the ‘Demo print’ item with the or button.5 Press ‘next/select’ to print the demo print.6 Press ‘on line’ to put the printer on line again to print the demo print.

Use the Océ TDS400 to print 33
Configuration
Select a language
On the operator panel of the Océ TDS400 Printer you can indicate which language you use to display the printer information, like status and error messages.
▼▼▼▼ Select a language
1 Press the ‘on line’ button to put the printer off line. 2 Select the ‘Configuration’ item with the or button.3 Press ‘next/select’ to enter the ‘Configuration’ menu.4 Select ‘Language’ with the or button.5 Press ‘next/select’ to enter the ‘Language’ menu.6 Select the desired language with the or button.7 Press ‘next/select’ to confirm the selected language.8 Press ‘on line’ to put the printer on line again.9 Turn the printer ‘off’ and ‘on’ again.
Network settings
The Océ TDS400 has 2 network adapters. To set the network settings you must enter the network data in 4 fields.■ Use DHCP server. The Dynamic Host Configuration Protocol (DHCP) is a
protocol to automate the assignment of Internet Protocol (IP) addresses in a network. Without DHCP, the IP address must be entered manually.
■ IP address. An IP address has two parts: one part identifies the network (with the network number) and the other part identifies the specific machine or host within the network (with the host number).
■ Subnetmask. A subnet (short for ‘subnet work’) is an identifiably separate part of an organization's network. To manage routing that could and should be handled within an organization.
■ Set default gateway A gateway is a network point that acts as an entrance to another network.

34 Océ TDS400 Digital Multifunctional System User Manual
▼▼▼▼ Set use DHCP server
1 Press the ‘on line’ button to put the printer off line.2 Select the ‘System’ item with the or button.3 Press ‘next/select’ to enter the ‘System’ menu.4 Select ‘Network sett.’ with the or button.5 Enter password.6 Press ‘next/select’ to enter the ‘Network sett.’ menu.7 Select ‘adapter 1’ or ‘adapter 2’with the or button8 Press ‘next/select’ to enter the ‘adapter 1’ or ‘adapter 2’ menu9 Select ‘Use DHCP server.’ with the or button.
10 Select ‘Yes’or ‘No’ with the or button.11 Press ‘next/select’ to confirm.12 Press ‘on line’ to put the printer on line again.
▼▼▼▼ Set the IP address
1 Press the ‘on line’ button to put the printer off line.2 Select the ‘System’ item with the or button.3 Press ‘next/select’ to enter the ‘System’ menu.4 Enter password.5 Select ‘Network sett.’ with the or button.6 Press ‘next/select’ to enter the ‘Network sett.’ menu.7 Select ‘adapter 1’ or ‘adapter 2’with the or button8 Press ‘next/select’ to enter the ‘adapter 1’ or ‘adapter 2’ menu9 Select ‘IP address’ with the or button
The first three digits flash.10 Enter the first three numbers of the ‘IP address’ with the or button. 11 Press ‘next/select’ to confirm, the next digits flash.12 Enter the next three numbers of the ‘IP address’ with the or button.13 Press ‘next/select’ to confirm, the next digits flash.14 Enter the next numbers of the ‘IP address’ with the or button.15 Press ‘next/select’ to confirm, the next digits flash.16 Enter the next numbers of the ‘IP address’ with the or button.17 Press ‘next/select’ to confirm.18 Press ‘on line’ to put the printer on line again.
▼▼▼▼ Set the Subnetmask
1 Press the ‘on line’ button to put the printer off line.2 Select the ‘System’ item with the or button.3 Press ‘next/select’ to enter the ‘System’ menu.4 Enter password.5 Select ‘Network sett.’ with the or button.6 Press ‘next/select’ to enter the ‘Network sett.’ menu.

Use the Océ TDS400 to print 35
7 Select ‘adapter 1’ or ‘adapter 2’with the or button8 Press ‘next/select’ to enter the ‘adapter 1’ or ‘adapter 2’ menu9 Select ‘Subnetmask’ with the or button
The first three digits flash.10 Enter the first three numbers of the ‘Subnetmask’ with the or button. 11 Press ‘next/select’ to confirm, the next digits flash.12 Enter the next three numbers of the ‘Subnetmask’ with the or button.13 Press ‘next/select’ to confirm, the next digits flash.14 Enter the next numbers of the ‘Subnetmask’ with the or button.15 Press ‘next/select’ to confirm, the next digits flash.16 Enter the next numbers of the ‘Subnetmask’ with the or button.17 Press ‘next/select’ to confirm.18 Press ‘on line’ to put the printer on line again.
▼▼▼▼ To set the Default gateway
1 Press the ‘on line’ button to put the printer off line.2 Select the ‘System’ item with the or button.3 Press ‘next/select’ to enter the ‘System’ menu.4 Enter password.5 Select ‘Network sett.’ with the or button.6 Press ‘next/select’ to enter the ‘Network sett.’ menu.7 Select ‘adapter 1’ or ‘adapter 2’with the or button8 Press ‘next/select’ to enter the ‘adapter 1’ or ‘adapter 2’ menu9 Select ‘Default gateway’ with the or button
The first three digits flash.10 Enter the first three numbers of the ‘Default gateway’ with the or button. 11 Press ‘next/select’ to confirm, the next digits flash.12 Enter the next three numbers of the ‘Default gateway’ with the or button.13 Press ‘next/select’ to confirm, the next digits flash.14 Enter the next numbers of the ‘Default gateway’ with the or button.15 Press ‘next/select’ to confirm, the next digits flash.16 Enter the next numbers of the ‘Default gateway’ with the or button.17 Press ‘next/select’ to confirm.18 Press ‘on line’ to put the printer on line again.
Paper series
You must enter the paper series that you use in the printer. Choose between:■ DIN■ DIN CARTO

36 Océ TDS400 Digital Multifunctional System User Manual
■ Only 8.5 inch■ Mix 8.5/9 inch
▼▼▼▼ To set a paper series
1 Press the ‘on line’ button to put the printer off line.2 Select the ‘Configuration’ item with the or button.3 Press ‘next/select’ to enter the ‘Configuration’ menu.4 Select ‘Paper series’ with the or button.5 Press ‘next/select’ to enter the ‘Paper series’ menu.6 Select the required paper series with the or button.7 Press ‘next/select’ to confirm.8 Press ‘on line’ to put the printer on line again.

Use the Océ TDS400 to print 37
System menu
To enter the System menu you need a password. The password for the System menu is: stops’ .
Clear set memory
The set memory indicates the available memory. If an error occurs, for example the set memory reaches its limits, you must clear the set memory.
▼▼▼▼ Clear set memory
1 Press the ‘on line’ button to put the printer off line.2 Select the ‘System’ item with the or button.3 Press ‘next/select’ to enter the ‘System’ menu.4 Enter the password to get access.5 Select the ‘Clear setmem’ item with the or button.6 Press ‘next/select’ to enter the ‘Clear setmem’ menu.7 Select ‘Yes’or ‘No’ with the or button.8 Press ‘next/select’ to confirm the setting.9 Press ‘on line’ to put the printer on line again.
10 Turn ‘off’ and ‘on’ the controller.
Diagnostic mode
The Diagnostic mode is only meant for the Océ service technician.

38 Océ TDS400 Digital Multifunctional System User Manual
Status messages
Status MessagesStatus messages ExplanationOff-line The printer is off-line.
Change options.Reset printer Turn the printer off and turn the printer on.Connecting..... There is no communication between the controller and the printer.
Wait until there is communication.Printer asleep The printer is in low power mode.
The energy is saved.Please wait The printer downloads the language.
Wait until the printer is prepared to operate.Printer ready The printer is prepared to print.Preparing job The printer prepares a print or copy job.Printing The printer prints.Load roll 1A2Paper
The printer detects that the required media is not available on roll 1.Fill roll 1 with the indicated media.
Load roll 2A2Paper
The printer detects that the required media is not available on roll 2.Fill roll 2 with the indicated media.
Manual feedA2Paper
The printer detects that the required media is not available in the manual feed.Put the required media in the manual feed.
Open left coverRefill tonerPress <on-line>
The toner container is empty.Refill the toner container.
Conditioning The machine improves the print quality by optimising the toner concentration.Wait until the toner concentration is at the correct level.
Printer readyRoll 1 empty
The paper roll 1 is empty.Reload roll 1.
Printer readyRoll 2 empty
The paper roll 2 is empty.Reload roll 2.
Printer runningRoll 1 empty
The paper roll 1 is empty.Reload roll 1 after the printers stops printing.
Printer runningRoll 2 empty
The paper roll 2 is empty.Reload roll 2 after the printers stops printing.
Job cancelled The current print or copy job is cancelledClose roll unit The roll unit is open.
Close the roll unit.

Use the Océ TDS400 to print 39
Error messages
Sensor not freeRemove paperPress <on-line>
The paper of one of the rolls is transferred after the marker (see ‘Feed the material’ on page 155) when power is applied to the printer.Take the paper back.Press <on-line>
Paper retractedPress <on-line>
Put the paper into the manual feed.Press <on-line>
Copy too shortRemove paperPress <on-line>
The length of the print material is less than 420 mm. This can oc-cur with the manual feed.Use an original longer than 420 mm.
Inputflap openClose inputflap
The input flap is open.Close the input flap.
Inputflap openRemove paperPress <on-line>
The input flap is open during the print processRemove the paper and press <on-line>.
Roll 1 emptyOpen roll unit
The paper on roll 1 is empty.Open the roll unit and replace it.
Roll 2 emptyOpen roll unit
The paper on roll 2 is empty.Open the roll unit and replace it.
Error messagesError messages ExplanationCopy too lateRemove paperPress <on-line>
The copy is too late at the paperpath output sensorRemove the print material.
Speed failureRemove paperPress <on-line>
A paper jam occurred.Remove the paper jam and press <on-line>
Knife 1 errorRemove paperPress <on-line>
An error occurred during the cut of the roll.Check the paper in the roll unit and remove if necessary.Press <on-line>.
Knife 2 errorRemove paperPress <on-line>
An error occurred during the cut of the roll.Check the paper in the roll unit and remove if necessary.Press <on-line>.
Roll retract errPress <on-line>
Print material error when the roll unit takes back the material.
Status Messages (continued)Status messages Explanation

40 Océ TDS400 Digital Multifunctional System User Manual
Roll init errorOpen roll unitPress <on-line>
A sensor of the roll unit is activated when power is applied to the printer.Open the roll unit.Guide the paper to the marker (see ‘Feed the material’ on page 155).Press <on-line>
Input too lateOpen roll unitPress <on-line>
The input sheet is too late.Open the roll unitIf necessary, withdraw roll and rewindPress <on-line>
Deposit errorPress <on-line>
An error in the compact output stacker occurred.The compact output stacker stops.The print process continues.Press <on-line>.
Illegal language on controllerusing UK EnglishPress <on-line>
The controller has an illegal language.The controller uses the English language instead of the selected language.Call service.Press <on-line>
Close roll unitRewind paperPress <on-line>
While you printed, the roll unit opened.Rewind the paper.Close the roll unit.Press <on-line>
Error messages (continued)Error messages Explanation

Use the Océ TDS400 to print 41
Menu structure of the printer
When you browse through the tree, the left items are displayed on top. The upper items are displayed first.
A0 (841x1189mm)A1 (594x841mm)A2 (420x594mm)A3 (297x420mm)B1+ (707x1000mm)B2+ (500x707mm)B1 (700x1000mm)
Width B2 (500x700mm)E (34x44”)D (22x34”)C (17x22”)B (11x17”)
Roll 1 E+ (36x48”)D+ (24x36”)C+ (18x24”)
Roll 2 B+ (12x18”)30x42”
Media settings Paper 64gPaper 75g
Transparent 75 gTransparent 90 g
Material Transparent 110gVellum
Material Film 3.5Film 4.5
Manual feed Translucent
Time out 67 seconds
Cut media Cutting...
Configuration Printing...
Print info Menu card Printing...
Demo print Printing...
UK EnglishLanguage Nederlands
more...Configuration
DINPaper series DIN CARTO
ONLY 8.5”MIX 8.5/9”
Clear setmem YesNo
System Enterpassword
Diagnosticmode
Yes
No
Use DHCPserver
Yes
No
Network sett. adapter 1 IP address 123.456.789.123
Subnetmask 123.456.789.123
Defaultgateway
123.456.789.123
Use DHCPserver
Yes
No
adapter 2 IP address 123.456.789.123
Subnetmask 123.456.789.123
Defaultgateway
123.456.789.123
Installation Enter password start install.

42 Océ TDS400 Digital Multifunctional System User Manual

43
Océ TDS400Digital Multifunctional System
User Manual
Chapter 3Use the Océ TDS400 to copy
This chapter contains a description how to copy with the Océ TDS400.

44 Océ TDS400 Digital Multifunctional System User Manual
Scanner operator panel
Make the settings with the scanner operator panel. The display gives you the feedback and the available menu options.
.
[7] Scanner operator panel
+-start cancel
stripexposure
input output extra
set file
zoom
sheet copy
leading
trailing
roll 1
roll 2
manual
media
Input button Extra buttonOutput button
Alphanumeric display
Browse buttons
Confirmbutton
Strip button
Copy quantity display
Cancel button
+ button
Zoom button
Exposure button
- button
Start button
Media button

Use the Océ TDS400 to copy 45
The buttonsThe input button Select a single original or a set originals.
The output button Select a copy or a file (scan to file) as your output.
The extra button This button allows you to enter the ‘extra’ mode of the scanner and return to the normal mode. Set the properties for the original, the scanned files and for the scanner in the ‘extra’ mode.
The browse buttons (left , right ) Move in one level of the menu structure as the display shows. Browse the preset zoom values.
The browse buttons (up , down ) Move between the levels of the menu structure as the display shows. Adjust the zoom value with an accuracy of 1 percent.
The confirm button Confirm the current setting in the menu structure. If you press the confirm button a second time in the current menu item, you restore the previous setting.
The strip button Press this button to add or to remove a ‘leading’ or a ‘trailing’ strip. The icon flashes. Use the browse buttons (left , right , up , down ) to change the value. The icon remains on if you press another settings button and select a different value than the default value.
The cancel button Press this button one time to set the copy counter to the default value. Press this button twice to change all settings to their default values. The scan stops if you press this button.
The - and + buttons Change the number of copies.
The start button Press the green start button to start the scan or to restart the copy process.
The zoom button Enters the zoom mode. The icon flashes. Use the browse buttons (left , right ) to browse the preset zoom values. Use the browse buttons (up , down ) to adjust the zoom value with an accuracy of 1 percent.
The exposure button enters the exposure mode. The icon flashes. Use the browse buttons to change the exposure value.
The media button Select roll 1, roll 2 or manual feed. The equivalent icon is on.

46 Océ TDS400 Digital Multifunctional System User Manual
The displayThe display shows the feedback about the scan/copy job status (see table below) in normal mode. In off-line mode it shows the off-line menu (see page 64) and (see page 72))
.
Status messages Status Messages ExplanationScanner ready The scanner is prepared to scan.
+ = add = close
Add an original to the set and press the start button .After the last scan of the set, remove the original and press the start button to close the set.
Connecting..... There is no communication between the controller and the scanner.Wait until the there is communication.
Scanner asleep The scanner is in low power mode.Scanner running The scanner scans.Please wait The scanner downloads the languages.Remove originalPress <cancel>
There is an original on the table while you turn on the scan-ner.The message appears if you pressed the ‘cancel’ button while you scan.Remove the original.Press cancel.
Original too longPress <cancel>
Use an original shorter than 15 meter.
Wrong orig. typePress <cancel>
This message shows when you select ‘Background compen-sation’ and ‘Blueprint’ as original.Press cancel.
Set closed You closed the copy set.Reset scanner Turn the scanner on and off.

Use the Océ TDS400 to copy 47
Menu level indicatorThe menu level indicator indicates the current position in the menu. Press the ‘Previous’ button to scroll through the menu.
[8] Menu level indicator on the scanner operator panel
input output extra
set file
sheet copy
48 Océ TDS400 Digital Multifunctional System User Manual
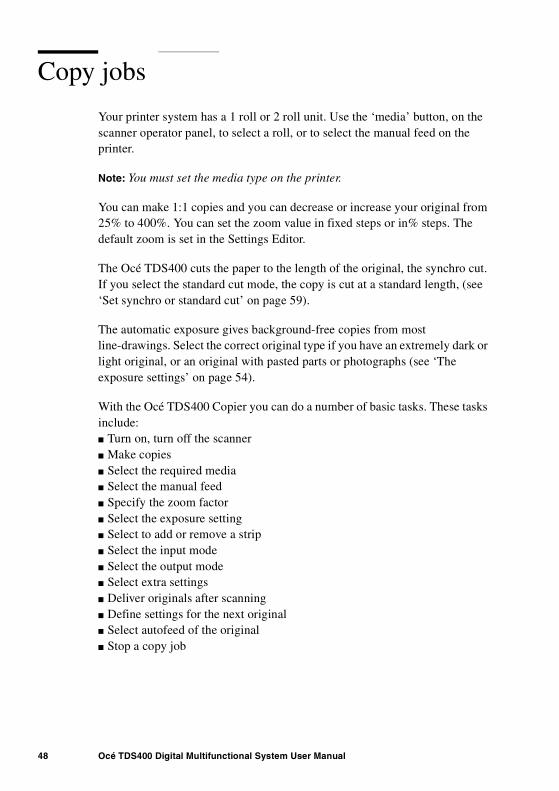
Copy jobs
Your printer system has a 1 roll or 2 roll unit. Use the ‘media’ button, on the scanner operator panel, to select a roll, or to select the manual feed on the printer.
Note: You must set the media type on the printer.
You can make 1:1 copies and you can decrease or increase your original from 25% to 400%. You can set the zoom value in fixed steps or in% steps. The default zoom is set in the Settings Editor.
The Océ TDS400 cuts the paper to the length of the original, the synchro cut. If you select the standard cut mode, the copy is cut at a standard length, (see ‘Set synchro or standard cut’ on page 59).
The automatic exposure gives background-free copies from most line-drawings. Select the correct original type if you have an extremely dark or light original, or an original with pasted parts or photographs (see ‘The exposure settings’ on page 54).
With the Océ TDS400 Copier you can do a number of basic tasks. These tasks include:■ Turn on, turn off the scanner■ Make copies■ Select the required media■ Select the manual feed■ Specify the zoom factor■ Select the exposure setting■ Select to add or remove a strip■ Select the input mode■ Select the output mode■ Select extra settings■ Deliver originals after scanning■ Define settings for the next original■ Select autofeed of the original■ Stop a copy job

Use the Océ TDS400 to copy 49
You can also do a number of special copy jobs. These special copy jobs include:■ Copy non standard size originals■ Define the copy size■ Define image quality: Optimisation for line/text/photo or blueprint mode■ Background compensation for line/text/photo or blueprint mode■ Edit function: mirror
Turn on and turn off the Océ TDS400 scanner
To turn on the system:■ turn on the scanner.■ turn on the printer (see page 25). ■ turn on the controller (see page 26).
When you turn on the system, it is ready for operation. In this state, the machine is in the stand-by mode. There is no need to turn it off after each copy job. You can leave the system turned on for the rest of the day. At all times, the Océ TDS400 is ready to use.
If the system is not in use for more than 1 minute, the operator panel returns automatically to the stand-by mode. The operator panel of the scanner is activated in the following conditions:■ you feed an original ■ a button on the operator panel is pressed
▼▼▼▼ Turn on the scanner
1 Set the ON/OFF switch at the rear of the scanner, to position ‘1’ (see figure 9). If the power supply is connected, the green switch lights.
[9] On/off switch of the scanner

50 Océ TDS400 Digital Multifunctional System User Manual
Note: The system is ready to use. You can turn ON and OFF the scanner separate from the printer and without any particular order.
▼▼▼▼ Turn off the scanner
1 Set the on/off switch at the rear of the scanner, to position ‘0’ (see figure 9).
Start the copy process
If you press the ‘start’ button, and you do not change any settings, the settings of the previous copy job are used or the default settings of the machine are used:■ number of copies 1■ use roll 1■ zoom 100%■ synchro cut■ no leading /trailing edge■ auto exposure on; exposure setting 0.
Default settings are used in the following situations:■ after turn on■ after you press ‘cancel’ twice■ after a time-out of 1 minute (since the end of previous copy job has expired).
If the ‘start’ button is pressed the original will be scanned. The original returns to the operator if you have enabled the rewind function (see page 56). You can make settings for the next job.
When the original returns, remove the original. A new original can be fed and you can program new settings.
Make copies
The copying process starts when you press the ‘start’ button. Before you press the ‘start’ button, you can change the settings.
▼▼▼▼ Feed the original
1 Insert the original face down and right aligned, along the original guide line on the scanner feed table so that you can see the line (see figure 10).

Use the Océ TDS400 to copy 51
[10] Insert the original
The original will be transported about 1 centimetre to a defined position.2 Specify the number of copies with the ‘+’ or ‘-’ buttons.3 Press the ‘media’ button to select a roll or to select ‘manual feed’.4 Press the ‘input’ button to specify how a job is sorted: ‘sheet’ (output 1-1, 2-2,
3-3, or ‘set’ (output 1-2-3, 1-2-3).5 Press the ‘zoom’ button to specify a reduction or an enlargement factor, if
needed.6 Press the ‘exposure’ button to correct for a lighter or darker original, if needed.7 Press the ‘strip’ button to add or remove a strip, if needed.8 Press the green ‘start’ button to start the copy job. The original is fed into the
scanner. The printer starts.9 Collect your output.
If you make a copy within the time-out of 1 minute, the machine will use the settings of the previous copy job.
Number of copies
To have multiple copies from one original, enter the number of copies on the scanner operator panel. The original is scanned just once and the required number of copies are processed.
Refer to ‘Product specifications Océ TDS400’ on page 175 for the limitation of multiple copy jobs.
52 Océ TDS400 Digital Multifunctional System User Manual
▼▼▼▼ Select the number of copies
1 Enter the number of copies (1 upto 99) with the ‘+’ or ‘-’ button on the scanner operator panel.The display shows the number of copies.
Select the use of roll 1 or roll 2 or manual feed
You can select between two rolls or manual feed with the ‘media’ button. When a roll is selected, the copy material is taken from the selected roll.
Note: Only use paper as specified in ‘List of available material types and sizes’ on page 180.
▼▼▼▼ Select roll 1, roll 2
1 Press the ‘media’ button until the indicator that matches your selection lights.2 Enter the media width if you have selected ‘Manual feed’ (see ‘Media type and
size on the printer’ on page 27).3 Set the correct media type settings (see ‘Set the media type settings’ on
page 28).4 Press the confirm button.
Select the input mode
You can use the ‘Input’ setting to indicate how a job is sorted: the ‘sheet’ option prepares each sheet as a separate job (see figure 11).
Select ‘set’ to keep the copies together and to prevent the interruption with a print job. ‘set’ makes a copy for each sheet in a set and continues with the next copy of the complete set (see figure 11).

Use the Océ TDS400 to copy 53
:
[11] Difference between the ‘sheet’ option and the ‘set’ option
▼▼▼▼ Select the input mode
1 Press the ‘input’ button to select the input mode ‘sheet’ or ‘set’.The selected indicator lights.
To copy sets
Use the input mode ‘set’ to copy sets of originals. The originals will be scanned sheet by sheet and the image information will be stored in memory. When you press the start button to close the set the printer prints the output.
▼▼▼▼ How to copy sets
1 Press the ‘input’ button to select the input mode ‘set’.2 Insert an original.3 Add the originals to the set and press the start button .4 After the last scan of the set, remove the original and press the start button
to close the set.
Specify the zoom factor
With the Océ TDS400 you can reduce or enlarge your original from 25% to 400%. Press the ‘zoom’ button to enter the zoom mode. You can select the zoom factor by means of the browse buttons when the indication flashes.
page 1page 1page 1page 2page 2page 2page 3page 3page 3
page 1page 2page 3
page 1page 2page 3page 1page 2page 3
Output with the input mode ‘sheet’ Output with the input mode ‘set’.
Print 3 copies of a 3 - page document

54 Océ TDS400 Digital Multifunctional System User Manual
Choose between the fixed step zoom mode by means of the right and left browse buttons. In fixed steps mode 8 pre-set zoom settings are available. Choose the % zoom mode by means of the up and down browse buttons.
Note: You can configure the fixed zoom steps in the Settings Editor. Also refer to ‘Summary of standard zoom formats’ on page 183.
▼▼▼▼ Select the zoom factor with pre-set zoom steps
1 Press the ‘zoom’ button. The indicator flashes.2 Specify the zoom ratio with the or button.
The display shows the selected ratio. If you make the adjustments with this button, one of the indications above the button flashes. If the adjustment is different from the default setting, the indication lights.
▼▼▼▼ Select the zoom factor with 1% zoom steps
1 Press the ‘zoom’ button. The indicator flashes.2 Specify the zoom ratio with the or button.
The display shows the selected ratio. If you make adjustments with this button, one of the indications above the button flashes. If the adjustment is different from the default setting, the indication lights.
The exposure settings
You can modify the exposure quality to improve the image quality. To modify the exposure you can choose between:■ use of the lighter and darker buttons■ enable or disable automatic background compensation■ adjust the Océ Image Logic® based on the original type you want to copy
The default exposure settings makes background-free copies of most line drawings. The automatic background compensation is activated. The background is measured when you scan an original. The result of some originals can not match your requirements.
When you copy very light or dark originals, or originals with unequal background density, the result can not meet your requirements (e.g. too much background).

Use the Océ TDS400 to copy 55
Default the automatic background compensation is active and the exposure level is 0.
The automatic background compensation will provide a good quality copy from a large variety of originals. The automatic background compensation setting, which is switched on (by default), ensures the production of background-free copies of most line drawings.
▼▼▼▼ Adjust the exposure setting
1 Press the ‘Exposure’ button.2 Select the needed exposure value with the or button.
▼▼▼▼ Set the automatic background compensation
1 Press the ‘extra’ button.2 Select ‘Original’ with the or button. 3 Press the button to enter the ‘Original’ menu.4 Select ‘Background comp.’ with the or button.5 Press the button to enter the ‘Background comp. menu.6 Select ‘on’or ‘off’ with the or button.7 Press the confirm button.
The Océ TDS400 Copier allows you to adjust the exposure setting according to the type of image on the original. There are three original types available:■ Lines/text■ Photo■ Blueprint
By default ‘Lines/text’ is selected with the background compensation enabled. This is the best setting for originals with characters and line art.■ Select ‘Photo’ when the original consists of a combination of characters, line
art and picture images.Note: If you select ‘Photo’, the ‘Background compensation’ will be switched off automatically.■ Select ‘Blue print’ when you want to copy an original with an image in
negative (image in white on dark background). The copy will be positive (image in black on white background).
▼▼▼▼ Improve the copy quality according to the type of image
1 Press the ‘extra’ button.2 Select ‘Original type’ with the or button.3 Press the button to enter the ‘Original type’ menu.4 Select ‘Lines/text’, ‘Blueprint’ or ‘Photo’ with the or button.
56 Océ TDS400 Digital Multifunctional System User Manual
5 Press the button to enter the ‘Lines/text’, ‘Blueprint’ or ‘Photo’ menu.6 Select the needed original type.7 Press the confirm button.
Deliver originals after scanningYou can choose for delivery of the original at the front (rewind) or the rear side of the scanner. Use the output at the rear side of the scanner if your originals are:■ thick ■ very thin ■ damaged ■ in a carrier sheet.
The rewind setting will return to default when, ■ the ‘cancel’ button is pressed,■ the panel time out has exceeded.
▼▼▼▼ Enable the rewind function
1 Press the ‘extra’ button.2 Select ‘Scanner’ with the or button.3 Press the button, to enter the ‘Scanner’ menu.4 Select ‘Rewind original’ with the or button.5 Press the button, to enter the ‘Rewind original’ menu.6 Select ‘on’ or ‘off’ with the or button.7 Press the ‘confirm’ button.
Enable automatic feed of the original
To increase the productivity enable Automatic feed, no need to press the ‘start’ button, except for the first original. If you disable automatic feed you must press the ‘start’ button.
▼▼▼▼ To enable automatic feed
1 Press the ‘extra’ button.2 Select ‘Scanner’ with the or button.3 Press the button, to enter the ‘Scanner’ menu.4 Select ‘Autofeed orig.’ with the or button.5 Press the button, to enter the ‘Autofeed orig.’ menu.

Use the Océ TDS400 to copy 57
6 Select ‘on’ or ‘off’ with the or button.7 Press the ‘confirm’ button.
Define settings for the next original
For each original you need to copy you can specify new settings.
▼▼▼▼ Define settings for the next copy job
1 Select all the needed settings for the next original.2 Insert the next original.
Copy on pre-cut sheets
If you copy a job on a media type and/or size that is not available on one of the paper rolls, you can manually feed sheets instead of reloading paper rolls. You can insert pre-cut copy material in this slot, one sheet at a time. To set the time out for manual feed refer to ‘Set the time-out for manual feed’ on page 58.
▼▼▼▼ Copy on pre-cut sheets
1 Enter the type of the copy material on the printer operator panel.2 Press the ‘media’ button to select ‘manual feed’. The indicator lights.
Note: The minimum length of the print material must be 420 mm.
[12] Manual feed
3 Enter the number of copies.4 Select the copy size.5 Feed the original.

58 Océ TDS400 Digital Multifunctional System User Manual
6 Press the ‘start’ button .7 Take your sheet of copy material to the side of the printer that contains the
sheet feed (see figure 12). 8 Align the copy material with your hands to the format indication and the label
on the manual feed table.9 Move the copy material forward in the cut of the roller. A paper bulge must
appear over the full width of the page.10 Hold the paper with your hands until the printer pulls in the first part of the
sheet.The bulge decreases or disappears. After a few seconds, the printer pulls the complete sheet.Note: If the copy job requires more sheets, the display indicates to feed the next sheet.
11 Repeat the steps 7 to 10 to complete the job.12 Collect your output.
Note: The printer prints the image on the side of the sheet which is facing up.
Attention: When you feed a sheet of material in the manual feed while a normal print job runs, a media jam can occur.
▼▼▼▼ Set the time-out for manual feed
Default is 60 seconds.
1 Press ‘on line’ on the printer operator panel, to enter the main menu.2 Select the ‘media settings’ item with the or button.3 Press ‘next/select’ to enter the ‘media settings’ menu.4 Select ‘manual feed’ with the or button.5 Press ‘next/select’ to enter the ‘manual feed’ menu.6 Select the ‘time out’ with the or button. 7 Press ‘next/select’ to enter the ‘time out’ menu.8 Select the desired timeout with the or button.9 Press ‘next/select’ to confirm the selected timeout.
10 Press ‘on line’ to leave the main menu.
Use the Océ TDS400 to copy 59
Stop a copy jobPress the ‘cancel’ button to interrupt the original transport.
▼▼▼▼ Stop a job
1 Press the ‘cancel’ button.The original transport is stopped.
2 The message ‘Remove original’, ‘Press cancel’ appears on the scanner display.3 Open the scanner cover and remove the original.4 Close the cover.5 Press the ‘cancel’ button. The message disappears on the scanner display.
Set synchro or standard cut
In synchro cut mode, the copy is cut at the length of the original. The length depends on the zoom factor and the leading or trailing strip setting. The default is Synchro cut mode.
In standard cut mode, the copy is cut at a standard format length (portrait). You select the length of the standard format with the browse buttons. Example: select 36 inches, means select a format of 36 inches width and a corresponding 48 inches length. Independent of the roll width, the material is cut at a length of 48 inches.
When you select standard cut, the system always cuts at the selected length. If the original length is shorter or longer than the selected length, the cut is made at the selected length.
▼▼▼▼ Select synchrone cut
1 Press the ‘extra’ button.2 Select ‘Paper copy’ with the or button.3 Press button, to enter the ‘Paper copy’ menu.4 Select ‘cut length’ with the or button.5 Press button, to enter the ‘cut length’ menu.6 Select ‘on’ or ‘off’ with the or button.7 Press the ‘confirm’ button.

60 Océ TDS400 Digital Multifunctional System User Manual
▼▼▼▼ Select standard cut
1 Press the ‘extra’ button.2 Select ‘Paper copy’ with the or button.3 Press button, to enter the ‘Paper copy’ menu.4 Select ‘cut length’ with the or button.5 Press button, to enter the ‘cut length’ menu.6 Select a standard paper format with the or button.7 Press the ‘confirm’ button.
Adjust the leading or the trailing strip
To increase the copy length to accommodate for a filing strip select a positive leading or trailing strip.
If you do not want the filing strip to show on the copy, select a negative leading or trailing strip. The adjustment steps are indicated on the operator panel, expressed in millimetres or 0.1 inches.
▼▼▼▼ Adjust the leading or the trailing strip
1 Press the ‘strip’ button to toggle between ‘leading’ and ‘trailing’ strip. 2 Select a positive or negative value in steps of 10 mm with the or button.3 Select a positive or negative value in steps of 1 mm with the or button.
The length of the selected strip is shown in the display. If the adjustment differs from the default setting, the indication lights.
Attention: If you make the strip larger than the strip on the original, you can loose information.
See the figures on the next pages to make a difference between rolls and manual feed, when you adjust the strips.

Use the Océ TDS400 to copy 61
Leading/trailing strip when you use rolls of paper
[13] Use of rolls
Leading edge
Tra
ilin
g e
dg
e
Null Positive Negative
Neg
ativ
eP
osi
tive
Nu
ll
OriginalCopy

62 Océ TDS400 Digital Multifunctional System User Manual
Leading/trailing strip when you use pre-cut sheets of paper
[14] Use pre-cut sheets
Leading edge
Tra
ilin
g e
dg
eNull Positive Negative
Neg
ativ
eP
osi
tive
Nu
ll
OriginalCopy
Use the Océ TDS400 to copy 63
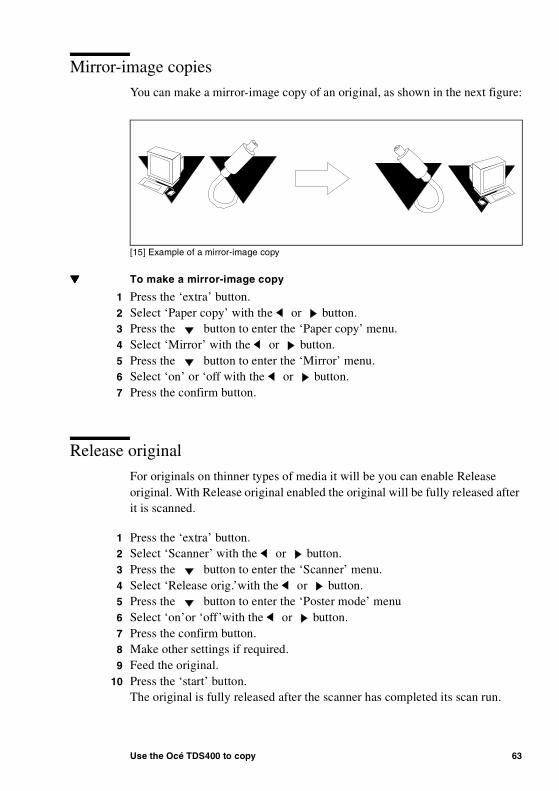
Mirror-image copiesYou can make a mirror-image copy of an original, as shown in the next figure:
[15] Example of a mirror-image copy
▼▼▼▼ To make a mirror-image copy
1 Press the ‘extra’ button.2 Select ‘Paper copy’ with the or button.3 Press the button to enter the ‘Paper copy’ menu.4 Select ‘Mirror’ with the or button.5 Press the button to enter the ‘Mirror’ menu.6 Select ‘on’ or ‘off with the or button.7 Press the confirm button.
Release original
For originals on thinner types of media it will be you can enable Release original. With Release original enabled the original will be fully released after it is scanned.
1 Press the ‘extra’ button.2 Select ‘Scanner’ with the or button.3 Press the button to enter the ‘Scanner’ menu.4 Select ‘Release orig.’with the or button.5 Press the button to enter the ‘Poster mode’ menu6 Select ‘on’or ‘off’with the or button.7 Press the confirm button.8 Make other settings if required.9 Feed the original.
10 Press the ‘start’ button.The original is fully released after the scanner has completed its scan run.
64 Océ TDS400 Digital Multifunctional System User Manual
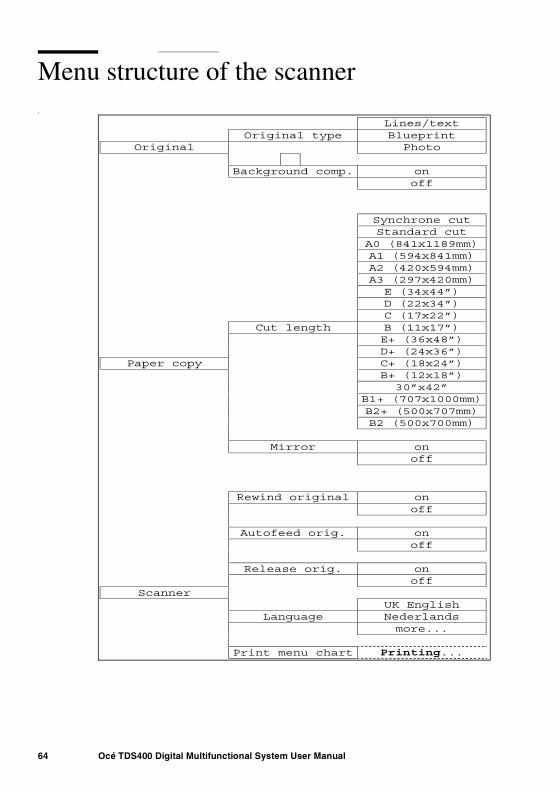
Menu structure of the scannerf
Lines/textOriginal type Blueprint
Original Photo
Background comp. onoff
Synchrone cutStandard cut
A0 (841x1189mm)A1 (594x841mm)A2 (420x594mm)A3 (297x420mm)
E (34x44”)D (22x34”)C (17x22”)
Cut length B (11x17”)E+ (36x48”)D+ (24x36”)
Paper copy C+ (18x24”)B+ (12x18”)
30”x42”B1+ (707x1000mm)B2+ (500x707mm)B2 (500x700mm)
Mirror onoff
Rewind original onoff
Autofeed orig. onoff
Release orig. onoff
ScannerUK English
Language Nederlandsmore...
Print menu chart Printing...

65
Océ TDS400Digital Multifunctional System
User Manual
Chapter 4Use the Océ TDS400 to Scan
This chapter describes how to use Océ Scan Logic® with the Océ TDS400.

66 Océ TDS400 Digital Multifunctional System User Manual
Introduction
‘Océ Scan Logic®’ is an option which enables you to scan a document and send it to a specific directory on the network. It makes full use of Océ Image Logic®, a quality enhancement technology. Enable Océ Scan Logic® through a password in the settings editor. A graphical user interface is supplied with the ‘Océ Scan Logic®’ option.
You scan in order to:■ Use the documents again■ Archive the documents■ E-mail the documents■ Prints the documents at a later time
A scan is made at the Océ TDS400 scanner. On the scanner operator panel, you select the resolution and the destination of the scan.
You can store a generated file on the controller (temporary store) or move the scan towards a network destination.
With Océ View Station (LT) you can see the scanned documents later. Océ View Station (LT) comes with the Scan Manager application.
Note: The optional Graphical User Interface (GUI) on the controller and a memory configuration of 256 Mb are required to use Océ Scan Logic®.

Use the Océ TDS400 to Scan 67
Make a scan
To scan an original to file is an easy operation. If the settings (see ‘Settings to scan’ on page 68) are correct, you must press the start button on the scanner operator panel.
▼▼▼▼ How to make a scan
1 Place your original face-down, right aligned along the original guide.2 Select the appropriate original type.3 Press the ‘Output’ button to select ‘File’.4 Select a Destination (see ‘Destinations’ on page 76).5 Press the start button .
The original is scanned. Note: Select auto-feed on/off, rewind original on/off, and release paper on/off in the ‘scanner’ menu on the scanner panel (see ‘Menu structure Océ TDS400 Scanner’ on page 72). When release paper is enabled, the original will be fully released after it is scanned.
6 On the controller, Océ View Station starts, to show the result of the scan (see figure 16).
[16] Océ View Station

68 Océ TDS400 Digital Multifunctional System User Manual
Settings to scan
Press the ‘Extra’ button on the scanner operator panel to access the settings to make a scan. The following options are available in the ‘File’ menu:
Destination You can store your scan either in the temporary storage on the controller or you can store it on a network destination. You can define a maximum of six destinations in the Scan Manager application. You can select one of these destinations on the scanner operator panel.
Check print A Check print is a print from the scanned original. You can turn the check print on or off.
File resolution The Océ TDS400 Scan Logic® option can scan three resolutions: 200, 300 or 400 dots per inch (DPI). The higher the resolution, the better the image quality. Higher resolution also causes larger sizes of files.
File format To define the internal order of the scanned files, select between TIFF (Tagged Image File Format), CALS-I (Continuous Acquisition and Life Cycle support), or PDF (Portable Document Format).
Optimise size Select this option to decrease the size of the file or to get good quality.
Set the scan size In the ‘Original’ menu.
Destination
You can store your scan either in the temporary store on the controller or on a network destination. You can define up to six destinations in the Scan Manager application. On the scanner operator panel you can choose one of these destinations.
▼▼▼▼ Select a destination
1 Press the ‘extra’ button.2 Select ‘Destination’ with he or button.3 Press the button, to enter the ‘Destination’ menu.4 Select the needed ‘Destination’ with he or button.5 Press the confirm button.

Use the Océ TDS400 to Scan 69
Note: The names of the destinations can be any. However, for your convenience, you are able to define understandable nicknames in the Scan Manager application (see ‘Create a destination’ on page 76).
Check printA check print is a print from the scanned original. You can turn check print on or off.
▼▼▼▼ Select check print
1 Press the ‘output’ button to select ‘file’.2 Press the ‘extra’ button.3 Select ‘check print’ with he or button.4 Press the button, to enter the ‘check print’ menu.5 Select ‘on’ or ‘off’with he or button.6 Press the confirm button.
Resolution
The Océ TDS400 Scan Logic® option can scan three resolutions:■ 200 dots per inch (dpi)■ 300 dpi■ 400 dpi
To reach the best print quality on the Océ TDS400 select 300 dpi.
▼▼▼▼ Select the resolution
1 Press the ‘output’ button to select ‘file’.2 Press the ‘extra’ button.3 Select ‘File resolution’ with he or button.4 Press the button, to enter the ‘File resolution’ menu.5 Select the needed resolution with he or button.6 Press the confirm button.

70 Océ TDS400 Digital Multifunctional System User Manual
File formatTo define the internal order of the scanned files, select between TIFF (Tagged Image File Format), CALS-I (Continuous Acquisition and Life Cycle support), or PDF (Portable Document Format).
Within the ‘Tiff format’ option, you can define 9 different Tiff subformats. The ‘Organization’ and ‘Compression’ of the file are determined by the Tiff subformat you select.
Organization ■ Stripped ■ Tiled■ Raw
Note: Select ‘Stripped’ or ‘Tiled’ when you can use these organizations later. Select ‘Raw’ in another case.
Compression ■ Group 4■ Group 3-1D■ None
Note: Select ‘Group 4’ or ‘Group 3-1D’ when you can use these compressions later. Choose ‘None’ in another case.
Note: ‘Group 4’ or ‘Group 3-1D’ are compression methods which are best for text and vector drawings. If you select these compressions to scan a photo with many grey scales these compressions can cause a negative compression: the file size increases instead of decreases.
▼▼▼▼ Select file format
1 Press the ‘output’ button to select ‘file’.2 Press the ‘extra’ button.3 Select ‘File format’ with the or button.4 Press the button, to enter the ‘File format’ menu.5 Select the required format or subformat with the or button.6 Press the confirm button.

Use the Océ TDS400 to Scan 71
OptimisationYou can turn File size optimisation’ or ‘off’. If you select ‘on’ the file size is smaller, the scan quality will be less.
▼▼▼▼ Select optimise size
1 Press the ‘output’ button to select ‘file’.2 Press the ‘extra’ button.3 Select ‘Optimise size’ with he or button.4 Press the button, to enter the ‘Optimise size’ menu.5 Select ‘on’ or ‘off’ with he or button.

72 Océ TDS400 Digital Multifunctional System User Manual
Menu structure Océ TDS400 Scanner
w=A0 l=synch l= synch
w=A1 l=synch A0
w=A2 l=synchw=A3 l=synchw=A4 l=synchw=34” l=synchw=22” l=synch
Standard size w=17” l=synchw=11” l=synchw=8.5” l=synch
Scan size w=36” l=synchw=24” l=synchw=18” l=synchw=12” l=synchw=9” l=synchw=30” l=synchw=B1 l=synchw=B2 l=synch
Original w=B1+ l=synchw=B2+ l=synch
Custom width w=123mm l=synch
Custom size w=123mm l=12.3”
Lines/textOriginal type Blueprint
Photo
Background comp. onoff
Destination 1Destination 2Destination 3
Destination Destination 4Destination 5Destination 6
Check print onoff
File 200 dpiFile resolution 300 dpi
400 dpi
TIFF G3 RAWTIFF G3 stripTIFF G3 tiledTIFF G4 RAW
TIFF G4 stripFile format TIFF G4 tiled
TIFF unc. RAWTIFF unc. stripTIFF unc. tiled
CALSPDF unc.PDF G4
Optimize size onoff
Rewind original onoff
Autofeed orig. onoff
Scanner Release orig. onoff
UK EnglishLanguage Nederlands
more...
Print menu chart Printing...

Use the Océ TDS400 to Scan 73
Scan Manager
The Scan Manager is an application available local on the controller. With the Scan Manager you can configure the destinations for scan logic. To increase your productivity you can define automatic file naming. This way you can do batch scans without operating the controller.
During scanning, Scan Manager displays the filename and the status of the file generation process. When the scan is completed a view of the scanned image is automatically displayed on the controller.
Figure 17 shows an example of the Scan Manager application. The left part displays a tree view containing folders containing destinations. The right part displays a table view containing the content of the folder currently selected.
[17] Overview of the Scan Manager application
Note: Not all options are available to all users. You must log into a particular user mode to do specific tasks with Scan Manager (see ‘Océ TDS400 users’ on page 17).

74 Océ TDS400 Digital Multifunctional System User Manual
Tree viewThe tree view displays:■ the system name■ the collapsible destination tree■ the collapsible temporary store tree.
If you scan to a particular destination, that destination is displayed bold and the corresponding icon changes. The destination you scanned last to, is displayed bold.
If for any reason a scan can not be sent to the correct remote destination, the file is stored in the ‘Unsent’ folder.
Table view
The table view (on the right side of figure 17 on page 73) displays the filenames of the files in the opened destination or temporary folder.
Each file has the following information:■ Name■ Size■ Type■ Modified■ Resolution■ Image size.
If the currently viewed destination is the one you are scanning to, then the scanned file appears at the end of the table. If you currently view another destination than the one you are scanning to, then the scanned to destination is displayed bold.
It is possible that there are more files in the table than fit on screen. The most recent scanned file appears at the end of the table. Under these circumstances it is possible that your most recent scanned file is not visible in the table on screen. In this case you can update the table view.

Use the Océ TDS400 to Scan 75
▼▼▼▼ Update the table view
1 From the ‘View’ menu select ‘Refresh’ or click the ‘Refresh’ button on the toolbar (see figure 18). If the opened destination is also the one which is currently scanned to, then the view is automatically updated.
[18] ‘Refresh’ button on the toolbar

76 Océ TDS400 Digital Multifunctional System User Manual
Actions from the Scan Manager
The Scan Manager enables you to make settings for Océ Scan Logic®. You can edit and view the destination properties. You can also view the properties of scanned files.
Destinations
A destination is a place where you scan your file to. You can create, delete and lock destinations. You can also define automatic filenaming to ensure your files get the desired names.
A destination can also be a file server or a PC of an end user. It is better to select remote destinations instead of the local ones. The local destinations are temporary and cannot contain a lot of scan files.
▼▼▼▼ Create a destination
1 Select ‘Destinations’ in the tree view.2 From the ‘File’ menu select ‘New’ or click the ‘New’ button on the toolbar (see
figure 19).
[19] ‘New’ button on the toolbar

Use the Océ TDS400 to Scan 77
The following dialogue box appears (see figure 20):
[20] ‘Destination properties’ window
3 Enter a name for the destination in the ‘Name’ text box. This name also appears on the scanner operator panel in the ‘Destination’ menu.
4 Select a destination type from the ‘Type’ drop-down list box.Select between:■ File Transfer Protocol (FTP), ■ Server Messages Block (SMB),■ local store in the temporary store on the controller.
5 Enter the name of the system you want to scan your files to in the ‘System’ text box.Note: Names in Japanese can only be entered for remote destinations in SMB.
6 Enter a path of the target folder in the ‘Path’ text box, or click the ‘Browse’ button to select the path. The path selection is only available if you select ‘On the controller’ as ‘Type’.
7 Enter, if needed, a user name for the network destination in the ‘User name’ textbox.
8 Enter, if needed, the correct password for the network destination in the ‘Password’ text box.
9 Click ‘OK’ to accept the destination properties.
Note: You can create six destinations.
A key operator can select if a destination can be modified by an anonymous user. This is done by locking and unlocking a destination.
▼▼▼▼ Lock a destination
1 Select a destination.

78 Océ TDS400 Digital Multifunctional System User Manual
2 From the ‘File’ menu select ‘Properties’.3 Check the ‘Locked’ check box.4 Click ‘OK’ to accept the destination settings.
The destination properties are now locked.Note: This option is only available if you are logged on as a Key operator (see chapter 9, ‘Océ Print Exec® LT Web’ on page 133).
▼▼▼▼ Unlock a destination
1 Select a destination.2 From the ‘File’ menu select ‘Properties’.3 Uncheck the ‘Locked’ check box.4 Click ‘OK’ to accept the destination settings.
The destination properties are now unlocked.Note: This option is only available if you are logged on as a Key operator (see ‘Océ Print Exec® LT Web’ on page 133).
▼▼▼▼ Delete a destination
1 Select a destination.2 Open the ‘File’ menu and select ‘Delete’ or click the ‘Delete’ button on the
toolbar (see figure 21).
[21] ‘Delete’ button on the toolbar
The selected destination is deleted.Note: This option is only available if you are logged on as a Key operator or as a Repro operator.
Note: You are not able to delete the last destination.
▼▼▼▼ Define file name
1 Select a destination.2 From the ‘File’ menu select ‘Properties’.
The ‘Destination properties’ screen appears (see figure 20 on page 77).3 Enter a name in the ‘Base name’ textbox.
Note: The ‘Base name’ may contain ‘###’ for automatic file naming. The ‘###’ will be replaced by an ascending number. You may place as many dots in the ‘Base name’.
4 Check or uncheck the ‘Add appropriate file extension’ check box to add or respectively leave out an appropriate file extension. The file extension can be set in the Settings Editor.
5 Click ‘OK’ to accept the settings.

Use the Océ TDS400 to Scan 79
▼▼▼▼ Set or Change destination properties
1 Select a destination.2 From the ‘File’ menu select ‘Properties’ or click the ‘Properties’ button on the
toolbar (see figure 22).
[22] ‘Properties’ button on the toolbar
The ‘Destination properties’ screen appears as in figure 20 on page 77.3 Change the destination properties as described in ‘Create a destination’ on
page 76.
Scanned files
The right pane of the Scan Manager contains the scanned files and additional information about the files. You can view, print and delete these files. You can also view the file properties.
▼▼▼▼ View a scanned file
1 Select a file in the right pane.2 From the ‘File’ menu select ‘View’ or click the ‘View’ button on the toolbar
(see figure 23).
[23] ‘View’ button on the toolbar
Océ View Station (see ‘Océ View Station (LT)’ on page 84) starts and displays the file.Note: When you make a scan Océ View Station starts automatically, and shows the result of the scan.
▼▼▼▼ Print a scanned file
1 Select a file in the right pane.2 From the ‘File’ menu select ‘Print’ or click the ‘Print’ button on the toolbar
(see figure 24).
[24] ‘Print’ button on the toolbar

80 Océ TDS400 Digital Multifunctional System User Manual
The selected file will be printed with the default settings as defined in the Settings Editor.
▼▼▼▼ Delete a scanned file
1 Select a file in the right pane.2 From the ‘File’ menu select ‘Delete’ or click the ‘Delete’ button on the toolbar
(see figure 25).
[25] ‘Delete’ button on the toolbar.
The selected file will be deleted.Note: This option is only available if you are logged on as a Key operator or as a Repro operator.
▼▼▼▼ View properties of a scanned file
1 Select a file in the right pane.2 From the ‘File’ menu select ‘Properties’ or click the ‘Properties’ button on the
toolbar (see figure 26).
[26] ‘Properties’ button on the toolbar.
The following window appears (see ‘‘Scanfile properties’ window’ on page 81):

Use the Océ TDS400 to Scan 81
[27] ‘Scanfile properties’ window
3 Click ‘OK’ to close the ‘Scanfile properties’ window.
▼▼▼▼ Automatically view a file after scanning
You can choose to view a file automatically after scanning:1 From the ‘System’ menu select ‘Auto view’.
When you scan, Océ View Station starts automatically and show the scanned file.
Manage the temporary store
When you normally scan the originals to a file, many files are created in the temporary store. You can clean the temporary store:■ manual: from the ‘System’ menu select the ‘Purge’ command.■ automatic: you must make some settings in the Océ TDS400 Settings Editor.

82 Océ TDS400 Digital Multifunctional System User Manual
How to retrieve scanned files?
When you scan your files will be stored in the destination you set. This can be on the local controller or on a remote system. You can retrieve your files from the local host via File Transfer Protocol (FTP) (see figure 28). Also if during scanning to a remote destination, something goes wrong, you can retrieve your files from the local host.
[28] How to retrieve scan files?
Remote client Windows®95 / 98
Remote client Windows® NT 4.0
Power Logic ControllerWindows NT® 4.0
Get files via FTP
Get files via FTP

Use the Océ TDS400 to Scan 83
Get files via FTP1 Launch an FTP client.2 Enter the ‘ftp’ command.
A DOS box now appears with the FTP prompt.3 Enter the ‘Open’ command followed by either the registered name of the Océ
Power Logic® Controller or the IP address (for example: 194.2.66.146) to connect to the NGC and press Enter: ‘open 194.2.66.146’.Note: Instead of performing steps 2 and 3 you could also enter “ftp host_name” in the FTP client.The connection with the NGC is now established and a window appears asking you for a user name.
4 Enter your user name ‘anonymous’, and enter as your password also ‘anonymous’. A connection is now set up for the default user ‘anonymous’.Note: As there is no registered user, you can press Enter to initiate the connection.
5 Set the transmission mode to binary by entering ‘binary’.6 Go to the ‘tempstore’ directory using the following command: ‘cd tempstore\’.7 Go to the ‘scan’ directory if you want to retrieve a file from a destination on
the local host, orgo to the ‘unsent’ directory if you want to retrieve a file from ‘unsent’ folder on the local host.
8 Get the data file (for example: bugatti.tif) via the ‘get’ command: ‘get bugatti.tif’.
9 Quit FTP by entering the ‘bye’ command.

84 Océ TDS400 Digital Multifunctional System User Manual
Océ View Station (LT)
With Océ View Station (LT) you can view your scanned files. This can be automatically (see ‘Automatically view a file after scanning’ on page 81) after scanning or via Scan Manager (see ‘Print a scanned file’ on page 79).
Océ View Station has the following menu’s (see figure 29):■ File■ View■ Preference■ Help
[29] Océ View Station
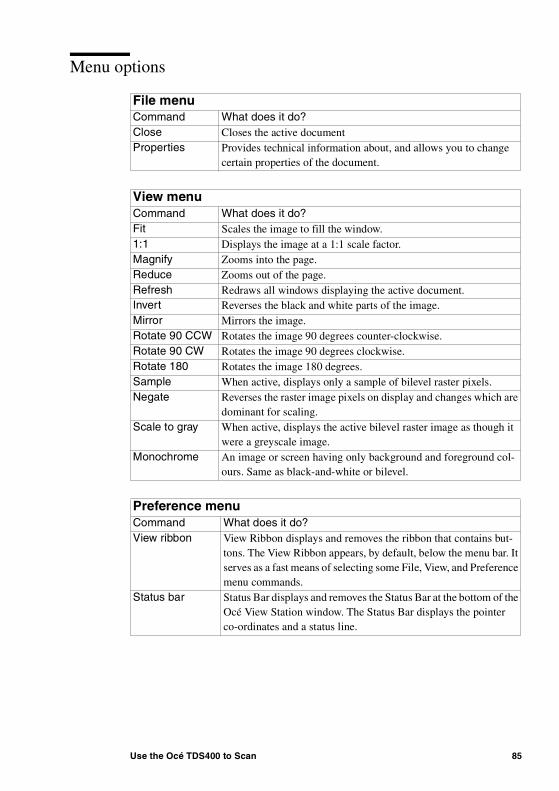
Use the Océ TDS400 to Scan 85
Menu options
File menuCommand What does it do?Close Closes the active documentProperties Provides technical information about, and allows you to change
certain properties of the document.
View menuCommand What does it do?Fit Scales the image to fill the window.1:1 Displays the image at a 1:1 scale factor.Magnify Zooms into the page.Reduce Zooms out of the page.Refresh Redraws all windows displaying the active document.Invert Reverses the black and white parts of the image.Mirror Mirrors the image.Rotate 90 CCW Rotates the image 90 degrees counter-clockwise.Rotate 90 CW Rotates the image 90 degrees clockwise.Rotate 180 Rotates the image 180 degrees.Sample When active, displays only a sample of bilevel raster pixels.Negate Reverses the raster image pixels on display and changes which are
dominant for scaling. Scale to gray When active, displays the active bilevel raster image as though it
were a greyscale image. Monochrome An image or screen having only background and foreground col-
ours. Same as black-and-white or bilevel.
Preference menuCommand What does it do?View ribbon View Ribbon displays and removes the ribbon that contains but-
tons. The View Ribbon appears, by default, below the menu bar. It serves as a fast means of selecting some File, View, and Preference menu commands.
Status bar Status Bar displays and removes the Status Bar at the bottom of the Océ View Station window. The Status Bar displays the pointer co-ordinates and a status line.
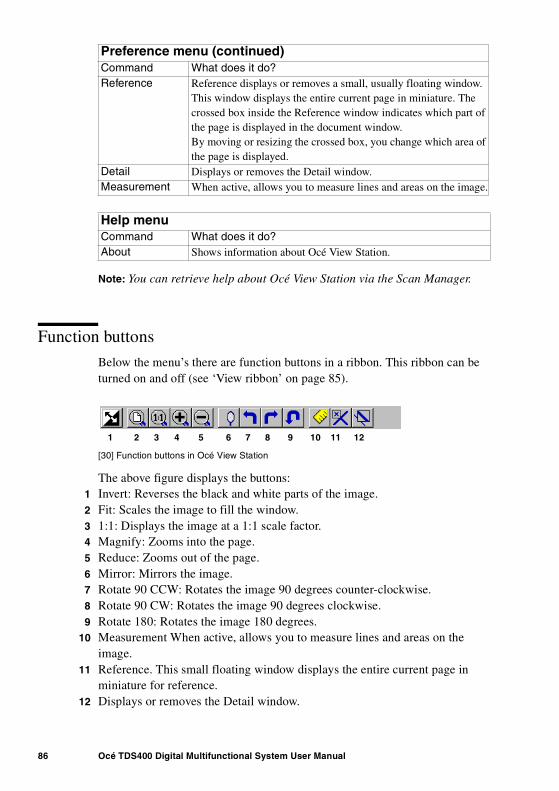
86 Océ TDS400 Digital Multifunctional System User Manual
Note: You can retrieve help about Océ View Station via the Scan Manager.
Function buttons
Below the menu’s there are function buttons in a ribbon. This ribbon can be turned on and off (see ‘View ribbon’ on page 85).
[30] Function buttons in Océ View Station
The above figure displays the buttons:1 Invert: Reverses the black and white parts of the image.2 Fit: Scales the image to fill the window.3 1:1: Displays the image at a 1:1 scale factor.4 Magnify: Zooms into the page.5 Reduce: Zooms out of the page.6 Mirror: Mirrors the image.7 Rotate 90 CCW: Rotates the image 90 degrees counter-clockwise.8 Rotate 90 CW: Rotates the image 90 degrees clockwise.9 Rotate 180: Rotates the image 180 degrees.
10 Measurement When active, allows you to measure lines and areas on the image.
11 Reference. This small floating window displays the entire current page in miniature for reference.
12 Displays or removes the Detail window.
Reference Reference displays or removes a small, usually floating window. This window displays the entire current page in miniature. The crossed box inside the Reference window indicates which part of the page is displayed in the document window.By moving or resizing the crossed box, you change which area of the page is displayed.
Detail Displays or removes the Detail window.Measurement When active, allows you to measure lines and areas on the image.
Help menuCommand What does it do?About Shows information about Océ View Station.
Preference menu (continued)Command What does it do?
2 3 4 5 6 8 9 10 11 121 7

Use the Océ TDS400 to Scan 87
View errorWhen the memory is almost full it can occur that the viewer does not show the scanned file. Instead it shows a red border with a red cross (see figure 31).
[31] Error view in Océ View Station

88 Océ TDS400 Digital Multifunctional System User Manual

89
Océ TDS400Digital Multifunctional System
User Manual
Chapter 5Océ Power Logic®: The Settings Editor
This chapter gives information about the Settings Editor. For details about specific settings, refer to the Help on the Settings Editor.
90 Océ TDS400 Digital Multifunctional System User Manual
Introduction
Use the Settings Editor to set the default settings of the Océ TDS400 according to your companies requirements. 2 types of users can determine settings in the Settings Editor, Key Operators and System Administrators. You can log in as either Key Operator or System Administrator. Key Operators and System Administrators have different rights to determine settings.

Océ Power Logic®: The Settings Editor 91
How to start up and shut down the controller
Take the following actions to start up the controller:
▼▼▼▼ Start up the Océ controller
1 Turn on the controller and the screen. After the initial system test of the controller the applications, Queue Manager, System Control Panel, Settings Editor and Scan Manager are automatically started and the Océ TDS400 is ready for operation.Note: The Queue Manager and the System Control Panel applications are visible on the screen; however the Settings Editor is minimised, to save screen estate.
Take the following actions to shut down the controller:
▼▼▼▼ Shut down the Océ controller
1 Go to the System Control Panel application.2 Select the ‘Shutdown’ option from the ‘System’ menu.3 Confirm shutdown by clicking on the ‘Yes’ button in the ‘Shut down’ window.
The system automatically performs the shutdown procedure for the controller. Finally, the Windows NT® ‘Shutdown Computer’ window appears, which informs you that you can turn off your computer. Note: You can now restart the controller by pressing the ‘Restart’ button.
4 Turn off your computer and display.
Note: The Océ TDS400 has a sleep mode. The sleep mode powers off almost all the power supplies after a certain time of inactivity.

92 Océ TDS400 Digital Multifunctional System User Manual
Settings Editor
The Settings Editor is one of the controller applications for the Océ TDS400. The Settings Editor allows users and operators to view settings of the system. If authorised, the settings of the system can be modified on the Settings Editor.
With the Settings Editor two groups of settings can be configured:■ Key Operator settings (KO settings)
The Key Operator group allows authorised users to configure default settings for copy and print jobs, default off-line fold settings and scan to file options. With the Key Operator settings also the printer, system and scanner defaults can be set or modified. A subset of the Key Operator settings are the Repro Operator settings. The Repro Operator has no rights to change settings in the Settings Editor. In the Queue Manager and the System Control Panel the repro operator has the same user rights as the Key Operator and System Administrator. See ‘User modes’ on page 127.
■ System Administrator settings (SA settings) The System Administrator group allows authorised users to configure default printer language (PDL) settings and printer pen settings. It also allows the System Administrator to configure system and connectivity settings.
These groups of settings can be selected from the ‘View’ menu of the Settings Editor.
Setting dependencies The Settings Editor is used to display and edit a specified group of settings. Some settings are related to other settings, however. If you want to change settings which have dependencies with other settings you will be prompted with a message. When a setting is changed, the system automatically updates the related settings.
Also, when you change certain settings, such as measurement unit or paper series, all related settings are instantaneously converted to the new setting (with a bullet for the settings that are changed).

Océ Power Logic®: The Settings Editor 93
[32] Settings Editor
General structure
The Settings Editor is structured as follows: ■ Menu bar■ Top toolbar■ Left toolbar■ Settings area■ Status bar

94 Océ TDS400 Digital Multifunctional System User Manual
Menu bar The menu bar of the Settings Editor contains the following menus:
File If you select the ‘File’ menu you can log in as a particular type of user, log out of the previously selected user mode, open an existing setting file, save the current settings to a file, connect to a different controller (only for remote users) or exit the Settings Editor.
Edit If you select ‘Options’ from the ‘Edit’ menu, a window is displayed in which you can view your default system and the display languages (first and second) for the Settings Editor application. The ‘Auto login’ option allows you to start the Settings Editor application automatically in the specified user mode.
View The ‘View’ menu allows you to switch between the display languages as defined in the Edit options window and to switch between KO settings and SA settings.
Help The ‘Help’ menu contains the following options: ‘Contents of Settings Editor’ and ‘About Settings Editor’.
[33] Menu bar
Top toolbar
The top toolbar of the Settings Editor contains four control buttons: ‘Open’, ‘Save as’, ‘Apply’ and ‘Undo’.
[34] Top toolbar
Open When you click on the ‘Open’ button, you open a saved file.
Save as All Key Operator and System Administrator settings can be saved in a file. This way you can have different settings for different customers, departments or other situations.
Océ Power Logic®: The Settings Editor 95
Note: These settings can only be saved in Key Operator or System Administrator mode.
Apply When you click on the ‘Apply’ button, the changes you have made become effective. Initially, this button is disabled. It is enabled after the first setting is changed and disabled again after the apply action is performed or after an undo action.
Undo This button restores the settings to the state it was in the last time the settings were applied (and not back to the factory default). Initially, the ‘Undo’ button is disabled. This button is enabled the moment the first setting is changed. It is disabled after an Apply action is performed or after an undo action
▼▼▼▼ Save settings to file
1 Open the ‘File’ menu and select ‘Save as’, or press the ‘Save as’ button on the toolbar.You now have two possibilities:■ If the client is a local client, a dialogue is displayed and the user can supply
a file name. The file is saved in a predefined directory on the system. ■ If the client is a remote client, a dialogue box is displayed and the user can
supply a directory and a file name.Note: All settings in the current view mode are saved; not only the ones that are currently visible.
A few special files are available here:■ Default.kos/Default.sas
These files contain the factory default settings for the Key Operator and System Administrator, respectively, and can not be changed.
■ Backup.kos/Backup.sas These files contain a previous version of the settings for the Key Operator and System Administrator, respectively (before the last Apply).
■ Current.kos/Current.sas These files contain the version of the settings for the Key Operator and System Administrator after the last Apply.
When an Apply is performed, first the contents of the current settings is copied to the backup file. There are two versions of this file, one for KO settings and one for SA settings. These files are always stored on the system.

96 Océ TDS400 Digital Multifunctional System User Manual
▼▼▼▼ Open a saved file
1 Open the ‘File’ menu and select ‘Open’, or press the ‘Open’ button on the toolbar.A dialogue box is displayed from where you can choose the correct file.
2 Click the ‘Apply’ button. The loaded settings are transferred to the system.Note: This is only possible if the user is logged in as a Key Operator or System Administrator.
Left toolbar
There are four different buttons available at the left toolbar of the Settings Editor. These are ‘Jobs’, ‘Printer’, ‘Scanner’ and ‘System’. Each button provides access to a specific group of settings. By clicking on each of these buttons, you can get access to the settings related to the selected group.
A shadow highlight is used to indicate which button is activated.
[35] Left toolbar
Settings area
The settings area consists of two parts: a setting tree and an update area.
Tree structure Most settings are displayed using a tree structure. By clicking on the settings, folders can be opened to show all the entries or closed to hide all the entries below these folders.

Océ Power Logic®: The Settings Editor 97
The settings for system components that are not available are not displayed. So, if you do not have a folder, no folder settings are available. This means that different configurations result in different tree structures.
Note: When a tree item has been changed, this item will be marked with a bullet.
Update area The user can move through the tree and select a setting. If he selects a setting for which he is authorised, he can edit the setting in the update area.
If the user is not authorised for a particular setting, the update area is greyed and no changes can be made.
Note that a few settings, such as basic card and pen settings, are not edited from the tree structured, but are accessed directly from the settings area.
The update area contains some additional information about the selected setting. This includes a brief definition of the setting, as well as the minimum, maximum and default values (if appropriate).
[36] Settings area
Status bar
The Settings Editor has a status bar displaying the following information (left to right):

98 Océ TDS400 Digital Multifunctional System User Manual
■ System status (icon for connected or disconnected)The following icons are used:
The Settings Editor is connected to a system.
The Settings Editor is not connected to a system.
■ System name (‘localhost’ if you are working at the controller)■ User mode (Repro operator, Key Operator, System Administrator or
anonymous)■ View mode (KO settings or SA settings).
How to access the Settings Editor
In order to perform special Key Operator functions, you must log into the Settings Editor as a Key Operator.
As these functions are restricted to a dedicated Key Operator, a password is required to access them. The service engineer will provide this password to you upon installation.
Note: Only one Key Operator or System Administrator at a time is authorised to make modifications. However, there may be multiple users viewing the settings. When a second user tries to log in as Key Operator or as System Administrator, an error message is displayed.
Start Océ Settings Editor
You can start the Océ TDS applications on the controller as well as on a remote workstation.
▼▼▼▼ Start Océ Settings Editor on the Océ Power Logic® Controller
1 Select the 'Launcher' application.2 Select Settings Editor. Océ Settings Editor starts.
▼▼▼▼ Start Océ Settings Editor on a remote workstation
Note: You must first install Océ Remote Logic® as described (see ‘Installation procedure for MS Windows® systems’ on page 121).
1 Select 'Océ Remote Logic®' via the 'Start' menu.

Océ Power Logic®: The Settings Editor 99
2 Select the 'Launcher' application.3 Select Settings Editor. Océ Settings Editor starts.
How to perform actions from the Settings Editor
You can perform a number of activities from the Settings editor. These activities include:
■ Save settings to file■ Load settings from a fileSave and load settings All Key Operator and System Administrator settings can be saved in a file or loaded from a file. This way you can have different settings for different customers, departments or other situations.
Note: These settings can only be saved in Key Operator or System Administrator mode.
▼▼▼▼ Save settings to file
1 Open the ‘File’ menu and select ‘Save as’.You now have two possibilities:■ If the client is a local client, a dialogue is displayed and the user can supply
a file name. The file is saved in a predefined directory on the system. ■ If the client is a remote client, a dialogue box is displayed and the user can
supply a directory and a file name.Note: All settings in the current view mode are saved; not only the ones that are currently visible.
A few special files are available here:■ Default.kos/Default.sas
These files contain the factory default settings for the Key Operator and System Administrator, respectively, and can not be changed.
■ Backup.kos/Backup.sas These files contain a previous version of the settings for the Key Operator and System Administrator, respectively (before the last Apply).
■ Current.kos/Current.sas These files contain the version of the settings for the Key Operator and System Administrator after the last Apply.
When an Apply is performed, first the contents of the current settings is copied to the backup file. There are two versions of this file, one for KO settings and one for SA settings. These files are always stored on the system.

100 Océ TDS400 Digital Multifunctional System User Manual
▼▼▼▼ Load a settings file
1 Open the ‘File’ menu and select ‘Open’.A dialogue box is displayed from where you can choose the right file.
2 Click the ‘Apply’ button. The loaded settings are transferred to the system.Note: This is only possible if the user is logged in as a Key Operator or System Administrator.

Océ Power Logic®: The Settings Editor 101
Key Operator settings
The Key Operator is responsible for correct default settings of the system. These settings include the default settings, and groups of default printer settings for the print and the copy jobs that again occur.
The Key Operator can define all timer settings, like the panel time out and the sleep mode time out.
Note: One Key Operator or System Administrator can log into the Settings Editor at the same time.
In order to perform special Key Operator functions, you must log into the Settings Editor as a Key Operator.
As these functions are restricted to a dedicated Key Operator, a password is required to access them. The service engineer will provide this password to you upon installation.
Note: When you are finished, make certain you log out of the Key Operator mode of the Settings Editor to prevent unauthorized use of the Océ TDS400.
▼▼▼▼ Make Key Operator settings in the Settings Editor
1 maximise the Settings Editor on the screen.2 Log in as Key Operator.3 Click on one of the top buttons to display the desired group of settings.4 Select the setting you want to update in the tree structure.5 Update the setting in the update area, as required.
Note: A few settings are made directly from the tree structure area.6 Click on the ‘Apply’ button.
The new value is now applied for the settingLog out of the Key Operator mode when you have finished updating the settings.

102 Océ TDS400 Digital Multifunctional System User Manual
System Administrator settings
The Océ TDS400 System Administrator is responsible for:
■ Dithering matrix and Poker settings■ Printer language controller settings■ Pen settings■ Automatic Language Selection (ALS) settings■ Controller identification settings■ Set memory reservation settings■ Connectivity settings.
To modify the System Administrator settings you have to access the SA settings in the Settings Editor.
There are two types of System Administrator settings (see figure 37):
■ Printer■ System
.
[37] System Administrator settings in the Settings editor
In order to perform special System Administrator functions, you must log into the Settings Editor as a System Administrator (see ‘User modes’ on page 127).
Océ Power Logic®: The Settings Editor 103
Note: When you are finished, make certain you log out of the System Administrator mode of the Settings Editor to prevent unauthorized use of the Océ TDS400.
▼▼▼▼ Make System Administrator settings in the Settings Editor
1 Maximise the Settings Editor on the screen.2 Log in as System Administrator.
See ‘User modes’ on page 127 for more information about logging into the Settings Editor.
3 Click on one of the top buttons to display the desired group of settings.4 Select the setting you want to update in the tree structure.5 Update the setting in the update area, as required.
Note: A few settings, such as the default pen settings, are made directly from the tree structure area.
6 Click on the ‘Apply’ button.The new value is now applied for the setting
7 Log out of the System Administrator mode when you are finished updating settings.

104 Océ TDS400 Digital Multifunctional System User Manual
105
Océ TDS400Digital Multifunctional System
User Manual
Chapter 6Océ Power Logic®: System Control Panel
This chapter describes how to view the status of the Océ TDS400.

106 Océ TDS400 Digital Multifunctional System User Manual
Introduction
The Océ System Control Panel (SCP) application provides you with status information about the system. This includes:■ Status of the printer■ Overview of the loaded media types and sizes■ Status of the scanner■ Status of the controller■ Memory usage.
Note: If you do not have a scanner, the scanner status is not available. If you have a scanner only, the machine status of the printer and the overview of the loaded media is not available.
StructureThe System Control Panel window is divided into the following parts (see figure 38 on page 108):
The menu bar which contains the following menu’s:■ File - Login, Logout, Connect to and Exit.■ Edit
If you select this option a window is displayed in which you can view your default system for the System Control Panel application. The ‘Auto login’ option allows you to start the application automatically in the indicated user mode.
■ ViewThe View menu allows you to switch between the display languages as defined in the Edit options window and to enable or disable System Control Panel sub windows.
■ SystemThe System menu allows you to dump your configuration settings, make a demo plot, clear the system and shut down the system.
■ Help options: Contents of System Control Panel, About System Control Panel.
■ ToolbarThe tool bar of the System Control Panel contains the following buttons:Printer: to hide or to show the status of the printer.Media: to hide or to show media information.

Océ Power Logic®: System Control Panel 107
Scanner: to hide or to show the status of the scanner.Controller: to hide or to show the status of the controller.Memory: to hide or to show the amount of set memory that is used.
Note: If operator invention is required for a device, the respective button flashes.
The Printer status window Displays the current status of the Printer. Any error messages displayed on the printer control panel also appear in the printer status window of the System Control Panel.
The Media display Provides graphical information about the status of the rolls and sheetfeeders (available, empty or disabled) of the printer and about the available media (size and type).
Note: If the Media type equals polyester, the thickness is expressed in mil (0.001"), otherwise the weight is expressed in g/m2.
When a roll or tray is disabled the roll icon is dimmed and the media information is replaced by the text “-disabled-” (see ‘Icons’ on page 108).
Note: Special media are excluded from the automatic behaviour of the Océ Power Logic® Controller.
The Scanner status display Displays the current status of the scanner. Any error messages displayed on the scanner control panel will also appear in the scanner status window of the System Control Panel.
The set memory meter Indicates how much of the set memory is filled. The information is displayed in the form of a meter which is divided into three zones:■ Green: safe, you have enough space left to print large jobs/many small jobs■ Orange: pay attention, you might reach the set memory limit soon■ Red: the set memory is (nearly) full; you should remove files or wait until
files are printed and automatically removed or flushed from memory. No more print jobs are accepted. Copy jobs can still be made.
Note: At the right of the set memory meter a percentage is displayed, indicating the amount of set memory currently being used.Below the System Control Panel main window is displayed:
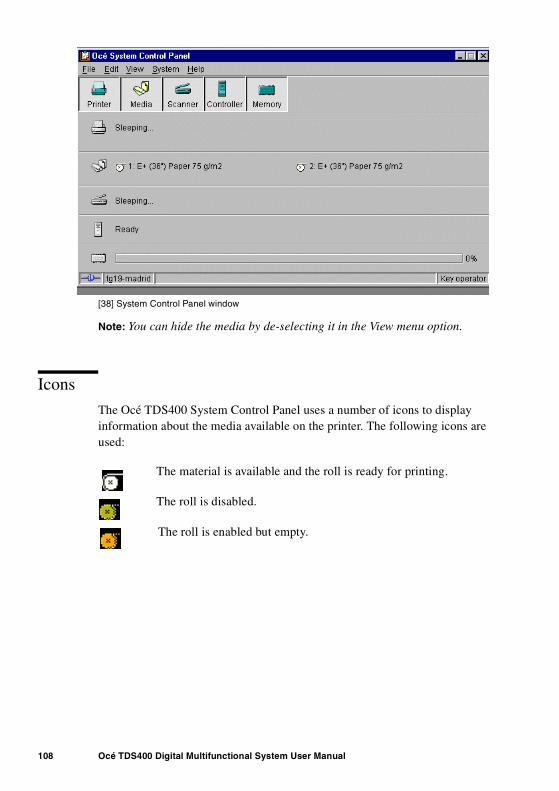
108 Océ TDS400 Digital Multifunctional System User Manual
[38] System Control Panel window
Note: You can hide the media by de-selecting it in the View menu option.
Icons
The Océ TDS400 System Control Panel uses a number of icons to display information about the media available on the printer. The following icons are used:
The material is available and the roll is ready for printing.
The roll is disabled.
The roll is enabled but empty.

Océ Power Logic®: System Control Panel 109
User operations
The System Control Panel allows you to perform the following operations:■ Make a demo plot■ Print your system configuration■ Clear the system■ Shut down the system
▼▼▼▼ Make a demo plot
1 Select the Demo plot option in the System menu.A demo plot is made on the printer.
▼▼▼▼ Print your system configuration
1 Select the Print settings option in the System menu.A list is printed of the current settings on the Océ Power Logic® Controller.
▼▼▼▼ Clear the system
1 Select the Clear system option in the System menu to delete all jobs. You can use this option in case of a corrupt job which can not be deleted with the help of the Queue Manager. Note: This option is only available in repro operator, key operator and system administrator mode. In anonymous user mode it is not possible to clear the system.
▼▼▼▼ Clear the system (on printer panel)
1 Press the ‘on line’ button to put the printer off line.2 Select the ‘System’ item with the or button.3 Press ‘next/select’ to enter the ‘System’ menu.4 Select ‘Clear setmem’ with the or button.5 Enter password6 Press ‘next/select’ to enter the ‘Clear setmem’ menu.7 Select the ‘on’ or ‘off’ with the or button.8 Press ‘on line’ to put the printer on line again.
▼▼▼▼ Shut down the system
1 Select the Shut down option in the System menu to shut down the system.Note: This option is only available in repro operator, key operator and system administrator mode. In anonymous user mode it is not possible to shut down the system.

110 Océ TDS400 Digital Multifunctional System User Manual

111
Océ TDS400Digital Multifunctional System
User Manual
Chapter 7Océ Power Logic®: Queue Manager
This chapter describes how to view and manage jobs in the Océ TDS400 print queue, inbox queue, and history queue. It shows how to cancel the active print and how to delete the prints, how to hold the print jobs in the queue, how to restart the jobs, and how to move jobs to top.

112 Océ TDS400 Digital Multifunctional System User Manual
Introduction
The Queue Manager application provides you with a graphical representation of the print queue. It allows you to view the print queue and the status of the print jobs as well as to manage the jobs in the queue. With the Queue Manager you can:■ Abort the job currently being printed■ Delete job(s) in the queue■ Put job(s) in the queue on hold■ Print jobs from the history queue■ Print jobs from the inbox queue■ Move job(s) to the top of the queue■ Restart job(s) that were previously put on hold in the queue
▼▼▼▼ Start Océ Queue Manager on a remote workstation
Note: You must first install Océ Remote Logic® in ‘Installation procedure for MS Windows® systems’ on page 121.
1 Select 'Océ Remote Logic®' via the 'Start' menu, or 2 Select the 'Launcher' application.3 Select Queue Manager. Océ Queue Manager starts.
Note: To start more than one Queue Manager, System Control Panel or Settings editor you can better use the Launcher.
Structure
The Queue Manager window is divided into the following parts (see figure 39 on page 114):
The standard menu bar. The menu bar for the Queue Manager contains the following menus:
■ File: Login, Logout, Connect to, Close■ Edit: set the default printer and 'Auto login'.■ View: selecting the language, switching between queues, and configuring the
view of the queues.■ Help: About Queue Manager, Contents of the help.
Océ Power Logic®: Queue Manager 113
The tool bar The tool bar for the Queue Manager contains the following icons: hold, resume, move to top, delete and print job(s).
The active print job window. This window displays the job currently being printed on the Océ TDS400.
The print queue window. This window has a tabular format and shows the jobs waiting to be printed. The jobs are displayed in the order in which they are expected to be printed.
Note: Copy jobs can move in the queue, to take preference over print jobs. This depends on a setting in the Settings Editor.
Inbox queue The inbox queue contains print jobs which have been sent to the 'Inbox' on the controller. You can print these jobs, view the properties and delete these jobs.
History queue The history queue contains print and copy jobs which have been printed. You can print these jobs, view, edit some the properties and delete these jobs. You can set how long and how many jobs are kept in the history queue in the Settings Editor.
Note: You can not view the history queue and inbox queue at the same time. Select either the history queue or the inbox queue from view menu on the toolbar. They will be visible in the right pane of the queue manager window.
Status bar The Queue Manager has a status bar displaying the following information:
■ System status (connected, not connected)■ The connected system■ The job status e.g. ‘printing job.A0.hp’■ User mode
For each job the following information is displayed:■ The current status and schedule of the job in the form of an icon. See ‘Icons’
on page 116.■ The name of the print job.■ The type of job (print job / copy job)■ The name of the user who has submitted the print job.■ The number of sets and pages.■ Any remarks (e.g. 'Manual Feed').

114 Océ TDS400 Digital Multifunctional System User Manual
You can resize the columns in the main queue window by dragging the table header separators. It is also possible to change the order of the columns by dragging a specific column to a new position.
Note: You can sort the inbox and history. You can not sort the printer queue.
[39] Queue Manager window
Modes
The Océ TDS400 Queue Manager has the following modes: ■ Anonymous user mode■ Repro operator mode■ Key operator mode■ System administrator mode■ Service operator mode
These different modes are designed to limit access to the specific functions to authorized users only.
The anonymous user mode only offers view access to the queue. In this mode the buttons and menu items are disabled.
The repro operator, the key operator and the system administrator modes allow you to perform a number of activities on the jobs in the queue, with the help of
menu bar
active print job window
header separator
print queue
status bar inbox queue
tool bar

Océ Power Logic®: Queue Manager 115
the Abort, Delete, Resume and Hold buttons. The service operator mode is meant for Océ technicians.
Note: In the Queue Manager and the System Control Panel, the repro operator, the key operator and the system administrator have the same user rights. In the Settings Editor, however, the user modes offer different rights.
Access The access to the key operator, repro operator, system administrator modes and service operator is password protected to allow only authorized personnel to use particular functions. You can enter these modes by selecting the Login option from the File menu and by specifying the correct password when prompted for it, (see ‘Log in’ on page 128).
From the ‘File’ menu, select ‘Close’ to exit the Queue Manager.
Job priority The priority of print and copy jobs in the Queue Manager is determined by the order in which they are submitted to the Océ TDS400. However, there is a setting in the Settings Editor which allows you to give copy jobs priority over print jobs.

116 Océ TDS400 Digital Multifunctional System User Manual
IconsThe Océ TDS400 Queue Manager uses a number of icons to display information about a job in the queue. The following icons are used:
[40] Receiving/received the job
[41] Processing / processed the job
[42] Printing the job
[43] Delivering the job
[44] The delivered job
[45] The deleted job
[46] A job that requires manual feed
[47] The job is placed on hold by the user or the system.
[48] Attention, needs operator attention (e.g. a media request).

Océ Power Logic®: Queue Manager 117
Managing print jobs
▼▼▼▼ View the print queue
The Queue Manager displays all jobs sent to the print queue in a list sorted according to the order in which they will be printed.
This ordering can be changed by: ■ deleting jobs■ putting jobs on hold ■ restarting jobs currently on hold■ moving jobs to topThis list will be automatically updated.
Note: Queue operations can only be performed when you are properly authorized. Before you can use the Queue Manager in a different mode, you first have to enter a password to get the required access. See ‘User modes’ on page 127.
▼▼▼▼ Delete print jobs
1 Select the desired job(s) by clicking on them.Note: You can select a consecutive list of jobs to be deleted by clicking on the first job, holding down the Shift key and clicking on the last job. You can select a non-consecutive list of jobs to be deleted by clicking on each desired job while holding down the Ctrl key.Note: To delete a job from a remote client, you need repro operator, key operator or system administrator rights.
2 Click on the Delete button. A cross icon is displayed in front of the job indicating it will be deleted. After the job is actually deleted, the job is removed from the queue. Note: Consider carefully before you use the Delete button. A delete operation cannot be undone.
▼▼▼▼ Put print jobs on hold
1 Select the desired job(s) by clicking on them.Note: You can select a consecutive list of jobs to be put on hold by clicking on the first job, holding down the Shift key and clicking on the last job. You can select a non-consecutive list of jobs to be put on hold by clicking on each desired job while holding down the Ctrl key.
2 Click on the Hold button.

118 Océ TDS400 Digital Multifunctional System User Manual
Note: A job that is put on hold will retain its position in the print queue. Once it reaches the top of the queue, the job that is put on hold will stay there until it is restarted or deleted. While a job is on hold, other jobs will be printed, even when they were behind the job on hold in the queue. The active job and the jobs in printing state can not be put on hold by the Queue Manager.
▼▼▼▼ Restart jobs that are put on hold
1 Select the desired job(s) by clicking on them.Note: You can select a consecutive list of jobs to be restarted by clicking on the first job, holding down the Shift key and clicking on the last job. You can select a non-consecutive list of jobs to be restarted by clicking on each desired job while holding down the Ctrl key.
2 Click on the Resume button. The selected job(s) will now be restarted.
▼▼▼▼ Move jobs to top
1 Select the desired job(s) by clicking on it/them. 2 Click on the ‘Move to top’ button on the toolbar.
If more than one job is selected then the first selected job will be on top, the second will be on top, the second below that one and so on.
▼▼▼▼ Reprint jobs from the History queue.
1 Select the desired job(s) by clicking on it/them.2 Click on the ‘Print’ button on the toolbar.
▼▼▼▼ Change number of sets in the history queue
1 Select the desired job(s) by clicking on it/them.2 Click on the ‘Properties’ button on the toolbar.3 Select number of sets in the menu window
119
Océ TDS400Digital Multifunctional System
User Manual
Chapter 8Océ Power Logic®: Remote Logic
This chapter describes how to install and use Océ Remote Logic®.

120 Océ TDS400 Digital Multifunctional System User Manual
Introduction
Océ Remote Logic® enables you to:■ View system status (Océ System Control Panel).■ Manage print jobs (Océ Queue Manager).■ Change settings (Océ Settings Editor).
For more information see ‘Use Océ Remote Logic®’ on page 126

Océ Power Logic®: Remote Logic 121
Installation procedure for MS Windows® systems
Before you install Océ Remote Logic®, you must take note of the following minimum system requirements for the remote system. The system must be a Pentium® 233 with 32 Mb RAM running Windows 95, 98, NT® (service pack 3) or Windows® 2000. Contact your local Océ organisation for more possible systems.
Océ Remote Logic® (Queue Manager, System Control Panel and Settings Editor) are on the Océ TDS400 CD-ROM and on the Océ Power Logic® Controller CD-ROM provided with the system. The installation procedure for Remote Logic® is quite simple and self-explanatory. When you select the ‘Install remote applications’ option on the CD-ROM, a Wizard starts to guide you through the installation process. When the installation process is complete you do not have to restart your system.
Note: Océ Remote Logic® only works when TCP/IP is enabled on your system. Refer to your system administrator for assistance with the installation procedure for TCP/IP.
▼▼▼▼ Install Océ Remote Logic®
1 Insert the Océ remote Logic® CD-ROM or the Océ Power Logic® Controller CD-ROM into the CD-ROM drive of your PC.
2 Select the ‘Install remote applications’ option. The installation Wizard starts, and asks to select a setup language.
[49] Choosing a setup language

122 Océ TDS400 Digital Multifunctional System User Manual
3 Indicate the required language and click ‘OK’. 4 Follow the instructions on screen to complete the installation of ‘Océ Remote
Logic’.
When the installation is complete, you can start the applications by selecting them from the specified folder in the ‘Start’ menu.
To work with the applications you first have to connect to an available Océ TDS400 machine. How to connect is described in ‘How to use the remote system’ on page 132.
If you plan to work with more than one of the available remote applications, you are advised to use the “Applications Launcher”, because this uses less system resources than the individual applications.

Océ Power Logic®: Remote Logic 123
Installation procedure for Unix systems
Océ Remote Logic® is set up to be platform independent. It runs on a variety of operating systems providing that a Java™ runtime environment is available for that platform. The Java™ runtime environment must be installed by a user with system administrator privileges, depending on Java™ Virtual Machine (VM). It is also assumed that Océ Remote Logic® is installed by an experienced user.
▼▼▼▼ Install Océ Remote Logic®’
1 Check if a Java™ runtime environment (JRE) is installed on the system. The preferred version is JRE 1.1.8. Below you can find some links to JRE's for various UNIX platforms.
2 Unpack the contents of the file ‘RemoteLogic_vX.tar’, from the directory Products/remotelogic/UNIX, to a subdirectory on the system.
3 Use ‘tar xvf RemoteLogic_vX.tar’ to unpack.4 Set the environment variable ‘RL_VM_HOME’ to point to the installation of
the JVM.5 Run the file ‘remotelogic’ with the applications as parameters. (e.g.
remotelogic QM SCP SE to start the three applications), or use ‘remotelogic AL’, for the application launcher.
Note: If you do not supply any options, a short help text is displayed.
UNIX versions and the required JREUNIX version OS version JRE Default installation directoryIBM AIX 4.1.5 1.1.6 /usr/jdk_baseIBM AIX 4.2.1 1.1.8 /usr/jdk_baseIBM AIX 4.3.3 + fix 1.2.2 /usr/jdk_dev2IBM AIX 4.3.3.10 + fix 1.3.0 /usr/jdk_java130SUN Solaris 2.6 1.1.6HP-UX 10.20 1.1.3LINUX 1.0 1.1.3LINUX 1.2 1.1.8
Note: OS = Operating System, JRE = Java™ Runtime Environment

124 Océ TDS400 Digital Multifunctional System User Manual
IBM AIXFor the various versions of IBM AIX, Java™ runtime engines can be downloaded from:http://www.ibm.com/java
The preferred version of the Java™ runtime engine for use with Océ Remote Logic® is the 1.1.8 version.
HP-UX
For HP-UX 10.20 and 11.00 the runtime engine can be downloaded from: http://www.unix.hp.com/javaThe preferred version of the Java™ runtime environment for HP-UX 10.20 and HP-UX 11.00 is version C.01.18.xx.
Linux
IBM has a runtime engine available for Linux which can be downloaded from: http://www.ibm.com/java

Océ Power Logic®: Remote Logic 125
Installation procedure for Other systems
In general, Océ Remote Logic® can run on any system with a Java™ VM.
▼▼▼▼ Steps to install Océ Remote Logic® in general
1 Install Java™ Virtual machine (preferred 1.1.8 (or higher)).2 Extract ‘RemoteLogic_vX.tar’ or ‘RemoteLogic_vX.zip’, from the Océ
Remote logic® CD-ROM.3 Set the environment variable RL_VM_HOME to point to the Java™ VM
installation directory.4 If needed, edit the remote logic script or batch file.5 Use remotelogic script or batch file to start the applications.

126 Océ TDS400 Digital Multifunctional System User Manual
Use Océ Remote Logic®
Océ Remote Logic® enables you to:■ View the system status (Océ System Control Panel).■ Manage print jobs (Océ Queue Manager).■ Change settings (Océ Settings Editor).
Océ Remote Logic® has five different user modes. These user modes are meant to limit access to the special functions to authorised users only. Log in to get access to one of the user modes.
Change the display language, to operate Océ Remote Logic® in the language of your selection. refer to the on-line help for information on how to do this.
The Océ Remote Logic® applications can operate separately. If you start the applications separately, you have to log in and select a language in each application. If you start the applications via the ‘Application Launcher’, the language is selected automatically.
Note: The default language is English US.
Start the Océ TDS applications via the ‘Start’ menu or via the ‘Application Launcher’ application.
▼▼▼▼ Start Océ Remote Logic® on a remote workstation
1 Select 'Océ Remote Logic' via the 'Start' menu.2 Select ' Application Launcher'.3 Select the required application from the ‘Application Launcher’.

Océ Power Logic®: Remote Logic 127
User modes
The following user modes are available:■ Anonymous user mode■ Repro operator mode■ Key operator mode■ System administrator mode■ Service operator mode
The anonymous user mode only offers monitoring capabilities. You are not allowed to change anything.
The repro operator, the key operator and the system administrator modes allow you to perform a number of user actions.
In the Queue Manager and the System Control Panel the repro operator, the key operator and the system administrator have the same user rights. The repro operator, the key operator and the system administrator modes allow you to perform a number of activities on the jobs in the queue, with the help of the Abort, Delete, Resume and Hold buttons.
In the Settings Editor, however, the user modes offer different rights. In repro operator mode, the operator is allowed to only view settings in the key operator and system administrator views.
In key operator mode, the operator is allowed to view and change settings in the key operator view. The key operator is also allowed to view system administration settings, but is not able to change them.
In system administrator mode, the operator is allowed to view and change settings in the system administrator view. The system administrator is also allowed to view key operator settings, but is not able to change them.
The service operator mode is meant for the Océ technician.
When you are not authorised to perform a certain action, the action is greyed out.
Note: The status bar at the bottom displays the active user mode.

128 Océ TDS400 Digital Multifunctional System User Manual
Log inThe access to the key operator, repro operator, system administrator and service operator modes is password protected to allow only authorised personnel to use particular functions.
The default password for the System Administrator is: SysAdm.The default password for the Key Operator is: KeyOp.The default password for the Repro Operator is: ReproOp.Note: The default passwords are case sensitive. Change the passwords after your first log in.
▼▼▼▼ How to log in
1 From the ‘File’ menu, select ‘Log in’.2 Select the correct user name.3 Enter the Password. 4 Click ‘OK’.
Note: You must log in into each application separately.
Log in is restricted to one user only. When a second user attempts to log in an error message will appear (see figure below).
[50] When a second user attempts to log in an error message will appear
Log out
You have to log out to leave the key operator, repro operator and system administrator modes.
▼▼▼▼ How to log out
1 From the ‘File’ menu, select ‘Log out’.You return to anonymous user mode.Note: You must log out into each application separately.

Océ Power Logic®: Remote Logic 129
To change the passwordYou can change your password on a standard base. You can change the password for each user mode (except anonymous user mode, for which no password is required and service operator) by taking the following steps:
▼▼▼▼ Change the password:
1 From the ‘File’ menu, select ‘Log in’.2 Click the ‘Password’ button. 3 Select the correct username in the ‘Username’ drop-down list box.4 Enter the old password in the ‘Password’ text box.5 Enter the new password in the ‘New password’ text box.6 Enter he new password in the ‘Confirm new password’ text box and click ‘OK’
to confirm the new password.
Automatic login
If you do not want to log in each time you start an application, you can select the automatic login function. This option allows you to start an application automatically in the indicated user mode.
▼▼▼▼ Enable automatic log in
1 From the ‘Edit’ menu, select ‘Options’.The Options window appears.
2 Select the ‘Enable automatic login’ check box.3 Select the correct user mode and enter your password for that user mode.4 Click ‘OK’. Automatic login is now enabled.
LanguageFrom the ‘View’ menu, select ‘Language’, to select one of the supported languages.
Note: The check mark in front of the language indicates that this is the active display language.
▼▼▼▼ Set the languages
1 From the ‘View’ menu, select ‘Language’.

130 Océ TDS400 Digital Multifunctional System User Manual
You have to change the display language setting in the Settings Editor, to change the languages in the scanner and printer operator panels, and in the local applications.
Help
▼▼▼▼ Display help information
1 Open the ‘Help’ menu and select ‘Contents’. Now you can find help for all functions of the Océ Remote Logic® applications.
Command line parameters
In order to start the remote applications faster, there are 6 command line parameters available.
configfile=<config_file> Sets the configuration file to use.
server=server Sets the specified server as the server to connect to.
language1=lang Specifies the first language in combination with the parameter ‘country1=country’.
country1=country Specifies the first language in combination with the parameter ‘language1=language’.
language2=lang Specifies the second language in combination with the parameter ‘country2=country’.
country2=country Specifies the second language in combination with the parameter ‘language2=language’.
Note: You must always use a matching combination of ‘lang’ and ‘country’ (see table on page 131).

Océ Power Logic®: Remote Logic 131
The parameters can be applied to the following applications:■ QM.exe (Queue Manager)■ SCP.exe (System Control Panel)■ SE.exe (Settings Editor)■ AL.exe (Application launcher)
Note: These .exe files are usually located in ‘C:\Program Files\Remote Logic\Bin’.
The easiest way to do this is by creating a short-cut of an application and then add the command line properties.
Example command line parameter Below is an example of how to start the Océ Remote Logic® applications with the configuration file ‘Myconfig.cfg’, connected to the ‘My9600’ server. The first language is set to US English and the second to French:‘C\Program Files\Remote Logic\Bin\AL.exe -configFile=Myconfig.cfg server=My9600 language1=en country1=US language2=fr country2=FR’.
LanguageLanguage Language
parametersCountry
Danish da DKCzech cs CZSpanish es ESFinnish fi FIHungarian hu HUItalian it ITUS English en USUK English en GBDutch nl NLGerman de DEFrench fr FRPortuguese pt PTNorwegian no NOSwedish sv SVPolish pl PLJapanese ja JP

132 Océ TDS400 Digital Multifunctional System User Manual
How to use the remote system
Start up the Océ Remote Logic® applications (Océ Settings editor, Océ Queue manager, Océ System control panel), on a remote client after you installed the software (see ‘Installation procedure for MS Windows® systems’ on page 121). In order to use the functionality you first have to add an Océ Power Logic® controller and then connect to an available Océ Remote Logic® controller.
▼▼▼▼ Add an Océ Power Logic® controller
1 Open the ‘File’ menu and select ‘Connect to’. A dialogue box will appear with a drop-down list box containing the already added Océ Remote Logic® systems.
2 Click ‘Edit...’. The ‘Edit systems’ dialogue box appears.3 Enter the IP address or the name of the Océ Remote Logic® system you want
to connect to, in the ‘Systems’ text box.4 Click ‘Add’. The system is added to the list. You can add as many systems.
Note: You can also remove an Océ Remote Logic® system. Select one in the list and click ‘Remove’.
5 Click OK twice to return to the application.
Note: Before you can add an Océ Remote Logic® system, the system has to be installed and configured by a system consultant or a technician.
▼▼▼▼ Connect to an Océ Power Logic® controller
1 Open the ‘File’ menu and select ‘Connect to’. A dialogue box will appear containing a drop-down list box with the available systems. Select one of the available systems and click on ‘OK’. When you connect to another system, all settings have to be retrieved. This may take some time.

133
Océ TDS400Digital Multifunctional System
User Manual
Chapter 9Océ Print Exec® LT Web
The Océ Print Exec® LT Web is a job submission application. It allows you to send print jobs to a printer from your web browser and view the status of the system.
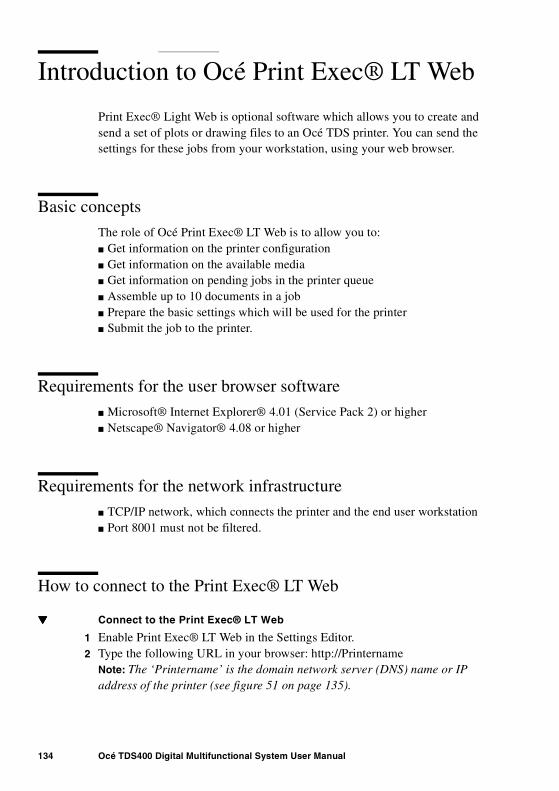
134 Océ TDS400 Digital Multifunctional System User Manual
Introduction to Océ Print Exec® LT Web
Print Exec® Light Web is optional software which allows you to create and send a set of plots or drawing files to an Océ TDS printer. You can send the settings for these jobs from your workstation, using your web browser.
Basic concepts
The role of Océ Print Exec® LT Web is to allow you to:■ Get information on the printer configuration■ Get information on the available media■ Get information on pending jobs in the printer queue■ Assemble up to 10 documents in a job■ Prepare the basic settings which will be used for the printer ■ Submit the job to the printer.
Requirements for the user browser software
■ Microsoft® Internet Explorer® 4.01 (Service Pack 2) or higher■ Netscape® Navigator® 4.08 or higher
Requirements for the network infrastructure
■ TCP/IP network, which connects the printer and the end user workstation■ Port 8001 must not be filtered.
How to connect to the Print Exec® LT Web
▼▼▼▼ Connect to the Print Exec® LT Web
1 Enable Print Exec® LT Web in the Settings Editor.2 Type the following URL in your browser: http://Printername
Note: The ‘Printername’ is the domain network server (DNS) name or IP address of the printer (see figure 51 on page 135).

Océ Print Exec® LT Web 135
[51] Océ Print Exec® LT Web
▼▼▼▼ Add new jobs
1 Click ‘New job’A form appears like in figure 52 on page 135.
2 Click ‘Browse’ to add documents3 Click ‘Submit’ when you are ready.
[52] Job composition
For more information please consult the on-line help.

136 Océ TDS400 Digital Multifunctional System User Manual

137
Océ TDS400Digital Multifunctional System
User Manual
Chapter 10Océ Power Logic®: Account Logging
This chapter describes what Account logging is and how to use it.

138 Océ TDS400 Digital Multifunctional System User Manual
The account logging option
For accounting purposes, the Océ Power Logic® Controller is able to keep track of all your jobs. For each copy/print/scan job the job info and the paper usage is stored. For scan to file with check print 2 records are generated, one for the scan to file and one for the check print.
All this data is stored in a file: the account log file. The account file contains a record for each copy/print/scan job.
Account logging consists of the following steps:1 Enable the Account logging option2 Set the file format properties3 Make copy/print/scan jobs on the right account4 Retrieve the generated Account logging file5 Use the generated Account logging file
1 Enable the Account logging option
Account logging is an option. You enable this option in the Settings Editor via a password.
2 The account log fileFile format The account logging information is stored in a file. The format of the file is either ASCII (using the ISO Latin-1 encoding) or UTF-16. The format depends on the Logging file format setting. The file format is either YYYYMMDD.csv (for ASCII files), or YYYYMMDD.txt (for UTF-16 files). You set the file name in the settings editor.
File content The account log file content is based on a text file consisting of a sequence of lines of text. A line of text is an ordered sequence of characters. Records consist of a sequence of fields separated by a field separator character. Each line of text forms a record. The records can be of different types, as indicated by a record type identifier which is the first field in a record.
Storage The account log file is stored on the controller. The controller generates a account log file each day. You can determine for how long the

Océ Power Logic®: Account Logging 139
accounting log file is kept on the controller. You set the file age in the Settings Editor.
File field separator The items of a record in the account log file are separated by the file field separator. The file field separator depends on the regional settings of your operating system. By default the file field separator is set to ‘semicolon’. Make sure you specify the same file field separator in the Settings Editor as in your regional system settings. For Windows® operating system you can find this under: Start - Settings - Control Panel - Regional Setting - Number - List separator.
Escaping method If the text in the field separator contains the field separator character, end of line or double quote then the text in the field changes as follows:
1 An occurrence of a double quote is replaced by two double quotes.2 The resulting text is surrounded by double quotes.
Note: The escaping method is compatible with MS Access® and MS Excel®.
Storage The print/copy/scan jobs you make in one day are stored in one separate account log file. The Océ TDS400 system makes each day a new account log file. You can set how long the account log files are stored on the controller.
3 Make copy, print, or scan jobs
▼▼▼▼ To set the accounting for a copy or scan job
1 if “account logging” is enabled, “account logging” is shown on the scanner display instead of “scanner ready”. It is shown at the highest level of the menu tree.Note: ID’s can only be modified during “scanner ready”.
2 Enter the correct account ID and user ID with the arrow buttons on the scanner operator panel, as shown below.

140 Océ TDS400 Digital Multifunctional System User Manual
[53] Enter the correct account ID and user ID with the arrow buttons on the scanner operator panel
Note: The account ID and user ID will return to the default set in the Settings Editor after an idle time (panel time out, sleep mode, or power up).Note: the entry fields for account ID and user ID on the scanner panel are limited to 3 digits. You can set 9 digit default ID’s on the Settings Editor. If a default ID is larger than 3 digits, this ID will be shown on the scanner as ‘---‘.
3 If you press any other user button on the scanner panel, the editing of the user ID and account ID is aborted. An exception to this are the ‘+’ and ‘-‘ button to set the number of copies. This can be done independent of the editing of the user ID and account ID.
▼▼▼▼ To set accounting for a print job
1 For a print job, you must specify the ‘account ID’ and the ‘user ID’ in the printer driver, in Océ Print Exec® LT web or in Océ Print Exec® LT. If no ID’s are set the default ID’s from the Settings Editor are used.
You are now ready to make copy, print, or scan jobs.
4 How to retrieve the account files
The account log files are stored in the logging directory of the controller. You can retrieve your files from the local host via File Transfer Protocol (FTP). FTP can be done:
1 via an internet browser or 2 via a dos box.
▼▼▼▼ Get the account log file via FTP in a internet browser
1 Start an internet browser
Decrease ID Increase ID
Centre button=confirm and select other ID

Océ Power Logic®: Account Logging 141
2 Enter the ftp address of the Océ TDS400 system.Note: You set the name of the system in the Settings Editor.The browser shows the ftp directories on the Océ TDS400 system (see figure 54).
3 Browse to the ‘Accounting’ directory.The accounting log files are shown (see figure 55).
4 Save the accounting log files to any destination on your system. This is usually done by a right click on the file and then the ‘save’ option.
[54] The ftp directories on the Océ TDS400 system
[55] The accounting directory with the account log file on the Océ TDS400 system

142 Océ TDS400 Digital Multifunctional System User Manual
▼▼▼▼ Get the account log file via FTP in a dos box
1 Launch an FTP client.2 Enter the ‘ftp’ command.
A DOS box now appears with the FTP prompt.3 Enter the ‘Open’ command followed by either the registered name of the
Power Logic Controller or the IP address (for example: 194.2.66.146) to connect to the Controller and press Enter: ‘open 194.2.66.146’.Note: Instead of performing steps 2 and 3 you could also enter “ftp host_name” in the FTP client.The connection with the Controller is now established and a window appears asking you for a user name.
4 Enter your user name ‘anonymous’, and enter as your password also ‘anonymous’. A connection is now set up for the default user ‘anonymous’.Note: As there is no registered user, you can simply press Enter to initiate the connection.
5 Set the transmission mode to binary by entering ‘binary’.6 Go to the ‘logging’ directory using the following command: ‘cd logging\’.7 Get ‘20001011.csv’ or ‘20001110.txt’ depending on the file format setting.8 Quit FTP by entering the ‘bye’ command.
5 Use the generated accounting file
After you retrieved the accounting file you can view and use the data that are stored in the records. You can import the account log file into for example Microsoft Excel® or Microsoft Access®.
▼▼▼▼ Import the account log file into Microsoft Excel®
1 Start Microsoft Excel®.2 Open the account log file that is on your system.
Microsoft Excel® shows the content of the account log file: the records (see figure 56).Now you can process the data in the account log file.

Océ Power Logic®: Account Logging 143
[56] The account log file in Microsoft Excel®

144 Océ TDS400 Digital Multifunctional System User Manual
Account information in the log file
For each output page an account log record (1 line) is generated. A job that consists of several output pages, will have several account log records. Also for each scan (scan to file jobs) an account log record is generated.
All records that are part of a single job, will have the same value for the ‘Job Unique ID’ field. This field is part of each record and is unique for each job in the file. This field is for collecting records that are part of a single job and to calculate the totals for the whole job.
Account information for the media formatIf a standard output media format is chosen in a print, scan or copy job, the media width and height for the output media reported in the account log file, will be exactly as specified in the following table. Any deviation from these values (even by 1 unit) implies that a non-standard media format was chosen in the job.
Note: Note that for output in landscape orientation, the width and height values are swapped.

Océ Power Logic®: Account Logging 145
Account information for the media weights
In the account log file, media weight is represented by the values ‘LIGHT’, ‘NORMAL’ and ‘HEAVY’. The following table specifies the mapping for actual media to the values in the account log.
Media Format for Output MediaFormat name Width
(units of 1/72 inch)Height(units of 1/72 inch)
A0 2384 3370A1 1684 2384A2 1191 1684A3 842 1191A4 595 842E 2448 3168D 1584 2448C 1224 1584B 792 1224A 612 792E+ 2592 3456D+ 1728 2592C+ 1296 1728B+ 864 1296A+ 648 864B1 2004 2835B2 1417 2004B3 1001 1417B4 709 100130x42 2160 3024jis B1 2064 2920jis B2 1460 2064jis B3 1032 1460jis B4 729 1032jis B5 516 729

146 Océ TDS400 Digital Multifunctional System User Manual
Structure of the account file
The Océ TDS400 supports two different record types: 6310 and 6311. The first record in each account log file is of type 6310 and contains a list of abbreviated field names that occur in records of type 6311. this record is always the same in each account log file and is used as a comment. For example to clarify the meaning of the fields if the file is imported in an application like MS Excel
The actual account log information is in records of type 6311 (the second up to the last record in the account log file). The fields of that record are described in the table ‘All Parameter descriptions’ on page 147.
Description of all the parameters in the account log file
Note: The table below lists the fields in their order of appearance in the account log file.
Media Weight ValuesActual material Value in log file
Plain paper 64g LIGHT
Plain paper 75g NORMAL
Plain paper 110g, 24lb HEAVY
Transparent 75g LIGHT
Transparent 90g NORMAL
Transparent 110g HEAVY
Vellum NORMAL
Polyester 3P5 Mil NORMAL
Polyester 4P5 Mil NORMAL
Translucent NORMAL

Océ Power Logic®: Account Logging 147
All Parameter descriptionsParameter Type Length
(max)Description
Record type num 4 Record type identifier = 6311.Note: each account log file starts with a record of type 6310. This is a constant record which only contains the abbreviated field names used in records of type 6311.
Account ID text 255 Account ID, escaped according to escaping rules.Empty field if not available. Note: numeric ac-count ID from RCF or scanner panel is converted to its textual representation (without any prefix). For OJT, the Account ID is copied from the OJT “Account” field (string).
User ID text 255 User ID of submitter of job, escaped according to escaping rules.Empty field if not available. Note: numeric user ID from RCF or scanner panel is converted to its tex-tual representation (without any prefix).
Job ID text 255 ID of job (e.g. job name) as specified in a job tick-et, escaped according to escaping rules. Empty field if not available.
Machine ID text 255 Unique ID of the printer. If there is only a scanner, then the unique ID of the scanner. For the Océ TDS400 this is implemented as the serial number of the printer/scanner.
Record version num 2 Version number of this record type. 0 for this ver-sion.
Job Unique ID num 8 Controller-generated unique job ID. Is unique for each job in the log file.
Record number num 6 Sequence number of this record in the account log for this job. Starts at 0.
Job submission source
text 255 Host name or IP address of the source of the job.Empty field if not available.
Channeltype text Protocol used for the job submission: LP, SMB, PSERVER, FTP, CENTRONICS
Receive date year
num 4 Year when source page was received. E.g. 2001
Receive date month
num 2 Month when source page was received. 1-12
Receive date day num 2 Day of the month when source page was received. 1-31
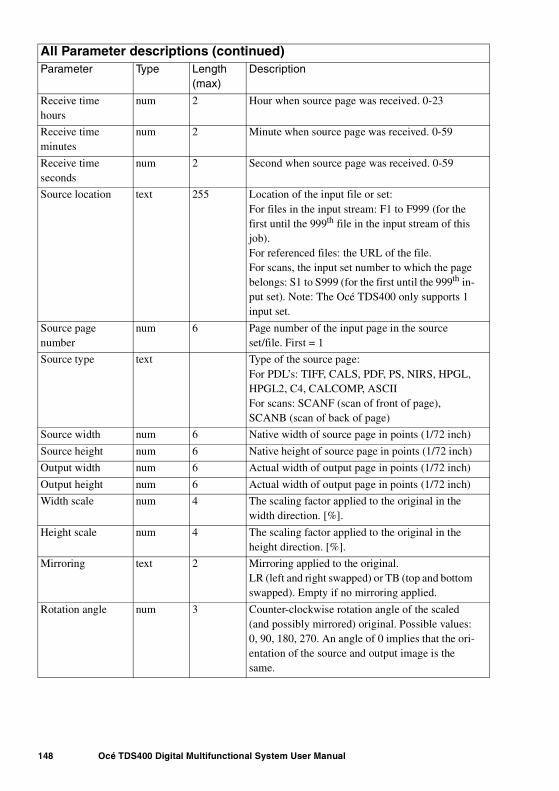
148 Océ TDS400 Digital Multifunctional System User Manual
Receive time hours
num 2 Hour when source page was received. 0-23
Receive time minutes
num 2 Minute when source page was received. 0-59
Receive time seconds
num 2 Second when source page was received. 0-59
Source location text 255 Location of the input file or set:For files in the input stream: F1 to F999 (for the first until the 999th file in the input stream of this job).For referenced files: the URL of the file.For scans, the input set number to which the page belongs: S1 to S999 (for the first until the 999th in-put set). Note: The Océ TDS400 only supports 1 input set.
Source page number
num 6 Page number of the input page in the source set/file. First = 1
Source type text Type of the source page:For PDL’s: TIFF, CALS, PDF, PS, NIRS, HPGL, HPGL2, C4, CALCOMP, ASCIIFor scans: SCANF (scan of front of page), SCANB (scan of back of page)
Source width num 6 Native width of source page in points (1/72 inch)
Source height num 6 Native height of source page in points (1/72 inch)
Output width num 6 Actual width of output page in points (1/72 inch)
Output height num 6 Actual width of output page in points (1/72 inch)
Width scale num 4 The scaling factor applied to the original in the width direction. [%].
Height scale num 4 The scaling factor applied to the original in the height direction. [%].
Mirroring text 2 Mirroring applied to the original.LR (left and right swapped) or TB (top and bottom swapped). Empty if no mirroring applied.
Rotation angle num 3 Counter-clockwise rotation angle of the scaled (and possibly mirrored) original. Possible values: 0, 90, 180, 270. An angle of 0 implies that the ori-entation of the source and output image is the same.
All Parameter descriptions (continued)Parameter Type Length
(max)Description

Océ Power Logic®: Account Logging 149
Process type text Type of processing that was done for this page:PLOT, COPY, STF (scan to file), CHK (check plot), ICOPY (interrupt copy), INTRNL (internal job), HEADER (header page), TRAILER (trailer page), ERRPAGE(error page), REPLOT (from history queue)
Process comple-tion
text How the process completed for this page: DONE (normal termination), ABRT (job aborted by user), ERR (error occurred).In case an error occurred or the job was aborted, the last page that was correctly delivered has value DONE and an extra record with value ABRT or ERR is generated for the first page after that (the page that did not come out due to the error).
Delivery date year
num 4 Year when source page was delivered. E.g. 2000
Delivery date month
num 2 Month when source page was delivered. 1-12
Delivery date day
num 2 Day of the month when source page was delivered. 1-31
Delivery time hours
num 2 Hour when source page was delivered. 0-23
Delivery time minutes
num 2 Minute when source page was delivered. 0-59
Delivery time seconds
num 2 Second when source page was delivered. 0-59
Output page number
num 6 Page number of the output page in this job. First = 1. Physical output pages are numbered separately from digital output pages.Digital output pages are numbered separately for each separate output file.
Output media type
text Type of the output medium in case of physical out-put: PPAPER (plain paper), TRANSPARENT, FILM, POLYESTER, VELLUM, TRANSLU-CENT. Empty if no physical output.
Output media special
text 1 Indicates whether special output media is selected. Y or N.Empty if no physical output
All Parameter descriptions (continued)Parameter Type Length
(max)Description

150 Océ TDS400 Digital Multifunctional System User Manual
Output media weight
text Output media weight in case of physical output: LIGHT, NORMAL, HEAVY. Empty if not known or if only digital output.
Output media source
text Source from which the output media was taken in case of physical output: ROLL1, ROLL2, ROLL3, ROLL4, ROLL5, ROLL6, TRAY1, TRAY2, TRAY3. MANUAL (manual feed slot). Empty if no physical output.
Output fold method
text Empty field.
Output binding method
text Empty field
Output media destination
text Empty field.
Output file type text Type of output file in case of digital output: TIFF, CALS, PDF. Empty if no digital output.
Output file com-pression
text Compression method of output file in case of dig-ital output: GROUP3, GROUP4, PACKBITS, LZW. Empty if no digital output or no compres-sion.
Output file size num 9 Size of output file in bytes (including all pages in case of multi-page output files) in case of digital output. Empty if no digital output.
Output file desti-nation
text 255 Nickname of the destination for the output file as used in the scan manager, in case of digital output. If multiple pages in one job have the same destina-tion file, a multi-page file is generated. Empty if no digital output.
Output resolu-tion (width di-rection)
num 4 Resolution of output in width direction in dpi
Output resolu-tion (height di-rection)
num 4 Resolution of output in height direction in dpi
All Parameter descriptions (continued)Parameter Type Length
(max)Description

151
Océ TDS400Digital Multifunctional System
User Manual
Chapter 11Printer supplies and scanner maintenance
This chapter describes how to load paper, refill the toner, replace the waste toner bag and clean the scanner.

152 Océ TDS400 Digital Multifunctional System User Manual
Media
The Océ TDS400 is available with a roll unit for one or two rolls.
Each of the rolls on the Océ TDS400 can be loaded with print material of a different size or type. The size and type of the available media are indicated on the operator panel.
Attention: When you load new print material, you must tell the system the size of the material and the type of print material (paper, transparent, or polyester). Refer to ‘Media type and size on the printer’ on page 27.
The definition of the size and type of the new print material is required to:■ Enable the automatic media switch function to work correctly.■ Support auto format functions.

Printer supplies and scanner maintenance 153
The paper rollsWhen a roll is empty during a print job, a ‘Roll empty’ message is displayed at the printer operator panel and on the System Control Panel application. You then have to load a new roll of print material.
Note: You can use the following media for the Océ TDS400:
■ Plain paper 64 g/m2 (55 g/m2)■ Plain paper 75 g/m2 (110 g/m2)■ Biotop paper 80 g/m2■ Green label 80 g/m2■ Recyonomic 80 g/m2■ Transparent paper 75 g/m2■ Transparent paper 90/95 g/m2 (80/85 g/m2)■ Transparent paper 110/115 g/m2■ Translucent 60 g/m2■ Vellum 20 lbs (16 lbs)■ Film 3.5 mil (4 mil)■ Film 4.5 mil
▼▼▼▼ Reload roll 1
1 Open the drawer completely (see figure 57).
[57] Open the drawer

154 Océ TDS400 Digital Multifunctional System User Manual
2 Remove the roll holder from the drawer (see figure 58).
[58] Removing the roll holder from the drawer
3 Remove the empty core from the roll holder while pressing the knob (see figure 59).
4 Slide the roll holder in the new roll of material while pressing the knob (see figure 59). The knob must be at the right hand side and paper must be positioned as shown in figure 59.
[59] Press the knob
5 Align the roll with the appropriate lines on the roll holder while pressing the knob. This line has to be completely visible.
34"A0 36"

Printer supplies and scanner maintenance 155
6 Place the roll holder with the material in the drawer (see figure 60).
[60] Reposition the roll
7 Feed the material between the input guide plates against the rollers.8 Turn the rollers until the material is visible (see figure 61). Also refer to the
sticker inside the drawer.
[61] Feed the material
9 If you have inserted a roll with another material or with a different width, you have to program the correct width and material type (refer to ‘Media type and size on the printer’ on page 27).If you want to cut the paper to get a straight leading edge refer to ‘Cut media’ on page 30.Otherwise continue with the next step.
10 Close the drawer.11 Press the button ‘on line’.

156 Océ TDS400 Digital Multifunctional System User Manual
▼▼▼▼ Reload roll 2
1 Open the cover to get access to roll 2 (see figure 62).
[62] Open the lower paper drawer
2 Remove the roll holder (see figure 63).
[63] Remove the roll holder from the lower paper drawer
3 Remove the empty core from the roll holder while pressing the knob (see figure 59 on page 154).
4 Slide the roll holder in the roll of print material while pressing the knob (see figure 59 on page 154). It is important to have the knob at the right hand side and the paper as shown in figure 59.

Printer supplies and scanner maintenance 157
5 Align the roll with the appropriate lines on the roll holder while you press the knob.Place the roll holder with the material in the lower paper compartment (see figure 64).
da
[64] Reposition the roll in the lower paper drawer
6 Feed the material between the input guide plates against the rollers.Turn the rollers until the material is visible (see figure 65). Also refer to the sticker inside the drawer.
[65] Feed the material
If you want to cut the paper to get a straight leading edge refer to ‘Cut media’ on page 30.Otherwise continue with the next step.
7 Close the lower paper compartment.8 Press the button ‘on line’.

158 Océ TDS400 Digital Multifunctional System User Manual
How to program media settingsIf you insert a new roll with another material or with a different width, set the new roll specifications.
The material paper, transparent, transparent 110g, vellum, film, film 4,5, translucent. Set the material type according to the following table:
The width of the materialMaterial SizeA0 841 mmA1 594 mmA2 420 mmA3 297 mmE 34 inchD 22 inchC 17 inchB 11 inchE+ 36 inchD+ 24 inchC+ 18 inchB+ 12 inch30 inch 30 inchB1 707 mmB2 500 mm700 700 mmNote: The default is 36 inch
Material propertiesMaterial Weight Media SettingPlain paper 64 g/m2(55 g/m2) Paper 64gPlain paper 75 g/m2(110 g/m2) Paper 75gBiotop paper 80 g/m2 Paper 75gGreen label 80 g/m2 Paper 75gRecyonomic 80 g/m2 Paper 75gTransparent paper 75 g/m2 Transparent 75gTransparent paper 90/95 g/m2 (80/85 g/m2) Transparent 75gTransparent paper 110/115 g/m2 Transparent 110 gTranslucent 60 g/m2 TranslucentVellum 20 lbs (16 lbs) VellumFilm 3.5 mil (4 mil) Film 3.5Film 4.5 mil Film 4.5

Printer supplies and scanner maintenance 159
How to refill toner
If the ‘Refill toner’ message appears on the printer panel, you must refill toner immediately.
Attention: Use only B5 toner.
▼▼▼▼ Refill toner
1 Turn off the printer.2 Unscrew the knurled nut at the left hand side of the printer and open the left
cover (see figure 66).
[66] Unscrew the knurled nut and open the cover
3 Shake the toner bottle thoroughly and open the bottle.

160 Océ TDS400 Digital Multifunctional System User Manual
4 Screw in the bottle clockwise in a slanted position (see figure 67).
[67] Screw in the bottle
5 Move the toner bottle to a vertical position (see figure 68).
[68] Add toner
6 Tap the toner out of the bottle.7 When the toner bottle is empty return the bottle to the original position.8 Unscrew the toner bottle anti clockwise.
B5
B5

Printer supplies and scanner maintenance 161
▼▼▼▼ Replace the waste toner bag
9 Pull the waste toner bag from the holder and place the cap provided on the bag (see figure 69).
[69] Replace the waste toner bag
10 Slide a new waste toner bag over the holder.11 Close the cover and tighten the knurled nut.12 Press the ‘on line’ button to resume printing.
Note: Replace the toner waste bag, every time you refill the toner.

162 Océ TDS400 Digital Multifunctional System User Manual
Maintenance of the glass platen and the reference roller of the scanner
If the glass platen of the scanner is dirty or static, it should be cleaned to ensure top quality copies are produced. At the same time you can clean the white reference roller.
▼▼▼▼ Clean the glass platen and reference roller
1 Switch off the scanner.2 Unlock the top cover by pushing the front side of the cover down and pulling
it towards.
[70] Open the top cover of the scanner
3 Raise the cover (see figure 71 on page 163). 4 Clean the glass platen and the white pressure platen gently with a soft cloth
moistened with a small quantity “Cleaner A”. For safety information see the safety data sheet in Appendix B.

Printer supplies and scanner maintenance 163
[71] Glass platen and reference roller
5 Lower the top cover.6 Lock the cover by pushing the front side of the cover down and pushing it back
to the rear until you hear a click.Note: Make sure that the cover is closed correctly, to ensure proper original transport.
7 Switch on the scanner.

164 Océ TDS400 Digital Multifunctional System User Manual

165
Océ TDS400Digital Multifunctional System
User Manual
Chapter 12How to solve problems
This chapter describes the problems that can occur with the Océ TDS400.

166 Océ TDS400 Digital Multifunctional System User Manual
Introduction
This chapter describes problems that can occur with the Océ TDS400 and how to correct the problems.
There are two main categories:■ Original jams in the scanner (see page 167).■ Paper jams in the printer (see page 168).
Stickers on parts of the system indicate which green handles, green knobs, green bars and covers can be lifted, pressed or opened to remove the jammed material.
If you clear the error, the display gives the instruction on how to continue the job. Refer to ‘Error messages’ on page 39 for complete information about the error messages on the printer operator panel.

How to solve problems 167
Original jams in scanner
If an original jams, you can stop the original with the orange ‘cancel’ button.
▼▼▼▼ Remove a jammed original
1 Unlock the top cover by pushing the front side of the cover down and to pull it towards you. (see figure 72).
[72] Open the top cover of the scanner
2 Raise the cover (see figure 73)
[73] Raise the cover of the scanner
3 Remove the original.4 Lower the top cover.5 Lock the cover by pushing the front side of the cover down and to push it back
to the rear until you hear a click.

168 Océ TDS400 Digital Multifunctional System User Manual
Note: Make sure that the cover is closed correctly, to make sure correct original move.
6 Press the ‘cancel’ button.
How to clear a paper jamIf a jam occurs a message appears on the operator panel. If a paper jam occurs, check if:■ The roll is loaded correct and the media is fed as indicated.■ The correct media is used (see ‘List of available material types and sizes’ on
page 180).■ No scraps of material are blocking the paper path
▼▼▼▼ Clear a jam in the material feed section
1 Turn off the printer.2 Open the correct roll compartment.
Note: One compartment can be open at a time.3 Lower the feed table, use the two catches on the front underneath the feed table
(see figure 74).
[74] Lower the feed table
4 Remove the jammed material. 5 Close the feed table.6 Close the roll compartment.7 Turn on the printer.
Note: If you can not clear the paper jam by opening the feed table than open the fusing section (see ‘How to solve a jam in the fuser section’ on page 169).

How to solve problems 169
How to solve a jam in the fuser section
Caution: Open the fuser only to remove the paper after a media jam. Because of hot surfaces the operator always has to be cautious and wear heat-protective gloves, when he removes material in the fuser section.
▼▼▼▼ Clear a jam in the fuser section
1 Turn off the printer.2 Loosen the screw at the left hand side of the machine and open the cover (see
figure 75).
[75] Unscrew the knurled nut to open the cover
3 Lift the green handle (see figure 76).
[76] Lift the green handle
4 Open the fuser unit (see figure 77).

170 Océ TDS400 Digital Multifunctional System User Manual
Caution: If the printer is used, the fuser can be hot.
[77] Open the fuser section
5 Remove the jammed material.
Attention: Be careful! The toner is not fused.
6 Lift the green handle and close the fuser unit.7 Close the left cover and tighten the screw.8 Turn on the printer.
2

171
Océ TDS400Digital Multifunctional System
User Manual
Appendix ASummary and tables

172 Océ TDS400 Digital Multifunctional System User Manual
The Océ TDS400
[78] The Océ TDS400 system
1 Scanner2 Scanner feed table3 Copy delivery tray4 Scanner operating panel5 Printer6 Manual feed7 Printer operating panel8 Monitor9 Cabinet
10 Océ Power Logic® Controller11 Rolls12 Integrated Receiving Tray
1 2 3 4 5 6
8
9
10
1112
7

Summary and tables 173
Printer operator panel
next/select
previous
on-line stop
1
2
3
56
4
1 The graphics display2 The previous button3 The next/select button4 The stop button5 The browse buttons (left ,
right )6 The on-line button

174 Océ TDS400 Digital Multifunctional System User Manual
Scanner operator panel
Alphanumeric display
Browse buttons
Confirmbutton
Strip button
Copy quantity display
Cancel button
+ button
Zoom button
Exposure button
- button
Start button
Media button
Extra buttonOutput button
Input button
+-start cancel
stripexposure
input output extra
set file
zoom
sheet copy
leading
trailing
roll 1
roll 2
manual
media

Summary and tables 175
Product specifications Océ TDS400
The Océ TDS400 is a wide format low to medium volume print and copy system.
PrinterTechnology Electrophotography (LED) with organic photoconductor
(OPC) drum and closed toner systemResolution 600 dpiSpeed 3 linear meters p/min. or approx. 2A0s p/min.Media sources 1 roll version with manual feed
2 roll version with manual feed2 roll version with manual feedExtented integrated stacker for up to 100 prints
Output sizes From A3 to A0 and 36”, a maximum of 15 meters longMedia types Plain, translucent, transparent, recycled, fluorescent and
coloured papers; films and vellumOutput reception Standard Integrated Receiving Tray (IRT)Warm up time None, instant behaviourDimensions 1352 mm (W) x 1250 mm (H) x 899mm (D) including
integrated receiving trayWeight Model with 1 roll 149 kg
Model with 2 rolls 159 kg

176 Océ TDS400 Digital Multifunctional System User Manual
Océ Power Logic® ControllerPlatform Océ Controller with embedded Windows NT®Memory 128 MByte RAM standard, expendable to 256 MByteDisk space High-speed hard disk dedicated to file spooling, and a
high-speed hard disk dedicated to set memory offering 135 A0 storage capacity
File formats HPGL, HPGL2, HPRTL, TIFF 6.0, CALS type 1, NIRS, EDMICS (C4), CalComp 906/907/951, ASCII, Adobe® PostScript® 3™
Interfaces Standard: Ethernet 10/100 Mbits/s with RJ45Optional: Ethernet 10 Mbits/s with BNC and SubD; To-kenRing 4/16 Mbits/s; Centronics
Network protocols TCP/IP, NetBEUI (smb), Novell (IPX, SPX), FTP, LPDCabinet An option to store the controllerUser Interface GUI with a monitor, keyboard and mouse to use the ap-
plications on the controllerAdobe® Postscript® 3™ / PDF
Enables you to print the Postscript® level 3™ files and Portable Document Files (PDF), optional.
Print Exec® LT Web Optional software which allows you to create and send a set of plots or drawing files to an Océ TDS printer. You can send the settings for these jobs from your workstation, using your web browser.
Account logging An optional feature that enables you to track how many jobs you make for a customer. This chapter describes how you use the accounting functionality for this purpose.
Functionality Multiple prints: up to 999Automatic Language Sensing (ALS)Auto roll selection and switchingPlot manipulation: rotation, auto scalingFile spooling on the controllerSet memory: send once, process once, print many; ca-pacity to store up to 135 A0s and create identical sets sorted by page or by setConcurrent receiving / processing / printing of digital jobs

Summary and tables 177
Océ Remote Logic® softwareSoftware Application FunctionalityQueue Manager view status for each job and cancel, hold and restart the en-
tire jobSystem Control Panel application
view status and settings of system components
Settings Editor change system settings
ScannerModel Free-standing consoleTechnology CCD, Océ Image Logic® real-time image processing hard-
wareSpeed 3 linear metres per minute or approximately 2 A0s per
minuteOriginal feed Face down, right aligned
Automatic feed off/on Rewind original to front off/on
Originals A4 to A0 sizes and 36”, up to 15 metres.Maximum thickness 1 mmExposure control Automatic background compensation, manual fine adjust-
ment.Special modes: Lines & Text, Photo, Blueprint
Media selection Manual selection of roll 1 or 2 or manual feed.Reproduction scale Zoom: 25% - 400% (adjustable in 1% programmable fixed
steps)Scan to file zoom: 50% - 200%
Input mode Single sheetSet (sets processing/set collation)
Other operating func-tions
Concurrent scanning and printing
Functionality Multi-copy mode: 1-99 copies (scan once, print many)Pre-programming of next jobProgrammable default settingsStandard cut, synchro cut Scan to file (option)Leading and trailing strip adjustment (remove 400 mm, add 400 mm)
Image editing Image mirroringDimensions 1240 mm (W) x 1105 mm (H) x 615 mm (D)Weight 65 Kg

178 Océ TDS400 Digital Multifunctional System User Manual
Océ Scan Logic®Application Océ Scan Manager, integrated scanning solution, including
Océ View Station LTScan destinations 6 programmable destinations
Scan to controllerScan to network directoryFile Transfer Protocol (FTP)
Resolution 200, 300, 400 dpiData formats Tiff (G3, G4, uncompressed)
CALS type 1PDF
Scan modes Single scan, batch scanning with or without checkprintFile naming Automatically generate unique file names for each scanCheck print To check your scanned fileViewing View scans at point of scanningOcé Image Logic® Optimum scan quality with special original modesEase of use STF from scanner panel, scan directly to destinationRequirements 256 Mb on controller and a graphical user interfaceOptions Océ View Station for editing and enhancement of scanned
documentsOcé Batch Processor for automated editing.
Drivers and application softwareOcé ADI driver For AutoCAD® 12, 13, and 14
Windows 95/98® and NT 4.0®Océ HDI driver For AutoCAD® 2000
Windows 95/98/2000® and NT 4.0®Océ Windows driver Windows 95/98/2000® and NT 4.0®Adobe® PostScript® Level 3™ drivers
For Windows 95/98/2000®, NT 4.0® and Macintosh®
Océ Print Exec® Light Web
Job submission software for Windows 95/98® and NT 4.0®
Note: Check Océ on the internet at www.oce.com for the latest drivers.
Finishing: copy delivery trayModel Wheeled delivery tray with blower unitCapacity Up to 150 sheets (media type dependent) from A3 to A0Types of media Plain paper, transparent paper, film, vellum, polyester and
translucentDimensions 1170 mm (W) x 1090 mm (H) x 1440 mm (D) with tray ful-
ly extendedWeight 35,5 kg

Summary and tables 179
Compact output stackerModel The transport unit that delivers copies and prints on the
front-side of the printer.Capacity Up to 100 sheets depending on the material.
Dew PreventerModel An optional heater to prevent dampness in media
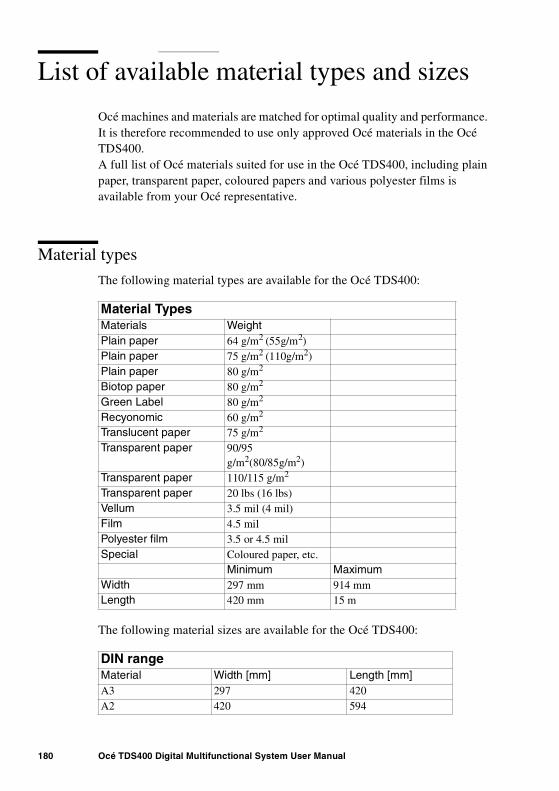
180 Océ TDS400 Digital Multifunctional System User Manual
List of available material types and sizes
Océ machines and materials are matched for optimal quality and performance. It is therefore recommended to use only approved Océ materials in the Océ TDS400.A full list of Océ materials suited for use in the Océ TDS400, including plain paper, transparent paper, coloured papers and various polyester films is available from your Océ representative.
Material types
The following material types are available for the Océ TDS400:
The following material sizes are available for the Océ TDS400:
Material TypesMaterials WeightPlain paper 64 g/m2 (55g/m2) Plain paper 75 g/m2 (110g/m2)Plain paper 80 g/m2
Biotop paper 80 g/m2
Green Label 80 g/m2
Recyonomic 60 g/m2
Translucent paper 75 g/m2
Transparent paper 90/95 g/m2(80/85g/m2)
Transparent paper 110/115 g/m2
Transparent paper 20 lbs (16 lbs)Vellum 3.5 mil (4 mil)Film 4.5 milPolyester film 3.5 or 4.5 milSpecial Coloured paper, etc.
Minimum MaximumWidth 297 mm 914 mmLength 420 mm 15 m
DIN rangeMaterial Width [mm] Length [mm]A3 297 420A2 420 594

Summary and tables 181
500
Attention: Avoid storing paper in rooms where temperature and humidity are high. Also, avoid dust and direct sunlight. Wrap unused paper in plastic to prevent it absorbing moisture.
A1 594 841A0 841 1189
8,5 inch rangeMaterial Width [inch] Length [inch]11 inch / B 11 1717 inch / C 17 2222 inch / D 22 3434 inch / E 34 44
9 inch rangeMaterial Width [inch] Length [inch]12 inch / B+ 12 1818 inch / C+ 18 2424 inch / D+ 24 3636 inch / E+ 36 48
Other formatsMaterial Width Length30 inch 30 inch 12 inchB1 carto 700 mm 1000 mmB1 (DIN) 707 mm 1000 mmB2 carto 500 mm 700 mmB2 (DIN) 500 mm 707 mm
DIN range

182 Océ TDS400 Digital Multifunctional System User Manual
Automatic format selectionThe Océ TDS400 controller switches to the next larger format. For example you set the 8,5 inch range on the printer. The job you print is an A1 format. The printer will automatically select the 30 inch format. The next table shows which format the Océ TDS400 controller chooses if you print a specific format on a chosen range
.
Automatic format selectionPaper seriesDIN DIN carto 8,5 inch Mixed 8,5 and 9,5 inch
DIN rangeA3 X XA2 X XA1 X XA0 X X8,5 inch range11 inch / B X X17 inch / C X X22 inch / D X X34 inch / E X X9 inch range12 inch / B+ X18 inch / C+ X24 inch / D+ X X36 inch / E+ X X X XOther formats30 inch X XB1 carto XB1 (DIN) XB2 carto XB2 (DIN) X
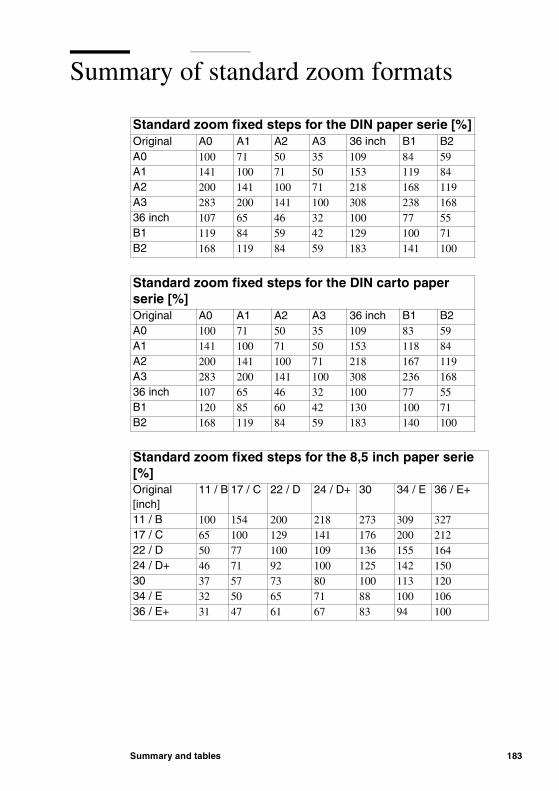
Summary and tables 183
Summary of standard zoom formats
Standard zoom fixed steps for the DIN paper serie [%]Original A0 A1 A2 A3 36 inch B1 B2A0 100 71 50 35 109 84 59A1 141 100 71 50 153 119 84A2 200 141 100 71 218 168 119A3 283 200 141 100 308 238 16836 inch 107 65 46 32 100 77 55B1 119 84 59 42 129 100 71B2 168 119 84 59 183 141 100
Standard zoom fixed steps for the DIN carto paper serie [%]Original A0 A1 A2 A3 36 inch B1 B2A0 100 71 50 35 109 83 59A1 141 100 71 50 153 118 84A2 200 141 100 71 218 167 119A3 283 200 141 100 308 236 16836 inch 107 65 46 32 100 77 55B1 120 85 60 42 130 100 71B2 168 119 84 59 183 140 100
Standard zoom fixed steps for the 8,5 inch paper serie [%]Original [inch]
11 / B 17 / C 22 / D 24 / D+ 30 34 / E 36 / E+
11 / B 100 154 200 218 273 309 32717 / C 65 100 129 141 176 200 21222 / D 50 77 100 109 136 155 16424 / D+ 46 71 92 100 125 142 15030 37 57 73 80 100 113 12034 / E 32 50 65 71 88 100 10636 / E+ 31 47 61 67 83 94 100

184 Océ TDS400 Digital Multifunctional System User Manual
Standard zoom fixed steps for the 8,5 & 9 inch mixed paper serie [%]Original [inch]
11 / B 12 / B+
17 / C
18 / C+
22 / D
24 / D+
30 34 / E
36 / E+
11 / B 100 109 154 164 200 218 273 309 32712 / B+ 92 100 142 150 183 200 250 283 30017 / C 65 71 100 106 129 141 176 200 21218 / C+ 61 67 94 100 122 133 167 189 20022 / D 50 55 77 82 100 109 136 155 16424 / D+ 46 50 71 75 92 100 125 142 15030 37 40 57 60 73 80 100 113 12034 / E 32 35 50 53 65 71 88 100 10636 / E+ 31 33 47 50 61 67 83 94 100

185
Océ TDS400Digital Multifunctional System
User Manual
Appendix BSafety information

186 Océ TDS400 Digital Multifunctional System User Manual
Instructions for safe use
Océ designed products have been tested in accordance with the strictest international safety standards. To help assure safe working with these products it is important that you observe the following safety rules:
Maintenance
■ Do not remove any screws from fixed panels.■ Do not carry out maintenance activities except for the parts and maintenance
materials mentioned in this manual.■ Do not place any liquids on the machine.■ Use maintenance materials or other materials for their original purpose only.
Keep maintenance materials away from children.■ Do not mix cleaning fluids or other substances.■ To avoid the risk of introducing hazards, all modifications to Océ equipment
are strictly reserved to properly qualified and trained service technicians.
Connection
■ If for some reason you have to move the machine yourself, please make sure that the mains power point has the right fuse capacity. See the Océ TDS400 safety data sheet in this appendix for information about maximum current.
■ Do not bridge any mechanical or electrical circuit breakers.■ Do not use an extension lead to connect the machine.■ This equipment has not been designed for connection to an IT power system.
(An IT power system is a voltage network in which the neutral wire is not connected to earth).
■ For equipment connected via a wall socket: locate the machine close to a wall socket that is easily accessible.
■ For equipment connected via a fixed connection to the electricity grid: the disconnect device in the fixed connection should be easily accessible.

Safety information 187
Surroundings
■ Do not block the ventilation openings of the machine.■ Ensure that the machine is placed on a level, horizontal surface of sufficient
strength. See the Océ TDS400 safety data sheet in this appendix for information about the weight of the equipment.
■ Ensure there is sufficient space around the machine. This facilitates reloading materials as well as maintenance.
■ Do not place the machine in rooms which are subject to excessive vibration.■ Do not place the machine in rooms which are too small and insufficiently
ventilated. See the Océ TDS400 safety data sheet in this appendix for information about space and ventilation requirements.
General
■ Always use materials recommended by Océ and developed for this Océ machine. Materials not approved by Océ may result in faults in your machine.
■ Do not use the machine when it is emitting unusual sounds. Remove the plug from the power socket or switch off the fixed connection to the electricity grid and contact Customer Service.

188 Océ TDS400 Digital Multifunctional System User Manual
Safety data sheets
The disclaimer below is valid for all safety data sheets in this manual. For questions about Océ products regarding health, safety and environment, please contact your Océ organisation; you can find the address in the last appendix of this manual.
Disclaimer The safety data sheets in this manual have been compiled to the best of our knowledge as a compact guide to safe handling of this product. We reserve the right to revise safety data sheets as new information becomes available. It is the user’s responsibility to determine the suitability of this information for the adoption of safety precautions as may be necessary and to contact the company to make sure that the sheet is the latest one issued. If and in so far as limitation of liability is permitted under the applicable laws, we do not accept liability for any inaccuracy that may occur in this information.

Safety information 189
Safety data sheet Océ TDS400 printer
The content of this safety data sheet is subject to the disclaimer of liability on page 188 of this manual.
PRODUCT SAFETY DATA SHEET
Océ-(UK), Ltd
Number E-717-a-UKDate August 2000
Copyright © 2000 Océ-Technologies B.V., Venlo, NL
Model Océ TDS400 printer
Description Electrophotographic printer, instant printing, console model, plain paper, organic photoconductive drum, powder toner
Max. process speed 3 m/min
DimensionsWidth
Engine Controller1 roll 2 roll
1352 mm 1352 mm 206 mmDepth 899 mm 899 mm 437 mmHeight 1251 mm 1251 mm 444 mm
Weight 175 kg 185 kg 15 kg
Voltage 100/115/230 V 100/115/230 V 100/230 VFrequency 50/60 Hz 50/60 Hz 50-60 HzCurrent-rated 15/15/7,5 A 15/15/7,5 A 0,9 ACurrent-max 20/20/10 A 20/20/20/10 A 6/3 APower consumption, stand by 30 W Power consumption, operation 1,5 kW 4 0 WEPA ENERGY STAR ®* Power consumption sleep mode 42 W (total system)Mains connection Cable with plugSafety class I (IEC 536) Protective earth connectionProtection class IP 20 (IEC 529)
Sound pressure level(at bystander position)
Standby In operation24 dB(A) main body 54 dB(A)
impulse Li = 4 dB(A)Sound power level 40 dB(A) main body 62 dB(A)Radio interference Complies with Directive 89/336/EEC and FCC rules and regulations, part 15 Class A.Radiation Below the Threshold Limit Values for UV, Visible and IR radiation (TLV list of ACGIH).Heat emission Standby 70 W; at continuous operation 1,5 kWOzone emission 0,04 mg/min at continuous operation
Room volume Recommendation: min. 25 m3
Room ventilation Recommendation: min. 12,5 m3/h (natural ventilation)Use simulation at random operation
With a room volume and ventilation as recommended and a daily volume of 150 m (much more than average) the use simulation at random operation gives the following ozone concentrations:- Time weighted average 0,01 mg/m3 (0,005 ppm)- Peak 0,002 mg/m3 (0,001 ppm)Threshold Limit Value/Occupational Exposure Limit(Time Weighted Average) for ozone 0,2 mg/m3 (0,1 ppm)Odour Perception Limit for ozone 0,04 mg/m3 (0,02 ppm)
Consumables Océ OPC Drum (Océ Safety Data Sheet E-218)Océ B5 Toner (Océ Safety Data Sheet E-199)Océ D5 Developer (Océ Safety Data Sheet E-200)Océ Copying Materials.This apparatus is suitable for processing recycling paper which complies with the requirements of ENV 12281.
Additional safety information The ozone filter does not have to be replaced to keep the ozone concentration in the workplace below 0,04 mg/m3 (i.e. the life of the filter equals that of the apparatus).
CE-Compliance Approved according to Approved according to EPA ENERGY STAR ®Low Voltage Directive EMC Directive
73/23/EEC 89/336/EEC

190 Océ TDS400 Digital Multifunctional System User Manual
Safety data sheet Océ TDS400 printer and scanner
The content of this safety data sheet is subject to the disclaimer of liability on page 188 of this manual.
PRODUCT SAFETY DATA SHEET
Océ-(UK), Ltd
Number E-718-a-UKDate August 2000
Copyright © 2000 Océ-Technologies B.V., Venlo, NL
Model Océ TDS400
Description Multifunction device, instant copying/printing, consisting of an electrophotographic printer, console model, plain paper, organic photoconductive drum, powder toner and a free standing scanner.
Max. process speed 3 m/min
Dimensions WidthEngine Scanner Controller Monitor (17”)
1352 mm 1240 mm 206 mm 299 mmDepth 899 mm 615 mm 437 mm 410 mmHeight 1251 mm 1105 mm 444 mm 409 mm
Weight 175 kg 65 kg 15 kg 15 kg 10 kg (extra roll)
Voltage 100/115/230 V 100/115/230 V 100/230 V 100-230 VFrequency 50/60 Hz 50-60 Hz 50-60 Hz 50-60 HzCurrent-rated 15/15/7,5 A 1,1/1,1/0,7 A 0,9 ACurrent-max 20/20/10 A 1,6/1,6/0,8 A 6/3 A 1,4 APower consumption, stand by 30 W 27 WPower consumption, operation 1,5 kW 1 40 W 40 W 70 WEPA ENERGY STAR ®* Power consumption sleep mode 52 W (total system)Mains connection Cables with plugSafety class I (IEC 536) Protective earth connectionProtection class IP 20 (IEC 529)
Sound pressure level(at bystander position)
Standby In operation24 dB(A) main body 54 dB(A)
impulse Li = 4 dB(A)Sound power level 41 dB(A) main body 63 dB(A)Radio interference Complies with Directive 89/336/EEC and FCC rules and regulations, part 15 Class A.Radiation Below the Threshold Limit Values for UV, Visible and IR radiation (TLV list of ACGIH)Heat emission Standby 182 W; at continuous operation 1,8 kWOzone emission 0,04 mg/min at continuous operation
Room volume Recommendation: min. 25 m3
Room ventilation Recommendation: min.12,5 m3/h (natural ventilation)Use simulation at random operation
With a room volume and ventilation as recommended and a daily volume of 150 m (much more than average) the use simulation at random operation gives the following ozone concentrations:- Time weighted average 0,01 mg/m3 (0,005 ppm)- Peak 0,002 mg/m3 (0,001 ppm)Threshold Limit Value/Occupational Exposure Limit(Time Weighted Average) for ozone 0,2 mg/m3 (0,1 ppm)Odour Perception Limit for ozone 0,04 mg/m3 (0,02 ppm)
Consumables Océ OPC Drum (Océ Safety Data Sheet E-218)Océ B5 Toner (Océ Safety Data Sheet E-199)Océ D5 Developer (Océ Safety Data Sheet E-200)Océ Copying Materials.This apparatus is suitable for processing recycling paper which complies with the requirements of ENV 12281.
Additional safety information The ozone filter does not have to be replaced to keep the ozone concentration in the workplace below 0,04 mg/m3 (i.e. the life of the filter equals that of the apparatus).
CE-Compliance Approved according to Approved according to EPA ENERGY STAR ®Low Voltage Directive EMC Directive
73/23/EEC 89/336/EEC

Safety information 191
Safety data sheet Océ B5 toner
continued on the next page
MATERIAL SAFETY DATA SHEET Number E-199-a-UK(93/112/EEC and ISO 11014-1) Date October 1997
Page 1 of 2Océ B5 Toner
1. Product and company identification
Product name Oc B5 TonerPacking Polyethylene bottle, contents 0,45 kg/1.1 lb
Company Oc (UK) Ltd.Address Langston Road, Loughton, Essex IG10 3SLTelephone 0181-508 5544 (contact product safety coordinator)Telefax 0181-508 6689
2. Composition / information on ingredients
3. Hazards identification
In a toner dust cloud the formation of an explosive dust-air mixture is possible.Toner dust may cause discomfort for the eyes and respiratory tract, in the same manner as inert nuisance dust.To our knowledge, with due observance of the recommended exposure limit and of normal hygiene this product presents no health hazardin normal use.
4. First aid measures
Eyes contact Rinse with plenty of water.Skin contact Wash with cold water and soap.Inhalation Clean nose, mouth, throat. Cough up. Fresh air.Ingestion Rinse mouth with water. If large quantity swallowed seek medical advice.
For any medical advice take along this material safety data sheet.
5. Fire fighting measures
Extinguishing media Dry chemical, carbon dioxide, water spray (fog), foamSpecial fire fighting precautions N.A.Hazardous products of decomposition N.A.
6. Accidental release measures
Spills can be cleaned with a vacuum cleaner or a damp rag. Do not use warm water, because this makes the powder soft and sticky.
7. Handling and storage
Keep bottle tightly closed to prevent dust formation. Handle carefully. Avoid breathing dust.No special technical measures for storage.
8. Exposure controls / personal protection
No special technical measures. No personal protective equipment needed.Industrial hygiene: after skin contact wash with cold water and soap.Threshold Limit Value for:
* nuisance dust 10 mg/m3
* carbon black 3,5 mg/m3
* amorphous silica 10 mg/m3
Ingredients CAS No. ClassiÞcation Weight %
Poly ester resin 170831-75-1 25-50Phenoxy resin PMN P-95-461 25-50Iron o xide 1317-61-9 10-25Carbon b lack 1333-86-4 1-5Amor phous Silica 68611-44-9 <1Pigment <1

192 Océ TDS400 Digital Multifunctional System User Manual
The content of this safety data sheet is subject to the disclaimer on page 188 of this manual.
MATERIAL SAFETY DATA SHEET Number E-199-a-UK(93/112/EEC and ISO 11014-1) Date October 1997
Page 2 of 2Océ B5 Toner
9. Physical and chemical properties
Explosion limits (dust explosion) LEL 60 g/m3. UEL U (= unknown) Flash point (oC) N.A. (=Not Applicable)Appearance and odour Black powder, faint odour Ignition temperature (oC) U.Boiling point (oC) N.A Bulk density (kg/m3) Approx. 1400Vapour density (air = 1) N.A. Softening point (oC) Approx. 50Solubility in water Insoluble Evaporation rate (butyl acetate = 1) N.A.Vapour pressure N.A. % Volatile 0Other characteristics N.A. pH (solution) N.A.
10. Stability and reactivity
Thermal decomposition Above approx. 450 oCHazardous decomposition products None at intended useHazardous reaction None at intended use
11. Toxicological information
12. Ecological information
This product is not biodegradable.The ing redients are not classified as ecologically hazardous. No adverse environmental effects are expected.
13. Disposal considerations
Pack waste dustproof to prevent dusting. With due observance of local laws and regulations, dispose of by burial in a sanitary landfill orincineration. Do not throw in open fire, in order to prevent the risk of a dust explosion.
14. Transport information
This product is not classified as a dangerous substance according to the international transport regulations.
15. Regulatory informationThis product is not classified as a dangerous preparation according to the European Directives 67/548/EEC and 88/379/EEC for theclassification, packaging and labelling of dangerous substances and preparations.Therefore, indications of special risks or safety advice on the packing are not prescribed for this product.
16. Other information
Use: ink powder for printers.Room ventilation: see operator manual or safety data sheet for the machine.
Copyright © 1997 Océ-Technologies B.V. Venlo, NL
Inhalation * At high concentr ation in air the po wder ma y cause discomf or t of upper respir ator y system.Skin * No adv erse health eff ects are e xpected.Eyes * Dust ma y cause discomf or t in the same manner as n uisance dust.Ingestion * Considered relativ ely har mless .Mutagenicity No mutagenicity detected in Ames test of similar toners .
* These statements are based on to xicological liter ature on the ing redients of this product and test results of similarproducts .

Safety information 193
Safety data sheet Océ D5 Developer
continued on the next page
MATERIAL SAFETY DATA SHEET Number E-200-a-UK(93/112/EEC and ISO 11014-1) Date October 1997
Page 1 of 2Océ D5 Developer
1. Product and company identification
Product name Océ D5 DeveloperPacking Polyethylene bottle, contents 1,75 kg/3.86 lb
Company Océ (UK) Ltd.Address Langston Road, Loughton, Essex IG10 3SLTelephone 0181-508 5544 (contact product safety coordinator)Telefax 0181-508 6689
2. Composition / information on ingredients
3. Hazards identification
In a developer dust cloud the formation of an explosive dust-air mixture is possible.Developer dust may cause discomfort for the eyes and respiratory tract, in the same manner as inert nuisance dust.To our knowledge, with due observance of the recommended exposure limit and of normal hygiene this product presents no health hazardin normal use.
4. First aid measures
Eyes contact Rinse with plenty of water.Skin contact Wash with cold water and soap.Inhalation Clean nose, mouth, throat. Cough up. Fresh air.Ingestion Rinse mouth with water. If large quantity swallowed seek medical advice.
For any medical advice take along this material safety data sheet.
5. Fire fighting measures
Extinguishing media Dry chemical, carbon dioxide, water spray (fog), foamSpecial fire fighting precautions N.A.Hazardous products of decomposition N.A.
6. Accidental release measures
Spills can be cleaned with a vacuum cleaner or a damp rag. Do not use warm water, because this makes the powder soft and sticky.
7. Handling and storage
Keep bottle tightly closed to prevent dust formation. Handle carefully. Avoid breathing dust.No special technical measures for storage.
8. Exposure controls / personal protection
No special technical measures. No personal protective equipment needed.Industrial hygiene: after skin contact wash with cold water and soap.Threshold Limit Value for:
* nuisance dust 10 mg/m3
* carbon black 3,5 mg/m3
* amorphous silica 10 mg/m3
Ingredients CAS No. ClassiÞcation Weight %
Iron oxide 1317-61-9 50-100Polyester resin 170831-75-1 1-5Phenoxy resin PMN P-95-461 1-5Carbon black 1333-86-4 < 1Amorphous Silica 68611-44-9 < 1Pigments < 1

194 Océ TDS400 Digital Multifunctional System User Manual
The content of this safety data sheet is subject to the disclaimer on page 188 of this manual.
MATERIAL SAFETY DATA SHEET Number E-200-a-UK(93/112/EEC and ISO 11014-1) Date October 1997
Page 2 of 2Océ D5 Developer
9. Physical and chemical properties
Explosion limits (dust explosion) LEL(= unknown)UEL U Flash point (oC) N.A. (=Not Applicable)Appearance and odour Black powder, faint odour Ignition temperature (oC) UBoiling point (oC) N.A Bulk density (kg/m3) Approx. 2500Vapour density (air = 1) N.A. Softening point (oC) Approx. 50Solubility in water Insoluble Evaporation rate (butyl acetate = 1) N.A.Vapour pressure N.A. % Volatile 0Other characteristics N.A. pH (solution) N.A.
10. Stability and reactivity
Thermal decomposition Above approx. 450 oCHazardous decomposition products None at intended useHazardous reaction None at intended use
11. Toxicological information
12. Ecological information
This product is not biodegradable.The ingredients are not classified as ecologically hazardous. No adverse environmental effects are expected.
13. Disposal considerations
Pack waste dustproof to prevent dusting. With due observance of local laws and regulations, dispose of by burial in a sanitary landfill orincineration. Do not throw in open fire, in order to prevent the risk of a dust explosion.
14. Transport information
This product is not classified as a dangerous substance according to the international transport regulations.
15. Regulatory information
This product is not classified as a dangerous preparation according to the European Directives 67/548/EEC and 88/379/EEC for theclassification, packaging and labelling of dangerous substances and preparations.Therefore, indications of special risks or safety advice on the packing are not prescribed for this product.
16. Other information
Use: ink powder for printers.Room ventilation: see operator manual or safety data sheet for the machine.
Copyright © 1997 Océ-Technologies B.V. Venlo, NL
Inhalation * At high concentration in air the powder may cause discomfort of upper respiratory system.Skin * No adverse health effectsare expected.Eyes * Dust may cause discomfort in the same manner as nuisance dust.Ingestion * Considered relatively harmless.Mutagenicity No mutagenicity dectected in Ames-test of similar products.
* These statements are based on toxicological literature on the ingredients of this product and test results of similarproducts.

Safety information 195
Safety data sheet Océ OPC drum
continued on the next page
MATERIAL SAFETY DATA SHEET Number E-218-a-UK(93/112/EEC and ISO 11014-1) Date April 1998
Page 1 of 2
Océ OPC Drum Part No. 2912571, Océ ES102 OPC Part No. 70690081. Product and company identification
Product name Océ OPC Drum Part No. 2912571, Océ ES102 OPC Part No. 7069008 OPC for Océ 705x, 707x, 9400 and 9600
Packing Cardboard box
Company Océ (UK) Ltd.Address Langston Road, Loughton, Essex IG10 3SLTelephone 0181-508 5544 (contact product safety coordinator)Telefax 0181-508 6689
2. Composition / information on ingredients
3. Hazards identification
To our knowledge this product presents no health hazard in normal use.
4. First aid measures
Eyes contact Not Applicable(=N.A.)Skin contact N.A.Inhalation N.A.Ingestion N.A.
For any medical advice take along this material safety data sheet.
5. Fire fighting measures
Extinguishing media Dry chemical, carbon dioxide, water spray (fog), foamSpecial fire fighting precautions N.A.Hazardous combustion products Carbon monoxide, carbon dioxide.
6. Accidental release measures
N.A.
7. Handling and storage
No special technical measures for storage.
8. Exposure controls / personal protection
No special technical measures. No personal protective equipment needed.No special work hygiene practices needed.
Ingredients CAS No. ClassiÞcation Weight %
Aluminium 7429-90-5 >99Resins < 1Pigments < 1

196 Océ TDS400 Digital Multifunctional System User Manual
The content of this safety data sheet is subject to the disclaimer on page 188 of this manual.
MATERIAL SAFETY DATA SHEET Number E-218-a-UK(93/112/EEC and ISO 11014-1) Date April 1998
Page 2 of 2
Océ OPC Drum Part No. 2912571, Océ ES102 OPC Part No. 70690089. Physical and chemical properties
Explosion limits (dust explosion) LEL N.A. UEL N.A. Flash point (oC) N.A.Appearance and odour brown coloured aluminium cylinder Ignition temperature (oC) N.ABoiling point (oC) N.A Density (g/cm3) 2,7Vapour density (air = 1) N.A. Melting point (oC) N.A.Solubility in water Insoluble Evaporation rate (butyl acetate =1) N.A.Vapour pressure N.A. % Volatile 0Other characteristics N.A. pH (solution) N.A.
10. Stability and reactivity
Thermal decomposition None at intended useHazardous decomposition products None at intended useHazardous reaction None at intended use
11. Toxicological information
12. Ecological information
This product is not biodegradable.The ingredients are not classiÞed as ecologically hazardous. No adverse environmental effects are expected.
13. Disposal considerations
The drum will be returned to Oc for re-use.
14. Transport information
This product is not classified as a dangerous substance according to the international transport regulations.
15. Regulatory information
This product is an article and contains no dangerous substances. Therefore, indications of special risks or safety advice on the packing arenot prescribed for this product.
16. Other information
Copyright © 1998 Océ-Technologies B.V. Venlo, NL
Use: photoconductor for printers and copiers.
Inhalation N.A.Skin No adverse health effects are expected. (Based on toxicological literature on the ingredients of this product)Eyes N.A.Ingestion N.A.Mutagenicity No mutagenicity detected in Ames test. None of the ingredients is listed as mutagenic or carcinogenic.

Safety information 197
Safety data sheet Océ Cleaner A
continued on the next page

198 Océ TDS400 Digital Multifunctional System User Manual
©1991 Océ-Technologies B.V.The content of this safety data sheet is subject to the disclaimer on page 188 of this manual.

Safety information 199
EPA ENERGY STAR®
Océ-Technologies B.V. has joined the ENERGY STAR® Program of the United States Environmental Protection Agency (EPA). The purpose of the ENERGY STAR® Program is to promote the manufacturing and marketing of energy-efficient equipment, thereby potentially reducing combustion-related pollution. Using the energy management features outlined below prevents unnecessary power consumption, which helps to prevent air pollution from electricity generating plants and saves money on your utility bills.
As an ENERGY STAR® Partner, Océ-Technologies B.V. has determined that this copier model meets the ENERGY STAR® guidelines for energy efficiency.
The EPA ENERGY STAR® Criteria for copiers involve the following features:
low power mode In the low power mode, the power consumption of certain functions is automatically reduced to save energy. The printer enters the low power mode 30 minutes after the last copy is made1. This default time can be adjusted by the key operator to between 5 and 120 minutes. The scanner enters the low power mode 10 minutes after the last copy is made1. This default time can be adjusted by the key operator to between 5 and 120 minutes. The low power mode recovery time is less than 1 seconds, after which copying can be resumed.
recycled copier paper The use of recycled paper also benefits the environment. This copier is designed to use recycled paper. Product literature on recommended types of recycled copier paper can be obtained from your local Océ company or Océ Headquarters (Océ-Technologies B.V.) in Venlo, the Netherlands.
1For power consumption data: see Product Safety Data Sheet in this appendix.
ENERGY STAR® is a U.S. registered mark.

200 Océ TDS400 Digital Multifunctional System User Manual

201
Océ TDS400Digital Multifunctional System
User Manual
Appendix CMiscellaneous

202 Océ TDS400 Digital Multifunctional System User Manual
Notation conventions
There are a number of notation conventions used in this manual. This consistent style enables you to quickly become conversant with the use of this manual and consequently the Océ TDS400.
Description Each section or subsection contains a description of the feature or operation identified in the title. It might also include possible applications, as well as any guidelines that you should bear in mind.
Procedures A description is followed by a procedure. A procedure always begins with a phrase which briefly describes the procedure, followed by a series of numbered steps that take you, step by step, through all phases of performing the operation.
Figures and tables Figures and tables are titled and numbered in a sequential way throughout this manual. Figures include pictures of product components, screendumps, examples, and diagrams of concepts discussed in the description.
Attention getters There are several types of information to which we draw your attention. This information is classified as follows:
Note: In a ‘Note’, information is given about matters which ensure the proper functioning of the machine or application, but useful advice concerning its operation may also be given.
Attention: The information that follows ‘Attention’ is given to prevent something (your copy or original, the copier or printer, data files etc.) being damaged.
Caution: The information that follows ‘Caution’ is given to prevent you suffering personal injury.

Miscellaneous 203
Reader’s comment sheet
Have you found this manual to be accurate?❏ Yes❏ No
Could you operate the product after reading this manual?❏ Yes❏ No
Does this manual provide enough background information?❏ Yes❏ No
Is the format of this manual convenient in size, readability and arrangement (page layout, chapter order, etc.)?❏ Yes❏ No
Could you find the information you were looking for?❏ Always❏ Most of the times❏ Sometimes❏ Not at all
What did you use to find the required information?❏ Table of contents❏ Index
Are you satisfied with this manual?❏ Yes❏ No
Thank you for evaluating this manual. If you have other comments or concerns, please explain or suggest improvements overleaf or on a separate sheet.

204 Océ TDS400 Digital Multifunctional System User Manual
Comments:
--------------------------------------------------------------------------------------------
--------------------------------------------------------------------------------------------
--------------------------------------------------------------------------------------------
--------------------------------------------------------------------------------------------
--------------------------------------------------------------------------------------------
--------------------------------------------------------------------------------------------Date:
This reader’s comment sheet is completed by: (If you prefer to remain unknown, please do fill in your occupation)
Name:
Occupation:
Company:
Phone:
Address:
City:
Country:
Please return this sheet to:
Océ-Technologies B.V.For the attention of ITC User Documentation.P.O. Box 101,5900 MA VenloThe Netherlands
Send you comments by E-mail to: [email protected]
For the addresses of local Océ organizations see: www.oce.com

Miscellaneous 205
Addresses of local Océ organisations
Océ-Australia Ltd.P.O.Box 363Ferntree Gully MDC VIC 3165Australia
Océ-Österreich GmbHPostfach 951233 ViennaAustria
Océ-Belgium N.V./S.A.Avenue J.Bordetlaan 321140 Brussels Belgium
Océ-Brasil Comércio e Industria Ltda.Caixa Postal 318701060-970 Sao Paulo, SPBrazil
Océ-Canada Inc.4711 Yonge Street, Suite 1100Toronto, Ontario M2N 6K8Canada
Océ Office Equipment (Beijing) Co Ltd.Xu Mu ChengChaoyang DistrictBeijing 100028China
Océ-Èeská republika s.r.o.Hanusova 1814021 Praha 4Pankrác,Czech Republic
Océ-Danmark A.S.Kornmarksvej 6DK 2605 BrøndbyDenmark
Océ-France S.A.32, Avenue du Pavé Neuf,93161 Noisy-le-grand, CedexFrance
Océ-Deutschland GmbHPostfach 1014544330 Mülheim an der Ruhr (13)Deutschland
Océ (Hong Kong China) Ltd.12/F 1202 The Lee Gardens33 Hysan Avenue, Causeway BayHong Kong
Océ-Hungária Kft.P.O.B. 2371241 BudapestHungary
Océ-Italia S.p.A.Strada Padana Superiore 2/B20063 Cernusco sul Naviglio (MI)Italia
Océ Systems (Malaysia Sdn. Bhd.)#3.01, Level 3, Wisma AcademyLot 4A, Jalan 19/146300 Petalig JayaMalaysia

206 Océ TDS400 User Manual
Océ-Nederland B.V.P.O.Box 8005201 AV ‘s-HertogenboschThe Netherlands
Océ Norge A/SPostboks 53, Grefsen0409 Oslo 4Norway
Océ-Poland Ltd.ul. £opuszañska 5302-232 WarszawaPoland
Océ-Lima Mayer S.A.Av. José Gomes Ferreira, 11Ed. Atlas II Miraflores1495 AlgésPortugal
Océ (Far East) Pte. Ltd./Océ (Singapore) Pte. Ltd.,#03-00 Wisma Gulab190 MacPherson RoadSingapore 348548
Océ España SABusiness Park MAS BLAUC/Osona 2, 2-3a Planta08820 El Prat del Llobregat (Barcelona)Spain
Océ-Svenska ABP.O.box 1231S-164 28 KistaSweden
Océ-Schweiz AGSägereistrasse 29CH8152 GlattbruggSwitzerland
Océ (Taiwan) Ltd.No. 99-24 Nan Kang Road Sec.2Taipeh, TaiwanTaiwan, RO
Océ (Thailand) Ltd.16th Floor, B.B. Building54 Asoke Road, Sukhumvit 21Bangkok 10110Thailand
Océ-U.K.Ltd.Langston RoadLoughton, Essex IG10 3SLUnited Kingdom
Océ-USA Inc.5450 North Cumberland Av.Chicago, Ill. 60656U.S.A.

Index 207
Index
Aaccess 98account logging
copy, print, or scan jobs 139edit account id and user id on the scanner panel
139account logging option 138add a controller 132add toner 159
replace waste toner bag 159alphanumeric display 23applications 120apply 95auto-feed 67automatic format selection 182automatic login 129automatic login 129automatically view a scanned file 81available material types and sizes 11, 180
Bbuttons 24
selection buttons 24stop 24
Ccancel button 59cleaner a 162clear media jam
roll feed section 168clear media jam
fuser section 169roll feed section 168
clear set memory 37command line parameters 130compression 70configuration report 31
connect to a controller 132connecting 132connecting workstations 83, 142controller
shut down 91start up 91
copy processstart 50
cut media 30
Ddelete a scanned file 80deleting print jobs 117demo print 32destination 68
delete 78lock 77unlock 78
destination properties 79diagnostic mode 37display (printer)
error messages 39status messages 38
display language 129drivers 178
Eedit account id and user id on the scanner pane 139
energy star 199
Ffile extension 78file type 68ftp 82, 140ftp in a internet browser 140
Ggeneral control buttons 97

208 Océ TDS400 Digital Multifunctional System User Manual
get files 83, 142
Hhelp 130how to use the remote system 132
Iimport the account log file 142input button 45install remote logic 121ip address. 33
Jjapan support 16, 77
Kkey operator settings 92
Llanguage 129load media 152log file 138log in 128log in 128log out 128log out 128log record 144
Mmaintenance
glass platen 162reference roller 162
make a scanhow to 67
managing print jobs 117manual feed 13, 57material
types 180material properties 158menu bar 94menu level indicator 23, 47moving a job to top 118
Nnetwork settings 33
default gateway 33ip address 33subnetmask 33
networksettingsdhcp server 33
Oocé queue manager 112océ remote logic“ 119
user modes 127océ tds400 applications
queue manager 15scan manager 73system control panel 14
océ tds400 system 12on/off switch printer 25, 49on/off switch scanner 49optional
automatic 2-roll unit 15compact output stacker 15graphical user interface 16scan to file 16
organization 70original guide line 50original jam 167output button 45
Ppaper series 35
8.5 inch 36

Index 209
din 35din carto 35mix 8.5/9 inch 36
password 37, 129power logic controller 14pre-cut copy material 57print
configuration report 31demo print 32menu card printer 31
print a scanned file 79print exec lt web 133print exec lt web
add new jobs 135print queue 117printer 13printer buttons 24printer menu 31printer settings
selecting language 33set a special media indication 27stopping print job 33
problems 166product specifications 175
compact output stacker 179drivers and application software 178finishing copy delivery tray 178power logic controller 176printer 175remote logic software 177scan logic 178
program media settings 158properties of a scanned file 80
Qqueue manager
active print job window 112deleting print jobs 117functions 112introduction 15, 112menu bar 112modes 114moving a job to top 118pausing print jobs 117possibilities 112print queue window 113
restarting paused print job 118restarting paused print jobs 118structure 112viewing the print queue 117window 114
queue manager window 107
Rrecord 144refill toner 159release paper 67remote logic
languages 129repro operator settings 17, 92resolution 68, 69restarting a paused print job 118retrieve scanned files 82retrieve the account files 140rewind original 67
Ssafety data sheets
océ b5 toner 191océ cleaner a 197océ d4 developper 193océ opc drum 195océ tds400 printer 189océ tds400 printer and scanner 190
safety data sheets 188safety information 186scan logic 65scan manager
create destination 76scan to file
password 66settings 68
scanner 13scanner display 46scanner feed table 50scanner operating panel
buttons 45select language 33selection buttons 24

210 Océ TDS400 Digital Multifunctional System User Manual
setdefault gateway 35ip address 34language 33media type 28media width 28paper series 36subnetmask 34time-out manual feed 29use dhcp server 34
set default gateway 33set media type and size 27set memory 37set the accounting for a copy or scan job 139setting dependencies 92settings area 96settings editor 14standard cut 48standard zoom formats 183status bar 97stop a copy job 59stop button 24subnetmask 33switching off
scanner 50switching on
scanner 49synchro cut 48system administrator settings 92system control panel (scp)
icons 108introduction 14, 106structure 106
system menu 37
Ttable view 74
file properties 74temporary store 81tiff subformat 70time-out manual feed 29top cover of the scanner 162, 167tree structure 96tree view 74
destinations 74turn off
printer 26turn off the printer 25turn on
printer 25turn on the controller 26turn on the printer 25turn the controller off 26
Uundo 95unix 123update area 97use dhcp server 33user modes 127user modes 98
Vview a scanned file 79view error 87view station 84
see a scanned file 67view station lt 66viewing printer status 105
Wwaste toner bag 159, 161width of the material 158work on a remote system 132