Embed Size (px)
Citation preview

Océ Power Print Controller
Technical Reference Manual

Copyright
Océ-Technologies B.V. Venlo, The Netherlands © 2000 All rights reserved. No part of this work may be reproduced, copied, adapted, or transmitted in any form or by any means without written permission from Océ.
Océ-Technologies B.V. makes no representation or warranties with respect to the contents hereof and specifically disclaims any implied warranties of merchantability or fitness for any particular purpose. Further, Océ-Technologies B.V. reserves the right to revise this publication and to make changes from time to time in the content hereof without obligation to notify any person of such revision or changes.
Edition 3.0
Océ-Technologies B.V.
GB
This manual reflects software release 5.1 of the Océ Power Print Controller.
Trademarks
All trademarks of third parties mentioned in this manual are the exclusive property of the respective parties and are hereby respected by Océ-Technologies B.V.
Xionics Document Technologies, the Xionics logoand PhoenixPage are trademarks of Xionics.SoftNet Utilities™ is licensed by Puzzle Systems Corporation.Times Roman, Helvetica and Palatino are trademarks of Linotype AG and/or its subsidiaries.ITC Garamon, ITC Avant Garde, ITC Bookman, ITC Zapf Chancery and ITC Zapf Dingbats are trademarks of International Typeface Corporation.Century Schoolbook is a trademark of Kingsley-ATFType Corporation.IBM and AS 400 are trademarks of International Business Machines.The LZW algorithm of the PS option is published under US patent no. 4.558.302 and foreign counterparts.

Contents 3
Contents
Chapter 1IntroductionFor whom is this Technical Reference Manual intended? 20
End users and Key Operators 20Programmers 20
Structure of this Technical Reference Manual 21Additional Océ documentation 23
Chapter 2Océ Power Print Controller printer seriesIntroduction 26Basic engine configurationsOcé 8400 Series 27
Common characteristics 27Océ 8400 Series basic models 27Configurations overview 28
Paper input options Océ 8400 Series 29Paper trays 29Paper input characteristics 30
Finishing options Océ 8400 Series 3120-bin Sorter 31Finisher 31Output tray 32Error output tray 32
User interface Océ 8400 Series 33Engine user interface 33Controller user interface 33Job Control System 34Service login 34
Chapter 3Océ Power Print Controller Host environmentsHost environments 36Printer Control Interfaces 37

4 Océ Power Print Controller Technical Reference Manual
Chapter 4Generic Controller architectureController outline — BASIC version 40Controller outline — JAC version 41
Job Automation Control 41Upgrading from BASIC to JAC version 42
Input handling 43Spool mechanism 44
JAC processing 45The principle of JAC processing 45Importance of JAC processing 45
PDL processing 46PostScript level 2 46PCL5e 47FOL 47TIFF 48IPDS 48AJC/FOL 49
Print context 50Print context selection 51
Combining PDLs 52Controller hardware 53
Memory 53Storage devices 53
Chapter 5Job Automation Control principlesJob automation with the Océ Power Print Controller 56
The job ticket mechanism 57Identification attributes 57Processing attributes 58Job separation 60Job segmentation 62Job and segment identification 63Job and segment processing 64
JAC workflow diagram 69Job recognition based on I/O channel attributes (1) 70Job recognition based on the banner page (2) 70Job recognition based on the job data (3) 70Association Rules Table 70Tickets from the Store (4) 71Printing and processing (5) 71

Contents 5
Integration using JEC 72Any host can send a print job (print file) to the printer (1) 73JEC (2) 73Printing and processing (3) 73
JAC advantages 74Any kind of print job automation 74Flexibility in choosing where control takes place 74
JAC priority 75Assigning identification attributes 75Using identification attributes 76Assigning processing attributes 77Multiple job processing 79
Contradiction handling 80Engine contradictions 80JAC priority level contradictions 81JAC encapsulation contradictions 82Flagsheet handling 83
Limitations of the BASIC version 85BASIC version functionality 85
Chapter 6FontsIntroduction 90Global overview fonts 91
Font types 91Outlines delivered by Océ 92
Supported font types and metrics 93FOL metrics compatibility 93
Installation and configuration aspects 94Standard fonts 94Optional fonts 94Download fonts 96Installed download fonts 96
Symbolsets 97PCL5e symbolsets 97FOL symbolsets 97AJC/FOL symbolsets 98Overview symbolsets 98Overview Océ Supersets 101

6 Océ Power Print Controller Technical Reference Manual
Chapter 7Centronics connection to the Océ Power Print ControllerApplications of a Centronics connection with the Océ Power Print Controller 104Centronics implementation in the Océ Power Print Controller 105
Cabling 105Centronics parameters in KOS 107
Enabling/disabling a Centronics communication port 107Queue state 107Queue handling 108The communication time-out 108Enable/disable the use of status signal lines 108
Centronics connector pin layout 110Centronics pin mapping to a CHAMP-type connector 110Centronics pin mapping to a 25-pin D-sub connector 112
Centronics protocol 113Signal function and naming 113
Advanced settings 115Signal timing 115Buffer size 116Confirmation time-out mechanism 116
Centronics and JAC 118Centronics job separation 118Centronics identification attributes for JAC 118
Chapter 8Ethernet connection to the Océ Power Print ControllerApplications of an Ethernet connection with the Océ Power Print Controller 120
TCP/IP Protocol 121Ethernet implementation in the Océ Power Print Controller 122Diagnose the Ethernet connection 123DHCP implementation 124
Enable/disable DHCP 124
Chapter 9Token Ring connection to the Océ Power Print ControllerApplications of a Token Ring connection with the Océ Power Print Controller 126
DHCP support 127
Contents 7
Token Ring implementation for the Océ Power Print Controller 128Token Ring speed 128
Chapter 10FTP connection to the Océ Power Print ControllerAbout this chapter 130
Structure of this chapter 130Terminology 130
General description of the FTP host I/O channel 132Architecture 132Internet address 133Unix and Océ-specific FTP server 133User interaction 134
Using the FTP print service 135Logging in 135Selecting a function 138Using the help function 138Reading the status of the printer 140Reading the console information 141Reading the printer spool queue information 142Using job tickets with FTP 143
Printing files with FTP 146Standard procedure 146FTP identification attributes for JAC 147Example 147
Uploading files 151Uploading printer log files 151Uploading printer configuration files 153Uploading JAC printer resources 154
Example Unix shell scripts for FTP users 158Regular file printing 158Printing using job tickets 158Reading printer status 159Uploading a log file 159
Directory structure of FTP print service 160Supported FTP protocol commands 161
Access Control commands 161Transfer Parameter commands 164FTP Service commands 165

8 Océ Power Print Controller Technical Reference Manual
Chapter 11LPD connection to the Océ Power Print ControllerAbout this chapter 170
Structure of this chapter 170Terminology 171
General description of the LP host I/O channel 172LP architecture 172Spooling 173
Using the LP print service 175Preparing the host (BSD) 176Preparing the host (System V) 177
Submitting print jobs to the Océ Power Print Controller 178lp and lpr command line options 178Printing multiple copies 180Examples of print job submission (BSD style commands) 180Priority in case of multiple print jobs 181
Printing flagsheets 182Flagsheet principle 182Default lpheader 183Customised lpheader 184
Identification attributes for JAC 185Reading printer status 187
Contents of the status information 187Command line options to obtain a status reply 188Example of a status reply (short format) 189Example of a status reply (long format) 190Empty queue 192Limitations 192
Removing print jobs from the print queue 193Authentication rules 193Command line options 193Examples 194
Disabling/enabling the LP interface 196
Chapter 12NetWare connection to the Océ Power Print ControllerAbout this chapter 198
Structure of this chapter 198NetWare in the Océ Power Print Controller printer 199
NetWare architecture 199Physical connection 200
Initial configuration of NetWare 201

Contents 9
Configuration in PCONSOLE 201Configuration in NWADMIN( 95/NT) 203The initial File server configuration 204Password-protected Print Queues 205Configuration in KOS 206
Submitting print jobs 207Print command options 207Printing multiple copies 209
Reading printer status 210Reading printer status with NetWare 3.x 210Reading printer status with NetWare 4.x 211
NetWare identification attributes for JAC 212Printing flagsheets 213
Flagsheet principle 213Default nwheader 215Customised nwheader 216
Diagnostics 217
Chapter 13PrintLink connection to the Océ Power Print ControllerIntroduction 220
About PrintLink 220About this chapter 221
Basic principles of Océ Power Print Controller PrintLink 222The connection to the server 222The data connection 223The information connection 225
Enabling/disabling the PrintLink I/O channel 226PrintLink I/O (data connection) 226FTP I/O (information connection) 226Specifying the TCP port 226
PrintLink and JAC 227PrintLink identification attribute for JAC 227Job separation 227
Chapter 14The raw socket connection to the Océ Power Print ControllerRaw socket interface specification 230
Basic specifications 230Multiple connections 230Job separation 231
C-KOS settings 232

10 Océ Power Print Controller Technical Reference Manual
Enable/disable the raw socket interface 232TCP port 232Uni-directional versus bi-directional data transfer 232Parse option 233
Limited PJL parsing commands 235Adobe BCP support 236
Raw socket and JAC 237JAC job identification 237Limitation with bi-directional data transfer 237SIF requirements 238
Examples 239Example 1: Printing in VAX VMS environment 239Example 2: Printing through a filter 239Example 3: Downloading a ticket 240
Chapter 15The EtherTalk connection to the Océ Power Print ControllerApple Macintosh environment 242EtherTalk 243
AppleTalk on an Ethernet network 243EtherShare ordering information 243EtherShare installation and configuration 243
EtherTalk architecture 244EtherTalk Phase I versus Phase II 244Print server versus file server 245
Printing on the Océ Power Print Controller using EtherTalk 247Printing Using the PAP Server 247Checking status using EtherShare Admin 248Macuser functions 253Exclusive macoper functions 260
EtherTalk and JAC 262Downloading fonts using EtherShare 263
Chapter 16SNMP implementation in theOcé Power Print ControllerSNMP implementation 266
SNMP configuration 266Supported MIBs 267Accessing MIBs 268Overview of important objects 268Printer MIB specifications 271

Contents 11
MIB objects overview 273MIB-II objects 273Host Resources MIB 273Printer MIB 275
Chapter 17Spooling and queuing mechanismJob scheduling 282
Definitions 282Job schedule mechanism 282Queue handling 283Channel queues 283From the channel queues to the print queue 284Dependent print jobs 285
Maximum number of jobs in a queue 286Limited job spooling 286Spool mode 286Job counter 287Performance 287Input handler specific behaviour 287
Practical spooling aspects 289Job recovery and spooling 289Removing jobs from a queue with Pre C-KOS 290Disk full handling 290
Chapter 18Job ticket mechanismIntroduction to job tickets 294
Functions of job tickets 294Ticket attributes 294Appearances of a job ticket 296
The identification function 297Recognition using I/O attributes 297Recognition using banner pages 298Recognition using job data 298Identification attributes 299
The processing function 301Processing attributes 301General aspects of processing attributes 301Interesting processing applications 301
Ticket syntax and semantics 303Generic ticket syntax 303

12 Océ Power Print Controller Technical Reference Manual
Syntax and semantics of ticket attributes 304Syntax of ticket files 305Syntax and semantics of job identification attributes 306Syntax and semantics of processing attributes 309BIN 310BIND 311COLLATE 312COPIES 313DUPLEX 314FLAGSHEET 315FORM 316JOG 317LAYOUTPIF 317MULTIPLEUP 318PAGEPIF 320PRINTQUALITY 321RESOLUTION 322SETSIZE 322STAPLE 323TRAY 323Examples of job tickets 324
Flagsheets 326Creating flagsheets 326Describing a flagsheet in FOL 327Example 328
JEC tickets 329JEC ticket syntax 329JEC marker 329JEC subcommands 329JEC headers embedded within PDL comments 330Example of a JEC ticket 331
Download tickets 332Download attributes 332Syntax and semantics of download attributes 332Examples of download tickets 333
Chapter 19Association Rules Table (ART)ART mechanism 336A real-life example to start 337
Basic ART file structure 339Identification 340Association 341
ART file syntax 342

Contents 13
Block definition 342Item definition 342Identifiers 344Wildcard character 344OR relation 345Working with variables 345Pre-installed ART file 346
Example of an ART file 347Example 1: basic ART for networked PC application 347Example 2 347Example 3: ART containing variable entries 348
Downloading an ART 349Troubleshooting ARTs 350
Two error levels 350Proofing ARTs 350Error messages on the ART error logging page 350
Chapter 20Job separation and segmentationWhat is job separation and segmentation? 354
Example 354The SIF mechanism 355Job separation 356Job identification 356Job segmentation 356Segment identification 357Job data filtering 357
Separation Instruction Files 358Downloading a SIF 358Proofing SIFs 358Activating a SIF 358SIF job environment 359SIF structure 360Separator definitions 362Default job 363
Separator evaluation 365Scan area 365Rules evaluation 366
Layered SIF structure 367Variables and job identification attributes 370
Variables 370Job identification attributes 371
SIF language 372

14 Océ Power Print Controller Technical Reference Manual
SIF syntax notation 372General SIF grammar parts 373SIF file contents 374
Job structure definition 375PDL events inside SIF 375Pre-defined separators 377JOBBEGIN 380JOBEND 381SIFUSE 381SEGMENT 382FILTER 383
“Job-begin” and “job-end” definitions in a SIF 384For a one-layer SIF (no sub-SIF) 384For a two-layer SIF, using a sub-SIF 388
Separator definition syntax 390SETSCAN 393SETSCAN with/without variable 395TEST 396Wildcards for the TEST and SETSCAN commands 397SETVAR 398START 399STOP 401SIF comment lines 403
Software limits 404Examples 405
Example 1: DOSVSE job separation 405Example 1: PostScript SIF 408Example 2: IPDS SIF 408Example 3: Structured job 410
Chapter 21Page and page set processingPage processing functionality 414
PDL and JAC processing 414Page processing 414An example of page processing: printing invoices 414Page Processing Instruction Files (PagePIFs) 415
Working with PagePIFs 417Installing a PagePIF 417Activating a PagePIF 417Working on page level 418Working on page set level 419Working with header/trailer pages 420Relationship between job data, tickets and PagePIFs 421

Contents 15
Limitations of the PagePIF functionality 422PagePIF commands overview 423PagePIF commands reference 425
BIN 426BIND 427COLLATE 428COPIES 428CYCLEEND 429CYCLESTART 430DELIVER 430DUPLEX 431FORM 431GETPAGE 432JOG 433PAGE 433PAGESIDE 434REM 434SETSIZE 435STAPLE 435TRAY 436USEPAGE 437
PagePIF examples 438Example 1: page handling 438Example 2: set handling 440Example 3: header/trailer handling 441Example 4: multi-level form selection 443Example 5: multiple-up independent of PDL set boundaries 444
Chapter 22Document separationProcessing data as jobs and segments 446Document separation overview 447
Chapter 23JAC logical error messagesGeneral characteristics of logical errors 450
Error classes 450Logical error page 451Notation conventions for logical errors 451
Logical errors overview 452

16 Océ Power Print Controller Technical Reference Manual
Chapter 24AccountingThe accounting mechanism 496Accounting information 497
Accounting information from the job ticket 497Accounting information from the PCI (only for Windows) 497Accounting information from the print system 497Accounting information from the printing result 498
The account file 499General characteristics of the account file 499Account file format Océ 8400 Series printer 499Structure of the account file 500
Account file management 502KOS functions 502Uploading the account.log file 502
Chapter 25Input filtersIntroduction 504
Input/translate filters 505PDL filters 507
Chapter 26Line Printer FilterLine printer emulation 510
Line Printer Filters 511Formatting line printer data 511
LayoutPIF mechanism 512Initialisation 513Marking the start of the cycle 515Reading input pages or lines 515Conditional commands 517Printing the page 518Scope of objects 519
Variables 520Reserved variables 521
Downloading and activating LayoutPIFs 522Downloading 522Activating 522
Supported LayoutPIF commands 523Restrictions 525

Contents 17
Chapter 27Supported emulationsASCII translation 528
Supported PCL commands 528IBM 3287 emulation 529
Supported PCL commands 529IBM 3812 emulation 532
Supported PCL commands 532IBM 4214 emulation 535
Supported PCL commands 535IBM 5224 emulation 538
Supported PCL commands 538Channel emulation 541
Supported PCL commands 541
Chapter 28LayoutPIF error handlingError handling in the Océ Power Print Controller 544
Using FOL files and LayoutPIFs on different printers 544Printing error messages 544Structure of this chapter 545
Overview of error messages 546
Appendix AMiscellaneousNotation conventions 554Reader’s comment sheet 555Addresses of local Océ organisations 557Index 559

18 Océ Power Print Controller Technical Reference Manual

19
Océ Power Print Controller
Technical Reference Manual
Chapter 1Introduction
This chapter defines the readers for whom this Technical Reference Manual is intended. Further, this chapter gives an overview of the related documentation. This Technical Reference Manual covers both the basic version and the JAC version of the Power Print Controller.

20 Océ Power Print Controller Technical Reference Manual
For whom is this Technical Reference Manual intended?
This Technical Reference Manual is not the user manual of the Océ Power Print Controller printer. It is meant to be used for installation, configuration and programming the Océ Power Print Controller printer.
End users and Key Operators
This Technical Reference Manual is not intended for end-users of the Océ Power Print Controller printer. End-users will only access the printer through the print menu of the application they print from. Therefore, end-users should refer to the documentation of the application, or the platform, they wish to print from.
System Operators, responsible for advanced functions from the printer’s operating panel and for day-to-day maintenance and troubleshooting on the printer will find all information they need in the System Operation Manual, which is supplied with the printer.
System Administrators, who perform tasks such as: installing Referable Objects, fonts and JAC objects, set advanced PDL settings, need the System Administration manual.
Programmers
This Technical Reference Manual —as its name says— is only intended for specially skilled personnel, such as:
■ Application developers who wish to write drivers to enable users to print to the Océ Power Print Controller printer from within their application
■ System Administrators who wish to do job automation control, i.e. program job processing on the printer
■ System integrators■ Océ system consultants.

Introduction 21
Structure of this Technical Reference Manual
This Technical Reference Manual is divided into sections. Each section describes a logical part of the Océ Power Print Controller.
Section 1 contains the chapters 1 up to 6 inclusive. These chapters contain: ■ An introduction■ The engine description and the engine options ■ The various host environments■ The generic architecture of the controller■ The Job Automation Principles■ Fonts
Section 2 contains the chapters 7 up to 17 inclusive. These chapters contain:■ Centronics■ Ethernet■ Token Ring■ FTP■ LPD■ NetWare.■ PrintLink ■ TCP/IP Raw Socket■ Ethernet■ SNMP■ The spooling and queuing mechanism.
Section 3 contains the chapters 18 up to 23 inclusive. These chapters contain:■ Job Ticket Mechanism■ Association Rules Table■ Job Separation and Segmentation■ Page Processing■ Document separation ■ JAC logical error messages.

22 Océ Power Print Controller Technical Reference Manual
Section 4 contains the chapters 24 up to 28 inclusive. These chapters contain:■ Accounting■ Filters■ Supported emulations■ LayoutPIF error handling.

Introduction 23
Additional Océ documentation
The Océ 8400 Series System Operation Manual describes the engine-related configuration of the Océ 8400 Series, as well as the procedures concerning daily maintenance. This manual is supplied with the printer.
The Océ 8400 Series System Administration Manual describes the advanced user settings of the Océ 8400 Series. This manual is supplied with the printer.
The implementation of the Page Description Languages is described in separate Océ manuals:■ Océ Power Print Controller PostScript level 2 Reference Guide■ Océ Power Print Controller PCL5e Reference Guide■ Océ Power Print Controller FOL Reference Guide■ Océ Power Print Controller TIFF Reference Guide■ Océ Power Print Controller IPDS Reference Guide■ Océ Power Print Controller AJC/FOL Reference Guide
All manuals are available in PDF format on the Océ 8400 Series User Documentation CD-ROM.

24 Océ Power Print Controller Technical Reference Manual

25
Océ Power Print Controller
Technical Reference Manual
Chapter 2Océ Power Print Controller printer series
This chapter provides an overview of the printer series which include the Océ Power Print Controller.

26 Océ Power Print Controller Technical Reference Manual
Introduction
On several occasions in this Technical Reference Manual, reference is made to the Key Operator System. Depending on which type of printer you have, we use the terms E-KOS/C-KOS or just KOS. On an Océ 8400 Series printer there are two user interaction points, the operating panel of the printer and via a terminal/telnet connection with the controller. Therefore if we are talking about the Key Operator System of the Océ 8400 Series we distinguish separate Key Operator Systems. We use the Engine Key Operator System (E-KOS) for the printer and the Controller Key Operator System (C-KOS) for the controller.
For more information on KOS, refer to the System Operation Manual and System Administration Manual of your printer.

Océ Power Print Controller printer series 27
Basic engine configurationsOcé 8400 Series
Common characteristics
The Océ 8400 Series has the following characteristics in common::
Océ 8400 Series basic models
The Océ 8400 Series consists of 2 basic models. The difference between these models lies in the engine print speed.
Item Description
Resolution Standard 300 dpi or 600 dpi quality, switchable be-tween print jobs
Controller Sun Ultra 10, Solaris operating environment with 9 GB fixed disk, a 3.5” floppy disk unit and a CD-Rom drive with at least 128 MB of system memory.
Printing technology LED Print Head electro-photographic technology with Océ Copy Press system
Print mode One-pass duplex (double-sided)
Océ Power Print Con-troller functionality
Multiple PDL’s, optional Job Automation Control
Model Engine print speed
Océ 8445 45 prints per minute
Océ 8465 62 prints per minute

28 Océ Power Print Controller Technical Reference Manual
Configurations overviewThe following list gives an overview of the engine configuration:
:
The illustration below shows an Océ 8400 Series printer.
[1] Océ 8400 Series
Paper in-put
Paper output
4 trays 20-bin Sorter
Finisher Output tray
Error tray
Océ 8400 Series
X X X X X

Océ Power Print Controller printer series 29
Paper input options Océ 8400 Series
Paper trays
The Océ 8400 Series has four paper trays:■ Upper paper tray (1)■ Middle paper tray (2) ■ Lower paper tray (3) ■ Bulk paper tray (4)
[2] The four paper trays
Note: Paper tray 1 is user configurable. Paper trays 2 and 3 will be set to a fixed size by the Océ service technician during installation of the printer. The lower tray (4), can only contain A4/Letter size paper.
Upper tray 1
Middle tray 2
Lower tray 3
Bulk tray 4
30 Océ Power Print Controller Technical Reference Manual
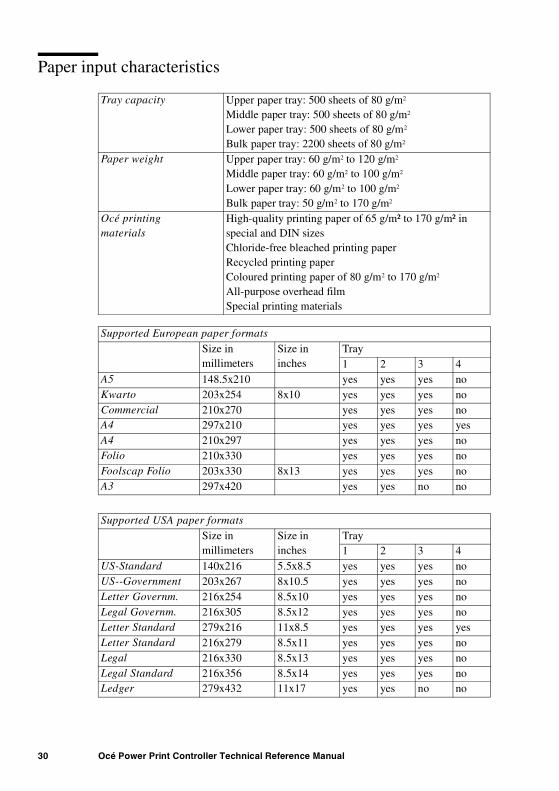
Paper input characteristics
Tray capacity Upper paper tray: 500 sheets of 80 g/m2
Middle paper tray: 500 sheets of 80 g/m2
Lower paper tray: 500 sheets of 80 g/m2
Bulk paper tray: 2200 sheets of 80 g/m2
Paper weight Upper paper tray: 60 g/m2 to 120 g/m2
Middle paper tray: 60 g/m2 to 100 g/m2
Lower paper tray: 60 g/m2 to 100 g/m2
Bulk paper tray: 50 g/m2 to 170 g/m2
Océ printing materials
High-quality printing paper of 65 g/m² to 170 g/m² in special and DIN sizesChloride-free bleached printing paperRecycled printing paperColoured printing paper of 80 g/m2 to 170 g/m2
All-purpose overhead filmSpecial printing materials
Supported European paper formats
Size in millimeters
Size ininches
Tray1 2 3 4
A5 148.5x210 yes yes yes noKwarto 203x254 8x10 yes yes yes noCommercial 210x270 yes yes yes noA4 297x210 yes yes yes yesA4 210x297 yes yes yes noFolio 210x330 yes yes yes noFoolscap Folio 203x330 8x13 yes yes yes noA3 297x420 yes yes no no
Supported USA paper formats
Size in millimeters
Size ininches
Tray1 2 3 4
US-Standard 140x216 5.5x8.5 yes yes yes noUS--Government 203x267 8x10.5 yes yes yes noLetter Governm. 216x254 8.5x10 yes yes yes noLegal Governm. 216x305 8.5x12 yes yes yes noLetter Standard 279x216 11x8.5 yes yes yes yesLetter Standard 216x279 8.5x11 yes yes yes noLegal 216x330 8.5x13 yes yes yes noLegal Standard 216x356 8.5x14 yes yes yes noLedger 279x432 11x17 yes yes no no

Océ Power Print Controller printer series 31
Finishing options Océ 8400 Series
The Océ 8400 Series supports different finishing devices:■ 20-bin Sorter■ Finisher with stapling/jog unit■ Output tray ■ Error output tray.
20-bin Sorter
The 20-bin Sorter features:■ face-down delivery■ A4/Letter size paper only■ 20 individually addressable bins■ bins can be used for collated or stacked output■ each bin can contain up to 100 prints of 60 to 80 g/m2 in duplex mode, or 50
prints of 100 to 120 g/m2 in simplex mode■ you can combine several physical bins into one logical bin to increase
throughput■ a ‘bin full’ detection resumes delivery after prints have been removed from a
full bin.
Finisher
The Finisher features:■ face-down delivery■ A4/Letter size paper only■ the maximum staple batch capacity of the finisher is 50 sheets 80 g/m2 ■ the finisher unit also supports off-line stapling■ the finisher tray has a capacity of 900 prints 80 g/m2.

32 Océ Power Print Controller Technical Reference Manual
Output trayThe Output Tray features:■ face-down delivery■ the output tray has a capacity of 450 prints 80 g/m2 ■ all supported paper sizes can be deposited in the output tray.
Error output trayThe Error output tray features:■ error prints will be deposited, face up, in the error output tray■ the error output tray can contain 100 sheets■ the error output tray is intended for error pages only.

Océ Power Print Controller printer series 33
User interface Océ 8400 Series
The Océ 8400 Series basically has two points of User Interaction. Therefore, it is important that you understand which point of user interaction is required to perform a specific task or function.
Engine user interface
The operating panel of the printer engine is used to carry out normal operational user interaction. This graphical operating panel can be used for engine-related actions (E-KOS) as well as engine-related error recovery (e.g. paper jam handling). The following modes of operation are distinguished: Normal User mode, E-KOS mode and Limited E-KOS mode.
Controller user interface
Controller related system settings (C-KOS) require a terminal connection to the printer controller. This terminal connection can be established directly by connecting a terminal or PC. Another way of connecting a terminal to the system is via a Telnet session. For more information about a terminal connection, refer to the Océ 8400 Series System Administration Manual.
Note: The Océ 8400 Series integrated operating panel can not be used for controller-related (C-KOS) functions.
For more information on establishing a terminal connection or Telnet session, refer to the Océ 8400 Series System Administration Manual.
When the printer is ‘Idle’, it can be switched off-line to enter the Controller User Interface Handler. The UIH offers the following possibilities:
■ the Service Diagnostics System (SDS), which can be used by the Service Engineer (SE). A password is needed which cannot be changed.
■ the Key Operator System (KOS), which can be used by the Service Engineer (SE) and Key Operators (KO). The KOS allows you to access advanced functions like change the PDL settings, install RO’s etc. A password is

34 Océ Power Print Controller Technical Reference Manual
needed which can be changed in SDS on demand. An initial pin-code has to be set by the SE, at the time the printer is installed.
■ the possibility to shutdown the printer in a controlled way, which can be used by the Service Engineer (SE) and Key Operator.
Job Control System
The Job Control System or JCS is a KOS-alike menu that can be entered while the printer is printing. The JCS menu contains a number of functions that allow you to make changes to jobs that are already being printed.
The JCS menu provides the following functionality:
■ abort the current print job■ suspend the printer (pausing) at the following print job, allowing you to enter
KOS in between two jobs, e.g. to print a Status Report■ adjust the IPDS PDL shift image values■ resume the printing process while the printer is suspending■ shut the printer down safely while printing.
Service login
For Service purposes it is possible to connect to the controller via a VT100 terminal, or via Telnet.

35
Océ Power Print Controller
Technical Reference Manual
Chapter 3Océ Power Print Controller Host environments
This chapter provides an overview of the host environments to which you can connect the Océ Power Print Controller.

36 Océ Power Print Controller Technical Reference Manual
Host environments
The Océ Power Print Controller supports a number of host environments. ■ Host platforms are either directly connected to the Océ Power Print
Controller or through a protocol convertor box.■ Any platform that supports LPR/LPD, FTP or Socket protocols over TCP/IP
(Ethernet or Token Ring Network) may print directly to the Océ Power Print Controller. Examples of such platforms are SunOS, Solaris, AIX, HP-UX, Sinix, Unix, DOS, OS/2, VMS, AS/400, NextStep etc. (see table 3 on page 36).
■ The Océ Power Print Controller can be controlled through a host-based application called a Printer control Interface (PCI). PCI however are not supported for Mainframe, Unix and MS-DOS environments.
The Océ Power Print Controller can receive print jobs simultaneously from all interfaces that are installed and enabled.
Host environment Supported printer connection PCI
MS Windows 3.1/95/98/NT4.0/2000
Ethernet and/or Token Ring TCP/IP - LPR/LPD /FTP / socket, Ethernet Netware
yes
MS-DOS Ethernet and/or Token Ring TCP/IP - LPR/LPD /FTP / socket,Ethernet Netware
no
Unix Ethernet and/or Token Ring TCP/IP - LPR/LPD /FTP / socketEthernet Netware
no
Apple Macintosh Ethertalk yes
VMS(DEC VAX)
LAT print server,Ethernet TCP/IP - LPR/LPD / Socket
yes
Alpha VMS LAT print server,Ethernet TCP/IP - LPR/LPD / FTP / Socket
yes
Océ PRISMAflow Ethernet PrintLink no
Océ PRISMApro IPDS via TCP/IP no
IBM AS/400 Ethernet and/or Token Ring TCP/IP LPR/LPD
yes
Others e.g. BS 2000 TCP/IP - LPR/LPD no
[3] Host environments supported by the Océ Power Print Controller

Océ Power Print Controller Host environments 37
Printer Control Interfaces
A PCI, short for Printer Control Interface, also known as drivers, is application software running on the host, which create appropriate headers and trailers to the data sent from the host to the Océ Power Print Controller.
The use of a PCI is most appropriate to control the basic version of the Power Print Controller. A PCI is able to control advanced features of the Océ Power Print Controller engine such as the Sorter or the Finisher, to see which PCIs are available (see table 3 on page 36)

38 Océ Power Print Controller Technical Reference Manual

39
Océ Power Print Controller
Technical Reference Manual
Chapter 4Generic Controller architecture
This chapter gives a brief but complete overview of the functionality of the Océ Power Print Controller.
40 Océ Power Print Controller Technical Reference Manual
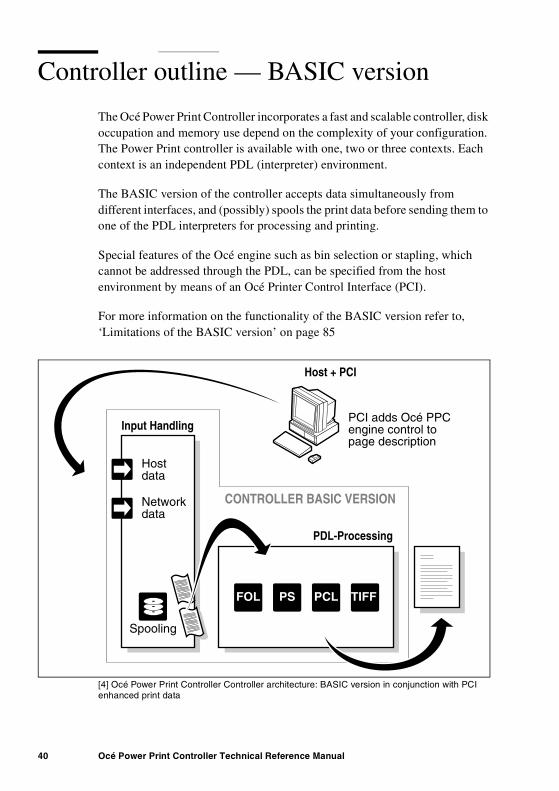
Controller outline — BASIC version
The Océ Power Print Controller incorporates a fast and scalable controller, disk occupation and memory use depend on the complexity of your configuration. The Power Print controller is available with one, two or three contexts. Each context is an independent PDL (interpreter) environment.
The BASIC version of the controller accepts data simultaneously from different interfaces, and (possibly) spools the print data before sending them to one of the PDL interpreters for processing and printing.
Special features of the Océ engine such as bin selection or stapling, which cannot be addressed through the PDL, can be specified from the host environment by means of an Océ Printer Control Interface (PCI).
For more information on the functionality of the BASIC version refer to, ‘Limitations of the BASIC version’ on page 85
[4] Océ Power Print Controller Controller architecture: BASIC version in conjunction with PCI enhanced print data
PDL-Processing
FOL PS PCL TIFF
Input Handling
Hostdata
Networkdata
Spooling
CONTROLLER BASIC VERSION
PCI adds Océ PPCengine control topage description
Host + PCI

Generic Controller architecture 41
Controller outline — JAC version
Job Automation Control
Job Automation Control (JAC) enables you to perform additional processing on a print job besides merely printing the print data (as the BASIC version does). JAC includes, e.g. identification and job separation, device specific control, form overlaying or underlaying, multiple processing of the same job, etc.
Interpreting print files and putting marks on a page is only a fraction of the tasks accomplished by the Océ Power Print Controller. The diagram below shows clearly that the Océ Power Print Controller is active before a job is actually sent to a PDL interpreter, but also after interpretation of the job. In fact, JAC takes control over the print job and activates one or more PDL interpreters, whenever appropriate. Three steps can be identified in the process of printing jobs:
■ Input handling■ JAC processing■ PDL processing.
[5] Océ Power Print Controller Controller architecture: three-step approach in print job automation
PDL-Processing
Recognition FOL PS PCL TIFF
- Electronic forms- Collate- Multiple jobs, page set & page processing- Device control- Flagsheet
Segmentation
JAC ProcessingInput Handling
Hostdata
Networkdata
Spooling
PCI adds Océ PPCengine control topage description
Host + PCI

42 Océ Power Print Controller Technical Reference Manual
Upgrading from BASIC to JAC versionYou can upgrade the Océ Power Print Controller printer from the BASIC to the JAC version by purchasing the JAC software package from Océ.
Generic Controller architecture 43
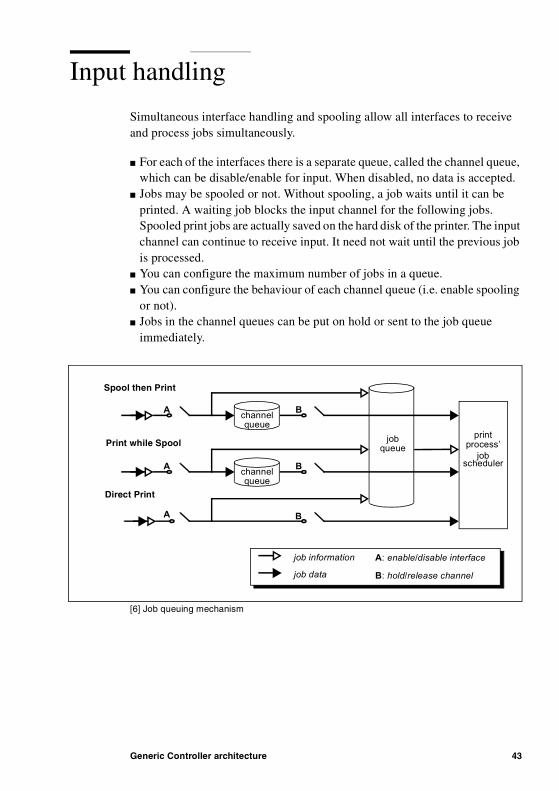
Input handling
Simultaneous interface handling and spooling allow all interfaces to receive and process jobs simultaneously.
■ For each of the interfaces there is a separate queue, called the channel queue, which can be disable/enable for input. When disabled, no data is accepted.
■ Jobs may be spooled or not. Without spooling, a job waits until it can be printed. A waiting job blocks the input channel for the following jobs. Spooled print jobs are actually saved on the hard disk of the printer. The input channel can continue to receive input. It need not wait until the previous job is processed.
■ You can configure the maximum number of jobs in a queue.■ You can configure the behaviour of each channel queue (i.e. enable spooling
or not).■ Jobs in the channel queues can be put on hold or sent to the job queue
immediately.
[6] Job queuing mechanism
channel
A
B
queue
channelqueue
jobqueue
printprocess’
B
BA
A
job information
job data
A: enable/disable interface
B: hold/release channel
schedulerjob
Spool then Print
Print while Spool
Direct Print

44 Océ Power Print Controller Technical Reference Manual
Spool mechanismThe Océ Power Print Controller can receive jobs simultaneously from all interfaces that are installed and enabled. All print jobs from all interfaces are queued in the Océ Power Print Controller for printing. Interfaces that are disabled, do not accept jobs.
The job information is sent to the job queue, while the job data follows one out of three options (see figure 6 on page 43):■ Spool then print; the job data is spooled in a channel queue (one channel
queue per interface).■ Print while spool; the job data is spooled in a channel queue (one channel
queue per interface), but chunks of a job may already be printed before the job has completely entered the channel queue.
■ Direct print; the job data is sent directly to the printer without using spooling. Note that in this mode, only one single job can enter the print process at a time, although multiple jobs can be processed simultaneously within the printer.
Note: For more information about spooling refer to chapter 17, ‘Spooling and queuing mechanism’ on page 281.

Generic Controller architecture 45
JAC processing
The principle of JAC processing
Job Automation Control (JAC) enables you to perform additional processing on a print job besides merely printing the print data. JAC includes e.g. device control, form overlaying or underlaying, multiple processing of the same job, etc.
JAC processing analyses the incoming data stream and is able to identify a print job. The printer will then build-up and append an appropriate Job Ticket with processing instructions to the job. Users can also attach a Job Ticket to a print job using Océ-supplied PCIs or utility software.
Importance of JAC processing
Using JAC, all features of the Océ Power Print Controller and the print engine can be addressed without any modification to the host software, to standard PDLs or to line data streams.
■ JAC merges variable data with PostScript, PCL or FOL forms.■ Printer device control enables paper tray selection, double-sided printing,
printing collated copies, sorting, stapling and addressing output to the appropriate bin of the Sorter or Finisher.
■ Multiple job, page and page set processing create personalised copies without having to submit data again to the printer, thus off-loading the host and the network.
■ JAC selects the proper PDL for correct processing of the data.■ JAC adds flagsheets for efficient labelling and distribution of jobs.
For more information refer to chapter 5, ‘Job Automation Control principles’ on page 55 and chapter 18, ‘Job ticket mechanism’ on page 293.

46 Océ Power Print Controller Technical Reference Manual
PDL processing
JAC identifies PDL-related identification attributes in a print job. In the Job Ticket that JAC appends to the job context, instructions are included to submit the print job to the correct PDL interpreter within the Océ Power Print Controller.
The Océ Power Print Controller supports the major industry-standard PDL’s of this moment.
The following PDL processing is supported:
■ PostScript Level 2■ PCL5■ FOL■ TIFF ■ IPDS■ AJC/FOL.
Maximum three PDL’s can be active at the same time, each with its own independent environments, called print context. This excludes AJC/FOL.
PostScript level 2PostScript is an interpretive language, capable of transmitting text, graphical objects and sampled images to a PostScript printer or display.
PostScript is de facto the Page Description Language in today’s office and documentation environments which require the printing of both text —in various appearances— and advanced graphics in a host and printer-independent manner.
The PostScript PDL interpreter in the Océ Power Print Controller is PostScript Level 2 compatible.
Note: For more information about PostScript refer to the separate Océ Power Print Controller PostScript level 2 Reference Guide.

Generic Controller architecture 47
PCL5ePCL stands for Printer Command Language. It is the native language of the Hewlett-Packard LaserJet and DeskJet series of printers. PCL has become an industry standard for text-oriented printing. Therefore it is also suitable within mini and mainframe environments.
The Océ Power Print Controller incorporates a PCL5e interpreter. It features the following developments, compared to its predecessors:
■ Printer Job Language (PJL) commands, provide job level control. One of the main features is the ability to switch printer languages between jobs. Applications supporting PJL can print one job using PCL and then print the next job using PostScript (or another printer language) - without any operator intervention.
■ Hewlett-Packard Graphic Language (HP-GL) is a vector oriented language. The commands are two letter codes designed to remind you of the function of the command (such as IN for initialize). After the two-letter mnemonic, there may be one or more parameters which identify details of how to process the command.
■ PCL-mode is accessible through PCL commands. It is also possible to switch from HPGL mode to PCL mode and visa versa.
Note: For more information about PCL refer to the separate Océ Power Print Controller PCL5e Reference Guide.
FOL
Form & Overlay Language, or just FOL, is a specially developed by Océ, to control the printing process within Data Processing environments. FOL is a powerful, easy-to-use tool for the formatting of line printer data and ASCII data streams. This results in high-quality output, possibly including outline fonts, graphics and bar codes.
Note: For more information about FOL refer to the separate Océ Power Print Controller FOL Reference Guide.
48 Océ Power Print Controller Technical Reference Manual
TIFFTagged Image File Format or just TIFF is an image file format, capable of describing black and white, gray scale, palette-colour, and full colour image data in several colour spaces.
TIFF describes image data that typically comes from scanners, frame grabbers and paint- and photo-retouching programs. The purpose of TIFF is to describe and store raster image data.
Note: In combination with TIFF there are limitations to take into account using JAC.
Note: For more information about TIFF, refer to the separate Océ Power Print Controller TIFF Reference Guide.
IPDS
Intelligent Printer Data Stream (IPDS) is a host-to-printer data stream for AFP.
AFP (Advanced Function Printing) is an IBM architecture and family of associated printer software and hardware. AFP provides document and information presentation control, independent of specific applications and devices. The AFP architecture is primarily designed to work with the Intelligent Printer Datastream (IPDS).
The IPDS interpreter in the Océ Power Print Controller is compatible with the IBM 3160 printer. All IPDS towers are supported.
Note: IPDS can not be combined with JAC.
Note: For more information about IPDS, refer to the separate Océ Power Print Controller IPDS Reference Guide.

Generic Controller architecture 49
AJC/FOLAJC stands for Automatic Job Control. This AJC/FOL interpreter is compatible with the FOL release 2.4.1. interpreter in previous Océ FOL printers, such as, e.g., the Océ 6800 and the Océ 6900.
AJC/FOL should not be confused with the previously discussed FOL PDL. In the new version, the FOL PDL has evolved towards a genuine PDL, whereas job control is taken care of by JAC.
Note: AJC/FOL cannot be used in combination with JAC.
Note: For more information about AJC/FOL, refer to the separate ‘Océ Power Print Controller AJC/FOL Reference Guide’.

50 Océ Power Print Controller Technical Reference Manual
Print context
To handle print jobs from both data processing and office environments in an independent and hence productive way, the Océ Power Print Controller supports up to three print contexts. Each print context is an independent environment that contains the configured PDL and its cached resources (such as downloaded fonts, macro’s etcetera). Installed print contexts can be configured to use different or identical PDL’s.
The Océ Power Print Controller may optionally be equipped with multiple print contexts for the following PDLs:
■ PostScript■ PCL■ FOL■ TIFF■ IPDS.
The following illustration shows the relation of context in the Océ Power Print Controller architecture.
[7] Print context
The Océ Power Print Controller architecture is made up of the following modules:
1 The connectivity module, which supports a variety of communication protocols to interface with host environments.
2 The JAC module, which takes care of Job Automation Control. 3 Up to three Print-Context modules for interpretation and rendering print job
data.4 The optional AJC/FOL module which can be installed for compatibility
reasons, which can not be used in combination with JAC.
Connectivity
Engine
printcontext
Job Automation Control
printcontext
printcontext
AJC/FOLResources

Generic Controller architecture 51
5 The resource module, which contains all installed Referable Objects.6 The printer engine, which handles the actual generation of printed pages.
Modules 1 through 5 are part of the printer’s controller.
Print context selection
By default, every communication channel is attached to one of the print contexts. A user may select one of the other installed print contexts instead of the default context.
Of course, in homogeneous environments, an Océ Power Print Controller printer may be configured with only one print context, making a context selection superfluous.
But when using multiple contexts in heterogeneous environments, JAC is used to select the print context require
Multiple contexts are most beneficial in case of combined host and network printing. Each context contains one PDL and its cached resources such as fonts, forms etc. Context saving and switching is particularly interesting in these environments. From within the Job Ticket you can specify which PDL should be used, but also whether to use context 1, context 2 or context 3.

52 Océ Power Print Controller Technical Reference Manual
Combining PDLs
JAC offers the possibility to add forms and flagsheets to the data. Your print data may be coded in a PDL, and the form or flagsheet that you use with it may be coded in another PDL.These objects do not need to be in the same PDL. In this way you have several PDL’s in one job.
Forms or flagsheets can be coded in:
■ PostScript■ PCL■ FOL
When used for forms or flagsheets, these PDLs are also called Form (FDL) or Flagsheet Description Languages (FSDL).
Any combination of print data and forms/flagsheets is supported, as you can see from the table below:
:
Note: * It is only possible to place forms as an overlay on top of a TIFF page
Forms and flagsheets
PostScript PCL FOL
Print data
PostScript l l l
PCL l l l
FOL l l l
TIFF * l l l
[8] Combining print data with forms and flagsheets

Generic Controller architecture 53
Controller hardware
The Océ Power Print Controller in based on a Sun Ultra 10 with a Sun OS Solaris operating environment.
Memory
Océ Power Print Controller has standard 128 Mb of system memory.
Storage devices
Storage devices include a hard disk, a floppy disk and a CD-ROM drive.

54 Océ Power Print Controller Technical Reference Manual
55
Océ Power Print Controller
Technical Reference Manual
Chapter 5Job Automation Control principles
This chapter explains the basic principles of Job Automation Control in the Océ Power Print Controller. It gives you a global idea of what JAC can do for you.

56 Océ Power Print Controller Technical Reference Manual
Job automation with the Océ Power Print Controller
Job Automation Control (JAC) enables you to perform additional processing on a job besides merely printing the print data. JAC includes e.g. job recognition, job separation and segmentation, device control, form overlaying or underlaying, processing and printing a job more than once, adding a routing page, etc.
The first step in handling a print job is to separate a job from the preceding and the succeeding job in the data stream. This process is called ‘Job Separation’. A job is defined as a part of the input data which can be handled and processed by the print system, independently of the rest of the input data. If however, there is a PDL context relation between subsequent jobs, the jobs cannot be handled out of order. Such dependent jobs are sent from a host that keeps an administration of the PDL context e.g. a font used in job A and job B is only send with job A.
In C-KOS you can select whether a context should be dependent or independent, for an input channel, i.e. whether or not a context may be reset between jobs.
Often, parts of a job have to be processed in a different way. This means that the job has to be split up in parts, each with its own specific processing. A part of a job is called a ‘segment’. All segments of a job have a fixed processing sequence and the PDL context setting is passed from one segment to the next.
In order to process a job or segment correctly, the JAC module has to identify it. This job and segment identification is based on the available attributes of the input channels and protocols and on the recognition of certain parts of banner pages or data (the SIF mechanism). Furthermore, attributes for identification can be sent to the printer together with the job data, the JEC mechanism.
Once the job is completely separated, identified and segmented, JAC provides a mechanism to select a processing method based on the identification and segmentation information. This mechanism is driven by the Association Rules Table (ART). Processing methods are pre-defined in so-called ‘tickets’. Selecting a processing method for a job will overrule the processing method for job segmentation.

Job Automation Control principles 57
Note: Be aware that JAC ticket settings will overrule PDL settings.
Note: JAC processing can not be performed on IPDS data.
JAC related functions such as downloading JAC objects (e.g. tickets, forms) to the printer are also provided. They are described in ‘Download tickets’ on page 332 of this Technical Reference Manual.
The job ticket mechanism
Instructions for the printer how to process a job, are all contained in a ticket. A job ticket is attached to the print job when it is created. As it passes through the various JAC processing stages, the ticket may be filled in with attributes, or existing attributes may be overwritten.
Identification attributes
Identification takes place using the following steps:■ The job’s communication channel may provide identification attributes for
the job■ A JEC (Job Envelope Command) header (e.g. generated by a PCI) may
contain job identification attributes■ An optional SIF for the channel may extract additional job or segment
identification attributes from the job data
Using the (job or segment) identification attributes found in the above steps, a look-up in the Association Rule Table (ART) is performed in order to find the ticket that is needed for further processing of the data.
The job ticket contains the extracted (job or segment) identification attributes, new identification attributes and the resulting processing method for that segment or job.
58 Océ Power Print Controller Technical Reference Manual
Processing attributesThe processing of a job or segment is defined in a ticket. Possible ways to use tickets are:
■ A JEC header (e.g. generated by a PCI) is in fact a ticket that may contain job processing attributes
■ A ticket that is stored on the printer hard disk may be associated with the job or segment data using the ART
■ Through FTP, a ticket that is stored on the printer hard disk may be selected before the job is processed
The ticket defines the processing steps using a selection of one of the following actions:■ Device configuration ■ Device control (bin, tray, collation, jogging, stapling, etcetera)■ Adding flagsheets and forms to jobs and segments■ Segment processing steps and multiple job processing steps■ Selection of page set processing■ Selection of layout processing
Processing methods defined in job tickets apply for all segments of a job. The processing method of a segment is defined in the segment ticket. For each job segment, the processing attributes of the job ticket and the segment ticket are merged in such a way that the attributes in a job ticket always overrule the requested attributes in a segment ticket.
In JAC, it is possible to use a variable argument in the ticket process attributes that refer to one of the identification attributes. This way, the value of the identification attributes can be used in the processing of jobs and segments (e.g., bin %custom, form %username).
If variable substitution is used, the contents of used identification attributes should match the syntax of the used processing attribute. (bin %custom ; contents of %custom should be an integer value).

Job Automation Control principles 59
There are several occasions to fill in or update the job ticket.
[9] The job ticket is filled in and updated on several levels
Job ticket applied by the user
■ You send a job to the printer using the PCI on your system. The PCI always adds processing and identification attributes to the print job. These attributes are embedded in a Job Envelope with JEC commands. Before the data arrives at the printer, the job is recognized and the printer job ticket is filled in. See ‘Integration using JEC’ on page 72.
■ You can also explicitly attach a ticket to a print job using utility software. In this case the job is also embedded in a job envelope using Job Enveloping Commands (JEC). See‘Integration using JEC’ on page 72.
You will find all details concerning the job ticket mechanism in ‘Job ticket mechanism’ on page 293 of this Technical Reference Manual.
Job ticket applied by the printer
■ When you send a job to the printer without using a PCI, i.e. by copying the file directly to the printer, the ticket is blank at the onset.
■ JAC processing identifies the communication protocol, e.g. LPD, FTP, NetWare etc. in the print job. A number of attributes are added to the job ticket.
More functionalityis added / overruled
ART does finalediting of the job ticket
Print file creation -empty job ticket
JOB TICKET
JOB TICKET
JOB TICKET
ART does final editing of the job ticket
More functionalityis added / overruled
Print file creation -empty job ticket

60 Océ Power Print Controller Technical Reference Manual
■ You may have provided a SIF (Separation Instruction File) to split an endless data stream into separate jobs and add identification attributes (from the banner page or generated by the PDL) to the resulting job tickets.
■ You may use the Association Rules Table. As the job ticket contains identification information, the printer is able to use this information to automatically process certain jobs in a previously specified way. The printer looks up these specifications in the Association Rules Table (ART). The printer uses the identification information as entry in the ART, and the ART overrides the job ticket with a ticket from the Ticket Store. You will find more details on this mechanism in ‘Association Rules Table (ART)’ on page 335 of this Technical Reference Manual.
Job separation
Boundaries between jobs can be indicated explicitly by a host (application) in the data stream by using Job Enveloping Commands (JEC). The use of JEC to provide this separation function is described in ‘JEC tickets’ on page 329.
In absence of JEC, job separation has to be accomplished by the printer itself.
For file-oriented printer connections separating jobs is easy, as jobs are delimited by file boundaries (e.g. in case of an ftp connection).
For stream-oriented printer connections (e.g. Centronics) the original user jobs cannot always be recognised as such. All submitted jobs are concatenated and form a continuous flow of data towards the printer.
The first task of JAC is job separation, i.e. splitting up a continuous data stream into separate jobs. The process of job separation is governed by describing job separators. Job separators can be actual banner pages and trailer pages, but they can also consist of a text string near the beginning or the end of the job.
Job separators are specified in a Separation Instruction File (SIF). The SIF, its separation mechanism and the PDL-specific job events that are recognised by the job separation process are described in ‘Job separation and segmentation’ on page 353.
The separator recognition process is in fact a little more complex than just matching some pattern in the data. A separator definition in a SIF consists of a number of rules which all together make up the separator. A rule in the separator can consist of a search pattern, but it can also involve the testing of

Job Automation Control principles 61
the contents of a variable. Only when all the rules are validated, the separator is considered found. It is then interpreted as the beginning or end of a job.
The separation process can repeat itself, which is very convenient for jobs arranged in a multi-layer nested structure. In a SIF, you can include an instruction to invoke a second separation step (i.e. a second SIF).
The result of the complete separation process, i.e. of all steps together, is a job.

62 Océ Power Print Controller Technical Reference Manual
Job segmentationJob separation splits up a data stream into separate jobs. In the same way, it is possible to split up a job into multiple smaller parts called ‘segments’. This segmentation is required if you want some part of the job to be processed differently from another part. The process of segmentation results in a number of data segments, each with their own specific processing requirements. Normally the job consists of a single segment, you have to use SIF to get multiple segments.
Job segmentation enables to process parts of the same print job differently, while maintaining any PDL settings which are valid for the entire job, and the order of the segments. Job segmentation works with any type of printer data.
The process of segmentation is governed by describing segment separators in a SIF. A segment separator has the same structure as a job separator, although the effect of recognising a segment separator is different.
[10] Process of segmentation
Segment B1 Segment B2 Segment B2
Job A Job B Job C
Page set-1 Page set-2 Page set-2
(Segment Banner) (Segment data) (Segment Trailer)
Input stream
Jobs
Segments
Page Sets

Job Automation Control principles 63
Job and segment identificationIdentification is a way to recognise a job or segment. It can be based on:■ I/O attributes■ banner pages■ job data.
Identification using I/O attributes Input channels and protocols often supply a number of identification attributes with each job. The number and nature of the supplied attributes differ for each I/O protocol. The ftp protocol supplies the name of the connected host and user, and for each transferred file a job name.A lp connection can give a specific segment identification attribute: when multiple files are submitted in one print job, each file is considered one segment and the file name is stored as segment identification attribute.
Identification using banner pages Many applications add a banner page to a print job. Sometimes the job submitting mechanism does this too, e.g. the Novell printing application does so. The banner page is often used to pass information about the origin, the contents or the destination of a print job. It may also be used to indicate the boundary of a segment.In most cases, a banner page is a page with a simple, straightforward layout and is coded in plain 7-bits ASCII or EBCDIC. JAC is able to extract the information contained in such a banner page and save it in identification attributes.
Identification using job data It is also possible to search the job data for certain patterns. This method is especially convenient with ASCII data, but can also be used on more complex PCL5 or PostScript data.
Note: The appearance of the printed page does not give any clue on the complexity of the job data, and the possibility to extract identification attributes.
Job and segment identification is used:■ as the key to activate a certain ticket for the complete job or the specific
segment (via ART)■ to select the required print context (PDL)■ to print identification values on flagsheets for distribution after printing■ to use the identification values inside the PDL data■ to be saved for accounting purposes.

64 Océ Power Print Controller Technical Reference Manual
Job and segment processingSpecific processing instructions can be attached to a print job and to each segment, by use of a ticket. The ticket contains the actual processing attributes for the job as a whole and may also contain references to page processing instructions required for a segment.
The processing associated to a job or segment can consist of a simple device control selection, but also of more sophisticated functions like using a form overlay or some specific page processing.
A job or segment boundary introduces a physical sheet boundary.
Device control The Océ Power Print Controller has a lot of engine features (device features) which are not available on other laser printers, e.g. the Sorter, advanced finishing etc. Device control concerns the handling of the physical pages by the printer. For example, users can select the paper tray the sheet should be fed from and how the sheet should be delivered in the output device (sorted, stapled or jogged, etc.).
JAC can handle the following device control:■ output (mailbox) bin selection■ input tray selection■ simplex/duplex printing and selection of the page side during duplex printing■ binding horizontal/vertical, including binding offset and flipping■ 2-up and 4-up printing■ same-up printing■ number of copies■ collate■ delivery: staple/jog■ resolution.
Some of these controls can also be specified from within the print job data. In this case, the PDL setting is overruled by the processing attribute in the job ticket.
Job enhancement by use of forms and flagsheets The Océ Power Print Controller provides extensive forms functionality on JAC level. Jobs can be printed with a form overlaying or underlaying the job data. On JAC level, forms originating from different PDLs can be used simultaneously on all types of print data.

Job Automation Control principles 65
Job processing also includes the printing of flagsheets. A flagsheet is a user-definable physical form which is generated by the printer and accompanies the print job. Flagsheets with routing information are particularly useful to handle the printed job when it has been taken from the output device. The flagsheet may contain fixed information and variable information. The fixed information comes from a downloaded PostScript, PCL or FOL file which resides in the printer. The variable information originates from the identification attributes in the job ticket.
The table below displays the types of forms and flagsheets that can be used with the various types of print data:
:
Note: * It is only possible to place forms as an overlay on top of a TIFF page.
Forms and flagsheets
Print data PostScript PCL FOL
PostScript yes yes yes
PCL5 yes yes yes
FOL /Line printer data yes yes yes
TIFF * yes yes yes
[11] Combining print data with forms and flagsheets
66 Océ Power Print Controller Technical Reference Manual
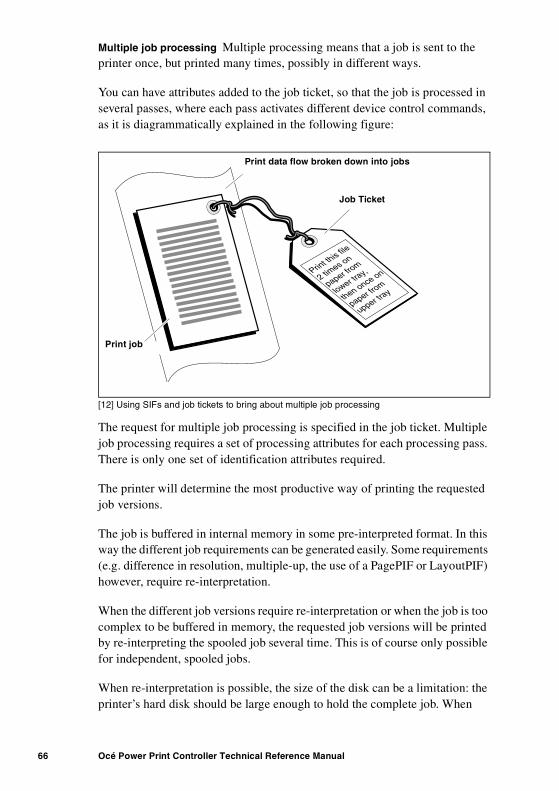
Multiple job processing Multiple processing means that a job is sent to the printer once, but printed many times, possibly in different ways.
You can have attributes added to the job ticket, so that the job is processed in several passes, where each pass activates different device control commands, as it is diagrammatically explained in the following figure:
[12] Using SIFs and job tickets to bring about multiple job processing
The request for multiple job processing is specified in the job ticket. Multiple job processing requires a set of processing attributes for each processing pass. There is only one set of identification attributes required.
The printer will determine the most productive way of printing the requested job versions.
The job is buffered in internal memory in some pre-interpreted format. In this way the different job requirements can be generated easily. Some requirements (e.g. difference in resolution, multiple-up, the use of a PagePIF or LayoutPIF) however, require re-interpretation.
When the different job versions require re-interpretation or when the job is too complex to be buffered in memory, the requested job versions will be printed by re-interpreting the spooled job several time. This is of course only possible for independent, spooled jobs.
When re-interpretation is possible, the size of the disk can be a limitation: the printer’s hard disk should be large enough to hold the complete job. When
Print th
is file
2 times on
paper from
lower tray,
then once on
paper from
upper tray
Job ticket
Print data flow broken down into jobs
Print job
Print data flow broken down into jobs
Job Ticket
Print job

Job Automation Control principles 67
re-interpretation is not possible, the size of the available internal memory for buffering can be a limitation.
Note: Multiple processing via JAC tickets only acts on a job level. Multiple segment processing is not supported yet. When multiple segment processing is tried anyway, only the first process pass is handled, all other passes are ignored silently. No logical error page is printed.
Advantages of device control and multiple job processing The combination of device control and multiple job processing offers a myriad of advantages. For example, spreadsheet output may be combined with a form to print invoices. The original invoice may be printed on paper from the upper tray, which contains pre-printed letterhead paper. Automatically, a copy may be printed on coloured paper from the lower tray and with a different form which labels the copy as ‘copy’. The original may be delivered in bin 1 of the Sorter which is regularly emptied by the mail department for further forwarding. The copies may be delivered in bin 10 of the Sorter which is the ‘private mail box’ of the accounting department.
Page Processing A set of pages can be processed in a specific way, e.g. by attaching device control or by applying forms. When a set of pages has to be processed multiple times, the job consists of a repetition of a fixed number of pages. Each page within this cycle can have its own processing applied to it.
You can apply the following page processing functionality:■ page handling■ set handling■ special banner/trailer handling.
Page Processing and Page Set Processing, are excellent tools to bring about complex job control on a page by page basis without additional burden to the host application. This is called the PagePIF mechanism. See ‘Page and page set processing’ on page 413 for more details.
Support for line printer data enhancement You can enhance a plain line printer job to a complete FOL job containing complex layout instructions. These layout instructions are specified within a LayoutPIF and are inserted in the data stream by the Line Printer Filter. JAC can be used to select the LayoutPIF.

68 Océ Power Print Controller Technical Reference Manual
Accounting For accounting purposes, the Océ Power Print Controller is able to log the print job identification and the number of pages printed for each print job. See ‘JAC logical error messages’ on page 449 for more details. Accounting information is obtained from different sources. The job ticket provides the following job identification fields for accounting:■ Jobname■ Channeltype■ Channelname■ Hostname■ Username■ Custom (CUSTOM ticket attribute).

Job Automation Control principles 69
JAC workflow diagram
The entire workflow and interaction with ART is depicted in the diagram below:
[13] JAC workflow using ART (3962)
Printer recognizesjob and selects anappropriate ticket,
using ART
I/O channel attributes are filledinto the ticket
Ticket is merged/overruled by onefrom the Store
%%
A SIF recognizes strings in thebanner page or in the job
data and uses thisinformation to fill in the
job ticket
Ticket Store containsdownloaded job tickets
JOB TICKET
JOB TICKET
JOB TICKET
Output is processedaccording to theselected ticket
I/O Channel attributes are filledinto the ticket
Ticket store containsdownloaded job tickets
Ticket is merged/overruled by onefrom the store
Printer recognizesjob and selects anappropriate ticket,using ART
Output is processedaccording to theselected ticket
a SIF recognizes strings in thebanner page or in the jobdata and uses thisinformation to fill in thejob ticket

70 Océ Power Print Controller Technical Reference Manual
Job recognition based on I/O channel attributes (1)I/O channels supply information which can be used for identification. The communication protocol writes the identification information (I/O channel attributes) into the job ticket. JAC uses this information to recognise or identify a job. How this is done is explained in ‘Recognition using I/O attributes’ on page 297.
Note: You can configure one SIF per I/O channel.
Job recognition based on the banner page (2)
In many cases the application or print submitting mechanism generates a banner page that can be used to retrieve identification information. A SIF is able to look for banner pages within a data stream and to split the stream into several jobs. The SIF also parses the banner page(s) for relevant information and fills that information into the job ticket.
Job recognition based on the job data (3)
Note: The print file itself may also contain identification information. For example: if the (PostScript) print file complies with Adobe’s Document Structuring Conventions (DSC), SIF is able to identify the job.
Not only PostScript jobs can be recognised this way. Any kind of ASCII job can be parsed by a SIF. How this is done is explained in ‘Job separation and segmentation’ on page 353.
Association Rules Table
The printer recognises the job (see 1 or 2) and checks the Association Rules Table (ART) to find the matching ticket. If a match is found, the processing specification associated to this rule is applied to the job or segment.
In the Océ Power Print Controller Series one ART handles the jobs of all input channels. The ART is a true junction in the job flow within the printer, both at the job and the segment level. This makes the ART an essential instrument for the printer operator to perform his “operator control”.

Job Automation Control principles 71
You will find more details on the ARTs in ‘ART mechanism’ on page 336.
Tickets from the Store (4)
The Ticket Store on the hard disk of the printer contains previously downloaded job tickets which, in turn, contain processing attributes for the printer to activate engine functions, print overlays etc. JAC retrieves a ticket and merges/overrules its information into the existing job ticket.For specifications of tickets and how to download tickets, see ‘Job ticket mechanism’ on page 293.
Printing and processing (5)
The processing attributes contained in the job ticket are activated and the job is printed according to the specifications.The identification attributes may be used, e.g. to copy identification items onto a flagsheet.

72 Océ Power Print Controller Technical Reference Manual
Integration using JEC
In some situations there is no need for recognition, because the required processing is already specified in the print file, e.g., when the job is composed on the host or prepared for printing by a PCI. If such an environment is fully based on Océ printing solutions, JAC allows to pass these job attributes directly to the Océ Power Print Controller printer.
In such cases an Océ Power Print Controller job is embedded in a job envelope using Job Enveloping Commands (JEC). The job envelope holds the job data as well as all identification and processing attributes. The JAC workflow using JEC is depicted in the illustration below.
[14] JAC workflow using JEC
Printer prints the dataand executes the JEC
attributes
Host wraps print fileinto job envelope (JEC)
Output is processedaccording to JEC
JEC TICKET
Host wraps print fileinto job envelope
Printer prints the dataand executes the JECattributes
Printer prints the dataand executes the JECattributes

Job Automation Control principles 73
Any host can send a print job (print file) to the printer (1)The host wraps the print job into an envelope which contains all necessary identification and processing attributes for the printer.
JEC (2)
The printer reads and prints the print data, and executes the various processing attributes included with the JEC ticket. Nevertheless, the printer verifies the processing attributes, using ART, based on the identification attributes in the job envelope.
Printing and processing (3)
The job is printed according to the specifications.
Note: JAC makes use of a variety of resources. These resources are managed by the operator of the printer. JAC takes care of downloading these resources to the Océ Power Print Controller by means of ‘download tickets’; these are JEC tickets that contain download attributes. Jobs such as downloading resources, do not require printing. See ‘Download tickets’ on page 332.
74 Océ Power Print Controller Technical Reference Manual
JAC advantages
Any kind of print job automation
Using JAC, any kind of print job automation can be obtained, for example adding supplementary pages to a job (known as flagsheets) which contain information retrieved by JAC from the job ticket. This information facilitates the identification of the printed job, but may also contain routing information, such as whom the printed matter should be forwarded to.
Flexibility in choosing where control takes place
The JAC concept allows to control the print job on different levels.
■ Are users (applications) entitled to include printer commands with the job and do they have the tools to do so? Then the job ticket can be applied by the user, by use of a PCI if the environment is based on Océ print solutions or by embedding a ticket with the job data in a job envelope (JEC).
■ Is it more appropriate to centralise print job control in the printer, possibly under supervision of the Key Operator?Then ART is likely to be the solution.
Jobs always have a ticket, independent of the level of control you choose. As ticket attribute values may be overruled by new values in the JAC workflow, it is crucial for you to understand the implications of your choice. See ‘JAC priority’ on page 75 for more details.

Job Automation Control principles 75
JAC priority
Job and segment processing can be influenced at several stages. This section describes how the value of identification and processing attributes is assigned throughout these stages, and where the final values can be used. You can find a priority scheme for quick reference in ‘JAC priority level contradictions’ on page 81.
Assigning identification attributes
Identification attributes are used to select the appropriate job and segment processing.
SIFs (Separation Instruction Files) use identification attributes to split an endless data stream into separate jobs and segments, and to add attributes to the resulting job tickets.
As a rule, an attribute value with a higher priority overrides a value with a lower priority. In the ticket, the initial value of the attribute will be replaced by a new value.
The following paragraphs describe how the value of identification attributes is determined. The printer uses the identification information to determine the job and segment processing, by use of the Association Rules Table (ART).
I/O parameters I/O channels supply information which is necessary:■ to establish the actual connection with the printer■ or to send the job to the printer.
This information can be used for identification. The number of attributes and the value of the attributes is completely determined by the communication protocol and the settings on the host. Users cannot modify the value of I/O attributes. The protocol (e.g. LPD, FTP, NetWare) is recognised in the print job and a number of attributes is added to the job ticket. They act as defaults and therefore they have low priority.
Ticket attached at job submission Some I/O channels provide the possibility to select a ticket when the print job is submitted. This is the case when you send a job to the printer using the PCI on your system. The PCI always adds
76 Océ Power Print Controller Technical Reference Manual
identification attributes to the print job. These attributes are copied in the ticket. The ticket is explicitly chosen by the user. The values of the identification attributes in these tickets have intermediate priority.
An alternative way to link attributes to the job is to embed a ticket with the job data in a job envelope (JEC). In this way too, you explicitly attach a ticket to a print job.
Attention: Keep in mind that it can be confusing to mix job control via JEC with job control via tickets in the Ticket Store, as you then mix job control on the host (i.e. ticket applied by the user) with job control on the printer (i.e. ticket applied by the printer). In most structured printer environments, the control is either on the host or on the printer but not on both. If both are used together anyway, the priority of JEC identification attributes is intermediate.
Job banner page and job data recognition Recognising patterns in banner pages or job data is a way of determining properties of a print job. The printer can retrieve information about the job as a whole. Job banner page recognition has a high priority.
Segment banner page and segment data recognition Recognising patterns in segment banner pages or segment data is a way of determining properties of a specific segment of a print job. The identification process act on a more specific level. Therefore, the identification attributes determined on segment level overrule the attributes determined on job level. Segment banner page recognition has the highest priority.
Using identification attributes
The printer uses the identification information to retrieve a matching ART entry, and the ART overrides the job or segment ticket with a ticket from the Ticket Store. This means that in the new ticket, the initial value of an attribute may be replaced by a new value.
Attention: Here again, segment identification attributes have priority over job identification attributes.
The new values become the final identification attribute values which can be used:

Job Automation Control principles 77
■ on flagsheetsBy printing identification attribute values on flagsheets, the operator can indicate the routing of the printed job.
■ inside the PDLHow the identification attributes are used by a specific PDL, is determined by the PDL itself.
■ for accountingIf accounting information is collected on the printer, then the final values for identification attributes are stored in the accounting file.
■ to select the print contextWithin the set of identification attributes, the EMULATION attribute selects the print context that will handle the job. The value of this attribute is highly related with the type of job data. If this attribute would get a new value via a ticket from the Ticket Store, then the routing of the print job will be changed accordingly. Again, it is the final value of the EMULATION attribute which sets the choice of the print context.
Assigning processing attributes
A general JAC rule defines that the printer operator always has the last word on the value of an attribute. This is called ‘printer operator control’. It means that when a user submits a job and requests a certain job processing, the printer operator can still decide whether or not this request is honoured.
The following paragraphs describe how the value of processing attributes is determined.
PDL data The processing attributes in the PDL data will only be used in absence of any JAC processing attributes. This means that JAC settings always overrule PDL settings.
PagePIF From within a ticket a PagePIF can be selected to perform page processing. The PagePIF can also include processing attributes.If the same attributes are also present in the (job or segment) ticket, then the values in the ticket have priority. If the same attributes are not present in the (job or segment) ticket, then the values in the PagePIF are used.
ART-selected segment ticket Operator control is effectuated by the ART mechanism. The ART overrides the current ticket with a ticket from the Ticket

78 Océ Power Print Controller Technical Reference Manual
Store. Therefore, any processing attributes (as specified by the PDL data or a PagePIF), can be overruled by attributes from the newly selected ticket. Via ART, a segment ticket can be associated to a segment. Within this ticket a certain segment processing recipe can be selected.
Attention: A general rule is that a processing attribute within a segment ticket can only be effectuated if the job ticket does not specify the same attribute. There is one exception to this rule: flagsheets and forms are cumulative.
I/O parameters I/O channels offer ways to determine the processing of the submitted print job (e.g. number of copies for lp). These I/O processing requests are used as the initial value for the JAC job processing. Therefore they have a low priority.
Ticket attached at job submission Some I/O channels provide the possibility to select a ticket when the print job is submitted. This is the case when you send a job to the printer using the PCI on your system. The PCI always adds processing attributes to the print job. The processing attribute values in the ticket overrule the values set by the I/O channel itself. The values in these tickets have intermediate priority.
An alternative way to link attributes to the job is to embed a ticket with the job data in a job envelope (JEC). In this way too, you explicitly attach a ticket to a print job.
Attention: Keep in mind that it can be confusing to mix job control via JEC with job control via tickets in the Ticket Store, as you then mix job control on the host (i.e. ticket applied by the user) with job control on the printer (i.e. ticket applied by the printer). In most structured printer environments, the control is either on the host or on the printer but not on both. If both are used together anyway, the priority of JEC processing attributes is intermediate.
ART-selected job ticket Operator control is effectuated by the ART mechanism. The ART overrides the current ticket with a ticket from the Ticket Store. Therefore, any processing attributes (as specified by the PDL data or a PagePIF), can be overruled by attributes from the newly selected ticket. The job ticket selected by the ART has the highest priority. A processing instruction on job level overrules the processing specified for a specific

Job Automation Control principles 79
segment. In this way, the operator has a fast and easy mechanism to change the processing of a job by changing only the job ticket.
Multiple job processing
Multiple job processing is specified in the job ticket. The priority rules for processing described in ‘JAC priority level contradictions’ on page 81, also hold for multiple job processing tickets. However, the interaction is not always a plain mechanism of one value overruling another.
Multiple job processing requires a set of processing instructions for each processing pass. These processing instructions can be present on the printer (in a ticket in the Ticket Store) or they can be sent together with the job in a job envelope (JEC). Combining these two ways results in the application of both sets of multiple processing instructions. All the processing passes from the job envelope will be executed once within each processing pass from the printer-resident ticket. So one way does not overrule the other, but they reinforce each other.
Note: Multiple processing of segments is not possible.

80 Océ Power Print Controller Technical Reference Manual
Contradiction handling
The Océ 8400 Series supports a large range of paper formats. Each paper input tray and each paper output device has its own capabilities. For example, if you select A3 paper, and you also select a Sorter bin, you make a selection that can not be granted by the printer since the Sorter only supports A4 and Letter paper format.
The mechanism, used by the Océ Power Print Controller, for solving contradictions is called ‘contradiction handling’. In the following sections the rules for contradiction handling are explained in more detail. Furthermore, the printer behaviour regarding flagsheets is explained in this chapter.
The Power Print Controller will grant your input tray and output bin selections based on the following possible contradictions:■ engine contradictions■ JAC priority level contradictions■ JAC encapsulation contradictions.
Note: Selections causing a contraction are ignored.
Engine contradictions
The following scheme shows the rules for engine contradiction handling. Priorities are ordered from high to low.
1 Paper input tray selection.The right paper format influences direct whether all data will be printed, or that data will be clipped.
2 Keep output together.Sheets within a job and flagsheets are kept together, unless you specify different.
3 Paper path selection.Paper path selection includes selecting simplex or duplex printing , and face up or face down delivery of printed sheets.
4 Paper output bin selection.The Sorter and Finisher can only accept A4/Letter LEF. The upper output tray can accept all paper formats. Thus, in case of a contradiction the job will be deposited in the upper output tray.

Job Automation Control principles 81
5 Finishing selections.Jogging is only possible when a Sorter bin or Finisher tray is selected. In case you select stapling together with Sorter bin 3, stapling will be ignored.
JAC priority level contradictionsYou can specify printer attributes at four different levels in a job:■ job ticket■ segment ticket■ PagePIF■ PDL data.
If you request for a certain attribute at different levels and with different values, a contradiction may be introduced. A contradiction may occur in identification attributes and processing attributes.
Identification attributes The following scheme shows how the final value of an identification attribute for one specific data segment is obtained. Priorities are ordered from high to low.
1 ART segment ticket2 segment banner recognition3 ART job ticket4 job banner recognition5 JEC job ticket (for example PCI)6 I/O selected job ticket (for example FTP)7 I/O parameters
Processing attributes The following scheme shows how the final value of a processing attribute for one specific data segment is obtained. Priorities are ordered from high to low.
1 ART job ticket2 JEC job ticket (for example PCI)3 I/O selected job ticket (for example FTP)4 I/O parameters5 ART segment ticket6 PagePIF7 PDL data

82 Océ Power Print Controller Technical Reference Manual
Example If you select output bin 3 in a job ticket and output bin 61 in a segment ticket, output bin 3 will be selected provided that output bin 3 does not result in an engine contradiction. If output bin 3 results in an engine contradiction, the request for output bin 61 will be granted if this selection does not result in a contradiction too.
JAC encapsulation contradictions
The most powerful feature of JAC is its capability to reorganize a job. For example, JAC allows you to generate stapled sets from parts of a print job.
Within a JAC print job the following objects can be distinguished:■ PDL frames. A PDL frame is generated by the PDL and describes one page.■ Logical frames. A Page PIF organizes one or more PDL frames into one
logical frame.■ Pages. A page describes one side of sheet.■ Sheets. A sheet consist of one or two pages.■ Sets. Multiple sheets may be organized into sets. A set can be a jog set, a
staple set, a copy set or a setsize set. For example, a staple set is set of sheets that will be stapled together. A job set may include several staple sets.
■ Segments. With JAC you can separate a print job into segments. A segment can contain several sets.
■ Process passes. A pass is a copy of a whole job: a copy set. For each pass you are allowed to change the processing attributes.
You can create these objects using JAC. The objects may result in conflicts. For example, you can not jog within a staple set. In table 15 on page 83 an overview of the hierarchy of JAC objects is given.
The vertical alignment of two objects indicates that only the object with the higher weight can include (encapsulate) one of the objects with lower weight. For example, a sheet includes pages, but no segments.

Job Automation Control principles 83
The horizontal alignment of objects indicates that there is no constraint on inclusion regarding these objects. For example, a jog set can include a copy set and vice versa.
The priority rules for objects are:■ objects with a higher weight overrule the properties of objects with a lower
weight■ if properties of an object are not overruled by objects with a higher weight
then the properties of the first included object are inherited.
Example If output bin 3 is selected on pass level, then all pages in that pass will be delivered in output bin 3.
Example If on pass and segment level no output bin is specified, and the first logical frame on a sheet requests for output bin 7, then this sheet will be delivered in output bin 7.
Flagsheet handling
The general rule for flagsheet handling is:■ sheets (including flagsheets) of a job have to be kept together as far as
possible, and desired.
JAC priority level contradictions To make this possible, there are a few extra rules regarding flagsheets. These rules are:
■ A header flagsheet will be delivered in the same bin as the first sheet of the job or segment. The selected input tray for the flagsheet will be overruled if it conflicts with the output bin selection for the first sheet of the job.
Weight Type
High Pass
Segment Jog set Copy set
Staple set
‘Set size’ set
Sheet
Page
Logical frame
Low PDL frame
[15] JAC objects hierarchy

84 Océ Power Print Controller Technical Reference Manual
■ A trailer flagsheet will be delivered in the same output bin as the last sheet of the job or segment, regardless of the input tray selection for the flagsheet.
■ Flagsheets of an empty job will be delivered in a default bin that does not conflict with the selected tray.
JAC encapsulation contradictions Flagsheets may be attached to segments and passes. How flagsheets are handled for jog sets, staple sets, copy sets, and setsize sets, is described by the following rules:■ Header flagsheets are included in the jog set that follows the flagsheet.
Trailer flagsheet are included in the preceding jog set. For jog sets it does not make any difference on which priority level the flagsheet is selected.
■ Flagsheets are only included in staple sets that are selected at a higher priority level. For example, a flagsheet selected on pass level will never be stapled since there is no higher priority level. Flagsheets selected at segment level are stapled if stapling is selected at pass level.
■ Flagsheets are included in copy sets that are selected at the same priority level as the flagsheet, or in copy sets that are selected at a higher priority level than the flagsheet. For example, if you select 10 copies at pass level, then also 10 copies of the flagsheet will be made.
■ Flagsheets are excluded of setsize sets. A setsize set counts the pages in the job data, flagsheets are no part of the job data.

Job Automation Control principles 85
Limitations of the BASIC version
This chapter describes the exceptions in the BASIC version functionality compared with the JAC version. All remaining functionality and specifications for the JAC and BASIC versions are the same.
The BASIC version of the Océ Power Print Controller has the same functionally as the JAC version, except for most of the Job Automation Control (JAC) functionality.
In short the BASIC version functionality is based on the following guidelines:■ The major part of Job Automation Control functionality is not supported.■ It is possible to use any Océ Power Print Controller based PCI in
combination with the BASIC version.■ Any job suitable for a JAC version print system should come to a
comparable, and acceptable, result on a BASIC version.■ Upgrading from a BASIC to JAC version is possible.
BASIC version functionality
In the BASIC version the following functionality is not supported:■ Separation Instruction File (SIF)■ Association Rule Table (ART)■ Tickets■ PagePIF■ LayoutPIF (as JAC objects).
Note: LayoutPIFs can be downloaded, deleted, and selected via the FOL datastream.
In the BASIC version the following functionality is supported:■ Job Envelope Commands (JEC)■ host-I/O identification and processing attributes.
Job separation and segmentation Since SIF is not supported, job separation and segmentation is not possible via SIF.

86 Océ Power Print Controller Technical Reference Manual
■ Segmentation via LP-communication channels is possible. Printing more than one file via one LP print command will result in one segment per LP file.
■ Job separation via JEC is possible. For information on JEC, refer to ‘Job Envelope Commands’ on page 86.
Job identification Host I/O specific identification attributes are supported in the BASIC version. The channelname and channeltype are defined for each I/O channel. For FTP communication also Host-ID, jobname and username are supported.■ The ART is not supported. It is not possible to link processing attributes to
identification attributes via the ART.■ Printer resident tickets are not supported. It is not possible to select a printer
resident ticket via FTP.
Job processing attributes Host-I/O specific processing attributes are supported. The host-I/O processing attributes are:■ flagsheets in LP and Netware ■ number of copies for LP host-I/O.
Job Envelope Commands The BASIC version does support JEC. All JEC ticket commands are supported with the following exceptions:■ Downloading JAC objects via JEC is not possible. The JEC command
‘Download:’ will result in printing a logical error page. ■ Multiple processing passes in one JEC ticket is not supported. The JEC ticket
is limited to only the first processing pass. If more than one processing pass is defined all remaining processing passes are ignored and a message is written in the ‘SYSLOG file’.
■ The ticket attribute ‘FORM’ is not supported. This attribute will be ignored and a message is written in the ‘SYSLOG file’.
■ The ticket attribute ‘MULTIPLEUP’ is not supported. This attribute will be ignored and a message is written in the ‘SYSLOG file’.
■ The ticket attribute ‘PAGEPIF’ is not supported. This attribute will be ignored and a message is written in the ‘SYSLOG file’.
■ The ticket attribute ‘LAYOUTPIF’ is not supported. This attribute will be ignored and a message is written in the ‘SYSLOG file’.
Flagsheets Flagsheets can not be downloaded or installed. Two flagsheets are available, ‘lpheader’ for LP communication channels, and ‘nwheader’ for Netware communications.
Accounting Accounting is supported. The accounting mechanism accounts the number of pages printed plus all identification attributes obtained from host-I/O communication and from a PCI (JEC headers).

Job Automation Control principles 87
KOS functions KOS functions are limited as follows:■ Proofing JAC Referable Objects, ARTs, SIFs, Forms, PagePIFs, and Tickets
is not possible.■ Proofing LayoutPIFs is possible in the BASIC version.■ Installation of JAC objects (including LayoutPIFs) from floppy is not
supported in the BASIC version.■ Selection of a default ART is not possible.■ Selection of a default SIF is not possible.
Input Filter Input Filters are supported in the BASIC version.

88 Océ Power Print Controller Technical Reference Manual

89
Océ Power Print Controller
Technical Reference Manual
Chapter 6Fonts
This chapter provides a description of the handling and installation aspects of fonts and symbol sets for the Océ Power Print Controller Series.

90 Océ Power Print Controller Technical Reference Manual
Introduction
In the Océ Power Print Controller the following fonts are available:■ Standard Outline fonts■ Standard Bitmap fonts■ Optional Outline fonts■ Optional Bitmap fonts■ Downloadable Outline fonts■ Downloadable Bitmap fonts■ Installed Downloadable Outline fonts■ Installed Downloadable Bitmap fonts
Standard fonts are pre-installed objects on the hard disk of an Océ Power Print Controller printer. If you install an interpreter, the standard font set will be installed automatically. Optional fonts can be installed via floppy.
Installed downloadable fonts are downloaded fonts which are stored on the printer hard disk. They will survive a power down and at power up they will be recognized as if they were downloaded during power up.

Fonts 91
Global overview fonts
Font types
Fonts can be specified in different formats (font types):
Intellifont The Intellifont format is developed by AGFA Compugraphic and used by HP printers. It is not supported by the Océ Power Print Controller.
Speedo The Speedo outline format is developed by Bitstream. The Speedo outlines are available with different metrics, to achieve metric compatibility with Intellifont (HP) metrics, Type 1 (Adobe) metrics, Truetype (Apple/Microsoft) metrics and of course Bitstream metrics.
Type 0, Type 1, Type 3, Type 5, Type 42 ■
Type 0 fonts are composed base fonts. Composite fonts are a level 2 feature.■ Type 1 fonts are standard available on the printer.■ Type 3 fonts are user defined base fonts. Characters are defined as ordinary
PostScript language procedures. Type 3 fonts may include scalable or bitmap fonts.
■ Type 5 fonts are the internal standard fonts (ROM fonts).■ Type 42 fonts are downloadable TrueType fonts within a PostScript
description.
TrueType The TrueType outline format is developed by Apple/Microsoft and used by Apple Macintosh System 7.0 and Microsoft Windows System. The TrueType outlines used in Macintosh environments do contain a limited set of characters.
Bitmap fonts Bitmap fonts are also called raster fonts.
Downloadable bitmap and scalable fonts Fonts represented with vector graphics are called scalable fonts

92 Océ Power Print Controller Technical Reference Manual
Outlines delivered by OcéThe table below shows the outline fonts, related to the outline format and metric, that Océ can deliver.
Note: The 300 dpi bitmap Océ bitmap fonts are not mentioned here.
(1) The set of 43 outlines contains the standard PostScript (compatible) font set of 13 Type 5 typefaces (see later on for a detailed specification).
(2) The set of 10 outlines contains the HP 5Si standard set of PCL TrueType fonts (see later on for a detailed specification).
(3) The set of 35 outlines contains the HP 5Si standard set of PCL Intellifont compatible outlines (see later on for a detailed specification).
(4) The TrueType outlines Océ delivers do contain a limited set of characters related to the available Speedo outlines.
Océ font deliverables Type 1 TrueType Speedo
Adobe metrics 43 outlines (1)
43 outlines
HP metrics 35 outlines (3)
Bitstream metrics 1009 Type 1 1085 outlines (4)
1085 outlines
Apple/Windowsmetrics
10 outlines (2) 10 outlines
[16] Océ deliverable typefaces.

Fonts 93
Supported font types and metrics
The font types supported by a PDL are listed in the table below:
FOL metrics compatibility
For the FOL PDL the metrics of the scalable fonts can be specified as compatible with the Océ 6800 Printer Series by setting the FOL point size in C-KOS to DIDOT. In order to be metrics compatible with the PCL5e PDL, the FOL point size should be set to PICA.
Metrics Type0,1,3,5,42
TrueType Speedo Océ 300 dpi Bitmap
PS-L2 AdobeBitstream
FOL BitstreamWindows
BitstreamWindowsHP
Océ HP LJ2000
PCL5e BitstreamWindows
BitstreamWindowsHP
AJC/FOL OcéHP LJ2000
[17] Supported fonttypes
94 Océ Power Print Controller Technical Reference Manual
Installation and configuration aspects
Standard fonts
For each supported PDL a standard set of outlines and/or bitmap fonts is defined. These standard sets are available on the Océ Power Print Controller hard disk. The installation procedure of a PDL contains also the installation of the standard fontset.
The installation of a PostScript interpreter as PDL, Form PDL and/or Flagsheet PDL includes the installation of 43 Type 1 outline fonts.
The installation of a FOL interpreter as PDL, Form PDL and/or Flagsheet PDL includes the installation of the standard HP 5Si fontset, some Speedo outlines and 300 dpi bitmap fonts.
The installation of a PCL5e interpreter as PDL, Form PDL and/or Flagsheet PDL includes the installation of the standard HP 5Si fontset.
The installation of the AJC/FOL includes the installation of some 300 dpi bitmap fonts.
Optional fonts
Optional fonts (outlines and bitmap fonts) can be installed from floppy by using C-KOS. It is also possible to install optional fonts from a floppy formatted on an Océ 6800 Printer.
Optional fonts for FOL and AJC/FOL should not be secured. If you use Océ 6800 font floppies, then these must be desecured.
When installing optional fonts, the C-KOS install option will first determine the font types available on the floppy. Next, the C-KOS displays a sequence of installed PDLs. The user may then select one or more PDLs for which the fonts have to be installed. Only the font types which are supported by a PDL will be installed. After installation of a font, the font may be referenced in the datastream as well as in flagsheet and form descriptions.

Fonts 95
PostScript If a PostScript interpreter is installed as PDL, Form PDL and/or Flagsheet PDL, Type 1 (pfa) and Type 3 (pfb) fonts can be installed from floppy.
FOL If a FOL interpreter is installed as PDL, Form PDL and/or Flagsheet PDL, the following font types can be installed from floppy:
■ 300 dpi Océ bitmap fonts■ TrueType fonts■ Speedo fonts■ Symbolsets
The TrueType fonts which have to be installed should contain a PCL section. TrueType fonts delivered by Océ do contain the required PCL section.
These optional objects can be selected as default font/symbolset within C-KOS.
PCL5e If a PCL5e interpreter is installed as PDL, Form PDL and/or Flagsheet PDL, TrueType and Speedo fonts can be installed from floppy. The TrueType and Speedo fonts which have to be installed should contain a PCL table section, otherwise the PCL Type face id (necessary for font selection) and the Symbolset id array (needed for symbolset matching) cannot be determined.
TrueType fonts delivered by Océ do contain the required PCL section.
PCL5e symbolsets can also be installed.
AJC/FOL If an AJC/FOL PDL is installed, only 300 dpi Océ bitmap fonts can be installed from a user disk. If a 6800 formatted floppy is used, 300 dpi Océ bitmap fonts and 6800 installed PCL4 download fonts can be installed.
These optional objects can be selected as default font/symbolset within C-KOS.
96 Océ Power Print Controller Technical Reference Manual
Download fontsDownload fonts can be software downloaded from applications. These download fonts can be temporary or permanently downloaded.
Temporary storage means that the fonts will be stored in local memory of the PDL environment and will be removed after the job has been completely processed. When fonts are downloaded permanently they will also be stored in local memory of the PDL environment, but they will be available until the printer is turned off.
Download fonts will always be local to the PDL in which they are downloaded. Other PDLs (i.e. Form PDL and/or Flagsheet PDL) do not have any knowledge of the downloaded fonts in a printcontext.
If download fonts are used in forms, the fonts have to be included in the form description.
Usage of download fonts in flagsheets holds that the download fonts have to be part of the flagsheet definition.
Only the PostScript, PCL5e, and AJC/FOL interpreters support download fonts in the way as specified in the language itself.
Installed download fonts
Installed download fonts are download fonts that were downloaded as permanent fonts, while the INSTALLED/PERMANENT flag for the PDL in C-KOS was set to INSTALLED.
During start-up these fonts will be scanned in by the PDL and can be used with the same specifications as if they were downloaded.
This feature can be used to circumvent the cumbersome downloading of fonts, each time the printer is turned on. It is supported by the PCL5e and AJC/FOL PDL.
The PCL5e PDL also supports this feature for downloaded symbolsets.

Fonts 97
Symbolsets
Within AJC/FOL, FOL and PCL5e there is a strong relation between fonts and symbolsets. Symbolsets are used to identify the symbols in a font.
PCL5e symbolsets
The symbolsets which can be selected within the PCL5e context are specified in the HP 5Si reference manual. The factory installed symbolsets are mentioned in the first two columns of the table on the next page.
Additional symbolsets can be downloaded to the printer in the way as specified in the HP 5Si reference manual.
The Key Operator System provides a function to specify whether permanently downloaded symbolsets should be treated as installed objects. This means that permanently downloaded symbolsets will survive a power down.
FOL symbolsets
The factory installed FOL symbolsets consist of three categories:
■ PCL VSi equivalent symbolsets■ Océ supersets■ Symbolsets needed for support of FOL bar code functionality.
The HP 5Si symbolsets are symbolsets with RO-identifiers in the range 1 up to 2000. Océ supersets are identified by RO-identifiers in the range 2001 up to 2079. Symbolsets for support of the FOL bar code functionality are identified by RO-identifiers in the range 2080 up to 2090.
Within the FOL context it is possible to install additional symbolsets. To install an additional symbolset, two symbolset files should be present on a user disk. One of the symbolset files is used by the FOL interpreter for selection of a symbolset. The other symbolset file is used by the (outline) rasteriser to identify the symbol in a font file.

98 Océ Power Print Controller Technical Reference Manual
If symbolsets have to be installed for usage in combination with the Océ bitmap fonts, only the first symbolset file is required.
AJC/FOL symbolsets
The factory installed AJC/FOL symbolsets consist of two categories:
■ HP Laserjet 2000 equivalent symbolsets■ Océ supersets.
Within the AJC/FOL context it is possible to install additional symbolsets. Both 6800 and 8400 formatted diskettes can be used. In the following tables you can see an overview of the AJC/FOL supported symbolsets.
Overview symbolsets
PCL-ID
PCL symbolset
FOL symbolset
FOL,AJC/FOL superset
RO-ID
AJC/FOL symbolset
8U Roman 8 HP_Roman-8 19 (HPTEXT) 277 HP_Roman-8
0E Roman Ext Roman_Extension 19 (HPTEXT) 5 Roman_Extension
0N Ecma Latin ISO_100_Latin_1 19 (HPTEXT) 14 ISO_100_Latin_1
2N Latin 2 HP_Latin_2 19 (HPTEXT) 78
5N Latin 5 HP_Latin_5 19 (HPTEXT) 174
10U PC-8 HP_PC-8 14 (HPIBM-PC)
341 HP_PC-8
11U PC-8 D/N HP_PC-8_D/N 14 (HPIBM-PC)
373 HP_PC-8_D/N
12U IBM 850 HP_PC-850 14 (HPIBM-PC)
405
17U PC 852 HP_PC-852 14 (HPIBM-PC)
565
9T PC Turk HP_PC_Turk 14 (HPIBM-PC)
308
19U Win 3.1 L1 HP_Win_3.1_L1 19 (HPTEXT) 629
9E Win 3.1 L2 HP_Win_3.1_L2 19 (HPTEXT) 293
5T Win 3.1 HP_Win_3.1_L5 19 (HPTEXT) 180
7J Desktop Desktop 19 (HPTEXT) 234
[18] Overview Symbolsets

Fonts 99
12J MC Text HP_MC_Text 19 (HPTEXT) 394
10J PS Text PS_Text 19 (HPTEXT) 330
13J Ven Intl HP_Ven_Intl 19 (HPTEXT) 426
14J Van U.S. HP_Ven_US 19 (HPTEXT) 458
6J MS Pub MS_Pubs 19 (HPTEXT) 202
8M Math-8 HP_Math-8 13 (HP-MATH)
269 HP_Math-8
5M PS Math PS_Math 13 (HP-MATH)
173
6M Ven Math HP_Ven_Math 13 (HP-MATH)
205
15U PI HP_Pi 20 (HPPI) 501
1U Legal HP_US_Legal 19 (HPTEXT) 53 HP_US_Legal
1E ASCII ISO_14_JIS_ASCII
19 (HPTEXT) 11 ISO_14_JIS_ASCII
19 (HPTEXT) 21 ISO_6_ASCII
0U ISO-4 U.K. ISO_4_United-Kingdom
19 (HPTEXT) 37 ISO_4_United_Kingdom
0S ISO-11 Swed
ISO_11_Swedish 19 (HPTEXT) 19 ISO_11_Swedish
19 (HPTEXT) 115 ISO_10_Swedish
0I ISO-15 Ital ISO_15_Italian 19 (HPTEXT) 9 ISO_15_Italian
2S ISO-17 Span
ISO_17_Spanish 19 (HPTEXT) 83 ISO_17_Spanish
19 (HPTEXT) 51 HP_Spanish
19 (HPTEXT) 211 ISO_85_Spanish
1G ISO_21 Ger ISO_21_German 19 (HPTEXT) 39 ISO_21_German
19 (HPTEXT) 7 HP_German
0D ISO-60 Norw
ISO_60_Norwegian_1
19 (HPTEXT) 4 ISO_60_Norwegian_1
19 (HPTEXT) 36 ISO_61_Norwegian_2
1F ISO-69 Fr ISO_69_French 19 (HPTEXT) 38 ISO_69_French
19 (HPTEXT) 6 ISO_25_French
19 (HPTEXT) 75 ISO_57_Chines
19 (HPTEXT) 85 ISO_2_Intern
19 (HPTEXT) 147 ISO_16_Portug
PCL-ID
PCL symbolset
FOL symbolset
FOL,AJC/FOL superset
RO-ID
AJC/FOL symbolset
[18] Overview Symbolsets
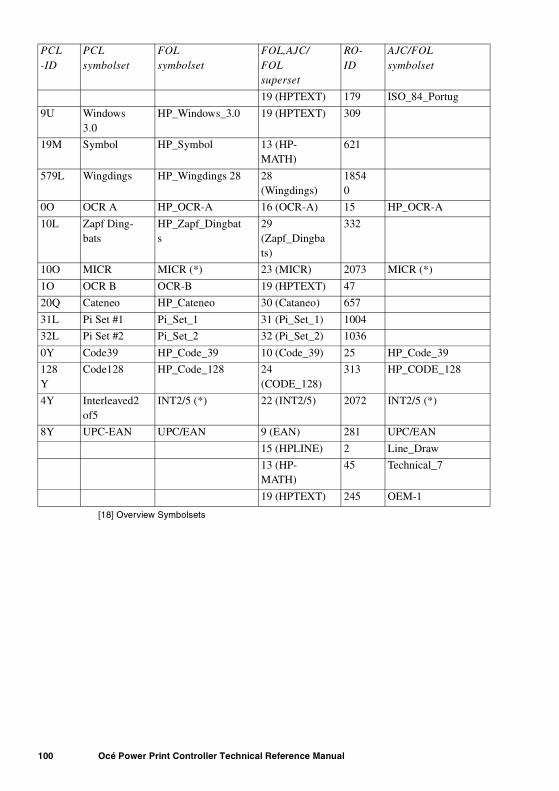
100 Océ Power Print Controller Technical Reference Manual
19 (HPTEXT) 179 ISO_84_Portug
9U Windows 3.0
HP_Windows_3.0 19 (HPTEXT) 309
19M Symbol HP_Symbol 13 (HP-MATH)
621
579L Wingdings HP_Wingdings 28 28 (Wingdings)
18540
0O OCR A HP_OCR-A 16 (OCR-A) 15 HP_OCR-A
10L Zapf Ding-bats
HP_Zapf_Dingbats
29 (Zapf_Dingbats)
332
10O MICR MICR (*) 23 (MICR) 2073 MICR (*)
1O OCR B OCR-B 19 (HPTEXT) 47
20Q Cateneo HP_Cateneo 30 (Cataneo) 657
31L Pi Set #1 Pi_Set_1 31 (Pi_Set_1) 1004
32L Pi Set #2 Pi_Set_2 32 (Pi_Set_2) 1036
0Y Code39 HP_Code_39 10 (Code_39) 25 HP_Code_39
128Y
Code128 HP_Code_128 24 (CODE_128)
313 HP_CODE_128
4Y Interleaved2of5
INT2/5 (*) 22 (INT2/5) 2072 INT2/5 (*)
8Y UPC-EAN UPC/EAN 9 (EAN) 281 UPC/EAN
15 (HPLINE) 2 Line_Draw
13 (HP-MATH)
45 Technical_7
19 (HPTEXT) 245 OEM-1
PCL-ID
PCL symbolset
FOL symbolset
FOL,AJC/FOL superset
RO-ID
AJC/FOL symbolset
[18] Overview Symbolsets

Fonts 101
Overview Océ Supersets
RO-ID
Océ super-set number
FOL AJC/FOL remarks
2064 15 HPLINE HPLINE
2068 19 HPTEXT HPTEXT
2049 19 standard standard
2065 16 OCR-A OCR-A
2059 10 Code_39 Code_39
2062 13 HPMATH HPMATH
2063 14 HPIBMPC HPIBMPC
2050 1 scientific scientific
2053 4 Formula Formula
2058 9 EAN EAN
2070 21 IBMTEXT IBMTEXT
2071 21 EBCDIC EBCDIC
2072 22 INT2/5 INT2/5
2074 24 CODE_128 CODE_128
2073 23 MICR MICR
2077 27 MSI MSI
2080 2080 Code39 Only i.c.w. FOL Barcode function
2081 2081 Industrial2of5 Only i.c.w. FOL Barcode function
2082 2082 Interleaved2of5 Only i.c.w. FOL Barcode function
2083 2083 CodaBar Only i.c.w. FOL Barcode function
2084 2084 MSI-PLESSY Only i.c.w. FOL Barcode function
[19] Overview Océ Supersets

102 Océ Power Print Controller Technical Reference Manual
2085 2085 UPC-EAN Only i.c.w. FOL Barcode function
2086 2086 Code 128 Only i.c.w. FOL Barcode function
RO-ID
Océ super-set number
FOL AJC/FOL remarks
[19] Overview Océ Supersets

103
Océ Power Print Controller
Technical Reference Manual
Chapter 7Centronics connection to the Océ Power Print Controller
This chapter provides all the details you need to physically and logically connect the Océ Power Print Controller to the host computer or network using a Centronics interface. It also documents the Centronics related JAC attributes.

104 Océ Power Print Controller Technical Reference Manual
Applications of a Centronics connection with the Océ Power Print Controller
Centronics connections may be used to connect a stand-alone host, a networked host or a protocol converter to the Océ Power Print Controller.
[20] Possible applications of a Centronics connection with the Océ Power Print Controller
Networked host(s)
Stand-alone host
Print Server
Centronics
Centronics
Stand alone Host
Networked Host(s)
Print server

Centronics connection to the Océ Power Print Controller 105
Centronics implementation in the Océ Power Print Controller
All Océ Power Print Controller printers can optionally be equipped with a Dual Parallel Port (DPP) Board. This DPP board is a PCI based board which holds 2 independent Centronics ports.
Cabling
The connector type of both Centronics ports is ‘IEEE 1284-C’. Both ports support the ‘Compatibility mode’ only, and use the same ‘IEEE Std 1284-1994’ compliant cable. These standard cables can also be ordered from Océ.
To use the Centronics port you need one of the following cables:■ a IEEE 1284-C connector (printer side) combined with a male 25-pin D-sub
connector (host side)■ a IEEE 1284-C connector (printer side) combined with a male 36-pin Champ
connector (host side).
For more information on the pin layout of the cable, refer to ‘Centronics connector pin layout’ on page 110.
Examples: To make a connection to a PC host and for some protocol converters you need a D-sub cable. For some protocol converters and multiplexers you need a Champ cable.

106 Océ Power Print Controller Technical Reference Manual
The location of the Centronics board in the printer is shown in the two figures below.
[21] Location of the DPP board on the back of the Océ 8400 Series
Centronics port 1
Centronics port 2
Centronics connection to the Océ Power Print Controller 107
Centronics parameters in KOS
Centronics communication parameters can be separately specified for each port, using the Key Operator System. Whenever a Centronics communication parameter is changed, the new settings become effective immediately.
The following settings can be changed by the Key Operator:■ enabling or disabling a Centronics communication port■ queue state■ queue handling■ the communication time-out■ enabling or disabling the status lines■ the host data mode (ASCII, EBCDIC, MIXED).
The various settings are discussed in more details in the following paragraphs. You can find more details on how to operate the Key Operator System in the System Administration Manual of your printer.
Enabling/disabling a Centronics communication port
Each port can separately be disabled or enabled. When the Key Operator disables a port at the moment that data communication takes place, the transfer stops immediately and the Océ Power Print Controller assumes an end-of-job.
If a Centronics communications port is disabled, the host can no longer send data to the printer.
Queue state
The Centronics queue state can be:■ released: the data is sent to the appropriate print context■ on hold: the data is held in the Centronics channel queue.

108 Océ Power Print Controller Technical Reference Manual
Queue handlingThe queue handling for Centronics channel can be set to:■ Print while spool■ Spool then print■ Direct printing.
For more information on the queue state and queue handling, refer to the System Administration Manual of your printer.
The communication time-out
The time-out allows for automatic closing of the Centronics service. If a time-out has been specified, the printer forces an end-of-job condition after the time-out is exceeded. If no commands entered the Centronics interface within the time-out, the Centronics service is closed.
The time-out can be set from 0 through 9999 seconds. If you set the time-out to 0, the time-out mechanism is disabled. Default, the time-out time equals 10 seconds. The time-out can be changed with KOS.
Note: When the time-out mechanism is disabled, it is useful that the job boundaries can be detected with a SIF in order to force an end of job condition.
Enable/disable the use of status signal lines
Enabling the use of signal lines implies that the following printer statuses are signalled to the host through the respective Centronics interface signals:
Printer status Active signal
Printer requires a user intervention, other than interventions due to any interactive printer mode
PError
Printer on-line/off-line, using the <LINE> key on the operat-ing panel
Select
System error or permanent engine error Fault

Centronics connection to the Océ Power Print Controller 109
The ‘PError’, ‘Select’ and ‘Fault’ signals are completely independent from each other.
If the signal lines are disabled, the printer status is not signalled to the host.

110 Océ Power Print Controller Technical Reference Manual
Centronics connector pin layout
The DPP-board has 36-pins mini D-sub connectors as shown in the figure below:
[22] Pin layout 36-pins D-sub mini connector.
Centronics pin mapping to a CHAMP-type connector
The table below shows the connector pin mapping of the IEEE 1284-C connector to a 36-pin, CHAMP-type connector.
36-pin CHAMP connector
signal mnemonic 36-pin mini D-sub 1284-C connector
1 nStrobe 15
2 Data 1 6
3 Data 2 7
4 Data 3 8
5 Data 4 9
6 Data 5 10
7 Data 6 11
8 Data 7 12
Cable plug (male)Printer connector (female)
Pin 1
Pin 36
Pin 19
Pin 18
Pin 1

Centronics connection to the Océ Power Print Controller 111
Note: The ‘Logic High’, ‘Logic Gnd’ and ‘Chassis Gnd’ will never be delivered. Not all signal grounds are connected.
Note: In this table active low signal are indicated with the prefix ‘n’.
9 Data 8 13
10 nAck 3
11 Busy 1
12 PError 5
13 Select 2
14 nAutoFd 17
15 Not connected Not connected
16 Logic Gnd Not connected
17 Chassis Gnd Not connected
18 Pr Logic High 36
19 Signal Gnd 33
20 Signal Gnd 24
21 Signal Gnd 25
22 Signal Gnd 26
23 Signal Gnd 27
24 Signal Gnd 28
25 Signal Gnd 29
26 Signal Gnd 30
27 Signal Gnd 31
28 Signal Gnd 20
29 Signal Gnd 22
30 Signal Gnd 34
31 nInit 14
32 nFault 4
33 Not connected 21
34 Not connected 23
35 Not connected Not connected
36 nSelectIn 16
36-pin CHAMP connector
signal mnemonic 36-pin mini D-sub 1284-C connector

112 Océ Power Print Controller Technical Reference Manual
Centronics pin mapping to a 25-pin D-sub connectorThe table below shows the connector pin mapping of the IEEE 1284-C connector to a 25-pin, D-sub connector.
Note: In this table active low signal are indicated with the prefix ‘n’.
25-pin D-sub connector
signal mnemonic 36-pin mini D-sub 1284-C connector
1 nStrobe 15
2 Data 1 6
3 Data 2 7
4 Data 3 8
5 Data 4 9
6 Data 5 10
7 Data 6 11
8 Data 7 12
9 Data 8 13
10 nAck 3
11 Busy 1
12 PError 5
13 Select 2
14 nAutoFd 17
15 nFault 4
16 nInit 14
17 nSelectIn 16
18 Signal Gnd 33
19 Signal Gnd 24
20 Signal Gnd 26
21 Signal Gnd 28
22 Signal Gnd 30
23 Signal Gnd 19
24 Signal Gnd 21
25 Signal Gnd 34
Not connected Pr Logic High 26

Centronics connection to the Océ Power Print Controller 113
Centronics protocol
Signal function and naming
The various signals of the Centronics protocol are depicted in the illustration below:
:
[23] Graphical representation of the Centronics protocol
The Centronics port of the Océ Power Print Controller operates in the ‘Compatibility Mode’.
1 When the host generates valid data on the ‘Data’ lines, it activates the ‘Strobe’ signal as to trigger the printer to read the data.
2 The printer activates the ‘Busy’ signal as long as the ‘Strobe’ signal is active.3 The ‘Data’ lines are latched by the ‘Strobe’ signal. The printer issues the
‘Acknowledge’ signal to indicate that it could read the data.4 The ‘Busy’ and ‘Acknowledge’ signals are reset, indicating that the host can
send new data.
Strobe When this signal goes from inactive (high) to active (low) the printer latches the data on the ‘Data’ lines.
StrobeData bitAcknowledgeBusyPErrorSelect
PR Logic highInitFault
8x

114 Océ Power Print Controller Technical Reference Manual
Data Each line carries a specific bit: ‘Data 1’ is the least significant bit; ‘Data 8’ is the most significant bit.
Acknowledge While the ‘Busy’ signal is active, the printer generates a negative going pulse indicating to the host that a byte is being read. After a reset (going into low state) of the ‘Busy’ signal, the host can send a new character.
Busy Whenever the printer cannot receive more data, it activates the ‘Busy’ line. This can happen in the following cases:
■ the printer is currently receiving a data byte■ the input buffer is full■ the printer is off-line■ the printer requires user intervention■ there is an error condition.
PError The printer activates this signal when it requires user intervention.
Select An active level here means that the printer is on-line.
SelectIn This signal is not supported.
Peripheral Logic High This line is active to indicate that all other signals coming from the printer are in a valid state. This signal is set low to indicate that the printer power is off or that the printer-driven interface signals are in an invalid state.
Host Logic High This line is active to indicate that all other signals coming from the host are in a valid state. This signal is set low to indicate that the host power is off or that the host-driven interface signals are in an invalid state.
AutoFd This signal is not supported.
Init This signal remotely initializes the printers to its default status and clears its buffers on request of the host computer.
Fault An active level indicates that the printer has detected a fault condition.
Signal Ground The number of signal ground connections depends on the implementation.
Chassis Ground The chassis ground of the printer is connected via the connector housing to the shielding of the interface bundle.

Centronics connection to the Océ Power Print Controller 115
Advanced settings
The Centronics ports have some parameters which can be altered by your local Océ System Consultant. The advanced settings for the Centronics ports are:■ Acknowledge pulse width (default 1 µs)■ Strobe to Acknowledge delay (default 0 µs)■ Buffer size■ Confirmation time-out.
Signal timing
The timing of the Centronics signals is depicted in the diagram below:
[24] Centronics signal timing
Data byte n Data byte n+1
Setup
Strobe
Hold Setup
Strobe
Hold
Ready BusyReady Busy
Ready nBusy
Next
Ack
peripheral busyBusy
nStrobe
D1...D8nAutoFeed
nAck
nSelectIn

116 Océ Power Print Controller Technical Reference Manual
The various time frames within the Centronics signal timing are further specified in the table below:
Note: The maximum value stated for peripherals in this table are referenced to the peripheral. For example, the peripheral cannot require more than 500 ns data setup time.
Note: Recognise that complementary signal changes may have overlapping signal transitions. The zero minimum value cannot be guaranteed.
Buffer size
The buffer size must be specified within the range of 4,096 and 262,140 bytes.
Note: The buffer size must be a multiple of 4.
Confirmation time-out mechanism
Whenever a printer wait situation occurs, e.g. ‘PError’, the host will be informed about this specific situation in case return communication is enabled on the printer.
When using Centronics return communication, the operator should always keep in mind that various host systems, such as IBM AS/400, PC’s or Siemens main-frame, require a host confirmation on the host after the printer wait
Specification minimum (ηs) maximum (ηs)
T ready 0 -
T setup host 750 -
T setup peripheral - 500
T strobe host 750 500 µs
T strobe peripheral - 500
T hold host 750 -
T hold peripheral - 500
T busy - 500
T reply 0 -
T ack 500 20 µs
T nbusy 0 -
T next 0 -

Centronics connection to the Océ Power Print Controller 117
situation has been solved. It is only after this confirmation that the transmission of job data will be resumed.
Thus, from the printer’s point of view, it may take some time before the remaining job data arrives at the printer. This time interval might exceed the default job time-out value that is used on the Centronics channel to distinguish between various jobs.
To handle these situations, the printer will allow the operator a certain period to confirm the solved printer wait situation on the host. If even after this ‘confirmation time interval’ no new data has arrived at the printer, the printer will consider the current job to be finished (‘END OF JOB’ condition). The confirmation time interval can be adjusted as a tuning parameter.
The confirmation time interval is started after the wait situation has been solved on the printer and is additional to the regular job time-out interval. Default, the confirmation time-out mechanism is disabled (value 0).
If the operator confirms the printer wait on the host after the confirmation time-out interval is exceeded, the printer will treat the new data as a new job.
Note: During the confirmation time-out interval, the printer is still processing the current Centronics job, so no jobs from other input channels can be processed.
In case the Centronics input channel is configured for ‘direct printing’, it is highly recommended to enable the Centronics return communication to the host. This will ensure that in situations where the printer buffer is full, the host operator will be notified and the channel can handle the resulting confirmation actions on the host.
In case the Centronics input channel is configured for spooled printing (‘print while spool’ or ‘spool then print’) it is highly recommended to disable the Centronics return communication to the host. This way, the data transmission from the host is not blocked by a printer wait situation.

118 Océ Power Print Controller Technical Reference Manual
Centronics and JAC
Centronics job separation
As the Centronics I/O channel is a byte stream oriented channel, the Océ Power Print Controller cannot distinguish print jobs. However, there are sufficient other methods to detect job boundaries:
Generic JAC software JAC software on the Océ Power Print Controller is able to detect job boundaries based on generic JAC functionality.
time-out The KOS time-out setting may also be used to force job boundaries. The Océ Power Print Controller assumes there is an end-of-job, when it does not receive any character during a given time-out. This time-out can be specified using KOS, between 1 second and endless. For more details, refer to the System Administration Manual of your printer.
Page length The SIF page length setting in KOS can also be used to specify job boundaries. For more details, refer to the System Administration Manual of your printer.
The operator can select (or overrule) specific job processing options through specific entries in the ART, using JAC identification attributes.
Centronics identification attributes for JAC
Each file arriving over the Centronics interface will automatically receive one of the following JAC identification attributes, depending on whether the job arrived over the first or second parallel interface:
Interface Identification attribute
Centronics port 1 CHANNELNAME “CENTRONICS_1”
Centronics port 2 CHANNELNAME “CENTRONICS_2”
either one CHANNELTYPE “CENTRONICS”
[25]

119
Océ Power Print Controller
Technical Reference Manual
Chapter 8Ethernet connection to the Océ Power Print Controller
This chapter provides all the details you need to physically connect the Océ Power Print Controller to the host computer or network using an Ethernet connection. Further, the DHCP implementation for the Ethernet connection is described in this chapter.

120 Océ Power Print Controller Technical Reference Manual
Applications of an Ethernet connection with the Océ Power Print Controller
[26] Possible applications of an Ethernet connection with the Océ Power Print Controller
IBM AS/400 or DEC VAXAlpha VMX
NetwareFile Server
Apple Environment
Windows NT Environment
Unix Environment
Océ PRISMAflowOcé Repro Center
PC Netware
Network
Ethernet connection to the Océ Power Print Controller 121
Ethernet is a network standard which is used in a large number of host environments. Some of the main environments in which Ethernet is used to connect to the Océ Power Print Controller are:
■ Microsoft Windows environments■ IBM AS/400■ NetWare environments■ Unix environments■ Océ PRISMAflow and Océ Repro Center■ Digital: DEC VAX and Alpha VMS.
In Ethernet networks several protocols or protocol sets may be used. In connection with the Océ Power Print Controller printers, the most common protocol is TCP/IP, but also IPX/SPX and Ethertalk protocols are used. TCP/IP (Transmission Control Protocol/Internet Protocol) is a layered set of protocols which are standardised across all the layers.
TCP/IP Protocol
TCP is a highly reliable transport protocol, between hosts in packet switched computer communication networks, and in interconnected systems of such networks.
The Internet Protocol (IP) provides for transmitting blocks of data called datagrams from sources to destinations, where sources and destinations are hosts identified by fixed length addresses.

122 Océ Power Print Controller Technical Reference Manual
Ethernet implementation in the Océ Power Print Controller
On the Océ Power Print Controller you find an RJ45 connector (auto sensing 10 or 100Mb/s). Ethernet connection uses UTP cabling. UTP (Unshielded Twisted pair) cable looks much like standard phone cable. The cable should have RJ45 plugs.
The connection detects automatically whether the connection is hooked up for 10 or 100 Mb.
The UTP connector is located at the rear side of the controller.
[27] Location of the Ethernet port on the back of the Océ 8400 Series
Plugging in an RJ-45 connector
Ethernet port

Ethernet connection to the Océ Power Print Controller 123
Diagnose the Ethernet connection
There are three diagnose tools for the Ethernet connection:
■ Powerup test■ Advanced KOS or SDS■ Status Report
Each time you start up the printer, the interface board tests itself and isolates the chip set and cabling faults. Its messages are logged in the ‘/var/adm/messages’ file.
If you are using advanced pre-KOS or advanced pre-SDS, you can check the status of the network connection by selecting the option ‘diag’ from the ‘Network’ menu. This will run the UNIX commands ‘netstat -ia’ and ‘ifconfig -a’.
Name Mtu Net/Dest Address Ipkts Ierrs Opkts Oerrs Collis Queuelo0 8232 loopback localhost 7938 0 7938 0 0 0hme0 1500 192.1.1.0 Oce8465 567353 0 286540 0 10 0trp0 2052 192.1.2.0 Oce8465 97029 0 3953 0 0 0lo0: flags=849<UP,LOOPBACK,RUNNING,MULTICAST> mtu 8232
inet 127.0.0.1 netmask ff000000hme0: flags=863<UP,BROADCAST,NOTRAILERS,RUNNING,MULTICAST> mtu 1500
inet 192.1.1.0 netmask ffffff00 broadcast 192.1.1.255 trp0:flags=1863<UP,BROADCAST,NOTRAILERS,RUNNING,MULTICAST,MULTI_BCAST>
mtu 2052 inet 192.1.2.0 netmask ffffff00 broadcast 192.1.2.255
The interface is OK if:
■ RUNNING is one of the flags■ The number of collisions is:
zero for trp0,less than 20% of the number of input packets for hme0.
Check the Status Report for the network settings in case the results are not okay.
Refer to the System Administration Manual for more information on the KOS/SDS menu tree and on how to print a full Status Report.

124 Océ Power Print Controller Technical Reference Manual
DHCP implementation
DHCP stands for Dynamic Host Configuration Protocol. With DHCP enabled, the printer gets the following Ethernet configuration settings from the DHCP-server:
■ Printer name■ Internet address■ Netmask■ Router name■ Router Internet address.
At boot time the Ethernet configuration settings will be updated with the settings from the DHCP-server. During boot time the printer will wait maximum 120 seconds for obtaining a valid IP-address from the DHCP-server. To view the Ethernet settings, obtained during boot time from the DHCP-server, you have to print a Status Report.
If no DHCP-server can be found within 120 seconds, the printer sets the IP-address to ‘0.0.0.0’. The printer keeps trying to get a valid IP-address. If the printer eventually obtains the Ethernet settings from a DHCP-server, these settings will not be included in the Status Report.
The printer will not update the Dynamic Domain Name Server (DDNS) with the printer name you specified in C-KOS. A client host name sent by the DHCP-server will overrule the printer name you specified in C-KOS.
Enable/disable DHCP
You can enable/disable DHCP using C-KOS. With DHCP enabled, the Ethernet configuration settings disappear from the C-KOS menu. How to operate C-KOS is explained in the System Administration Manual.

125
Océ Power Print Controller
Technical Reference Manual
Chapter 9Token Ring connection to the Océ Power Print Controller
This chapter provides all details you need to physically connect the Océ Power Print Controller to the host computer or network using a Token Ring connection

126 Océ Power Print Controller Technical Reference Manual
Applications of a Token Ring connection with the Océ Power Print Controller
[28] A typical Token Ring configuration consisting of a file server, workstations and a network printer
Token Ring is a type of network in which devices are connected in a logical ring configuration. On the ring a bit pattern called a token, to which an amount of data can be attached, circulates. When the token is free, a device can grab the token and attach its data to transport it to the destination device.
As with Ethernet, Token Ring networks support a variety of protocols. In connection with the Océ Power Print Controller only the TCP/IP protocols are supported. TCP/IP (Transmission Control Protocol/Internet Protocol) is a layered set of protocols which are standardised across all layers.
This means that you can use the following communication interfaces of the Océ Power Print Controller over a Token Ring network:
■ RAW SOCKET ■ LP
TCP/IP
Océ Prismaflow
Unix
IBM AS/400orDEC
Windows
Océ PRISMAflow
Unix
WindowsIBM AS/400orDEC
TCP/IP

Token Ring connection to the Océ Power Print Controller 127
■ FTP ■ SERVER.
Attention: The Token Ring interface does not support the NetWare IPX/SPX and AppleTalk protocols.
You can install the Ethernet and Token Ring interfaces simultaneous, since you give them different IP addresses. However, the printer cannot make a distinction between jobs sent from the Ethernet and Token Ring network, since they both use the same protocols.
If both, the Ethernet and Token Ring network, consist of multiple subnets, the printer only works if there is a logical connection between two subnets. So, if there is a router between the Ethernet and Token Ring network, the router can be configured for that type of network.
Note: The Ethernet or Token Ring network can be connected to a router.
DHCP support
DHCP is supported for Token Ring. For more information on DHCP, refer to the section ‘DHCP implementation’ on page 124.

128 Océ Power Print Controller Technical Reference Manual
Token Ring implementation for the Océ Power Print Controller
The Token Ring interface is optional for the Océ Power Print Controller. In order to install it, you need three items:
■ TRI/P Token Ring board■ Token Ring cable■ A VT100 terminal to connect to the printer’s serial diagnostics port.
Apart from these items, you require the pre-installed Sun token ring on the printer.
On the interface board, you find a 9-pin D-connector and a RJ 45 connector to attach your Token Ring cable to. The adapter board detects automatically the type of cabling you connect.
[29] Connectors on the Token Ring interface board
Attention: The cable is not delivered either with the printer or with the interface board.
Token Ring speed
Token Ring networks operate at two speed levels:
■ 4 Mbps■ 16 Mbps
These are C-KOS/C-SDS settings.
Note: Refer to the System Administration Manual for the items you should configure.

129
Océ Power Print Controller
Technical Reference Manual
Chapter 10FTP connection to the Océ Power Print Controller
This chapter contains all the information you need to connect an Océ Power Print Controller to a TCP/IP FTP network in order to print files, to retrieve status information from the printer and to perform advanced functions.

130 Océ Power Print Controller Technical Reference Manual
About this chapter
This chapter provides information on how to use the File Transfer Protocol (FTP) mechanism to communicate with the Océ Power Print Controller in order to print files. FTP may also be used to provide the host with printer status information and to upload logging information, configuration files or resources. Océ service engineers and system consultants can use it to access the printer’s internal file system directly.
The FTP protocol specification itself is specified in Request For Comments RFC 959, which is an official standard from the Internet Community.
Structure of this chapter
■ This chapter sets off with a general description of the FTP host I/O channel.■ The second section documents how to use the FTP service. It contains a
number of general procedures such as logging in, reading the status of a printer, using the help function etc.
■ The third section explains several procedures to print files with FTP.■ The fourth section contains all information on the special upload functions.■ The fifth section provides some Unix shell scripts for FTP users.■ A section with tables listing the supported FTP commands concludes this
chapter.
Terminology
Throughout this chapter, the following terminology is used:
FTP (upper case) refers to the protocol (RFC 959) which is used for host-to-printer communication.
ftp (lower case) indicates the program on the user’s computer which interacts with the FTP user. This is generally called the FTP client.
ftpd (lower case) refers to the program which processes the requests from the ftp program. This is generally called the FTP server.

FTP connection to the Océ Power Print Controller 131
oceftpd (lower case) is the Océ printer-specific version of ftpd, which enables the use of FTP for printing.
User An FTP user may be a human operator, but is more likely to be a program running on the user’s workstation, which communicates with the Océ Power Print Controller printer. Therefore, in this chapter, the user is always addressed in the third person.

132 Océ Power Print Controller Technical Reference Manual
General description of the FTP host I/O channel
Architecture
An FTP session actually involves two programs, one running on a user’s host computer, and one running on the Océ Power Print Controller printer. The user issues commands to his/her local ftp program. The local ftp program translates these commands into FTP requests and sends these to the FTP server program running on the printer.
[30] FTP data flow
During an FTP session, the ‘command/reply’ connection between ftp and (oce)ftpd is always present. The FTP client initiates the setup of this control-connection. Whenever data transfer has to take place, a second connection between ftp and (oce)ftpd is created automatically. The setup of this data connection is initiated by the FTP server.
In the Océ Power Print Controller printer, only FTP server functionality is implemented; no FTP client functionality. The printer is a passive station that waits for requests from other users or systems. The host software need not be changed to use the service provided by the oceftpd program of the printer.
user ftp (oce)ftpd
FTP commandsand replies
Data
Printer /remote computer
Host computer
FTP client FTP server
CommandsCommands
FTP Commandsand replies
Data
Printer/Remote Computer
Host computer
FTP client FTP server
user FTP (oce) FTP

FTP connection to the Océ Power Print Controller 133
Note: The local ftp program is a fixed entity. Consequently, its behaviour and user interface are implementation-dependent. From the Océ printer point of view, this program and the associated interface to the user cannot be influenced.
Internet address
As every other Internet device, each Océ Power Print Controller printer has its own unique Internet address, consisting of 4 numeric fields separated by dots, for example:
134.188.76.107
The Internet address is mentioned on the Status Report which can be obtained through KOS.
To make the printer’s address better readable in day-to-day operations, the Internet address can be aliased by an alphanumeric string which makes more sense for the users, for example:
my_printer
The link between the actual Internet address and the alias name is made in a table on operating system level on the host.
Unix and Océ-specific FTP serverDifferent FTP servers The Océ Power Print Controller printer provides two different FTP servers, which may both be accessed from the same FTP client program:
■ the standard Unix FTP server■ the Océ printer-specific FTP server.
The Unix FTP server Use of the standard Unix FTP server is reserved to Océ service engineers and system consultants. Therefore, only the Océ-specific server will be discussed in this Technical Reference Manual.
The Océ printer-specific FTP server This server program (referred to as oceftpd) is further described in this Technical Reference Manual. It implements the mechanism of using FTP for printing purposes.

134 Océ Power Print Controller Technical Reference Manual
The use of FTP is bound to the use of the TCP/IP networking protocol stack, or —more specifically— to the use of the TCP protocol. The Océ printer-specific oceftpd server uses the well-known TCP port 21 for communication with the client system.
Example A regular user connects as follows to printer ‘myprinter’ for printing purposes (‘myprinter’ is the alias name for the Internet address):
% ftp myprinterConnected to myprinter.
220 myprinter FTP server (Oce8445 printer) ready.
User interaction
Users never interact directly (i.e. using the FTP protocol) with oceftpd. They always use a program such as ftp on their local computer system as an intermediate to FTP. The interface between user and ftp program is locally defined by the provider of this ftp program, which is normally the computer manufacturer or any other third party software provider.
The FTP standard does not specify any user commands. It only specifies the protocol between ftp and (oce)ftpd. Any implementation of ftp is free to choose a set of user commands. In practice, however, most ftp implementations have very similar user commands.
Although the Océ printer’s FTP server cannot influence the user interface of ftp, it can provide (as part of the FTP protocol) ASCII text information intended for the FTP user. Such text may contain error reports, confirmations, information etc. For each protocol request, the FTP protocol defines a set of possible numerical replies, with some associated ASCII text which is more or less free to choose. This text is always in English.
The replies from oceftpd are meant to be self-explanatory. Most ftp program versions will write the reply messages from oceftpd to the terminal screen of the ftp user.
Users can use their local ftp program directly, but it is also possible to use ftp from within user applications. As ftp runs on almost any standard TCP/IP network connected (host/computer) system, it is very easy to interface other software to ftp and thus to oceftpd. Some examples of such usage are provided further on in this chapter.

FTP connection to the Océ Power Print Controller 135
Using the FTP print service
Whenever a ftp program requests a connection with the Océ Power Print Controller, the latter starts an oceftpd program automatically. There may be a maximum of seven oceftpd processes running simultaneously and autonomously. When more users try to login, the next oceftp will not start and returns the following message:
421 Insufficient resources to use ftp, retry later.
The FTP I/O interface on the Océ printer does not provide interactive printing to the networked FTP user.
The FTP print service is only available if it is installed through SDS. If FTP is not configured, but the user nevertheless tries to establish a network connection to the printer’s FTP server, the user will receive the following reply message:
421 FTP Print service not available, connection closed.ftp>
If the FTP print service is installed, the Océ Power Print Controller Key Operator System provides the possibility to enable or disable the use of the FTP host I/O channel. Should the Key Operator (temporarily) have disabled the FTP host I/O channel, the FTP user receives the following reply on a connect request:
421 FTP Print service disabled, connection closed.ftp>
Logging in
A user requesting FTP server access, must first log in to the Océ Power Print Controller. Access to the FTP print service is granted to any user.
However, there is a difference between ordinary users and the special user ‘keyoperator’.
An ordinary user does not need a password to be able to use the printer’s oceftpd FTP service. Some protocol convertor boxes however, expect FTP to ask for a password at login. When such a convertor box is used, the menu option ASKPASSWD in the printer’s KOS menutree can be enabled. however,

136 Océ Power Print Controller Technical Reference Manual
the password will not be checked. For more information on the ASKPASSWD option, refer to the System Administration Manual.
A special user ‘keyoperator’ always requires a password when logging in, independant of the value of the ASKPASSWD menu option. User ‘keyoperator’ is able to access the oceftpd upload functionality besides the general functions available to all users. The password is the same as the password required to enter KOS at the printer’s operating panel.
▼▼▼▼ To log in as an ordinary user (no password required):
1 Connect to printer ‘myprinter’.Type the following command to do so:
% ftp myprinter
After successful connection, ftp returns the following reply:
Connected to myprinter.220 myprinter FTP server (Oce8445 printer) ready.
Name :
2 Type your user name (e.g. ‘jhp’) followed by return.ftp returns the following confirmation:
230 User jhp logged in.ftp>
▼▼▼▼ To log in as an ordinary user (password required):
1 Connect to printer ‘myprinter’.Type the following command to do so:
% ftp myprinter
After successful connection, ftp returns the following reply:
Connected to myprinter.
220 myprinter FTP server (Oce8445 printer) ready.Name :
2 Type your user name (e.g. ‘jhp’) followed by return.ftp returns the following message:
331 Password required for user.
Password :
3 Type any password followed by return.ftp returns the following confirmation:

FTP connection to the Océ Power Print Controller 137
230 User logged in.ftp>
▼▼▼▼ To log in as special user ‘keyoperator’:
1 Connect to printer ‘myprinter’.Type the following command to do so:
% ftp myprinter
After successful connection, ftp returns the following reply:
Connected to myprinter.220 myprinter FTP server (Oce8445 printer) ready.
Name :
2 Type
keyoperator
followed by return.
Note: You must type the word ‘keyoperator’ in lower case.ftp returns the following message:
331 Password required for user keyoperator.Password :
3 Type the KOS Key Operator password followed by return.ftp returns the following confirmation:
230 User keyoperator logged in.
ftp>
After a successful login, the user can choose between the following activities:
■ ask help on the use of FTP for printing purposes■ read current printer status information■ read current spool queue information■ read current console information■ transmit files from host to printer; these files will be printed.
User ‘keyoperator’ can do the same things, extended with some additional uploading actions:
■ uploading printer log files (message, syslog, accounting, traces, etc.)■ uploading printer configuration files for backup■ uploading JAC printer resources for backup: ARTs, flagsheets, forms,
PagePIFs, LayoutPIFs, SIFs and job tickets.

138 Océ Power Print Controller Technical Reference Manual
All users can influence the way a file has to be printed, by selecting a specific job ticket for that print file. See ‘Job ticket mechanism’ on page 293 for more information on the function of a job ticket.
Selecting a functionIn order to select a function, users first have to move to the directory the function is located in, by means of the cd command. oceftpd provides the following pre-defined directories to the FTP user:
■ help■ status■ spool■ console■ jobtickets■ admin: for user ‘keyoperator’ only.
These directories may be used for the activities mentioned above. Users who do not select a specific directory are supposed to be in the home directory of their FTP print service.
Note: No job ticket functionality or JAC resource uploading is available if the FTP interface is configured for use with the AJC/FOL option. In this case, the directory ‘jobtickets’ is not available.
Using the help functionHow to proceed users may obtain help information on the FTP print service by listing the contents of the help directory. They can do so by typing either one of the following commands from the ftp> prompt:
ftp> cd help250 CWD command successful
ftp> dir
or (from the home directory):
ftp> dir help
oceftpd replies by giving a detailed overview of actions the user can perform, together with associated ftp user commands, as you can see from the example below:
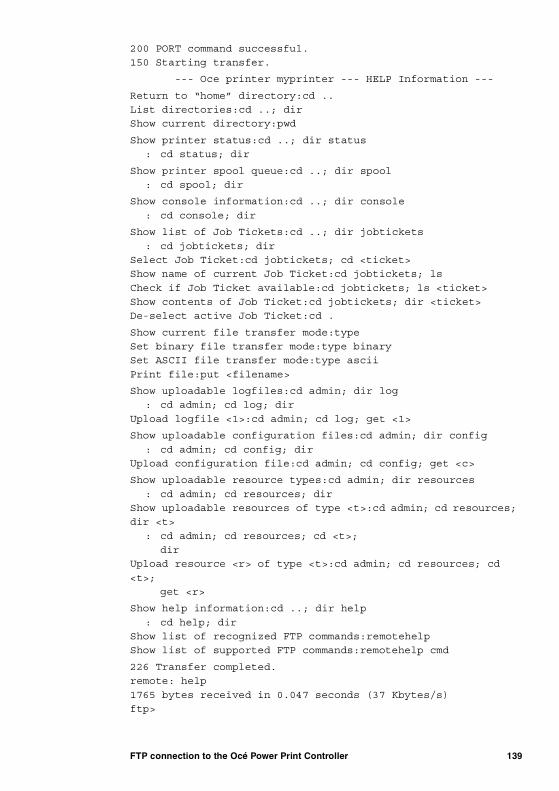
FTP connection to the Océ Power Print Controller 139
200 PORT command successful.150 Starting transfer.
--- Oce printer myprinter --- HELP Information ---
Return to “home” directory:cd ..List directories:cd ..; dirShow current directory:pwd
Show printer status:cd ..; dir status: cd status; dir
Show printer spool queue:cd ..; dir spool: cd spool; dir
Show console information:cd ..; dir console
: cd console; dir
Show list of Job Tickets:cd ..; dir jobtickets
: cd jobtickets; dirSelect Job Ticket:cd jobtickets; cd <ticket>Show name of current Job Ticket:cd jobtickets; ls
Check if Job Ticket available:cd jobtickets; ls <ticket>Show contents of Job Ticket:cd jobtickets; dir <ticket>De-select active Job Ticket:cd .
Show current file transfer mode:typeSet binary file transfer mode:type binarySet ASCII file transfer mode:type ascii
Print file:put <filename>
Show uploadable logfiles:cd admin; dir log: cd admin; cd log; dir
Upload logfile <1>:cd admin; cd log; get <1>
Show uploadable configuration files:cd admin; dir config
: cd admin; cd config; dirUpload configuration file:cd admin; cd config; get <c>
Show uploadable resource types:cd admin; dir resources
: cd admin; cd resources; dirShow uploadable resources of type <t>:cd admin; cd resources; dir <t>
: cd admin; cd resources; cd <t>;dir
Upload resource <r> of type <t>:cd admin; cd resources; cd
<t>;get <r>
Show help information:cd ..; dir help
: cd help; dirShow list of recognized FTP commands:remotehelpShow list of supported FTP commands:remotehelp cmd
226 Transfer completed.remote: help
1765 bytes received in 0.047 seconds (37 Kbytes/s)ftp>

140 Océ Power Print Controller Technical Reference Manual
Note: The actual contents of this screen depends on the options installed in the Océ Power Print Controller. Also, these ftp commands are FTP client implementation-specific, and may be subject to change. In fact, the help reply from oceftpd describes the FTP print service functionality in terms of common ftp user commands.
Reading the status of the printerHow to proceed Users may retrieve actual printer status information by listing the contents of the status directory. They can do so by typing either one of the following FTP commands from the ftp> prompt:
ftp> cd status
250 CWD command successfulftp> dir
or (from the home directory):
ftp> dir status
ftp replies by providing status information.
Status information The status information may include the following items:
■ printer off-line or on-line■ printer idle, processing, aborting, suspending or suspended■ printer error information■ wait or warning situations.
Example of a status reply in an IDLE situation In an idle situation, a status reply from oceftp will look as follows:
200 PORT command successful.150 Starting transfer.
--- Oce printer myprinter --- STATUS Information ---
Printer is online and idle.Printer reports no errors/warnings:
226 Transfer completed.remote: status131 bytes received in 0.053 seconds (2.4 Kbytes/s)
Error, wait and warning status messages that are returned to the FTP user, are equivalent to those displayed on the Océ Power Print Controller console. However, the status information returned to the FTP user is not limited to one single line of text; it contains all relevant status messages.
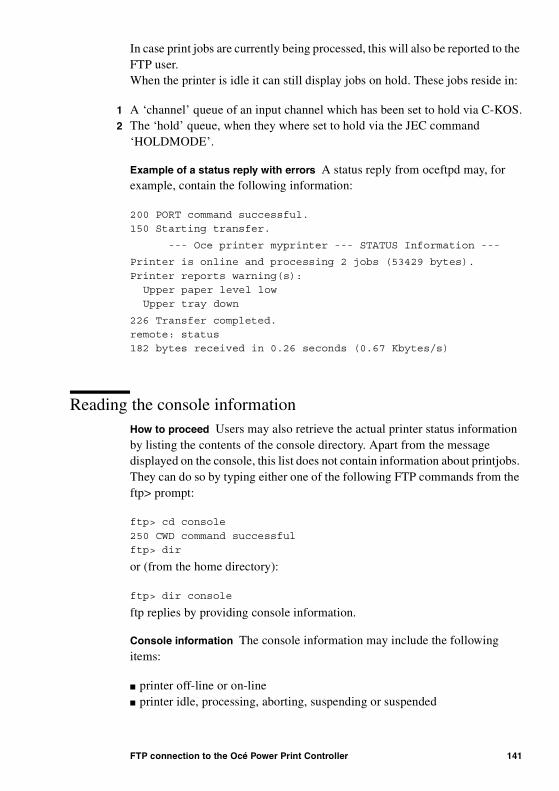
FTP connection to the Océ Power Print Controller 141
In case print jobs are currently being processed, this will also be reported to the FTP user.When the printer is idle it can still display jobs on hold. These jobs reside in:
1 A ‘channel’ queue of an input channel which has been set to hold via C-KOS.2 The ‘hold’ queue, when they where set to hold via the JEC command
‘HOLDMODE’.
Example of a status reply with errors A status reply from oceftpd may, for example, contain the following information:
200 PORT command successful.150 Starting transfer.
--- Oce printer myprinter --- STATUS Information ---
Printer is online and processing 2 jobs (53429 bytes).
Printer reports warning(s):Upper paper level lowUpper tray down
226 Transfer completed.remote: status182 bytes received in 0.26 seconds (0.67 Kbytes/s)
Reading the console informationHow to proceed Users may also retrieve the actual printer status information by listing the contents of the console directory. Apart from the message displayed on the console, this list does not contain information about printjobs. They can do so by typing either one of the following FTP commands from the ftp> prompt:
ftp> cd console
250 CWD command successfulftp> dir
or (from the home directory):
ftp> dir console
ftp replies by providing console information.
Console information The console information may include the following items:
■ printer off-line or on-line■ printer idle, processing, aborting, suspending or suspended

142 Océ Power Print Controller Technical Reference Manual
■ printer error information■ wait or warning situations.
Messages regarding KOS, SDS or an external console will not be presented. In this case, dir console returns that the printer is off-line.
Example of a console reply in an idle situation In an idle situation, a console reply from oceftp will look as follows:
200 PORT command successful.150 Starting transfer.
--- Oce printer myprinter --- CONSOLE Information ---
Idle.
226 Transfer completed.
remote: console99 bytes received in 0.43 seconds (0.22 Kbytes/s)
The error, wait or warning message that is returned to the FTP user, is equivalent to that displayed on the Océ Power Print Controller console.
Example of a console reply with error A console reply from oceftpd may, for example, contain the following information:
200 PORT command successful.150 Starting transfer.
--- Oce printer myprinter --- CONSOLE Information ---
Upper paper level low
226 Transfer completed.
remote: console182 bytes received in 0.26 seconds (0.67 Kbytes/s)
Reading the printer spool queue informationHow to proceed Users may retrieve the actual printer spool queue information by listing the contents of the spool directory. They can do so by typing either one of the following FTP commands from the ftp> prompt:
ftp> cd spool250 CWD command successfulftp> dir
or (from the home directory):
ftp> dir spool
ftp replies by providing spool queue information.

FTP connection to the Océ Power Print Controller 143
Spool queue information The spool queue information may consist of information regarding printjobs in the printer’s spool queue, also if the printer is off-line. However, printjobs that are on hold will not be shown in detail. Only the number of jobs on hold is displayed.
The maximum number of characters for the username is limited to 10 characters. For the filename this is 20 characters.
Example of a spool queue reply in a standby situation In a standby situation, a spool queue reply from oceftp may look as follows:
200 PORT command successful.
150 Starting transfer.
--- Oce printer myprinter --- SPOOL Information ---
No jobs to print
226 Transfer completed.remote: spool
77bytes received in 0.059 seconds (1.3 Kbytes/s)
Example of a spool queue reply with jobs on hold A spool queue reply with jobs on hold from oceftpd may, for example, contain the following information:
200 PORT command successful.
150 Starting transfer.
--- Oce printer myprinter --- SPOOL Information ---
Rank Owner Job Channel Files Total size
active qqbdo 2 FTP myprinter.ps 3477496 bytes1st qqbdo 3 FTP ftpdc 125656 bytes
3 jobs on hold
226 Transfer completed.remote: console
363 bytes received in 3.4 seconds (0.104 Kbytes/s)
Using job tickets with FTP
The job tickets appear as subdirectories of the ftp directory ‘jobtickets’. Consequently, the user can issue a ‘cd’ command to select a job ticket, then type dir to check the contents of a ticket.
FTP users can switch freely between the following directories:
■ help■ status

144 Océ Power Print Controller Technical Reference Manual
■ spool■ console■ jobtickets■ admin (only for special user ‘keyoperator’).
However, once a user has changed to directory jobtickets, another ‘cd’ command is expected to select a specific job ticket for files to be printed, not for changing between the mentioned directories. Likewise, a ‘dir’ command issued from within the directory jobtickets will always refer to specific job ticket information.
Users can always return to the home directory by issuing a ‘cd ..’ command. This action does not affect the current job ticket selection.
Users who want to de-select a previously selected job ticket, may at any time use the ‘cd .’ command.
Example A user selects a specific job ticket, but wants to check the printer status before actually transmitting the print data. The procedure is as follows:
1 From the ftp> prompt, type:
cd jobtickets
oceftpd replies:
250 CWD command successfulftp>
2 Type
dir
oceftpd returns:
200 PORT command successful.
150 Starting transfer.
--- Oce printer myprinter --- JOB TICKET Information
---
No Job Ticket selected.
Available Job Tickets:
DUPLEX BIN10 BIN11 BIN12
BIN13 BIN14 BIN15 BIN16BIN17 BIN18 BIN19 INVOICEMEMO
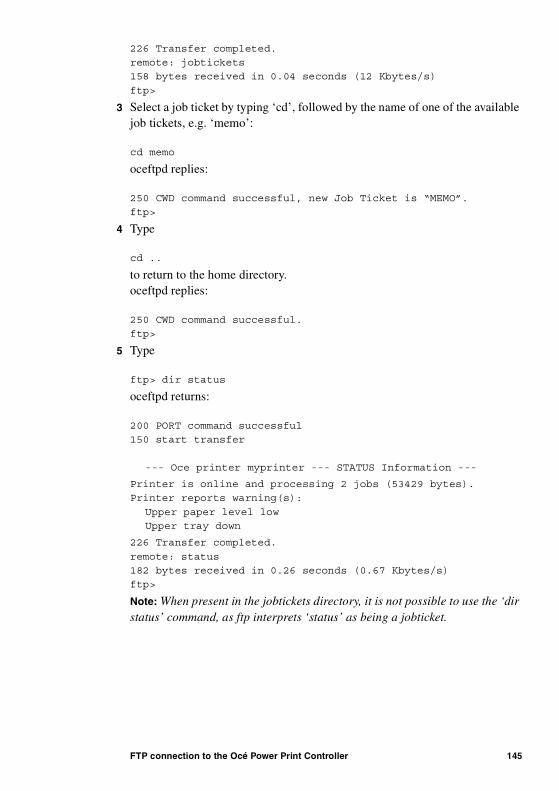
FTP connection to the Océ Power Print Controller 145
226 Transfer completed.remote: jobtickets158 bytes received in 0.04 seconds (12 Kbytes/s)
ftp>
3 Select a job ticket by typing ‘cd’, followed by the name of one of the available job tickets, e.g. ‘memo’:
cd memo
oceftpd replies:
250 CWD command successful, new Job Ticket is “MEMO”.ftp>
4 Type
cd ..
to return to the home directory.oceftpd replies:
250 CWD command successful.ftp>
5 Type
ftp> dir status
oceftpd returns:
200 PORT command successful150 start transfer
--- Oce printer myprinter --- STATUS Information ---
Printer is online and processing 2 jobs (53429 bytes).Printer reports warning(s):
Upper paper level lowUpper tray down
226 Transfer completed.
remote: status182 bytes received in 0.26 seconds (0.67 Kbytes/s)ftp>
Note: When present in the jobtickets directory, it is not possible to use the ‘dir status’ command, as ftp interprets ‘status’ as being a jobticket.

146 Océ Power Print Controller Technical Reference Manual
Printing files with FTP
Standard procedure
Users may print files using the ftp ‘put’ command. This is the standard way of printing the transmitted data. Print jobs may be transmitted either in ASCII mode or in binary mode. However, the use of binary transmission is always recommended. Print files may contain ‘non-printable’ control characters for the printer, which would not be transmitted correctly if ASCII transfer is active. Moreover, binary mode features a higher throughput than ASCII mode. This is due to the FTP protocol overhead associated with ASCII transfer.
ASCII mode is the default mode for FTP. Therefore, to print files in binary mode, the actual print command must be preceded by the ‘binary’ command as you can see in the example below.
Example To print a file named ‘printjob.ps’, type the following commands from the ftp> prompt:
ftp> binary200 Type set to I.
ftp> put printjob.ps
Upon successful completion, ftp returns a message similar to this:
200 PORT command successful.
150 Binary data connection for printjob.ps (134.188.180.66,1787).226 Transfer complete.
local: printjob.psremote: printjob.ps
99805 bytes sent in 0.32 seconds (3.1e+02 Kbytes/s)ftp>
FTP connection to the Océ Power Print Controller 147
FTP identification attributes for JACIf the Océ Power Print Controller supports JAC, users can influence the way a file has to be printed by selecting a job ticket. Although users may select specific processing options for their print files, the printer operator may overrule certain processing options by means of the printer’s internal Association Rules Table (ART).
Example By selecting a specific job ticket, a user requests output bin 10 for a print job. The printer’s internal Association Rules Table (ART), however, specifies that for this particular user, all print jobs have to be deposited in bin 15. As a result, bin 15 is used and not bin 10.
For ART identification purposes, the FTP host I/O channel will provide the following JAC identification attributes:
Note: These JAC identification attributes can also be defined in a job ticket. If such a job ticket is selected, the identification attributes in the ticket override the attributes provided by the FTP host I/O channel.
ExampleChecking the content of a job ticket and printing according to the ticket Users who want to select a specific job ticket, first must change their working directory to ‘jobtickets’. Then they can issue a new ‘cd’ command to select a specific job ticket. For the oceftpd FTP server, job ticket names are case insensitive. It is possible to check the contents of a specific job ticket before selecting a job ticket.
Proceed as follows:
1 From the ftp> prompt, type:
cd jobtickets
Attribute Description
HOSTNAME unique Internet address of the remote host
USERNAME user name used during FTP login
JOBNAME name of the print file
CHANNELTYPE “FTP” (fixed value)
[31] Identification attributes provided by the FTP I/O channel

148 Océ Power Print Controller Technical Reference Manual
to move to the directory ‘jobtickets’.oceftpd replies:
200 CWD command successful.
ftp>
2 Type
dir
for an overview of all job tickets.oceftpd returns job ticket information:
200 PORT command successful.150 Starting transfer.
--- Oce printer myprinter --- JOB TICKET Information ---
No Job Ticket selected.
Available Job Tickets:
DUPLEX BIN10 BIN11 BIN12
BIN13 BIN14 BIN15 BIN16BIN17 BIN18 BIN19 INVOICEMEMO
226 Transfer completed.remote: jobtickets
158 bytes received in 0.04 seconds (12 Kbytes/s)ftp>
3 Type:
dir invoice
to check the content of the job ticket ‘invoice’.
oceftpd returns information similar to the example below:

FTP connection to the Océ Power Print Controller 149
200 PORT command successful.150 Starting transfer.
--- Oce printer myprinter --- JOB TICKET Information ---
Contents of Job Ticket “INVOICE”:
Process:BIN 1
DUPLEX onFORM invoice OVERLAYCOPIES 5
226 Transfer completed.remote: invoice
171 bytes received in 0.017 seconds (10 Kbytes/s)ftp>
4 Type
cd invoice
to activate job ticket ‘invoice’. oceftpd replies:
250 CWD command successful, new Job Ticket is “INVOICE”.ftp>
5 Type:
bin
to activate binary transfer. oceftpd replies:
200 Type set to I.ftp>
6 Type:
put printjob.ps
to actually print the data.
oceftpd returns:

150 Océ Power Print Controller Technical Reference Manual
200 PORT command successful.150 Binary data connection for printjob.ps (134.188.180.66,1787).
226 Transfer completed.local: printjob.psremote: printjob.ps
99805 bytes sent in 0.32 seconds (3.1e+02 Kbytes/s)ftp>

FTP connection to the Océ Power Print Controller 151
Uploading files
Uploading is the action of sending files from the Océ Power Print Controller to the host computer. The following types of files can be uploaded:
■ printer log files■ printer configuration files■ JAC printer resources.
Only users who have logged in with the ‘keyoperator’ password are able to upload files.
The available upload actions are provided with the additional directory ‘admin’, which is only shown if user ‘keyoperator’ is logged in.
The directory ‘admin’ contains three subdirectories:
■ log: for uploading printer log files■ config: for uploading printer configuration files■ resources: for uploading JAC printer resources.
Uploading printer log files
Uploading printer log files is provided in the subdirectory ‘log’. The following log files can be uploaded:
■ Messages: the message log file contains system log messages.■ Syslog: the system log file contains system log messages.■ Account: the accounting log file contains account information about all
printed jobs.■ Accountreset: this file is the same as the accounting log file. However, if the
accountreset file is uploaded, the file will be reset on the printer, i.e. all uploaded entries will be deleted from the printer’s log file.
■ Dump.dat: this is the data trace file. ■ Dump.jac: this is the JAC trace file.
The trace files Dump.dat and Dump.jac will only be displayed if they really exist on the printer.

152 Océ Power Print Controller Technical Reference Manual
Log files can be uploaded by means of the ftp ‘get’ command, with the log file name specified as first parameter. The log file is then stored on the user’s local directory, from which he performed the ‘get’ command. The name of an uploaded log file may be specified as a second parameter with the ‘get’ command. If no name is specified, the uploaded log file will get the same name as shown in the dir ‘log’ overview.
Note: The ‘mget’ (multiple get) command is not supported by oceftpd.
Accounting can be enabled or disabled on the printer through KOS. Also, the accounting log file may be reset through KOS. If accounting is disabled, or if the log file has been reset through KOS, the uploaded accounting log file may be empty.
Example User ‘keyoperator’ wants to upload the accounting log file and reset the log file on the printer. The accounting log file must be stored in the local file account.log. The procedure is as follows:
1 From the ftp> prompt, type:
cd admin
oceftpd replies:
250 CWD command successful.
ftp>
2 Type
cd log
oceftpd replies:
250 CWD command successful.ftp>
3 Type
get accountreset account.log
oceftpd returns:

FTP connection to the Océ Power Print Controller 153
200 PORT command successful.150 ASCII data connection for accountreset (134.188.180.66,1787).
226 Transfer completed.local: account.logremote: accountreset
199610 bytes sent in 0.64 seconds (3.1e+02 Kbytes/s)ftp>
Uploading printer configuration files
Uploading printer configuration files for backup purposes is provided in the subdirectory ‘config’. User ‘keyoperator’ can request an overview of all uploadable configuration files as follows:
1 From the ftp> prompt, type:
cd admin
oceftpd replies:
200 PORT command successful.ftp>
2 Type
dir config
to get an overview. oceftpd returns:
200 PORT command successful.150 Starting transfer.
--- Oce printer myprinter --- ADMINISTRATION config files ---
COMMUN.NVSJAC.NVSPCL1.NVSPS1.NVSPS3.NVSPS5.NVSSYSTEM.NVS
226 Transfer completed.remote: admin203 bytes received in 0.021 seconds (9.6 Kbytes/s)
ftp>
Configuration files can be uploaded by means of the ftp ‘get’ command, with the log file name specified as first parameter. The configuration file is then stored on the user’s local directory, from which he performed the ‘get’ command. The name of an uploaded file may be specified as a second parameter with the ‘get’ command. If no name is specified, the uploaded file will get the same name as shown in the dir ‘log’ overview.

154 Océ Power Print Controller Technical Reference Manual
Note: The ‘mget’ (multiple get) command is not supported by oceftpd.
Example User ‘keyoperator’ wants to upload the system configuration file. The system configuration file must be stored in the local file system290995.nvs. The procedure is as follows:
1 From the ftp> prompt, type:
cd admin
oceftpd replies:
250 CWD command successful.ftp>
2 Type
cd config
oceftpd replies:
250 CWD command successful.
ftp>
3 Type
get system.nvs system290995.nvs
oceftpd returns:
200 PORT command successful.150 ASCII data connection for accountreset
(134.188.180.66,1787).226 Transfer completed.local: system290995.nvs
remote: system.nvs199610 bytes sent in 0.64 seconds (3.1e+02 Kbytes/s)ftp>
Uploading JAC printer resources
Uploading JAC printer resources for backup purposes is provided in the subdirectory ‘resources’ (only if the Océ Power Print Controller supports JAC). Within this directory there is a lower level of subdirectories. Each subdirectory contains all uploadable resources of a specific resource type. The following subdirectories are available in the resources directory:
■ art

FTP connection to the Océ Power Print Controller 155
■ flagsheet■ form■ jobticket■ pagepif■ layoutpif■ sif
Note: All available flagsheets and forms are stored in their respective subdirectories, independent of the PDLs.
User ‘keyoperator’ can request an overview of all uploadable resources of a specific type, e.g. job tickets. The procedure is as follows:
1 From the ftp> prompt, type:
cd admin
oceftpd replies:
200 PORT command successful.ftp>
2 Type
cd resources
oceftpd replies:
200 PORT command successful.
ftp>
3 Type
dir jobticket
to get an overview of available job ticket files.
oceftpd returns:
200 PORT command successful.
150 Starting transfer.
--- Oce printer myprinter --- ADMINISTRATION jobticket ---
DUPLEX BIN10BIN11BIN12
BIN13 BIN14BIN15BIN16BIN17 BIN18BIN19INVOICEMEMO

156 Océ Power Print Controller Technical Reference Manual
226 Transfer completed.remote: jobticket314 bytes received in 0.023 seconds (13.6 Kbytes/s)
ftp>
Resources can be uploaded by means of the ftp ‘get’ command, with the resource name specified as first parameter. The resource is then stored on the user’s local directory, from which he performed the ‘get’ command. The name of the uploaded resource may be specified as a second parameter with the ‘get’ command. If no name is specified, the uploaded resource will get the same name as specified with the first parameter of the ‘get’ command.
Note: Within the admin directory, the contents of the resources cannot be viewed on-line.
Example User ‘keyoperator’ wants to upload the job ticket ‘invoice’. The job ticket file must be stored in the file invoice.tck. The procedure is as follows:
1 From the ftp> prompt, type:
cd admin
oceftpd replies:
250 CWD command successful.ftp>
2 Type
cd resources
oceftpd replies:
250 CWD command successful.
ftp>
3 Type
cd jobticket
oceftpd replies:
250 CWD command successful.ftp>
4 Type
get invoice invoice.tck
oceftpd returns:

FTP connection to the Océ Power Print Controller 157
200 PORT command successful.150 ASCII data connection for invoice (134.188.180.66,1787).226 Transfer completed.
local: invoice.tckremote: invoice430 bytes sent in 0.030 seconds (14.3 Kbytes/s)
ftp>
Note: You can use the JAC download functionality to store the uploaded resources on the printer again.

158 Océ Power Print Controller Technical Reference Manual
Example Unix shell scripts for FTP users
Below are some examples of simple shell scripts to facilitate printing with ftp. All scripts are tested on SunOS 4.1.3. In the following examples ‘myprinter’ is assumed to be the printer’s ‘host name’ within the user’s TCP/IP network environment.
Regular file printing
This is a simple script to print all files named on the argument line, using default job attributes. All output of the FTP command, i.e. responses received from oceftpd, is disposed of.
The additional blank line after the line that contains the ‘ftp’ command is essential for FTP login purposes. A password is not required (ASKPASSWD is off).
#!/bin/sh
## print all files named on the command line.#
ftp myprinter> /dev/null <<EOF
prompt n
mput $*EOF
Printing using job tickets
Same example as the above, except that the files will be printed with a specific set of job processing attributes. Processing attributes are selected through job ticket ‘invoice’. Binary transfer is used because it is faster than ASCII transfer.
#!/bin/sh
## print all files named on the command line, using Job Ticket#

FTP connection to the Océ Power Print Controller 159
ftp myprinter > /dev/null <<EOF
prompt n
bincd jobticketscd invoice
mput $*EOF
Reading printer status
The example below is a sample shell script to read the status of the printer.
#!/bin/sh## read status of printer
#ftp myprinter <<EOF
dir statusEOF
Uploading a log file
The example shell script uploads the printer’s message log file. The user must be logged in as ‘keyoperator’. The Key Operator password, represented by ‘xxxxx’ in the script below, is required.
#!/bin/sh
## upload printer’s message logfile#
ftp myprinter <<EOFkeyoperatorxxxxx
cd admincd logget messages
EOF

160 Océ Power Print Controller Technical Reference Manual
Directory structure of FTP print service
ROOT help help information
status printer status information
spool spool queue information
console printer console information
jobtickets TICKET1TICKET2...
admin log MESSAGESSYSLOGACCOUNTACCOUNTRESET
config CONFIG1CONFIG2...
resources art ART1ART2...
flagsheet FLAG1FLAG2...
form FORM1FORM2...
jobticket TICKET1TICKET2...
pagepif PPIF1PPIF2...
layoutpif LPIF1LPIF2...
sif SIF1SIF2...
Help Information
Printer Status Information
Spool Que Information
Printer Console Information

FTP connection to the Océ Power Print Controller 161
Supported FTP protocol commands
oceftpd can handle all requests as defined in RFC 959, as well as the additional requests stated in RFC 765, which is the (obsolete) predecessor of RFC 959. Not all FTP requests will result in a useful action at the Océ Power Print Controller, because not all requests make sense for a printer system.
The following lists specify which FTP protocol commands are supported by the Océ Power Print Controller. Not-supported commands are recognised by the FTP protocol interpreter, but no specific printer action will result from these commands, i.e. the request will be ignored. Unsupported commands are reported back to the remote host.
Note: FTP users may request a list of FTP commands supported by oceftpd by issuing the ftp command ‘remotehelp’.
For most FTP commands to take effect, a user must first have been logged in to the FTP server on the Océ Power Print Controller. If not, the following message is returned:
530 Please login with USER.
Access Control commands
The following table gives an overview of the Access Control Commands supported by the Océ Power Print Controller. For each command, the table specifies:
■ the FTP command■ whether it is supported or not■ description and any useful information about the implementation in the Océ
Power Print Controller printer.

162 Océ Power Print Controller Technical Reference Manual
Com-mand
Sup-port
Comments
USER yes SPECIFY USER NAMEThe actual user name provided with the USER command will be used as a job attribute for the job(s) to be printed during this FTP session.After initial login, the FTP user is assumed to be in home directory.
PASS yes SPECIFY PASSWORDIf the specified user name is ‘keyoperator’, a password is required. This password must be the same as the KOS password.If any other user name is specified, no password is required. A specified password will in this case be accepted but ignored.
ACCT no SPECIFY ACCOUNT
CWD yes CHANGE WORKING DIRECTORYoceftpd does not support a real directory structure but directories are to be considered as ‘contexts’. Pre-defined contexts are help, status, spool, console,jobtickets and admin.If the current working directory is jobtickets, a subsequent CWD command will select a job ticket. A job ticket may be selected to request specific processing op-tions for the job(s)If the current working directory is admin, a subsequent CWD command can switch to subdirectories log, config or resources. Within resources, further subdirectories ex-ist for each type of resource, also accessible with a CWD command.
XCWD yes CHANGE WORKING DIRECTORYEquivalent to CWD.
CDUP yes CHANGE TO PARENT DIRECTORYReturn to home directory.
XCUP yes CHANGE TO PARENT DIRECTORYEquivalent to CDUP.
SMNT no STRUCTURE MOUNT
REIN no RE-INITIALIZE SERVER

FTP connection to the Océ Power Print Controller 163
QUIT yes TERMINATE FTP SESSIONThis implies a user-initiated disconnect. oceftpd will also automatically disconnect after a certain amount of time (TIMEOUT) when the user does not issue any command. Timeout can be set using the Key Operator System.
Com-mand
Sup-port
Comments
[32] FTP Access Control Commands

164 Océ Power Print Controller Technical Reference Manual
Transfer Parameter commandsThe following table gives an overview of the Transfer Parameter Commands supported by the Océ Power Print Controller. For each command, the table specifies:
■ the FTP command■ whether it is supported or not■ description and any useful information about the implementation in the Océ
Power Print Controller printer.
Command Support Comments
PORT yes SPECIFY ALTERNATE DATA PORTThe user may choose to assign a specific TCP port during data transmission.
PASV no SET SERVER IN PASSIVE MODE
TYPE yes REPRESENTATION OF DATA DURING TRANSFERRepresentation types ASCII, IMAGE (binary) and LOCAL are supported. Default is ASCII. LOCAL type is treated as IMAGE type. The only difference be-tween ASCII and IMAGE types lies in the handling of LineFeed. In most situations, users do not need to use ASCII type, but are advised to use IMAGE type in which data is passed through transparently. This also yields a better data throughput than ASCII type. Note that some ftp programs may allow only 7-bit data with ASCII type, while oceftpd will allow 8-bit data.
STRU yes FILE STRUCTURESpecifies whether a transmitted file has any structure or not. Only File Structure F (File, no record structure) is supported. File Structures R (Record structure) and P (Page structure) are not supported.
MODE yes TRANSMIT MODEOnly Stream Mode is supported, which implies that there is no structure in the data transferred. Block Mode and Compressed Mode are not supported.
[33] FTP Transfer Parameter Commands

FTP connection to the Océ Power Print Controller 165
FTP Service commandsThe following table gives an overview of the FTP Service Commands supported by the Océ Power Print Controller. For each command, the table specifies:
■ the ftp command■ whether it is supported or not■ description and any useful information about the implementation in the Océ
Power Print Controller printer:
Command Support Comments
RETR yes RETRIEVE FILEThis command uploads a printer log file, configuration file or resource.With regard to log files it is possible to upload the print-er’s message log file (messages), the syslog log file (sys-log), the printer’s accounting log file (account) and to upload and reset the accounting log file (accountreset), the data trace file (dump.dat) and the JAC trace file (dump.jac). With regard to configuration files, it is possi-ble to upload the files on the printer which specify the current configuration of the printer.With regard to resources, it is possible to upload resourc-es of type art, flagsheet, form, jobticket, pagepif, layout-pif and sif.This command is only supported if special user ‘keyoper-ator’ is logged in and if the current working directory is ‘admin’.
STOR yes STORE FILEThis will cause a file to be transmitted and printed on the printer.The JAC processing attributes which are defined in the currently selected job ticket will be ‘attached’ to the print file.
STOU yes STORE UNIQUEThis will be treated the same as STOR.
APPE no APPEND DATA TO A FILE(with create)
ALLO no ALLOCATE STORAGE
REST no RESTART COMMAND
RNFR no RENAME FROM
[34] FTP Transfer Parameter Commands

166 Océ Power Print Controller Technical Reference Manual
RNTO no RENAME TO
ABOR yes ABORTUpon user request (e.g. user types a ^C) the current FTP protocol operation is aborted. Data already arrived at the printer will be printed. Depending on the network it may take some time before oceftpd allows the host FTP pro-gram to accept new user requests.
DELE no DELETE FILE
RMD no REMOVE DIRECTORY
XRMD no REMOVE DIRECTORYEquivalent to RMD.
MKD no MAKE DIRECTORY
XMKD no MAKE DIRECTORYEquivalent to MKD.
PWD yes PRINT WORKING DIRECTORYShows the name of the currently selected directory, i.e. home, help, status, spool, console, jobtickets, admin, log, config, resources, art, flagsheet, form, jobticket, pagepif, layoutpif or sif.
XPWD yes PRINT WORKING DIRECTORYEquivalent to PWD.
LIST yes LISTShows relevant information for specified or current FTP directory or job tickethome: present overview of selectable directorieshelp: overview of functional usage of FTP for printing his datastatus: detailed status overview of the printer is shownspool: current spool queue information of the printer is shownconsole: current console information of the printer is shownjobtickets: overview of available job tickets is presented. The currently selected job ticket is marked.Job Ticket name: contents of the selected job ticketadmin: overview of possible uploading actionslog: overview of uploadable log filesconfig: overview of uploadable configuration filesresources: overview of uploadable resource typesart, flagsheet, form, jobticket, pagepif, layoutpif and sif: overview of uploadable resources of a specific type
Command Support Comments
[34] FTP Transfer Parameter Commands (continued)
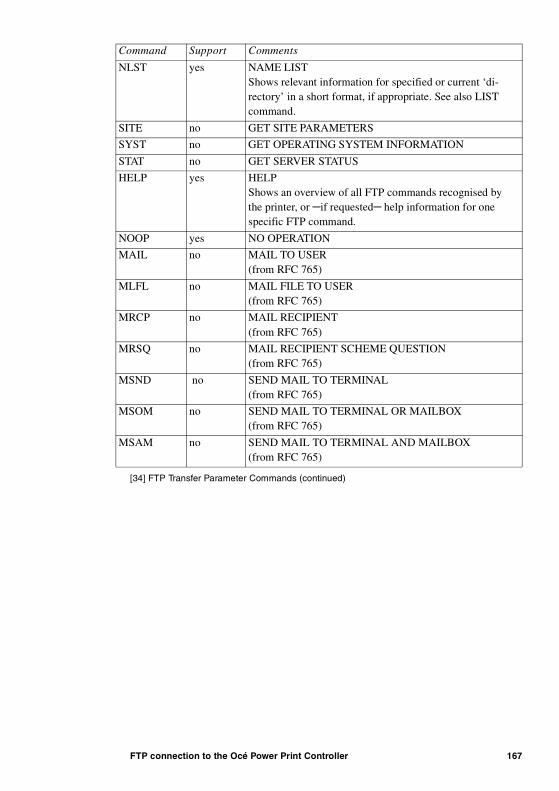
FTP connection to the Océ Power Print Controller 167
NLST yes NAME LISTShows relevant information for specified or current ‘di-rectory’ in a short format, if appropriate. See also LIST command.
SITE no GET SITE PARAMETERS
SYST no GET OPERATING SYSTEM INFORMATION
STAT no GET SERVER STATUS
HELP yes HELPShows an overview of all FTP commands recognised by the printer, or –if requested– help information for one specific FTP command.
NOOP yes NO OPERATION
MAIL no MAIL TO USER(from RFC 765)
MLFL no MAIL FILE TO USER(from RFC 765)
MRCP no MAIL RECIPIENT(from RFC 765)
MRSQ no MAIL RECIPIENT SCHEME QUESTION(from RFC 765)
MSND no SEND MAIL TO TERMINAL(from RFC 765)
MSOM no SEND MAIL TO TERMINAL OR MAILBOX(from RFC 765)
MSAM no SEND MAIL TO TERMINAL AND MAILBOX(from RFC 765)
Command Support Comments
[34] FTP Transfer Parameter Commands (continued)

168 Océ Power Print Controller Technical Reference Manual

169
Océ Power Print Controller
Technical Reference Manual
Chapter 11LPD connection to the Océ Power Print Controller
This chapter contains all the information you need to connect an Océ Power Print Controller to a network using the TCP/IP - Line Printer Daemon Protocol (LPD). This protocol allows networked systems to communicate with the Océ Power Print Controller in order to print files.
170 Océ Power Print Controller Technical Reference Manual
About this chapter
This chapter documents the implementation of the Line Printer Daemon (LPD) protocol mechanism in the Océ Power Print Controller. This mechanism allows the Océ Power Print Controller to communicate with the host system in order to print files.
The use of LPD implies that all files transferred from the host to the Océ Power Print Controller are always queued on the printer in the host I/O-specific LPD print queue, before they are processed for actual printing. The LPD protocol provides a mechanism to perform basic queue management on the LPD print queue.
Remote users may also use the LPD protocol to retrieve printer status information, which includes both machine status information and LPD print queue information.
The LPD protocol specification itself is specified in request For Comments RFC 1179, which is an official standard from the Internet Community.
Structure of this chapter
■ The first section of this chapter provides a general description of the LP host I/O channel.
■ The second section focuses on how to use the LP print service. It contains procedures both for BSD and System V Unix.
■ The third section explains how to submit print jobs to the Océ Power Print Controller over the LP host I/O channel.
■ The fourth section documents the use of flagsheets.■ The fifth section documents the various LP-related attributes for ART
identification purposes.■ The sixth section explains how to read the printer status.■ The seventh section explains how to remove jobs from the print queue.■ The last section concentrates on enabling and disabling the LP interface.

LPD connection to the Océ Power Print Controller 171
TerminologyThroughout this chapter, the following terminology is used:
LP refers to the entire Line Printer architecture/system, consisting of client programs, server programs, print queues, and communication protocol.
LPD (upper case) refers to the protocol (RFC 1179) which is used to communicate between host and printer.
lpd (lower case) refers to the program which services LPD requests from the (local or remote) host system. This is generally called the LPD server.
ocelpd is the Océ printer-specific version of lpd.
Océ LP printer refers to an Océ Power Print Controller printer using the Line Printer Daemon (LPD) protocol.
User An lpd user may be a human operator, but is more likely to be a program running on the user’s workstation, which communicates with the Océ Power Print Controller printer. Therefore, in this chapter, the user is always addressed in the third person.

172 Océ Power Print Controller Technical Reference Manual
General description of the LP host I/O channel
LP architecture
An LP session involves at least two programs:
■ an LP client program and■ an LP server program.
Depending on the specific functional request, the user will normally use different client programs to communicate with the lpd program. In general, one single lpd program will handle all different user requests.
The actual names and detailed behaviour (program options) of the LPD client programs depend on the host Operating System environment. In general, one may distinguish between Unix BSD style and Unix System V style systems. For these kinds of systems, the user programs are mostly named as follows:
Also the LP server programs often have different names in System V and BSD Unix environments:
Functionality request-ed by the user
System V Unixuser program
BSD Unixuser program
Submit print jobs lp, rlp lpr
Cancel print requests cancel lprm
Display status lpstat lpq
[35] User program names in System V Unix and BSD Unix
System V Unixserver program
BSD Unixserver program
LPD server programs lpsched, lpNet, rlpdae-mon
lpd
[36] LPD server program names in System V Unix and BSD Unix

LPD connection to the Océ Power Print Controller 173
For LP system management and control purposes, the host system normally offers specific commands for the system administrator. These commands are local to the host system, and are of no direct need while printing to the Océ LP printer:
Spooling
Within the LP architecture, an lpd program always serves as a spooler for the submitted print jobs. After spooling the submitted print job, the lpd program checks whether the job can be printed on a locally attached printer (i.e. directly connected to the host over, e.g., a serial line), or whether the print job must be transmitted over a network connection to another, remote lpd program for further processing.
It is allowed to use intermediate lpd spooling systems between the originating host (the host system where the user is logged in), and the ultimate lpd spooler which actually drives the printer.
From the user’s point of view, the LP host I/O channel on the Océ LP printer provides the LPD functionality. However, because LP spooling and actual printing are incorporated into one single machine, an Océ-specific program version of lpd: ocelpd is applied.
System V Unix BSD Unix
LP management andcontrol
lpsystem, lpadmin, enable, disable, accept, re-ject
lpc
[37] LP management and control commands in System V Unix and BSD Unix

174 Océ Power Print Controller Technical Reference Manual
Besides providing information from the LP printqueue, ocelpd also provides information about the printer’s SPOOL queue which contains all processed jobs waiting to be printed. These buffered printjobs may originate from other sources than LP host i/o, e.g. FTP or CENTRONICS.
[38] ocelpd workflow
The printer provides only LP server functionality; no LP client functionality. The printer acts as a passive station that waits for requests from remote users or systems.
The use of LPD is bound to the use of the TCP/IP networking protocol stack, or —more specifically— to the use of the TCP protocol. The Océ printer-specific ocelpd server uses the well-known TCP port 515 for communication with the client system.
Note: The LP client programs are running locally on a user’s computer system, and these programs as such are a fixed entity. From the Océ LP printer point of view, these programs, and the associated user interfaces, cannot be influenced. However, no software program changes are needed at the host computer side to use the service provided by the printer’s ocelpd program.
Note: The preferred spool mode for the LP protocol is direct printing. If you choose ‘spool while print’ or ‘ print while spool’ the job will be spooled twice.
lprlprmlpq
lpd lpd ocelpdLPD LPD LPD
LPprintqueue
LPprintqueue
LPprintqueue
Zero or moreintermediate
spoolers on otherhost computers
Océ printerUser's host computer
LP client / LP server LP server
SPOOLqueue
lprlprmlpq
lpd ocelpdlpd
Printqueue Printqueue Printqueue SPOOLqueue
User’s host computer
LP client / LP server
Océ printer
LP server
Zero or moreintermediatespoolers on other host computers

LPD connection to the Océ Power Print Controller 175
Using the LP print service
The LPD protocol manipulates a print queue on a host, either local or remote. Each print queue is referred to by a logical name. A job in a print queue consists of one Control File and one or more Data Files. A Control File describes the print job in terms of characteristics and print requirements, while a Data File contains the actual data to be printed.
The LPD protocol provides commands to:
■ send Control and Data Files■ remove a print job from the queue■ read the queue status■ start printing on a queue.
Because of the specifics of the LPD protocol, the LP I/O interface on the Océ Power Print Controller does not provide interactive printing possibilities for the user.
In a traditional (Unix) LPD server environment, the lpd program may serve several print queues, each having their own logical name. Queues are also physically distinguished, and can be handled separately.
On the Océ Power Print Controller, however, there is only one physical LP print queue available. All print requests, received for various logical print queues, will be stored in the same LP print queue. The printer queues incoming print jobs on a first-come-first-serve basis.
For the Océ Power Print Controller printer, print jobs transferred via the LP interface may be coded in PCL5, FOL or PostScript format, depending on the configuration of the printer. If AJC/FOL is installed, the LP interface may be used for this module as well. ocelpd does not provide any data type conversion or filtering such as ASCII-to-PostScript; neither does it provide specific services such as resolving fonts. Conversion or filtering can be provided by the Océ PRISMAflow Print Server.
Any remote host and/or user has access to the LP print service. However, the LP print service is only available if it is installed through SDS. If the LP print service is installed, the Key Operator System of the Océ Power Print Controller still provides the possibility to (temporarily) enable or disable the use of the LP host I/O channel. When the LP interface is disabled, the printer will not accept

176 Océ Power Print Controller Technical Reference Manual
new print jobs from remote hosts, but jobs already queued on the printer will still be processed.
A host system which needs LP print service access to the Océ Power Print Controller, must adapt its local LP print system environment to include settings for the Océ LP printer.
Preparing the host (BSD)
Note: The operations described in this subsection are restricted to super user only.
In a BSD Unix environment this will result in adapting the /etc/printcap file on the host, as in the following example:
# printcap entry for Oce8445 printer#Q8445| Oce8445 printer with lpd interface:\
:lp=:mx#0:rm=Oce8445:rp=myqueue:sd=/var/spool/lpd/myqueue:
Within this example configuration, the entries have the following meaning:
Q8445 The printer name on this host. When submitting print jobs, the user refers to this printer name.
Oce8445 Comment statement, for information only.
lp= Specifies that the printer is remote to this host. For the use of the Océ Power Print Controller printers, this is a required setting.
mx#0 Do not limit maximum file size of a print job to 1 MByte.
rm=Oce8445 This is the ‘hostname’ of the Océ Power Print Controller (remote machine). The ‘hostname’ should be defined in the host’s /etc/hosts file, while the Internet address associated with this ‘hostname’ should be the same as the printer’s Internet address which is configured using KOS/SDS.
rp=myqueue The remote print queue name. The printer will accept all print queue name values, and map these onto one internal LP print queue. This print queue name may be used on the printer for JAC identification purposes.
sd=/var/spool/lpd/myqueue The physical location of the local (host) print queue. If this spool directory is not available, you have to create it on the host.

LPD connection to the Océ Power Print Controller 177
Preparing the host (System V)Note: The operations described in this subsection are restricted to super user only.
Within a System V Unix environment the printer must be defined using the lpsystem and lpadmin commands. Accomplishing the same kind of setup as in the BSD Unix example above, involves two steps:
1 Define the Océ LP printer as a print server in BSD mode (LPD protocol). oce8445 is assumed to be the ‘hostname’ of the printer.
% lpsystem -t bsd oce8445
2 Map the local print queue on the System V host onto a remote print queue on the printer. In this example, we assume that the local print queue is named ‘Q8445’, and that the remote print queue is named ‘myqueue’. On a System V host, it may be defined which type of data is supported on the printer, and thus through the local print queue. If possible, the host will take care of converting the submitted data to the named data type. For example, to support PostScript:
% lpadmin -s oce8445\!myqueue -p Q8445 -T postscript
Another example configuration is to use the Océ LP printer as a remote, LPD-connected PCL printer. PostScript files will now be rejected from printing on the local System V host:
% lpadmin -s oce8445\!myqueue -p Q8445 -T hplaserjet
If you do not want the host to perform any conversion configure it with ‘any’:
% lpadmin -p Q8445 -s oce8445\!myqueue -T any
Enable the printer via the command:
% accept Q8445
Note: The examples above will work on Sun Solaris 2.3 and 2.4 systems.

178 Océ Power Print Controller Technical Reference Manual
Submitting print jobs to the Océ Power Print Controller
Users may submit print jobs using an LP client program such as lpr (BSD style) or lp (System V style).
The user may influence the way a job is printed using specific command line options with the lpr or lp command. Available command line options may differ from host to host as each host might have a specific implementation. Not all command line options are meaningful for each printer.
lp and lpr command line options
The following table gives an overview of generally known lp or lpr command line options.
For all generally known command line options, the table indicates whether the option is supported by the Océ Power Print Controller printer or not. Not supported options are recognised by the printer, but they do not result in any action. Some command line options are handled locally on the user’s host system, and as such will never be known at the printer. In the following table, these options are marked as ‘n.a.’ (not applicable).
If the variables USERNAME, HOSTNAME or QUEUENAME are not specified, the value ’UNKNOWN’ is used.
Wherever applicable, the associate JAC identification attribute is also mentioned.

LPD connection to the Océ Power Print Controller 179
lp option lpr option LP processing request supp.
d<dest> -P<printer> select print queue related JAC identification attribute:CHANNELNAME
yes
-n<copies> -#<copies> produce number of copies yes
-o nobanner -h DO NOT produce banner page yes
-o <option> printer-specific options other than “nobanner”
no
-C<class> print class on banner related JAC identification attribute:JOBCLASS
yes
-t<title> -J<job> print title / job on banner instead of (first) Data File name; related JAC identification attribute: JOB-NAME
yes
-1<font>-2<font>-3<font>-4<font>
mount font for troff filtermount font for troff filtermount font for troff filtermount font for troff filter
nononono
-c -s use copy / symbolic link for Data File
n.a.
-r remove file after spooling n.a.
-m -m send mail upon completion no
-w write message on user terminal upon completion
no
-i<indent> indent each line with spaces no
-p use pr filter no
-T<title> use title for pr filter n.a.
-w<font> specify page width for pr n.a.
-l print control characters no
-t use troff filter no
-n use ditroff filter no
-d use tex (DVI) filter no
-g use plot filter no
-v use verbatim/raster filter no
-c use cifplot filter no
-f use Fortran carriage control filter no
-T<type> use filter to convert specified con-tent type
n.a.
[39] Mapping lp-and lpr-options on lp-processing requests

180 Océ Power Print Controller Technical Reference Manual
Note: There may be specific command line options available in specific LP host implementations, which are not mentioned in the above table.
Printing multiple copies
If the user requests to print multiple copies of some files (‘lpr -#’ or ‘lp -n’ option), the printer generates these multiple copies using JAC functionality, rather than transmitting and processing these files several times, which is particularly interesting in combination with the JAC ‘COLLATE’ function.
However, for AJC/FOL, multiple copies will be generated by processing the files multiple times.
Note: If the LP interface is configured for use with AJC/FOL, the use of an LP banner page is not supported.
Examples of print job submission (BSD style commands)
Print 3 copies of each named file, including banner page:
% lpr -PQ8445 -#3 invoice.fol document.fol
Print 1 copy of the named file, without banner page:
% lpr -PQ8445 -h document.fol
Powering down the Océ Power Print Controller printer has no effect on print jobs queued in the LP print queue. All jobs visible in the printer’s LP print
-y<modelist> use (locally defined) filters before printing
no
-f<form-name>
print on specified form n.a.
-H<handling> special request handling n.a.
-P<pagelist> print only specified pages n.a.
-q<prio> specify job priority n.a
-s suppress LP messages n.a.
-S<charset> specify character set or print wheel
n.a.
lp option lpr option LP processing request supp.
[39] Mapping lp-and lpr-options on lp-processing requests (continued)
LPD connection to the Océ Power Print Controller 181
queue will survive across powerdown. When the printer is rebooted, it processes these queued jobs automatically.
Priority in case of multiple print jobs
Multiple files that are submitted by one single lpr command are treated as one job on the Océ Power Print Controller. Consequently, multiple files are always printed in the order they were submitted and jobs submitted through another interface will not be printed in between.

182 Océ Power Print Controller Technical Reference Manual
Printing flagsheets
This section applies to the JAC version of the controller only, except the default lpheader flagsheet. The default lpheader flagsheet is also available on the basic version of the controller.
Flagsheet principle
In case the user requests that an LP banner page (‘lpr -h’ or ‘lp -o nobanner’ option not specified) is printed, or the ART identification rules specify the use of a JAC flagsheet, the printer generates this flagsheet before printing the actual job. The user request for printing a banner page can be superseded by the operator using KOS or SDS.
The Key Operator can specify if he wants a flagsheet, also called a header page. He can choose from “always a header page”, “never a header page” or “a header page if specified conform the LP protocol”.
If the print job consists of multiple files and/or multiple copies, a JAC flagsheet is printed before each of these files or copies. The flagsheet object both defines a standard page layout and a definition of where to print the JAC identification attribute values on this flagsheet.
Note: The LP flagsheet functionality is not supported with AJC/FOL.

LPD connection to the Océ Power Print Controller 183
The example below shows the LP flagsheet that is standard available on the hard disk of the Océ Power Print Controller:
[40] Example of a flagsheet
Default lpheader
If not overruled through ART (flagsheet), the printer uses the JAC flagsheet ‘lpheader’ to print the LP banner page. The printer contains a default JAC ‘lpheader’ flagsheet object, which may be replaced by downloading another flagsheet object with the name ‘lpheader’.
From KOS it is possible to specify from which paper tray this flagsheet should be taken.

184 Océ Power Print Controller Technical Reference Manual
The table below documents the information that can be contained in the lpheader flagsheet. The table has the following structure:
■ The first column contains the item that can appear on the flagsheet.■ The second column, A/C, specifies whether this item is always present (A)
or conditionally (C). Conditional information is only printed on the flagsheet if the associated JAC attribute was set. All conditional items are initially set by the LP host I/O interface of the printer, based on control information received from the host.
■ The third column contains a further description of the item in the first column. You can find more information on the various JAC attributes in section ‘Identification attributes for JAC’ on page 185.
The initial attribute values, as set by the LP Host I/O interface, may be overruled by settings in the ART.
Customised lpheader
You can also create a customised flagsheet for a given Océ Power Print Controller printer. This customised flagsheet must be named ‘lpheader’ and downloaded to the printer refer to ‘Flagsheets’ on page 326.
Item A/C Description
Océ Power Print Controlleridentification
A 8445, 8465
Flagsheet name A This string is ‘Flagsheet’ by default
Date/time A Date/time on which the job was printed
Input channel C This string is always ‘LP’
Channel name C Related to JAC attribute CHANNELNAME
User C Related to JAC attribute USERNAME
Host C Related to JAC attribute HOSTNAME
Jobname C Related to JAC attribute JOBNAME
Jobclass C Related to JAC attribute JOBCLASS
Jobnumber C Related to JAC attribute JOBNUMBER
Filename C Related to JAC attribute SEGMENTNAME
Custom C Related to JAC attribute CUSTOM
[41] Information in the lpheader flagsheet

LPD connection to the Océ Power Print Controller 185
Identification attributes for JAC
Job identification attributes and specific processing options are stored in the Control File, which is sent from the remote host to the printer.
The printer builds a list of JAC identification attributes based on the Control File contents.These JAC identification attributes may then be used to select or overrule specific processing options by means of the printer’s internal Association Rules Table. This provides a method for printer operator control with respect to specific processing of print jobs.
For ART identification purposes, LP host I/O automatically provides the following JAC identification attributes:
If the Océ Power Print Controller printer is configured for multiple print contexts and multiple PDLs, you can use separate logical LP print queues to address the different print contexts.
Identification attribute Description
HOSTNAME logical name of the remote host where the print job was submitted
USERNAME name of the user who submitted print job
JOBNAME name of the print job
name of file, for each separate file within a single print job
JOBCLASS name of the print class to which the job belongs
JOBNUMBER request id of the submitted print job
CHANNELNAME name of the logical LP print queue as communicat-ed from host to printer (remote print queue name)
CHANNELTYPE “LP” (fixed value)
[42] Host identification attributes for ART purposes

186 Océ Power Print Controller Technical Reference Manual
Example The host LP system configuration may have a PCL5 specific queue, as well as a FOL specific queue. Using the CHANNELNAME identification attribute, the ART can be set up so that the various LP print jobs are handled by the correct print context.

LPD connection to the Océ Power Print Controller 187
Reading printer status
The user may read the actual printer status information by applying an LP client program such as lpq (BSD style) or lpstat (System V style).
Contents of the status information
The status information may consist of the following information:
■ printer off-line or on-line■ printer idle, processing, aborting, suspending or suspended■ printer error information■ wait or warning situations.
Error, wait and warning status messages that are returned to the user are equivalent to those displayed on the Océ Power Print Controller console. However, the status information returned to the user is not limited to one single line of text; it contains all relevant status messages.
Besides typical printer status information, lpq or lpstat also provide detailed information about print jobs currently being buffered on the Océ LP server. These print jobs may possibly originate from other sources than LP host I/O such as FTP. The total number of print jobs being processed, and the total size of these jobs (in bytes), are displayed.
The print jobs which were sent to the printer using LP I/O, are visible in the LP print queue. All these print jobs have a unique identification, which may be used when cancelling previously made print job requests.
When the top print job from the LP print queue has ‘left’ the queue, this indicates that the job is (currently being) printed. Depending on the queue settings, this job may not survive across powerdown.

188 Océ Power Print Controller Technical Reference Manual
Command line options to obtain a status replyGenerally known command line options for the lpq and lpstat commands are listed in the following table.
Note: There may be specific command line options available in specific LP host implementations, which are not listed in the above table.
Attention: The ‘lpq +’ option is not supported because the criterion for lpq to stop, is generally based on the printer reply message “No entries”, which is not an official part of the LPD protocol. Because the Océ Power Print Controller returns more verbose printer status information, the stop criterion for ‘lpq +’ will never be reached.
lpstat option lpq option or argu-ment
status info request supp.
-p<printer> -P<printer> select print queue yes
-p<printer> -D display in short format yes
-p<printer> -L -l
+ <interval>
display in long format
display status until print queue is empty
yes
no (see
note be-
low)
-o<list> job# ... status for specified jobs yes
-u<userlist> user ... status of jobs from user yes
[43] Command line options for the lpq and lpstat commands

LPD connection to the Océ Power Print Controller 189
Example of a status reply (short format)A status reply from ocelpd may look as follows:
% lpq -PmyqueuePrinter is ready and idle.
Printer reports error(s)/warning(s):Upper paper level low.
SPOOL queue:
Rank OwnerJobChannelFilesTotal Sizeactive jhp1 LP pres.ps2039880 bytes
1st mbr2 FTP doc.ps13400 bytes2nd root3CENTRONICSdemo.ps439867 bytes
LP queue:
Rank Owner Job Files Total Sizeactive jhp 243 pcd.ps 2039880 bytes
1st mbr 245 document.ps 13400 bytes2nd root 5 frame.ps 439867 bytes
In the example above, three parts may be distinguished:
■ The first part describes the general system status of the printer, including the total amount of jobs currently being processed by the printer. This does not include the jobs waiting in the LP print queue.
■ The second part describes the SPOOL queue in detail, on a one-line-per-job basis. Jobs shown in the SPOOL queue are already being processed by the Job Server (JS).
Rank The Rank column displays the position of the print job in the SPOOL queue.
Owner The Owner column identifies the user who submitted the print job.
Job The Job column displays the spool queue ID for this print job.
Files The Files column identifies the jobname of the Data Files which together make up this print job.
Total size The Total size column specifies the amount of data queued for this print job.

190 Océ Power Print Controller Technical Reference Manual
The spool queue information may consist of information regarding printjobs in the printer’s spool queue, also if the printer is off-line. However, printjobs that are on hold will not be shown in detail. Only the number of jobs on hold is displayed.
■ The third part describes the LP print queue in detail, on a one-line-per-job basis. This is the so called short format, which is the default display format. Jobs from the LP print queue are passed on for processing on a first-come-first-serve basis.
Rank The Rank column displays the position of the print job in the LP print queue.
Owner The Owner column identifies the user who submitted the print job. The printer uses this value for the JAC identification attribute USERNAME.
Job The Job column displays the request ID for this print job. The request ID is generated by the host where the print job was submitted, and serves as a reference when a user wants to cancel a previous print job request. This information is also used for the JAC identification attribute JOBNUMBER.
Files The Files column identifies the file name(s) of the Data Files which together make up this LP print job. The file names are used by the printer when constructing the JAC identification attribute SEGMENTNAME.Unless overruled by the ‘lpr -J’ or ‘lp -t’ option, the name of the first file within each print job request is used by the printer when building the JAC identification attribute JOBNAME.If multiple files were specified within one LP print request, all the files contained in this print request will receive the same JOBNAME attribute value, i.e. the name of the first file in this print request.
Total size The Total size column specifies the amount of data queued for this print job.
Example of a status reply (long format)
The unique identification of a print job is built up around the triplet value:
■ jobnumber■ hostname■ printerqueue.

LPD connection to the Océ Power Print Controller 191
To retrieve information about this triplet value, which may especially be useful when a user wants to cancel a specific print job request, the user may request an LP print queue overview in long format (lpq -l option).
In such case, the lpq command displays the LP print queue information in the following format:
jhp: active[job 243st6-oa6.myqueue]/home/jhp/invoice.fol2039880 bytes
mbr: 1st[job 245st6-oa6.myqueue]2 copies of document.fol13400 bytes
root: 2nd[job 5oce-rd2.ocepcl]frame.pcl439867 bytes
In addition to the short format LP print queue display, the long format display provides information about the number of copies requested for the Data Files for each print job, and the unique identification for each print job.
The number of copies refers to the copycount requested in the LP print request. This copycount value may be overruled later on during processing by a specific JAC job ticket.
The unique job identification is specified within the [job...] field. The active job, for example, has job number 243 (related to JAC identification attribute JOBNUMBER), was submitted from host system “st6-oa6” (JAC identification attribute HOSTNAME), and was submitted for remote print queue “myqueue” (JAC identification attribute CHANNELNAME).
The printer merges print requests for different print queues internally into one single LP print queue, as you can see from the above example. The first two jobs were submitted for print queue “myqueue”, the last job was submitted for print queue “ocepcl”. The print queue value may be used for JAC identification purposes (i.e. CHANNELNAME attribute). One could for example define specific print queues for specific kinds of jobs, and attach a specific job ticket to each of these queues through ART.

192 Océ Power Print Controller Technical Reference Manual
Empty queueIf the printer’s internal SPOOL queue is empty, the following message is displayed instead of the SPOOL queue queue list:
No jobs to print.
If the printer’s internal LP print queue is empty, the following message is displayed instead of the LP print queue list:
No entries in LP queue.
Limitations
For the SPOOL queue the maximum number of characters for:
■ the username is 10 characters■ the channelname is 10 characters■ the file name is 20 characters.
For the LP queue (short format) the maximum number of characters for:
■ the username is 10 characters■ the file name is 32 characters.
For the LP queue(long format) the maximum number of characters for:
■ the username is 10 characters■ the file name is 19 characters.

LPD connection to the Océ Power Print Controller 193
Removing print jobs from the print queue
Users may remove print jobs from the LP print queue, using an LPD client program like lprm (BSD style) or cancel (System V style).
Authentication rules
To be able to remove files, the user’s request is checked against some authentication rules.
Regular users Users without special privileges can only cancel requests associated with their own user name. As well, the request to remove one or more print jobs is only granted if the specified print queue name corresponds to the one associated to the print job(s) to be removed.
System administrator The system administrator root has special privileges, in that he/she is able to remove jobs from other users. Root is also allowed to flush the entire contents of the printer’s LP print queue. In this case all jobs from all users from all client hosts systems are removed, regardless of the print queue specified with the original print request.
The names of the Control and Data Files which are removed from the LP print queue will be reported back to the user.
Command line options
Generally known command line options for the lprm and cancel commands are listed in the following table.
cancel optionor argument
lprm optionor argument
remove job request supp.
printer ... -P<printer> select print queue yes
- remove all jobs yes
requestid ... job# ... remove specified jobs yes
-u<userlist> user ... remove jobs from user
yes
printer ... [no argument] remove active job yes
[44] Command line options for the lprm and cancel commands

194 Océ Power Print Controller Technical Reference Manual
Note: There may be specific command line options available in specific LP host implementations, which are not listed in the above table.
When removing print jobs from the LP print queue, a distinction between print jobs cannot be made on the original host where the print job was submitted. The LPD protocol does not provide a mechanism to make this distinction when removing jobs. Thus, for example, the jobs ‘312vaxhost.myqueue’ and ‘312unixhost.myqueue’ (lpq long format) cannot be distinguished from one another, and will both be referred to from a host system with jobnumber 312 and print queue ‘myqueue’. In such case both print jobs will be removed from the LP print queue.
Examples
Suppose the LP print queue on the Océ Power Print Controller contains the following jobs (long format display):
jhp: active[job 243st6-oa6.myqueue]/home/jhp/invoice.fol2039880 bytes
mbr: 1st[job 245st6-oa6.myqueue]2 copies of document.fol13400 bytes
root: 2nd[job 5oce-rd2.ocepcl]frame.pcl439867 bytes
mbr: 3rd[job 246st6-oa6.myqueue]
file.fol5647 bytes
jhp: 4th[job 247st6-oa6.myqueue]appl1.ps, appl2.ps578431 bytes
jhp: 5th[job 34as400.oceps]office.ps439867 bytes
Removing an active job User jhp on host st6-oa6 wants to remove the active job. This user has to type:
% lprm -Pmyqueue
Remove all owned jobs User ‘gloria’ on host st6-oa6 wants to remove all owned jobs for specified print queue ‘myqueue’. This user has to type:
% lprm -Pmyqueue -
Remove own job as root User root on host oce-rd2 wants to remove his/her own job. This user types:
% lprm -Poceps 5

LPD connection to the Océ Power Print Controller 195
Remove all jobs of one user User root on any host wants to remove all jobs for user jhp. This user types:
% lprm -Pmyqueue jhp
Remove all jobs in the queue User root on any host wants to remove all jobs from printer’s LP print queue. This user types:
% lprm -Pmyqueue -
Note: In the last two examples, print queue ‘myqueue’ has been specified by root, but due to the special privileges of user root the actual action will also affect print jobs which where originally queued for another print queue. In this case ‘myqueue’ is just one possible alias-name by which root can address the printer’s print queue.

196 Océ Power Print Controller Technical Reference Manual
Disabling/enabling the LP interface
The Key Operator has the possibility to (temporarily) disable the LP host I/O interface on the printer. In this case, the printer will not accept new print jobs from remote hosts, but jobs already queued on the printer will still be processed. Previously queued print jobs may still be cancelled using the lprm/cancel command.
When using lpq or lpstat, the user can see whether the printer is able to accept new jobs or not. The user can still submit new print jobs, but these jobs will be queued on the local or intermediate host.
When the printer’s LP interface has been enabled again, the LPD communication between host and printer will come up automatically, as soon as it is initiated by the host. It may take quite some time, however, before the LPD sessions will be setup again. To avoid long waiting periods, the host’s operator can restart the local host LP system manually after the printer’s LP interface has been enabled again, using the lpadmin (System V) or lpc (BSD) command.
In a situation where the LP interface has been temporarily disabled, a user’s lpq command may for example return the following information:
% lpq -PmyqueuePrinter is online and idle.
No entries in printer’s lpd queue.Queuing of new jobs disabled.
st6-oa6: waiting for Oce8445 to come upRank OwnerJobFilesTotal Size
1st jhp152 job.pcl5168 bytes
In this situation, the printer’s LP print queue has been processed completely, but new jobs are not accepted via LP host I/O. However, the printer may still accept new print jobs through another host I/O channel, e.g. FTP. In the above example, the host system “st6-oa6” has one job locally queued for transmission to the printer, but has to wait until the LP interface on the printer is enabled again.

197
Océ Power Print Controller
Technical Reference Manual
Chapter 12NetWare connection to the Océ Power Print Controller
This chapter documents the NetWare host I/O channel for the Océ Power Print Controller. It explains how to configure NetWare and how to print files.

198 Océ Power Print Controller Technical Reference Manual
About this chapter
This chapter provides information on how to use the NetWare interface to communicate with the host system in order to print files. The NetWare host I/O channel is intended for network connections of the Océ Power Print Controller to PC client environments.
Structure of this chapter
This chapter provides information on the following items:
■ a general description of NetWare in the Océ Power Print Controller Series■ the initial configuration of NetWare, in the PCONSOLE application, in the
NWADMIN95 application and on the printer itself■ submitting print jobs■ retrieving the printer status■ NetWare-specific identification attributes for JAC■ NetWare flagsheet■ NetWare diagnostics.

NetWare connection to the Océ Power Print Controller 199
NetWare in the Océ Power Print Controller printer
NetWare is a Novell-specific Network Operating System, including the Novell-specific communication protocols IPX/SPX. The Océ Power Print Controller supports NetWare 3.x and 4.x, running on an Ethernet network. but is not supported on Token Ring. Within the NetWare environment, the printer behaves like a Print Server.
By using the bindery emulation of NetWare 4.x, the Océ Power Print Controller with NetWare installed can also be used in a NetWare 4.x environment. Bindery emulation is enabled by default during installation of NetWare 4.x.
NetWare architecture
Printing in a NetWare environment involves the use of a Print Queue, which resides on a File Server. NetWare users can issue print commands from their local work station. The print jobs are sent to the specified Print Queue.
A Print Server, also called PSERVER, retrieves the print jobs from the Print Queue, and passes them on to the printer. In the Océ Power Print Controller series, the Print Server is an integral part of the printer itself.
[45] NetWare architecture
PCNetware
NetwareFile server
Printqueue
PSERVER
Netwareprint request
PSERVER handles print job
Ethernet
NetwarePSERVER
ethernet PCNetware
NetwarePrint request
PSERVERhandles print job
PSERVERPrintqueue
NetwareFile Server
NetwarePSERVER

200 Océ Power Print Controller Technical Reference Manual
Spooling jobs Because of the nature of NetWare printing, files have to be spooled on the File Server before actual printing. Therefore, the NetWare host I/O channel cannot provide interactive (PostScript) printing.
Queue management A job will be removed from the NetWare Print Queue only when it actually can be processed by the printer. This means that for the NetWare environment, real queue management takes place on the NetWare File Server.
Physical connection
The Océ Power Print Controller only supports a physical printer connection to Ethernet. For attachment to a Token Ring LAN, an additional (external) bridge or router device must be used in the network.
Ethernet Type II, IEEE 802.2, IEEE 802.3 and SNAP packet frame types are supported the Océ Power Print Controller PSERVER. However, only one packet frame type can be used at the time, depending on the NetWare File Server in the network.

NetWare connection to the Océ Power Print Controller 201
Initial configuration of NetWare
Configuration in PCONSOLE
The Océ Power Print Controller is able to contact one single File Server, and service a maximum of four different Print Queues on that File Server.
In order to use the Océ Power Print Controller printer as a PSERVER in the NetWare network, the NetWare supervisor must carry out the following configuration actions in the PCONSOLE application.
Note: These configuration settings must be made for each Print Queue serviced by the Océ Power Print Controller printer.
▼▼▼▼ To initially configure NetWare 3.x for the Océ Power Print Controller:
1 As user ‘SUPERVISOR’, start the PCONSOLE application.2 Select ‘Print Server Information’.
Press the insert key and type the new Print Server name.The Print Server name has the following format:
<Printer Name>_<Print Queue Name>
where <Printer Name> is the name of the printer as configured on the printer through Advanced KOS. For more information about the printer name, refer to the System Administration Manual of your printer.<Print Queue Name> is the name of the specific Print Queue which is serviced through this PSERVER.
3 Press enter twice.4 Select ‘Print Server Users’.5 Modify the list as necessary and press escape.
In most situations, the default group EVERYONE will be the preferred entry.6 Select ‘Print Server Operators’.7 Modify the list as necessary and press escape.
By default, SUPERVISOR is the only Server Operator.8 If required, select ‘Change Password’.9 Enter the new password.
10 If required, select ‘Full Name’.You may enter a descriptive full name for this specific PSERVER, e.g., ‘Océ 84xx printer second floor’.
11 Press escape twice to return to the menu ‘Available Options’.

202 Océ Power Print Controller Technical Reference Manual
12 Select ‘Print Queue Information’.13 Press the insert key and type the new Print Queue name.14 Press enter twice.15 Select ‘Queue Users’.16 Modify the list as necessary and press escape.
In most situations, the default group EVERYONE will be the preferred entry.
17 Select ‘Queue Operators’.18 Modify the list as necessary and press escape.
The listed persons/groups are allowed to perform queue management actions on this File Server.
19 Select ‘Queue Servers’.20 Press insert and select the Océ Power Print Controller Print Server (as defined
in step 2) from the displayed Queue Server Candidates list.21 Press enter.22 Press escape twice.23 Press escape to quit the PCONSOLE application.
▼▼▼▼ To initially configure NetWare 4.x in bindery mode for the Océ Power Print Controller:
1 As user ‘ADMIN’, start the PCONSOLE application.2 Select Bindery mode by pressing <F4>.3 Select ‘Print Servers’ in the menu “Available Options”.
Press the insert key and type the new Print Server name.The Print Server name has the following format:
<Printer Name>_<Print Queue Name>
where <Printer Name> is the name of the printer as configured on the printer through Advanced KOS. For more information about the printer name, refer to the System Administration Manual of your printer.<Print Queue Name> is the name of the specific Print Queue which is serviced through this PSERVER.
4 Press enter twice.5 Select ‘Users’ in the menu “Print Server Information”.6 Press the insert key and select User candidates and press escape.7 Select ‘Operators’.8 Press the insert key and select one of the necessary Operator candidates.
By default, ADMIN is the only Server Operator.9 If required, select ‘Change Password’.
10 Enter the new password.11 If required, select ‘Full Name’.

NetWare connection to the Océ Power Print Controller 203
You may enter a descriptive full name for this specific PSERVER, e.g., ‘Océ 84xx printer second floor’.
12 Press escape twice to return to the menu ‘Available Options’.13 Select ‘Print Queue’.14 Press the insert key and type the new Print Queue name.15 Press enter twice.16 Select ‘Users’ in the menu “Print Queue Information”. 17 Modify the list as necessary and press escape.
Default is ADMIN, you have to add the necessary users.18 Select ‘Operators’ in the menu “Print Queue Information”..19 Modify the list as necessary and press escape.
The listed persons/groups are allowed to perform queue management actions on this File Server.
20 Select ‘Print Servers’.21 Press insert and select the Océ Power Print Controller Print Server (as defined
in step 2) from the displayed Print Server Candidates list.22 Press enter.23 Press escape twice.24 Press escape to quit the PCONSOLE application.
Configuration in NWADMIN( 95/NT)
The Océ Power Print Controller is able to contact one single File Server, and service a maximum of four different Print Queues on that File Server.
In order to use the Océ Power Print Controller printer as a PSERVER in the NetWare network, the NetWare supervisor must carry out the following configuration actions in the NWADMIN application.
Note: These configuration settings must be made for each Print Queue serviced by the Océ Power Print Controller printer.

204 Océ Power Print Controller Technical Reference Manual
The initial File server configurationTo locate the print objects (i.e. printer, print server and queue) the Océ Power Print Controller printer requires the bindery emulation mode of the file server. Therefore the autoexec.ncf file must specify the bindery context which on its turn must point to every directory where a print object is defined. Hence, print objects need not to be located in the same directory if the bindery emulation points to the different directories.
Example: Suppose a top context called ORG, containing two contexts. One subdirectory, called PS, where the print server is located and one subdirectory, called QU, where the queue is located. In this case following setting must be put in the autoexec.ncf file:
set Bindery Context = O=ORG;OU=PS.ORG;OU=QU.ORGor,
set Bindery Context =ORG; PS.ORG; QU.ORG
The Print Server name has the following format:
<Printer Name>_<Print Queue Name>
where <Printer Name> is the name of the printer as configured on the printer through Advanced KOS. For more information about the printer name, refer to the System Administration Manual of your printer.<Print Queue Name> is the name of the specific Print Queue which is serviced through this PSERVER.
▼▼▼▼ To initially configure NetWare 4.x server for the Océ Power Print Controller in a WIN95/NT environment:
1 As user ‘ADMIN’, start the NWADMIN application in the WIN directory.2 Create a new Print Queue, a new Printer and a new Print Server (in this order):
* Select a place (brench) in the TREE as highlighted item* Choose Object/Create from the menus or press ‘Insert key’* Choose Print Queue, Printer, Print Server from the object list* Type a name for the Print Queue, Printer, Print Server.* Press the ‘Create’ button.
3 Assign a Printer to the Print Server:* Double-click the print server item* Choose assignments* Add a printer to the list* ‘Change Password’ can be chosen if a password is required* Press the ‘OK’ button.
4 Assign a Print Queue to a Printer:* Double-click the printer item

NetWare connection to the Océ Power Print Controller 205
* Choose assignments* Add a print queue to the print queue list* Choose confirmation* Choose Printer type and banner type* Press the ‘OK’ button.
5 Adding users/operators to a Print Queue:* Double-click the print queue item* Choose users/operators* Add user(s)/operator(s)* Press the ‘OK’ button.
6 Adding users/operators to a Print Server:* Double-click the print server item* Choose users/operators* Add user(s)/operator(s)* Press the ‘OK’ button.
7 Check the configuration:* Double-click the print queue item* Choose assignments* Check the assigned printer server and print queue by checking whether the
printer and the print queue are visible.
Password-protected Print Queues
The Print Queues on the File Server may be protected against unauthorised use by means of a password. Such password provides a ‘private’ queue. All four queues have the same password. If a Print Queue is protected with a password, the PSERVER on the Océ Power Print Controller must be configured with the same password, in order to be able to access that Print Queue.
Only if passwords are used, the following setting must be executed on the Novell file server: ‘set allow unencrypted passwords = on’.
Note: The Océ Power Print Controller does not support encrypted NetWare passwords.

206 Océ Power Print Controller Technical Reference Manual
Configuration in KOSThe following NetWare-specific parameters need to be configured via KOS. After changing any of these parameters, the printer needs rebooting.
■ NetWare network number■ packet frame type (Ethernet II, IEEE 802.2, IEEE 802.3 or SNAP)■ File Server name■ alphanumeric password (as defined on the File Server) for the PSERVER to
access the File Server■ up to four Print Queue names (as defined on the File Server).
The printer uses the Print Queue names and the generic Printer Name to construct the specific PSERVER name for each of four Print Servers. The PSERVER name is:
<Printer Name>_<Print Queue Name>
where <Printer Name> is the name of the printer as configured on the printer through Advanced KOS. For more information about the printer name, refer to the System Administration Manual of your printer. <Print Queue Name> is the name of the specific Print Queue which is serviced through this PSERVER.
The Key Operator also has the possibility to (temporarily) disable the NetWare host I/O channel. If the channel is disabled, the Océ Power Print Controller PSERVERs will not retrieve print jobs from the Print Queues.

NetWare connection to the Océ Power Print Controller 207
Submitting print jobs
On the NetWare network, the user can submit print jobs to a NetWare Print Queue with the use of the NetWare CAPTURE/ENDCAP commands. Also, NetWare provides a PC command line interface, called NPRINT, to print directly from a local PC to the Print Queue on the File Server. Most applications provide integrated NetWare printing.
Print command options
With respect to supported options of the NetWare specific print commands, some differences exist between the various versions of these NetWare commands. The actual parameters available to the local CAPTURE or NPRINT commands can be obtained by typing the command CAPTURE ? or NPRINT.
The various options of the print commands are listed in the table below. Not all command options are relevant to the Océ Power Print Controller printer. The irrelevant options are marked with ‘not applicable’.
Wherever applicable, the associated JAC identification attribute is also mentioned.
Option CAPTURE NPRINT Print request Supp.
SH yes no show capture status of parallel ports
n.a.
J=<jobname> yes yes select group of print pa-rameters by type of job
n.a.
Q=<queuename> yes yes select Print Queue: re-lated JAC identification attribute: CHANNEL-NAME
yes
S=<servername> yes yes File Server where Print Queue resides
yes
L=n yes no refers to parallel port which will be captured
n.a.
F=nF=<formname>
yes yes form number or name to use
n.a.n.a.
[46] Options of NetWare print commands

208 Océ Power Print Controller Technical Reference Manual
CR=<path> yes no create file instead of sending output to Print Queue
n.a.
C=n yes yes number of copies per job
yes
TI=n yes no capture timeout n.a.
A yes no auto-end capture n.a.
NA yes no no auto-end capture n.a.
K yes no preserve print job if connection to File Serv-er is lost
n.a.
T=n yes yes translate TAB charac-ters into n-spaces
n.a.
NT yes yes do not translate TAB characters
n.a.
B=<bannername> yes yes <bannername> will be printed on the NetWare banner page, instead of the original job name; related JAC attribute: JOBNAME
yes
NAM=<name> yes yes instead of username, print <name> on the NetWare bannerpage; related JAC attribute: USERNAME
yes
NB yes yes do not print NetWare bannerpage
yes
FF yes yes FormFeed at end of job n.a.
NFF yes yes no FormFeed at end of job
n.a.
NOTI yes yes notify user after print-ing of job (i.e. job re-moved from Print Queue)
n.a.
NNOTI yes yes no notify n.a.
DO=<domainname>
yes yes if NetWare Name Serv-ice is used, specify the domain name
n.a.
D no yes delete original file after printing
n.a.
Option CAPTURE NPRINT Print request Supp.
[46] Options of NetWare print commands (continued)

NetWare connection to the Océ Power Print Controller 209
Printing multiple copiesMultiple copies of a file will be generated through JAC unless the NetWare interface is used for AJC/FOL. However, if you use one NPRINT command to print multiple files, these files are stored in the Print Queue as if multiple NPRINT commands were used to print one single file. Therefore, for the Océ Power Print Controller PSERVER, each job consists of a single file.

210 Océ Power Print Controller Technical Reference Manual
Reading printer status
Job, queue and printer status monitoring is provided through the use of the NetWare PCONSOLE application.
NetWare does not provide the Océ Power Print Controller-specific status messages, such as errors, wait and warning messages. Detailed printer status information can only be viewed at the printer, or through another interface such as FTP.
In this paragraph the distinction is made between NetWare 3.x and NetWare 4.x.
Reading printer status with NetWare 3.x
Jobs which are stored in a Print Queue can have any of the following status identifications:
Status identification Job status
Active The job is currently being printed, i.e. retrieved from the Print Queue by the Océ Power Print Controller PSERVER.
Ready The job is ready to be serviced, waiting for PSERVER.
Held The job will not print until it is released. The job can be held by the user or the operator.
Waiting The job will print at a specific day and time.
Adding The job is currently being added to the queue.
[47] Job status identification in PCONSOLE for NetWare 3.x

NetWare connection to the Océ Power Print Controller 211
Reading printer status with NetWare 4.xPerform the following sequence of actions to check the job list:
■ start the NWADMIN program■ double-click the required queue where the jobs are stored■ choose the ‘Job List’ item■ all jobs in this queue are displayed in a list.
Jobs which are stored in a Print Queue can have any of the following status identifications:
Status identification Job status
Printing The job is currently being printed, i.e. retrieved from the Print Queue by the Océ Power Print Controller PSERVER.
Ready The job is ready to be serviced, waiting for PSERVER.
Held The job will not print until it is released. The job can be held by the user or the operator.
Paused The job will print at a specific day and time.
[48] Job status identification in PCONSOLE for NetWare 4.x

212 Océ Power Print Controller Technical Reference Manual
NetWare identification attributes for JAC
The Océ Power Print Controller PSERVER does not provide any specific filtering on the jobs printed through the printer’s NetWare host I/O channel — this means that print jobs are passed from the File Server to the Print Server without any processing.
The following JAC identification attributes are automatically assigned to each job printed through the NetWare interface:
These JAC identification attributes may be used to select or overrule specific processing options by means of the internal ART of the printer. This provides a method for printer operator control with respect to specific processing of print jobs.
Note: The JAC functionality is limited when the NetWare interface on the printer is configured to be used with AJC/FOL.
Identification attribute Description
HOSTNAME Name of the NetWare File Server where print jobs are located. This is a fixed value, which can be configured in KOS.
USERNAME Name of the user who submitted the print job
JOBNAME Name of the print job
CHANNELNAME Name of the Print Queue from which the job was retrieved
CHANNELTYPE “NETWARE” (fixed value)
[49] Host identification attributes for ART purposes

NetWare connection to the Océ Power Print Controller 213
Printing flagsheets
This section applies to the JAC version of the controller only, except the default nwheader flagsheet. The default nwheader flagsheet is also available on the basic version of the controller.
Flagsheet principle
In case the user requests an NW banner page, or the ART identification rules specify the use of a JAC flagsheet, the printer generates this flagsheet before printing the actual job. The user request for printing a banner page can be superseded by the operator using KOS or SDS.
The Key Operator can specify if he wants a flagsheet, also called a header page. He can choose from “always a header page”, “never a header page” or “a header page if specified conform the NW protocol”.
If the print job consists of multiple files and/or multiple copies, a JAC flagsheet is printed before each of these files or copies. The flagsheet object both defines a standard page layout and a definition of where to print the JAC identification attribute values on this flagsheet.
Note: The NW flagsheet functionality is not supported with AJC/FOL.

214 Océ Power Print Controller Technical Reference Manual
The example below shows the NetWare flagsheet that is standard available on the hard disk of the Océ Power Print Controller:
[50] Example of a flagsheet

NetWare connection to the Océ Power Print Controller 215
Default nwheaderIf not overruled through ART (flagsheet), the printer uses the JAC flagsheet ‘nwheader’ to print the NetWare flagsheet. The printer contains a default JAC ‘nwheader’ flagsheet object, which may be replaced by downloading another flagsheet object with the name ‘nwheader’.
From KOS it is possible to specify from which paper tray this flagsheet should be taken. By default, the upper paper tray is used.
The table below documents the information that can be contained in the default nwheader flagsheet. The table has the following structure:
■ The first column contains the item that can appear on the flagsheet.■ The second column, A/C, specifies whether this item is always present (A)
or conditionally (C). Conditional information is only printed on the flagsheet if the associated JAC attribute was set. All conditional items are initially set by the host I/O interface of the printer, based on control information received from the host.
■ The third column contains a further description of the item in the first column. You can find more information on the various JAC attributes in section ‘NetWare identification attributes for JAC’ on page 212.
The initial attribute values, as set by the host I/O interface, may be overruled by settings in the ART.
Item A/C Description
Printer model A This string is the printer model.
Flagsheet name A This string is ‘Flagsheet’ by default
Date/time A Date/time on which the job was printed
Input channel A This string is always ‘NETWARE’
File Server C Related to JAC attribute HOSTNAME
Print Queue C Related to JAC attribute CHANNELNAME
User C Related to JAC attribute USERNAME
Job name C Related to JAC attribute JOBNAME
[51] Information in the nwheader flagsheet

216 Océ Power Print Controller Technical Reference Manual
Customised nwheaderYou can also create a customised flagsheet for a given Océ Power Print Controller printer. This customised flagsheet must be named ‘nwheader’ and downloaded to the printer.

NetWare connection to the Océ Power Print Controller 217
Diagnostics
If the printer is equipped with a terminal device, it is possible to check the connection of the Océ Power Print Controller to the NetWare network with KOS.As a result of this check, a list of current NetWare File Servers will be presented, which includes the File Server that provides the Print Queue(s) for the Océ Power Print Controller PSERVER.The output from this diagnostics check may look like this:
Checking for other NetWare servers.
Frame Type Ethernet_802.3 :
Known NetWare ServersNetworkNode---------------------------------------------------
No NetWare servers found.Network number : 00000000
Frame Type Ethernet_II :
Known NetWare ServersNetworkNode---------------------------------------------------
PS-NOVELL-1 [31244001][000000000001]IMS [31069003][000000000001]
A total of 2 NetWare servers found.
Network number: 31000180Network address: 08002007bc00
In this example only Ethernet packet frame types according to Ethernet Type II are used in the network.
Note: Ethernet_802.2 and SNAP are listed under Ethernet_802.3 .Two File Servers are visible on the network, i.e. PS-NOVELL-1 on NetWare network number 31244001, and IMS on NetWare network number 31069003.The Océ Power Print Controller itself is located on NetWare network number 31000180. The printer’s physical Ethernet address is 08002007bc00.
Note: PSERVER and File Server can reside on different NetWare networks, provided that correct routing services are available within the network(s)

218 Océ Power Print Controller Technical Reference Manual

219
Océ Power Print Controller
Technical Reference Manual
Chapter 13PrintLink connection to the Océ Power Print Controller
This chapter documents the PrintLink host I/O channel for the Océ Power Print Controller. It explains how to set up the connection and how to print files. As PrintLink is an Océ specific product to connect the printer to Océ PRISMAflow, you will also find a brief, general description of this channel.

220 Océ Power Print Controller Technical Reference Manual
Introduction
About PrintLink
This chapter specifies the PrintLink host I/O channel for the Océ Power Print Controller. PrintLink is a high-speed, point-to-point connection between the Océ Power Print Controller on the one hand, and PRISMAflow (former Océ 6320 Print Server) or the Océ Repro Center on the other hand. The PrintLink implementation in the Océ Power Print Controller is PDL-independent.
Note: In this chapter, the term ‘server’ will be used to designate both PRISMAflow and the Océ Repro Center.
Basically, a PrintLink connection between an Océ Power Print Controller and a server looks as follows:
[52] PrintLink connection between server (Océ PRISMAflow or Repro Center) and Océ Power Print Controller
Ethernet
Océ PrintLink
Océ PRISMAflow Print ServerOcé Repro Center
Network
Océ PRISMAflow Print ServerOcé Repro Center
Ethernet
Océ PrintLink
Network

PrintLink connection to the Océ Power Print Controller 221
The server uses the high-speed PrintLink network connection to accomplish the following server tasks:■ provide high print throughput■ provide printer accounting information on the server■ provide printer status reporting on the server■ provide job recovery on the server for jobs that are not recoverable on the
printer, i.e. for jobs that were not completely received by the printer.
About this chapter
The structure of this chapter is as follows:
Basic principles of Océ Power Print Controller PrintLink This section provides some background information on the Océ PrintLink channel. It pays special attention to two main components within PrintLink:
■ a data connection, used to send files to the Océ Power Print Controller■ an information connection —based on FTP— used to transmit status and
accounting information.
Enabling/disabling the PrintLink I/O channel Explains how to enable/disable both connections within PrintLink and what happens when you disable them separately.
PrintLink and JAC Finally, this section documents how PrintLink combines with JAC to handle print jobs.

222 Océ Power Print Controller Technical Reference Manual
Basic principles of Océ Power Print Controller PrintLink
The connection to the server
PrintLink provides two logical, bi-directional connections between the server and the Océ Power Print Controller:
■ a data connection■ an information connection.
Both connections are activated from the server.
On the data connection, the data sent from the server to the Océ Power Print Controller consists of print jobs to be printed. The data returned from the Océ Power Print Controller to the server consists of confirmation replies, notifying the correct reception of jobs.
On the information connection, the data sent from the server to the Océ Power Print Controller consists of requests for status or accounting information. The data returned to the server consists of the requested status or accounting information.
[53] PrintLink consists of a data connection and an information connection
Print jobs
Data ConnectionInformation Connection
Confirmation replyStatus request
Status information
Accounting request
Accounting information
TCPbased
FTPbased

PrintLink connection to the Océ Power Print Controller 223
The data connectionThe data connection is based on an Ethernet TCP/IP connection. The server initiates the bi-directional connection setup.
Regular printing Print jobs are sent transparently from the server to the Océ Power Print Controller over the data connection. On the Océ Power Print Controller, the received jobs are handled as specified within the print context for which the PrintLink I/O channel is configured. The server must make sure that the jobs are offered correctly to this print context. The server may use JEC envelopes to provide job identification and processing attributes to the Océ Power Print Controller.
The Océ Power Print Controller does not return any data generated by the PDL to the server.
Default job separation After sending a print file, the server closes the connection. This is interpreted by the Océ Power Print Controller as an end-of-job. This is the default job separation. JAC allows for advanced job identification and separation. For more details, see ‘PrintLink and JAC’ on page 227.
Server-based job recovery To make sure that print jobs are fully recoverable, the Océ Power Print Controller returns a confirmation to the server upon reception of each job. A positive confirmation is sent over the data connection as soon as the print job is correctly received by the Océ Power Print Controller, indicating that from that moment onwards the printer is able to fully recover the job (printer-based job recovery). In all other situations it returns a negative confirmation.
The server always awaits the confirmation of a print job before it continues processing:
■ Upon reception of a positive confirmation, the server removes the job from its local administration or queue and sends the next job to the Océ Power Print Controller.
■ Upon reception of a negative confirmation, the server sends the same job again (server-based job recovery).

224 Océ Power Print Controller Technical Reference Manual
The Océ Power Print Controller removes the failed job as far as it is not yet printed. As the default Océ Power Print Controller queue handling for the PrintLink I/O channel is of a ‘print-while-spool’-type, actual printing of the job may already have started.
Example The diagram below depicts a typical workflow in case of errors during transmission of a print file. The activity of the server is displayed in the left hand column; the activity of the printer is displayed in the right hand column. The horizontal arrows represent communication back and forth between server and printer.
[54] Workflow in case of errors during transmission of a print file
Server
Receive printjob A
Error in Receive
Send negative confirmRemove printjob A
Receive printjob A
Receive save
Send positiveconfirm
Receive printjob B
Océ 8445
Send printjob
Wait for confirm
Receive confirm
Resend printjob A
Wait for confirm
Receive confirmRemove printjob A
Send printjob B
Send printJob
Wait for confirm
Receive confirm
Resend printjob A
Wait for confirm
Receive confirmRemove printjob A
Send printjob B
Receive printJob A
Error in receive
Send negative confirmRemove printjob A
Receive printjob A
Receive save
Send positive confirm,
Receive printjob B
PrintLink connection to the Océ Power Print Controller 225
The information connectionThe information connection is based on the FTP I/O channel of the Océ Power Print Controller. The server can therefore request status or accounting information using the FTP commands provided by the FTP I/O channel. This implies that, when the PrintLink I/O channel is enabled on the Océ Power Print Controller, also the FTP I/O channel must be enabled to achieve a proper information connection between server and Océ Power Print Controller. If the FTP I/O channel is not enabled, the Océ Power Print Controller will reject any login attempt from the server and no information will be returned.
Request status information The Océ Power Print Controller does not automatically supply printer status information to the server. The server will request the information.
Request accounting information To request accounting information, as well as to reset the accounting file of the Océ Power Print Controller, the server will also use the FTP I/O channel. The accounting information returned, is a copy of the accounting log file residing on the Océ Power Print Controller.

226 Océ Power Print Controller Technical Reference Manual
Enabling/disabling the PrintLink I/O channel
Both connections within PrintLink can be enabled/disabled separately by the Key Operator. The effects of enabling/disabling these connections is explained below.
PrintLink I/O (data connection)
Using KOS, the Key Operator can enable or disable the PrintLink I/O channel. This only affects the data connection. If this connection is disabled, the Océ Power Print Controller cannot receive any print jobs from the server. Requesting status or accounting information from the printer, however, remains possible through the information connection.
FTP I/O (information connection)
Enabling/disabling the FTP I/O channel affects the information connection. If the FTP I/O channel is disabled, the server can no longer request status or accounting information (the connection request is rejected by the Océ Power Print Controller). However, the Océ Power Print Controller can still receive print jobs from the server.
Specifying the TCP port
The Key Operator can specify the TCP port used for the connection with the server, using KOS. When the TCP port has changed, it is necessary to reboot the Océ Power Print Controller in order to use the new port. The same TCP port must be configured on the server, in order to establish the communication with the printer.
How to operate KOS is explained in the System Administration Manual.

PrintLink connection to the Océ Power Print Controller 227
PrintLink and JAC
PrintLink identification attribute for JAC
In case the Océ Power Print Controller is running JAC printer software, the following JAC identification attribute will automatically be attached to each print job printed through the PrintLink I/O channel:
IDENT:CHANNELTYPE “PLINK”
The server may also wrap print files into JEC envelopes containing identification and/or processing attributes, in order to identify the job for the Océ Power Print Controller and to enhance its processing.
Based on the identification attributes of a job, the printer may select (or overrule) specific job processing options through specific entries in the Association Rules Table (ART) of the printer.
Job separation
After sending a print file, the server closes the data connection. This is interpreted by the Océ Power Print Controller as an end-of-job.
The JAC software on the Océ Power Print Controller is also able to detect job boundaries based on generic JAC functionality (e.g. a JEC envelope, string recognition). The printer will not send a confirmation to the server for jobs separated by JAC.

228 Océ Power Print Controller Technical Reference Manual

229
Océ Power Print Controller
Technical Reference Manual
Chapter 14The raw socket connection to the Océ Power Print Controller
This chapter documents the use of the TCP/IP socket host I/O channel of the Océ Power Print Controller.

230 Océ Power Print Controller Technical Reference Manual
Raw socket interface specification
Basic specifications
The raw socket interface (sometimes called a TCP stream interface) provides a low-level, though reliable network interface to the host system or host application. Network communication with the host is based upon TCP/IP protocols.
The physical connection between host and Océ Power Print Controller is based on an Ethernet TCP/IP connection. There is no high-level network protocol on top of the TCP protocol.
The raw socket interface is either binary transparent with respect to the data transferred through this interface, or it can be used with parsing data. You can:■ enable parsing for PJL data■ enable ‘Limited PJL Parsing’ for PCL and FOL data■ enable the BCP mode for PostScript data.
Multiple connections
Only one raw socket interface is available on the Océ Power Print Controller.
Multiple, concurrent hosts or applications may connect to the raw socket interface. However, only one of these connections will be associated to the Input Handler responsible for handling the raw socket print data.
Other raw socket connections will be put in a wait state whenever the internal buffer of the interface runs full. The internal buffer can hold 8 kB of data.

The raw socket connection to the Océ Power Print Controller 231
Job separationClosing the data connection on interface level by the host is interpreted by the Océ Power Print Controller as an end-of-job.
Both PJL and ‘Limited PJL parsing’, will result in job separation upon the occurrance of the ‘PJL-EOJ’ command..
The JAC software on the Océ Power Print Controller is also able to detect job boundaries based on generic JAC functionality (e.g. a JEC envelope, string recognition).

232 Océ Power Print Controller Technical Reference Manual
C-KOS settings
The following C-KOS settings are related to the use of the raw socket interface. How to operate C-KOS is explained in the System Administration Manual.
Enable/disable the raw socket interface
You can enable/disable the raw socket interface using C-KOS. If it is disabled, the host is not able to connect to the printer via this interface.
TCP port
The TCP port value specifies which TCP port number is used for establishing a raw socket interface connection between host and Océ Power Print Controller. Whenever the TCP port value has been changed within KOS, it is necessary to reboot the printer in order to use this new TCP port value.
Uni-directional versus bi-directional data transfer
You can use the interface in uni-directional mode as well as in bi-directional mode. In uni-directional mode, data can be transferred from host to printer only. In bi-directional mode, the printer can also transfer data to the host, using the same TCP port and (open) socket connection.
Using the socket interface in bi-directional mode makes sense for:■ ‘Limited PJL parsing’ for PCL5 and FOL jobs■ PJL parsing for PCL5 jobs■ BCP support for PostScript jobs.
The JAC SIF functionality is limited in case of bi-directional data transfer. See, ‘Limitation with bi-directional data transfer’ on page 237 for more details.

The raw socket connection to the Océ Power Print Controller 233
Parse optionThe parse option allows you to interpret BCP PostScript data or a limited set of PJL commands in to order to control your print jobs.
With the bi-directional mode enabled, the Océ Power Print Controller can transfer BCP data, or PJL data towards the host, using the same TCP port and socket connection.
The choices for parse support you can make are:
In figure 55 the data stream with PJL parsing is shown.
Option Explanation
none No parse support for raw data.
bcp Adobe Binary Communications Protocol (BCP). The BCP mode is only meaningful when the socket interface is con-nected by default to a PostScript print context. With the BCP mode enabled, the interface can handle special events such as ‘status echo’, ‘end of job’ and ‘abort job’.
pjl Printer Job Language (PJL) protocol. Use this option when the socket interface is connected by default to a PCL or FOL print context. This mode is also referred to as ‘Limited PJL parsing’. ‘Limited PJL parsing’ offers you more control over your PCL and FOL print jobs and provides for status feedback information. The following PJL-commands are supported for ‘Limited PJL pars-ing’:- ECHO- INFO- USTATUS- USTATUSOFF- JOB, used for job separation- EOJ, used for job separation.
pjl+eoj This option has the same functionality as ‘PJL’, and separates the data stream into jobs using the PJL end-of-job marker.

234 Océ Power Print Controller Technical Reference Manual
For a complete overview of the supported PJL commands by the PCL5 PDL, refer to the Océ Power Print Controller PCL5e Reference Guide.
[55] PJL parsing options
For more information on using a SIF in combination with parsing, refer to ‘SIF requirements’ on page 238.
Input Handler
SIF
Input Handler
SIF FOL
Limited PJL parser
SIF allowed‘Limited PJL parsing’ enabled
‘Limited PJL parsing’ enabled
‘Limited PJL parsing’ disabled
SIF not allowed
PDL data stream
SIF allowed
PJL data stream
PCL5PJL
PCL5PJL
Input Handler
Limited PJL parser

The raw socket connection to the Océ Power Print Controller 235
Limited PJL parsing commands
In this section, the supported PJL commands for ‘Limited PJL parsing’ in the Input Handler are given. For more information on the syntax of the commands, refer to the Océ Power Print Controller PCL5e Reference Guide.
ECHO command The ‘ECHO’ command prompts the printer to return a specified message to the host. It is used to synchronize the printer with the host to ensure that the status received is the requested status information.
INFO command The ‘INFO’ command is used to request a specified category of information. The ‘INFO’ command is supported for the following categories only:■ STATUS■ USTATUS.
USTATUS command The ‘USTATUS’ command is used to enable or disable unsolicited printer status. Unlike the status information, which is solicited by sending the ‘INFO’ command, unsolicited status is sent automatically when the status changes. The ‘USTATUS’ command is used when you want to know:■ Device status changes, printer on/offline.■ Job status changes when a JOB command is encountered, the job completely
prints, or the job is cancelled.■ Page status changes when each interpreted page is rendered and ready to be
printed.
This command can be used with the supported categories ‘DEVICE’, ‘JOB’ and ‘PAGE’, returned by the ‘INFO USTATUS’ command. It is used to enable or disable unsolicited status messages for the specified category.
With ‘Limited PJL parsing’ enabled, the ‘VERBOSE’ option for the ‘USTATUS DEVICE’ command is not supported.
The ‘TIMED’ category is not supported.
USTATUSOFF command The ‘USTATUS’command turns off all unsolicited status for ‘JOB’, ‘PAGE’ and ‘DEVICE’. This command eliminates the need to send several ‘USTATUS’ with option ‘OFF’ for these commands.

236 Océ Power Print Controller Technical Reference Manual
JOB command The ‘JOB’ command informs the printer of the start of a PJL job and synchronizes the job and page status information. This command only separates jobs if the option ‘pjl+eoj’ is selected.
EOJ command The ‘EOJ’ command informs the printer of the end of a PJL job and synchronizes the job status information. This command only separates jobs if the option ‘pjl+eoj’ is selected.
Note: The ‘JOB’ and ‘EOJ’ commands should always be used in pairs. Do not use one without the other. If you use un-paired ‘JOB’ and ‘EOJ’ commands, unexpected results may occur.
Adobe BCP supportAdobe BCP support can be enabled, which results in non-transparent data transfer. This support is only meaningful for PostScript printing. By using BCP, the interface can handle special events, such as ̂ T status echo, ̂ D end of job and ̂ C abort job. BCP control characters which appear in the user data will be escaped with ^A. BCP support holds for both input and output data.

The raw socket connection to the Océ Power Print Controller 237
Raw socket and JAC
JAC job identification
The following JAC attribute is automatically attached to each job printed through the raw socket host I/O channel:
CHANNELTYPE “SOCKET”
Limitation with bi-directional data transferIn case of bi-directional data transfer, the SIF mechanism is not allowed in all situations. No SIF job identification, separation and segmentation is provided in this case. If you require JAC functionality, in addition to the bi-directional functionality, you have to wrap these jobs into JEC envelopes. In table 56 an overview is given of valid combinations of parsing, default print context and SIF.
Attention: Queue handling for the socket interface must be configured in KOS as ‘direct printing’.
For more information on the queuing mechanism, see ‘From the channel queues to the print queue’ on page 284.

238 Océ Power Print Controller Technical Reference Manual
SIF requirementsA data stream can also be split into jobs and segments with a SIF.
If a SIF is used to perform segmentation on a datastream in order to split the stream into segments or jobs, particular care should be given to the parsing rules. The resulting segments should still contain valid ‘@PJL’ commands.For example, the datastream should contain an ‘UEL’+’@PJL’ to start the PJL interpreter. If the PJL data only contains ‘@PJL’ lines without ‘UEL’, which is still valid PJL, then it is not allowed to segment on these lines. To circumvent this, each ‘@PJL’ should be preceded with an ‘UEL’, but this in turn slows down performance and resets the PJL-environment each time.
Note: For ‘PARSESUPP’, the print context has to be connected as default print context to the socket interface. For more information, refer to the System Administration Manual.
Note: In case SIF is not allowed, the printer will disable the active SIF for the socket interface.
Socket interface settings Default print context
BIDIRECT PARSESUPP PS PCL5 FOL
Enabled none Valid.SIF not allowed.
Valid.SIF not allowed.
Valid, no return communication.
bcp Valid.SIF not allowed.
Invalid. Invalid.
pjl / pjl+eoj Invalid. Valid.SIF allowed.
Valid.SIF allowed.
Disabled none Valid.SIF allowed.
Valid.SIF allowed.
Valid.SIF allowed.
pjl / pjl+eoj Invalid. Valid.SIF allowed.
Valid.SIF allowed.
[56] SIF support overview

The raw socket connection to the Océ Power Print Controller 239
Examples
The examples below illustrate the usage of the raw socket interface. The following conventions are used:
■ ‘oce8445’ is used as printer name, i.e. ‘hostname’ within the TCP/IP network environment.
■ The Internet address is 134.188.76.1. ■ TCP port 7500 is used for the socket connection.
Example 1: Printing in VAX VMS environment
The printer is connected to the VAX/VMS environment through the Northlake Software ‘PrintKit VMS print symbiont’ — i.e. the Océ PCI for VMS environments. The print jobs are PostScript print files. Job synchronisation between VAX and printer is required, i.e. job queuing and queue handling is fully based on VMS mechanisms.
In this case a bi-directional socket connection can be used between PrintKit and printer. The PrintKit configuration on the VAX looks as follows:
KITCP> ADD QUEUE OCE8445 /ON=BG0
KITCP> MOD QUEUE OCE8445 /PRINTER=MODEL=”Oce 8445 Mailbox system”
KITCP> MOD QUEUE OCE8445 /PRINTER=EMULATIONS=POSTSCRIPT
KITCP> MOD QUEUE OCE8445 /PROTOCOL=TCP_SOCKET
KITCP> MOD QUEUE OCE8445 /PROTOCOL=(ADDRESS=134.188.76.1,
PORT=7500)
Example 2: Printing through a filter
Especially on Unix systems, you may want to write your own applications or filters (or use public domain software) to send data over the network to the Océ Power Print Controller. These filters normally read each file, do some transformation (if needed), then send it to the printer over a TCP socket connection: all this happens on a FIFO basis. Any output from the printer is written to the standard output of the filter.

240 Océ Power Print Controller Technical Reference Manual
Examples of such filters are HPNPF from HP, or filters which may be used with network interface boxes from manufacturers such as Lantronix or Axis.
Example 3: Downloading a ticket
You want to install a new ticket without first saving it in a local file:
% telnet oce8445 7500
Trying 134.188.76.1 ...Connected to oce8445.Escape character is ‘^]’.
*JEC BEGINDownload:
OBJECT duplex.tck TICKET
*JEC BODYIdent:
CUSTOM ticket downloaded using socket interface
Process:DUPLEX ON
TRAY 1*JEC END^]
telnet> quitConnection closed.

241
Océ Power Print Controller
Technical Reference Manual
Chapter 15The EtherTalk connection to the Océ Power Print Controller
This chapter documents the EtherTalk network protocol.

242 Océ Power Print Controller Technical Reference Manual
Apple Macintosh environment
AppleTalk is Apple’s own networking protocol. Direct communication between a Apple Macintosh and a printer is possible using the optional EtherTalk protocol over an Ethernet network. An appropriate Océ Power Print Controller PPD file to be used with the Adobe PostScript driver is available from Océ. The driver is available on the Macintosh as part of the standard Macintosh system software.
The Océ Power Print Controller uses Helios EtherShare for the practical implementation of EtherTalk. This is a commercially available third party software.
[57] Océ Power Print Controller in an Apple Macintosh environment
Note: Whenever Helios EtherShare is enabled, the Postscript PDL must be configured on the Océ Power Print Controller.
Adobedriver withappropriate PPD file
Océ 8445running EtherShare
EtherTalkprotocol
Ethernet
AppleMacintosh
Ethernet
Ether TalkProtocol
AppleMacintosh
Adobe driver withappropriate PPD file Océ 8445
running EtherShare
The EtherTalk connection to the Océ Power Print Controller 243
EtherTalk
The EtherTalk host I/O channel is provided through EtherShare. For activation of AppleTalk you need to get a license from your local HELIOS dealer. EtherShare is developed by HELIOS Software GmbH.
AppleTalk on an Ethernet network
EtherTalk refers to an implementation of Apple-specific communications protocols (i.e. AppleTalk) running on an Ethernet network.The AppleTalk protocols, however, may also be used on top of other physical infrastructures. Besides EtherTalk the following implementations of AppleTalk are known:
■ LocalTalk (RS-422A physical interface)■ TokenTalk (Token Ring network interface)■ FDDITalk (FDDI network interface).
The Océ Power Print Controller only supports EtherTalk. If a connection to LocalTalk, TokenTalk or FDDITalk is required, additional hardware is needed to translate from/to EtherTalk.
EtherShare ordering information
EtherTalk connectivity on the Océ Power Print Controller is implemented by means of the following optional software product:EtherShare V2.5 for Solaris 2.x, Base License.Your Océ System Consultant will obtain the package for you through the local EtherShare dealer.
EtherShare installation and configuration
The HELIOS software is already pre-installed on the printer’s hard disk. The EtherShare software can only be installed using Advanced SDS. Therefore, you have to refer for the installation of this software to your Océ Service engineer or Océ System Consultant.

244 Océ Power Print Controller Technical Reference Manual
EtherTalk architecture
EtherTalk Phase I versus Phase II
In general, an EtherTalk connection between printer and Apple Macintosh is established as shown below.
[58] EtherTalk communication between host and Océ Power Print Controller
Two versions of AppleTalk/EtherTalk exist. The original version, also called Phase I, supports up to 254 devices in a single network. Extensions to the original version have led to Phase II, which, among other improvements, uses an enlarged addressing scheme for networked devices.
Zones Different network segments are referred to as Zones.Each Zone has the following identification attributes:
■ a logical Zone Name■ a Zone Number (Phase I) or a Zone Number range (Phase II).
Each printer on the network also has a logical name by which it can be addressed from Macintosh work stations. The generic Printer Name setting
Océ 8445
EtherTalk
Ethernet
AppleMacintosh
AppleMacintosh
Océ 8445
Ether Talk
Ethernet

The EtherTalk connection to the Océ Power Print Controller 245
that can be set on the Océ Power Print Controller is used as the logical EtherTalk Printer Name.
Systems conforming to AppleTalk Phase I cannot directly communicate with systems running AppleTalk Phase II. EtherTalk systems can operate in Phase I or Phase II mode. TokenTalk and FDDITalk are Phase II only. LocalTalk is phaseless.
The Océ Power Print Controller can be configured for either EtherTalk Phase I or Phase II.
It is also possible to have an AppleTalk network without zones. In that case, the Helios EtherShare package must be configured with the name “NoZone” as zonename.
Print server versus file serverThe Océ Power Print Controller appears to the Macintosh user as a print server and as a file server as you can see in the illustration below.
[59] The Océ Power Print Controller appears to the user in two ways
AppleTalk print server For PostScript printing purposes, an Apple Macintosh accesses the printer by means of the AppleTalk Printer Access Protocol (PAP).
SERVER/
SPOOLER
FILESERVER
PAPPrinter Access Protocol
AFPAppleTalkFiling Protocol
PAPPrinter Access Protocol
AFPAppleTalkFiling Protocol

246 Océ Power Print Controller Technical Reference Manual
The Océ Power Print Controller behaves like a PAP Server (spooler) for the Macintosh client systems. Because the Océ Power Print Controller operates as a spooler, interactive PostScript printing via EtherTalk is not possible.
Regular Macintosh users can submit print jobs to the Océ Power Print Controller from their local work station. The Océ Power Print Controller supports the various printer drivers for the Apple LaserWriter, up to and including the current Adobe LaserWriter 8.4.3 printer driver.An Océ Power Print Controller printer-specific PPD (PostScript Printer Description) file is available to the Macintosh users. This file is available on DOS floppy and on the Océ Power Print Controller printer itself on the AppleTalk file server. It has to be copied to the Macintosh.
AppleTalk file server The Océ Power Print Controller is also visible on the network as an AppleTalk file server. In this case, the printer can be accessed by means of the AppleTalk Filing Protocol (AFP).
Users may connect their work station by means of AppleShare to another device of type ‘AFPServer’. Consequently, any Macintosh user can connect to the Océ Power Print Controller file server, and access the HELIOS EtherShare Admin application residing on the Océ Power Print Controller.
The PAP Server (spooler) on the Océ Power Print Controller does not provide interactive printing capabilities. The EtherShare Admin application, running on the user’s Macintosh system, can provide feedback to the user about jobs queued for printing, actual Océ Power Print Controller status, and – if applicable – output data returned from the printer’s Postscript interpreter.
Note: Although the Océ Power Print Controller also operates as an AppleTalk file server, the printer does not provide real file server facilities to the Macintosh users. In other words, the printer does not allow for storage of all kinds of Macintosh user files on the printer.
Other applications and servers The HELIOS EtherShare package includes a number of additional Macintosh and Unix applications and servers. Because these applications and servers are not related to printing, they are not used on the Océ Power Print Controller.

The EtherTalk connection to the Océ Power Print Controller 247
Printing on the Océ Power Print Controller using EtherTalk
Printing Using the PAP Server
The Océ Power Print Controller appears as a PAP Server to the Macintosh. Jobs received from the Macintosh will always be queued on the printer, before they are actually printed. The PAP Server behaves like a spooler, which implies that the EtherTalk interface cannot be used for interactive printing.
The EtherTalk interface on the Océ Power Print Controller is simultaneously active with other printer’s I/O interfaces such as Lp and FTP. When configured, the EtherTalk interface can be disabled or enabled via KOS. Using the HELIOS EtherShare Admin application, the operator can select between ‘Spool only’ and ‘Spool & Print’.
▼▼▼▼ Selecting the Océ Power Print Controller as default printer
To select the Océ Power Print Controller as the default printer for a specific Macintosh computer, proceed as follows:
1 Run the Chooser application on the Macintosh, when the printer is configured for and connected to the EtherTalk network.

248 Océ Power Print Controller Technical Reference Manual
2 Select the required network Zone (as configured on the Océ Power Print Controller) and the required printer driver (e.g. LaserWriter 8.4.3).A list with network devices complying with these settings is displayed; the Océ Power Print Controller belongs to this list. The Océ Power Print Controller is visible with the Printer Name as configured on the printer.
[60] Chooser: Océ Power Print Controller is displayed with spooler icon in front of printer name
3 Select this Printer Name to make the Océ Power Print Controller the default printer for this Macintosh work station.Any normal Macintosh application, like e.g. TeachText, can now print to the Océ Power Print Controller.You can also configure the Macintosh to enable printing in the background. If configured this way, you can use Apple’s Print Monitor to track the progress of the local print operation.
Checking status using EtherShare Admin
EtherShare Admin enables users to check the printer’s configuration and status from a remote Macintosh work station. The Océ Power Print Controller supports a maximum of four simultaneously active EtherShare Admin sessions.
Configuring the EtherShare package on the printer from a remote Macintosh through EtherShare Admin is not supported on the Océ Power Print Controller.
OceOce

The EtherTalk connection to the Océ Power Print Controller 249
All HELIOS EtherShare configuration data on the printer is fixed, and can therefore not be changed through EtherShare Admin.
The printer’s EtherTalk network parameters can only be altered on the printer itself.
▼▼▼▼ Connection to the file server
To run the EtherShare Admin application, a Macintosh user must first connect to the Océ Power Print Controller’s EtherTalk file server. The procedure is as follows:
1 Select the required EtherTalk Zone from the Chooser.2 Select AppleShare.
A list with ‘AFPServer’ devices is displayed. The Océ Power Print Controller is visible in this list with the Printer Name as configured on the printer.
[61] The Océ Power Print Controller as file server

250 Océ Power Print Controller Technical Reference Manual
3 Select the Océ Power Print Controller Printer Name to connect to the file server.The following window pops up:
[62] Océ Power Print Controller login window
4 Login to the file server, either as Guest User or as a Registered User.
[63] Selecting the ‘EtherShare Applications’ volume
The network volume ‘EtherShare Applications’, which holds the EtherShare Admin application, is displayed.

The EtherTalk connection to the Océ Power Print Controller 251
5 Select this volume.The EtherShare Applications icon appears on the Macintosh desktop and the application is available for use.
[64] EtherShare Applications icon
▼▼▼▼ Selecting a PPD file
1 Double-click the ‘PPD’ icon to obtain the PPD files for the various printer types.
2 Drag the correct PPD file and drop it in your Macintosh folder.3 Select this PPD file in the ‘Chooser’.
▼▼▼▼ Running EtherShare Admin
1 Double-click the ‘EtherShare Admin’ icon to start the EtherShare Admin application.
2 Login to EtherShare Admin using the File menu.The Océ Power Print Controller recognizes two types of EtherShare Admin users:
■ macuser■ macoper.

252 Océ Power Print Controller Technical Reference Manual
Macuser Ordinary users, who just wish to check the printer and/or job status information, should login to the Océ Power Print Controller with user name ‘macuser’, and equivalent password.
[65] Logging is as ‘macuser’
Whenever a user logs in as macuser, a message will be displayed on the Macintosh stating that he user is not allowed to make any EtherShare related changes on the Océ Power Print Controller:
[66] EtherShare access privilege warning
Macoper A special account is provided for the printer operator: ‘macoper’. User macoper can check the current printer status, but may also perform some specific operations related to the EtherTalk print job queue. The macoper account is protected with a fixed password: Mac95Oce.
During login the Macintosh user can choose to save the EtherShare Admin login name and/or password in a local (Macintosh) ‘EtherShare Prep’ file.This will make use of EtherShare Admin more transparent to the user. The various functions are explained in the next sub-section.
The accounts for macuser and macoper can also be used as Registered Users for general login to the Océ Power Print Controller EtherTalk file server.
Any Macintosh user should run only one ‘EtherShare Admin’ application on his local work station, also for connecting to multiple Océ Power Print

The EtherTalk connection to the Océ Power Print Controller 253
Controller file and print servers. If more than one local copy of ‘EtherShare Admin’ is running, the following message will be displayed on the Macintosh:
Hops, operation system was not very pleased and returned the
following error code: -49
Macuser functions
If logged in to the Océ Power Print Controller file server as ‘macuser’, the following functions may be performed with EtherShare Admin. The functions mentioned below are named according to the EtherShare Admin pull-down menu structure on the Macintosh system.
File - Login Login to EtherShare Admin, either as macuser or macoper. Settings may be saved for future use. User and/or password values may be saved locally on the Macintosh, for future use with the EtherShare Admin application.See also the function ‘Edit - Preferences’.
File - Logout Logout from EtherShare Admin application. The session with the indicated AppleTalk file server (i.e. the Océ Power Print Controller) will be closed.
File - Quit Quit EtherShare Admin application.
Edit - Preferences This option allows Macintosh users to set their personal preferences with respect to the use of EtherShare Admin. The settings are stored on the Macintosh system in the file ‘EtherShare Prep’.
For use with the Océ Power Print Controller, only the ‘Log on automatically’ check box may be of use for the Macintosh user. If specified, EtherShare Admin will present the Login dialogue immediately after start-up, instead of using the Login item in the File menu. If user and/or password are saved as well, the Login dialogue will be skipped completely.
Lists - Users Lists all known user names on the Océ Power Print Controller. User-related information cannot be altered.
Lists - Groups Lists all known groups on the Océ Power Print Controller. Group related information cannot be altered.
Lists - Volumes Shows the list of AppleTalk file server volumes available to the Macintosh users. Only one volume is available: EtherShare Applications.
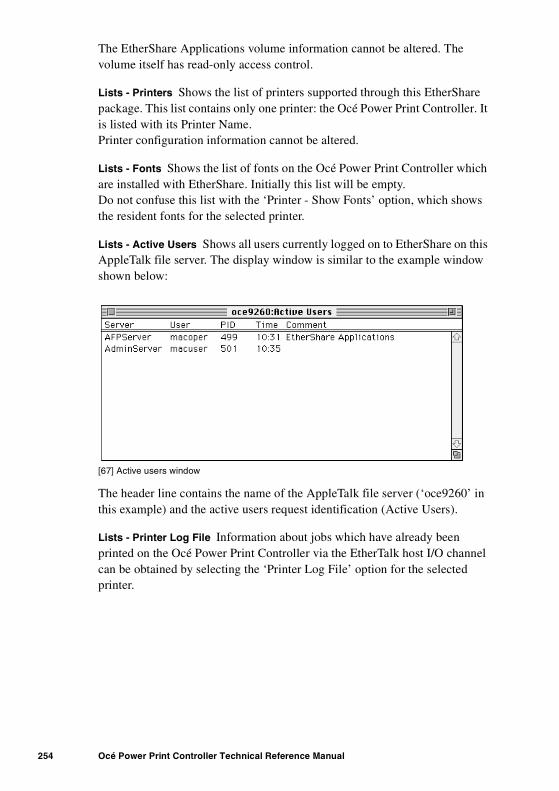
254 Océ Power Print Controller Technical Reference Manual
The EtherShare Applications volume information cannot be altered. The volume itself has read-only access control.
Lists - Printers Shows the list of printers supported through this EtherShare package. This list contains only one printer: the Océ Power Print Controller. It is listed with its Printer Name.Printer configuration information cannot be altered.
Lists - Fonts Shows the list of fonts on the Océ Power Print Controller which are installed with EtherShare. Initially this list will be empty.Do not confuse this list with the ‘Printer - Show Fonts’ option, which shows the resident fonts for the selected printer.
Lists - Active Users Shows all users currently logged on to EtherShare on this AppleTalk file server. The display window is similar to the example window shown below:
[67] Active users window
The header line contains the name of the AppleTalk file server (‘oce9260’ in this example) and the active users request identification (Active Users).
Lists - Printer Log File Information about jobs which have already been printed on the Océ Power Print Controller via the EtherTalk host I/O channel can be obtained by selecting the ‘Printer Log File’ option for the selected printer.

The EtherTalk connection to the Océ Power Print Controller 255
The information returned by the printer is similar to the example shown below:
[68] Printer log file window
For all jobs in the Printer Log File display, the following information is displayed:
Entry Description
Status The status of each printed job is displayed with either ✓or ●.Status ✓ indicates that the job has been printed successfully, and that there is not further response data available related to this job.Status ● signals that there is response data for this job, either related to printer or printing errors, or to requested response data from the respective PostScript job.Detailed response information can be displayed on the Macin-tosh by double-clicking (with the mouse) on the respective Printer Log File message. The following window pops up:
Printer This is the Printer Name of the Océ Power Print Controller.
User This is the name specified in the Macintosh ‘Sharing setup’ control panel. If the user name was unknown to EtherShare, the User field in the Printer Log File will be left blank.
Document The document name is retrieved from the ‘%%Title’ field in the PostScript job that was printed.
Date/time The date and time when the job was printed.
[69] Printer log file information
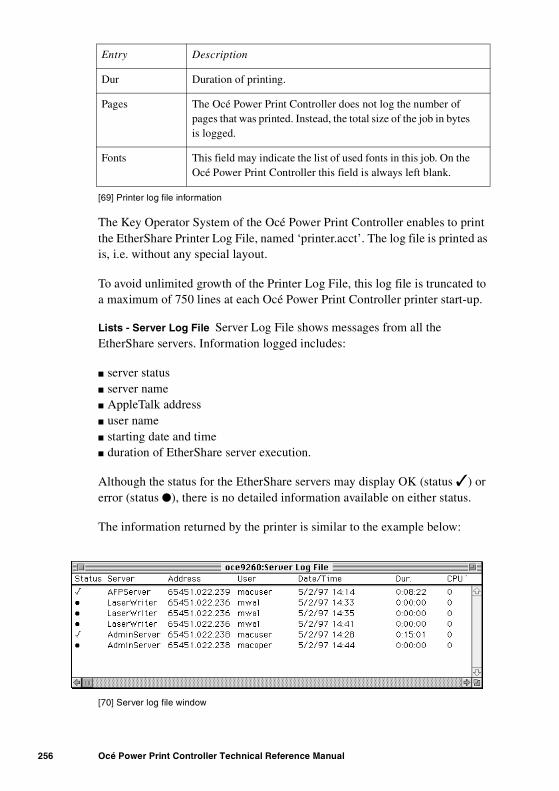
256 Océ Power Print Controller Technical Reference Manual
The Key Operator System of the Océ Power Print Controller enables to print the EtherShare Printer Log File, named ‘printer.acct’. The log file is printed as is, i.e. without any special layout.
To avoid unlimited growth of the Printer Log File, this log file is truncated to a maximum of 750 lines at each Océ Power Print Controller printer start-up.
Lists - Server Log File Server Log File shows messages from all the EtherShare servers. Information logged includes:
■ server status■ server name■ AppleTalk address■ user name■ starting date and time■ duration of EtherShare server execution.
Although the status for the EtherShare servers may display OK (status ✓) or error (status ●), there is no detailed information available on either status.
The information returned by the printer is similar to the example below:
[70] Server log file window
Dur Duration of printing.
Pages The Océ Power Print Controller does not log the number of pages that was printed. Instead, the total size of the job in bytes is logged.
Fonts This field may indicate the list of used fonts in this job. On the Océ Power Print Controller this field is always left blank.
Entry Description
[69] Printer log file information

The EtherTalk connection to the Océ Power Print Controller 257
The Server Log File display on the Macintosh may present additional fields in the header line, like CPU Time, Memory, and Disk IO. Information regarding these items is not logged by the EtherShare package as it is installed on the Océ Power Print Controller. These fields will therefore always have a zero (0) value.
The Key Operator of the Océ Power Print Controller can print the EtherShare Server Log File, named ‘server.acct’, using KOS. The log file which is part of the log report, is printed as is, i.e. without any special layout.
To avoid unlimited growth of the Server Log File, this log file is truncated to a maximum of 750 lines at each Océ Power Print Controller start-up.
Lists - System Messages Shows the printer’s system messages log file.
Lists - Versions List the version information of the files which make up the EtherShare software package installed on the Océ Power Print Controller.
Lists - Extension Mappings Lists the MS-DOS file name extension mappings for users accessing the EtherShare file server from an MS-DOS system. This list is not applicable for the Océ Power Print Controller, and will therefore always be empty.
Printer - Show Fonts Shows the list of resident fonts available to the PostScript interpreter on the Océ Power Print Controller. The list of available fonts, as it is presented to the Macintosh user, is automatically maintained by the printer itself.

258 Océ Power Print Controller Technical Reference Manual
A Typical ‘Show Fonts’ reply is shown below:
[71] Typical ‘Show fonts’ reply
The header line contains the name of the AppleTalk file server (Oce8400 in this example), the show fonts request identification (i.e. Fonts), and the AppleTalk printer name of the Océ Power Print Controller.
Note: On the Océ Power Print Controller, the AppleTalk file server name and the AppleTalk printer name are always equal.

The EtherTalk connection to the Océ Power Print Controller 259
Printer - Show Printer Jobs Displays the printer status and the EtherTalk print queue on the Océ Power Print Controller. A ‘Show Printer Jobs’ reply may for example look like:
[72] Printer Jobs window
The header line contains the name of the AppleTalk file server (Oce8400 in this example), the show printer jobs request identification (Printer Jobs in this example), and the AppleTalk printer name of the Océ Power Print Controller.
The actual printer status is displayed in the next line. This status information will contain general information regarding printer off-line or on-line, printer idle or processing, and printer error, wait or warning situations.Printer status information is related to the status information as displayed on the printer’s own console.
For all jobs in the EtherTalk print queue, the following information is displayed:
Entry Description
Document The document name is retrieved from the ‘%%Title’ field in the PostScript job that is queued for printing.
User This is the name specified in the Macintosh ‘Sharing setup’ con-trol panel. If the user name is unknown to EtherShare, the job will be assigned to user ‘root’.
Size The size of the spooled job in Kilobytes.
No The job sequence number in the EtherTalk interface print queue. The job sequence number is internally determined by the Océ Power Print Controller.
Time Time job queued.
[73] Details of queued print jobs

260 Océ Power Print Controller Technical Reference Manual
Jobs remain visible in the EtherTalk print queue until they are processed for printing.
Only the operator (logged in as macoper) is allowed to remove jobs from the EtherTalk print queue, regardless of the submitter of the job. To remove a job, the operator must select the jobs in the ‘Printer Jobs’ display with the mouse, and then use EtherShare Admin’s ‘Edit - Clear’ menu option.
Exclusive macoper functions
In addition to the functions that can be performed by ‘macuser’, the following additional functions are available to ‘macoper’:
Printer - Edit Initialization Mechanism to create or change a PostScript printer initialisation sequence (‘INIT’) for jobs queued on the EtherTalk interface of the Océ Power Print Controller.This initialisation sequence will then be added to all files printed through the EtherTalk interface.
Attention: Use of this option requires knowledge of PostScript.
Printer - Update Fonts The Océ Power Print Controller maintains its own list of available fonts. This list is visible on the EtherTalk interface and, consequently, on the LaserWriter driver of the Macintosh. The list of available fonts is only updated if there are ‘no SIFs’ connected to the AppleTalk channel. If SIFs are used, a static font list is used. This static font list is even used when the default SIF is selected. Therefore, the ‘Printer - Update fonts’ menu has no effect on the Océ Power Print Controller.
However, if this menu is used by macoper, EtherShare Admin will try nevertheless to accomplish the requested task. Eventually EtherShare Admin issues the message that the action did not succeed and should be repeated at a later time.
Note: The ‘Update Fonts’ function, will not succeed on the Océ Power Print Controller, if it was activated from within EtherShare Admin.
Printer - Restart Printer On the Océ Power Print Controller, this option has no effect in that it does not actually restart the printer. On the other hand, if the option ‘Print - Spool only’ was previously selected, this will be reset to ‘Spool & Print’.

The EtherTalk connection to the Océ Power Print Controller 261
Printer - Spool only Put the printing of new jobs on hold via the printer’s EtherTalk interface. New Macintosh jobs are still queued on the printer, but they are hold until printing is resumed by selecting ‘Spool & Print’.
Using the ‘Spool only’ option can be useful when, e.g., jobs on another Océ Power Print Controller I/O channel (like FTP or LP) should temporarily receive the highest printing priority.
Printer - Spool & Print This option restarts printing for jobs queued on the printer’s EtherTalk interface.
Edit - Bring to Front The operator can move a selected print job to the top of the printer’s EtherTalk print queue. If the Océ Power Print Controller is currently printing a job from the EtherTalk print queue, this job will be finished first, and the moved print job will be handled next.

262 Océ Power Print Controller Technical Reference Manual
EtherTalk and JAC
Each job printed through the EtherTalk host I/O channel will automatically receive the following JAC identification attribute:
CHANNELTYPE ‘ATALK’
Additional JAC identification attributes may be retrieved from the PostScript print file itself, based on the Adobe Document Structuring Conventions. For more information on this subject, (see ‘Job Automation Control principles’ on page 55).
The printer operator may select (or overrule) specific job processing options through specific entries in the printer’s internal Association Rule Table.
Job automation control may for example be used to generate a flag sheet for jobs printed via the EtherTalk channel.
Note: On the Océ Power Print Controller, the EtherShare software itself cannot generate its own banner pages for received jobs.

The EtherTalk connection to the Océ Power Print Controller 263
Downloading fonts using EtherShare
EtherShare supports the installation of Adobe Type 1 and Type 3 printer fonts onto the Océ Power Print Controller, directly from the font manufacturer’s original font diskettes. When the EtherShare Admin ‘Lists - Fonts’ display window is opened on the Macintosh system, the operator (macoper) can use the ‘File - New’ menu option to install all or selected fonts from the specified drive and folder.
Note: Fonts downloaded this way are only available to the jobs that are printed on the Océ Power Print Controller through the EtherTalk interface, but not to the jobs that are printed through other Océ Power Print Controller interfaces like LP and FTP.
Other Macintosh utilities, such as Send-PS, can be used for font downloading, as long as they are used in a non-interactive way. In other words, these tools cannot be used if they query the PostScript interpreter for an active font list, before actually downloading the font.
Note: Not all Macintosh utilities can work with a PAP spooler, e.g. LaserWriter Utilities. Consequently, these tools cannot be used with the Océ Power Print Controller.
Fonts that are downloaded with specific Macintosh tools will be available at the printer’s PostScript interpreter level, and as such be available to all jobs printed through all interfaces of the Océ Power Print Controller, including LP and FTP.
Fonts may also be downloaded and installed on the Océ Power Print Controller through another interface such as LP or FTP, or directly from a floppy disk using KOS. These downloaded fonts will be available to all jobs printed through all interfaces, as is the case with Macintosh utilities.
At printer start-up, an initial list of available PostScript fonts is built for communication with the LaserWriter driver on the Macintosh. The printer automatically maintains this list of fonts, as new fonts are downloaded and made available to the Océ Power Print Controller PostScript interpreter.
Note: The list of available fonts is only updated if there are ‘no SIFs’ connected to the AppleTalk channel. If SIFs are used, a static font list is used.

264 Océ Power Print Controller Technical Reference Manual

265
Océ Power Print Controller
Technical Reference Manual
Chapter 16SNMP implementation in theOcé Power Print Controller
This chapter documents the SNMP implementation in the Océ Power Print Controller.

266 Océ Power Print Controller Technical Reference Manual
SNMP implementation
SNMP stands for Simple Network Management Protocol, which is a protocol on top of UDP/IP. SNMP makes it possible to retrieve and change information of a printer via the network, using three operations: get, set and trap. The information which can be changed or retrieved is defined in a Management Information Base (MIB). A MIB can be proprietary or standard. The standard MIBs are defined by the Internet Engineering Task Force (IETF) and are written down in RFCs.
SNMP configuration
SNMP is by default enabled. SNMP can be disabled by your local System Consultant or Service Engineer.
SNMP has two configurable parameters:■ community name■ trap destination.
If SNMP is installed its setting is specified on the Status Report. In the ‘Network’ specifications of the ‘FrontEnd’ ‘Settings’ section, the following line is depicted:
SNMP : Enabled
There will be no information available about SNMP on the Status Report when SNMP is not installed.
Community name SNMP provides limited functionality for security. The community name is used for authorizing access to the MIBs.
Trap destination SNMP is able to send messages to a network management application in case the device has an error. In SNMP this is called a ‘trap’. A critical alert results in a ‘trap’. A ‘trap’ is generated for each configured trap destination. The IP addresses of the trap destinations have to be configured.
For information on how to configure the SNMP parameters, refer to the System Administration Manual of your printer.

SNMP implementation in the Océ Power Print Controller 267
Supported MIBsThe following versions of the SNMP protocol are supported:■ v1■ v2c.
The definition of the SNMP v1 and SNMP v2c protocol can be found in RFC1155, RFC1157, RFC1212 and RFC1901 till RFC1908.
The following MIBs are supported in the Océ Power Print Controller: ■ MIB-II (RFC 1213)■ Host Resources MIB (RFC 2790)■ Printer MIB (RFC 1759, with some expected extensions of Printer MIB V2).
MIB-II and the Host Resources MIB are the most elementary MIBs for a device in a network with SNMP support. They offer some global information about the devices like:■ Status information■ Global error information■ Characteristics of the device like an ID.
MIB-II MIB-II is a collection of objects which mainly consists of network related information. MIB-II is divided into multiple groups each containing multiple objects: system, interfaces, at, ip, icmp, tcp, udp, snmp.Two objects of the system group can be changed via the SNMP protocol (not in the KOS). These objects contain information about the system administrator and the location of the system.
Host Resources MIB The Host Resources MIB mainly contains information about a host in general. The 3 mandatory groups of the Host Resources MIB are supported: ■ hrSystem■ hrStorage■ hrDevice.
Printer MIB The Printer MIB contains information about the printer options and status of the printer device. The following mandatory groups of the Printer are supported:■ prtGeneralGroup■ prtInputGroup■ prtOutputGroup■ prtMarkerGroup

268 Océ Power Print Controller Technical Reference Manual
■ prtMediaPathGroup■ prtChannelGroup■ prtInterpreterGroup■ prtConsoleGroup■ prtAlertTableGroup.
For an overview of all objects of these 3 MIBs, refer to the RFCs.
For an overview of the supported MIBs of the Océ Power Print Controller, refer to the ‘MIB objects overview’ on page 273.
Accessing MIBs
The information in the MIBs can be accessed via the SNMP v1 and v2c protocol. Read operations can be done by using the community string ‘public’. A walk through the implemented MIB tree starting at object 0.0, using the community string ‘public’, will result in a MIB tree. The objects specified in section ‘MIB objects overview’ on page 273, will show up.
Read/Write MIBs Read and Write operations can be done by using the community string ‘oce_operator’. Write permission is restricted to this community. A walk through starting at object 0.0, with the community ‘oce_operator’, will result in a MIB tree containing the objects specified section ‘MIB objects overview’ on page 273.
The ‘community name’ can be changed in C-KOS.
Applications The information of the MIBs can be accessed at the host side by applications for network management.
Overview of important objects
A MIB contains objects which are static, and objects which can change at runtime. Values of an object can be changed by the system, like for example the time, or by an SNMP client using a set operation.
Objects in MIB-II In MIB-II there are 3 important objects:■ sysContact■ sysName■ sysLocation.

SNMP implementation in the Océ Power Print Controller 269
Writable objects are: ‘sysContact’ and ‘sysLocation’. The C-KOS setting ‘printer name’ defines the value for ‘sysName’.
Objects in the Host Resources MIB The Host Resources MIB contains 8 objects which can be influenced by the system:■ hrSystemUptime■ hrSystemDate■ hrSystemInitialLoadParameters■ hrStorageUsed■ hrDeviceStatus■ hrDeviceErrors ■ hrPrinterStatus■ hrPrinterDetectedErrorState.
The behaviour of these 8 objects can be derived from the MIB RFCs. The behaviour of the last 4 objects is described in more detail below.
hrDeviceStatus The object ‘hrDeviceStatus’ can have 5 different values:
hrDeviceErrors The object ‘hrDeviceErrors’ contains the number of errors that have occurred in the printer since power up. The initial value (after a reboot) is 0. The value of this object will be incremented by one in case of the following situations: ■ noPaper■ noToner■ doorOpen■ Jammed■ an output bin is full■ there is no connection with engine.
unknown The engine-status can not be determined on the controller side.
running There are no errors or warnings active in the printer
warning There is/are warning(s) active in the printer.
testing This status is not supported in the printer.
down There are operational or permanent errors active in the print-er, or when the printer is offline, or when the printer engine is switched off.

270 Océ Power Print Controller Technical Reference Manual
hrPrinterStatus The object ‘hrPrinterStatus’ can have 5 different values:
hrDetectedErrorState The object ‘hrDetectedErrorState’ can have 256 different values because 8 different conditions can hold simultaneously. These conditions are:
other There is an error active in the printer.The printer is offline.There is no error, and the printer is not printing and not idle.
unknown The engine status can not be determined by the controller.
idle There are no errors active in the printer, and the printer is not printing.
printing There are no errors active in the printer, and the printer is processing a job.
warmup There are no errors and the engine is warming up.
lowpaper Any of the input trays has a low paper status.
noPaper The active input tray contains no paper.
lowToner The toner level is low.
noToner There is no toner in the toner cartridge.
doorOpen One of the doors of the printer is open.
jammed A paper is jammed somewhere in the paper path, or an out-put bin is full.
offline The printer is offline, or the controller cannot communicate with the engine.
serviceRequested There is a warning, or error condition which can not be mapped on one of the conditions mentioned above. The ‘hrDevicestatus’ of the printer can be ‘warning’ or ‘down’ if serviceRequested holds.

SNMP implementation in the Océ Power Print Controller 271
Printer MIB specificationsThis section describes the Océ specific behaviour of the following Printer MIB groups:■ prtInputGroup■ prtOutputGroup■ prtMarkerGroup■ prtMediaPathGroup■ prtChannelGroup■ prtInterpreterGroup■ prtAlertTableGroup
prtInputGroup The SNMP input devices are mapped to physical trays. The paper input trays of the Océ 8400 Series can be linked, but for SNMP this is not taken into account. The SNMP presentation order for the paper input trays in the ‘prtInputGroup’ follows exactly the physical tray numbering, so SNMP index 1 is paper input tray 1.
prtOutputGroup The SNMP paper output devices are mapped to logical bins. The Océ 8400 Series bin mapping functionality is taken into account. The SNMP presentation order for the paper output bins in the ‘prtOutputGroup’ follows the logical bin numbering.
prtMarkerGroup The Océ 8400 Series has one marker.
prtMediaPathGroup The Océ 8400 Series has one media path.
SNMP tray number Physical tray
1 Upper Cassette
2 Middle Cassette
3 Lower Cassette
4 Bulk Paper Input Tray
SNMP bin number Logical bin
1 Finisher Bin
2 Upper Bin
3 to X+2 Logical Bin 1 to X
4 Logical Bin 2
X+2 Logical Bin X
22 Logical Bin 6

272 Océ Power Print Controller Technical Reference Manual
prtChannelGroup A channel in the Printer MIB is specified as a Print Job Delivery channel. Only configured channels are shown.
prtInterpreterGroup All configured and enabled PDL interpreters are shown. An enabled PDL is a PDL which is associated with a print context.
prtConsoleGroup The console light for the on-line off-line indicator light is supported.
prtAlertTableGroup The Printer MIB contains an ‘Alert table’ in order to administrate errors and warnings. There are two types of alerts:■ critical alerts■ non-critical alerts.
A critical alert results in a ‘trap’.

SNMP implementation in the Océ Power Print Controller 273
MIB objects overview
This section contains 3 tables which contain information about the supported objects of MIB-II, the Host Resources MIB, and the Printer MIB.
The tables contain the following columns:■ object identification name (OID)■ short description■ access, which can be read (R), read restricted by conformance rules (CR)
write (W).
MIB-II objectsThe following table contains information about the MIB-II objects which are Océ specific.
Host Resources MIB
The following table contains information about the supported Host Resources MIB objects.
MIB-II System group
OID Short description Access
sysDescr A textual description of the entity R
sysObjectID OID number of the enterprise + ID R
sysContact Contact person R W
sysName Node’s fully qualified domain name (e.g. IP address)
R
sysLocation Physical location R W
Host Resources MIB hrSystem group
OID Short description Access
hrSystemUptime The amount of time since this host was last initialized
R

274 Océ Power Print Controller Technical Reference Manual
hrSystemDate The host's notion of the local date and time R W
hrSystemInitialLoad-Device
Index of HrDeviceEntry to load initial OS configuration
R
hrSystemInitialLoad-Parameters
Parameters supplied to load device e.g. path name
R
hrSystemNumUsers The number of user sessions on this host R
hrSystemProcesses The number of process contexts currently R
hrSystemMaxProcess-es
Maximum number of processes (0 if there is no maximum)
R
hrMemorySize The amount of available spool memory con-tained by the host
R
Host Resources MIB hrStorage group
hrStorageIndex An unique value for each logical storage area on the host
R
hrStorageType The type of storage represented by this entry R
hrStorageDescr A description of the type of storage R
hrStorageAlloca-tionUnits
The size in bytes of the data objects allocated from this pool
R
hrStorageSize The size of the storage represented by this entry
R
hrStorageUsed The amount of storage represented by this entry that is used
R
hrStorageAllocation-Failures
The number of request for storage that could not be honoured
R
Host Resources MIB hrDevice group
hrDeviceIndex An unique value for each device R
hrDeviceType The type of device represented by this entry R
hrDeviceDescr A description of the type of device R
hrDeviceID The product ID for this Device R
hrDeviceStatus Current operational state R
hrDeviceErrors The number of errors detected in this device R
hrPrinterStatus Current status of the device R
hrPrinterDetectedEr-rorState
Error conditions of the printer R

SNMP implementation in the Océ Power Print Controller 275
Printer MIBThe following table contains information about the supported Printer MIB objects.
prtGeneral group
OID Short description Access
prtGeneralCon-figChanges
The number of configuration changes since power on.
R
prtGeneralCurrentLo-calization
The current localization. R
prtGeneralReset Reboots the controller. R W
prtInputDefaultIndex The default input tray. R
prtOutputDefaultIn-dex
The default output bin. R
prtMarkerDefaultIn-dex
The default marker. R
prtMediaPathDefault-Index
The default media path. R
prtConsoleLocaliza-tion
The localization of the console information R
prtConsoleNum-berOfDisplayLines
The number of lines on the console of the printer.
R
prtConsoleNum-berOfDisplayChars
The number of characters per line on the con-sole of the printer.
R
prtConsoleDisable The console mode. R
prtGeneralPrinter-Name
The printer name specified by the adminis-trator.
R
prtGeneralSerialNum-ber
The serial number of the printer. R
prtAlertCriticalEvents The number of critical alert events since power on.
R
prtAlertAllEvents The total number of alert events since life. R
prtStorageRefIndex The value of the hrDeviceIndex for this stor-age device.
R
prtDeviceRefIndex The value of the hrDeviceIndex for this de-vice.
R
prtCoverIndex A unique value for each cover. R
prtCoverDescription A description for each cover. R
prtCoverStatus The status of each cover. R

276 Océ Power Print Controller Technical Reference Manual
prtLocalizationIndex A unique value for each localization. R
prtLocalizationLan-guage
The language code of the localization. R
prtLocalizationCoun-try
The country code of the localization. R
prtLocalizationChar-acterSet
The character set of the localization. R
prtInput group
prtInputIndex A unique value for each input tray. R
prtInputType The type of the input tray. R
prtInputDimUnit The unit of measurement for the dimensions. R
prtInputMediaDim-FeedDirDeclared
The declared dimension in the feed direction. R
prtInputMediaDimX-FeedDirDeclared
The declared dimension in the cross feed di-rection.
R
prtInputMediaDim-FeedDirChoosen
The chosen dimension in the feed direction. R
prtInputMediaDimX-FeedDirChoosen
The chosen dimension in the cross feed di-rection.
R
prtInputCapacityUnit The unit of measurement for the capacity. R
prtInputMaxCapacity The maximum capacity of the input tray. R
prtInputCurrentLevel The current level of the input tray. R
prtInputStatus The current status of the input tray. R
prtInputMediaName A description of the media name. R
prtOutput group
prtOutputIndex A unique value for each output bin. R
prtOutputType The type of the output bin. R
prtOutputCapacityU-nit
The unit of measurement for the capacity. R
prtOutputMaxCapaci-ty
The maximum capacity of the output bin. R
prtOutputRemaining-Capacity
The remaining capacity of the output bin. R
prtOutputStatus The current status of the output bin. R
prtMarker group
prtMarkerIndex A unique value for the marker unit. R
prtMarkerMarkTech The type of marking technology used for the marking unit.
R
prtMarkerCounterUnit The unit for the counter values. R

SNMP implementation in the Océ Power Print Controller 277
prtMarkerLifeCount The number of print clicks since life. R
prtMarkerPowerOn-Count
The number of print clicks since power on. R
prtMarkerProcessCol-orants
The number of process colours supported by this marker.
R
prtMarkerSpotColor-ants
The number of spot colours supported by this marker.
R
prtMarkerAddressa-bilityUnit
The unit of measure for resolution and mar-gins.
R
prtMarkerAddressa-bilityFeedDir
The resolution in the feed direction. R
prtMarkerAddressa-bilityXFeedDir
The resolution in the cross feed direction. R
prtMarkerNorthMar-gin
The vertical clip margin. R
prtMarkerSouthMar-gin
The vertical clip margin. R
prtMarkerWestMargin The horizontal clip margin. R
prtMarkerEastMargin The horizontal clip margin. R
prtMarkerStatus The current status of the marker unit. R
prtMediaPath group
prtMediaPathIndex A unique value for the media path. R
prtMediaPathMax-SpeedPrintUnit
The unit of measure for the printing. speed R
prtMediaPathMedia-SizeUnit
The units of measure for media size. R
prtMediaPathMax-Speed
The maximum printing speed of this media. R
prtMediaPathMaxMe-diaFeedDir
The maximum paper size in the feed direc-tion.
R
prtMediaPathMaxMe-diaXFeedDir
The maximum paper size in the cross feed di-rection.
R
prtMediaPathMinMe-diaFeedDir
The minimum paper size in the feed direc-tion.
R
prtMediaPathMinMe-diaXFeedDir
The minimum paper size in the cross feed di-rection.
R
prtMediaPathType The type of media path. R
prtMediaPathDescrip-tion
The description of the media path. R
prtMediaPathStatus The current status of the media path. R

278 Océ Power Print Controller Technical Reference Manual
prtChannel group
prtChannelIndex A unique value for each configured print data channel.
R
prtChannelType The type of the print data channel. R
prtChannelProtocolV-ersion
The version of the protocol used on the print channel.
R
prtChannelCurrent-JobCntlLangIndex
The corresponding JCL of the print channel. R
prtChannelDefault-PageDescLangIndex
The default PDL of the print channel. R
prtChannelState The state of the print data channel. R
prtChannelIfIndex The value of ifIndex which corresponds to the print channel.
R
prtChannelStatus The current status of the print channel. R
prtChannelInforma-tion
Additional print channel information. R
prtInterpreter group
prtInterpreterIndex A unique value for each enabled PDL. R
prtInterpreterLang-Family
The family name of the PDL. R
prtInterpreterLan-gLevel
The language level of the PDL. R
prtInterpreterLangVer-sion
The date code or version of the language. R
prtInterpreterDescrip-tion
The description to identify the PDL. R
prtInterpreterVersion The date or version of the PDL. R
prtInterpreterDefault-Orientation
The default orientation of the PDL. R
prtInterpreterFeedAd-dressability
The maximum resolution of the PDL in the feed direction.
R
prtInterpreterXFeed-Addressability
The maximum resolution of the PDL in the cross feed direction.
R
prtInterpreterDe-faultCharSetIn
The default coded character set for input. R
prtInterpreterDe-faultCharSetOut
The default coded character set for output. R
prtInterpreterTwoWay Indicates whether or not this PDL is bi-direc-tional.
R
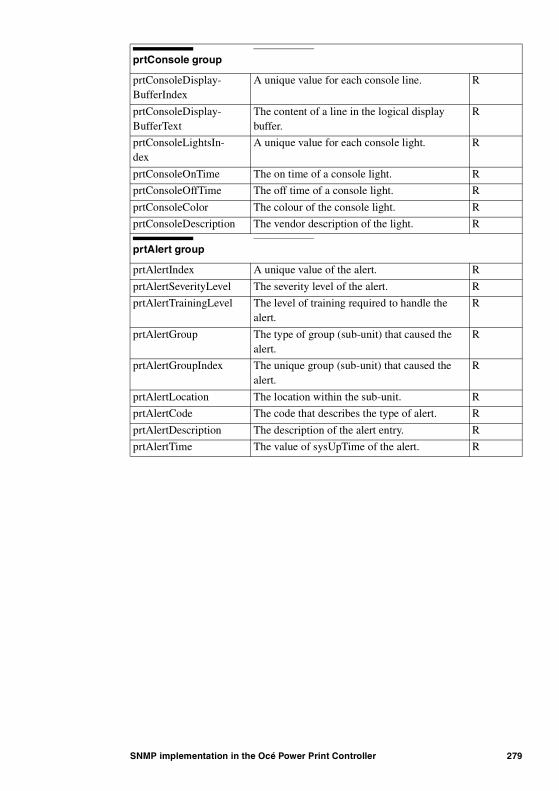
SNMP implementation in the Océ Power Print Controller 279
prtConsole group
prtConsoleDisplay-BufferIndex
A unique value for each console line. R
prtConsoleDisplay-BufferText
The content of a line in the logical display buffer.
R
prtConsoleLightsIn-dex
A unique value for each console light. R
prtConsoleOnTime The on time of a console light. R
prtConsoleOffTime The off time of a console light. R
prtConsoleColor The colour of the console light. R
prtConsoleDescription The vendor description of the light. R
prtAlert group
prtAlertIndex A unique value of the alert. R
prtAlertSeverityLevel The severity level of the alert. R
prtAlertTrainingLevel The level of training required to handle the alert.
R
prtAlertGroup The type of group (sub-unit) that caused the alert.
R
prtAlertGroupIndex The unique group (sub-unit) that caused the alert.
R
prtAlertLocation The location within the sub-unit. R
prtAlertCode The code that describes the type of alert. R
prtAlertDescription The description of the alert entry. R
prtAlertTime The value of sysUpTime of the alert. R

280 Océ Power Print Controller Technical Reference Manual

281
Océ Power Print Controller
Technical Reference Manual
Chapter 17Spooling and queuing mechanism
This chapter documents how you deal with the spooling and queuing mechanism in the Océ Power Print Controller. In addition to an introduction to the job scheduling mechanism, it elaborates on input channel queues, print queues and some practical aspects of spooling.

282 Océ Power Print Controller Technical Reference Manual
Job scheduling
DefinitionsQueuing If a print job is administrated — i.e. the job is processed by the printer — then the job is queued.
Spooling If a print job is actually saved on the hard disk of the printer, then the job is spooled.
This means that some print jobs are spooled but all print jobs are queued.
Job schedule mechanism
Each input channel of the Océ Power Print Controller has a dedicated queue. This implies that all jobs offered to the printer via a specific input channel are administrated separately and independently of jobs offered via other input channels. This results in simultaneously processed jobs.
The Job Schedule Module keeps track of the jobs in every input channel and selects one job for further processing by the printer. This job is transferred from the input queue to a (virtual) print queue. The job is then processed and printed. The job scheduling mechanism is depicted in the illustration below.
[74] Job scheduling mechanism
Note: The number of jobs shown on the operating panel of the printer is the total number of print jobs in all channel queues.
1
2
InputChannel
ChannelQueue
JobScheduleModule
PrintQueue
JACProcessing
PDLProcessing
Host I/Oand InputHandling

Spooling and queuing mechanism 283
The Job Schedule Module has to make sure that the different print contexts keep on printing.
Queue handling
For each I/O channel, the Key Operator can control the behaviour of the channel queue of this I/O channel with the ‘QHANDLING’ function. The queue handling can be set to:■ print-while-spool■ spool-then-print■ direct printing.
For more information, refer to ‘Input handling’ on page 43 and refer to the System Administration Manual of your printer.
Channel queues
Every input channel has a dedicated queue: jobs received via a specific input channel are automatically stored in the matching queue. This process can only be stopped if you disable the input channel. After you have disabled the channel, new jobs will no longer be offered to the Job Schedule Module and the queue is emptied.
The channel queues are based on the First-In-First-Out (FIFO) principle: jobs are processed in the same sequence as they have been put in the queue.
If a queue is set on hold, no jobs from this queue are printed as long as the queue is not released. As a result, the size of the queue continuously increases as new jobs are queued. For more information on setting a queue on hold, refer to the System Administration Manual.
Input channels can accept jobs independently of each other and independently of the job printing rate, as long as the channel spools the jobs. The Océ Power Print Controller can queue a maximum of 10,000 jobs. The maximum number of jobs that can be spooled is also limited by the hard disk size. However, for performance reasons in a job recovery situation, the number of spooled jobs should be kept low.
284 Océ Power Print Controller Technical Reference Manual
From the channel queues to the print queueThe Job Schedule Module keeps track of all channel queues and uses the FIFO principle on all channel queues together. Hence, the sequence of arrival is also the sequence for further processing and printing.You can only change this sequence with the following channel queue parameters:
Queue status: hold or release A job will only be scheduled for printing from a released channel. Jobs that have been transferred to the print queue at the time the queue was set on hold, are printed in the normal way. If a queue is set on hold, the queue will grow as new jobs are queued.
Configured queue mode Using Advanced KOS, you can configure channels in three different queue modes each with a different scheduling delay.
■ In ‘spool-then-print’ mode a print job is scheduled only after it is completely spooled in the printer. The delay can be high in case of large print jobs.
■ In ‘direct printing’ mode a print job has to wait to be scheduled until preceding jobs have completely finished.
■ The ‘print-while-spool’ mode makes sure the print job is scheduled immediately after the first byte is received.
For more information on configuring the different queue modes, refer to the System Administration Manual.
Availability of the print context A print context can only handle one job at a time. Jobs have to wait until the required print context is available.
Availability of the print engine After processing, a job can only be printed and delivered if the print engine is available.

Spooling and queuing mechanism 285
Dependent print jobsEach input channel is configured with a default print context. Some jobs, however, are ‘dependent jobs’ — i.e. the PDL context left by a job has to be used as the starting point for the next job. Dependent jobs are common in AS/400 and IPDS environments.
If a print context is configured for dependent jobs, a fixed relationship exists between the input channel and the print context. The fixed relationship has the following consequences:■ The print context can only accept jobs from the configured input channel.■ A print context can only be configured for one dependent input flow at a
time.■ Not all JAC functionality is available for dependent jobs.■ PDL is not reset in between jobs.■ Job recovery, after switching off the controller or a shutdown procedure, is
not available for dependent jobs.
Attention: Take care when selecting the print context via JAC for a dependent input channel.

286 Océ Power Print Controller Technical Reference Manual
Maximum number of jobs in a queue
When jobs are stored in the spool queue of the printer, you can no longer control these jobs. In case of an engine problem the jobs can not be redirected to another printer. You are able to limit the number of jobs that may reside in the spool queues of the printer, in order to re-direct print jobs in case of a printer failure.
Limited job spooling
Per interface, the maximum number of jobs that will be queued can be set. If the maximum number of jobs is reached for an input channel, no more jobs will be accepted from that input channel. Jobs will still be accepted from other interfaces.
Jobs are counted after JAC processing and separation by SIF. This means that a single ‘job’ send by the user in a single action, may result in many jobs being counted on the printer. This way of counting jobs is compatible with the job-counter on the operating panel and the number of jobs in the spool queue as reported by LPQ and ftp.
The number of jobs contains all the following jobs:■ jobs (partly) in the spool queue■ jobs currently being processed■ jobs being printed.
Spool mode
Limited job spooling can be combined with all spool modes so it can be used with ‘direct printing’, ‘print while spool’ and ‘spool then print’. When ‘direct printing’ is used, it is possible that the configured limit is never reached. For example, when jobs consisting of 100 pages are printed using ‘direct printing’, the job-counter will probably stay on 1 or 2 most of the time.

Spooling and queuing mechanism 287
Job counterWhen the job limit is reached, the next job, that is waiting to be received is already announced to the job administration and will be counted. So if the limit is set to 5, the number of counted jobs for that interface will be 6 if a job is waiting to be received. If, for another interface, the limit is set to 10 jobs, the job counter may reach a total of 10 + 1 + 5 + 1 = 17 jobs.
Performance
When the number of jobs in the printer is set too low, the performance may decrease. For good performance, at any time, the total number of pages, of all jobs in the printer should be at least 30 pages. The performance may also depend on the ‘alertness’ of the host, as the printer buffers little data, the host has to respond quickly when the printer needs new data.
For example, if the host waits 5 minutes before sending new data, the printer will have to buffer more than 300 pages, to be able to print continuously.
Input handler specific behaviour
In this paragraph the input handler specific behaviour is described. The behaviour, when the limit is reached is equal to the handling of disk full situation.
LP LP has its own queue. LP jobs are first completely stored in the LP-queue before being transferred further into the printer. To avoid the LP-queue from accepting jobs, you can not specify less than two LP jobs for limited job spooling.
The LP-job order may be mixed-up when using limited job spooling, or when a disk full occurs. Whether this happens is host dependent. This can occur in the following situations:■ The maximum number of jobs is reached, and the printer refuses a job.■ The printer has finished a job and is ready to accept a new job.■ The host transmits a new job, before retrying the job refused earlier.■ The new job is printed before the other because it is received earlier.

288 Océ Power Print Controller Technical Reference Manual
When the host has to retry very often, you may get a message like ‘system not responding’ when the host issues an LPQ command.
AppleTalk AppleTalk has its own queue, just like LP. An AppleTalk host queue may contain an unlimited amount of jobs. You can not specify the maximum number of jobs for the EtherTalk channel queue in the printer.
Netware Netware can be configured for a maximum of 4 queues. You can only specify once the maximum number of jobs for Netware. The number of jobs, received through the various queues is simply added. If the limit is reached, none of the queues will accept new jobs.
Netware jobs are first stored after reception before being transferred further in the printer. Per Netware queue only one Netware job may be stored this way. These jobs in this intermittent store are not counted.
Server, Socket and Centronics Server, Socket and Centronics connections will store data in input buffers. Approximately 100 kilobytes of data may reside in these buffers. The data in the buffers is not yet counted as a job, and not yet stored on the printers hard disk, in case of spooled printing.
FTP When the limit for the FTP spool queue is reached, no jobs are accepted anymore. Only when a single file contains multiple small jobs, the client may return before the file is completely separated and saved in the spool queue.

Spooling and queuing mechanism 289
Practical spooling aspects
Job recovery and spooling
Queuing and spooling can play an important role in several error situations. In some cases, the spooling mechanism causes the error. In other cases, the spooling mechanism helps to correct errors and salvage print jobs.
Job recovery, after switching off the controller or a shutdown procedure, is only certain if a job is completely spooled — i.e. completely saved on the internal hard disk. Hence, in direct printing mode there is no job recovery. Also, dependent jobs are never recovered.
If you accidentally switch off your printer, all jobs that have been spooled are automatically recovered after start-up. Jobs that have not been spooled completely, cannot be recovered. Depending on the host and the communication protocol, the printer informs the host about the failure. The host can send the job again to the printer.
All jobs that have to be printed by a PDL that is dependant of a certain input channel are dependent jobs. When during recovery the characteristics of the configured PDL contexts (f.i. emulation type, dependency) are changed, this can result in the removal of the spooled dependant jobs.
In short, the following jobs are removed by the recovery algorithm:
■ jobs that are incomplete■ direct printing (non-spooled) jobs■ dependent jobs.
Note: All jobs that are intended for a PDL which is exclusively connected to a certain input channel, also called a dependent channel/PDL, are called dependent jobs.
Small jobs Small jobs, less than approximately100 kilobytes, may be stored in the printer’s interface buffers. The host may therefore think a job is already sent while that job is not safely stored in the spool queue. This may cause problems when the printer is rebooted or shutdown. Because when the job limit is reached, one or more following small jobs may be waiting in the printer’s interface buffers. The host has to handle these small jobs carefully.

290 Océ Power Print Controller Technical Reference Manual
Removing jobs from a queue with Pre C-KOSInternal errors or errors in a print job may cause your printer to crash. An error message will tell you to reboot the printer. The error recovery mechanism provides for the Océ Power Print Controller to retry and print the job again.
If the print job itself has caused the error, the printer will crash again after rebooting. Hence, you cannot print unless the erroneous print job is removed from the print queue.
You can remove the job in JCS with the ‘ABORT’ function. Refer to the System Operation Manual for more information on this function.
If it is not possible to enter JCS, you can remove the active job or all jobs in Pre C-KOS mode. In this mode, print jobs that are available when rebooting, are held in the print queue. Pre C-KOS allows you to remove an erroneous print job from the print queue. Furthermore Pre C-KOS enables you to remove all jobs before the Job Server (JS) recovers them. To remove a job in Pre C-KOS mode, refer to the System Operation Manual.
Disk full handling
Power Print Controller based printers are able to print jobs which are larger than the hard disk size, but several constraints exist. The processing of such a job of course has its limitations, especially in possible JAC functions (multiple job processing and collated copies). The possibilities for job recovery, after switching off the controller or a shutdown procedure, are also limited.
Printing a job larger than the hard disk size can be accomplished as follows.
■ The first way to do this is submitting the job via a direct printing channel. Make sure that no spooling takes place. The hard disk size will be of no concern.
■ If the printer is forced to spool because of the configured queue mode, spooling cannot be avoided. Using the JAC segmentation principle, a job can be split up in several parts each with a dedicated processing. If a segment is completely finished, the stored segment data files can sometimes be removed (partially) from the printer hard disk. By doing so there might become again disk space available for accepting another part of the job. This of course limits possibilities for job recovery after switching off the controller or a shutdown procedure.

Spooling and queuing mechanism 291
■ If the input channel is configured for dependent jobs, then the drawbacks of not full JAC capability already exists. For that reason these channels can cleanup parts of a spooled job much earlier, i.e. as soon as these parts are printed. That makes them also suitable for printing jobs larger than the hard disk size.
If a job is blocked because it has to wait for disk space becoming available, the host will not always be able to finish its print command. Blocking requires that the host I/O is able to keep the host waiting, as the printer cannot completely accept the job at once. It depends on the host and the communication protocol whether this is handled correct or not.
Note: The Job Scheduler will not allow the disk to become completely full. It keeps a free margin of 10 MB, which prevents that the system would not be able to report errors, save environments, etc.

292 Océ Power Print Controller Technical Reference Manual

293
Océ Power Print Controller
Technical Reference Manual
Chapter 18Job ticket mechanism
This chapter contains a general explanation of job tickets, together with a full description of the syntax and semantics of job tickets. Also, JEC tickets are described.

294 Océ Power Print Controller Technical Reference Manual
Introduction to job tickets
Functions of job tickets
A print job is a request to the printer to perform a task. Usually this task is to print data, but it could also be the downloading of referable objects (forms, tickets, etc.). Print job identification and print job characteristics are described in (job-) attributes. These attributes are collected into tickets. The three functions of job tickets are:
■ identification function■ processing function■ download function (JEC tickets only).
Ticket attributes
Two types of tickets can be distinguished, depending on the attributes inside the ticket:
■ processing tickets and■ download tickets (JEC tickets only).
A ticket is always either a processing ticket or a download ticket. One ticket cannot be a processing ticket and a download ticket at the same time.
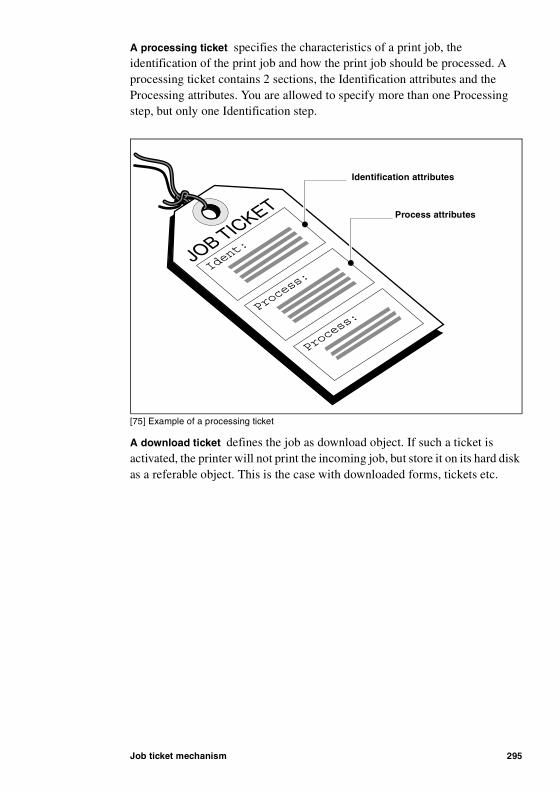
Job ticket mechanism 295
A processing ticket specifies the characteristics of a print job, the identification of the print job and how the print job should be processed. A processing ticket contains 2 sections, the Identification attributes and the Processing attributes. You are allowed to specify more than one Processing step, but only one Identification step.
[75] Example of a processing ticket
A download ticket defines the job as download object. If such a ticket is activated, the printer will not print the incoming job, but store it on its hard disk as a referable object. This is the case with downloaded forms, tickets etc.
Identification attributes
JOB TICKET
Ident:
Process:
Process attributes
Process:
Identification attributes
Process attributes
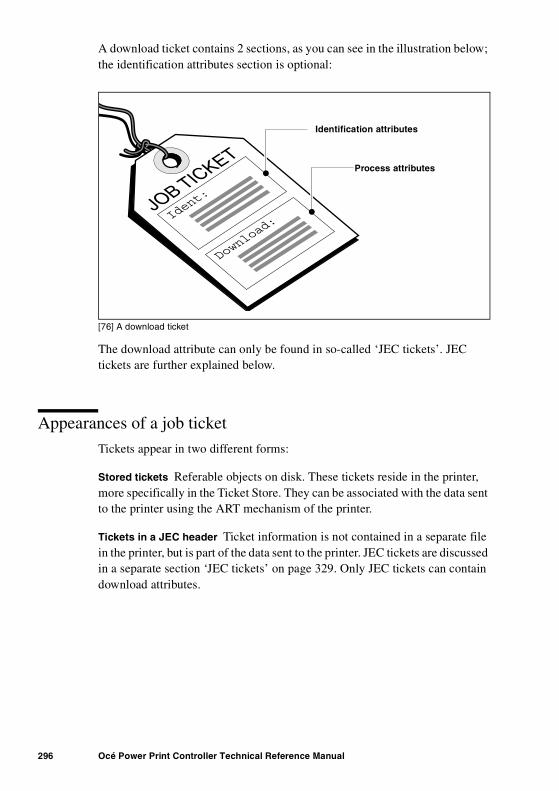
296 Océ Power Print Controller Technical Reference Manual
A download ticket contains 2 sections, as you can see in the illustration below; the identification attributes section is optional:
[76] A download ticket
The download attribute can only be found in so-called ‘JEC tickets’. JEC tickets are further explained below.
Appearances of a job ticket
Tickets appear in two different forms:
Stored tickets Referable objects on disk. These tickets reside in the printer, more specifically in the Ticket Store. They can be associated with the data sent to the printer using the ART mechanism of the printer.
Tickets in a JEC header Ticket information is not contained in a separate file in the printer, but is part of the data sent to the printer. JEC tickets are discussed in a separate section ‘JEC tickets’ on page 329. Only JEC tickets can contain download attributes.
Identification attributes
JOB TICKET
Ident:
Download:
Download attributes
Identification attributes
Process attributes

Job ticket mechanism 297
The identification function
In order to process a job in the right way, JAC first has to identify the job. Job recognition is based on the available attributes of the I/O channels and protocols, and on the optional recognition of strings in the host data or on an optional JEC header sent with the host data.
Recognition using I/O attributes
I/O channels and protocols often supply a number of identification attributes with each job. The number and nature of the supplied attributes differ for each I/O protocol. E.g., for each print job the FTP protocol supplies the name of the connected host, the name of the user and the job name. An LP connection can provide even more job identification attributes.
JAC knows a set of identification attributes that can be set by the printer’s I/O handling. Such attributes include, among others:
■ name of the logical input channel■ name of the sending host■ name of the user■ name of the group the user belongs to■ name of the job■ etc.
The actual attributes depend on the protocol used.
■ For details on the attributes provided by the Centronics interface, refer to ‘Centronics and JAC’ on page 118.
■ For details on the attributes provided by the PrintLink interface, (see ‘PrintLink connection to the Océ Power Print Controller’ on page 219).
■ For details on the attributes provided by the FTP protocol, (see ‘FTP connection to the Océ Power Print Controller’ on page 129).
■ For details on the attributes provided by the LP protocol, (see ‘Identification attributes for JAC’ on page 185).
■ For details on the attributes provided by the NetWare protocol, (see ‘NetWare identification attributes for JAC’ on page 212).

298 Océ Power Print Controller Technical Reference Manual
Recognition using banner pagesMany applications append a banner page (header or trailer) to a print job. In other cases, the use of banner pages is taken care of by the job submitting mechanism (e.g. NetWare). In almost all the cases, the banner page contains information on the origin of the print job.
A SIF (Separation Instruction File) is able to extract JAC identification attributes from the banner page.
Recognition using job dataGeneral principle If no banner page is available, you may use a SIF (Separation Instruction File) to search for specific strings within the print data which are known to provide identification information.
How to proceed depends on the PDL in use, and the way the printer driver has composed the print job.
Special case: PostScript Many applications generate PostScript jobs that comply with Adobe’s Document Structuring Conventions (DSC). These conventions (syntax and semantics) are specified in the ‘PostScript Language Reference Manual, Second Edition’, Appendix G. A DSC preamble is a most appropriate way to transmit information about the origin, the contents and the destination of a print job.

Job ticket mechanism 299
Some of these conventions have a matching JAC identification attribute. A SIF is able to extract the information contained in these DSC comments and to save it in the corresponding identification attribute of the job ticket. This results in the following DSC-JAC relations:
Once the job is identified, the JAC ART mechanism can be used to associate a stored job ticket with the job.
Identification attributesThe identification attributes are used to identify the job on the print system. Identification attributes can be used to select a stored ticket via the ART and the contents can be printed on flagsheets. The identification attributes for the print job are obtained in various ways:
■ from the host I/O communication■ via JEC-tickets■ by scanning the print data■ from stored tickets.
Examples are the names of the channel, the host, the user, the job, etc.
Within a job ticket, all identification attributes are optional. The information contained in the identification attributes is only used to forward identification information to jobs requiring, e.g., the printing of a flagsheet which contains identification information.
DSC JAC identification attribute
%%For: JOBADDRESSEE
%%Creator: JOBAPPLICATION
%%CreationDate: JOBDATE
%%Title: JOBTITLE
%%Routing: JOBADDRESS
[77] DSC entries and their JAC counterparts

300 Océ Power Print Controller Technical Reference Manual
Note: The information in the identification attributes need not be identical to the actual identification information provided by the host I/O channel attributes, the banner page or the job data.
If an identification attribute appears more than once in a ticket, the last attribute in the sequence is valid and a logical error is generated.

Job ticket mechanism 301
The processing function
Processing attributes
Processing attributes describe how a print job should be processed, by specifying such functions as:
■ input tray■ output bin■ duplex/simplex■ number of copies■ use of referable objects (forms)■ collate■ use of flagsheets etc.
General aspects of processing attributes
It is possible to use variables as argument in processing attributes. All identification attributes can be used as variables. This way it is possible to use the ‘jobname’ for forms selection, etc.
A ticket can contain more than one processing attribute field, where each processing field represents one processing pass of the complete print job and each pass uses its own processing attributes.
Processing attributes overrule the corresponding PDL commands in the print data. If any of the processing attributes appears more than once in a processing field, a logical error is generated, except for the FORM attribute which can occur more than once and the FLAGSHEET attribute which can occur twice (one header and one trailer flagsheet).
Interesting processing applications
Many processing attributes can also be called from the PDL. However, if they are called from a job ticket, they offer additional advantages, as is made clear by some examples below.

302 Océ Power Print Controller Technical Reference Manual
Overlays and underlays Using JAC, several overlays and underlays can be used in one processing pass of the job, where the total number of overlays + the number of underlays for all passes should not exceed 20. Underlays are positioned under the print data, overlays are positioned over the print data. If more than one under- or overlay is specified in a ticket, the underlays and/or overlays appear in the order in which they appear on the ticket.
Overlays and underlays are not influenced by the PDL file from the host. The overlays and/or underlays can appear either on the rear side, the front side or on both sides of the sheet. The BIND and MULTIPLEUP attributes, however, influence the position and orientation of any overlays and/or underlays.
Overlays or underlays do not appear on flagsheets.
Flagsheets Flagsheets are additional to the sheets generated by the PDL data. A flagsheet at the beginning of a print job is called header page. A flagsheet at the end of a print job is called trailer page.
Flagsheets are referable objects on the print system. A processing attribute specifies the flagsheets used in a job. When multiple collated copies are printed, all copies of the job are provided with the specified flagsheets. A flagsheet is always simplex and can display all identification attributes. For the STAPLE, BIND and COLLATE attributes, the flagsheets are part of the print job. This means that if, e.g. STAPLE is active, the flagsheet is stapled together with the actual job. Other processing attributes have no influence on flagsheets.
Collate Specifies whether a job should be copied page by page or as a whole. Multiple copies can be specified by the COPIES attribute. If the collate function is specified from within a job ticket and the job is too complex to fit in the internal memory of the printer, the Océ Power Print Controller can spool jobs on its hard disk. It is then able to process large jobs in several passes as is required to collate jobs with a Finisher. This feature is only supported for independent jobs: the print context for the job may not be coupled to only one input channel.
Multiple-up Multiple-up enables the printing of several logical pages onto one physical page. Several multiple-up features are available. Scaling is not supported.

Job ticket mechanism 303
Ticket syntax and semantics
Generic ticket syntaxTicket coding Tickets are coded in plain ASCII. Each ticket line contains one attribute and, possibly, a number of arguments. A ticket line is 0 to 132 bytes long. Lines that are longer than 132 bytes generate a logical error and are ignored. Arguments and attributes are separated by space characters.
Notation:
{A,B}
A or B
[1-20]
A number between 1 and 20, 1 and 20 included
<name>
Variable name “name”, possible contents is defined elsewhere.The file name must comply with the MS-DOS file naming conventions, because backup is done on DOS-formatted floppy disks.
Notation conventions The following notation conventions are used in this Technical Reference Manual:
<NL>
New line; any combination of Carriage Returns (CR) Line Feeds (LF) and Form Feeds (FF)
<WS>
White Space; any combinations of spaces and tabs
<string>
0 to 255 printable characters including white space, excluding newline characters
<number>
Any real number ranging from - 999,999 to (+) 999,999
<filename>
The filename of a referable object. It must meet the MS-DOS filename

304 Océ Power Print Controller Technical Reference Manual
conventions, i.e. maximum 8 characters for name and optional a dot with a 3-character file extension. Only printable characters are allowed; <WS> and <NL> are not allowed.
<IDattr>
{%CHANNELNAME, %CHANNELTYPE, %CUSTOM, %EMULATION, %GROUPNAME,
%HOSTNAME, %JOBADDRESS, %JOBADDRESSEE, %JOBAPPLICATION,
%JOBCLASS, %JOBDATE, %JOBNAME, %JOBNUMBER, %JOBTITLE,
%HOLDMODE, %SEGMENTNAME, %USERNAME}
The <IDattr> can be used in processing fields to use one of the identification attributes as variable, for example for forms and/or flagsheets.
Syntax and semantics of ticket attributesGeneral syntax:
[<WS>] <attributeID> <WS> <attributeVAL> [<WS>] <NL>
In which <attributeID> is the identification of the attribute, the attribute name.<atrributeVAL> are the arguments of the attribute.Attribute-ID and attribute-value are case insensitive.Invalid attribute IDs, attribute values or missing (non-optional) attribute values result in error messages. These attributes are ignored.
Comments The comments attribute can be used anywhere in the ticket, provided it starts at the beginning of a line.
Syntax: REM: <string>
Any line starting with ‘REM:’ is treated as comment and is not part of the information stored in the job ticket. It is used to make the job ticket more readable for humans. All printer processes skip comment lines when parsing a job ticket.
The following example is correct:
BIN 2
REM: bin selection
The following example is not correct, because the REM command does not start on a new line:
BIN 2 REM: bin selection

Job ticket mechanism 305
Syntax of ticket filesAttribute group commands Ticket attributes can be split into three functional areas:
■ identification attributes■ processing attributes■ download attributes.
A ticket is split in these areas by attribute-group commands, as you can see in the illustration below which shows a processing ticket:
[78] Attribute-group commands
Note: A ticket cannot contain both process and download commands.
Follows the syntax of the ticket attribute-group commands.
General syntax The general syntax of the attribute-group commands is as follows:
[<WS>] <main keyword> <WS> <NL>
The maximum length of attribute-group commands is 40 characters.
Identification information
Syntax: Ident:
Identification attributes
JOB TICKET
Ident:
Process:
Process attributes
Process:
Identification attributes
Process attributes

306 Océ Power Print Controller Technical Reference Manual
The Ident keyword indicates the start of the job identification section of the ticket. Identification sections apply to the job as a whole, i.e. to each file within the job. It includes settings for the job itself and settings for each file in the job.
Processing information
Syntax: Process: [ <process-id> ]<process-id> = { <IDattr>, <string> }
The Process keyword indicates the start of the job processing pass of the ticket. Process passes specify how the Océ Power Print Controller should process the job. An optional process-id may conclude the Process keyword in order to make the tickets human-understandable.
Note: In case of multiple processing, there should be as many processing sections as processing passes; in other words, if a job has to be processed 3 times, there must be 3 processing sections in the ticket, each of them setting off with ‘Process:’
Syntax and semantics of job identification attributes
Below you find an overview of the identification attributes in alphabetical order, together with their meaning and correct syntax. All identification attributes are empty by default, except CHANNELTYPE.
Channel name The name of the (logical) input channel.
Syntax: CHANNELNAME { <string> }Channel type The logical channel type the jobs are received on.
Syntax: CHANNELTYPE {CENTRONICS, FTP, LP, ATALK, NETWARE, PLINK, SOCKET}
Custom defined Identification This variable offers an additional identification variable to be specified by the user. This variable is an additional attribute that can be used to select tickets from the Ticket Store.
Syntax: CUSTOM <string>Emulation Definition of the PDL used in the print data or in the print context.
Syntax: EMULATION [<pdl_type>] [<printcontext>]
where:

Job ticket mechanism 307
■ <pdl_type> can be: ‘PCL5’, ‘FOL’, ‘TIFF’ , ‘POSTSCRIPT’ .■ <printcontext> specifies the desired print context {1, 2, 3}.
The number of print contexts depends on the printer configuration. In case of conflict, the pdl_type overrules the context specification.
If no emulation is specified or only a print context is given that is dependant on another input channel, the data is printed to the input channel´s default context. When this default context is dependant on another input channel, a logical error page is generated and the job data is ignored.
If only the PDL type is given or the specified print context introduces a contradicting situation, a correct print context is found by means of the following rules:
1 Use the input channel´s default context when it has the same PDL type as the one that is specified. This context must be independent of any input channel unless it is the current input channel.
2 Use the first found independent context that has the specified PDL type.3 Use the first found dependant context that depends on the used inputchannel
and has the specified PDL type.
Note: In download tickets, the print context is ignored.
Group name The name of the department or the group the user belongs to. This information can be used, e.g., for accounting purposes.
Syntax: GROUPNAME <string>Holdmode Specifies the way the spool queue manager handles the job.
Syntax: HOLDMODE {PRINT_THEN_DELETE, HOLD, PRINT_THEN_HOLD, DELETE}
meaning:
■ PRINT_THEN_DELETE: the job is printed and removed from the spool queue when finished
■ HOLD: the job is not printed, but held in the spool queue■ PRINT_THEN_HOLD: the job is printed and put on hold afterwards■ DELETE: the job is not printed, but immediately removed from the spool
queue.
When the holdmode is not specified, PRINT_THEN_DELETE is assumed.
Host name The name of the sending host.

308 Océ Power Print Controller Technical Reference Manual
Syntax: HOSTNAME <string>Job address The name of the job address.
Syntax: JOBADDRESS <string>Job addressee The name of the job addressee, i.e. the person the printed matter should be forwarded to.
Syntax: JOBADDRESSEE <string>Job application The name of the application that created the job.
Syntax: JOBAPPLICATION <string>Job class A classification of the print job, e.g., the IBM printer class.
Syntax: JOBCLASS <string>Job date The date the job is created on the host.
Syntax: JOBDATE <string>Job name The name of the print job.
Syntax: JOBNAME <string>Job number A numeric identification of the job.
Syntax: JOBNUMBER <string>Job title The name of the job title.
Syntax: JOBTITLE <string>Segment name Specifies the name of the segment or the LP print file. One job can contain more than one segment.
Syntax: SEGMENTNAME <string>User name Name of the user.
Syntax: USERNAME <string>

Job ticket mechanism 309
Syntax and semantics of processing attributesA characteristic set by a ticket processing attribute affects the entire job. This means that PDL definitions for the same characteristic are ignored. The default for all processing attributes is the corresponding characteristic in the PDL file (or print system configuration). Forms and flagsheets have no influence on over-/underlays or banner pages specified in the PDL print file.
On the following pages you find a detailed description of each processing attribute. The attributes are sorted in alphabetical order.
The following information is provided with each attribute:
Command syntax command name and possible arguments
Description what you can achieve with this command.

310 Océ Power Print Controller Technical Reference Manual
BINSyntax
BIN (<IDattr>|<binnumber>)<binnumber> = { 0, 1, 2, 4, 5 ... }
where with the Océ 8400 Series printer:
■ 0 = error output bin■ 1 – 20 = actual bin number in 20-bin Sorter■ 61 = finisher bin■ 81 = upper output tray
When variable substitution is used, you have to make sure that the variable contains a valid value.
Output bin The output bin in which the pages will be delivered.
Note: The projection (mapping) of logical bins on physical bins is defined on the printer. If you select a logical bin which does not exist on your printer (e.g. bin 21 on a 20-bin Sorter), then the bin command is not executed.
Attention: Do not select bin 0, this bin is intended for error pages and misprints only.

Job ticket mechanism 311
BINDSyntax
BIND [<edge> <offset>] [flip]<edge> = { left, right, top, bottom }<offset> = { <number> }
Binding Specifies the binding edge and binding offset (shift) in millimetres relative to the page-offset.
The binding mechanism works for simplex and for duplex jobs. However, if duplex printing is activated, the front and back pages are shifted with respect to the same physical paper edge. E.g., if the front side is shifted to the right, the back side is equally shifted to the left. The default binding offset is 0 mm.
The flip argument specifies whether the back side should be rotated 180 degrees with respect to the front side.

312 Océ Power Print Controller Technical Reference Manual
COLLATESyntax
COLLATE { on, off }
Collate This attribute switches the collating mode on or off. How collating works is explained in full detail in the ‘Océ Power Print Controller FOL Reference Manual’. There is, however, an important difference between collating from within the PDL file and collating from within a job ticket. If collating is specified from within the job ticket, the Océ Power Print Controller will spool the job on its hard disk, so as to be able to collate larger jobs in multiple passes, e.g. if a Finisher is installed or if the number of available logical bins in the Sorter is insufficient. If collating is specified from within the PDL file, the job has to be stored in internal memory which generates an error if the job is too complex.
Collate also affects the printing of flagsheets:
■ if collate is set to off, only one flagsheet is printed for the entire job■ if collate is set to on, one flagsheet is printed for each copy.
Note: If you have specified Collate, the default number of copies is assumed ‘1’.

Job ticket mechanism 313
COPIESSyntax
COPIES (<IDattr|<nrcopies>)<nrcopies> = {1, 2, 3, 4...}
When variable substitution is used, you have to make sure that the variable contains a valid value.
Copies The number of copies of the job that should be printed.
If the number of copies is specified, collate is set to on by default.

314 Océ Power Print Controller Technical Reference Manual
DUPLEXSyntax
DUPLEX { on, off, auto}
Duplex This attribute specifies the print job to be printed simplex or duplex.
If auto is selected, the PDL data selection or C-KOS default is used.
The default setting is the PDL or C-KOS setting.

Job ticket mechanism 315
FLAGSHEETSyntax
FLAGSHEET <flgsh_name> <flgsh_pos> [<input_tray>]<flgsh_name> = {<IDattr>, <filename>}<flgsh_pos> = {HEADER, TRAILER}<input_tray> = { 0, 1, 2, 3, ... }
Flagsheets A flagsheet is an additional separator page, in front or at the end of the print job, which also offers the possibility to print job identification information. The flagsheet requires the name of a printer-resident flagsheet and the specification header or trailer. The input tray is optional. Only one header and one trailer page can be specified for each pass.
If multiple collated copies are required, a flagsheet will be printed with each copy.
Flagsheets do not influence any host-related banner pages, i.e. header or trailer pages.
Flagsheets are always printed simplex. Flagsheets are stapled and jogged conform the contradiction handling rules (see ‘Flagsheet handling’ on page 83). Furthermore, the ticket attribute for binding influences the position of the flagsheet on the page.
When a flagsheet is requested, an input tray can be specified for the flagsheet. Whether a segment flagsheet is actually printed from this tray depends on the tray selection in the job.
The table below gives the priority for a job flagsheet (from high to low).1 job flagsheet tray selection2 job ticket tray selection3 tray selection in the flagsheet data4 flagsheet PDL default tray
The table below gives the priority for a segment flagsheet (from high to low).1 job ticket tray selection2 segment flagsheet tray selection3 segment ticket tray selection4 tray selection in the flagsheet data5 flagsheet PDL default tray

316 Océ Power Print Controller Technical Reference Manual
FORMSyntax
FORM <form_name> [<page_select>] [<layer>]<form_name> = {<IDattr>,<filename>}<page_select> = { front, rear}<layer> = { underlay, overlay }
Form The form attribute defines the name of a printer-resident form. The form can be used as overlay or as underlay and can appear on either side of the sheet. This attribute has no influence on forms used from within the host data.
The form attribute can be used more than once in one processing step. If multiple forms are used, they appear in the order in which they are specified.
The arguments page_select and layer are optional. However, if they are used, they must be used in the specified order: page_select comes first.
The page_select argument works as follows:
■ by default, the form is added to all data pages■ if page_select is set to front, the form is only added to pages that are printed
to the front side of a sheet■ if page_select is set to rear, the form is only added to pages that are printed
to the back side of a sheet
You can use the layer argument to achieve an opaque or transparent result: use opaque forms as an underlay rather than as an overlay to prevent the blinding of data page information. Likewise, you can purposely blind information by using a (partly) opaque form as an overlay. You can simulate a partly opaque form by using the ~BLIND command in FOL.
The form attribute is the only attribute that may occur more than once in a ticket, without generating a logical error. You may use a maximum of 40 forms.
Forms are affected by the following attributes:
■ binding■ multiple-up: the form is added to each logical page.
Job ticket mechanism 317
Note: Flagsheets are not affected by the form attribute. You cannot overlay (or underlay) a flagsheet with a form. The TIFF interpreter cannot be configured as a Flagsheet PDL.
JOGSyntax
JOG { ON, OFF }
Jog The jog attribute controls the jogger device on a Stacker/Stapler from within a job or segment ticket. On a Mailbox system the jog attribute controls the transition to the next physical bin within the same logical bin.
If a number of collated copies are specified, then jogging will take place for each copy of the set. However, if a number of un-collated copies are specified, jogging will be done only once, after all copies of the set or document are made.
The default setting is the PDL default.
LAYOUTPIFSyntax
LAYOUTPIF <layoutpif_file><layoutpif_file> = { <IDattr>, <filename> }
LayoutPIF selection The layoutpif attribute specifies the use of a LayoutPIF. LayoutPIFs can only be used with FOL data.

318 Océ Power Print Controller Technical Reference Manual
MULTIPLEUPSyntax
MULTIPLEUP <numimages> [<scaling>] [<multupmap>]<numimages> = {1, 2, 4 }<scaling> = {autoscale,noscale}<multupmap> = { 1, 2, 3, 4, SAMEUP}
Multiple-up The multipleup attribute allows for printing several logical pages onto one physical page. There are three possibilities, set by numimages:
■ one-up■ two-up■ four-up.
The optional multiple-up map (set by the ‘multupmap’ field) specifies alternative positioning of the logical pages onto the physical page. The various possibilities are shown in the following diagram:

Job ticket mechanism 319
[79] Effect of the ‘multupmap’ field in the multiple-up command
Multiple-up, map 1
Multiple-up, map 2
Multiple-up, map 3
Multiple-up, map 4
Multiple-up 1
12
1
1
3
2
4
Multiple-up 2 Multiple-up 4
1
2
1
2
3
4
Multiple-up 2 Multiple-up 4
2
1
4
3
Multiple-up 4
3
1
4
2
Multiple-up 4
Multiple-up, map Same-up
1
1
1
1
1
1
Multiple-up 2 Multiple-up 4
Where:
= portrait origin of physical = portrait origin of logical page
Where:
= Portrait origin of physical= Portrait origin of logical page

320 Océ Power Print Controller Technical Reference Manual
The default settings are:
■ one-up■ autoscale■ multiple-up map 1.
Multiple-up is affected by the bind attribute.Flagsheets are not affected by the multiple-up attribute. Flagsheets can only be printed one-up.Forms are affected by the multiple-up attribute.When MULTIPLEUP 2 or 4 is selected, the printer ignores page side selections (front, rear) specified in the PDL or a PagePIF.When MULTIPLEUP 2 or 4 is selected, the print mode (simplex or duplex) is fixed for the whole job. Changes of print mode (from simplex to duplex or vice versa) as specified in the PDL or a PagePIF, are ignored.
Attention: Autoscaling is not supported. Selecting autoscaling will result in an error situation. However, as autoscale is the default setting, you always have to explicitly specify ‘noscale’.
PAGEPIFSyntax
PAGEPIF <pagepif_file><pagepif_file> = { <IDattr>, <filename> }
PagePIF selection The pagepif attribute specifies the use of a PagePIF. No PagePIF is selected by default.

Job ticket mechanism 321
PRINTQUALITYSyntax
PRINTQUALITY [HALFTONE <int>] [BITMAPFATTENING <int>]
Printquality Printquality indicates the print quality for each PDL emulation. This attribute has different meanings for different emulations. If a category of printquality is not supported by a PDL it will be ignored. The default value for printquality is the print quality specified by the PDL or in C-KOS.
Halftone Halftone selects the ditter matrix to be used for PostScript jobs.
A fine dither matrix is a good choice when printing images. A coarse halftone is a better choice when printing graphics with large gray areas.
In the table below the possible values for halftone are listed.
Bitmapfattening Bitmapfattening improves the contrast of thin lines and fine raster images for PCL jobs. Bitmapfattening can be switched on or off:
■ bitmapfattening 0: bitmap fattening is disabled■ bitmapfattening 1: bitmap fattening is enabled (default).
Halftone Dither matrix
0 8 * 8 (default)1 10 * 102 12 * 123 14 * 14 4 16 * 16

322 Océ Power Print Controller Technical Reference Manual
RESOLUTIONSyntax
RESOLUTION { 300, 600 }
Resolution Specifies the engine resolution in dots per inch (dpi). The default resolution is the resolution specified by the PDL or in C-KOS.
The resolution attribute overrules any PDL resolution setting.
SETSIZESyntax
SETSIZE <setsize><setsize> = {1, 2, 3, 4...}
Set size Setsize can be used to specify the number of sheets that should be stapled/jogged. An end-of-job or end-of-segment also terminates the current set.
If staple is set to on, setsize specifies the number of sheets that are stapled together. If staple is set to off, setsize specifies after how many sheets jogging should take place. If setsize is not specified, jogging or stapling takes place on a job-by-job basis. Default is set to No Setsize.
Note: Jogging on a job-by-job basis depends on the job separation option in C-KOS. To obtain a physical separation between documents, you have to enable job separation.
There is no maximum number of setsize as far as the syntax is concerned. However, if the staple function is active, it is important to remember that the stapler batch capacity is limited.
Note: The Océ 8400 Series can staple a maximum of 50 sheets of 80 g/m2 .

Job ticket mechanism 323
STAPLESyntax
STAPLE { on, off, auto }
Staple Specifies whether the job must be stapled. If multiple copies of a job are requested, each copy is stapled. If a Sorter is installed, this attribute is ignored. Flagsheets are stapled together to the actual job data pages if the ‘Staple’ command is specified at a higher priority level (see ‘Contradiction handling’ on page 80).
If staple is set to auto, the PDL setting is used. Stapling on and off overrule any PDL settings for stapling and jogging.
The default setting is the PDL default.
Note: The Océ 8400 Series can staple a maximum of 50 sheets of 80 g/m2.
TRAYSyntax
TRAY (<IDattr|<tray_number>)<tray_number> = { 0, 1, 2, 3, ... }
where for the Océ 8400 Series printer:
■ 1 = upper paper tray■ 2 = middle paper tray■ 3 = lower paper tray■ 4 = bulk tray
When variable substitution is used, you have to make sure that the variable contains a valid value.
Input tray The logical input tray from which the paper will be fed.
Note: The projection (mapping) of logical input trays on physical input trays is specified on the printer. If you select a logical tray which does not exist on your printer (e.g. tray 6), then the tray command is not executed.

324 Océ Power Print Controller Technical Reference Manual
Examples of job ticketsSimple multi-processing ticket This is an example of a multi-processing ticket. For print jobs with multiple processing steps, the ticket contains multiple Process fields.
This job will be processed twice:
■ With the first pass, two copies are printed, delivered into bin 10 and enhanced with a PostScript form named ‘form1.ps’ which is used as an overlay.
■ With the second pass, one copy is delivered into bin 5, the front side uses ‘form2.ps’ as an overlay, the back side uses ‘form3.ps’.
Ident:
JOBNAME example
Process: PreprintedFormsBIN 10
FORM form1.ps OVERLAYCOPIES 2
Process:BIN 5FORM form2.ps OVERLAY
FORM form3.ps REAR
Note: A ticket may contain multiple ‘Process’ attribute fields, but only one ‘Ident’ or one ‘Download’ attribute field, e.g. Indent + Process + Process or Ident + Download.
More elaborate ticket This is a ticket that also contains remarks and quite some identification attributes.
Rem: Ticket: Month_figures V1.5Rem: Monthly accounting figures to be reported to Joe
Ident:CHANNELNAME centronics_1HOSTNAME station 5
USERNAME ChiefGROUPNAME abcREM: location main building
JOBNAME listing.accountJOBNUMBER 12098JOBADDRESSEE joe smith
JOBADDRESS room 12

Job ticket mechanism 325
Process:COPIES 2REM: One copy for Joe, one for accounting department
BIN 12FORM account_figures OVERLAYDUPLEX ON
A real goody The following example shows another ticket with two processing passes. The first pass prints one duplex copy of the job. The second pass prints 50 copies with an overlay ‘company_logo’. Both passes use the staple option.
Ident:
CHANNELNAME centronics_1JOBNAME customer.datJOBNUMBER 12098
Process: AdministrationTRAY 4BIN 61
DUPLEX ONSTAPLE ON
Process: CustomersTRAY 4BIN 61
DUPLEX ONFORM form1.ps OVERLAYCOPIES 50
STAPLE ON
Ticket containing a variable attribute This example shows a ticket that uses a form with the same name as the print job owner. This ticket selects a unique form for each user.
Process:FORM %USERNAME

326 Océ Power Print Controller Technical Reference Manual
Flagsheets
Flagsheets are user-definable physical sheets which precede or follow the print job. They can contain both variable and fixed data. The variable information may be JAC identification information derived from the job ticket. The fixed information may be any kind of printable information, including pictures, bar codes, etc.
Flagsheets can be used to add information about documents, such as routing information. This information does not belong to the document. As any device control can be applied to flagsheets, you can easily distinguish the flagsheet from the document by printing it from another input tray on paper of a different colour.
Note: For more information about FOL commands refer to the Océ Power Print Controller FOL Reference Guide.
Creating flagsheets
Flagsheets can be created with an ordinary word processor. The print job that is generated by the word processor can be downloaded to the printer as a flagsheet with the corresponding emulation.
Within a flagsheet, identification attributes can be referred to as @attributename@, where ‘attributename’ can be any JAC identification attribute. The attribute names are case insensitive.
Some things to keep in mind when creating flagsheets:
■ Attribute names are not recognised if there are control commands inside the name, e.g. because of layout changes halfway through the attribute name. Also, some word processors add positioning commands before each character. Such packages are not suitable for making flagsheets.
■ Certain layout commands like centred or right-aligned text may depend on the actual length of the text string that is printed. This can go wrong if the word processor assumes that the string @attributename@ is printed, while in reality this string will be replaced by the attribute’s value.

Job ticket mechanism 327
Flagsheets are activated through a job ticket. For more information on how to download and activate flagsheets, see ‘JEC tickets’ on page 329.
Describing a flagsheet in FOL
A FOL flagsheet can be created in exactly the same way as a FOL form. The variable information on the flagsheet, i.e. the identification attributes, are added to the page description of the flagsheet as you would add any plain text. However, to be recognised as variable data, the attribute must be entered between two ‘@’ characters.
For example, the line:
@JOBNAME@
in a flagsheet description will print the current contents of the identification attribute ‘jobname’, e.g. invoice. If the attribute is not entered in this way, the string will be printed as plain text. For example, the line
JOBNAME
in a flagsheet description will print the word JOBNAME, instead of the contents of the attribute.
The following JAC identification attributes can be printed in a flagsheet:■ Channelname■ Channeltype■ Custom■ Emulation■ Groupname■ Hostname■ Jobaddress■ Jobaddressee■ Jobapplication■ Jobclass■ Jobdate■ Jobname■ Jobnumber■ Jobtitle■ Segmentname■ Username
Note: The attribute name is case insensitive.

328 Océ Power Print Controller Technical Reference Manual
ExampleAn example of a flagsheet description in FOL is shown below. The identification attributes Username, Hostname and Jobname are used.
~TOPMARGIN 30~LW 1000~HLINE 25 15 30
~HTAB 50~F “Univers 12 bold”~TEXT 25 25 @USERNAME@
~VPA 70~F “Univers 12 bold” Hostname: ~T ~F “Univers 12” @HOSTNAME@~VPA 90
~F “Univers 12 bold” Jobname: ~T ~F “Univers 12” @JOBNAME@~LW 50~HLINE 100 200.75 100 REPEAT 10 DOWN 10
~LW 1500~HLINE 150 200 50 REPEAT 10 DOWN 10~PAGE
The attribute Username is positioned on the flagsheet page with the ~TEXT command, because the attribute is to be printed above the top margin.

Job ticket mechanism 329
JEC tickets
JEC ticket syntax
Job Envelope Commands are used to separate Océ job attributes from the job data and to separate two jobs from each other. Inside a JEC header, a ticket is included according to the ticket-file description from the paragraph above.
A JEC command always consists of a JEC marker and a JEC subcommand, according to the following syntax:
<WS><JECmarker><WS><JECsubcommand><WS><NL>
Three JEC subcommands are allowed.
JEC marker
The JEC marker must comply with the following requirements:
■ The JEC marker is an alphanumerical string which can contain the following characters: ‘-’, ‘_’, ‘.’, ‘*’, a-z, A-Z, 0-9.
■ Line terminators (LF, CR, FF) are not allowed.■ JEC markers and JEC subcommands are case-insensitive.
Note: On your request, your local System Consultant can alter the JEC marker with different characters.
Note: . In all examples in this Technical Reference Manual, the factory default string ‘*jec’ is used as JEC marker.
JEC subcommandsBEGIN
Syntax: BEGIN
The BEGIN subcommand indicates the begin of a job and the begin of a JEC header. It closes all open jobs.

330 Océ Power Print Controller Technical Reference Manual
BODY
Syntax: BODY
The BODY subcommand indicates the end of the current job header and the begin of the job data.
END
Syntax: END
The END subcommand indicates the end of the current job data and the end of the current job. The END subcommand is optional; BEGIN automatically implies an END.
Note: The EndOfLine of the END-command can be tuned per input channel.
JEC headers embedded within PDL comments
JEC headers can also be embedded within PDL comments. Each ticket line starts with the ‘PDL comment characters’, as you can see in the following examples:
FOL example ~REM *JEC begin~REM Ident:
~REM Emulation FOL~REM REM: next line is empty~REM
~REM Download:~REM Object form1.frm FORM~REM *JEC body
~REM REM: still needs PDL comment
PostScript example %% *JEC begin%% Ident:%% Jobaddressee Invoice department
%% *jec body
PCL5 example @PJL COMMENT OCE *JEC BEGIN
@PJL COMMENT OCE IDENT:
@PJL COMMENT OCE EMULATION PCL5
@PJL COMMENT OCE PROCESS:
@PJL COMMENT OCE DUPLEX ON
@PJL COMMENT OCE *JEC BODY

Job ticket mechanism 331
Take the following restrictions into account:
■ Characters in the range of 0x00 to 0x1F are not allowed in the PDL comment, except for the tab character (0x09). If the PDL comment contains one or more of these characters, then the printer considers this text as part of the print job.
■ Any ‘PDL comment syntax’ before ‘*JEC Begin’ sets the comment for the best of the JEC header.
■ Comment strings should not be longer than 25 bytes.■ The comment string must be consistent within one JEC header; e.g. a
combination of ‘%%’ and ‘%!’ is not valid.■ Any text before ‘*JEC end’ is considered a PDL comment.
Example of a JEC ticket
The following example is a complete JEC ticket, included the printed data which is clearly identified.
*jec BEGIN
Ident:<Identification attribute 1>
<Identification attribute 2><Identification attribute 3>
Process: For_user_admin<Processing attribute 1><Processing attribute 2>
Process: For_user_demo<Processing attribute 3><Processing attribute 4>
*jec BODY
Gallia est omnia divisa in partes tres
quarum unam incolant Belgae, aliam Aquitani, tertiam qui ipsorum linguaCeltae, nostra Galli appellantur. Horum
omnium fortissimi sunt Belgae.
*jec END
This example processes the data embedded between BODY and END two times, once using processing attributes 1 and 2 and once using processing attributes 3 and 4.
Print data

332 Océ Power Print Controller Technical Reference Manual
Download tickets
JAC makes use of a variety of resources. These resources are managed by the operator of the printer. JAC takes care of downloading these resources to the Océ Power Print Controller by means of ‘download tickets’; these are JEC tickets that contain download attributes.
The following JAC resources are downloadable:
■ form■ flagsheet (header or trailer page)■ job ticket■ LayoutPIF■ PagePIF■ SIF■ ART file.
Download attributes
Download attributes re-define the print job as referable object. The download attributes describe the type and name of the object.
If a ticket contains both processing and (valid-) download attributes, no downloading is done and a logical error is generated. If any of the download attributes appear more than once in a ticket, a logical error is generated.
Syntax and semantics of download attributes
Note: The directory in which the objects are stored in the printer, is fixed for each object type. Therefore, it is not necessary to pass the directory name as attribute.
Attribute group command The download attribute group must be identified as follows:
Syntax: Download:

Job ticket mechanism 333
The Download keyword indicates the start of the download section of the ticket. Download sections specify how the job should be downloaded and saved in the print system.
Object ID Specifies the name and the type of the object. Object ID defines which kind of object is downloaded. The object ID is mandatory for download jobs.
Syntax: OBJECT <objectname> <objecttype><objectname> = {<IDattr>,<filename>}
<objecttype> = {art, ticket, form, sif, pagepif,layoutpif, flagsheet}
Downloading an ART Several ARTs can be downloaded to the printer, but only one ART can be active at a time. Select the active ART with the ‘ARTNAME’ function in C-KOS. Refer to the System Administration Manual for more information.
Downloading forms and flagsheets A download ticket for a form or a flagsheet contains identification information on the PDL in which the form or flagsheet was made. For example, for a FOL form or flagsheet:
Ident:
EMULATION FOL
Examples of download ticketsSimple download ticket This is a simple download ticket that downloads a PostScript form named ‘form1.ps’ to the printer.
*jec beginIdent:
EMULATION POSTSCRIPT
Download:OBJECT form1.ps FORM
*jec body
Download ticket with variable The following ticket downloads a PCL form and stores it on the printer for later use. The name of the form will be the same as the name of the print job.
Ident:EMULATION PCL5
Download:
OBJECT %jobname FORM

334 Océ Power Print Controller Technical Reference Manual

335
Océ Power Print Controller
Technical Reference Manual
Chapter 19Association Rules Table (ART)
This chapter contains all information on how to create, download and use ART files. A full description of the syntax, and some tips on keeping your ARTs error-free are also included.
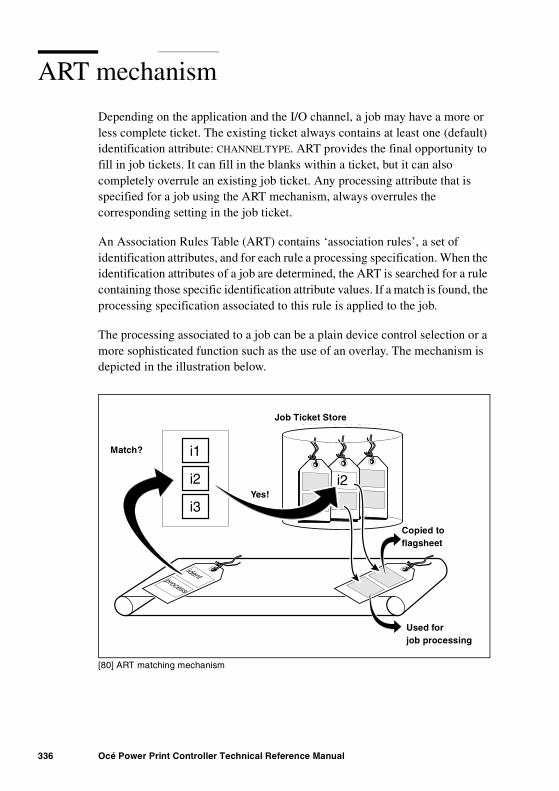
336 Océ Power Print Controller Technical Reference Manual
ART mechanism
Depending on the application and the I/O channel, a job may have a more or less complete ticket. The existing ticket always contains at least one (default) identification attribute: CHANNELTYPE. ART provides the final opportunity to fill in job tickets. It can fill in the blanks within a ticket, but it can also completely overrule an existing job ticket. Any processing attribute that is specified for a job using the ART mechanism, always overrules the corresponding setting in the job ticket.
An Association Rules Table (ART) contains ‘association rules’, a set of identification attributes, and for each rule a processing specification. When the identification attributes of a job are determined, the ART is searched for a rule containing those specific identification attribute values. If a match is found, the processing specification associated to this rule is applied to the job.
The processing associated to a job can be a plain device control selection or a more sophisticated function such as the use of an overlay. The mechanism is depicted in the illustration below.
[80] ART matching mechanism
identprocess
i2
i1
i2
i3
Match?
Yes!
Copied toflagsheet
Used forjob processing
ART
Job Ticket StoreJob Ticket Store
Yes!
Match?
Copied toflagsheet
Used forjob processing

Association Rules Table (ART) 337
A real-life example to start
Before digging into the details of ART, a simple but real-life example will make clear what ART can bring about.
The example features job recognition based on I/O channel attributes and multiple job processing.
1 User ‘Gloria’ logs in to FTP, by entering her user name ‘gloria’ (a password is not required).
2 User ‘Gloria’ sends a print job to the Océ Power Print Controller over an FTP connection. When Gloria starts the print job, the FTP host I/O channel transmits Gloria’s user name —amongst other items— to the printer automatically.
3 When the FTP connection with the printer is established, the printer checks the ART file for the following entry:
username “gloria”
4 Depending on the configuration, the ART file contains a number of entries. In this example the printer finds an entry that looks as follows:
BLOCK_ART “jobs for gloria”channelname “*”username “gloria”
hostname “*”jobname “*”ticket “ticket-1.tck”
ENDBLOCK
Indeed, in this entry, the value of the item username is gloria.
5 The entry ‘jobs for gloria’ is activated.As you can see, the ART entry ‘BLOCK_ART’ also contains an item named ‘ticket’. The value of ticket is ‘ticket-1.tck’. That means that the job should be printed according to the specifications contained in the file ‘ticket-1.tck’ on the hard disk of the printer.The file ‘ticket-1’ contains the following information:

338 Océ Power Print Controller Technical Reference Manual
Process: ticket-1TRAY 1BIN 10
COPIES 2
Process:
TRAY 2BIN 15COPIES 1
FORM myform OVERLAY
6 The job is processed as follows, according to the specifications in the ticket:
■ 2 copies are printed on paper from the lower paper tray (tray 1) and delivered into bin 10 and bin 11 of the Sorter. This is according to the specifications that you find below the first occurrence of ‘Process:’.
■ You can see that the string ‘Process:’ occurs twice in the ticket. That means that the same print file is printed again; this time, 1 copy is printed on paper from the lower tray (tray 2) and delivered into bin 15 of the Sorter. The print is enhanced with an overlay. This overlay is a valid page description (PostScript, FOL, PCL) which was previously saved onto the printer as ‘myform’.

Association Rules Table (ART) 339
Basic ART file structureAn ART file has the following basic structure:
[81] Basic structure of an ART
The ART contains a sequence of entries. Each entry specifies a set of predefined values for the JAC identification attributes and a reference to a stored ticket. A wildcard character can be used in the predefined value of an identification attribute. The reference to the stored ticket may be specified literally or by using the value of an identification attribute (variable substitution).
ENDBLOCK
BLOCK_ART "name"
ITEMidentifier "value"
ENDBLOCK ART entries
Blockdelimiters
BLOCK_ART "name"
ART file
BlockDelimiters
ART entries
ART file

340 Océ Power Print Controller Technical Reference Manual
IdentificationAn entry in the Association Rules Table is found by comparing the job identifiers of a certain job one by one with the identifiers mentioned in the ART entries. The first ART entry (starting from the top of the file) in which all identifiers match, is taken as associated entry for the job. This means that the first entry has the highest priority and the last entry the lowest.
Note: As to limit the size of an ART file, a job identifier which is not found in an ART entry is considered to match, according to the rules of the default wildcard (*) match.
For the Océ Power Print Controller Series the following identifiers are supported:
■ Channeltype: the physical input channel name (set by the printer)■ Emulation: the name of print context that should handle the job■ Channelname: the name of the logical input channel■ Hostname: the name of the sending host■ Username: the name of the user■ Groupname: the name of the department/group■ Jobname: the name of the print job■ Jobdate: the time the job was created on the host■ Jobnumber: the job number ■ Jobclass: the job class■ Jobapplication: the application that created the print job■ Jobtitle: a more verbose title given to the job■ Jobaddressee: for whom the job is printed■ Jobaddress: where the printed job has to be sent to■ Segmentname: a name assigned to one segment of a print job■ Custom: an attribute for customisation purposes■ Holdmode: the way the spool queue manager handles the job.

Association Rules Table (ART) 341
AssociationWhen a matching ART entry is found, the job ticket which appears in this ART entry is associated with the job. An associated ticket is always applied on job level, unless the matching ART entry explicitly specifies a value for the segmentname identification attribute.
The input process reads the job ticket and starts the corresponding action.
Note: When an ART entry contains a segment name, then the job ticket is associated with the segment only and not with the whole job.

342 Océ Power Print Controller Technical Reference Manual
ART file syntax
The ART file is a plain ASCII-file which contains a sequence of ART entries. Each entry is represented as a block which contains items.
Block definition
A block is started with the keyword “BLOCK_ART” and followed by its name. A block is ended with the keyword “ENDBLOCK”. The (optional) name is an ASCII string which is always surrounded by double quotes and can be used by the operator as reference. It is recommended that the name be unique and it must not contain NEWLINE, RETURN or ENDOFFILE characters.
Item definition
A number of items can be specified within a block (between the keywords “BLOCK_ART” and “ENDBLOCK”). Each item is specified on a separate line and contains an identifier and a value.
The following items are valid:
Item name Description Corresponding to
CHANNEL-TYPE
string used for identification
the physical input channel (set by the printer)
EMULATION string used for identification
the print context that should handle the job
CHANNEL-NAME
string used for identification
the name of the logical input channel
HOSTNAME string used for identification
the name of the sending host
USERNAME string used for identification
the name of the user
GROUPNAME string used for identification
the name of the department/group
[82] Valid ART block items

Association Rules Table (ART) 343
JOBNAME string used for identification
the name of the print job
JOBDATE string used for identification
the time the job was created on the host
JOBNUMBER string used for identification
the identification of the job
JOBCLASS string used for identification
the classification of the print job
JOBAPPLICA-TION
string used for identification
the application that created the print job
JOBTITLE string used for identification
a more verbose title given to the job
JOBAD-DRESSEE
string used for identification
for whom the job is printed
JOBADDRESS string used for identification
where the printed job has to be sent to
SEGMENT-NAME
string used for identification
a name assigned to one segment of a print job. You have to use this entry if you want a segment to be proc-essed with a segment ticket.
CUSTOM string used for identification
an attribute for customisation pur-poses
HOLDMODE string used for identification
the way the spool queue manager handles the job
TICKET string contain-ing the name of the ticket to be activated for further process-ing of the job
If the first character of the string is ‘%’, it indicates a variable. See al-so‘Working with variables’ on page 345.
Item name Description Corresponding to
[82] Valid ART block items (continued)

344 Océ Power Print Controller Technical Reference Manual
IdentifiersIdentifiers are ASCII-strings which always end with at least one space or tab character, values are ASCII-strings surrounded by double quotes. Any leading and trailing spaces between these quotes are ignored. If the value does not contain spaces, the quotes are optional.
An identifier does never start with the substring “BLOCK_” and does not contain space, tabs, NEWLINE, ENDOFFILE or (") characters.A value does not contain NEWLINE, RETURN or ENDOFFILE characters.
The identifier of an item is not case-sensitive. The values are case-sensitive and may contain wildcard characters and OR relations.
An identifier may occur more than once within a block. The “ticket” identifier can also occur more than once, but only the first “ticket” item is used for the ticket association.
Wildcard character
The following wildcard characters are valid:
Example [a-zA-Z] replaces any upper case or lower case letter.
* The asterisk ‘*’ replaces any string, including the empty string.
? A question mark ‘?’ replaces any printable character includ-ing the space character.
[a-c] Any of the characters between the brackets. The ‘-’ character will be used to define the range, more than one range is al-lowed. Separate the ranges by commas.
\ The backslash character will be used as escape character for ‘*’, ‘?’, ‘[’, ‘]’ and ‘\’.Control characters can be search using:\<hexcode><hexcode>.

Association Rules Table (ART) 345
OR relationThe value of a job identifier in an ART entry supports the logical OR relation between sub job identifier values. The OR symbol is represented by the ‘|’ character. Leading and trailing spaces or tabs enclosing the job identifier values are ignored. A ‘|’ character in the job identifier value must be preceded by a ‘\’ (backslash) character. A ‘\’ in the job identifier must be preceded by another ‘\’.
Example USERNAME “john|gloria”
If you do not know whether the first character will be upper case or lower case, use:
USERNAME “[Jj]ohn|[Gg]loria”
Attention: If you include a DOS path name as part of the job name, make sure to use double backslashes:The following path name is valid within an ART: c:\\jobs\\myfile.psThe following path name will not work: c:\jobs\myfile.ps
Working with variablesThe ‘ticket’ item can refer to a variable rather than to a specific ticket. The variable is then the value of a job identifier such as JOBNAME, JOBCLASS, CUSTOM etc. The value of this identifier must be a valid ticket name.
An example Two jobs are sent to the Océ Power Print Controller. The USERNAME associated to the first job is GLORIA, while the USERNAME associated to the second job is JOHN.The value of the ‘ticket’ item in the art is ‘%username’ (the % indicates that the following string is a variable).As a result, the first job will be printed according to the settings in the ticket named ‘gloria’ while the second job will be printed according to the settings in the ticket ‘john’.
Attention: In this case the ticket name does not have the extension .TCK.

346 Océ Power Print Controller Technical Reference Manual
Pre-installed ART fileThere is one pre-installed ART file, “default.art”. It acts like a dummy, i.e. it does nothing.
BLOCK_ART "default"
channeltype "*"
channelname "*"
hostname "*"
username "*"
groupname "*"
jobname "*"
jobnumber "*"
jobclass "*"
emulation "*"
custom "*"
jobapplication "*"
jobtitle "*"
jobaddressee "*"
jobaddress "*"
jobdate "*"
ticket ""
ENDBLOCK

Association Rules Table (ART) 347
Example of an ART file
Example 1: basic ART for networked PC application
The following ART will print any file with extension ‘.PS’ from directory f:\jobs with ticket ‘ticket-1.tck’.
BLOCK_ART “default ART”
jobname “f:\\jobs\\*.PS”ticket “ticket-1.tck”
ENDBLOCK
Example 2
The following ART will print any job with extension ‘.DOC’ from Gloria on host HP4-ABC with ticket ‘ticket-1.tck’. Any job with extension ‘.C’ from Michael on host HP8-ABC will be printed with ‘ticket-2.tck’ etc.
BLOCK_ART “jobs for gloria”channelname “*”username “gloria”
hostname “hp4-abc”jobname “*.doc”ticket “ticket-1.tck”
ENDBLOCK
BLOCK_ART “jobs for michael”channelname “*”
username “michael”hostname “hp8-abc”jobname “*.c”
ticket “ticket-2.tck”ENDBLOCK
BLOCK_ART “jobs for joe”
channelname “*”username “joe”hostname “st12-abc”
jobname “*.confidential”ticket “ticket-3.tck”
ENDBLOCK

348 Océ Power Print Controller Technical Reference Manual
Example 3: ART containing variable entriesThe following ART handles three types of jobs:
■ Jobs with extension ‘.DOC’, coming from John, Gloria or Tracy (whereby it does not matter whether the first letter of the user name is upper case or lower case) on host st1-oa6, st2-oa6 etc. until st9-oa6 will be printed with a ticket that has the same name as the user. Files from John will be printed with ticket named ‘john’ etc.
■ Jobs coming from any user on any host ‘-oa6’ and generated by application Macproject, will be printed with ticket named ‘ticket-2.tck’.
■ All other jobs will be printed with ticket ‘default.tck’.
BLOCK_ART “Documentation jobs”channelname “*”
username “[Jj]ohn|[Gg]loria|[Tt]racy”hostname “st[1-9]-oa6”jobname “*.doc”
ticket “%username”ENDBLOCK
BLOCK_ART “planning”
jobapplication “(Macproject*”hostname “???-oa6”ticket “ticket-2.tck”
ENDBLOCK
BLOCK_ART “default”
ticket “default.tck”ENDBLOCK

Association Rules Table (ART) 349
Downloading an ART
Downloading an ART is done by means of a download ticket, as is described in ‘Ticket syntax and semantics’ on page 303.
However, only one ART can be active at a time. Select the active ART with the ‘ARTNAME’ function in KOS. Refer to the System Administration Manual of your printer for more information. The syntax is as follows:
DOWNLOAD:OBJECT <objectname> ART
where
<objectname> = {<IDattr>,<filename>}
Note: The directory in which the ART is stored in the printer is fixed. Therefore it is not necessary to pass the directory name as attribute.

350 Océ Power Print Controller Technical Reference Manual
Troubleshooting ARTs
Two error levels
Logical errors as a result of a faulty ART can be generated on two levels:
■ syntax errors printed on the ‘ART error logging page’ as a result of proofing ARTs using KOS. These errors are further described below.
■ at runtime: these errors are described in ‘JAC logical error messages’ on page 449 of this Technical Reference Manual.
Proofing ARTs
You can test whether your ART contain errors by proofing it. Proofing is done through KOS. How to proof ARTs is described in the System Administration Manual.
Proofing an ART results in the printing of the contents of an ART. If the ART is faulty, an error logging page is generated.
Note: Make it a habit to proof each ART before you use it!
Error messages on the ART error logging page
The following error messages may occur on the ART error logging page. The errors are listed in alphabetical order.
Line [ x] BLOCK_ART not opened!
Line x in the ART contains an ENDBLOCK command, while a BLOCK_ART was not yet encountered.
Line [ x] BLOCK_ART not terminated!
Line x contains another BLOCK_ART, while the previous one is not closed yet.
Line [ x] Duplicate ticket : ticket_2
Line x contains more than one ticket command; only the first one is valid.

Association Rules Table (ART) 351
Line [ x] Invalid BLOCK ident: ident_x
Line x in the ART contains an invalid BLOCK_ART identification; the identification is not surrounded by double quotes.
Line [ x] Invalid item: invalid_item
Line x contains an unknown item inside BLOCK_ART.
Line [ x] Invalid item value: item_value
Line x contains a valid item with an invalid value; the item value is not surrounded by double quotes.
Line [ x] Line too long : Line_y
Line x in the ART contains more than 256 bytes.
Line [ x] Non BLOCK_ART : Invalid_command
Line x contains an invalid command where a BLOCK_ART is expected.
Line [ x] Warning: No TICKET attribute used in BLOCK
The BLOCK terminated in line x does not contain a ticket attribute. The BLOCK_ART is valid in itself but it has no effect as no ticket is activated.

352 Océ Power Print Controller Technical Reference Manual

353
Océ Power Print Controller
Technical Reference Manual
Chapter 20Job separation and segmentation
This chapter contains all the information you need to divide data streams into logical jobs which can be processed independently from each other. This involves the programming of Separation Instruction Files (SIFs).Some programmers like to see a real-life example right away. If you are one of them, you can turn directly to the annotated example in ‘Examples’ on page 405.

354 Océ Power Print Controller Technical Reference Manual
What is job separation and segmentation?
Job separation splits an ‘endless’ data stream into separate jobs by restoring the original job delimiters as they were generated by the application.
In the same way, it is possible to split up a job into multiple smaller parts called ‘segments’. This segmentation is required if you want some part of the job to be processed differently from another part, while maintaining any PDL settings which are valid for the entire job, and the order of the segments.
Example
You can use job segmentation to automatically select a new physical sheet, to select an overlay and to operate the stapler, all based on automatic recognition of strings within the print data.
The example below shows how sales records are split up per region. The records of each region are stapled together and appropriately identified with a logo.
[83] Job separation and segmentation allows for differential processing based on information in the print data
Print job
Region 1
Region 2
Page breakin print data
PREPARED ON: 02-01-1995 11:59:59
LOCAL CURRENCY *1000
PRODUCT: TOTAL
VARIABLE 1Q92 2Q92 3Q92 4Q92 1Q93
SALES-HW 10.269 1.435 2.746 3.263 4.755 SALES-SW 849 107 205 247 262 SALES-INSTR 265 57 58 136 148 SALES-SERV 7.269 4.027 4.690 6.244 6.901
----------------------------------------------------------------------
----------------------------------------------------------------------
---------------
----------- -------- -------- -------- -------- --------
----------- -------- -------- -------- -------- --------
SALES-HW 10.269 1.435 2.746 3.263 4.755 SALES-SW 849 107 205 247 262 SALES-INSTR 265 57 58 136 148 SALES-SERV 7.269 4.027 4.690 6.244 6.901
----------- -------- -------- -------- -------- --------
Region 1
PREPARED ON: 02-01-1995 11:59:59
LOCAL CURRENCY *1000
PRODUCT: TOTAL
VARIABLE 1Q92 2Q92 3Q92 4Q92 1Q93
SALES-HW 10.269 1.435 2.746 3.263 4.755 SALES-SW 849 107 205 247 262 SALES-INSTR 265 57 58 136 148 SALES-SERV 7.269 4.027 4.690 6.244 6.901
----------------------------------------------------------------------
----------------------------------------------------------------------
---------------
----------- -------- -------- -------- -------- --------
----------- -------- -------- -------- -------- --------
Region 1
PREPARED ON: 02-01-1995 11:59:59
LOCAL CURRENCY *1000
VARIABLE 1Q92 2Q92 3Q92 4Q92 1Q93
SALES-HW 10.269 1.435 2.746 3.263 4.755 SALES-SW 849 107 205 247 262 SALES-INSTR 265 57 58 136 148 SALES-SERV 7.269 4.027 4.690 6.244 6.901
----------------------------------------------------------------------
----------------------------------------------------------------------
----------- -------- -------- -------- -------- --------
SALES-HW 10.269 1.435 2.746 3.263 4.755 SALES-SW 849 107 205 247 262 SALES-INSTR 265 57 58 136 148 SALES-SERV 7.269 4.027 4.690 6.244 6.901
----------- -------- -------- -------- -------- --------
SALES-HW 10.269 1.435 2.746 3.263 4.755 SALES-SW 849 107 205 247 262 SALES-INSTR 265 57 58 136 148 SALES-SERV 7.269 4.027 4.690 6.244 6.901
----------- -------- -------- -------- -------- --------
Region 2
PREPARED ON: 02-01-1995 11:59:59
LOCAL CURRENCY *1000
VARIABLE 1Q92 2Q92 3Q92 4Q92 1Q93
SALES-HW 10.269 1.435 2.746 3.263 4.755 SALES-SW 849 107 205 247 262 SALES-INSTR 265 57 58 136 148 SALES-SERV 7.269 4.027 4.690 6.244 6.901
----------------------------------------------------------------------
----------------------------------------------------------------------
----------- -------- -------- -------- -------- --------
----------- -------- -------- -------- -------- --------
Region 2
Stringrecognition
StringRecognitionPage breakin print data
Print Job

Job separation and segmentation 355
The SIF mechanismThe SIF mechanism is the leading actor in job separation and segmentation. It is an input data processing module, controlled by means of instructions. These instructions are contained in Separation Instruction Files (SIFs), residing in the Océ Power Print Controller.
The main tasks of the SIF mechanism are:
■ job separation■ job identification■ job segmentation■ segment identification■ job data filtering.
The various steps in the SIF process are depicted in the illustration below and further explained in the following sub-sections.
[84] SIF workflow
Header
Trailer
Segment header
Segment trailer
Jobseparation
Job identification createsPDL-independent jobs
Job segmentationcreates PDL-dependent
job segments
Segmentidentification
filled intoticket
Processing attributesare used for job/segment-
specific processingJob data filteringremoves headers
and trailers
Segment header
Segment trailer
JobSeparation
Job Identification createsPDL-independent jobs
Job segmentationcreates PDL-dependentjob segments
Segment identificationfilled into ticket
Processing attributesare used for job/segment- specific processingJob data filtering
removes headersand trailers

356 Océ Power Print Controller Technical Reference Manual
Job separationThe job separation mechanism is able to recognise jobs within a data stream. Upon recognition, it actually splits the stream into separate jobs which can be processed individually. These individual jobs have to consist of independent data parts, i.e., processing of one job does not depend on the processing of another job. Consequently, the order in which the jobs are processed is arbitrary.
When the input channel is not assigned to process dependent jobs, then jobs start in a reset PDL environment.
Job identification
The job identification mechanism appends identification attributes to a job. The values of these attributes can be derived from two sources, when the job is started:
■ the host I/O channel■ the banner page via the SETSCAN command.
The values of the identification attributes can be overruled by data extraction, via a SETSCAN command, from the job banner page.
Job segmentation
It may be useful to process logical parts of a job differently. This is possible with job segmentation. Job segmentation splits a job into segments. Each segment can then be processed in different way, without disrupting any PDL relationships or the processing order of the data parts inside that job.
Example of PDL relationship Downloaded fonts may be part of the page description. If a job that contains downloaded fonts is split into segments, it is obvious that the segment where the font is called, cannot be processed before the segment where the font is downloaded.
Job segmentation is based on patterns in the job data.
The process of segmentation is governed by describing segment separators. A segment separator has the same structure as a job separator, although the effect
Job separation and segmentation 357
of recognising a segment separator is different. If a segment separator is found, the part of the job preceding this separator is considered a segment and the separator is the beginning of the new segment. Segment separators always function as segment banners.
Segment identification
Segment identification appends identification attributes to a job segment, at the beginning of the segment.
The value of these identification attributes is retrieved from the print data. You can however modify it by scanning the segment banner page using the SETSCAN command.
Job data filtering
Job data filtering is used to flush data parts from the input data. This functionality is needed, for example, to discard the intermediate burst (header/trailer) pages added by the host after e.g. 1000 pages, or to delete data parts such as PDL commands from the print data.
358 Océ Power Print Controller Technical Reference Manual
Separation Instruction Files
Job separation and segmentation is accomplished through Separation Instruction Files (SIFs). The following sections describe the basic principles of SIFs, their syntax and a few elaborated examples.
Downloading a SIF
Downloading a SIF is done by means of a download ticket, as is described in ‘Ticket syntax and semantics’ on page 303 in this Technical Reference Manual.
Note: The directory in which the SIF is stored in the printer is fixed. Therefore it is not necessary to pass the directory name as attribute.
Proofing SIFs
You can test whether your SIF contain errors by proofing it. Proofing is done through KOS. How to proof SIFs is described in the System Administration Manual.
Proofing a SIF results in the printing of the contents of a SIF.
Note: Make it a habit to proof each SIF before you use it!
Activating a SIF
If a SIF is configured, it is always automatically activated when a job arrives over a specific host I/O channel. You can assign a SIF to a specific host I/O channel through KOS. Once assigned, this SIF checks all the data received through that particular channel.
If a specified SIF file cannot be found, a logical error is reported and the data is processed without using this SIF.

Job separation and segmentation 359
SIF job environmentA SIF always works within the boundaries of ‘hard’ job breaks (e.g. EOF, time-out etc.) forced by the host I/O channel, or within a job if it is wrapped by a Job Envelope Command (JEC). In other words, a SIF cannot ‘combine’ several hard jobs.A SIF recognises ‘user definable’ jobs within this ‘hard job’. The result is a stream of jobs, which are forwarded for further processing.
SIFs can be nested. Another ‘child’ SIF can recognise user definable jobs within the jobs which were previously recognised by the ‘parent’ SIF.
After all jobs are recognised, these jobs can be further segmented according to the segmentation definitions in the recognised jobs.

360 Océ Power Print Controller Technical Reference Manual
SIF structureA SIF basically consists of two parts:
■ job separator definitions■ a job structure definition.
Let us consider a practical example first:
[85] Job separation and segmentation example
The left hand side of the diagram shows a print data stream. Among these data there is a job that starts out with a specific banner page, followed by 8 pages of data and a specific trailer page. You may want to process this data stream as follows:
■ apply some settings for the entire job: e.g. print duplex■ discard the host banner page from the data■ identify 2 chapters and staple the document per chapter■ discard the host trailer page from the data.
To be able to do so, you will have to isolate the job from the data stream so you can set the general settings. Next, you will split the entire job into 4 segments:
■ the host banner page
Host data Required result
Host banner page
Host trailer page
Data page 1
Data page 2
Data page 3
Data page 4
Data page 5
Data page 6
Data page 7
Data page 8
Banner page
Discarded 2 chapters, each stapled
Trailer page
Host data Required Result
Discarded 2 chapters, each stapled

Job separation and segmentation 361
■ chapter 1: the first three pages■ chapter 2: the following pages■ the host trailer page.
The first part of the SIF consists of Job Separator Definitions. They define how a job, segment, banner or trailer can be distinguished by use of a set of criteria. The criteria to distinguish segments are retrieved from the data stream.
In this example you will need 4 separators, as you can see in the diagram below. We have called the segments thus obtained: A, B, C and D. ‘A’, ‘B’, ‘C’ and ‘D’ are called separator identifiers (sep_id). This segment identification is filled into the ticket.
[86] SIF job separation
The second part of the SIF consists of job structure definitions. A job structure definition specifies how the print job should be handled, based on segment recognition. E.g., a segment may be skipped (not printed) or another SIF may be used to recognise further job separation events inside a segment.
For our example, you would write a job structure definition which discards the host banner page and the host trailer page from the data by skipping them. This is the part of the work which you can do by use of a SIF.
Search for host headername first segment A
Separationname this segment B
Host header page
Host trailer page
Data page 1
Data page 2
Data page 3
Data page 4
Data page 5
Data page 6
Data page 7
Data page 8
Host header page
Host trailer page
Data page 1
Data page 2
Data page 3
Data page 4
Data page 5
Data page 6
Data page 7
Data page 8
Separationname this segment C
Separationname this segment D
A
B
C
D
Search for host header name first segment A
SeparationName this segment B
SeparationName this segment C
SeparationName this segment D

362 Océ Power Print Controller Technical Reference Manual
To print the document duplex and to staple it per chapter, you will most likely use a ticket from the Ticket Store. Therefore you need:
■ a ticket which takes care of duplex printing and stapling■ an ART entry to use this ticket.
Practically speaking, this means that you will verify if such a ticket exists and make one if it does not. Next you will link the segment identification for each chapter with the appropriate ticket. You will make an entry in the ART and use the SEGMENTNAME and TICKET items.
Suppose that the appropriate ticket for our example is “ticket-2”. Then segments ‘B’ and ‘C’ will each be linked to this ticket as they both require the same processing. Of course it is possible to process segments ‘B’ and ‘C’ differently, by associating a different ticket to each of them.
Note: The example above is a simplified example. If you want to see a real-life example, before reading all the syntax and semantic details of a SIF, you can turn directly to ‘Examples’ on page 405.
Separator definitions
SIF uses separator definitions to describe events (e.g. banner) that have to be recognised through patterns in the data. The separator definition is a set of rules that all have to be fulfilled to unambiguously define the event.
These criteria can be either strings which have to be matched on the host data, or tests which have to succeed. String scanning takes place within a specific scan area. Tests make use of variables whose values can be extracted from the data.
Together with the rules, the separator definition also contains boundary definitions for marking the exact separation point between two jobs or job segments.
Separators can be used to separate jobs, but also to separate segments within a job.

Job separation and segmentation 363
Default jobNot all the jobs have a host banner page. Also, not all the print data can be separated into jobs. All these jobs are considered default jobs. A default job is the first job in the SIF without banner separator.
In order to be able to process data when no job definition applies, SIF implicitly adds the following job definition:
JOBBEGIN
JOBEND
The default job will put all data in a job until a hard job break is encountered or until another job definition is activated.
Note: This job definition is only selected when no other job inside the active SIF applies.
A default job can be seen as a ‘trash can’ for all not recognised data. First all jobs which are recognised on their header are handled, then all data that does not belong to one of these jobs will be put in the default job.
A default job can be defined to have a trailer separator. This trailer separator is only used to separate the default jobs from each other. The trailer is not used for recognition.
JOBBEGIN AJOBEND X
JOBBEGIN BJOBEND
JOBBEGINJOBEND Y

364 Océ Power Print Controller Technical Reference Manual
The following jobs are recognised:
[87] Default jobs in a data stream
Default
Job B
Job A
Default
Default
Job A
B
A
X
Y
A

Job separation and segmentation 365
Separator evaluation
SIF evaluates a separator definition on a page-by-page basis. The evaluation of a separator succeeds if all criteria do succeed. The evaluation of a separator definition fails if one of the criteria has failed.
Note: At this point in the manual, we are entering into the actual SIF details. Should you want to see a real life example, at any time you can turn to ‘Examples’ on page 405.
Scan area
The data which is ‘seen’ by SIF need not be the same as the original host data. All the PDL-specific commands are filtered out, or are sometimes interpreted. The data which is used by SIF is fully ASCII (= ISO 646) together with line ends and page ends, and a very restricted set of job end commands (e.g. PCL reset, PostScript endofjob etc.).
Pages The recognition of a separator is based on pages. All the criteria which are used to define the separator definitions have to be defined within the same page.
Lines Separator recognition is based on patterns at locations, or ranges on the host page (line position, column position).
Columns Because SIF works on ASCII data in which some PDL information is skipped, the columns do not necessary refer to the original host data.
Note: If data is coded in EBCDIC format, please contact your local System Consultant.

366 Océ Power Print Controller Technical Reference Manual
Rules evaluationThere are three types of rules (criteria) which can influence the evaluation of the total separator definition:
■ scan■ test■ setvar.
Scan There are two kinds of scanning:
■ SETSCAN without a variableA SETSCAN without a variable indicates whether the specified tag was found within the scan area or not. As a result, a flag is set to true or false.
■ SETSCAN with use of variableThe evaluation of a SETSCAN with a variable always succeeds.However, a new value is assigned to the variable only if the defined tag was found within the defined scan area.
Test There are two kinds of tests:
■ TEST without a DO partA TEST without a DO part indicates whether the test succeeded or not.
■ TEST with a DO partThe evaluation of a TEST with a DO part always succeeds. However, the DO part is only executed if the test itself succeeded.
Setvar A SETVAR fills a variable with a string. The evaluation of a SETVAR always succeeds.
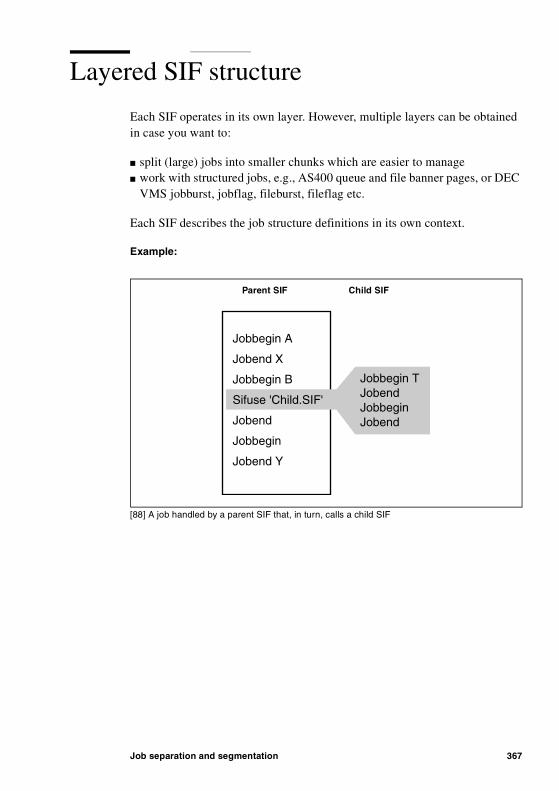
Job separation and segmentation 367
Layered SIF structure
Each SIF operates in its own layer. However, multiple layers can be obtained in case you want to:
■ split (large) jobs into smaller chunks which are easier to manage■ work with structured jobs, e.g., AS400 queue and file banner pages, or DEC
VMS jobburst, jobflag, fileburst, fileflag etc.
Each SIF describes the job structure definitions in its own context.
Example:
[88] A job handled by a parent SIF that, in turn, calls a child SIF
Jobbegin A
Jobend X
Jobbegin B
Sifuse 'Child.SIF'
Jobend
Jobbegin
Jobend Y
Parent SIF
Jobbegin TJobendJobbeginJobend
Child SIFChild SIFParent SIF

368 Océ Power Print Controller Technical Reference Manual
The first layer (parent SIF) recognises the following jobs:
[89] Jobs recognised by the parent SIF
Default
Job B
Job A
Default
Default
Job A
B
A
X
Y
A

Job separation and segmentation 369
The second layer (child SIF) recognises jobs inside job ‘B’:
[90] Jobs recognised by the child SIF
Default
Job T
Job A
Default B
Default
Job A
Default
B
A
T
X
Y
A

370 Océ Power Print Controller Technical Reference Manual
Variables and job identification attributes
Variables
Each variable can hold 256 bytes of ASCII data of arbitrary value (>= 0x20, <= 0x7f). If a value is assigned to a variable by some SIF command, the length of the assigned value is truncated at 256 characters. The value is case-sensitive. Variables are initialised with the empty string, except for job ticket attributes whose default value can be specified in the environment of SIF, e.g. via the host I/O channel or JEC.
During evaluation of a variable, two flags are maintained for each variable, the SET flag and the CHANGED flag.
SET The SET flag indicates whether the last SETVAR or SETSCAN command for a variable did indeed store a value in that variable.
CHANGED The CHANGED flag indicates whether this stored new value differs from the previously stored value of that variable.
At every page, both flags are initialised to ‘false’. These flags can be tested within a separator definition using the TEST command.
Variable contents Leading and trailing spaces and tabs are removed from the extracted data.
Variable context layers The variable context is layered. The upper layer will overrule the lower one, but is only valid in that context. The hierarchy is as follows:
■ variables set in a job FILTERed or SEGMENTed page■ variables set in a (sub) job BANNER■ variables set in a job BANNER■ job identification attributes received from the environment.
Variable value lifetime The lifetime of the value stored in a variable is limited by the specific context the variable was in, at the moment the value was assigned. The value will only be visible in the specific context in which it was set and in a context supported by this specific context. For example, a value

Job separation and segmentation 371
assigned in a job is also visible in the sub-jobs or segments which are part of the job (as long as the value is not overwritten with another value).
Variable scope Variables can be referenced in each SIF header, trailer, filter or segment, even if these variables are not extracted explicitly in one of the context layers for that job.
A variable always has a value. If the variable is not extracted or set, then its value is the empty string.
Job identification attributes
Job identification attributes are reserved variables. They have the same behaviour as other variables, except that they always have a default value. The default value is assigned by the host I/O channel.
All user variables are only used for internal SIF operations. Only the job identification attributes are visible to the rest of the print system.

372 Océ Power Print Controller Technical Reference Manual
SIF language
Separation Instruction Files are stored in the SIF pool. All SIFs have a file name.
A SIF is parsed until its internal state is unambiguous.
Syntax errors are reported as logical errors and the data is processed without using this erroneous SIF. If a child SIF is incorrect, the errors are reported and the data is processed up to the level of the parent SIF.
SIF commands are case-insensitive. The identifications used to refer to a separator definition are also case-insensitive.
SIF syntax notation
The table below lists the notation conventions for SIF syntax:
Symbol Description
+ concatenation
{ } repetition (zero times or more)
( ) grouping
[ ] optional (zero times or more)
| choice
<item> item which has to be defined
= grammatical expansion of grammar rule
: a more verbose expansion of grammar rule
. end of grammar rule
ITEM keyword
/* cc */ comment
[91] SIF syntax notation

Job separation and segmentation 373
General SIF grammar partsThe table below lists the general syntax parts of the SIF grammar:
Mnemonic Description Formal notation
<ws> White space (<space> | <tab>) <os>.
<os> Optional white space { <space> | <tab> }
<eol> Line terminator in SIF <os> <line_end>{ <line_end> }
<variable> SIF variable <var_marker> <id>.
<sep_id> Separator identification string <id>.
<line_end> Line end { <cr> | <lf> | <ff> }.
<value> Variable value such as %jobname, “.job” or %jobnumber
( <variable> | <quoted string> ){ <ws> <plus> <ws> <value> ) }.
<id> Characters in the range of (a..zA..Z).The length is limited to 80 charac-ters.The id is case-insensitive
<quoted string> String enclosed by double quotes (0x22).
<var_marker> The ASCII percentage character (0x25).
<space> The ASCII space character (0x20).
<tab> The ASCII tab character (0x09).
<plus> The ASCII plus character (0x2B).The <plus> operator means string concatenation.
<cr> Carriage Return (0x0D).
<lf> Line Feed (0x0A).
<ff> Form Feed (0x0C).
[92] SIF grammar elements

374 Océ Power Print Controller Technical Reference Manual
SIF file contentsThe contents of the SIF consists of a collection of separator definitions and job structure definitions. Because the SIF is parsed from front to back, the order of the definitions in the SIF is important; a separator definition should be known to the SIF parser before it is referenced by a job.

Job separation and segmentation 375
Job structure definition
A job structure definition is marked with a JOBBEGIN keyword and a JOBEND keyword.
Within the job structure definition it is defined what job template looks like:
■ how to recognise the job entry and job exit events inside the stream of data■ how to recognise the different segments inside the job data■ how to recognise the filter events inside the job data■ specifying another SIF which has to be used to recognise further job
separation events inside this job data.
Command format
JOBBEGIN [ sep_id_1 [ (SKIP | SEGMENT | PROLOG) ] ]JOBEND [ sep_id_2 [ (SKIP | SEGMENT) ] ]
Syntax
<jobdef> = <jobbegin>
{ <filter> }( { <segment> } | <SIFuse> )
<jobend>
PDL events inside SIFBesides ‘user definable’ separator definitions which are used to recognise the job banner, job trailer, segment start, or filter start, it is also possible to use some pre-defined separators.
These pre-defined separators, which are all derived from a PDL command, can be used for the recognition of job and/or segment boundaries.
The recognition should be configurable depending on the knowledge of the connected host and its data stream.
PCL The PCL reset (<ESC>E) command is an example of a configurable separation event.

376 Océ Power Print Controller Technical Reference Manual
A PCL reset is advised to be used at the start and end of a PCL job. In the reverse sense, however, it is not specified. Sometimes a PCL reset is used as a job separation and sometimes it is used only as a printer reset.
In spite of this ambiguity, the PCL reset is configurable as a job start/end.
The HP_EOD (<ESC>%-12345X) command is recognised as a PJL_EOJ event.
PostScript PostScript uses a control-D as an end of job signal to separate jobs transmitted through stream-oriented interfaces such as Centronics or RS-232.
If the PostScript file is structured according to DSC (Adobe’s Document Structuring Conventions), it can have some meaning for the job separation functionality. Some typical DSC comments are listed below:
%!PS-Adobe-3.0%%Pages:
%%EndComments%%BeginProlog%%EndProlog
%%BeginSetup%%EndSetup%%Page:
%%BeginPageSetup%%EndPageSetup%%Trailer
%%EOF
These comments are not recognised as PostScript events. If these events have to be recognised inside the data, then a SIF has to be used where these strings can be defined in ‘user definable’ separator definitions.
One exception is the recognition of ‘%%Page: ’ as a page break command. The current page ends before the first character of the PostScript page command and this command is not taken as part of the current page, but as first PostScript command of the next page.
PostScript segmentation means that a job is divided into a prologue and one or more segments. The SIF JOBBEGIN definition, described on page III-76 must contain the PROLOG keyword:
JOBBEGIN sep_id PROLOG

Job separation and segmentation 377
Each segment is provided with this prologue, as depicted below:
[93] PostScript segmentation via JAC
Note: When a print job specifies the use of a layoutPIF, only the job data and not the requested prologue is processed by the layoutPIF. The prologue is passed on directly to the PDL.
FOL FOL also contains some job start/stop commands. These commands are:
~BEGINOFDOC [ id ]~ENDOFDOC
~ENDOFDOCUMENT
The ~PAGE command is recognised as a page break.
Pre-defined separators
The pre-defined separators which can be used in a SIF are listed in the table below:
Separator mnemonic Description
PCL_RESET PCL reset command, <esc>E
PJL_EOJ HP_EOD command, <esc>%-12345X
PS_EOJ PS end of job, <ctrl>D
FOL_BOD FOL ~BEGINOFDOC command
FOL_EOD FOL ~ENDOFDOC(UMENT) command
EOF EndOfFile, end of communication, Centronics time out
PAGES Page count separator
[94] PDL separators
Prolog
Result after PostScript segmentation:
Segment 1
Prolog Segment 1
Segment 2 Segment 3
Prolog Segment 2
Prolog Segment 3
Result after postscript segmentation
Prologue Segment 1 Segment 2 Segment 3
Prologue
Prologue
Prologue
Segment 1
Segment 2
Segment 3

378 Océ Power Print Controller Technical Reference Manual
Note: If a FOL ~BEGINOFDOC command is used together with an identification parameter, then this parameter will not set the %jobname identification attribute.
Note: When a PDL event coincides with an EndOfFile, end of communication or Centronics time-out, the PDL event is overruled.
PCL reset command A PCL_RESET can be used in:
■ JOBBEGIN separator■ JOBEND separator■ SEGMENT separator■ FILTER.
A line terminator immediately following <esc>E is not a part of PCL_RESET.
When PCL_RESET is used in combination with SKIP, only <esc>E is skipped from the data. All leading and trailing data, including line terminators, are not skipped from the data.
Each <esc>E in a sequence of <esc>E commands is recognised as PCL_RESET and will result in a job/segment start/end or a filter.
PJL EOJ command A PJL_EOJ can be used in:
■ JOBBEGIN separator■ JOBEND separator■ SEGMENT separator■ FILTER.
A line terminator immediately following <esc>%-12345X is not a part of PJL_EOJ.
When PJL_EOJ is used in combination with SKIP, only <esc>%-12345X is skipped from the data. All leading and trailing data, including line terminators, are not skipped from the data.
Each <esc>%-12345X in a sequence of <esc>%-12345X commands is recognised as PJL_EOJ and will result in a job/segment start/end or a filter.
PS EOJ command A PS_EOJ can be used in:
■ JOBBEGIN separator■ JOBEND separator

Job separation and segmentation 379
■ SEGMENT separator■ FILTER.
A line terminator immediately following <ctrl>D is not a part of PS_EOJ.
When PS_EOJ is used in combination with SKIP, only <ctrl>D is skipped from the data. All leading and trailing data, including line terminators, are not skipped from the data.
Each <ctrl>D in a sequence of <ctrl>D commands is recognised as PS_EOJ and will result in a job/segment start/end or a filter.
FOL BOD command A FOL_BOD can be used in:
■ JOBBEGIN separator■ SEGMENT separator
and not in a JOBEND separator or a FILTER.
A line terminator immediately following ~BEGINOFDOC is taken as a part of FOL_BOD.
FOL EOD command A FOL_EOD can only be used in a JOBEND separator and not in a JOBBEGIN or SEGMENT separator or a FILTER.
A line terminator immediately following ~ENDOFDOC(UMENT) is taken as a part of FOL_EOD.
Communication separators (EOF command) The EOF separator can be used to define the scope of the job and/or segment until the end of the job.
If, for example, the information can only be recognised at the start of the data, then a header can be defined that recognises the start of the job. However, if this pattern is also recognised somewhere inside the rest of the data, this will result in a job separation. An EOF trailer specifies that the job ends at the End Of File.
Example:
JOBBEGIN ps_dsc_headerJOBEND EOF
EOF: EndOfFile, end of network job, End of communication, ...

380 Océ Power Print Controller Technical Reference Manual
Page count separator (PAGES command) The page count separator can be used to split a job and/or segment into sets of a fixed number of pages.
A typical example is:
JOBBEGINJOBEND PAGES 100
PAGES nr: separate after <nr> pages.
JOBBEGINCommand format JOBBEGIN [ sep_id [ (SKIP | SEGMENT | PROLOG) ]]
Arguments sep_id refers to the separator definitions which have to be taken as guard for the job entry.
Syntax
<jobbegin> = <os> JOBBEGIN [<ws> <sep_id> [<ws> (SKIP |
SEGMENT | PROLOG)]] <eol>
Description The JOBBEGIN keyword defines the entry of a new job. The recognition is done with the separator definition referenced by the specified sep_id.
Besides the user definable job separators, also some pre-defined separations can be used. See ‘PDL events inside SIF’ on page 375.
The SKIP keyword indicates whether the recognised banner has to be flushed from the data or not.
The SEGMENT keyword indicates whether the recognised banner has to be submitted as a segment (segmentname is set to sep_id).
The PROLOG keyword indicates whether the recognised banner has to be submitted as a prologue. A prologue is added before every segment of the job. When a JOBBEGIN contains the keyword PROLOG, the job definition is not allowed to contain any SIFUSE commands.

Job separation and segmentation 381
JOBENDCommand format JOBEND [ sep_id [ (SKIP | SEGMENT) ] ]
Arguments sep_id is an id referring to the separator definitions which has to be taken as guard for the job exit.
Syntax
<jobend> = <os> JOBEND [<ws> <sep_id> [<ws> (SKIP | SEGMENT)]]
<eol>
Description The JOBEND keyword defines the exit of a current job. The recognition is done with the separator definition referenced by the specified sep_id.
Besides the user definable job separators, also some pre-defined separations can be used. See ‘PDL events inside SIF’ on page 375.
The SKIP keyword indicates whether the recognised trailer has to be flushed from the data or not.
The SEGMENT keyword indicates whether the recognised trailer has to be submitted as a segment (segment name is set to sep_id).
SIFUSECommand format SIFUSE SIF
Arguments SIF is the file name which has to be used inside the already existing SIF context.
Syntax
<SIFuse> = <os> SIFUSE <ws> <value>
Description Within the job structure definition, the SIFUSE command re-directs the job to another SIF description, in order to take the job separation and identification to a lower (more specific) level.

382 Océ Power Print Controller Technical Reference Manual
SEGMENTCommand format SEGMENT sep_id [ (SKIP | SEGMENT) ]
Arguments sep_id refers to a separator definition which has to be taken as a recogniser for the start of a new segment in the job data.
Syntax
<segment> = <os> SEGMENT [<ws> <sep_id> [<ws> (SKIP |
SEGMENT)]] <eol>
Description Segments inside a job can be recognised by a segment header, which indicates the start of a new segment. This event is used to split the job data into segments, which can be handled differently.
The segment is identified by a segment name which contains the separator identifier which, in turn, is specified by sep_id. The identification attribute segment name is always set to the separator identifier, even if the separator defines segment name with the SETVAR command.
When an evaluation is successful, this does not result in a job break. All recognised segments are contained in the same job.
It is possible to extract more data from this segment header to make the segment identification more specific. The default identification is the same as the job identification.
The SKIP keyword indicates whether the recognised segment banner has to be flushed from the data or not.
The SEGMENT keyword whether the recognised segment banner has to be submitted as a segment (segment name is set to sep_id). The rest of the data until the next segment or the end of the job is stored in a different segment with the same segment name.

Job separation and segmentation 383
FILTERCommand format FILTER sep_id [SKIP]
Arguments sep_id is an id referring to a separator definition which has to be taken as a recogniser for the data part that has to be filtered.
Syntax
<filter> = <os> FILTER [<ws> <sep_id> [<ws> SKIP]] <eol>
Description The separator definition referenced by the FILTER command will be watched during the job processing.
A filter event is used to scan strings and if necessary flush data during the processing of a job.
The main usage of this command is to remove intermediate separator pages from the data stream.
When an evaluation is successful this does not result in a job break.
The SKIP keyword indicates whether the recognised filter event has to be flushed from the data or not.

384 Océ Power Print Controller Technical Reference Manual
“Job-begin” and “job-end” definitions in a SIF
A SIF detects the beginning of a job (other than a default job) when it detects a job-begin separator.
The end of a job (other than a default job) is either explicitly defined in a job-end separator, or it is implied by the job-begin separator of a next job.
The following sections describe when a SIF searches for job entries and when for job exits.
For a one-layer SIF (no sub-SIF)
The illustration below summarises how a one-layer SIF operates:
[95] One-layer SIF search procedure
The following procedure describes in detail how a one-layer SIF operates.
Search for alljob entries
Job entry isdetected
Search for job exitSearch for all
job entries
Job has explicitjob exit
Job has no explicitjob exit
Search for allJob entries
Job entry isdetected
Job has no explicitjob exit
Job has explicitjob exit
Search for job exit Search for alljob entries

Job separation and segmentation 385
▼▼▼▼ One layer SIF search procedure:
1 When the SIF has not yet detected a job-begin separator, it searches for all job-begin separators, in the order in which they are defined in the job structure definition.
2 When the SIF detects a job-begin separator, the following two situations are possible:■ this job has an explicit job-end separator. Proceed with step 3.■ this job has no explicit job-end separator. Proceed with step 4.
3 When the SIF has detected a job-begin separator and the job has an explicit job-end separator, the SIF will search for this job-end separator until it is found.Consider the example SIF below. This SIF can detect two types of jobs:
■ ‘job1’, that starts with job-begin separator job1 and ends explicitly with an <EOF>
■ ‘job2’, that starts with job-begin separator job2 and ends implicitly.
SEPARATOR job1SETSCAN 1 1 ALL “job1”
START -1 PAGESTOP +1 PAGE
SEPARATOR
SEPARATOR job2SETSCAN 1 1 ALL “job2”START -1 PAGE
STOP +1 PAGESEPARATOR
JOBBEGIN job1JOBEND EOF
JOBBEGIN job2
JOBEND
Consider a data stream that consists of (in this particular order):
job-begin separator job1
<FF>job-begin separator job2<FF>
job-begin separator job1<EOF>
The SIF considers this whole data stream as one job of type ‘job1’.
This is how the SIF works:

386 Océ Power Print Controller Technical Reference Manual
In the beginning, the SIF searches for all job-begin separators.It detects the job-begin separator of job1.
Because job1 is defined in the SIF with an explicit job-end separator, the SIF will now search for the job-end separator of job1 (EOF).
All data until the job-end separator, in other words until <EOF>, is considered to be part of job1.
4 When the SIF has detected a job-begin separator and this job has no explicit job-end separator, then the SIF will search for all job-begin separators.This means that the job explicitly ends when a job-begin separator is found.
Consider the example SIF below. This SIF can detect two types of jobs:
■ ‘job1’, that starts with job-begin separator job1 and ends implicitly■ ‘job2’, that starts with job-begin separator job2 and ends explicitly with an
<EOF>.
SEPARATOR job1SETSCAN 1 1 ALL “job1”START -1 PAGE
STOP +1 PAGESEPARATOR
SEPARATOR job2
SETSCAN 1 1 ALL “job2”START -1 PAGESTOP +1 PAGE
SEPARATOR
JOBBEGIN job1JOBEND
JOBBEGIN job2JOBEND EOF
Consider a data stream that consists of (in this particular order):
job-begin separator job1<FF>
job-begin separator job2<EOF>
The SIF splits the data stream into a job of type job1 and a job of type job2.
This is how the SIF works:
In the beginning, the SIF searches for all job-begin separators.It detects the job-begin separator of job1.

Job separation and segmentation 387
Because job1 is defined in the SIF with an implicit job-end, the SIF will again search for all job-begin separators.
The SIF then detects the job-begin separator of job2. Job1 is hereby ended.Because job2 is defined in the SIF with an explicit job-end (EOF), the SIF will now search for the EOF.
When the SIF detects the EOF, job2 is ended.
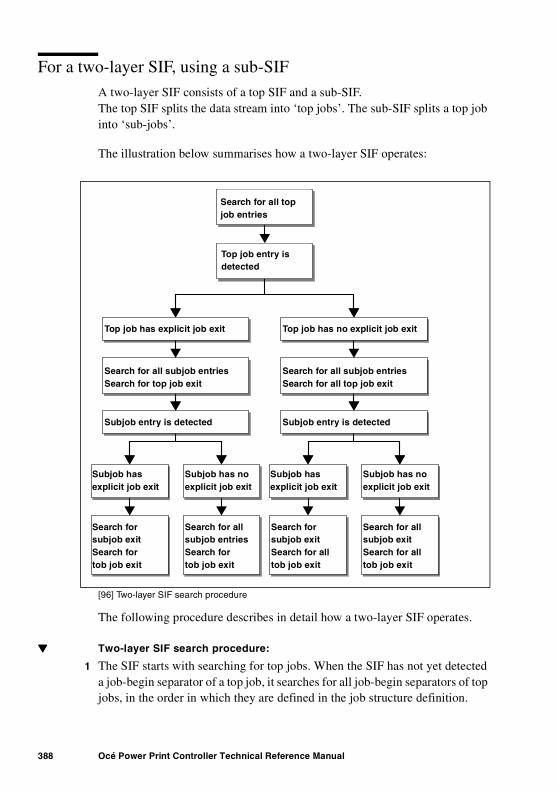
388 Océ Power Print Controller Technical Reference Manual
For a two-layer SIF, using a sub-SIFA two-layer SIF consists of a top SIF and a sub-SIF. The top SIF splits the data stream into ‘top jobs’. The sub-SIF splits a top job into ‘sub-jobs’.
The illustration below summarises how a two-layer SIF operates:
[96] Two-layer SIF search procedure
The following procedure describes in detail how a two-layer SIF operates.
▼▼▼▼ Two-layer SIF search procedure:
1 The SIF starts with searching for top jobs. When the SIF has not yet detected a job-begin separator of a top job, it searches for all job-begin separators of top jobs, in the order in which they are defined in the job structure definition.
Top job entry isdetected
Search for all topjob entries
Top job has explicit job exit Top job has no explicit job exit
Search for all subjob entriesSearch for top job exit
Search for all subjob entriesSearch for all top job exit
Subjob entry is detected Subjob entry is detected
Subjob hasexplicit job exit
Subjob has noexplicit job exit
Subjob hasexplicit job exit
Subjob has noexplicit job exit
Search forsubjob exitSearch fortob job exit
Search for allsubjob entriesSearch fortob job exit
Search forsubjob exitSearch for alltob job exit
Search for allsubjob exitSearch for alltob job exit

Job separation and segmentation 389
2 When the SIF detects a job-begin separator of a top job and this top job has an explicit job-end separator, the SIF will search for:■ all job-begin separators of the sub-SIF■ the job-end separator of the top job.
3 When the SIF detects a job-begin separator of a top job and this top job has no explicit job-end separator, the SIF will search for:■ all job-begin separators of the sub-SIF■ all job-begin separators of the top SIF. This means that the top job implicitly
ends when the SIF detects a job-begin separator of a top job.
4 When the SIF has detected a job-begin separator of a sub-job and the sub-job has an explicit job-end separator and the top job has an explicit job-end separator, the SIF will search for:■ the job-end separator of the sub-job■ the job-end separator of the top job.
5 When the SIF has detected a job-begin separator of a sub-job and the sub-job has no explicit job-end separator and the top job has an explicit job-end separator, the SIF will search for:■ all job-begin separators of the sub-SIF■ the job-end separator of the top job.
6 When the SIF has detected a job-begin separator of a sub-job and the sub-job has an explicit job-end separator and the top job has no explicit job-end separator, the SIF will search for:■ the job-end separator of the sub-job■ all job-begin separators of the top SIF.
7 When the SIF has detected a job-begin separator of a sub-job and the sub-job has no explicit job-end separator and the top job has no explicit job-end separator, the SIF will search for:■ all job-begin separators of the sub-SIF■ all job-begin separators of the top SIF.

390 Océ Power Print Controller Technical Reference Manual
Separator definition syntax
All criteria are combined in an ‘AND’ relation, i.e. the lines are evaluated one after another until one of the criteria fails, or all have succeeded.
A separator definition consists of a number of string search (scan) commands which are executed on the input data. During this scanning, some data can be extracted from the input data and stored into variables. The result of the scanning and extraction can then be tested for certain rules. Depending on the results of all of these scans and tests, it is decided whether an actual separator was found or not. If such a separator is found, the boundaries and exact location of the separator are defined.
The found separator also defines the exact position of the segment break in the input data:
■ If the separator is used by a JOBBEGIN, then the job break is at the start of the resulting separator.
■ If the separator is used by a JOBEND, then the job break is at the end of the resulting separator.
■ If the separator is used by a SEGMENT, then the segment break is at the start of the resulting separator.
Multiple start/stop definitions inside a separator overrule the previous definitions, i.e. the last definition is valid.
Command format
SEPARATOR id
SETSCAN TESTSETVAR
STARTSTOPSEPARATOR
Note: There should be at least one (1) SETSCAN command inside the separator definition, otherwise an error is reported.
Arguments The argument sep_id is a string which can be used further on in the SIF to refer to this separator definition.
Syntax

Job separation and segmentation 391
<sepdef> = <os> SEPARATOR <ws> <sep_id> <eol>{ <setscan> | <test> | <setvar> | <start> | <stop> }<setscan>
{ <setscan> | <test> | <setvar> | <start> | <stop> }<os> SEPARATOR <eol>
Description The SEPARATOR command specifies the recognition of a separator, as well as the actions that have to be processed on it.
The command consists of the following parts:
The separator identification Its reference can be used in the job structure definition. All separator definitions should have a unique identifier. The identifier is case-insensitive. There can be more than one reference to the same separator by using the identifier of the separator more than once in the job structure definitions or in the FILTER commands.
The recognition part It defines the recognition of the separator. This is accomplished by:
■ searching tags■ extracting data in variables■ testing variables.
A separator unit is successful if all conditional lines (SETSCAN commands, SETVAR commands and TEST commands) succeed.
The conditional lines are checked in order of occurrence. This implies that, if a conditional line fails, all following separator lines are not checked any longer. Consequently, the order of the conditional lines should be designed carefully to obtain best performance.
Extracted variables are stored only if the total separator evaluates successfully, otherwise the state of the variables does not change at all.
The separator evaluations are done in parallel for all separator definitions which are referenced by the current active job structure context. If a separator fails during an evaluation, it waits until all the separators are restarted after a job break, filter, or page break.
The conditional lines can have 2 different values: ‘success’ or ‘failed’. The conditional lines are processed in order of occurrence. The next line is processed when the current line evaluates to ‘success’. When the current line evaluates to ‘failed’ the separator evaluation as a whole evaluates to ‘failed’, the evaluation of this separator is aborted and the variable context is restored.

392 Océ Power Print Controller Technical Reference Manual
The separator evaluation restarts on the next input data when all separators are restarted. This will continue until a context switch sets the separator definition outside the new scope.
SETSCAN command If a match between the data and the specified tag occurs in the specified scan area, the SETSCAN command gets the value ‘success’. If the match did not occur in the specified scan area and the SETSCAN command has no variable assignment, then the SETSCAN command gets the value ‘failed’. It gets the value ‘success’ if the SETSCAN command has a variable assignment.
Note: The SETSCAN command will always get the value ‘failed’ or ‘success’ when a page break is encountered because a page break signals a premature end of the specified scan area.
TEST command If the TEST command has no DO part, then the TEST command will get the value ‘failed’ if the boolean test evaluates to ‘false’. The TEST command will get the value ‘success’ if the boolean test evaluates to ‘true’.
If the TEST command has a DO part, then the TEST command will always get the value ‘success’. The DO part is only executed when the boolean test evaluates to ‘true’.
SETVAR command If a SETVAR command is executed it will always get the value ‘success’.
Boundary definition The separator definition command does more than recognising separators. It can also define the boundaries (start and stop) of the separator.
The default start and stop of a separator are at the first character and the last character of the smallest continuous data area which includes all successfully scanned strings.
With the START and STOP commands it is possible to specify the boundaries of the separator area relatively to these positions. For more details, see ‘START’ on page 399 and ‘STOP’ on page 401.

Job separation and segmentation 393
SETSCANThe SETSCAN command specifies a scan area and a tag to be searched in this scan area. Depending on the scan result, some action can be taken.
Command format SETSCAN tagpos tagstring [ var-id varpos ]
Arguments The tagpos argument specifies the scan area. The tagstring argument specifies the string to be searched. The var-id argument specifies in which variable some data has to be stored in case the scan/search is successful and the varpos argument specifies which data has to be stored into this variable.
Syntax
<setscan> = <os> SETSCAN <ws> <tagpos> <ws> <tag>[ <ws> <variable> <ws> <varpos> ] <eol>.
<tagpos> = ANYWHERE |
(<linepos> (numberof_lines> | ALL ) (<charpos> | ALL)
<varpos> = TAG | ( ( ( <length> | ALL ) | <endtag> )[ <charplace> ] )
where:
■ tag and endtag are quoted strings■ linepos is an unsigned integer ≥ 1■ numberof_lines is an unsigned integer ≥ 1■ charpos is an unsigned integer ≥ 1■ length is an unsigned integer ≥ 1■ charplace is an unsigned integer ≥ 1 or signed integer <> 0.
Description The SETSCAN command can be used to inspect the input data stream and extract data from the input data and store this extracted data in variables. If the var-id and varpos arguments are used, then the SETSCAN command acts like a conditional assignment command. If the var-id and varpos arguments are not used, then the SETSCAN command acts like a test command on input data.
The following is a detailed description of the arguments:
tagpos The argument tagpos specifies the scan area, e.g. the area in which the argument tag has to be searched.
If the keyword ANYWHERE is used, the tag string will be searched from the start of the page until the first occurrence anywhere on the page. If the keyword

394 Océ Power Print Controller Technical Reference Manual
ANYWHERE is not used, then the scan area should be specified by giving the start line, a line range and the character location on these lines.
tag The argument tag is a string (any text between " ") that must be matched. It is possible to specify wildcard characters and non-printable characters in the tag string. For more details on wildcard characters, see ‘Wildcards for the TEST and SETSCAN commands’ on page 397.
var-id The argument var-id is an identifier.
varpos The varpos argument indicates the location of the string to be stored in the variable and the length of the string that must be stored. If the keyword TAG is used as varpos, the variable will be filled with the matched tag string. For example, if tagpos is 1 1 and the tag is “a*b” and the first line of the page is: a12345b, the variable will contain a12345b see also ‘Wildcards for the TEST and SETSCAN commands’ on page 397.
.
linepos The argument linepos is an unsigned integer indicating the line from which the scanning will start.
numberof_lines The argument numberof_lines indicates the number of lines where the scan has to be performed. If the keyword ALL is used as numberof_lines, the scan will be performed on all the lines starting at the linepos line until the end of the page. The search will stop at the first match.
charpos The argument charpos is an unsigned integer indicating the start of the tag string. If ALL is used instead of charpos, the tag string will be searched from the start of the line until the end of the line. The search will stop at the first match.
[97] Extensions of the tagpos argument
length Unsigned integer specifying the number of characters that will be stored in the string buffer, starting from charplace. If the number of characters between the start of the variable and end of line is less than length, only these characters will be stored. If the keyword ALL is used, all characters from charplace until end of line will be stored in the variable.
endtag The argument endtag can be used instead of length or ALL, to indicate how many characters have to be stored in the variable.
char-place
The argument charplace is an integer indicating the start of the con-tents for var. It can be signed or unsigned. The unsigned integer spec-ifies the absolute position in the line. A signed value specifies the position relatively to the end of the matched tag. If charplace is omit-ted, the contents starts with the first character after the matched tag.
[98] Extensions to the TAG argument

Job separation and segmentation 395
SETSCAN with/without variableDuring evaluation, the status of a SETSCAN command without variable evaluates to ‘success’ only if the specified tag argument is found inside the specified area.
During the evaluation, a SETSCAN command with a variable always evaluates to ‘success’ at the moment the specified area is completely processed. Whether the searched tag is found or not, can be checked with the TEST command.
If a SETSCAN command with a tagpos based on a linepos is used, the scanning is based on host pages, e.g., the line count starts at 1 after each page break. This is necessary because the lines in the page have to be identified by the number of the line in the page.
When the scanning starts again because of a page break or because of a recognised separator the line numbering is reset to 1.
Note: Relative line numbering is not supported.
The SETSCAN command influences the SET flag and the CHANGED flag of the associated variable (if any).
If the SETSCAN command stores a value in the variable, the SET flag is set to ‘true’. The CHANGED flag is set to ‘true’ if the SETSCAN command stores a new value in the variable and this new value differs from the previously stored value.
If the tag string is found in the specified scan area, the variable var will be filled according to the specifications regarding the value and the flags.
If the tagstring is not found in the specified scan area, the value of the variable will not change.
Note: The SETSCAN command without a variable is always implicitly combined with a TEST SET command.
The evaluation result of the command:
SETSCAN 1 1 1 “xyz”
is equivalent to the evaluation result of the command sequence:

396 Océ Power Print Controller Technical Reference Manual
SETSCAN 1 1 1 “xyz” %dummy TAGTEST SET %dummy
TEST
The TEST command specifies the checking on a variable.
Command format TEST condition [ DO setvarcommand ]
Arguments The argument condition is:
■ a boolean test on the status of a variable (set and/or changed)■ a boolean expression based on string comparison.
When the right hand side of the condition argument is not a single string between double quotes, but a variable name or a concatenation of strings and/or variables, then the comparison is done literally e.g. no wildcard matching is done; wildcard matching is only done when the right hand part of the condition argument is a sole double quoted string and does contain at least one of the reserved wildcard characters. For more details on wildcard characters, see ‘Wildcards for the TEST and SETSCAN commands’ on page 397.
Syntax
<test> = <os> TEST <condition>
[ <ws> DO <ws> <setvar> ] <eol>
<condition> = ( [ <ws> NOT ] <ws> ( SET | CHANGED ) <ws> <variable> )
|( <ws> <variable> <ws> ( “=” | “<>” ) <value> )
<value> = ( <variable> | <quoted string> ) { <ws> <plus> <ws> <value> }
where:
■ setvar is a setvar command■ the “=” operator means ‘equal to’■ the “<>” operator means ‘not equal to’.
Description A test is performed and possible an action is done as a consequence of the test. During evaluation of a separator definition a TEST command without a DO part evaluates to ‘success’ if the condition is ‘true’.

Job separation and segmentation 397
During the evaluation of a separator, a TEST command with a DO part always evaluates to ‘success’. The DO part is only executed if the condition is ‘true’.
Note: Nested TEST commands are not supported.
Strings The quoted strings used in a concatenation in the right hand side of the condition of the TEST command are handled in the following way:
■ All characters between the first " and the next " are taken into account.■ The characters 0x00 – 0x1f will be ignored.■ The character " will be taken as end of string.■ The character sequence ‘\*’, ‘\?’, ‘\\’, ‘\[‘, and ’\] will be taken as a literal ‘*’,
‘?’, ‘\’, ‘[‘, and ‘]’ character.■ The character sequence \xx, where x is one of 0123456789abcdefABCDEF,
will be taken as a hex escape sequence and will be replaced by the character with the hex-value denoted by xx. The hex-value 00 is illegal.
■ All other characters (sequences) are taken literally.
Wildcards for the TEST and SETSCAN commands
You can use the following wildcards with the TEST and SETSCAN commands:
asterisk ‘*’ Matches any string, including the empty string.
question mark ‘?’ Matches any printable character including the space character.
set of square brackets ‘[ ]’ Matches one character that is enumerated between [ and ]. A range may be specified using the ‘-’ char-acter.Example: [a-zA-Z.] means an alphabetic character or a period.
backslash ‘\’ The backslash character will be used as escape character for ‘*’, ‘?’, ‘[’, ‘]’ and ‘\’.
[99] Wildcards for TEST and SETSCAN commands

398 Océ Power Print Controller Technical Reference Manual
The following examples describe the end of the match string or the result of the scan or compare:
Note: The usage of wildcards may degrade the performance of the printing system.
SETVAR
The SETVAR command initialises a variable to a specified value.
Command format SETVAR variable value
Arguments The argument value is assigned to the argument variable. If the value argument is not a single quoted string but an expression of concatenations of strings and variables, then the result of the concatenation will be stored in the variable.
Syntax
<test> = <os> SETVAR <ws> <variable> <value> <eol>
Description The SETVAR command sets the specified variable to the specified value. During a separator evaluation a SETVAR command always evaluates to ‘success’.
The SETVAR command influences the SET flag and the CHANGED flag of the associated variable (if any). The SET flag and the CHANGED flag will be reset to ‘false’ when the evaluation of the SETVAR command starts. If the SETVAR command then stores a value in the variable, the SET flag is set to ‘true’. The CHANGED flag will be set to ‘true’ when the SETVAR command
*abc This wildcard pattern matches with the first occurrence of abc after char-pos on an input data line. The end of the matched string is the last char-acter, e.g. c. The start of the matched string is the character at the charpos position.
abc* This wildcard pattern matches with abc located at charpos. The end of the matched string is the end of the line or the 256th character on the line, whichever comes first.
*abc* This wildcard pattern matches each input line which contains the string abc. The start of the matched string is the character at the charpos posi-tion. The end of the matched string is the end of the line or the 256th char-acter on the line, whichever comes first.
[100] Examples of end of match string or result of scan or compare
Job separation and segmentation 399
stores a new value in the variable and this new value differs from the previous value stored in the variable.
Strings The quoted strings used in the right hand argument of the SETVAR command are handled in the following way:
■ All characters between the first " and the next " are taken into account.■ The characters 0x00 – 0x1f will be ignored.■ The character " will be taken as end of string.■ The character sequence ‘\*’, ‘\?’, ‘\\’, ‘\[‘, and ’\]’ will be taken as a literal
‘*’, ‘?’, ‘\’, ‘[‘, and ‘]’ character.■ The character sequence \xx, where x is one of 0123456789abcdefABCDEF,
will be taken as a hex escape sequence and will be replaced by the character with the hexvalue denoted by xx. The hexvalue 00 is illegal.
■ All other characters (sequences) are taken literally.
START
When a separator is recognised it is possible to define the exact location of the start boundary.
Command format START [ amount ] ( PAGE | LINE | CHAR )
Arguments The argument amount defines the distance between the begin of the recognised scan area and the separator begin boundary.
Syntax
<start> = <os> START [<ws> <amount>] <ws> (PAGE | LINE | CHAR)
<eol>
<amount>: signed int <> 0
Description The START command will locate the starting point of the separator.
The default starting point of a separator is at the first character of the smallest data area which includes all successfully scanned strings. The first character is included in the separator area.
Multiple start definitions inside a separator overrule the previous definitions, i.e. the last definition is valid.
With a START command it is possible to define the starting point:

400 Océ Power Print Controller Technical Reference Manual
■ at a number of page breaks backwards or forwards from the default starting point. The exact starting point will always be after the specified page break.
■ at a number of line breaks backwards or forwards from the default starting point. The exact starting point will always be after the specified line break.
■ at a number of characters backwards or forwards from the default starting point. The exact starting point will always be at the start of a character, before the specified character.
.
Note:
If type = CHAR, then the starting point cannot be transferred over a line break.If type = LINE, then the starting point cannot be transferred over a page break.If type = PAGE, then the starting point cannot be transferred over a job break.
Attention: Because of technical buffer limitations it is possible that the buffer limits are reached before the specified starting point. The buffer size is tunable.
Defaults The default starting point of a separator is at the first character of the smallest data area which includes all successfully scanned strings. The first character is included in the separator area.
START -n PAGE The separator will start exactly after the n-th pagebreak backwards from the default starting point as described below.
START +n PAGE The separator will start exactly after the n-th pagebreak forward from the default starting point as described be-low.
START -n LINE The separator will start exactly after the n-th linebreak backwards from the default starting point as described below.
START +n LINE The separator will start exactly after the n-th linebreak forward from the default starting point as described be-low.
START -n CHAR The separator will start exactly before the n-th character backward from the default starting point as described below.
START +n CHAR The separator will start exactly before the n-th character forward from the default starting point as described be-low.
[101] Default starting points for the START command

Job separation and segmentation 401
If type = PAGE, then START -1 PAGE is assumedIf type = LINE, then START -1 LINE is assumedIf type = CHAR, then the default starting point is as described above.
STOPWhen a separator is recognised, it is possible to define the exact location of the end boundary.
Command format STOP [ amount ] ( PAGE | LINE | CHAR )
Arguments The argument amount defines the distance between the end of the recognised scan area and the separator end boundary.
Syntax
<stop> = <os> STOP [<ws> <amount>] <ws> (PAGE | LINE | CHAR)
<eol>
<amount>: signed int <> 0
Description The STOP command will locate the end point of the separator.
The default end point of a separator is after the last character of the smallest data area which includes all successfully scanned strings. This last character is included in the separator area.
If this STOP command is used in a separator which is used as a header (separator used at JOBBEGIN or SEGMENT) then the data between the START and STOP is not examined to recognise further events.
Multiple stop definitions inside a separator overrule the previous definitions i.e. the last definition is valid.
With the STOP command it is possible to define the endpoint:
■ at a number of page breaks backwards or forwards from the default endpoint. The exact endpoint will always be after the specified page break.
■ at a number of line breaks backwards or forwards from the default endpoint. The exact endpoint will always be after the specified line break.
■ at a number of characters backwards or forwards from the default endpoint. The exact endpoint will always be at the start of a character, before the specified character.

402 Océ Power Print Controller Technical Reference Manual
Note:
If type = CHAR, then the endpoint cannot be transferred over a line break.If type = LINE, then the endpoint cannot be transferred over a page break.If type = PAGE, then the endpoint cannot be transferred over a job break.
Attention: Because of technical buffer limitations it is possible that the buffer limits are reached before the specified endpoint. The buffer size is tunable.
Exceptions Adjustments are made automatically in the following situations:
■ if ‘START +m PAGE’ and ‘STOP +n PAGE’ are specified and m>n, then STOP is set to START
■ if ‘START -m PAGE’ and ‘STOP -n PAGE’ are specified and m<n, then STOP is set to START
■ if ‘START +m LINE’ and ‘STOP +n LINE’ are specified and m>n, then STOP is set to START
■ if ‘START -m LINE’ and ‘STOP -n LINE’ are specified and m<n, then STOP is set to START.
Defaults The default endpoint of a separator is at the last character of the smallest data area which includes all successfully scanned strings. This last character is included in the separator area.
STOP -n PAGE The separator will end exactly after the n-th page break backwards from the default endpoint as described be-low.
STOP +n PAGE The separator will end exactly after the n-th page break forward from the default endpoint as described below.
STOP -n LINE The separator will end exactly after the n-th line break backwards from the default endpoint as described be-low.
STOP +n LINE The separator will end exactly after the n-th line break forward from the default endpoint as described below.
STOP -n CHAR The separator will end exactly before the n-th character backward from the default starting point as described below.
STOP +n CHAR The separator will end exactly before the n-th character forward from the default endpoint as described below.
[102] Default endpoints with the STOP command

Job separation and segmentation 403
If type = PAGE, then STOP +1 PAGE is assumed.If type = LINE, then STOP +1 LINE is assumed.If type = CHAR, then the default endpoint is as described above.
SIF comment linesAll empty lines or lines starting with a ‘#’ are considered comment lines.

404 Océ Power Print Controller Technical Reference Manual
Software limits
The following table lists the software limits of the SIF mechanism:
The maximum separator area size is approximately 30 KB.
The maximum separator area displacement is approximately 30 KB.
When a separator is recognised it is possible to relocate and/or resize the separator area by means of the START and/or STOP commands in the separator. Although the SIF mechanism handles the buffering intelligently and postpones decisions and buffer flush actions as long as possible, it is still possible that the resize an/or relocate fails because the physical buffer limits are reached. This will be handled by setting the separator start and/or end point at the appropriate buffer limit and by issuing a warning.
Maximum number of job definitions in a SIF 20
Maximum number of filter separator references in a job definition 5
Maximum number of segment separator references in a job definition 5
Maximum number of separator definitions in a SIF, including the variables reserved for ticket attributes
100
Maximum number of criteria (setscan, test, setvar) inside a separator defi-nition
25
Maximum number of different variable names in SIF 100
Maximum number of SIF syntax error messages 10
Maximum length of variable name in SIF (including %) 80
Maximum length of separator id in SIF 80
Maximum length of scan string (TAG) 256
Maximum length of an extracted variable value 80
[103] Software limits of the SIF mechanism

Job separation and segmentation 405
Examples
Example 1: DOSVSE job separation
The banner page is shown below; relevant parts are highlighted.
[104] Typical example of DOSVSE banner page: the relevant parts are highlighted for clarity
1234567890123456789012345678901234567890123456789012345678901234567890123456789012345678901234567890123456789012345678901234567823456789 KK KK VV VV 0000000000 0000000000 11 11 TTTTTTTTTTTT0 KK KK VV VV 000000000000 000000000000 111 111 TTTTTTTTTTTT1 KK KK VV VV 00 00 00 00 1111 1111 TT2 KK KK VV VV 00 00 00 00 00 00 1111 1111 TT3 KK KK VV VV 00 00 00 00 00 00 11 11 TT4 KK KK VV VV 00 00 00 00 00 00 11 11 TT5 KK KKKK VV VV 00 00 00 00 00 00 11 11 TT6 KKKK KK VV VV 00 00 00 00 00 00 11 11 TT7 KK KK VVVV 00 0 00 00 0 00 11 11 TT8 KK KK VVVV 00 00 00 00 11 11 TT9 KK KK VV 000000000000 000000000000 111111 111111 TT0 KK KK VV 0000000000 0000000000 111111 111111 TT1234 2222222222 555555555555 555555555555 11 2222222222 7777777777775 222222222222 555555555555 555555555555 111 222222222222 7777777777776 22 22 55 55 1111 22 22 77 777 22 55 55 1111 22 778 22 55 55 11 22 779 22222222222 55555555555 55555555555 11 22222222222 770 22222222222 555555555555 555555555555 11 22222222222 771 22 55 55 11 22 772 22 55 55 11 22 773 22 55 55 55 55 11 22 774 222222222222 555555555555 555555555555 111111 222222222222 775 222222222222 5555555555 5555555555 111111 222222222222 7767890123456789012345678901NODE: VSE1 USER: ORG NODE: VSE1 ORG USER: AV01 EXEC.NODE: VSE1 ORG JOB-NO: 051272DEV : 50A FN0 : B006 FCB : $$BFCB LINES : 00000225 CLASS : A345************ F4 *** START KV0011T 051427 ONLY 12 NOV 92 15,24 03 ** VSE/POWER V4.1 **6************ F4 *** START KV0011T 051427 ONLY 12 NOV 92 15,24 03 ** VSE/POWER V4.1 **7************ F4 *** START KV0011T 051427 ONLY 12 NOV 92 15,24 03 ** VSE/POWER V4.1 **8************ F4 *** START KV0011T 051427 ONLY 12 NOV 92 15,24 03 ** VSE/POWER V4.1 **9************ F4 *** START KV0011T 051427 ONLY 12 NOV 92 15,24 03 ** VSE/POWER V4.1 **0************ F4 *** START KV0011T 051427 ONLY 12 NOV 92 15,24 03 ** VSE/POWER V4.1 **1************ F4 *** START KV0011T 051427 ONLY 12 NOV 92 15,24 03 ** VSE/POWER V4.1 **2************ F4 *** START KV0011T 051427 ONLY 12 NOV 92 15,24 03 ** VSE/POWER V4.1 **34567890 KK KK VV VV 0000000000 0000000000 11 11 TTTTTTTTTTTT1 KK KK VV VV 000000000000 000000000000 111 111 TTTTTTTTTTTT2 KK KK VV VV 00 00 00 00 1111 1111 TT3 KK KK VV VV 00 00 00 00 00 00 1111 1111 TT4 KK KK VV VV 00 00 00 00 00 00 11 11 TT5 KK KK VV VV 00 00 00 00 00 00 11 11 TT6 KK KKKK VV VV 00 00 00 00 00 00 11 11 TT7 KKKK KK VV VV 00 00 00 00 00 00 11 11 TT8 KK KK VVVV 00 0 00 00 0 00 11 11 TT9 KK KK VVVV 00 00 00 00 11 11 TT0 KK KK VV 000000000000 000000000000 111111 111111 TT1 KK KK VV 0000000000 0000000000 111111 111111 TT2345 2222222222 555555555555 555555555555 11 2222222222 7777777777776 222222222222 555555555555 555555555555 111 222222222222 7777777777777 22 22 55 55 1111 22 22 77 778 22 55 55 1111 22 779 22 55 55 11 22 770 22222222222 55555555555 55555555555 11 22222222222 771 22222222222 555555555555 555555555555 11 22222222222 772 22 55 55 11 22 773 22 55 55 11 22 774 22 55 55 55 55 11 22 775 222222222222 555555555555 555555555555 111111 222222222222 776 222222222222 5555555555 5555555555 111111 222222222222 77789012
Column numbers
Line numbers
Banner page information
Unique banner identification string

406 Océ Power Print Controller Technical Reference Manual
The SIF The SIF consists of 4 blocks, separated by a blank line:
■ the first three blocks are separator definitions■ the last block is a job structure definition.
SEPARATOR FNOStartJobHeaderSETSCAN 67 1 1 “\*\*\*\*\*\*\*\*\*\*\*\*”
SETSCAN 67 1 23 “ START “SETSCAN 62 1 16 “ FNO : “ %jobname 4SETSCAN 61 1 52 “ ORG USER: “ %username 8
SETSCAN 61 1 93 “ ORG JOB-NO: “ %jobnumber 8SETSCAN 62 1 1 “DEV : “ %hostname 8SETSCAN 62 1 72 “ CLASS : “ %jobclass 8
START -1 PAGESTOP +1 PAGESEPARATOR
SEPARATOR FNOLastTrailerSETSCAN 67 1 1 “\*\*\*\*\*\*\*\*\*\*\*\*”
SETSCAN 67 1 23 “ END “SETSCAN 67 1 50 “ LAST “ %var TAGSETSCAN 67 1 50 “ ONLY “ %var TAG
TEST SET %varSTART -1 PAGESTOP +1 PAGE
SEPARATOR
SEPARATOR FNOIntBTsSETSCAN 67 1 1 “\*\*\*\*\*\*\*\*\*\*\*\*”
SETSCAN 67 1 23 “ END “ %var TAGSETSCAN 67 1 23 “ START “ %var TAGTEST SET %var
START -1 PAGESTOP +1 PAGESEPARATOR
JOBBEGIN FNOStartJobHeader SKIPFILTER FNOIntBTs SKIPJOBEND FNOLastTrailer SKIP
Explanation of the SIF A SIF starts out with a number of separator definitions. A separator definition starts with the separator command followed by an argument and ends with a separator command without argument.
Let us analyse the first separator definition line by line:
■ The first line contains the SEPARATOR command and the name of the separator; this name is FNOStartJobBanner.

Job separation and segmentation 407
■ The second line searches for string ************ on line 67 from the first position onwards; the backslash ‘\’ before each asterisk means that the asterisk has to be taken literally, and not as a wildcard.
■ The third line searches for string START in line 67, from the 23d position onwards.
■ The fourth line checks line 62 for the string FNO :, then it takes the next 4 positions (you see 4 as the last number in this line) and places this number in variable %jobname: in this example, the value of variable %jobname becomes B006.
■ Likewise, the fifth line fills 8 characters following the string ORG USER: into variable %username etc.
■ The ninth line and the tenth line denote the beginning and the end of the host header page; in line 10 it searches backwards (-1) for the first page break in the host data; in line 11 it searches forward (+1).
■ Finally, line 11 contains another SEPARATOR command, this time without argument, to close the separator definition.
The second separator does the recognition of the host trailer page:
■ The first line contains the SEPARATOR command and the name of the separator; this name is FNOLastTrailer.
■ The second line searches for string ************ on line 67 from the first position onwards; the backslash ‘\’ before each asterisk means that the asterisk has to be taken literally, and not as a wildcard.
■ The third line searches for string END in line 67, from the 23d position onwards.
■ Then it checks whether the asterisks are followed by either LAST or ONLY. To do so, it first checks whether the string is LAST; if it is, it sets the keyword TAG. Then it checks on the same position whether it finds the string LAST; if it does, it sets the keyword TAG.
■ Finally, in line 6, the TEST command checks whether or not the keyword TAG was set. This variable will be set if either LAST or ONLY was found next to the asterisks.
■ The last three lines have the same function as in the previous job separator.
The third separator checks for an intermediate banner page that is printed every thousand pages and identifies it as FNOIntBts.
The job structure definition In this example, the job structure definition contains three lines. It starts with a JOBBEGIN command and ends with a JOBEND command. Let us examine line by line:
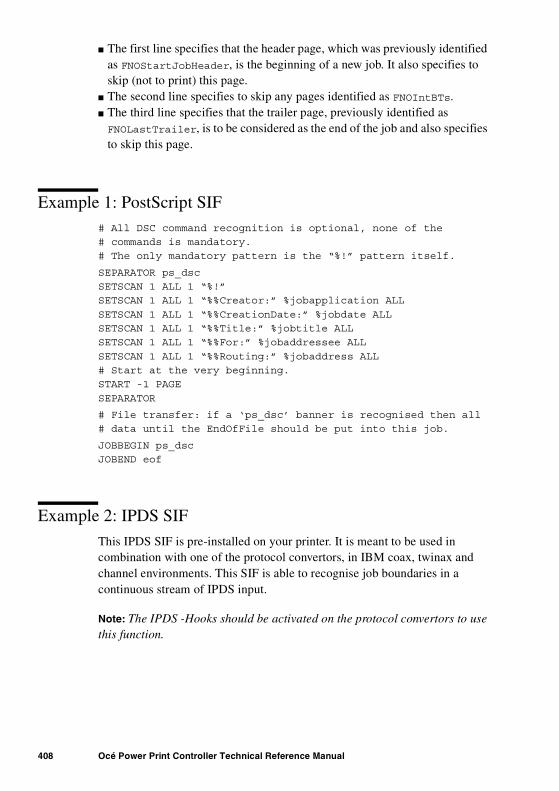
408 Océ Power Print Controller Technical Reference Manual
■ The first line specifies that the header page, which was previously identified as FNOStartJobHeader, is the beginning of a new job. It also specifies to skip (not to print) this page.
■ The second line specifies to skip any pages identified as FNOIntBTs.■ The third line specifies that the trailer page, previously identified as FNOLastTrailer, is to be considered as the end of the job and also specifies to skip this page.
Example 1: PostScript SIF# All DSC command recognition is optional, none of the# commands is mandatory.# The only mandatory pattern is the “%!” pattern itself.
SEPARATOR ps_dscSETSCAN 1 ALL 1 “%!”SETSCAN 1 ALL 1 “%%Creator:” %jobapplication ALL
SETSCAN 1 ALL 1 “%%CreationDate:” %jobdate ALLSETSCAN 1 ALL 1 “%%Title:” %jobtitle ALLSETSCAN 1 ALL 1 “%%For:” %jobaddressee ALL
SETSCAN 1 ALL 1 “%%Routing:” %jobaddress ALL# Start at the very beginning.START -1 PAGE
SEPARATOR
# File transfer: if a ‘ps_dsc’ banner is recognised then all# data until the EndOfFile should be put into this job.
JOBBEGIN ps_dscJOBEND eof
Example 2: IPDS SIF
This IPDS SIF is pre-installed on your printer. It is meant to be used in combination with one of the protocol convertors, in IBM coax, twinax and channel environments. This SIF is able to recognise job boundaries in a continuous stream of IPDS input.
Note: The IPDS -Hooks should be activated on the protocol convertors to use this function.
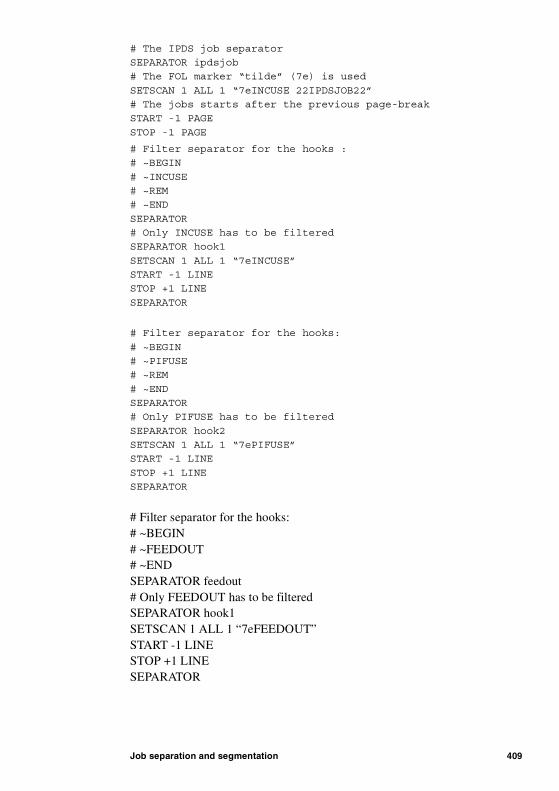
Job separation and segmentation 409
# The IPDS job separatorSEPARATOR ipdsjob# The FOL marker “tilde” (7e) is used
SETSCAN 1 ALL 1 “7eINCUSE 22IPDSJOB22”# The jobs starts after the previous page-breakSTART -1 PAGE
STOP -1 PAGE
# Filter separator for the hooks :# ~BEGIN
# ~INCUSE# ~REM# ~END
SEPARATOR# Only INCUSE has to be filteredSEPARATOR hook1
SETSCAN 1 ALL 1 “7eINCUSE”START -1 LINESTOP +1 LINE
SEPARATOR
# Filter separator for the hooks:
# ~BEGIN# ~PIFUSE# ~REM
# ~ENDSEPARATOR# Only PIFUSE has to be filtered
SEPARATOR hook2SETSCAN 1 ALL 1 “7ePIFUSE”START -1 LINE
STOP +1 LINESEPARATOR
# Filter separator for the hooks:# ~BEGIN# ~FEEDOUT# ~ENDSEPARATOR feedout# Only FEEDOUT has to be filteredSEPARATOR hook1SETSCAN 1 ALL 1 “7eFEEDOUT”START -1 LINESTOP +1 LINESEPARATOR

410 Océ Power Print Controller Technical Reference Manual
JOBBEGIN ipdsjobFILTER hook1 SKIPFILTER hook2 SKIPFILTER feedout SKIPJOBEND
Example 3: Structured job
SEPARATOR FNOStartJobBannerSETSCAN 67 1 1 “\e*\e*\e*\e*\e*\e*\e*\e*\e*\e*\e*\e*”SETSCAN 67 1 23 “ START “SETSCAN 62 1 16 “ FNO : “ %jobname 4SETSCAN 61 1 52 “ ORG USER: “ %username 8SETSCAN 61 1 93 “ ORG JOB-NO: “ %jobnumber 8SETSCAN 62 1 1 “DEV : “ %hostname 8SETSCAN 62 1 72 “ CLASS : “ %jobclass 8START -1 PAGESTOP +1 PAGE
SEPARATOR FNOLastTrailerSETSCAN 67 1 1 “\e*\e*\e*\e*\e*\e*\e*\e*\e*\e*\e*\e*”SETSCAN 67 1 23 “ END “
SETSCAN 67 1 50 “ LAST “ %var TAGSETSCAN 67 1 50 “ ONLY “ %var TAGTEST SET %var
START -1 PAGESTOP +1 PAGESEPARATOR
SEPARATOR FNOIntBTsSETSCAN 67 1 1 “\e*\e*\e*\e*\e*\e*\e*\e*\e*\e*\e*\e*”
SETSCAN 67 1 23 “ END “ %var TAGSETSCAN 67 1 23 “ START “ %var TAGTEST SET %var
START -1 PAGESTOP +1 PAGESEPARATOR
SEPARATOR DepartmentSETSCAN 1 1 4 “?????” %department TAGTEST changed %department
START -1 PAGESEPARATOR

Job separation and segmentation 411
JOBBEGIN FBOJobBanner SKIPFILTER FNOIntBTs SKIPSEGMENT Department
JOBEND FNOLastTrailer SKIP

412 Océ Power Print Controller Technical Reference Manual

413
Océ Power Print Controller
Technical Reference Manual
Chapter 21Page and page set processing
This chapter explains how you can process pages and page sets separately, using a Page Processing Instruction File (PagePIF).
414 Océ Power Print Controller Technical Reference Manual
Page processing functionality
PDL and JAC processing
In general, a printer just supports one or several PDLs, such as PCL5, PostScript, FOL etc. Printers of the Océ Power Print Controller provide additional Job Automation Control (JAC) functionality to automate the handling of complete jobs on the printer. The JAC mechanism consists of:
■ job identification■ job separation: separates a data stream into several jobs■ job segmentation: separates a job into several segments■ (multiple) job and job segment processing: enhances jobs and job segments
by providing device control, form and flagsheet functionality.
The actual commands that specify how a job should be identified and processed, are contained in job tickets.
Page processing
Sometimes the required processing functionality cannot be specified on a job or job segment level. In this case, you can use the page processing functionality. Page processing and page set processing allow the Océ Power Print Controller to further process the page, after interpretation by the PDL interpreter.
Page processing is an excellent tool to bring about complex job control on a page-by-page basis without additional burden to the host application. Page processing combines perfectly with the Sorter and with the Finisher.
An example of page processing: printing invoices
Complex page and page set handling is made possible, while jobs are only sent once. Paper can be fed from different trays, delivered in different output bins. Different forms can be applied on a page-by-page basis.

Page and page set processing 415
With page processing, you send the invoice file only once to the printer, the printer itself seeing to it that the original is delivered together with a customer copy on coloured paper, and that the internal copies are collected into a dedicated mailbox bin, as you can see in the diagram below:
[105] Example of page processing application
Page Processing Instruction Files (PagePIFs)
Page and page set processing is accomplished by means of Page Processing Instruction Files (PagePIFs). A Page Processing Instruction File (PagePIF) contains commands which specify how a page is to be processed. A PagePIF can operate on three levels:
■ page level■ page set level■ header/trailer.
Page level The PagePIF specifies the way in which the pages from the job must be processed. This PagePIF may include three types of commands:
■ device control commands such as selecting the input paper tray, simplex or duplex printing and selecting the output bin
■ commands that retrieve input pages from the host print data■ a command that generates logical output pages.
Copy Copy
Invoice Invoice
Invoices
Invoice Invoice
COPYCOPY
One original and onecustomer copy, deliveredtogether, ready to forward
Internal copies collectedin the mailbox bin of theaccountant
One original an onecustomer copy, deliveredtogether, ready to forward
Internal copies collectedin the mailbox bin of theaccountant

416 Océ Power Print Controller Technical Reference Manual
Page set level The PagePIF specifies the way in which a set of pages must be grouped into sets and how sets must be finished: jogged or stapled.
Header/trailer functionality A header or trailer page (as part of the job data) can be processed differently from the regular job data. For example: the header page is printed on paper of a different colour, or the header page is delivered separately, while the actual job pages are stapled together.

Page and page set processing 417
Working with PagePIFs
Whenever the required processing functionality cannot be specified on a job or job segment level, you can use the page processing functionality. To create a PagePIF, you need to know the contents of the print job or segment, as you will handle it page by page.
This section documents the following items:
■ installing a PagePIF■ activating a PagePIF■ working on page level■ working on page set level■ working with header/trailer pages■ the relationship between job data, tickets and PagePIFs■ the limitations of the PagePIF functionality.
Installing a PagePIF
You can install PagePIFs on the printer as referable objects. You can download them using a download ticket, or install them using KOS RO-OPER functionality. How to do so is documented in ‘Download tickets’ on page 332 and in the System Administration Manual respectively.
Activating a PagePIF
You can activate a PagePIF using the following processing attribute in a job ticket or segment ticket:
PAGEPIF <pagepif_file>
For each segment of a job, you can activate a PagePIF in the corresponding segment ticket. If a PagePIF is selected in a job ticket, this PagePIF will be used for every segment of the job and will possibly overrule a PagePIF selection in a segment ticket.

418 Océ Power Print Controller Technical Reference Manual
Working on page levelThere are two ways to work on page level:
■ using device control commands: by inserting page attributes you can specify paper tray, print mode (simplex/duplex), output bin, forms, etc. and you can rearrange the sequence of pages.
■ inserting page boundaries: you can group printed information into pages by inserting page boundaries into the page description.
The table below lists the commands that you can use in a PagePIF to work on page level. The table lists the command name, a brief description, the page where you can find more details and whether this command (implicitly) generates a conditional sheet boundary or a set boundary.
Command Description See Sheet bounda-ry
Set bounda-ry
Device control commands
BIN selects the output bin for the sheets to be printed next
page 426 l l
TRAY selects an input tray for the sheets to be printed next
page 436 l
COPIES(collate off)
sets the number of copies to be made
page 437 l l
DUPLEX selects duplex or simplex print-ing mode for the sheets to be printed next
page 437 l
BIND selects a binding edge, binding offset and possible flipping of the image on the back side of the sheets to be printed next
page 437 l
PAGESIDE specifies that the next page should be printed on a front or back side
page 437
FORM specifies a form to be used for overlaying/underlaying all next pages
page 437
Multiple printing commands and printing pages in arbitrary order
[106] Commands to work on page level

Page and page set processing 419
Working on page set level
There are two ways to work with page sets:
■ inserting set boundaries into a sequence of physical sheets, thus grouping several physical sheets into a set
■ inserting device control commands for a page set: jogging and stapling.
The table below lists the commands that you can use in a PagePIF to work on page set level. The table lists the command name, a brief description, the page where you can find more details and whether this command (implicitly) generates a conditional sheet boundary or a set boundary.
GETPAGE <page_id>
assigns the label <page_id> to the next input page that is scheduled by the interpreter that handles the job data
page 437
USEPAGE <page_id>
prints the page identified by <page_id> on the current (logi-cal) output page
page 437
Generation of logical output pages
PAGE prints a logical page page 438
Command Description See Sheet bounda-ry
Set bounda-ry
Device control commands
COPIES(Collate on)
sets the number of copies to be made page 437 l l
JOG sets the jog attribute for subsequent output sets on or off
page 438 l l
SETSIZE specifies the upper limit <setsize> of the number of output sheets in sub-sequent sets
page 438 l l
STAPLE Specifies whether or not to staple subsequent output sets
page 438 l l
[107] Commands to work on page set level
Command Description See Sheet bounda-ry
Set bounda-ry
[106] Commands to work on page level (continued)

420 Océ Power Print Controller Technical Reference Manual
Working with header/trailer pages
Many times, a job consists of a header page, the actual job data and a trailer page.
The following commands in a PagePIF specify the way in which headers and trailers must be handled. This may be different from the way in which the rest of the job must be handled.
The table below lists the commands that you can use in a PagePIF to work with header and trailer pages. The table lists the command name, a brief description and the page where you can find more details.
Header and trailer pages are always printed. If the GETPAGE command finds and empty header and/or trailer page, the USEPAGE command will produce blank pages as output.
Pages within a cycle are printed only when they are available: a cycle is started only when the GETPAGE command finds valid input (i.e. at least one non-empty page).
Inserting set boundaries
DELIVER marks the current position as a set boundary
page 430 l l
Command Description See page
CYCLESTART labels the position in the PagePIF to be used as the cyclic starting point
page 438
CYCLEEND labels the position in the PagePIF to be used as the cyclic end-point
page 429
[108] Commands to work with header and trailer pages
Command Description See Sheet bounda-ry
Set bounda-ry
[107] Commands to work on page set level (continued)

Page and page set processing 421
Relationship between job data, tickets and PagePIFsA PagePIF allows for controlling some page and set attributes. Some of these attributes can also be controlled in the job data, or in a ticket on job level or job segment level.
In general, you can specify attributes either on job ticket level or on segment level.
PagePIF and ticket It does not make sense to specify an attribute both in a ticket and the PagePIF.
If an attribute is already specified on a job or segment basis, it will overrule any occurrences of this attribute in the PagePIF. In other words, a PagePIF can only control an attribute that is not yet contained in a job ticket or segment ticket.
The FORM attribute is the only exception to this rule. As multiple forms can be added to one page, a PagePIF does not overrule form attributes in a ticket, but merely adds forms to the list of forms that are specified in the ticket.
If a set attribute (staple or setsize) is specified on job or segment level, it will overrule all set boundaries, as generated in the PagePIF.
Example:
In this example the total job will be stapled. Not every 3 pages!
Similarly, if multiple-up 2 (or 4) is specified in the job or segment ticket, this setting will overrule all pageside selections and boundaries in the PagePIF, including the duplex settings.
ticket
process STAPLE ON
pagepif
SETSIZE 3
GETPAGE <page_id>
USEPAGE <page_id>
[109] Set attributes: ticket versus PagePIF

422 Océ Power Print Controller Technical Reference Manual
PagePIF and job data If an attribute is specified in the PagePIF, any corresponding attributes in the job data are overruled or ignored.
When the paper format or the paper feed direction (short/long edge feed) of the tray specified in the PagePIF differs from the tray that was selected in the job-data, then the image might not fit on the paper. In this case some clipping might occur. Also, the image will not be rotated or scaled when the PagePIF selects another feed direction or paper format.
Limitations of the PagePIF functionality
A PagePIF requires that some input pages can be buffered. This is only possible if the job is not too complex. Otherwise a logical error is generated and the rest of the job will be printed without applying the PagePIF functionality.

Page and page set processing 423
PagePIF commands overview
A PagePIF is stored in an ASCII file. It contains a number of commands that are executed in sequence.
The table below lists all the commands that you can use in a PagePIF. The table contains the following information for each command:
■ command name■ arguments (if any)■ brief description■ reference to the page where you can find more details on this command.
The commands are listed in alphabetical order.
Command Argument(s) Description See
BIN binnumber selects the output bin for the sheets to be printed next
page 426
BIND edgeoffsetflip
selects a binding edge, binding offset and possible flipping of the image on the back side of the sheets to be printed next
page 437
COPIES numcopies sets the number of copies to be made
page 437
COLLATE on | off sets the way in which the copies attribute is interpreted: copy by page or copy by set
page 428
CYCLEEND — labels the position in the PagePIF to be used as the cyclic end-point
page 438
CYCLE-START
— labels the position in the PagePIF to be used as the cyclic starting point
page 430
DELIVER — marks the current position as a set boundary
page 430
DUPLEX on | off selects duplex or simplex print-ing mode for the sheets to be printed next
page 437
FORM formnamepage_selectlayer
adds the form <formname> to the list of forms to be used for over-laying/underlaying
page 437
[110] PagePIF commands overview

424 Océ Power Print Controller Technical Reference Manual
GETPAGE PAGE_id assigns the label <page_id> to the next input page that is sched-uled by the interpreter that han-dles the job data
page 437
JOG on | off sets the jog attribute for subse-quent output sets on or off
page 438
PAGE — prints a logical page page 438
PAGESIDE frontrear
specifies that the next page should be printed on a front or back side
page 437
SETSIZE setsize specifies the upper limit <set-size> of the number of output sheets in subsequent sets
page 438
STAPLE on | off specifies whether or not to staple subsequent output sets
page 438
TRAY traynumber selects an input tray for the sheets to be printed next
page 436
USEPAGE page_id specifies that one of the pages in the list of input pages (identified by <page_id>) must be printed on the current (logical) output page
page 437
Command Argument(s) Description See
[110] PagePIF commands overview (continued)

Page and page set processing 425
PagePIF commands reference
On the following pages you find a detailed description of each PagePIF command. The commands are sorted in alphabetical order.
The following information is provided with each command:
Command syntax command name and possible arguments
Description what you can achieve with this command
Relationship any interference this command may have with other commands
Example This section contains a reference to a page where you can find a complete PagePIF example which makes typical use of this command.

426 Océ Power Print Controller Technical Reference Manual
BINSyntax
BIN <binnumber><binnumber> = { 0, 1, 2, 3, 4, 5, ... }
Where with the Océ 8400 series printer:
■ 0 =error bin■ 1 – 20 =actual bin number in 20-bin Sorter■ 61 = finisher bin■ 81 = output tray
Function The BIN command specifies the number of the output bin for the sheets to be printed next.
The BIN command implicitly generates a set boundary. This set boundary generates a conditional sheet boundary.
Relationship If collated copies are requested, more output bins may be used. In that case, <binnumber> will be the number of the first bin to be used.
Example The following command will deliver all following pages into bin 3 of the Sorter:
BIN 3
Note: The projection of logical bins on physical bins can change the behaviour of BIN.

Page and page set processing 427
BINDSyntax
BIND [ <edge> <offset> ] [flip]
Where:
■ edge: left, right, top or bottom■ offset: offset in millimetres.
Function The BIND command selects a binding edge and binding offset. The image (on the front and back side) is shifted relatively to the physical paper edge. Flipping means that for duplex print jobs, the image on the back side is turned 180 degrees. By default binding and flipping are not active.
[111] Binding offsets
[112] The effect of flip on the final print
abc
Offset
Offset
def
No flip Flip
abc
def
abc
def
No Flip Flip

428 Océ Power Print Controller Technical Reference Manual
The BIND command implicitly generates a conditional sheet boundary.
Relationship The flip option of the bind attribute is only relevant for duplex printing.
Example The following command specifies a binding edge of 10 mm at the top of the page:
BIND top 10
The following command specifies a binding edge of 25.4 mm at the left edge of the page. The image on the back side is turned 180 degrees:
BIND left 25.4 FLIP
COLLATESyntax
COLLATE { on | off }
Function The COLLATE command sets the way in which the copies attribute is interpreted.
When printing multiple copies of a print job, collate specifies if the copies are deposited in sets of pages or in sets of jobs. ‘Collate on’ means that multiple copies of the complete print job are delivered as one complete set. ‘Collate off’ implies that multiple copies are delivered as a set of page one, a set of page two, etc.
The COLLATE command implicitly generates a set boundary. This set boundary generates a conditional sheet boundary.
Relationship The COPIES command implicitly sets the collate attribute to on.
COPIESSyntax
COPIES <numcopies>
Function The COPIES command sets the number of copies to be made. The way in which the copies must be delivered in the output device depends on the collate attribute.

Page and page set processing 429
If collate is on, then the copies attribute is interpreted as a set attribute, which means that a complete set of sheets must be copied <numcopies> times. The output device will contain the complete set <numcopies> times.
If collate is off, the copies attribute is interpreted as a page attribute, which means that each sheet must be copied <numcopies> times. The output device will contain each sheet <numcopies> times.
The COPIES command implicitly generates a set boundary. This set boundary generates a conditional sheet boundary.
Relationship The COLLATE command can be used to change the way in which the copies attribute is interpreted.
If collate is on, the bin attribute specifies the start bin.
Example See ‘Example 2: set handling’ on page 440.
CYCLEENDSyntax
CYCLEEND
Functionality This command labels the position in the PagePIF to be used as the cyclic end-point. This command can be used as a separation between the first part of the PagePIF and the trailer part.
Relationship Only one CYCLEEND command is allowed in a PagePIF.
Note: Buffers will be cleared at cycle boundaries. The last USEPAGE before a cycle boundary should be followed by a PAGE command.
Example See ‘Example 3: header/trailer handling’ on page 441.

430 Océ Power Print Controller Technical Reference Manual
CYCLESTARTSyntax
CYCLESTART
Functionality This command labels the position in the PagePIF to be used as the cyclic starting point. This command can be used as a separation between the header part of the PagePIF and the remaining part.
Relationship Only one CYCLESTART command is allowed in a PagePIF.
Note: Buffers will be cleared at cycle boundaries. The last USEPAGE before a cycle boundary should be followed by a PAGE command.
Example See ‘Example 2: set handling’ on page 440.
DELIVERSyntax
DELIVER
Functionality This command marks the current position as a set boundary.
The DELIVER command implicitly generates a set boundary. This set boundary generates a conditional sheet boundary.
Example The following commands will deliver two duplex pages , followed by one simplex page, until all data pages are printed:
DUPLEX ONCYCLESTARTGETPAGE <id>
USEPAGE <id>PAGEGETPAGE <id>
USEPAGE <id>PAGEGETPAGE <id>
USEPAGE <id>PAGEDELIVER
CYCLEEND

Page and page set processing 431
DUPLEXSyntax
DUPLEX { on | off }
Function The DUPLEX command selects the duplex or simplex printing mode for the sheets to be printed next.
The DUPLEX command implicitly generates a conditional sheet boundary.
Relationship If the TRAY command specifies printing from tray 0 (manual feed), then the DUPLEX command will be ignored.
Example See ‘Example 3: header/trailer handling’ on page 441.
FORMSyntax
FORM [<formname>] [<page_select>] [<layer>]
Where:
■ formname is any valid FOL, PCL or PostScript form■ page_select is FRONT or REAR■ layer is overlay or underlay.
Function The FORM command adds the form <formname> to the list of forms to be used for overlaying/underlaying.
If no attributes are specified, the list of overlays and underlays specified in the PagePIF is cleared. It is not possible to clear the list of overlays or underlays that are specified in the corresponding job/segment ticket.
If underlays are specified in a ticket, they are rendered before the PagePIF underlays. If overlays are specified in a ticket, they are rendered after the PagePIF overlays.
The page_select argument assumes that printing is duplex. If, e.g., the job ticket specifies simplex printing, front and rear forms will alternate on the front page. The following commands:

432 Océ Power Print Controller Technical Reference Manual
FORM form1 FRONT OVERLAYFORM form2 REAR OVERLAY
Note: The TIFF interpreter cannot be configured as a form PDL. For more information refer to the Océ Power Print Controller TIFF Reference Guide.
will have the following effect with duplex and with simplex:
[113] Effect of page_side = rear with both duplex and simplex printing
Relationship You cannot use more than 20 forms within a PagePIF.
Example See ‘Example 1: page handling’ on page 438.
GETPAGESyntax
GETPAGE <page_id>
Functionality This command assigns the label <page_id> to the next input page that is scheduled by the interpreter that handles the job data. An earlier page with the same id cannot be referenced any more.
A list of buffered input pages with their corresponding page_id is maintained.
Relationship The USEPAGE <page_id> command can be used to print one of the buffered input pages.
= form 1
Duplex printing
Duplex printing is overruled by simplex in the job ticket
= form 2
Front Back Front Back
Duplex Printing
Duplex Printing is overruled by simplex in the job ticket

Page and page set processing 433
The list of input pages with their assigned page_id is cleared at each cycle boundary.
Example See ‘Example 1: page handling’ on page 438.
JOGSyntax
JOG { on | off }
Functionality The JOG command sets the jog attribute for subsequent output sets on or off.
The JOG command implicitly generates a set boundary. This set boundary generates a conditional sheet boundary.
If the COPIES command specifies a number of collated copies, then the jog attribute is used for each copy of the set.
Note: It is not sure whether the first copy of the current job (i.e. the job where the jog command is set to on) will be jogged with respect to the last copy of the previous job. It depends on the jog setting during the previous job.
PAGESyntax
PAGE
Functionality A logical output page is printed. This means that all FORM underlays, overlays and USEPAGE commands generate printable information for the current logical page. The logical page is then printed. If printing is one-up, the PAGE command also generates a page side boundary. If printing is two-up or four-up, every second or fourth page command generates a page side boundary.
Relationship If the ticket specified MULTIPLEUP 2 or MULTIPLEUP 4, a page side boundary is only generated when the number of pages reaches the number of images to be printed upon one physical page side.If the ticket specifies duplex on, the page side and print mode as specified in the PagePIF will be overruled.

434 Océ Power Print Controller Technical Reference Manual
Example See ‘Example 1: page handling’ on page 438.
PAGESIDESyntax
PAGESIDE <page_side>
<page_side> = { front, rear }
Function The PAGESIDE command specifies that the next page should be printed on a front or rear (back) side.
If no page side is specified, then the page side for the next page to be printed is determined implicitly:
■ when printing duplex, and the last page was a front, the next page side will automatically be a rear.
■ when printing duplex, and the last page was a rear, the next page side will automatically be a front.
PAGESIDE rear is ignored when the print mode is set to simplex (DUPLEX off) or when on job or segment level the duplex attribute or multipleup attribute is set.
Relationship Sheet boundaries set the page side attribute for the next page to be printed to ‘front’.
REMSyntax
REM: <string>
Where <string> can be one line of text.
Function Any line starting with ‘REM:’ is treated as comment and is not part of the information stored in the PagePIF. Comment is used to make the PagePIF more readable and understandable. When parsing a PagePIF, the printer skips comment lines.

Page and page set processing 435
Note: ‘REM’ is followed by a colon (:).‘REM:’ cannot be combined with other PagePIF commands on one line.If you add comment which is longer than one line, do not forget to add the ‘REM:’ command before each line.
SETSIZESyntax
SETSIZE <setsize>
Functionality This command sets an upper limit <setsize> to the number of output sheets in subsequent sets.
If <setsize> is set to a positive value, the SETSIZE command implicitly generates a set boundary each time the number of physical output sheets becomes equal to <setsize>. This set boundary generates a conditional sheet boundary.
If <setsize> is set to zero, SETSIZE processing is disabled and no implicit set boundaries will be generated.
STAPLESyntax
STAPLE { on | off }
Functionality The STAPLE command sets the staple attribute for subsequent output sets on or off.
The STAPLE command implicitly generates a set boundary. This set boundary generates a conditional sheet boundary.
If there is only one sheet in a set, the staple attribute will be ignored.
Note: SETSIZE + FLAGSHEET + STAPLE implies that the flagsheet is not stapled to the data.
Relationship If the COPIES command specifies a number of collated copies, then the staple attribute is used for each copy of the set.
Example See ‘Example 2: set handling’ on page 440.

436 Océ Power Print Controller Technical Reference Manual
TRAYSyntax
TRAY <traynumber>
<traynumber> = { 0, 1, 2, 3, 4, 5, ... }
where for the Océ 8400 Series printer:
■ 1 = upper paper tray■ 2 = middle paper tray■ 3 = lower paper tray■ 4 = bulk tray
Function The TRAY command selects an input tray for the sheets to be printed next.
The available trays (2 on a Dual Paper Tray configuration and 3 on a Triple Paper Tray configuration) are numbered from bottom to top. The higher the tray number, the higher the physical position of the tray.
If you select a tray which is not available (e.g. tray 3 on a Dual Paper Tray configuration), then the highest available tray number is used instead (tray 2 for this example).
The TRAY command implicitly generates a conditional sheet boundary.
Relationship Duplex printing cannot be combined with TRAY 0 (manual feed). In that case, printing will be done in simplex mode (DUPLEX on will be ignored).
Example See ‘Example 3: header/trailer handling’ on page 441.
Note: The projection of logical input trays on physical input trays can change the behaviour of the TRAY command.

Page and page set processing 437
USEPAGESyntax
USEPAGE <page_id>
Functionality This command specifies that the input page identified by <page_id> must be printed on the next (logical) output page.
Relationship A page with a given page_id can only be used if an input page was previously assigned to this page_id (GETPAGE command).
Example See ‘Example 1: page handling’ on page 438.

438 Océ Power Print Controller Technical Reference Manual
PagePIF examples
Example 1: page handling
Consider a job with the following structure:
[114] Example: page handling
The complete job must be printed from bin 10. Version A input pages must be printed on paper from tray 1, with form ‘address’ as overlay.Version B and C input pages must be printed on paper from tray 2, with form ‘invoice’ as overlay.
The number of output pages is a multiple of three. When the number of input pages is not a multiple of three, some output pages are printed without any input data. On these only the form is printed.
example1.tck
Process:BIN 10
PAGEPIF example1.ppf
example1.ppf
Data 1Version A
Data 1Version B
Data 1Version C
Data 2 Version A
Data 2Version B
Data 2Version C

Page and page set processing 439
REM: Start of file, implicit CYCLESTARTREM: Clear active PagePIF forms
FORM
REM: Activate overlay <address>FORM address OVERLAY
REM: Print from tray 1
TRAY 1REM: Get/use/print data page one of three
GETPAGE 1of3
USEPAGE 1of3PAGE
REM: No usepage active
REM: Overlay <address> still activeREM: Tray 1 still activeREM: Clear active PagePIF forms
FORM REM: Activate overlay <invoice>
FORM invoice OVERLAY
REM: Print from tray 2 (set boundary)TRAY 2
REM: Get/use/print data page two of three
GETPAGE 2of3USEPAGE 2of3PAGE
REM: No usepage activeREM: Overlay <invoice> still activeREM: Tray 2 still active
REM: Get/use/print data page three of threeGETPAGE 3of3USEPAGE 3of3
PAGE REM: No usepage activeREM: Overlay <invoice> still active
REM: Tray 2 still activeREM: End of file, implicit CYCLEENDREM: Cycle getpages cannot be used any more

440 Océ Power Print Controller Technical Reference Manual
Example 2: set handlingConsider a job with the following structure:
[115] Example: set handling
This complete job must be printed and delivered into the Finisher.
The header must be skipped.Each set of 3 data pages must be printed twice. Each set must be stapled.
example2.tck
Process :REM: Separate job in sets of three pages
SETSIZE 3REM: Make two collated copies of each set
COPIES 2
REM: Staple each setSTAPLE ONPAGEPIF example2.ppf
example2.ppf
REM: Start of file, header page
REM: Get the header pageGETPAGE header
REM: Don’t use the header page
CYCLESTARTREM: Header page cannot be used any moreREM: Get/use/print data page
GETPAGE dataUSEPAGE dataPAGE
REM: End of file, implicit CYCLEENDREM: Cycle getpages cannot be used any more
Data1a
Data1b
Data1c
Data1a
Data1b
Data1c
Header
Set 1 Set 2

Page and page set processing 441
Example 3: header/trailer handlingConsider a job with the following structure:
[116] Example: header/trailer handling
From this job one version must be printed, simplex, in bin 5.The header and trailer pages must be printed on paper from tray 1, with the form ‘special’ as overlay.The data pages must be printed on paper from tray 2, with the form ‘dataform’ as overlay.
example3.tck
Process :
DUPLEX OFFBIN 5PAGEPIF example3.ppf
example3.ppf
Data1
Data2
Data3
Data4
TrailerHeader

442 Océ Power Print Controller Technical Reference Manual
REM: Start of file, header page partREM: Print from tray 1
TRAY 1
REM: Activate overlay <special>FORM special OVERLAY
REM: Get/use/print the header page
GETPAGE headerUSEPAGE headerPAGE
REM: initialise for cyclic partREM: Print from tray 2
TRAY 2
REM: Clear active PagePIF formsFORM
REM: Activate overlay <dataform>
FORM dataform OVERLAYCYCLESTART
REM: Header page not usable any more
REM: page(s) from earlier cycle not usableREM: Get/use/print the header page
GETPAGE data
USEPAGE dataPAGE
REM: Set the cycleend
CYCLEENDREM: last cycle getpage not usable any moreREM: Print from tray 1 (set boundary)
TRAY 1REM: Clear active PagePIF forms
FORM
REM: Activate overlay <special>FORM special OVERLAY
REM: Get/use/print the trailer page
GETPAGE trailerUSEPAGE trailerPAGE
REM: End of file, implicit CYCLEENDREM: trailer getpage cannot be used any more

Page and page set processing 443
Example 4: multi-level form selectionThe input data pages from our job should be used on every second logical page of a two-up simplex sheet. On the first logical page we print an ‘intro’ form without any data. On the second logical page we print an ‘account’ form overlaid with the job data.
Moreover, the whole job should be printed simplex and overlaid with a ‘specimen’ form.
In the PagePIF, the appropriate forms (‘intro’ and ‘account’) are selected based on the PagePIF page side. The ticket, which has priority over the PagePIF, forces the complete job to print simplex two-up.
Note: The forms selected in the PagePIF do not depend on attributes set in the higher level ticket and cannot be changed by those.
example4.tck
Process :
DUPLEX OFFMULTIPLEUP 2FORM specimen OVERALY
PAGEPIF example4.ppf
example4.ppf
REM: Start of file, initialise cyclic partREM: Select forms based on page side
DUPLEX onREM: Activate overlay <intro> for front sides
FORM intro OVERLAY FRONT
REM: Activate underlay <account > for back sidesFORM account UNDERALY REARCYCLESTART
REM: Print the front (only form)PAGE
REM: Get/use/print a “rear” data page
GETPAGE rearUSEPAGE rearPAGE
REM: End of file, implicit CYCLEEND

444 Océ Power Print Controller Technical Reference Manual
Example 5: multiple-up independent of PDL set boundariesFor this job, the job data is divided in sets of pages by PDL-generated set boundaries. These PDL boundaries must be ignored and the job should be printed 4-up in sets of 5 duplex sheets. Each of these sets should be stapled.
With a PagePIF you can effectively suppress PDL set boundaries and the side effects which they have on page level processing at the ticket level.
If the job would be printed without the PagePIF, each set boundary generated by the PDL would terminate the page level processing for a sheet. As a result, you would obtain simplex pages (no data on the back side) and possibly less than 4 logical pages on a page side.
example5.tck
Process :
MULTIPLEUP 4SETSIZE 5
STAPLE ONDUPLEX ONPAGEPIF example5.ppf
example5.ppf
REM: Start of file, implicit CYCLESTART
REM: Get/use/print a data pageGETPAGE dataUSEPAGE data
PAGE REM: End of file, implicit CYCLEEND

445
Océ Power Print Controller
Technical Reference Manual
Chapter 22Document separation
This chapter describes how document separation can be accomplished on an Océ Power Print Controller printer.The table included on page 447 presents an overview of possible document separation options, which have been discussed in the previous chapters.
446 Océ Power Print Controller Technical Reference Manual
Processing data as jobs and segments
As described in ‘Job separation and segmentation’ on page 353, the printer divides the data stream it receives into jobs. These jobs each consist of one or more segments.
For each job, a job ticket that specifies the processing (such as staple, jog, setsize, pagePIF) for all segments of the job is used. Likewise, a segment ticket that specifies the processing (such as staple, jog, setsize, pagePIF) for this segment of the job is used for each segment.
The job data in each segment specifies pages which are separated from each other by means of the document separation commands embedded in the job data.
Furthermore, the printer can be configured via KOS to separate each job from the next one.
Thus, document separation actions can be specified in:
■ job ticket attributes (jog/staple/setsize)■ KOS job separation setting (enable/disable)■ segment ticket attributes (jog/staple/setsize)■ pagePIF attributes (jog/staple/setsize/deliver)■ job data (depends on the PDL that is used).
The sequence in which the document separation actions are presented above, corresponds to the general JAC priority scheme. When a higher level requests a certain behaviour, the equivalent request on a lower level is ignored. Furthermore, in case of related requests, the lower level one may be influenced by the higher level one. For example, when a pagePIF is used, document separation requests by the job data are ignored.
The job separation setting in KOS only has effect when it is enabled. In that case, it forces a jog between each copy or processing pass of the job when the corresponding job ticket does not request either ‘jog on’ or ‘jog off’.
Details on the order of priority and on dependencies between attributes can be found throughout the previous chapters in this JAC volume.

Document separation 447
Document separation overview
The table below consists of two halves.
The left part indicates the levels where document separation requests may be specified:■ in the job ticket (pass) or KOS job separation setting■ in the segment ticket■ in the pagePIF, or the PDL data (when no pagePIF is used).
For the left part, the following notations are used:■ ‘-’ = not specified on this level■ ‘y’ = defined as ‘on’■ ‘n’ = defined as ‘off’■ ‘*’ = not applicable (both ‘enabled’ and ‘disabled’ are valid).
The right half of the table gives the possible and allowed document separation commands resulting from the requests specified in the left half.
For the right part, the following notations are used:■ ‘none’ = suppress document separations at this place■ ‘y’ = defined as ‘on’■ ‘n’ = defined as ‘off’.
Separation specified at level Separation action at place
Job ticket (pass) Segment ticket
PagePIFPDL
End of pass End of seg-ment
In segment
Jog Stap. Sep. Jog Stap Jog Stap Jog Stap Jog Stap Jog Stap
- - n - - n n n n n n n n
- - y - - n n y n n n n n
- - n - - n y n y n y n y
- - y - - n y y y n y n y
- - * - - y n y n y n y n
- - * - - y y y y y y y y
- - n - n n * n n n n n n
- - y - n n * y n n n n n
- - * - n y * y n y n y n
- - n - y n * n y n y none
- - y - y n * y y n y none
[117] Document separation overview table

448 Océ Power Print Controller Technical Reference Manual
- - * - y y * y y y y none
- - n n - * n n n n n n n
- - y n - * n y n n n n n
- - n n - * y n y n y n y
- - y n - * y y y n y n y
- - * y - * n y n y n n n
- - * y - * y y y y y n y
- - n n n * * n n n n n n
- - y n n * * y n n n n n
- - n n y * * n y n y none
- - y n y * * y y n y none
- - * y n * * y n y n n n
- - * y y * * y y y y none
- n n - * n * n n n n n n
- n y - * n * y n n n n n
- n * - * y * y n y n y n
- n n n * * * n n n n n n
- n y n * * * y n n n n n
- n * y * * * y n y n n n
- y n - * n * n y none none
- y y - * n * y y none none
- y * - * y * y y none none
- y n n * * * n y none none
- y y n * * * y y none none
- y * y * * * y y none none
n - * * - * n n n n n n n
n - * * - * y n y n y n y
n - * * n * * n n n n n n
n - * * y * * n y n y none
y - * * - * n y n n n n n
y - * * - * y y y n y n y
y - * * n * * y n n n n n
y - * * y * * y y n y none
n n * * * * * n n n n n n
n y * * * * * n y none none
y n * * * * * y n n n n n
y y * * * * * y y none none
Separation specified at level Separation action at place
Job ticket (pass) Segment ticket
PagePIFPDL
End of pass End of seg-ment
In segment
Jog Stap. Sep. Jog Stap Jog Stap Jog Stap Jog Stap Jog Stap
[117] Document separation overview table (continued)

449
Océ Power Print Controller
Technical Reference Manual
Chapter 23JAC logical error messages
This chapter provides an overview of all JAC-related error messages and how to solve the errors.

450 Océ Power Print Controller Technical Reference Manual
General characteristics of logical errors
JAC logical error messages are printed on a JAC logical error page.
JAC logical error messages are not directly related to any specific PDL or PDL error page.
Error classes
JAC logical error messages are grouped into 3 classes.
Class 1 Class 1 errors have the largest impact on the result of the print job. These errors include:
■ JEC syntax errors■ ticket structure errors.
For example, JEC commands used in the wrong order, or process and download attributes used within the same ticket.
Class 2 Syntax errors in ticket attributes and SIFs.
Class 3 Unsolved references and too complex print data.
For example, non-existing forms or flagsheets, or jobs which are too complex to collate multiple copies.
As a result of errors in class 1 and 2 and most errors in class 3, the print job itself will not be printed; only the logical error page will be printed (if enabled).
Some class 3 errors are detected during processing of the print job. When such an error is detected, the currently active processing pass is stopped and, if enabled, the logical error page is printed. These class 3 errors are marked with the message “CHECK OUTPUT” on the error page. All preceding and following process passes are executed as usual.

JAC logical error messages 451
Logical error pageIf the ‘Print Logical Error’ option is set to ON (in KOS), logical error messages are printed on a logical error page and deposited in the bypass tray. If this switch is disabled, the logical error message is not visible for the user. A logical error page cannot contain more than 10 error messages.
Class 1 error messages are printed with the highest priority, followed by class 2 messages and class 3.
The error messages are maximum 80 characters long. Longer messages are truncated to 80 characters.
Notation conventions for logical errors
In this chapter, the logical error messages are listed in alphabetical order. Each logical error is listed together with the description of the included variable (if any), the class to which it belongs (1, 2 or 3), the result it has on the print job and one or more remedies to avoid this kind of error in the future.
The following assumptions are made in this chapter:
■ The JEC marker used in this chapter is ‘*JEC”■ The ‘Print Logical Error’ option is set to ON.
The first part of the message specifies the kind of error. These are, in alphabetical order:
■ ART Errors: these are errors related to the ART (Association Rules Table) mechanism
■ FLG Errors: flagsheet errors■ FRM Errors: form errors■ JOB Errors: these job processing errors are mostly due to the use of very
complex forms and/or print data. They can be avoided by increasing the internal memory of the printer.
■ PGP Errors: PagePIF errors■ SIF Errors: Separation Instruction File errors■ TCK Errors: ticket errors.

452 Océ Power Print Controller Technical Reference Manual
Logical errors overview
“ART ERROR: ART file xxxx, block [yyyy] error BLOCK_ART id”
Variable: xxxx is the ART filename.yyyy is the block number in the ART file.
Explanation: ART files consist of blocks, starting with BLOCK_ART and ending with ENDBLOCK. The specified block in the ART file contains BLOCK_ART, followed by an incorrect parameter. Usually this is caused by a missing leading or terminating quote.
Class: 2
Result: Logical error page printed; print job is not printed.
Remedy: Print the ART file with the RO Proof function, using KOS, refer to the System Administration Manual. The proof function generates an error page with the exact error identification and location.Download a correct ART file, see ‘ART file syntax’ on page 342.
“ART ERROR: ART file xxxx, block[yyyy] error in ‘zzzz’”
Variable: xxxx is the ART filename.yyyy is the block number in the ART filezzzz is the name of an entry in the block.
Explanation: ART files consist of blocks, starting with BLOCK_ART and ending with ENDBLOCK. The specified block in the ART file contains an invalid entry name “zzzz”.
Class: 2
Result: Logical error page printed; print job is not printed.
Remedy: Print the ART file with the RO Proof function, using KOS, refer to the System Administration Manual. The proof function generates an error page with the exact error identification and location.Download a correct ART file, see ‘ART file syntax’ on page 342.

JAC logical error messages 453
“ART ERROR: Cannot open ART file xxxx”
Variable: xxxx is the name of the required ART.
Explanation: The default ART is not present on the system. The active ART file is deleted from the print system.
Class: 2
Result: Logical error page printed; print job is not printed.
Remedy: Select another ART via KOS. Refer to the System Administration Manual.orDownload the required ART again.
“ART ERROR: Ticket variable xxxx invalid”
Variable: xxxx is the invalid ticket variable.
Explanation: In the ART the ticket attribute can contain a variable argument. The variable should be one of the available identification attributes. When this is not the case, this message is displayed.
Class: 1
Result: Logical error page printed; print job is not printed.
Remedy: Use ticket identification attributes for variables.
“ART ERROR: Ident attribute xxxx not found for current job”
Variable: xxxx is the ART identification attribute.
Explanation: In the ART the ticket attribute can contain a variable argument. In this case, a valid identification attribute is used as variable, but it has not been used for the current job.
Class: 1
Result: Logical error page printed; print job is not printed.

454 Océ Power Print Controller Technical Reference Manual
Remedy: Do not use variables in this job, or use one that is defined in this job.
“ART ERROR: Ident attribute xxxx is empty”
Variable: xxxx is the ART filename.
Explanation: In the ART the ticket attribute can contain a variable argument. A valid identification attribute is found, but it is empty, so no ticket can be selected.
Class: 1
Result: Logical error page printed; print job is not printed.
Remedy: Do not use variables in this job, or use one with a valid filling.
“FLG ERROR: flagsheet xxxx does not exist”
Variable: xxxx is the name of the unknown flagsheet.
Explanation: A print job uses a flagsheet which has not previously been downloaded to the printer.
Class: 3
Result: Logical error page printed; print job is not printed.
Remedy: Download a new flagsheet or use a printer-resident flagsheet.
“FLG ERROR: flagsheet emulation xxxx not supported”
Variable: xxxx is the name of the emulation which is not supported.
Explanation: A flagsheet is downloaded with a ticket indicating an emulation that is not configured for flagsheets.
Class: 3
Result: Logical error page printed; flagsheet not downloaded.

JAC logical error messages 455
Remedy: Create the flagsheet again with a different emulation and/or download the flagsheet with the correct emulation attribute.Another possibility is to configure the requested flagsheet emulation.
“FLG ERROR: number of pages in flagsheet xxxx not 1 : CHECK OUTPUT”
Variable: xxxx is the name of the flagsheet.
Explanation: A flagsheet can only be one page. Any larger number of pages results in this message.
Class: 3
Result: Job data is processed until the error is detected.
Remedy: Download one-page flagsheets.
“FRM ERROR: form xxxx does not exist”
Variable: xxxx is the name of the unknown form.
Explanation: A print job uses a form which has not previously been downloaded to the printer.
Class: 3
Result: Logical error page printed; print job is not printed.
Remedy: Download a new form or use a printer-resident form.
“FRM ERROR: form xxxx too complex”
Variable: xxxx is the name of the form that is too complex.
Class: 3
Result: Logical error page printed; print job is not printed.
Remedy: Use less complex forms.
456 Océ Power Print Controller Technical Reference Manual
“FRM ERROR: form emulation xxxx not supported”
Variable: xxxx is the name of the emulation which is not supported.
Explanation: A form is downloaded with a ticket indicating an emulation that is not configured for forms.
Class: 3
Result: Logical error page printed; form not downloaded.
Remedy: Create the form again with a different emulation and/or download the form with the correct emulation attribute.Another possibility is to configure the requested form emulation.
“FRM ERROR: number of pages in form xxxx not 1”
Variable: xxxx is the name of the form.
Class: 3
Explanation: A form can only be one page. Any larger number of pages results in this message.
Result: Logical error page printed, print job not printed.
Remedy: Download one-page forms.
“FRM ERROR: user-interaction request in form xxxx”
Variable: xxxx is the name of the form.
Class: 3
Explanation: A form is used which calls for user interaction, e.g. security printing.This is not supported for forms.
Result: Logical error page printed; print job is not printed.
Remedy: Do not call for user interaction from within forms.
JAC logical error messages 457
“JOB ERROR: emulation xxxx not supported”
Variable: xxxx is the emulation which is not supported.
Explanation: A job is printed with a ticket indicating an emulation that is not configured as a print context.
Class: 3
Result: Logical error page printed; print job is not printed.
Remedy: Create the print job again with a different emulation and/or send the print job again with the correct emulation attribute.Another possibility is to configure the required print context.
“JOB ERROR: forms too complex”
Explanation: The combination of all forms used in a job makes it too complex for processing.
Class: 3
Result: Logical error page printed; print job is not printed.
Remedy: Use fewer, or less complex forms.Another possibility is to add more memory to the printercontroller and to adjust the memory allocation for the corresponding form emulation.
“JOB ERROR: job too complex for binding : CHECK OUTPUT”
Explanation: For binding purposes, the contents of front and back sides of the sheet are shifted with respect to the physical page.Due to some PDL commands/characteristics, ‘front side’ pages might be positioned on the back.With very complex pages it may be impossible to format this page again.This problem is visible in that one edge of the page is clipped.
Class: 3
Result: Job data is processed as much as possible.

458 Océ Power Print Controller Technical Reference Manual
Remedy: Check the output.Do not use bindingorprint the job as simplexoradd more memory to the printer controller and adjust the memory allocation for the corresponding emulation.
“JOB ERROR: job too complex for front/rear forms : CHECK
OUTPUT”
Explanation: A job with complex data pages is printed with different forms on front and back sides of the sheet.Due to certain PDL commands/characteristics, ‘front side’ pages may be positioned on the back side.With very complex pages it may be impossible to format this page again.This problem is visible in that front and back forms are mixed up.
Class: 3
Result: Job data is processed as far as possible.
Remedy: Check the output.Do not use different forms on front and back sideorprint the job as simplexoradd more memory to the printer controller and adjust the memory allocation for the corresponding emulation.
“JOB ERROR: job too complex for pagepif: CHECK OUTPUT”
Explanation: The job, or part of the job, is too complex (too large) to be processed by the selected PagePIF.
Class: 3
Result: Job data is processed by PagePIF as far as possible, remainder of the job is printed without the PagePIF.

JAC logical error messages 459
Remedy: Check the output.Make the print job less complexorreduce the number of pages that is buffered by the PagePIForadd more memory to the printer controller and adjust the memory allocation for the corresponding emulation.
“JOB ERROR: job too complex to collate (PDL) : CHECK
OUTPUT”
Explanation: Via the job data a job is defined with multiple collated copies.The job, or part of the job, is too complex (too large) to be processed this way.
Class: 3
Result: Job data is processed as much as possible.
Remedy: Check the output.Do not collate complex jobs, oradd more memory to the printer controller and adjust the memory allocation for the corresponding emulation.
“JOB ERROR: job too complex for sameup: CHECK OUTPUT”
Explanation: The job, or part of the job, is too complex (too large) to be processed multiple up sameup.
Class: 3
Result: Job data is processed as much as possible.
Remedy: Check the output.Do not use multiple up sameup in complex jobs, oradd more memory to the printer controller and adjust the memory allocation for the corresponding emulation.

460 Océ Power Print Controller Technical Reference Manual
“JOB ERROR: layoutpif not supported on this channel”
Explanation: LayoutPIF is only supported for FOL print contexts. The print job has a ticket which selects a LayoutPIF, but it has selected a non-FOL print context.
Class: 3
Result: Logical error page printed; print job is not printed.
Remedy: Do not select a LayoutPIF unless the job is handled by a FOL print context.
“JOB ERROR: multiple-up no autoscale supported”
Explanation: Currently, multiple-up does not support the autoscaling functionality.
Class: 3
Result: Logical error page printed; print job is not printed.
Remedy: Do not use autoscaling for multiple-up.
“JOB ERROR: no multi processing; dependent job”
Explanation: This error can only occur on host communication channels that are configured for dependent jobs, i.e. the channel is linked to a print context which is used solely for that particular channel.A job ticket is defined with multiple processing passes which require re-interpretation of the print joborthe job data is too complex (too large) to be processed this way.
Class: 3
Result: Logical error page printed; not all processing passes are printed.
Remedy: Check the output.Send the job again for the remaining processing passes.

JAC logical error messages 461
“JOB ERROR: no multi processing; job not spooled”
Explanation: This error can only occur on host communication channels that do not buffer the complete job.A job ticket is defined with multiple processing passes which require re-interpretation of the print job.
Class: 3
Result: Logical error page printed; not all processing passes are printed.
Remedy: Check the output.Send the job again for the remaining processing passes.
“JOB ERROR: no multi processing; job too complex”
Explanation: This error can occur on host communication channels that do not buffer the complete job.A job ticket is defined with multiple processing passes and the job data is too complex (too large) to be processed this way.
Class: 3
Result: Logical error page printed; only one processing pass printed.
Remedy: Check the output.Send the job again for the remaining processing passes.
“JOB ERROR: no multi processing; not enough spool space”
Explanation: This error can only occur on host communication channels that buffer the print job, when there is not enough space on the internal hard disk of the printer to store the entire print job.A job ticket is defined with multiple processing passes.
Class: 3
Result: Logical error page printed; not all processing passes are printed.
Remedy: Check the output.Send the job again for the remaining processing passes

462 Océ Power Print Controller Technical Reference Manual
or add a larger disk and increase the spooling area.
“JOB ERROR: not all copies printed; dependent job”
Explanation: This error can only occur on host communication channels that are configured for dependent jobs, i.e. the channel is linked to a print context which is used solely for that particular channel.A job ticket is defined with multiple copies in combination with COLLATE. The job data is too complex (too large) to be processed this way.
Class: 3
Result: The number of copies that is printed is smaller than the required number of copies.
Remedy: Check the output.Send the job multiple times to achieve the required number of copiesoradd more memory to the printer controller and adjust the memory allocation for the corresponding emulation.
“JOB ERROR: not all copies printed; job not spooled”
Explanation: This error can only occur on host communication channels that do not buffer the complete job.A job ticket is defined with multiple copies in combination with COLLATE.
Class: 3
Result: The number of copies that is printed is smaller than the required number of copies.
Remedy: Check the output.Send the job multiple times to achieve the required number of copies.

JAC logical error messages 463
“JOB ERROR: not all copies printed; job too complex”
Explanation: This error can only occur on host communication channels that do not buffer the complete job.A job ticket is defined with multiple copies in combination with COLLATE. The job data is too complex (too large) to be processed this way.
Class: 3
Result: The number of copies that is printed is smaller than the required number of copies.
Remedy: Check the output.Send the job multiple times to achieve the required number of copiesoradd more memory to the printer controller and adjust the memory allocation for the corresponding emulation.
“JOB ERROR: not all copies printed; not enough spool space”
Explanation: This error can only occur on host communication channels that buffer the print job, when there is not enough space on the internal hard disk of the printer to store the entire print job.A job ticket is defined with multiple copies in combination with COLLATE. The job data is too complex (too large) to be processed this way.
Class: 3
Result: The number of copies that is printed is smaller than the required number of copies.
Remedy: Check the output.Send the job multiple times to achieve the required number of copiesor add a larger disk and increase the spooling area.

464 Océ Power Print Controller Technical Reference Manual
“JOB ERROR: not all segment copies printed; dependent job”
Explanation: This error can only occur on host communication channels that are configured for dependent jobs, i.e. the channel is linked to a print context which is used solely for that particular channel.A segment ticket is defined with multiple copies in combination with COLLATE. The segment data is too complex (too large) to be processed this way.
Class: 3
Result: The number of copies that is printed is smaller than the required number of copies.
Remedy: Check the output.Send the segment multiple times to achieve the required number of copiesoradd more memory to the printer controller and adjust the memory allocation for the corresponding emulation.
“JOB ERROR: not all segment copies printed; job not
spooled”
Explanation: This error can only occur on host communication channels that do not buffer the complete job.A segment ticket is defined with multiple copies in combination with COLLATE.
Class: 3
Result: The number of copies that is printed is smaller than the required number of copies.
Remedy: Check the output.Send the segment multiple times to achieve the required number of copies.

JAC logical error messages 465
“JOB ERROR: not all segment copies printed; job too complex”
Explanation: This error can only occur on host communication channels that do not buffer the complete job.A segment ticket is defined with multiple copies in combination with COLLATE. The segment data is too complex (too large) to be processed this way.
Class: 3
Result: The number of copies that is printed is smaller than the required number of copies.
Remedy: Check the output.Send the segment multiple times to achieve the required number of copiesoradd more memory to the printer controller and adjust the memory allocation for the corresponding emulation.
“JOB ERROR: not all segment copies printed; not enough spool space”
Explanation: This error can only occur on host communication channels that buffer the print job, when there is not enough space on the internal hard disk of the printer to store the entire segment.A segment ticket is defined with multiple copies in combination with COLLATE. The segment data is too complex (too large) to be processed this way.
Class: 3
Result: The number of copies that is printed is smaller than the required number of copies.
Remedy: Check the output.Send the segment multiple times to achieve the required number of copiesoradd a larger disk and increase the spooling area.

466 Océ Power Print Controller Technical Reference Manual
“JOB ERROR: not all segment copies printed; segmented job”
Explanation: This error can only occur for print jobs that consist of multiple segments.A segment ticket is defined with multiple copies in combination with COLLATE. The segment data is too complex (too large) to be processed this way, and the segment is not the first one of the print job.
Class: 3
Result: The number of copies that is printed is smaller than the required number of copies.
Remedy: Check the output.Send the segment multiple times to achieve the required number of copies.
“JOB ERROR: overwrite protection for downloading”
Explanation: The print job attempts to download an ART, flagsheet, font, form, LayoutPIF, PagePIF, SIF or ticket while there is already such an object with the same name and type.
Class: 3
Result: Logical error page printed, object not downloaded.
Remedy: Use a different name for the object.orEnable overwrite in KOS. Refer to the System Administration Manual for more information on how to do so.
“JOB ERROR: Only resolution 240 supported for IPDS”
Explanation: IPDS print jobs can only be printed at 240 dpi.
Class: 3
Result: Logical error page printed; print job is not printed.
Remedy: Do not select other resolutions than 240 dpi for IPDS print jobs.

JAC logical error messages 467
“JOB ERROR: resolution 240 not supported for PCL5”
Explanation: Emulation PCL5 does not support 240 dpi.
Class: 3
Result: Logical error page printed; print job is not printed.
Remedy: Do not use 240 dpi for PCL5 print jobs.
“JOB ERROR: resolution xxx not supported”
Explanation: The ticket of a print job requests a resolution of xxx dpi, but the printer is only configured to support lower or highr resolutions.
Class: 3
Result: Logical error page printed; print job is not printed.
Remedy: Use another resolutionorchange the maximum resolutin of the printer, if the printer is able to support the requested resolution.
“JOB ERROR: selected forms for this job too complex”
Explanation: The combination of all forms used in a job makes it too complex for processing.
Class: 3
Result: Logical error page printed; print job is not printed.
Remedy: Use fewer, or less complex forms, or increase the dll space for the appropriate forms PDL.
“JOB ERROR: too many forms”
Explanation: The total number of forms used in this print job is too large (more than 40).

468 Océ Power Print Controller Technical Reference Manual
Class: 3
Result: Logical error page printed; print job is not printed.
Remedy: Forms can be requested in (one of ) the processins pass(es) of a job ticket, in a PagePIF selected in (one of) the processing pass(es) of a job ticket, in (one of) the segment ticket(s) of the job and/or in a PagePIF selected in (one of) the segment ticket(s) of the job.If there are multiple processing passes which use different forms, the printer attempts to handle these passes in the most efficient way (based on re-rendering). This requires that all forms requested in a process pass which will be handled through re-rendering are cached simultanuously. By forcing reinterpretation of the spooled data for each of the process passes, only the forms of one process pass need to be cached simultanuously.If there are multiple processing passes which use different forms, only combine passes that use the same forms in one print job, and send the print job again for the remaining processing passes.If that is not sufficient, and there are processing passes requesting collated copies, do not use multiple copies. Send the print job again for the remaining copies.If that is not sufficient, use fewer forms.
“JOB ERROR: user-interaction in job with pagepif: CHECK OUTPUT”
Explanation: The use of a PagePIF cannot be combined with user-interaction requests from the job data.
Class: 3
Result: Job data is processed by the PagePIF as far as possible, user interaction is performed and the remainder of the job is printed without the PagePIF.
Remedy: Do not use a PagePIF in combination with user interaction requests in the job data.
“PGP ERROR: xxxx: CYCLESTART after CYCLEEND”
Variable: xxxx is the name of the PagePIF.

JAC logical error messages 469
Explanation: The commands CYCLESTART and CYCLEEND may occur only once in each PagePIF, and in that order. In this PagePIF, the CYCLEEND command is found before the CYCLESTART command.
Class: 3
Result: Logical error page printed, print job is not printed.
Remedy: Remove the CYCLEEND command or add a CYCLESTART before it.
“PGP ERROR: xxxx: Empty file”
Variable: xxxx is the name of the PagePIF.
Explanation: A job is printed with a ticket indicating a PagePIF which is empty. Probably, the PagePIF was downloaded incorrectly.
Class: 3
Result: Logical error page printed, print job is not printed.
Remedy: Use another PagePIF or download the PagePIF again.
“PGP ERROR: xxxx: id yyyy invalid, value zzzz”
Variable: xxxx is the name of the PagePIF.yyyy is the name of a PagePIF identifier.zzzz is the value of the PagePIF identifier.
Explanation: The PagePIF contains an invalid identifier.
Class: 3
Result: Logical error page printed, print job is not printed.
Remedy: Proof the PagePIF in KOS (refer to the System Administration Manual). Download a correct PagePIF. For the correct syntax, refer to ‘PagePIF commands reference’ on page 425 of this Technical Reference Manual.

470 Océ Power Print Controller Technical Reference Manual
“PGP ERROR: xxxx: id yyyy, value zzzz invalid”
Variable: xxxx is the name of the PagePIF.yyyy is the name of a PagePIF identifier.zzzz is the value of the PagePIF identifier.
Explanation: The PagePIF contains an identifier with an invalid value.
Class: 3
Result: Logical error page printed, print job is not printed.
Remedy: Proof the PagePIF in KOS (refer to the System Administration Manual). Download a correct PagePIF. For the correct syntax, see ‘PagePIF commands reference’ on page 425 of this Programmer’s Guide.
“PGP ERROR: xxxx: multiple CYCLEEND”
Variable: xxxx is the name of the PagePIF.
Explanation: The commands CYCLESTART and CYCLEEND may only occur once in each PagePIF. In this PagePIF, the command CYCLEEND occurs multiple times.
Class: 3
Result: Logical error page printed, print job is not printed.
Remedy: Remove the surplus CYCLEEND commands from the PagePIF.
“PGP ERROR: xxxx: multiple CYCLESTART”
Variable: xxxx is the name of the PagePIF.
Explanation: The commands CYCLESTART and CYCLESTART may only occur once in each PagePIF. In this PagePIF, the command CYCLESTART occurs multiple times.
Class: 3
Result: Logical error page printed, print job is not printed.
Remedy: Remove the surplus CYCLESTART commands from the PagePIF.

JAC logical error messages 471
“PGP ERROR: xxxx: no GETPAGE in pif cycle”
Variable: xxxx is the name of the PagePIF.
Explanation: A PagePIF cycle must contain at least one GETPAGE command.
Class: 3
Result: Logical error page printed, print job is not printed.
Remedy: Add a GETPAGE to the PagePIF cycle.
“PGP ERROR: xxxx: Not present”
Variable: xxxx is the name of the PagePIF.
Explanation: A job is printed with a ticket indicating a PagePIF which is not present in the printer.
Class: 3
Result: Logical error page printed, print job is not printed.
Remedy: Use another PagePIF or download the PagePIF first.
“PGP ERROR: xxxx: Not valid”
Variable: xxxx is the name of the PagePIF.
Explanation: The PagePIF’s contents do not conform to the PagePIF syntax (e.g. a double quote is missing).
Class: 3
Result: Logical error page printed, print job is not printed.
Remedy: Proof the PagePIF in KOS (refer to the <System Administration Manual). Download a correct PagePIF. For the correct syntax, see ‘PagePIF commands reference’ on page 425 of this Programmer’s Guide.

472 Océ Power Print Controller Technical Reference Manual
“PGP ERROR: xxxx: pending USEPAGE on CYCLEEND”
Variable: xxxx is the name of the PagePIF.
Explanation: At the end of the PagePIF cycle there is a USEPAGE command for which there is no corresponding PAGE command.
Class: 3
Result: Logical error page printed, print job is not printed.
Remedy: Remove the USEPAGE command(s) or add a PAGE command.
“PGP ERROR: xxxx: pending USEPAGE on CYCLESTART”
Variable: xxxx is the name of the PagePIF.
Explanation: Before the start of the PagePIF cycle there is a USEPAGE command for which there is no corresponding PAGE command.
Class: 3
Result: Logical error page printed, print job is not printed.
Remedy: Remove the USEPAGE command(s) or add a PAGE command.
“PGP ERROR: xxxx: pending USEPAGE on end-of-pagepif”
Variable: xxxx is the name of the PagePIF.
Explanation: At the end of the PagePIF there is a USEPAGE command for which there is no corresponding PAGE command.
Class: 3
Result: Logical error page printed, print job is not printed.
Remedy: Remove the USEPAGE command(s) or add a PAGE command.
JAC logical error messages 473
“PGP ERROR: xxxx: syntax error yyyy”
Variable: xxxx is the name of the PagePIF.yyyy is the line number where the syntax error occurred.
Explanation: The PagePIF contains a syntax error.
Class: 3
Result: Logical error page printed, print job is not printed.
Remedy: Proof the PagePIF in KOS (refer to the System Administration Manual). Download a correct PagePIF. For the correct syntax, see ‘PagePIF commands reference’ on page 425 of this Programmer’s Guide.
“PGP ERROR: xxxx: too many forms”
Variable: xxxx is the name of the PagePIF.
Explanation: The total number of forms used in this print job (including the PagePIF) is too large.
Class: 3
Result: Logical error page printed; print job is not printed.
Remedy: If there are multiple processing passes which use different forms, only combine passes that use the same forms in one print job, and send the print job again for the remaining processing passes.If that is not sufficient, and there are processing passes requesting collated copies, do not use multiple copies. Send the print job again for the remaining copies.If that is not sufficient, use fewer forms.
“PGP ERROR: xxxx: usepage yyyy without getpage”
Variable: xxxx is the name of the PagePIF.yyyy is the parameter of the USEPAGE command.
Explanation: The PagePIF contains a USEPAGE command for which no GETPAGE was done.or

474 Océ Power Print Controller Technical Reference Manual
A CYCLESTART or CYCLEEND command appears between the GETPAGE and the USEPAGE command.
Class: 3
Result: Logical error page printed, print job is not printed.
Remedy: Correct the USEPAGE command, add or move the corresponding GETPAGE command.
“SIF ERROR: Arguments missing in xxxx line: yyyy”
Variable: xxxx is the name of the SIF.yyyy is the line number at which the error occurred.
Explanation: There are arguments missing.
Class: 2
Result: Logical error page printed; print job is not printed.
Remedy: Proof the SIF in KOS. Refer to the System Administration Manual.Download a correct SIF. For correct SIF grammar, see ‘Job separation and segmentation’ on page 353.
“SIF ERROR: Argument too long in xxxx line: yyyy”
Variable: xxxx is the name of the SIF.yyyy is the line number at which the error occurred.
Explanation: The separator identifier name is limited to 21 characters.
Class: 2
Result: Logical error page printed; print job is not printed.
Remedy: Proof the SIF in KOS. Refer to the System Administration Manual.Download a correct SIF. For correct SIF grammar, see ‘Job separation and segmentation’ on page 353.

JAC logical error messages 475
“SIF ERROR: Argument value out of range in xxxx line: yyyy”
Variable: xxxx is the name of the SIF.yyyy is the line number at which the error occurred.
Explanation: The argument used is out of range.
Class: 2
Result: Logical error page printed; print job is not printed.
Remedy: Proof the SIF in KOS. Refer to the System Administration Manual.Download a correct SIF. For correct SIF grammar, see ‘Job separation and segmentation’ on page 353.
“SIF ERROR: Cannot open SIF file xxxx”
Variable: xxxx is the name of the SIF.
Explanation: The SIF cannot be opened.
Class: 1
Result: For a ‘top-level’ SIF, assigned to an input channel which receives data on a stream basis, the job is handled until the error occurs.Otherwise, logical error page printed; print job is not printed.
Remedy: Proof the SIF in KOS. Refer to the System Administration Manual.Download a correct SIF. For correct SIF grammar, see ‘Job separation and segmentation’ on page 353.
“SIF ERROR: Command error in xxxx line: yyyy command:
zzzz”
Variable: xxxx is the name of the SIF.yyyy is the line number at which the error occurred.zzzz is the command that caused the error.
Explanation: An unrecognised command is used.
Class: 2
Result: Logical error page printed; print job is not printed.
476 Océ Power Print Controller Technical Reference Manual
Remedy: Proof the SIF in KOS. Refer to the System Administration Manual.Download a correct SIF. For correct SIF grammar, see ‘Job separation and segmentation’ on page 353.
“SIF ERROR: Incorrect argument in xxxx line: yyyy”
Variable: xxxx is the name of the SIF.yyyy is the line number at which the error occurred.
Explanation: The argument used is of an invalid type.
Class: 2
Result: Logical error page printed; print job is not printed.
Remedy: Proof the SIF in KOS. Refer to the System Administration Manual.Download a correct SIF. For correct SIF grammar, see ‘Job separation and segmentation’ on page 353.
“SIF ERROR: Invalid quoted item in xxxx line: yyyy”
Variable: xxxx is the name of the SIF.yyyy is the line number at which the error occurred.
Explanation: An item starting with double quotes was not terminated with double quotes.
Class: 2
Result: Logical error page printed; print job is not printed.
Remedy: Proof the SIF in KOS. Refer to the System Administration Manual.Download a correct SIF. For correct SIF grammar, see ‘Job separation and segmentation’ on page 353.
“SIF ERROR: Line too long in xxxx line: yyyy”
Variable: xxxx is the name of the SIF.yyyy is the line number at which the error occurred.
Explanation: A line in a SIF is limited to 256 characters.

JAC logical error messages 477
Class: 2
Result: Logical error page printed; print job is not printed.
Remedy: Proof the SIF in KOS. Refer to the System Administration Manual.Download a correct SIF with lines of 256 characters or less. For correct SIF grammar, see ‘Job separation and segmentation’ on page 353.
“SIF ERROR: Memory allocation error in xxxx”
Variable: xxxx is the name of the SIF.
Explanation: A memory allocation error occurred while building the internal SIF structure.
Class: 2
Result: Logical error page printed; print job is not printed.
Remedy: Reboot the system.
“SIF ERROR: More than one default job in xxxx line: yyyy”
Variable: xxxx is the name of the SIF.yyyy is the line number at which the error occurred.
Explanation: The number of default jobs, i.e. jobs without a banner reference, is limited to 1.
Class: 2
Result: Logical error page printed; print job is not printed.
Remedy: Proof the SIF in KOS. Refer to the System Administration Manual.Download a correct SIF. For correct SIF grammar, see ‘Job separation and segmentation’ on page 353.

478 Océ Power Print Controller Technical Reference Manual
“SIF ERROR: No SETSCAN found in separator in xxxx line: yyyy”
Variable: xxxx is the name of the SIF.yyyy is the line number at which the error occurred.
Explanation: All separators have to contain at least one SETSCAN command.
Class: 2
Result: Logical error page printed; print job is not printed.
Remedy: Proof the SIF in KOS. Refer to the System Administration Manual.Download a correct SIF. For correct SIF grammar, see ‘Job separation and segmentation’ on page 353.
“SIF ERROR: Not terminated correct in xxxx”
Variable: xxxx is the name of the SIF.
Explanation: All separator and job blocks have to be closed.
Class: 2
Result: Logical error page printed; print job is not printed.
Remedy: Proof the SIF in KOS. Refer to the System Administration Manual.Download a correct SIF. For correct SIF grammar, see ‘Job separation and segmentation’ on page 353.
“SIF ERROR: Quoted argument expected in xxxx line: yyyy”
Variable: xxxx is the name of the SIF.yyyy is the line number at which the error occurred.
Explanation: A quoted argument is expected.
Class: 2
Result: Logical error page printed; print job is not printed.
JAC logical error messages 479
Remedy: Proof the SIF in KOS. Refer to the System Administration Manual.Download a correct SIF. For correct SIF grammar, see ‘Job separation and segmentation’ on page 353.
“SIF ERROR: Separator id. already used in xxxx line: yyyy”
Variable: xxxx is the name of the SIF.yyyy is the line number at which the error occurred.
Explanation: All separator identifiers have to be unique.
Class: 2
Result: Logical error page printed; print job is not printed.
Remedy: Proof the SIF in KOS. Refer to the System Administration Manual.Download a correct SIF. For correct SIF grammar, see ‘Job separation and segmentation’ on page 353.
“SIF ERROR: State error in xxxx line: yyyy command: zzzz”
Variable: xxxx is the name of the SIF.yyyy is the line number at which the error occurred.zzzz is the command that caused the error.
Explanation: This command is not allowed in the current state.
Class: 2
Result: Logical error page printed; print job is not printed.
Remedy: Proof the SIF in KOS. Refer to the System Administration Manual.Download a correct SIF. For correct SIF grammar, see ‘Job separation and segmentation’ on page 353.
“SIF ERROR: Too many arguments in xxxx line: yyyy”
Variable: xxxx is the name of the SIF.yyyy is the line number at which the error occurred.
Explanation: There are too many arguments.

480 Océ Power Print Controller Technical Reference Manual
Class: 2
Result: Logical error page printed; print job is not printed.
Remedy: Proof the SIF in KOS. Refer to the System Administration Manual.Download a correct SIF. For correct SIF grammar, see ‘Job separation and segmentation’ on page 353.
“SIF ERROR: Too many criteria in separator in xxxx line: yyyy”
Variable: xxxx is the name of the SIF.yyyy is the line number at which the error occurred.
Explanation: The number of criteria (SETSCAN, TEST, SETVAR) inside a separator is limited to 25.
Class: 2
Result: Logical error page printed; print job is not printed.
Remedy: Proof the SIF in KOS. Refer to the System Administration Manual.Download a correct SIF. For correct SIF grammar, see ‘Job separation and segmentation’ on page 353.
“SIF ERROR: Too many filters in job in xxxx line: yyyy”
Variable: xxxx is the name of the SIF.yyyy is the line number at which the error occurred.
Explanation: The number of filters inside a job definition is limited to 5.
Class: 2
Result: Logical error page printed; print job is not printed.
Remedy: Proof the SIF in KOS. Refer to the System Administration Manual.Download a correct SIF. For correct SIF grammar, see ‘Job separation and segmentation’ on page 353.

JAC logical error messages 481
“SIF ERROR: Too many items in xxxx line: yyyy”
Variable: xxxx is the name of the SIF.yyyy is the line number at which the error occurred.
Explanation: A line in a SIF contains more than 100 words.
Class: 2
Result: Logical error page printed; print job is not printed.
Remedy: Proof the SIF in KOS. Refer to the System Administration Manual.Download a correct SIF with fewer words in the specified line. For correct SIF grammar, see ‘Job separation and segmentation’ on page 353.
“SIF ERROR: Too many job definitions in xxxx line: yyyy”
Variable: xxxx is the name of the SIF.yyyy is the line number at which the error occurred.
Explanation: The number of job blocks is limited to 20.
Class: 2
Result: Logical error page printed; print job is not printed.
Remedy: Proof the SIF in KOS. Refer to the System Administration Manual.Download a correct SIF. For correct SIF grammar, see ‘Job separation and segmentation’ on page 353.
“SIF ERROR: Too many segments in job in xxxx line: yyyy”
Variable: xxxx is the name of the SIF.yyyy is the line number at which the error occurred.
Explanation: The number of segments inside a job block is limited to 5.
Class: 2
Result: Logical error page printed; print job is not printed.

482 Océ Power Print Controller Technical Reference Manual
Remedy: Proof the SIF in KOS. Refer to the System Administration Manual.Download a correct SIF. For correct SIF grammar, see ‘Job separation and segmentation’ on page 353.
“SIF ERROR: Too many separator definitions in xxxx line: yyyy”
Variable: xxxx is the name of the SIF.yyyy is the line number at which the error occurred.
Explanation: The number of separator blocks is limited to 100.
Class: 2
Result: Logical error page printed; print job is not printed.
Remedy: Proof the SIF in KOS. Refer to the System Administration Manual.Download a correct SIF. For correct SIF grammar, see ‘Job separation and segmentation’ on page 353.
“SIF ERROR: Too many variables in xxxx line: yyyy”
Variable: xxxx is the name of the SIF.yyyy is the line number at which the error occurred.
Explanation: The number of variables inside a SIF is limited to 100. These variables include the job identification attributes. Therefore it is possible that the maximum is reached while there are less than 100 variables defined inside the SIF.
Class: 2
Result: Logical error page printed; print job is not printed.
Remedy: Proof the SIF in KOS. Refer to the System Administration Manual.Download a correct SIF. For correct SIF grammar, see ‘Job separation and segmentation’ on page 353.

JAC logical error messages 483
“SIF ERROR: Undefined error in xxxx line: yyyy”
Variable: xxxx is the name of the SIF.yyyy is the line number at which the error occurred.
Explanation: An unidentified error is detected inside the SIF.
Class: 2
Result: Logical error page printed; print job is not printed.
Remedy: Proof the SIF in KOS. Refer to the System Administration Manual.Download a correct SIF. For correct SIF grammar, see ‘Job separation and segmentation’ on page 353.
“SIF ERROR: SIFUSE not allowed; PROLOG in xxxx<line:yyyy>”
Variable: xxxx is the name of the SIF.yyyy is the line number at which the error occurred.
Explanation: When the JOBBEGIN of a job definition is used as a PROLOG, the job definition is not allowed to contain any SIFUSE commands.
Class: 2
Result: Logical error page printed; print job is not printed.
Remedy: Proof the SIF in KOS. Refer to the System Administration Manual.Download a correct SIF. For correct SIF grammar, see ‘Job separation and segmentation’ on page 353.
“SIF ERROR: separator results in looping in
xxx<line:yyyy>”
Variable: xxxx is the name of the SIF.yyyy is the line number at which the error occurred.
Explanation: A filter definition is used that caused looping.A separator causes looping when it contains only one criterium: SETSCAN, and the searchstring of the SETSCAN is set to “ “ or “*” and the end of the separator is defined as +/- x CHAR.
484 Océ Power Print Controller Technical Reference Manual
Class: 2
Result: Logical error page printed; print job is not printed.
Remedy: Change the end border of the separator into STOP +1 LINE.Proof the SIF in KOS. Refer to the System Administration Manual.Download a correct SIF. For correct SIF grammar, see ‘Job separation and segmentation’ on page 353.
“SIF ERROR: Undefined identifier in xxxx line: yyyy”
Variable: xxxx is the name of the SIF.yyyy is the line number at which the error occurred.
Explanation: An identifier is used which is not defined with a separator block.
Class: 2
Result: Logical error page printed; print job is not printed.
Remedy: Proof the SIF in KOS. Refer to the System Administration Manual.Download a correct SIF. For correct SIF grammar, see ‘Job separation and segmentation’ on page 353.
“SIF ERROR: Wildcard error in xxxx line: yyyy”
Variable: xxxx is the name of the SIF.yyyy is the line number at which the error occurred.
Explanation: An invalid wildcard is detected.
Class: 2
Result: Logical error page printed; print job is not printed.
Remedy: Proof the SIF in KOS. Refer to the System Administration Manual.Download a correct SIF. For correct SIF grammar, see ‘Job separation and segmentation’ on page 353.
JAC logical error messages 485
“TCK ERROR: Cannot find ticketfile: xxxx”
Variable: xxxx is the name of the requested ticket file.
Explanation: A non-existing ticket file is referenced in the ART file, or via FTP.
Class: 1
Result: Logical error page printed; print job is not printed.
Remedy: Download an ART file that does not contain this reference, or download the required ticket.
“TCK ERROR: Combination download- and process attributes
not allowed”
Explanation: A ticket is either a download ticket or a process ticket; the combination is not allowed.
Class: 1
Result: Logical error page printed, job is not downloaded nor printed.
Remedy: Do not use download and process attributes within one ticket.Do not combine download tickets with printing tickets. For more details on Job Tickets, see ‘Job ticket mechanism’ on page 293.
“TCK ERROR: Downloading JAC objects not allowed in BASIC version”
Explanation: Downloading of JAC objects is only possible in full JAC support. The BASIC JAC software does not support downloading.
Class: 1
Result: Logical error page printed, job is not downloaded nor printed.
Remedy: Do not download JAC objects in BASIC software versions.
486 Océ Power Print Controller Technical Reference Manual
“TCK ERROR: Download attributes not allowed in stored ticket”
Explanation: Download attributes can only be used in JEC (ticket) headers, not in printer-resident tickets.
Class: 1
Result: Logical error page printed, job is not downloaded.
Remedy: Use download attributes only in JEC tickets.For more details on Job Tickets, see ‘Job ticket mechanism’ on page 293.
“TCK ERROR: Duplicate download attribute: xxxx”
Variable: xxxx is the download attribute that is found more than once.
Class: 2
Result: Logical error page printed, job is not downloaded.
Remedy: Use each download attribute only once per ticket.For more details on Job Tickets, see ‘Job ticket mechanism’ on page 293.
“TCK ERROR: Duplicate ident attribute: xxxx”
Variable: xxxx is the identification attribute that is found more than once.
Class: 2
Result: Logical error page printed; print job is not printed.
Remedy: Use each identification attribute only once per ticket.For more details on Job Tickets, see ‘Job ticket mechanism’ on page 293.
“TCK ERROR: Duplicate process attribute: xxxx”
Variable: xxxx is the processing attribute that is found more than once.
Class: 2
JAC logical error messages 487
Result: Logical error page printed; print job is not printed.
Remedy: Most of the process attributes may be used only once per processing pass, with the exception of FORM and FLAGSHEET.For more details on Job Tickets, see ‘Job ticket mechanism’ on page 293.
“TCK ERROR: Entry more than 100 words, ignored: xxxx...”
Variable: xxxx are the first characters of the ticket entry that is ignored.
Class: 1
Result: Logical error page printed; print job is not printed.
Remedy: Check the ticket contents.Do not use more than 100 words per ticket command line.For more details on Job Tickets, see ‘Job ticket mechanism’ on page 293.
“TCK ERROR: Ident:, Process: or Download: expected, found: xxxx”
Variable: xxxx is the invalid ticket attribute found at the line where either ‘Ident:’, ‘Process:’ or ‘Download:’ was expected.
Explanation: A ticket always starts with an attribute group command: ‘Ident:’, ‘Process:’ or ‘Download:’ (or REM for comments) to specify what kind of attributes follow.This error indicates that a different command is found.
Class: 1
Result: Logical error page printed; print job is not printed.
Remedy: For more details on Job Tickets, see ‘Job ticket mechanism’ on page 293.
“TCK ERROR: Illegal download arguments: xxxx”
Variable: xxxx are the unknown arguments used in a download attribute.
Class: 2

488 Océ Power Print Controller Technical Reference Manual
Result: Logical error page printed, job is not downloaded.
Remedy: Use MS-DOS file name conventions for the object name (maximum 8 characters for name and optional a dot with 3-character file extension).An object type is required: ‘Form’, ‘Art’, ‘Flagsheet’, ‘Sif’, ‘PagePIF’ or ‘Ticket’.For more details on Job Tickets, see ‘Job ticket mechanism’ on page 293.
“TCK ERROR: Illegal download attribute: xxxx”
Variable: xxxx is the unknown download attribute.
Explanation: Only the OBJECT attribute is allowed in a download ticket.
Class: 2
Result: Logical error page printed, job is not downloaded.
Remedy: Use the OBJECT attribute in the download ticket. For more details on Job Tickets, see ‘Job ticket mechanism’ on page 293.
“TCK ERROR: Illegal ident argument: xxxx”
Variable: xxxx is the unknown argument used in an identification attribute.
Explanation: For some identification attributes only a limited set of values is allowed.
Class: 2
Result: Logical error page printed; print job is not printed.
Remedy: For more details on Job Tickets, see ‘Job ticket mechanism’ on page 293.
“TCK ERROR: Illegal ident attribute: xxxx”
Variable: xxxx is the unknown identification attribute.
Explanation: The attribute is not one of the known identification attributes.
Class: 2
JAC logical error messages 489
Result: Logical error page printed; print job is not printed.
Remedy: For more details on Job Tickets, see ‘Job ticket mechanism’ on page 293.
“TCK ERROR: Illegal process argument(s): xxxx”
Variable: xxxx are the unknown arguments used in a processing attribute.
Class: 2
Result: Logical error page printed; print job is not printed.
Remedy: An invalid process argument is used; a non-optional argument is used; too many arguments are used etc.See ‘Syntax and semantics of processing attributes’ on page 309.
“TCK ERROR: Illegal process attribute: xxxx”
Variable: xxxx is the unknown processing attribute.
Explanation: The attribute is not one of the known processing attributes.
Class: 2
Result: Logical error page printed; print job is not printed.
Remedy: See ‘Syntax and semantics of processing attributes’ on page 309.
“TCK ERROR: Invalid variable: xxxx”
Variable: xxxx is the invalid variable.
Class: 2
Result: Logical error page printed; print job is not printed.
Remedy: Only the IDENT attributes can be used as variables; see <IDattr> in ‘Generic ticket syntax’ on page 303 and ‘Ticket containing a variable attribute’ on page 325.

490 Océ Power Print Controller Technical Reference Manual
“TCK ERROR: JEC syntax error, *JEC BODY not expected in data”
Explanation: A *JEC BODY appears again between *JEC BODY and *JEC END.
Class: 1
Result: Logical error page printed; print job is not printed.
Remedy: Use *JEC BODY only to terminate JEC headers; see ‘JEC tickets’ on page 329.
“TCK ERROR: JEC syntax error, ticket not terminated”
Explanation: JEC ticket is not terminated by *JEC BODY, but terminated by an End-Of-File or *JEC BEGIN or *JEC END.
Class: 1
Result: JEC ticket header corrupted.Logical error page printed; print job is not printed.
Remedy: Terminate JEC header with *JEC BODY; see ‘JEC tickets’ on page 329.
“TCK ERROR: JEC syntax error, ticket terminated with *JEC END”
Explanation: The JEC header is followed by *JEC END.
Class: 1
Result: JEC ticket header corrupted.
Remedy: Terminate JEC header with *JEC BODY; see ‘JEC tickets’ on page 329.
“TCK ERROR: JEC syntax error: xxxx”
Variable: xxxx is the invalid JEC command found after the JEC marker.
Class: 1
Explanation: The JEC marker is used without command or with an invalid command.

JAC logical error messages 491
Result: JEC ticket header corrupted.Logical error page printed; print job is not printed.
Remedy: See ‘JEC tickets’ on page 329.
“TCK ERROR: Max. nr of forms reached, xxxx rejected”
Variable: xxxx is the form that is rejected.
Class: 2
Explanation: A ticket can use at most 40 forms.
Result: Logical error page printed; print job is not printed.
Remedy: Do not use more than 40 forms.
“TCK ERROR: No emulation type defined in download ticket”
Explanation: This error occurs in a download job, if the ticket contains an attribute EMULATION which specifies only the print context number. Print context numbers are ignored for download jobs.
Class: 1
Result: Logical error page printed; job is not downloaded.
Remedy: When using the attribute EMULATION for a download job, always supply an emulation name.
“TCK ERROR: Overwrite object xxx not allowed”
Variable: xxxx is the name of the object that cannot be overwritten.
Explanation: You tried to overwrite a JAC object by another JAC object with the same name, while the overwrite protection is set to ‘on’ in KOS.
Class: 1
Result: Logical error page printed; job is not printed.

492 Océ Power Print Controller Technical Reference Manual
Remedy: Specify another JAC object name or disable the overwrite protection in KOS. The latter method is not recommended.
“TCK ERROR: Ticket entry longer than 132: xxxx...”
Variable: xxxx are the first characters of the ticket entry that is too long.
Explanation: Ticket entries can be max. 132 characters long.
Class: 1
Result: Logical error page printed; print job is not printed.
Remedy: The length of ticket strings is limited to 132 characters; see ‘Generic ticket syntax’ on page 303.
“TCK ERROR: Variable substitution data invalid: xxxx”
Variable: xxxx is the content of the invalid substitution field.
Class: 2
Explanation: The substitution data is too long, is empty or contains more than one word, which makes it invalid.
Result: Logical error page printed; print job is not printed.
Remedy: Check contents of the substitution data.
“TCK ERROR: Variable substitution not found: xxxx”
Variable: xxxx is the variable that cannot be found.
Class: 2
Explanation: A variable is used that cannot be substituted. The matching IDENT field is not found in the ticket.
Result: Logical error page printed; print job is not printed.

JAC logical error messages 493
Remedy: Select one of the available identification variables for variable substitutionormake sure the required variable is defined in one of the IDENT fields.

494 Océ Power Print Controller Technical Reference Manual

495
Océ Power Print Controller
Technical Reference Manual
Chapter 24Accounting
This chapter describes the location, the syntax and the structure of the account file. It also documents any relationships with KOS and FTP.

496 Océ Power Print Controller Technical Reference Manual
The accounting mechanism
For accounting purposes, the Océ Power Print Controller is able to log the print job identification and the number of pages printed for each print job.
The accounting information is stored in an ASCII file named ‘account.log’ in the logging directory on the Océ Power Print Controller.
Accounting can be enabled or disabled through KOS. The account file can be copied to floppy through KOS or uploaded via FTP.
When the account file is full, the message “account file full” is displayed as a warning, the current input job is still handled.
Incoming jobs will be handled until the maximum size is reached. Via “ftp key operator” the account file should first be reset to continue printing. The def. max. size of the account.log file is 1 Mbyte. If this file exceeds the 1.4 MB then the system will not accept jobs anymore until the account file is reset.
The accounting file size can be tuned.

Accounting 497
Accounting information
The information for the account file is obtained from four different sources:
■ The job ticket provides job identification information.■ The PCI provides job identification information (this method is used for the
basic version of the controller)■ The printer itself provides a job number and the print starting time.■ The printer also provides an overview of the total number of simplex and
duplex pages printed, based on the result of the print job.
Accounting information from the job ticketThe information provided by the PCI depends on the platform on which the PCI operates.
Accounting information from the PCI (only for Windows)
The PCI provides the following job identification fields for logging:
■ Jobname■ Channeltype■ Channelname■ Hostname■ Username■ Custom (CUSTOM ticket attribute).
Accounting information from the print system
The print system provides the following job identification items for logging:
■ the job sequence number■ the time and date the print system starts to process the print job. This timing
information is split into different fields: year, month, day, hour, minute and second.

498 Océ Power Print Controller Technical Reference Manual
Accounting information from the printing resultThe printing result provides the following additional information for logging:
■ the number of simplex pages printed from logical tray 0, 1, 2 and 3, specified per tray
■ the number of duplex pages printed from logical tray 1, 2 and 3, specified per tray.
Note: Each duplex page accounts for two clicks!
Note: On your printer, physical trays are grouped into logical trays by use of the ‘Link paper trays’ function in E-KOS. To interpret the accounting information correctly, you need to know the current tray linking. For details on setting the ’Link paper trays’, refer to the System Operation Manual.

Accounting 499
The account file
General characteristics of the account file
As the accounting information is logged in one record per print job, the account file can be easily parsed by any computer application:
■ there is one record per print job■ the number of fields is fixed; there are no optional fields■ all information fields are separated by a semicolon (;)■ the record is terminated by a Carriage Return/Line Feed.
Account file format Océ 8400 Series printer
The Océ 8400 Series printer supports accounting format 2. The next table specifies which accounting fields are used when printing from one of the paper input trays. The engine 'link papertray' feature has no effect on the account mechanism.
Where:n.a. = not applicable, the number of pages is always set to zero.
Accounting informa-tion
Physical tray
<Simpl_tray0> speciality
<Dupl_tray0> n.a.
<Simpl_tray1> cassette, tray 1
<Dupl_tray1> cassette, tray 1
<Simpl_tray2> cassette, tray 2
<Dupl_tray2> cassette, tray 2
<Simpl_tray3> cassette, tray 3
<Dupl_tray3> cassette, tray 3
<Simpl_tray4> bulk tray
<Dupl_tray4> bulk tray
[118] Accounting fields used for the Océ 8400 Series printer

500 Océ Power Print Controller Technical Reference Manual
Structure of the account fileThe structure of the ‘account.log’ file is as follows:
<account.log> == { <account_record> }
Example An example of a valid Océ 8400 Series account.log file is shown below:
1;testjob;FTP;;st46-oa6;tester;;1998;2;11;10:56:26;0;0;2;0;0;0;0;0;0;0
2;testjob;FTP;;st46-oa6;tester;;1998;2;11;10:56:58;0;0;0;0;0;0;0;0;0;1
In the table of the next page you find a listing of all accounting variables and the syntax. There are a few remarks about the syntax:
■ <string>: 0 to 80 characters including space characters and tabs, excluding newline characters and semicolons (;).
■ The fields for Jobname, Channeltype, Channelname, Hostname, Username and Custom are limited to 80 bytes.
■ In a job ticket, the fields mentioned above can contain semicolons. For the account logfile these semicolons are deleted.
■ None of the record fields can be omitted. However, a string field can be empty (contain zero characters).
■ Each record is minimal 44 bytes long, and maximal 604 bytes. An average entry length is 100 bytes long. An account file of 1.4 Mbyte can contain minimal 231 account records (all records maximum size).

Accounting 501
Océ 8400 Series Syntax
Job_seq_number 0..99999999
Jobname <string>
Channeltype <string>
Channelname <string>
Hostname <string>
Username <string>
Custom <string>
Date_Year 0..9999
Date_Month 1..12
Date_Day 1..31
Time_Hour 0..23
Time_Minute 0..59
Time_Second 0..59
Simpl_Tray0 0..999999
Dupl_Tray0 0..999999
Simpl_Tray1 0..999999
Dupl_Tray1 0..999999
Simpl_Tray2 0..999999
Dupl_Tray2 0..999999
Simpl_Tray3 0..999999
Dupl_Tray3 0..999999
Simpl_Tray4 0..999999
Dupl_Tray4 0..999999
[119] Account file syntax

502 Océ Power Print Controller Technical Reference Manual
Account file management
KOS functions
Through KOS you can perform the following actions:
■ enable or disable the accounting mechanism. If the mechanism is disabled, the account file is not updated during the next print job(s).
■ copy the contents of ‘account.log’ to the system floppy■ clear the contents of ‘account.log’■ upload (and clear) ‘account.log’ via generic upload functions.
Refer to the System Administration Manual for more details.
Uploading the account.log file
You can upload the account.log file through FTP. How to do so is explained in ‘Uploading printer log files’ on page 151 of this Technical Reference Manual.
503
Océ Power Print Controller
Technical Reference Manual
Chapter 25Input filters
This chapter informs you on the functionality of the Input filters.

504 Océ Power Print Controller Technical Reference Manual
Introduction
There are three types of filters available:
■ Input Filters (i.e. Translate Filters), Translate datastream when it arrives at the printer
■ PDL Filters, Modify data just before PDL processing
■ Line Printer Filters, Translate/enhance line-printer data to a FOL data stream.
[120] Part of the printer structure
A print job could be received by LP, anything received by LP will be modified by the input-filter attached to LP, in this case it is ‘Input-FilterY’. After JAC scanning, the data is send further along its path. Suppose it has to be processed by FOL, then the data will first pass through PDL-filter called ‘PDL-FilterA’ and finally arrives at the FOL PDL.
JACscanning
Input-FilterX
PDL-FilterA
PDL-FilterC
PDL-FilterB
FOL
PS
PCL5
Input-FilterZ
Input-FilterY
FTP
LP
SCK
PrintEngine
Input filters 505
Input/translate filtersThe input filter translates strings to other strings. The data is translated directly after it is received. From the viewpoint of the printer it will appear as if the translated data was received.
Per I/O channel you have to configure one input filter.
1 Log on to SDS.2 Select ‘SETTINGS’, ‘FRONTEND’ and ‘INTERFACE’.3 Press <Enter> to confirm.4 Press <Escape> to return to the menu, then exit SDS.
The description of what should be translated is stored in a file. Such file is called a table file.
Example # This is an example of a table file39323030 : 38343030 # "9200" : "8400"
5072696e746572 : # "Printer"
Table file syntax A description of the syntax of the table file rules is stated in the following list.
■ Each line is either a translation rule, a comment or an empty line,■ All translation rules must be sorted on the search string. ■ Each search string has to be unique■ The longest match wins: if a search string is a subsequence of another search
string, then the longest match wins during search.■ The maximum line length is 255 bytes■ The maximum number of translation rules is 1000. (That is the number of
lines excluding comment, and empty lines.)■ line format: ‘search string : replace string’
WS = (' ' | \t)+
NEWLINE= <the line-feed character 0A>
HEXDIG= 0|1|2|3|4|5|6|7|8|9|a|b|c|d|e|f|A|B|C|D|E|F
HEXVAL= [WS] HEXDIG HEXDIG [WS]
ITEMLINE= [HEXVAL+ : [HEXVAL]+] [# comment] NEWLINE

506 Océ Power Print Controller Technical Reference Manual
Sorting table files Table files have to be sorted. This sorting is a bit complicated, but can be executed very efficiently. Lets first look at how the file should be sorted:
Compare the hexvals of string A and B, in pairs from left to right. The first pair that is not equal decides which string is listed first. The string which has the smallest hexval in the first unequal pair, is listed first. If string A is an initial substring of B (i.e. B is A followed by something) then string A must be listed before string B.
Small table files can be sorted manually, large files, can be sorted using the unix utility ‘sort’, but only if some extra constraints are taken into account:
■ The hexadecimal search string should be in lower case and should not contain a space.
■ Each search string must be followed by a space.
If the unsorted table file satisfies the above constraints, you can sort it using the following command:
sort unsorted.tbl > sorted.tbl
Using a input filter You can install table files from floppy just like other JAC Referable Objects, but only by using SDS.
▼▼▼▼ Installation of table files
1 Copy the table files to a user floppy disk in the directory:a:\jac\filter\translat\params
2 Install floppy in C-SDS, using the menu ‘RO-OPER:JACINSTALL’.3 Print a Total Report.
The installed table files are listed on the JAC RO page.4 Proof the table file via the menu ‘RO-OPER:PROOF’.

Input filters 507
PDL filtersA PDL-filter is a program which reads data from ‘stdin’ and writes converted data to ‘stdout’ (see figure 121).
[121] Reading and writing data via a PDL filter
The intended use of filters is to make small changes to the data just before it enters the PDL.In this way the printer can handle non standard data. However, as the filter can be almost any program, the real possibilities are unlimited.
The filter receives all the JAC identification attributes, these can help the filter to select what to do. So it can for instance decide to convert data only when the job was received from FTP.
Note: PDL filters can be requested at your local Océ System Consultant.
stdin stdoutFilter
Some JAC attributes
ababab xyzxyzx

508 Océ Power Print Controller Technical Reference Manual

509
Océ Power Print Controller
Technical Reference Manual
Chapter 26Line Printer Filter
This chapter informs you on the functionality of Line Printer Filters and LayoutPIFs.

510 Océ Power Print Controller Technical Reference Manual
Line printer emulation
The Océ Power Print Controller can be used as an emulation for a number of line printers in DP environments. The line printer data are handled by the FOL PDL.
The host sends print data to the Océ Power Print Controller via a protocol converter. This protocol converter emulates the line printer and outputs ASCII data merged with PCL escape sequences.
The Line Printer Filter (LPF) takes care of translating and enhancing the line printer data stream into a FOL stream, which can be handled by the FOL Command Interpreter on the Océ Power Print Controller. The output of the Line Printer Filter is a pure FOL stream.
[122] Line printer emulation
Host
ProtocolConverter
Line printer data stream
FOL data stream
LayoutPIFs
FOL InterpreterLPF

Line Printer Filter 511
Line Printer FiltersThe Océ Power Print Controller supports different line printer emulations via different Line Printer Filters. Filters are available for the following emulations:
■ ASCII: the LPF for this emulation skips all PCL codes.■ IBM 3287: the LPF for this emulation translates the PCL codes, as provided
by the INCAA 9833 protocol converter.■ IBM 3812 (DP): the LPF for this emulation translates the PCL codes, as
provided by the INCAA 9835 protocol converter. The emulation does not support Office documents.
■ IBM 4214: the LPF for this emulation translates the PCL codes, as provided by the INCAA 9835 protocol converter.
■ IBM 5224: the LPF for this emulation translates the PCL codes, as provided by the INCAA 9835 protocol converter.
Note: A PCI may add some FOL commands to the line printer data. The Line Printer Filter is transparent to these FOL commands.
Formatting line printer data
The line printer data, as they enter the Line Printer Filter (LPF), contain some PCL commands. These commands are filtered out by the Line Printer Filter and translated into a FOL data stream. This is still an unformatted data stream.
The line printer data that enters the LPF can be enhanced and modified with the LayoutPIF mechanism. The LayoutPIF reads the line printer data page by page, and adds FOL layout commands to the data. For example, a LayoutPIF can specify the use of overlay or underlay forms, it can modify fonts, set the page margins and the page length.
Note: The LayoutPIF handles only line printer data, it is not suitable to process formatted data such as PCL5, AS/400 Office or FOL formatted data.

512 Océ Power Print Controller Technical Reference Manual
LayoutPIF mechanism
A LayoutPIF consists basically of two parts:
■ the initialisation part, which contains layout commands that are relevant for the whole document
■ the cyclic part: this part handles the input data page by page. The LayoutPIF reads a page and stores it in a buffer with the ~GETPAGE command. The LayoutPIF can scan the page for text strings, and store these strings in variables. The layout handling of the page can be different, according to the output of tests that are performed on the variables.The buffer contents are added to the logical page buffer of the Océ Power Print Controller with the ~USEBUF command.The ~PAGE command prints the contents of the logical page buffer. The LayoutPIF returns to the beginning of the cyclic part: the next page is read into the buffer of the LayoutPIF.
The figure below shows the LayoutPIF mechanism for a 3-page document. The LayoutPIF is executed three times: once for each page.
[123] LayoutPIF mechanism
LayoutPIF second cycle LayoutPIF third and last cycle
1
2
3
1
2
3
LayoutPIF BUFID
BUFID BUFID
3-page document
~GETPAGE "BUFID"......~USEBUF "BUFID"
~PAGE(eof)
LogicalPageBuffer
~PAGE prints thelogical page bufferand clears the buffer
~USEBUF addsbuffer to logical
page buffer
~GETPAGE fills BUFID with page data
1
2
3
(eof)
LayoutPIF first cycle
3-page document
~PAGE prints thelogical pagebuffer and clearsthe buffer
LogicalpageBuffer
~USEBUF adds buffer to logical page buffer
~GETPAGE fills BUFID with page data
LayoutPIF first cycle
LayoutPIF second cycle LayoutPIF third and last cycle

Line Printer Filter 513
The LayoutPIF mechanism is described in detail in the following subsections.
Initialisation
During the initialisation phase, variables are defined, relevant layout commands for the print output of the whole document such as fonts or forms are given, and, possibly, text modifications are defined. Any FOL Layout command can be added in the LayoutPIF.
Defining the input format The ~PAGELENGTH command allows you to define the number of lines to be read by the ~GETPAGE command.
In the example below two buffers are used, whose size has been determined by ~PAGELENGTH. ~PAGELENGTH without argument resets the default number of lines per page:
~PAGELENGTH 4
~GETPAGE “first4”
~PAGELENGTH
~GETPAGE “restofpage”
~VPA 10
~LEFTMARGIN 20
~USEBUF “first4”
~VPA 80
~LEFTMARGIN 10
~USEBUF “restofpage”
~PAGE
The printout of this job will contain the contents of the buffer ‘first4’ on the top of the page (~VPA 10). The buffer ‘restofpage’ will be printed on the bottom part of the page (~VPA 80).
Scanning input pages The ~SEARCH command allows you to initialise variables and assign values to them. ~SEARCH will be executed during every ~GETPAGE command.
~SEARCH builds a variable table. The variable’s contents will be updated with every execution of ~GETPAGE. Although ~SEARCH belongs to the initialisation part of the job, it will be executed cyclically.
See the chapter ‘FOL commands reference’ in the ‘Océ Power Print Controller FOL Reference Manual’ for the full syntax of the ~SEARCH command.

514 Océ Power Print Controller Technical Reference Manual
The example LayoutPIF below scans the whole input page for the string “USER”. It takes the string of 4 characters at 3 positions to the right of the string “USER”, and stores it into the variable %user.
~SEARCH ANYWHERE “USER” %user 4 +3
If this ~SEARCH command would work on the page below, the variable %user would be filled with the string “INV ”, including the trailing space.
[124] Scanning input pages
Modifying text The ~MODIFY command can be used to insert font selections or replace text strings. Use your modify command(s) once, preferably in the top of your LayoutPIF. See the chapter ‘FOL commands reference’ in the ‘Océ Power Print Controller PDL Reference Guide’ for a full description of the ~MODIFY command.
......~MODIFY 1 1 30 TEXT “Test-job”
......
Actual execution of this command will take place when the contents of the buffer will be placed in the logical page buffer (~USEBUF “bufid”).
1 2 3 4 5 6 7 8 9 0 1 2 3 4 5 6 7 8 9 0 1 2 3 4 5 6 7 8 9 0 1 2 3 4 5 6 7 8 9 0 1 2 3 4 5 6 7 8 9
1 I I I I TTTTTT LL
2 I I TT LL
3 I I TT LL
4 I I TT LL
5 I I TT LLLLLL
6 NODE : I TL USER : I NV ORG NODE : I TLO
7 ORG USER : I NVO ORG J OB - NO : 0 2 3 4 5
8 DEV : OOE FNO : FN0 1 FCB : $ $BFCB0 0
9 L I NES : 0 0 0 0 0 1 7 4 CLASS : Q
0 * * * * * * * * * * * * BG * * * START PR I NT J OB 0 2 3 4 5 ONLY
1 0 1 OCT 9 2 1 1 . 5 9 . 5 9 * * VSE / POWER V2 . 3 * *

Line Printer Filter 515
Marking the start of the cycleThe ~COMMIT command instructs the LayoutPIF to begin its cyclical part at this point. If you do not use ~COMMIT, the cycle will start again at the top of the LayoutPIF.
Note: A LayoutPIF is only cyclic if it contains a ~GETPAGE or ~GETLINE command.The smaller the ~COMMIT cycle, the higher the performance.
Reading input pages or linesInput pages The ~GETPAGE “bufid” command reads the line printer data until it encounters a page break. The data is stored in the buffer named bufid. See the chapter ‘FOL commands reference’ in the ‘Océ Power Print Controller FOL Reference Manual’ for a full description of the ~GETPAGE command.
You are not allowed to read new data into the same buffer before the buffer contents was used by the ~USEBUF or ~FLUSHBUF commands.
You can use more than one buffer. The example below reads page 1 in a buffer called buf1, page 2 in buf2, and page 3 in buf3. Page 3 will be printed first, then page 2, and next page 1 will be printed.
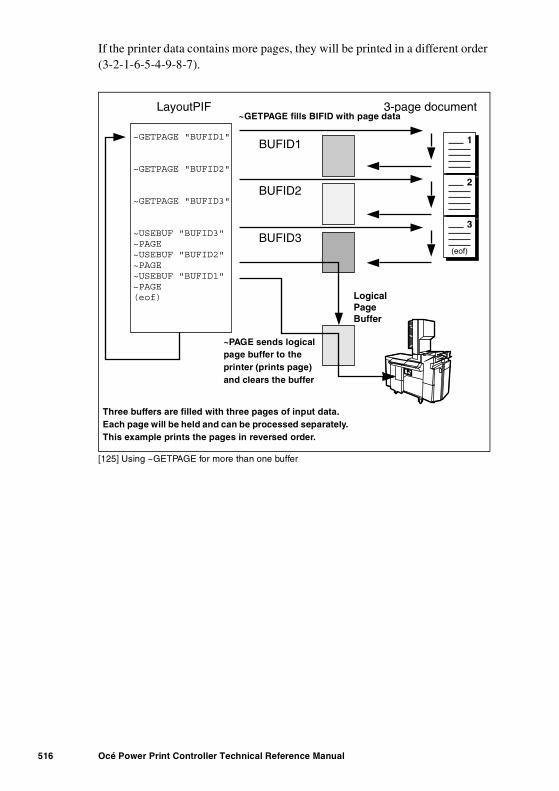
516 Océ Power Print Controller Technical Reference Manual
If the printer data contains more pages, they will be printed in a different order (3-2-1-6-5-4-9-8-7).
[125] Using ~GETPAGE for more than one buffer
LayoutPIF
BUFID1
BUFID2
BUFID3
3-page document
~GETPAGE "BUFID1"
~GETPAGE "BUFID2"
~GETPAGE "BUFID3"
~USEBUF "BUFID3"~PAGE~USEBUF "BUFID2"~PAGE~USEBUF "BUFID1"~PAGE(eof) Logical
PageBuffer
~PAGE sends logicalpage buffer to theprinter (prints page)and clears the buffer
~GETPAGE fills BUFID with page data
1
2
3
(eof)
Three buffers are filled with three pages of input data.Each page will be held and can be processed separately.This example prints the pages in reversed order.
~GETPAGE fills BIFID with page data
~PAGE sends logicalpage buffer to theprinter (prints page)and clears the buffer
Three buffers are filled with three pages of input data.Each page will be held and can be processed separately.This example prints the pages in reversed order.

Line Printer Filter 517
Input lines The ~GETLINE command reads the input data until it encounters an end-of-line. See the chapter ‘FOL commands reference’ in the ‘Océ Power Print Controller FOL Reference Manual’ for a full description of the ~GETLINE command.
Conditional commands
The ~TEST command allows you to conditionally execute commands.
You can test the contents of variables, or test the setflag of a variable. See ‘Variables’ on page 520 for more information on variables. Depending on the result of the test, the page can be handled in a different way. For example, the page can be delivered into a different bin, or use a different overlay.
Any FOL Layout command can be used in the conditional command block.
The example LayoutPIF below scans the input page for the string “USER” and stores a string of four characters, at 3 positions to the right of the string “USER”, into the variable %user.
For all pages where the string “INV ” is found, form1 is used as overlay. For all pages where the string “COPY” is found, form2 is used as overlay.
.....
.....
~SEARCH ANYWHERE “USER” %user 3 +3
~MODIFY 1 1 30 TEXT “Test-job”
~LANDSCAPE
~TOPMARGIN 2
~LEFTMARGIN 5
~BOTTOMMARGIN 3
~F “Courier 12”
~LPP 40
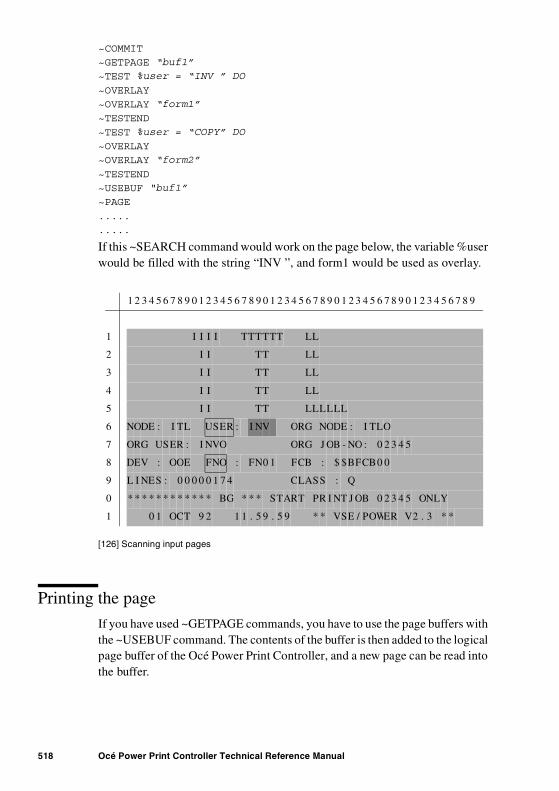
518 Océ Power Print Controller Technical Reference Manual
~COMMIT~GETPAGE “buf1”
~TEST %user = “INV ” DO
~OVERLAY~OVERLAY “form1”
~TESTEND
~TEST %user = “COPY” DO
~OVERLAY~OVERLAY “form2”
~TESTEND~USEBUF “buf1”
~PAGE
.....
.....
If this ~SEARCH command would work on the page below, the variable %user would be filled with the string “INV ”, and form1 would be used as overlay.
[126] Scanning input pages
Printing the page
If you have used ~GETPAGE commands, you have to use the page buffers with the ~USEBUF command. The contents of the buffer is then added to the logical page buffer of the Océ Power Print Controller, and a new page can be read into the buffer.
1 2 3 4 5 6 7 8 9 0 1 2 3 4 5 6 7 8 9 0 1 2 3 4 5 6 7 8 9 0 1 2 3 4 5 6 7 8 9 0 1 2 3 4 5 6 7 8 9
1 I I I I TTTTTT LL
2 I I TT LL
3 I I TT LL
4 I I TT LL
5 I I TT LLLLLL
6 NODE : I TL USER : I NV ORG NODE : I TLO
7 ORG USER : I NVO ORG J OB - NO : 0 2 3 4 5
8 DEV : OOE FNO : FN0 1 FCB : $ $BFCB0 0
9 L I NES : 0 0 0 0 0 1 7 4 CLASS : Q
0 * * * * * * * * * * * * BG * * * START PR I NT J OB 0 2 3 4 5 ONLY
1 0 1 OCT 9 2 1 1 . 5 9 . 5 9 * * VSE / POWER V2 . 3 * *
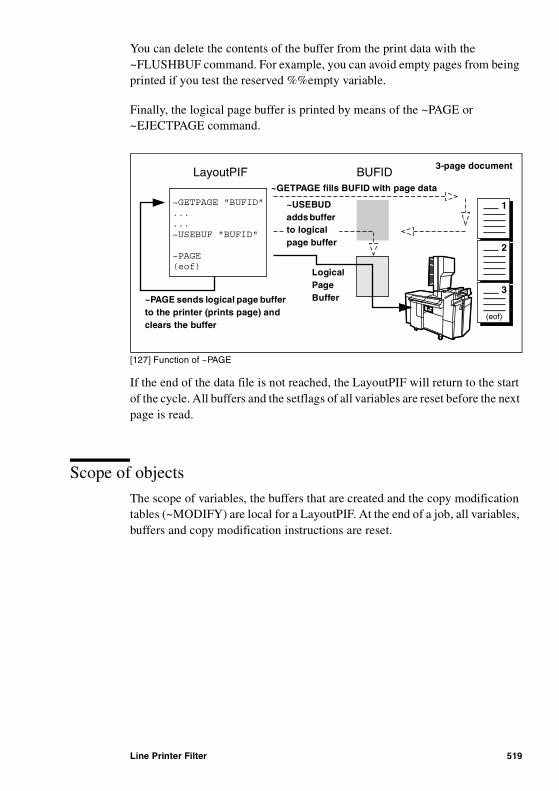
Line Printer Filter 519
You can delete the contents of the buffer from the print data with the ~FLUSHBUF command. For example, you can avoid empty pages from being printed if you test the reserved %%empty variable.
Finally, the logical page buffer is printed by means of the ~PAGE or ~EJECTPAGE command.
[127] Function of ~PAGE
If the end of the data file is not reached, the LayoutPIF will return to the start of the cycle. All buffers and the setflags of all variables are reset before the next page is read.
Scope of objects
The scope of variables, the buffers that are created and the copy modification tables (~MODIFY) are local for a LayoutPIF. At the end of a job, all variables, buffers and copy modification instructions are reset.
LayoutPIF BUFID 3-page document
~GETPAGE "BUFID"......~USEBUF "BUFID"
~PAGE(eof)
LogicalPageBuffer
~PAGE sends logical page buffer to the printer(prints page) and clears the buffer
~USEBUF addsbuffer to logical
page buffer
~GETPAGE fills BUFID with page data
1
2
3
(eof)
~GETPAGE fills BUFID with page data
3-page document
LogicalPageBuffer~PAGE sends logical page buffer
to the printer (prints page) and clears the buffer
~USEBUD adds buffer to logical page buffer

520 Océ Power Print Controller Technical Reference Manual
Variables
Variables are memory stores that can be set, modified and used.
Variables set in a LayoutPIF can only be used in the LayoutPIF.
A variable has the following attributes:
■ setflag: a boolean value denoting that the tag field for the variable has been found with the last ~GETPAGE command.
■ value: the contents of the variable. This is a string of printable characters. This string may be empty or just contain spaces. The variable contents will be filled when the setflag has been set to TRUE.
The syntax for a variable name is:
%<local_ID>
The variable name is case insensitive.
The variable name may also be used with the following commands:
■ ~TEXT (with use of the in-line command ~VAR)■ ~LOGO■ ~BIN, ~TRAY, ~NRCOPIES (device control commands)■ ~INCUSE■ ~OVERLAY, ~UNDERLAY■ ~PIFUSE■ ~BARCODE■ ~VAR (in-line command for using variables in plain text and ~TEXT)
Note: Note that when using a variable with a command, the contents of the variable will be used as argument and therefore must satisfy the conditions for that command.

Line Printer Filter 521
Reserved variablesThe Océ Power Print Controller supports the following reserved variables for the LayoutPIF:
■ %%EMPTY
This variable describes whether the last executed ~GETPAGE command in the LayoutPIF has received printable information. Initially, when starting up a LayoutPIF, the setflag of %%EMPTY is set to TRUE (i.e. the page buffer is empty). The set flag will be set to TRUE before each ~GETPAGE command. If the ~GETPAGE receives printable information, the set flag will be set to FALSE (the page buffer is filled, i.e. not empty). This variable may only be used in combination with [NOT] SET in the ~TEST command.
The following variables are reserved variables, containing JAC identification attributes. See the volume on communication channels and protocols, and the volume on JAC for more information.
■ %JOBAPPLICATION■ %JOBTITLE■ %JOBADDRESSEE■ %JOBADDRESS■ %CHANNELTYPE■ %CHANNELNAME■ %HOSTNAME■ %USERNAME■ %GROUPNAME■ %JOBNAME■ %JOBNUMBER■ %JOBCLASS■ %JOBDATE■ %CUSTOM■ %SEGMENTNAME

522 Océ Power Print Controller Technical Reference Manual
Downloading and activating LayoutPIFs
Downloading
There are three ways to download a LayoutPIF to the printer’s hard disk:
■ with JAC, using a download ticket. See ‘JEC tickets’ on page 329.■ install from floppy disk with the ‘JACINSTAL’ function in KOS. Refer to the
System Administration Manual.■ with LayoutPIF commands ~PIFSAVE or ~PIFCREATE.
LayoutPIFs reside on the printer’s hard disk. They are downloaded with the ~PIFSAVE or the ~PIFCREATE command, and ended with ~PIFEND. They can only be removed through KOS or with the ~PIFREMOVE command.
For a full description of these commands, see the chapter ‘FOL commands reference’ in the ‘Océ Power Print Controller FOL Reference Manual’ .
Activating
A LayoutPIF is activated via a job ticket. See the volume on JAC for more information.
Only one LayoutPIF is allowed per print job. You cannot activate another LayoutPIF from within a LayoutPIF.
Note: For compatibility reasons, it is also allowed to activate a LayoutPIF in the print data with the ~PIFUSE command. The data in front of the ~PIFUSE are sent towards the FOL PDL.
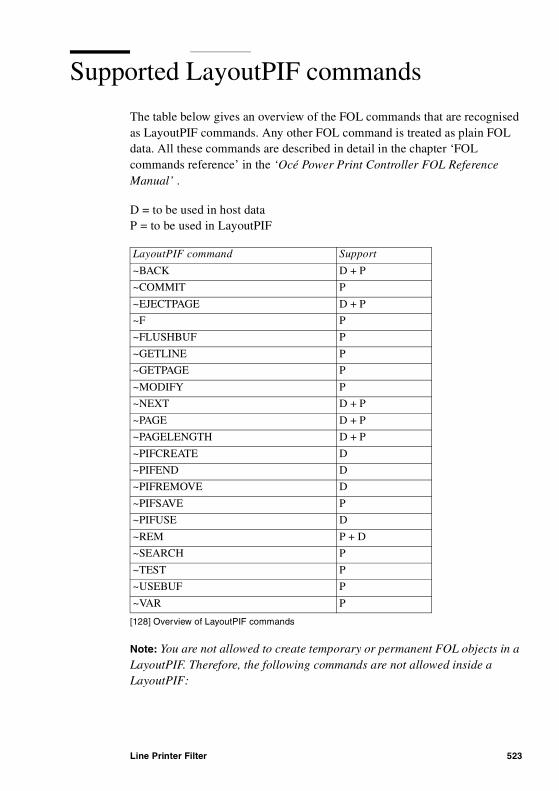
Line Printer Filter 523
Supported LayoutPIF commands
The table below gives an overview of the FOL commands that are recognised as LayoutPIF commands. Any other FOL command is treated as plain FOL data. All these commands are described in detail in the chapter ‘FOL commands reference’ in the ‘Océ Power Print Controller FOL Reference Manual’ .
D = to be used in host dataP = to be used in LayoutPIF
Note: You are not allowed to create temporary or permanent FOL objects in a LayoutPIF. Therefore, the following commands are not allowed inside a LayoutPIF:
LayoutPIF command Support
~BACK D + P
~COMMIT P
~EJECTPAGE D + P
~F P
~FLUSHBUF P
~GETLINE P
~GETPAGE P
~MODIFY P
~NEXT D + P
~PAGE D + P
~PAGELENGTH D + P
~PIFCREATE D
~PIFEND D
~PIFREMOVE D
~PIFSAVE P
~PIFUSE D
~REM P + D
~SEARCH P
~TEST P
~USEBUF P
~VAR P
[128] Overview of LayoutPIF commands

524 Océ Power Print Controller Technical Reference Manual
■ ~FORMCREATE■ ~FORMSAVE■ ~INCCREATE■ ~INCSAVE■ ~PIFCREATE■ ~PIFSAVE■ ~PIFUSE
Note: For compatibility reasons, the LayoutPIF will filter the ~BEGINOFDOC and ~ENDOFDOC commands from the data stream and replace them by a page break. The ~BEGINOFDOC and ~ENDOFDOC commands can be generated by a PCI.

Line Printer Filter 525
Restrictions
The following restrictions apply to the use of LayoutPIFs:
The argument (global id), used for ~PIFUSE, ~INCUSE, ~UNDERLAY and ~OVERLAY, and all ~XXXCREATE, ~XXXSAVE, and ~XXXREMOVE commands, must be according to the conventions of MS-DOS file names:
■ The name can contain a maximal of 8 characters, optionally followed by the ‘.’ character and a suffix of maximal 3 characters.
■ The space character, ? * “ : / and the characters above ASCII value 126 and below ASCII value 32 are not allowed.
■ No more than one dot (‘.’) is allowed.
Maximum length of local id: 20
Maximum length of global id: 80
Maximum length of global ID for selecting LOGO: 20
Maximum length of global ID for selecting PID or LID: 20
Maximum length of typeface name in font selection: 20
Maximum length of symbolset name in font selection: 20
Maximum length of variable name (including %): 20
Maximum length of variable contents: 256
Maximum length of tag string: 256
Maximum length of compare string: 256
Maximum length of modify string: 256
Maximum number of digits in an integer (excl. sign): 8

526 Océ Power Print Controller Technical Reference Manual

527
Océ Power Print Controller
Technical Reference Manual
Chapter 27Supported emulations
In this chapter you will find the PCL-to-FOL translation tables for all supported Line Printer Emulations of the Océ Power Print Controller. Line Printer emulations are part of the Line Printer Filter.

528 Océ Power Print Controller Technical Reference Manual
ASCII translation
This document describes the ASCII line printer filter.
Supported PCL commands
The ASCII filter will recognise all PCL4 commands and will strip these commands from the input. The output data of the LPF will not contain any PCL commands.

Supported emulations 529
IBM 3287 emulation
This section describes the IBM 3287 line printer emulation as provided by the INCAA 9833 BOX.
Supported PCL commands
Not emulation-specific PCL4 commands will be stripped from the input. The output data of the LPF will not contain any of these PCL commands. The IBM 3287 itself supports only Courier fonts.
The translation of the supported PCL4 commands is as follows:

530 Océ Power Print Controller Technical Reference Manual
1 The font will not change, only the symbol set.
Description PCL command
FOL command
reset <esc>E ~RESET
select Roman 8 symbol set <esc>(8U ~F “CR HP_Roman-8”1
select Latin 1 symbol set <esc>(ON ~F “ CR ISO_100_Latin_1”
select fixed spacing <esc>(sOP Skip by LPF2
set line termination CR=CR, LF=LF, FF=FF
<esc>&kOG none, handled by LPF
set perforation skip enabled <esc>&l1L none3
Underline on <esc>&d#D ~US
Underline off <esc>&d@ ~UE
bold printing on via micro-shift
<esc>&a+#H ~HPADECI +#4
bold printing off via micro-shift
<esc>&a-#H ~HPADECI +#4
bold start selection via font attribute # = [1, 2, 3, 4, 5, 6, 7]
<esc>(s#B ~BS
bold off selection via font at-tribute # = [-7, -6, -5, -4, -3, -2, -1, 0]
<esc>(s#B ~BE
set marginshorizontal Tabset left margin (column)set top margin (lines)
<esc>&a#H<esc>&a#L<esc>&l#E
~HPADECI #4
~LEFTMARGIN #5
~TOPMARGIN # 5,6
set line spacing (VMI) <esc>&l#C ~SPI #5
set Vertical Motion Index <esc>&l#H ~SPI #5
set Horizontal Motion Indexset HMI to 1/120 inch
<esc>&k#H<esc>&k1H
~HMI #5
Ignore
select CPI <esc>(s#H ~F “PI <size>”7
double underscore character emulation
_<esc>*p+6Y
<bs>_<esc>*p-6Y
~XYSAVE 31(save xy pos)underscore~HPA xpos31~VPA ypos31+0.508skip backspaceunderscore~VPA ypos31
[129] Translation of the IBM 3287 Emulation-specific PCL commands into FOL

Supported emulations 531
2 Selection of a fixed font is not possible by only attribute in FOL. Only monospaced fonts are supported.
3 Soft page breaks are not supported by the LPF, not in ~GETPAGE nor by adding ~PAGE to the data when perforation region is reached. Pages are ended by the IBM 3287 with a FormFeed
4 This is an internal FOL command, required to make point/decipoint positioning possible. Supports both absolute and relative positioning. The units of measurement of the HPADECI command is specified in decipoints.
5 The units of measurement of the LEFTMARGIN, TOPMARGIN, SPI and HMI command are specified in millimetres.
6 The default top margin of the FOL interpreter must be reset from 25400 to 0 mm. Else a TOPMARGIN selection smaller than the default will be ignored.
7 The rest of the font characteristics do not change.

532 Océ Power Print Controller Technical Reference Manual
IBM 3812 emulation
This section describes the IBM 3812 line printer emulation, as provided by the INCAA 9835 BOX.
Attention: Note that the IBM 3812 is a Laser Printer which can be used from Office Environments. However, this specific line printer filter is only intended for line printer data sent towards an IBM 3812, not for Office formatted print data.
Supported PCL commands
Not emulation-specific PCL4 commands will be recognised and will be stripped from the input. The output data of the LPF will not contain any of these PCL commands. Although the IBM 3812 itself supports monospaced (Courier, Letter Gothic, Line Printer, Prestige, OCRB) and typographical fonts (Times Roman, Helvetica), this LPF supports only monospaced fonts.
The translation of the supported PCL4 commands is as follows:

Supported emulations 533
Description PCL-command FOL-command
reset <esc>E ~RESET
select Roman 8 symbol set
<esc>(8U ~F “CR HP_Roman-8”1
select Latin 1 symbol set <esc>(ON ~F “CR ISO_100_Latin_1”
select fixed spacing <esc>(sOP Skip by LPF2
set line termination CR=CR, LF=LF, FF=FF
<esc>&kOG None, handled by LPF
set perforation skip ena-bled
<esc>&l1L None3
superscript on <esc>&a-1R<ESC>=
~SP
subscript on <esc>= ~SB
superscript off <esc>= ~SB
subscript off <esc>&a-1R <ESC>=
~SP
set spacing <esc>(s#P Ignore
bold printing on via mi-croshift
<esc>&a+#H ~HPADECI +#5
bold printing off via mi-croshift
<esc>&a-#H ~HPADECI -#5
portrait orientation <esc>&10O ~PAGE6
~PORTRAIT
landscape orientation <esc>&l1O ~PAGE6
~LANDSCAPE
bold start selection via font attribute # = [1, 2, 3, 4, 5, 6, 7]
<esc>(s#B ~BS
bold off selection via font attribute # = [-7, -6, -5, -4, -3, -2, -1, 0]
<esc>(s#B ~BE
set marginshorizontal Tabset left marginvet top marginVertical offset
<esc>&a#H<esc>&a#L<esc>&l0E<esc>&a#V
~HPADECI #5
~LEFTMARGIN #~TOPMARGIN 07
~VPA #8
set Line Spacing (VMI) <esc>&l#C ~SPI #8
set Horizontal Motion In-dex
<esc>&k#H ~HMI #8
select CPI <esc>(s#H ~F “font #”4
[130] Translation of the IBM 3812 Emulation-specific PCL commands into FOL

534 Océ Power Print Controller Technical Reference Manual
1 The font will not change, only the symbol set.2 Selection of a fixed font is not possible by only attribute in FOL. Only
monospaced fonts are supported.3 Soft page breaks are not supported by the LPF, not in ~GETPAGE nor by
adding ~PAGE to the data when perforation region is reached. Pages are ended by the IBM 3812 with a FormFeed.
4 This command changes the font size. The font and symbolset will not change. The default font is Courier HP_Roman-8.
5 This is an internal FOL command, required to make point/decipoint positioning possible. Supports both absolute and relative positioning.
6 Only a new page is started when the orientation differs.7 The default top margin of the FOL interpreter must be reset from 25400 to
0 mm. Else a TOPMARGIN selection smaller than the default will be ignored.8 The units of measurement are specified in millimetres.9 If simplex/duplex is changed (except when it is selected for the first time), the
FOL-command ~EJECTPAGE will precede the simplex/duplex command.
select paper source <esc>&1#H 0 = <FormFeed>1 = ~TRAY 2 (UPPER)2 = ~TRAY 03 = ~TRAY 04 = ~TRAY 15 = ~TRAY 1 (large)6 = ~TRAY 1 (env. feed)
Underline on <esc>&d#D ~US
Underline off <esc>&d@ ~UE
double underscore char-acter emulation
_<esc>*p+6Y
<bs>_<esc>*p-6
~XYSAVE 31(save xy pos)underscore~HPA xpos31~VPA ypos31+0.508skip backspaceunderscore~VPA ypos31
simplex selection <esc>&l0S ~SIMPLEX9
duplex selection vertical binding
<esc>&l1S ~DUPLEX 1 (portrait)9
~DUPLEX 3 (landscape)9
duplex selection horizon-tal binding
<esc>&l1S ~DUPLEX 2 (portrait)9
~DUPLEX 4 (landscape)9
Description PCL-command FOL-command
[130] Translation of the IBM 3812 Emulation-specific PCL commands into FOL

Supported emulations 535
IBM 4214 emulation
This document describes the IBM 4214 line printer emulation as provided by the INCAA 9835 BOX.
Supported PCL commands
Not emulation-specific PCL4 commands will be recognised and will be stripped from the input. The output data of the LPF will not contain any of these PCL commands. The IBM 4214 printer does not support font changes. The only font family supported is Courier.
The translation of the supported PCL4 commands is as follows:

536 Océ Power Print Controller Technical Reference Manual
1 The font will not change, only the symbol set.2 Selection of a fixed font is not possible by only attribute in FOL. Courier font
selected by the IBM 4214 emulation is already monospaced.
Description PCL-command FOL-command
reset <esc>E ~RESET
select Roman 8 symbol set <esc>(8U ~F “CR HP_Roman-8”1
select Latin 1 symbol set <esc>(ON ~F “CR ISO_100_Latin_1
select fixed spacing <esc>(s0P Skip by LPF2
set line termination CR=CR, LF=LF, FF=FF
<esc>&k0G None, handled by LPF
set perforation skip enabled <esc>&l1L None3
font selection <esc>(s10H LPF, pitch selection 10
bold printing on via micro-shift
<esc>&a+#H ~HPADECI +#4
bold printing off via micro-shift
<esc>&a-#H ~HPADECI -#4
portrait orientation <esc>&10O ~PORTRAIT
set marginshorizontal Tabset left marginset top marginvertical offset
<esc>&a#H<esc>&a#L<esc>&l0E<esc>&a#V
~HPADECI #4
~LEFTMARGIN #~TOPMARGIN 0~VPA #5
set line spacing (VMI) <esc>&l#C ~SPI #5
set Horizontal Motion Index <esc>&k#H ~HMI #5
select CPI <esc>(s#H ~F “PI <size>”6
select paper source <esc>&1#H 0 = <FormFeed>1 = ~TRAY 2 (UPPER)2 = ~TRAY 03 = ~TRAY 04 = ~TRAY 15 = ~TRAY 1 (large)6 = ~TRAY 1 (env. feed)
double underscore character emulation
_<esc>*p+6Y
<bs>_<esc>*p-6
~XYSAVE 31(save xy pos)underscore~HPA xpos31~VPA ypos31+0.508skip backspaceunderscore~VPA ypos31
[131] Translation of the IBM 4214 Emulation-specific PCL commands into FOL

Supported emulations 537
3 Soft page breaks are not supported by the LPF, not in ~GETPAGE nor by adding ~PAGE to the data when perforation region is reached. Pages are ended by the IBM 4214 with a FormFeed.
4 This is an internal FOL command, required to make point/decipoint positioning possible. Supports both absolute and relative positioning. The unit of measurement is in decipoints.
5 The units of measurement are specified in millimetres.6 The rest of the font characteristics do not change.

538 Océ Power Print Controller Technical Reference Manual
IBM 5224 emulation
This document describes the IBM 5224 line printer emulation as provided by INCAA 9835 BOX
Supported PCL commands
Not IBM 5224 Emulation specific PCL4 commands will be recognised and will be stripped from the input. The IBM 5224 printer does not support font changes. The only font family supported is Courier. The output data of the LPF will not contain any of these PCL commands.
The translation of the supported PCL4 commands is as follows:

Supported emulations 539
1 The font will not change, only the symbol set.2 Selection of a fixed font is not possible by only attribute in FOL. Courier font
selected by the IBM 5224 emulation is already monospaced.
Description PCL-command FOL-command
reset <esc>E ~RESET
select Roman 8 symbol set <esc>(8U ~F “CR HP_Roman-8”1
select Latin 1 symbol set <esc>(ON ~F “CR ISO_100_Latin_1
select fixed spacing <esc>(s0P Skip by LPF2
set line termination CR=CR, LF=LF, FF=FF
<esc>&k0G None, handled by LPF
set perforation skip enabled <esc>&l1L None3
bold printing on via micro-shift
<esc>&a+#H ~HPADECI +#4
bold printing off via micro-shift
<esc>&a-#H ~HPADECI -#4
portrait orientation <esc>&10O ~PORTRAIT
set marginshorizontal Tabset left marginset top marginvertical offset
<esc>&a#H<esc>&a#L<esc>&l0E<esc>&a#V
~HPADECI #4
~LEFTMARGIN #~TOPMARGIN 0~VPA #5
set line spacing (VMI) <esc>&l#C ~SPI #5
set Horizontal Motion Index <esc>&k#H ~HMI #5
select CPI <esc>(s#H ~F “PI <size>”6
select paper source <esc>&1#H 0 = <FormFeed>1 = ~TRAY 2 (UPPER)2 = ~TRAY 03 = ~TRAY 04 = ~TRAY 15 = ~TRAY 1 (large)6 = ~TRAY 1 (env. feed)
double underscore character emulation
_<esc>*p+6Y
<bs>_<esc>*p-6
~XYSAVE 31(save xy pos)underscore~HPA xpos31~VPA ypos31+0.508skip backspaceunderscore~VPA ypos31
[132] Translation of the IBM 5224 Emulation-specific PCL commands into FOL

540 Océ Power Print Controller Technical Reference Manual
3 Soft page breaks are not supported by the LPF, not in ~GETPAGE nor by adding ~PAGE to the data when perforation region is reached. Pages are ended by the IBM 5224 with a FormFeed.
4 This is an internal FOL command, required to make point/decipoint positioning possible. Supports both absolute as relative positioning. The units of measurement are specified in millimetres.
5 The units of measurement are specified in millimetres.6 The rest of the font characteristics do not change.

Supported emulations 541
Channel emulation
This document describes the Channel LPF.
Supported PCL commands
Not emulation-specific PCL4 commands will be recognised and will be stripped from the input. The output data of the LPF will not contain any of these PCL commands.
The translation of the supported PCL4 commands is as follows:
1 This is an internal FOL command, required to make point/decipoint positioning possible.
2 The units of measurement are specified in millimetres.
Description PCL-command FOL-command
reset <esc>E ~RESET
bold font emulation via microshift
<esc>&a#H ~HPADECI #1
bold start selection via font attribute # = [1, 2, 3, 4, 5, 6, 7]
<esc>(s#B ~BS
bold off selection via font attribute # = [-7, -6, -5, -4, -3, -2, -1, 0]
<esc>(s#B ~BE
lpi selection (VMI) <esc>&l#C ~SPI #2
lpi selection (LPI) <esc>&l#D ~SPI #2
page length selection <esc>&l#P ~PAGELENGTH #
[133] Translation of the Channel Emulation-specific PCL commands into FOL

542 Océ Power Print Controller Technical Reference Manual
543
Océ Power Print Controller
Technical Reference Manual
Chapter 28LayoutPIF error handling
This chapter provides an overview of all error messages related to the use of LayoutPIFs, together with the origin of the error message and how to solve the error.

544 Océ Power Print Controller Technical Reference Manual
Error handling in the Océ Power Print Controller
The Line Printer Filer software deals with the following logical errors:
■ errors related to the FOL commands in the LayoutPIF■ errors that are part of the translation of PCL codes into FOL by one of the
specific line printer emulations.
Most errors are a result of one erroneous FOL command, or its parameters. These are checked when the command is interpreted by the FOL interpreter.
Some errors are a result of an illegal combination of printer settings which may be changed by LayoutPIF commands.
The Line Printer Filter checks if a command is supported. If the command is not allowed, or not supported, a logical error is generated. If a syntax error occurs, a logical error is generated.
Using FOL files and LayoutPIFs on different printers
Job and device control commands will not automatically cause an error due to a different printer configuration. This ensures transportability of FOL files and LayoutPIFs on different printer configurations and products.
For example, a ~BIN command (for a Sorter), sent to a printer with a Finisher, will be ignored and will not cause an error. Also, Finisher commands sent to a printer with a Sorter, will be ignored.
Printing error messages
An error message consists of three parts:
■ the error number■ the error message■ the data line (or a part of it) where the error occurred.

LayoutPIF error handling 545
Error messages are printed on a separate error page, if the error page is enabled in KOS (‘ERRPAGE’ option, see the Océ Power Print Controller System Administration Manual).
The error page is part of the document and is deposited together with the document pages.
Structure of this chapter
The error messages are described on the next pages. They are arranged by error number. The error messages are described in the following format:
“[error number] Message: the actual text string which is either printed or displayed”
Description: explains the error and the reasons for its occurrence
Action: tells you how you can solve the error
Type of error: describes the type of error
Commands: identifies possible commands that generated the error message.

546 Océ Power Print Controller Technical Reference Manual
Overview of error messages
“[3001] PIF: xxxx FOL syntax error”
Variable: xxxx is the name of the LayoutPIF in which the error occurred.
Description: This message appears when any command is not recognised by the Océ Power Print Controller, or when a command has an invalid syntax.
Action: Make sure that the command you have used is valid, and that your code obeys the rules of syntax for that specific command. Submit the job again.
Type of error: logical or syntax error
Commands: Any FOL command
“[3008] PIF: xxxx FOL invalid global name”
Variable: xxxx is the name of the LayoutPIF in which the error occurred.
Description: This message is reported when the number of characters in a global identifier exceeds 80. It is also reported if an object name does not fulfil the MS-DOS file naming rules. It can occur in any command in which an alias can be used, where the global identifier is the argument oldname.
Action: Change the global identifier you used in conjunction with the alias, using a maximum of 80 characters. Submit the job again.
Type of error: logical or syntax error
Commands: Any command in which an alias can be used.Any command which needs an object name.
“[3027] FOL not enough memory available”
Description: There is not enough memory available to create the requested object or the administration of an object.

LayoutPIF error handling 547
Action: Ensure that the FOL programme that you have coded does not require more memory than is currently available on your printer. Try submitting a shorter, less complex programme. If the condition persists, notify your system administrator.
Type of error: logical or syntax error
Commands: ~PIFCREATE, ~PIFSAVE, ~MODIFY, ~SEARCH, ~GETPAGE
Related commands: ~PIFUSE
“[3029] FOL not enough hard disk space available”
Description: There is not enough hard disk space available to store the LayoutPIF permanently.
Action: Check with your system administrator if space can be made on the hard disk to save your LayoutPIF.
Type of error: logical or syntax error
Commands: ~PIFSAVE
“[3035] LPF pif xxxx already exists”
Variable: xxxx is the name of the LayoutPIF that already exists.
Description: A LayoutPIF with the same name already exists on the hard disk of the printer.
Action: Create or save the LayoutPIF under a different name, or remove the LayoutPIF with this name from the printer’s hard disk.
Type of error: logical or syntax error
Commands: ~PIFCREATE, ~PIFSAVE
“[3036] LPF pif xxxx not found”
Variable: xxxx is the name of the LayoutPIF.

548 Océ Power Print Controller Technical Reference Manual
Description: You have specified the name of a non-existing LayoutPIF, either with the ~PIFUSE command or in a JEC ticket.
Action: Specify the correct name of the LayoutPIF, or download the LayoutPIF to the printer’s hard disk first. In case of doubt, you can ask your Key Operator to print a printer Status Report which contains a list of stored LayoutPIFs.
Type of error: logical or syntax error
Commands: ~PIFUSE, JEC ticket command
“[3059] LPF pif active xxxx”
Variable: xxxx is the name of the LayoutPIF.
Description: The LayoutPIF cannot be created, saved or removed because it is active.
Action: Create or save the LayoutPIF using a different name. Remove the LayoutPIF when it is not active.
Type of error: logical or syntax error
Commands: ~PIFCREATE, ~PIFSAVE, ~PIFREMOVE
“[3068] FOL no page break in pif cycle present”
Description: The cyclical part of your LayoutPIF did not generate a page break.
Action: Change the LayoutPIF.
Type of error: logical or syntax error
Related commands: ~PIFUSE, ~NEXT, ~BACK, ~EJECTPAGE
“[3069] PIF: xxxx FOL value out of range”
Variable: xxxx is the name of the LayoutPIF in which the error occurred.

LayoutPIF error handling 549
Description: One or more of the parameters of the FOL command is out of range. That is linepos <1, linenum <1, charpos <1, length <1, or charplace = 0 or outside the line.
Action: Use the correct syntax.
Type of error: logical or syntax error
Commands: ~MODIFY, ~SEARCH
“[3071] LPF previous contents of buffer xxxx is lost”
Variable: xxxx is the name of the buffer.
Description: The LayoutPIF has filled a buffer named xxxx using the ~GETPAGE command. The LayoutPIF tries to fill the buffer again, but the contents of the specified buffer have not been used yet.
Action: If you want to flush the buffer’s contents, add ~FLUSHBUF before ~GETPAGE, else add the ~USEBUF command.
Type of error: logical or syntax error
Commands: ~GETPAGE
“[3072] LPF buffer xxxx does not exist”
Variable: xxxx is the name of the buffer.
Description: The buffer you have specified does not exist.
Action: Check the ~GETPAGE command in your LayoutPIF for the correct buffer name(s).
Type of error: logical or syntax error
Commands: ~USEBUF, ~FLUSHBUF
“[3073] LPF warning, part of buffer xxxx contents is lost”
Variable: xxxx is the name of the buffer.

550 Océ Power Print Controller Technical Reference Manual
Description: Host data have been read in the buffer. During processing of these data a page break, which was not detected when filling the buffer, is generated. Therefore, only part of the buffer will be processed.
Action: Modify your LayoutPIF to detect the page-break when reading in the buffer.
Type of error: logical or syntax error
Commands: Any command that can generate a page break.
“[3074] LPF variable name xxxx already used”
Variable: xxxx is the name of the variable.
Description: You have declared a variable twice or more.
Action: Remove the surplus of variable definitions.
Type of error: logical or syntax error
Commands: ~SEARCH
“[3075] LPF variable name xxxx unknown”
Variable: xxxx is the name of the variable.
Description: The variable name you specified in a FOL command is unknown.
Action: Check the ~SEARCH commands in your LayoutPIF for the correct variable name and use this variable name.
Type of error: logical or syntax error
Commands: ~PIFUSE, ~VAR~INCUSE, ~BIN, ~LOGO, ~NRCOPIES, ~OVERLAY, ~UNDERLAY, ~TRAY

LayoutPIF error handling 551
“[3076] FOL incorrect nesting test/testend”
Description: The ~TEST commands are nested incorrectly. For example, the ~TESTEND command may be missing.
Action: Use the correct nesting.
Type of error: logical or syntax error
Commands: ~TEST, ~TESTEND
“[3080] FOL too many pifs nested”
Description: You cannot use more than one LayoutPIF within one job.
Action: Do not use nested LayoutPIFs.
Type of error: logical or syntax error
Commands: ~PIFUSE, JEC ticket command

552 Océ Power Print Controller Technical Reference Manual

553
Océ Power Print Controller
Technical Reference Manual
Appendix AMiscellaneous

554 Océ Power Print Controller Technical Reference Manual
Notation conventions
There are a number of notation conventions used in this manual. This consistent style enables you to quickly become conversant with the use of this manual and consequently the Océ Power Print Controller.
Description Each section or subsection contains a description of the feature or operation identified in the title. It might also include possible applications, as well as any guidelines that you should bear in mind.
Procedures A description is followed by a procedure. A procedure always begins with a phrase which briefly describes the procedure, followed by a series of numbered steps that take you, step by step, through all phases of performing the operation.
Figures and tables Figures and tables are titled and numbered sequentially throughout this manual. Figures include pictures of product components, screendumps, examples, and diagrams of concepts discussed in the description.
Attention getters There are several types of information to which we draw your attention. This information is classified as follows:
Note: In a ‘Note’, information is given about matters which ensure the proper functioning of the machine or application, but useful advice concerning its operation may also be given.
Attention: The information that follows ‘Attention’ is given to prevent something (your copy or original, the copier or printer, data files etc.) being damaged.
Caution: The information that follows ‘Caution’ is given to prevent you suffering personal injury.

Miscellaneous 555
Reader’s comment sheet
Have you found this manual to be accurate?❏ Yes❏ No
Could you operate the product after reading this manual?❏ Yes❏ No
Does this manual provide enough background information?❏ Yes❏ No
Is the format of this manual convenient in size, readability and arrangement (page layout, chapter order, etc.)?❏ Yes❏ No
Could you find the information you were looking for?❏ Always❏ Most of the times❏ Sometimes❏ Not at all
What did you use to find the required information?❏ Table of contents❏ Index
Are you satisfied with this manual?❏ Yes❏ No
Thank you for evaluating this manual. If you have other comments or concerns, please explain or suggest improvements overleaf or on a separate sheet.

556 Océ Power Print Controller Technical Reference Manual
Comments:
--------------------------------------------------------------------------------------------
--------------------------------------------------------------------------------------------
--------------------------------------------------------------------------------------------
--------------------------------------------------------------------------------------------
--------------------------------------------------------------------------------------------
--------------------------------------------------------------------------------------------Date:
This reader’s comment sheet is completed by: (If you prefer to remain unknown, please do fill in your occupation)
Name:
Occupation:
Company:
Phone:
Address:
City:
Country:
Please return this sheet to:
Océ-Technologies B.V.For the attention of ITC User Documentation.P.O. Box 101,5900 MA VenloThe Netherlands
Send you comments by E-mail to : [email protected]
For the addresses of local Océ organizations see : www.oce.com

Miscellaneous 557
Addresses of local Océ organisations
Océ-Australia Ltd.P.O.Box 196Cheltenham VIC 3192Australia
Océ-Österreich GmbHPostfach 951233 ViennaAustria
Océ-Belgium N.V./S.A.Avenue J.Bordetlaan 321140 Brussel Belgium
Océ-Česká republika s.r.o.K. Rysánce 1614754 Praha 4Czech Republic
Océ-Danmark A.S.Kornmarksvej 6DK 26605 BrøndbyDenmark
Océ-France S.A.“La Brèche”3, Rue des ArchivesF-94000 CréteilFrance
Océ Printing Systems GmbHSiemensallee 285586 PoingGermany
Océ-Hungária Kft. P.S.1241 Budapest, P.O.B. 2371135 Budapest, Hun u. 2Hungary
Océ-Italia S.P.A.Via Cassanese 20620090 Segrate, MilanoItalia
Océ Asia Pte. Ltd. P.S.P.O. Box 12602 Kallang Sector, 7th floorSIN-349277 Singapore
Océ Printing Systems SA (Pty) Ltd.P.O. Box 3149Johannesburg 2000South Africa
Océ-Nederland B.V.P.O.Box 8005201 AV ‘s-HertogenboschThe Netherlands
Océ Norge A/SPostboks 53, GrefsenN-409 Oslo 4Norway
Océ España SABusiness Park MAS BLAUC/Osona 2, 2-3a Planta08820 El Prat del Llobregat (Barcelona)Spain

558 Océ Power Print Controller Technical Reference Manual
Océ-Svenska A.B.P.O.box 1231S-164 28 KistaSweden
Océ Printing SystemsObstgartenstrasze 25CH-8302 klotenSwitserland
Océ Printing Systems U.K.Ltd.(Loughton)Langston Road, LoughtonGB-Esses IG10 3THUnited Kingdom
Océ Printing Systems U.K.Ltd.(Bracknell)Siemens Nixdorf House OldburyBracknell, Berks RG12 4FZUnited Kingdom
Océ-USA Inc.5450 North Cumberland Av.Chicago, Ill. 60656U.S.A.
Océ Printing Systems USA5600 Broken Sound BlvdBoca Raton, FI 33487USA

Index 559
Index
*jec 329~beginofdoc
in layoutpif 524~endofdoc
in layoutpif 52425-pin d-sub connector 11236-pin champ connector 1109-pin d-connector
token ring 128
Aaccess control commands 161accounting
printlink 225acknowledge (centronics signal) 114activate
art 349pagepif 417sif 358
adobebinary communications protocol (bcp) 233laserwriter driver 246
advantagesmultiple job processing 67
afp 48afp (appletalk filing protocol) 246ajc/fol
defined 49ajcfol
defined 48and relation in separator definition 390apple
laserwriter 246appletalk 243
address 256filing protocol (afp) 246token ring 127
appletalk implementationsfdditalk 243, 245localtalk 243, 245tokentalk 243
application developer 20art 56, 60
active art 349associate ticket to job 341downloading 333, 349error levels 350error messages 350example 337, 347file structure 339fill in job ticket 336in jac workflow 71job identification 340mechanism 336or relation 345proofing 350syntax 342troubleshooting 350using variables 345wildcards 344
art block 342items 342
art entry 342art identifiers 344
overview 340art items in block 342asds
install ethershare 243association rules table. see artatalk 262attributes
for downloading 332for job identification 297for processing 301in job tickets 294syntax 306
authentication rules 193autofd (centronics signal) 114automatic scaling for multiple-up 320availability
of print context 284of print engine 284
Bbanner page 356
ethertalk 262for job identification 298

560 Océ Power Print Controller Technical Reference Manual
segment 357basic specifications of raw socket 230basic version
functionality 85bcp. see adobebegin (jec) 329bi-directional data transfer 232bin command
job ticket 310pagepif 426
bind commandjob ticket 311pagepif 427
binding edge 427ticket attribute 311
binding offset 427bitmap fonts 91block_art 342body (jec) 330boundary 392
page boundary (pagepif) 418segment boundary 390set boundary 419
boundary definition 362burst page 357busy (centronics signal) 114
Ccabling
token ring 128utp 122
capture 207centronics
25-pins d-sub pin layout 110applications 104champ pin layout 110description of the signals 113identification attributes for jac 118implementation 105jac 118job separation 118status signal lines 108
centronics communication parameters, setting 107
centronics communication portenabling/disabling 107
status lines 108timeout 108
changed flag 370channel queues 283channelname, syntax 306channeltype 262channeltype, syntax 306chassis ground (centronics signal) 114child sif 359, 367
error 372chloride-free bleached printing paper 30chooser 249collate 302, 312collate command
job ticket 312pagepif 428
coloured printing paper 30combining print data and forms/flagsheets 52command line options 178
for lpq and lpstat commands 188for lprm and cancel commands 193to obtain a status reply 188to remove job from queue 193
comment linein sif 403in ticket 304
common characteristics 27communication separator 379community name 266conditional line in sif, evaluation 391configuration (netware)
in kos 206in pconsole 201
configurations overview 28configured queue mode 284connection
physical 200to océ print server 222
connectors25-pin d-sub 112champ (36-pin) 110rj45 122
contents of the status information 187contexts 50
fol 50ipds 50pcl 50postscript 50

Index 561
tiff 50contradiction handling 80, 81
engine 80flagsheets 83jac 82priority 81
control of print job (levels) 74controller
basic version 40disk drives 53jac version 41memory 53outline 40overview of the functionality 39type 27
copiesticket attribute 313
copies commandjob ticket 313pagepif 428
cpu 257custom, syntax 306customised lpheader 184customised nwheader 216cycleend command 429cyclestart command 430
Ddata (centronics signal) 114data connection (printlink) 223data transfer 232date/time from ethertalk 255default
lpheader 183nwheader 215separator endpoint 402separator starting point 400
default job (sif) 363example 364
default job separation (printlink) 223delete data parts 357deliver command 430dependent print jobs 285device control
advantages 67for page set 419
handled by jac 64with pagepif 418
dhcpenabling/disabling 124
diagnosetoken ring 123
diagnostics, netware 217digital 37directory structure of ftp print service 160disk drives 53disk full handling 290document name from ethertalk 259download
font using ethershare 263download (keyword) 332download attributes 332download fonts
installation 96download ticket 295, 332downloading
art 333, 349forms and flagsheets 333jac resources 332sif 358syntax 332
dsc 70dsc comments used as jac identification attribute 299
duplexticket attribute 314
duplex commandjob ticket 314pagepif 431
duration of printing 256
Eekos/esds 33empty queue 192emulation, syntax 306end (jec) 330end user information 20endblock 342endcap 207engine
contradiction handling 80engine configurations

562 Océ Power Print Controller Technical Reference Manual
océ 8400 series 27error levels of art 350error page 451errors
art 350classes of jac errors 450jac 450layoutpif 544
ethernetappletalk 243frame type 200host environments 121implementation 122
ethernet connectionalpha vms 121applications 120dec vax 121netware environments 121océ prismaflow 121océ repro center 121unix environments 121
ethershare 243active user list 254fonts list 254group list 253login 253logout 253printer list 254user list 253
ethershare admin 246, 251, 263ethertalk 243, 244
printer name 248evaluation
conditional line in sif 391setscan command 392setvar command 392test command 392
exampledownload ticket 333downloading a ticket 240jec ticket 331job tickets 324printing in vax vms environment 239printing through a filter 239
extracting data with sif 390
Ffault (centronics signal) 114fdditalk 243, 245files 189, 190filter command 383filtering job data 357finishing, overview of the options 30flag 370flag sheet
ethertalk 262flagsheet
contradiction handling 83downloading with jac 333for lpd 182for netware 213printing with lpd 182printing with netware 213ticket attribute 315using in ticket 302
flagsheet command 315flip
job ticket 311pagepif 427
foldefined 47predefined separators for sif 377
fol commandsin line printer data 511
fontsdownload using ethershare 263downloadable bitmap and scalable fonts 91ethertalk 256, 257font types 91
bitmap fonts 91intellifont 91speedo 91true type 91type 0 91type 1 91type 3 91type 42 91type 5 91
installationdownload fonts 96outline fonts 94standard fonts 94

Index 563
installed download fonts 96list fonts in ethershare 254list of available fonts 90océ outline fonts 92overview fonts 91update on ethertalk 260
formticket attribute 316
form commandjob ticket 316pagepif 431
formatting line printer data 511forms
downloading with jac 333using in tickets 302
from the channel queues to the print queue 284ftp 130
uploading printer configuration files 153uploading printer log files 151uploading printer resources 154
ftp 130ftp i/o channel
architecture 132general description 132information connection for print server 225
ftp identification attributes for jac 147ftp print service
selecting a function 138usage 135using the help function 138
ftp protocol commands 161ftp server 133
océ-specific 133ftp service commands 165ftpd 130function
of job ticket 294selecting in ftp print service 138
Ggeneric jac software 118getpage command (pagepif) 432group
list names in ethershare 253groupname, syntax 307guest user 250
Hhalftone 321hard job break 359helios software 243help function of ftp print service 138holdmode, syntax 307host (bsd)
preparing 176host (system v)
preparing 177host logic high (centronics signal) 114hostname, syntax 307
Iident (keyword) 305identification
job 356segment 357
identification attributes for jac 185, 299centronics 118for accounting 77ftp 147i/o parameters 75in banner pages 76in jec ticket 76in job data 76in pci 75in segment data 76inside a pdl 77netware 207, 212on flagsheets 77printlink 227priority 75sif 356syntax 306to select the print context 77use 76using in sif 371
identifierart 344separator 361, 391
information connection (printlink) 225init (centronics signal) 114initialisation of layoutpif 513

564 Océ Power Print Controller Technical Reference Manual
input filter 505input handling 43input tray addressing
in ticket 323install table files 506installing pagepif 417intellifont (font) 91interfaces (optional)
token ring 126internet address
of the océ 9200 133ip address
token ring 127ipds
afp 48defined 48
ipx/spxtoken ring 127
Jjac
centronics 118contradiction handling 82error messages 450principle 55priority 75
jac job identification 237jac processing
importance 45principle 45
jac workflowdiagram 69using jec 72
jecusing to integrate jobs 72
jec header 296as comment in pdl 330
jec marker 329jec subcommands 329jec ticket 329
example 331syntax 329
job 189, 190size ethertalk 256
job automation control. see jacjob automation, explained 56
job boundary, by centronics timeout 118job data
filtering 357using for job identification 298
job data v. tickets and pagepifs 421job entry for sif 384job envelope 72job enveloping commands (jec) 72job exit for sif 384job identification
art 340banner pages 63defined 63i/o attributes 63job data 63sif 356with banner page 298with i/o attributes 297with job data 298
job processingdefined 64device control 64layoutpif 67multiple processing 66page processing 67using flagsheets 64using forms 64
job recognitionbased on i/o channel attributes 70based on the banner page 70based on the job data 70see also job identification
job recoveryprintlink 223see also spooling 289
job scheduling 282mechanism 282
job segmentation 354defined 62example 354, 360pdl relationship 356processing order 356sif 356
job separation 354, 356centronics 118defined 60example 360nested structure 61

Index 565
pattern matching 60printlink 227raw socket 231
job separator definition 361job structure definition 361, 375job ticket
accounting information 68append to job through art 341applied by the printer 59applied by the user 59associate with job segment 341attributes 294description of the mechanism 57download ticket 295examples 324fill in attributes 59fill in with art 336functions 294in jec header 296in ticket store 296processing ticket 295segment identification 361v. job data and pagepif 421
job ticket commandsbin 310bind 311collate 312copies 313duplex 314flagsheet 315form 316jog 317layoutpif 317multipleup 318pagepif 320rem 304setsize 322staple 323tray 323
jobaddress, syntax 308jobaddressee, syntax 308jobapplication, syntax 308jobbegin command 375, 380jobclass, syntax 308jobdate, syntax 308jobend command 375, 381jobname, syntax 308jobnumber, syntax 308
jobs, processing parts differently 62jobtitle, syntax 308jog
ticket attribute 317jog
page set 419jog command 317jog command (pagepif) 433
Kkos
dhcp settings 124netware configuration 206print ethershare log file 257raw socket settings 232
Llayoutpif
defined 511error messages 544mechanism 512printing error messages 544ticket attribute 317using on different printers 544
layoutpif command 317layoutpif error messages
overview 546printing 544
levelspage processing 415to control the print job 74
limitationsbasic version 85bi-directional transfer (raw socket) 237pagepif 422sif 404
limited job spooling 286limited pjl parsing 233line printer data, formatting 511line printer emulation 510line printer filter (lpf) 510
supported filters 511localtalk 243, 245

566 Océ Power Print Controller Technical Reference Manual
log file ethertalk 254logging in to océ 9200 through ftp
as ordinary user 136as special user ’keyoperator’ 137
logical error 451login
from ethershare 253to ethershare admin 251
logoutfrom ethershare 253
lp 171lp and lpr command line options 178lp architecture 172lp host i/o channel
enabling/disabling 196general description 172
lp print service, usage 175lp= 176lpd 171lpd 171lpf. see line printer filterlpheader
customised 184default 183
Mmacintosh
sharing setup 255macoper 251
exclusive functions 260macuser 251management information base 266materials for printing, overview 30maximum number of jobs in a queue 286memory
controller 53messages from ethertalk 257mib 266ms-dos
file name extension 257multiple connections 230multiple copies
with lpd 180with netware 209
multiple job processingadvantages 67
buffering 66complex jobs 66disk size limitation 66memory size limitation 67re-interpretation 66specify in ticket 306
multiple print jobs, priority 181multiple-up
automatic scaling 320ticket attribute 318using in ticket 302
multipleup command 318mx#0 176
Nnesting sifs 359netware 199
architecture 199diagnostics 217initial configuration 201physical connection 200spooling 200token ring 127
netware configurationin kos 206in pconsole 201
netware identification attributes for jac 207, 212netware queue
management 200notation conventions
jac error messages 451sif 372ticket syntax 303
nprint 207nwheader
customised 216default 215
Oobject (keyword) 333océ 171océ 9200 printlink. see printlinkocé lp printer 171

Index 567
océ power print controller. see controllerocé 8445
paper input and output options 28print speed 27
oceftpd 131ocelpd 171océ-specific ftp server 133offset for binding 427options for lp/lpr command line 178or relation (art) 345outline fonts 92
installation 94output bin
ticket attribute 310output tray
ticket attribute 310overhead film 30overview
layoutpif error messages 546pagepif commands 423predefined separators 377
owner 189, 190
Ppage boundary, inserting 418page command (pagepif) 433page count separator 380page length 118page processing 414
example 414levels 415on header/trailer level 416on page level 415on page set level 416
page processing instruction file. see pagepifpage set processing 67pagepif
activate 417defined 415examples 438installing 417limitations 422printing header/trailer pages 420printing pages in a cycle 420ticket attribute 320v. job ticket and job data 421
pagepif command (ticket) 320pagepif commands
bin 426bind 427collate 428copies 428cycleend 429cyclestart 430deliver 430duplex 431form 431getpage 432jog 433overview 423page 433pageside 434rem 434setsize 435staple 435tray 436usepage 437
pagepif commands, usefor header/trailer functionality 420on page level 418on page set level 419
pageside command (pagepif) 434pap (printer access protocol) 245paper input
printing materials 30tray capacity 30weight 30
paper tray selectionticket 323
paper trayscapacity 30
parent sif 359, 367parsing data
sif 238password
netware print queues 205pserver 205
passwordethershare 252macintosh 252
password-protected print queues (netware) 205pci
basic printer version 40defined 37

568 Océ Power Print Controller Technical Reference Manual
job attributes 59printer control interface 37
pcldefined 47predefined separators for sif 375
pcl commandsin line printer data 511
pconsoleconfiguration 201printer monitoring 210
pdlcombining 52
pdl filter 507perror (centronics signal) 114physical connection
netware 200pin layout
centronics connector 110pjl
commands 233postscript
%%title 255defined 46predefined separator for sif 376
power print controller. see controllerpowerup test
token ring interface board 123ppd file 242
selecting a ppd file 251pr logic high (centronics signal) 114practical spooling aspects 289pre kos 290predefined separator 375
fol 377overview 377pcl 375postscript 376
preferences ethershare 253preparing the host
bsd 176system v 177
print command options for netware 207print contexts 50
fol 50ipds 50pcl 50postscript 50tiff 50
print engine, availability 284print job submission (bsd style commands) 180print jobs, removing from the print queue 193print mode, specified 27print queues (netware), password-protected 205print speed 27printer
.acct 256access protocol (pap) 245driver for apple laserwriter 246name for ethertalk 248printer list in ethershare 254
printer configuration files, uploading 153printer log files, uploading 151printer resources
uploading 154printer status
reading 187, 210reading in ftp print service 140
printingusing job tickets 158
printing fileswith ftp, standard procedure 146
printing flagsheets 182, 213printing layoutpif error messages 544printing materials, overview 30printing multiple copies
nprint command 209with lpd 180
printing paper, overview 30printing technology 27printlink 220
accounting information 225basic principles 222data connection 223default job separation 223enable/disable data connection 226enabling/disabling 226enabling/disabling information connection 226
information connection 225job recovery 223job separation 227regular printing 223specifying the tcp port 226status information request 225
printlink and jac 227identification attribute 227

Index 569
priority 81priority in case of multiple print jobs 181process (keyword) 306processing attributes for jac 301
from i/o parameters 78in jec ticket 78in pagepif 77in pci 78in pdl data 77priority 77syntax 309
processing ticket 295prolog
keyword for jobbegin command 380proofing
art 350sif 358
protocol converter 510protocols
tcp/ip 121pserver password 205
Qq9245 176queue
empty 192queue handling 283queue management, netware 200queue status, hold or release 284queuing 282
Rrank 189, 190raw socket interface
enabling/disabling 232specification 230
reading printer status 187, 210unix shell script for ftp users 159
recognition. see job recognitionrecovery. see job recoveryrecycled printing paper 30registered user 250regular printing
printlink 223unix shell script for ftp users 158
regular users 193rem command
pagepif 434ticket 304
removing jobs from a queue 193active job 194all jobs in the queue 195all jobs of one user 195all owned jobs 194own job as root 194with pre kos 290
request accounting information (print server) 225request status information (print server) 225reserved variables 371resolution
possible options 27ticket attribute 322
resolution command (ticket) 322resources
uploading 154rj45 connector 122rm=oce9245 176rp=myqueue 176
Sscaling
multiple-up 320scan (sif) 366scan area 365scope, of variable 371sd=/var/spool/lpd/myqueue 176search area 365segment
keyword for jobbegin command 380keyword for jobend command 381keyword for segment command 382
segment 354associate job ticket with segment 341definition 62
segment boundaries 390segment command 382segment identification 357
banner pages 63defined 63

570 Océ Power Print Controller Technical Reference Manual
i/o attributes 63job data 63
segment processingdefined 64device control 64using flagsheets 64using forms 64
segment separator. see separatorsegmentation. see job segmentationsegmentname, syntax 308select (centronics signal) 114selectin (centronics signal) 114send-ps 263sep_id 361separation instruction file
search for job entry or exit 384search procedure (1-layer sif) 384search procedure (2-layer sif) 388
separation instruction file. see sifseparation. see job separationseparator 356
communication separator 379page count separator 380predefined 375
separator command 391separator definition 362
and relation 390syntax 390
separator evaluation 365separator identifier 361separator recognition 391server
.acct 257name/status in ethertalk 256
server-based job recovery (printlink) 223set boundary 419set flag 370setscan command 356, 357
evaluation 392syntax 393wildcards 397with and without variable 366with or without variable 395
setsizeticket attribute 322
setsize commandjob ticket 322pagepif 435
setvar command 366evaluation 392syntax 398
shell scripts for ftp users 158sif
activate 358comment line 403downloading 358errors 372examples 405job environment 359job identification 356job segmentation 356job separation 356layers 367mechanism 355nesting 359parsing data 238proofing 358see also predefined separatorseparator 356structure 360syntax 372workflow 355
sif commands 374file contents 374filter 383jobbegin 375, 380jobend 375, 381segment 382separator 391sifuse 381
sifuse command 381signal ground (centronics signal) 114simple network management protocol 266skip
keyword for filter command 383keyword for jobbegin command 380keyword for jobend command 381keyword for segment command 382
snmp 266community name 266mib 266trap destination 266
solaris 2.x 243sorter
20-bin 31sorting of table files 506

Index 571
spaces and tabs in variables 370specifications of raw socket 230speed, printing 27speedo (font) 91splitting 354spool
& print 261only 261
spooling 282disk full 290job recovery 289limited number of jobs 286lp 173netware 200
standard fontsinstallation 94
standard interfaces 45staple
page set 419ticket attribute 323
staple commandjob ticket 323pagepif 435
start command 399default separator starting point 400multiple start definitions 399
statusethertalk 255
status information, contents 187status of the printer
reading in ftp print service 140status reply (long format)
example 190status reply (short format)
example 189status signal lines (centronics)
enabling/disabling 108stobe (centronics signal) 113stop command
default separator endpoint 402multiple stop definitions 401syntax 401
string matching 362structure
art 339sif 360
submitting print jobslpd 178
to netware print queue 207sun
solaris 2.x 243symbolsets 97
ajcfol symbolsets 98fol symbolsets 97overview 98pcl5 symbolsets 97supersets 101
systemmessages from ethertalk 257
system administrator 193system consultant from océ 20
Ttable files
installation 506sort 506
tcp port 232printlink 226
tcp/ipprotocol 121token ring 126
teachtext 248test (sif) 362test command
evaluation 392syntax 396wildcards 397with and without do 366
ticket store 296ticket. see job tickettickets from the store 71timeout 118token ring 126
speed 128tokentalk 243total size 189, 190transfer parameter commands 164trap destination 266tray command
job ticket 323pagepif 436
troubleshooting arts 350true type (font) 91type 0 font 91

572 Océ Power Print Controller Technical Reference Manual
type 1 font 91type 3 font 91type 42 font 91type 5 font 91
Uuni-directional data transfer 232unix
shell scripts for ftp users 158uploading
printer configuration files 153printer log files 151printer resources 154
uploading printer log files 151unix shell script for ftp users 159
usepage command (pagepif) 437user 131, 171
ethertalk 259guest/registered 250list active users in ethershare 254list names in ethershare 253specified in macintosh sharing setup 255
user interaction 33user interaction, ftp 134username, syntax 308using job tickets with ftp 143using layoutpifs on different printers 544
Vvariable
in a ticket (example) 325in download ticket (example) 333using in art 345using with setscan command 366
variable (sif)fill 366
variables (sif) 370context layer 370lifetime 370reserved 371scope 371spaces and tabs 370user variables 371
Wweight of the paper, overview 30wildcards
using in art 344using in sif 397
Zzone 248zone name 244zone number 244