Embed Size (px)
Citation preview
Installation and Operation Manual
NX Wireless Wind transducer set
English

NX Wind transducer set English
1
English NX Wind transducer set
2
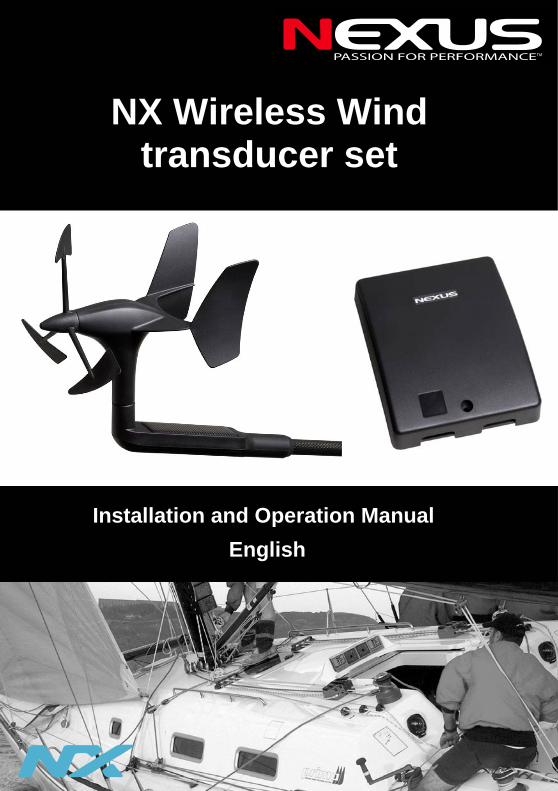
Edition: April 2007
NX Wind transducer set English
3
Mounting instruction Tri-transducer 1 Installation ........................................................................................................ 4
1.1 Location............................................................................................................ 4 2 Part specification.............................................................................................. 4 3 Mounting in the mast head .............................................................................. 4
3.1 Mounting step by step ...................................................................................... 6 4 Pairing the Transducer to the WSI-box .......................................................... 7 5 Specifications ................................................................................................. 10
5.1 Dimensions: ................................................................................................... 10 6 Waranty ........................................................................................................... 11

English NX Wind transducer set
4
NX Wireless Wind transducer Installation Manual
Thank you for choosing a Nexus product. Through this manual we would like to help you to install your new Nexus product. Please read through this manual carefully before starting your installation. This unique wind transducer provides both wind speed and wind angle relative the boat. If a Speed transducer is connected to the system, true wind speed and angle is computed. In addition, a compass or GPS antenna may be used to compute true wind direction relative North This transducer set can be used in any Nexus Network system. It may even be installed in a Nexus or NX2 system substituting the standard wired transducer.
1 IMPORTANT Installation information! BEFORE placing the wind transducer on the mast, a pairing procedure must be done!
1.1 Location The transducer should be mounted on a horizontal surface in the mast head. If the masthead is not horizontal a shim has to be added. A 15 shim for Seldén masts is available (art.no 67400-15). 2 Part specification 1# Mounting instruction 1# Warranty card 1# Bracket 1# Representation list 3 Mounting in the mast head The transducer permits any type of horizontal mounting angle. Mount the unit by directing the pipe (1) down and backwards in the bracket (2). Secure the nut (3) towards the attachment BY HAND (tools can be needed when demounting). Attach the security clamp (4) behind the nut.

NX Wind transducer set English
5
English NX Wind transducer set
6
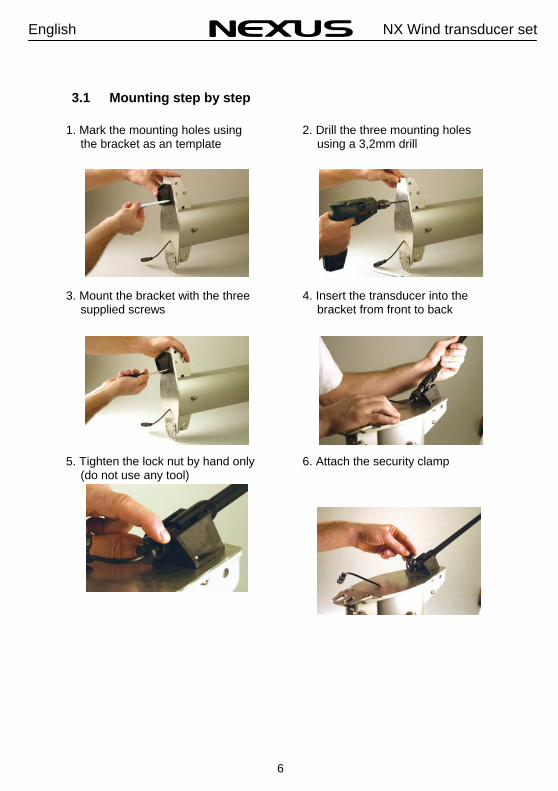
3.1 Mounting step by step
1. Mark the mounting holes using the bracket as an template
3. Mount the bracket with the three
supplied screws 5. Tighten the lock nut by hand only
(do not use any tool)
2. Drill the three mounting holes
using a 3,2mm drill 4. Insert the transducer into the
bracket from front to back 6. Attach the security clamp
NX Wind transducer set English
7
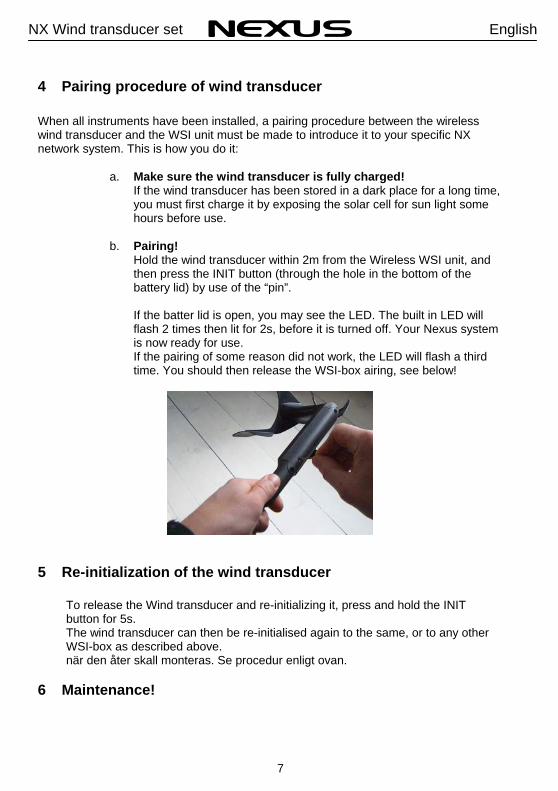
4 Pairing procedure of wind transducer When all instruments have been installed, a pairing procedure between the wireless wind transducer and the WSI unit must be made to introduce it to your specific NX network system. This is how you do it:
a. Make sure the wind transducer is fully charged! If the wind transducer has been stored in a dark place for a long time, you must first charge it by exposing the solar cell for sun light some hours before use.
b. Pairing! Hold the wind transducer within 2m from the Wireless WSI unit, and then press the INIT button (through the hole in the bottom of the battery lid) by use of the “pin”. If the batter lid is open, you may see the LED. The built in LED will flash 2 times then lit for 2s, before it is turned off. Your Nexus system is now ready for use. If the pairing of some reason did not work, the LED will flash a third time. You should then release the WSI-box airing, see below!
5 Re-initialization of the wind transducer
To release the Wind transducer and re-initializing it, press and hold the INIT button for 5s. The wind transducer can then be re-initialised again to the same, or to any other WSI-box as described above. när den åter skall monteras. Se procedur enligt ovan.
6 Maintenance!
English NX Wind transducer set
8
If you have been using the Wireless wind for several seasons, you may need to change the rechargeable cells. Use Nexus original NiMh cells. IMPORTANT! Do not change the rechargeable cell in strong light! If needed, cover the solar cell with your hand while changing cells! Open the battery lid and remove the old cell from the connector, install the new cells. Return the used Cells to waste collection!
7 Change transducer or WSI-box / Release the pairng If the wireless transducer or the WSI box has to be exchanged, WSI-box piring has to be released. To release the WSI-box, there are two alteratives: A From a NX Sea Data instrument 1. Press and hold the SET button for two seconds 2. Press the PLUS button until the text C15 is showed 3. Note the value for C15. 4. Press SET (short) and enter the value 99.9 using MINUS, PLUS and PAGE. 5. Press SET. 6. The WSI-boxen has now released the pairing and you can now enter the value you
noted under point 3 again 7. Press PAGE followed by SET to exit the setting mode B From a NX Wind instrument
1. Press and hold the SET button for two seconds 2. Press the PAGE button until the text C50 is showed 3. Press the PLUS button until the text C53 is showed 4. Note the value for C53 (normally 1.70). 5. Press SET (short) and enter the value 1.99 using MINUS, PLUS and PAGE. 6. Press SET. 7. The WSI-boxen has now released the pairing and you can now enter the value
you noted under point 4 again 8. Press PAGE followed by SET to exit the setting mode
Release the pairing of the wind transducer To release the Wind transducer and re-initializing it, press and hold the INIT button (see picture on previous page) for 5s. Use the supplied initialization pin.
NX Wind transducer set English
9
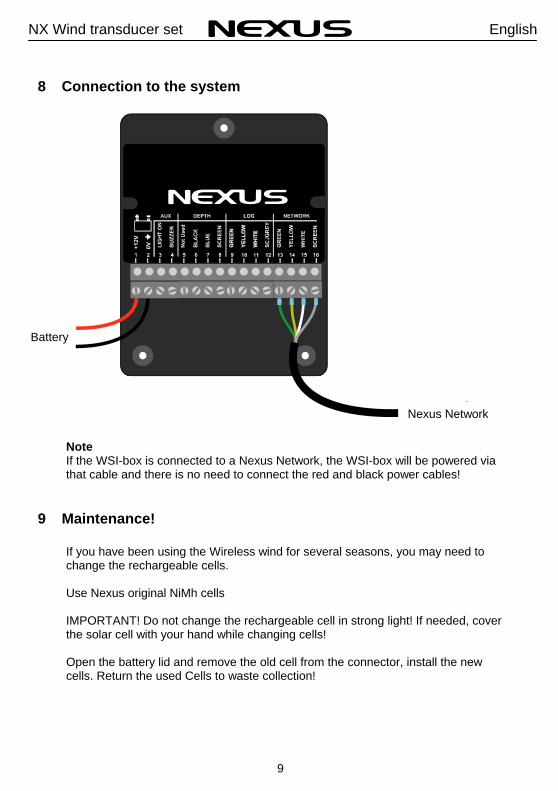
8 Connection to the system
‘ Note If the WSI-box is connected to a Nexus Network, the WSI-box will be powered via that cable and there is no need to connect the red and black power cables!
9 Maintenance! If you have been using the Wireless wind for several seasons, you may need to change the rechargeable cells. Use Nexus original NiMh cells IMPORTANT! Do not change the rechargeable cell in strong light! If needed, cover the solar cell with your hand while changing cells! Open the battery lid and remove the old cell from the connector, install the new cells. Return the used Cells to waste collection!
Nexus Network
Battery

English NX Wind transducer set
10
10 Specifications Power consumption 0,24 W Current consumption: 20mA @12V Wind speed range 0.9-90 knots, 0.5-50 m/s Angle Accuracy Better than ± 2° Speed Accuracy ± 5% Temperature range Operating -5ºC to +70ºC Storage -20ºC to +80ºC Weight 260 g.
10.1 Dimensions:

NX Wind transducer set English
11
11 Waranty
English NX Wind transducer set
12

NX Wind transducer set English
13

English NX Wind transducer set
14
2290
4-1
Edi
tion
2 Copyright ©:
Nexus Marine AB Kuskvägen 4, 191 62 Sollentuna, Sweden
Tel: +46 -(0) 8 – 506 939 00. Fax: +46 -(0) 8 -506 939 01 www.nexusmarine.se