Embed Size (px)
Citation preview

0
NURSERY MANAGEMENT OF
VEGETABLE CROPS
PARTICIPANT MATERIALS
Module 1
Nov, 2016 Addis Abeba

1
Contents
1. Introduction ...................................................................................................................... 2
2. Crop Selection. .................................................................................................................. 3
3. Cropping Pattern .............................................................................................................. 3
4. Advantage of Raising Seedling in Nursery ....................................................................... 4
5. Nursery Site Selection ....................................................................................................... 5
6. Seedling Raising Methods ................................................................................................. 5
7. Steps to seedbed preparation ............................................................................................ 9
8. Transplanting .................................................................................................................. 17
9. References ........................................................................................................................ 19

2
1. Introduction
Modern as well as traditional irrigation require intensive input and trained human labor.
Government as well as different supporting organization are developing many irrigation
infrastructure which is expect for the contribution of agricultural transformation. Parallel to
developing the infrastructure, making agronomic practice modern is irreplaceable. To maximize
the profit and contribution of the sector Small Scale Irrigation farmers have to be supported in
modern, scientific Irrigated agronomic skill and knowledge. For the improvement of this
knowledge and skill of implementers providing training with appropriate training material and
methods is important.
As it known nursery management is the beginning of many crops that can be transplanted. For
good achievement of crops in the field good nursery management is important. So special attention
should be given for the success of nursery management. Hence this nursery management module
is prepared in such away to have good crops stand and yield.

3
2. Crop Selection.
Before purchasing seeds and raising in nursery, crops and varieties to be cultivated for that
particular season should be determined ahead. So it is important to select the crops based on
different criteria’s and considerations.
Crop selection to be produced is determined by water availability, prevailing climatic conditions,
soils type and fertility, crop rotation, the farmer preference and marketing potentials. Labor
requirements and availability, market distances, information and needs, transport costs and
reliability, and measures to combat pests and diseases must also be considered as they determine
the scale and frequency of production.
As irrigation is high investment business, selected cultivated crops should be high value crops.
High value crop selection is based on the following determinant and major factors. Availability
and price of inputs, previous experiences with the crop, price volatility at harvest in local market,
existence of basic cooperatives/ unions and other potential buyers, possibility to link producers
with agro processors and other potential buyers and presence of partners’ /research, universities,
non-governmental organizations and programs/ to work on the crop.
3. Cropping Pattern
Area to be planted for each crop has to be planned well in advance so that all arrangements be
made ahead. Cropping pattern indicate which crop will occupy what part of the available area
during each season for example crop rotation such as cabbage, onion & tomato, successive
cropping i.e planting of the same crop on several dates 3-4 months apart for a continuous supply
of particular vegetable in the market. It is useful to indicate the time needed for doing planting or
transplanting dates, the length of the period that the crop will be in the field, the time for harvest
as well as for land preparation for the next crop on the cropping program diagram. Repeating this
for the next season gives a clear picture of the yearly cropping pattern. This can be done as per the
schemes or on individual farmers’ base.
4
Example of a crop calendar and cropping pattern
If one farmers has a total 0.5 ha irrigated land and if there is two dry cropping season he/she can
planned his/her cropping pattern and calendar as follow on cropping program diagram.
Table 1. Example of Cropping calendar and pattern
Months (time)
Crop Sep Oct Nov Dec Jan Feb Mar April May Jun July
August
1st season
Cabbage (0.2ha)
Onion (0.12)
Tomato (0.18)
2st season
Cabbage (0.12ha)
Onion (0.18)
Tomato (0.2)
4. Advantage of Raising Seedling in Nursery
Higher rates of seed germination, especially when using expensive hybrid seeds
Lower incidence of pests and diseases.
Easy to eliminate weak and diseased plants that are not appropriate for planting
and select healthy seedlings in order to obtain an even stand on the field.
For economize use of seeds (To minimize excessive seed rate comparing broadcasting).
It avoids gap filling to replace the missed plants, due to poor germination.
Greater control over seedling densities in the nursery, allowing optional spacing, which helps
to produce stronger plants with earlier and higher yields.
Improved continuity planning, allowing the farmer to harvest when market prices are high or
making the farmer less dependent on market prices
Relatively shorter interval from planting to first harvest in the field

5
Easier weed control of transplanted crops.
Improved protection against pests and diseases during the early stages of propagation &
possibility pre-treating of the soil
There are different factors affecting seed germination and seedling establishment. These are
Seed and soil borne diseases,
Use of improper seed bed type and size
Excessive seed rate per seed bed,
Improper management
Broadcasting seeds and others
Environmental factors /light, heat, moisture, & aeration/
These practices are commonly observed in most nursery field. Seedlings produced in this way
are weak and easily affected by diseases and insects even after transplanting.
5. Nursery Site Selection
The nursery site should be located as near as possible to water sources or has access to irrigation
water. The nursery site should be separated from the main production field. Seedbeds site should
be clean, leveled and should not be close to any types of trees because the shadow of the trees will
affect seedlings from getting adequate sunlight. Additionally, the falling of leaves and barks from
the trees release chemicals that negatively affect seed germination and seedling emergence.
Windbreak about 10m distance is also important to protect strong wind.
6. Seedling Raising Methods
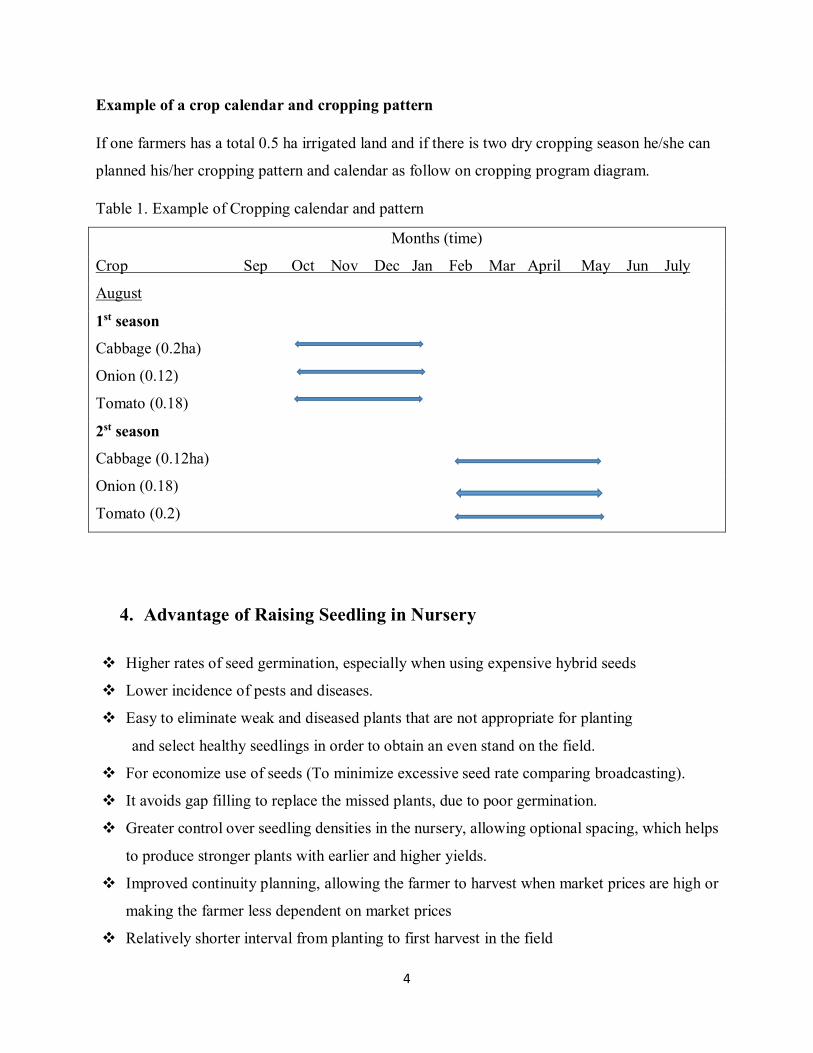
a. Tray method
Tray method is raising seedlings in trays. The tray should be kept in a shelter place, especially
during unfavorable conditions. Seedling that raised in tray is convenient to transport to distant
fields.
6
To raise seedling in tray method:
Use 10 to 12-centimeter-deep plastic or wooden boxes
Prepare the growing medium using a mixture of soil, forest soil, sand, and compost with
5:3:1:1 ratio respectively for most vegetable crops.
Use well-decomposed and sieved compost to facilitate the emergence of seedlings.
Sterilize the growing mixture by heat or chemical
Fill the tray with soil
Sow seeds in 0.5-to 1-centimeter-deep /hole/furrows
Irrigate recommended amount of water at appropriate time.
Inspect seedlings daily and apply recommended control measures if some serious disease
and insect pest problems are encountered.
Fig 1. Raising seedlings in tray
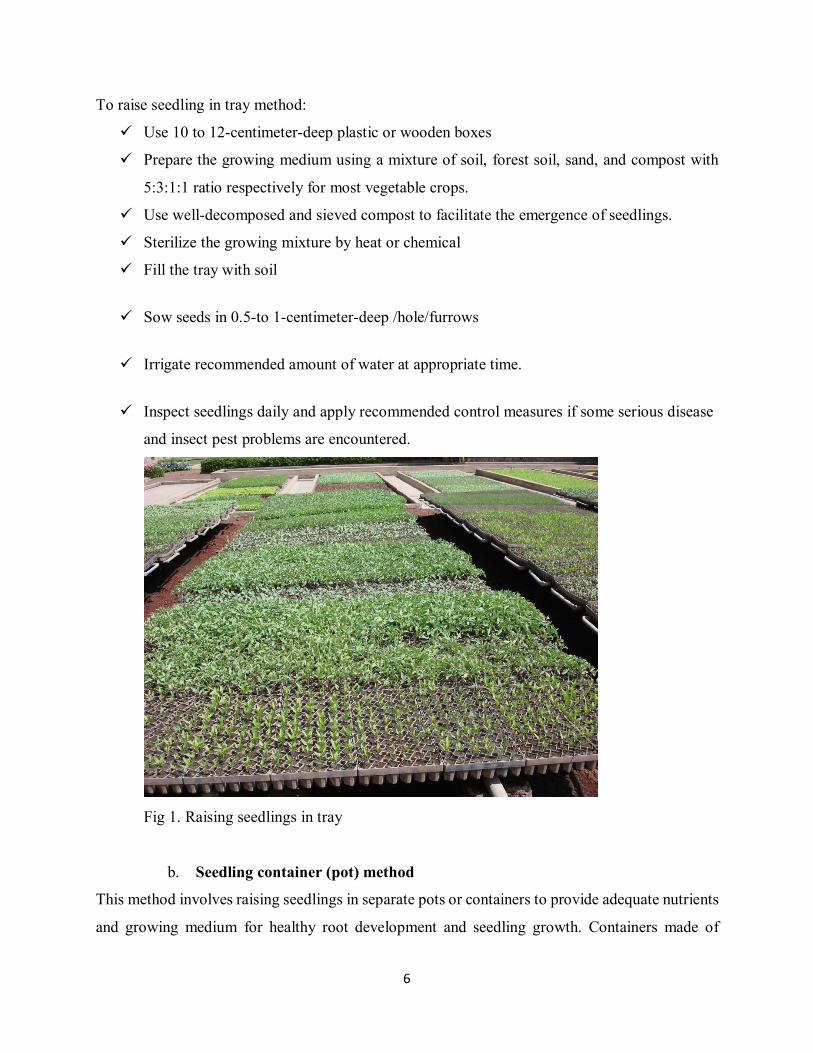
b. Seedling container (pot) method
This method involves raising seedlings in separate pots or containers to provide adequate nutrients
and growing medium for healthy root development and seedling growth. Containers made of
7
biodegradable material such as rolled banana leaves, or other locally available leaves or thin plastic
pots 5 to 6 centimeters wide are generally used. All containers or pots must have a hole in the base
for drainage of excess water.
The same growing medium used in the flat or tray method can be used. It is also advisable to
sterilize the medium. After preparation of the container and media:-
Sow two to three seeds per pot.
Cover the seeds and irrigate gently with watering can.
Mulch with any material available /paper, plastic sheet, dry grass/
When one to two true leaves have appeared, thin out excess seedlings, selecting only one
better seedling per pot. Prick out the excess seedlings.
Fig 2. Pot methods
c. Seed bed
Other common and practiced method of raising seedling is on seedbed. There are different types
of seed bed. They are:-
Raised seedbed: It is raised above the ground at 15-20 cm height. It is more applicable during
rainy seasons in order to facilitate drainage and in areas with poorly drained soils (clay soil).

8
Fig 3. Lay out and preparation of raised seed bed
Sunken seedbeds: Made like basin with depth of about 15-20cm. Applicable in dry seasons
and light drained soils like sand, low rainfall areas and low land areas.
Flat seedbed: prepared where the land is level with adequate drainage system. It is applicable
in areas where there is minimum water availability.
Factors determining the choice of type of seed bed -
a) Soil characteristics -Heavy clays are generally difficult to work particularly during the
wet season, therefore raised beds are prepared. Since sandy soils have less water holding
capacity, sunken beds can be used.
b) Water availability - Use raised beds in heavy rainfall areas whereas sunken beds will be
suitable for low rainfall areas. In areas where there may be periodic water shortage, ridge
and furrow soil formation should be used rather than broad beds as this will give the plants
better access to water.
c) Types of plants to be cultivated - Flat beds are suitable for leafy vegetables and cucurbits.

9
7. Steps to seedbed preparation
Step 1. Lay out seed bed: -
Prepare manageable seedbed size from east west direction either 1m x 5m or 1m X 10m and 15-
20cm high beds in 3,4,5 quadratics by using tape, spade, tracing line etc. Keep 40cm-50cm space
between two adjacent beds and they may be arranged in staggered manner to check erosion as
possible. Plough or dig soil 20cm -30cm depth until it is bring to fine tilth..
Step 2. Soil and seed treatment.
Seedling media sterilization
Sterilize the beds to kill weed seeds, insect and pathogen such as those that cause damping-off.
Sterilizing can be accomplished by:-
Plastic sheet cover; - Keep the beds covered for a week using, preferably, black plastic sheet.
Chemical sterilization- Treat the soil with granular formulation of chemicals, such as Dozamet
and Nemacuir, provides effective control of nematodes, soil fungi, pests and weeds. After
chemical treatment, turn over the soil in the bed and leave exposed for four to five days to
remove residual chemicals.
Heat method: - This can be done by burning straw over the beds.
After soil is treated by the above methods:-
Prepare the bed again for sowing.
To replace the destroyed useful organisms during burning and plastic cover, incorporate
with well-decomposed compost or farmyard manure with soil.
Mix the fertilizer well with the soil in the bed
Make furrows 10-15cm apart at recommended spacing and 0.1cm-2cm depth depends
upon size of seed. Sow larger seeds at 2cm depth and small seeds at 0.1 to 1cm depth.

10
Seed treatment
Some vegetables (example peppers) are relatively slow to emerge and need protection from seed
and soil borne diseases. In order to produce any crop, first, it is advisable to use the certified seeds.
However, certified seeds are mostly not readily available in many cases. Thus, farmers particularly
vegetable growers obtain seeds either from local market or extract their own seeds from the
previous harvest fruit that categorically rejected and unmarketable. Both purchased seeds from the
local market and traditionally extracted seeds are unreliable and more likely attacked by seed borne
pathogens and become the cause to transmit the disease in the nursery. So seed treatment is
important
In order to avoid disease and insect pest problems, treating the seeds with chemicals prior to
sowing the seed is advisable, because it protects the seeds both from seed and soil born infection.
Most seed treatment products are fungicides or insecticides applied to seed before planting.
Fungicides are used to control diseases of seeds and seedlings; insecticides are used to control
insect pests. Some seed treatment products are sold as combinations of fungicide and insecticide.
Fungicidal seed treatments are used for three reasons:
(1) To control soil-borne fungal disease organisms (pathogens) that cause seed rots, damping-off,
seedling blights and root rot;
(2) To control fungal pathogens that are surface-borne on the seed; and
(3) To control internally seed-borne fungal pathogens.
Most fungicidal seed treatments do not control bacterial pathogens and most will not control all
types of fungal diseases, so it is important to carefully choose /select/ the treatment that provides
the best control of the disease organisms present on the seed or potentially present in the soil. The
degree of control will vary with product, rate, environmental conditions and disease causing
organisms present. Some systemic fungicidal seed treatments may also provide protection against
early-season infection by leaf diseases. Treating vegetable crops seeds with Apron star can also
help to control disease causing organisms during seed germination and seedling emergence.

11
Procedure of seed treatment with chemical Determine the amount of the seed to be treated. Calculate the amount of chemical required as
shown in the example below:
Example: Suppose, the amount of seeds required for one seedbed is 20 gram of pepper. The
company recommendation of Apron star for 1 kilogram seed of pepper is 2.5 gram. Then, the
amount of Apron star required to treat 20 gram of pepper seed can mathematically be calculated
as below:
Required amount of Apron star product= 20g x 2.5g/1000g= 0.05g
Next, to rinse the seed with water, it is necessary to calculate the required amount of water as
shown below:
The company recommendation to mix 1 kg of any vegetable seeds is equal to 10 ml water, thus
the amount of water for 20g pepper can mathematically be calculated as below:
Required amount of water= 20 x 10/1000=0.02ml.
Treating the seeds can be on flat plastic sheet and the mixing should be done using gloves.
Fig 4. Seed treatment

12
Step 3. Sowing, covering and mulching
After determining amount of seeds required for a given plot of land, it should be sown in appropriate
spacing and depth. After sowing, cover the seed with fine soils and the surface of the drill should
then be lightly firmed. Seed rate of some vegetables are listed in table 2.
Table 2. Seed rate of some vegetable crops
No Seed rate and related conditions Pepper Tomato Onion Cabbage 1 Seed rate for 1 hector 600 - 750g 250-300g For hybrid 3-4 kg
For Non hybrid 6.5-7.5kg 400 gm
2 Seed rate for 1 bed(5m2 area) 20-25g 4.2-5g For hybrid 27 - 36gm For Non hybrid 46 - 53.5gm
40 gm
3 Convenient seed bed size 1m x 5m 1m x 5m 1m x 5m 1m x 5m
4 Distance between beds 40-50cm 40-50cm 40-50cm 40-50cm
5 Depth of the planting rows 1- 1.5cm 0.5- 1cm 1- 1.5 cm 0.5- 1cm
6 Spacing between planting rows on the seed bed
15cm 15 cm 15 cm 15 cm
7 Fertilizer rate for a bed of 5m2 –DAP/ NPS -Urea
100/121gm 50gm
100/ 21gm 50gm
100/121gm 50gm
100/121gm 50gm

13
20
Fig 5.Sawing and covering the sown seed with fine soil
Step 4. Mulching, Irrigation and cultivation
For the germination of seed; moisture, oxygen and temperature are the most important factors to
be considered. Therefore, to get a good stocky seedlings care must be given to the following
factors -
a) Mulching immediately after sowing of the seeds until germination (7-10days) and after
germination avoiding mulching,
Mulching is important to:-
regulate temperature
maintain moisture
protect the seeds from moving away
suppress weed
can be used as fertilizer after being decomposed

14
b) Watering using water cane for the seedlings morning or afternoon,
c) Weed control shallow cultivation should be practiced timely.
d) Thinning out to reduce competition and diseases effect (2-5cm apart b/n seedlings),
e) Urea fertilizer is needed 15-20 days after sowing,
Fig 6. Spread a thin layer of straw-mulch
The seedbed should be irrigated immediately after sowing. Watering seedlings using watering cane
with correct amount of water uniformly until transplanting is an important task in nursery
management. Excess amount of water and incorrect method of watering will harm seedlings.
Excessively wet soil create conducive environment for disease development and affect seedlings
root growth development.
Allow seedlings to grow. Thinning out excessive plants at 2 cm apart within the row is
important to avoid competition. This is usually done within two to three days after the
first true leaves have appeared.
After germination is secured and seedlings are starting to develop the mulched grass should
be removed carefully, just to avoid any leggy and etiolating of the plantlets;
Construct shades in order to protect seedlings from strong sunlight, wind and hail damage

15
Keep irrigating frequently
The nursery should be kept clean all the time
Weeds are removed carefully by hand.
22
Fig 7. Removed mulch from seedling
Harrowing should be done regularly in some soils when compaction happen to break down
the soil surface (crusting) to allow better aeration and percolation of water in the soil.

16
Fig 8. Harrowing
Sometimes growers commonly use high seed rate per seed bed to secure maximum seedlings that
can be used for gap filling in case transplanted seedlings failed to be established in the fields. Using
high seed rate has the following drawbacks:
1. It creates overcrowding and suffocation and restrict aeration.
2. Crowded seedlings create competition for nutrients and sun light and can lead to stunted growth
of the seedlings due to lack of enough nutrients.
3. Seedlings tend to be weak with less number of leaves, and lack stem strength, thickness and poor in root development.
4. Create favorable conditions for the growth and development of the pathogens.
5. Seedlings being crowded, the diseases can easily be transmitted from affected seedlings to the healthy ones.
6. In most cases, infected seedlings will die either while they are in the seed bed or after
transplanting and become source for diseases transmission.
Thus, using recommended seed rate per unit area of land and sowing in rows is important and
planning for contingency seedling of 10-15% on separate beds is needed.
The main precautions in the nursery are -
a) Avoid high soil and air moisture
b) Water the seed bed early in the morning
c) Avoid over frequent or over heavy watering
d) Avoid heavy shading
e) Avoid excess seedlings

17
Table 3. List of crops that can directly seeded and planted in nursery for transplanting
Days to germination of some vegetable crops
Pepper=After 9-17days
Tomato= After 8 days
Onion = After 15 days
8. Transplanting
To minimize transplant shock the following activities should be done:
Hardening-off the plants from several days to one week prior to transplanting by reducing
the amount of water and relatively widening the frequency to slow down the growth process
and allow the young plant build up carbohydrate reserves and root and also to avoid
transplanting shock
Water the seed bed one day prior to transplanting (the night before lifting) to facilitate the
removal of the seedling from the bed
Lift the seedlings at the proper stage of development(as indicated in the description of the
different crops in the next chapters)
If possible, carry out the operation when rainfall is imminent or under overcast or cloudy
conditions
Lift the seedlings, using a digging fork, either early in the morning or alternatively in the
evening after the worst heat of the day has passed
Place the uprooted seedlings in trays with soil as much root and soil are together.
No Crops that can be directly seeded planted in nursery before being transplanted
1 Garlic Tomato 2 Shallot Pepper 3 Potato Onion 4 Carrot Cabbage 5 Beet root lettuce 6 Swiss chard

18
Immediately cover the seedlings with a damp sack, and prevent exposure to full sun or
drying winds; under arid conditions frequently rewet the covering
Transport the seedlings to a shaded area
Plant the seedlings as soon as possible after lifting, preferably in the evening after the worst
heat of the day is over, and irrigate immediately
Days of transplanting
Most vegetables are ready for transplanting when they have 2-6 true leaves
Tomato 28 –35 days
Pepper 40 - 55 days
Cabbage 25 - 30 days
Onion 40-45 days
Kale After one month
Fig 9:- Stage of transplanting
Fig 10. Carful removal of seedling

19
9. References
ARARI. 2005. Technical guide for technicians on production of vegetables. ARARI, Bahir Dar,
Ethiopia.
AVRDC. 2005. Saving your own vegetable seeds: guide for farmers.
Food and Agriculture Organization of the United Nations. (2008).
Husen kebede and Imiru Biru, 2011, Guideline on Irrigation Agronomy MoA, Mashav and GIZ,
Addis Abeba.
IFAD et.al, 2014, A Training Manual for Training of Trainers on Major Vegetable Crops
Production and Management Practices under irrigated system in Ethiopia, Melkassa
Lemma, D. and Shimelis, A. 2003. Research experiences in onion production: Research reports no
55.
Lemma Dessalegn. 1998. Seed production guideline for tomatoes, onion and hot pepper.
Olani Nikus. 2010. Onion Seed Production Techniques.www.echocommunity.org/en/resources.
Tilahun Horofa et.al, 2013. Training Manual on Production, Handling and Processing of
Horticultural Crops, MoA, ATA and EIAR, Addis Ababa, Ethiopia