Embed Size (px)
Citation preview

Number: OPS-MANL-00583
POLARIS SUPPLIER EXCHANGE MANUAL - EXTERNAL
Revision: 3 Last Saved: 17-APR-17 Page 1 of 80
Confidential © 2016 Polaris Industries Inc.
Any printed/soft copy of a document is UNCONTROLLED. For current revision, go to Polaris Document Control.
POLARIS INDUSTRIES INC.
2100 HIGHWAY 55
MEDINA, MN 55340
POLARIS SUPPLIER EXCHANGE MANUAL - EXTERNAL
OPS-MANL-00583
WRITTEN BY: Darcy Fowler DATE: 4/17/17
APPROVED BY: Amy Buckta DATE: 4/20/17

Number: OPS-MANL-00583
POLARIS SUPPLIER EXCHANGE MANUAL - EXTERNAL
Revision: 3 Last Saved: 17-APR-17 Page 2 of 80
Confidential © 2016 Polaris Industries Inc.
Any printed/soft copy of a document is UNCONTROLLED. For current revision, go to Polaris Document Control.

Number: OPS-MANL-00583
POLARIS SUPPLIER EXCHANGE MANUAL - EXTERNAL
Revision: 3 Last Saved: 17-APR-17 Page 3 of 80
3
REVISION HISTORY
REV DATE AUTHOR APPROVER(S) DESCRIPTION OF CHANGES
01 9/28/16 Darcy Fowler Chandra Kumar Release of Document
02 10/24/16 Darcy Fowler Chandra Kumar Add: Special Charges; EAM invoicing;
EMEA section update; reorganize for better flow.
03 04/17/17 Darcy Fowler Amy Buckta
Update: Tooling Invoicing Process
instructions to allow for system
upgrades; Naming convention within
manual of Miscellaneous Invoices
replaced by Ad-hoc Invoices to
alleviate confusion; New Field added
(due to system upgrade) to Invoicing
System: “PO Line Schedule Number”
instructions added.

Number: OPS-MANL-00583
POLARIS SUPPLIER EXCHANGE MANUAL - EXTERNAL
Revision: 3 Last Saved: 17-APR-17 Page 4 of 80
4
Infor Supplier Exchange Polaris Industries Inc.
Supplier User Manual
Revision 03
Last Updated: 2017-04-17
www.polarissuppliers.com

Number: OPS-MANL-00583
POLARIS SUPPLIER EXCHANGE MANUAL - EXTERNAL
Revision: 3 Last Saved: 17-APR-17 Page 5 of 80
5
Table of Contents
Supplier Exchange User Guide:
Introduction .................................................................................................................................................... 6
1.1 Overview ................................................................................................................................................ 6
1.2 Initial Login and Access ............................................................................................................................ 7
1.3 Polaris Customer Entities ......................................................................................................................... 9
1.4 Multiple Supplier Numbers .................................................................................................................... 10
Administrator Functions................................................................................................................................. 11
2.1 Roles .................................................................................................................................................... 11
2.2 Restriction Groups ................................................................................................................................ 12
2.3 Define Additional User Accounts ............................................................................................................ 15
User Preferences ........................................................................................................................................... 17
3.1 Security Questions ................................................................................................................................ 17
3.2 Change Password .................................................................................................................................. 18
3.3 Forgot Username and/or Password......................................................................................................... 19
3.4 Configure Email Alerts ........................................................................................................................... 20
Electronic Copies of Documents...................................................................................................................... 23
4.1 Configure EMC (Dashboard) ................................................................................................................... 29
Viewing Documents ....................................................................................................................................... 33
5.1 Purchase Orders.................................................................................................................................... 33
5.2 View Debit Memos ................................................................................................................................ 38
Introduction to Invoicing ................................................................................................................................ 39
Parts Setup ................................................................................................................................................... 42
Open & Verify PO .......................................................................................................................................... 45
Creating a Shipper ......................................................................................................................................... 49
Edit Shippers ............................................................................................................................................. 55
Creating a Production Invoice ..................................................................................................................... 57
Canceling / Editing Published Invoices ......................................................................................................... 61
Special Charges ......................................................................................................................................... 63
Creating an Invoice for Work Not Physically Shipped (TOOL/NONINV) ........................................................... 67
Creating an Ad-Hoc Invoice ........................................................................................................................ 70
View Invoices ............................................................................................................................................ 78

Number: OPS-MANL-00583
POLARIS SUPPLIER EXCHANGE MANUAL - EXTERNAL
Revision: 3 Last Saved: 17-APR-17 Page 6 of 80
6
Supplier Exchange User Guide
Introduction The purpose of this document is to assist suppliers to Polaris Industries Inc. (Polaris) in the use of the
Infor Supplier Exchange application with respect to Polaris’s expectations. This guide should be used to
train additional employees within your company.
1.1 Overview
Supplier Exchange (SE) is an advanced, web-enabled supplier relationship management solution that
facilitates effective, efficient collaboration and execution between Polaris and suppliers. It replaces the
E-Commerce Site used by non-traditional Electronic Data Interchange (EDI) suppliers to receive Polaris
purchase orders and debit memos as well as submit invoices.
• Supports all transaction types currently available on E-Commerce Site (PO, PO changes, debit
memos, invoices and planning schedules)
• Individual sign-on and user profiles
• Personalized event notifications and alerts
• Sorting/filtering/ad-hoc reporting capabilities
• Multi-language support (English, Spanish and Polish)
• Download/export content in multiple formats (XML, CSV, XLS)
• More data capacity to store information for a longer duration
• And much more!
During the initial supplier setup, [email protected] will create an “administrator”
Supplier user account. This will be the first user account in Supplier Exchange for that supplier. The
Administrator will be able to set up additional user accounts after the initial setup. We suggest that with
each new user they complete the training on Supplier Exchange to lessen the amount of errors.

Number: OPS-MANL-00583
POLARIS SUPPLIER EXCHANGE MANUAL - EXTERNAL
Revision: 3 Last Saved: 17-APR-17 Page 7 of 80
7
1.2 Initial Login and Access
Please contact [email protected] to get setup with a login. Please provide the following
information with your request:
• First and Last Name (John Doe)
• Email Address ([email protected])
• Polaris Supplier Number (e.g. 99999A)
• Subject Line: “Supplier Exchange”
Note: This login is used for Supplier Exchange
Only (Login Overview)
Once you have received your username and
Password, you may access Supplier Exchange
via logging into www.polarissuppliers.com under
the “Current Suppliers” tab you will click on “Supplier Exchange.” or access directly here:
https://supplierexchange.polarisdmz.com/supplyWeb/account/login)
System Access Training Material

Number: OPS-MANL-00583
POLARIS SUPPLIER EXCHANGE MANUAL - EXTERNAL
Revision: 3 Last Saved: 17-APR-17 Page 8 of 80
8
Login Screen
Homepage Screen
Change language
Login
Latest news and messages
Links to Polaris Supplier Portal and training documents
Planning Schedules Purchase Orders
Create Shipper
Debit Memos
Create Invoice
Edit User Profile Configure Email Alerts Configure EMC (Dashboard) Change Password
Administrator Functions Define users and roles
Event Management Console (EMC) / Dashboard of high level status for the Supplier
Reset password

Number: OPS-MANL-00583
POLARIS SUPPLIER EXCHANGE MANUAL - EXTERNAL
Revision: 3 Last Saved: 17-APR-17 Page 9 of 80
9
IF YOU ARE GOING
TO ENTER AN
INVOICE: BE SURE
YOU ARE IN THE
CORRECT CUSTOMER
ENTITY!
N.AMERICA PO
SHOULD BE INVOICED
UNDER THE
N. AMAERICA
CUSTOMER ENTITY
ONLY!
POLAND PO SHOULD
BE INVOICED UNDER
POLAND.
OTHER WISE IT WILL
ERROR OUT.
If you supply to EMEA Poland and do
not see the customer entity available
please contact
1.3 Polaris Customer Entities
There are two Polaris customer entities on Supplier Exchange:
• “Polaris North America”
• “Polaris EMEA Poland”
You can only access each customer one at a time and will conduct business which each as if they were
two different customers.
Example: If order P999999 ship-to is Polaris Roseau, MN USA plant (warehouse
2), you must access “Polaris North America” to see the order and invoice it. If you
access “Polaris EMEA Poland” you will not see the order and won’t be able to
invoice it.
Viewing the entities
• If you are a vendor that supplies components to only our North America
plant(s), you will only see “Polaris North America”.
• If you are a vendor that supplies components to only our EMEA Poland
plant, you will only see “Polaris EMEA Poland”.
• If you are a vendor that supplies components to both entities, you will
see both “Polaris North America” and “Polaris EMEA Poland”. You can
use one login to access both entities but can only view one entity at a
time by switching back and forth between customers. The entity
highlighted in blue is the current customer you are viewing orders and
invoicing for.
Switch between customer entities

Number: OPS-MANL-00583
POLARIS SUPPLIER EXCHANGE MANUAL - EXTERNAL
Revision: 3 Last Saved: 17-APR-17 Page 10 of 80
10
• If you are a vendor that supply components to both entities but have a different remittance
address, you will be given two Polaris vendor numbers for each Polaris customer entity. As a
result, you will have two Supplier Exchange logins, one for “Polaris North America” and one for
“Polaris EMEA Poland”.
1.4 Multiple Supplier Numbers
If you are a supplier with multiple ship from addresses you will log into each Supplier Number separately
for invoicing.
Example:
You are a supplier who has multiple locations:
12345A (located in Dallas, Texas)
12345B (located in Minneapolis, Minnesota)
12345C (located in Charleston, South Carolina)
Your employees would need to log into each location A, B, C with different logins to be able to invoice
for each location.
If your company is expanding to a new location you would need to request the additional login
information and supply the contact who to be set up as the administrator for that location.
Please contact [email protected] to get setup with a login. Please provide the following
information with your request:
• First and Last Name (John Doe)
• Email Address ([email protected])
• Polaris Supplier Number (e.g. 99999A)
• Subject Line: “Supplier Exchange”

Number: OPS-MANL-00583
POLARIS SUPPLIER EXCHANGE MANUAL - EXTERNAL
Revision: 3 Last Saved: 17-APR-17 Page 11 of 80
11
Administrator Functions During the initial supplier setup, the Polaris Helpdesk will create an “administrator” user account. This
will be the first user account in Supplier Exchange for that supplier. Administrator users have additional
privileges outlined in this section.
Please take the time to complete the following recommended setup functions as they will greatly
simplify the troubleshooting down the line.
Roles and Restriction Groups should be defined before additional users are added to the account.
2.1 Roles
Roles define what level of functional permission this account will have within Supplier Exchange In other
words, Roles limit what the user can do in the system. Accounts may be limited to only purchasing, or
only shipping, or other functions. Roles will dictate what menu options are present for the account.
There are several pre-defined roles within Supplier Exchange. These may be used to apply functionality
or user-defined roles may be created and applied.
To begin, select Setup menu, select Security menu and click Define Roles.

Number: OPS-MANL-00583
POLARIS SUPPLIER EXCHANGE MANUAL - EXTERNAL
Revision: 3 Last Saved: 17-APR-17 Page 12 of 80
12
2.2 Restriction Groups
Where roles limit menu functionality, restrictions limit data visibility. For example, a supplier shipping
clerk may only deal with one Polaris plant. That supplier may choose to restrict some users to only see
that one plant.
To begin, select Setup menu, select Security menu and click Define Restrictions.

Number: OPS-MANL-00583
POLARIS SUPPLIER EXCHANGE MANUAL - EXTERNAL
Revision: 3 Last Saved: 17-APR-17 Page 13 of 80
13
To define a restriction, click New. Then select what the restriction will limit.
Now, we can limit by Customer or Ship From. Click the pencil icon to edit, and then move the requested
customer name from the left hand side to the right hand side using the arrows in the middle.
Click Submit to return to the main restriction screen.
Then, within the selected Customer, we can limit for a selected
Facility. Click the pencil icon to edit the facility.
Example of Role vs. Restriction:
You set up a role for a user who
was going to do invoice entry, so
that they can enter data into the
system. If that user was only going
to invoice for the Roseau location
you would create a restriction so
that all they had visible were the
Roseau POs.

Number: OPS-MANL-00583
POLARIS SUPPLIER EXCHANGE MANUAL - EXTERNAL
Revision: 3 Last Saved: 17-APR-17 Page 14 of 80
14
Again, move from the left hand (Restricted) side to the right (Allowed) side for the requested locations.
Click Submit to return the main restriction screen.
We have now created a restriction for a Customer (Polaris Testing) and a Facility within that customer
(Polaris Testing). Click Submit to save the restriction group.

Number: OPS-MANL-00583
POLARIS SUPPLIER EXCHANGE MANUAL - EXTERNAL
Revision: 3 Last Saved: 17-APR-17 Page 15 of 80
15
2.3 Define Additional User Accounts
By completing the setup process, an administrator account has been created. Additional accounts
(admin or otherwise) may now be created for the necessary employees.
Infor recommends that each individual within a supplier’s company that will be accessing Supplier
Exchange has their own account. Please do not create department accounts like “Customer Service” or
“Sales”.
To begin, select Setup menu, select Security menu and click Define Users.
The edit button is where the Administrator can edit user detail, reset user passwords, and
deactivate a user by turning off all the roles they have access to.
The New button will allow the Administrator to add a new user to the system.

Number: OPS-MANL-00583
POLARIS SUPPLIER EXCHANGE MANUAL - EXTERNAL
Revision: 3 Last Saved: 17-APR-17 Page 16 of 80
16
Click New to create a new profile and minimally complete the highlighted information:
Accounts may be defined as “administrator” accounts. During the registration process, it’s assumed that
the account is an administrator. Additional accounts may also be set with admin rights.
If the account being created is an administrator account, check off the “Admin User” field next to the
User ID (highlighted with the red outline). If the account is not an administrator account, then leave that
box un-checked. If the account is not an administrator, it must have a role defined (when in doubt,
select “All Modules”).
Administrator users may not be limited in their functional roles – they have access to everything. All
other user accounts may be flagged as admins or given other permissions (called roles).
Type of User
Roles and Restrictions apply to supplier accounts that will actually log into Supplier Exchange.
Administrators have to be either a “User” or “Contact and User”.
• “User” refers to an account with a login ID and password (does the work).
• “Contact” refers to an account that can receive email notices from Supplier Exchange.
When an account is defined as a “user” they may only login to the website and view content online (but can’t receive email)
When an account is defined as “contact” they may only receive email notices from Supplier Exchange (but can’t login).
When an account is defined as “contact and user”, they may both login and receive mail.
See definitions below
This is where the administrator
will reset a user’s password.

Number: OPS-MANL-00583
POLARIS SUPPLIER EXCHANGE MANUAL - EXTERNAL
Revision: 3 Last Saved: 17-APR-17 Page 17 of 80
17
User Preferences Once the Administrator adds new users each user should complete this section:
3.1 Security Questions
You may setup security questions to answer in case you forget your username and/or password. It is
highly recommended that this is setup when logging in for the first time.
Setup Security Questions
1. On the menu, click Preferences.
2. In the Preferences submenu, click Security Questions.
3. Select and answer at least 3 Security Questions below. ALL questions selected will need to be
answered if Username and/or Password are forgotten.
4. Click Submit. The changes are saved and the User Profile redisplays with the verification:
"Question(s) successfully updated."

Number: OPS-MANL-00583
POLARIS SUPPLIER EXCHANGE MANUAL - EXTERNAL
Revision: 3 Last Saved: 17-APR-17 Page 18 of 80
18
3.2 Change Password
Password can be changed in the Security Information section of the User Profile. Administrator users or
Polaris helpdesk can also change the password on behalf of a non-administrator user.
Change your Password
1. On the menu, click Preferences.
2. In the Preferences submenu, click Edit User Profile. The User Profile displays.
3. Update the User Profile information in the User Information, Security Information, User
Preferences, and Contact Information tables.
4. Click Submit. The changes are saved and the User Profile redisplays with the verification: "User
successfully updated."
Password Rules
1. Have at least 14 characters
2. Have a leading letter
3. Not contain your name
4. Not contain “password”
5. Not contain “Polaris”
6. Not contain special characters such as “*” or “!”
7. Not be an old password
8. 6 invalid attempts within 30 minutes, locks out for 30 minutes.
9. Password age max 90 days, min 10 minutes and warning expiration 14 days’ prior

Number: OPS-MANL-00583
POLARIS SUPPLIER EXCHANGE MANUAL - EXTERNAL
Revision: 3 Last Saved: 17-APR-17 Page 19 of 80
19
3.3 Forgot Username and/or Password
• If you forgot your username and/or password, go to the main login page of Polaris Supplier Exchange and click on the link “Forgot Username or Password”.
• You will then be asked to enter your work email address. This is the same email address used to create the user account. You will then be asked to answer all three security questions.
• If all questions are answered correctly, an email will be sent to the specified email address with your username and temporary password.
• To change your password, login and Edit your user profile to change the user name and/or password.
• If you cannot remember the answers to the questions your next contact will be the Administrator who can reset your passwords for you.
Only in an instance where your administrator will not be available in time and you need to get access,
should you contact purchasing systems to reset your password for you. Purchasing Systems should be
your last resort.

Number: OPS-MANL-00583
POLARIS SUPPLIER EXCHANGE MANUAL - EXTERNAL
Revision: 3 Last Saved: 17-APR-17 Page 20 of 80
20
3.4 Configure Email Alerts
Email alerts keep you connected to your Supplier Exchange account without needing to log in to the
application to check your account status. As an individual user, you can subscribe to and customize
alerts of various events using product groups and tolerance levels. When an event occurs, a message is
sent to the email address stored in your User Profile.
You can turn on alerts to receive an email notification when events occur. In conjunction with product
groups, you can additionally configure the alerts to be sent for specific parts and for some alerts, set an
acceptable tolerance level before the event is triggered. The alert message will be sent to the address
stored in your User Profile.
If you supply to Polaris North America and EMEA Poland you will receive email notifications for both
customer entities. You cannot turn off alerts for one or the other.
Configure Alerts
1. On the menu, click Preferences.
2. In the Preferences submenu, click Configure Alerts. The Alert List page displays.
3. If you are an admin user, select the User from the drop down menu for whom you are
configuring alerts. If you are non admin user, you will only be able to configure your own alerts.
4. Select the boxes for the alerts to which you are subscribing (see below orange circles). If you
have not created product groups, the alert will be turned on for all parts. If you have created
product groups, you must edit the selected alerts to assign one or more product groups to the
alert. Some alerts also have tolerances associated. You must edit each alert that has a tolerance
to set the tolerance.

Number: OPS-MANL-00583
POLARIS SUPPLIER EXCHANGE MANUAL - EXTERNAL
Revision: 3 Last Saved: 17-APR-17 Page 21 of 80
21
5. To create or edit Product Groups to the left of the alert, click the Edit button (pencil icon). The
Product Groups page displays.
6. Select the product groups for which the alert is to be
sent.
7. For under, over, early, or late shipment alerts, next to
the selected product groups enter the tolerance.
8. Click Save. The Alert List page redisplays.
9. Repeat steps 5-8 for each selected alert.
10. Click Save. The verification displays: "Successfully
updated Alerts."
PO Alerts
Purchase order alerts display only if you use the SE Purchase Order module.
• Purchase Order Changed
• New Purchase Order Published
Example of using a Product Group:
If you would like to have specific alerts on a
project like the side stand assembly project
for Indian Motorcycle. You would add the
part numbers in that product group and
any alerts checked affecting those part
numbers will create an email alert.

Number: OPS-MANL-00583
POLARIS SUPPLIER EXCHANGE MANUAL - EXTERNAL
Revision: 3 Last Saved: 17-APR-17 Page 22 of 80
22
RMA Alerts
RMA’s (debit memos) alerts display when an RMA is issued.
• RMA Added
• RMA Changed
RMA - Reject Material
Authorization
We will Debit through RMA, do
not send Credits to Polaris.

Number: OPS-MANL-00583
POLARIS SUPPLIER EXCHANGE MANUAL - EXTERNAL
Revision: 3 Last Saved: 17-APR-17 Page 23 of 80
23
Electronic Copies of Documents Suppliers may elect to receive electronic copies of orders and receipts that are published to Supplier
Exchange. These documents may be delivered via email or via a direct connection to a server via FTP. To
define how the delivery occurs and which document types are requested, a document profile is created.
To begin, click Communications / Define Documents.
Click ADD to create a New Document Profile.
Remember: All individuals added to the Supplier Exchange need to be set up as either a “Contact” or
“User and Contact” in the User Profile order to receive email notifications from Supplier Exchange. The
Administrator must assign these functions.
Example set-ups are on the next page.

Number: OPS-MANL-00583
POLARIS SUPPLIER EXCHANGE MANUAL - EXTERNAL
Revision: 3 Last Saved: 17-APR-17 Page 24 of 80
24
Email PDF
Planning Releases
If a direct FTP connection is desired, the host (created in Communications / Define Hosts) may be
selected. Otherwise, the document will be delivered via email to the contacts chosen at the bottom.
Change the Document Type to “Material Release”
• Set the File Format to the desired option (PDF, XML, CSV, EDI)
• Ensure Attach File is checked
• Select the contacts to deliver to mail to.
New Purchase Orders
Change the Document Type to “Proposed PO”

Number: OPS-MANL-00583
POLARIS SUPPLIER EXCHANGE MANUAL - EXTERNAL
Revision: 3 Last Saved: 17-APR-17 Page 25 of 80
25
• Set the File Format to the desired option (PDF, XML, CSV, EDI)
• Ensure Attach File is checked
• Select the contacts to deliver to mail to.
Updates to existing Purchase Orders
Change the Document Type to “Proposed PO”
• Set the File Format to the desired option (PDF, XML, CSV, EDI)
• Ensure Attach File is checked
• Select the contacts to deliver to mail to.

Number: OPS-MANL-00583
POLARIS SUPPLIER EXCHANGE MANUAL - EXTERNAL
Revision: 3 Last Saved: 17-APR-17 Page 26 of 80
26
EDI
Document profile settings may also be used to configure export from Supplier Exchange of either PO or
Planning Releases as EDI messages. These may be emailed as described above, or they may also be
pushed to a FTP account hosted by the supplier (or supplier’s agent).
To enable export of EDI (or any of the other formats), the supplier must perform the following steps:
• Create a FTP account on a server within the Supplier’s company.
• Within that account’s FTP home directory, create 4 sub-directories named “send”, “receive”,
“archive” and “work”.
• Define a communications host profile within Supplier Exchange
• Associate documents with the host
Define Host for FTP:

Number: OPS-MANL-00583
POLARIS SUPPLIER EXCHANGE MANUAL - EXTERNAL
Revision: 3 Last Saved: 17-APR-17 Page 27 of 80
27
Complete the FTP Account details.
Associate Documents with the Host
Once the FTP host has been defined, then documents must be associated with that host. Depending
upon the desired EDI or other electronic formats, suppliers may also establish exports directly to the FTP
server by creating entries for each document.
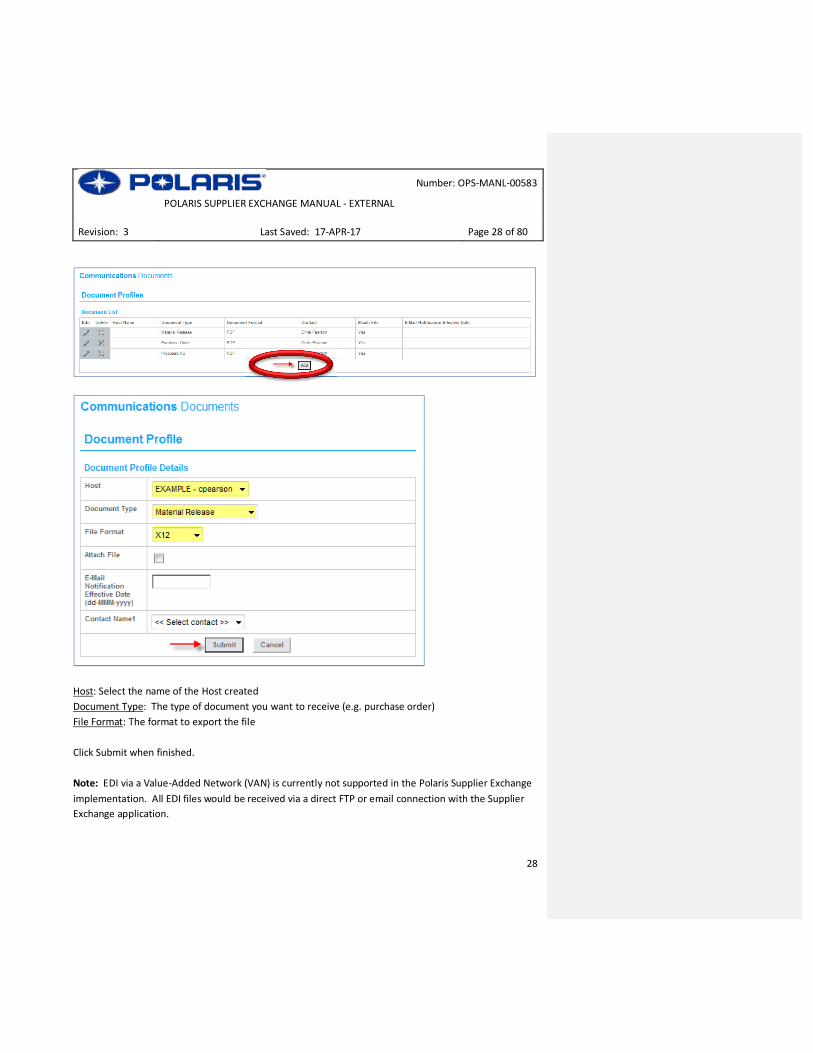
Click Define Documents under the Communications menu and then click Add to associate a document
to the host.
Number: OPS-MANL-00583
POLARIS SUPPLIER EXCHANGE MANUAL - EXTERNAL
Revision: 3 Last Saved: 17-APR-17 Page 28 of 80
28
Host: Select the name of the Host created
Document Type: The type of document you want to receive (e.g. purchase order)
File Format: The format to export the file
Click Submit when finished.
Note: EDI via a Value-Added Network (VAN) is currently not supported in the Polaris Supplier Exchange
implementation. All EDI files would be received via a direct FTP or email connection with the Supplier
Exchange application.

Number: OPS-MANL-00583
POLARIS SUPPLIER EXCHANGE MANUAL - EXTERNAL
Revision: 3 Last Saved: 17-APR-17 Page 29 of 80
29
4.1 Configure EMC (Dashboard)
The Event Management Console (EMC) acts as Supplier Exchange's homepage. Through the EMC you
can quickly view critical exceptions and the status of your company account. On the EMC, both
customers and suppliers can quickly view shipment, release, purchase order, and other statistics and
exceptions. You can then click on statistic hyperlinks to view detailed information.
How you customize your preferences will apply to both the Polaris North America and Polaris EMEA
Customer Entities.
Customization
Each user can customize the EMC display. From a list based on purchased modules and the role assigned
by the security administrator, users select which events display. Events can be also be selected to
display as priority items. If a user has established product groups, the event must then be turned on by
product group. Some events also have a tolerance setting. For each product group assigned to an event
with a tolerance setting, users select the tolerance permitted before the event displays.
Statistics
The statistics on the EMC are grouped by data categories: Releases, Purchase Orders, Shipments,
Receipts, Problem Reporting, and Billing. The default category is the user-defined Priority Items. Users
can select a different category by clicking on the category's tab.
Charts
Some information on the EMC can be displayed as a chart. This charting provides a visual representation
of the statistics. To view a chart, in the category header, click View as Chart. The chart displays.
Configure Your EMC
As an individual user, you can configure the Event Management Console (EMC) to display in a way that
better fits your work. You can choose which events displays as priority items, which events display as
category items, and the order in which categories are listed. You can also configure which events display
for which product groups and set tolerances. If you do not configure the EMC, all of the events assigned
to your role display in their category table.
1. On the menu, click Preferences.
2. In the Preferences submenu, click Configure EMC. The Event Modules page displays.

Number: OPS-MANL-00583
POLARIS SUPPLIER EXCHANGE MANUAL - EXTERNAL
Revision: 3 Last Saved: 17-APR-17 Page 30 of 80
30
3. If you are an administrator user, select the User from the drop down menu for whom you are
configuring alerts.
4. To display the list of events for a category, click on a table heading. The table expands. (orange
circles below)
5. To have events display as priority items, select the Priority check box to the right of the event.
6. To have events display as standard items in their category list, select the Show check box to the
right of the event (red circle above).
7. To edit an event using product groups and tolerances, to the left of the event, click the Edit
button. The Product Groups page displays.
8. Select the product groups for which the event is to display.
9. For under, over, early, or late shipment events and the requirements exceed net change release
event, next to the selected product groups enter the tolerance.
10. Click Save. The Event Modules page redisplays.
11. To collapse the list of events, click on the table heading.

Number: OPS-MANL-00583
POLARIS SUPPLIER EXCHANGE MANUAL - EXTERNAL
Revision: 3 Last Saved: 17-APR-17 Page 31 of 80
31
12. To position the categories, in the Positioning table select the order in which the categories
display.
13. After selecting the events to be displayed on the EMC and positioning the categories, click
Save. The EMC displays.

Number: OPS-MANL-00583
POLARIS SUPPLIER EXCHANGE MANUAL - EXTERNAL
Revision: 3 Last Saved: 17-APR-17 Page 32 of 80
32
Purchase Orders
The Purchase Orders table displays only if your customer uses the Purchase Order module.
• Past Due: Purchase Orders due before the current date for which you have not published a
shipper.
• Due Today: Purchase Orders due by the current date for which you have not published a
shipper. (If a purchase order is Due Today, it is also Due Next 7 Days and will be included in each
event link.)
• Due Within 7 Days: Purchase Orders due within the next seven days for which you have not
published a shipper.
• Unviewed: Purchase Orders that you have not yet viewed.
Click on the text to see the details for the items that need attention.
Click on the glasses icon to get the details for each PO.
Unviewed Purchase Orders MUST
be reviewed; this is how you
acknowledge that you have
reviewed the PO requirements
and contractually agree to fulfill
them. If something is incorrect
this is the time to have edits
performed by the Polaris team.

Number: OPS-MANL-00583
POLARIS SUPPLIER EXCHANGE MANUAL - EXTERNAL
Revision: 3 Last Saved: 17-APR-17 Page 33 of 80
33
Viewing Documents
5.1 Purchase Orders
Purchase Orders are titled Discrete Purchase Orders (POs) on Supplier Exchange and are used to order
parts. POs contain header information and line item details that formally state all the terms and
conditions of the transaction, including quantity due, required date, price, and other associated costs.
View Discrete POs
1. On the menu, click Demand.
2. In the Demand submenu tab, click Discrete POs. The Discrete PO List displays.
3. Enter the Discrete PO Search Criteria, including the PO Status, to narrow the purchase orders
displayed (optional).

Number: OPS-MANL-00583
POLARIS SUPPLIER EXCHANGE MANUAL - EXTERNAL
Revision: 3 Last Saved: 17-APR-17 Page 34 of 80
34
4. Click Search. The Discrete PO List updates beneath the search criteria. (see next page)
5. To view the details of the purchase order, click the View button to the left of the purchase order
(glasses icon). The Discrete Purchase Order displays.

Number: OPS-MANL-00583
POLARIS SUPPLIER EXCHANGE MANUAL - EXTERNAL
Revision: 3 Last Saved: 17-APR-17 Page 35 of 80
35
6. To see line item detail, click the View button to the left of the line item. The Discrete Purchase
Order Line Item displays.
Notes
1. Blanket orders without a release will not be available on SE. When the firm release is issued, the
order will then post on SE.

Number: OPS-MANL-00583
POLARIS SUPPLIER EXCHANGE MANUAL - EXTERNAL
Revision: 3 Last Saved: 17-APR-17 Page 36 of 80
36
2. Extended Item Description for Tooling orders (PT) and Engineering orders (PE) will be found in
the line item details under “Comments”. See PT detail below. Click on the view icon beside the
line item detail to get to the “Comments”
See screenshot below showing the line item detail, and the extended description:

Number: OPS-MANL-00583
POLARIS SUPPLIER EXCHANGE MANUAL - EXTERNAL
Revision: 3 Last Saved: 17-APR-17 Page 37 of 80
37
Download POs
You can download POs in various formats:
3. In the PO list, check off the PO(s) you want to download.
4. At the bottom, select a format type in the drop-down.
5. Click the “Download POs” button.
6. A message will pop up asking you to save or open the file.
NOTE: You can filter your POs by clicking on the header. This gives you the option to reorganize the list
based on newest, oldest, PO number, status, etc.

Number: OPS-MANL-00583
POLARIS SUPPLIER EXCHANGE MANUAL - EXTERNAL
Revision: 3 Last Saved: 17-APR-17 Page 38 of 80
38
5.2 View Debit Memos
RMAs
Debit Memos are called RMAs on Supplier Exchange. Do not submit
Credits to Polaris we will process all these types of payments through
Debit Memos/RMAs.
View RMAs
1. On the menu, click Receipts.
2. In the Receipts submenu tab, click View RMAs. The RMA List displays.
3. Enter the search criteria to narrow the RMAs displayed.
4. Click Search. The RMA List updates beneath the search criteria.
5. To view the details of the RMAs, click the View button to the left of the RMA. The RMA displays.
If you do not have enough detail on a debit memo being issued you can contact the buyer on the RMA
and/ or the plant quality who initiated the RMO. Please include all circled detail in the correspondence
so that the Polaris employee can find the detail you are requesting. (Buyer Name, API number, Facility,
Part Number, and Extended Price.)
RMA - Reject Material
Authorization

Number: OPS-MANL-00583
POLARIS SUPPLIER EXCHANGE MANUAL - EXTERNAL
Revision: 3 Last Saved: 17-APR-17 Page 39 of 80
39
Invoicing Guide
Introduction to Invoicing The purpose of this user guide is to provide Polaris suppliers instructions on how to submit invoices via
Polaris Supplier Exchange.
Please cut out and reference the detail below; following these steps in order will prevent the MOST
common invoicing issues:
High Level Process (Required to be done in this order to prevent the most common Invoicing Issues):
1. Set up each part once the part has been awarded
See ‘Parts’ section of Supplier Exchange User Manual
2. Open and Verify PO (noting the following):
o Facility
o Ship to address
o Ship from Address
o If Open items available
3. Create a Shipper Matching EXACTLY to the PO:
o Facility
o Ship to address
o Ship from address
o Shipper number should match invoice number
4. Create Invoice:
Use shipper that was created with matching invoice number
Complete the Shipper and Invoice BEFORE the goods have been received at Polaris.

Number: OPS-MANL-00583
POLARIS SUPPLIER EXCHANGE MANUAL - EXTERNAL
Revision: 3 Last Saved: 17-APR-17 Page 40 of 80
40
Invoice 1
(shipper 1 assigned)
Shipper 1
(same ship-to)
PO 1
(same ship-to)
PO 2
(same ship-to)
PO 3
(same ship-to)
Contact Information
• If you have a technical question relating to invoicing electronically, email
• If you have submitted an incorrect invoice, contact Account Payable (763-525-7740) to delete
the invoice from the system. You can then cancel, edit and resubmit correctly.
• If you have submitted an invoice that is late in payment, you are questioning if Polaris received
an invoice you submitted or you have questions regarding electronic payment, please contact
Accounts Payable (763-525-7740).
• If you have questions regarding discrepancies on your invoice versus your Purchase Order,
contact your buyer (for pricing) /planner (for quantity and/or due date) listed on the Purchase
Order you are invoicing from.
Invoicing Best Practices:
• A Shipper MUST be created first and is required to create an invoice.
• Create a new shipper for every new invoice.
• A Shipper can contain multiple POs as long as it’s going to the same ship-to destination, but an
invoice can only have one shipper. If there is a discrepancy on the invoice for any PO, the entire
invoice will be on hold.
• Duplicate Invoices will error out both invoices that were submitted. If you need to delete an
invoice that has been submitted contact AP.
• The Shipper number should be the same as your company’s unique invoice number for reference
and traceability.
• Filling out the Shipper does not replace the ASN submitted through Supplier ASN Web portal if
you receive LeanCor shipping instructions. You must still follow this process.
• Each invoice submission must have a unique Invoice Number. If there are duplicate invoice
numbers they will all get rejected and you will have to resubmit.
• Please use the exact invoice number displayed in your company invoice. For example, if your
company invoice is “INV002145”, submit the invoice as “INV002145”. Do not submit the invoice
as “002145” or “2145”. Also when communicating with Polaris, reference the entire invoice
number.

Number: OPS-MANL-00583
POLARIS SUPPLIER EXCHANGE MANUAL - EXTERNAL
Revision: 3 Last Saved: 17-APR-17 Page 41 of 80
41
• An invoice submitted with an invalid PO Number will not process in our system and you will be
requested to resubmit for payment to be issued.
• Verify the Facility, Ship to, Ship from, PO number, PO line item, part number and unit of measure
on the invoice match EXACTLY what is listed on the PO.

Number: OPS-MANL-00583
POLARIS SUPPLIER EXCHANGE MANUAL - EXTERNAL
Revision: 3 Last Saved: 17-APR-17 Page 42 of 80
42
Parts Setup Each Polaris part number may be cross-referenced with a supplier’s item number and description.
Supplier Exchange also requires a weight (in pounds or kilograms) for each part.
Once an item has been defined with a supplier item number, it will also be visible on any POs where that
item is ordered. In addition, because the weight has been defined, the weight will automatically calculate
during the shipment process, simplifying the creation of Advance Shipment Notices.
Note: This ASN is non-functioning and does not tie to any system. It will NOT replace the ASN that is
needed to be submitted through Supplier ASN Web Portal if you receive LeanCor shipping instructions.
You must still follow that process.
Example: Part Ordered in EA
To begin, click Setup / Master Data / Parts.
All of the items Polaris has ordered for this supplier will display.
Required:
ALL existing parts and ALL New
parts awarded need to be set up in
the system with a correct weight
converted to pounds.
Parts have to be entered
individually; a mass upload option
is not supported by the system.

Number: OPS-MANL-00583
POLARIS SUPPLIER EXCHANGE MANUAL - EXTERNAL
Revision: 3 Last Saved: 17-APR-17 Page 43 of 80
43
You can search the list using either the customer (Polaris) item number or a supplier number (if defined).
Otherwise, select the part, and click the pencil icon to the left hand side.
For example, the above part has not been defined – it has not been given a weight nor has it been given a
supplier item number or description. Click the Edit button in the middle of the screen to make those
changes.
Supplier Part Number: this is the supplier assigned item number against the Polaris item. This may be
used to track the internal number for the part.
Weight: The amount (in Pounds or Kilograms) that one of the Unit of Measure weighs. In this example,
the unit of measure is “EA” or each. So, this example shows that 1 EA weighs 10 pounds. The part weight
is relative to the unit of measure.
Must always be “EA”
Must be converted to pounds
Polaris Part number
POUNDS
Ignore price here as it will be read directly from the PO
Polaris or internal supplier number

Number: OPS-MANL-00583
POLARIS SUPPLIER EXCHANGE MANUAL - EXTERNAL
Revision: 3 Last Saved: 17-APR-17 Page 44 of 80
44
Note: If the unit of measure is LB, then the weight is 1 pound (because one LB weights one pound). If the
unit of measure is KG, but the supplier is shipping in pounds, then the value becomes 2.2 because one
kilogram weighs 2.2 pounds.
Ignore the part price and currency as those values will be read from the PO directly.
Description: The supplier’s item description.
Click Save to record your changes. When you return to the list of items, you will now see the supplier’s
item number and description in the list of parts.

Number: OPS-MANL-00583
POLARIS SUPPLIER EXCHANGE MANUAL - EXTERNAL
Revision: 3 Last Saved: 17-APR-17 Page 45 of 80
45
Open & Verify PO 1. On the menu, click Demand
2. On the submenu, click Discrete POs
3. Filter the search criteria and click Search
4. A PO list will populate similar to image below:
Do NOT press the Backspace Button in this system!
PO Status example:
Open- Polaris
requested 100 pieces
and you have not
created a shipper for
those 100 pieces
Pending- Polaris
requested 100 pieces
and created a shipper
and invoiced for only
50 pieces – thus
creating an
outstanding balance
Closed- Polaris
requested 100 pieces
and you created the
shipper for 100 pieces

Number: OPS-MANL-00583
POLARIS SUPPLIER EXCHANGE MANUAL - EXTERNAL
Revision: 3 Last Saved: 17-APR-17 Page 46 of 80
46
5. Click on the View Icon for the PO you would like to invoice.
6. For Creating Shipper and Invoice that will not error out you will need to enter the following information EXACTLY. Write it down.
7. Review the PO line items to make sure that there are open orders:
8. If there are no open orders to ship against contact your Polaris Planner for that part.

Number: OPS-MANL-00583
POLARIS SUPPLIER EXCHANGE MANUAL - EXTERNAL
Revision: 3 Last Saved: 17-APR-17 Page 47 of 80
47
***OPEN & VIEW PO BEST PRACTICE: ***
Use the screenshot tool/ Snipping Tool / or Print Screen Button to take a snap
shot of the po, highlight the information and reference this information when
creating the shipper and/or the invoice. SEE BELOW.
Keep this open or print it to review during the invoicing process.
PO LINE NUMBER
PO LINE SCHEDULE NUMBER

Number: OPS-MANL-00583
POLARIS SUPPLIER EXCHANGE MANUAL - EXTERNAL
Revision: 3 Last Saved: 17-APR-17 Page 48 of 80
48
Common Reasons PO(s) would not visible or be unable to invoice against:
1. If the parts were received at Polaris before you submitted your shipper and invoice in Supplier Exchange the system will close the PO. If this is the case you will need to create an Ad-Hoc Invoice (see “Creating an Ad-Hoc Invoice” section).
2. If a PO does not have open releases it will not show up in Supplier Exchange. Contact Polaris Planner for more detail.
3. If there is not an open quantity left of the PO to invoice against you will need to Contact your Polaris Planner. Please note: Once you create a shipper and publish it the quantity listed on that shipper is removed from the PO quantity. Review your ASNs for unused shippers that may be causing the quantity error. You can edit and uses the shippers to invoice. (See Edit Shippers section)

Number: OPS-MANL-00583
POLARIS SUPPLIER EXCHANGE MANUAL - EXTERNAL
Revision: 3 Last Saved: 17-APR-17 Page 49 of 80
49
Creating a Shipper Shipper Creation
Shippers are working documents where line items can be applied in order to generate an invoice. As
requirements are added to shippers, the demand from which they originate is fulfilled.
Creating a Shipper is REQUIRED before invoicing can be created.
Shipper number should be the same as the Invoice number.
A Shipper is REQUIRED for invoicing even if you are invoicing for labor, tooling,
or anything that will not be physically shipped.
You will need a new shipper number every time you have a new invoice.
You can have multiple POs on a shipper and corresponding invoice, but all line items on the shipper and
invoice MUST be the same ‘Facility’ and ‘Ship To’.
Supplier Exchange stores default shipper information. The first time a shipper is created, the header
information becomes default data. The next time a shipper is created, the default header information is
automatically populated. The defaults can be updated by overwriting the populated information with the
correct Shipper/Invoice number.
The first time a shipper is created for a particular part, the selected ‘Ship From’ becomes the default ‘Ship
From’ for that part. When creating shippers in the future, the part will only be available for shipping on
shippers originating from its default Ship From.
Do not press the Backspace Button, if you do your shipper number will be saved and be unable for you to
enter into the shipper details to proceed. In this system the shipper number has to be unique for every
invoice. If you do hit the backspace button in error you can find the shipper in the Edit Shipper Menu.
(See Edit Shipper section for more detail)
The Shipper must be created before the goods are received into Polaris for the quantity to be
available on the PO for you to invoice using the correct process. If the goods have already been
received you will need to create an Ad-Hoc invoice.
Do NOT press the Backspace Button in this system!

Number: OPS-MANL-00583
POLARIS SUPPLIER EXCHANGE MANUAL - EXTERNAL
Revision: 3 Last Saved: 17-APR-17 Page 50 of 80
50
Line Items
When parts are added to a shipper, they become shipper line items. Depending on the customer setup,
line items may be based on the part, the part and PO combination, or the part and pull signal
combination. Adding one part may add one or more line items. When a shipper is staged, it is
automatically saved as a shipper.
Once a shipper is published the quantity is removed from the open quantity on the PO and is available
to invoice.
Through the Shipments menu tab, you can create a shipper.
1. On the menu, click Shipments.
2. On the Shipments submenu, click Create Shipper. The Facility and Location Selection page displays.
3. Select the Facility from the drop down menu. (noted in #6 of Open & Verifying PO step)
4. Select the Ship To from the drop down menu. (noted in #6 of Open & Verifying PO step)
5. Select the Ship From address from the drop down menu.
6. The next shipper number is entered for you. Change the shipper number to match the Invoice
Number.
7. Click Continue. The Requirements page displays.
This is the section where you have to EXACTLY
match what you wrote down from the PO to not
create an error. There may be a lot of drop down
options but be careful which option you choose.
Remember to have the shipper number match
the invoice number for traceability and ability to
match invoice to shipper at a later date.

Number: OPS-MANL-00583
POLARIS SUPPLIER EXCHANGE MANUAL - EXTERNAL
Revision: 3 Last Saved: 17-APR-17 Page 51 of 80
51
8. Enter the Requirement Filters and click Search. The Parts List updates. The number of
days’ set will show the number of open orders and quantities due within the date range.
NOTE:
If the PO does not show up you will need to increase the Days value according to the suggestions
below, and click Search.
Enter this information into the section outlined in Red:
The following values are suggested for Domestic Suppliers
30 Requirement View
5 Ship Coverage
2 Transit Time
The following values are suggested for International Suppliers
120 Requirement View
65 Ship Coverage
60 Transit Time
If the PO does not show up after you have tried changing the dates you will need to confirm that
there is open quantity on that PO, and that the parts were not already received prior to your
entering in the shipper and invoice. If this is the case an Ad-Hoc invoice will be needed. (See
Creating an Ad-Hoc Invoice section)

Number: OPS-MANL-00583
POLARIS SUPPLIER EXCHANGE MANUAL - EXTERNAL
Revision: 3 Last Saved: 17-APR-17 Page 52 of 80
52
9. In the Parts List table, select (via check box) the parts to be added to the shipper. As needed,
change the suggested ship quantities to the actual ship quantities.
10. Click Create Shipper.
11. The Shipper displays with the requirements you have selected. The header information is generated
from the location selections, requirement filters, and defaults. The shipper is automatically saved to
the database.
Example of a Shipper is on the next page.

Number: OPS-MANL-00583
POLARIS SUPPLIER EXCHANGE MANUAL - EXTERNAL
Revision: 3 Last Saved: 17-APR-17 Page 53 of 80
53
12. You need to review and edit parts of the shipper before you can publish it (such as net weight). Click
the Edit Line Item Icon.
NOTE: It is crucial that you review the line items and confirm the weight is entered or errors will
occur.

Number: OPS-MANL-00583
POLARIS SUPPLIER EXCHANGE MANUAL - EXTERNAL
Revision: 3 Last Saved: 17-APR-17 Page 54 of 80
54
13. Validate and Publish when finished.
Note: Once the Shipper has been published it will become an ASN. This ASN is non-functioning and does
not tie to any system. It will NOT replace the ASN that needs to be submitted through Supplier ASN Web
portal if you receive LeanCor shipping instructions. You must still follow that process.
Note: Once the Shipper has been created the quantity entered on that shipper will be removed from
the open quantity on the PO. If you do not use a shipper the system will count the amount “shipped”
against the open PO. At the end of the year this will block you from invoicing as the PO will show as “No
Open Quantity.”
You can open a shipper and edit it to be reused later if needed. See following section.

Number: OPS-MANL-00583
POLARIS SUPPLIER EXCHANGE MANUAL - EXTERNAL
Revision: 3 Last Saved: 17-APR-17 Page 55 of 80
55
Edit Shippers When will you need to Edit Shippers?
• If you save a shipper and need to get to it at a later date
• If you hit the backspace button while creating a shipper • If you make a mistake prior to publishing a shipper
1. On the menu, click Shipments
2. On the submenu, click View Shippers
3. Select the Shipper criteria. Click Continue.
4. Click the Edit Icon for the Shipper Number that you wish to use.

Number: OPS-MANL-00583
POLARIS SUPPLIER EXCHANGE MANUAL - EXTERNAL
Revision: 3 Last Saved: 17-APR-17 Page 56 of 80
56
5. You can add or edit line items here.
6. Review and edit parts of the shipper before you can publish it (such as net weight). Click the Edit Line Item Icon. Click the Edit Line Item Icon.
7. Save once the edits have been completed. 8. Validate and Publish when finished.
Note:
This is one of the reasons why you should match the
shipper number and the invoice number. If you need to go
back and edit the shipper to be able to submit an invoice
you will know which one to work on.

Number: OPS-MANL-00583
POLARIS SUPPLIER EXCHANGE MANUAL - EXTERNAL
Revision: 3 Last Saved: 17-APR-17 Page 57 of 80
57
Creating a Production Invoice Suppliers can create invoices through Supplier Exchange. Line items of production invoices can be added
from system ASNs/shippers. Once you have created the Shipper, you can now create an Invoice and
assign that Shipper to the invoice.
** DO NOT PRESS THE BACKSPACE BUTTON OR BACK BUTTON ON THE WEB BROWSER. Either of these
actions will cause the system to count the invoice number as used even though it has not been published.
If this occurs, you can create a new shipper and new matching invoice number or contact Purchasing
Systems. **
Create an Invoice
1. On the menu, click Billing.
2. In the Billing submenu, click Invoice Create. The New Invoice page displays.
3. Select the New Invoice criteria.
Select the same Facility, Ship To and Ship From as you did to create the shipper. Required to
match these items or the invoice will sit in error.
Do NOT press the Backspace Button in this system!
This is the section where you have to EXACTLY
match what you wrote down from the PO to not
create an error. There may be a lot of drop down
options but be careful which option you choose.
Remember to have the shipper number match
the invoice number for traceability and ability to
match invoice to shipper at a later date.

Number: OPS-MANL-00583
POLARIS SUPPLIER EXCHANGE MANUAL - EXTERNAL
Revision: 3 Last Saved: 17-APR-17 Page 58 of 80
58
4. In the Shipper ID drop-down, you will see the non-invoiced Shipper(s). Assign a shipper to
invoice. The Shipper number will auto-default as the Invoice Number, it is advised that you
change this to your company’s invoice number for reference and traceability.
Note: Each invoice submission must have a unique Invoice Number. If there are duplicate
invoice numbers they will all get rejected and you will have to resubmit. Be sure to have Accounts
Payable delete the duplicate invoices so that when you resubmit it will not be automatically
rejected.
Note: Please use the exact invoice number displayed in your company invoice. For example, if
your company invoice is “INV002145”, submit the invoice as “INV002145”. Do not submit the
invoice number as “002145” or “002145”.
5. Click Create Invoice. The invoice is automatically created and saved. Information is defaulted
from the customer and supplier invoice profile. Line items are defaulted based on the selected
ASN.
6. At the bottom of the Billing Information Page the line items will be listed. Click the Edit Icon.

Number: OPS-MANL-00583
POLARIS SUPPLIER EXCHANGE MANUAL - EXTERNAL
Revision: 3 Last Saved: 17-APR-17 Page 59 of 80
59
7. Review the following information, edit if incorrect.
• PO Number
• Release Number should always be EMPTY
• Unit of Measure should always use EA
• PO Line Number entered should be based on the following criteria :
a) If you are a production supplier and you are invoicing a blanket PO with releases: enter 1
b) If you are a production supplier and you are invoicing a discrete PO with multiple line items
all labeled MISC: enter the item line number you are invoicing (ex. 1, 2, etc.)
c)
d)c) If you are an EAM supplier you need to reference the line item (ex. 10, 20, 30…) see screen
shot of an EAM PO below for example.

Number: OPS-MANL-00583
POLARIS SUPPLIER EXCHANGE MANUAL - EXTERNAL
Revision: 3 Last Saved: 17-APR-17 Page 60 of 80
60
e)d) If you are a production supplier and supplying a PE order with multiple part numbers
listed you need to reference the PO line number you are invoicing (ex. 1, 2, 3…). See image
below for example.
8. Review the price
9. DO NOT ADD SPECIAL CHARGES ON THE LINE ITEM LEVEL! PLEASE REVIEW THE SPECIAL CHARGES SECTION OF THE PO FOR HOW TO ADD A SPECIAL CHARGE TO THE PO LEVEL.

Number: OPS-MANL-00583
POLARIS SUPPLIER EXCHANGE MANUAL - EXTERNAL
Revision: 3 Last Saved: 17-APR-17 Page 61 of 80
61
DELETING OR CANCELING THE INVOICE IN SUPPLIER EXCHANGE DOES NOT REMOVE THE
INVOICE FROM POLARIS’ SYSTEM. DO NOT CANCEL OR DELETE THE INVOICE IN SUPPLIER
EXCHANGE AND RESUBMIT THE INVOICE OR IT WILL ERROR OUT AS A DUPLICATE!!!
10. Click Save.
11. Once the invoice information has
been reviewed
and updated click Publish.
12. You will get a note saying the Invoice was
13. successfully published:
Canceling / Editing Published Invoices
If you find that you have an error on a published invoice you need to review the
procedure below:
Under the invoice maintenance section you see the following:
NOTE:
The price located on the invoice is pulled directly
from the PO. If it is not what you agreed to be
paid you need to contact the Buyer immediately.
If the buyer gives you permission to submit a
price that does not match it will error into the
Buyer Messages queue where the Buyer will
have to go in and manually approve the pricing
discrepancy for payment.
DO NOT ADD SPECIAL
CHARGES HERE

Number: OPS-MANL-00583
POLARIS SUPPLIER EXCHANGE MANUAL - EXTERNAL
Revision: 3 Last Saved: 17-APR-17 Page 62 of 80
62
As you can see above, there is the possibility to select certain invoices and delete them or cancel them.
Proper process to correct published invoice mistakes:
1. Identify in a pdf copy where the mistake is and what the correction needs to be.
2. Submit an email to Accounts Payable at Polaris with the pdf copy of the invoice.
3. Accounts Payable will need to correct the mistake in Polaris’ system for it to
The only section on a published invoice that is able to be edited after the Invoice has been submitted is
the PO Line Number, see below.

Number: OPS-MANL-00583
POLARIS SUPPLIER EXCHANGE MANUAL - EXTERNAL
Revision: 3 Last Saved: 17-APR-17 Page 63 of 80
63
Special Charges
ONLY if you have permission from your Purchasing Agent should you be
submitting any type of special charge with your invoice.
***Sales Tax is NOT applicable on Production Parts/ Raw Materials.
If you have this special permission to apply a special charge you will follow the additional steps to
complete your invoice.
1. Once you have reviewed the information in the Invoice you will click save (step 7 of entering an invoice pg. 47).
DO NOT ADD SPECIAL
CHARGES HERE

Number: OPS-MANL-00583
POLARIS SUPPLIER EXCHANGE MANUAL - EXTERNAL
Revision: 3 Last Saved: 17-APR-17 Page 64 of 80
64
***NOTE: DO NOT CLICK ADD. IF YOU DO THIS DIOLOGUE BOX WILL POP UP. DO NOT ADD THE CHARGE IN THIS SPACE.
2. Then instead of publishing you will click the tab labeled Invoice Surcharge ON THE PO LEVEL.

Number: OPS-MANL-00583
POLARIS SUPPLIER EXCHANGE MANUAL - EXTERNAL
Revision: 3 Last Saved: 17-APR-17 Page 65 of 80
65
3. The invoice surcharge tab will then show at the bottom of the invoice:
4. Click Add

Number: OPS-MANL-00583
POLARIS SUPPLIER EXCHANGE MANUAL - EXTERNAL
Revision: 3 Last Saved: 17-APR-17 Page 66 of 80
66
5. Choose the Special Charge Code in the drop down menu.
6. Add the amount 7. Click Save. The charge will now be listed as a line item in the Invoice Surcharge Section
8. Review your Invoice for accuracy and possible errors. 9. Click Publish
***Sales Tax and Freight is
NOT applicable on Production
Parts/ Raw Materials.***

Number: OPS-MANL-00583
POLARIS SUPPLIER EXCHANGE MANUAL - EXTERNAL
Revision: 3 Last Saved: 17-APR-17 Page 67 of 80
67
Creating an Invoice for Work Not Physically Shipped (TOOL/NONINV) You are REQUIRED to create a shipper in order to invoice anything.
If you are doing work for Polaris it should be under a PO of some type. That PO should be listed in your
Supplier Exchange Discreet PO list.
You will follow the same steps in completing the invoicing for these types of payments as you would
production parts.
1. Locate the PO in the Discrete PO list (review Open & Verify PO section )
2. Copy/write down the key pieces of information:
1.a) Facility Address
2.b) Ship to Address
3.c) Ship From Address
4.d) PT, PIL, PE order number
5.e) PO Terms, if PT order
3. Create Shipper (review Creating a Shipper section)
4. Create Invoice using the shipper you have created (see Creating a Production Invoice section)
See Next Page for entering process differences.
Do NOT press the Backspace Button in this system!

Number: OPS-MANL-00583
POLARIS SUPPLIER EXCHANGE MANUAL - EXTERNAL
Revision: 3 Last Saved: 17-APR-17 Page 68 of 80
68
• Part number will be TOOL / MISC / NONINV (actual part number will be in the comments section of
the PO) IF YOU ARE DOING AN AD-HOC INVOICE BE SURE TO PUT EXACTLY WHAT WAS WRITTEN ON
THE PO IN THIS SECTION. If you create a shipper this field will be filled out for you.
• You can invoice the quantity in two ways Invoicing for payment terms of 50/50 or 1/3, 1/3,1/3 you
can use decimal places or a quantity of 1
Preferred Method (prevents most common invoicing errors)
o The decimal format will allow you to create shippers for each invoice and thus is the
preferred method.
o If you invoice for a quantity of 1 for the first invoice you will be required to invoice the
next invoices using the Ad-Hoc Invoicing process (See Section 15 in this manual).
o If you are invoicing using decimals you will need to invoice using the following:
o Use 0.5 for both invoices if your terms are 50/50
o Use 0.33 for the first invoice, 0.33 for the second invoice, and 0.34 for the final invoice if
your terms are 1/3, 1/3, 1/3.
o The PT will remain open until the complete amount of the PT has been invoiced and paid.
• Best Practice: make the amount divisible by .33 equally if those are the terms of payment so that
when the invoice enters our system will automatically pay, provided everything else was submitted
properly.

Number: OPS-MANL-00583
POLARIS SUPPLIER EXCHANGE MANUAL - EXTERNAL
Revision: 3 Last Saved: 17-APR-17 Page 69 of 80
69
Alternate Method (room for errors, process not preferred)
o BE CONSISTANT. If you have already invoiced the first or second invoices using a 1 you
will need to complete the final invoices using the Ad-Hoc invoicing process. If you begin a
new PO using the decimal format you will need to submit all subsequent invoices using
this format.
o Edit invoice cost to be half or one third of the full amount.

Number: OPS-MANL-00583
POLARIS SUPPLIER EXCHANGE MANUAL - EXTERNAL
Revision: 3 Last Saved: 17-APR-17 Page 70 of 80
70
Creating an Ad-Hoc Invoice This is for EXCEPTIONS and should not be used as the standard way to enter invoices! Everything is
manually entered thus there is more room for error when using Ad-Hoc Invoices.
You should use this ONLY if you are invoicing a closed PO (where the goods have been
received at Polaris before you completed the Shipper and Invoice).
High Level Process (Ad-Hoc INVOICES ONLY):
1. Open and Verify PO (noting the following):
o Facility
o Ship to address
o Ship from Address
o PO number
o Part Number
o Price
2. Manually Enter Invoice Details
o Matching EXACTLY the information highlighted from the PO
o Most errors occur here! Make sure to carefully enter the details from the PO.
Create Ad-Hoc Invoice
1. Open and verify PO (use instructions located in production invoicing )
Use the screenshot
tool / Snipping Tool
/ or Print Screen
Button to take a
snap shot of the po,
highlight the
information and
reference this
information when
creating the shipper
and/or the invoice.
Do NOT press the Backspace Button in this system!

Number: OPS-MANL-00583
POLARIS SUPPLIER EXCHANGE MANUAL - EXTERNAL
Revision: 3 Last Saved: 17-APR-17 Page 71 of 80
71
2. On the menu, click Billing.
3. In the Billing submenu, click Invoice Create. The New Invoice page displays.
4.
5. Select the New Invoice criteria. Instead of selecting a Shipper from the drop-down menu, enter
in any shipper number in the field provided.
6. Click Create Invoice. The Invoice Detail page displays.
7. In the Line Item section, click Add to manually add PO information. The Line Item Detail page
displays.
This is the section where you have to EXACTLY
match what you wrote down from the PO to not
create an error. There may be a lot of drop down
options but be careful which option you choose.

Number: OPS-MANL-00583
POLARIS SUPPLIER EXCHANGE MANUAL - EXTERNAL
Revision: 3 Last Saved: 17-APR-17 Page 72 of 80
72
8. Select the Customer (Polaris) Part from the drop-down list.
Be sure to match to the PO! If the PO states the part number is MISC / NONINV / TOOL / SERVICE
then be sure to select that option from the list.
9. Enter Polaris PO number (this must be filled out even though it is not a required field).
BE SURE TO WRITE A CAPITAL “P” IN WHEN ENTERING THE PO INTO THIS FIELD!!
If you write a lower case “p” it will error out!

Number: OPS-MANL-00583
POLARIS SUPPLIER EXCHANGE MANUAL - EXTERNAL
Revision: 3 Last Saved: 17-APR-17 Page 73 of 80
73
10. Enter PO Line Number (this must be filled out even though it is not a required field).
PO Number can be found on the PO see criteria below and screen shots from PO documents
PO Line Number entered should be based on the following criteria:
a) If you are a production supplier and you are invoicing a blanket PO with releases:
enter 1
b) If you are a production supplier and you are invoicing a discrete PO with multiple line
items all labeled MISC: enter the item line number you are invoicing (ex. 1, 2, etc.)
f)
c) If you are an EAM supplier you need to reference the line item (ex. 10, 20, 30…) see
screen shot of an EAM PO below for example.

Number: OPS-MANL-00583
POLARIS SUPPLIER EXCHANGE MANUAL - EXTERNAL
Revision: 3 Last Saved: 17-APR-17 Page 74 of 80
74
d) If you are a production supplier and supplying a PE order with multiple part numbers
listed you need to reference the PO line number you are invoicing (ex. 1, 2, 3…). See
image below for example.
11. If you a certain that you know the PO Line Schedule Number please enter the field below. It is
located on your PO. See screen shot comparisons below. This is not a required field but will
decrease process time if filled out CORRECTLY.

Number: OPS-MANL-00583
POLARIS SUPPLIER EXCHANGE MANUAL - EXTERNAL
Revision: 3 Last Saved: 17-APR-17 Page 75 of 80
75
12. Enter Quantity and Unit Price.

Number: OPS-MANL-00583
POLARIS SUPPLIER EXCHANGE MANUAL - EXTERNAL
Revision: 3 Last Saved: 17-APR-17 Page 76 of 80
76
13. Select Unit of Measure from the drop-down list. (Should be EA).
14. Be sure NOT TO add Special Charges on the Line item level.
15. Select Save. The Invoice Detail page displays
DO NOT ADD SPECIAL
CHARGES HERE

Number: OPS-MANL-00583
POLARIS SUPPLIER EXCHANGE MANUAL - EXTERNAL
Revision: 3 Last Saved: 17-APR-17 Page 77 of 80
77
16. Update the invoice information as necessary and click Publish.
Note: The PO number field must be filled out otherwise it will get rejected by Accounts Payable.

Number: OPS-MANL-00583
POLARIS SUPPLIER EXCHANGE MANUAL - EXTERNAL
Revision: 3 Last Saved: 17-APR-17 Page 78 of 80
78
View Invoices 1. On the menu, click Billing.
2. In the Billing submenu, click Invoice Maintenance.
3. Select the Invoice Search Criteria.
4. Click Continue. A categorized list of invoices displays.
5. Click Published Invoices to see invoices you have submitted.

Number: OPS-MANL-00583
POLARIS SUPPLIER EXCHANGE MANUAL - EXTERNAL
Revision: 3 Last Saved: 17-APR-17 Page 79 of 80
79
NOTE: the Rejected invoices tab is invoices that have been reviewed and rejected, not items that errored
out.
Part Billing History
The part billing history displays all published invoices by part for a specified date range.
View Parts Billing History
1. On the menu, click Billing.
2. In the Billing submenu, click Parts Billing History. The Search Criteria display.
3. Select the Parts Billing Search Criteria.
4. Click Continue. The Parts Billing History displays.
5. To view a list of invoices for a part, in the Part Summary Results table click the view button to the
left of the part. The invoice list displays.

Number: OPS-MANL-00583
POLARIS SUPPLIER EXCHANGE MANUAL - EXTERNAL
Revision: 3 Last Saved: 17-APR-17 Page 80 of 80
80
6. To view invoice details, click the view button for one of the invoices. The invoice displays.
**END OF DOCUMENT**