Embed Size (px)
Citation preview

Green Eyes LLC Easton, MD 21601 +1.443.746.2175
[email protected] http://gescience.com
NuLAB and NuLAB Plus
User Manual
V1.0

Green Eyes LLC Easton, MD 21601 +1.443.746.2175
[email protected] http://gescience.com
Table of Contents
1. Introduction
2. System Architecture
3. System Requirements
4. User Control Software
5. Macros
6. Valve Allocation Tables
7. Setup and Recovery
8. Servicing
9. Appendices
a. Specifications
b. Warranty

Green Eyes LLC Easton, MD 21601 +1.443.746.2175
[email protected] http://gescience.com
1. Introduction
The NuLAB is a multi-channel, wet chemistry sensor for the automated determination of
dissolved nutrient concentrations (Nitrate plus Nitrite, Nitrite, Phosphate, Ammonium and
Silicate) in aqueous samples. It can be deployed outdoors adjacent to bays, rivers or streams
inside a waterproof enclosure, in a laboratory or in an industrial plant. Data is calibrated via an
On-Board Standard (OBS) that precedes one or more samples.
The NuLAB Plus extends the regular NuLAB to include a built in touch screen controller with
Green Eyes’ ComScript software that allows for graphical system setup, real time data
processing, daily email updates and real-time transfer of text and graphical data files to the
internet.
2. System Architecture
The NuLAB has five main elements.
1. Reagents and Standards are stored in IV bags that connect to the NuLAB valve.
2. A six port rotary valve connects the reagents, standards, detector and sample water to
the syringe
3. The syringe collects and dispenses precise volumes of sample water, standards and
reagents for flushing and mixing activities.
4. The colorimetric detector LED shines filtered light through flow cells (2mm low
sensitivity or 10mm high sensitivity) that is quantified by a photodiode and associated
electronics.
5. During analysis, the valve, syringe and detector are all controlled by Macros, which are
text files of specific instructions loaded into the memory of the NuLAB. Each chemistry
has specific macros which are in turn specific to the detector style.
The additional parts of the NuLAB plus include:
1. A Raspberry Pi Linux based computer which serves as the NuLAB Plus controller
2. Green Eyes’ ComScript software provides the user interface, and the water2web
(W2W) real time data displays and email updates.
3. Commands and configuration parameters are entered into the ComScript software via the
seven-inch touchscreen mounted on the face of the NuLAB.
4. The Rii, wireless mouse and keyboard is used for screen navigation and the entry of
configuration parameters. Each Rii is paired to its USB receiver connected to the USB
port of the Raspberry Pi. If the keyboard and mouse pad is damaged, the USB receiver
must also be replaced with the matched unit.
5. Manual or computer controlled switches mounted on the top of the NuLAB plus (variable
with selected options) that power the Raspberry Pi controller, individual channels and the
pump (optional).

Green Eyes LLC Easton, MD 21601 +1.443.746.2175
[email protected] http://gescience.com
Fig. 1: Major elements of the NuLAB Plus
Colorimetric Detector Reagent and Standard
Bags
Touch Screen
Controller
Eight Port Rotary Valve Waste Container Syringe
12 Volt
Power
Connection

Green Eyes LLC Easton, MD 21601 +1.443.746.2175
[email protected] http://gescience.com
3. System Requirements
1. A 12 volt power supply for bench testing and a 12 volt battery with a 2 to 6 amp charger.
Be very careful to connect the power cable leads to the correct terminals of the battery.
Reversing the polarity can severely damage the NuLAB.
2. The NuLAB is not a submersible instrument so it requires a dry environment. When
deployed outside, it should be fitted inside a waterproof enclosure with necessary
connections for power and sample water.
3. If an existing water supply is not available, a pump (available through Green Eyes) must
be used to deliver water to the sample chamber that should remain full during both
sample and OBS analysis. A mechanical check-valve or electronically operated valve
placed in front of the sample chamber can be used to prevent the sample chamber from
draining when the pump is turned off.
4. The Raspberry Pi Linux controller requires an internet connection to keep accurate time
(Real Time Clock optional), send daily emails and send data files and plots to the internet
sites. The internet connection can be provided through a LAN connection or through the
provided USB to WiFi adapter. If necessary, a Real Time Clock can be added to the
controller that will maintain time through power outages, but the W2W features of the
NuLAB Plus require an internet connection.
Note: To set up the WiFi connection, plug in the USB WiFi dongle into one of the
two USB sockets on the top of the NuLAB Plus. Right clicking on WiFi network
icon in the upper right of the screen should show available WiFi networks. Select
the correct network and enter the key/password. The controller will automatically
establish a connection to the network whenever rebooted. If a key must be
entered via a browser, open the Epiphany web browser by clicking on the globe
icon in the upper left of the screen. The connection page should open
automatically in a few moments.
5. Reagents and standards should be prepared in a proper laboratory by trained personnel.
The majority of problems with the NuLAB are caused by improperly made reagents and
standards and are often difficult to diagnose. While the NuLAB Plus has greatly
simplified the deployment of autonomous nutrient monitors, the system still uses wet
chemistry and requires attention to details. Some patience is also helpful during initial
deployments while the “kinks are ironed out” of the system.

Green Eyes LLC Easton, MD 21601 +1.443.746.2175
[email protected] http://gescience.com
4. User Control Software
The NuLAB can be controlled via a simple terminal program (Tera Term recommended) or with
Green Eyes’ ComScript applications running on the NuLAB controller. The controller is built-in
to the NuLAB Plus and is available as an external option for the regular NuLAB. The controller
uses the following three applications:
1. NuLAB_Manual – Provides manual controls for the valve, syringe and detector, and can
run individual macros.
2. NuLAB_Logging – Collects and stores deployment configuration data, runs the
continuous logging cycle, processes data and executes W2W functions.
3. FileTransferSetup – Collect user data for W2W file transfer to internet server during
continuous operation of NuLAB_Logging.
Running NuLAB controller apps: The three apps above are opened with text commands typed
into an LX terminal window. To open the terminal, click on the computer screen icon in the
upper left of the screen. When the terminal opens, change to the ComScriptPi directory by
typing the following command at the pi@raspberrypi ~ $ prompt.
pi@raspberrypi ~ $ cd ComScriptPi
then type:
pi@raspberrypi ~ /ComScriptPi $ mono ComScript.Mono.exe NuLAB_Manual
To launch the logging application type:
pi@raspberrypi ~ /ComScriptPi $ mono ComScript.Mono.exe NuLAB_Manual
Note: “_nr” which denotes no relay board, should be added to the commands for the
external controller (e.g. NuLAB_Manual_nr)
Text will rapidly scroll past in the LX terminal window and in a few seconds the ComScript
input and output windows will open.
To open the other two apps, simply replace NuLAB_Manual with the name of the app exactly as
it is listed above (e.g. mono ComScript.Mono.exe NuLAB_Logging or
mono ComScript.Mono.exe NuLAB_Logging_nr for the external controller).
Helpful tip: Typing long commands such as those above on the small keyboard provided with
the controller can be difficult. Once commands are entered into the LX terminal, they are stored
in the operating system’s log and can be accessed easily by clicking the up and down arrow
buttons on upper right corner of the Rii keyboard. This way, the commands only have to be
typed in correctly one time and then can be easily accessed via the arrow buttons. Check the
Green Eyes LLC Easton, MD 21601 +1.443.746.2175
[email protected] http://gescience.com
command log before typing any commands as they were probably already stored during Green
Eyes testing.
NuLAB_Manual
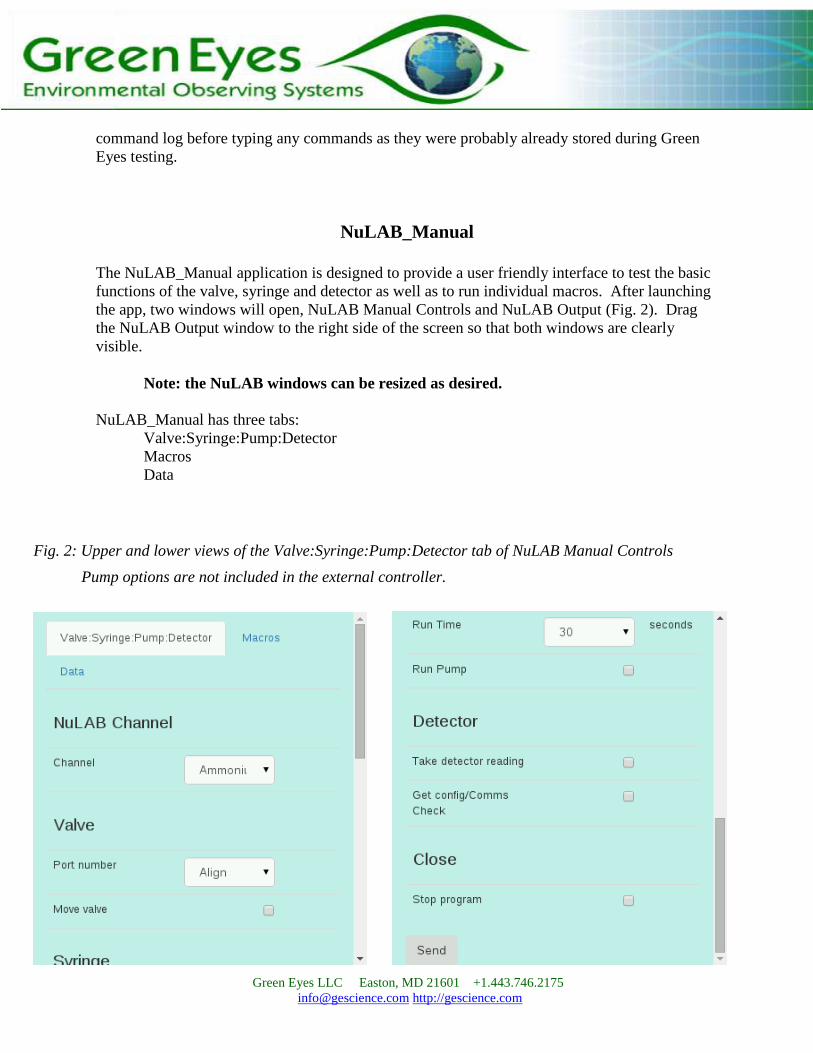
The NuLAB_Manual application is designed to provide a user friendly interface to test the basic
functions of the valve, syringe and detector as well as to run individual macros. After launching
the app, two windows will open, NuLAB Manual Controls and NuLAB Output (Fig. 2). Drag
the NuLAB Output window to the right side of the screen so that both windows are clearly
visible.
Note: the NuLAB windows can be resized as desired.
NuLAB_Manual has three tabs:
Valve:Syringe:Pump:Detector
Macros
Data
Fig. 2: Upper and lower views of the Valve:Syringe:Pump:Detector tab of NuLAB Manual Controls
Pump options are not included in the external controller.

Green Eyes LLC Easton, MD 21601 +1.443.746.2175
[email protected] http://gescience.com
The Valve:Syringe:Pump:Detector
tab (Fig. 2) provides basic controls of
the major elements of the NuLAB.
Select the desired channel, and a valve,
syringe or detector command then click
send to have the controller issue the
command to the selected NuLAB
channel. A valve and syringe command
can be sent at the same time with the
valve command executing first. All
commands begin with a communication
check to the selected channel. View the
System Message in the NuLAB Manual
output window (Fig. 3) for feedback
from the NuLAB. In addition to the
System Message, detector test data and
configuration information is displayed.
While not necessary during automated logging operations, the individual valve and syringe
commands are useful for initial testing after setup or to flush an individual port. This is the place
to start if you are not familiar with the NuLAB.
Fig. 4: Upper and lower views of the NuLAB Manual Macros tab
Fig. 3: NuLAB Manual input (macros tab) and output windows

Green Eyes LLC Easton, MD 21601 +1.443.746.2175
[email protected] http://gescience.com
The Macros tab allows users to select one macro to run on up to three channels with selected
interval and repetitions. In Fig. 4,
macro 3 (inlet flush) will be run two
times with a three minute interval on
the ammonia channel only. Before
launching a deployment in logging
mode, the macros tab can be used to
run reagent primes (macro four) on
all channels. It is also necessary to
run reagent blanks (macro one with
deionized water on the inlet; macro
seven for nitrite). The reagent blank
absorbance (average of three or more
replicates) can then be entered into
the NuLAB_Logging app along with
OBS concentration for sample
concentration calculations. It is also a convenient way to check the repeatability of the OBS,
reagent blank and other standards fed through the inlet. Green Eyes strongly recommends
running a few OBS macros and insuring stable results and then running a few reagent blanks
with the inlet tube connected to nutrient free water (DIW or low nutrient seawater depending on
deployment water).
Data from all analysis macros can be found in the NuLAB_Manual profile directory. To open
the file browser program, click on the file cabinet icon in the upper left corner of the desktop.
When the browser opens, double click on the following folders and then the desired data file.
ComScriptPi >> profiles >> NuLAB_Manual (Fig. 5)
Each channel has its own data file and both N+N and Nitrite data are stored in the Nitrate_Data-
M.txt file. The files are comma separated for easy import into spreadsheet software and all raw
data from the detector is included as is the calculated analysis absorbance. Sample concentration
is not calculated in the NuLAB Manual app, but can be calculated manually or in a spread sheet
if the OBS concentration, OBS absorbance and reagent blank absorbance are known. See Green
Eyes’ Data Processing Guide.
The Data tab under NuLAB Manual is used to delete the data from each channel’s MCU
controller. The MCU data buffer will be filled after 1500 lines are collected and no new data
will be stored, so it is essential that the data buffer be cleared occasionally. If more than
1000 lines of data are stored on the MCU, the comms check routine will write a warning to the
system message in the output window that the data on the specified channel needs to be cleared
which can be done easily from the data tab.
Fig. 5 Raspberry Pi file browser window

Green Eyes LLC Easton, MD 21601 +1.443.746.2175
[email protected] http://gescience.com
NuLAB_Logging
Continuous logging setup and operation is done from the NuLAB_Logging application which,
like NuLAB_Manual, has one input and output window. The Logging app has three tabs:
Calibration Parameters
Alerts and File Transfer
Logging Cycle
Reagent blank absorbance and OBS concentrations that are
required to calculate sample concentration are entered in the
Calibration Parameters tab (Fig. 6). The reagent blank
absorbance values have no units and are collected by running
DIW samples as described in the NuLAB Manual section
above. The units of the OBS concentration (mg/L or µM)
are not needed, but the sample concentration plots assume
mg/L units. Contact Green Eyes to change the plot axis
labels to µM or for other customization of the data plots.
The Alerts and File Transfer tab (Fig. 7) is used to collect
up to five email addresses for a daily email update that will
include all text data and png plots. The email addresses must
be entered without spaces or extra characters (e.g.
[email protected]). Under the email address text boxes in
the Alerts and File Transfer tab are check boxes to turn
on/off the automated file transfer (setup through the File
Transfer Setup application described below) and Secure File
Transfer Protocol (SFTP). The various parameters that
control how the NuLAB Plus runs the logging cycle are
contained in the Logging Cycle tab (Fig. 8).
Channels to Run: select individual channels (chemistries) to
include in the continuous logging cycle. Because Nitrate plus
Nitrite (N+N) and Nitrite only analyses are both run on the
Nitrate channel, the Nitrite specific analysis (if selected) will
run after the last N+N, Phosphate, or Ammonium macro has
completed.
Pump Run Time: (not included on external controller) The
number of seconds the pump will run to flush and fill the
sample chamber with water. The water travel time from the
pump to the sample chamber should be measured and Green
Eyes recommends that the Pump Run Time be three times the
measured travel time to insure proper system flushing.
Fig. 6: Upper view of the Calibration
Parameters tab
Fig. 7: NuLAB_LoggingAlerts and File
Transfer tab

Green Eyes LLC Easton, MD 21601 +1.443.746.2175
[email protected] http://gescience.com
Inlet Flushes per Sample: The number of times the inlet flush macro will be run to fully flush
the inlet tubes, syringes and filter. It is important to mount the sample chamber as close to the
NuLAB as possible and to keep all inlet tubes as short as possible to reduce necessary inlet
flushing. Each flush routine collects 6 ml (two full syringes) from the inlet so if three channels
are running the total volume pulled through the inlet filter and tubes is 18 ml. Ideally, more than
one inlet flush on each channel is not necessary, but we recommend users test required inlet
flushing before commencing logging.
Samples per On-Board Std.: The number of samples run after the OBS analysis (see the
Logging Cycle Flow Chart in Fig. 9). For the most accurate results, set this value to one (1) to
run an OBS for each sample.
Inlet Backflush: The NuLAB can back-flush the inlet with one of the on-board reagents using a
designated back-flushing macro. This is a highly effective way to prevent clogging and bio-
fouling of the filter when sampling productive or turbid water. Check the box to enable inlet
back-flushing on selected channels (checked under Channels to Run). It is suggested to enable
back-flushing on only one (1) channel so that chemicals (albeit only about 1ml of reagent is used
per channel) are not unnecessarily pushed though the filter and out the pump waste line. Back-
flushing multiple lines simultaneously has also adversely affected data quality. The nitrate
channel back-flush is recommended if running nitrate analysis. Back-flushing occurs daily after
the 11am and 11pm analysis and a line indicating the back-flush event including a timestamp is
written into the data files. The table below indicates the chemical used in back-flushing on each
channel.
Channel Reagent used for backflush
Nitrite Sulfanilamide/NEDA mixed reagent
Phosphate Molybdic Acid
Ammonium Hypochlorite
Note: Do not enable back-flushing when sampling from a bottle or other fixed volume sample.
Analysis Cycle Interval: The analysis cycle interval is used to set the minutes between the start
of each analysis cycle.
Samples per OBS: Set the number of sample only analysis cycles to run after the OBS and
Sample analysis cycle. If the Samples per OBS value is set at one (1), each analysis cycle will
consist of one sample and one standard run within the interval. If the Samples per OBS value is
above one (1), then the analysis cycle(s) after the first will consist of only samples until the
number of analysis cycles equals the Samples to OBS value.
Start Hour: The start hour is used to delay the start of logging until the specified hour is
reached. If the specified hour has already elapsed when logging is initiated, the instrument will
commence logging immediately. Format must be two digit HH (e.g. 7 am entered as 07).

Green Eyes LLC Easton, MD 21601 +1.443.746.2175
[email protected] http://gescience.com
End Date: The numeric date when the NuLAB will stop logging. Format must be
MM/DD/YYYY (e.g. 09/08/2016 for September 8, 2016).
End Hour: The hour of the day specified in End Date to stop logging. Format is two digit hour
(e.g. 07 for 7am).
Start Logging: The start logging box must be checked when the send button is clicked to initiate
logging.
Fig. 8: Logging Cycle tab; upper (left), middle (center) and lower (right) views

Green Eyes LLC Easton, MD 21601 +1.443.746.2175
[email protected] http://gescience.com
Fig. 9: NuLAB Plus logging flow chart

Green Eyes LLC Easton, MD 21601 +1.443.746.2175
[email protected] http://gescience.com
5. Macros and Reagents
Macro Allocation table
Macro
#
Nitrate/Nitrite Phosphate Ammonium
1 N+N sample PO4 sample NH4 sample
2 N+N OBS* PO4 OBS NH4 OBS
3 Inlet flush Inlet flush Inlet flush
4 Prime Prime Prime
5 One detector reading One detector reading One detector reading
6 Inlet back-flush Inlet back-flush Inlet back-flush
7 NO2 sample N/A N/A
8 NO2 OBS N/A N/A
* Make the on-board standard for the N+N analysis (Port 6) with nitrate standard only. The NO2
analysis is calibrated with the NO2 on-board standard (Port 4).
Before deploying the NuLAB for continuous sampling, be sure to perform the following steps:
1. Run macro 4. Priming the tubing gets rid of most bubbles. If you do not prime the tubes
then you will not get accurate data. The number of primes that you perform should be
determined by the length of tubing that you use to connect your reagents. If you
complete the M4 macro and there is still air in the tubes, then repeat as needed.
2. Run macro 1. Make sure DI water is connected to your inlet when running reagent
blanks. This will be your base reading with a “zero concentration”. Using two known
concentrations you can then use the absorbance to calculate the concentration for any
sample you might run.
3. If you are measuring nitrite, run macro 7. This will serve the same purpose as step 2,
however M1 only runs a blank for N+N, PO4, and NH4.
4. To access your reagent blank data go to the specific file as described in under
NuLAB_Manual section above.

Green Eyes LLC Easton, MD 21601 +1.443.746.2175
[email protected] http://gescience.com
For every macro, be sure to set the run time to at LEAST the following run times:
Macro # Nitrate/Nitrite Phosphate Ammonium
1 12 min 13 min 15 min
2 12 min 13 min 15 min
3 2 min 2 min 2 min
4 10 min 10 min 10 min
5 1 min 1 min 1 min
6 2 min 2 min 2 min
7 8 min N/A N/A
8 8 min N/A N/A
If running more than one channel at a time, use the longest macro time (i.e. 15 for macro one).

Green Eyes LLC Easton, MD 21601 +1.443.746.2175
[email protected] http://gescience.com
6. Valve Allocation Tables
Nitrate+Nitrite Valve Allocation Table
Port # Reagent
1 Detector
2 Sulfanilamide + NEDA
3 Imidizole
4 Nitrite (NO2) OBS
5 Inlet
6 Nitrate (NO3) OBS
7 Cadmium Column
8 Air Intake
Note: The outlet of the detector (top on low sensitivity, long end on high sensitivity) should
connect to an outside waste container. All ports on the valve should be tightened with the
provided torque wrench prior to instrument deployment and re-torqued every four to six weeks.
Use only chemically resistant Tygon tubing with 1/16 inch (1.6 mm) inside diameter. The Air
intake should be connected to a bag of inert gas (e.g. Ar, He, N2) or air. The NuLAB collects a
gas bubble from the bag and passes it through the detectors immediately in front of measured
solutions to sweep or scavenge micro bubbles from the detector.

Green Eyes LLC Easton, MD 21601 +1.443.746.2175
[email protected] http://gescience.com
Phosphate Valve Allocation Table
Port # Reagent
1 Detector
2 Ascorbic Acid
3 Sodium Molybdate
4 Wash
5 Inlet
6 Phosphate OBS
7 Open Port
8 Air Intake
Note: The outlet of the detector (top on low sensitivity, long end on high sensitivity) should
connect to an outside waste container. All ports on the valve should be tightened with the
provided torque wrench prior to instrument deployment and re-torqued every four to six weeks.
Use only chemically resistant Tygon tubing with 1/16 inch (1.6 mm) inside diameter. The Air
intake should be connected to a bag of inert gas (e.g. Ar, He, N2) or air. The NuLAB collects a
gas bubble from the bag and passes it through the detectors immediately in front of measured
solutions to sweep or scavenge micro bubbles from the detector.

Green Eyes LLC Easton, MD 21601 +1.443.746.2175
[email protected] http://gescience.com
Ammonium Valve Allocation Table
Port # Reagent
1 Detector
2 Sodium Hypochlorite
3 Phenol
4 Complexing Reagent
5 Inlet
6 Ammonium OBS
7 Wash
8 Air Intake
Note: The outlet of the detector (top on low sensitivity, long end on high sensitivity) should
connect to an outside waste container. All ports on the valve should be tightened with the
provided torque wrench prior to instrument deployment and re-torqued every four to six weeks.
Use only chemically resistant Tygon tubing with 1/16 inch (1.6 mm) inside diameter. The Air
intake should be connected to a bag of inert gas (e.g. Ar, He, N2) or air. The NuLAB collects a
gas bubble from the bag and passes it through the detectors immediately in front of measured
solutions to sweep or scavenge micro bubbles from the detector.

Green Eyes LLC Easton, MD 21601 +1.443.746.2175
[email protected] http://gescience.com
Reagent and OBS connections: All reagent and OBS connections should be made with 1/16”
(1.6 mm) ID tubing. Larger diameter tubing or unnecessarily long lengths of tubing can reduce
flushing and cause noisy or inaccurate results, particularly for the OBSs. OBS tubing should be
sterilized with isopropyl alcohol prior to connecting to reagent bags. Detector inlet and outlet
use 3/32 inch tubing.
7. Setup and Recovery
Reagent preparation: Follow the procedures described in Green Eyes reagent recipes to prepare
reagents and standards. Recipes other than those supplied by Green Eyes may not produce
desirable results and should be thoroughly tested before using in field deployments.
Note: For updates on reagent and other technical improvements please send Green Eyes a
request to be added to technical updates email list.
After preparing the reagents and standards, they should be poured into reagent bags (medical IV
bags). The easiest method is to connect the tubing (1/16” ID) of the bag to a large funnel
securely mounted above the bag and pour the reagent into the funnel (the greater the vertical
distance between the funnel and the bag the faster the flow into the bag). Cutting the bottom out
of a common lab squirt bottle turns it into a large funnel with small outlet to connect the bag
tubing. Some different sizes of tubing and barbed adapters may be necessary to make
connections from the end of the squirt bottle to the 1/16” bag tubing. It is also helpful to remove
the stem from inside the squirt bottle cap so that all the liquid is able to flow out of the squirt
bottle funnel. When the reagent has flowed into the bag, squeeze the bag to push the air bubbles
and some liquid back into the funnel. Allow only the liquid to flow back into the bag and pinch
the clamp before air re-enters the bag.
While it is desirable to remove all the air
bubbles, one or two small bubbles are of
no concern. If a large funnel is not
available for bag filling, a 60 ml or larger
syringe can act as a suitable funnel.
Deployment: When deploying the
NuLAB in the field, the instrument,
reagents, battery and other accessories
should be stored in a waterproof enclosure
(Fig. 10) or building. To reduce
temperature changes, the enclosure should
be insulated and protected from direct
sunlight or painted a reflective color. The
bottom of the enclosure should be lined
with a layer of absorbent cloth to contain
any accidental reagent leaks. The sample
delivery pump and tubing should be
secured along its path to the NuLAB and
Fig. 10: NuLAB and accessories inside external enclosure

Green Eyes LLC Easton, MD 21601 +1.443.746.2175
[email protected] http://gescience.com
the sample chamber input and output connections should be fastened with stainless steel hose
clamps to prevent leaks. The NuLAB inlet tubing is connected to the 1/16” nozzle at the bottom
of the sample chamber (available as an accessory from Green Eyes or Green Eyes’ sales
representative). When running more than one channel, a y-connector(s) should be used to
connect each channel’s inlet (port five) to the sample chamber. Place the y-connectors close to
the NuLAB to minimize combined inlet volume.
Connecting reagents and the OBS to the NuLAB: Follow the reagent and OBS allocations as
indicated in the valve maps in section six above. Before connecting tubing to the valve, it is
important to retorque (2 in. lbs.) the nozzles with the torque wrench provided in the tool
kit. Be sure all bags are pinched off before connecting them to the valve and that the end of the
tubing extends past the barb on the valve nozzles or it will slip off. When removing tubing from
the valve, use your fingernail to pry the tube over the barb while pulling on it. When re-
connecting a tube, trim off the last cm where the tubing was previously deformed from the barb
to insure a secure connection.
When using the nitrate channel, the cadmium column/tube (OTCR) should be connected so that
the end of the cadmium touches or butts up against the valve nozzle. The other end of the OTCR
should be connected to a waste bag (check sample, reagent and waster volume spread sheet for
required bag volume).
After all connections are made and the tubing is run neatly, check and double check that all
pinch clamps are in the un-pinched position. Place the inlet tube in a clean bottle of high
quality deionized water (DIW) or low nutrient seawater (LNSW) for initial flushing and reagent
blank analyses. Open the NuLAB_Manual application to the Macros tab (see running NuLAB
controller apps above) and run one or two reagent prime macros (macro four). When complete,
check that the reagents, OBSs and inlets are fully flushed and there are no leaks. If all lines are
fully primed, run one or more OBS macros until the absorbance signal is stable, then run three or
more reagent blanks (DIW or LNSW) and record the average absorbance of the reagent blanks
from the data files (Fig. 5).
Note: It is very important that the DIW or LNSW be checked periodically to insure very low or
below detection nutrient concentrations. It is also advisable to use the same water (DIW or
LNSW) that is used for reagent blanks to make the OBSs.
Launching logging mode: Be sure to connect the sample line to the sample chamber outlet.
Open the NuLAB_Logging application (see running NuLAB controller apps in section four
above) to the Calibration Parameters tab and enter the reagent blank absorbances and OBS
concentrations (the calculated sample concentrations will have the same units as the OBS
concentrations). In the Logging Cycle tab, enter the desired logging cycle parameters. To
maximize accuracy, Green Eyes advises to run no more than two samples per OBS (used for
calibration) unless the interval is short (~20 minutes). It is also suggested to run the pump for
three times longer than the water travel time from the pump inlet to the sample chamber (e.g.
sample transit time equals 30 seconds, set Pump Run Time to 90 seconds). After checking start
logging and clicking the ‘Send’ button, it is important to watch the message window to insure no

Green Eyes LLC Easton, MD 21601 +1.443.746.2175
[email protected] http://gescience.com
errors are encountered and you have a successful start to the deployment. Be sure all battery,
power and solar panel connections are secure and waste is flowing from the detector lines to the
waste jug before closing the enclosure. Do not be alarmed if the sample pump does not run
on the first analysis, because the OBSs run before the samples.
Deployment recovery: Place a USB memory stick into one of the available USB sockets. A
window should automatically open to allow you to open the USB drive in a file browser. Open a
second file browser and navigate to ComScriptPi >> profiles >> NuLAB_Logging and transfer
the Logging data files (one for each nutrient measured and nitrate with is calculated as the
difference of N+N and Nitrite and thus has no raw data) onto the USB drive. Use the eject icon
in the upper right of the screen to safely remove the USB drive or it may become corrupted.
Disconnect the sample line from the sample chamber and place it into a bottle of DIW. Pinch off
all reagent and OBS lines and remove all bags and the OTCR from the instrument. Connect the
inlet and outlet of the OTCR to form a closed loop with as little air as possible. The OTCR can
be stored like this for one to two months, but should be stored dry for long-term storage. See the
Nitrate reagent recipe for the re-activation procedure. Connect clean tubing from each valve
port, except the detector, to a bottle of DIW. Close the NuLAB logging app and open
NuLAB_Manual to the macro tab. Run two or more prime macros to flush DIW through the
valve and detectors. When flushing is complete, shut down the Raspberry Pi from the main
menu (upper left of screen). The flushing tubes can be removed (they can be reused) and the
NuLAB should be stored in a secure, dry location.
Note: When simply replacing reagents and OBSs in the field, it is not necessary to flush with
DIW. However, it is important to avoid letting regent solutions dry up inside the valve
without proper flushing with DIW or crystals can form inside the valve and damage sealing
surfaces.
8. Servicing
Valve and syringe: The main service requirements of the NuLAB are to keep the system clean
and thoroughly flushed with DIW after use. It is also important to retorque the valve nozzles
when replacing reagents. If acidic reagents contact the valve body, they will dissolve the
aluminum and destroy the valve. When nozzle tightness is maintained, users report few
problems with the valve and multi-year life span. It should be replaced if any reagent leaks
cannot be stopped. The valve nozzles should be replaced every six months. Failure to do so will
result in permanent damage to the valve not covered by warranty. If the syringe begins to leak
around the plunger, it should be replaced. Users report average syringe lifetime around one year
with continuous use.
To remove the valve and syringe assembly for cleaning or replacement, start by unscrewing the
shoulder screw at the base of the syringe plunger. Then simply unscrew the syringe from the
valve in the counter-clockwise direction. To remove the valve, unscrew the two small black
mounting screws on the valve flange with a small cross head screw driver and pull the valve
away from the NuLAB face plate. The valve and syringe can be soaked in a DIW bath

Green Eyes LLC Easton, MD 21601 +1.443.746.2175
[email protected] http://gescience.com
overnight. The syringe can be washed with lab detergent, but the valve should only be soaked in
DIW.
Detector: It is recommended when replacing reagents, to also replace the short length of tubing
between the valve and detector inlet with a new piece of equal length. Over time, the tubing may
become coated with an “organic” layer which can interfere with the smooth flow of the
scavenging bubble and cause noisy results.
Note: Unusually high or very negative absorbances are usually the result of a bubble in the light
path of the detector.
The flow cells of high sensitivity detectors and the optical tubing of the low sensitivity detectors
can also become coated or stained over time, particularly when measuring high concentrations.
The high sensitivity flow cells can be flushed with flow cell cleaner until the I0 light
transmissions return to normal (30,000 to 40,000 bits). The optical tubing of the low sensitivity
detectors should just be replaced. To replace the detector tubing, disconnect the soft tubing
between at the bottom of the optical tube and unscrew both nuts that screw into the detector
blocks. Then pull firmly on the detector tubing from the top to remove it from the detector
block.
Note: The tubing must be pulled through a ferrule compressed around the tube so it will require a
reasonable fore to extract the detector tube from the detector block.
To replace the detector tube, cut a piece of new tubing (be sure there are no kinks in the new
tube) the same length as the old tube. Push a ferrule onto the tube so the flat part of the ferrule
faces the detector block and the cone of the ferrule will form a sealing surface with the tubing
nut. If reusing a ferrule, or if the tubing will not go through the ferrule, the head of the ferrule
can be flared with the tip of a pen or other pointy object. Slide the tube through the detector
block from the bottom so the ferrule butts against the detector block. Slide the other ferrule over
the top length of tubing and lightly screw in both tubing nuts. Then adjust the positioning of the
tubing so that about one cm of tube sticks out past the bottom nut for the soft tubing connection
to the valve. Finger tighten each nut to secure the tubing into the detector block.
Note: The ferrules are only used to hold the tubing in place and do not make a water tight seal.
At the user’s discretion, the bottom ferrule may be omitted to make detector tubing easier.

Green Eyes LLC Easton, MD 21601 +1.443.746.2175
[email protected] http://gescience.com
9. Appendices
a. Specifications
Physical
NuLAB (two channel): 39 cm x 34 cm 20 cm (H x W x D), Weight: 6 kg plus reagents
NuLAB Plus (three channel): 66 cm x 64 cm 30 cm (H x W x D) including reagent
hangers, Weight: 6 kg plus reagents
Analytical
- Standard Ranges (detection limit to linear range) - Standard Ranges (detection limit to linear range, micro M)
High Sensitivity Detectors mg/L: N+N 0.003 to 0.70, Nitrite 0.002 to 0.5, Phosphate 0.006 to 0.8, Ammonium
0.004 to 0.3, Silicate 0.008 to 1.7
micro mol/L: N+N 0.2 to 50, Nitrite 0.15 to 35, Phosphate 0.2 to 25, Ammonium 0.3
to 20, Silicate 0.3 to 60
Low Sensitivity Detectors
mg/L: N+N 0.01 to 2.8, Nitrite 0.008 to 2.1, Phosphate 0.025 to 2.0, Ammonium
0.02 to 1.0, Silicate 0.04 to 2.8
micro mol/L: Nitrate 0.8 - 200, Nitrite 0.6 - 150, Phosphate 1.0 - 75, Ammonium 1.5
to 75, Silicate 1.5 to 100
- Precision (one SD @ midrange of scale): Nitrate 2%, Nitrite 2%, Phosphate 3%,
Ammonium 4%, Silicate 3%
- Expanded Ranges: Up to 5 mg/l through auto-dilution
- Accuracy: Based on the accuracy of the preserved on-board standard and sample
delivery/handling procedures
- Analyses: Typically 1000 per channel, per deployment. Controlled by reagent payload
and chemistry.
Note: detection limit calculated as 3 x SD of reagent blank; linear range is variable upon
detector path length and chemistry. Contact Green Eyes for specific information.
General
- Power: voltage 10 - 15 dc, current per channel (mA) heating max. 820, motors 160-260,
idle 90; add 250 mA continuous for NuLAB plus
- Communications of each channel: RS232 9600,N,8,1
- Not waterproof

Green Eyes LLC Easton, MD 21601 +1.443.746.2175
[email protected] http://gescience.com
b. Warranty and Liability
Warranty
Green Eyes LLC warrants the NuLAB electronics, detectors and enclosure against faulty
materials and workmanship for a period of 24 months, and the valve and syringe for a period of
12 months from the date the unit originally ships from Green Eyes facility.
Faulty units will be repaired or replaced at Green Eyes option free of charge provided they are
delivered to Green Eyes LLC's premises at the owners/user’s expense, and providing all
manufacturer’s recommendations with regard to operation, servicing and storage have been
followed. The warranty will not apply if the fault has been caused by misuse, attempted repair or
modifications in a manner not authorized by Green Eyes LLC.
Return Address: Green Eyes LLC
930 Port St.
Easton, MD 21601 USA
Limited Liability
Green Eyes LLC disclaims all product liability risks arising from the use or servicing of this
equipment. Green Eyes LLC cannot take steps to comply with laws pertaining to product
liability, including laws which impose a duty to warn the user of any dangers as it has no way of
controlling the use of this equipment or selecting the personnel to operate it. Acceptance of this
system by the customer shall be deemed to include a covenant by the customer to defend,
indemnify, and hold Green Eyes LLC harmless from all product liability claims arising from the
use or servicing of this system.
Green Eyes LLC
Easton, MD 21601
+1.443.746.2175
www.gescience.com