Embed Size (px)
Citation preview

1
E
N
G
L
I
S
H
Contents
Congratulations on your purchase of the Honeywell Domonial security system.
To make the best out of your system we advise you to read this manual carefully.
This security system is designed to operate on an authorised radio frequency and will in no way endanger the user.
BASIC OPERATIONS
Introduction .......................................................................... 3
Arming the system ............................................................... 9
Disarming the system ......................................................... 11
Duress code ....................................................................... 12
Sending an SOS ................................................................. 12
Resetting the system after an alarm ................................. 12
Incorrect code or invalid TAG ............................................ 13
Setting preferences (TCU keypad) ................................... 13
Checking the alarm status ................................................ 14

2
E
N
G
L
I
S
H
Contents
ADVANCED OPERATIONS
Assigning codes and TAGs .............................................. 15
Device remote control ....................................................... 17
Manually bypass detectors (TCU keypad) ....................... 18
Cancelling operator access (TCU keypad) ...................... 19
Adjusting the beep level (CSK keypad) ............................ 20
Changing batteries ............................................................ 20
How to control your system by phone ............................. 21
Maintenance and recommendations ................................ 22

BASIC OPERATION.
3
E
N
G
L
I
S
H
Introduction
This manual describes how to use your Domonial alarm system and what you should do in the event of an alarm. It is task based and is divided into two sections covering basic and advanced operations.
Basic operation includes arming and disarming your alarm system, and if you only ever perform these tasks, then you need not read past the first few pages of the manual.
However, if you want to assign TAGs or codes to users, or bypass detectors, then read on to the Advanced operation part of the manual.
To help keep your Domonial alarm system in good condition, please read the Maintenance and recommendations section at the end of the manual.
Your system will comprise a wall mounted control panel, a number of detectors and sensors fitted during installation, and it will also include one or more of the following devices for arming/disarming and system configuration:
TCU keypad CSK keypad TCB keyfob keytag (TAG)
Wireless keypads
Your installer will provide you with a master TAG and a 4 or 6-digit master code to use with your keypad. You will need this to modify other users' codes and TAGs, and other more advanced user functions
Both wireless keypads can be used to arm and disarm your security system, using any valid access code or keytag (TAG).
CSK keypad
This is a wall mounted keypad, primary intended for arming and disarming. Although it has no screen it can be used for some advanced operations.

BASIC OPERATION.
4
E
N
G
L
I
S
H
TCU keypad
This keypad can be removed from its wall mounted holder for ease of use. However, it must be returned to its holder to fully arm the system.
All operations can be carried out using the TCU keypad.
A description of the icons you may see on the TCU keypad screen is provided below. The TCU screen clears after a few seconds to conserve battery power.
1 receiver 1 ON
2 receiver 2 ON
3 radio transmission in progress*
4 tamper fault*
5 power supply fault
6 keypad battery status:
blinking: replace battery
7 system fault*
8 alarm in memory
9 arming status:
total set armed
part set armed
total and part set disarmed
annex set armed
annex set disarmed
10 silent mode
11 bypassed detector
12 detector activated
13 message area, allowing scrolling and validation
* contact your installer if these faults persist
Protected zones
The Domonial alarm system allows for the surveillance of up to three different zones:
► Zone A = the perimeter or ground floor
► Zone B = the rest of the house
► Zone C = An optional area (annex)
Linked configuration: a second perimeter area or a garage.
Autonomous configuration: a studio or shop.
An access path can be associated with each area, allowing triggering of the alarm to be delayed while the user enters or leaves the site.
The zones will be set by the installer. You should check with the installer how these zones have been defined.

BASIC OPERATION.
5
E
N
G
L
I
S
H
The following surveillance modes can be activated:
► Main area Surveillance (Total set) = Areas A + B (or Areas A + B + C depending on your system settings) are protected – you are absent from the site.
► Partial Surveillance (Part set) = only Area A is protected – you are present on site.
► Optional: Annex Surveillance (Annex set) = Only Area C is protected – you are present on site.
Use Total set arming ( ) when you are away from home.
Use Part set arming ( ) when you are staying at home and want to arm the doors and windows only.
Sensors
There are several different types of sensors that can be used with your Domonial system. The installer has selected the sensors that meet your requirements.
Intrusion detectors
Intrusion detectors are used to detect any undesired entry into protected premises. There are two main categories of intrusion detectors, perimetric and volumetric.
Perimetric detectors
Perimetric sensors detect intrusion at possible entry points such as doors and windows. An alarm is triggered as soon as an intrusion takes place. Perimetric sensors can be of the following types:
Contact detectors detect the opening of doors or windows when the contact is broken. They are located at the key possible entry points of the premises.
Shock detectors detect shocks, such as when an intruder tampers with a door or a window in an attempt to break in. They provide more advanced security and can detect an intrusion attempt before the door or the window is ever opened.
Glass break sensors detect the sound frequency generated by glass when it breaks. They are the ideal solution to protect large glass areas that are not protected by blinds or roller shutters.

BASIC OPERATION.
6
E
N
G
L
I
S
H
Volumetric sensors
Volumetric sensors detect motion within the protected area. The movement of an intruder inside the protected area will trigger the alarm. Volumetric sensors can be of the following types:
Infrared sensors detect the heat generated by a person within the field of view of the detector and trigger an alarm. Because pets also generate heat, pet immune PIRs are designed to avoid pet generated alarms and represent the most suitable solution for residential applications.
Dual technology sensors. These high security sensors allow faster detection for high risk premises.
Infrared sensors with image verification. These sensors are designed for monitored applications. The image sensor included in the detector will store the picture of the detected object to allow the monitoring station to immediately validate the alarm and provide a faster response to it. It is also useful to allow the monitoring station to identify false alarms, generated for example by a blind that has not been properly closed.
Safety sensors
Smoke sensors. When smoke is detected, the smoke sensor immediately triggers a local alarm to warn the occupants; the monitoring station is also informed so that they can request assistance from the fire and rescue services.
Flood and temperature sensors. Flood sensors can be used to detect water leaks when placed in a bathroom or near a washing machine for example. When a flood sensor is triggered the information will be sent to the monitoring station so that they can to warn the occupants before it has caused severe damage. The temperature sensors can be used to detect high or low temperature problems such as frost or a high temperature in a refrigerator or a freezer. When a temperature sensor is triggered, the information will be sent to the monitoring station so that they can to inform the occupants before severe damage has occurred.
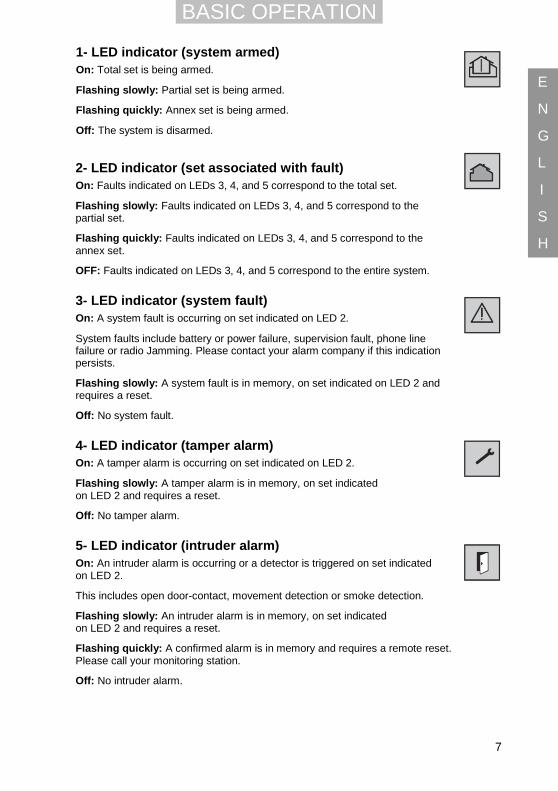
Indicator lights
The front cover of the control panel features LED indicators which show the status of your security system.
Indicators 2, 3, 4 and 5 show the faults, which are occurring or in memory for one set at a time. Indicators are only active when the system is unset and during the arming and disarming phases. When the system is set, the indicator lights turn off after a few seconds.
BASIC OPERATION.
7
E
N
G
L
I
S
H
1- LED indicator (system armed) On: Total set is being armed.
Flashing slowly: Partial set is being armed.
Flashing quickly: Annex set is being armed.
Off: The system is disarmed.
2- LED indicator (set associated with fault) On: Faults indicated on LEDs 3, 4, and 5 correspond to the total set.
Flashing slowly: Faults indicated on LEDs 3, 4, and 5 correspond to the partial set.
Flashing quickly: Faults indicated on LEDs 3, 4, and 5 correspond to the annex set.
OFF: Faults indicated on LEDs 3, 4, and 5 correspond to the entire system.
3- LED indicator (system fault) On: A system fault is occurring on set indicated on LED 2.
System faults include battery or power failure, supervision fault, phone line failure or radio Jamming. Please contact your alarm company if this indication persists.
Flashing slowly: A system fault is in memory, on set indicated on LED 2 and requires a reset.
Off: No system fault.
4- LED indicator (tamper alarm)
On: A tamper alarm is occurring on set indicated on LED 2.
Flashing slowly: A tamper alarm is in memory, on set indicated on LED 2 and requires a reset.
Off: No tamper alarm.
5- LED indicator (intruder alarm) On: An intruder alarm is occurring or a detector is triggered on set indicated on LED 2.
This includes open door-contact, movement detection or smoke detection.
Flashing slowly: An intruder alarm is in memory, on set indicated on LED 2 and requires a reset.
Flashing quickly: A confirmed alarm is in memory and requires a remote reset. Please call your monitoring station.
Off: No intruder alarm.

BASIC OPERATION.
8
E
N
G
L
I
S
H
Understanding the system tones
The siren is an effective deterrent due to its volume and very irritating tone. The system has a siren built into the control panel, an optional outdoor and/or indoor wireless siren can be added if required.
The panel siren emits an audible confirmation tone when arming and disarming the security system and a fire tone when a smoke detector is triggered. Volume levels can be adjusted by the installer.
TOTAL SET ARMING
Sequence of 3 modulated sounds.
Duration: 4 seconds
When arming total set, confirms that the control panel has received a valid code or TAG and is preparing to arm total set.
PARTIAL SET ARMING
ANNEX SET ARMING
Sequence of 2 modulated sounds.
Duration: 2,5 seconds
When arming the partial set, confirms that the control panel has received a valid code or TAG and is preparing to arm partial set.
EXIT DELAY
Upon arming...
one beep per second.
Total set arming: beeps continue until final exit door is closed.
Partial set arming: beeps continue for 30 seconds until partial set is armed.
ARMING COMPLETE
After closing the final door.
Three fast beeps
When closing the final exit door, confirms that the system is armed.
ENTRY DELAY
Upon entry...
one beep per second
This entry tone lasts for 30 seconds after you open the entry door. You should disarm your system within this time.
DISARMING
Long and continuous beep
Duration: 2,5 seconds
When Disarming, confirms that the control panel has been successfully disarmed.
FAULT 2 times 7 fast beeps.
This signal indicates a fault in the system.
ALERT
4 beeps upon alert...
sent via the keypad
Confirms the transmission of an alert to the alarm company.

BASIC OPERATION.
9
E
N
G
L
I
S
H
Arming the system
You can arm the system using one of these devices:
The TCU or CSK keypads with code or with a TAG
Note: Although you can use a code number or a TAG to access the alarm system, we recommend you use a TAG as the primary method.
The TCB keyfob.
To arm the system using the TCU or CSK keypad:
Note: When using the TCU keypad, make sure it is in its holder before arming the Total set.
1. Press or , and then:
or Enter your 4 to 6-digit user code (provided by your installer).
Note: Depending on the configuration of your keypad, you may be able to arm your system without the identification process.
The start of the arming process is signalled by a series of keypad beeps (and by the siren, if set up).
TCU keypad: The screen counts down the exit time remaining and the Total or Part set arming light comes on to confirm arming.
2. If a fault is diagnosed on arming:
TCU keypad: a message is displayed. Press to override the fault and
continue the arming process, or press to cancel arming and diagnose the fault
CSK keypad: a fault tone is emitted. If a perimeter fault is signalled, disarm the system and investigate.
3. If you selected Total set arming, exit your property and close the final door.
Arming is completed at the end of the arming delay.
At the end of the arming delay, the or icon is displayed on the TCU keypad screen to confirm that the system is armed. The arming light goes out and the screen clears after a few seconds.

BASIC OPERATION.
10
E
N
G
L
I
S
H
To arm the system using the TCB keyfob:
Caution: Arming is immediate when using a keyfob. Only arm the system when you are outside the area to be protected.
1. Press a Total set or a Part set button. The panel emits the arming tone.
The associated LED lights during arming and remains lit for 3 seconds to confirm the system is armed. If a fault is diagnosed the disarm LED lights continuously.
2. If a door or window equipped with contacts is left open, the system cannot be armed. Close all doors and windows, and then try again.
Total set arm
Partial set arm
To arm the Annex set using the TCU keypad:
Note: You can only do this from the main menu.
1. Press to select the user menu, and then press
or until ANNEX SET is highlighted.
2. Press . The USER ACCESS screen is displayed.
3. Present your TAG or enter your your 4 to 6-digit user code.
The arming process is signalled by a series of beeps and the system counts down from 60 seconds.
The icon is displayed when the Annex set is armed.
To arm the Annex set using the CSK keypad or TCB keyfob:
Press one of these key combinations:
CSK keypad: Press and together.
TCB keyfob: Press and together.

BASIC OPERATION.
11
E
N
G
L
I
S
H
Disarming the system
If an alarm is accidentally triggered, disarm the system to stop the sirens.
Note: Disarming the system will also stop the sirens if an alarm is triggered. Stopping the siren does not interrupt the transmission of the alarm to the alarm receiving company (ARC).
To enable you to get to the keypad without triggering an alarm, an entry delay of at least 30 seconds is programmed by your installer.
You can disarm the system using one of these devices:
A keypad with code or TAG
Note: Although you can use a code number or a TAG to access the alarm system, we recommend you use a TAG as the primary method.
A keyfob
To disarm using the TCU or the CSK keypad:
or Enter your 4 to 6-digit user code (provided by your installer)
Both keypads: the disarming tone is emitted by the keypad and by the panel siren (if set up).
CSK keypad: a green LED confirms that the code is valid.
Note: Depending on the configuration of your keypad, the Total set or the entire system is disarmed. In the latter case, the Annex set might need to be re-armed.
To disarm using the TCB keyfob:
To disarm the Total and/or the Partial set, press the disarm button . The panel emits a long tone.
The associated LED lights during disarming and remains lit for 3 seconds to confirm the instruction.
To disarm the Annex set using the TCB keyfob:
To disarm, press and together.

BASIC OPERATION.
12
E
N
G
L
I
S
H
Duress code
If you are forced to disarm your security system under duress, enter your duress code using a keypad. Your duress code is your access code with the last digit incremented by 1, for example 1234 becomes 1235, and 6789 becomes 6780.
The system will disarm as normal, however a silent alert signal is transmitted to your alarm receiving centre.
Sending an SOS
You can send an instant personal attack alarm whenever you feel threatened while at home, even when your system is not armed.
To send an SOS:
Note: you can send an SOS using the TCU or CSK keypads or the TCB keyfob.
Press the SOS buttons together.
An alarm is sent to the alarm company
The siren is triggered (depending on your system configuration)
Examples
+
+
Resetting the system after an alarm
Caution: Stopping the siren does not interrupt the transmission of the alarm to the alarm company.
If the LEDs flash slowly on your control panel, an alarm has occurred. When an alarm is in the memory, the system cannot be armed until it has been reset.
To reset the system using the TCU or CSK keypad:
or Enter your 4 to 6-digit user code (provided by your installer)
If there is more than one alarm in the memory, repeat this operation for each alarm until all LEDs are off.
If the right-hand LED is flashing quickly on your alarm panel, a confirmed alarm has occurred and you will need to call your alarm company to perform a reset. Until then you will not be able to arm the system.

BASIC OPERATION.
13
E
N
G
L
I
S
H
To reset the system using the TCB keyfob
1. On the keyfob, press the disarm button .
All three lights will blink slowly. The system does not reset in order to avoid beeps that could attract the attention of an intruder.
2. Press the disarm button once more to confirm disarming.
The associated light will blink rapidly while communicating with the panel, then light for 3 seconds to confirm that disarming is successful.
3. If the right-hand LED is flashing quickly on your alarm panel, a confirmed alarm has occurred and you will need to call your alarm company to perform a reset. Until then you will not be able to arm the system.
Incorrect code or invalid TAG
After five attempts to enter an incorrect code or use an invalid TAG, the keypad locks out all users for 5 minutes.
Setting preferences (TCU keypad)
Using the preferences menu you can change any of the following:
Preference Settings
SILENT MODE ACTIVE – No beeps on the panel
INACTIVE – Beeps on the panel are active
PART SET ONLY – Beeps are not active when the Part set is armed
CHIMES ENABLED
DISABLED
SHORTCUT Set the main menu item to be highlighted when is initially pressed
LANGUAGE Set the display language for the TCU keyboard
To set a preference:
1. On the TCU keypad, press to select the user menu,
and then press until PREFERENCES is highlighted.
2. Press . The preferences submenu is displayed.
3. Highlight the preference you want to change, and then press .
4. Press or to change the setting, and then
press . The example shows the Silent Mode preference screen.
After a few seconds the preferences submenu is displayed again.
BASIC OPERATION.
14
E
N
G
L
I
S
H
Checking the alarm status
To check the alarm status using the TCU keypad:
1. On the TCU keypad, press .
You may be asked to present your TAG or enter your access code. The following information is displayed on the screen:
The current active icons (whether blinking or steady).
The current arming status.
The fault status.
2. Do one of the following:
If there is an alarm message, investigate and remove the source of the fault.
If there is a memo message, follow the instructions on the screen to clear the memorised fault and reset the system.
To check the alarm status using the TCB keyfob:
On the keyfob, press the control button for 1 second.
All three LEDs will light several times in succession; the LED for the current arming status will remain lit for 3 seconds.

ADVANCED OPERATION.
15
E
N
G
L
I
S
H
Assigning codes and TAGs
Assigning a unique code or TAG to each user enables the date and time that each user operates the alarm system to be recorded.
Note: A master TAG is required to modify other users' codes and TAGs, and to authorise the alarm company to access the system for maintenance.
Add and modify codes
You can add codes or modify existing codes. All new codes must be at least 2 figures higher than any existing codes. For example, if a code for an existing user is 2345, the next code you allocate must be 2347 or higher.
To modify or add a code using the TCU keypad:
1. On the TCU keypad, press to select the user
menu, and then press until USERS is highlighted.
2. Press . The USERS submenu is displayed.
3. Press . The Present TAG or Enter Code screen is displayed.
4. Place your master TAG close to the keypad TAG reader, or enter your master code. The CODES submenu is displayed.
5. Press to highlight the user to be changed,
and then press .
6. Type a code number, and then press .
The ALLOWED? message is displayed.
7. Press to authorise the code, or press to cancel.
The USERS submenu is displayed, then after a few seconds the screen goes blank.

ADVANCED OPERATION.
16
E
N
G
L
I
S
H
To modify or add a code using the CSK keypad:
1. On the CSK keypad, press and simultaneously. The red light will flash slowly.
2. Enter the master code or present the master TAG (NB: User 1 is always the master).
3. Select and enter a single-digit user ID (0 to 9).
4. Enter the new code for this user. A double beep on the keypad will confirm acceptance of the new code.
5. Re-enter the new code to confirm. A double beep on the keypad will confirm acceptance of the new code.
6. Exit the programming mode by pressing .
Assign, change and disable TAGs
This function allows you to assign individual TAGs to each user.
Note: When a new TAG is assigned to a user, it overwrites the existing tag.
To assign or change a TAG using the TCU keypad:
1. On the TCU keypad, press to select the user
menu, and then press until USERS is highlighted.
2. Press , press , and then press again. The TAGS submenu is displayed.
3. Press . The Present TAG or Enter Code screen is displayed.
4. Place your master TAG close to the keypad TAG reader, or enter your master code. The TAGS submenu is displayed.
5. Press to highlight the user to be changed.
6. Press to display the TAG ALLOWED? message.

ADVANCED OPERATION.
17
E
N
G
L
I
S
H
7. Press to display the PRESENT TAG message.
8. Place your TAG close to the keypad TAG reader.
The ACCEPT NEW TAG? message is displayed.
9. Press to accept the new TAG.
The TAG is now registered and can be used to arm and disarm the system.
To disable a TAG using the TCU keypad:
1. Follow steps 1 to 6 described above.
2. Press to disable the user's TAG.
Notice that there is now a strikethrough line on the user's name.
To assign or change a TAG using the CSK keypad:
1. Select and enter an existing or new single digit user ID (0-9).
(User 1 is always the master).
2. Present the new key TAG.
A double beep on the keypad will confirm that the new TAG is programmed and has replaced the previous TAG if any.
3. Press the off key to exit programming.
Device remote control
This function allows you to control remote devices.
Note: This function requires an optional X10 extension with X10 receivers. Your installer will advise you on the different options for controlling appliances depending on your needs.
To control a remote device using the TCU keypad:
1. On the TCU keypad, press to select the user
menu, and then press or until TOOLS is highlighted.
2. Press . The TOOLS submenu is displayed. Ensure REMOTE PLUGS is highlighted.

ADVANCED OPERATION.
18
E
N
G
L
I
S
H
3. Press . The Present TAG or Enter Code screen
is displayed.
4. Place your TAG close to the keypad TAG reader, or enter your user code.
5. Press or to select the device you wish to
modify, and then press .
6. Press or to select ON or OFF for the device,
and then press .
To control a remote device using the TCB keyfob:
If this has been configured by the installer, you can control up to 4 household appliances, the default is 2.
The Control button controls the first appliance (receiver 1).
The 3 lights blink until the request has been accepted by the system, and then remain lit for 3 seconds.
The Control and Partial Arm
buttons control the next appliance (receiver 2).
Lights 1 and 2 blink until the request has been accepted by the system and then remain lit for 3 seconds.
Manually bypass detectors (TCU keypad)
This function allows you to temporarily bypass one or more detectors.
Bypassed detectors are returned to normal operation the next time the alarm system is disarmed.
To bypass a detector using the TCU keypad:
1. On the TCU, press to select the user menu, and
then press or until TOOLS is highlighted.
2. Press . The TOOLS submenu is displayed.
3. Press to highlight BYPASS DETECTOR, and
then press .

ADVANCED OPERATION.
19
E
N
G
L
I
S
H
The Present TAG or Enter Code screen is displayed.
4. Place your TAG close to the keypad TAG reader, or enter your user code.
5. Press or to select the detector you wish
to bypass, and then press .
6. Press or to select INACTIVE, and then
press .
Bypassed detectors are displayed with their names struck through. The icon blinks to tell you that one or more detectors are bypassed.
Cancelling operator access (TCU keypad)
This function allows the master user to disable the operator's maintenance access to the system.
To cancel operator access using the TCU keypad:
1. On the TCU keypad, press to select the user
menu, and then press or until TOOLS is highlighted.
2. Press . The TOOLS submenu is displayed.
3. Press to highlight OPERATOR ACCESS, and
then press .
The Present TAG or Enter Code screen is displayed.
4. Place your TAG close to the keypad TAG reader, or enter your user code.
5. Press or to select the detector you wish to
bypass, and then press .
6. Press or to select NOT ALLOWED, and
then press .

ADVANCED OPERATION.
20
E
N
G
L
I
S
H
Adjusting the beep level (CSK keypad)
To adjust the beep level on the CSK keypad:
1. Press .
2. Press .
3. Enter a beep level from 1 to 7.
A double beep on the keypad will confirm the change.
Changing batteries
The battery in all wireless devices in the alarm system, with the exception of the panel battery, needs to be changed on a regular basis.
Caution: Except for the TCU keypad and the TCB keyfob, batteries should only be changed by an approved installer.
Agree a battery change regime with your installer.
Changing the batteries in the TCU keypad
A blinking battery indicator light informs you that the TCU keypad battery needs to be replaced.
WARNING: THERE IS A RISK OF EXPLOSION IF INCORRECT BATTERIES ARE USED. REPLACE ONLY WITH A BATTERY OF THE SAME OR AN EQUIVALENT TYPE RECOMMENDED BY THE MANUFACTURER.
Note: Dispose of batteries in accordance with the regulations in force in your area.
To change the battery on the TCU keypad:
1. Remove the keypad from its base.
2. Remove the battery cover by inserting a screwdriver into the slot at the base of the cover, and then lever upwards.
3. Fit a new battery, observing the correct polarity.
4. Refit the cover, and return the keypad to its base.
Changing the batteries in the CSK keypad
The batteries in the CSK keypad should be changed only by an approved installer.

ADVANCED OPERATION.
21
E
N
G
L
I
S
H
Changing the batteries in the TCB keyfob
WARNING: THERE IS A RISK OF EXPLOSION IF THE CORRECT BATTERY IS NOT USED. REPLACE ONLY WITH BATTERY TYPE CR2032 (PANASONIC OR GP).
When the battery starts to run down, the LEDs will start to fade gradually.
1. To access the battery compartment, Insert a small screwdriver into the space in the back of the casing, as shown in the illustration. Push with the screwdriver while levering upwards until the front of the casing releases.
2. Use the screwdriver to push the old battery gently out of its housing.
3. Insert the new battery.
4. To close the casing, insert the lower part of the front into the rear casing, then slide the upper portion into place and press firmly until it clicks.
How to control your system by phone
Control of your system via the phone is only possible from a multi-frequency (tone dialling) or cellular phones. This function must be configured by the installer.
Remote control is authorised only after you have entered a valid code.
The control panel receives your call after the number of rings configured by the installer or after it has been called twice in succession.
Remote access to your security system
1. Dial the phone number of your security system.
2. A two-second beep is emitted, followed by the “Arpeggio” invitation tune.
3. Enter your secret code within 30 seconds.
A high-pitched beep confirms that the code is valid. You are then connected to your security system.

ADVANCED OPERATION.
22
E
N
G
L
I
S
H
Remote arming
You can arm a set over the phone if the system has not been programmed to arm once the final door is closed.
1. Press keys *, 2, 1 for total set arming.
2. Press keys *, 2, 2 for partial set arming.
3. Press keys *, 2, 3 for annex set arming.
Arming is confirmed as soon as you hear a tune.
Remote control of electrical equipment:
Note: This function requires an optional X10 extension and X10 receivers.
You can activate/deactivate up to 12 electrical appliances (lights, etc.) from a distance using a telephone.
1. Key in plus the number of the appliance (101 to 112) using the keypad.
One short beep informs you that your appliance is active.
Two beeps inform you that your appliance is not active.
2. To turn ON an appliance, press 1.
3. To turn OFF an appliance, press 0.
Terminating the communication:
1. To terminate the communication, press and on your telephone.
Your security system will terminate the call.
Maintenance and recommendations
Check your system (once a month or according to your operator’s specifications).
Avoid shocks to all the components, and especially avoid dropping keyfobs.
Do not immerse components in water.
Do not use detergents to clean the components. Use a damp cloth only.
Keep components in a clean, dry place at room temperature.
Dispose of old batteries in containers provided for this purpose.
Avoid prolonged exposure to siren emissions.
Do not hide motion detectors behind curtains, furniture, etc.
Do not paint or paper the components.
Do not try to open or move the components; they are tamper-protected and some of them may cause electric shocks.

23
E
S
P
A
Ñ
O
L
Contenido
Lo felicitamos por haber comprado el sistema de seguridad Honeywell Domonial.
Para sacar el mejor partido de este sistema, le aconsejamos que lea este manual con suma atención.
Este sistema de seguridad está diseñado para funcionar en una frecuencia de radio autorizada que no presenta ningún peligro para el usuario.
OPERACIONES BÁSICAS
Introducción ......................................................................... 25
Activación del sistema ........................................................ 31
Desactivación del sistema .................................................. 33
Código de coerción.............................................................. 34
Enviar un mensaje SOS ....................................................... 34
Reiniciar el sistema tras una alarma .................................. 34
Código incorrecto o tarjeta TAG no válidos ...................... 35
Preferencias de configuración (teclado de la TCU) .......... 35
Comprobación del estado de la alarma ............................. 36

24
E
S
P
A
Ñ
O
L
Contenido
OPERACIONES AVANZADAS
Asignar códigos y tarjetas TAG .......................................... 37
Control remoto de dispositivos .......................................... 39
Invalidar detectores de forma manual (teclado de la TCU) .............................................................. 40
Cancelar el acceso del operador (teclado de la TCU) ....... 41
Ajustar el volumen del pitido (teclado del CSK) ............... 41
Cambiar las baterías ............................................................ 42
Controlar el sistema a través del teléfono ......................... 43
Mantenimiento y recomendaciones ................................... 44

OPERACIONES BÁSICAS.
25
E
S
P
A
Ñ
O
L
Introducción
En este manual se describe cómo utilizar el sistema de alarma Domonial y los pasos a seguir en caso de que se dispare una alarma. El manual se articula en torno a las tareas y se divide en dos secciones que cubren las operaciones básicas y las avanzadas.
Entre las operaciones básicas se incluyen la activación y desactivación del sistema de alarma y, en caso no realizar nunca estas tareas, no será necesario leer las primeras páginas del manual.
Sin embargo, si desea asignar tarjetas TAG o códigos a los usuarios, o bien detectores de derivación, consulte la parte dedicada a las operaciones avanzadas del manual.
Al objeto de mantener el buen estado del sistema de alarma Domonial, lea la sección Mantenimiento y recomendaciones al final del manual.
El sistema se compone de un panel de control para montaje mural, varios detectores y sensores que se acoplan durante la instalación, y además incluye uno o más de los siguientes dispositivos para la activación y desactivación, así como para la configuración del sistema:
Teclado de la TCU
Teclado del CSK Llave electrónica del TCB
Tarjeta (TAG)
Teclados inalámbricos
El instalador le suministrará una tarjeta TAG de usuario principal y un código maestro de 4 a 6 dígitos para su uso con el teclado. Los necesitará para modificar otros códigos y tarjetas TAG de usuarios, así como para otras funciones de usuario más avanzadas.
Ambos teclados inalámbricos se pueden utilizar para activar y desactivar el sistema de seguridad, mediante el uso de un código de acceso o tarjeta (TAG) válidos.
Teclado del CSK
Es un teclado de montaje mural cuyo fin primordial es la activación y desactivación del sistema. Pese a que no dispone de pantalla se puede utilizar para algunas operaciones avanzadas.
OPERACIONES BÁSICAS.
26
E
S
P
A
Ñ
O
L
Teclado de la TCU
Este teclado se puede retirar del soporte que se ha montado en la pared para que resulte más cómodo de usar. Sin embargo, se debe volver a colocar en el soporte para activar el sistema completamente.
Todas las operaciones se pueden realizar mediante el teclado de la TCU.
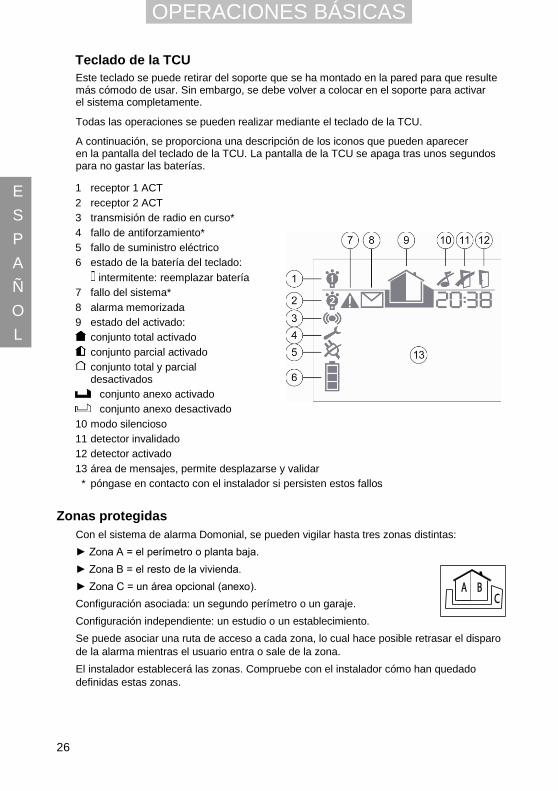
A continuación, se proporciona una descripción de los iconos que pueden aparecer en la pantalla del teclado de la TCU. La pantalla de la TCU se apaga tras unos segundos para no gastar las baterías.
1 receptor 1 ACT
2 receptor 2 ACT
3 transmisión de radio en curso*
4 fallo de antiforzamiento*
5 fallo de suministro eléctrico
6 estado de la batería del teclado:
intermitente: reemplazar batería
7 fallo del sistema*
8 alarma memorizada
9 estado del activado:
conjunto total activado
conjunto parcial activado
conjunto total y parcial desactivados
conjunto anexo activado
conjunto anexo desactivado
10 modo silencioso
11 detector invalidado
12 detector activado
13 área de mensajes, permite desplazarse y validar
* póngase en contacto con el instalador si persisten estos fallos
Zonas protegidas
Con el sistema de alarma Domonial, se pueden vigilar hasta tres zonas distintas:
► Zona A = el perímetro o planta baja.
► Zona B = el resto de la vivienda.
► Zona C = un área opcional (anexo).
Configuración asociada: un segundo perímetro o un garaje.
Configuración independiente: un estudio o un establecimiento.
Se puede asociar una ruta de acceso a cada zona, lo cual hace posible retrasar el disparo
de la alarma mientras el usuario entra o sale de la zona.
El instalador establecerá las zonas. Compruebe con el instalador cómo han quedado
definidas estas zonas.

OPERACIONES BÁSICAS.
27
E
S
P
A
Ñ
O
L
Se pueden activar los siguientes modos de vigilancia:
► Vigilancia del área principal (conjunto total) = las áreas A + B (o áreas A + B + C, en función de la configuración del sistema) están protegidas; usted no se encuentra en la zona.
► Vigilancia parcial (conjunto parcial) = sólo está protegida el área A; usted se encuentra en la zona.
► Opcional: vigilancia del anexo (conjunto anexo) = sólo está protegida el área C; usted se encuentra en la zona.
Utilice la activación del conjunto total ( ) cuando no esté en la vivienda.
Utilice la activación del conjunto parcial ( ) cuando se encuentre en la vivienda y desee activar solamente la vigilancia de puertas y ventanas.
Sensores
Hay diversos tipos de sensor que se pueden utilizar con el sistema Domonial. El instalador ha seleccionado los sensores que se ajustan a sus requisitos.
Detectores de intrusos
Los detectores de intrusos se utilizan para detectar un acceso no deseado a las instalaciones protegidas. Existen dos categorías principales de detectores de intrusos, perimétricos y volumétricos.
Detectores perimétricos
Los sensores perimétricos detectan intrusos en los posibles puntos de acceso, como puertas y ventanas. Se dispara una alarma en el momento en que se produce una intrusión. Los sensores perimétricos pueden ser de los tipos siguientes:
Los detectores de contacto detectan cuando se abre una puerta o ventana, al romperse el contacto. Se colocan en los posibles puntos de acceso clave de la instalación.
Los detectores de impactos detectan golpes, como cuando un intruso fuerza una puerta o ventana para poder entrar. Proporcionan una seguridad más avanzada y pueden detectar un intento de intrusión antes de que se llegue a abrir la puerta o ventana.
Los sensores de rotura de cristal detectan la frecuencia del sonido que produce el cristal cuando se rompe. Son la solución idónea para proteger zonas amplias acristaladas que no se encuentran protegidas por persianas o cortinas.

OPERACIONES BÁSICAS.
28
E
S
P
A
Ñ
O
L
Sensores volumétricos
Los sensores volumétricos detectan el movimiento en el área protegida. El movimiento de un intruso dentro de un área protegida desencadenará la alarma. Los sensores volumétricos pueden ser de los tipos siguientes:
Los sensores infrarrojos detectan el calor que genera una persona dentro del campo de visión de un detector y desencadenan una alarma. Dado que las mascotas también generan calor, se han diseñado sensores PIR inmunes a mascotas para evitar que éstas provoquen que se desencadene una alarma y son la solución idónea para las aplicaciones residenciales.
Los sensores de tecnología dual son sensores de gran seguridad que permiten una detección más rápida en instalaciones de alto riesgo.
Los sensores infrarrojos con verificación de imagen se han diseñado para su uso en aplicaciones supervisadas. El sensor de imagen que se incluye en el detector almacenará la imagen del objeto detectado para poder supervisar la estación con el fin de validar inmediatamente la alarma y aportar una respuesta más rápida a la misma. También resulta útil permitir que la estación de supervisión identifique alarmas falsas que pueda generar, por ejemplo, una persiana que no se ha cerrado adecuadamente.
Sensores para seguridad
Los sensores de humo. Disparan inmediatamente una alarma local al detectar humo para avisar a los inquilinos; la estación de supervisión también recibe la información de forma que pueda solicitar ayuda a los servicios contra incendios y de rescate.
Sensores de inundación y de temperatura. Lo sensores de inundación se pueden utilizar para detectar fugas de agua cuando se colocan en un baño o cerca de una lavadora, por ejemplo. Cuando un sensor de inundación se desencadena, la información se envía a la estación de supervisión de forma que se pueda avisar a los inquilinos antes de que se produzca un daño grave. Los sensores de temperatura se pueden utilizar para detectar problemas por temperaturas altas o bajas, como congelación o una temperatura muy elevada en una nevera o congelador. Cuando un sensor de temperatura se desencadena, la información se envía a la estación de supervisión de forma que se pueda avisar a los inquilinos antes de que se produzca un daño grave.

OPERACIONES BÁSICAS.
29
E
S
P
A
Ñ
O
L
Indicadores luminosos
La cubierta frontal del panel de control incorpora indicadores LED que muestran el estado del sistema de seguridad.
Los indicadores 2, 3, 4 y 5 muestran los fallos, que se están produciendo o que están en la memoria para un conjunto de cada vez. Los indicadores sólo se pueden activar cuando el sistema no se ha configurado y durante las fases de activación y desactivación. Cuando el sistema está configurado, los indicadores luminosos se apagan una vez han transcurrido algunos segundos.
Indicador LED 1 (sistema activado)
ACT.: se ha activado el conjunto total.
Parpadeo lento: se ha activado el conjunto parcial.
Parpadeo rápido: se ha activado el anexo.
DES.: el sistema está desactivado.
Indicador LED 2 (conjunto asociado al fallo)
ACT.: los fallos que se indican los LED 3, 4 y 5 corresponden al conjunto total.
Parpadeo lento: los fallos que se indican con los LED 3, 4 y 5 corresponden al conjunto parcial.
Parpadeo rápido: los fallos que se indican con los LED 3, 4 y 5 corresponden al conjunto anexo.
DES.: los fallos que se indican con los LED 3, 4 y 5 corresponden al sistema total.
Indicador LED 3 (fallo del sistema) ACT.: se produce un fallo del sistema en el conjunto que indica el LED 2.
Entre los fallos del sistema se incluyen los fallos de la batería o del suministro eléctrico, los fallos de supervisón, la interrupción de la línea de teléfono o las interferencias radiofónicas. Póngase en contacto con la empresa de la alarmas si persiste esta indicación.
Parpadeo lento: hay un fallo del sistema en la memoria o en el conjunto que se indica en el LED 2 y se debe reiniciar el sistema.
DES.: no hay fallo del sistema.
Indicador LED 4 (alarma antiforzamiento)
ACT.: se está produciendo una alarma antiforzamiento en el conjunto que indica el LED 2.
Parpadeo lento: hay una alarma antiforzamiento en la memoria o en el conjunto que se indica en el LED 2 y requiere reiniciar el sistema.
DES.: no hay alarma antiforzamiento.

OPERACIONES BÁSICAS.
30
E
S
P
A
Ñ
O
L
Indicador LED 5 (alarma de intrusos) ACT.: Se está produciendo una alarma de intrusos o se ha desencadenado un detector en el conjunto que se indica en el LED 2.
Esto incluye abrir el contacto de una puerta, detección de movimiento o detección de humo.
Parpadeo lento: hay una alarma de intrusos en la memoria o en el conjunto que se indica en el LED 2 y requiere reiniciar el sistema.
Parpadeo rápido: hay una alarma confirmada en memoria y se requiere reinicio remoto. Llame a la estación de supervisión.
DES.: no hay alarmas de intrusos.
Descripción de los tonos del sistema
La sirena es un elemento disuasorio muy eficaz por su volumen y tono muy molesto. El sistema incorpora una sirena integrada en el panel de control; además se puede añadir de forma opcional y si fuera necesario una sirena inalámbrica externa y/o interna.
La sirena del panel emite un tono de confirmación audible cuando se activa y desactiva el sistema de seguridad y un tono para los casos de incendio cuando se desencadena un detector de humo. El instalador puede ajustar los niveles de volumen.
ACTIVACIÓN DEL CONJUNTO TOTAL
Secuencia de 3 sonidos modulados.
Duración: 4 segundos.
Cuando se realiza la activación del conjunto total, confirma que el panel de control ha recibido un código válido o que se ha utilizado la tarjeta TAG apropiada y se está preparando para activar el conjunto total.
ACTIVACIÓN DEL CONJUNTO PARCIAL
ACTIVACIÓN DEL CONJUNTO ANEXO
Secuencia de 2 sonidos modulados.
Duración: 2,5 segundos.
Cuando se realiza la activación del conjunto parcial, confirma que el panel de control ha recibido un código válido o se ha utilizado la tarjeta TAG apropiada y se está preparando para activar el conjunto parcial.
RETARDO SALIDA
En el momento de la activación…
un pitido por segundo.
Activación del conjunto total: el pitido se alarga hasta que se cierra la última puerta de salida.
Activación del conjunto parcial: el pitido se alarga durante 30 segundos* hasta que se haya activado el conjunto parcial.
ACTIVACIÓN COMPLETA
Después de cerrar la última puerta.
Tres pitidos rápidos.
Cuando se cierra la última puerta, confirma que el sistema está activado.

OPERACIONES BÁSICAS.
31
E
S
P
A
Ñ
O
L
RETARDO ENTRADA
Cuando se entra…
un pitido por segundo.
Este tono de entrada se alarga durante 30 segundos* tras abrir la puerta de entrada. En este periodo se debe desactivar el sistema.
DESACTIVACIÓN
Pitido largo y continuo.
Duración: 2,5 segundos.
Cuando se realiza la desactivación, confirma que el panel de control se ha desactivado correctamente.
FALLO 7 pitidos rápidos 2 veces.
Esta señal indica un fallo en el sistema.
ALERTA
4 pitidos cuando se produce la alerta…
se envía a través del teclado.
Confirma la transmisión de una alerta a la empresa de alarmas.
Activación del sistema
Puede activar el sistema mediante uno de estos dispositivos:
Los teclados de la TCU o del CSK con un código o con una tarjeta TAG.
Nota: pese a que se puede utilizar un número de código o una tarjeta TAG para acceder al sistema de alarma, recomendamos que utilice una tarjeta TAG como método inicial.
La llave electrónica del TCB.
Para activar el sistema con los teclados de la TCU o del CSK:
Nota: cuando se utiliza el teclado de la TCU, asegúrese de que se encuentra en su soporte antes de activar el conjunto total.
1. Pulse o y, a continuación:
o bien Introduzca el código de usuario de 4 a 6 dígitos que le proporcionó el instalador.
Nota: en función de la configuración del teclado, podrá activar el sistema sin llevar a cabo el proceso de identificación.
El inicio del proceso de activación se indica a través de una serie de pitidos del teclado (y por la sirena, si se configura).

OPERACIONES BÁSICAS.
32
E
S
P
A
Ñ
O
L
Teclado de la TCU: en la pantalla aparece la cuenta atrás del tiempo para la salida restante y la luz de la activación del conjunto total o parcial se enciende para confirmar la activación.
2. Si un fallo se diagnostica en el momento de la activación:
Teclado de la TCU: se muestra un mensaje. Pulse para invalidar el fallo
y continuar con el proceso de activación o pulse para cancelar la activación y diagnosticar el fallo.
Teclado del CSK: se emite un tono de fallo. Si se indica un fallo de perímetro, desactive el sistema e investigue.
3. Si selecciona el activado del conjunto total, salga de su propiedad y cierre la última puerta.
El activado se habrá completado cuando finalice el retardo de activación.
Una vez haya finalizado el retardo de la activación, el icono o el icono se mostrarán en la pantalla del teclado de la TCU para confirmar que se ha activado el sistema. La luz de la activación se apaga y la pantalla se queda en blanco tras unos segundos.
Para activar el sistema con la llave electrónica del TCB:
Precaución: la activación será inmediata cuando se utilice la llave electrónica. Active el sistema únicamente cuando se encuentre fuera del área que se va a proteger.
1. Pulse un botón de conjunto total o parcial. El panel emite el tono de activación.
Durante la activación, el LED asociado se enciende y permanece encendido durante 3 segundos para confirmar que el sistema está activado. Si se diagnostica un fallo el LED de desactivación se enciende de forma continuada.
2. Si una puerta o una ventana con contactos se dejaran abiertas, no se podrá activar el sistema. Cierre todas las puertas y ventanas y vuelva a intentarlo.
Activación del conjunto total
Activación del conjunto parcial
Para activar el conjunto anexo con el teclado de la TCU:
Nota: sólo se puede realizar desde el menú principal.
1. Pulse para seleccionar el menú de usuario
y, a continuación, pulse o hasta que quede resaltado ANNEX SET.
2. Pulse . Se mostrará la pantalla ACCESO USUARIO.
3. Utilice la tarjeta TAG o escriba el código de usuario de 4 a 6 dígitos.
El proceso de activación se indica mediante una serie de pitidos y el sistema efectúa una cuenta atrás a partir de 60 segundos.
Aparece el icono cuando se activa el conjunto anexo.

OPERACIONES BÁSICAS.
33
E
S
P
A
Ñ
O
L
Para activar el conjunto anexo con el teclado del CSK o la llave electrónica del TCB:
Pulse una de las siguientes combinaciones de teclas:
Teclado del CSK: Pulse y a la vez.
Llave electrónica del TCB: Pulse y a la vez.
Desactivación del sistema Si una alarma se desencadena de forma accidental, desactive el sistema para parar las sirenas.
Nota: asimismo, al desactivar el sistema se detendrán las sirenas en caso de disparo de una alarma. Cuando se detiene una sirena no se interrumpe la transmisión de la alarma a la empresa de recepción de alarmas (ARC, del inglés alarma receiving company).
Para que pueda llegar al teclado sin desencadenar una alarma, el instalador ha programado un retardo de entrada de al menos 30 segundos.
Puede desactivar el sistema mediante uno de estos dispositivos:
Un teclado con código o tarjeta TAG.
Nota: pese a que se puede utilizar un número de código o una tarjeta TAG para acceder al sistema de alarma, recomendamos que utilice una tarjeta TAG como método inicial.
Una llave electrónica.
Para desactivar el sistema con los teclados de la TCU o del CSK:
o bien
Introduzca el código de usuario de 4 a 6 dígitos que le proporcionó el instalador.
Ambos teclados: el teclado y la sirena del panel emiten el tono de desactivación (si se ha configurado).
Teclado del CSK: un LED verde confirma que el código es válido.
Nota: en función de la configuración del teclado, se desactiva el conjunto total o el sistema completo. En este último caso, es posible que sea necesario volver a activar el conjunto anexo.
Para desactivar el sistema con la llave electrónica del TCB:
Para desactivar el conjunto total y/o parcial, pulse el botón de desactivado . El panel emite un tono largo.
Durante la desactivación, el LED asociado se enciende y permanece encendido durante 3 segundos para confirmar la instrucción.

OPERACIONES BÁSICAS.
34
E
S
P
A
Ñ
O
L
Para desactivar el conjunto anexo con la llave electrónica del TCB:
Para la desactivación, pulse y a la vez.
Código de coerción
Si se ve forzado a desconectar el sistema de seguridad bajo coerción, marque el código de coerción en el teclado. El código de coerción es su código de acceso, pero se suma 1 al último dígito, por ejemplo 1234 será 1235 y 6789 será 6780.
El sistema se desactivará con normalidad, sin embargo se transmitirá una alerta silenciosa al centro de recepción de alarmas.
Enviar un mensaje SOS
Puede enviar una alarma de ataque personal instantánea siempre que se sienta amenazado mientras esté en su casa, incluso si el sistema no está activado.
Para enviar un mensaje SOS:
Nota: puede enviar un mensaje SOS mediante los teclados de la TCU o del CSK o con la llave electrónica del TCB.
Pulse a la vez los botones SOS.
Se enviará una alarma a la empresa de alarmas.
La sirena se dispara (en función de la configuración del sistema).
Ejemplos
+
+
Reiniciar el sistema tras una alarma
Precaución: cuando se detiene una sirena no se interrumpe la transmisión de la alarma a la empresa de alarmas.
Si los LED parpadean lentamente en el panel de control, se habrá generado una alarma. Cuando haya una alarma en la memoria, el sistema no se puede activar hasta que se haya reiniciado.
Para reiniciar el sistema con los teclados de la TCU o del CSK:
o bien Introduzca el código de usuario de 4 a 6 dígitos que le proporcionó el instalador.
Si hay más de una alarma en la memoria, repita esta operación para cada alarma hasta que se apaguen los LED.

OPERACIONES BÁSICAS.
35
E
S
P
A
Ñ
O
L
Si el LED de la derecha está parpadeando rápidamente en el panel de alarmas, se habrá generado una alarma confirmada y será necesario que llame a la empresa de alarmas para reiniciar. Hasta entonces no podrá activar el sistema.
Para reiniciar el sistema con la llave electrónica del TCB:
1. En la llave electrónica, pulse el botón de desactivación .
Las tres luces parpadearán lentamente. El sistema no se reinicia al objeto de evitar pitidos que pudieran llamar la atención del intruso.
2. Pulse el botón de desactivación una vez más para confirmar la desactivación.
La luz asociada parpadeará rápidamente mientras dura la comunicación con el panel, después permanecerá encendida durante 3 segundos para confirmar que se ha desactivado correctamente.
3. Si el LED de la derecha está parpadeando rápidamente en el panel de alarmas, se habrá generado una alarma confirmada y será necesario que llame a la empresa de alarmas para reiniciar. Hasta entonces no podrá activar el sistema.
Código incorrecto o tarjeta TAG no válidos
Tras haber intentado cinco veces especificar un código incorrecto o utilizar una tarjeta TAG no válida, el teclado se bloquea a todos los usuarios durante 5 minutos.
Preferencias de configuración (teclado de la TCU)
Con el menú de preferencias, se puede modificar lo siguiente:
Preferencia Parámetros
MODO SILENCIOSO
ACTIVE: el panel no emite pitidos.
INACTIVE: se activan los pitidos del panel.
PART SET ONLY: no hay pitidos cuando esté activado el conjunto parcial.
CARRILLONES HABILITADOS.
DESHABILITADOS.
TECLAS RÁPIDAS
Establezca que el elemento del menú principal quede resaltado cuando se pulsa inicialmente.
IDIOMAS Establezca el idioma de visualización para el teclado de la TCU.
OPERACIONES BÁSICAS.
36
E
S
P
A
Ñ
O
L
Para establecer una preferencia:
1. En el teclado de la TCU, pulse para seleccionar
el menú de usuario y, a continuación, pulse hasta que quede resaltado PREFERENCES.
2. Pulse . Aparece el submenú de preferencias.
3. Resalte la preferencia que desee modificar y, a continuación, pulse .
4. Pulse o para cambiar la configuración
y, a continuación, pulse . El ejemplo muestra la pantalla de la preferencia Modo Silencioso.
Una vez transcurridos algunos segundos, el submenú de preferencias se volverá a mostrar.
Comprobación del estado de la alarma
Para comprobar el estado de la alarma con el teclado de la TCU:
1. En el teclado de la TCU, pulse .
Es posible que se le solicite que utilice la tarjeta TAG o que especifique el código de acceso. Se mostrará la siguiente información en pantalla.
Los iconos actualmente activos (ya estén parpadeando o no).
El estado de activación actual.
El estado de los fallos.
2. Realice uno de los siguientes procedimientos:
Si hay un mensaje de alarma, investigue y elimine la causa del fallo.
Si no hay un mensaje en memoria, siga las instrucciones en pantalla para borrar el fallo memorizado y reiniciar el sistema.
Para comprobar el estado de la alarma con la llave electrónica del TCB:
En la llave electrónica, pulse el botón de control durante un segundo.
Se iluminarán los tres LED varias veces seguidas; el LED del estado de activación actual permanecerá encendido durante 3 segundos.

OPERACIONES AVANZADAS.
37
E
S
P
A
Ñ
O
L
Asignar códigos y tarjetas TAG
Si se asigna un código o tarjeta TAG únicos a cada usuario, se puede registrar la fecha y hora en la que cada usuario utiliza el sistema de alarma.
Nota: es preciso utilizar una tarjeta TAG para modificar los códigos y tarjetas TAG de otros usuarios y para autorizar a la empresa de alarmas el acceso al sistema para su mantenimiento.
Agregar y modificar códigos
Puede agregar códigos o modificar los existentes. Todos los códigos nuevos deben ser al menos mayores en dos cifras que los códigos que se utilicen en esos momentos. Por ejemplo, si un código para un usuario actual es 2345, el siguiente código que asigne deberá ser 2347 o mayor.
Para modificar o agregar un código con el teclado de la TCU o del CSK:
1. En el teclado de la TCU, pulse para seleccionar
el menú de usuario y, a continuación, pulse hasta que quede resaltado USUARIO.
2. Pulse . Aparece el submenú USUARIO.
3. Pulse . Aparece la pantalla Presente el tag
o introduzca código.
4. Coloque su tarjeta TAG de usuario principal cerca del lector de tarjeta TAG del teclado o especifique el código maestro. Aparece el submenú CÓDIGOS.
5. Pulse para resaltar el usuario que desee modificar
y, a continuación, pulse .
6. Escriba el número del código y pulse .
Aparece el mensaje PERMITIDO?
7. Pulse para autorizar el código, o bien, pulse para cancelar.
Aparece el submenú USUARIO, posteriormente, tras unos segundos, se apagará la pantalla.

OPERACIONES AVANZADAS.
38
E
S
P
A
Ñ
O
L
Para modificar o agregar un código con el teclado del CSK:
1. En el teclado del CSK, pulse y a la vez. La luz roja parpadeará lentamente.
2. Escriba el código maestro o utilice la tarjeta TAG de usuario principal (nota: el usuario 1 es siempre el principal).
3. Seleccione y especifique un usuario con un ID de un solo dígito (0 al 9).
4. Escriba el código nuevo para este usuario. Un pitido doble en el teclado confirmará la aceptación del código nuevo.
5. Vuelva a especificar el código nuevo para confirmarlo. Un pitido doble en el teclado confirmará la aceptación del código nuevo.
6. Pulse para salir del modo de programación.
Asignar, modificar y deshabilitar tarjetas TAG
Con esta función, se pueden asignar tarjetas TAG individuales a cada usuario.
Nota: cuando se asigna una tarjeta TAG nueva a un usuario, se invalida la anterior.
Para asignar o modificar una tarjeta TAG con el teclado de la TCU:
1. En el teclado de la TCU, pulse para seleccionar
el menú de usuario y, a continuación, pulse hasta que quede resaltado USUARIO.
2. Pulse , y, a continuación, vuelva
apulsar . Aparece el submenú TAGS.
3. Pulse . Aparece la pantalla Presente el tag o introduzca código.
4. Coloque su tarjeta TAG de usuario principal cerca del lector de tarjeta TAG del teclado o especifique el código maestro. Aparece el submenú TAGS.
5. Pulse para resaltar el usuario que desee modificar.
6. Pulse para mostrar el mensaje TAG PERMITIDO?
7. Pulse para mostrar el mensaje PRESENTE TAG.

OPERACIONES AVANZADAS.
39
E
S
P
A
Ñ
O
L
8. Coloque su tarjeta TAG cerca del lector de tarjeta TAG del teclado.
Se mostrará el mensaje ACEPTAR NUEVO TAG?
9. Pulse para aceptar la nueva tarjeta TAG.
La tarjeta TAG quedará registrada y podrá utilizarse para activar y desactivar el sistema.
Para deshabilitar una tarjeta TAG con el teclado de la TCU:
1. Siga los pasos del 1 al 6 que se describen anteriormente.
2. Pulse para deshabilitar la tarjeta TAG del usuario.
Observe que ahora el nombre del usuario está tachado.
Para asignar o modificar una tarjeta TAG con el teclado del CSK:
1. Seleccione y especifique un ID de usuario de un solo dígito (0 al 9) nuevo o existente.
(El usuario 1 es siempre el principal).
2. Presente la nueva tarjeta TAG.
Un doble pitido en el teclado confirmará que se ha programado una tarjeta TAG nueva que sustituye a la anterior, en su caso.
3. Pulse la tecla de apagado para salir de la programación.
Control remoto de dispositivos
Esta función le permite controlar los dispositivos remotos.
Nota: para esta función, es preciso contar con una extensión X10 y con receptores X10. El instalador le informará sobre las distintas opciones de control de dispositivos en función de sus necesidades.
Para controlar un dispositivo remoto con el teclado de la TCU:
1. En el teclado de la TCU, pulse para seleccionar
el menú de usuario y, a continuación, pulse o hasta que quede resaltado TOOLS.
2. Pulse . Aparece el submenú TOOLS. Asegúrese de que EQUIPOS REMOTOS esté resaltado.
3. Pulse . Aparece la pantalla Presente el tag o introduzca código.

OPERACIONES AVANZADAS.
40
E
S
P
A
Ñ
O
L
4. Coloque su tarjeta TAG cerca del lector de tarjeta TAG del teclado o especifique el código de usuario.
5. Pulse o para seleccionar el dispositivo que
desee modificar y, a continuación pulse .
6. Pulse o para seleccionar ON u OFF para el dispositivo que desee modificar y, a continuación, pulse .
Para controlar un dispositivo remoto con la llave electrónica del TCB:
Si el instalador lo ha configurado, se pueden controlar hasta 4 dispositivos en la vivienda, el valor predeterminado es 2.
El botón de control controla el primer dispositivo (receptor 1).
Las 3 luces parpadean hasta que el sistema haya aceptado la solicitud y permanecen encendidas durante 3 segundos.
Los botones de control y de activado parcial controlan el siguiente dispositivo
(receptor 2).
Las luces 1 y 2 parpadean hasta que el sistema haya aceptado la solicitud y permanecen encendidas durante 3 segundos.
Invalidar detectores de forma manual (teclado de la TCU)
Con esta función, puede invalidar provisionalmente uno o más detectores.
Los detectores invalidados retoman su función normal la próxima vez que se desactive el sistema de alarma.
Para invalidar un detector con el teclado de la TCU:
1. En el teclado de la TCU, pulse para seleccionar el
menú de usuario y, a continuación, pulse o hasta que quede resaltado TOOLS.
2. Pulse . Aparece el submenú TOOLS.
3. Pulse para resaltar BYPASS DETECTOR y luego
pulse .
Aparece la pantalla Presente el tag o introduzca código.
4. Coloque su tarjeta TAG cerca del lector de tarjeta TAG del teclado o especifique el código de usuario.

OPERACIONES AVANZADAS.
41
E
S
P
A
Ñ
O
L
5. Pulse o para seleccionar el detector que desee
invalidar y, a continuación pulse .
6. Pulse o para seleccionar INACTIVE
y, a continuación, pulse .
El nombre de los detectores invalidados aparece tachado. El icono parpadea para indicar que se han invalidado uno o más detectores.
Cancelar el acceso del operador (teclado de la TCU)
Con esta función, el usuario principal puede deshabilitar el acceso por mantenimiento del operador al sistema.
Para cancelar el acceso del operador con el teclado de la TCU:
1. En el teclado de la TCU, pulse para seleccionar
el menú de usuario y, a continuación, pulse o
hasta que quede resaltado TOOLS.
2. Pulse . Aparece el submenú TOOLS.
3. Pulse para resaltar OPERATOR ACCESS y luego
pulse .
Aparece la pantalla Presente el tag o introduzca código.
4. Coloque su tarjeta TAG cerca del lector de tarjeta TAG del teclado o especifique el código de usuario.
5. Pulse o para seleccionar el detector que desee
invalidar y, a continuación, pulse .
6. Pulse o para seleccionar NO PERMITIDO y,
a continuación, pulse .
Ajustar el volumen del pitido (teclado del CSK)
Para ajustar el volumen del pitido en el teclado del CSK:
1. Pulse .
2. Pulse .
3. Introduzca un volumen de pitido comprendido entre 1 y 7.
Se oirá un pitido doble en el teclado que confirma el cambio.

OPERACIONES AVANZADAS.
42
E
S
P
A
Ñ
O
L
Cambiar las baterías
Las baterías de todos los dispositivos inalámbricos del sistema de alarma, salvo la batería del panel, deben cambiarse de forma regular.
Precaución: a excepción del teclado de la TCU y de la llave electrónica del TCB, únicamente los instaladores certificados deberían cambiar las baterías.
Póngase de acuerdo con el instalador para establecer un programa de cambio de baterías.
Cambiar las baterías en el teclado de la TCU
Una luz parpadeante de la batería indicará que la batería del teclado de la TCU debe cambiarse.
AVISO: EXISTE UN RIESGO DE EXPLOSIÓN SI SE UTILIZAN BATERÍAS NO ADECUADAS. UTILICE BATERÍAS DE SUSTITUCIÓN DEL MISMO TIPO O EQUIVALENTES QUE HAYA RECOMENDADO EL FABRICANTE.
Nota: tire las baterías de acuerdo con la normativa vigente de su zona.
Para cambiar la batería del teclado de la TCU:
1. Retire el teclado de su base.
2. Retire la tapa de la batería, para ello, inserte un destornillador en la ranura de la base de la tapa y después levántela.
3. Coloque una batería nueva, respete la polaridad correcta.
4. Vuelva a colocar la tapa y coloque de nuevo el teclado en su base.
Cambiar las baterías del teclado del CSK
Únicamente un instalador certificado debe cambiar las baterías del teclado del CSK.
Cambiar las baterías de la llave electrónica del TCB
AVISO: EXISTE UN RIESGO DE EXPLOSIÓN SI SE UTILIZA UN TIPO DE BATERÍA INADECUADO. UTILICE SOLAMENTE EL TIPO DE BATERÍA CR2032 (PANASONIC O GP).
Cuando la batería comience a agotarse, los LED irán perdiendo intensidad gradualmente.
1. Para acceder al compartimiento de la batería, inserte un destornillador pequeño en el espacio de la parte posterior de la carcasa, tal como se muestra en la ilustración. Empuje el destornillador mientras lo eleva hasta que se desprenda la parte frontal de la carcasa.
2. Utilice el destornillador para sacar con cuidado la batería usada de su sitio.

OPERACIONES AVANZADAS.
43
E
S
P
A
Ñ
O
L
3. Inserte la batería nueva.
4. Para cerrar la carcasa, inserte la parte inferior de la parte frontal en la carcasa posterior, después, deslice la porción superior en su sitio y presione fuerte hasta que se cierre con un “clic”.
Controlar el sistema a través del teléfono
El control del sistema a través del teléfono sólo es posible desde un teléfono de multifrecuencia (marcación por tonos) o móvil. Es preciso que el instalador configure esta función.
Se autorizará el control remoto únicamente tras especificar el código correcto.
El panel de control recibe la llamada tras el número de tonos de llamada que haya configurado el instalador o tras haberse cancelado dos veces seguidas.
Acceso remoto al sistema de seguridad
1. Marque el número de teléfono del sistema de seguridad.
2. Se emite un pitido durante dos segundos, seguido de la melodía de invitación “Arpeggio”.
3. Introduzca el código secreto en 30 segundos.
Un pitido agudo confirma que el código es válido. A partir de entonces, estará conectado al sistema de seguridad.
Activación remota
Puede activar un conjunto por teléfono si el sistema no se ha programado para que se active tras cerrar la última puerta.
1. Pulse la teclas *, 2, 1 para la activación del conjunto total.
2. Pulse la teclas *, 2, 2 para la activación del conjunto parcial.
3. Pulse la teclas *, 2, 3 para la activación del conjunto anexo.
La activación queda confirmada tan pronto como se reproduzca una melodía.

OPERACIONES AVANZADAS.
44
E
S
P
A
Ñ
O
L
Control remoto de equipos eléctricos
Nota: para esta función, es preciso contar con una extensión X10 y con receptores X10.
Puede activar o desactivar hasta 12 dispositivos eléctricos (luces, etc.) a distancia mediante un teléfono.
1. Pulse y el número del dispositivo (101 a 102) en el teclado.
Un pitido corto indica que el dispositivo está activo.
Dos pitidos indican que el dispositivo no está activo.
2. Para encender un dispositivo, pulse 1.
3. Para apagar un dispositivo, pulse 0.
Finalizar la comunicación
1. Para finalizar la comunicación, pulse y en el teléfono.
El sistema de seguridad habrá finalizado la llamada.
Mantenimiento y recomendaciones
Compruebe el sistema (una vez al mes según las especificaciones del operador).
Evite los golpes a todos los componentes y especialmente intente que no se le caigan las llaves electrónicas.
No sumerja los componentes en agua.
No utilice detergentes para limpiar los componentes. Use solamente un trapo húmedo.
Mantenga los componentes en un sitio limpio, seco y a temperatura ambiente.
Tire las baterías usadas en contenedores para tal fin.
Evite una exposición prolongada a las emisiones de la sirena.
No oculte los detectores de movimiento tras las cortinas, muebles, etc.
No pinte o forre los componentes.
No intente abrir o mover los componentes; están protegidos frente a forzamientos y algunos de ellos pueden generar descargas eléctricas.

45
I
T
A
L
I
A
N
O
Sommario
Vi ringraziamo di aver scelto questo sistema di sicurezza Honeywell Domonial.
Per usufruire di tutte le funzionalità del sistema, vi consigliamo di leggere attentamente il presente manuale.
Questo sistema di sicurezza funziona su una radiofrequenza autorizzata che non rappresenta nessun pericolo per l’utente.
OPERAZIONI DI BASE
Introduzione ......................................................................... 47
Inserimento del sistema ...................................................... 53
Disinserimento del sistema ................................................. 55
Codice di coercizione .......................................................... 56
Invio di un SOS .................................................................... 56
Ripristino del sistema dopo un allarme ............................. 56
Codice errato o TAG non valido ......................................... 57
Impostazione delle preferenze (tastiera TCU) ................... 57
Controllo dello stato di allarme .......................................... 58

46
I
T
A
L
I
A
N
O
Sommario
OPERAZIONI AVANZATE
Assegnazione di codici e TAG ............................................ 59
Controllo remoto dei dispositivi ......................................... 61
Esclusione manuale dei rilevatori (tastiera TCU) .............. 62
Annullamento dell’accesso operatore (tastiera TCU) ....... 63
Regolazione del livello dei segnali acustici (tastiera CSK) ....................................................................... 63
Sostituzione delle batterie ................................................... 64
Controllo del dispositivo dal telefono ................................ 65
Manutenzione e raccomandazioni ...................................... 66

OPERAZIONI DI BASE.
47
I
T
A
L
I
A
N
O
Introduzione
Il presente manuale descrive la modalità di funzionamento del sistema di allarme Domonial e i comportamenti da osservare in caso di allarme. È strutturato in base alle attività ed è diviso in due sezioni, che trattano le operazioni di base e le operazioni avanzate.
Le operazioni di base includono l’inserimento e il disinserimento del sistema di allarme: se si è interessati solo a queste operazioni, non occorre leggere oltre le prime pagine del presente manuale.
Tuttavia, per assegnare TAG o codici agli utenti o escludere i rilevatori, occorre leggere la parte del presente manuale dedicata alle operazioni avanzate.
Per mantenere in buone condizioni il sistema di allarme Domonial, leggere la sezione Manutenzione e raccomandazioni alla fine del presente manuale.
Il sistema comprende una centrale montata a parete, numerosi rilevatori e sensori montati in fase di installazione e uno o più dispositivi per inserire/disinserire e configurare il sistema:
Tastiera TCU Tastiera CSK Telecomando TCB Tag di identificazione (TAG)
Tastiere wireless
L’installatore fornirà un TAG master e un codice master a 4 o 6 cifre da usare con la tastiera. Questo consentirà di modificare i codici e i TAG degli altri utenti, e altre funzioni utente più avanzate.
Entrambe le tastiere wireless possono essere utilizzate per inserire e disinserire il sistema di sicurezza, utilizzando un codice di accesso o un tag di identificazione (TAG) validi.
Tastiera CSK
È una tastiera montata a parete, destinata principalmente all’inserimento e disinserimento del sistema. Benché sia sprovvista di schermo, può essere utilizzata per alcune operazioni avanzate.

OPERAZIONI DI BASE.
48
I
T
A
L
I
A
N
O
Tastiera TCU
Questa tastiera può essere rimossa dal relativo supporto montato a parete per un più
agevole utilizzo. Tuttavia, per inserire completamente il sistema, deve essere riposta
nel relativo supporto.
La tastiera TCU consente di effettuare tutte le operazioni.
Di seguito è riportata la descrizione delle icone visibili sullo schermo della tastiera TCU.
Lo schermo della TCU si azzera dopo qualche secondo per preservare la durata della
batteria.
1 ricevitore 1 ACCESO
2 ricevitore 2 ACCESO
3 trasmissione radio in corso*
4 difetto tamper*
5 difetto alimentazione
6 stato batteria tastiera:
lampeggiante: sostituire la batteria
7 difetto di sistema*
8 allarme in memoria
9 stato di inserimento:
zona totale inserita
zona parziale inserita
zona totale e parziale disinserite
zona annessi inserita
zona annessi disinserita
10 modo silenzioso
11 rilevatore escluso
12 rilevatore attivato
13 area messaggi, che consente scorrimento e convalida degli stessi
* se i guasti persistono, contattare l’installatore
Zone protette
Il sistema di allarme Domonial consente di sorvegliare fino a tre zone diverse:
► Zona A = perimetro o piano terra
► Zona B = resto della casa
► Zona C = area opzionale (annessa)
Configurazione collegata: una seconda area perimetrale o garage.
Configurazione autonoma: uno studio o negozio.
Ad ogni area, può essere associato un percorso di accesso, che consente di ritardare
l’innesco dell’allarme mentre gli utenti entrano o escono dal sito.
Le zone saranno impostate dall’installatore. Verificare con l’installatore le modalità
con cui sono state definite tali zone.

OPERAZIONI DI BASE.
49
I
T
A
L
I
A
N
O
Possono essere attivate le seguenti modalità di sorveglianza:
► Sorveglianza dell’area principale (Zona totale) = Protezione delle aree A + B (o aree A + B + C in funzione delle impostazioni del sistema) – l’utente è assente dal sito.
► Sorveglianza parziale (Zona parziale) = Protezione della sola area A – l’utente è presente nel sito.
► Opzionale: Sorveglianza annessi (Zona annessi) = Protezione della sola area C – l’utente è presente nel sito.
L’inserimento della zona totale ( ) è indicato quando si è fuori casa.
L’inserimento della zona parziale ( ) è indicato quando si resta a casa e si desidera inserire l’allarme solo per porte e finestre.
Sensori
Il sistema Domonial può essere utilizzato con numerosi tipi di sensori diversi. L’installatore ha selezionato i sensori che soddisfano al meglio le esigenze dell’utente.
Rilevatori di intrusione
I rilevatori di intrusione consentono di rilevare eventuali ingressi indesiderati nei locali protetti. Esistono due principali categorie di rilevatori di intrusione: perimetrali e volumetrici.
Rilevatori perimetrali
I sensori perimetrali rilevano l’intrusione in corrispondenza dei possibili punti di ingresso, come porte e finestre. L’allarme è azionato non appena si verifica l’intrusione. I sensori perimetrali possono essere dei seguenti tipi:
Rilevatori di contatto rilevano l’apertura di porte o finestre quando si chiude il contatto. Sono situati in corrispondenza dei possibili punti chiave di ingresso dei locali.
Rilevatori d’urto rilevano gli urti, come quando un intruso tenta di manomettere una porta o una finestra per irrompere. Forniscono una sicurezza più avanzata e sono in grado di rilevare un tentativo di intrusione prima ancora che la porta o la finestra venga aperta.
Sensori di rottura vetri rilevano la frequenza acustica generata dalla rottura di un vetro. Sono la soluzione ideale per proteggere ampie aree vetrate non protette da veneziane o tapparelle.
Sensori volumetrici
I sensori volumetrici rilevano il movimento all’interno dell’area protetta. Il movimento di un intruso all’interno dell’area protetta azionerà l’allarme. I sensori volumetrici possono essere dei seguenti tipi:
Sensori a infrarossi. Rilevano il calore generato da una persona all’interno del campo di vista del rilevatore e azionano l’allarme. Poiché anche gli animali generano calore, esistono dei PIR immuni agli animali che ignorano gli allarmi generati da questi ultimi, e rappresentano la soluzione più idonea per le applicazioni residenziali.

OPERAZIONI DI BASE.
50
I
T
A
L
I
A
N
O
Sensori a doppia tecnologia. Questi sensori ad elevata sicurezza consentono un più rapido rilevamento per locali ad alto rischio.
Sensori a infrarossi con verifica delle immagini. Questi sensori sono messi a punto per le applicazioni monitorate. Il sensore di immagine integrato nel rilevatore memorizzerà l’immagine dell’oggetto rilevato per consentire alla centrale di monitoraggio di convalidare immediatamente l’allarme e fornire una risposta più tempestiva. È inoltre utile per consentire alla centrale di monitoraggio di identificare i falsi allarmi, generati per esempio da una veneziana che non è stata chiusa correttamente.
Sensori di sicurezza
Sensori di fumo. Quando viene rilevata la presenza di fumo, il sensore di fumo aziona immediatamente un allarme locale per avvisare gli occupanti; anche la centrale di monitoraggio viene informata, in modo tale da richiedere l’assistenza antincendio e i servizi di evacuazione necessari.
Sensori di allagamento e temperatura. Se posizionati all’interno di un bagno o accanto alla lavatrice, per esempio, i sensori di allagamento consentono di rilevare perdite idriche. All’attivazione di un sensore di allagamento, l’informazione sarà inviata alla centrale di monitoraggio che può in tal modo avvertire gli occupanti prima che si verifichino gravi danni. I sensori di temperatura consentono di rilevare problemi legati ad alte o basse temperature, come gelo o elevate temperature all’interno di un frigorifero o congelatore. All’attivazione di un sensore di temperatura, l’informazione sarà inviata alla centrale di monitoraggio che può in tal modo informarne gli occupanti prima che si verifichino gravi danni.

OPERAZIONI DI BASE.
51
I
T
A
L
I
A
N
O
Indicatori
Il frontalino della centrale presenta degli indicatori LED che mostrano lo stato del sistema di sicurezza.
Gli indicatori 2, 3, 4 e 5 mostrano i difetti, che si verificano o che sono in memoria per una zona alla volta. Gli indicatori sono attivi solo quando il sistema non è impostato e durante le fasi di inserimento e disinserimento. Quando il sistema è impostato, gli indicatori si spengono dopo qualche secondo.
Indicatore LED 1- (sistema inserito)
Acceso: Azionamento in corso della zona totale.
Lampeggio lento: Azionamento in corso della zona parziale.
Lampeggio rapido: Azionamento in corso della zona annessi.
Spento: Il sistema è disinserito.
Indicatore LED 2- (zona associata al difetto) Acceso: I difetti indicati dai LED 3, 4 e 5 corrispondono alla zona totale.
Lampeggio lento: I difetti indicati dai LED 3, 4 e 5 corrispondono alla zona parziale.
Lampeggio rapido: I difetti indicati dai LED 3, 4 e 5 corrispondono alla zona annessi.
Spento: I difetti indicati dai LED 3, 4 e 5 corrispondono all’intero sistema.
Indicatore LED 3- (difetto di sistema) Acceso: Si sta verificando un difetto di sistema nella zona indicata sul LED 2.
I difetti di sistema includono guasto alla batteria o all’alimentazione, difetto di supervisione, difetto della linea telefonica o disturbi radio. Se questa indicazione persiste, contattare la società di allarmi.
Lampeggio lento: Nella memoria è stato memorizzato un difetto di sistema, nella zona indicata sul LED 2, che richiede un ripristino.
Spento: Nessun difetto di sistema.
Indicatore LED 4- (allarme manomissione) Acceso: È in corso un allarme per manomissione nella zona indicata sul LED 2.
Lampeggio lento: Nella memoria è stato memorizzato un allarme manomissione, nella zona indicata sul LED 2, che richiede un ripristino.
Spento: Nessun allarme manomissione.

OPERAZIONI DI BASE.
52
I
T
A
L
I
A
N
O
Indicatore LED 5- (allarme intrusione) Acceso: È in corso un allarme per intrusione o è azionato un rilevatore sulla zona indicata sul LED 2.
Questo include contatto porta aperta, rilevamento di movimento o rilevamento di fumo.
Lampeggio lento: Nella memoria è stato memorizzato un allarme per intrusione, nella zona indicata sul LED 2, che richiede un ripristino.
Lampeggio rapido: Nella memoria è stato memorizzato un allarme confermato, che richiede un ripristino a distanza. Chiamare la centrale di monitoraggio.
Spento: Nessun allarme per intrusione.
Comprensione dei toni di sistema
Dato il volume, la sirena è un efficace deterrente ed è molto irritante. La centrale del sistema è dotata di una sirena integrata; su richiesta, può essere aggiunta una sirena opzionale wireless esterna e/o interna.
La sirena della centrale emette un tono acustico di conferma durante l’inserimento e il disinserimento del sistema di sicurezza e un tono antincendio quando viene azionato un rilevatore di fumo. I livelli del volume possono essere regolati dall’installatore.
INS. TOTALE
Sequenza di 3 suoni modulati.
Durata: 4 secondi
Durante l’inserimento della zona totale, conferma che la centrale ha ricevuto un codice o un TAG valido e si prepara all’inserimento della zona totale.
INS. PARZIALE
INS. ANNESSI
Sequenza di 2 suoni modulati.
Durata: 2,5 secondi
Durante l’inserimento della zona parziale, conferma che la centrale ha ricevuto un codice o un TAG valido e si prepara all’inserimento della zona parziale.
RITARDO USCITA
Durante l’inserimento...
un segnale acustico al secondo
Inserimento zona totale: i segnali acustici continuano fino alla chiusura della porta di uscita finale.
Inserimento zona parziale: i segnali acustici continuano per 30s* fino all’inserimento della zona parziale.
INSERIMENTO COMPLETATO
Dopo la chiusura della porta finale.
Tre segnali acustici rapidi
Quando si chiude la porta di uscita finale, conferma che il sistema è inserito.

OPERAZIONI DI BASE.
53
I
T
A
L
I
A
N
O
RITARDO INGRESSO
All’ingresso...
un segnale acustico al secondo
Questo tono di accesso suona per 30 secondi* dopo aver aperto la porta di ingresso. Disinserire il sistema entro questo intervallo di tempo.
DISINSERIMENTO
Segnale acustico lungo e continuo
Durata: 2,5 secondi
Durante il disinserimento, conferma che il disinserimento della centrale è riuscito.
DIFETTO 2 volte, 7 segnali acustici rapidi.
Questo segnale indica un difetto di sistema.
AVVISO
4 segnali acustici durante l’avviso...
inviati attraverso la tastiera
Conferma la trasmissione di un avviso alla società di allarmi.
Inserimento del sistema
Il sistema può essere inserito utilizzando uno di questi dispositivi:
Tastiera TCU o CSK con codice o TAG
Nota: Benché si possa usare un codice numerico o un TAG per accedere al sistema di allarme, si raccomanda di usare un TAG come metodo principale.
Il telecomando TCB.
Inserimento del sistema usando la tastiera TCU o CSK:
Nota: Quando si usa la tastiera TCU, assicurarsi che sia posizionata nel relativo supporto prima di inserire la zona totale.
1. Premere o , quindi:
oppure
Immettere il proprio codice utente a 4 o 6 cifre (fornito dall’installatore).
Nota: In funzione della configurazione della tastiera, potrebbe essere possibile inserire il sistema anche senza il processo di identificazione.
L’avvio del processo di inserimento è segnalato da una serie di segnali acustici della tastiera (e, se impostata, dalla sirena).

OPERAZIONI DI BASE.
54
I
T
A
L
I
A
N
O
Tastiera TCU: Lo schermo mostra il conteggio a ritroso per l’uscita e la spia di inserimento della zona totale o parziale si accendono per confermare l’inserimento.
2. Se al momento dell’inserimento si verifica un errore:
Tastiera TCU: viene visualizzato un messaggio. Premere per escludere
l’errore e continuare il processo di inserimento o premere per annullare l’inserimento ed eseguire la diagnostica dell’errore.
Tastiera CSK: viene emesso un tono di errore. Se è segnalato un errore a livello di perimetro, disinserire il sistema e ricercare la causa dell’errore.
3. Se è stato selezionato l’inserimento della zona totale, uscire dalla proprietà e chiudere la porta finale.
Allo scadere del ritardo di inserimento, l’inserimento è completato.
Al termine del ritardo di inserimento, viene visualizzata l’icona o sullo schermo della tastiera TCU a confermare che il sistema è stato inserito. La spia di inserimento si spegne e dopo qualche secondo la schermata si cancella.
Inserimento del sistema usando il telecomando TCB:
Attenzione: Utilizzando un telecomando l’inserimento è immediato. Inserire il sistema solo quando ci si trova all’esterno dell’area da proteggere.
1. Premere il pulsante della zona totale o quello della zona parziale. La centrale emette il tono di inserimento.
Il LED associato si accende durante l’inserimento e rimane acceso per 3 secondi a confermare che il sistema è stato inserito. Se è stato diagnosticato un errore, il LED di disinserimento si accende fisso.
2. Se una porta o una finestra dotata di contatti è lasciata aperta, il sistema non può essere inserito. Chiudere tutte le porte e le finestre, quindi riprovare.
Inserimento zona Totale
Inserimento zona Parziale
Inserimento della zona Annessi utilizzando la tastiera TCU:
Nota: Questa operazione può essere eseguita solo dal menu principale:
1. Premere per selezionare il menu utente, quindi
premere o fino ad evidenziare ANNEX SET (zona annessi).
2. Premere . Viene visualizzata la schermata USER
ACCESS (Accesso utente).
3. Immettere il proprio TAG o codice utente a 4 o 6 cifre.
Il processo di inserimento è segnalato da una serie di segnali acustici e dal conteggio a ritroso del sistema partendo da un intervallo di 60 secondi.
Quando la zona annessi è stata inserita, viene visualizzata l’icona .

OPERAZIONI DI BASE.
55
I
T
A
L
I
A
N
O
Inserimento della zona Annessi utilizzando la tastiera CSK o il telecomando TCB:
Premere una delle seguenti combinazioni di tasti:
Tastiera CSK: Premere e contemporaneamente.
Telecomando TCB: Premere e contemporaneamente.
Disinserimento del sistema
Se l’allarme viene innescato accidentalmente, disinserire il sistema per arrestare le sirene.
Nota: Disinserendo il sistema, anche le sirene si arrestano se è stato azionato un allarme. L’arresto della sirena non interrompe la trasmissione dell’allarme alla società di ricezione allarmi (ARC).
Per poter accedere alla tastiera senza azionare l’allarme, l’installatore avrà programmato un ritardo di ingresso di almeno 30 secondi.
Il sistema può essere disinserito utilizzando uno di questi dispositivi:
Una tastiera con codice o TAG
Nota: Benché si possa usare un codice numerico o un TAG per accedere al sistema di allarme, si raccomanda di usare un TAG come metodo principale.
Un telecomando
Disinserimento usando la tastiera TCU o CSK:
oppure
Immettere il proprio codice utente a 4 o 6 cifre (fornito dall’installatore)
Entrambe le tastiere: il tono di disinserimento è emesso dalla tastiera e dalla sirena della centrale (se impostata).
Tastiera CSK: un LED verde conferma che il codice è valido.
Nota: In funzione della configurazione della tastiera, viene disinserita la zona totale o l’intero sistema. In quest’ultimo caso, potrebbe essere necessario inserire nuovamente la zona Annessi.
Disinserimento usando il telecomando TCB:
Per disinserire la zona totale e/o parziale, premere il pulsante di disinserimento .
La centrale emette un tono lungo.
Il LED associato si accende durante il disinserimento e rimane acceso per 3 secondi a confermare l’istruzione ricevuta.

OPERAZIONI DI BASE.
56
I
T
A
L
I
A
N
O
Disinserimento della zona Annessi utilizzando il telecomando TCB:
Per disinserire, premere e contemporaneamente.
Codice di coercizione
Se si è costretti a disinserire il sistema di sicurezza sotto minaccia, immettere il codice di coercizione da una tastiera. Per codice di coercizione si intende il proprio codice di accesso con l’ultima cifra incrementata di 1, per esempio 1234 diventa 1235 e 6789 diventa 6780.
Il sistema si disinserirà normalmente, ma viene inviato un segnale di allarme silenzioso al centro di ricezione allarmi.
Invio di un SOS
È possibile inviare un allarme immediato per attacco personale ogni qualvolta ci si sente in pericolo dentro casa, anche quando il sistema non è inserito.
Per inviare un SOS:
Nota: È possibile inviare un SOS utilizzando le tastiere TCU o CSK o il telecomando TCB.
Premere i pulsanti SOS contemporaneamente.
Viene inviato un allarme alla società di allarmi.
Viene azionata la sirena (in funzione della configurazione del sistema).
Esempi
+
+
Ripristino del sistema dopo un allarme
Attenzione: L’arresto della sirena non interrompe la trasmissione dell’allarme alla società di allarmi.
Se i LED lampeggiano lentamente sul pannello di controllo, si è verificato un allarme. Quando un allarme è inserito in memoria, il sistema non può essere inserito fino a dopo il ripristino.
Ripristino del sistema usando la tastiera TCU o CSK:
oppure Immettere il proprio codice utente a 4 o 6 cifre (fornito dall’installatore)
Se in memoria è memorizzato più di un allarme, ripetere l’operazione per ogni allarme fino a spegnere tutti i LED.

OPERAZIONI DI BASE.
57
I
T
A
L
I
A
N
O
Se sulla centrale il LED di destra lampeggia rapidamente, è stato azionato un allarme confermato e sarà necessario contattare la società di allarmi per un ripristino. Fino ad allora, non sarà possibile inserire il sistema.
Ripristino del sistema usando il telecomando TCB
1. Sul telecomando, premere il pulsante di disinserimento .
Tutte e tre le spie lampeggeranno lentamente. Il sistema non esegue il ripristino per evitare i segnali acustici che potrebbero attirare l’attenzione di un intruso.
2. Per confermare il disinserimento, premere il pulsante corrispondente.
La spia associata lampeggerà rapidamente mentre comunica con la centrale; in seguito, si accenderà per 3 secondi per confermare l’avvenuto disinserimento.
3. Se sulla centrale il LED di destra lampeggia rapidamente, è stato azionato un allarme confermato e sarà necessario contattare la società di allarmi per un ripristino. Fino ad allora, non sarà possibile inserire il sistema.
Codice errato o TAG non valido
Dopo cinque tentativi di immissione di un codice errato o di uso di un TAG non valido, la tastiera impedisce per 5 minuti l’accesso a tutti gli utenti.
Impostazione delle preferenze (tastiera TCU)
Attraverso il menu delle preferenze, è possibile modificare le seguenti impostazioni:
Preferenza Impostazioni
MODO SILENZIOSO
ATTIVO – Nessun segnale acustico sul pannello
NON ATTIVO – I segnali acustici sulla centrale sono attivi
PART SET ONLY (Solo zona parziale) – I segnali acustici non sono attivi quando la zona parziale è inserita
MODO GONG ATTIVO
NON ATTIVO
SCORCIATOIA Imposta l’evidenziazione della voce principale di menu quando
viene premuto inizialmente
LINGUA Imposta la lingua del display per la tastiera TCU

OPERAZIONI DI BASE.
58
I
T
A
L
I
A
N
O
Impostazione di una preferenza:
1. Sulla tastiera TCU, premere per selezionare
il menu utente, quindi premere fino ad evidenziare PREFERENCES (Preferenze).
2. Premere . Viene visualizzato il sottomenu delle preferenze.
3. Evidenziare la preferenza che si intende modificare, quindi premere .
4. Premere o per modificare l’impostazione,
quindi premere . L’esempio mostra la schermata delle preferenze del modo silenzioso.
Dopo qualche secondo, il sottomenu delle preferenze viene nuovamente visualizzato.
Controllo dello stato di allarme
Controllo dello stato di allarme utilizzando la tastiera TCU:
1. Sulla tastiera TCU, premere .
Potrebbe venire chiesto all’utente di presentare il TAG o immettere il codice di accesso. Sullo schermo sono visualizzate le seguenti informazioni:
Le icone attive correnti (siano esse lampeggianti o fisse).
Lo stato di inserimento corrente.
Lo stato degli errori.
2. Procedere in uno dei seguenti modi:
Se è presente un messaggio di allarme, ricercarne e rimuoverne la causa.
Se esiste un messaggio di promemoria, seguire le istruzioni sullo schermo per cancellare l’errore in memoria e ripristinare il sistema.
Controllo dello stato di allarme utilizzando il telecomando TCB:
Sul telecomando, premere il pulsante di comando per 1 secondo.
Tutti e tre i LED si accenderanno parecchie volte in successione; il LED dello stato corrente di inserimento rimarrà acceso per 3 secondi.

OPERAZIONI AVANZATE.
59
I
T
A
L
I
A
N
O
Assegnazione di codici e TAG
L’assegnazione di un codice o TAG univoco ad ogni utente consente la registrazione della data e dell’ora in cui ogni utente aziona il sistema di allarme.
Nota: È richiesto un TAG master per modificare i codici e i TAG degli altri utenti e per autorizzare la società di allarmi ad accedere al sistema a fini di manutenzione.
Aggiunta e modifica di codici
È possibile aggiungere codici o modificare i codici esistenti. Tutti i nuovi codici devono essere di almeno 2 cifre più alti rispetto a qualsiasi codice esistente. Per esempio, se un codice per un utente esistente è 2345, il codice successivo assegnato deve essere 2347 o superiore.
Modifica o aggiunta di un codice usando la tastiera TCU:
1. Sulla tastiera TCU, premere per selezionare il
menu utente, quindi premere fino ad evidenziare USERS (Utenti).
2. Premere . Viene visualizzato il sottomenu USERS.
3. Premere . Viene visualizzata la schermata
PRESENTARE TAG o CODICE.
4. Collocare il TAG master vicino al lettore di TAG, o immettere il codice master. Viene visualizzato il sottomenu CODICI.
5. Premere per evidenziare l’utente da cambiare,
quindi premere .
6. Immettere un numero di codice, quindi premere .
Viene visualizzato il messaggio AUTORIZZAZIONE?.
7. Premere per autorizzare il codice o per annullarlo.
Viene visualizzato il sottomenu USERS (Utenti) e, dopo qualche secondo, la schermata si cancella.

OPERAZIONI AVANZATE.
60
I
T
A
L
I
A
N
O
Modifica o aggiunta di un codice usando la tastiera CSK:
1. Sulla tastiera CSK, premere e contemporaneamente. La spia rossa lampeggia lentamente.
2. Immettere il codice master o presentare il TAG master (NB: User 1 (Utente 1) è sempre master).
3. Selezionare e immettere un ID utente a 1 cifra (da 0 a 9).
4. Immettere il nuovo codice per questo utente. Un doppio segnale acustico sulla tastiera confermerà l’accettazione del nuovo codice.
5. Immettere nuovamente il nuovo codice per confermare. Un doppio segnale acustico sulla tastiera confermerà l’accettazione del nuovo codice.
6. Uscire dalla modalità di programmazione premendo .
Assegnazione, modifica e disattivazione di TAG
Questa funzione consente di assegnare singoli TAG ad ogni utente.
Nota: Assegnando un nuovo TAG a un utente, viene sovrascritto quello esistente.
Assegnazione o modifica di un TAG utilizzando la tastiera TCU:
1. Sulla tastiera TCU, premere per selezionare il
menu utente, quindi premere fino ad evidenziare USERS (Utenti).
2. Premere , , e nuovamente . Viene visualizzato il sottomenu TAG.
3. Premere . Viene visualizzata la schermata PRESENTARE TAG o CODICE.
4. Collocare il TAG master vicino al lettore di TAG, o immettere il codice master. Viene visualizzato il sottomenu TAG.
5. Premere per evidenziare l’utente da cambiare.
6. Premere per visualizzare il messaggio
TAG CONSENTITO?.

OPERAZIONI AVANZATE.
61
I
T
A
L
I
A
N
O
7. Premere per visualizzare il messaggio
PRESENTARE TAG.
8. Collocare il TAG vicino al lettore di TAG.
Viene visualizzato il messaggio CONFERMI IL NUOVO TAG?.
9. Premere per accettare il nuovo TAG.
Il TAG viene registrato e può essere utilizzato per inserire e disinserire il sistema.
Disattivazione di un TAG utilizzando la tastiera TCU:
1. Seguire i passaggi da 1 a 6 sopra descritti.
2. Premere per disattivare il TAG utente.
Si noti che ora il nome dell’utente è barrato.
Assegnazione o modifica di un TAG utilizzando la tastiera CSK:
1. Selezionare e immettere un ID utente esistente o a una cifra (da 0 a 9).
(L’utente 1 è sempre master).
2. Presentare il nuovo TAG.
Un doppio segnale acustico sulla tastiera confermerà che il nuovo TAG è stato programmato e sostituirà l’eventuale TAG precedente.
3. Premere il tasto di spegnimento per uscire dalla programmazione.
Controllo remoto dei dispositivi
Questa funzione consente di controllare i dispositivi a distanza.
Nota: Questa funzione richiede un’estensione X10 opzionale con ricevitori X10. L’installatore consiglierà le varie opzioni per il controllo degli apparecchi in funzione delle esigenze dell’utente.
Controllo di un dispositivo remoto dalla tastiera TCU:
1. Sulla tastiera TCU, premere per selezionare
il menu utente, quindi premere o fino a evidenziare TOOLS (Strumenti).
2. Premere . Viene visualizzato il sottomenu TOOLS. Verificare che DOMOTICA sia evidenziato.

OPERAZIONI AVANZATE.
62
I
T
A
L
I
A
N
O
3. Premere . Viene visualizzata la schermata
PRESENTARE TAG O CODICE.
4. Collocare il TAG master vicino al lettore di TAG, o immettere il codice utente.
5. Premere o per selezionare il dispositivo
da modificare, quindi premere .
6. Premere o per selezionare l’accensione
o lo spegnimento del dispositivo, quindi premere .
Controllo di un dispositivo remoto dal telecomando TCB:
Se questa opzione è stata configurata dall’installatore, è possibile controllare fino a 4 apparecchi domestici, il numero predefinito è 2.
Il pulsante di comando controlla il primo apparecchio (ricevitore 1).
I 3 indicatori lampeggiano fino all’accettazione della richiesta da parte del sistema, poi rimangono accesi per 3 secondi.
I pulsanti di comando e Inserimento zona parziale controllano l’apparecchio
successivo (ricevitore 2).
Gli indicatori 1 e 2 lampeggiano fino all’accettazione della richiesta da parte del sistema, poi rimangono accesi per 3 secondi.
Esclusione manuale dei rilevatori (tastiera TCU)
Questa funzione consente di escludere temporaneamente uno o più rilevatori.
I rilevatori esclusi vengono riportati al normale funzionamento la volta successiva in cui il sistema di allarme viene disinserito.
Esclusione di un rilevatore usando la tastiera TCU:
1. Sulla TCU, premere per selezionare il
menu utente, quindi premere o fino a evidenziare TOOLS (Strumenti).
2. Premere . Viene visualizzato il sottomenu TOOLS.
3. Premere per evidenziare BYPASS DETECTOR
(Esclusione rilevatore), quindi premere .
Viene visualizzata la schermata PRESENTARE TAG o CODICE.
4. Collocare il TAG master vicino al lettore di TAG, o immettere il codice utente.

OPERAZIONI AVANZATE.
63
I
T
A
L
I
A
N
O
5. Premere o per selezionare il rilevatore
da escludere, quindi premere .
6. Premere o per selezionare FUNZIONE
INATTIVA quindi premere .
I rilevatori esclusi sono visualizzati con i relativi nomi barrati. L’icona lampeggia ad indicare che uno o più rilevatori sono stati esclusi.
Annullamento dell’accesso operatore (tastiera TCU)
Questa funzione consente all’utente master di disattivare l’accesso per manutenzione dell’operatore al sistema.
Annullamento dell’accesso operatore usando la tastiera TCU:
1. Sulla tastiera TCU, premere per selezionare
il menu utente, quindi premere o fino a evidenziare TOOLS (Strumenti).
2. Premere . Viene visualizzato il sottomenu TOOLS.
3. Premere per evidenziare OPERATOR ACCESS
(Accesso operatore), quindi premere .
Viene visualizzata la schermata PRESENTARE TAG O CODICE.
4. Collocare il TAG master vicino al lettore di TAG, o immettere il codice utente.
5. Premere o per selezionare il rilevatore
da escludere, quindi premere .
6. Premere o per selezionare NON
AUTORIZZATO quindi premere .
Regolazione del livello dei segnali acustici (tastiera CSK)
Regolazione del livello dei segnali acustici sulla tastiera CSK:
1. Premere .
2. Premere .
3. Immettere un livello di segnale acustico da 1 a 7.
Un doppio segnale acustico sulla tastiera confermerà la modifica.
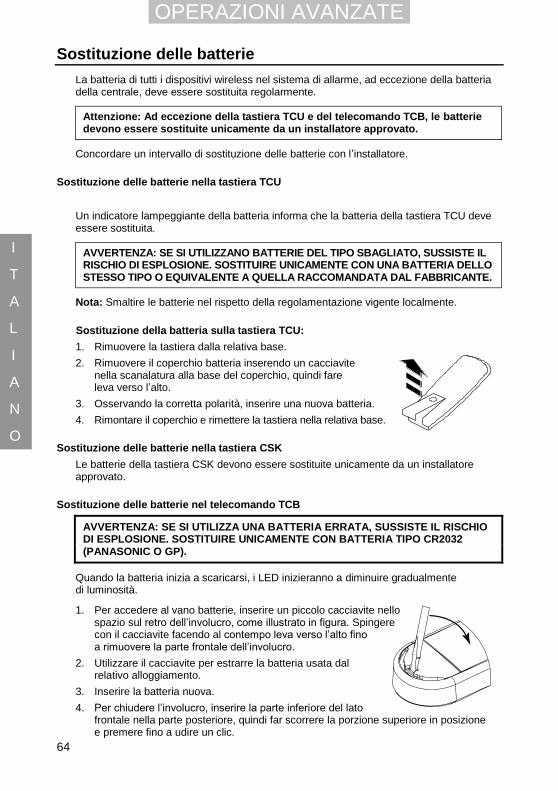
OPERAZIONI AVANZATE.
64
I
T
A
L
I
A
N
O
Sostituzione delle batterie
La batteria di tutti i dispositivi wireless nel sistema di allarme, ad eccezione della batteria della centrale, deve essere sostituita regolarmente.
Attenzione: Ad eccezione della tastiera TCU e del telecomando TCB, le batterie devono essere sostituite unicamente da un installatore approvato.
Concordare un intervallo di sostituzione delle batterie con l’installatore.
Sostituzione delle batterie nella tastiera TCU
Un indicatore lampeggiante della batteria informa che la batteria della tastiera TCU deve essere sostituita.
AVVERTENZA: SE SI UTILIZZANO BATTERIE DEL TIPO SBAGLIATO, SUSSISTE IL RISCHIO DI ESPLOSIONE. SOSTITUIRE UNICAMENTE CON UNA BATTERIA DELLO STESSO TIPO O EQUIVALENTE A QUELLA RACCOMANDATA DAL FABBRICANTE.
Nota: Smaltire le batterie nel rispetto della regolamentazione vigente localmente.
Sostituzione della batteria sulla tastiera TCU:
1. Rimuovere la tastiera dalla relativa base.
2. Rimuovere il coperchio batteria inserendo un cacciavite nella scanalatura alla base del coperchio, quindi fare leva verso l’alto.
3. Osservando la corretta polarità, inserire una nuova batteria.
4. Rimontare il coperchio e rimettere la tastiera nella relativa base.
Sostituzione delle batterie nella tastiera CSK
Le batterie della tastiera CSK devono essere sostituite unicamente da un installatore approvato.
Sostituzione delle batterie nel telecomando TCB
AVVERTENZA: SE SI UTILIZZA UNA BATTERIA ERRATA, SUSSISTE IL RISCHIO DI ESPLOSIONE. SOSTITUIRE UNICAMENTE CON BATTERIA TIPO CR2032 (PANASONIC O GP).
Quando la batteria inizia a scaricarsi, i LED inizieranno a diminuire gradualmente di luminosità.
1. Per accedere al vano batterie, inserire un piccolo cacciavite nello spazio sul retro dell’involucro, come illustrato in figura. Spingere con il cacciavite facendo al contempo leva verso l’alto fino a rimuovere la parte frontale dell’involucro.
2. Utilizzare il cacciavite per estrarre la batteria usata dal relativo alloggiamento.
3. Inserire la batteria nuova.
4. Per chiudere l’involucro, inserire la parte inferiore del lato frontale nella parte posteriore, quindi far scorrere la porzione superiore in posizione e premere fino a udire un clic.

OPERAZIONI AVANZATE.
65
I
T
A
L
I
A
N
O
Controllo del dispositivo dal telefono
Controllare il sistema dal telefono è possibile solo da un telefono multifrequenza (composizione a toni) o da telefoni cellulari. Questa funzione deve essere configurata dall’installatore.
Il controllo remoto è autorizzato solo dopo aver immesso un codice valido.
La centrale riceve la chiamata dopo il numero di squilli configurato dall’installatore o dopo che è stato chiamato due volte di seguito.
Accesso remoto al sistema di sicurezza
1. Comporre il numero telefonico del sistema di sicurezza.
2. Viene emesso un segnale acustico di due secondi, seguito dalla musica di cortesia “Arpeggio”.
3. Immettere il codice segreto entro 30 secondi.
Un segnale acustico alto conferma che il codice è valido. A questo punto si è connessi al sistema di sicurezza.
Inserimento a distanza
È possibile inserire una zona dal telefono se il sistema non è stato programmato per inserirsi dopo la chiusura della porta finale.
1. Premere i tasti *, 2, 1 per l’inserimento della zona totale.
2. Premere i tasti *, 2, 2 per l’inserimento della zona parziale.
3. Premere i tasti *, 2, 3 per l’inserimento della zona annessi.
L’inserimento è confermato da un brano musicale.
Comando a distanza di apparecchi elettrici:
Nota: Questa funzione richiede un’estensione X10 opzionale e ricevitori X10.
È possibile attivare/disattivare fino a 12 apparecchi elettrici (luci, ecc.) a distanza utilizzando un telefono.
1. Immettere più il numero dell’apparecchio (da 101 a 112) utilizzando la tastiera.
Un breve segnale acustico informa che l’apparecchio è attivo.
Due segnali acustici informano che l’apparecchio non è attivo.
2. Per accendere l’apparecchio, premere 1.
3. Per spegnere l’apparecchio, premere 0.

OPERAZIONI AVANZATE.
66
I
T
A
L
I
A
N
O
Chiusura della comunicazione:
1. Per chiudere la comunicazione, premere e sul telefono.
Il sistema di sicurezza concluderà la chiamata.
Manutenzione e raccomandazioni
Controllare il sistema (una volta al mese o secondo le specifiche del fabbricante).
Proteggere da eventuali urti tutti i componenti, in particolare evitare di far cadere il telecomando.
Non immergere i componenti in acqua.
Non usare detergenti per pulire i componenti. Usare solo un panno umido.
Riporre i componenti in un luogo pulito e asciutto, a temperatura ambiente.
Riporre le batterie usate negli appositi contenitori per la raccolta differenziata.
Evitare l’esposizione prolungata al segnale acustico della sirena.
Non nascondere i rilevatori di movimento dietro tende, mobili, ecc.
Non verniciare o incartare i componenti.
Non tentare di aprire o spostare i componenti; sono protetti da manomissione e alcuni di essi possono provocare scosse elettriche.

67
D
E
U
T
S
C
H
Inhalt
Herzlichen Glückwunsch zu Ihrem Kauf eines Honeywell Domonial Sicherheitssystems.
Wir empfehlen Ihnen, vor Einsatz Ihrer Anlage dieses Handbuch aufmerksam zu lesen.
Dieses Sicherheitssystem wurde für den Betrieb auf einer zugelassenen Funkfrequenz ausgelegt. Jede Gefahr für den Benutzer ist ausgeschlossen.
GRUNDLEGENDE BEDIENVORGÄNGE
Einführung ............................................................................ 69
Scharfschalten des Systems .............................................. 75
Unscharfschalten des Systems .......................................... 77
Überfallcode ......................................................................... 78
Senden eines Notrufs .......................................................... 78
Zurücksetzen des Systems nach einem Alarm ................. 79
Falscher Code oder ungültiges ID-TAG ............................. 80
Konfigurieren von Voreinstellungen (TCU-Bedienteil) ................................................................... 80
Überprüfen des Alarmstatus ............................................... 81

68
D
E
U
T
S
C
H
Inhalt
ERWEITERTE BEDIENVORGÄNGE
Zuordnen von Codes und ID-TAGs .................................... 82
Fernbedienung von Geräten ............................................... 85
Melder manuell deaktivieren (TCU-Bedienteil) .................. 86
Sperren des Betreiberzugriffs (TCU-Bedienteil) ................ 86
Einstellen der Lautstärke des Pieptons (CSK-Bedienteil) ................................................................... 87
Auswechseln der Batterien ................................................. 87
So steuern Sie Ihr System per Telefon ............................... 88
Wartung und Empfehlungen ............................................... 90

GRUNDLEGENDE BEDIENVORGÄNGE.
69
D
E
U
T
S
C
H
Einführung
Dieses Handbuch beschreibt die Bedienung des Domonial Alarmsystems und die Vorgehensweisen bei Auslösung eines Alarms. Es ist nach Vorgängen strukturiert und in zwei Abschnitte gegliedert, in denen die grundlegenden und die erweiterten Bedienvorgänge erläutert werden.
Die grundlegenden Bedienvorgänge umfassen die Scharfschaltung und die Unscharfschaltung des Alarmsystems. Wenn Sie nur diese Vorgänge ausführen müssen, brauchen Sie nur die ersten Seiten dieses Handbuchs zu lesen.
Wenn Sie hingegen Benutzern ID-TAGs oder Codes zuordnen oder Melder deaktivieren möchten, lesen Sie auch den Teil des Handbuchs, in dem die erweiterten Bedienvorgänge beschrieben sind.
Um die Betriebsbereitschaft Ihres Domonial-Alarmsystems aufrechtzuerhalten, lesen Sie bitte auch den Abschnitt „Wartung und Empfehlungen“ am Ende dieses Handbuchs.
Das System umfasst eine an der Wand installierte Funkzentrale, eine Reihe von Meldern und Sensoren, die während der Installation verbunden werden, sowie ein oder mehrere der folgenden Geräte für die Scharfschaltung und Unscharfschaltung und die Systemkonfiguration:
TCU-Bedienteil CSK-Bedienteil TCB-Schlüsselanhänger Token (ID-TAG)
Drahtlose Bedienteile
Ihr Installateur wird Ihnen ein Master-ID-TAG und einen 4- oder 6-stelligen Mastercode zur Eingabe über die Tastatur des Bedienteils geben. Sie benötigen diese, um die Codes und ID-TAGs anderer Benutzer zu ändern und andere erweiterte Funktionen zu verwenden.
Beide drahtlosen Bedienteile können für die Scharfschaltung und Unscharfschaltung des Sicherheitssystems mithilfe eines gültigen Zugriffscodes oder ID-TAG verwendet werden.
CSK-Bedienteil
Dieses an der Wand fest installierte Bedienteil dient in erster Linie zur Scharfschaltung und Unscharfschaltung. Obwohl es kein Display umfasst, kann es für einige erweiterte Bedienvorgänge genutzt werden.

GRUNDLEGENDE BEDIENVORGÄNGE.
70
D
E
U
T
S
C
H
TCU-Bedienteil
Dieses Bedienteil kann zur einfacheren Verwendung von der Wandhalterung abgenommen werden. Allerdings muss es wieder in die Halterung eingeführt werden, um die Scharfschaltung des Systems abzuschließen.
Mit dem TCU-Bedienteil können alle Bedienvorgänge ausgeführt werden.
Es folgt eine Beschreibung der Symbole, die auf dem TCU-Bedienteil angezeigt werden können. Das TCU-Display erlischt nach ein paar Sekunden, um die Batterien zu schonen.
1 Empfänger 1 EIN
2 Empfänger 2 EIN
3 Funkübertragung läuft*
4 Fehler aufgrund Sabotage*
5 Stromversorgungsfehler
6 Batterieladestand des Bedienteils
blinkt: Batterie auswechseln
7 Systemfehler*
8 Alarm im Speicher
9 Scharfschaltungsstatus:
Hauptbereich scharf
Teilraum scharf
Hauptbereich und Teilraum unscharf
Meldergruppe scharf
Meldergruppe unscharf
10 Lautlos-Modus
11 Deaktivierter Melder
12 Melder aktiviert
13 Meldungsbereich für Datendurchlauf und -bestätigung
* Kontaktieren Sie den Installateur, wenn diese Fehler bestehen bleiben.
Geschützte Bereiche
Das Domonial-Alarmsystem ermöglicht die Überwachung von bis zu drei verschiedenen Bereichen:
► Bereich A = der Perimeter oder das Erdgeschoss
► Bereich B = der Rest des Hauses
► Bereich C = optionaler Bereich (Meldergruppe)
Verbundene Konfiguration: Ein zweiter Perimeterbereich oder eine Garage.
Unabhängige Konfiguration: Büro- oder Verkaufsraum.
Jedem Bereich kann ein Zugangspfad zugeordnet werden, damit die Alarmauslösung verzögert wird, während der Benutzer den Ort betritt oder verlässt.
Die Bereiche werden vom Installateur eingestellt. Lassen Sie sich vom Installateur erklären, wie diese Bereiche definiert sind.

GRUNDLEGENDE BEDIENVORGÄNGE.
71
D
E
U
T
S
C
H
Die folgenden Überwachungsmodi können aktiviert werden:
► Überwachung des Hauptbereichs = Bereiche A + B (oder Bereiche A + B + C, je nach den Systemeinstellungen) sind geschützt – Sie sind abwesend.
► Teilüberwachung (Teilraum) = Nur Bereich A ist geschützt – Sie sind anwesend.
► Optional: Überwachung der Meldergruppe = Nur Bereich C ist geschützt – Sie sind anwesend.
Schalten Sie die Überwachung des Hauptbereichs scharf ( ), wenn Sie abwesend sind.
Schalten Sie die Teilüberwachung scharf ( ), wenn Sie zu Hause sind und nur die Türen und Fenster überwacht werden sollen.
Sensoren
Es gibt mehrere verschiedene Arten von Sensoren, die mit dem Domonial-System verwendet werden können. Der Installateur hat die für Ihre Anforderungen am besten geeigneten ausgewählt.
Einbruchmelder
Einbruchmelder werden verwendet, um jede Art des unbefugten Zutritts zu den geschützten Bereichen zu melden. Es gibt zwei Hauptkategorien von Einbruchmeldern: perimetrische und volumetrische.
Perimetrische Einbruchmelder
Perimetrische Sensoren melden das Eindringen an möglichen Zugangspunkten wie Türen und Fenstern. Ein Alarm wird ausgelöst, sobald ein Eindringen erkannt wird. Zu den perimetrischen Sensoren gehören folgende:
Kontaktmelder erkennen das Öffnen von Türen oder Fenstern, das heißt die Unterbrechung des Kontakts. Sie sind an den möglichen Hauptzugangspunkten der Räumlichkeiten positioniert.
Erschütterungsmelder erkennen Erschütterungen, wie sie bei dem Versuch eines Einbrechers entstehen, wenn dieser versucht, ein Fenster oder eine Tür aufzubrechen. Sie bieten eine höhere Sicherheit und erkennen Einbruchsversuche, bevor die Tür oder das Fenster geöffnet wurde.
Glasbruchsensoren erkennen die Klangfrequenz von zersplitterndem Glas. Die sind ideal geeignet, um große Glasflächen zu schützen, die nicht durch Fensterläden oder Rollläden geschützt sind.
Volumetrische Sensoren
Volumetrische Sensoren erkennen Bewegung innerhalb des geschützten Bereichs. Die Bewegung eines Eindringlings innerhalb des geschützten Bereichs löst den Alarm aus. Zu den volumetrischen Sensoren gehören folgende:
Infrarotsensoren: Erkennen die von Personen abgestrahlte Körperwärme innerhalb des Sichtfelds des Sensors und lösen einen Alarm aus. Da auch Haustiere Wärme abstrahlen, sind die PIR-Sensoren so konzipiert, dass sie tierimmun sind und Falschalarme vermieden werden. Sie sind daher für Wohnbereiche besonders geeignet.

GRUNDLEGENDE BEDIENVORGÄNGE.
72
D
E
U
T
S
C
H
Dualtechnologie-Sensoren: Diese Hochsicherheitssensoren ermöglichen eine schnellere Erkennung für stark gefährdete Bereiche.
Infrarotsensoren mit Bildverifizierung: Diese Sensoren sind für kontrollierte Anwendungen konzipiert. Der im Melder integrierte Bildsensor speichert das Bild des erkannten Objekts, damit der Alarm sofort an der Überwachungsstation überprüft und schneller reagiert werden kann. Die Überwachungsstation kann auf diese Weise auch Falschalarme erkennen, die beispielsweise von einem nicht ordentlich geschlossenen Fensterladen ausgelöst wurden.
Sicherheitssensoren
Rauchmelder: Wenn Rauch erkannt wird, löst der Rauchmelder sofort einen lokalen Alarm aus, um die Bewohner zu warnen. Zudem wird die Überwachungsstation informiert, damit sie die Feuerwehr und den Rettungsdienst alarmieren kann.
Überflutungs- und Temperatursensoren: Überflutungssensoren können dazu verwendet werden, Wasserlecks zu erkennen, wenn sie z. B. in einem Badezimmer oder in der Nähe einer Waschmaschine positioniert werden. Wenn ein Überflutungssensor ausgelöst wird, ergeht die Meldung an die Überwachungsstation, damit diese die Bewohner warnen kann, bevor ein ernsthafter Schaden verursacht wird. Die Temperatursensoren können dazu verwendet werden, unerwünscht hohe oder niedrige Temperaturen zu erkennen, wie beispielsweise Frost oder eine hohe Temperatur in einem Kühl- oder Gefrierschrank. Wenn ein Temperatursensor ausgelöst wird, ergeht die Meldung an die Überwachungsstation, damit diese die Bewohner informieren kann, bevor ein ernsthafter Schaden entsteht.

GRUNDLEGENDE BEDIENVORGÄNGE.
73
D
E
U
T
S
C
H
Anzeigeleuchten
An der Vorderseite der Funkzentrale befinden sich LEDs, die den Status des Sicherheitssystems anzeigen.
Die Anzeigeleuchten 2, 3, 4 und 5 zeigen für jeweils eine Gruppe die Fehler an, die aufgetreten sind oder sich im Speicher befinden. Die Anzeigeleuchten sind nur dann aktiv, wenn das System zurückgesetzt wird, und während der Scharfschaltung und der Unscharfschaltung. Wenn das System aktiviert wird, erlöschen die Anzeigeleuchten nach ein paar Sekunden.
1- LED-Anzeigeleuchte (System scharf) Ein: Hauptbereichsgruppe ist scharf geschaltet.
Blinkt langsam: Teilbereichsgruppe ist scharf geschaltet.
Blinkt schnell: Meldergruppe ist scharf geschaltet.
Aus: Das System ist unscharf geschaltet.
2- LED-Anzeigeleuchte (Fehlergruppe) Ein: Die von den LEDs 3, 4 und 5 angezeigten Fehler beziehen sich auf den Hauptbereich.
Blinkt langsam: Die von den LEDs 3, 4 und 5 angezeigten Fehler beziehen sich auf den Teilraum.
Blinkt schnell: Die von den LEDs 3, 4 und 5 angezeigten Fehler beziehen sich auf die Meldergruppe.
Aus: Die von den LEDs 3, 4 und 5 angezeigten Fehler beziehen sich auf das gesamte System.
3- LED-Anzeigeleuchte (Systemfehler) Ein: Ein Systemfehler ist in der von LED 2 angezeigten Gruppe eingetreten.
Systemfehler sind Batterie- oder Stromausfall, Kontrollfehler, Telefonleitungsausfall oder Funkstörung. Wenn die Anzeige fortbesteht, wenden Sie sich an die Sicherheitsfirma.
Blinkt langsam: Im Speicher befindet sich ein Systemfehler. Er betrifft die von LED 2 angegebene Gruppe und erfordert eine Rücksetzung.
Aus: Kein Systemfehler vorhanden.
4- LED-Anzeigeleuchte (Sabotagealarm)
Ein: Ein Sabotagealarm ist in der von LED 2 angezeigten Gruppe aufgetreten.
Blinkt langsam: Im Speicher befindet sich ein Sabotagealarm. Er betrifft die von LED 2 angegebene Gruppe und erfordert eine Rücksetzung.
Aus: Es besteht kein Sabotagealarm.

GRUNDLEGENDE BEDIENVORGÄNGE.
74
D
E
U
T
S
C
H
5- LED-Anzeigeleuchte (Einbruchalarm) Ein: Ein Einbruchalarm ist aufgetreten oder ein Melder wurde in der von LED 2 angezeigten Gruppe ausgelöst.
Das kann ein offener Türkontakt, eine Bewegungsmeldung oder Rauchmeldung sein.
Blinkt langsam: Im Speicher befindet sich ein Einbruchsalarm. Er betrifft die von LED 2 angegebene Gruppe und erfordert eine Rücksetzung.
Blinkt schnell: Im Speicher befindet sich ein bestätigter Alarm, der über eine Fernverbindung zurückgesetzt werden muss. Rufen Sie die Überwachungsstation an.
Aus: Es besteht kein Einbruchsalarm.
Erläuterung der Systemtöne
Die Sirene ist aufgrund ihrer Lautstärke und ihres unangenehmen Tons ein wirksames Abschreckungsmittel. Die Funkzentrale des Systems verfügt über eine integrierte Sirene. Eine optionale drahtlose Außen- und/oder Innensirene kann bei Bedarf hinzugefügt werden.
Die Sirene gibt einen Bestätigungston aus, wenn das System scharf/unscharf geschaltet wird, und einen Feueralarmton, wenn ein Feuermelder ausgelöst wurde. Die Lautstärkepegel können vom Installateur geändert werden.
SCHARFSCHALTUNG HAUPTBEREICH
Abfolge von 3 modulierten Tönen.
Dauer: 4 Sekunden
Bestätigt bei Scharfschaltung der Hauptbereich-Gruppe, dass die Funkzentrale einen gültigen Code oder ein gültiges ID-TAG empfangen hat und die Scharfschaltung der Hauptbereich-Gruppe vorbereitet.
SCHARFSCHALTUNG TEILRAUM
SCHARFSCHALTUNG MELDERGRUPPE
Abfolge von 2 modulierten Tönen.
Dauer: 2,5 Sekunden
Bestätigt bei Scharfschaltung der Teilbereich-Gruppe, dass die Funkzentrale einen gültigen Code oder ein gültiges ID-TAG empfangen hat und die Scharfschaltung der Teilbereich-Gruppe vorbereitet.
AUSGANGSVERZÖGERUNG
Bei Scharfschaltung ...
ein Piepton pro Sekunde
Scharfschaltung Gesamtbereich: Die Pieptöne werden ausgegeben, bis die letzte Ausgangstür geschlossen ist.
Scharfschaltung Teilraum: Die Pieptöne werden 30s* ausgegeben, bis die Teilraum-Gruppe scharf geschaltet ist.
SCHARFSCHALTUNG BEENDET
Nach Schließen der letzten Tür:
Drei schnelle Pieptöne
Wenn die letzte Ausgangstür geschlossen wurde, bestätigt dies, dass das System scharf geschaltet ist.

GRUNDLEGENDE BEDIENVORGÄNGE.
75
D
E
U
T
S
C
H
EINTRITTSVERZÖGERUNG
Bei Eintreten ...
ein Piepton pro Sekunde
Dieser Eintrittston wird 30s* ausgegeben, nachdem Sie die Eingangstür geöffnet haben. Sie sollten das System innerhalb dieser Zeitspanne unscharf schalten.
UNSCHARFSCHALTEN
Langer, durchgehender Piepton
Dauer: 2,5 Sekunden
Bestätigt bei der Unscharfschaltung, dass die Funkzentrale erfolgreich unscharf geschaltet wurde.
FEHLER 2-mal 7 schnelle Pieptöne
Das Signal weist auf einen Fehler im System hin.
ALARM
4 Pieptöne bei Warnung ...
über das Bedienteil gesendet.
Bestätigt die Übermittlung eines Alarms an die Sicherheitsfirma.
Scharfschalten des Systems
Das System kann mit einem der folgenden Geräte scharf geschaltet werden:
TCU- oder CSK-Bedienteil mit Code oder einem ID-TAG
Anmerkung: Wenngleich sowohl eine Codenummer als auch ein ID-TAG für den Zugriff auf das Alarmsystem verwendet werden kann, empfehlen wir, möglichst ein ID-TAG zu verwenden.
TCB-Schlüsselanhänger
So schalten Sie das System mit dem TCU- oder CSK-Bedienteil scharf
Anmerkung: Bei Verwendung des TCU-Bedienteils muss sich das Gerät in der Halterung befinden, bevor der Hauptbereich scharf geschaltet wird.
1. Drücken Sie oder . Tun Sie dann Folgendes:
oder
Geben Sie Ihren 4- bis 6-stelligen Benutzercode ein (vom Installateur mitgeteilt).
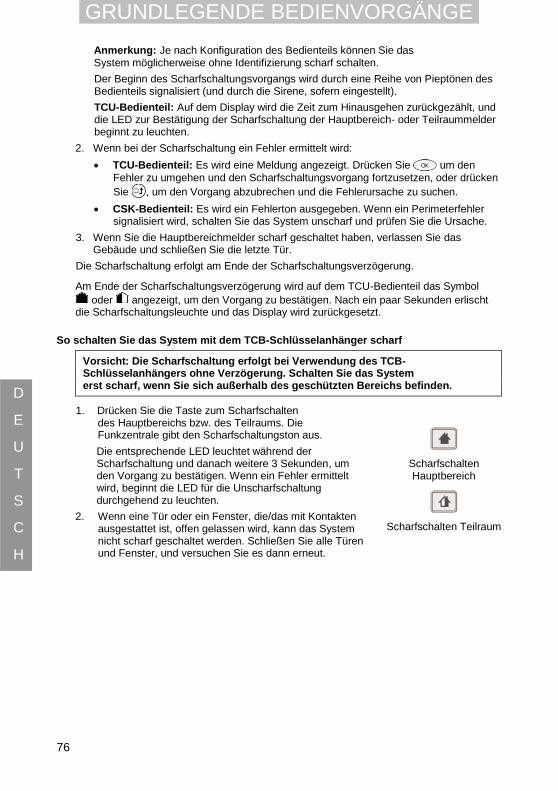
GRUNDLEGENDE BEDIENVORGÄNGE.
76
D
E
U
T
S
C
H
Anmerkung: Je nach Konfiguration des Bedienteils können Sie das System möglicherweise ohne Identifizierung scharf schalten.
Der Beginn des Scharfschaltungsvorgangs wird durch eine Reihe von Pieptönen des Bedienteils signalisiert (und durch die Sirene, sofern eingestellt).
TCU-Bedienteil: Auf dem Display wird die Zeit zum Hinausgehen zurückgezählt, und die LED zur Bestätigung der Scharfschaltung der Hauptbereich- oder Teilraummelder beginnt zu leuchten.
2. Wenn bei der Scharfschaltung ein Fehler ermittelt wird:
TCU-Bedienteil: Es wird eine Meldung angezeigt. Drücken Sie um den
Fehler zu umgehen und den Scharfschaltungsvorgang fortzusetzen, oder drücken
Sie , um den Vorgang abzubrechen und die Fehlerursache zu suchen.
CSK-Bedienteil: Es wird ein Fehlerton ausgegeben. Wenn ein Perimeterfehler signalisiert wird, schalten Sie das System unscharf und prüfen Sie die Ursache.
3. Wenn Sie die Hauptbereichmelder scharf geschaltet haben, verlassen Sie das Gebäude und schließen Sie die letzte Tür.
Die Scharfschaltung erfolgt am Ende der Scharfschaltungsverzögerung.
Am Ende der Scharfschaltungsverzögerung wird auf dem TCU-Bedienteil das Symbol
oder angezeigt, um den Vorgang zu bestätigen. Nach ein paar Sekunden erlischt die Scharfschaltungsleuchte und das Display wird zurückgesetzt.
So schalten Sie das System mit dem TCB-Schlüsselanhänger scharf
Vorsicht: Die Scharfschaltung erfolgt bei Verwendung des TCB-Schlüsselanhängers ohne Verzögerung. Schalten Sie das System erst scharf, wenn Sie sich außerhalb des geschützten Bereichs befinden.
1. Drücken Sie die Taste zum Scharfschalten des Hauptbereichs bzw. des Teilraums. Die Funkzentrale gibt den Scharfschaltungston aus.
Die entsprechende LED leuchtet während der Scharfschaltung und danach weitere 3 Sekunden, um den Vorgang zu bestätigen. Wenn ein Fehler ermittelt wird, beginnt die LED für die Unscharfschaltung durchgehend zu leuchten.
2. Wenn eine Tür oder ein Fenster, die/das mit Kontakten ausgestattet ist, offen gelassen wird, kann das System nicht scharf geschaltet werden. Schließen Sie alle Türen und Fenster, und versuchen Sie es dann erneut.
Scharfschalten Hauptbereich
Scharfschalten Teilraum

GRUNDLEGENDE BEDIENVORGÄNGE.
77
D
E
U
T
S
C
H
So schalten Sie die Meldergruppe mit dem TCU-Bedienteil scharf
Anmerkung: Dies ist nur vom Hauptmenü aus möglich.
1. Drücken Sie , um das Benutzermenü auszuwählen,
und drücken Sie dann oder , bis ANNEX SET hervorgehoben wird.
2. Drücken Sie . Der Bildschirm USER ACCESS wird angezeigt.
3. Übermitteln Sie Ihr ID-TAG, oder geben Sie Ihren 4- bis 6-stelligen Benutzercode ein.
Der Scharfschaltungsvorgang wird durch eine Reihe von Pieptönen signalisiert, und das System zählt von 60 Sekunden runter.
Das Symbol wird angezeigt, wenn die Meldergruppe scharf geschaltet ist.
So schalten Sie die Meldergruppe mit dem CSK-Bedienteil oder dem TCB-Schlüsselanhänger scharf
Drücken Sie eine der folgenden Tastenkombinationen:
CSK-Bedienteil: Drücken Sie gleichzeitig die Tasten und .
TCB-Schlüsselanhänger: Drücken Sie die Tasten und gleichzeitig.
Unscharfschalten des Systems
Wenn versehentlich ein Alarm ausgelöst wird, schalten Sie das System unscharf, um die Sirenen auszuschalten.
Anmerkung: Wenn ein Alarm ausgelöst wurde, werden die Sirenen durch Unscharfschaltung des Systems ebenfalls ausgeschaltet. Das Ausschalten der Sirene verhindert nicht die Übermittlung des Alarms an die Notruf- und Serviceleitstelle.
Um es Ihnen zu ermöglichen, das Bedienteil zu erreichen, ohne einen Alarm auszulösen, programmiert Ihr Installateur eine Eintrittsverzögerung von mindestens 30 Sekunden.
Das System kann mit einem der folgenden Geräte unscharf geschaltet werden:
Bedienteil mit Code oder ID-TAG
Anmerkung: Wenngleich sowohl eine Codenummer als auch ein ID-TAG für den Zugriff auf das Alarmsystem verwendet werden kann, empfehlen wir, möglichst ein ID-TAG zu verwenden.
TCB-Schlüsselanhänger

GRUNDLEGENDE BEDIENVORGÄNGE.
78
D
E
U
T
S
C
H
So schalten Sie das System mit dem TCU- oder CSK-Bedienteil unscharf
oder
Geben Sie Ihren 4- bis 6-stelligen Benutzercode ein (vom Installateur mitgeteilt).
Beide Bedienteile: Der Signalton für die Unscharfschaltung wird vom Bedienteil und der Sirene der Funkzentrale ausgegeben (sofern entsprechend eingestellt).
CSK-Bedienteil: Eine grüne LED bestätigt, dass der Code gültig ist.
Anmerkung: Je nach Konfiguration des Bedienteils wird der Hauptbereich oder das gesamte System unscharf geschaltet. Wenn Letzteres der Fall ist, muss die Meldergruppe ggf. wieder scharf geschaltet werden.
So schalten Sie das System mit dem TCB-Schlüsselanhänger unscharf
Um die Hauptbereich- und/oder Teilraummelder unscharf zu schalten, drücken
Sie die Taste . Die Funkzentrale gibt einen langen Ton aus.
Die entsprechende LED leuchtet während der Unscharfschaltung und danach weitere 3 Sekunden, um den Befehl zu bestätigen.
So schalten Sie die Meldergruppe mit dem TCB-Schlüsselanhänger unscharf
Drücken Sie zur Unscharfschaltung gleichzeitig die Tasten und .
Überfallcode
Wenn Sie von jemandem genötigt werden, das Sicherheitssystem unscharf zu schalten, geben Sie Ihren Überfallcode über ein Bedienteil ein. Ihr Überfallcode ist bis auf die letzte Ziffer mit Ihrem Zugriffscode identisch. Die letzte Ziffer ist um 1 erhöht, z. B. 1235 statt 1234 oder 6780 statt 6789.
Das System wird dadurch ganz normal unscharf geschaltet, jedoch wird ein lautloser Alarm an die Notruf- und Serviceleitstelle übermittelt.
Senden eines Notrufs
Auch wenn das System unscharf geschaltet ist, haben Sie jederzeit die Möglichkeit, einen Panikalarm zu senden, wenn Sie sich zu Hause bedroht fühlen.
So senden Sie einen Notruf
Anmerkung: Sie können mit dem TCU- oder CSK-Bedienteil oder dem TCB-Schlüsselanhänger einen Notruf senden.
Drücken Sie die Notruftasten zusammen.
Es wird ein Alarm an die Sicherheitsfirma gesendet.
Die Sirene wird ausgelöst (je nach Systemkonfiguration).
Beispiele
+
+

GRUNDLEGENDE BEDIENVORGÄNGE.
79
D
E
U
T
S
C
H
Zurücksetzen des Systems nach einem Alarm
Vorsicht: Das Ausschalten der Sirene verhindert nicht die Übermittlung des Alarms an die Notruf- und Serviceleitstelle.
Wenn die LEDs an der Funkzentrale langsam blinken, ist ein Alarm aufgetreten. Wenn sich ein Alarm im Speicher befindet, muss das System erst zurückgesetzt werden, bevor es scharf geschaltet werden kann.
So setzen Sie das System mit dem TCU- oder CSK-Bedienteil zurück
oder
Geben Sie Ihren 4- bis 6-stelligen Benutzercode ein (vom Installateur mitgeteilt).
Wenn sich mehrere Alarme im Speicher befinden, wiederholen Sie diesen Vorgang für jeden Alarm, bis alle LEDs erloschen sind.
Wenn die rechte LED der Alarmzentrale schnell blinkt, besteht ein bestätigter Alarm. Sie müssen Ihre Sicherheitsfirma anrufen, um eine Rücksetzung durchzuführen. Vorher können Sie das System nicht scharf schalten.
So setzen Sie das System mit dem TCB-Schlüsselanhänger zurück
1. Drücken Sie auf dem Schlüsselanhänger die Taste zum Unscharfschalten.
Alle drei Anzeigeleuchten blinken danach langsam. Das System wird nicht zurückgesetzt, um Pieptöne zu vermeiden, die die Aufmerksamkeit eines Einbrechers auf sich ziehen könnten.
2. Drücken Sie die Taste zur Unscharfschaltung ein weiteres Mal, um den Vorgang zu bestätigen.
Die entsprechende LED blinkt während der Kommunikation mit der Funkzentrale schnell. Danach leuchtet sie 3 Sekunden lang, um die erfolgreiche Unscharfschaltung anzuzeigen.
3. Wenn die rechte LED der Alarmzentrale schnell blinkt, besteht ein bestätigter Alarm. Sie müssen Ihre Sicherheitsfirma anrufen, um eine Rücksetzung durchzuführen. Vorher können Sie das System nicht scharf schalten.

GRUNDLEGENDE BEDIENVORGÄNGE.
80
D
E
U
T
S
C
H
Falscher Code oder ungültiges ID-TAG
Nach fünfmaliger Eingabe eines falschen Codes oder Verwendung eines ungültigen ID-TAG sperrt das Bedienteil 5 Minuten lang alle Benutzer.
Konfigurieren von Voreinstellungen (TCU-Bedienteil)
Im Menü PREFERENCES können Sie die folgenden Einstellungen vornehmen:
Voreinstellung Einstellungen
LAUTLOS-MODUS ACTIVE – Keine Pieptone von der Funkzentrale.
INACTIVE – Pieptone von der Funkzentrale sind aktiviert.
PART SET ONLY – Pieptöne werden nicht ausgegeben, wenn der Teilraum scharf geschaltet ist.
KLANGSIGNAL AKTIVIERT.
DEAKTIVIERT.
TASTATURBEFEHLE Stellt den hervorgehobenen Hauptmenüeintrag ein, wenn zu Beginn gedrückt wird.
SPRACHE Legt die Display-Sprache für das TCU-Bedienteil fest.
So legen Sie eine Voreinstellung fest
1. Drücken Sie auf dem TCU-Bedienteil , um das Benutzermenü auszuwählen, drücken Sie dann
, bis PREFERENCES hervorgehoben wird.
2. Drücken Sie . Das Untermenü der Voreinstellungen wird angezeigt.
3. Markieren Sie die Voreinstellung, die Sie ändern möchten, und drücken Sie dann .
4. Drücken Sie oder , um die Einstellung zu
ändern, und drücken Sie danach . Im Beispiel ist der Voreinstellungsbildschirm MODUS: LAUTLOS dargestellt.
Nach ein paar Sekunden wird das Untermenü für die Voreinstellungen erneut angezeigt.

GRUNDLEGENDE BEDIENVORGÄNGE.
81
D
E
U
T
S
C
H
Überprüfen des Alarmstatus
So überprüfen Sie den Alarmstatus mit dem TCU-Bedienteil
1. Drücken Sie auf dem TCU-Bedienteil die Taste .
Möglicherweise werden Sie zur Übermittlung Ihres ID-TAG oder zur Eingabe Ihres Zugriffscodes aufgefordert. Auf dem Bildschirm werden die folgenden Informationen angezeigt:
Die aktuell aktiven Symbole (ganz gleich, ob sie blinken oder durchgehend leuchten)
Der aktuelle Scharfschaltungsstatus
Der Fehlerstatus
2. Führen Sie einen der folgenden Schritte aus:
Wenn eine Alarmmeldung vorliegt, suchen Sie nach der Quelle des Fehlers und beseitigen Sie den Fehler.
Wenn eine Speichermeldung vorliegt, befolgen Sie die Anweisungen auf dem Display, um den Speicherfehler zu beheben und das System zurückzusetzen.
So überprüfen Sie den Alarmstatus mit dem TCB-Schlüsselanhänger:
Drücken Sie auf dem Schlüsselanhänger die Steuerungstaste 1 Sekunde lang.
Alle drei LEDs leuchten daraufhin mehrmals in Folge auf. Die LED für den aktuellen Scharfschaltungsstatus bleibt 3 Sekunden erleuchtet.

ERWEITERTE BEDIENVORGÄNGE.
82
D
E
U
T
S
C
H
Zuordnen von Codes und ID-TAGs
Indem jedem Benutzer ein individueller Code oder ein persönliches ID-TAG zugeordnet wird, können das Datum und die Uhrzeit der jeweiligen Bedienung des Alarmsystems aufgezeichnet werden.
Anmerkung: Zur Änderung der Codes und ID-TAGs von Benutzern ist ein Master-ID-TAG erforderlich. Dieses dient außerdem dazu, der Sicherheitsfirma zu Wartungszwecken Zugriff auf das System zu gewähren.
Hinzufügen und Ändern von Codes
Sie können Codes hinzufügen oder bestehende Codes ändern. Alle neuen Codes müssen gegenüber bestehenden Codes mindestens um den Wert 2 erhöht werden. Wenn beispielsweise ein Code für einen bestehenden Benutzer 2345 lautet, muss der nächste Code, der zugeordnet werden soll, 2347 oder höher sein.
So fügen Sie mit dem TCU-Bedienteil einen Code hinzu oder ändern einen bestehenden
1. Drücken Sie auf dem TCU-Bedienteil , um das
Benutzermenü auszuwählen, drücken Sie dann , bis USERS hervorgehoben wird.
2. Drücken Sie . Das Untermenü USERS wird angezeigt.
3. Drücken Sie . Der Bildschirm ID-TAG ZEIGEN ODER CODE wird angezeigt.
4. Bringen Sie das Token mit dem Master-ID-TAG in die Nähe des ID-TAG-Readers des Bedienteils, oder geben Sie Ihren Mastercode ein. Das Untermenü CODES wird angezeigt.
5. Drücken Sie , um den zu ändernden Benutzereintrag zu markieren, und drücken Sie danach .

ERWEITERTE BEDIENVORGÄNGE.
83
D
E
U
T
S
C
H
6. Geben Sie eine Codenummer ein und drücken
Sie .
Die Meldung ERLAUBT? wird angezeigt.
7. Drücken Sie , um den Code zu autorisieren,
oder , um den Vorgang abzubrechen.
Das Untermenü USERS wird angezeigt, und nach ein paar Sekunden wird die Anzeige gelöscht.
So fügen Sie mit dem CSK-Bedienteil einen Code hinzu oder ändern einen bestehenden
1. Drücken Sie auf dem CSK-Bedienteil gleichzeitig und . Die rote Anzeigeleuchte blinkt daraufhin langsam.
2. Geben Sie den Mastercode ein oder übermitteln Sie das Master-ID-TAG (Hinweis: Benutzer 1 ist immer der Master).
3. Wählen Sie eine einstellige Benutzer-ID aus (0 bis 9) und geben Sie sie ein.
4. Geben Sie den neuen Code für diesen Benutzer ein. Ein doppelter Piepton des Bedienteils bestätigt die Annahme des neuen Codes.
5. Geben Sie den neuen Code zur Bestätigung noch einmal ein. Ein doppelter Piepton des Bedienteils bestätigt die Annahme des neuen Codes.
6. Beenden Sie den Programmiermodus durch Drücken von .
Zuordnen, Ändern und Deaktivieren von TAGs
Mit dieser Funktion können Sie jedem Benutzer ein individuelles TAG zuordnen.
Anmerkung: Wenn einem Benutzer ein neues TAG zugeordnet wird, überschreibt es das bestehende TAG.
So ordnen Sie ein TAG mit dem TCU-Bedienteil zu oder ändern es
1. Drücken Sie auf dem TCU-Bedienteil , um das
Benutzermenü auszuwählen, drücken Sie dann , bis USERS hervorgehoben wird.
2. Drücken Sie , dann und dann erneut . Das Untermenü ID-TAG wird angezeigt.
3. Drücken Sie . Der Bildschirm ID-TAG ZEIGEN ODER CODE wird angezeigt.

ERWEITERTE BEDIENVORGÄNGE.
84
D
E
U
T
S
C
H
4. Bringen Sie das Token mit dem Master-ID-TAG in die Nähe des ID-TAG-Readers des Bedienteils, oder geben Sie Ihren Mastercode ein. Das Untermenü ID-TAG wird angezeigt.
5. Drücken Sie , um den zu ändernden Benutzereintrag zu markieren.
6. Drücken Sie die Taste , um die Meldung ID-TAG BEFUGEN? anzuzeigen.
7. Drücken Sie die Taste , um die Meldung ID-TAG ZEIGEN anzuzeigen.
8. Bringen Sie Ihr Token mit dem ID-TAG in die Nähe des ID-TAG-Readers des Bedienteils.
Die Meldung ID-TAG AKZEPTIEREN? wird angezeigt.
9. Drücken Sie die Taste , um das neue ID-TAG zu bestätigen.
Das ID-TAG ist nun registriert und kann zur Scharfschaltung und Unscharfschaltung des Systems verwendet werden.
So deaktivieren Sie ein TAG mit dem TCU-Bedienteil
1. Führen Sie die obigen Schritte 1 bis 6 aus.
2. Drücken Sie , um das TAG des Benutzers zu deaktivieren.
Daraufhin wird der Name des Benutzers durchgestrichen angezeigt.
So ordnen Sie ein ID-TAG mit dem CSK-Bedienteil zu oder ändern es
1. Wählen Sie eine bestehende oder neue einstellige Benutzer-ID aus (0 bis 9) und geben Sie sie ein.
(Benutzer 1 ist immer der Master).
2. Positionieren Sie das Token und übermitteln Sie das ID-TAG.
Ein doppelter Piepton des Bedienteils bestätigt die erfolgreiche Programmierung des neuen ID-TAG. Ein eventuell vorhandenes ID-TAG wurde überschrieben.
3. Drücken Sie die Aus-Taste , um die Programmierung zu beenden.

ERWEITERTE BEDIENVORGÄNGE.
85
D
E
U
T
S
C
H
Fernbedienung von Geräten
Mit dieser Funktion können Sie Geräte fernsteuern.
Anmerkung: Zur Verwendung dieser Funktion ist eine optionale X10-Erweiterung mit X10-Empfängern erforderlich. Ihr Installateur kann Sie hinsichtlich der verschiedenen Optionen zur Steuerung von Geräten beraten.
So steuern Sie ein entferntes Gerät mit einem TCU-Bedienteil
1. Drücken Sie auf dem TCU-Bedienteil , um das
Benutzermenü auszuwählen, drücken Sie dann
oder , bis TOOLS hervorgehoben wird.
2. Drücken Sie . Das Untermenü TOOLS
wird angezeigt. Vergewissern Sie sich, dass FERNBED. ausgewählt ist.
3. Drücken Sie . Der Bildschirm ID-TAG ZEIGEN ODER CODE wird angezeigt.
4. Bringen Sie das Token mit dem ID-TAG in die Nähe des ID-TAG-Readers des Bedienteils, oder geben Sie Ihren Benutzercode ein.
5. Drücken Sie oder , um das zu ändernde
Gerät auszuwählen, und drücken Sie danach .
6. Drücken Sie oder , um ON oder OFF für das
Gerät auszuwählen, und drücken Sie danach .
So steuern Sie ein entferntes Gerät mit dem TCB-Schlüsselanhänger
Wenn der Installateur das System entsprechend konfiguriert hat, können Sie bis zu 4 Haushaltsgeräte steuern (der Standardwert ist 2).
Mit der Steuerungstaste wird das erste Gerät (Empfänger 1) gesteuert.
Die 3 Anzeigeleuchten blinken, bis die Anforderung vom System angenommen wurde, und leuchten danach 3 Sekunden lang.
Die Steuerungstaste und die Teilraumtaste steuern ein weiteres Gerät
(Empfänger 2).
Die Anzeigeleuchten 1 und 2 blinken, bis die Anforderung vom System angenommen wurde, und leuchten danach 3 Sekunden lang.

ERWEITERTE BEDIENVORGÄNGE.
86
D
E
U
T
S
C
H
Melder manuell deaktivieren (TCU-Bedienteil)
Mit dieser Funktion können Sie einen oder mehrere Melder vorübergehend deaktivieren.
Die deaktivierten Melder werden wieder zugeschaltet, sobald das Alarmsystem das nächste Mal unscharf geschaltet wird.
So deaktivieren Sie einen Melder mit dem TCU-Bedienteil
1. Drücken Sie auf dem TCU-Bedienteil , um das
Benutzermenü auszuwählen, drücken Sie dann
oder , bis TOOLS hervorgehoben wird.
2. Drücken Sie . Das Untermenü TOOLS wird angezeigt.
3. Drücken Sie die Taste , um die Option BYPASS DETECTOR auszuwählen, und drücken Sie anschließend die Taste .
Der Bildschirm ID-TAG ZEIGEN ODER CODE wird angezeigt.
4. Bringen Sie das Token mit dem ID-TAG in die Nähe des ID-TAG-Readers des Bedienteils, oder geben Sie Ihren Benutzercode ein.
5. Drücken Sie oder , um den zu deaktivierenden Melder auszuwählen, und drücken Sie danach .
6. Drücken Sie oder , um INACTIVE
auszuwählen, und drücken Sie danach .
Die Namen deaktivierter Melder werden durchgestrichen angezeigt. Das Symbol blinkt, um anzuzeigen, das ein oder mehrere Melder deaktiviert sind.
Sperren des Betreiberzugriffs (TCU-Bedienteil)
Mit dieser Funktion kann der Masterbenutzer dem Betreiber den Wartungszugriff zum System verweigern.
So sperren Sie den Betreiberzugriff mit dem TCU-Bedienteil
1. Drücken Sie auf dem TCU-Bedienteil , um das
Benutzermenü auszuwählen, drücken Sie dann oder , bis TOOLS hervorgehoben wird.
2. Drücken Sie . Das Untermenü TOOLS wird angezeigt.
3. Drücken Sie die Taste , um die Option OPERATOR ACCESS auszuwählen, und drücken Sie anschließend die Taste .

ERWEITERTE BEDIENVORGÄNGE.
87
D
E
U
T
S
C
H
Der Bildschirm ID-TAG ZEIGEN ODER CODE wird angezeigt.
4. Bringen Sie das Token mit dem ID-TAG in die Nähe des ID-TAG-Readers des Bedienteils, oder geben Sie Ihren Benutzercode ein.
5. Drücken Sie oder , um den zu deaktivierenden Melder auszuwählen, und drücken Sie danach .
6. Drücken Sie oder , um NICHT ERLAUBT
auszuwählen, und drücken Sie danach .
Einstellen der Lautstärke des Pieptons (CSK-Bedienteil)
So stellen Sie die Lautstärke des Pieptons mit dem CSK-Bedienteil ein
1. Drücken Sie .
2. Drücken Sie .
3. Geben Sie einen Lautstärkewert von 1 bis 7 ein.
Ein doppelter Piepton des Bedienteils bestätigt die Änderung.
Auswechseln der Batterien
Die Batterien aller drahtlosen Geräte des Alarmsystems, mit Ausnahme der Batterie der Funkzentrale, müssen regelmäßig ausgewechselt werden.
Vorsicht: Mit Ausnahme der Batterien des TCU-Bedienteils und des TCB-Schlüsselanhängers sollten alle Batterien ausschließlich von einem zugelassenen Installateur ausgewechselt werden.
Vereinbaren Sie ein Auswechslungsintervall mit Ihrem Installateur.
Auswechseln der Batterien des TCU-Bedienteils
Wenn die Anzeigeleuchte für den Batterieladezustand blinkt, muss die Batterie des TCU-Bedienteils ausgewechselt werden.
ACHTUNG: WENN EINE BATTERIE FALSCHEN TYPS VERWENDET WIRD, BESTEHT EXPLOSIONSGEFAHR. ERSETZEN SIE DIE BATTERIE DURCH EINE DES GLEICHEN, VOM HERSTELLER EMPFOHLENEN TYPS ODER EINES VERGLEICHBAREN TYPS.
Anmerkung: Entsorgen Sie die Batterien gemäß den am Einsatzort geltenden Bestimmungen.

ERWEITERTE BEDIENVORGÄNGE.
88
D
E
U
T
S
C
H
So wechseln Sie die Batterie des TCU-Bedienteils aus
1. Nehmen Sie das Bedienteil aus der Basis.
2. Entfernen Sie die Batteriefachabdeckung, indem Sie einen Schraubendreher in die Aussparung unten an der Abdeckung einführen und sie nach oben anheben.
3. Legen Sie eine neue Batterie ein. Achten Sie auf die richtige Polarität.
4. Bringen Sie die Abdeckung wieder an und führen Sie das Bedienteil wieder in die Basis ein.
Auswechseln der Batterien des CSK-Bedienteils
Die Batterien des CSK-Bedienteils sollten ausschließlich von einem zugelassenen Installateur ausgewechselt werden.
Auswechseln der Batterien des TCB-Schlüsselanhängers
ACHTUNG: WENN EINE BATTERIE FALSCHEN TYPS VERWENDET WIRD, BESTEHT EXPLOSIONSGEFAHR. VERWENDEN SIE AUSSCHLIEßLICH DEN BATTERIETYP CR2032 (PANASONIC ODER GP).
Wenn die Batterie beginnt, schwächer zu werden, lässt die Helligkeit der LEDs nach.
1. Um das Batteriefach zu öffnen, führen Sie einen kleinen Schraubendreher in die Aussparung auf der Rückseite des Gehäuses ein (siehe Abbildung). Drücken Sie mit dem Schraubendrehen hinein und hebeln Sie die vordere Abdeckung des Gehäuses nach oben heraus.
2. Drücken Sie die alte Batterie behutsam mit dem Schraubendreher aus der Aufnahme.
3. Setzen Sie eine neue Batterie ein.
4. Um das Gehäuse zu schließen, führen Sie den unteren Teil der Abdeckung in das hintere Gehäuse ein und schieben Sie den oberen Teil mit etwas Druck in Position, bis er einrastet.
So steuern Sie Ihr System per Telefon
Das Steuern des Systems per Telefon ist lediglich mit einem Tonwahltelefon oder einem Mobiltelefon möglich. Diese Funktion muss vom Installateur konfiguriert werden.
Die Fernsteuerung ist erst nach Eingabe eines gültigen Codes möglich.
Die Funkzentrale empfängt Ihren Anruf nach der vom Installateur festgelegten Anzahl Klingelzeichen, oder nachdem sie zweimal in Folge angerufen wurde.

ERWEITERTE BEDIENVORGÄNGE.
89
D
E
U
T
S
C
H
Fernzugriff auf Ihr Sicherheitssystem
1. Wählen Sie die Telefonnummer Ihres Sicherheitssystems.
2. Es wird ein zwei Sekunden langer Piepton ausgegeben, gefolgt vom Aufforderungston „Arpeggio“.
3. Geben Sie Ihren geheimen Code innerhalb von 30 Sekunden ein.
Eine hoher Piepton bestätigt, dass der Code gültig ist. Danach steht die Verbindung zu Ihrem Sicherheitssystem.
Scharfschaltung per Fernzugriff
Sie können einen Bereich über das Telefon scharf schalten, wenn das System nicht so programmiert ist, dass es nach dem Schließen der letzten Tür scharf geschaltet wird.
1. Drücken Sie *, 2, 1, wenn der Hauptbereich scharf geschaltet werden soll.
2. Drücken Sie *, 2, 2, wenn der Teilraum scharf geschaltet werden soll.
3. Drücken Sie *, 2, 3, wenn die Meldergruppe scharf geschaltet werden soll.
Die Scharfschaltung wird durch ein Tonsignal bestätigt.
Fernsteuerung elektrischer Geräte
Anmerkung: Zur Verwendung dieser Funktion sind eine optionale X10-Erweiterung und X10-Empfänger erforderlich.
Sie können bis zu 12 elektrische Geräte (Lampen usw.) per Fernzugriff mit einem Telefon aktivieren/deaktivieren.
1. Geben Sie und die Nummer des Geräts (101 bis 112) am Bedienteil ein.
Ein kurzer Piepton bestätigt, dass das Gerät aktiv ist.
Zwei Pieptöne geben an, dass das Gerät nicht aktiv ist.
2. Um ein Gerät EINzuschalten, drücken Sie 1.
3. Um ein Gerät AUSzuschalten, drücken Sie 0.
Beenden der Kommunikation
1. Um die Kommunikation zu beenden, drücken Sie auf dem
Telefon und .
Ihr Sicherheitssystem beendet den Anruf.

ERWEITERTE BEDIENVORGÄNGE.
90
D
E
U
T
S
C
H
Wartung und Empfehlungen
Überprüfen Sie das System (einmal im Monat oder nach den Angaben des Betreibers).
Schützen Sie alle Komponenten vor Stößen und achten Sie darauf, dass die Bedienteile nicht herunterfallen.
Tauchen Sie die Komponenten nicht in Wasser.
Reinigen Sie die Komponenten nicht mit Reinigungsmitteln. Verwenden Sie lediglich ein feuchtes Tuch.
Die Komponenten müssen sich an einem sauberen, trockenen Ort bei Raumtemperatur befinden.
Entsorgen Sie alte Batterien in dafür bestimmten Sammelbehältern.
Setzen Sie sich nicht über einen längeren Zeitraum dem Schall der Sirene aus.
Bringen Sie Bewegungsmelder nicht hinter Vorhängen, Möbelstücken usw. an.
Streichen oder tapezieren Sie die Komponenten nicht über.
Öffnen oder versetzen Sie die Komponenten nicht. Sie sind sabotagegeschützt und einige von ihnen können einen Stromschlag verursachen.