Embed Size (px)
Citation preview

Note Cards Tutorial
Ms. Cousineau

Go to the “My Lists” tab.Select the topic for your research paper.

List view
Select “New”

Source
Notes
Each citation will have the note cards attached.The citation and note
cards will stay together.

Overview
1. Direct Quotation-- You can capture author’s words or images.– You can copy-and-paste the quotation into the
quotation box.– Use control + C to copy.– Use control + V to paste.
2. Paraphrase or summarize– You should write your explanation of the quote.– You can tag concepts and facts.
3. My ideas– In this box, write your original ideas.– Analyze how the sources fit into your research.– Ask questions, evaluate ideas.

Copy-and-paste firstTip: Pull up your original article, so you can just copy and paste.
Author’s image
Author’s words

Copy-and-paste
• If you can’t find the original article, you can copy from your printed research.– DO NOT MAKE ANY
CHANGES.

Reread and color-code information
Red for problems
Green for statistics
Highlight main ideas
Suggestions:

Explain it to yourself.Use words that make more sense to you.

What do you think?
I wonder…?What are you thoughts on this topic? Reflect on what you have learned about this topic.

Title
• A word or phrase that states the main idea of the content of this particular quote.
• If you saw the title of the note card, would you be able to identify the note card being discussed?

Add the title last

Add tags now…or later!

Note cards
• Save the note card.• Then, at the very top of the
page, click the “Note cards” tab.

Use your “tabletop” to organize notes.
Your notes are waiting here.

You can drag your notes onto the table top.
Put your cursor on the note card, click, and drag.
As you are dragging and dropping, you could be organizing them into groups by subtopic.

Piles
• A pile is a stack of note cards.• To create a new pile, drag and drop
one note card on top of another note card.
• When you put a note card on top of another note card, it will automatically ask you for a pile name.
• Give the new pile a name. The pile name should be a sub topic or one of your arguments.

Make piles.
Group notes by sub topics and arguments. You’ll notice that the number on the top note card is the number of cards in that
pile.

Tags
• Tags are key words from your direct quotation and argument it supports.
• You can put multiple tags on each note card.
• If your tag is more than one word, use an under score. (For instance, Global_Warming)
• Tip: You do not need to put commas in between each tag. Put quotation marks around each tag.

Tags
• Tags help you organize your note cards.
• Ctrl + click on a note card to select the note card.
• Go to the top tool bar and select the “Tags” tab.
• Tagging options: colors, visual cues, or words.

Color Tags
• SUGGESTIONS:– You can then group your
arguments together based on color.
– You could have all of your “for” arguments be the color green.
– You could have all of your “against” arguments be the color red.

Color Tags
Control + Click on the note card to select the note card.

Visual Cues
• These are ideas/thoughts to tag each piece of research.
• The options are:– Needs further research– Need help– Incomplete– Original thinking– Important– Used in paper

Visual Cues

Visual Cues
• Suggestion:– Use visual cues as a
reminder to yourself. – Do you need more research?
Do you need help?– Is this a note card you
definitely want to use in your paper?

Text Tags
• Text tags are words or phrases that aren’t necessarily the main idea of the note card. It is another way for you to categorize note cards.
• SUGGESTIONS– You may have a “Statistics” tag.– They can also be arguments. You could
organize all of your note cards under the different arguments of your paper.

Text Tags

You are able to search for tags, key words, and titles through the search bar.

You can begin your outline on Noodle Tools.
Follow the template provided on the right side of the screen.

Click to add a new problem, sub-topic, or argument.

Click to move the indentation over to the left. Give it a try to see its function!

Click to move the indentation over to the right. Give it a try to see its function!
The highlighted subtopic A was subtopic B, but I selected the move up/down button to change the order.

1. Select the argument that you want to delete.
2. Click the “X” button.
3. Confirm that you want to delete the topic.

Drag notes and piles into your outline.
When you do this step, you are adding ALL of the information needed to your outline.
When you print your article, all of the note cards will print.
This is the ideal outline.
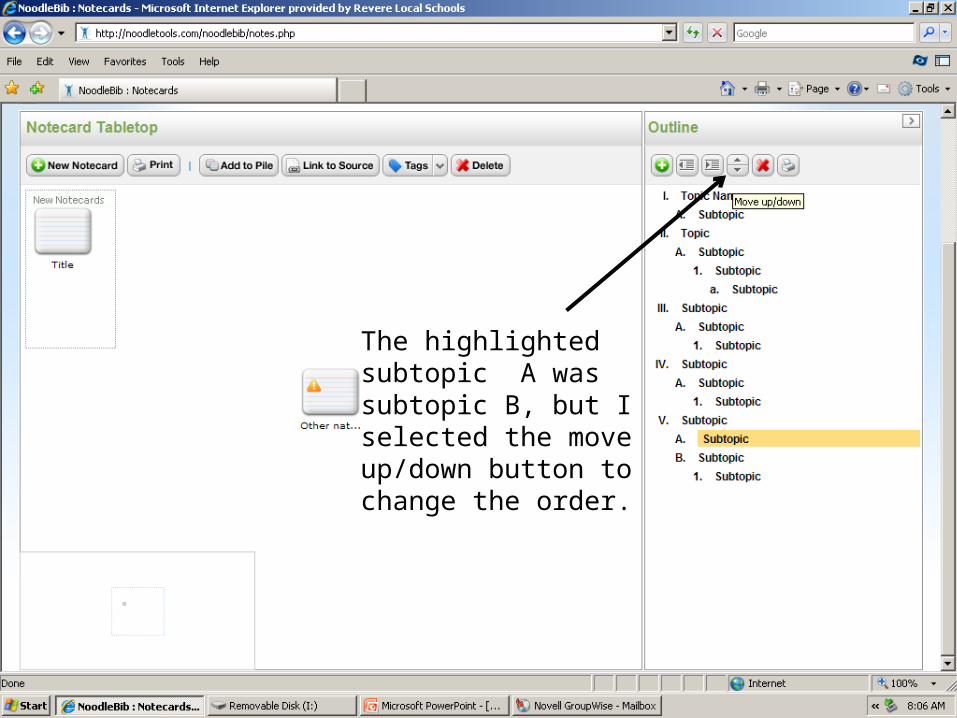
Select the printer icon.
Select the “print outline with notecards” option.Submit.Print!

Enough information?
When you think you’re done, review your work• Can I add more tags now that I know more?• Any loose ends?
• Are there types of sources I missed?– Use button to see the type and range of
sources you used.

Organizing information
Create subtopics and outline• What notes have similar titles or topics?
– Pile the note cards together.– Add the note cards to your outline.
Play with the order, be curious!• What other ways can I order my outline?• Do new grouping suggest new ways to analyze
what I know? New ideas? New questions?

Easy to add more sources if you need to!

Helpful Tutorials
• If you are confused, consult the tutorials for guidance.• Sign out of NoodleTools. Select the “Software Tools” tab.

Click on the “Tutorials & PowerPoints” link.

“Click on Tutorials”

Select a tutorial.
Notecard piles
Notecard tags
Notecard color tags
Moving notecards on the tabletop
Notecard text tags
Notecard visual cues