Embed Size (px)
Citation preview
Cold Weather Kit#6231 & #6254
Installation Instructions
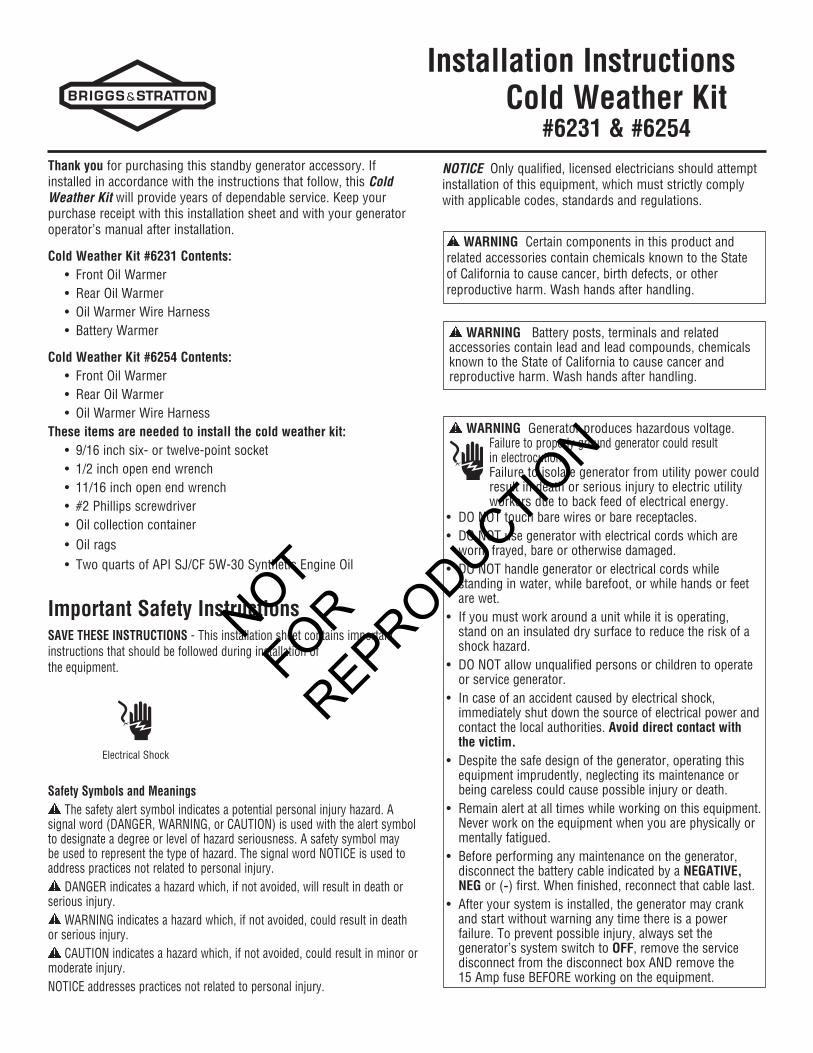
Thank you for purchasing this standby generator accessory. If installed in accordance with the instructions that follow, this Cold Weather Kit will provide years of dependable service. Keep your purchase receipt with this installation sheet and with your generator operator’s manual after installation.
Cold Weather Kit #6231 Contents: • FrontOilWarmer • RearOilWarmer • OilWarmerWireHarness • BatteryWarmer
Cold Weather Kit #6254 Contents: • FrontOilWarmer • RearOilWarmer • OilWarmerWireHarnessThese items are needed to install the cold weather kit: • 9/16inchsix-ortwelve-pointsocket • 1/2inchopenendwrench • 11/16inchopenendwrench • #2Phillipsscrewdriver • Oilcollectioncontainer • Oilrags • TwoquartsofAPISJ/CF5W-30SyntheticEngineOil
Important Safety InstructionsSAVE THESE INSTRUCTIONS-Thisinstallationsheetcontainsimportantinstructions that should be followed during installation of theequipment.
Safety Symbols and MeaningsThesafetyalertsymbolindicatesapotentialpersonalinjuryhazard.A
signalword(DANGER,WARNING,orCAUTION)isusedwiththealertsymboltodesignateadegreeorlevelofhazardseriousness.Asafetysymbolmaybeusedtorepresentthetypeofhazard.ThesignalwordNOTICEisusedtoaddresspracticesnotrelatedtopersonalinjury.
DANGERindicatesahazardwhich,ifnotavoided,willresultindeathorseriousinjury.
WARNINGindicatesahazardwhich,ifnotavoided,couldresultindeathorseriousinjury.
CAUTIONindicatesahazardwhich,ifnotavoided,couldresultinminorormoderateinjury.NOTICEaddressespracticesnotrelatedtopersonalinjury.
ElectricalShock
NOTICE Onlyqualified,licensedelectriciansshouldattemptinstallationofthisequipment,whichmuststrictlycomplywith applicable codes, standards and regulations.
WARNING CertaincomponentsinthisproductandrelatedaccessoriescontainchemicalsknowntotheStateofCaliforniatocausecancer,birthdefects,orotherreproductiveharm.Washhandsafterhandling.
WARNINGBatteryposts,terminalsandrelatedaccessories contain lead and lead compounds, chemicals knowntotheStateofCaliforniatocausecancerandreproductiveharm.Washhandsafterhandling.
WARNINGGeneratorproduceshazardousvoltage. Failuretoproperlygroundgeneratorcouldresultin electrocution. Failuretoisolategeneratorfromutilitypowercouldresultindeathorseriousinjurytoelectricutilityworkersduetobackfeedofelectricalenergy.
• DONOTtouchbarewiresorbarereceptacles.• DONOTusegeneratorwithelectricalcordswhichare
worn, frayed, bare or otherwise damaged.• DONOThandlegeneratororelectricalcordswhile
standing in water, while barefoot, or while hands or feet are wet.
• Ifyoumustworkaroundaunitwhileitisoperating,standonaninsulateddrysurfacetoreducetheriskofashockhazard.
• DONOTallowunqualifiedpersonsorchildrentooperateor service generator.
• Incaseofanaccidentcausedbyelectricalshock,immediately shut down the source of electrical power and contact the local authorities. Avoid direct contact with the victim.
• Despite the safe design of the generator, operating this equipmentimprudently,neglectingitsmaintenanceorbeingcarelesscouldcausepossibleinjuryordeath.
• Remainalertatalltimeswhileworkingonthisequipment.Neverworkontheequipmentwhenyouarephysicallyormentally fatigued.
• Beforeperforminganymaintenanceonthegenerator,disconnect the battery cable indicated by a NEGATIVE, NEG or (-)first.Whenfinished,reconnectthatcablelast.
• Afteryoursystemisinstalled,thegeneratormaycrankand start without warning any time there is a power failure.Topreventpossibleinjury,alwayssetthegenerator’s system switch to OFF, remove the service disconnectfromthedisconnectboxANDremovethe15AmpfuseBEFOREworkingontheequipment.
NOT
FOR
REPRODUCTION

2 BRIGGSandSTRATTON.COM
InstallationDisconnect PowerNOTICEBeforeperforminganygeneratorinstallation,maintenance,orservice,ALWAYSperformthefollowingsteps:
1. Setgenerator’scircuitbreakertoitsOFF position.
2. DepressthecontrolpanelOFF switch for3seconds.
3. Remove15Ampfusefromcontrolpanel.
4. Utility voltage is present at generator control panel. Disconnect power before servicing control panel by removing the fuses from the transfer switch.
Install Front Oil Warmer (6231,6254) 1. Usingtheoilcollectioncontainer,drainoilfromengineas
described in Maintenance in the generator operator’s manual.
2. Positionoilragstocollectresidualoilfromcrankcase.
3. Removetheoildrainhose(A)fromtheforwardfacingsideofthecrankcase.
4. Theelbow-fitting-equippedoilwarmer(B)mustbeinstalledinplace of the oil drain hose facing the front of the generator.
5. Handthreadoilwarmerintocrankcase.
NOTICE DonotusethreadsealantorTeflontapeasoilwarmeriscoated with sealant.
6. Tightenfrontoilwarmer¼turnpastsnug.Orientthewarmersuch that the oil drain hose will allow oil to drain properly through the hose.
7. Handthreadtheoildrainhoseintheoilwarmerelbowfitting.Tightenthehosetotheoilwarmerelbow¼turnpastsnug.
Install Rear Oil Warmer (6231,6254) 1. Positionragstocollectresidualoilfromthecrankcase
and remove the plug from the rearward facing side of the crankcase.Discardplug.
2. Thenon-elbow-fittingequippedoilwarmer(C)mustbeinstalled in place of the oil drain plug facing the rear of the generator.
3. Handthreadoilwarmerintocrankcase.
NOTICE DonotusethreadsealantorTeflontapeasoilwarmeriscoated with sealant.
4. Tightenrearoilwarmer¼turnpastsnug.
Install Oil Warmer Wire Harness (6231,6254) 1. Connectthe2-pinmaleplugonthewarmerharnesstothe
2-pinfemalereceptacleonthegeneratorwireharness(D).The2-pinfemalereceptacleislocatedneartheenginestarter.
2. Connectthe2-pinfemalereceptacleonthewarmerharnesstothe2-pinmaleplugontherearoilwarmer(E).
3. Routethewarmerharness(F)undertheengine/alternatorassembly.Connecttheremainingwarmerharness2-pinreceptacletothe2-pinmaleplugonthefrontoilwarmer.
4. Addengineoiltofullmarkondipstickaccordingtotheinstructions in the Maintenance section in the operator’s manual.
5. Startengineandinspectforleaks.Ifleaksarefound,repairasnecessary.
B
A
C
D
E
F
NOT
FOR
REPRODUCTION
3
Install Battery Warmer (6231)
NOTICEThebatterywarmermustbeinstalledafterthegenerator installation is complete. Do not transport the generatorwiththebatteryand/orbatterywarmerinstalled. 1. ConsulttheInstallationManualforrecommended
batterytypeandsizing. 2. Setthegenerator’scircuitbreakertotheOFF position. 3. DepressthecontrolpanelOFF switch for3seconds. 4. Removethe15Ampfusefromthesystemcontrol
panel.NOTICEUtilityvoltageispresentatthecontrolpanel.Disconnect power before servicing the control panel by removing the fuses from the transfer switch. 5. Removethetwofastenerssecuringthepanelatthe
righthandsideofthegenerator.Removethepanel. 6. Ifanexistingbatteryisinplace,loosenanddisconnect
the negative (-)batterycablefromthenegativebatteryterminal.Thenremovethepositive(+)batterycablefromthepositivebatteryterminal.Removethebatteryfrom the unit and set aside.
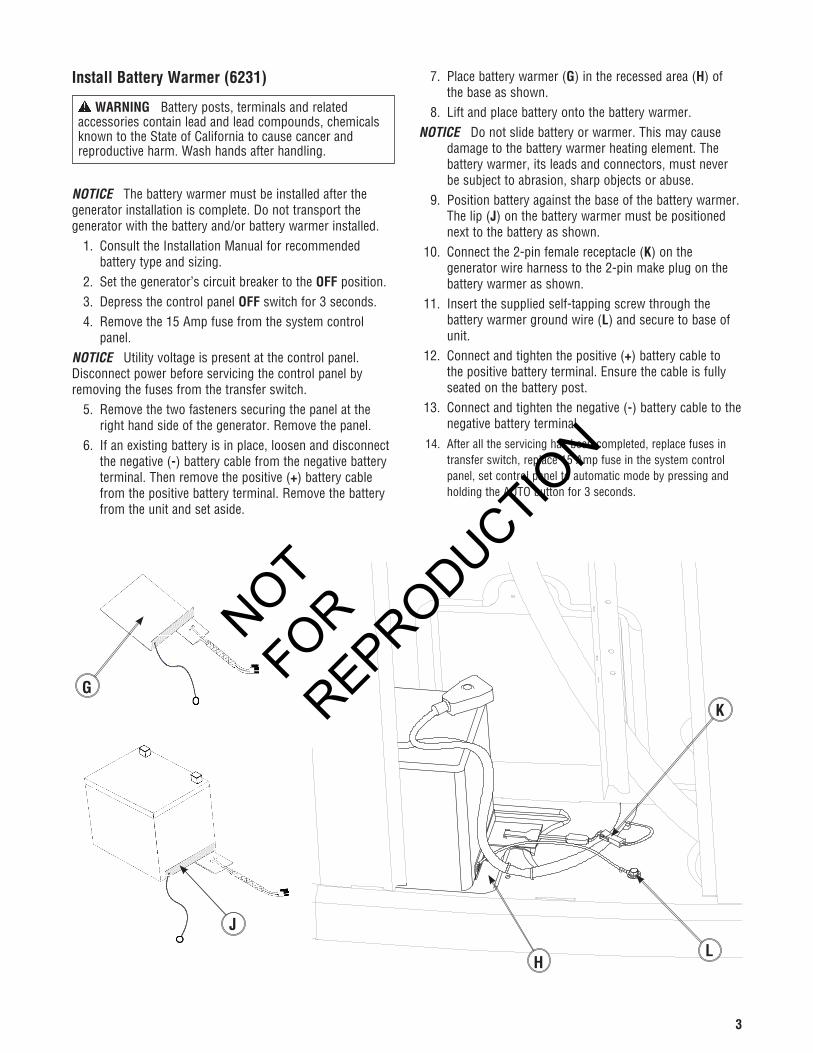
7. Placebatterywarmer(G)intherecessedarea(H)ofthe base as shown.
8. Liftandplacebatteryontothebatterywarmer.NOTICEDonotslidebatteryorwarmer.Thismaycause
damagetothebatterywarmerheatingelement.Thebattery warmer, its leads and connectors, must never besubjecttoabrasion,sharpobjectsorabuse.
9. Positionbatteryagainstthebaseofthebatterywarmer.Thelip(J)onthebatterywarmermustbepositionednexttothebatteryasshown.
10. Connectthe2-pinfemalereceptacle(K)onthegeneratorwireharnesstothe2-pinmakeplugonthebattery warmer as shown.
11. Insertthesuppliedself-tappingscrewthroughthebattery warmer ground wire (L)andsecuretobaseofunit.
12. Connectandtightenthepositive(+)batterycabletothepositivebatteryterminal.Ensurethecableisfullyseated on the battery post.
13. Connectandtightenthenegative(-)batterycabletothenegative battery terminal.
14. Afteralltheservicinghasbeencompleted,replacefusesintransferswitch,replace15Ampfuseinthesystemcontrolpanel, set control panel to automatic mode by pressing and holdingtheAUTObuttonfor3seconds.
WARNINGBatteryposts,terminalsandrelatedaccessories contain lead and lead compounds, chemicals knowntotheStateofCaliforniatocausecancerandreproductiveharm.Washhandsafterhandling.
H
G
J
K
L
NOT
FOR
REPRODUCTION

4 BRIGGSandSTRATTON.COM
1YearLimitedWarranty
Thisisa“LimitedWarranty”asdefinedintheU.S.ConsumerProductWarrantyandFederalTradeCommissionImprovementAct.Thiswarranty gives you specific legal rights, and you may also have other rights that vary from state to state or country to country.
Foraperiodof1yearfromthedateofpurchase,anymalfunctioncausedbyfactorydefectivepartsorworkmanshipwillbecorrectedatnochargetoyou.Toobtainarefundorareplacement,returntheproducttotheplaceofpurchasealongwithproofofpurchase.
NotCovered-Repairservice,adjustmentandcalibrationduetomisuse,abuseornegligenceandotherexpendableitemsarenotcoveredbythiswarranty.Unauthorizedserviceormodificationofanyfurnishedcomponentwillvoidthiswarrantyinitsentirety.Thiswarrantydoesnotincludereimbursementforinconvenience,labor,transportationcharges,installation,set-uptime,lossofuseorunauthorizedservice.
ThiswarrantycoversonlyBriggs&Strattonproductsandisnotextendedtopremises,otherequipment,andcomponentsthataconsumerusesinconjunctionwithourproducts.
SUCHREPAIRORREPLACEMENTSHALLBETHESOLEREMEDYOFTHECUSTOMERANDTHERESHALLBENOLIABILITYONTHEPARTOFBRIGGS&STRATTONPOWERPRODUCTSGROUP,LLCFORANYSPECIAL,INDIRECT,INCIDENTALORCONSEQUENTIALDAMAGES,INCLUDINGBUTNOTLIMITEDTOANYLOSSOFBUSINESSORPROFITS,WHETHERORNOTFORESEEABLE.Somestatesandcountriesdonotallowtheexclusionorlimitationofincidentalorconsequentialdamages,sothislimitationorexclusionmaynotapplytoyou.
Warranty
Briggs&StrattonPowerProductsGroup,LLCP.O.Box702Milwaukee,WI53201-0702
Copyright©2012.Allrightsreserved.NopartofthismaterialmaybereproducedortransmittedinanyformwithouttheexpresswrittenpermissionofBriggs&StrattonPowerProductsGroup,LLC.
Questions?
Help is just a moment away!Call: Technical Services 800-743-4115 Monday-Friday 8:00 AM to 5:00 PM Central Time
NOT
FOR
REPRODUCTION
5
Contenido del juego para climas fríos #6231:
• Calentadordeaceitedelantero.
• Calentadordeaceitetrasero.
• Hazdecablesdelcalentadordeaceite.
• Calentadordebatería.
Contenido del juego para climas fríos #6254:
• Calentadordeaceitedelantero.
• Calentadordeaceitetrasero.
• Hazdecablesdelcalentadordeaceite.
Estos elementos son necesarios para instalar el juego para climas fríos: • Llavede9/16pulg.deseisodoceestrías.
• Llavefijade1/2pulgada.
• Llavefijade11/16pulg.
• Destornilladorconpuntadeestrelladeln.°2.
• Contenedorparalarecoleccióndeaceite.
• Pañosparaelaceite.
• 1,9litrosdeaceitesintéticoparamotorAPISJ/CF5W-30
Instrucciones importantes de seguridadGUARDEESTASINSTRUCCIONES-Estemanualcontieneinstruccionesimportantesquesedebenseguirdurantelainstalaciónyelmantenimientodelgeneradorydelasbaterías.
Símbolos sobre la seguridad y significados
Elsímbolodealertadeseguridadindicaunposibleriesgoparasuintegridadfísica.Seutilizaunapalabradeseñalización(PELIGRO,ADVERTENCIAoATENCIÓN)juntoconelsímbolodealertaparadesignarungradooniveldegravedadderiesgo.Sepuedeutilizarunsímbolodeseguridadpararepresentareltipoderiesgo.LapalabradeseñalizaciónAVISOseutilizaparahacerreferenciaaunaprácticanorelacionadaconunalesiónfísica.
PELIGROindicaunriesgoque,denoevitarse,provocará la muerte o lesiones de gravedad.
ADVERTENCIAindicaunriesgoque,denoevitarse,podría provocar la muerte o lesiones de gravedad.
ATENCIÓNindicaunriesgoque,denoevitarse,podría provocar lesiones leves o moderadas.AVISOhacereferenciaaunaprácticanorelacionadaconunalesiónfísica.
NOTICE Únicamente los electricistas capacitados pueden intentarinstalaresteproducto.Dichainstalacióndebecumplirestrictamenteconloscódigos,lasregulacionesylasnormascorrespondientes.
Descargaeléctrica
ADVERTENCIALaspatillasdelasbaterías,losterminalesy los accesorios relacionados contienen plomo y compuestos deplomo-sustanciasquímicasdeclaradascancerígenasycausantesdemalformacionescongénitasporelEstadodeCalifornia.Láveselasmanosdespuésdemanipularestos elementos.
ADVERTENCIA Determinados componentes en este producto y los accesorios relacionados contienen sustancias químicasdeclaradascancerígenas,causantesdemalformaciones,yotrosdefectoscongénitosporelEstadodeCalifornia.Láveselasmanosdespuésdemanipularestoselementos.
ADVERTENCIALosgeneradoresproducenunvoltajemuy poderoso. Sinohacetierraapropiadamenteconungenerador,puedehacerqueocurraunelectrocutamiento. Sinoaíslaelgeneradordeutilidadesdeenergía,puedehacerquelostrabajadoresdeelectricidad
sufran heridas graves e inclusive la muerte, debido a la retroalimentacióndelaenergíaeléctrica.• NOtoqueloscablespeladosnilastomasexpuestas.• NOuseungeneradorconcableseléctricosqueesténmalgastados,rotos,peladosodañadosdecualquierforma.
• NOmanejeelgeneradorocableseléctricosmientrasestéparadoenagua,descalzoocuandolasmanosylospiesesténmojados.
• Sitienequetrabajarjuntoaunaunidadenfuncionamiento,manténgaseenunasuperficieaisladaysecaparareducirelriesgodedescargaeléctrica.
• NOpermitaquepersonasdescalificadasoniñosoperenosirvanal generador.
• Encasodequeseproduzcaunaccidentecausadoporunadescargaeléctrica,cierreinmediatamentelafuentedeenergíaeléctricaycontactaadministraciónlocal.Evite el contacto directo con la víctima.
• Apesardeldiseñosegurodelsistemadegeneradordedoméstico,siseoperaesteequipoenformaimprudente,sinose cumple con el mantenimiento o si se actúa con descuido, se pueden producir lesiones o la muerte.
• Permanezcasiemprealertacuandotrabajeconesteequipo.NUNCAtrabajeconesteequiposisesientecansadofísicaomentalmente.
• Antesderealizarcualquiertareademantenimientoenelgenerador,desconecteprimeroelcabledelabateríamarcadocomo NEGATIVE, NEG o (-).Cuandohayaterminado,vuelvaaconectar el cable en último lugar.
• Despuésdeinstalarelsistemagenerador,puedearrancarseycomenzarafuncionarsinprevioavisocadavezquesepresenteunafallaeléctrica.Paraevitarposibleslesiones,siemprefijeelconmutadordelsistemaenOFF,Yretireelfusiblede15AmperiosANTESderealizartrabajosenelequipo.
Juego para climas fríos#6231 & #6254
Instrucciones de instalación
NOT
FOR
REPRODUCTION
6 BRIGGSandSTRATTON.COM
Instalación
Desconecte la alimentaciónAVISO Antesdellevaracabocualquierinstalación,mantenimientooserviciodelgenerador,realiceSIEMPRElossiguientespasos: 1. PongaeldisyuntordelgeneradorenlaposiciónOFF. 2. OprimaelinterruptorOFFdelpaneldecontrolpor3
segundos. 3. Quiteelfusiblede15Adelpaneldecontrol. 4. Haytensióndelaredpúblicaenelpaneldecontroldel
generador.Desconectelaalimentaciónantesdeprocederalserviciodelpaneldecontrol,quitandolosfusiblesdelconectador.
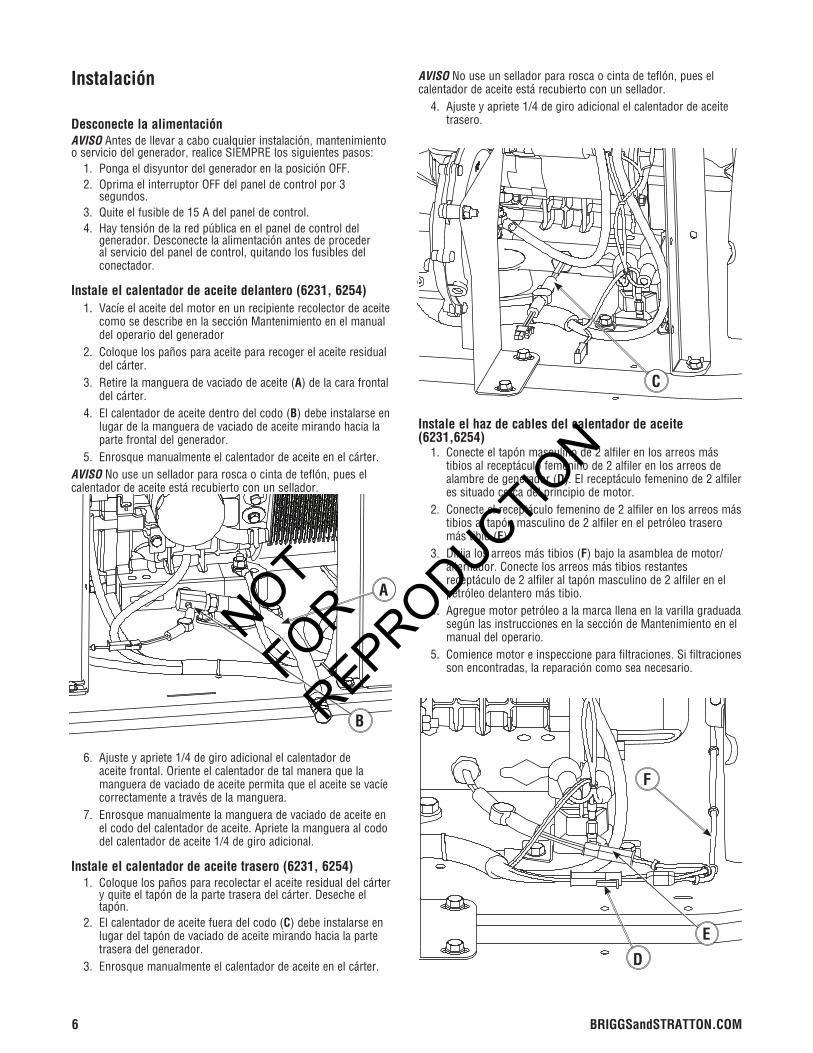
Instale el calentador de aceite delantero (6231, 6254) 1. Vacíeelaceitedelmotorenunrecipienterecolectordeaceite
comosedescribeenlasecciónMantenimientoenelmanualdel operario del generador
2. Coloquelospañosparaaceitepararecogerelaceiteresidualdel cárter.
3. Retirelamangueradevaciadodeaceite(A)delacarafrontaldel cárter.
4. Elcalentadordeaceitedentrodelcodo(B)debeinstalarseenlugar de la manguera de vaciado de aceite mirando hacia la parte frontal del generador.
5. Enrosquemanualmenteelcalentadordeaceiteenelcárter.AVISONouseunselladorpararoscaocintadeteflón,pueselcalentador de aceite está recubierto con un sellador.
6. Ajusteyapriete1/4degiroadicionalelcalentadordeaceitefrontal.Orienteelcalentadordetalmaneraquelamangueradevaciadodeaceitepermitaqueelaceitesevacíecorrectamenteatravésdelamanguera.
7. Enrosquemanualmentelamangueradevaciadodeaceiteenelcododelcalentadordeaceite.Aprietelamangueraalcododelcalentadordeaceite1/4degiroadicional.
Instale el calentador de aceite trasero (6231, 6254) 1. Coloquelospañospararecolectarelaceiteresidualdelcárter
yquiteeltapóndelapartetraseradelcárter.Desecheeltapón.
2. Elcalentadordeaceitefueradelcodo(C)debeinstalarseenlugardeltapóndevaciadodeaceitemirandohacialapartetrasera del generador.
3. Enrosquemanualmenteelcalentadordeaceiteenelcárter.
AVISONouseunselladorpararoscaocintadeteflón,pueselcalentador de aceite está recubierto con un sellador. 4. Ajusteyapriete1/4degiroadicionalelcalentadordeaceite
trasero.
Instale el haz de cables del calentador de aceite (6231,6254) 1. Conecteeltapónmasculinode2alfilerenlosarreosmás
tibiosalreceptáculofemeninode2alfilerenlosarreosdealambre de generador (D).Elreceptáculofemeninode2alfileres situado cerca del principio de motor.
2. Conecteelreceptáculofemeninode2alfilerenlosarreosmástibiosaltapónmasculinode2alfilerenelpetróleotraseromás tibio (E).
3. Dirijalosarreosmástibios(F)bajolaasambleademotor/alternador.Conectelosarreosmástibiosrestantesreceptáculode2alfileraltapónmasculinode2alfilerenelpetróleodelanteromástibio.
4. AgreguemotorpetróleoalamarcallenaenlavarillagraduadasegúnlasinstruccionesenlaseccióndeMantenimientoenelmanual del operario.
5. Comiencemotoreinspeccioneparafiltraciones.Sifiltracionessonencontradas,lareparacióncomoseanecesario.
B
A
C
D
E
F
NOT
FOR
REPRODUCTION

7
Instale el calentador de batería (6231)
AVISOElcalentadordebateríadebeinstalarsedespuésdequesecompletelainstalacióndelgenerador.Notransporteelgeneradorconlabateríay/oelcalentadordebateríainstalados.
1. ConsulteelManualdeinstalaciónparavereltipoytamañodebateríaqueserecomiendan.
2. PongaeldisyuntordelgeneradorenlaposiciónOFF.
3. OprimaelinterruptorOFFdelpaneldecontrolpor3segundos.
4. Quiteelfusiblede15Adelpaneldecontroldelsistema.
AVISOHaytensióndelaredpúblicapresenteenelpaneldecontrol.Desconectelaalimentaciónantesdeprocederalserviciodelpaneldecontrol,quitandolosfusiblesdelconectador.
5. Quitelosdoselementosdefijaciónquesujetanelpanelaladerechadelgenerador.Retireelpanel.
6. Siyahayunabateríacolocada,aflojeydesconecteelcablenegativo (-)delabateríadelterminalnegativodelabatería.Despuésretireelcablepositivo(+)delabateríadelterminalpositivodelabatería.Quitelabateríadelaunidadycolóquelaa un lado.
7. Coloqueelcalentadordebatería(G)eneláreaempotrada(H)de la base, como se muestra.
8. Levanteycoloquelabateríasobreelcalentadordebatería.
AVISONodeslicelabateríanielcalentador.Estopuedecausardañosalelementodecalefaccióndelcalentadordebatería.Elcalentadordebatería,suscablesyconectoresnodebenserjamássujetosdeabrasión,objetosafiladosousoindebido.
9. Coloquelabateríacontralabasedelcalentadordebatería.Elreborde (J)delcalentadordelabateríasedebecolocarjuntoalabatería,comosemuestra.
10. Conecteelreceptáculohembrade2clavijas(K)enelhazdecablesdelgeneradoralenchufemachode2clavijasenelcalentadordebatería,comosemuestra.
11. Inserteeltornilloautorroscantesuministradoatravésdelcabledeconexiónatierradelcalentadordebatería(L)yasegure a la base de la unidad.
12. Conecteyajusteelcablepositivo(+)delabateríaalaterminalpositivadelabatería.Asegúresedequeelcableestecompletamentefijoenlaspatillasdelabatería.
13. Conecteyajusteelcablenegativo(-)delabateríaalterminalnegativodelabatería.
14. Despuésdefinalizartodaslastareasdemantenimiento,vuelva a colocar los fusibles en el conectador, vuelva a colocarelfusiblede15Aenelpaneldecontroldelsistema,ponga el panel de control en modo automático pulsando y manteniendooprimidoelbotónAUTOpor3segundos.
H
G
J
K
L
ADVERTENCIALaspatillasdelasbaterías,losterminalesy los accesorios relacionados contienen plomo y compuestos deplomo-sustanciasquímicasdeclaradascancerígenasycausantesdemalformacionescongénitasporelEstadodeCalifornia.Láveselasmanosdespuésdemanipularestos elementos.
NOT
FOR
REPRODUCTION

8 BRIGGSandSTRATTON.COM
GarantíaGarantía limitada de 1 anoLapresenteesuna“garantíalimitada”conformealadefinicióndelaleyestadounidensedemejoradegarantíadelosproductosdeconsumoydelaComisiónFederaldeComercio(ConsumerProductWarrantyandFederalTradeCommissionImprovementAct).Estagarantíaleotorgadeterminadosderechoslegalesyesposiblequetengaotrosderechosquepuedenvariardeunpaísoestadoaotro.Duranteunperíodode1anodesdelafechadecompra,serepararágratuitamentetodofalloprovocadoporcomponentesquepresentendefectosdefabricaciónodemanodeobra.Paradevolverosustituirelproducto,envíeloalpuntodeventaenelqueloadquiriójuntoconlapruebadecompra.Estagarantíanocubrelasoperacionesdereparación,ajusteycalibraciónrealizadascomoconsecuenciadelusoindebido,elmaltratoolanegligencianiloselementossujetosadesgaste.Lareparaciónomodificaciónnoautorizadadecualquiercomponentesuministradoanularálagarantíaensutotalidad.Estagarantíanoincluyereembolsospormolestiascausadas,manodeobra,instalación,tiempodemontaje,privacióndeusooservicionoautorizado.EstagarantíasólocubrelosproductosBriggs&Strattonynoesampliablealasinstalacionesnianingúnotroequipoocomponentequeelconsumidorutiliceconnuestrosproductos.LAREPARACIÓNOSUSTITUCIÓNSERÁELÚNICOREMEDIOQUESEOFRECERÁALCLIENTE,YBRIGGS&STRATTONPOWERPRODUCTSGROUP,LLCNOSERÁRESPONSABLEDENINGÚNDAÑOESPECIAL,INDIRECTO,DERIVADOOSECUNDARIO,INCLUIDOS,ENTREOTROS,LAPÉRDIDADEACTIVIDADOELLUCROCESANTE,YAFUEREONOPREVISIBLE.Algunosestadosypaísesnopermitenexcluirnilimitarlaresponsabilidadpordañosderivadosoindirectos,porloqueesposiblequeestalimitaciónoexclusiónnoseaaplicableensucaso.
Briggs&StrattonPowerProductsGroup,LLCP.O.Box702Milwaukee,WI53201-0702
Copyright©2012.Reservadostodoslosderechos.Quedaprohibidalareproducciónotransmisióntotaloparcialdeestematerial,sinelpermiso previo y por escrito de Briggs&StrattonPowerProductsGroup,LLC.
Preguntas?
La ayuda es justa un momento lejos!Llamada: Línea directa de generador de hogar877-369-9400 De lunes a viernes, de 8:00 a. m. a 5:00 p. m., hora estándar del centro.
NOT
FOR
REPRODUCTION

9
Directives de sécurité importantesCONSERVEZCESDIRECTIVES–Cemanuelrenfermed’importantesdirectivesqu’ilfautsuivredurantl’installationetl’entretiendelagénératriceetdesbatteries.
Symboles de sécurité et leur signification
Lesymboled’alertedesécuritéindiqueunrisquepotentieldeblessurepersonnelle.Unmotsignal(DANGER,AVERTISSEMENTouATTENTION)estutiliséavecunsymboled’alertepourvousindiquerledegréouleniveaudurisque.Unsymboledesécuritépeutêtreutilisépourreprésenterletypederisque.LemotsignalAVISestutilisépourtraiterlespratiquesquinesontpasreliéesauxblessurespersonnelles.
LemotsignalDANGERindiqueundangerqui,s’iln’estpasévité,causera la mort ou des blessures graves.
LemotsignalAVERTISSEMENTindiqueunrisquequi,s’iln’estpasévité,pourrait causer la mort ou des blessures graves.
LemotsignalATTENTIONindiqueunrisquequi,s’iln’estpasévité,pourrait causerdesblessuresmineuresoumodérées.
LemotAVISestutilisépourlespratiquesquinesontpasreliéesauxblessurespersonnelles.
AVIS Seulslesélectriciensqualifiéspeuventprocéderàl’installationdeceproduit,laquelledoitseconformerstrictementauxcodes,auxnormesetauxréglementationsapplicables.
Chocêlectrique
AVERTISSEMENTCertainscomposantsdeceproduitainsiquelesaccessoiresreliéscontiennentdesproduitschimiquesreconnusparl’ÉtatdelaCaliforniecommecausantdescancers,desmalformationscongénitales,oud’autresproblèmesdereproduction.Nettoyez-vouslesmains après la manipulation.
AVERTISSEMENTLegénérateurproduitunetensionélevée. Nepasrelierlegénérateuràlaterrerisquedeprovoquerdesélectrocutions. NEPASisolerlegénérateurdel’installationélectriquerisquedeprovoquerdesblessuresoumêmed’êtrefatalpourlesouvriersélectriciensetdecauserdesdommagesau
générateurdusàun“backfeed”d’énergieélectrique• Lorsquevousutilisezlegénérateurcommesourced’énergiedesecours,
ilestnécessaired’aviserlesservicespublicsd’électricité.• NEtouchezPASauxfilsouauxprisesdénudés.• N’utilisezPASlegénérateuravecdescordonsélectriquesusés,
effilochésoudénudés,ouabîmésdequelquesortequecesoit.• NEmanipulezPASlegénérateuroulescordonsd’alimentationlorsque
vous êtes debout dans l’eau, pieds nus ou avec les mains ou les pieds humides.
• Sivousdeveztravaillerauxenvironsd’uneunitéalorsqu’elleestenmarche,placez-voussurunesurfacesècheisoléeafinderéduirelesrisquesdechocélectrique.
• NElaissezPASdespersonnesnonqualifiéesoudesenfantsseservirouréparerlegénérateur.
• Encasd’accidentcauséparunchocélectrique,procédezimmédiatementàlamisehorstensiondel’alimentationélectriqueetcontacterdesautoritéslocales.Évitez tout contact direct avec la victime.
• Endépitdelaconceptionsécuritairedugroupeélectrogène,lefaitd’opérerl’équipementdefaçonimprudente,denepasl’entreteniroud’êtrenégligentpeutcauserdesblessuresetlamort.
• Demeurezalerteentouttempslorsquevoustravaillezsurcetéquipement.NEtravaillezJAMAISsurl’équipementsivousêtesfatiguéphysiquementoumentalement.
• Avantdeprocéderàtoutentretiensurlagénératrice,débrancheztoutd’abordlecâbledebatterieidentifiéparNEGATIVE, NEG ou (-).Rebranchezlecâbleaprèsavoirterminé.
• Unefoisvotregroupeélectrogèneinstallé,lagénératricepeutselanceretdémarrersansavertissementlorsquesurvientunepanneélectrique.Pourprévenirdesblessurespotentielles,AVANTdetravaillersurl’équipement,régleztoujoursl’interrupteurdesystèmesurOFF,ETenlevezlefusiblede15Ampères.
AVERTISSEMENTLesbornes,lescossesainsiquetouslesaccessoiresreliésàlabatteriecontiennentduplombetdescomposésdeplomb-produitschimiquesreconnusparl’ÉtatdelaCaliforniecommecausantdescancersetd’autresproblèmesdereproduction.Nettoyez-vous les mains après la manipulation.
La trousse pour les temps froids comprend (6231): • Réchauffeurd’huileavant • Réchauffeurd’huilearrière • Faisceaudecâblesderéchauffeurd’huile • Chauffe-batterieLa trousse pour les temps froids comprend (6254): • Réchauffeurd’huileavant • Réchauffeurd’huilearrière • Faisceaudecâblesderéchauffeurd’huile
Ces articles sont nécessaires pour l’installation de la trousse pour les temps froids : • Douillesde9/16poàsixoudouzepoints • Cléouvertede1/2po • Cléouvertede11/16po • TournevisàpointecruciformeNo.2 • Contenantderécupérationd’huile • Chiffonspourhuile • Deuxpintesd’huileàmoteursynthétiqueAPISJ/CF5W-30
Trousse pour les temps froids#6231 & #6254
Directives d’installation
NOT
FOR
REPRODUCTION
10 BRIGGSandSTRATTON.COM
InstallationDébranchement de l’alimentationREMARQUE Avantdeprocéderàl’entretiendelagénératrice,suivezTOUJOURSlesétapessuivantes. 1. RéglezledisjoncteurdelagénératriceàlapositionOFF. 2. Appuyezsurl’interrupteurOFFdutableaudecommande
pendant3secondes. 3. Retirezlefusiblede15Adutableaudecommande. 4. Delatensiondeserviceestprésenteautableaude
commandedelagénératrice.Débranchezl’alimentationavantd’effectuer l’entretien du tableau de commande en retirant les deuxfusiblesducommutateurdetransfert.
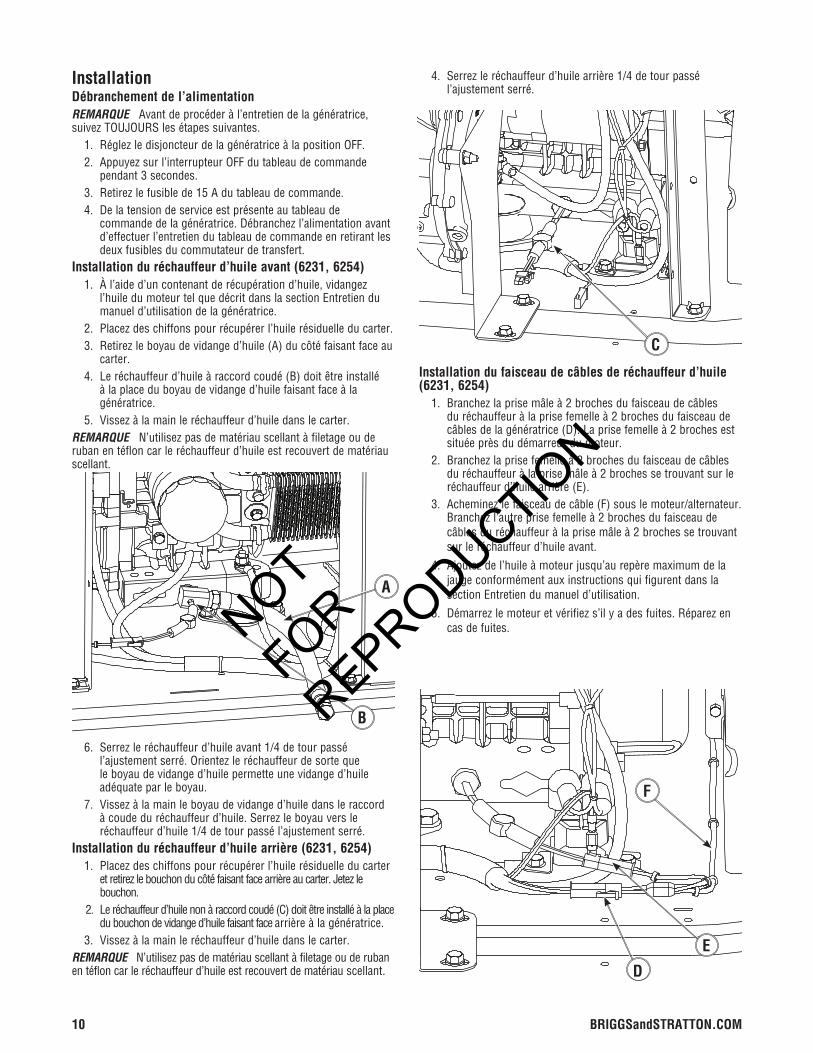
Installation du réchauffeur d’huile avant (6231, 6254) 1. Àl’aided’uncontenantderécupérationd’huile,vidangez
l’huiledumoteurtelquedécritdanslasectionEntretiendumanueld’utilisationdelagénératrice.
2. Placezdeschiffonspourrécupérerl’huilerésiduelleducarter. 3. Retirezleboyaudevidanged’huile(A)ducôtéfaisantfaceau
carter. 4. Leréchauffeurd’huileàraccordcoudé(B)doitêtreinstallé
àlaplaceduboyaudevidanged’huilefaisantfaceàlagénératrice.
5. Vissezàlamainleréchauffeurd’huiledanslecarter.REMARQUE N’utilisezpasdematériauscellantàfiletageouderubanentéfloncarleréchauffeurd’huileestrecouvertdematériauscellant.
6. Serrezleréchauffeurd’huileavant1/4detourpassél’ajustementserré.Orientezleréchauffeurdesortequele boyau de vidange d’huile permette une vidange d’huile adéquateparleboyau.
7. Vissezàlamainleboyaudevidanged’huiledansleraccordàcoudeduréchauffeurd’huile.Serrezleboyauversleréchauffeurd’huile1/4detourpassél’ajustementserré.
Installation du réchauffeur d’huile arrière (6231, 6254) 1. Placezdeschiffonspourrécupérerl’huilerésiduelleducarter
etretirezlebouchonducôtéfaisantfacearrièreaucarter.Jetezlebouchon.
2. Leréchauffeurd’huilenonàraccordcoudé(C)doitêtreinstalléàlaplacedubouchondevidanged’huilefaisantfacearrièreàlagénératrice.
3. Vissezàlamainleréchauffeurd’huiledanslecarter.REMARQUEN’utilisezpasdematériauscellantàfiletageouderubanentéfloncarleréchauffeurd’huileestrecouvertdematériauscellant.
4. Serrezleréchauffeurd’huilearrière1/4detourpassél’ajustementserré.
Installation du faisceau de câbles de réchauffeur d’huile (6231, 6254) 1. Branchezlaprisemâleà2brochesdufaisceaudecâbles
duréchauffeuràlaprisefemelleà2brochesdufaisceaudecâblesdelagénératrice(D).Laprisefemelleà2brochesestsituéeprèsdudémarreurdumoteur.
2. Branchezlaprisefemelleà2brochesdufaisceaudecâblesduréchauffeuràlaprisemâleà2brochessetrouvantsurleréchauffeurd’huilearrière(E).
3. Acheminezlefaisceaudecâble(F)souslemoteur/alternateur.Branchezl’autreprisefemelleà2brochesdufaisceaudecâblesduréchauffeuràlaprisemâleà2brochessetrouvant surleréchauffeurd’huileavant.
4. Ajoutezdel’huileàmoteurjusqu’aurepèremaximumdelajaugeconformémentauxinstructionsquifigurentdanslasectionEntretiendumanueld’utilisation.
5. Démarrezlemoteuretvérifiezs’ilyadesfuites.Réparezencas de fuites.
B
A
C
D
E
F
NOT
FOR
REPRODUCTION
11
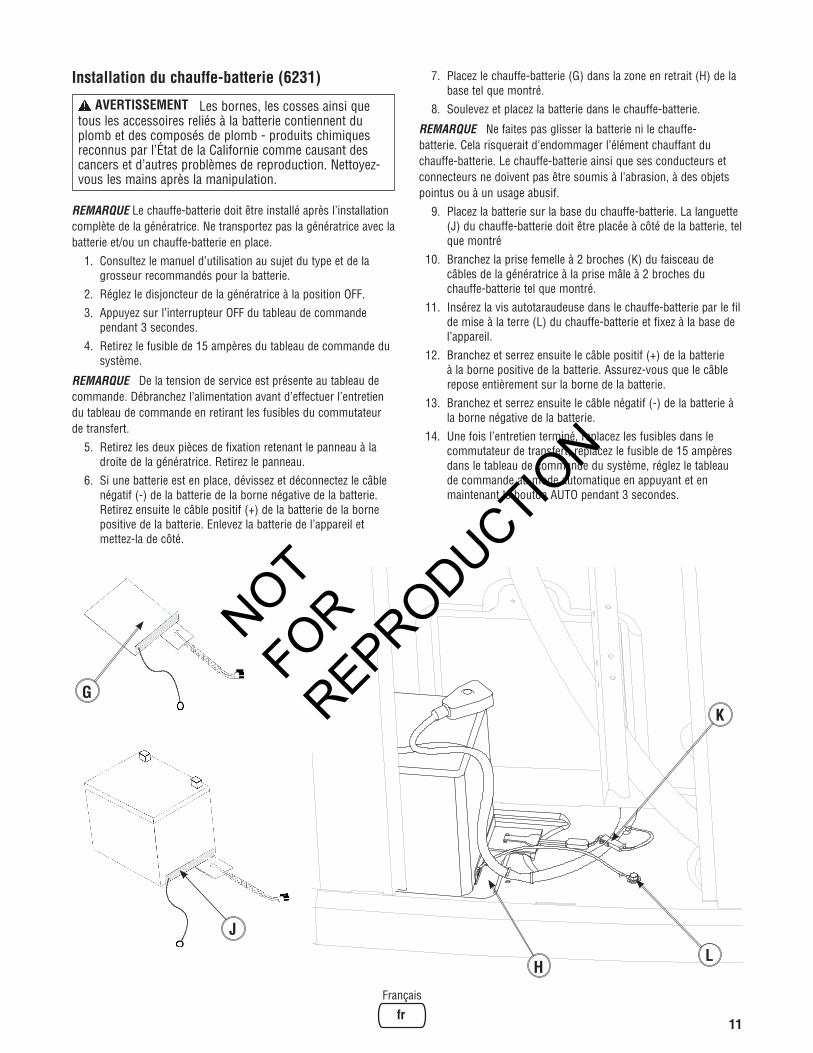
Installation du chauffe-batterie (6231)
REMARQUELechauffe-batteriedoitêtreinstalléaprèsl’installationcomplètedelagénératrice.Netransportezpaslagénératriceaveclabatterieet/ouunchauffe-batterieenplace.
1. Consultezlemanueld’utilisationausujetdutypeetdelagrosseurrecommandéspourlabatterie.
2. RéglezledisjoncteurdelagénératriceàlapositionOFF.
3. Appuyezsurl’interrupteurOFFdutableaudecommandependant3secondes.
4. Retirezlefusiblede15ampèresdutableaudecommandedusystème.
REMARQUEDelatensiondeserviceestprésenteautableaudecommande.Débranchezl’alimentationavantd’effectuerl’entretiendu tableau de commande en retirant les fusibles du commutateur de transfert.
5. Retirezlesdeuxpiècesdefixationretenantlepanneauàladroitedelagénératrice.Retirezlepanneau.
6. Siunebatterieestenplace,dévissezetdéconnectezlecâblenégatif(-)delabatteriedelabornenégativedelabatterie.Retirezensuitelecâblepositif(+)delabatteriedelabornepositivedelabatterie.Enlevezlabatteriedel’appareiletmettez-ladecôté.
7. Placezlechauffe-batterie(G)danslazoneenretrait(H)delabasetelquemontré.
8. Soulevezetplacezlabatteriedanslechauffe-batterie.
REMARQUE Nefaitespasglisserlabatterienilechauffe-batterie.Celarisqueraitd’endommagerl’élémentchauffantduchauffe-batterie.Lechauffe-batterieainsiquesesconducteursetconnecteursnedoiventpasêtresoumisàl’abrasion,àdesobjetspointusouàunusageabusif.
9. Placezlabatteriesurlabaseduchauffe-batterie.Lalanguette(J)duchauffe-batteriedoitêtreplacéeàcôtédelabatterie,telquemontré
10. Branchezlaprisefemelleà2broches(K)dufaisceaudecâblesdelagénératriceàlaprisemâleà2brochesduchauffe-batterietelquemontré.
11. Insérezlavisautotaraudeusedanslechauffe-batterieparlefildemiseàlaterre(L)duchauffe-batterieetfixezàlabasedel’appareil.
12. Branchezetserrezensuitelecâblepositif(+)delabatterieàlabornepositivedelabatterie.Assurez-vousquelecâblerepose entièrement sur la borne de la batterie.
13. Branchezetserrezensuitelecâblenégatif(-)delabatterieàlabornenégativedelabatterie.
14. Unefoisl’entretienterminé,replacezlesfusiblesdanslecommutateurdetransfert,replacezlefusiblede15ampèresdansletableaudecommandedusystème,réglezletableaudecommandeaumodeautomatiqueenappuyantetenmaintenantleboutonAUTOpendant3secondes.
H
G
J
K
L
AVERTISSEMENTLesbornes,lescossesainsiquetouslesaccessoiresreliésàlabatteriecontiennentduplombetdescomposésdeplomb-produitschimiquesreconnusparl’ÉtatdelaCaliforniecommecausantdescancersetd’autresproblèmesdereproduction.Nettoyez-vous les mains après la manipulation.
NOT
FOR
REPRODUCTION

Garantie limitée de 1 anneeIls’agitd’une«Garantielimitée»,tellequedéfiniedansU.SConsumerProductWarrantyandFederalTradeCommissionImprovementAct.Laprésentegarantievousaccordecertainsdroitslégauxspécifiquesetvouspourriezégalementenavoird’autres,quipeuventvarierd’unÉtatoud’uneprovinceàl’autreetd’unpaysàl’autre.Pourunepériodede1anneeàpartirdeladated’achat,toutedéfaillancecauséepardespiècesdéfectueusesouundéfautdefabricationseracorrigéesansfrais.Pourobtenirunremboursementouunarticlederemplacement,retournezleproduit,accompagnéd’unepreuved’achat,àl’endroitoùvousl’avezacheté.Exclus–Leservicederéparation,leréglageetl’étalonnagenécessairesàlasuited’unemauvaiseutilisation,d’uneutilisationabusiveoudenégligenceainsiquelesautrespiècesnonrécupérablessontexclusdelaprésentegarantie.L’entretienoulamodificationnonautorisésdetoutecomposantefournieannuleracomplètementlaprésentegarantie.Cettegarantieexclutleremboursementdesinconvénientssubis,delamaind’œuvre,del’installation,dutempsderéglage,delaperted’usageetdel’entretiennonautorisé.CettegarantienecouvrequelesproduitsdeBriggs&Strattonetn’estpasvalidepourleslieux,lesautreséquipementsetcomposantesqueleconsommateurutiliseavecnosproduits.LARÉPARATIONOULEREMPLACEMENTCONSTITUELESEULRECOURSDUCLIENT,ETBRIGGS&STRATTONPOWERPRODUCTSGROUP,LLC,NEDOITÊTRETENURESPONSABLED’AUCUNDOMMAGESPÉCIAL,INDIRECT,ACCIDENTELOUCONSÉCUTIF,NOTAMMENTLAPERTE,PRÉVISIBLEOUNON,DEVENTESOUDEPROFITS.CertainsÉtatsouprovincesoupaysn’autorisentpaslesexclusionsouleslimitationsdesdommagesaccessoiresouindirects.Ceslimitationsouexclusionsprécédentespourraientdoncnepass’appliquerdansvotrecas.
Garantie
317514GSRev.B
Briggs&StrattonPowerProductsGroup,LLCP.O.Box702Milwaukee,WI53201-0702
Copyright©2012.Tousdroitsréservés.Aucunepartiedecemanuelnepeutêtrereproduiteoutransmisesousn’importequelleformesansl’autorisationexpresseécritede Briggs&StrattonPowerProductsGroup,LLC..
Vous avez des questions?
Vous n’avez pas besoin d’aller loin pour trouver de l’aide!Appelez: ligne directe de génératrice la maison 877-369-9400 Du lundi au vendredi de 8:00 a. m. a 5:00 p. m., heure du centre
NOT
FOR
REPRODUCTION

![JxètâliT TEL : 06—6205—4723 ( ± a FAX : 06-6231 …...FIJ 15*lc 1990#, "/JxËt3T" "/JxètxiT" —oo&o, ï541-0046 Tel : 06-6205-4723 Fax : 06-6231-0403 "1]NètâlÃ" http :](https://img.dokumen.tips/doc/110x75/5e2a9ea4d89a3f6b28775c1e/jxtlit-tel-06a6205a4723-a-fax-06-6231-fij-15lc-1990-jxt3t.jpg)