Embed Size (px)
Citation preview

Installation Guidefor Websense Enterprise v5.0.1,
Stand-Alone EditionEmbedded on Nokia IPSOTM Appliances
v5.0.1

Websense Enterprise Installation Guide ©1996–2003, Websense Inc.All rights reserved.10240 Sorrento Valley Rd., San Diego, CA 92121, USAPublished November 24, 2003Printed in the United States of America
NP33-0003NOOThis document may not, in whole or in part, be copied, photocopied, reproduced, translated, or reduced to any electronic medium or machine-readable form without prior consent in writing from Websense Inc.Every effort has been made to ensure the accuracy of this manual. However, Websense Inc., makes no warranties with respect to this documentation and disclaims any implied warranties of merchantability and fitness for a particular purpose. Websense Inc. shall not be liable for any error or for incidental or consequential damages in connection with the furnishing, performance, or use of this manual or the examples herein. The information in this documentation is subject to change without notice.
TrademarksWebsense, AfterWork, and AfterWork.com are trademarks or registered trademarks of Websense Inc. in the United States and other countries.Check Point, OPSEC, and FireWall-1 are trademarks or registered trademarks of Check Point Software Technologies Ltd. or its affiliates. Microsoft, Windows NT, Windows 2000, Internet Explorer, and Active Directory are trademarks or registered trademarks of Microsoft Corporation. Solaris is a registered trademark of Sun Microsystems, Inc., in the United States and other countries. Sun, Sun ONE and all Sun ONE based trademarks and logos are trademarks of Sun Microsystems, Inc.Netscape is a registered trademark of Netscape Communications Corporation in the U.S. and other countries. Netscape Navigator and Netscape Communicator are also trademarks of Netscape Communications Corporation and may be regis-tered outside the U.S.The following is a registered trademark of Novell, Inc., in the United States and other countries: Novell Directory Services.Adobe, Acrobat, and Acrobat Reader are either registered trademarks or trademarks of Adobe Systems Incorporated in the United States and/or other countries. Pentium is a registered trademark of Intel Corporation.Red Hat is a registered trademark of Red Hat, Inc., in the United States and other countries. Linux is a trademark of Linus Torvalds, in the United States and other countries.Nokia IPSO is a registered trademark of the Nokia Corporation.This product includes software distributed by the Apache Software Foundation (http://www.apache.org).Other product names mentioned in this manual may be trademarks or registered trademarks of their respective companies and are the sole property of their respective manufacturers.
WinPcapCopyright (c) 1999–2003 NetGroup, Politecnico di Torino (Italy)All rights reserved. Redistribution and use in source and binary forms, with or without modification, are permitted provided that the following conditions are met:• Redistributions of source code must retain the above copyright notice, this list of conditions and the following disclaimer. • Redistributions in binary form must reproduce the above copyright notice, this list of conditions and the following dis-
claimer in the documentation and/or other materials provided with the distribution. • Neither the name of the Politecnico di Torino nor the names of its contributors may be used to endorse or promote prod-
ucts derived from this software without specific prior written permission.THIS SOFTWARE IS PROVIDED BY THE COPYRIGHT HOLDERS AND CONTRIBUTORS "AS IS" AND ANY EX-PRESS OR IMPLIED WARRANTIES, INCLUDING, BUT NOT LIMITED TO, THE IMPLIED WARRANTIES OF MERCHANTABILITY AND FITNESS FOR A PARTICULAR PURPOSE ARE DISCLAIMED. IN NO EVENT SHALL THE COPYRIGHT OWNER OR CONTRIBUTORS BE LIABLE FOR ANY DIRECT, INDIRECT, INCIDENTAL, SPE-CIAL, EXEMPLARY, OR CONSEQUENTIAL DAMAGES (INCLUDING, BUT NOT LIMITED TO, PROCUREMENT OF SUBSTITUTE GOODS OR SERVICES; LOSS OF USE, DATA, OR PROFITS; OR BUSINESS INTERRUPTION) HOWEVER CAUSED AND ON ANY THEORY OF LIABILITY, WHETHER IN CONTRACT, STRICT LIABILITY, OR TORT (INCLUDING NEGLIGENCE OR OTHERWISE) ARISING IN ANY WAY OUT OF THE USE OF THIS SOFTWARE, EVEN IF ADVISED OF THE POSSIBILITY OF SUCH DAMAGE.

Table of Contents
Sta
Chapter 1: Introduction.....................................................................7How Websense Works............................................................................ 8Deployment Tasks .................................................................................. 9Documentation Feedback ..................................................................... 10
Chapter 2: Network Configuration .................................................11Websense EIM Components ................................................................ 11
Embedded on the Nokia Appliance ................................................. 11 Installed Separately ....................................................................... 12
Websense Deployment ......................................................................... 14Load Balancing................................................................................ 16Switched Environments ................................................................... 18NAT and Network Agent Deployment.............................................. 20Directory Services ........................................................................... 21
System Requirements........................................................................... 23User Service .................................................................................... 23
Windows .................................................................................... 23Solaris........................................................................................ 24Linux .......................................................................................... 25
Websense Manager ....................................................................... 25Windows .................................................................................... 25Solaris........................................................................................ 25
DC Agent ......................................................................................... 26Network Agent ................................................................................. 27
Nokia IPSO................................................................................ 27Windows .................................................................................... 27Solaris........................................................................................ 27Linux .......................................................................................... 28
Real-Time Analyzer ......................................................................... 29User Workstations ........................................................................... 29
nd-Alone Edition Embedded on Nokia IPSO Applicances 3
4
Table of Contents
Chapter 3: Installation and Setup.................................................. 31Before Installing .................................................................................... 31
Host Name Setup............................................................................ 32Domain Name System (DNS) Configuration ................................... 34
Installing Websense EIM on the Nokia IPSO Appliance....................... 35Configuring Websense EIM on Nokia ................................................... 41Disabling User Service on the Nokia IPSO Appliance.......................... 43Installing Additional Websense Components........................................ 43
Recommended Installation.............................................................. 44Websense Manager Installed Separately ....................................... 52
Windows.................................................................................... 52Solaris ....................................................................................... 53
User Service Installed Separately ................................................... 55DC Agent Installed Separately ........................................................ 57Network Agent Installed Separately ................................................ 60
Modifying an Installation ....................................................................... 64Adding Components........................................................................ 64Removing Components................................................................... 67
Nokia Components.................................................................... 67Windows Components .............................................................. 68
Repairing an Installation.................................................................. 68Changing Network Addresses .............................................................. 70
Task 1: Run the IPChange Tool ...................................................... 70Task 2: Update the Logical IP Address........................................... 71Task 3: Update the Host Address Assignment ............................... 73Task 4: Update the Default Gateway .............................................. 74
Setup Tasks.......................................................................................... 76Subscription Key and Database Download..................................... 77HTTP Filtering and Protocol Management ...................................... 80Identifying the EIM Server for the Block Page URL ........................ 81Configuring FireWalls or Routers .................................................... 82
Language Pack..................................................................................... 82Translated Block Pages .................................................................. 82
Creating Custom Block Pages.............................................................. 83
Websense Enterprise EIM

Sta
Table of Contents
Restoring Original Block Pages....................................................... 85Configuration File Backups ................................................................... 85Stopping or Starting Websense Services.............................................. 85
Nokia IPSO...................................................................................... 86Windows .......................................................................................... 86
Windows NT .............................................................................. 86Windows 2000 ........................................................................... 87Solaris and Linux ....................................................................... 88
Appendix A: Troubleshooting ........................................................91I made a mistake during installation...................................................... 91I forgot my Websense EIM Server password........................................ 91Where can I find download and error messages?................................. 91EIM Database does not download ........................................................ 92Websense is not filtering as expected................................................... 94
Appendix B: Technical Support .....................................................95Before Contacting Websense Technical Support ................................. 95World Wide Web Support Center.......................................................... 95Feebased Support................................................................................. 95Support Options .................................................................................... 96
Index .................................................................................................97
nd-Alone Edition Embedded on Nokia IPSO Applicances 5


Chapter 1: Introduction
Thank you for choosing Websense Enterprise Employee Internet Management (EIM), the leading Employee Internet Management system embedded on Nokia IPSO. Websense EIM Stand-Alone for Nokia IPSO is designed to filter Internet requests and report on Internet activity without integrating with a router, firewall, proxy server, or caching appliance.Websense gives network administrators in business, education, government, and other enterprises the ability to monitor and control network traffic to Internet sites. In the business setting, Websense EIM is an invaluable tool for minimizing employee downtime due to Internet surfing that is not work related. In addition, Websense helps control the misuse of network resources and the threat of potential legal action due to inappropriate access.
The major components of Websense Enterprise are:
◆ EIM Server—interacts with Network Agent to provide Internet filtering.◆ Policy Server— stores all EIM configuration information and
communicates this data to other Websense services.◆ User Service— allows you to apply filtering policies based on users,
groups, domains and organizational units.◆ Websense Manager— administrative interface that communicates with
the Policy Server to configure and manage the EIM Server.◆ DC Agent—an optional component that transparently identifies users
for filtering through a Windows directory service.◆ Network Agent—detects all Internet activity and checks both URL and
protocol requests with the EIM Server. Besides its role as a stand-alone filtering agent, the Network Agent also calculates the number of bytes transferred and sends a request to the EIM Server to log this information. You must install the Network Agent and configure it properly if you want to use the Bandwidth Optimizer, Protocol Management, and enhanced reporting features.
◆ Real-Time Analyzer (RTA)—displays the real-time status of all the traffic filtered by Websense EIM. RTA graphically displays bandwidth information and shows requests by category or protocol.
Stand-Alone Edition Embedded on Nokia IPSO Applicances 7
Chapter 1: Introduction
◆ EIM Database—contains a collection of nearly 4 million Internet sites, representing more than 800 million pages, each categorized by content.
◆ EIM Reporter—a separate program available free of charge with Websense EIM. Its Log Server component records Internet activity on your network. Using this log information, Websense Reporter can generate a wide variety of reports and charts depicting your network's Internet usage trends. These reports can be used to refine Internet filtering strategies, helping to maximize network resources and employee productivity. Refer to the EIM Reporter Administrator’s Guide for installation and configuration procedures.
How Websense Works
Websense Enterprise EIM is the engine that enforces content filtering. With its flexible, policy based filtering approach, Websense allows you to apply different filtering policies to different clients (users, groups, domains/organizational units, workstations, or networks).
When the Network Agent detects an Internet request from a client, it queries the EIM Server to find out whether the requested site should be blocked or not. To make this determination, the EIM server consults the policy assigned to the client. Each policy defines specific time periods during the week and lists the category sets that are in effect during those time periods. After it determines which categories are blocked, EIM consults its comprehensive database of Internet addresses (URLs). If the site is assigned to a blocked category, the EIM Server sends a block page to the requesting workstation before the requested site can be returned from the Internet. The Network Agent then instructs the workstation browser not to accept the requested site when it is returned from the Internet. At the same time, it instructs the server at the requested Internet site not to send any more information.
Websense EIM filters network applications that use TCP-based protocols and provides filtering and logging support for UDP-based messages as well. If an initial Internet request is made with TCP, and the request is blocked by Websense EIM, all subsequent UDP traffic will also be blocked. UDP protocols such as RTSP and RTP are monitored and logged by Websense EIM.
If you have purchased the Bandwidth Optimizer, Websense EIM can filter Internet sites, protocols, or applications based on available network bandwidth. You can specify filtering settings to limit user access to sites, protocols, or applications based on bandwidth usage.
8 Websense Enterprise EIM

Chapter 1: Introduction
With the Protocol Management feature, Websense EIM can filter Internet protocols other than HTTP, HTTPS, and FTP. This includes protocols, applications, or other data transfer methods such as those used for instant messaging, streaming media, file sharing, file transfer, Internet mail, and various other network or database operations.
The quota feature is an alternative to full blocking. It gives employees time each day to visit sites in categories you deem appropriate. Quotas can be a powerful tool for Internet access management. Quotas help you control how much time your employees spend on personal surfing and the types of sites they are able to access. For more information, please refer to the Quotas section in your EIM Administrator's Guide.
AfterWork filtering options are additional alternatives to full blocking that allow users the opportunity to defer a blocked request. When deferred, the site is automatically added to the user’s personal bookmark area at http://www.afterwork.com, a Web site available exclusively to Websense customers. Users can access the AfterWork site during more suitable times at the office or from home, to retrieve their personal bookmarks. For more information, see the AfterWork section in your Websense Administrator's Guide, or visit http://www.afterwork.com.
Websense Inc. strongly recommends that your users be informed of your organization's policies concerning Internet access, and that Websense EIM has been installed as a tool for monitoring activity and/or enforcing your Internet use policies.
Deployment Tasks
The following sequence is recommended for installing Websense EIM and configuring it to filter Internet traffic with the Network Agent.
1. Plan the Websense deployment. Websense components can be deployed in various combinations depending upon the size and architecture of your network. Deciding what Websense components to install and where to put them is your first task. Consult Chapter 2: Network Configuration for sample deployment options and to determine the operating systems supported by each Websense EIM component.
2. Install and configure Websense EIM—Once you have decided how to deploy Websense on your network, you must install and configure Websense EIM on the Nokia IPSO appliance. Refer to Installing
Stand-Alone Edition Embedded on Nokia IPSO Applicances 9

Chapter 1: Introduction
Websense EIM on the Nokia IPSO Appliance, page 35, for the installation procedures. Refer to Configuring Websense EIM on Nokia, page 41, for instructions on using the Voyager interface.
3. Install the Websense Manager and optional Websense EIM components. Using the appropriate download file for the operating system, install the Websense Manager on a separate machine in your network. Install optional Websense components on separate Windows machines in your network or together on the same machine. Refer to the specific instructions in Chapter 3: Installation and Setup for instructions.
4. Perform the initial setup. Setup tasks include:Download the EIM Database. Refer to Subscription Key and Database Download, page 77, for instructions on entering your subscription key and downloading the EIM database.Identify the EIM Server for block pages. Refer to Identifying the EIM Server for the Block Page URL, page 81, for instructions.Identify upstream routers and firewalls in Websense EIM. Refer to Configuring FireWalls or Routers, page 82, for instructions.
Documentation Feedback
Websense Inc. welcomes comments and suggestions regarding the product documentation. Please send feedback to [email protected]. If possible, include your organization’s name in your message.
10 Websense Enterprise EIM

Chapter 2: Network Configuration
The EIM Server, the Policy Server, User Service, and Network Agent are embedded on the Nokia IPSO appliance. Websense Manager and the optional components can be installed in a number of possible configurations, depending upon the nature of your network and your filtering requirements. The information in this chapter will help you determine both your hardware needs and the relationship of Websense EIM components to one another.Websense EIM Components
When deciding how to deploy Websense EIM components in your network, consider the following installation dependencies.
Embedded on the Nokia Appliance The Websense EIM components embedded on Nokia IPSO are:
◆ Websense EIM Server—In very large networks, it may be desirable to install additional EIM Servers on separate Nokia IPSO appliances to increase efficiency.
◆ Policy Server—You may install additional Policy Servers depending upon the arrangement of your network. There must be only one Policy Server installed for each logical installation. An example would be a Policy Server that delivers the same policies and categories to each machine in a subnet.
◆ User Service—User Service must be installed in networks using a directory service for authentication. User Service is unnecessary if you intend to filter and log Internet requests based on IP addresses. If you are using a Windows-based directory service, User Service must be installed separately on a Windows machine. User Service must be installed on a Windows operating system if the DC Agent is being used. You may have only one User Service installation for each Policy Server. User Service installs on Windows, Solaris, and Linux.
Stand-Alone Edition Embedded on Nokia IPSO Applicances 11

Chapter 2: Network Configuration
For systems providing multilingual support, User Service produces correct results for one locale only. The locale of the Policy Server determines the language it supports for directory services. Organizations with multilingual support requirements must install the product suite (User Service, Policy Server, and EIM Server) for each supported language on machines configured for that language.
◆ Network Agent—When planning the deployment of the Network Agent (NA) consider the following:
The Nokia IPSO appliance must be able to directly see Internet traffic from your internal network for NA to function effectively. See Switched Environments, page 18 if you are installing Network Agent in a network that employs switches.On larger networks, you may need to install multiple Network Agents and assign them to monitor various IP address ranges in your network. Make sure to deploy the Network Agents so that they can filter the entire network. Partial deployment will result in the loss of log data from network segments not watched by the Network Agent. For instructions on defining IP address ranges for multiple Network Agents, refer to the EIM Administrator’s Guide.Avoid deploying the Network Agent across different LANs. If you install an instance of Network Agent on 192.x.x.x and configure it to communicate with a Policy Server on 10.x.x.x through a variety of switches and routers, communication may be slowed enough to prevent the Network Agent from blocking an Internet request in time.Do not install the Network Agent on a machine running any type of firewall. The Network Agent uses WinPcap, which may not be able to detect HTTP requests when installed on a firewall machine.
Installed Separately The Websense EIM components that are installed separately are:
◆ Websense Manager—may be installed on multiple machines in the network to enable remote configuration of the EIM Server. The Websense Manager installs on Windows and Solaris.
◆ Real-Time Analyzer (RTA)—installs on Windows only. You must have only one installation of RTA for each Policy Server in your network.
12 Websense Enterprise EIM

Chapter 2: Network Configuration
To use the RTA Web-based interface, you must have one of the following Web servers installed on the installation machine.
Apache version 2.x and laterMicrosoft IIS v4.0 or v5.0
◆ DC Agent—should be installed in networks using a Windows directory service (NTLM-based or Active Directory). DC Agent can be installed on any Windows Server in the network, either on the same machine as other Websense components, or a different machine. DC Agent installs on Windows only. For small to medium networks, it is recommended that you install only one DC Agent per domain. If you have a large, distributed network with many domain controllers on the same domain, you can install multiple DC Agents. Installing DC Agent on the domain controller machine is not recommended. DC Agent can be installed on any network segment as long as NetBIOS is allowed between the DC Agent and the domain controllers. Setting up the DC Agent in the DMZ is not recommended.For additional information on the role of DC Agent in user identification refer to the Websense EIM Administrator’s Guide.
◆ EIM Reporter components—installs on Windows only. The Log Server receives and saves information on Internet requests filtered by Websense EIM. Reporter then uses this information to create reports. See the EIM Reporter Administrator’s Guide for installation and administrative information.
NoteIf you do not have one of the supported Web servers on your machine, the Websense EIM installer will offer you the option of installing Apache.
NoteTo generate reports properly, you must use the same version of Websense EIM and Websense Reporter.
Stand-Alone Edition Embedded on Nokia IPSO Applicances 13
Chapter 2: Network Configuration
Websense Deployment
The following network diagrams represent common configurations that are maximized for efficiency. Separate Websense EIM components, can be installed on a single server machine or distributed across a network. This architecture may not be suitable for networks containing 1000 or more users. Refer to Websense EIM Components, page 11, and System Requirements, page 23, for installation guidelines when planning your deployment.
In environments with a large number of workstations, installing multiple EIM Servers for load balancing purposes may be appropriate; however, some load balancing configurations permit the same user to be filtered by different EIM Servers, depending on the current load. For instructions on how to configure Websense for multiple EIM Servers, refer to the EIM Administrator’s Guide.
Typical configurations include networks with a single firewall, proxy server, or caching appliance, and networks with an array of firewalls, proxy servers, or caching appliances. A common network topology places Websense EIM with Network Agent on the Nokia IPSO appliance behind the firewall. The Websense Manager, Real-Time Analyzer, and DC Agent are installed together on a Windows server machine communicating with the Policy Server on the Nokia IPSO appliance through TCP/IP. You can also install Websense Manager on multiple machines in the network to enable remote configuration of the Policy Server.
14 Websense Enterprise EIM

Chapter 2: Network Configuration
Websense EIM Embedded on Nokia IPSO Behind the Firewall
Workstation WorkstationWorkstation
Websense Reporter, Log Server
Nokia IPSO, EIM Server,Policy Server, User Service,
Network Agent
Internet
Firewall orInternet Router
Workstation
DirectoryService
Websense Manager,Real-Time Analyzer,
DC Agent,
Stand-Alone Edition Embedded on Nokia IPSO Applicances 15

Chapter 2: Network Configuration
Load BalancingIn large networks or those with heavy traffic, you may find it necessary to deploy additional Network Agents across your network to adequately filter all the requests. When you load balance your system in this fashion, you divide the Internet traffic between two or more Network Agents by assigning IP address ranges for each to filter. In the recommended deployment, each additional Network Agent is installed on a Nokia IPSO appliance. For complete instructions on configuring Network Agents with the Websense Manager, refer to the Websense EIM Administrator’s Guide.
The following diagram illustrates a medium sized network in which a second instance of Network Agent has been installed. Each Network Agent is configured to filter a separate range of IP addresses representing half the total traffic.
Network Load Balanced with a Second Installation of Network Agent
Websense Reporter, Log Server
Nokia IPSO, EIM Server,Policy Server, User Service,
Network Agent
InternetInternetRouter
DirectoryService
Websense Manager,Real-Time Analyzer,
DC Agent,
Workstation
Workstation
WorkstationWorkstation
Workstation
Workstation
Nokia IPSO,Network Agent
16 Websense Enterprise EIM

Chapter 2: Network Configuration
The following diagram illustrates the load balancing of a segmented network experiencing heavy traffic in which multiple Network Agents have been installed. Each Network Agent can be configured to filter the IP addresses of the subnet on which it is installed or IP addresses from other subnets, depending upon the load.
Load Balancing for Heavy Traffic on a Segmented Network
Firewall orInternet Router
Internet
Client ClientClient
Client
Client
Client
HubHub Hub
Client Client
Client
Nokia IPSO, EIMServer, Policy Server,
User Service
Router
Nokia IPSO,Network Agent
Nokia IPSO,Network Agent
Nokia IPSO,Network Agent
Websense Manager,Real-Time Analyzer,
DC Agent
Stand-Alone Edition Embedded on Nokia IPSO Applicances 17

Chapter 2: Network Configuration
Switched EnvironmentsIn a switched environment, configure a switch to use mirroring or 2-way port spanning, so that the Network Agent can detect Internet requests from all the workstations.
Basic Deployment in a Switched Environment
NoteContact your switch vendor to determine if your switch is capable of mirroring or port spanning and to learn how to implement the correct configuration.
Firewall orInternet Router
Internet
Client Websense Manager,DC Agent,
Real-Time Analyzer
ClientClient
Client
Client
Client
Switch #1 Switch #2
Switch #3
Requirement: Network Agent must be able to detect trafficcoming from all the workstations in the LAN. Traffic fromboth Switch #1 and Switch #2 go through Switch #3 intothe Nokia IPSO appliance.Solution: The port on Switch #3 to which the Nokiaappliance is connected must be configured to monitor theport to which the traffic from Switch #1 and Switch #2 isconnected. The Network Agent can then monitor allInternet traffic that passes through the Nokia appliance.
Switched Environment
Nokia IPSO, EIMServer, Policy Server,User Service, Network
Agent
18 Websense Enterprise EIM

Chapter 2: Network Configuration
Switched Environment with a Remote Office Connection
On a large network, you may need to install multiple Network Agents and assign them to monitor various IP address ranges in your network. If you install multiple Network Agents, consider the following:
◆ Do not assign overlapping IP address ranges. If the IP ranges overlap, network bandwidth measurements will not be accurate, and bandwidth-based filtering will not be applied correctly.
Requirement: The Network Agent must be able to monitorall internal Internet traffic from Switch #1, Switch #2, andSwitch #3, as well as the Internet traffic from the remoteoffice.Solution: Install a router for the remote office trafficbetween Switch #3 and the Nokia IPSO appliance.Configure the port on Switch #3 to which the router isconnected to monitor the port to which Switch #1 andSwitch #2 are connected.
Firewall orInternet Router
Internet
Client ClientClient
Client
Client
Client
Switch #1 Switch #2
Switch #3
RemoteOffice Router
Client Client
Websense Manager,DC Agent,
Real-Time Analyzer
Remote Office Connection
Nokia IPSO, EIMServer, Policy Server,User Service, Network
Agent
Router
Stand-Alone Edition Embedded on Nokia IPSO Applicances 19

Chapter 2: Network Configuration
◆ Deploy the Network Agents so that they can filter the entire network. Partial deployment will result in the loss of log data from network segments not watched by the Network Agent.
Multiple Network Agents in a Switched Environment
NAT and Network Agent DeploymentThe use of Network Address Translation (NAT) on internal routers can prevent the Network Agent from identifying the source IP addresses of client machines making Internet requests. If you are deploying the Network Agent to monitor traffic from multiple subnets after it passes through such a router, you must disable NAT, or the Network Agent will see the IP address of the router's external interface as the source of the request. An alternative would be to install the Network Agent on a machine located between the NAT router and the clients to be monitored.
Requirement: To effectively manage both HTTP and non-HTTP traffic, Network Agent must see all the traffic from allthree subnets.Solution: Install an instance of Network Agent on eachsubnet. Switch #1, Switch #2, and Switch #3 must beconfigured to allow the port to which the Network Agent isconnected to monitor the port to which the Nokia IPSOappliance is connected. Each instance of Network Agentwill be configured to monitor all the traffic on its subnet andto communicate with the same EIM Server installed on theNokia IPSO applicance.
Firewall orInternet Router
Internet
Client ClientClientClient
Switch #1Switch #2
Switch #3
Client
Multiple Network Agents
Nokia IPSO, EIM Server,Policy Server, User Service,
Nokia IPSO,Network Agent
Nokia IPSO,Network Agent
Nokia IPSO,Network Agent
Websense Manager,DC Agent,
Real-Time Analyzer
20 Websense Enterprise EIM

Chapter 2: Network Configuration
Directory ServicesIf your environment includes a directory service, you may also assign different policies to individual users or groups with accounts in that directory service. Websense can communicate with the following directory services:
◆ Windows NTLM-based directories ◆ Windows Active Directory ◆ SunONE Directory Server v4.2 and v5.1◆ Novell Directory Services/eDirectory v8.51, v8.6, and v8.7
For information about configuring directory service access, see your Websense EIM Administrator’s Guide.
Websense EIM can communicate with your directory service whether it runs on the same operating system as Websense EIM or on a different system. If your directory service is Windows-based, you must install the Websense User Service on a Windows machine. This enables User Service to communicate with the Windows-based directory service.
Filtering can be based on individual user, group, and domain/organizational unit policies, providing that Websense EIM is able to identify the user making an Internet request. The authentication method you configure must allow the EIM Server to obtain directory object information from a Windows or LDAP directory. For information about accessing LDAP and Windows directories, see the Websense EIM Administrator’s Guide.
Websense can use LDAP expressions to classify users for filtering purposes. You can create named groups of users based on any LDAP attribute in your directory service, and add these groups to Websense Manager. For information about defining groups of users based on LDAP attributes, see the Websense EIM Administrator’s Guide.
Internet requests can be filtered based on policies assigned to individual directory objects after the following tasks have been accomplished:
NoteIn any environment, Websense can filter based on workstation or network policies. Workstations are identified within Websense by their IP addresses, and networks are identified as IP address ranges.
Stand-Alone Edition Embedded on Nokia IPSO Applicances 21

Chapter 2: Network Configuration
◆ If you are using the SunONE or Novell directory service:1. Enable the appropriate directory service within Websense EIM.2. Enable Websense manual authentication so that Websense EIM can
identify users.◆ If you are using a Windows NTLM-based directory or Active Directory:
1. Configure the Windows directory service within Websense EIM.2. Enable Websense EIM to identify users transparently by installing
and configuring the Websense DC Agent.3. Enable manual authentication within Websense EIM so that if
Websense EIM is unable to identify users transparently, it will prompt users to manually authenticate. For information about Websense EIM manual authentication, see the EIM Administrator’s Guide.
4. Disable User Service on the Nokia IPSO appliance and install it on a Windows machine in your network. User Service may be installed separately or together with other Websense EIM components. For instructions on disabling User Service on the Nokia IPSO appliance, refer to page 43. For instructions on installing User Service separately, refer to page 55.
Websense EIM can transparently identify users in a Windows domain if the DC Agent is installed on a Windows NT or Windows 2000 Server in the network. The Websense EIM transparent identification feature allows Websense EIM to filter Internet requests from users identified in a Windows directory without prompting them to manually authenticate.
Once the Websense EIM Server is configured to communicate with DC Agent, DC Agent obtains user information from a Windows-based directory service and sends it to the EIM Server. When the EIM Server receives the IP address of a machine making an Internet request, the EIM Server matches the address with the corresponding user name provided by the DC Agent. This allows Websense EIM to transparently identify users whenever they open a browser that sends Internet requests. For information about transparent identification and the DC Agent, please see the EIM Administrator’s Guide.
22 Websense Enterprise EIM
Chapter 2: Network Configuration
System Requirements
Websense Enterprise v5.0.1 is compatible with IPSO v3.7 and higher and the following models of the Nokia IPSO appliance:
◆ IP350/IP380◆ IP530◆ IP650◆ IP710/IP740
System requirements are listed separately for the Websense EIM components not installed on the Nokia IPSO appliance.
◆ User Service—must be installed on a Windows machine if a Windows directory service is in use.
◆ Network Agent—runs on Windows, Solaris, Linux, and Nokia IPSO appliances. Multiple instances of Network Agent may be installed in larger networks.
◆ Websense Manager—runs on Windows or Solaris machines. ◆ DC Agent—runs on Windows only.◆ Real-Time Manager—runs on Windows only.
User ServiceUser Service can be run on Solaris and Linux operating system, but must be run on a Windows operating system when the DC Agent is used.
System requirements are listed separately for Windows, Solaris, and Linux.
Windows◆ Pentium II or higher◆ 512 MB RAM or more◆ Supported operating systems:
Windows NT 4.0 Server, Service Pack 6a Microsoft Windows 2000 Server, Service Pack 2 and higher
Stand-Alone Edition Embedded on Nokia IPSO Applicances 23

Chapter 2: Network Configuration
Solaris◆ Sun Ultra SPARC II◆ 512 MB RAM or more◆ One of the following Sun Operating Environments:
Solaris 9Solaris 8 with all the following patches applied
Solaris 7 with all the following patches applied:
Optional
Solaris 2.6 with all the following patches applied:
Optional
112003 108773 111310108652 108989 108528108940 111293 108827108921 112334
107544 106300 107226106541 108376 107081106980 107656 107636106950 107702106327 108374
107153 Can only be installed on Chinese language operating systems
106125 107733 106123106429 105591 106040105181 105633 108091105210 105669105568 105284
106842 Required for Euro support106841 Required for Euro support106409 Required for traditional Chinese fonts
24 Websense Enterprise EIM

Chapter 2: Network Configuration
Linux◆ Pentium III or higher (800 MHz)◆ 512 MB RAM (or more)◆ Red Hat Linux version 7.1, 7.2, 7.3, 8.0, and 9.0
Websense Manager Requirements are listed separately for Windows and Solaris installations. A Websense Manager installed on a Windows or Solaris machine can configure the Policy Server installed on the Nokia IPSO appliance.
Windows◆ Pentium II or higher◆ 256 MB RAM (or more)◆ Supported operating systems:
Windows 98 (with updated Microsoft Virtual Machine)Windows Millennium EditionWindows XP ProfessionalWindows NT 4.0 Workstation or Server, Service Pack 6aWindows 2000 Professional or Server, Service Pack 2 and higher
◆ Web browser with Java support enabled (required to view online Help)◆ Color depth set to 8 bit (256 colors) or greater◆ 60 MB of disk space
Solaris◆ Sun Ultra SPARC II◆ 512 MB RAM (or more)◆ One of the following Sun Operating Environments:
Solaris 9Solaris 8 with all the following patches applied
112003 108773 111310108652 108989 108528108940 111293 108827108921 112334
Stand-Alone Edition Embedded on Nokia IPSO Applicances 25

Chapter 2: Network Configuration
Solaris 7 with all the following patches applied:
Optional
Solaris 2.6 with all the following patches applied:
Optional
◆ Web browser with Java support enabled (required to view online Help)◆ Color depth set to 8 bit (256 colors) or greater◆ 55 MB of disk space
DC AgentThe DC Agent runs on Windows machines only.
◆ Pentium II or higher◆ 256 MB of RAM ◆ Supported operating systems:
Windows NT 4.0 (Server version) Service Pack 6aMicrosoft Windows 2000 (Server version), Service Pack 2 and higher
107544 106300 107226106541 108376 107081106980 107656 107636106950 107702106327 108374
107153 Can only be installed on Chinese language operating systems
106125 107733 106123106429 105591 106040105181 105633 108091105210 105669105568 105284
106842 Required for Euro support106841 Required for Euro support106409 Required for traditional Chinese fonts
26 Websense Enterprise EIM

Chapter 2: Network Configuration
Network AgentWhen installed separately, the Network Agent can be installed on Windows, Solaris, Linux, or another Nokia IPSO appliance. For the most reliable performance, install Network Agent on an Ethernet network.
Nokia IPSONetwork Agent is compatible with IPSO v3.7 and higher and the following models of the Nokia IPSO appliance:
◆ IP350/IP380◆ IP530◆ IP650◆ IP710/IP740
Windows◆ Pentium II or higher◆ 256 MB of RAM ◆ Supported operating systems:
Windows NT 4.0 (Server version) Service Pack 6a Microsoft Windows 2000 (Server version), Service Pack 2 and higher
Solaris◆ Sun Ultra SPARC II◆ 512 MB RAM (or more)◆ One of the following Sun Operating Environments:
Solaris 9Solaris 8 with all the following patches applied
112003 108773 111310108652 108989 108528108940 111293 108827108921 112334
Stand-Alone Edition Embedded on Nokia IPSO Applicances 27

Chapter 2: Network Configuration
Solaris 7 with all the following patches applied:
Optional
Solaris 2.6 with all the following patches applied:
Optional
◆ Web browser with Java support enabled (required to view online Help)◆ Color depth set to 8 bit (256 colors) or greater◆ 55 MB of disk space
Linux◆ Pentium III or higher (800 MHz)◆ 512 MB RAM (or more)◆ Red Hat Linux version 7.1, 7.2, 7.3, 8.0, and 9.0
107544 106300 107226106541 108376 107081106980 107656 107636106950 107702106327 108374
107153 Can only be installed on Chinese language operating systems
106125 107733 106123106429 105591 106040105181 105633 108091105210 105669105568 105284
106842 Required for Euro support106841 Required for Euro support106409 Required for traditional Chinese fonts
28 Websense Enterprise EIM

Chapter 2: Network Configuration
Real-Time AnalyzerThe Real-Time Analyzer runs on Windows machines only:
◆ Pentium II or higher◆ 256 MB of RAM ◆ Supported operating systems:
Windows NT 4.0 (Server version) Service Pack 6aMicrosoft Windows 2000 (Server version), Service Pack 2 and higher
To install and run the Real-Time Analyzer, you must have one of the following supported Web servers installed:
◆ Apache version 2.x and higher◆ Microsoft IIS version 4.0 and 5.0
User WorkstationsTo be filtered by Websense, a user workstation must access the Internet through the Nokia IPSO appliance. In addition:
◆ JavaScript must be enabled on browsers if you plan to implement AfterWork filtering options, so that deferred sites can be posted to AfterWork.com.Examples of browsers on which you can enable JavaScript are Netscape Navigator, Netscape Communicator, or Internet Explorer 4.0 or later. These browsers also support proxy-based connections.
NoteIf you do not have one of the supported Web servers on your system, the Websense EIM installer will offer you the option of installing Apache.
Stand-Alone Edition Embedded on Nokia IPSO Applicances 29


Chapter 3: Installation and Setup
This chapter contains instructions for installing Websense EIM on the Nokia IPSO appliance and for installing other Websense EIM components on separate machines in your network. Included are the procedures for configuring Websense EIM on Nokia, the initial setup procedures for downloading the EIM Database, and the steps for preparing Websense EIM to filter with the Network Agent.Before Installing
Please read the following information before installing Websense EIM.
◆ Foreign language versions: Websense Enterprise v5.0.1 installs in English only. Language Packs for converting systems to foreign language versions are released separately from Websense Enterprise. Installation instructions are provided with the Language Pack product. You can download the Language Pack from the Websense Web site at:
http://www.websense.com/downloads/◆ Reporting: To properly generate reports, you must use the same version
of Websense EIM and Websense Reporter. ◆ Deployment: The following Websense EIM components are installed
together on the Nokia IPSO appliance:EIM ServerPolicy ServerUser ServiceNetwork AgentUFP Server (not used in the Stand-Alone Edition)TransID Service
The following components can be distributed across your network or installed together on a Windows machine:
Websense ManagerUser Service
Stand-Alone Edition Embedded on Nokia IPSO Applicances 31

Chapter 3: Installation and Setup
DC AgentNetwork AgentReal-Time Analyzer
You can install these components and Real-Time Analyzer together or separately by performing a iCustom installation with the Websense EIM installer. Separate installers are available from the Websense Web site for Websense Manager, Network Agent, and DC Agent.
◆ LDAP directory: If your directory service information resides in an LDAP directory, Websense EIM uses LDAP-related information such as the LDAP server IP Address and port, base domain, and LDAP cache from the records.config file.
◆ Dynamic IP addresses: Websense EIM will not install on a machine that uses DHCP to assign IP addresses. You must assign a static IP address to the installation machine before attempting to install Websense EIM. If the installer detects the use of DHCP, it will display a message instructing you to assign a static IP addresses and will quit.
◆ Host Address: If you anticipate changing the Host Address of the Nokia IPSO appliance, do so before installing Websense for Nokia IPSO. Websense binds to the default Host Address during installation. If you change the IP address of the Nokia IPSO appliance after Websense is installed, you must reconfigure Websense to recognize the new address. See Changing Network Addresses, page 70 for details.
◆ Network Interface Cards (NIC): If you anticipate having to add a second NIC to a machine on which you plan to install the Network Agent, do so before installing the Network Agent. If the NIC is added after Network Agent is installed, you must run the appropriate utility to effect the change. See Changing Network Addresses, page 70 for details.
Host Name SetupBefore you install Websense EIM, you must configure the host name of the Nokia appliance and assign it an IP address.
1. Open a browser on the machine you use to connect to the Nokia IPSO appliance.
2. Enter the IP address of the Nokia IPSO appliance in the address line and press Enter.A dialog box is displayed asking for a user name and password.
32 Websense Enterprise EIM

Chapter 3: Installation and Setup
3. Log on to the Nokia IPSO appliance.The Voyager interface screen is displayed.
4. Click Config.A page of option menus is displayed.
5. From the System Configuration menu, select Host Address Assignment.The Static Host Entries page is displayed.
Entry Page for Creating Host Names
6. If no host name appears, enter one in the Add new hostname field and click Apply.Your new host name appears with no IP address.
7. Enter the correct IP address for the host name you just added.8. Click Apply.
Stand-Alone Edition Embedded on Nokia IPSO Applicances 33
Chapter 3: Installation and Setup
Domain Name System (DNS) ConfigurationBefore installing Websense EIM, you must configure the Nokia IPSO appliance to locate the DNS severs in your network.
To identify the DNS servers in your network for the Nokia IPSO appliance:1. Open a browser on the machine you use to connect to the Nokia IPSO
appliance.2. Enter the IP address of the Nokia IPSO appliance in the address line and
press Enter.A dialog box is displayed asking for a user name and password.
3. Log on to the Nokia IPSO appliance.The Voyager interface screen is displayed.
4. Click Config.A page of option menus is displayed.
5. From the System Configuration menu, select DNS.The DNS Configuration page is displayed.
34 Websense Enterprise EIM

Chapter 3: Installation and Setup
DNS Configuration Page
6. Enter the IP addresses of the available DNS servers7. Click Apply.8. Continue to the next section and install Websense EIM on the Nokia
IPSO appliance.
Installing Websense EIM on the Nokia IPSO Appliance
The following Websense EIM components are installed on the Nokia IPSO appliance:◆ EIM Server◆ Policy Server◆ User Service◆ Network Agent
Stand-Alone Edition Embedded on Nokia IPSO Applicances 35

Chapter 3: Installation and Setup
◆ UFP Server (not used in the Stand-Alone Edition)◆ TransID ServiceSee page 43 for the procedures for installing other Websense components in your network.To install all the main Websense EIM components on the Nokia appliance:1. Open a browser on any machine in the same network that has access to
the Nokia IPSO appliance.2. Enter the IP address of the Nokia IPSO appliance in the address line and
press Enter.A dialog box is displayed asking for a user name and password.
3. Log on to the Nokia appliance.The Nokia IPSO Voyager interface screen is displayed.
Nokia Voyager Main Screen
4. Click Config.A page of option lists is displayed.
5. From the Configuration list, select Manage Installed Packages.The Manage Packages page is displayed.
36 Websense Enterprise EIM

Chapter 3: Installation and Setup
Manage Installed Packages Page
6. Select FTP and Install Packages at the bottom of the screen.The FTP Packages page is displayed.
7. Proceed using one of the two following methods.Define an FTP site and select a package to install. If you already have an FTP server set up on your network, this is the quickest method.a. Place the Websense EIM installation package
(WebsenseIPSO_5.0.1.tgz) on the FTP server.b. Specify the FTP location with the following information:
FTP site: IP address of the FTP serverFTP dir: Directory on the FTP server where you have placed the Websense EIM installation packageFTP user: User name for the FTP server.FTP password: Password for the FTP server.
Stand-Alone Edition Embedded on Nokia IPSO Applicances 37

Chapter 3: Installation and Setup
c. Click Apply. All the files in the specified FTP directory with a .tgz extension are displayed in the Site Listing box.
d. Select the Websense EIM package from the Site Listing box.e. Click Apply to transfer the file from the FTP server to the
Nokia IPSO appliance.When this operation is complete the Websense EIM package appears in a list of packages that are available to be unpacked.
f. Select the WebsenseIPSO_5.0.1.tgz file and click Apply.
38 Websense Enterprise EIM

Chapter 3: Installation and Setup
When this operation is complete, an installation link appears below the Information of unpacked package section.
g. Click Click here to install/upgrade/opt/packages/WebsesnseIPSO_5.0.1.tgz to install the Websense EIM package.The Package Installation and Upgrade screen is displayed.
FTP the Websense EIM installation package from the browser machine to the Nokia IPSO appliance and select the package for installation. Use this method if no FTP server is available.
a. Place the Websense EIM installation package (WebsenseIPSO_5.0.1.tgz) on the machine running the Voyager interface (browser machine).
b. Open a command prompt on the browser machine and change to the directory where you placed the Websense EIM package using the full path.
c. Enter the following command: ftp <Nokia IP address>
d. Go to the opt/packages directory on the Nokia IPSO appliance.e. Enter bin.
NoteThis transfer method is slower than retrieving the file from an FTP server and may take several minutes to complete.
Stand-Alone Edition Embedded on Nokia IPSO Applicances 39

Chapter 3: Installation and Setup
f. Use the put command to place the file on the Nokia IPSO appliance.put WebsenseIPSO_5.0.1.tgz
The Websense EIM package appears in the Select a package to unpack list.
g. Select the WebsenseIPSO_5.0.1.tgz file and click Apply.When this operation is complete, an installation link appears below the Information of unpacked package section.
h. Click Click here to install/upgrade/opt/packages/<package name>, located below the package information.The Package Installation and Upgrade screen is displayed.
Package Installation and Upgrade Screen
8. Select Yes in the Install field.9. Click Apply.
40 Websense Enterprise EIM

Chapter 3: Installation and Setup
A success message is displayed naming the package that was installed.10. Select Click here to return to Manage Packages screen.
If Websense EIM installed correctly, Websense for IPSO version 5.0.1 will be listed among the applications installed on the Nokia appliance and will be enabled.
Configuring Websense EIM on Nokia
Once you have installed Websense EIM on the Nokia IPSO appliance, you must configure Websense EIM. Network Agent is disabled and must be configured appropriately.
To configure Websense EIM on the Nokia IPSO appliance:1. Open a browser on the machine you use to connect to the Nokia IPSO
appliance.2. Enter the IP address of the Nokia IPSO appliance in the address line and
press Enter.A dialog box is displayed requesting a user name and password.
3. Log on to the Nokia appliance.The Nokia IPSO Voyager interface screen is displayed.
4. Click Config.A page of option lists is displayed.
5. From the Security and Access Configuration list, select Websense Configuration.
Stand-Alone Edition Embedded on Nokia IPSO Applicances 41

Chapter 3: Installation and Setup
The Websense Configuration screen is displayed.
Websense Configuration Screen
6. Select an adapter from the Select Interface drop-down list.7. Select On in the Network Agent Enabled field to enable Network
Agent and click Apply.This enables Websense to run in stand-alone mode and perform all HTTP filtering, HTTP logging, and Protocol Management.
8. Leave the UFP Enabled setting at Off.The UFP Server is not used for the Websense EIM for Nokia IPSO Stand-Alone Edition.A success message is displayed. You can check the status of the Websense EIM processes in the statistics table below the configuration controls.
9. Install and configure the Websense Manager.
42 Websense Enterprise EIM

Chapter 3: Installation and Setup
Refer to Websense Manager Installed Separately, page 52 and Setup Tasks, page 76.
Disabling User Service on the Nokia IPSO Appliance
If you intend to use a Windows directory service (NTLM-based or Active Directory) or intend to identify users transparently, you must disable User Service on the Nokia IPSO appliance and install User Service on a separate Windows machine.
To disable the User Service, open a Telnet or console session on the Nokia IPSO appliance and run the following command:
dbset package:WebsenseIPSO:process:UserServiceUsing the procedures found on page 55, install User Service on a separate Windows machine in your network.
Installing Additional Websense Components
To configure and manage the Policy Server located on the Nokia IPSO appliance, you must install the Websense Manager on a Windows or Solaris machine in your network. You may install the Websense Manager together with other Websense EIM components (Recommended Installation, page 44) or separately (Websense Manager Installed Separately, page 52).
Optional components such as DC Agent, and Real-Time Analyzer can be distributed in your network or installed on the same Windows machine as the Websense Manager. You can use different combinations of installers to accomplish this depending upon how you intend to distribute the components. The recommended installation is to put all the additional components on a single Windows machine.
User Service and Network Agent can be deployed remotely if necessary. User Service must be installed on a Windows machine when an NTLM-based directory service is used, and additional instances of Network Agent can be installed for load balancing purposes in larger networks.
Stand-Alone Edition Embedded on Nokia IPSO Applicances 43

Chapter 3: Installation and Setup
The following table lists the Websense EIM components and the names of the download files containing the appropriate installers.
Recommended InstallationTo install Websense Manager, DC Agent, and Real-Time Analyzer on the same Windows machine:
1. Log on to the installation machine with domain and local administrator privileges.This will install DC Agent with administrator privileges on the domain.
2. Download the WebsenseEIM_5.0.1.exe file containing the Websense EIM installer.
Component Installer Download Files
Websense Manager Windows—WebsenseManager_5.0.1.exe1 or WebsenseEIM_5.0.1.exe Solaris—WebsenseEIM_Slr_5.0.1.tar.gz
1. Installs the Websense Manager only
User Service WebsenseEIM_5.0.1.exe
DC Agent WebsenseDCAgent_5.0.1.exe2 or WebsenseEIM_5.0.1.exe
2. Installs the DC Agent only
Real-Time Analyzer WebsenseEIM_5.0.1.exe
Network Agent WebsenseNetworkAgent_5.0.1.exe3 or WebsenseEIM_5.0.1.exe
3. Installs the Network Agent only
IMPORTANT DC Agent must have administrator privileges on the network to retrieve user login information from the domain controller. Without this information, Websense EIM cannot filter by users and groups. If you cannot install these components with such privileges, you may configure administrator privileges for these services after installation by using the Services Properties dialog box.
44 Websense Enterprise EIM

Chapter 3: Installation and Setup
3. Extract the compressed files to a folder on the installation machine.
4. Close all open applications.5. Run Setup.exe.6. Click Next on the welcome screen and follow the onscreen instructions
through the subscription agreement.You are asked to select an installation.
Installation Selection Screen
7. Select Websense Enterprise v5.0, Employee Internet Management (EIM) and click Next.You are offered a choice of three setup types.
8. Select Custom and click Next.A list of Websense EIM components is displayed.
IMPORTANTDo not extract the installer files to a folder on your desktop. This may prevent the Real-Time Analyzer from receiving the IP address of the Policy Server machine. Accept the default location of C:\Temp or select another appropriate folder.
Stand-Alone Edition Embedded on Nokia IPSO Applicances 45

Chapter 3: Installation and Setup
9. Select Websense Manager, Real-Time Analyzer, and DC Agent.
Component Selection Screen
10. Click Next to continue.The installer checks your system for a supported Web server (Apache or IIS) and takes the following action:
If both supported Web servers are detected, a dialog box is displayed asking you to choose one server for the RTA instance.If one of the supported servers is detected, the installer accepts that Web server for the RTA instance and continues. No notification is displayed.If neither supported Web server is detected, the installer gives you the option to install the Apache Web server or continue the upgrade without installing RTA. If you select the Apache Web Server installation option, the Websense installer starts the Apache installer and exits without
NoteMake sure to clear the check boxes for the components you do not want to install.
46 Websense Enterprise EIM

Chapter 3: Installation and Setup
installing any Websense components. You must restart your computer after installing the Apache Web server and run the Websense EIM installer again to perform the EIM installation.
RTA Web Server Dialog Box
11. Select a Web server, if appropriate, and click Next to continue.You are asked to identify the IP address of the machine on which the Policy Server is installed and the configuration port. The configuration port is the port used by Websense EIM components to communicate with the Policy Server.
NoteApache documentation is installed in HTML format in the docs/manual/ directory. The latest version can be found at: http://httpd.apache.org/docs-2.0/
IMPORTANTThe default configuration port (55806) in this dialog box is the port number the installer used to install the EIM Server on the Nokia IPSO appliance. Do not change the port number in this dialog box.
Stand-Alone Edition Embedded on Nokia IPSO Applicances 47

Chapter 3: Installation and Setup
Policy Server Machine Identification
12. Enter the IP address of the Nokia IPSO appliance and click Next.The installer asks for a port number for the DC Agent.
DC Agent Port Setting
48 Websense Enterprise EIM

Chapter 3: Installation and Setup
13. Accept the default (unless this port is already being used on your network) and click Next.A dialog box is displayed asking if you want an authenticated connection between the EIM Server and the DC Agent.
14. Select Yes or No, and then click Next.If you select Yes, you are asked to create a password for the authenticated connection. Follow the onscreen instructions and click Next to continue.A dialog box is displayed, asking you to select an installation folder for the Websense EIM components.
15. Accept the default path (C:\Program Files\Websense), or click Browse to locate another installation folder, and click Next to continue.The installer compares the system requirements for the installation you have selected with the resources of the installation machine. If the machine has inadequate disk space or memory, an information screen is displayed detailing the deficiencies.
System Requirements Warning
16. Click Next to continue.If the installation machine has insufficient disk space, the selected components cannot be installed, and the installer will quit.
Stand-Alone Edition Embedded on Nokia IPSO Applicances 49

Chapter 3: Installation and Setup
If the installation machine has less than the recommended amount of memory, the installation will continue. To ensure the best performance of the components you are installing, you should upgrade your machine’s memory to the recommended minimum.
A summary screen is displayed, listing the components that will be installed. Below this list is the total size of the installation.
17. Click Next to start the installation.An installation progress bar is displayed.
If you are installing the Real-Time Analyzer and are using IIS as your Web server, you are prompted for the name of the Web site in the IIS Manager under which the installer should create a virtual directory. The default value is Default Web Site, which is correct in most instances.
To enter the correct name of your default Web site (if it is different from Default Web Site), type or paste the desired Web site name into the input field exactly as it appears in the IIS Manager.To open the IIS Manager:a. From the Windows Control Panel, open Administrative Tools.b. Double-click Internet Services Manager.c. The IIS control screen is displayedd. Expand the tree under your computer name to view available
Web site names.e. Right-click on a Web site in which the installer should create the
virtual directory and select Properties from the pop-up menu.
IMPORTANT If you have renamed the default Web site in the IIS Manager or are using a language version of Windows other than English, you must enter a value in the Web site name field that matches an existing Web site name in the IIS Manager.
50 Websense Enterprise EIM

Chapter 3: Installation and Setup
IIS Manager—Locating the Default Web Site
f. Copy the name of the Web site from the Description field to the clipboard.
g. Close the IIS Manager.h. Return to the Virtual Directory screen in the Websense installer
and replace Default Web Site with the name from the IIS Manager.
i. Click Next to continue the installation.A message reminds you that Protocol Management and Bandwidth Optimizer cannot be used unless Network Agent is installed on a machine with direct access to Internet traffic. Click OK to continue.If you do not have Acrobat Reader (or the full version of Adobe Acrobat) installed on this machine, a screen is displayed reminding you that you must have Acrobat Reader to access the documentation. A link to the appropriate Adobe download site is displayed.
A message is displayed advising you that the installation was successful.18. Click Next to continue.
A dialog box is displayed asking you if you want to restart the computer now or wait until later.
Stand-Alone Edition Embedded on Nokia IPSO Applicances 51

Chapter 3: Installation and Setup
19. Select a restart option and click Finish.
Websense Manager Installed SeparatelyA separate installer is available for installing Websense Manager on Windows. To install Websense Manager on a Solaris machine, you must perform a Custom installation from the Solaris installer for Websense EIM and select Websense Manager when asked what components you want to install.
WindowsTo install Websense Manager on a Windows machine:
1. Log in with local administrator privileges to the installation machine.2. Download the Websense Manager installation program
(WebsenseManager_5.0.1.exe) from http://www.websense.com. The program is also available on the Websense CD.
3. Run WebsenseManager_5.0.1.exe.The WinZip Self-Extractor dialog box is displayed.
4. Select a destination folder for the extracted files, and click the Unzip button to expand the installation files.
5. Close all open applications.6. Run the Setup.exe file and follow the onscreen instructions through the
subscription agreement.A dialog box is displayed, asking you to select an installation folder for the Websense EIM components.
7. Accept the default path (C:\Program Files\Websense), or click Browse to locate another installation folder, and click Next to continue.The installer compares the system requirements for the installation you have selected with the resources of the installation machine. If the machine has inadequate disk space or memory, an information screen is displayed detailing the deficiencies.
NoteYou must restart the machine before the installer can be run again to remove or add components or to repair an installation.
52 Websense Enterprise EIM

Chapter 3: Installation and Setup
If the installation machine has insufficient disk space, the selected components cannot be installed, and the installer will quit.If the installation machine has less than the recommended amount of memory, the message is advisory only, and you can click Next to continue. To ensure the best performance of the components you are installing, you should upgrade your machine’s memory to the recommended minimum.
A summary screen is displayed, listing the components that will be installed, the installation path, and the total size of the installation.
8. Click Next to start the installation.An installation progress bar is displayed. When the installation is finished, a message is displayed advising you that the procedure was successful.
9. Click Next to exit the installer.
SolarisTo install the Websense Manager on Solaris:
1. Log in as the root user.2. Download the Websense Manager installation program
(WebsenseEIM_Slr_5.0.1.tar.gz) from http://www.websense.com. The program is also available on the Websense CD
3. Copy the WebsenseEIM_Slr_5.0.1.tar.gz file to the installation directory.
4. Enter the following command to unzip the file:gunzip WebsenseEIM_Slr_5.0.1.tar.gz
5. Expand the file into its components with the following command:tar xvf WebsenseEIM_Slr_5.0.1.tar
This places the following files into the installation directory:Documentation directory—contains installation guides, the administrator’s guide, the help system, and release notes. View or print the PDF files with Adobe Acrobat Reader, version 5 or later, available free from http://www.adobe.com or on the Websense CD. The release notes file is an HTML file containing enhancement information, installation procedures for special installers, and last minute information about Websense. Read this file with any supported browser.
Stand-Alone Edition Embedded on Nokia IPSO Applicances 53

Chapter 3: Installation and Setup
install.sh—the installation program.Setup directory—contains all the files necessary for installation.WebsenseEIM_Slr_5.0.1.tar—Websense EIM installer package.
6. Run the installation program from the directory where it resides../install.sh
To run the GUI version of the installer, use the following command: ./install.sh -g
If you are using a non-English based system, the installer will display an error message advising you that the GUI version is not supported.
7. Follow the on-screen instructions, pressing the Enter key after each response. Consider the following information as you proceed.
Installation Type—Select Custom.Select Components—Select Manager.Web Browser—full path to the Web browser to use when viewing online help.Directory Path—path to the installation directory where Websense will create the Websense directory. For example, /opt/Websense/EIM. If this directory does not already exist, the installer creates it automatically.For installations using the Overwrite (Solaris) option, it is strongly recommended to use the same directory as for the original installation, overwriting the old files. If you want to install Websense EIM into a different directory, type in the new path.
A summary of all the components that will be installed is displayed.
NoteThe installation machine must have 512 MB of RAM to run the GUI version of the Websense EIM installer.
IMPORTANTThe full installation path must use only ASCII characters.
54 Websense Enterprise EIM

Chapter 3: Installation and Setup
After you provide the requested information, the installation program creates the Websense/Manager directory.
8. See Setup Tasks to prepare your Websense EIM system to begin filtering.
User Service Installed SeparatelyIf you are using a Windows NTLM-based directory service, you must disable User Service on the Nokia IPSO appliance and install a separate instance of User Service on a Windows machine in your network.
To disable User Service on the Nokia IPSO appliance, enter the following command in a Telnet or console session:
dbset package:WebsenseIPSO:process:UserServiceYou may install User Service separately on a Windows machine, or together with the other components in the recommended Windows installation (page 44).
To install User Service on a separate machine:1. Log in with domain and local administrator privileges to the installation
machine.This will install User Service with administrator privileges on the domain.
2. Download the Websense EIM installation program (WebsenseEIM_5.0.1.exe) from http://www.websense.com/downloads. The program is also available on the Websense CD.
3. Run WebsenseEIM_5.0.1.exe.The WinZip Self-Extractor dialog box is displayed.
IMPORTANTUser Service must have administrator privileges on the network to retrieve user login information from the domain controller. Without this information, Websense EIM cannot filter by users and groups. If you cannot install these components with such privileges, you may configure administrator privileges for these services after installation by using the Services Properties dialog box.
Stand-Alone Edition Embedded on Nokia IPSO Applicances 55

Chapter 3: Installation and Setup
4. Select a destination folder for the extracted files, and then click the Unzip button to expand the installer files.
5. Close all open applications.6. Run the Setup.exe file and follow the onscreen instructions through the
subscription agreement.7. Select Websense Enterprise v5.0.1, Employee Internet Management
(EIM) when asked for an installation type and click Next.8. Select Custom when asked for a setup type and click Next.9. Select User Service from the list of components to install.
10. Click Next to continue.You are asked to identify the IP address of the machine on which the Policy Server is installed and the configuration port to use.
11. Enter the IP address of the Policy Server machine and click Next.A dialog box is displayed, asking you to select an installation folder for the Websense EIM components.
12. Accept the default path (C:\Program Files\Websense), or click Browse to locate another installation folder, and click Next to continue.The installer compares the system requirements for the installation you have selected with the resources of the installation machine. If the machine has inadequate disk space or memory, an information screen is displayed detailing the deficiencies.
If the installation machine has insufficient disk space, the selected components cannot be installed, and the installer will quit.
NoteMake sure to clear the check boxes for all the other components.
IMPORTANTThe default configuration port (55806) is the port number that was used to install the EIM Server. Do not change the port number in this dialog box.
56 Websense Enterprise EIM

Chapter 3: Installation and Setup
If the installation machine has less than the recommended amount of memory, the message is advisory only, and you can click Next to continue. To ensure the best performance of the components you are installing, you should upgrade your machine’s memory to the recommended minimum.
A summary screen is displayed, listing the components that will be installed, the installation path, and the total size of the installation.
13. Click Next to start the installation.An installation progress bar is displayed.
A message reminds you that Protocol Management and Bandwidth Optimizer cannot be used unless Network Agent is installed on a machine with direct access to Internet traffic. Click OK to continue.If you do not have Acrobat Reader (or the full version of Adobe Acrobat) installed on this machine, a screen is displayed reminding you that you must have Acrobat Reader to access the documentation. A link to the appropriate Adobe download site is displayed.
When the installation is finished, a message is displayed advising you that the procedure was successful.
14. Click Next.A dialog box is displayed asking you if you want to restart the computer now or wait until later.
15. Select a restart option and click Finish.
DC Agent Installed SeparatelyDC Agent must be installed if you are using a Windows directory service. If your network is large, you may benefit from installing DC Agent on multiple machines. This way, you will have ample space for DC Agent files that are continually populated with user information. See page 13 for additional information. DC Agent installs on Windows only.
NoteYou must restart the machine before the installer can be run again.
Stand-Alone Edition Embedded on Nokia IPSO Applicances 57

Chapter 3: Installation and Setup
To install DC Agent:
1. Log in with domain and local administrator privileges to the installation machine.This will install User Service and DC Agent with administrator privileges on the domain.
2. If needed, download the DC Agent installation program (WebsenseDCAgent_5.0.1.exe) from http://www.websense.com/downloads. The program is also available on the Websense CD.
3. Run WebsenseDCAgent_5.0.1.exe.The WinZip Self-Extractor dialog box is displayed.
4. Select a destination folder for the extracted files, and then click the Unzip button to expand the installer files.
5. Close all open applications.6. Run the Setup.exe file and follow the onscreen instructions through the
subscription agreement.A dialog box is displayed asking for a port number for the DC Agent.
7. Accept the default (unless this port is already being used on your network) and click Next.The installer asks if you want an authenticated connection between the EIM Server and the DC Agent. If you select Yes, you are asked to create a password for the authenticated connection. Follow the onscreen instructions and click Next to continue.A dialog box is displayed, asking you to select an installation folder for the Websense Enterprise components.
IMPORTANTUser Service and DC Agent must have administrator privileges on the network to retrieve user login information from the domain controller. Without this information, Websense EIM cannot filter by users and groups. If you cannot install these components with such privileges, you may configure administrator privileges for these services after installation by using the Services Properties dialog box.
58 Websense Enterprise EIM

Chapter 3: Installation and Setup
8. Accept the default path (C:\Program Files\Websense), or click Browse to locate another installation folder, and click Next to continue.The installer compares the system requirements for the installation you have selected with the resources of the installation machine. If the machine has inadequate disk space or memory, an information screen is displayed detailing the deficiencies.
9. Click Next to continue.If the installation machine has insufficient disk space, the selected components cannot be installed, and the installer will quit.If the installation machine has less than the recommended amount of memory, the installation will continue. To ensure the best performance of the components you are installing, you should upgrade your machine’s memory to the recommended minimum.
A summary screen is displayed, listing the components that will be installed, the installation path, and the total size of the installation.
10. Click Next to start the installation.An installation progress bar is displayed. When the installation is finished, a message is displayed advising you that the procedure was successful.
11. Click Next to exit the installer.12. Add the host name of the machine on which the DC Agent is installed to
the Host Address Assignment page in the Voyager interface.a. Open a browser on the machine you use to connect to the Nokia
IPSO appliance.b. Enter the IP address of the Nokia IPSO appliance in the address line
and press Enter.A dialog box is displayed asking for a user name and password.
c. Log on to the Nokia IPSO appliance.The Voyager home page is displayed.
d. Click Config.A page of option lists is displayed.
e. From the System Configuration menu, select Host Address Assignment.
f. Add the hostname of the DC Agent machine in Add new hostname field.
g. Click Apply.
Stand-Alone Edition Embedded on Nokia IPSO Applicances 59

Chapter 3: Installation and Setup
The DC Agent machine will appear in the list of host names.h. Add the IP address to the hostname of the DC Agent machine in the
field provided.i. Click Apply.j. Exit Voyager.
13. Configure EIM Server to communicate with DC Agent by following the instructions for identifying users in the Websense EIM Administrator’s Guide.
Network Agent Installed SeparatelyThe machine on which the Network Agent is being installed must directly see internal Internet traffic. If this is part of a multiple deployment of the Network Agent (for load balancing purposes), you must be sure that the IP address ranges for each instance of the Network Agent do not overlap. For instructions on setting IP address ranges, refer to the EIM Administrator’s Guide.
To install the Network Agent:
1. Log on to the installation machine with local administrator privileges.2. Download the Network Agent installation program
(WebsenseNetworkAgent_5.0.1.exe) from www.websense.com/downloads. The program is also available on the Websense CD.
3. Run WebsenseNetworkAgent_5.0.1.exe.The WinZip Self-Extractor dialog box is displayed.
4. Select a destination folder for the extracted files, and then click the Unzip button to expand the installer files.
5. Close all open applications.6. Run the installation program (Setup.exe) from the unzipped files.
IMPORTANTThe Websense Policy Server and the EIM Server must be installed and running prior to installing the Network Agent. The installer asks for the IP addresses and port numbers of these components and will not install the Network Agent if the Policy Server and EIM Server cannot be located.
60 Websense Enterprise EIM

Chapter 3: Installation and Setup
7. Click Next on the welcome screen and follow the onscreen instructions through the subscription agreement.You are asked to identify the machine on which the Policy Server is installed.
Policy Server Machine Identification
8. Enter the IP address of the Policy Server machine and click Next.You are asked for the port numbers for this instance of the EIM Server. The range of valid port numbers is from 1024 to 65535. If a port you select is in use, you are required to select another port before you can continue. Keep the default port settings, if possible. Changing them may require you to change your integration partner configuration.
IMPORTANTThe default configuration port (55806) is the port number that was used to install the EIM Server. Do not change the port number in this dialog box.
Stand-Alone Edition Embedded on Nokia IPSO Applicances 61
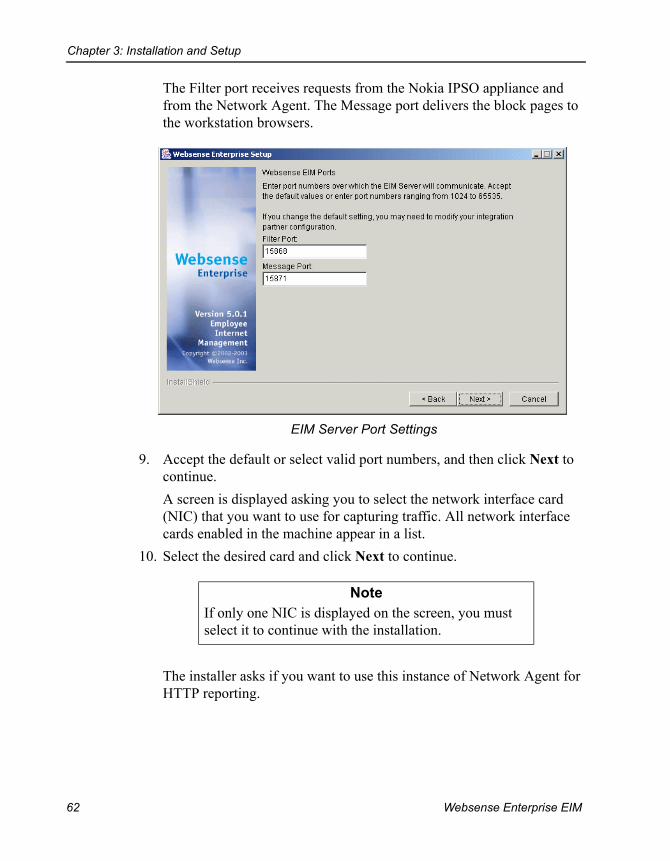
Chapter 3: Installation and Setup
The Filter port receives requests from the Nokia IPSO appliance and from the Network Agent. The Message port delivers the block pages to the workstation browsers.
EIM Server Port Settings
9. Accept the default or select valid port numbers, and then click Next to continue.A screen is displayed asking you to select the network interface card (NIC) that you want to use for capturing traffic. All network interface cards enabled in the machine appear in a list.
10. Select the desired card and click Next to continue.
The installer asks if you want to use this instance of Network Agent for HTTP reporting.
NoteIf only one NIC is displayed on the screen, you must select it to continue with the installation.
62 Websense Enterprise EIM

Chapter 3: Installation and Setup
HTTP Reporting for Network Agent
11. Select Yes or No and click Next to continue the installation.A dialog box is displayed, asking you to select an installation folder for the Network Agent.
12. You can accept the default path (C:\Program Files\Websense), or click Browse to locate another installation folder, and then click Next to continue.The installer compares the system requirements for the installation you have selected with the resources of the installation machine. If the machine has inadequate disk space or memory, an information screen is displayed detailing the deficiencies.
If the installation machine has insufficient disk space, the selected components cannot be installed, and the installer will quit.If the installation machine has less than the recommended amount of memory, the message is advisory only, and you can click Next to continue. To ensure the best performance of the components you are installing, you should upgrade your machine’s memory to the recommended minimum.
A summary screen is displayed, listing the components that will be installed, the installation path, and the total size of the installation.
13. Click Next to start the installation.
Stand-Alone Edition Embedded on Nokia IPSO Applicances 63

Chapter 3: Installation and Setup
An installation progress bar is displayed. When the installer is finished, a message is displayed advising you that the procedure was successful.
14. Click Next to continue.A dialog box is displayed asking you if you want to restart the computer now or wait until later.
15. Select a restart option and click Finish.
Modifying an Installation
If you decide to add or remove a component, or if a component has not installed properly, run the appropriate installer again. The installer will detect the presence of EIM components and offer you the following options for modifying your installation:
◆ Add Websense EIM components◆ Remove Websense EIM components◆ Repair an installation if one or more components are not properly
installed
Adding ComponentsAfter installation, you may want to change the configuration of Websense EIM in your network by adding a component to an existing Websense EIM installation.
To add Websense components in a Windows environment:
1. Log on to the installation machine with domain and local administrator privileges.
NoteYou must restart the machine before the installer can be run again.
64 Websense Enterprise EIM
Chapter 3: Installation and Setup
If you are installing User Service and DC Agent, this will assure that they have administrator privileges on the domain.
2. Close all open applications.3. Run the main Websense EIM installation program (Setup.exe).
After the welcome screen, a dialog box is displayed asking you what action you want to take with the installed Websense components.
4. Select Add Websense Enterprise Components and click Next.The installer displays a list of components not currently installed on the installation machine. By default, all selections are checked.
5. Clear the check boxes of those components you do not want to install and click Next.The installer compares the system requirements for the installation you have selected with the resources of the installation machine. If the machine has inadequate disk space or memory, an information screen is displayed detailing the deficiencies.
If the installation machine has insufficient disk space, the selected components cannot be installed, and the installer will quit.If the installation machine has less than the recommended amount of memory, the message is advisory only, and you can click Next to continue. To ensure the best performance of the components you are installing, you should upgrade your machine’s memory to the recommended minimum.
A summary screen is displayed, listing the components that will be installed, the installation path, and the total size of the installation.
6. Click Next to begin installation.
IMPORTANTUser Service and DC Agent must have administrator privileges on the network to retrieve user login information from the domain controller. Without this information, Websense EIM cannot filter by users and groups. If you cannot install these components with such privileges, you may configure administrator privileges for these services after installation by using the Services Properties dialog box.
Stand-Alone Edition Embedded on Nokia IPSO Applicances 65

Chapter 3: Installation and Setup
A progress bar is displayed. If you are installing the Real-Time Analyzer and are using IIS as your Web server, you are prompted for the name of the Web site in the IIS Manager under which the installer should create a virtual directory. The default value is Default Web Site, which is correct in most instances.
To enter the correct name of your default Web site (if it is different from Default Web Site), type or paste the desired Web site name into the input field exactly as it appears in the IIS Manager.To open the IIS Manager:a. From the Windows Control Panel, open Administrative Tools.b. Double-click Internet Services Manager.c. The IIS control screen is displayed.d. Expand the tree under your computer name to view available
Web site names.e. Right-click on a Web site in which the installer should create the
virtual directory and select Properties from the pop-up menu.f. Copy the name of the Web site from the Description field to the
clipboard.g. Close the IIS Manager.h. Return to the Virtual Directory screen in the Websense installer
and replace Default Web Site with the name from the IIS Manager.
i. Click Next to continue the installation.If you are installing the Network Agent, a screen is displayed asking you to select the network interface card (NIC) that you want to use for capturing traffic. All network interface cards enabled in the machine appear in a list. Select the desired card and click Next to continue.
IMPORTANT If you have renamed the default Web site in the IIS Manager or are using a language version of Windows other than English, you must enter a value in the Web site name field that matches an existing Web site name in the IIS Manager.
66 Websense Enterprise EIM

Chapter 3: Installation and Setup
If the Network Agent was not installed, a message reminds you that Protocol Management and Bandwidth Optimizer cannot be used unless Network Agent is installed on a machine with direct access to Internet traffic. Click OK to continue.
A message is displayed advising you that the installation was successful.When the installation is finished, you are asked whether or not you want to restart the machine.
7. Select a restart option and click Finish.
Removing ComponentsUse the following procedures to uninstall Websense components.
Nokia ComponentsTo remove the EIM Server, Policy Server, User Service, and Network Agent from the Nokia IPSO appliance:
1. Open a browser on the machine you use to connect to the Nokia IPSO appliance.
2. Enter the IP address of the Nokia IPSO appliance in the address line and press Enter.A dialog box is displayed asking for a user name and password.
3. Log on to the Nokia appliance.The Nokia IPSO Voyager interface screen is displayed.
4. Click Config.A page of option lists is displayed.
5. From the Configuration list, select Manage Installed Packages.
NoteYou must restart the machine before the installer can be run again.
IMPORTANTThe Policy Server Service must be running to uninstall any Websense EIM components.
Stand-Alone Edition Embedded on Nokia IPSO Applicances 67

Chapter 3: Installation and Setup
The Manage Packages page is displayed.6. Locate the Websense for IPSO version 5.0.1 package in the list of
applications.7. Click Off and click Apply.8. Select Delete Packages from the bottom of the screen.
A list of packages available for deletion is displayed.9. Locate the Websense for IPSO version 5.0.1 package in the list and
select Delete.10. Click Apply.
Windows ComponentsTo remove installed EIM components in a Windows environment:
1. Log on to the installation machine with local administrator privileges.2. Close all open applications.3. Run the main installation program (Setup.exe) for Websense EIM.
After the welcome screen, a dialog box is displayed asking you what action you want to take with the installed Websense components.
4. Select Remove Websense Enterprise Components, and click Next.A list of installed components is displayed. By default, all selections are checked.
5. Clear the check boxes of the components you do not want to remove, and click Next. A summary list is displayed of the components you have selected to remove.
6. Click Next to begin uninstalling the components.A completion messages advises you when the procedure is finished.
7. Click Next to exit the installer.
Repairing an InstallationIf a component fails to install properly, or is not performing normally, you can run the installer again and repair the installation. This procedure does not troubleshoot components, but merely overwrites all the installed components using original installation data retrieved from the configuration file.
68 Websense Enterprise EIM

Chapter 3: Installation and Setup
To repair your installation:1. Log on to the installation machine with domain and local administrator
privileges.If you are installing User Service and DC Agent, this will assure that they have administrator privileges on the domain.
2. Close all open applications.3. Run the main EIM installation program (Setup.exe) and follow the
onscreen instructions.An option screen informs you that the installer has detected a Websense EIM installation and asks you what action you would like to take.
4. Select Repair existing Websense Enterprise components and follow the onscreen instructions.The installer presents a list of Websense services that are running.
5. Click Next to stop the services listed.A progress message is displayed while the installer shuts down Websense services. As soon as the services are stopped an installation progress bar is displayed.When the procedure is finished, a screen is displayed asking you if you want to restart your machine now or later.
6. Select a restart option and click Finish.
IMPORTANTUser Service and DC Agent must have administrator privileges on the network to retrieve user login information from the domain controller. Without this information, Websense EIM cannot filter by users and groups. If you cannot install these components with such privileges, you may configure administrator privileges for these services after installation by using the Services Properties dialog box.
NoteYou must restart the machine before the installer can be run again.
Stand-Alone Edition Embedded on Nokia IPSO Applicances 69

Chapter 3: Installation and Setup
Changing Network Addresses
To change the IP addresses of the Nokia IPSO appliance or add additional network interface cards (NIC) after installing Websense EIM, you must perform the following tasks:
◆ Task 1—Run the IPChange tool from a console or telnet session◆ Task 2—Update the logical IP address in Voyager◆ Task 3—Update the host address assignment in Voyager◆ Task 4—Update the default gateway in Voyager if you are binding to a
different interface (an existing interface or a new interface).
Task 1: Run the IPChange ToolThe IPChange tool edits the IP address in the config.xml and websense.ini files. Stop the Websense service using the Voyager interface before running IPChange.
To run the IPChange tool:1. Open a browser on the machine you use to connect to the Nokia IPSO
appliance.2. Enter the IP address of the Nokia IPSO appliance in the address line and
press Enter.A dialog box is displayed asking for a user name and password.
3. Log on to the Nokia IPSO appliance.The Voyager home page is displayed.
4. Click Config.The Configuration page is displayed.
5. From the System Configuration menu, select Manage Installed Packages.The Manage Packages page is displayed.
6. Turn off Websense for Nokia IPSO v5.0.1.7. Click Apply.8. Back up your websense.ini and config.xml files to a safe location.9. Open the following directory from a console or a Telnet session:
cd /opt/WebsenseIPSO/bin
70 Websense Enterprise EIM

Chapter 3: Installation and Setup
10. Run the following command:./ipchange <old IP address> <new IP address>
Task 2: Update the Logical IP Address1. From the Voyager home page, select Interface Configuration from the
menu list.The Configuration page is displayed.
2. Click Interfaces.The Interface Configuration page is displayed, listing all the network interface cards (NIC) installed on the Nokia IPSO appliance.
Voyager Interface Configuration Page
Stand-Alone Edition Embedded on Nokia IPSO Applicances 71

Chapter 3: Installation and Setup
3. Click on the link in the Logical column for the NIC whose IP address you want to change.A page is displayed listing the characteristics of the logical interface you have selected.
Nokia Logical Interface Page
4. Check Delete, then enter the new IP address and new mask length in the fields provided.
5. Click Apply.The new IP address is immediately active on the network interface. The current browser session and any Telnet session will lose connectivity at this point. To continue, you must establish a new connection.
72 Websense Enterprise EIM

Chapter 3: Installation and Setup
Task 3: Update the Host Address AssignmentYou must reestablish the Voyager connection to the Nokia IPSO appliance using the new IP address.
To update the IP address of the host name affected by the change:
1. Enter the new IP address of the Nokia IPSO appliance in the address line of your browser and press Enter.A dialog box is displayed asking for a user name and password.
2. Log on to the Nokia IPSO appliance.The Voyager home page is displayed.
3. Click Config.A page of option lists is displayed.
4. From the System Configuration menu, select Host Address Assignment.
Host Address Assignment Page
Stand-Alone Edition Embedded on Nokia IPSO Applicances 73

Chapter 3: Installation and Setup
5. Update the IP address for the host name affected and click Apply.6. Return to the Voyager home page.7. Click Config.
A page of option lists is displayed.8. From the Configuration menu, select Manage Installed Packages.
The Manage Packages page is displayed.9. Turn on Websense for Nokia IPSO v5.0.1.10. Click Apply.11. Open the Websense Manager and add the new Policy Server with the
new IP address.Refer to the Websense EIM Administrator’s Guide for instructions on managing Policy Servers.
12. Delete the Policy Server with the old IP address.
Task 4: Update the Default GatewayIf you have added a new interface (NIC) or changed to a different one, you must update the default gateway in Voyager. A different interface on Nokia IPSO can only be added as a separate network or subnet.
To update the default gateway:
1. Open a browser on the machine you use to connect to the Nokia IPSO appliance.
2. Enter the new IP address of the Nokia IPSO appliance in the address line and press Enter.A dialog box is displayed asking for a user name and password.
3. Log on to the Nokia IPSO appliance.The Voyager home page is displayed.
4. Click Config.A page of option lists is displayed.
5. From the Routing Configuration menu, select Static Routes.
74 Websense Enterprise EIM

Chapter 3: Installation and Setup
The Static Routes page is displayed.
Static Routes Page
6. Click off in the Gateway field and click Apply.This removes the current default gateway.
7. Click on in the Gateway field and click Apply.
Stand-Alone Edition Embedded on Nokia IPSO Applicances 75

Chapter 3: Installation and Setup
This adds a field called Gateway Type.
8. From the drop-down list in the Gateway Type field, select Address and click Apply.This adds a field called Gateway Address.
9. Enter the new IP address for default gateway in the Gateway Address field and click Apply.
Setup Tasks
At this point, you should have Websense EIM installed and configured on the Nokia IPSO appliance. The Websense Manager should be installed on a separate machine, either by itself or together with additional Websense EIM components. You are now ready to perform the final setup tasks for Websense EIM.
NoteTo confirm that the default gateway has been updated, run netstat -nr from a Telnet session.
76 Websense Enterprise EIM

Chapter 3: Installation and Setup
◆ Download the EIM Database: You must enter your Websense EIM subscription key on the Database Download screen of the Settings dialog box and download the EIM Database. See Subscription Key and Database Download, page 77 for instructions.
◆ Identify the Nokia IPSO appliance by IP address: If the Nokia IPSO appliance is multihomed (multiple network interface cards), identify the appliance by its IP address in your network so that Websense block messages can be sent to users. See Identifying the EIM Server for the Block Page URL, page 81.
◆ Configure your firewall or Internet router. Upstream network devices such as firewalls and Internet routers must be configured to permit traffic from the Nokia IPSO appliance. See Configuring FireWalls or Routers, page 82 for details.
Subscription Key and Database DownloadThe Websense EIM Database is the basis for filtering and is updated daily by default. It is downloaded from a remote database server so that your version is the most current.
To download the EIM Database:1. Open Websense Manager on any machine where it is installed.
Windows: Select Start > Programs > Websense > Websense Manager.Solaris: Go to the Websense/Manager directory and enter:
./start_manager
2. For a first time installation, the Add Server dialog box appears.a. Enter the IP address or the name of the Nokia IPSO appliance on
which the Policy Server is installed, and the configuration port established during installation (default is 55806).
b. Click OK. The server's IP address or machine name appears in the Manager’s navigation pane.
3. Double-click the icon of the Policy Server in the navigation pane. For a first time installation, the Set Websense Password dialog box appears.
Stand-Alone Edition Embedded on Nokia IPSO Applicances 77

Chapter 3: Installation and Setup
4. Set a password (between 4 and 25 characters) for the Policy Server.
5. Click OK. 6. Select Server > Settings.
The Settings dialog box is displayed.
Database Download Screen
NoteRetain this password. It must be entered when you connect to this Policy Server from this or any other Websense Manager, or after the Policy Server is stopped and restarted.
NoteIf no subscription key has been entered, the Settings dialog box appears automatically.
78 Websense Enterprise EIM

Chapter 3: Installation and Setup
7. Enter your alphanumeric key in the Subscription key field.
8. If your network requires authentication to an upstream firewall or proxy server to reach the Internet and download the EIM Database, perform the following procedure:a. Check Use authentication. b. Be sure to configure the upstream proxy server or firewall to accept
clear text or basic authentication (for Websense to download the EIM Database).
c. Enter the User name required by the upstream proxy server or firewall to download the EIM Database.
d. Enter the Password required by the upstream proxy server or firewall.9. If your network requires that browsers use an upstream proxy server to
reach the Internet, the same proxy settings used by the browser must be used for downloading the Websense EIM Database. Establish the proxy settings for the database download as follows:a. Check Use proxy server. b. Enter the IP address of the upstream proxy server or firewall.c. Enter the Port of the upstream proxy server or firewall (default is 80).
10. Click OK. Websense automatically contacts the Websense database server and begins downloading the EIM Database.
11. Click Done in the Saving Data dialog box.
NoteThe value in the Subscribed users field shows 0 until the database is successfully downloaded.
NoteAfter downloading the EIM Database or updates to the EIM Database, and when the EIM Server is started, CPU usage can be 90% or more while the database is loaded into local memory.
Stand-Alone Edition Embedded on Nokia IPSO Applicances 79

Chapter 3: Installation and Setup
HTTP Filtering and Protocol ManagementBy default, Network Agent is configured for HTTP_AND_PROTOCOL mode during installation. It is not necessary to change any settings to filter both HTTP requests and manage protocols with your Nokia IPSO Stand-Alone installation. However, you may decide you do not need one of these filtering options. In this case, you can edit the Network Agent mode through the Websense Manager.
To change the Network Agent mode:1. Open Websense Manager on any machine where it is installed.
Windows: Select Start > Programs > Websense > Websense Manager.Solaris: Go to the Websense/Manager directory and enter:
./start_manager.
2. Select Server > Settings.The Settings dialog box is displayed.
3. Select Network Agent from the Settings Selections list.The name of each machine containing an installation of the Network Agent is displayed in the Local Settings structure.
4. Select the instance of Network Agent that you want to modify and click Edit.The local settings for that Network Agent are displayed.
5. Disable either HTTP reporting or Protocol monitoring in the Activities structure by clearing their respective check boxes.
6. Exit the Manager.7. Stop and restart the Network Agent.
IMPORTANTIf you change the Network Agent configuration in the Websense Manager and are prompted to restart the Network Agent, you must return to the Websense Configuration page in Voyager (Configuring Websense EIM on Nokia, page 41) to do so. Click Restart in the Network Agent Enabled field, and then click Apply.
80 Websense Enterprise EIM

Chapter 3: Installation and Setup
Identifying the EIM Server for the Block Page URLWhen Websense blocks an Internet request, the browser is redirected by default to a block message page hosted by the EIM Server. The format of the block page URL typically takes the form:
http://<WebsenseServerIPAddress>:<MessagePort>/cgibin/blockpage.cgi
If the Nokia IPSO appliance is multihomed (with two or more network interface cards), you must identify the appliance by its IP address in your network so that EIM block messages can be sent to users. If the EIM Server machine name, rather than the IP address, is contained in the block page URL, the users could see a blank page instead of the block message.
Use one of the following methods to identify the EIM Server by IP address:
◆ If you have an internal DNS server, associate the machine name of the EIM Server machine with its correct (typically internal) IP address by entering the IP address as a resource record in your DNS server. See your DNS server documentation for instructions.
◆ If you do not have internal DNS, add an entry to the eimserver.ini file with the following procedure.1. Using FTP, copy the eimserver.ini file from the opt/
WebsenseIPSO/bindirectory on the Nokia IPSO appliance to a folder on your local drive.
2. Open the eimserver.ini file on your local drive with any text editor.3. In the [WebsenseServer] area, enter the following command on a
blank line:BlockMsgServerName = <IP address>
where <IP address> is the correct (typically internal) IP address of the machine running EIM Server. Do not use the loopback address 127.0.0.1.
4. Save the file.5. Delete the eimserver.ini file from the Nokia IPSO appliance.6. Copy the edited version of the eimserver.ini file into the opt/
WebsenseIPSO/bindirectory on the Nokia IPSO appliance.7. Stop and then restart the EIM Server. See Stopping or Starting
Websense Services, page 85 for instructions.
Stand-Alone Edition Embedded on Nokia IPSO Applicances 81

Chapter 3: Installation and Setup
Configuring FireWalls or RoutersTo prevent users from circumventing Websense EIM filtering, your firewall or Internet router should be configured to allow outbound HTTP, HTTPS, FTP, and Gopher requests only from the Nokia IPSO appliance. Contact your router or firewall vendor for information on configuring access lists on the router or firewall.
Language Pack
A Language Pack is available for translating your English Websense EIM system to one of the supported languages:
The Language Pack is run from a remote machine and updates the Policy Server on the Nokia IPSO appliance with foreign language keys. For instructions on applying the Language Pack remotely, refer to the documentation accompanying the Language Pack. The Language Pack can be downloaded as an individual Websense component from:
http:/www.websense.com/downloads
Translated Block PagesTranslated block pages are loaded automatically into the following folder on the Nokia IPSO appliance when the Language Pack is installed:
/opt/WebsenseIPSO/BlockPages
After you have installed the Language Pack, you can activate the appropriate translated (or localized) block pages.
IMPORTANTIf Internet connectivity of the Websense Manager requires authentication through a proxy server or firewall for HTTP traffic, the proxy server or firewall must be configured to accept clear text or basic authentication to enable the EIM Database download.
Chinese Simplified French KoreanChinese Traditional German SpanishEnglish Japanese
82 Websense Enterprise EIM

Chapter 3: Installation and Setup
To activate the translated block pages:
1. Stop, then restart Websense EIM on the Nokia IPSO appliance.Refer to page 86 for instructions on stopping and starting Websense EIM.
2. Reload the EIM Database. Refer to Subscription Key and Database Download, page 77, for instructions.
Creating Custom Block Pages
You can create custom block pages by modifying the default block pages provided with Websense EIM. Websense EIM default block message files for an English system are located in the following folder on the Nokia IPSO appliance:
/opt/WebsenseIPSO/BlockPages
The table below shows block pages by file name and a description of each.
File Description
block.html Text for the top frame of the block message, indicating that access is restricted. Displays the site requested and the reason why it is restricted.
master.html Master frame that appears in the postpone, continue, and quota block messages. This message is replaced by a custom message if you enter an alternate URL in the Block Messages tab of the Server Configuration dialog box in Websense Manager.
postponeFrame.html Contains text and buttons that appear in the bottom frame when a site is requested which is in a category whose filtering option is set to Defer to AfterWork.
continueFrame.html Contains text and buttons that appear in the bottom frame when a site is requested which is in a category whose filtering option is set to Defer to AfterWork/Continue.
Stand-Alone Edition Embedded on Nokia IPSO Applicances 83

Chapter 3: Installation and Setup
To create custom block pages:1. Stop the EIM Server.
For instructions on stopping and starting the EIM Server, refer to page 85.2. Copy the block page files you want to customize from the /opt/
WebsenseIPSO/BlockPages folder on the Nokia IPSO appliance to a location on your local drive.
3. Open each file in a text editor and make the desired changes.The files contain comments that help guide you in editing the text. Observe the following cautions when editing these files:
Do not modify the tokens (enclosed by $* and *$ symbols) or the general structure of the HTML code as it relates to tokens. These portions of the file enable Websense to display specific information in the block message.Do not change the names of customized block page files. Websense looks for block page files by name.
4. Save and close the file.5. Add the customized block page files to the /opt/WebsenseIPSO/
BlockPages directory on the Nokia IPSO appliance.You may use FTP to accomplish this.
6. Restart the EIM Server to begin using the customized message.
quotaFrame.html Contains text and buttons that appear in the bottom frame when a site is requested which is in a category whose filtering option is set to Limit by Quota.
moreinfo.html Contains content for the page that appears when a user clicks the More Information link on the block message.
IMPORTANTDo not change the contents of files in this folder.
File Description
84 Websense Enterprise EIM

Chapter 3: Installation and Setup
Restoring Original Block PagesTo restore the original block pages if you experience errors after implementing custom block pages:
1. Stop the EIM Server2. Delete all the files from the WebsenseEnterprise/EIM/BlockPages/
<language code>/Custom directory.3. Restart the EIM Server.
Configuration File Backups
All server configuration and policy settings are stored in the config.xml file in the WebsenseEnterprise/EIM/bin directory. Before making changes to the Websense EIM configuration, you should back up this configuration file to a safe location so that you can restore the established settings in case of any problem. Be sure to date backups of the configuration file.
Stopping or Starting Websense Services
Occasionally you may need to stop or start a Websense service. For example, you must stop the EIM Server if you want to reset your subscription table at a time other than when it is automatically reset, whenever you edit the eimserver.ini file, and after customizing default block messages.
IMPORTANTIf the config.xml file becomes very large, it could impact performance in some environments.
NoteWhen the EIM Server is started, CPU usage can be 90% or more for several minutes while the EIM Database is loaded into local memory.
Stand-Alone Edition Embedded on Nokia IPSO Applicances 85

Chapter 3: Installation and Setup
Nokia IPSOYou can stop or start the Websense processes on Nokia IPSO from the Voyager Web interface.
To stop or start a Websense process with Voyager:1. Open a browser on the machine you use to connect to the Nokia IPSO
appliance.2. Enter the IP address of the Nokia IPSO appliance in the address line and
press Enter.A dialog box is displayed asking for a user name and password.
3. Log on to the Nokia appliance.The Nokia IPSO Voyager interface screen is displayed.
4. Click Config.A page of option lists is displayed.
5. From the Configuration list, select Manage Installed Packages.The Manage Packages page is displayed.
6. Locate the Websense for IPSO version 5.0.1 package in the list of applications.
7. Click Off.8. Click Apply.9. To start the process again, locate the Websense for IPSO version 5.0.1
package and click On.10. Click Apply.
WindowsStop, start, or restart a Websense service by using the Services dialog box. Restarting stops the service, then restarts it again immediately from a single command.
Windows NT To stop or start a Websense service on a Windows NT machine:
1. Select Start > Settings > Control Panel.2. Double-click Services.
86 Websense Enterprise EIM

Chapter 3: Installation and Setup
The Services dialog box is displayed.
Windows NT Services Dialog Box
3. Scroll down the list of available services and select a Websense service.4. Click Stop or Start.
Windows 2000 To stop or start Websense services on a Windows 2000 machine:
1. Select Start > Settings > Control Panel.2. Double-click Administrative Tools.3. Double-click Services.4. Scroll down the list of available services and select a Websense service.
NoteBy default, Websense services are configured to start automatically when the computer is started.
NoteThe Windows NT Services dialog box does not have the restart feature.
Stand-Alone Edition Embedded on Nokia IPSO Applicances 87

Chapter 3: Installation and Setup
Windows 2000 Services List
5. From the Action menu, select Start, Stop, or Restart or click one of the control buttons in the toolbar (Stop , Start , or Restart ). Restarting stops the service, then restarts it again immediately from a single command.
Solaris and LinuxYou can stop, start, or restart a Websense service from a command line on a Solaris or Linux machine. Restarting stops the service, then restarts it again immediately from a single command.
1. Go to the Websense directory.2. Stop, start, or restart the services with one of the following commands:
./WebsenseAdmin stop
./WebsenseAdmin start
NoteBy default, Websense services are configured to start automatically when the computer is started.
88 Websense Enterprise EIM

Chapter 3: Installation and Setup
./WebsenseAdmin restart
IMPORTANTDO NOT use the kill command to stop a Websense service. This procedure may corrupt the service.
Stand-Alone Edition Embedded on Nokia IPSO Applicances 89


Appendix A: Troubleshooting
You may encounter a situation while installing Websense EIM and configuring the Stand-Alone Edition that is not addressed in the previous chapters. This appendix troubleshoots installation situations that have been called in to Websense Technical Support. Please check this chapter for information before you contact Technical Support, in case the solution to your situation is described.If you still need to contact Technical Support, please see Appendix B: Technical Support, for contact information. The situations addressed in this chapter are as follows:
◆ I made a mistake during installation◆ I forgot my Websense EIM Server password◆ Where can I find download and error messages?◆ EIM Database does not download◆ Websense is not filtering as expected.
I made a mistake during installationRun the installation program again, choosing either the Continue installation and overwrite current configuration settings option (Solaris) or the Add/ Remove Websense Enterprise Components options (Windows), whichever is appropriate.
I forgot my Websense EIM Server passwordContact Websense Technical Support for assistance. You can find contact information in Appendix B: Technical Support .
Where can I find download and error messages?
Windows NTCheck the Windows Application Event log for any listings about the database download as well as other error or status messages. Access the
Stand-Alone Edition Embedded on Nokia IPSO Applicances 91

Appendix A: Troubleshooting
Application Event log by choosing Start > Programs > Administrative Tools > Event Viewer. Select Log > Application.
Windows 2000Check the Windows Application Event log for any listings about the database download as well as other error or status messages. Access the Application Event log by choosing Start > Settings > Control Panel > Administrative Tools > Event Viewer. Expand the Event Viewer tree and click Application Log.
Solaris and LinuxWebsense creates Websense.log and ufpserver.log (located in WebsenseEnterprise/EIM/bin) when there are errors to record. This log records error messages and messages pertaining to database downloads.
EIM Database does not downloadThere are several reasons why you might have difficulty receiving EIM Database downloads.
Subscription KeyVerify that the subscription key is entered correctly and has not expired. Open the Settings dialog box, and go to the Database Download screen.
◆ Compare the key you received via email or in the EIM package to the key in the Subscription key field (the key is not case sensitive). You must click OK to close the Settings dialog box before the key takes effect and enables the database download.
◆ Check the date shown in the Key expires field. If this date has passed, contact Websense Inc. to renew your subscription.
Internet AccessThe Nokia IPSO appliance must have access to the Internet via HTTP, and must be able to receive incoming transmissions.
To verify Internet access on the Nokia IPSO appliance:
1. Determine whether Websense EIM is accessing the Internet through a proxy server by checking the Database Download screen of the Settings dialog box in Websense Manager.
92 Websense Enterprise EIM

Appendix A: Troubleshooting
2. Open a Web browser (either Internet Explorer or Netscape).3. Set up the browser to access the Internet with the same proxy settings as
EIM Server.4. Request one of the following addresses:
http://download.websense.comhttp://asia.download.websense.comhttp://europe.download.websense.comIf you reach the site, the Websense logo appears, along with a message indicating that it will redirect you to the Websense home page. This means that the EIM Server’s proxy settings are correct, and the EIM Server should have appropriate HTTP access for downloading.If you are not able to reach the download site, and the system requires proxy information, the EIM Server proxy settings must be corrected. If no proxy information is required, use the nslookup command (at the command prompt) with the address of your download site to make sure the EIM Server machine is able to resolve the download location to an IP address. For example:nslookup asia.download.websense.comIf this does not return an IP address, you must set up the machine running EIM to access a DNS server.
If you need assistance, contact Websense Technical Support (see Appendix B: Technical Support for information)
5. If Websense must access the Internet through an upstream firewall or proxy server that requires authentication, check the following:
The correct user name and password must be entered in the Database Download screen of the Settings dialog box. Verify spelling and capitalization.The firewall or proxy server must be configured to accept clear text or basic authentication.
Restriction ApplicationsSome restriction applications, such as virus scanners or size-limiting applications, can interfere with database downloads. Disable the restrictions relating to the EIM Server machine and the Websense download location.
Stand-Alone Edition Embedded on Nokia IPSO Applicances 93

Appendix A: Troubleshooting
Websense is not filtering as expectedIn the Stand-Alone Edition, the Network Agent must be enabled and bound to the correct adapter for Websense to filter properly. For instructions on enabling Network Agent and selecting the correct adapter, refer to Configuring Websense EIM on Nokia, page 41.
94 Websense Enterprise EIM

Appendix B: Technical Support
Websense Inc. is committed to providing excellent service worldwide. Our goal is to provide professional assistance in the use of our software wherever you are located.
Before Contacting Websense Technical SupportBefore you call Websense Technical Support representative, please be ready with the following:
◆ Websense subscription key. ◆ Access to Websense Manager.◆ Access to the machine running EIM Server.◆ Familiarity with your network's architecture, or access to a person who
has this familiarity.◆ Specifications of the machines running EIM Server and Websense
Manager. ◆ A list of other applications running on the EIM Server machine.
For severe problems, additional information may be needed.
World Wide Web Support CenterTechnical information about Websense is available 24 hours a day via the Internet at:
http://www.websense.com/support
You will find the latest release information, Frequently Asked Questions, a Knowledge Base, and other information.
Feebased SupportTelephone support is available 24 hours a day, 7 days a week on a fee basis. Request information by contacting:
http://www.websense.com/support
Stand-Alone Edition Embedded on Nokia IPSO Applicances 95

Appendix B: Technical Support
Support OptionsWebsense Technical Support can be requested 24 hours a day.
Submissions can be made through the Web site 24 hours a day. After-hours requests will be responded to the next business day. Support tickets can be submitted at:
http://www.websense.com/support/form
24 x 7 Priority One Support is available for purchase. Please contact your Sales Representative for detailed information.
Customers in Asia should send support questions to:
Telephone assistance is available during business hours Monday through Friday at the following numbers:
San Diego, California, USA: 858.458.2940
London, England: +44 (0) 1932 796244
96 Websense Enterprise EIM

Index
AAfterWork, 9, 29Apache Web Serverinstalling, 46supported versions, 13, 29
authenticated connection for DC Agent, 49, 58
BBandwidth Optimizer, 7, 8basic authentication, 82block page URL, 81block pages
custom, 83–85translated, 82–83
browserpath to, 54
bytes transferred, 7
Cclear text, 82components
adding, 64–67removing
on Nokia, 67–68on Windows, 68
configuration file, 85configuration port, 47, 56, 61customer support, 95–96
Ddatabase download
and virus scanners, 93error message location, 91failure of, 92–93performing, 77–79
DC Agentdefined, 7deployment of, 13installing, 48, 58
required privileges, 44, 65separate installer, 57–60system requirements for, 26
Default Gateway, 74–76Default Web Site, 50–51, 66deployment
individual components, 11–13tasks, 9–10
DHCP and Websense installation, 32directory path for installation, 49, 54directory services
supported types, 21–22DNS server, 81domain administrator privileges, 44, 65Domain Name System (DNS)
configuration, 34–35
EEIM Database, 8EIM Reporter
defined, 8deployment of components, 13version compatibility, 31
EIM Serverdefined, 7deployment of, 11identifying for block page URL, 81machine identification, 61multiple installations of, 14
eimserver.ini file, 81
Ffiles
configuration file, 85default block pages, 83–84
FTP installation package, 37
GGopher, 82
Stand-Alone Edition Embedded on Nokia IPSO Applicances 97

Index
HHost Address Assignment, 73–74host name configuration, 32–33HTTP reporting, 80
IIIS Manager, 50–51installation
Custom option, 32DC Agent, 57–60directory path for, 49download files listed, 44Network Agent, 60–64prerequisite information, 31–32repairing an installation, 68–69system requirements warning, 49User Service, 55–57Websense EIM on Nokia, 35–41Websense Manager
Solaris, 53–55Windows, 52–53
Windows components together, 44–52Internet access problems, 92–93IP addresses
changing after installation, 70–76dynamic (DHCP), 32
IPChange tool, 70–71
JJavaScript enabled on browsers, 29
Llanguages
determining locales, 12language pack, 31
LDAP directory service, 21, 32Linux
starting and stopping Websense services, 88–89
load balancing, 14Logical IP Address, 71–72
Mmanual authentication, 22Microsoft IIS supported versions, 13, 29mirroring, 18
NNetBIOS, 13Netscape
enabling JavaScript on, 29Network Address Translation (NAT), 20Network Agent
capture interface, 66configuring, 41defined, 7deployment of, 12editing the mode, 80in switched environments, 12, 18installing, 60–64multiple installations of, 19Network Address Translation (NAT), 20network interface card, 62system requirements, 27troubleshooting, 94
network interface cards (NIC), 32, 62, 66Nokia IPSO
configurationDomain Name System, 34–35host name, 32–33Websense EIM, 41–43
disabling User Service, 43starting and stopping Websense
processes, 86system requirements, 23, 27Websense EIM installation, 35–41
Novell Directory Service/eDirectory, 21, 22NTLM-based directory service, 55
Ppassword
forgotten, 91Policy Server setting, 78proxy server/firewall setting, 79
Policy Serverdefined, 7deployment of, 11machine ID, 47, 56, 61
port numbersPolicy Server, 47, 56, 61
port spanning, 18Protocol Management, 7, 9protocol management, 80
98 Websense Enterprise EIM

Index
Qquotas, 9
RReal-Time Analyzer (RTA)
Default Web Site, 50defined, 7deployment of, 12system requirements for, 29
records.config file, 32repairing an installation, 68–69
Ssetup
block page URL, 81database download and subscription
key, 77–79Solaris
starting and stopping Websense services, 86, 88
starting and stopping Websense processes on Nokia, 86
subscription keyentering, 77–79verification and troubleshooting of, 92
SunONE Directory Server, 21, 22switched environments, 12, 18system requirements
DC Agent, 26installation warning, 49, 59, 63Network Agent, 27Nokia IPSO appliances supported, 23, 27Real-Time Analyzer, 29User Service, 23–25Websense Manager, 25–26workstations, 29
Ttechnical support, 95–96transparent identification, 22
Uuser identification, 21–22User Service
defined, 7
deployment of, 11disabling on Nokia IPSO, 43disabling on the Nokia IPSO appliance, 55required privileges, 65separate installer, 55–57system requirements for, 23–25
Vvirus scanners, 93Voyager interface, 33, 34, 36, 59, 70, 73, 74
WWebsense EIM
componentsadding, 64–67embedded on Nokia, 11–12optional, 12–13removing on Nokia, 67–68removing on Windows, 68
configuring on Nokia, 41–43functional overview, 8–9not filtering properly, 94
Websense Managerdefined, 7deployment of, 12installing separately
Solaris, 53–55Windows, 52–53
setting Network Agent mode with, 80system requirements for, 25–26
Websense Servicesstarting and stopping
Linux, 88–89Solaris, 86, 88Windows, 86–88
WindowsActive Directory, 21, 22NTLM-based directories, 21, 22starting and stopping Websense
services, 86–88Windows directory service, 43WinPcap, 12workstations, 29
Stand-Alone Edition Embedded on Nokia IPSO Applicances 99