Embed Size (px)
Citation preview

Nimsoft Server Installation Guide
for Linux and Solaris
Release: 5.0.0

2 Release: 5.0.0 Nimsoft Server Installation Guide for Linux and Solaris
Notices Copyright © 2010, Nimsoft Corporation
No part of this manual may be reproduced in any form or by any means (including electronic storage and retrieval or translation into a foreign language) without prior agreement and written consent from Nimsoft Corporation as governed by United States and international copyright laws.
Edition
First edition, December, 2010
Warranty
The material contained in this document is provided “as is,” and is subject to being changed, without notice, in future editions. Further, to the maximum extent permitted by applicable law, Nimsoft Corporation disclaims all warranties, either express or implied, with regard to this manual and any information contained herein, including but not limited to the implied warranties of merchantability and fitness for a particular purpose. Nimsoft Corporation shall not be liable for errors or for incidental or consequential damages in connection with the furnishing, use, or performance of this document or of any information contained herein. Should Nimsoft Corporation and the user have a separate written agreement with warranty terms covering the material in this document that conflict with these terms, the warranty terms in the separate agreement shall control.
Technology Licenses
The hardware and/or software described in this document are furnished under a license and may be used or copied only in accordance with the terms of such license.
U.S. Government Restricted Rights
If software is for use in the performance of a U.S. Government prime contract or subcontract, Software is delivered and licensed as “Commercial computer software” as defined in DFAR 252.227-7014 (June 1995), or as a “commercial item” as defined in FAR 2.101(a) or as “Restricted computer software” as defined in FAR 52.227-19 (June 1987) or any equivalent agency regulation or contract clause. Use, duplication or disclosure of Software is subject to Nimsoft Corporation’s standard commercial license terms, and non-DOD Departments and Agencies of the U.S. Government will receive no greater than Restricted Rights as defined in FAR 52.227-19(c)(1-2) (June 1987). U.S. Government users will receive no greater than Limited Rights as defined in FAR 52.227-14 (June 1987) or DFAR 252.227-7015 (b)(2) (November 1995), as applicable in any technical data.
Safety Notices
A CAUTION notice denotes a hazard. It
calls attention to an operating
procedure, practice, or the like that, if
not correctly performed or adhered to,
could result in damage to the product
or loss of important data. Do not
proceed beyond a CAUTION notice
until the indicated conditions are fully
understood and met.
CAUTION

Contact Nimsoft
Contact Technical Support
For your convenience, Nimsoft provides a single site where you can
access information about Nimsoft products.
At http://support.nimsoft.com/, you can access the following:
Online and telephone contact information for technical assistance
and customer services
Information about user communities and forums
Product and documentation downloads
Nimsoft Support policies and guidelines
Other helpful resources appropriate for your product
Provide Feedback
If you have comments or questions about Nimsoft product
documentation, you can send a message to [email protected].

4 Release: 5.0.0 Nimsoft Server Installation Guide for Linux and Solaris
Contents
1 Introduction 5
Prerequisites 6
Operating Systems 6
Database Servers 6
Java Virtual Machine 8
Installing on a Virtual Machine? 8
2 Installing the Nimsoft Server 9

Nimsoft Server Installation Guide for Linux and Solaris 5
1 Introduction
This document supplements the NIMSOFT SERVER INSTALLATION
GUIDE by providing installation instructions for users of Linux and
Solaris systems.
If you are installing the Nimsoft Server on Linux or Solaris, the
information in this document replaces the information in Chapter 2 of
the NIMSOFT SERVER INSTALLATION GUIDE.
Most of the information in the NIMSOFT SERVER INSTALLATION
GUIDE is otherwise applicable to your work, and it should be your
primary reference and guide.
NOTE
Because the installer used for Linux and Solaris® offers different
options than the installer used for Microsoft® Windows®, you
should largely disregard the three-step summary of installation in
Chapter 1 of the NIMSOFT SERVER INSTALLATION GUIDE.
Users of Linux and Solaris will also naturally ignore Chapter 7 of the
NIMSOFT SERVER INSTALLATION GUIDE, which covers certain
Microsoft Windows cluster environments.

6 Release: 5.0.0 Nimsoft Server Installation Guide for Linux and Solaris
Prerequisites
The Nimsoft Server has the following requirements.
Operating Systems
This document applies to the following operating systems:
Red Hat Enterprise Linux (RHEL) 4 and 5
X86 and AMD64 hardware
SUSE Linux Enterprise Server (SLES) 11 and 10
X86 and AMD64 hardware
Solaris 10
SPARC, X86 and AMD64 hardware
NOTE
Linux and Solaris systems must be configured with at least 1 GB of
swap space.
Linux Requirements
For systems running Linux, the libstdc++.so.5 library is
required.
Solaris Requirements
Solaris systems must be configured with 1GB of swap space.
Database Servers
This document applies to the following databases:
MySQL Server 5.1
Oracle 11g R1
MySQL
NMS uses ―LOAD DATA LOCAL INFILE‖ for MySQL data
uploads. This must be enabled on your MySQL server. You can
check that this is enabled by running show variables on the MySQL
server and confirming:
local_infile = ON
Linux/MySQL
For Linux systems using the MySQL database, the case sensitivity
setting must be enabled manually in the mySQL configuration file:
/etc/my.cnf
[mysqld]
lower_case_table_names=1
You can check this setting by running show variables on the
MySQL server.
Oracle

Nimsoft Server Installation Guide for Linux and Solaris 7
For installations using an Oracle database, the Oracle Instant Client
must be installed. If necessary, install it as follows:
1. Navigate to the Instant Client download page at
http://www.oracle.com/technetwork/database/features/instant-
client/index-097480.html.
2. Click the link for the appropriate operating system.
3. Download the zip file for the Instant Client Package – Basic.
4. Unzip the file.
5. Add the unzipped Instant Client directory to your path.
6. Restart the system.
Linux/Oracle
For Linux systems using an Oracle database, shared Oracle libraries
must be linked.
1. Create a file named oracle.conf in the /etc/ld.so.conf.d
directory.
2. In the file, enter the path to the Instant Client directory. For
example:
/root/instantclient_11_1
3. Navigate to the Instant Client directory
(/root/instantclient_11_1 in the example).
4. Enter the following command:
ldconfig
5. Enter the following command:
ldd libociei.so
6. Verify that there are links for all the libraries and there are no
messages stating ―not found.‖
The output should look similar to the following:
use11-vm3:~/instantclient_11_1 # ldd
libociei.so
linux-vdso.so.1 => (0x00007fff5b0e2000)
libclntsh.so.11.1 =>
/root/instantclient_11_1/libclntsh.so.11.1
(0x00007f36030b3000)
libdl.so.2 => /lib64/libdl.so.2
(0x00007f3602eae000)
libm.so.6 => /lib64/libm.so.6
(0x00007f3602c57000)
libpthread.so.0 => /lib64/libpthread.so.0
(0x00007f3602a3a000)
libnsl.so.1 => /lib64/libnsl.so.1
(0x00007f3602821000)
libc.so.6 => /lib64/libc.so.6
(0x00007f36024c1000)
libnnz11.so =>
/root/instantclient_11_1/libnnz11.so
(0x00007f3602064000)

8 Release: 5.0.0 Nimsoft Server Installation Guide for Linux and Solaris
libaio.so.1 => /lib64/libaio.so.1
(0x00007f3601e61000)
/lib64/ld-linux-x86-64.so.2
(0x00007f360a0a0000)
Java Virtual Machine
In order to run the Nimsoft Server installer, you must have Java
Virtual Machine (JVM) 1.6 or later installed on the machine. If JVM
is not installed, or if the installer cannot find the installation location
of JVM, you see this error:
No Java virtual machine could be found from
your PATH environment variable. You must
install a VM prior to running this program.
If JVM is not installed, install it and then proceed with the
installation. If it is installed but the installer is not finding it, add the
directory path for the JVM installation to your PATH environment
variable.
Installing on a Virtual Machine?
When installing on a VMware ESX Server, please review VMware’s
document ―Java in Virtual Machines on VMwareESX: Best
Practices.‖
The document is available at the following URL:
http://www.vmware.com/files/pdf/Java_in_Virtual_Machines_on_ES
X-FINAL-Jan-15-2009.pdf

Nimsoft Server Installation Guide for Linux and Solaris 9
2 Installing the Nimsoft Server
NOTE
The procedure is for a first-time installation of the Nimsoft Server
only.
If you need to reinstall NMS for any reason, first uninstall the
existing software before attempting to reinstall it.
Follow the instructions below to install the Nimsoft Server on the
Linux or Solaris system of your choice.
1. Turn off any anti-virus scanners running on your computer.
Active anti-virus scanners slow down the installation
significantly. Remember to turn the anti-virus scanners on again
immediately after the installation is completed.
2. Log in to the Nimsoft Customer Support Center site.
3. Download the NMS Install Package for your operating system.
4. Run the installer.
Linux: installNMS_linux.bin
Solaris: installNMS_solaris.bin
The InstallAnywhere wizard dialog appears.
NOTE
All fields in the installer dialogs are case sensitive.

10 Release: 5.0.0 Nimsoft Server Installation Guide for Linux and Solaris
The Introduction dialog appears.
5. Click Next.

Nimsoft Server Installation Guide for Linux and Solaris 11
6. Read the license agreement. If you agree to its terms, click ―I
accept the terms of the License Agreement‖, and then click Next.
Otherwise you will need to cancel the installation.

12 Release: 5.0.0 Nimsoft Server Installation Guide for Linux and Solaris
7. The next dialog (not shown) provides information you will want
to know before proceeding. After you have read it, click Next.
8. Enter path to the directory where you want the Nimsoft Server to
be installed, or use the default path provided. Then click Next.

Installing the Nimsoft Server
Release: 5.0.0 Nimsoft Server Installation Guide for Linux and Solaris 13
9. Specify whether you want to use an existing database or create a new one.
Then click Next.

Installing the Nimsoft Server
14 Release: 5.0.0 Nimsoft Server Installation Guide for Linux and Solaris
10. Select the type of DBMS that the Nimsoft Server is to use. Then click
Next.

Installing the Nimsoft Server
Release: 5.0.0 Nimsoft Server Installation Guide for Linux and Solaris 15
11. Specify the database parameters you want to use.
NOTE
All fields are case sensitive.
The actual parameters in this dialog will depend on whether you are using
MySQL or Oracle as your DBMS, and whether you are creating a new
database or using an existing database.
When you have finished entering the required parameters, click Next. The
installer verifies the parameter your database
If there are no errors, you get a verification screen; click Next to continue.
If there are errors, the cause—as nearly as the installer can determine—is
presented in the next dialog. Cancel the installation, address the reason for the
errors, and restart the installation.
12. Enter a password for your Nimsoft domain administrator. The name of
this user is fixed as administrator; both the name and the password
are required to login to the Nimsoft Server after installation.
The password must contain at least 6 characters. After entering and
confirming the password, click Next.

Installing the Nimsoft Server
16 Release: 5.0.0 Nimsoft Server Installation Guide for Linux and Solaris

Installing the Nimsoft Server
Release: 5.0.0 Nimsoft Server Installation Guide for Linux and Solaris 17
13. Specify the Nimsoft domain name for this NMS hub, then click Next.
For further information about Nimsoft domains, see the NIMSOFT
SERVER INSTALLATION GUIDE.

Installing the Nimsoft Server
18 Release: 5.0.0 Nimsoft Server Installation Guide for Linux and Solaris
14. Enter a name for this Hub; the default name is the name of the computer
you are installing on. Then click Next.

Installing the Nimsoft Server
Release: 5.0.0 Nimsoft Server Installation Guide for Linux and Solaris 19
15. The installer detects all network interfaces attached to the computer.
Enter the IP address of the one that you want to use for NMS traffic. Then
click Next.

Installing the Nimsoft Server
20 Release: 5.0.0 Nimsoft Server Installation Guide for Linux and Solaris
16. Enter the license key exactly as it appears on your Nimsoft License
Document.
If you have not yet obtained a license, the installer creates a 30-day trial
license that you can rely on for that period of time after installation.
Click Next to proceed.

Installing the Nimsoft Server
Release: 5.0.0 Nimsoft Server Installation Guide for Linux and Solaris 21
17. You can specify an intial port for Nimsoft probes. Unless you have a
specific reason for doing so, you may prefer to let the system choose
ports as required.
Click Next to proceed.

Installing the Nimsoft Server
22 Release: 5.0.0 Nimsoft Server Installation Guide for Linux and Solaris
18. Specify a network mask or IP address range that you want the Nimsoft
Server to discover. You can also exclude a range of IP addresses if
necessary.
Click Next to proceed.

Installing the Nimsoft Server
Release: 5.0.0 Nimsoft Server Installation Guide for Linux and Solaris 23
19. Select the methods you want the Nimsoft Server to use to obtain
information from devices and computer on the network.
When finished, click Next to proceed.
NOTE
The next three steps assume you have selected all options. Skip any that don’t
apply in your case.

Installing the Nimsoft Server
24 Release: 5.0.0 Nimsoft Server Installation Guide for Linux and Solaris
20. Enter the community string for your network’s SNMP configuration; this
is often the default (public), but some organizations use another
community string. Click Next to proceed.

Installing the Nimsoft Server
Release: 5.0.0 Nimsoft Server Installation Guide for Linux and Solaris 25
21. Enter the credentials for WMI on your network, then click Next to
proceed.
Installing the Nimsoft Server
26 Release: 5.0.0 Nimsoft Server Installation Guide for Linux and Solaris
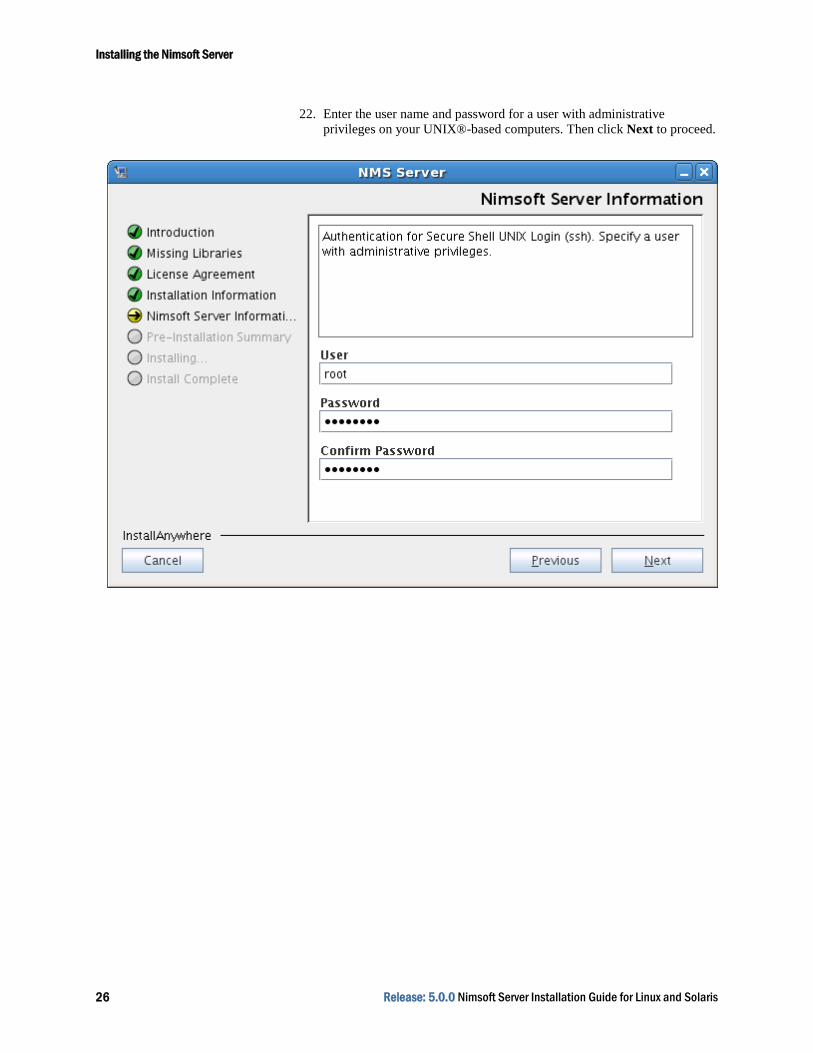
22. Enter the user name and password for a user with administrative
privileges on your UNIX®-based computers. Then click Next to proceed.

Installing the Nimsoft Server
Release: 5.0.0 Nimsoft Server Installation Guide for Linux and Solaris 27
23. Select which catalogs you want to be created in the database:
Microsoft Windows Servers
UNIX®-based Servers
Network Printers
Network Devices
Auto Configure Managed Systems only
Note that you can make catalog changes later using the NiS Manager.
The different computer systems discovered on the network get grouped
into Service Catalogs, depending on type of computer system. Pre-
defined filters define which kind of computer systems to be placed in the
different Service Catalogs. These filters can be modified in the NiS
Manager. You can filter on a lot of parameters, such as IP-range, OS etc.
The ―Auto Configure Managed Systems only‖ option selects
a pre-defined configuration profile that is used for all computer systems
set to Managed state in the NiS Manager. The Managed state must be
set manually for each of the system in the NiS Manager.
If this option is not set, the pre-defined configuration profile is used for
all computer systems, independent of state set in the NiS Manager.
When you are finished, click Next to proceed.

Installing the Nimsoft Server
28 Release: 5.0.0 Nimsoft Server Installation Guide for Linux and Solaris
24. Review the pre-installation summary. When ready, click Install to begin
the installation process.
During installation, a progress bar lets you know how far along the
process is.
At the conclusion of installation, the Nimsoft Server is launched.

Installing the Nimsoft Server
Release: 5.0.0 Nimsoft Server Installation Guide for Linux and Solaris 29
25. The installation of the Nimsoft Server is complete. Click Done to exit the
installer.
IMPORTANT!
Return now to Chapter 3 of the NIMSOFT SERVER INSTALLATION GUIDE
for further information about configuring and using the Nimsoft Server.