Embed Size (px)
Citation preview

1© 2006 Cisco Systems, Inc. All rights reserved. Cisco PublicNew Tools to Teach CCNA: Packet Tracer 4.0 - Extended Session
New Tools to Teach CCNA:Packet Tracer v4.0

2© 2006 Cisco Systems, Inc. All rights reserved.New Tools to Teach CCNA: Packet Tracer 4.0 - Extended Session Cisco Public
Goal of PTv4 Session
• Acquaint you with PTv4 so that you can beginUsing PTv4 in your classroom
Distributing PTv4 to your students for their use at home

3© 2006 Cisco Systems, Inc. All rights reserved.New Tools to Teach CCNA: Packet Tracer 4.0 - Extended Session Cisco Public
What is Packet Tracer?
• Simulation software
• Useful for lectures, group and individual labs, homework, and competitions

4© 2006 Cisco Systems, Inc. All rights reserved.New Tools to Teach CCNA: Packet Tracer 4.0 - Extended Session Cisco Public
Why use Packet Tracer?
• Teach complex CCNA-level networking concepts
• Design, build, configure and troubleshoot networks using virtual equipment
• Demonstrate technologies and configurations
• Supplement classroom equipment
• Empower students to explore concepts, conduct experiments, and test their understanding

5© 2006 Cisco Systems, Inc. All rights reserved.New Tools to Teach CCNA: Packet Tracer 4.0 - Extended Session Cisco Public
PTv4 Session
• Overview of the GUI
• Create and arrange devices
• Configure devices
• Basics of simulation mode
• Simulation mode scenarios
• PDU information & challenge mode
• Activity Wizard

6© 2006 Cisco Systems, Inc. All rights reserved.New Tools to Teach CCNA: Packet Tracer 4.0 - Extended Session Cisco Public
Overview of the GUI

7© 2006 Cisco Systems, Inc. All rights reserved.New Tools to Teach CCNA: Packet Tracer 4.0 - Extended Session Cisco Public
Access extensive help files from the Help menu.
Use the File menu to access “New”, “Open” and “Save” commands as well as the “Activity Wizard.”
The Toolbar buttons can also be used to access all the File menu commands.
Setting Preferences can be done from the Options menu.
Overview of the GUI

8© 2006 Cisco Systems, Inc. All rights reserved.New Tools to Teach CCNA: Packet Tracer 4.0 - Extended Session Cisco Public
Help can also be accessed by clicking on the “?”
Click on the “i” to add a description to this network.
Overview of the GUI

9© 2006 Cisco Systems, Inc. All rights reserved.New Tools to Teach CCNA: Packet Tracer 4.0 - Extended Session Cisco Public
The Common Tools bar includes:
Select tool for selecting
Move tool for moving the entire topology
Note tool for adding notes anywhere on the topology
Delete tool for removing devices and links
Overview of the GUI

10© 2006 Cisco Systems, Inc. All rights reserved.New Tools to Teach CCNA: Packet Tracer 4.0 - Extended Session Cisco Public
The Common Tools tool bar includes:
Inspect tool for viewing device tables
Simple PDU tool to create quick pings
Complex PDU tool to customize packet type
Overview of the GUI

11© 2006 Cisco Systems, Inc. All rights reserved.New Tools to Teach CCNA: Packet Tracer 4.0 - Extended Session Cisco Public
You can change the background with this button.
Overview of the GUI

12© 2006 Cisco Systems, Inc. All rights reserved.New Tools to Teach CCNA: Packet Tracer 4.0 - Extended Session Cisco Public
Overview of the GUI
The PDU List Window allows you to create and delete different scenarios.
Then select the specific device you want in this window.
The Device-Type Selection Box is used to select the type of device or links you wish to create.

13© 2006 Cisco Systems, Inc. All rights reserved.New Tools to Teach CCNA: Packet Tracer 4.0 - Extended Session Cisco Public
Click here to switch to Simulation Mode.
Click here to switch to the Physical Workspace
Overview of the GUI

14© 2006 Cisco Systems, Inc. All rights reserved.New Tools to Teach CCNA: Packet Tracer 4.0 - Extended Session Cisco Public
Creating & Arranging Devices

15© 2006 Cisco Systems, Inc. All rights reserved.New Tools to Teach CCNA: Packet Tracer 4.0 - Extended Session Cisco Public
1. Click the Select tool, if necessary.
To create a device:
3. Choose a device.
Creating & Arranging Devices
2. Choose a device type.

16© 2006 Cisco Systems, Inc. All rights reserved.New Tools to Teach CCNA: Packet Tracer 4.0 - Extended Session Cisco Public
1. Click the Select tool, if necessary.
To create a device:
2. Choose a device type.
3. Choose a device.
4. Click in the topology.
Creating & Arranging Devices

17© 2006 Cisco Systems, Inc. All rights reserved.New Tools to Teach CCNA: Packet Tracer 4.0 - Extended Session Cisco Public
You can create multiple instances of the same device by holding down the CTRL key.
A Few Tips:
Cancel creating a device by clicking on it again or another tool. Also, the ESC key will cancel any action.
Multiple devices can be selected at one time using the select tool and dragging a box around the desired devices.
Creating & Arranging Devices

18© 2006 Cisco Systems, Inc. All rights reserved.New Tools to Teach CCNA: Packet Tracer 4.0 - Extended Session Cisco Public
Configuring Devices

19© 2006 Cisco Systems, Inc. All rights reserved.New Tools to Teach CCNA: Packet Tracer 4.0 - Extended Session Cisco Public
A device may require a module before you can configure it.
The 2620XM needs a WIC before you can connect a serial cable
Clicking on a device brings up its configuration window.
Adding or Removing Modules

20© 2006 Cisco Systems, Inc. All rights reserved.New Tools to Teach CCNA: Packet Tracer 4.0 - Extended Session Cisco Public
1. Device must be off before adding or removing modules
2. Click on an appropriate WIC module and drag it into an available slot on the device
A brief description of the module is shown here
A picture of the module is shown here
Adding or Removing Modules

21© 2006 Cisco Systems, Inc. All rights reserved.New Tools to Teach CCNA: Packet Tracer 4.0 - Extended Session Cisco Public
2. Then click on the router that will be the DCE side of the link.
Connecting Devices
1. To connect two router serial interfaces choose the DCE connection.

22© 2006 Cisco Systems, Inc. All rights reserved.New Tools to Teach CCNA: Packet Tracer 4.0 - Extended Session Cisco Public
Choose the interface.
Connecting Devices

23© 2006 Cisco Systems, Inc. All rights reserved.New Tools to Teach CCNA: Packet Tracer 4.0 - Extended Session Cisco Public
Click on the other router and choose an interface.
Connecting Devices
The connection type you chose has a Cancel icon. Click it to cancel this connection type.

24© 2006 Cisco Systems, Inc. All rights reserved.New Tools to Teach CCNA: Packet Tracer 4.0 - Extended Session Cisco Public
You can just float your mouse over the link to see the interface names and which side is DCE.
Connecting Devices
You can turn on the interface labels permanently under Options >> Preferences.

25© 2006 Cisco Systems, Inc. All rights reserved.New Tools to Teach CCNA: Packet Tracer 4.0 - Extended Session Cisco Public
Hold down the CTRL key when selecting a device to add more than one instance of that device.
Connecting Devices

26© 2006 Cisco Systems, Inc. All rights reserved.New Tools to Teach CCNA: Packet Tracer 4.0 - Extended Session Cisco Public
Connections can be made automatically by choosing the connection type shown below.
Connecting Devices

27© 2006 Cisco Systems, Inc. All rights reserved.New Tools to Teach CCNA: Packet Tracer 4.0 - Extended Session Cisco Public
Connecting Devices
Router links will be red or not active until you correctly configure the interfaces.
Links between switches and PCs will be active after STP converges.

28© 2006 Cisco Systems, Inc. All rights reserved.New Tools to Teach CCNA: Packet Tracer 4.0 - Extended Session Cisco Public
Configuring Global Settings
2. Type hostname in both places; one for Display Name and one for Hostname
3. Device name is updated in topology.
4. Equivalent IOS commands are shown here.
5. Erase or Save NVRAM here. You can also load a saved .txt file or export the current configs.
1. To configure a device, click on it and then click the Configtab. Then click “Settings”under GLOBAL, if necessary.

29© 2006 Cisco Systems, Inc. All rights reserved.New Tools to Teach CCNA: Packet Tracer 4.0 - Extended Session Cisco Public
Configuring Interfaces
1. Click on an interface to configure it.
2. Enter the IP Address and Subnet Mask.
3. Activate the Interface.
4. IOS Commands are updated and the link light is now green.

30© 2006 Cisco Systems, Inc. All rights reserved.New Tools to Teach CCNA: Packet Tracer 4.0 - Extended Session Cisco Public
Configuring Interfaces
Serial links have a Clock Rate setting.

31© 2006 Cisco Systems, Inc. All rights reserved.New Tools to Teach CCNA: Packet Tracer 4.0 - Extended Session Cisco Public
Configuring Routing
2. Type the network address and click the Add button.
3. IOS commands are updated.
1. From the Config tab, you can configure either Static or RIP routing.

32© 2006 Cisco Systems, Inc. All rights reserved.New Tools to Teach CCNA: Packet Tracer 4.0 - Extended Session Cisco Public
Command-Line Interface
A router can also be configured from the command line by clicking on the CLI tab.

33© 2006 Cisco Systems, Inc. All rights reserved.New Tools to Teach CCNA: Packet Tracer 4.0 - Extended Session Cisco Public
Configuring a PC
Click on a PC and then click on the Config tab to configure it.
Under GLOBAL Settings, you can change the PC Name and enter the gateway IP Address.

34© 2006 Cisco Systems, Inc. All rights reserved.New Tools to Teach CCNA: Packet Tracer 4.0 - Extended Session Cisco Public
Configuring a PC
Click on FastEthernet under INTERFACE to configure the IP Address and Subnet Mask.

35© 2006 Cisco Systems, Inc. All rights reserved.New Tools to Teach CCNA: Packet Tracer 4.0 - Extended Session Cisco Public
Configure All Interfaces and RIP Routing.

36© 2006 Cisco Systems, Inc. All rights reserved.New Tools to Teach CCNA: Packet Tracer 4.0 - Extended Session Cisco Public
Configuring a PC
From the Desktop tab, you can access all the features of a PC device.

37© 2006 Cisco Systems, Inc. All rights reserved.New Tools to Teach CCNA: Packet Tracer 4.0 - Extended Session Cisco Public
Configuring a PC
IP Configuration allows you to configure IP addressing or use DHCP.

38© 2006 Cisco Systems, Inc. All rights reserved.New Tools to Teach CCNA: Packet Tracer 4.0 - Extended Session Cisco Public
Configuring a PC
Dial-up interfaces are not yet supported in PT.

39© 2006 Cisco Systems, Inc. All rights reserved.New Tools to Teach CCNA: Packet Tracer 4.0 - Extended Session Cisco Public
Configuring a PC
Terminal will bring up a Port Configuration window similar to HyperTerm and allow you to start a terminal session over a console connection.
You need a console connection to use Terminal.

40© 2006 Cisco Systems, Inc. All rights reserved.New Tools to Teach CCNA: Packet Tracer 4.0 - Extended Session Cisco Public
Configuring a PC
Command Prompt will bring up a command line window from which you can issue DOS commands including ping, tracert, ipconfig and arp.

41© 2006 Cisco Systems, Inc. All rights reserved.New Tools to Teach CCNA: Packet Tracer 4.0 - Extended Session Cisco Public
Simulation Mode Basics

42© 2006 Cisco Systems, Inc. All rights reserved.New Tools to Teach CCNA: Packet Tracer 4.0 - Extended Session Cisco Public
1. Click on this tab to enter Simulation Mode.
2. The Simulation Panel will open where you can control details of the simulation.
3. To create a basic ping, click on the Simple PDU tool.
4. Click on the source.
5. Then click on the destination. 6. Choose which events you want simulated.
7. The simulation will start when you click either Auto Capture/Play or Capture/Forward.
Simulation Mode Basics

43© 2006 Cisco Systems, Inc. All rights reserved.New Tools to Teach CCNA: Packet Tracer 4.0 - Extended Session Cisco Public
If a device does not know the destination MAC, it will first send an ARP request before sending the ping packet.
When Auto Capture/Play is selected, you can speed up the animation with this slider.
Simulation Mode Basics

44© 2006 Cisco Systems, Inc. All rights reserved.New Tools to Teach CCNA: Packet Tracer 4.0 - Extended Session Cisco Public
Eye indicates which Event is shown in topology.
Time since simulation began
Device that sent this packet
Device that currently has the packet
Protocol contained in this packet
Click an Info box to show details of the packet at that hop.
Simulation Mode Basics
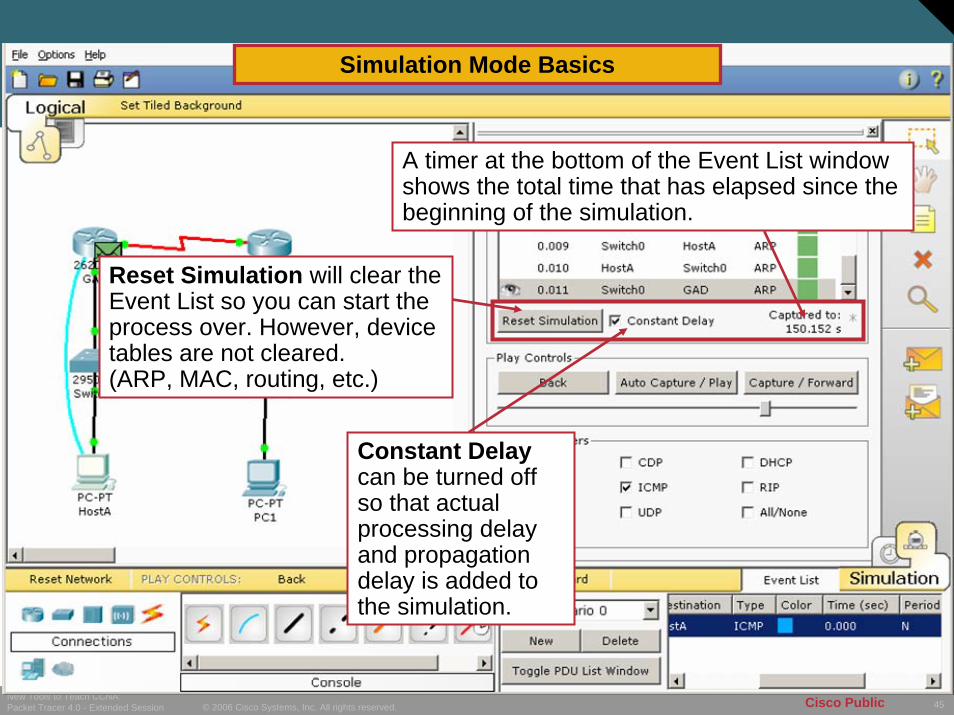
45© 2006 Cisco Systems, Inc. All rights reserved.New Tools to Teach CCNA: Packet Tracer 4.0 - Extended Session Cisco Public
Reset Simulation will clear the Event List so you can start the process over. However, device tables are not cleared.(ARP, MAC, routing, etc.)
Constant Delaycan be turned off so that actual processing delay and propagation delay is added to the simulation.
A timer at the bottom of the Event List window shows the total time that has elapsed since the beginning of the simulation.
Simulation Mode Basics

46© 2006 Cisco Systems, Inc. All rights reserved.New Tools to Teach CCNA: Packet Tracer 4.0 - Extended Session Cisco Public
2. Play Controlsare still available.
1. You can open and close the Simulation Panel by clicking the “Event List” button.
3. Reset Network is a global power cycle feature. Make sure your configs are saved!
Simulation Mode Basics

47© 2006 Cisco Systems, Inc. All rights reserved.New Tools to Teach CCNA: Packet Tracer 4.0 - Extended Session Cisco Public
Simulation Mode Scenarios

48© 2006 Cisco Systems, Inc. All rights reserved.New Tools to Teach CCNA: Packet Tracer 4.0 - Extended Session Cisco Public
Simulation Mode Scenarios
Double-clicking on the title bar shown here will undock the Simulation Panel.

49© 2006 Cisco Systems, Inc. All rights reserved.New Tools to Teach CCNA: Packet Tracer 4.0 - Extended Session Cisco Public
Simulation Mode Scenarios
Once undocked, the panel can be moved so that you can see the pings in both the Command Prompt window as well as the Simulation Panel.

50© 2006 Cisco Systems, Inc. All rights reserved.New Tools to Teach CCNA: Packet Tracer 4.0 - Extended Session Cisco Public
Simulation Mode Scenarios
Choose to send one packet or send a packet every configured interval.
Configure port numbers.
Type in the destination IP. Clicking on the destination will fill in the IP address of the closest interface to the source.
Select a wide variety of protocols.
You can pick the interface.Click on the Complex PDUtool to configure more specifics for a packet.
NOTE: Setting the protocol for an application will help test ACL implementation on routers. However, PTv4 does not yet support services on PCs and servers, so any packet other than a ping or trace will fail at the destination.

51© 2006 Cisco Systems, Inc. All rights reserved.New Tools to Teach CCNA: Packet Tracer 4.0 - Extended Session Cisco Public
You will get an empty Event List for each new scenario you create.
Highlight the Scenario name to type a new name.
Click on the i to add a description for this scenario.
Click the New button to create a new scenario.
Simulation Mode Scenarios

52© 2006 Cisco Systems, Inc. All rights reserved.New Tools to Teach CCNA: Packet Tracer 4.0 - Extended Session Cisco Public
Click here to expand the PDU List Window.
Simulation Mode Scenarios

53© 2006 Cisco Systems, Inc. All rights reserved.New Tools to Teach CCNA: Packet Tracer 4.0 - Extended Session Cisco Public
Double click here to undock the PDU List Window.
Simulation Mode Scenarios

54© 2006 Cisco Systems, Inc. All rights reserved.New Tools to Teach CCNA: Packet Tracer 4.0 - Extended Session Cisco Public
The PDU List Window displays properties for each PDU created under this scenario.
Simulation Mode Scenarios
Double click Fire to add a PDU to the Event List.
You can change the color of a PDU by double clicking on its color box.
You can Edit or Delete a PDU by double clicking here.

55© 2006 Cisco Systems, Inc. All rights reserved.New Tools to Teach CCNA: Packet Tracer 4.0 - Extended Session Cisco Public
PDU Information & Challenge Mode

56© 2006 Cisco Systems, Inc. All rights reserved.New Tools to Teach CCNA: Packet Tracer 4.0 - Extended Session Cisco Public
PDU Information
You can either click on the Info box for a specific PDU or click on the PDU in the topology window to bring up the PDU Information window.

57© 2006 Cisco Systems, Inc. All rights reserved.New Tools to Teach CCNA: Packet Tracer 4.0 - Extended Session Cisco Public
PDU Information
The OSI Model tab shows the de-encapsulation/encapsulation process.
Clicking on a layer will display detailed information about decisions made at that layer.

58© 2006 Cisco Systems, Inc. All rights reserved.New Tools to Teach CCNA: Packet Tracer 4.0 - Extended Session Cisco Public
PDU Information
Click on Challenge Mode to answer the question, “What is the device decision in this layer?”Float over
answers for more details.
Click Hintto get help.

59© 2006 Cisco Systems, Inc. All rights reserved.New Tools to Teach CCNA: Packet Tracer 4.0 - Extended Session Cisco Public
PDU Information
The Inbound and Outbound PDU Details tabs display the details of PDU headers starting with Layer 2 at the top.

60© 2006 Cisco Systems, Inc. All rights reserved.New Tools to Teach CCNA: Packet Tracer 4.0 - Extended Session Cisco Public
Activity Wizard

61© 2006 Cisco Systems, Inc. All rights reserved.New Tools to Teach CCNA: Packet Tracer 4.0 - Extended Session Cisco Public
Activity Wizard
Use the Activity Wizardto create an activity.
Activity Wizard can be accessed from the File menu, from the tool bar, or with Ctrl+W.

62© 2006 Cisco Systems, Inc. All rights reserved.New Tools to Teach CCNA: Packet Tracer 4.0 - Extended Session Cisco Public
Activity Wizard
We are going to use this topology as the answer network, so we answer “Yes”.

63© 2006 Cisco Systems, Inc. All rights reserved.New Tools to Teach CCNA: Packet Tracer 4.0 - Extended Session Cisco Public
The Welcome screen briefly describes the steps for making your activity.
There are no noticeable differences between PTv32 and PTv4 Activity Wizards

64© 2006 Cisco Systems, Inc. All rights reserved.New Tools to Teach CCNA: Packet Tracer 4.0 - Extended Session Cisco Public
The Instructions screen provides a place where you can list the steps needed to complete this activity. The text can be simple, like shown here.

65© 2006 Cisco Systems, Inc. All rights reserved.New Tools to Teach CCNA: Packet Tracer 4.0 - Extended Session Cisco Public
You can also use most basic HTML tags to format your Instructions, like shown here.
Copying code from an HTML editor works well!

66© 2006 Cisco Systems, Inc. All rights reserved.New Tools to Teach CCNA: Packet Tracer 4.0 - Extended Session Cisco Public
Click Preview as HTMLto verify your coding.

67© 2006 Cisco Systems, Inc. All rights reserved.New Tools to Teach CCNA: Packet Tracer 4.0 - Extended Session Cisco Public
The Answer Network screen allows you to customize the activity’s answer network, assessment options, and timer settings.
You can view and modify the answer network at any time by clicking here.
You can import a different answer network from an existing .pkt file or export the current answer network to a .pkt file.

68© 2006 Cisco Systems, Inc. All rights reserved.New Tools to Teach CCNA: Packet Tracer 4.0 - Extended Session Cisco Public
Under “Assessment Options”you can choose which categories you wish to assess.
Under “Assessment Items” you can specify exactly which items you want to assess.

69© 2006 Cisco Systems, Inc. All rights reserved.New Tools to Teach CCNA: Packet Tracer 4.0 - Extended Session Cisco Public
Under “Time Settings” you can have PT track how much time has elapsed since the activity was started or make this a timed activity. You can also simply turn the timer off by choosing “None”. The default is “Time Elapsed”.
70© 2006 Cisco Systems, Inc. All rights reserved.New Tools to Teach CCNA: Packet Tracer 4.0 - Extended Session Cisco Public
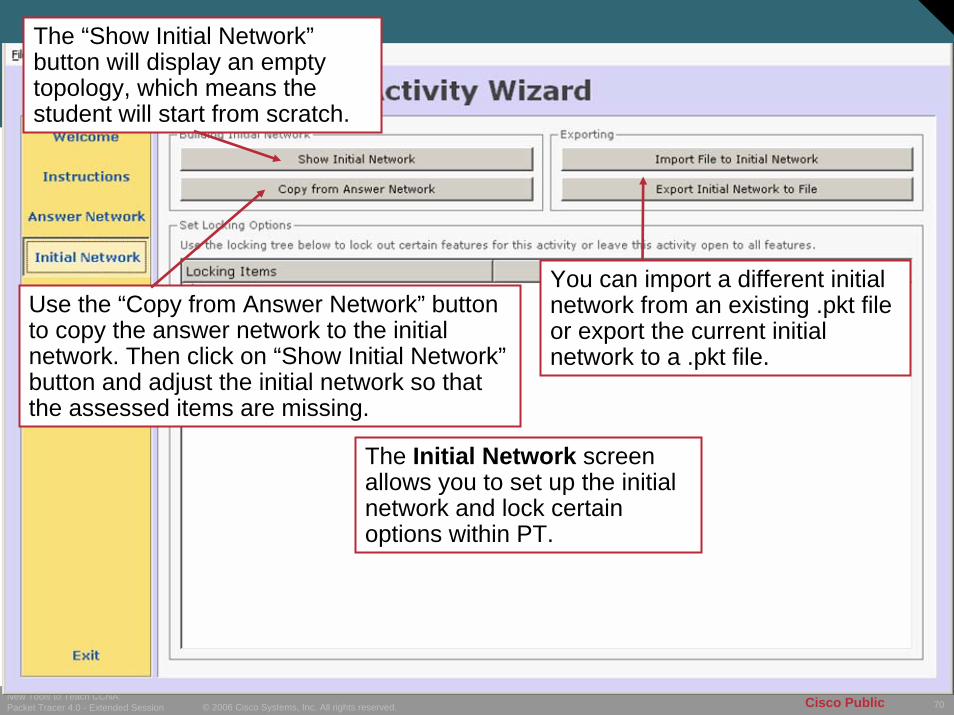
The Initial Network screen allows you to set up the initial network and lock certain options within PT.
The “Show Initial Network”button will display an empty topology, which means the student will start from scratch.
You can import a different initial network from an existing .pkt file or export the current initial network to a .pkt file.
Use the “Copy from Answer Network” button to copy the answer network to the initial network. Then click on “Show Initial Network”button and adjust the initial network so that the assessed items are missing.

71© 2006 Cisco Systems, Inc. All rights reserved.New Tools to Teach CCNA: Packet Tracer 4.0 - Extended Session Cisco Public
Under “Set Locking Options”, you can specify which features are not accessible within the activity. Check items you want locked.

72© 2006 Cisco Systems, Inc. All rights reserved.New Tools to Teach CCNA: Packet Tracer 4.0 - Extended Session Cisco Public
The Password screen allows you to set a case-sensitive password.
Click Test Activity to make sure the activity performs as intended.

73© 2006 Cisco Systems, Inc. All rights reserved.New Tools to Teach CCNA: Packet Tracer 4.0 - Extended Session Cisco Public
Activity Wizard
The Test Activitywizard cap reminds you that you are testing the activity. Click on it to exit testing.
The Instructions window cannot be closed or minimized. However, you can make it smaller by grabbing the bottom and dragging to resize.

74© 2006 Cisco Systems, Inc. All rights reserved.New Tools to Teach CCNA: Packet Tracer 4.0 - Extended Session Cisco Public
Activity Wizard
Use the Check Resultsbutton at anytime to see how many of the assessed items have been completed so far.
Use the Reset Activitybutton to restart the activity.

75© 2006 Cisco Systems, Inc. All rights reserved.New Tools to Teach CCNA: Packet Tracer 4.0 - Extended Session Cisco Public
When the student clicks Check Results, she can see exactly which assessment items have not yet been completed.
Activity Wizard

76© 2006 Cisco Systems, Inc. All rights reserved.New Tools to Teach CCNA: Packet Tracer 4.0 - Extended Session Cisco Public
When satisfied with the activity, click the Save button. Save the file with an appropriate name in the directory of your choice. Note that the file extension for activities is .pka.

77© 2006 Cisco Systems, Inc. All rights reserved.New Tools to Teach CCNA: Packet Tracer 4.0 - Extended Session Cisco Public
To protect a .pka file from being saved after a student has configured it, set the properties to Read-only.

78© 2006 Cisco Systems, Inc. All rights reserved.New Tools to Teach CCNA: Packet Tracer 4.0 - Extended Session Cisco Public
Q and A

79© 2006 Cisco Systems, Inc. All rights reserved.New Tools to Teach CCNA: Packet Tracer 4.0 - Extended Session Cisco Public
Additional Resources
• Forum
• Embedded resources in “Saves” folder
• Help and tutorials

80© 2006 Cisco Systems, Inc. All rights reserved.New Tools to Teach CCNA: Packet Tracer 4.0 - Extended Session Cisco Public
Packet Tracer Forum

81© 2006 Cisco Systems, Inc. All rights reserved.New Tools to Teach CCNA: Packet Tracer 4.0 - Extended Session Cisco Public
Embedded Instructional Resources

82© 2006 Cisco Systems, Inc. All rights reserved.New Tools to Teach CCNA: Packet Tracer 4.0 - Extended Session Cisco Public
Help and Tutorials

83© 2006 Cisco Systems, Inc. All rights reserved.New Tools to Teach CCNA: Packet Tracer 4.0 - Extended Session Cisco Public


![CCNA Lab Packet Tracer Activity 8.6.1 [Resolved] part 1.pdf](https://img.dokumen.tips/doc/110x75/55cf9387550346f57b9dbad9/ccna-lab-packet-tracer-activity-861-resolved-part-1pdf.jpg)