Embed Size (px)
Citation preview
1
XFp Analyzer Network Setup Guide
103237-400 Rev. B
XFp Analyzer
Network Setup Guide
September 2015
2
XFp Analyzer Network Setup Guide
103237-400 Rev. B
Table of Contents
Introduction .................................................................................................................................................. 3
XFp Analyzer System Information ................................................................................................................. 4
Wired Network Setup ................................................................................................................................... 4
Wireless Network Setup ............................................................................................................................... 5
Shared Folder Setup ..................................................................................................................................... 6
Email Configuration ...................................................................................................................................... 7
Time Server/Time Zone and System Clock……………………………………………………………………………………………… 8
Network Information Sheet .......................................................................................................................... 9
Required Materials: Approved Wireless USB Adapter or Wired Connection (ethernet cable); Network connection settings from IT Department Note: XFp instruments are shipped with Microsoft Security Essentials configured for Real Time protection and weekly scheduled virus scans using default actions for its four alert levels. This will provide sufficient protection from common threats originating in network connections and removable media, however MSE will not scan media automatically on connection/insertion.
3
XFp Analyzer Network Setup Guide
103237-400 Rev. B
Introduction
Why should I network my XFp Analyzer? Connecting your XFp Analyzer to a network provides unique workflow advantages to users, such as:
Immediate acquisition of Assay Results via email.
Simple file transfer for Assay Templates and Results – no need for USB drives.
Remote access to Seahorse Technical Support.
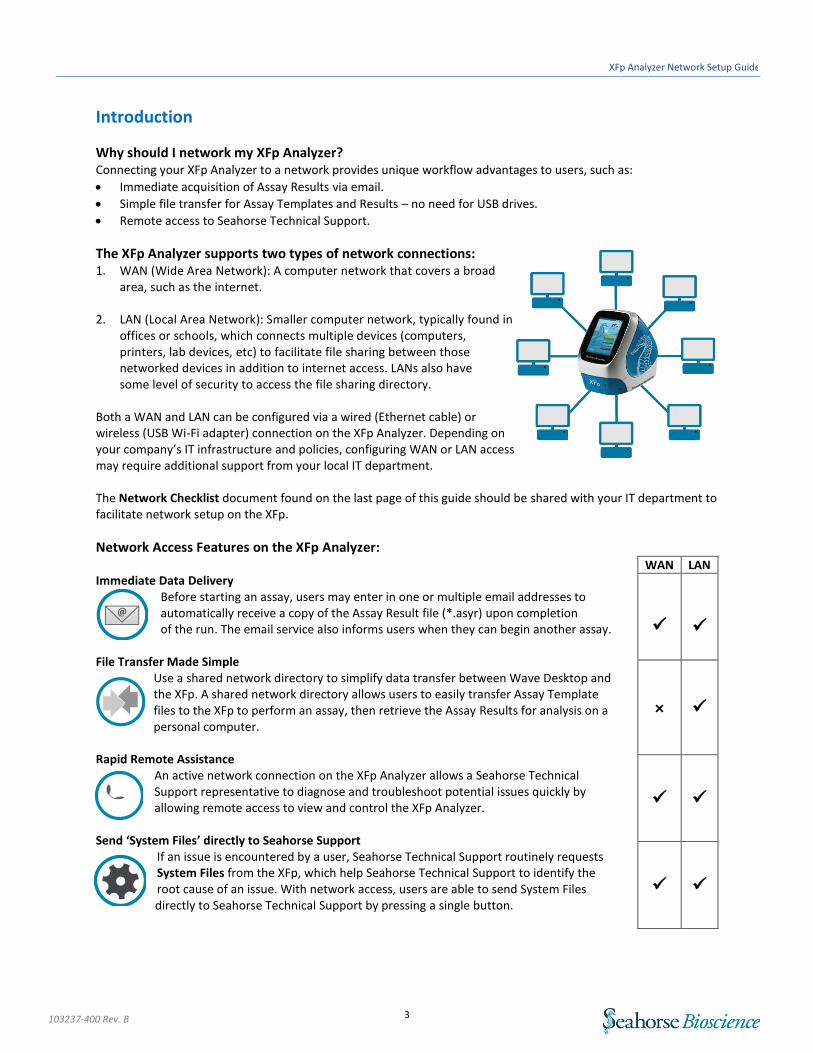
The XFp Analyzer supports two types of network connections: 1. WAN (Wide Area Network): A computer network that covers a broad
area, such as the internet.
2. LAN (Local Area Network): Smaller computer network, typically found in offices or schools, which connects multiple devices (computers, printers, lab devices, etc) to facilitate file sharing between those networked devices in addition to internet access. LANs also have some level of security to access the file sharing directory.
Both a WAN and LAN can be configured via a wired (Ethernet cable) or wireless (USB Wi-Fi adapter) connection on the XFp Analyzer. Depending on your company’s IT infrastructure and policies, configuring WAN or LAN access may require additional support from your local IT department. The Network Checklist document found on the last page of this guide should be shared with your IT department to facilitate network setup on the XFp.
Network Access Features on the XFp Analyzer: Immediate Data Delivery
Before starting an assay, users may enter in one or multiple email addresses to automatically receive a copy of the Assay Result file (*.asyr) upon completion of the run. The email service also informs users when they can begin another assay.
File Transfer Made Simple Use a shared network directory to simplify data transfer between Wave Desktop and the XFp. A shared network directory allows users to easily transfer Assay Template files to the XFp to perform an assay, then retrieve the Assay Results for analysis on a personal computer.
Rapid Remote Assistance
An active network connection on the XFp Analyzer allows a Seahorse Technical Support representative to diagnose and troubleshoot potential issues quickly by allowing remote access to view and control the XFp Analyzer.
Send ‘System Files’ directly to Seahorse Support
If an issue is encountered by a user, Seahorse Technical Support routinely requests System Files from the XFp, which help Seahorse Technical Support to identify the root cause of an issue. With network access, users are able to send System Files directly to Seahorse Technical Support by pressing a single button.
WAN LAN
×
4
XFp Analyzer Network Setup Guide
103237-400 Rev. B
XFp Analyzer System Information
The XFp can be connected to any Microsoft Windows compatible network and the Local Area connections can be configured as required by the network.
Complete the Network Settings Info Sheet (located on last page) provided to ensure you have everything needed to successfully connect to a new network.
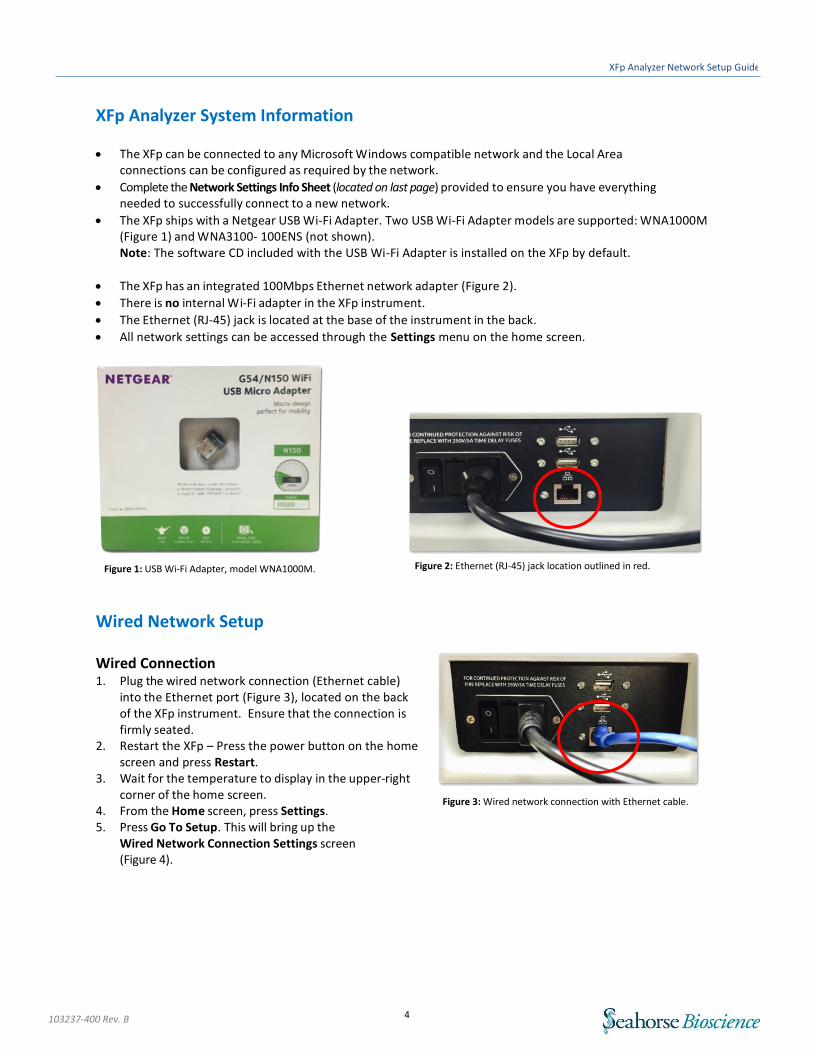
The XFp ships with a Netgear USB Wi-Fi Adapter. Two USB Wi-Fi Adapter models are supported: WNA1000M (Figure 1) and WNA3100- 100ENS (not shown). Note: The software CD included with the USB Wi-Fi Adapter is installed on the XFp by default.
The XFp has an integrated 100Mbps Ethernet network adapter (Figure 2).
There is no internal Wi-Fi adapter in the XFp instrument.
The Ethernet (RJ-45) jack is located at the base of the instrument in the back.
All network settings can be accessed through the Settings menu on the home screen.
Wired Network Setup Wired Connection 1. Plug the wired network connection (Ethernet cable)
into the Ethernet port (Figure 3), located on the back of the XFp instrument. Ensure that the connection is firmly seated.
2. Restart the XFp – Press the power button on the home screen and press Restart.
3. Wait for the temperature to display in the upper-right corner of the home screen.
4. From the Home screen, press Settings. 5. Press Go To Setup. This will bring up the
Wired Network Connection Settings screen (Figure 4).
Figure 1: USB Wi-Fi Adapter, model WNA1000M. Figure 2: Ethernet (RJ-45) jack location outlined in red.
Figure 3: Wired network connection with Ethernet cable.
5
XFp Analyzer Network Setup Guide
103237-400 Rev. B
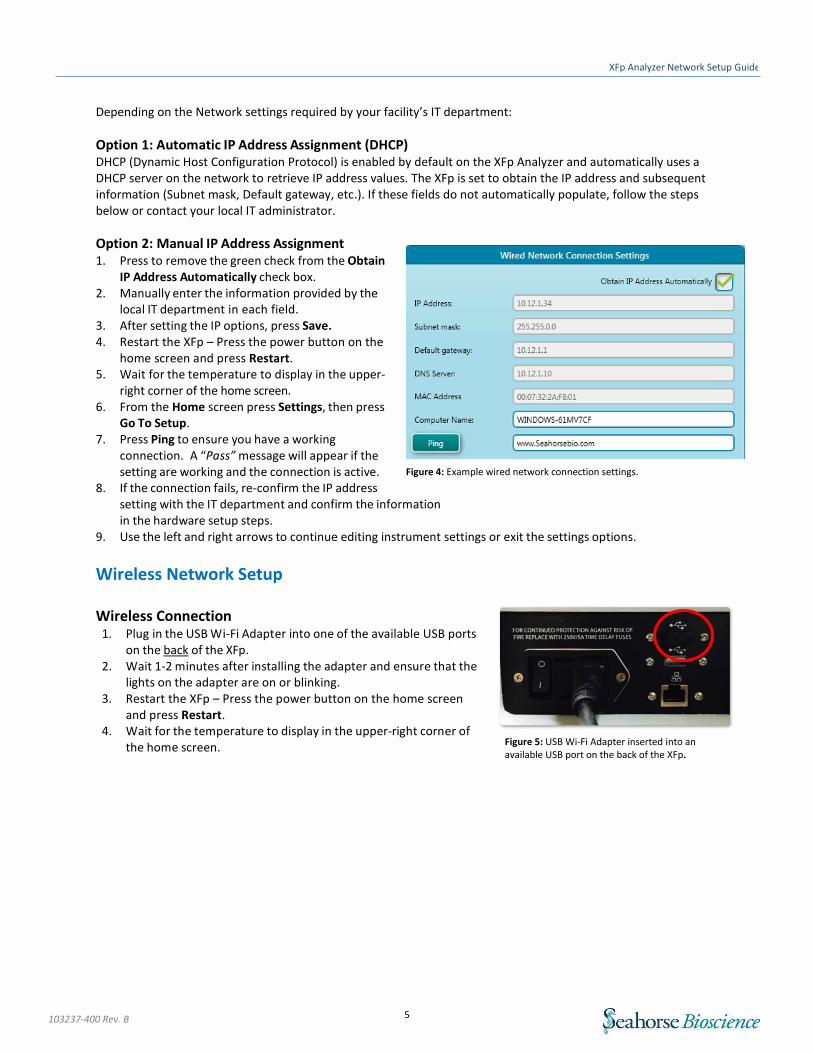
Depending on the Network settings required by your facility’s IT department:
Option 1: Automatic IP Address Assignment (DHCP) DHCP (Dynamic Host Configuration Protocol) is enabled by default on the XFp Analyzer and automatically uses a DHCP server on the network to retrieve IP address values. The XFp is set to obtain the IP address and subsequent information (Subnet mask, Default gateway, etc.). If these fields do not automatically populate, follow the steps below or contact your local IT administrator.
Option 2: Manual IP Address Assignment 1. Press to remove the green check from the Obtain
IP Address Automatically check box. 2. Manually enter the information provided by the
local IT department in each field. 3. After setting the IP options, press Save. 4. Restart the XFp – Press the power button on the
home screen and press Restart. 5. Wait for the temperature to display in the upper-
right corner of the home screen. 6. From the Home screen press Settings, then press
Go To Setup. 7. Press Ping to ensure you have a working
connection. A “Pass” message will appear if the setting are working and the connection is active.
8. If the connection fails, re-confirm the IP address setting with the IT department and confirm the information in the hardware setup steps.
9. Use the left and right arrows to continue editing instrument settings or exit the settings options.
Wireless Network Setup Wireless Connection
1. Plug in the USB Wi-Fi Adapter into one of the available USB ports on the back of the XFp.
2. Wait 1-2 minutes after installing the adapter and ensure that the lights on the adapter are on or blinking.
3. Restart the XFp – Press the power button on the home screen and press Restart.
4. Wait for the temperature to display in the upper-right corner of the home screen.
Figure 5: USB Wi-Fi Adapter inserted into an available USB port on the back of the XFp.
Figure 4: Example wired network connection settings.
6
XFp Analyzer Network Setup Guide
103237-400 Rev. B
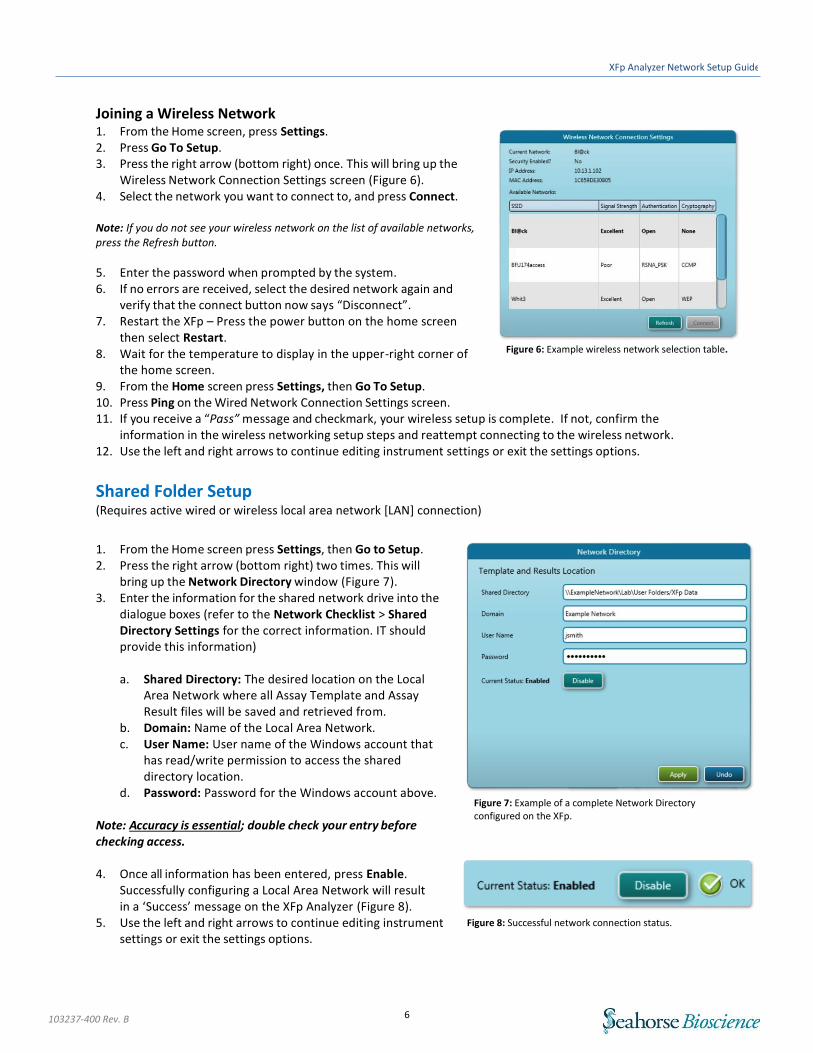
Joining a Wireless Network 1. From the Home screen, press Settings. 2. Press Go To Setup. 3. Press the right arrow (bottom right) once. This will bring up the
Wireless Network Connection Settings screen (Figure 6). 4. Select the network you want to connect to, and press Connect.
Note: If you do not see your wireless network on the list of available networks, press the Refresh button.
5. Enter the password when prompted by the system. 6. If no errors are received, select the desired network again and
verify that the connect button now says “Disconnect”. 7. Restart the XFp – Press the power button on the home screen
then select Restart. 8. Wait for the temperature to display in the upper-right corner of
the home screen. 9. From the Home screen press Settings, then Go To Setup. 10. Press Ping on the Wired Network Connection Settings screen. 11. If you receive a “Pass” message and checkmark, your wireless setup is complete. If not, confirm the
information in the wireless networking setup steps and reattempt connecting to the wireless network. 12. Use the left and right arrows to continue editing instrument settings or exit the settings options.
Shared Folder Setup (Requires active wired or wireless local area network [LAN] connection)
1. From the Home screen press Settings, then Go to Setup. 2. Press the right arrow (bottom right) two times. This will
bring up the Network Directory window (Figure 7). 3. Enter the information for the shared network drive into the
dialogue boxes (refer to the Network Checklist > Shared Directory Settings for the correct information. IT should provide this information) a. Shared Directory: The desired location on the Local
Area Network where all Assay Template and Assay Result files will be saved and retrieved from.
b. Domain: Name of the Local Area Network. c. User Name: User name of the Windows account that
has read/write permission to access the shared directory location.
d. Password: Password for the Windows account above. Note: Accuracy is essential; double check your entry before checking access. 4. Once all information has been entered, press Enable.
Successfully configuring a Local Area Network will result in a ‘Success’ message on the XFp Analyzer (Figure 8).
5. Use the left and right arrows to continue editing instrument settings or exit the settings options.
Figure 6: Example wireless network selection table.
Figure 7: Example of a complete Network Directory configured on the XFp.
Figure 8: Successful network connection status.
7
XFp Analyzer Network Setup Guide
103237-400 Rev. B
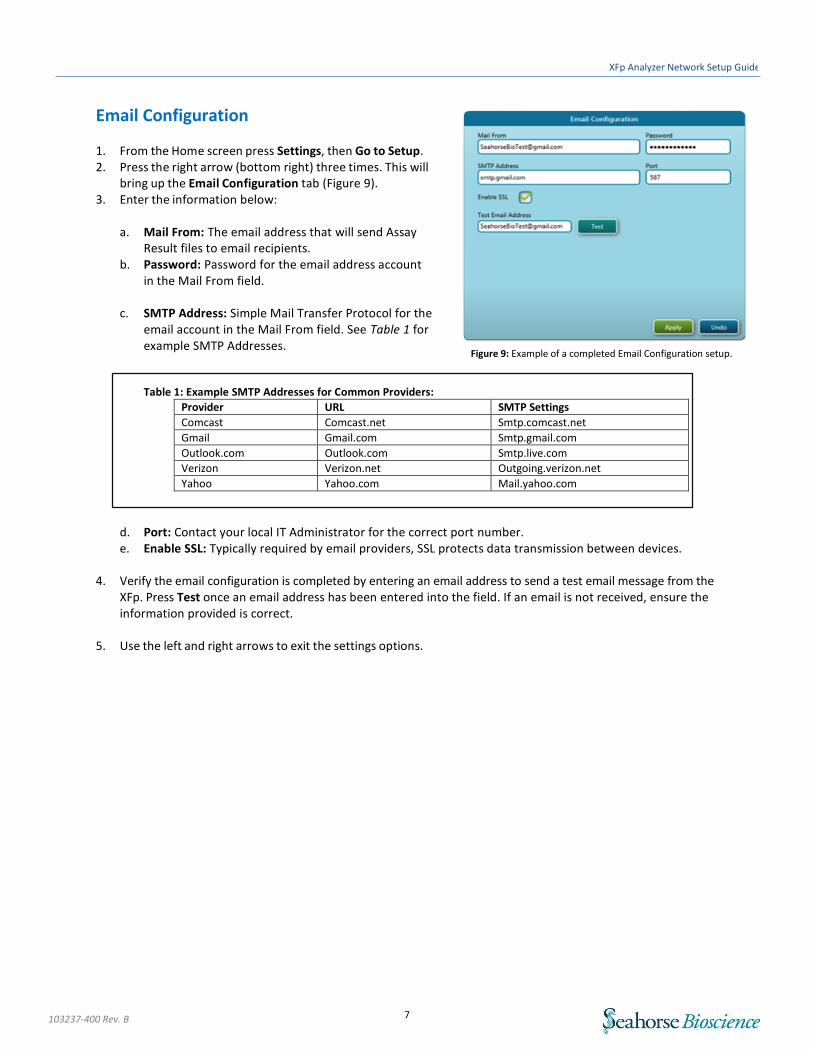
Email Configuration 1. From the Home screen press Settings, then Go to Setup. 2. Press the right arrow (bottom right) three times. This will
bring up the Email Configuration tab (Figure 9). 3. Enter the information below:
a. Mail From: The email address that will send Assay
Result files to email recipients. b. Password: Password for the email address account
in the Mail From field.
c. SMTP Address: Simple Mail Transfer Protocol for the email account in the Mail From field. See Table 1 for example SMTP Addresses.
Table 1: Example SMTP Addresses for Common Providers:
Provider URL SMTP Settings
Comcast Comcast.net Smtp.comcast.net
Gmail Gmail.com Smtp.gmail.com
Outlook.com Outlook.com Smtp.live.com
Verizon Verizon.net Outgoing.verizon.net
Yahoo Yahoo.com Mail.yahoo.com
d. Port: Contact your local IT Administrator for the correct port number. e. Enable SSL: Typically required by email providers, SSL protects data transmission between devices.
4. Verify the email configuration is completed by entering an email address to send a test email message from the
XFp. Press Test once an email address has been entered into the field. If an email is not received, ensure the information provided is correct.
5. Use the left and right arrows to exit the settings options.
Figure 9: Example of a completed Email Configuration setup.
8
XFp Analyzer Network Setup Guide
103237-400 Rev. B
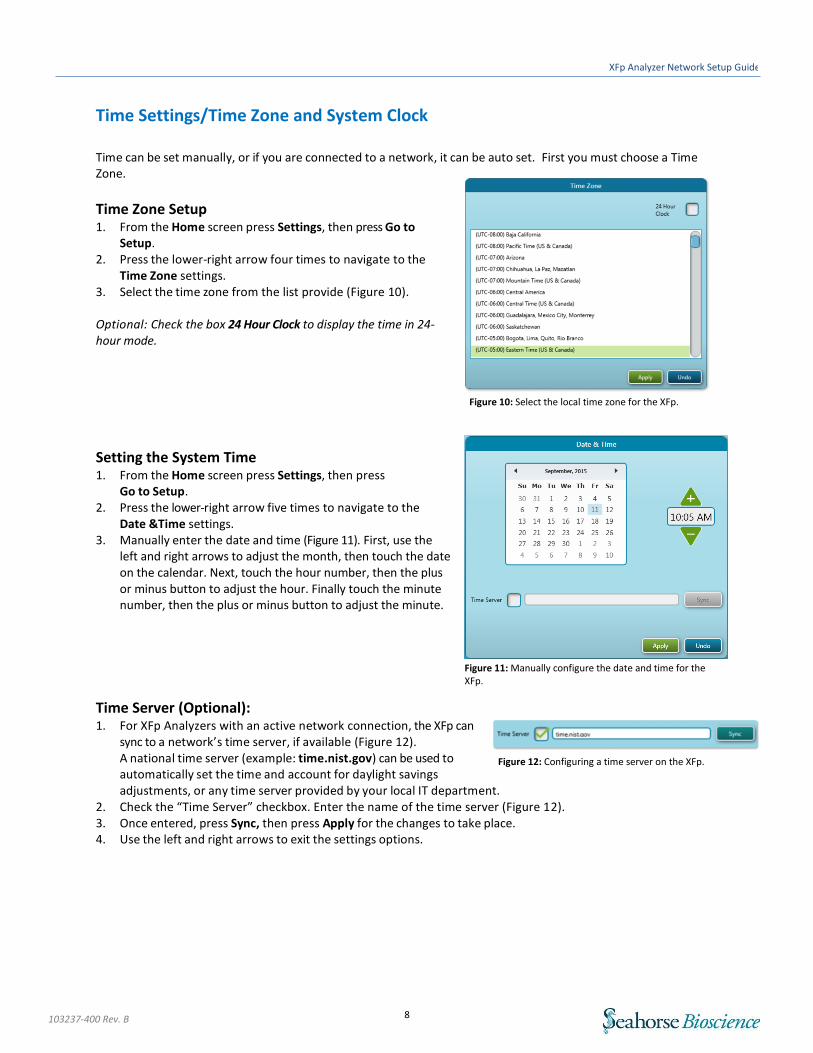
Time Settings/Time Zone and System Clock Time can be set manually, or if you are connected to a network, it can be auto set. First you must choose a Time Zone.
Time Zone Setup 1. From the Home screen press Settings, then press Go to
Setup. 2. Press the lower-right arrow four times to navigate to the
Time Zone settings. 3. Select the time zone from the list provide (Figure 10). Optional: Check the box 24 Hour Clock to display the time in 24-hour mode.
Setting the System Time 1. From the Home screen press Settings, then press
Go to Setup. 2. Press the lower-right arrow five times to navigate to the
Date &Time settings. 3. Manually enter the date and time (Figure 11). First, use the
left and right arrows to adjust the month, then touch the date on the calendar. Next, touch the hour number, then the plus or minus button to adjust the hour. Finally touch the minute number, then the plus or minus button to adjust the minute.
Time Server (Optional): 1. For XFp Analyzers with an active network connection, the XFp can
sync to a network’s time server, if available (Figure 12). A national time server (example: time.nist.gov) can be used to automatically set the time and account for daylight savings adjustments, or any time server provided by your local IT department.
2. Check the “Time Server” checkbox. Enter the name of the time server (Figure 12). 3. Once entered, press Sync, then press Apply for the changes to take place. 4. Use the left and right arrows to exit the settings options.
Figure 10: Select the local time zone for the XFp.
Figure 11: Manually configure the date and time for the XFp.
Figure 12: Configuring a time server on the XFp.
9
XFp Analyzer Network Setup Guide
103237-400 Rev. B
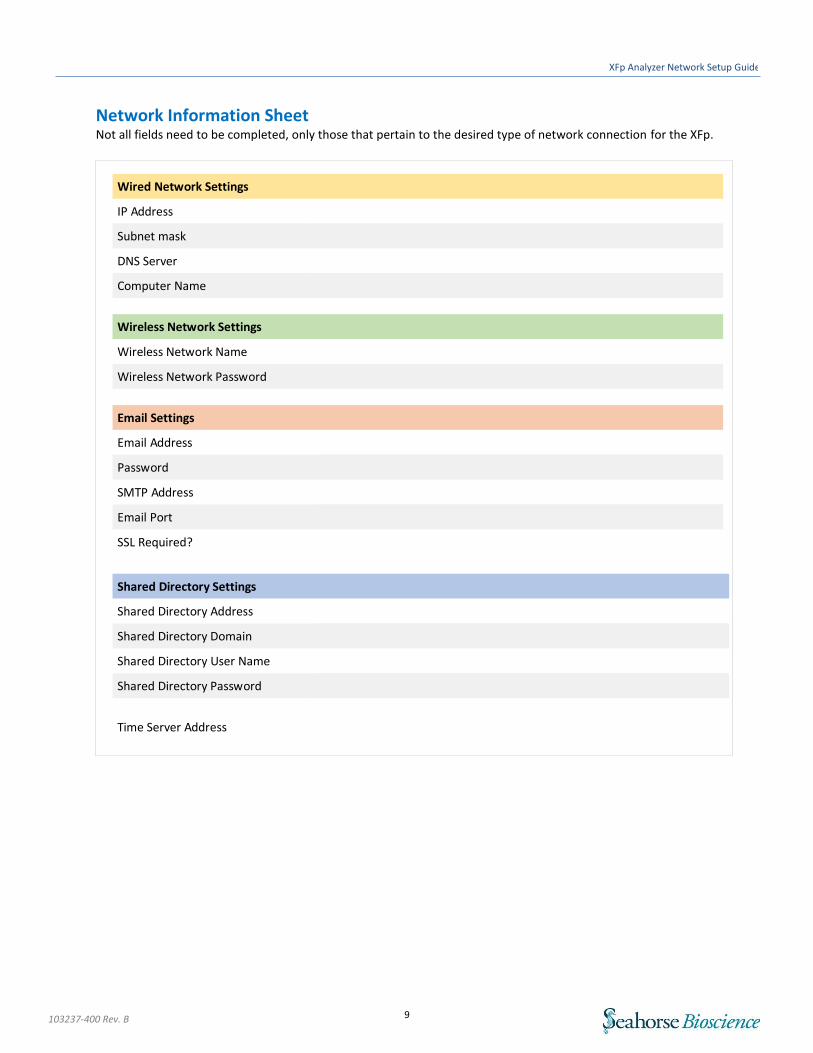
Network Information Sheet Not all fields need to be completed, only those that pertain to the desired type of network connection for the XFp.
Wired Network Settings
IP Address
Subnet mask
DNS Server
Computer Name
Wireless Network Settings
Wireless Network Name
Wireless Network Password
Email Settings
Email Address
Password
SMTP Address
Email Port
SSL Required?
Shared Directory Settings
Shared Directory Address
Shared Directory Domain
Shared Directory User Name
Shared Directory Password
Time Server Address