Embed Size (px)
Citation preview

2015
Portlock Software
2/26/2015
NetWare 5.x Virtualization

NetWare 5.x Virtualization Version 1.8 2/26/2015
Copyright 2000-2015 Portlock Software Page 1 of 45
NetWare 5.x VirtualizationFebruary 26, 2015
Version 1.8
Copyright 2000-2015 Portlock Software

NetWare 5.x Virtualization Version 1.8 2/26/2015
Copyright 2000-2015 Portlock Software Page 2 of 45
The Portlock storage management software described in this document is furnished under a LicenseAgreement and may be used only in accordance with the terms of the agreement.
Version: 1.8
Date of Publication: February, 2015
NO WARRANTY. The technical documentation is being delivered to you AS IS and Portlock makes nowarranty as to its accuracy or use. Any use of the technical documentation or the information containedtherein is at the risk of the user. Documentation may include technical errors, typographical errors orother inaccuracies. Portlock reserves the right to make changes without prior notice.
All technical documentation made available by Portlock is the copyrighted work of Portlock. No part ofthis publication may be copied without the express written permission of Portlock.
Copyright 2000-2013 Portlock. All Rights Reserved. Portlock, the Portlock logo, Portlock StorageManager, Portlock Scorpion, Portlock Volume Defrag, Portlock Disk Test and Portlock Storage Suite aretrademarks of Portlock.
Other vendor product names mentioned in this manual may be trademarks or registered trademarks oftheir respective companies and are hereby acknowledged. Printed in the United States.
NetWare 5.x Virtualization Version 1.8 2/26/2015
Copyright 2000-2015 Portlock Software Page 3 of 45
Table of ContentsChapter 1. Introduction ........................................................................................................................... 6
Prerequisites ....................................................................................................................................... 6
Portlock Storage Manager Client ......................................................................................................... 6
Portlock Storage Manager for NetWare ............................................................................................... 6
Portlock Boot CD ................................................................................................................................. 6
Basic Steps for Virtualization................................................................................................................ 7
Chapter 2. Virtualization Considerations .................................................................................................. 8
Chapter 3. Preparing for Virtualization .................................................................................................... 9
Configure Console Logging ................................................................................................................... 9
Routine Server Maintenance ............................................................................................................... 9
Schedule Downtime ......................................................................................................................... 9
Reboot the Server ............................................................................................................................ 9
Check Partitions and Volumes ........................................................................................................ 10
Check Directory Services ................................................................................................................ 11
Install Service Pack and Hotfixes .................................................................................................... 11
Application Review ........................................................................................................................ 13
Download Required Device Drivers ................................................................................................ 13
Chapter 4. Setup Environment ............................................................................................................... 14
Step 1. Download and install Portlock Products ................................................................................. 14
Step 2. Import your Portlock Storage Manager License ...................................................................... 15
Step 3. Install Portlock Storage Manger to the NetWare Server ......................................................... 15
Method #1 – Portlock Storage Manager Client method .................................................................. 15
Method #2 – Portlock Boot CD method .......................................................................................... 16
Step 4. Configure ESX Server Remote Management (optional) ........................................................... 16
Configure ESX Server: .................................................................................................................... 16
Configure Portlock Storage Manager Client .................................................................................... 16
Chapter 5. Virtual Machine Setup .......................................................................................................... 18
Step 1. Import the Portlock Boot CD ISO Image .................................................................................. 18
Method #1 – Portlock Storage Manager Client ............................................................................... 18
Method #2 - vSphere ..................................................................................................................... 19
Step 2. Create the virtual machine ..................................................................................................... 19

NetWare 5.x Virtualization Version 1.8 2/26/2015
Copyright 2000-2015 Portlock Software Page 4 of 45
Step 3. Modify the virtual machine .................................................................................................... 20
Step 4. Boot the virtual machine ........................................................................................................ 20
Step 5. Install Portlock Storage Manager License ............................................................................... 21
Chapter 6. NetWare Server Image Creation ........................................................................................... 22
Introduction. ..................................................................................................................................... 22
Chapter 7. NetWare Server Migration and Virtualization ....................................................................... 36
Step 1. Send Portlock Image .............................................................................................................. 36
Step 2. Restore from the Portlock Image............................................................................................ 36
Step 3. Shutdown the virtual machine ............................................................................................... 37
Step 4. Modify the virtual machine .................................................................................................... 37
Step 5. Boot the virtual machine ........................................................................................................ 37
Chapter 8. Post Migration Setup ............................................................................................................ 38
Step 1. Configure storage drivers ....................................................................................................... 38
Step 2. Configure network drivers ...................................................................................................... 38
Step 3. Install VMware Tools .............................................................................................................. 39
Method 1 ....................................................................................................................................... 39
Method 2 ....................................................................................................................................... 39
Step 4. Review boot errors ................................................................................................................ 40
Step 5. Review VMware Event Messages ........................................................................................... 40
Appendix A. Driver Versions .................................................................................................................. 41
Appendix B. Example STARTUP.NCF ....................................................................................................... 42
VMware ESX ...................................................................................................................................... 42
VMware Workstation ........................................................................................................................ 42
Appendix C. Example Network Driver Configuration .............................................................................. 43
VMware ESX ...................................................................................................................................... 43
VMware Workstation ........................................................................................................................ 43
Appendix D. Additional References ........................................................................................................ 44
Novell OES clustering with NSS on vSphere 4.x .................................................................................. 44
Novell Cluster Services on VMware ESX Without Shared Storage ....................................................... 44
Configuring Novell Clustering with ESX Server.................................................................................... 44
How to add Virtual Hard Disks and get them to work inside the Guest Operating System .................. 44
Appendix E. Tips & Common Problems .................................................................................................. 45
NetWare 5.x Virtualization Version 1.8 2/26/2015
Copyright 2000-2015 Portlock Software Page 5 of 45
The Portlock Boot CD hangs when starting a virtual machine ............................................................. 45
The NetWare server’s date and time is wrong after virtualization ...................................................... 45
After restoring NetWare, the SYS volume is not mounted. ................................................................. 45
DOS Partition does not have a label. .................................................................................................. 45

NetWare 5.x Virtualization Version 1.8 2/26/2015
Copyright 2000-2015 Portlock Software Page 6 of 45
Chapter 1. IntroductionThis document describes the steps necessary to virtualize NetWare 5.x to VMware ESX / ESXi.
PrerequisitesNetWare 5.0 with Service Pack6a or NetWare 5.1 with Service Pack 8.VMware ESX or ESXi version 4.1 or later.VMware vSphere Client version 4.1 or later.Portlock Storage Manager for NetWare version 5.20 or later.Portlock Storage Manager Client version 5.30 or later.Portlock Boot CD version 5.30 (32-bit) or later.
Portlock Storage Manager ClientPortlock Storage Manager Client is a Windows program and provides direct support for virtualizingNetWare servers. Portlock Storage Manager Client also manages NetWare and ESX servers, Portlocklicenses, Portlock products, downloads and libraries of objects (Portlock Images, ISO Images, etc.).
Portlock Storage Manager Client provides direct support for NetWare servers. Key features include:
Scanning the network for NetWare servers.Displaying NetWare storage objects.Downloading and installing Portlock Storage Manager to a NetWare server.Licensing Portlock Storage Manager on a NetWare server.Script creation wizard.Imaging a NetWare server.Managing Portlock Images.Managing NetWare servers that are part of Novell Clusters Services.Managing ESX servers.
Portlock Storage Manager for NetWarePortlock Storage Manager for NetWare runs on NetWare servers and is the program that creates imagesof NetWare servers (among its many storage management features). Portlock Storage Manager forNetWare is a NetWare Loadable Module (NLM) and is run from the NetWare console or launchedremotely by Portlock Storage Manager Client.
Portlock Boot CDPortlock Boot CD is a complete bootable operating system based upon WinPE 2.1 (Windows Server2008). Portlock Storage Manager running on the Portlock Boot CD has nearly the same feature set aswhen running under NetWare.
Note: Additional versions are available based upon WinPE 1.6 (Windows Server 2003) that supportsolder systems that do not have ACPI. There are also specialized versions that primarily supportVMware built with the base WinPE drivers + VMware drivers.

NetWare 5.x Virtualization Version 1.8 2/26/2015
Copyright 2000-2015 Portlock Software Page 7 of 45
Basic Steps for VirtualizationCreate virtual machine.Image NetWare server using Portlock Storage Manager Client.Boot the virtual machine with the Portlock Boot CD.Restore NetWare server using Portlock Storage Manager on the Portlock Boot CD.Configure NetWare server.

NetWare 5.x Virtualization Version 1.8 2/26/2015
Copyright 2000-2015 Portlock Software Page 8 of 45
Chapter 2. Virtualization ConsiderationsThere are a number of good reasons to virtualize Novell NetWare:
The hardware is out of date. The Novell NetWare server is running critical applications thatcontinue to be needed but the hardware will not reliably last that long.Complex configurations. The NetWare server has a complex configuration that needs to stay thesame but more resources are required. Virtualizing the server to higher end hardware will help.Simplified backups. A virtual machine can be backed up by just copying the virtual machine diskand configuration files.Hardware support. Major hardware vendors are gradually dropping support for NetWare.Moving a server to a virtual machine minimizes hardware obsolescence.
There are valid reasons to not virtualize Novell NetWare:
The NetWare server is running poorly on the existing hardware. Correct these problems firstbefore virtualizing.The NetWare server is part of a Novell Cluster that is sharing storage hardware.The downtime to virtualize is unacceptable. Depending on the age of the hardware, transfer ofdata can be as low as 2 MB / sec (7 GB per hour). Typically speeds for modern hardware arearound 50 – 75 GB per hour.Complex network configurations. VMware provides a simple network model that might notmeet your server’s network configuration. Review your network requirements and make surethat VMware supports your requirements and that you understand how to configure the virtualmachine network configuration.Incompatible applications. Some applications will not run well or at all on newer hardware.The applications were not tested with today’s high CPU speeds, gigabytes of memory andterabytes of disk space.

NetWare 5.x Virtualization Version 1.8 2/26/2015
Copyright 2000-2015 Portlock Software Page 9 of 45
Chapter 3. Preparing for VirtualizationNovell NetWare 5.x is legacy operating system that was released prior to the current generation ofVMware virtualization products. There are several tasks that should be completed in preparation forvirtualization that will simplify the procedure. Ensure that you have adequate training on both NetWareand VMware prior to beginning virtualization.
A server that is not running stably prior to virtualization will not run stably after virtualization except incases where the hardware is being replaced by a virtual machine. Ensure that the NetWare server isrunning reliably prior to virtualization.
Configure Console LoggingAdd the following line in your AUTOEXEC.NCF right after mounting the SYS volume:
LOAD CONLOG.NLM
After completing this chapter, reboot the server and review SYS:/ETC/CONSOLE.LOG. Note all warningsand errors. Correct the issues that should be fixed.
Note: Portlock Storage Manager Client has the ability to display common configuration files and log files.In Portlock Storage Manager Client, expand the left tree window for your server and select“Configuration Files” or “Log Files”.
Routine Server MaintenanceSchedule downtime for the server when it will not need to be accessed.Reboot the server.Check each DOS partition and NetWare Volume.Install the latest service pack (NetWare 5.0: SP6a; NetWare 5.1 SP8) and hotfixes. Note: You cantake a Portlock Image of the server prior to service pack and hotfix installation to ensurerecovery in case of issues.Review each of the server’s applications and update to the latest versions if possible.Download and install the disk and network drivers that are required for VMware.
o LSI Logic LSIMPTNW.HAM for storage.o Intel CE1000.LAN for network (VMware ESX).o AMD PCNTNW.LAN or CNEAMD.LAN for network (VMware Workstation).
Document network configuration.
Schedule DowntimeIn preparing a Novell NetWare server for virtualization, you will need to spend some time ensuring thatthe server is correctly maintained and patched. This may take only a few minutes for servers that havebeen properly maintained to several hours for servers that have not been maintained for a few years.
Reboot the ServerIt is important to begin the maintenance process with a freshly booted server. This step returns theserver to a fresh starting state, minimizes lost or fragmented memory, etc.
NetWare 5.x Virtualization Version 1.8 2/26/2015
Copyright 2000-2015 Portlock Software Page 10 of 45
Check Partitions and VolumesThis is an important step and is the number one source of failure while imaging and virtualizing a NovellNetWare server. Check and repair any warnings or errors on the DOS partitions and the NetWareTraditional and NSS volumes.
After each of the file systems have been checked and repaired, reboot the server.
Note: Portlock Storage Manager considers any file system consistency warnings to be an error which willprevent the virtualization from completing.
DOS PartitionsThere are two types of DOS partitions: Novell (Caldera) DR-DOS (NetWare default) and Microsoft MS-DOS. In rare cases IBM PC-DOS. You must use the correct check / repair tool for the DOS partition (seebelow).
A common problem with DOS partitions is that the server has abended in the past leaving the DOSpartition partially corrupted. This usually just affects the free space and is basically harmless. However, itis important to actually check the DOS partition to verify that there is no corruption.
Another common problem with DOS partitions is that the partition does not have a DOS partition label.Portlock Storage Manager requires that each DOS partition have a DOS partition label. The DOS “label”command can assign a partition label. Portlock Storage Manager for NetWare has a command to changethe partition label.
To assign a DOS partition label using Portlock Storage Manager for NetWare:
1. Start Portlock Storage Manager for NetWare on your server: load sys:/stormgr/stormgr2. From the Main Menu, select Partition Commands.3. Select the drive with the DOS partition that you want to modify.4. Select Change Partition Label command.5. Select the DOS partition to modify.6. Enter a unique DOS label name.
To check and repair DOS partitions, down the server to DOS. Then run either “CHKDSK” for DR-DOS or“SCANDISK” for MS-DOS.
Once the file systems have been checked and repaired, reboot the server.
NetWare Traditional VolumesTo check and repair NetWare Traditional volumes run the NetWare console command “VREPAIR”.
NetWare NSS VolumesA common problem with NSS Volumes is “unclaimed blocks”. These are blocks that exist but are notassigned to a file system object. Run the NetWare console command “NSS /VolumeRebuild” to correctthis type of error.

NetWare 5.x Virtualization Version 1.8 2/26/2015
Copyright 2000-2015 Portlock Software Page 11 of 45
To check NetWare NSS Volumes run the NetWare console command “NSS /VolumeVerify”. To repairNetWare NSS Volumes run the NetWare console command “NSS /VolumeRebuild”.
Check Directory ServicesDirectory Services is linked to your NetWare server’s physical storage. Run DSREPAIR to automaticallycorrect problems.
Method #1From Portlock Storage Manage Client right-click on your server, select “Maintenance Commands-> Run DSREPAIR (Full Unattended Repair)”.
Method #2At the server console type “LOAD SYS:/SYSTEM/DSREPAIR.NLM”. Select “Unattended fullrepair”.
After DSREPAIR runs, review SYS:/SYSTEM/DSREPAIR.LOG. From Portlock Storage Manager Client, selectthe NetWare server in the left tree window, expand the tree, expand “Log Files”. Select “dsrepair.log”.This log file will display in the right window. Review the log file for errors and warnings.
Install Service Pack and HotfixesPortlock does not recommend virtualizing servers that are not correctly patched and updated.Numerous problems have been fixed by Novell that might cause problems in virtualizing a system. Installthe latest service pack and hotfixes prior to virtualization.
Portlock Storage Manager Client version 5.35 now supports a new feature “NetWare Support PackLibrary”. This feature provides extensive support for managing NetWare support packs and patches.Review Portlock’s NetWare Patch User Guide for more information.
Go to Novell’s download web site for service packs and patches: http://download.novell.comDownloads are also available at the Portlock FTP server:http://www.portlock.com:88/Public/download/3rdparty/NetWare
Important updates (NetWare 5.0)The following support packs and patches are recommended:
nw50sp6a.exe (required) Novell 5.0 Support Pack 6a Dec-20-2000Os5pt2a.exe Updated server.exe … Mar-02-2001Nwpa5.exe NetWare 5 NWPA.NLM May-07-2001Flsysft3.exe Updated FILESYS.NLM … Jun-07-2001010606n5.exe Updated NetWare 5.x LIBC … Jun-07-2001Scsihdft.exe SCSIHD.CDM version 3.01 Oct-04-2002

NetWare 5.x Virtualization Version 1.8 2/26/2015
Copyright 2000-2015 Portlock Software Page 12 of 45
Important updates (NetWare 5.1)The following support packs and patches are recommended:
Nw51sp8.exe (required) Novell 5.1 Support Pack 8 Mar-08-2005Nfs30sp7.exe NFS Services 3.0 Support Pack 7 Mar-08-2005Tcp587i.exe TCP update for NetWare 5.1 Oct-04-2005Nw51os8a.exe Updated server.exe for NetWare 5.1 SP8 Oct-28-2005Libcsp6a.zip Update LIBC Mar-09-2007Wsock6o.zip Updated Winsock Suite Apr-15-2008Nwlib6l.zip Updated LIBC & DSAPI Apr-22-2008Fconfig17.zip CONFIG.NLM for NetWare May-13-2008Nw51sp8tsa500.zip TSA500 Update Jul-27-2009
Automatically Detect Required PatchesPortlock Storage Manager Client can display the patches that need to be installed. Expand the tree itemfor your NetWare server and select “Modules” in the left tree window. In the right list window will be alist of all loaded NetWare modules (NLMs). Review any lines that are highlighted in red. In the rightcolumn under “Notes” will be the recommended service pack / patch that should be installed.
Color coding: Red means that the NLM is out of date and needs updating, blue means current, blackmeans that the NLM is not part of our database.
Note: This feature was released in Portlock Storage Manager Client 5.28.0.2513 (January 2013).
Go to Novell’s download web site for service packs and patches http://download.novell.com
NetWare 5.x Virtualization Version 1.8 2/26/2015
Copyright 2000-2015 Portlock Software Page 13 of 45
Application ReviewReview each of the applications installed on the server. Remove any that will not be needed aftervirtualization. Update and patch all installed applications.
Download Required Device DriversThis is an important step that will save time later if the correct drivers are not present when thevirtualized NetWare server first boots. If the correct drivers are not present you might not be able tomount the NetWare volumes or setup networking. For storage you will need LSIMPTNW.HAM and fornetworking CE1000.LAN. Refer to Appendix A for driver names and versions.
Note: You can boot a virtual machine with the Portlock Boot CD and then use the File Browser feature inPortlock Storage Manager Client to transfer files to the DOS partition which can then be used toconfigure the disk and network drivers.
Note: If HDETECT crashes, double check that LSIMPTNW.HAM and LSIMPTNW.DDI are located inC:\NWSERVER. If they are missing, copy these files to the server.
You can download drivers for VMware Workstation and ESX fromhttp://www.portlock.com:88/Public/download/Drivers

NetWare 5.x Virtualization Version 1.8 2/26/2015
Copyright 2000-2015 Portlock Software Page 14 of 45
Chapter 4. Setup Environment
Step 1. Download and install Portlock ProductsRefer to the Portlock Quick Start Guide for the following steps:
Download and install Portlock Storage Manager Client on your workstation.Import your Portlock Storage Manager licenses.
o Note: You will need a license for each NetWare server that you virtualize.Download Portlock Storage Manager for NetWare using Portlock Storage Manager Client.Download Portlock Boot CD using Portlock Storage Manager Client.
o For Workstation and ESX, select the VMware version.

NetWare 5.x Virtualization Version 1.8 2/26/2015
Copyright 2000-2015 Portlock Software Page 15 of 45
Step 2. Import your Portlock Storage Manager LicenseIn the left tree window expand “Portlock Library”.Right-click on “Portlock Licenses” and select “Import License”.Browse to the directory where you saved your license.Select the license file name “stormgr.lic” or “stormgr.zip”.The license will be imported to “Portlock Storage Manager” under “Portlock Licenses”.
Step 3. Install Portlock Storage Manger to the NetWare Server
Method #1 Portlock Storage Manager Client methodThis method requires that the Novell Client is installed on your desktop.
In the left tree window expand “Portlock Library”.Expand “Remote Systems”.Expand “Netware Servers”.Review the list of NetWare servers. If your NetWare server does not appear, right click on“NetWare Servers” and select “Add NetWare Server”.Right-click on the desired NetWare server and select “Install / Update Portlock StorageManager”.Complete the wizard which will install Portlock Storage Manager and your license to yourNetWare server.

NetWare 5.x Virtualization Version 1.8 2/26/2015
Copyright 2000-2015 Portlock Software Page 16 of 45
Method #2 Portlock Boot CD methodUsing Portlock Storage Manager Client burn the Portlock Boot CD ISO image to a CD.
o In the left tree window expand “Portlock Library”.o Expand “ISO Library”.o Expand “Portlock Boot CD”.o Right-click on the desired Portlock Boot CD ISO image. Select “Burn ISO Image”.
Insert the CD into the drive connected to the NetWare server.At the server console type “volumes”.If the volume “PBCD” does not appear:
o At the server console type “load CDROM” or “load CD9660.NSS”.o Wait a few seconds. The system should automatically detect the media in the CD.
Once the Portlock Boot CD is mounted launch the Portlock Storage Manger install program:o At the server console type “load PBCD:/STORMGR/NETWARE/PINSTALL.NLM”o Complete the prompts to install Portlock Storage Manager
Launch Portlock Storage Manager Agent:At the server console type “load SYS:/STORMGR/PSMAGENT.NLM”
Step 4. Configure ESX Server Remote Management (optional)Portlock Storage Manager Client supports connecting directly to the ESX server. This requiresconfiguring the ESX server and adding the server to Portlock Storage Manager Client. This step isoptional.
Note: These features required that VMware VIX is installed on your desktop. This package can bedownloaded from VMware’s web site at: http://www.vmware.com/support/developer/vix-api/. If thispackage is not installed, Portlock Storage Manager Client will prompt you to install this package.
Once setup, Portlock Storage Manager Client offers a number of features for interacting with ESX:
Display information about ESX.Display and control virtual machines.Browse the file system on ESX. For example you can directly copy the Portlock Boot CD tothe ESX server which is must faster than the vSphere import method.
Configure ESX Server:At the ESX server console, login.From the “System Customization” menu select “Troubleshooting Options”.Enable the ESX Shell.Enable SSH.
Configure Portlock Storage Manager ClientIn the left tree window expand “Portlock Library”.Expand “Remote Systems”.Expand “VMware ESX Servers”.

NetWare 5.x Virtualization Version 1.8 2/26/2015
Copyright 2000-2015 Portlock Software Page 17 of 45
Right click on “VMware ESX Servers” and select “Add Server”.
In the properties dialog, enter the TCP/IP address, username and password for the ESX server.

NetWare 5.x Virtualization Version 1.8 2/26/2015
Copyright 2000-2015 Portlock Software Page 18 of 45
Chapter 5. Virtual Machine Setup
Step 1. Import the Portlock Boot CD ISO Image
Method #1 Portlock Storage Manager Client1. Expand “Portlock Library” in the left tree window.2. Expand “Remote Systems”.3. Expand “VMware ESX Servers”. If your ESX server is not displayed, follow the steps in chapter 4
“Setup Environment”, Step 3 “Configure ESX Server Remote Management (optional)”4. Select the ESX server.5. In the right list window, select the tab “Files”. This switches the view to the ESX server’s file
system.6. Go to the following location by doubling clicking on each directory name component:
/vmfs/volumes/datastore1.7. Right click in the right list window and select “Create Directory”. Enter “PBCD” in the dialog.8. Change directories to PBCD (double click on PBCD).9. Right click in the right list window and select “Upload File”.10. Browse to the location where the Portlock Boot CD ISO is located.11. Complete the upload of the Portlock Boot CD ISO.
Note: You can also use Windows Explorer to drag and drop a file onto the ESX server at step #9 above.

NetWare 5.x Virtualization Version 1.8 2/26/2015
Copyright 2000-2015 Portlock Software Page 19 of 45
Method #2 vSphereStart VMware vSphere Client on your workstation.
o If you have added your ESX server to Portlock Storage Manager Client, right click on theserver and select “Launch vSphere Client”.
Click on the “Summary” tab.Under “Resources” right click on the desired datastore such as “datastore1”.Select “Browse Datastore”.On the toolbar select the folder+ icon to create a new folder.Name the folder “PBCD”.Select “PBCD” in the tree window.On the toolbar select the “Upload” icon.Select “Upload File”.Browse to the location where the Portlock Boot CD ISO is located.Complete the import of the Portlock Boot CD ISO.
Step 2. Create the virtual machineStart VMware vSphere Client on your workstation.
o If you have added your ESX server to Portlock Storage Manager Client, right click on theserver and select “Launch vSphere Client”.
Go to File -> New -> Virtual Machine.

NetWare 5.x Virtualization Version 1.8 2/26/2015
Copyright 2000-2015 Portlock Software Page 20 of 45
Enter a name for the virtual machine.Select the datastore.Select “Novell NetWare” for the operating system type.Select “Novell NetWare 5.x” for the version.Enter a value for the virtual disk size.Optionally select “Allocate and commit space on demand (Thin Provisioning)”.Select “Edit the virtual machine settings before completion”.
o Memory: Change the memory Size to be at least 1024 MB. Note: 2048 MB isrecommended as a minimum during the virtualization phase.
o CPUs: Leave the setting at 1.o Video card: Select “Auto-detect video settings”.o VMCI device: No changes required.o New CD/DVD: Select “Datastore ISO File”. Click “Browse” and select the ISO image that
you uploaded into the datastore from Step #1.o New CD/DVD: Select “Connect at power on”.o New Floppy: Select “Client Device”.o New SCSI Controller: No changes required.o New NIC: Select “E1000” for the adapter type.o New Hard Disk: No changes required.
Do not start the virtual machine at this point.
Step 3. Modify the virtual machineThis step is necessary otherwise the virtual machine will hang. In Step #2 above, a new virtual machinefor Novell NetWare was created. However, the Portlock Boot CD is based upon Microsoft Windows. Wewill now change the guest operating system to “Microsoft Windows”. Once we have completed thevirtualization of NetWare, the guest operating system will need to be changed back to “NovellNetWare”.
Select the virtual machine in the vSphere tree window.Click on the “Summary” tab.Under “Commands” click on “Edit Settings”.Select the “Options” tab.Change the “Guest Operating System” to “Microsoft Windows.Change the “version” to “Windows Server 2008 (32-bit)”.Click OK.
Step 4. Boot the virtual machineSelect the virtual machine in the vSphere tree window.Click on the “Summary” tab.Under “Commands” click on “Power On”.Click on the “Console” tab.Wait for the Portlock Boot CD to boot. This will take approximately two minutes.

NetWare 5.x Virtualization Version 1.8 2/26/2015
Copyright 2000-2015 Portlock Software Page 21 of 45
Note the TCP/IP address displayed in the Portlock Boot CD dialog box.
Step 5. Install Portlock Storage Manager LicenseStart Portlock Storage Manager Client on your desktop.Expand the tree window item “Remote Systems”.Expand the tree window item “Boot CDs”.After approximately 30 seconds after the Portlock Boot CD completes the boot-up process, thesystem should appear in Portlock Storage Manager Client under “Boot CDs”. If this does nothappen, manually add the system using the TCP/IP address noted above in Step #4.Click on the TCP/IP address that corresponds to the booted virtual machine.Right-click and select “Install / Update License”.Select your Portlock Storage Manager license.Click “Install” to install your license over the network.Go back to vSphere. Go to the “Console” tab. Click on the “Reload license” button to load thenew license that was just installed. Click on the “License” tab and verify that the correct licensewas loaded by the Portlock Boot CD. Then click “OK”.When the Portlock OS Manager Dialog displays, select “Do not attach to an operating systeminstallation”. Click “OK”.Suggestion: Click on the Portlock Boot CD taskbar “800x600” to change the display resolution to1024 x 786.The Portlock Boot CD is now booted and ready.
NetWare 5.x Virtualization Version 1.8 2/26/2015
Copyright 2000-2015 Portlock Software Page 22 of 45
Chapter 6. NetWare Server Image Creation
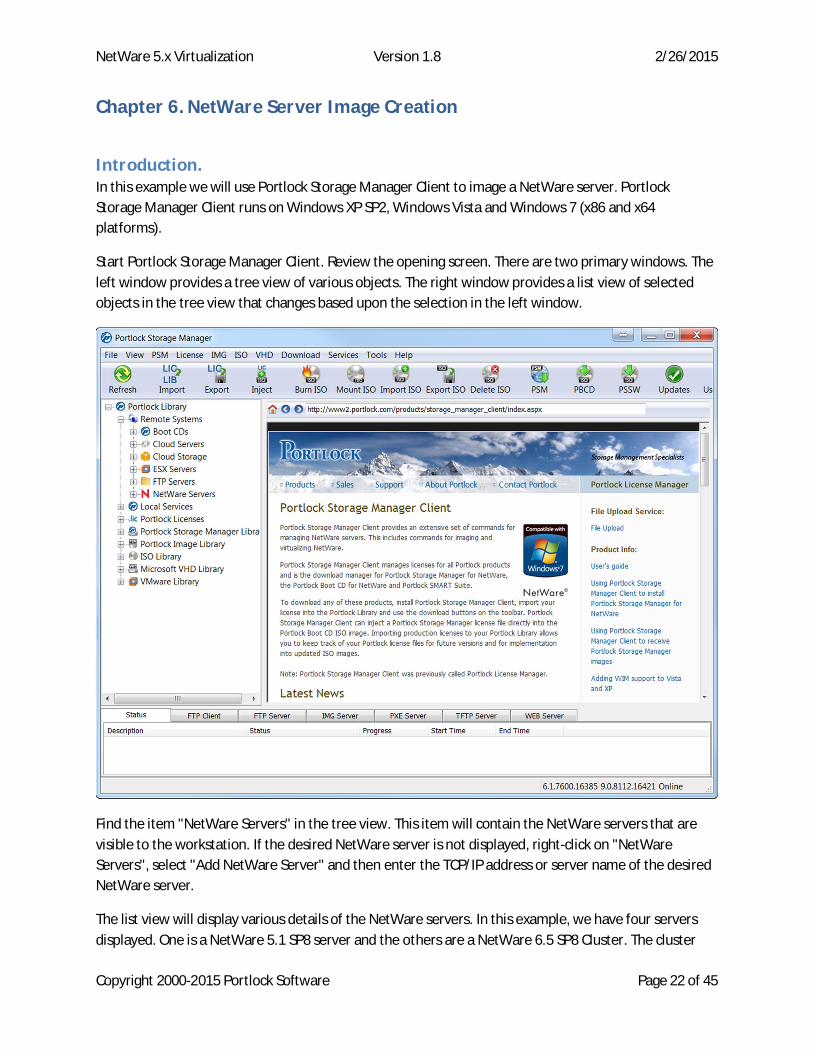
Introduction.In this example we will use Portlock Storage Manager Client to image a NetWare server. PortlockStorage Manager Client runs on Windows XP SP2, Windows Vista and Windows 7 (x86 and x64platforms).
Start Portlock Storage Manager Client. Review the opening screen. There are two primary windows. Theleft window provides a tree view of various objects. The right window provides a list view of selectedobjects in the tree view that changes based upon the selection in the left window.
Find the item "NetWare Servers" in the tree view. This item will contain the NetWare servers that arevisible to the workstation. If the desired NetWare server is not displayed, right-click on "NetWareServers", select "Add NetWare Server" and then enter the TCP/IP address or server name of the desiredNetWare server.
The list view will display various details of the NetWare servers. In this example, we have four serversdisplayed. One is a NetWare 5.1 SP8 server and the others are a NetWare 6.5 SP8 Cluster. The cluster

NetWare 5.x Virtualization Version 1.8 2/26/2015
Copyright 2000-2015 Portlock Software Page 23 of 45
has two servers (CLUSTERA and CLUSTERB). The virtual cluster server is named "cluster". Note thatPortlock Storage Manager Client displays information about the version of Novell Cluster Servicesversion and node numbers.
Select the server in the tree view. The list view will change and display information about the NetWarevolumes that are currently mounted on the server. This information is static - to update, right-click onthe server name and select "Refresh Server Information".
There are two methods to image a NetWare server. Immediately via the "Image NetWare Server"command and via a saved Portlock Image Script. When you select "Image NetWare Server" a script iscreated and saved under the NetWare server's name. In this example, we will create a script first andthen execute the script.
Right-click on the server name in tree view. Select "Create Script Wizard". The wizard displays anintroductory screen. After reviewing the screen, click “Next”.

NetWare 5.x Virtualization Version 1.8 2/26/2015
Copyright 2000-2015 Portlock Software Page 24 of 45

NetWare 5.x Virtualization Version 1.8 2/26/2015
Copyright 2000-2015 Portlock Software Page 25 of 45
The screen shows the name of the NetWare server. When the next button is clicked, Portlock StorageManager Client will connect to the NetWare server and launch Portlock Storage Manager. PortlockStorage Manager will create a list of storage objects on the server and send this information back toPortlock Storage Manager Client. This connection requires admin rights to the server. If Portlock StorageManager is not installed on the NetWare server, this phase will fail. To correct this problem cancel thewizard. Then right-click on the NetWare server and select "Install Portlock Storage Manager".

NetWare 5.x Virtualization Version 1.8 2/26/2015
Copyright 2000-2015 Portlock Software Page 26 of 45
This screen displays options for the image script. After setting the desired options click Next.
Name. This is the name of the script. Do not enter a path name as the script will be stored in thetree view under NetWare Servers.Enable image compression. This option enables or disables compression of the data created bythe image command.Calculate crc32 values for image data. This option enables crc32 checksum information to beadded to the data created by the image command. During an image restore, the data will beverified against the saved crc32 values.

NetWare 5.x Virtualization Version 1.8 2/26/2015
Copyright 2000-2015 Portlock Software Page 27 of 45
This screen displays options that are performed before the image begins. This is done via a NetWarebatch file (NCF). If desired, specify the full path name to the script located on the NetWare server.Portlock Storage Manager Client does not create the NCF file.
In this example, the script "sys:/pre_img.ncf" is specified. This script file contains the following content:
broadcast "Portlock Storage Manager is starting"
NetWare 5.x Virtualization Version 1.8 2/26/2015
Copyright 2000-2015 Portlock Software Page 28 of 45
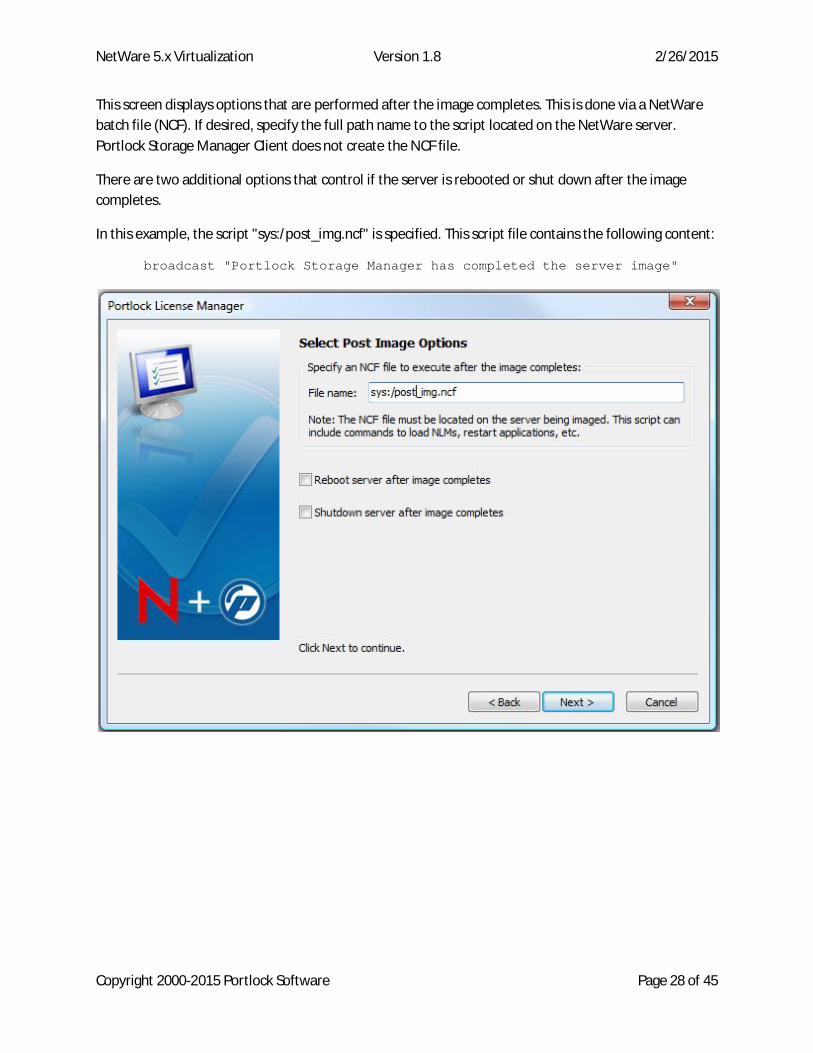
This screen displays options that are performed after the image completes. This is done via a NetWarebatch file (NCF). If desired, specify the full path name to the script located on the NetWare server.Portlock Storage Manager Client does not create the NCF file.
There are two additional options that control if the server is rebooted or shut down after the imagecompletes.
In this example, the script "sys:/post_img.ncf" is specified. This script file contains the following content:
broadcast "Portlock Storage Manager has completed the server image"

NetWare 5.x Virtualization Version 1.8 2/26/2015
Copyright 2000-2015 Portlock Software Page 29 of 45
This screen displays options for selecting where to store the image. In this example TCP/IP is used.Portlock Storage Manager will then image the NetWare server and send the image data over TCP/IP.
NetWare 5.x Virtualization Version 1.8 2/26/2015
Copyright 2000-2015 Portlock Software Page 30 of 45
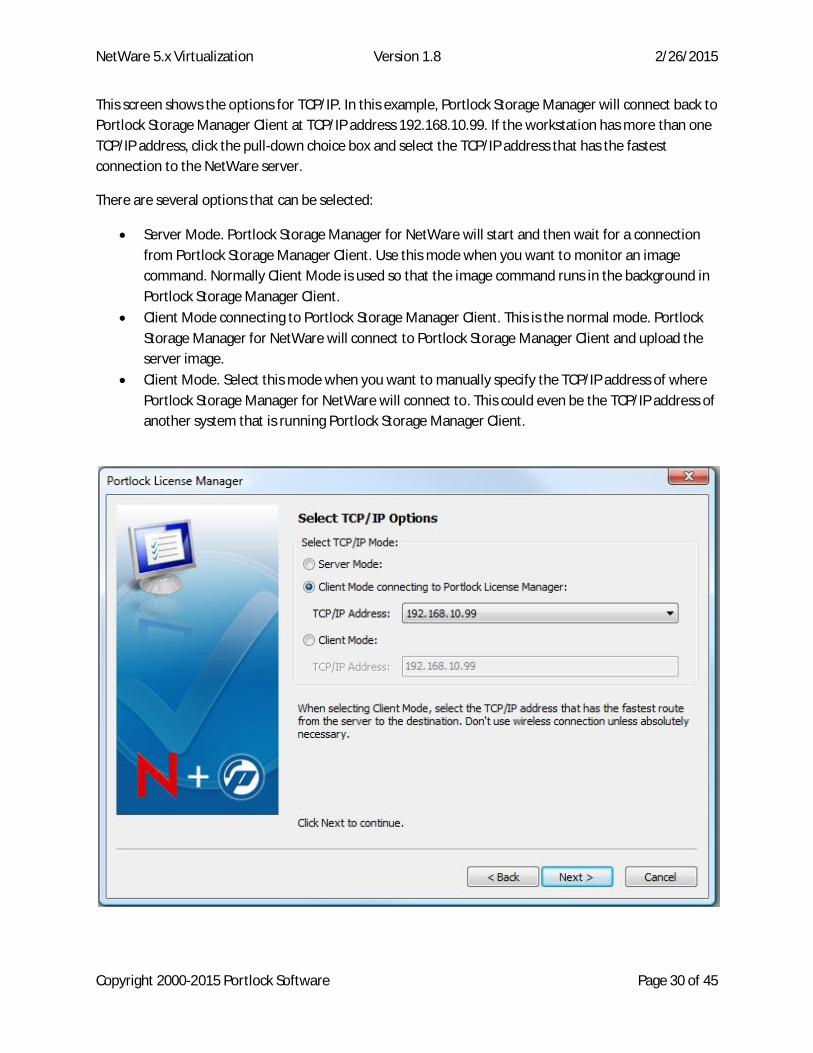
This screen shows the options for TCP/IP. In this example, Portlock Storage Manager will connect back toPortlock Storage Manager Client at TCP/IP address 192.168.10.99. If the workstation has more than oneTCP/IP address, click the pull-down choice box and select the TCP/IP address that has the fastestconnection to the NetWare server.
There are several options that can be selected:
Server Mode. Portlock Storage Manager for NetWare will start and then wait for a connectionfrom Portlock Storage Manager Client. Use this mode when you want to monitor an imagecommand. Normally Client Mode is used so that the image command runs in the background inPortlock Storage Manager Client.Client Mode connecting to Portlock Storage Manager Client. This is the normal mode. PortlockStorage Manager for NetWare will connect to Portlock Storage Manager Client and upload theserver image.Client Mode. Select this mode when you want to manually specify the TCP/IP address of wherePortlock Storage Manager for NetWare will connect to. This could even be the TCP/IP address ofanother system that is running Portlock Storage Manager Client.

NetWare 5.x Virtualization Version 1.8 2/26/2015
Copyright 2000-2015 Portlock Software Page 31 of 45
This screen displays the objects that can be imaged. In this example, there are three objects:
FAT16 DOS partition. This is the partition that the server boots from.SYS Volume. This is a NetWare Traditional volume holding the operating system.USERS Volume. This is a NetWare NSS volume for the user’s data on the system.
The objective in this example is to create a disaster recovery image of the operating system. This needsto include the booting DOS partition and the SYS volume. Therefore we select the DOS partition, the SYSvolume and deselect the USERS volume.

NetWare 5.x Virtualization Version 1.8 2/26/2015
Copyright 2000-2015 Portlock Software Page 32 of 45
This screen displays that all information has been collected. Once the Finish button is clicked, the scriptwill be saved in tree view under the item "Scripts". Review the following screens.

NetWare 5.x Virtualization Version 1.8 2/26/2015
Copyright 2000-2015 Portlock Software Page 33 of 45
The script that is created for this example has the following content. Refer to other sections of thisdocument for details on each line of this script.
%Author% Portlock Storage Manager Wizard%Date% Friday, March 12, 2010 8:56:43 PM%Description% This script was generated by the Portlock Storage Manager Wizard%Version% 1.0.0#-script-exec_ncf_0="sys:/pre_img.img"-exec_ncf_1="sys:/post_img.img"-imagetcp=client=192.168.10.99-compression=5-crc32=1-image_dos="DRDOS"-image_vol=SYS
Now that the script has been created, the script can be executed at any time. Select the script in the treeview, right-click and select "Image NetWare server using this script". The following steps will occur:
Portlock Storage Manager Client will open a connection to the NetWare server.Portlock Storage Manager Client will copy the script to the server with the destination file name"sys:/script.txt".Portlock Storage Manager will then be launched with the option "-script=sys:/script.txt".Portlock Storage Manager will first execute the script command "-exec_ncf_0".Portlock Storage Manager will connect to Portlock Storage Manager Client using the TCP/IPaddress 192.168.10.99.Portlock Storage Manager Client will accept the connection, verify the NetWare server nameand create a directory to receive the image.Portlock Storage Manager will then image the server using the commands in the script. Theimage data will be transferred to Portlock Storage Manager Client over TCP/IP.Portlock Storage Manager will execute the script command "-exec_nf_1".
NetWare 5.x Virtualization Version 1.8 2/26/2015
Copyright 2000-2015 Portlock Software Page 34 of 45
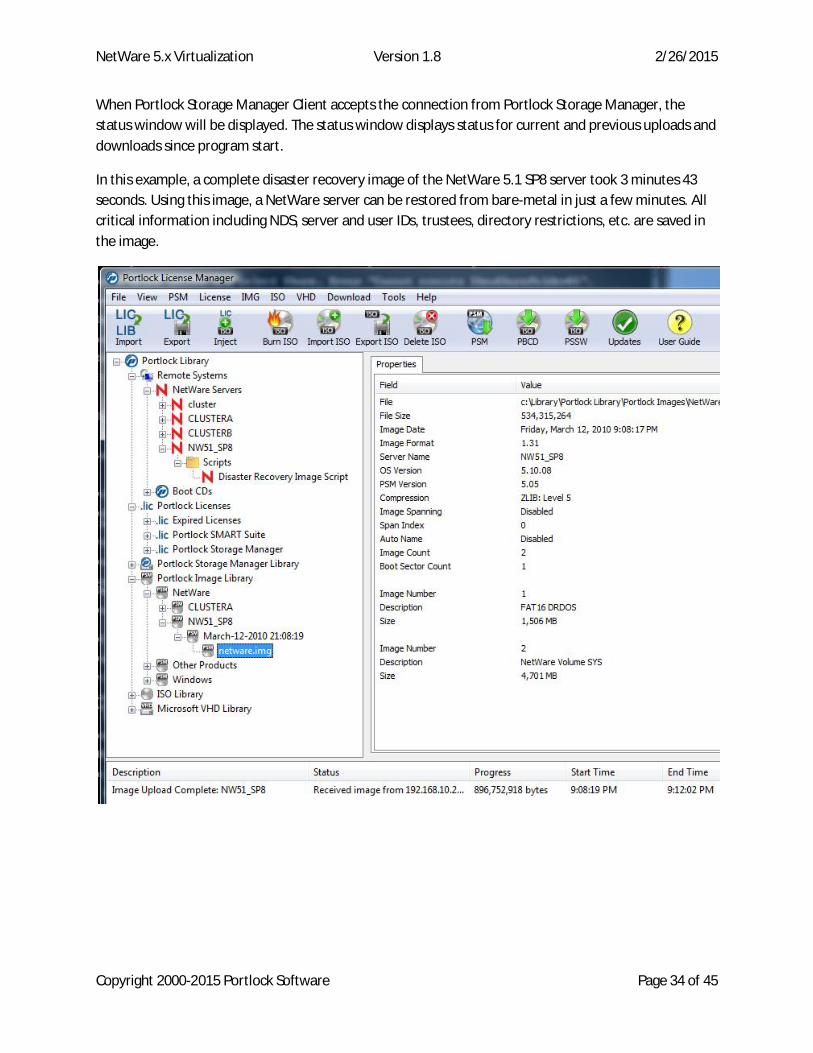
When Portlock Storage Manager Client accepts the connection from Portlock Storage Manager, thestatus window will be displayed. The status window displays status for current and previous uploads anddownloads since program start.
In this example, a complete disaster recovery image of the NetWare 5.1 SP8 server took 3 minutes 43seconds. Using this image, a NetWare server can be restored from bare-metal in just a few minutes. Allcritical information including NDS, server and user IDs, trustees, directory restrictions, etc. are saved inthe image.
NetWare 5.x Virtualization Version 1.8 2/26/2015
Copyright 2000-2015 Portlock Software Page 35 of 45
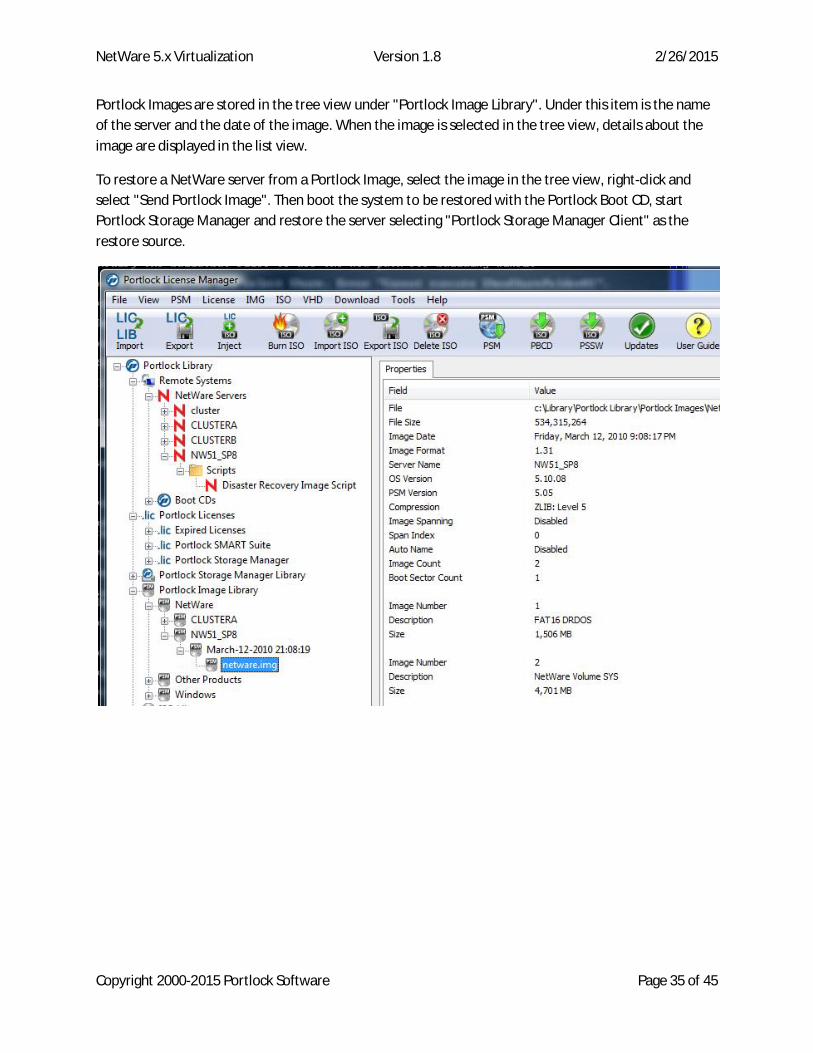
Portlock Images are stored in the tree view under "Portlock Image Library". Under this item is the nameof the server and the date of the image. When the image is selected in the tree view, details about theimage are displayed in the list view.
To restore a NetWare server from a Portlock Image, select the image in the tree view, right-click andselect "Send Portlock Image". Then boot the system to be restored with the Portlock Boot CD, startPortlock Storage Manager and restore the server selecting "Portlock Storage Manager Client" as therestore source.

NetWare 5.x Virtualization Version 1.8 2/26/2015
Copyright 2000-2015 Portlock Software Page 36 of 45
Chapter 7. NetWare Server Migration and Virtualization
Step 1. Send Portlock ImageStart Portlock Storage Manager Client on your desktop.Expand the tree window item “Portlock Image Library”.Expand the tree window item “NetWare”.Expand the tree window item that represents your NetWare server from Chapter 5.Expand the tree window item that represents the image from the NetWare server.Right-click on “portlock.img” and select “Send Portlock Image”.Note the TCP/IP address and the “secret key” displayed in the dialog box above the OKbutton.Press “OK”.
Portlock License Manger will now listen for connections from Portlock Storage Manager.
Step 2. Restore from the Portlock ImageSelect the virtual machine in the vSphere tree window.Click on the “Console” tab.Locate the icon for “Portlock Storage Manager” in the Portlock Boot CD GUI.Click on the icon to start Portlock Storage Manager.Verify your license in the Portlock Storage Manager Client License dialog. Press ENTER.Select “NetWare” in the “Select operating system to manage” dialog. Press ENTER.Select “NetWare 5.0 or NetWare 5.1 based upon your NetWare version. Press ENTER.If Portlock Storage Manager displays a prompt regarding the “Master Boot Record” select“Install boot code” and press ENTER.o Normally you would select “DR-DOS (NetWare Servers)” for the booting operating
system type. Note: Some NetWare servers have MS-DOS installed. Select the correctplatform and press ENTER.
At the Portlock Storage Manager main menu, select “Restore Commands”. Press ENTER.Select “Read image from Portlock Storage Manager Client”. Press ENTER.Enter the TCP/IP address for Portlock Storage Manager Client that you saved in Step #1.Enter the secret key in the “Key” field. Press F-10.Portlock Storage Manager will now connect to Portlock Storage Manager Client.For the “Enter the NetWare File Server Name” dialog, enter any name (it does not matter atthis point). For example, enter “TEST”. Press ENTER.Portlock Storage Manager will now download the list of items that can be restored. Press F-5 to toggle between restoring and skipping an item.Press ENTER when ready to restore.
Complete the restore of each partition and volume. Once the restore completes, exit PortlockStorage Manager.

NetWare 5.x Virtualization Version 1.8 2/26/2015
Copyright 2000-2015 Portlock Software Page 37 of 45
Step 3. Shutdown the virtual machineClick the “Shutdown System” label in the Portlock Boot CD GUI. There is also a “Shutdown”button on the Portlock Gadget toolbar.
Step 4. Modify the virtual machineThis step is necessary otherwise one or more of the follow symptoms will occur:
The virtual machine will hang.The mouse will not work in the NetWare GUI.The volume mounted for VMware Tools is “VMWARETOOLS” instead of “VMWTOOLS”.
Now that we have completed the virtualization of NetWare, the guest operating system needs to bechanged back to “Novell NetWare”.
Select the virtual machine in the vSphere tree window.Click on the “Summary” tab.Under “Commands” click on “Edit Settings”.Select the “Hardware” tab.Select “CD/DVD Drive” in the left column under “Hardware”.Unselect “Connect at power on” to disconnect the Portlock Boot CD ISO file.Select the “Options” tab.Change the “Guest Operating System” to “Novell NetWare”.Change the “version” to “Novell NetWare 5.x”.Click OK.
Step 5. Boot the virtual machineSelect the virtual machine in the vSphere tree window.Click on the “Summary” tab.Under “Commands” click on “Power On”.Click on the “Console” tab.Wait for the NetWare virtual machine to boot.

NetWare 5.x Virtualization Version 1.8 2/26/2015
Copyright 2000-2015 Portlock Software Page 38 of 45
Chapter 8. Post Migration SetupOn some systems, NetWare HDETECT will crash when processing the device driver configuration files. Inthis case you will need to manually configure STARTUP.NCF and AUTOEXEC.NCF. Refer to Appendix Band Appendix C for example configuration files. The HDETECT crash is not due to virtualization, but is abug in HDETECT that affects both physical systems and virtual machines. This bug was fixed in NetWare6.5.
Step 1. Configure storage driversOnce the NetWare virtual machine boots, you will have a “:” prompt at the server console.At the server console, type “edit C:STARTUP.NCF”
o Delete all lines in the editor that load device drivers (drivers ending with “.CDM” or“.HAM”). Do NOT delete lines that load patches from service packs.
o Press the ESC key and then select “Yes” to save the file.o Press the ESC key to exit the editor.
At the server console, type “HDETECT”. This will start the hardware detection program.o HDETECT will complain that the SYS volume is not mounted. Ignore this error and
continue to load drivers.o HDETECT will now display a screen for Platform and HotPlug support modules.o Select “Modify” and press ENTER.o Scroll to “Platform Support Module” and press F-3.o Scroll to “HotPlug Support Module” and press F-3. This normally will not do anything
under VMware.o Scroll to “Continue” and press ENTER.o HDETECT will now display a screen for Storage and Network boards.o Scroll to “Storage adapters” and press F-3.o Scroll to “Load” to load the storage adapters.o Scroll to “Storage devices” and press F-3.o Scroll to “Load” to load the storage devices.o Scroll to “Network boards” and press F3. If nothing appears then ignore this issue for
now.o Scroll to “Continue” and press ENTER.o HDETECT will save the driver configuration.
Reboot the server.o At the server console, type “reset server”. The server will now reboot.
Step 2. Configure network driversOnce the NetWare virtual machine boots, you will have a “:” prompt at the server console.At this point the SYS volume should be mounted. AUTOEXEC.NCF will have been executed.Ignore any network errors at this point. Ignore any applications that depend on networking thatreport errors.At the server console, type “HDETECT”. This will start the hardware detection program.
o HDETECT will now display a screen for Platform and HotPlug support modules.

NetWare 5.x Virtualization Version 1.8 2/26/2015
Copyright 2000-2015 Portlock Software Page 39 of 45
o Select “Continue” and press ENTER.o HDETECT will now display a screen for Storage and Network boards.o Scroll to “Network boards” and press F3.o If nothing appears then the Intel E1000 driver “CE1000.LAN” is missing from the system.o Scroll to “Continue” and press ENTER.o HDETECT will now display a screen for configuring network protocols.o Scroll to “Configure protocols” and press ENTER.o Select the “CE1000.LAN” entry and press ENTER.o Scroll to the line displaying “Ethernet_II” and press ENTER.o Scroll to “IP Address” and enter the TCP/IP address for the server. Press ENTER and then
ESC.o Review the “Subnet Mask” and “Router (Gateway)” entries. Correct as needed.o Scroll to “Continue” and press ENTER.o Scroll to “Return to driver summary” and press ENTER.o Scroll to “Continue” and press ENTER.o HDETECT will load the network driver and bind protocols. A dialog box will optionally
appear to confirm removing incorrect entries from AUTOEXEX.NCF.Reboot the server.
o At the server console, type “reset server”. The server will now reboot. The server shouldboot normally with storage and network drivers loaded, volumes mounted and TCP/IPnetworking working.
Step 3. Install VMware Tools
MethodRight-click on the virtual machine in the vSphere tree window.Select “Guest” and then “Install / Upgrade VMware Tools”.Switch to the NetWare server console and type “volumes”.If the volume “VMWTOOLS” does not appear:
o At the server console type “load CDROM”.Wait a few seconds. The system should automatically detect the media in the CD.At the server console type “VMWTOOLS:/setup.ncf”The VMware Tools are now installed.
MethodUsing Portlock Storage Manager Client, select the NetWare server.Right-click and select “Install VMware Tools”.Follow the prompts to install the VMware Tools to the server.
Note: This method requires that you have copied the VMware Tools ISO image to your workstation. IfVMware Workstation is already installed on your desktop, the vmware.iso file will automatically belocated.

NetWare 5.x Virtualization Version 1.8 2/26/2015
Copyright 2000-2015 Portlock Software Page 40 of 45
Step 4. Review boot errorsReview SYS:/ETC/CONSOLE.LOG for errors.
Step 5. Review VMware Event MessagesSelect the virtual machine in the vSphere tree window.Click on the “Events” tab.Review the messages for warnings and errors.

NetWare 5.x Virtualization Version 1.8 2/26/2015
Copyright 2000-2015 Portlock Software Page 41 of 45
Appendix A. Driver Versions
Driver NW 4.11 SP9 NW 5.1 SP8 NW 6.0 SP5 NW 6.5 SP8 Latest DriverMPS14.PSM 2.09.01 -
8/11/20032.09.01 -8/11/2003
LSIMPTNW.HAM 3.08 –12/11/2004
3.04.25 -12/12/2003
5.02 -12/5/2007
5.03.01 -1/23/2008
IDECD.CDM 2.0.0 –5/26/2000
4.04 –9/30/2004
4.00 -4/24/2004
4.13 -4/4/2007
SCSIHD.CDM 3.0.0 -5/3/2000
3.02i –12/17/2004
3.02.06 -4/21/2004
3.03.10 -5/30/2008
IDEATA.HAM 1.30.16 –6/9/1999
4.21 –1/15/2005
4.15 -6/4/2004
4.34 -5/5/2007
IDEHD.CDM 3.0.1 –5/18/2000
4.12 -4/24/2004
4.22 -4/4/2007
ACPIDRV.PSM 1.05.19 -1/16/2007
CE1000.LAN 2.18.0 –5/1/2000
7.63 –12/12/2004
7.34 -3/12/2004
7.65.0 -1/10/2005
PCNTNW.LAN 4.18.0 –1/5/2000
4.23.0 –11/22/2000
4.23.0 –11/22/2000
Note: For NetWare 4.11 install nwpa_up.exe to update the drivers beyond SP9.
http://developer.novell.com/devres/storage/drivers/nwpa_up.exe

NetWare 5.x Virtualization Version 1.8 2/26/2015
Copyright 2000-2015 Portlock Software Page 42 of 45
Appendix B. Example STARTUP.NCF
Note: Slot numbers are hardware specific and may vary from system to system.
VMware ESX
LOAD MPS14.PSM######## End PSM Drivers ########LOAD IDECD.CDMLOAD SCSIHD.CDM######## End CDM Drivers ########LOAD IDEATA.HAM SLOT=10004LOAD LSIMPTNW.HAM SLOT=2######## End HAM Drivers ########
VMware Workstation
LOAD MPS14.PSM######## End PSM Drivers ########LOAD IDECD.CDMLOAD IDEHD.CDMLOAD SCSIHD.CDM######## End CDM Drivers ########LOAD IDEATA.HAM SLOT=10004LOAD LSIMPTNW.HAM SLOT=2######## End HAM Drivers ########

NetWare 5.x Virtualization Version 1.8 2/26/2015
Copyright 2000-2015 Portlock Software Page 43 of 45
Appendix C. Example Network Driver Configuration
This example is part of AUTOEXEC.NCF except when INETCFG is used to configurethe network configuration.
For VMware ESX / ESXi, NetWare requires the PCNTNW.LAN driver for the networkcontroller.
Note: This configuration requires selecting “flexible” for the NIC type. Theother option is Intel E1000 which requires the E1000.LAN / CE1000.LAN driver.
Note: The statement “LOAD TCPIP.NLM” must appear before the BIND IPstatement.
VMware ESX
######## Start Drivers/Protocols ########SERVERID 943B0A3LOAD ODINEB.NLMLOAD IPXRTRLOAD IPXRTRNMLOAD TCPIPLOAD CE1000.LAN SLOT=3 FRAME=Ethernet_802.2 NAME=CE1000_1_E82LOAD CE1000.LAN SLOT=3 FRAME=Ethernet_II NAME=CE1000_1_EIIBIND IPX CE1000_1_E82 NET=EA754A94BIND IP CE1000_1_EII ADDR=10.1.10.45 MASK=255.255.255.0 GATE=10.1.10.1######## End Drivers/Protocols ########
VMware Workstation
######## Start Drivers/Protocols ########SERVERID 943B0A3LOAD ODINEB.NLMLOAD IPXRTRLOAD IPXRTRNMLOAD TCPIPLOAD CNEAMD.LAN SLOT=3 FRAME=Ethernet_802.2 NAME=CNEAMD_1_E82LOAD CNEAMD.LAN SLOT=3 FRAME=Ethernet_II NAME=CNEAMD_1_EIIBIND IPX CNEAMD_1_E82 NET=EA754A94BIND IP CNEAMD_1_EII ADDR=10.1.10.45 MASK=255.255.255.0 GATE=10.1.10.1######## End Drivers/Protocols ########

NetWare 5.x Virtualization Version 1.8 2/26/2015
Copyright 2000-2015 Portlock Software Page 44 of 45
Appendix D. Additional References
Novell OES clustering with NSS on vSphere 4.xhttp://www.novell.com/communities/node/13763/novell-oes-clustering-nss-vsphere-4x
Novell Cluster Services on VMware ESX Without Shared Storagehttp://www.novell.com/communities/node/6631/novell-cluster-services-vmware-esx-without-shared-storage
Configuring Novell Clustering with ESX Serverhttp://www.novell.com/communities/node/2753/configuring-novell-clustering-esx-server
How to add Virtual Hard Disks and get them to work inside the GuestOperating Systemhttp://www.novell.com/communities/node/8420/add-additional-virtual-hard-disks

NetWare 5.x Virtualization Version 1.8 2/26/2015
Copyright 2000-2015 Portlock Software Page 45 of 45
Appendix E. Tips Common Problems
The Portlock Boot CD hangs when starting virtual machineYou forgot to change the “Guest Operating System” to Windows. See Chapter 5, Step 3 “Modify thevirtual machine”.
Also review this document: http://www.portlock.com/support/knowledge_base/boot_VMware.aspx
The NetWare server’s date and time is wrong after virtualizationSetup NTP (Network Time Protocol) on the VMware ESXi server. Refer to this VMware document:http://www.vmware.com/files/pdf/Timekeeping-In-VirtualMachines.pdf
After restoring NetWare, the SYS volume is not mounted.NetWare requires the LSI Logic driver LSIMPTNW.HAM to access the VMware SCSI controller. Reviewthe steps in Chapter 8, Step 1 “Configure storage drivers”. Also review Appendix B, “ExampleSTARTUP.NCF”.
DOS Partition does not have label.A common problem with DOS partitions is that the partition does not have a DOS partition label.Portlock Storage Manager requires that each DOS partition have a DOS partition label. The DOS “label”command can assign a partition label. Portlock Storage Manager for NetWare has a command to changethe partition label.
To assign a DOS partition label using Portlock Storage Manager for NetWare:
1. Start Portlock Storage Manager for NetWare on your server: load sys:/stormgr/stormgr2. From the Main Menu, select Partition Commands.3. Select the drive with the DOS partition that you want to modify.4. Select Change Partition Label command.5. Select the DOS partition to modify.6. Enter a unique DOS label name.


![NetWare 6.5 オペレーティングシステムのインストールIslandcenter.jp [ ] Customized NetWare Server [※]Basic NetWare File Server [ ]Pre-Migration Server [ ]DNS/DHCP](https://img.dokumen.tips/doc/110x75/60d32e68047fd6547244d3a6/netware-65-fffffffffff-islandcenterjp.jpg)


![Sistema Netware Novell[1]](https://img.dokumen.tips/doc/110x75/55721300497959fc0b9162a3/sistema-netware-novell1.jpg)


