Embed Size (px)
Citation preview
EDUCATION USER GUIDE
1 of 78
Netspace Education User Guide (Version 4.3)

EDUCATION USER GUIDE
2 of 78
Table of Contents
1. IMPORTANT INFORMATION - CONTACTING NETSPACE ................................................................... 5
1.1. TECHNICAL SUPPORT ................................................................................................................................ 5 1.2. CUSTOMER SERVICE ................................................................................................................................. 5 1.3. MAILING LIST .............................................................................................................................................. 5 1.4. ESCALATION PATH ..................................................................................................................................... 6
1.4.1. Step 1 ................................................................................................................................................... 6 1.4.2. Step 2 ................................................................................................................................................... 6 1.4.3. Team Leader ....................................................................................................................................... 6 1.4.4. Contact Centre Management ............................................................................................................ 6
2. BASIC NETWORK TOPOLOGY ................................................................................................................... 7
3. ACCESS CONTROL SYSTEM - ACS .......................................................................................................... 8
3.1. NEWS AND UPDATES ................................................................................................................................. 9 3.2. HELP AND RESOURCES ........................................................................................................................... 10 3.3. ACCESS CONTROL ................................................................................................................................... 11
3.3.1. Networks ............................................................................................................................................ 12 3.3.2. Setting Network Level Access ........................................................................................................ 13 3.3.3. Setting Network Time Restrictions ................................................................................................. 14 3.3.4. Setting Network Custom Blocks / Allows – Network ................................................................... 15 3.3.5. Groups ................................................................................................................................................ 17 3.3.6. Setting Network Custom Blocks / Allows – Group ....................................................................... 19 3.3.7. Users .................................................................................................................................................. 20 3.3.8. Batch Import ...................................................................................................................................... 22 3.3.9. Batch Export ...................................................................................................................................... 24 3.3.10. Delete All Users ........................................................................................................................... 26 3.3.11. ACS for End Users ...................................................................................................................... 27
4. PROXY SERVER............................................................................................................................................ 28
4.1. ACS PROXY ............................................................................................................................................. 28 4.1.1. Global Block / Allow.......................................................................................................................... 29
5. EDUPASS PROXY CONFIGURATION ...................................................................................................... 30
6. MANAGING USAGE ...................................................................................................................................... 32
6.1. PERMSTATS ............................................................................................................................................. 33 6.2. ACS WEB LOGS ...................................................................................................................................... 35 6.3. MAIL SYSTEM ........................................................................................................................................... 36 6.4. POP3 / IMAP .......................................................................................................................................... 37 6.5. WEBMAIL .................................................................................................................................................. 38
6.5.1. Webmail - Large Icons ..................................................................................................................... 39 6.5.2. Bad Word Filtering ............................................................................................................................ 40
6.6. MAIL FORWARDING .................................................................................................................................. 41 6.7. SPAM FILTERING ...................................................................................................................................... 41 6.8. EMAIL - WHITE / BLACK LIST ................................................................................................................... 42 6.9. VIRUS FILTERING ..................................................................................................................................... 43

EDUCATION USER GUIDE
3 of 78
7. VIRTUAL WEB SERVER .............................................................................................................................. 44
7.1. VWS CONTROL PANEL - PLESK .............................................................................................................. 44 7.2. UPLOADING FILES TO VWS VIA PLESK ................................................................................................... 46 7.3. SITE PREVIEW .......................................................................................................................................... 48 7.4. PLESK PROTECTED DIRECTORIES .......................................................................................................... 48 7.5. SSH ACCESS ........................................................................................................................................... 50 7.6. SCRIPTING................................................................................................................................................ 51 7.7. DATABASES .............................................................................................................................................. 51 7.8. APPLICATION VAULT ................................................................................................................................ 52
7.8.1. How do I install an application? ...................................................................................................... 52 7.8.2. How do I uninstall an application? ................................................................................................. 56
7.9. DNS MANAGEMENT ................................................................................................................................. 57 7.9.1. What is DNS? .................................................................................................................................... 57 7.9.2. How does DNS work? ...................................................................................................................... 57 7.9.3. What types of DNS records are there? ......................................................................................... 58 7.9.4. How long will it take for any DNS record to update? ................................................................... 59 7.9.5. Using the DNS Interface .................................................................................................................. 59 7.9.6. How do I add a DNS record? .......................................................................................................... 60 7.9.7. How do I edit a DNS record? .......................................................................................................... 62 7.9.8. How do I delete a DNS record? ...................................................................................................... 64
7.10. DOMAIN ALIASES ..................................................................................................................................... 66 7.11. SUBDOMAINS ........................................................................................................................................... 67
8. FTP ................................................................................................................................................................... 69
9. ONSITE SERVICES ....................................................................................................................................... 70
10. INDEX ............................................................................................................................................................... 71
11. FAQ’S ............................................................................................................................................................... 73
12. GLOSSARY ..................................................................................................................................................... 74
13. DOCUMENT CONTROL ............................................................................................................................... 76

EDUCATION USER GUIDE
4 of 78
Welcome to Netspace! Netspace is proud to have been chosen as the sole provider for the eduSTAR.ISP centralized Internet Service. Netspace services over 1650 schools and is the single largest Education ISP. We hope that this short guide on how to set up and use your school‟s service is helpful, and makes the transition to Netspace a smooth and pleasurable one. Please feel free to contact us for support and assistance at any stage of your service. Mike D‟Monte Business Development and Product Manager – Education Netspace Online Systems Pty Ltd 693 Camberwell Rd, Camberwell VIC 3124 [email protected]

EDUCATION USER GUIDE
5 of 78
1. Important Information - Contacting Netspace Should you require any assistance with your VicSmart service, our Customer Service and Support Department contact details are listed below.
1.1. Technical Support
These are priority numbers for your use. Tech Support Team Hours: 8.00am to 6.30pm - Monday to Friday. Phone: 03 9811 0076 Fax: 03 9811 0029 A team member will respond to a request submitted through these numbers within four business hours. You can also contact the team via email and even leave feedback - Please email any comments you may have on our service, support or product to this address. Email: [email protected]
1.2. Customer Service
Education Customer Service Team Hours: 8.30am to 6.00pm - Monday to Friday Phone: 1300 008 009 Email: [email protected]
1.3. Mailing List
The preferred method of informing you of updates to our service is through two mailing-lists for which you are able to subscribe to. Edustar.isp - The „Edustar.isp‟ mailing list is primarily used for providing updates of a non-technical manner. Updates on our plans and services are sent to subscribers of this list. To signup: Browse to http://lists.netspace.net.au/mailman/listinfo/Edustar.isp - Fill in the relevant details so that the automated mails can find the correct mailbox. Edustar.isp-tech – The „Edustar.isp-tech‟ mailing list is primarily providing updates of a technical nature – upgrades, planned maintenance etc are advised via this mailing list. To signup: Browse to http://lists.netspace.net.au/mailman/listinfo/Edustar.isp-tech - Fill in the relevant details so that the automated mails can find the correct mailbox.

EDUCATION USER GUIDE
6 of 78
1.4. Escalation Path
At Netspace we take Complaints very seriously. In the event we get it wrong we will rectify the matter as quickly as possible. We aim to resolve your Complaints promptly and fairly with your first contact. We ensure that we have trained, professional staff who are empowered to deal with your enquiry. If you are not satisfied with the outcome of your first contact, Netspace has an internal escalation process to assist you in resolving your Complaint. This process is designed to make it as simple as possible for you to resolve your issue and the best results are achieved by following these easy steps below. In all levels of escalation the Netspace representative will commit to keeping you updated on the progress of your matter.
1.4.1. Step 1
If you have a Complaint or issue you would like to discuss with Netspace, your first contact will be with one of our skilled Level 1 Consultants. These Consultants have access to a variety of internal tools and are empowered to resolve simple disputes and complaints.
1.4.2. Step 2
If you are not satisfied with the solution presented by a Level 1 Consultant, you can ask to have your Complaint escalated to a Level 2 consultant. Level 2 Consultants are more experienced staff members and subject matter experts who are equipped to handle more complex issues and complaints. Level 2 Consultants are empowered to offer alternative solutions.
1.4.3. Team Leader
If you are not satisfied with the resolution offered by a Level 2 Consultant you can request to have your Complaint escalated to a Team Leader who will take ownership of the matter and continue to work with you until resolution. A Level 2 Consultant and Team Leader may enlist the assistance and advice of other relevant teams, including our specialised Customer Care team, who will assist in reviewing the dispute and offer alternative solutions to achieve a satisfactory outcome.
1.4.4. Contact Centre Management
If your Complaint is unable to be resolved by any of the previous steps you can request to have your case escalated further. At this stage, your Complaint may be handled by either the Contact Centre Manager or the Operations Manager, who will liaise with the Customer Care Team in order to ensure a fair and reasonable approach has been taken. If you remain unsatisfied, Contact Centre Management may escalate your issue internally to our Senior Management Team. In the unlikely event that your Complaint cannot be resolved internally you can escalate your Complaint to the Telecommunications Industry Ombudsman (TIO). The TIO is an office of last resort that deals with Complaints that consumers have been unable to resolve with the Telephone or Internet Company. Both Netspace and the TIO request that you make all reasonable attempts to resolve your Complaint with us using our Complaints Procedure before contacting the TIO.
EDUCATION USER GUIDE
7 of 78
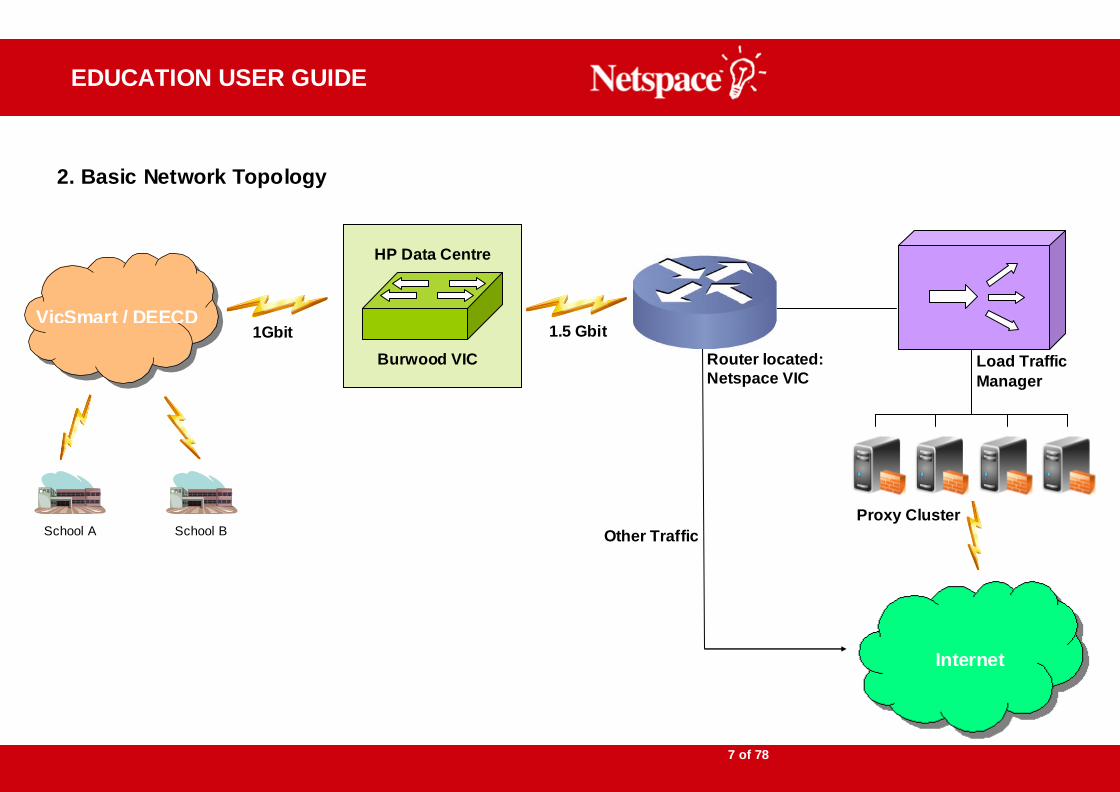
2. Basic Network Topology
VicSmart / DEECD
School A School B
Internet
HP Data Centre
Other Traffic
Router located:
Netspace VIC
Proxy Cluster
Load Traffic
Manager
1Gbit 1.5 Gbit
Burwood VIC

EDUCATION USER GUIDE
8 of 78
3. Access Control System - ACS This section provides an overview of the Netspace Access Control System, together
with instructions on how to administer it. You will be supplied with your default admin credentials at cut-over time. Any time that you need your admin credentials re-sent to
you, simply request this through our support team. The support team will then fax these to the school or email to the school‟s EduMail account.
We do not give out admin credentials verbally over the phone for security reasons.
You will only be able to undertake these tasks once you have been set up on the ACS and have received your credentials; however it is worth familiarizing yourself with the contents of this section beforehand.
IMPORTANT DETAILS
ACS Admin URL: http://admin.education.netspace.net.au/
Default admin user: [email protected]
Password: As per notification provided to you on setup
Upstream Proxy: proxy.education.netspace.net.au port: 8080
Once you have received notification that your school has been set-up to use the ACS
you can access the admin page: http://admin.education.netspace.net.au/
You will then be prompted for your username and password.

EDUCATION USER GUIDE
9 of 78
When logging in from within the school, your school‟s domain will be displayed at the
bottom of the page and you will be able to log in using the username alone. Example: postmaster
When you are outside of the school; but are within the education cloud, you must log in
using the full username. Example: [email protected]
Users with administration privileges will then see the ACS „News and Updates‟ page.
3.1. News and Updates
The „News and Updates‟ page lists posts on: service status, updates, and upgrades.
Recent posts that are no longer current can be found by clicking the tab titled „Resolved
news items.‟ You can return to this page by clicking the link titled „News and updates‟ under
„Information‟ on the left-hand menu.

EDUCATION USER GUIDE
10 of 78
3.2. Help and Resources
On the left-hand menu is the „Help and resources‟ page.
On this page you can find links to documentation such as the latest copy of the
„Education User Guide‟ you are reading now, an FAQ, advisory guides, as well as forms related to your Netspace Service and Netspace contact information.

EDUCATION USER GUIDE
11 of 78
3.3. Access Control
The ACS allows you to set an ACL (Access Control List) or rule at the user, group, and
network levels.
The following is a table of all available options for each of the ACL elements, and what restrictions are imposed on each element.
User Group Network Description
Edulist Edulist Edulist Block sites based on Edulist sites list
Filtered Filtered Filtered Block sited based on Filter sites
list
No Access No Access No Access Block all Access
Authentication
Required
Force all users to login before being able to browse (Network
Level ACL equivalent to ‘Filter’)
Unfiltered Browsing access only blocked
by Black Listed items
Inherited from Group
Inherit ACL from parent Group
Note: Users do not need to have a ‘User’ ACL.
The ACL‟s follow a hierarchy where one will impose itself on another element.

EDUCATION USER GUIDE
12 of 78
3.3.1. Networks
The Networks overview screen is linked from the „Access Control‟ menu.
All networks associated with your school are tabled on this page.
The first column contains the name of the network.
„Admin‟ for the Administration network
„Curric‟ for the Curriculum network
„DMZ‟ for any on-site hosted services
The second column contains the IP address associated with the network.
The third column contains the access level set for users of the network.
EDUCATION USER GUIDE
13 of 78
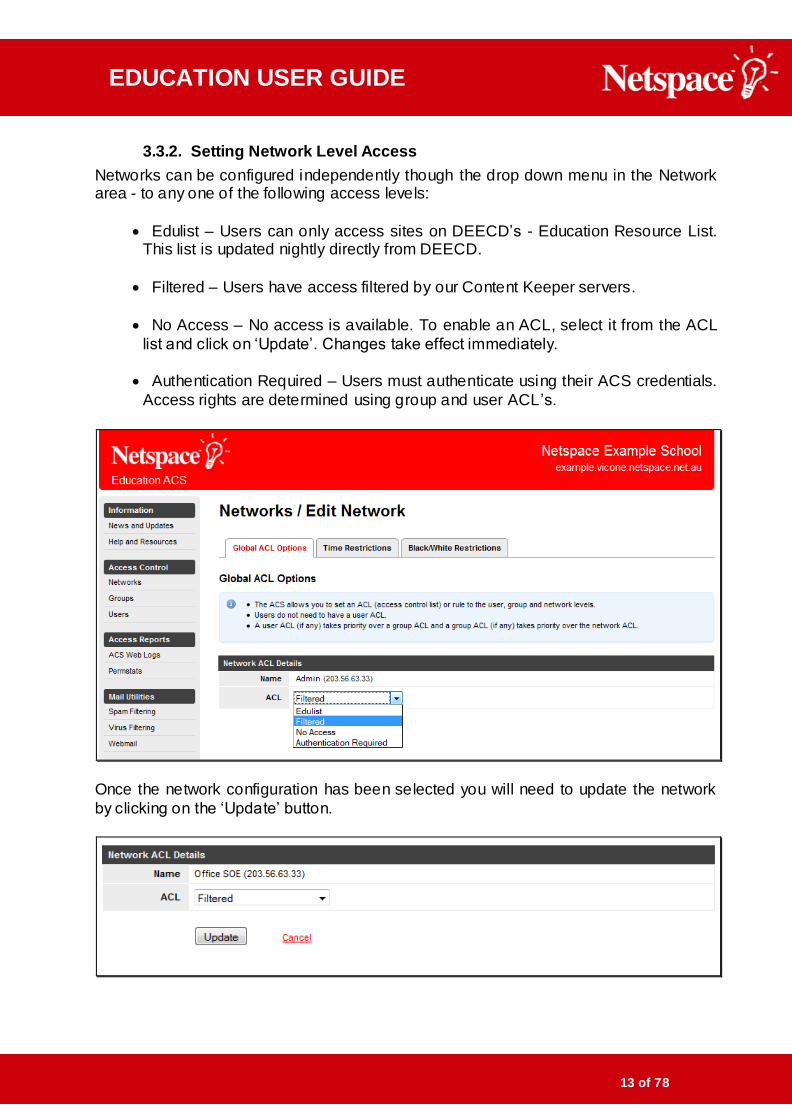
3.3.2. Setting Network Level Access
Networks can be configured independently though the drop down menu in the Network area - to any one of the following access levels:
Edulist – Users can only access sites on DEECD‟s - Education Resource List. This list is updated nightly directly from DEECD.
Filtered – Users have access filtered by our Content Keeper servers.
No Access – No access is available. To enable an ACL, select it from the ACL
list and click on „Update‟. Changes take effect immediately.
Authentication Required – Users must authenticate using their ACS credentials.
Access rights are determined using group and user ACL‟s.
Once the network configuration has been selected you will need to update the network
by clicking on the „Update‟ button.

EDUCATION USER GUIDE
14 of 78
3.3.3. Setting Network Time Restrictions
Access to the network can be scheduled to fit in to business hours of the school. The settings apply to all users regardless of their status in the ACS. This means that if
anyone at the school was to do work outside of normal network hours the setting would need to be adjusted to suit.
Network times can be as flexible or strict as you need them to be, meaning that you do not have to set them just to the opening hours of the school, but could offer a solution
where work could be completed outside of normal school hours – Thus enabling the administration and teaching staff access to the network for after hours.
From a security point of view it also provides a restricted network that would make outside access to it almost impossible due to the locked-down nature of the network.
In the image below you can see the drop down boxes that will enable you to set up the parameters for the network restrictions. You can create overlapping time periods without
any consequences. Any time periods that are not specified will be subjected to a block from the network in question
In the example above the settings for this network has been set to remain open 24hours a day 7 days a week – This configuration can be updated or deleted using the buttons
under the „Manage‟ column.
EDUCATION USER GUIDE
15 of 78
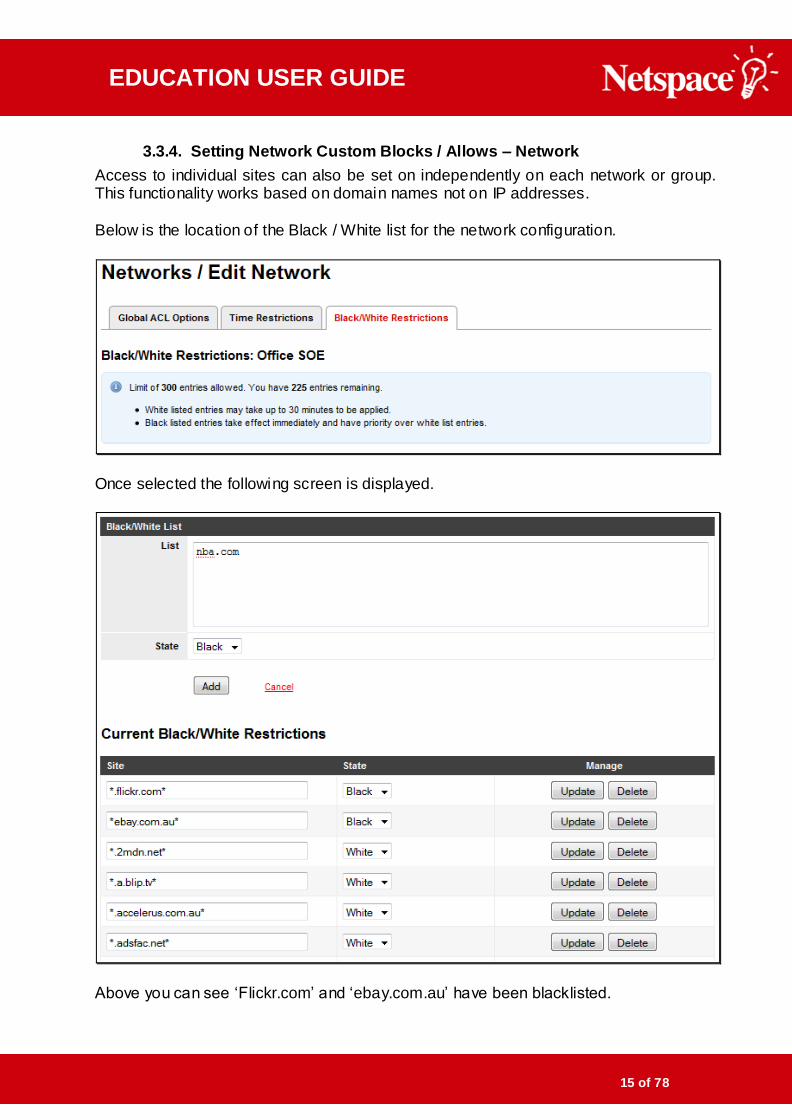
3.3.4. Setting Network Custom Blocks / Allows – Network
Access to individual sites can also be set on independently on each network or group. This functionality works based on domain names not on IP addresses.
Below is the location of the Black / White list for the network configuration.
Once selected the following screen is displayed.
Above you can see „Flickr.com‟ and „ebay.com.au‟ have been blacklisted.

EDUCATION USER GUIDE
16 of 78
In the above examples a „*‟ has been used as a wildcard to capture and sub-domains that may appear in the future.
The wildcard can be used any of the domain fields – To assist in capturing all possible permutations
Example: *.google.com – would block things like ‘www.google.com’ and
‘mail.google.com’ To add a new domain, type it into the textbox beside „Black / White List‟ (multiple entries
can be entered separated by a space), set the „State‟ to either Black or White as appropriate and then click on „Add.‟ To update or delete an existing entry, alter the
relevant field and then click on Update or Delete. Note: White listed entries may take up to 20 minutes to be applied. Black listed entries
take effect immediately and over-ride white list entries.

EDUCATION USER GUIDE
17 of 78
3.3.5. Groups
Groups are administered via the „Groups‟ link under the „Access Control‟ section of the left-hand side menu. Clicking this link will
present you with an overview page containing a table of groups. By default you will have one group named „Admin‟ containing the
„postmaster‟ user, this is the primary account that Netspace configures initially for each location. From this position you can
add new groups.
The ACL set for a group along with its members are displayed in the columns „Access‟ and „Members‟ respectively. Groups with
administration privileges on the ACS will have a tick in the „Admin‟ column. You will likely wish to create at least one other
group that does not have Admin privileges.
To add a group - Click on the „Add New Group‟ tab.
You will be prompted for: A name for the new group, whether they should have Admin privileges, and to select an ACL (Access). Once you have entered the appropriate
details, click on „Add.‟

EDUCATION USER GUIDE
18 of 78
To modify or delete a group, click its name. You may then update the relevant fields and select „Update‟ or if you would like to delete a group, select the link titled „Delete this
group.‟ Deleting a group will result in any members of that group being moved to a group
named „Orphaned‟ – Who by default have no access.
The following will display:
EDUCATION USER GUIDE
19 of 78
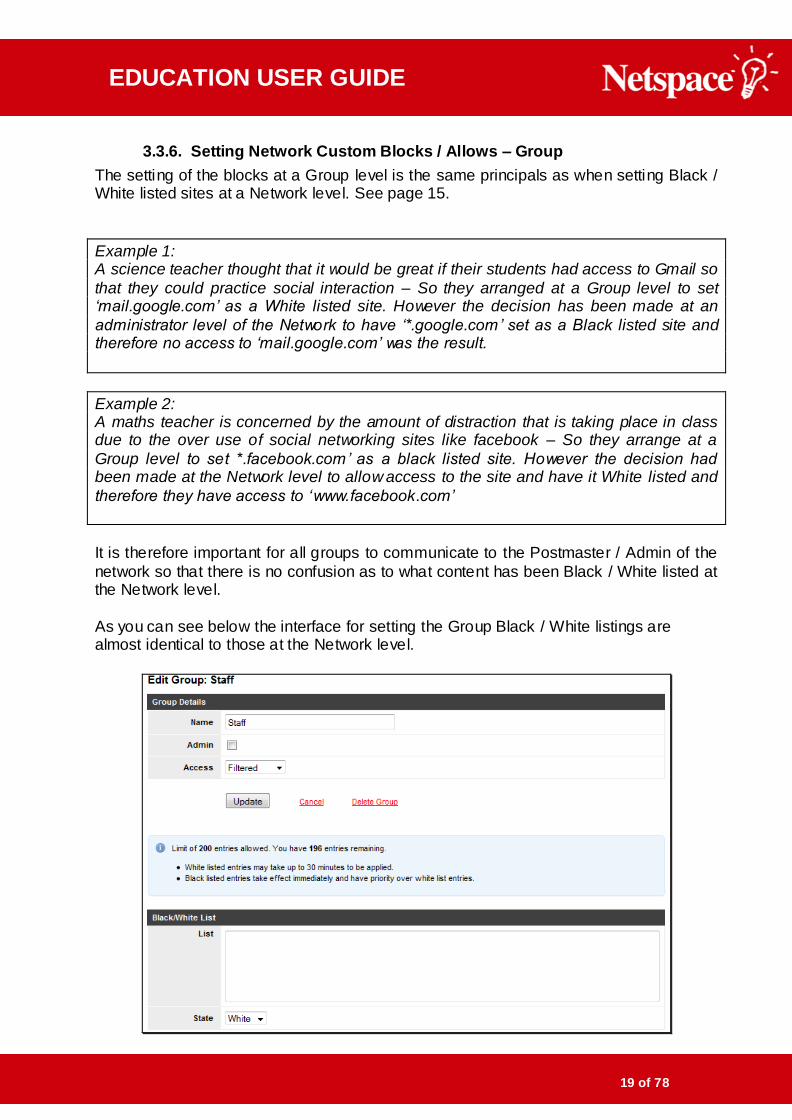
3.3.6. Setting Network Custom Blocks / Allows – Group
The setting of the blocks at a Group level is the same principals as when setting Black / White listed sites at a Network level. See page 15.
Example 1: A science teacher thought that it would be great if their students had access to Gmail so
that they could practice social interaction – So they arranged at a Group level to set ‘mail.google.com’ as a White listed site. However the decision has been made at an
administrator level of the Network to have ‘*.google.com’ set as a Black listed site and therefore no access to ‘mail.google.com’ was the result.
Example 2: A maths teacher is concerned by the amount of distraction that is taking place in class due to the over use of social networking sites like facebook – So they arrange at a
Group level to set *.facebook.com’ as a black listed site. However the decision had been made at the Network level to allow access to the site and have it White listed and
therefore they have access to ‘www.facebook.com’
It is therefore important for all groups to communicate to the Postmaster / Admin of the
network so that there is no confusion as to what content has been Black / White listed at the Network level.
As you can see below the interface for setting the Group Black / White listings are almost identical to those at the Network level.

EDUCATION USER GUIDE
20 of 78
3.3.7. Users
Users are created in the ACS for the dual purposes of user based email accounts and authenticated proxy access.
Usernames in the ACS follow the same conventions as the prefix of an email address – that is they must be all lowercase and
made up of only alphanumeric characters.
Users can be managed by clicking „Users‟ under „Access Control‟ on the left-hand side of the ACS – This brings up the overview screen.

EDUCATION USER GUIDE
21 of 78
To add a user - Click on „Add new user‟ tab.
Fill in the following detai ls:
User‟s Name (eg. Anthony Smith, Anthony etc.)
Username
Password (twice for the purposes of validation)
Select the appropriate Group (eg. Admin, Student Grade 10, Teacher etc.)
Select the User ACL
Confirm the checkbox for Email Enabled – on / off
o This controls whether the user has an email account. If this option is enabled, you must run the „Synchronise to Mail‟ utility after creating the user.
If you have a large number of users that need to be created it would be more efficient to
use the „Batch import‟ facility rather than creating individual users. To edit a user, simply click their name on the „Users Overview‟ page and make the
necessary changes, and then hit „Update user‟ to confirm the changes to the user account.

EDUCATION USER GUIDE
22 of 78
3.3.8. Batch Import
The Batch Import page allows you to upload a file containing existing user information or creates new users and is found by clicking „Batch import‟ on the „Users Overview‟
page.

EDUCATION USER GUIDE
23 of 78
To import a file:
Click the „Browse button‟
Find and select the file
Click on „ Import Users‟ The format must be a comma separated (CSV) text fi le - With the following fields in
listed order.
Examples of a valid format for import:
Garrett Wang,gwang,drwho123,Admin,Filtered,N
Anthony Hall,ahall,dr3vil77,Staff,Filtered,Y Mark Famiglietti,mfami,23jordan,Student,Filtered,Y
Note: Observe that there are no gaps between any of the fields – A good way of creating a CSV file is to use a spread sheet application and save the output information
as ‘.csv’ (comma delimited)
Any lines that contain errors are skipped and are not added to the import.
During the Import process errors may occur for any of the following reasons.
Line contains an incorrect number of commas
Line contains a Group name that does not exist
Line contains an Invalid User ACL Once the process is completed you will see details of the import above the Users frame.
If any errors occur, make the necessary adjustment and re-import the data.
If you are still unable to resolve the problem, please feel free to contact our support team and request assistance in the import process.
Full Name,Username,Password,Group,User ACL,Email Enabled

EDUCATION USER GUIDE
24 of 78
3.3.9. Batch Export
To export the User information from the ACS, select „Batch export‟ tab from the „page and then click the „Export Users‟ button.
The exported data will include one line / record for each user and contain the same fields as when compiling a User Import this information can be either saved or opened
Full Name,Username,Password,Group,User ACL,Email Enabled
EDUCATION USER GUIDE
25 of 78
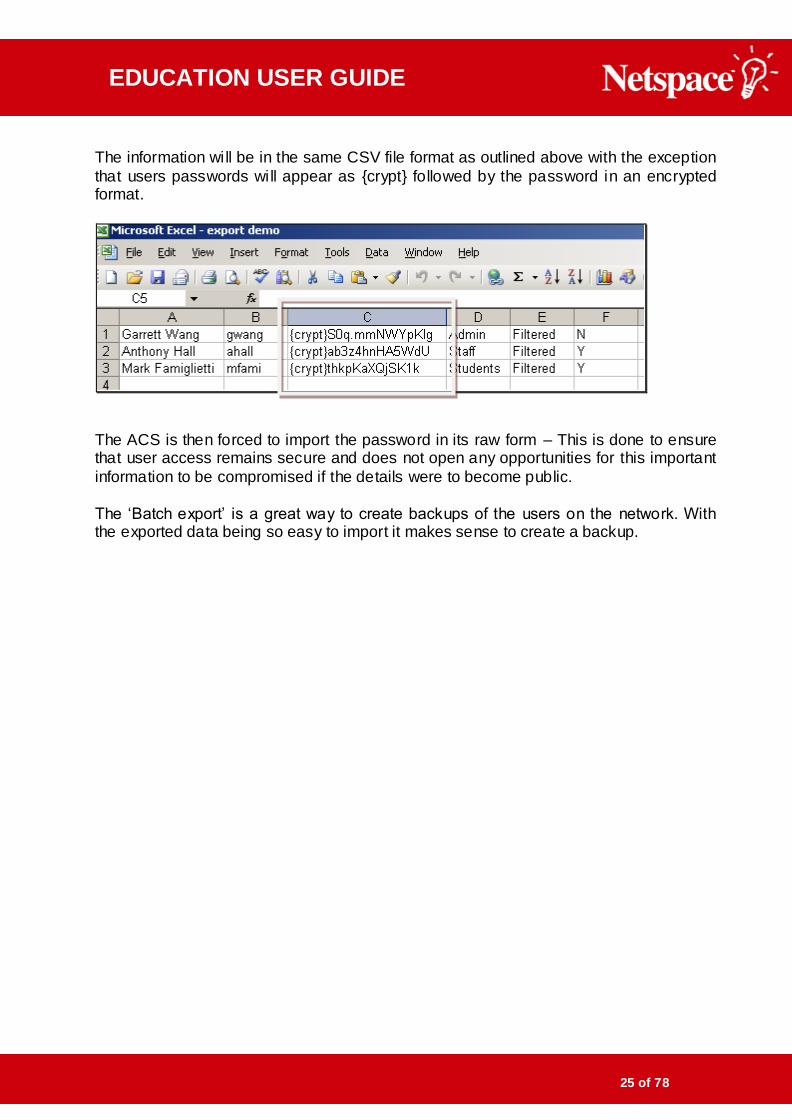
The information will be in the same CSV file format as outlined above with the exception
that users passwords will appear as {crypt} followed by the password in an encrypted format.
The ACS is then forced to import the password in its raw form – This is done to ensure that user access remains secure and does not open any opportunities for this important
information to be compromised if the details were to become public.
The „Batch export‟ is a great way to create backups of the users on the network. With the exported data being so easy to import it makes sense to create a backup.

EDUCATION USER GUIDE
26 of 78
3.3.10. Delete All Users
This is a feature that is useful whilst making bulk changes to the users of the network. Deleting all users will create a clean slate where new users can be imported using the
„Batch import‟ or be created again from scratch manually. With the clean list you can work on creating a new list of users by using a spreadsheet
or text editor and creating a CSV file. The new data could also be generated from a backup of the data that might have been created by the „Batch export‟ feature.
As the „Postmaster‟ is the default account with Administration privileges, it is the only account that is not deleted using this feature.
To access this feature, click „Delete ALL users‟ from the tab and follow the prompts.
The process not only allows you to remove all existing users from the ACS, it a lso enables you to remove users from the Mail system after you press the button
„Synchronise Mail‟ has been run.
EDUCATION USER GUIDE
27 of 78
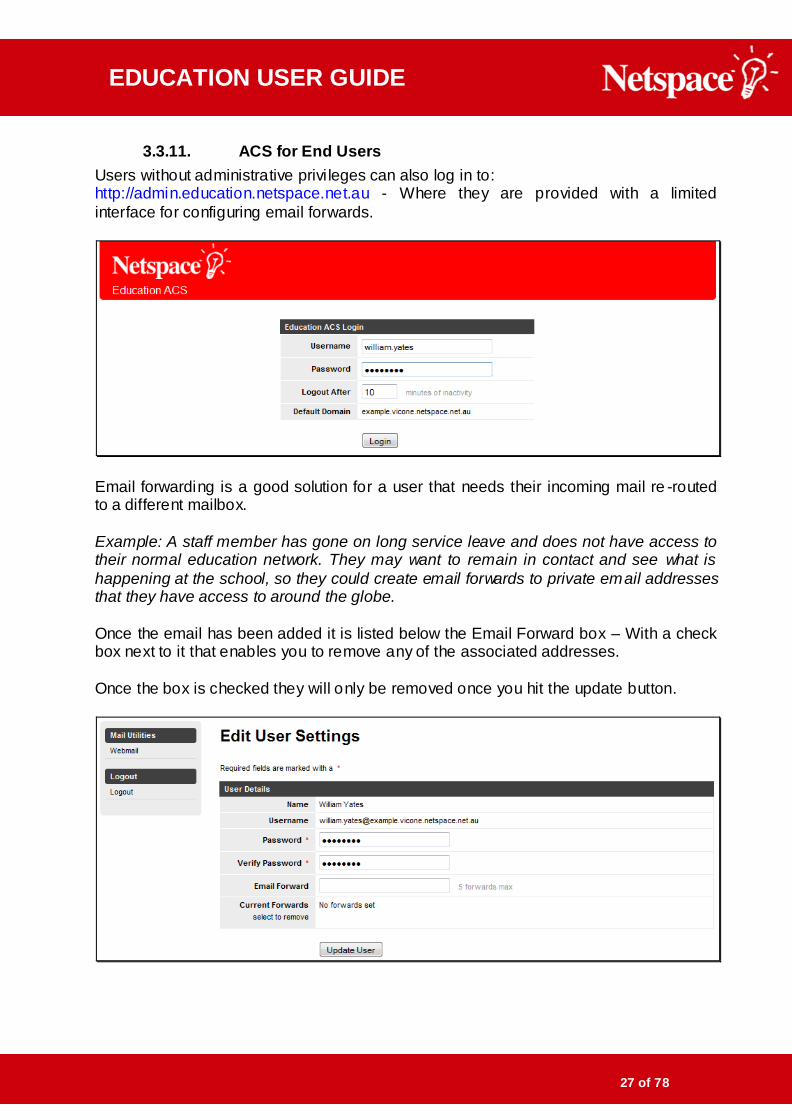
3.3.11. ACS for End Users
Users without administrative privi leges can also log in to: http://admin.education.netspace.net.au - Where they are provided with a limited
interface for configuring email forwards.
Email forwarding is a good solution for a user that needs their incoming mail re -routed to a different mailbox.
Example: A staff member has gone on long service leave and does not have access to their normal education network. They may want to remain in contact and see what is
happening at the school, so they could create email forwards to private email addresses that they have access to around the globe.
Once the email has been added it is listed below the Email Forward box – With a check box next to it that enables you to remove any of the associated addresses.
Once the box is checked they will only be removed once you hit the update button.

EDUCATION USER GUIDE
28 of 78
4. Proxy Server
Netspace provides access to an upstream proxy for filtering of web traffic. To access web sites outside the Education network the proxy must be used.
Appropriate proxy exceptions should be placed in web browsers to avoid traffic that could be served via by the DEECD network being served from Netspace‟s Education
Proxy Server.
4.1. ACS Proxy
The ACS proxy server allows for a mixture of access types. Using the ACS proxy also enables access to be set based on the User, Group or Network.
The Proxy logs browsing history and allows for custom, per network Black / White listing
of websites. To use the ACS proxy - Use the following settings:
Proxy : proxy.education.netspace.net.au Port : 8080

EDUCATION USER GUIDE
29 of 78
4.1.1. Global Block / Allow
The ACS administration interface also allows for URLs to be submitted to our education support team for reclassification for all
schools. We encourage the use of the ACS proxy to allow for an
immediate block of inappropriate material
However we would request that any URL‟s that are discovered that are in displaying inappropriate content are submitted to Netspace via the „Global block submission‟ page. This request is
so that all schools can be filtered from inappropriate material.
To submit a URL for global reclassification - Select „Global block submission‟ tab from the „Networks‟ section of the ACS
The page will then prompt for:
URL – The URL of the site in question
Comment - On the URL – i.e. A brief description
Status – Whether the site needs to be set as: Block or Allow
There may be situations where a site needs to be re-classified to „Allow‟ it. These would
need to be considered by DEECD and would only happen in some very rare circumstances where a site‟s content may have been significantly altered since its first classification.

EDUCATION USER GUIDE
30 of 78
5. eduPaSS Proxy Configuration The following outlines the basic configuration settings required for configuring an eduPaSS proxy to connect via the Education proxy server.
Netspace provides this guide for informational purposes only, any queries regarding
more advanced configuration or troubleshooting of an eduPaSS proxy should be addressed to DEECD Broadband Team.
After logging in to the eduPaSS proxy server:
Select the services tab
Select the Web Proxy link in the services menu
In the „Upstream proxy (host:port)‟ field enter the following:
cache_peer proxy.education.netspace.net.au parent 8080 7 no-query no-netdb-exchange no-digest login=PASS
The „transparent‟ option must not be set if you are using the proxy‟s authentication
service Then select the „enabled‟ check box and click the „Save‟ button

EDUCATION USER GUIDE
31 of 78
The Web Proxy service should now be running.
To verify: Select the “Server Status” tab and check that the Web Proxy Service is running and „green‟
To ensure the eduPaSS is connecting to the upstream proxy server, try browsing to a
website.

EDUCATION USER GUIDE
32 of 78
6. Managing Usage Managing the school‟s data usage will an ongoing task. And one that is extremely important to the smooth running of the school and its networks.
It is recommended that regular checks of the download quota are carried out so that an
understanding of what is „normal‟ for the school is identified and what your needs are likely to be in the future if the school was to expand its staff / student numbers.
Netspace have the tools that will assist in interpreting the data.
These tools are:
Permstats
ACS Web Logs
Weblogs
By using the Permstats tool you can easily identify problem days where the network has
seen significant impact from the users‟ usage. Once the day has been identified you can drill down using the Web Logs on that day
which in turn will reduce the workload. It will save time through not having to scan though the logs for each day for each individual user in an attempt to identify the issue.

EDUCATION USER GUIDE
33 of 78
6.1. Permstats
Permstats will show a breakdown of your daily usage for a particular month. It is available by clicking the „Permstats‟ link
located under „Access Reports‟ on the left-hand side menu within the ACS.
Next you will be presented with the Permstats login screen.
Input your credentials
Then select the month you with to report against
Leave the connection as – ADSL/Vicone/Education/ Permanent Dialup
Click on Generate Report
An example of the report is on the following page.

EDUCATION USER GUIDE
34 of 78
After clicking to generate the report you will be presented with usage for the month that
was selected. Netspace recommends that you monitor the usage through Permstats on a weekly
basis to ensure accurate understanding of the data usage.
This report used in conjunction with Web Logs – will enable you to isolate large data users and also identify trends in data usage.

EDUCATION USER GUIDE
35 of 78
6.2. ACS Web Logs
The ACS proxy service has the ability to generate access logs of a particular IP on the network.
Click „ACS Web Logs‟ found under „Access Reports‟ on the left-hand side of the ACS.
You will then be prompted to select the Date (A calendar will
appear when the field is clicked) and Network. Then the choice of who should be notified via email.
Once the request has been submitted the logs will be processed.
When the logs are ready for viewing, an email that includes a URL for viewing the logs will be sent to the appropriate admin, or to the specified address under the „Email Notify‟
Note: The complexity of the log query submitted determines how long it takes for the logs to be prepared. Once prepared, the logs will be
available for download for up to 72 hours.

EDUCATION USER GUIDE
36 of 78
6.3. Mail System
The features of the Netspace email service such as Spam & Virus Filtering, Real-time Block Lists and White / Black lists can only be configured from the ACS web interface.
Email addresses and passwords are created based on the user information stored in
the ACS. As outlined in the section on the „User‟. To enable email for a user simply tick the „Email
Enabled‟ option when adding or editing a user.
PLEASE NOTE: There is a new change to the mail system.
Previously you used to have to „synchronise mail‟ once any mail configurations were changed, or users modified.
With the new process in place the „synchronising‟ happens live – Whenever user details are added, modified or deleted.
The only time you will need to synchronise the mail is upon the initial configuration of the users.

EDUCATION USER GUIDE
37 of 78
6.4. POP3 / IMAP
Support for both POP3 and IMAP email clients is provided. Be aware that if you are
considering using IMAP you will have to manage the contents of your mailbox stringently as IMAP will not remove copies of messages transferred to your local mail
client. For both POP3 and IMAP the username is the full email address.
Example: [email protected]
The password is the same as for the ACS.
An SMTP service is also available to send email.
Server settings:
Service Hostname Port
IMAP imap.netspace.net.au 143
POP pop.netspace.net.au 110
SMTP smtp.netspace.net.au 25

EDUCATION USER GUIDE
38 of 78
6.5. Webmail
A custom webmail platform is available for all schools.
It can be accessed by browsing to:
http://webmail.exampleschool.vic.edu.au – Where the „exampleschool‟ is the name of the school.
To log in to webmail, the user simply enters their username and
their password as the schools domain is automatically appended to the webmail interface.
EDUCATION USER GUIDE
39 of 78
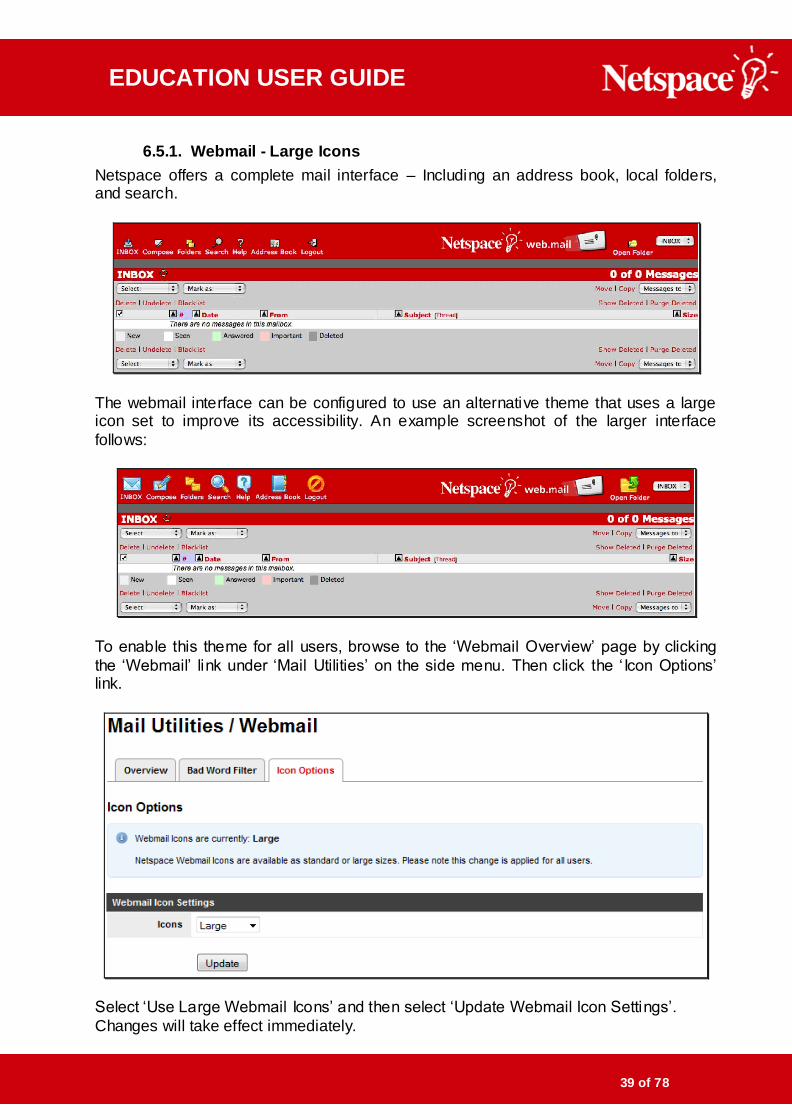
6.5.1. Webmail - Large Icons
Netspace offers a complete mail interface – Including an address book, local folders, and search.
The webmail interface can be configured to use an alternative theme that uses a large icon set to improve its accessibility. An example screenshot of the larger interface
follows:
To enable this theme for all users, browse to the „Webmail Overview‟ page by clicking
the „Webmail‟ link under „Mail Utilities‟ on the side menu. Then click the „ Icon Options‟ link.
Select „Use Large Webmail Icons‟ and then select „Update Webmail Icon Settings‟.
Changes will take effect immediately.

EDUCATION USER GUIDE
40 of 78
6.5.2. Bad Word Filtering
The „Bad Word Filtering‟ engine censors words that match a pre-defined list of offensive content. Message bodies will still be visible but may be in part censored.
Bad-word filtering should be used in conjunction with school policy as decided upon by the school and the wider school community. Note that by enabling this feature an
uncensored copy of potentially offensive emails will be forwarded to the postmaster account for review.
To enable the Bad Word Filter, from the „Webmail‟ page select the link titled „Bad Word
Filter‟. Select „Enable Bad Word Filtering‟ and then select „Update‟. The list of bad words can be accessed by selecting „Bad Word List‟ – please be aware
that potentially offensive content may be listed on this page. Additional Bad Words can be added to simply by typing them into the text box at the bottom of the menu and
clicking on the Add button.
Note: You can add words that contain spaces or numbers. But complex characters l ike
‘$’ are not able to be defined with this system.

EDUCATION USER GUIDE
41 of 78
6.6. Mail Forwarding
ACS users with administrative privileges can set email forwards for any account stored in the ACS. Email can be forwarded to up to five accounts for each user.
Users without administrative privileges can also set up their own
mail forwarding by logging into: http://admin.education.netspace.net.au
6.7. Spam Filtering
Spam Filtering can be enabled for the entire school via the
„Spam Filtering‟ link located under „Mail Utili ties‟ on the left-hand side of the ACS.
The Spam Filter works by assigning a rank to each email that comes in based on its content. The information is ranked by
different information like: the header format, its source, and its recipients etc. Generally any message ranked 10 or below can be regarded as safe.
The recommended setting for the Spam Filter would have it set
at rank 10; and then ensure that all reliable and important addresses have been „white listed‟ thus ensuring their successful delivery.
Ongoing adjustments may be needed over time, and should be
managed through the options on this screen. The Spam Filter can be enabled or disabled through this screen. (Disabled - Not Recommended)

EDUCATION USER GUIDE
42 of 78
6.8. Email - White / Black List
You can configure a manual list of trusted and non-trusted email addresses within the „Spam Filtering‟ section of the ACS.
It is accessed by selecting „Manage White List‟ or „Manage Black List‟. The „White / Black‟ lists contain known good and bad email addresses respectively.
If you enable the spam filter, it is recommended that you „White List‟ any important addresses that would ensure that emails are received from these trusted addresses
regardless of their content.
Similarly, the „Black List‟ automatically discards emails regardless of their content if they come from a particular address that is known to be un-trusted or spam.
To add to either list, select the appropriate link from the menu at the top of the „Spam
Filtering‟ page, then enter the appropriate email addresses in the text box and click on „Update Email White List‟ or „Update Email Black List‟ as appropriate.
To remove an item from the list tick the „Remove‟ box beside the item and then click on „Update Email White List‟ or „Update Email Black List‟ as appropriate

EDUCATION USER GUIDE
43 of 78
6.9. Virus Filtering
Virus Filtering can be enabled for the entire school via the „Virus Filtering‟ link located under „Mail Utilities‟ on the left-hand side of
the ACS.
We recommend that this be used in conjunction with virus
scanning software. ISP virus filtering service should not be seen as a substitute for desktop antivirus software.
To enable the virus filter, „Spam Filtering‟ must first be enabled. Once it is enabled, browse to the „Virus Filtering‟ page read
through the Declaration and then select „Enable email Virus Filtering‟ followed by clicking on „ I Agree‟, and virus filtering will be active.

EDUCATION USER GUIDE
44 of 78
7. Virtual Web Server The Virtual Web Server (VWS) is based on the Plesk platform. This is an advanced web hosting platform which provides features such as full PHP and CGI support, MySQL and
PostgreSQL databases, traffic and usage reports, DNS management and a variety of web applications that can be activated through the Plesk Control Panel.
7.1. VWS Control Panel - Plesk
The VWS Control Panel can be accessed by selecting „Control
Panel‟ on the left-hand side of the ACS under the heading titled „VWS Utilities‟.
You will be presented with a login screen, enter your VWS/FTP username and password then click on the login button to
proceed.
After logging in for the first time, you will be prompted for a
contact telephone number and email address. Once these detai ls have been entered, you will be on the main
screen of the Control Panel.

EDUCATION USER GUIDE
45 of 78
A brief explanation of some of the commonly used options available on the Control Panel follows:
Edit – Allows you to update the contact details for the VWS as well as the password.
Report – Generates a report detailing the domains, databases and traffic usage
of the site.
Traffic – shows an overview of the amount of traffic used by your VWS as well as a breakdown of how that traffic was used.
Further configuration options are found by selecting your domain from the domain‟s
name list.
These options include Databases and the Application vault which are covered in more detail later in the document, as well as a Log Manager which allows you to view and download access, error, and transfer logs.

EDUCATION USER GUIDE
46 of 78
7.2. Uploading files to VWS via Plesk
To upload files to your new VWS, you can now use the Plesk File Manager. You can access the „File Manager‟ by clicking on the „Home‟ icon.
Then click on your domain: Example: example.vicone.netspace.net.au
From „Hosting‟ click on „File Manager‟
From „File Manager‟ you can select directories to either upload or remove files that are available for your school domain.
EDUCATION USER GUIDE
47 of 78
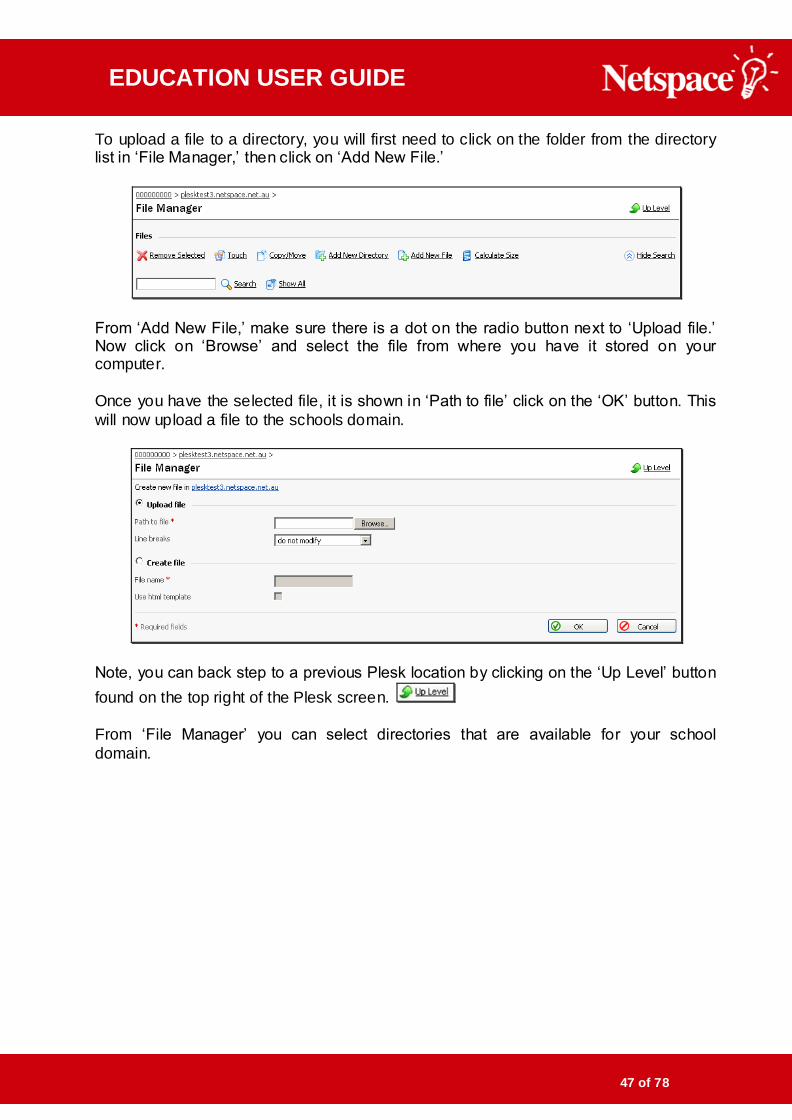
To upload a file to a directory, you will first need to click on the folder from the directory list in „File Manager,‟ then click on „Add New File.‟
From „Add New File,‟ make sure there is a dot on the radio button next to „Upload file.‟ Now click on „Browse‟ and select the file from where you have it stored on your computer.
Once you have the selected file, it is shown in „Path to file‟ click on the „OK‟ button. This
will now upload a file to the schools domain.
Note, you can back step to a previous Plesk location by clicking on the „Up Level‟ button
found on the top right of the Plesk screen.
From „File Manager‟ you can select directories that are available for your school
domain.

EDUCATION USER GUIDE
48 of 78
7.3. Site Preview
When you have uploaded or edited your school domain files, you can see the changes that have been made to your domain by using Plesk „Site Preview.‟ From „File Manager
this is found by clicking „Up Level‟ in then the „Hosting‟ area.
When you select „Site Preview‟, a new webpage will open and show any changes that have been made to the domain. This tool is useful for viewing changes to the domain
before the domain has been updated in DNS.
7.4. Plesk Protected Directories
When using Plesk you can assign your domains directories so that they have password-protected access. This function allows secure documents to reside in the virtual domain.
You can create directories under either the standard virtual host accessible via http or
under the SSL virtual host accessible via the https protocol. Icons are used next to each directory to identify which virtual host type (either SSL or non-SSL). An open lock depicts non-SSL; a closed lock depicts SSL.
In Plesk, you can find „Protected Directories‟ by selecting „Home‟, then clicking the
„domain‟, then searching under in „Hosting‟ area. From „Protected Directories‟ you will have the option to „Add new directory‟ and also see
what protected directories are currently listed.

EDUCATION USER GUIDE
49 of 78
To add a new directory, click on „Add New Directory‟. The next screen allows you to name the directory and assign its directory location, choose:
Non-SSL
SSL
cgi-bin
Now after creating this protected directory you will need to add a user(s) to access it.
First, click on a listed directory:
You will now see any users that have password access to the directory.
Click on the option „Add New User.‟
In the next screen you can now create a „New user‟ as well as specifying the „New
password.‟

EDUCATION USER GUIDE
50 of 78
7.5. SSH Access
Plesk provides the use of an SSH access terminal. SSH allows data to be exchanged using a secure channel between two computers. This data is encrypted - SSH is
typically used to log into a remote machine and execute commands, it also supports tunnelling.
Common uses of SSH are:
Remote administration of the SSH server computer
Automated remote monitoring and management of servers
Port forwarding or tunnelling, an alternative to VPN
Securely mounting a directory on the server as a file system on the local
computer Note: There are security cautions to consider when using SSH as its use may cause
possible unauthorised access of information.
You can find the SSH Terminal from the start of Plesk by clicking on „Home‟ and then clicking on the specific domain. This is located in the „Hosting‟ area.
After clicking on „SSH Terminal‟ and typing in your Plesk username and password you
will then have a SSH terminal prompt to use. See below.

EDUCATION USER GUIDE
51 of 78
7.6. Scripting
The VWS supports CGI and PHP scripting languages. CGI scripts should be placed in the cgi-bin folder and must have their permission set no higher than 755.
CGI scripts can reference:
Perl at: /usr/bin/perl
Sendmail at: /usr/sbin/sendmail
7.7. Databases
Database configuration can be accessed by selecting „Databases‟ after selecting the school‟s domain on the main page of the Control Panel.
Each VWS has access to one MySQL or PostgreSQL database. To add a database - Simply click: „Add Database‟, type the Database name and type
(MySQL or PostgreSQL) and click „OK.‟
A new database user should then be added so that the new database can be accessed. To add user: Select „Add new Database User‟.
You can now click on „DB WebAdmin‟ to administer your new database. To access your database from a CGI or PHP script, use the hostname „localhost‟.
Note: Netspace are unable to assist with database design or implementation.

EDUCATION USER GUIDE
52 of 78
7.8. Application Vault
A wide variety of applications are available including calendars and content management systems. Some of these applications will require database access and
may require further configuration. Unfortunately, we are unable to provide full support on all of the available applications.
7.8.1. How do I install an application?
The Application Vault can be accessed via the Home button on the left menu.
In the Domains section select the domain you wish to install an application on.
On the next screen to load locate the Hosting section and select „Web Applications‟
Upon selecting „Web Applications‟ you will be presented with the application installation screen. This provides an option to install an application whilst also displaying any
currently installed applications.

EDUCATION USER GUIDE
53 of 78
To proceed with an installation, click on Add New Application.
You will now be presented with a range of applications in two groups:
Personal
Web
See examples below:
EDUCATION USER GUIDE
54 of 78
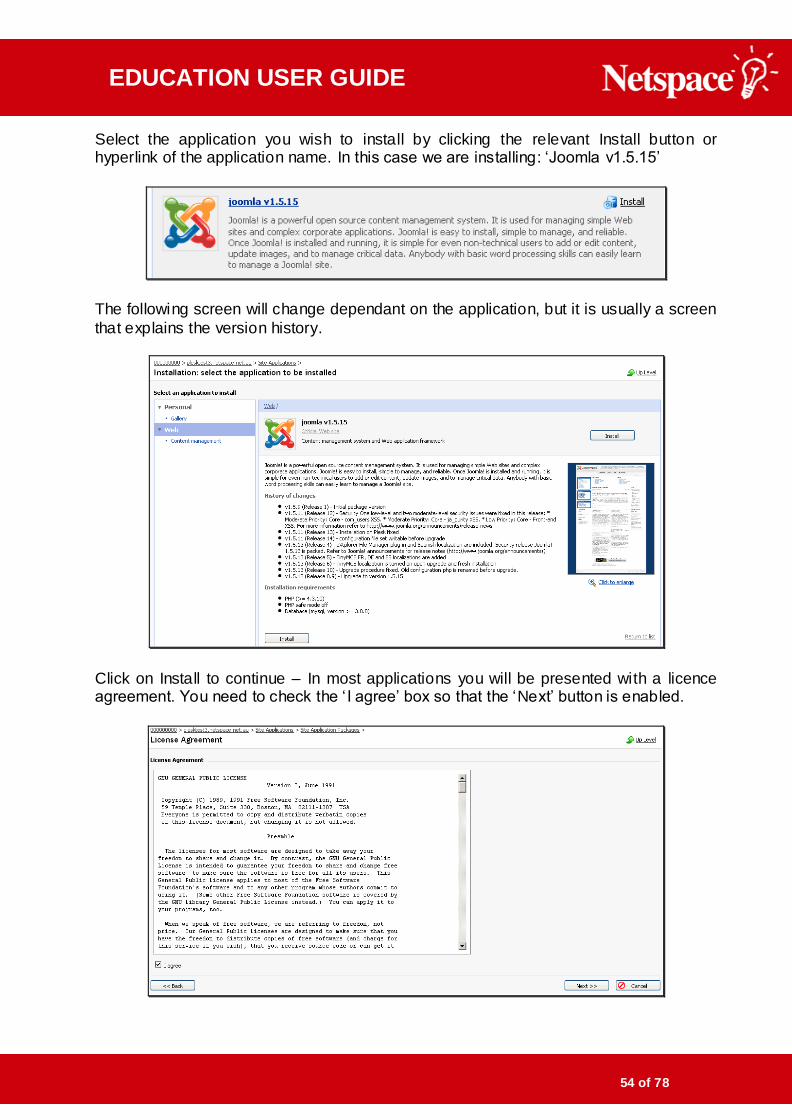
Select the application you wish to install by clicking the relevant Install button or hyperlink of the application name. In this case we are installing: „Joomla v1.5.15‟
The following screen will change dependant on the application, but it is usually a screen
that explains the version history.
Click on Install to continue – In most applications you will be presented with a licence agreement. You need to check the „ I agree‟ box so that the „Next‟ button is enabled.

EDUCATION USER GUIDE
55 of 78
The example below displays some generic installation options that you may encounter
for the application you have selected for the site application. Once the required items have been specified - Click on „ Install‟ to proceed.
Once the application is complete you will be presented with a confirmation screen, confirming that it has been completed successfully.
EDUCATION USER GUIDE
56 of 78
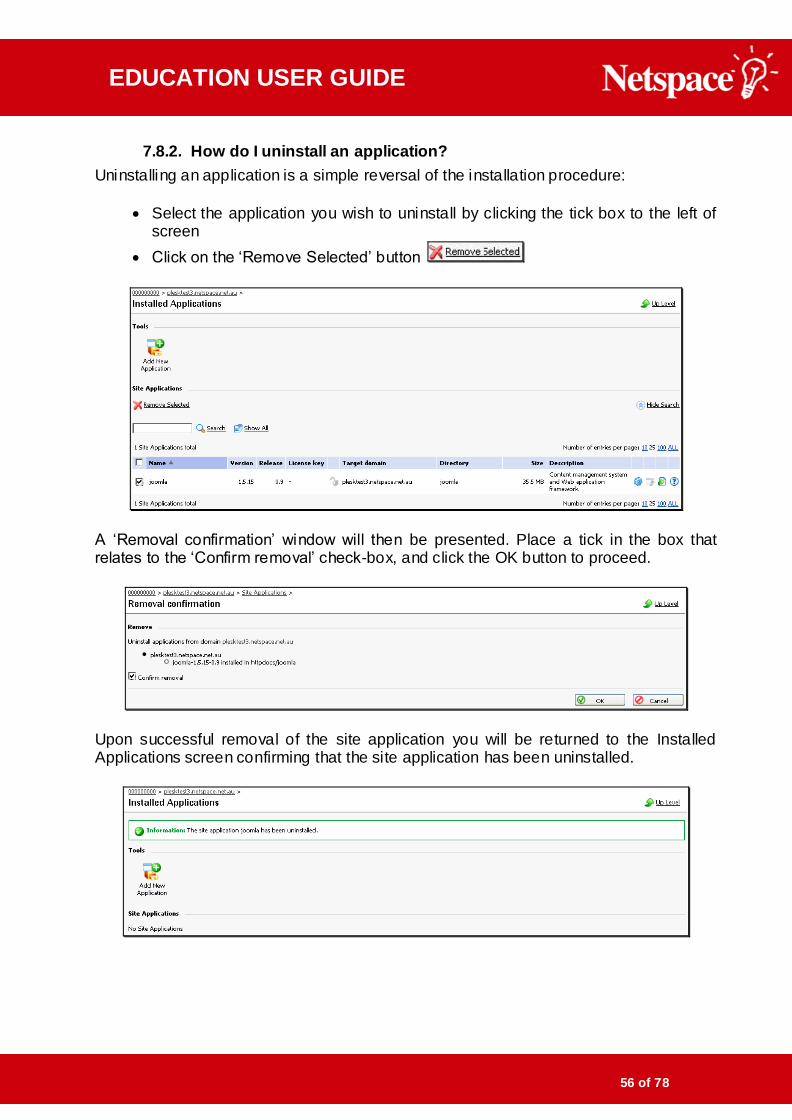
7.8.2. How do I uninstall an application?
Uninstalling an application is a simple reversal of the installation procedure:
Select the application you wish to uninstall by clicking the tick box to the left of screen
Click on the „Remove Selected‟ button
A „Removal confirmation‟ window will then be presented. Place a tick in the box that relates to the „Confirm removal‟ check-box, and click the OK button to proceed.
Upon successful removal of the site application you will be returned to the Installed Applications screen confirming that the site application has been uninstalled.

EDUCATION USER GUIDE
57 of 78
7.9. DNS Management
The Plesk Control Panel provides schools with the ability to manage the DNS records for their respective education domain.
Although this will give schools greater control in terms of being able to update, add, or delete DNS records whenever they wish, it must be pointed out that a solid
understanding of how DNS works is critical to ensure proper administration of these records. An incorrect DNS record entry could mean that the school‟s web site suddenly becomes inaccessible and emails stop working.
Note: Please take care when modifying any DNS records.
7.9.1. What is DNS?
DNS stands for Domain Name System. It is sometimes referred to as Domain Name
Server or Domain Name Service.
It is a service which helps a computer to translate a fully qualified domain name into a numerical address.
Example: www.netspace.net.au into an IP numerical address - 210.15.254.234
DNS is necessary because computers can only communicate using numbers so there needs to be a way to map a fully qualified domain name into an IP address.
You may already be familiar with a similar system known as the White Pages. The White Pages maps names to their corresponding address and phone number. DNS is
simply an extension of the White Pages concept that maps fully qualified domain names to an IP address and vice versa.
7.9.2. How does DNS work?
When you enter a fully qualified domain name (eg: www.netspace.net.au) into your web
browser, your computer must first communicate with a name server to find out the IP address of www.netspace.net.au - The name server is running its own DNS software which contains a database of mappings it already knows.
If the name server knows the IP address for www.netspace.net.au it will send this
information back to your computer or else it will go and ask other name servers to see if they might know that address.
Through this process your computer will receive a reply from the name server telling it that www.netspace.net.au has an IP address of 210.15.254.234
Knowing the IP address now, your computer then requests the web page from the machine with IP address 210.15.254.234 and the data sent back to your computer gets
displayed on your web browser.

EDUCATION USER GUIDE
58 of 78
7.9.3. What types of DNS records are there?
DNS information for a specific domain is stored in a zone file.
Zone files commonly have the following records and a few others: SOA (start of authority)
State Of Authority records define key information about a zone such as how long o ther
name servers should cache information they receive about the zone and the administrative e-mail contact for the zone. NS (name server)
Name Server records specify the IP addresses of name servers listed for the zone.
A (address)
„A‟ records are the main mechanism for associating a host name for a particular domain
with an IP address.
Example: The A record for www.netspace.net.au points at 210.15.254.234 The host name is www and the domain name is netspace.net.au. Together
www.netspace.net.au is referred to as a fully qualified domain name (FQDN). CNAME (canonical name)
CNAME records are name aliases – or alternative possible names for the same thing.
Example: We might create a CNAME record: other.netspace.net.au and point it at www.netspace.net.au
This means „other.netspace.net.au‟ is another name for „www.netspace.net.au‟ and therefore will resolve to the same IP address.
MX (mail exchange)
Mail eXchanger records specify the mail servers which handle mail for the domain. When a remote mail server has a message addressed to [email protected], that mail server will query the name servers for netspace.net.au for the MX records for
the zone and then deliver the message to one of the mail servers identified by the MX record.

EDUCATION USER GUIDE
59 of 78
7.9.4. How long will it take for any DNS record to update?
Generally after a DNS record has been updated it can take anywhere from 24 to 48 hours for the change to propagate to the rest of the Internet. This means that if you have modified your school web site to point to a different IP address, the web site will
not be instantly accessible from many parts of the Internet.
This is because name servers around the world cache DNS records to help speed things up and therefore must wait for the existing DNS record they have stored in their cache to expire before they will talk to other authorized name servers and receive the
updated DNS record for your web site.
7.9.5. Using the DNS Interface
To access the DNS Interface - Log into the Plesk through „Control Panel‟
Click on the Home link on the menu.
At the bottom of the page, click on your domain to bring up more tools.
EDUCATION USER GUIDE
60 of 78
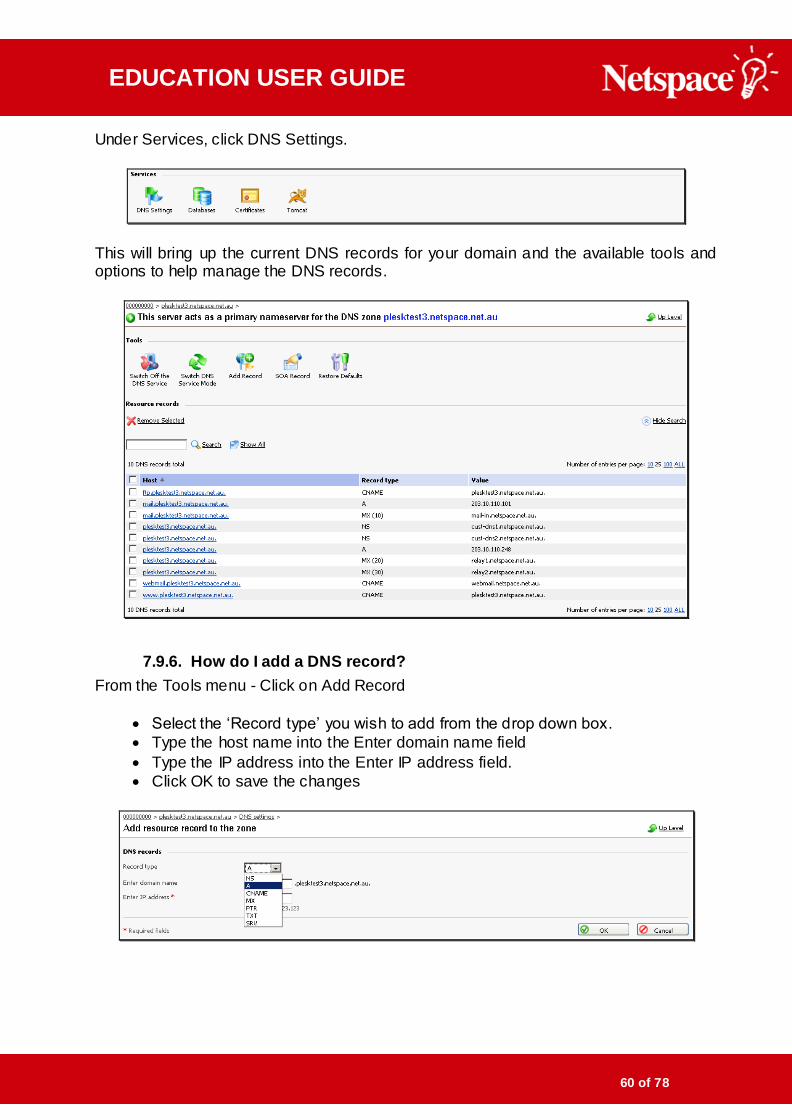
Under Services, click DNS Settings.
This will bring up the current DNS records for your domain and the available tools and options to help manage the DNS records.
7.9.6. How do I add a DNS record?
From the Tools menu - Click on Add Record
Select the „Record type‟ you wish to add from the drop down box.
Type the host name into the Enter domain name field
Type the IP address into the Enter IP address field.
Click OK to save the changes
EDUCATION USER GUIDE
61 of 78
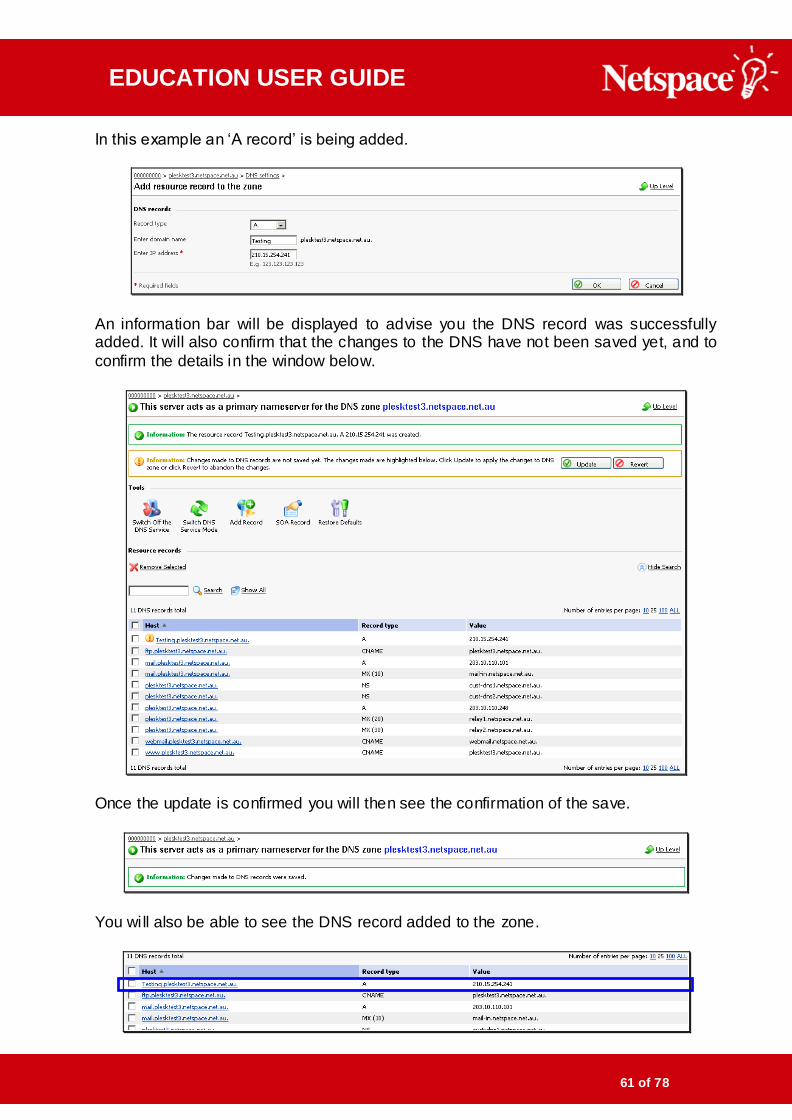
In this example an „A record‟ is being added.
An information bar will be displayed to advise you the DNS record was successfully added. It will also confirm that the changes to the DNS have not been saved yet, and to
confirm the details in the window below.
Once the update is confirmed you will then see the confirmation of the save.
You will also be able to see the DNS record added to the zone.

EDUCATION USER GUIDE
62 of 78
7.9.7. How do I edit a DNS record?
Click on the Host you wish to edit.
This will bring up the edit resource record window. Edit the record type, host name (domain name) or IP address.
Click OK to save the changes – In this case changed to: „Testing2‟
An information bar will be displayed to advise you the DNS record was successfully
changed.
It will also confirm that the changes to the DNS have not been saved yet, and to confirm the details in the window below, similar to what you see when adding a DNS.
EDUCATION USER GUIDE
63 of 78
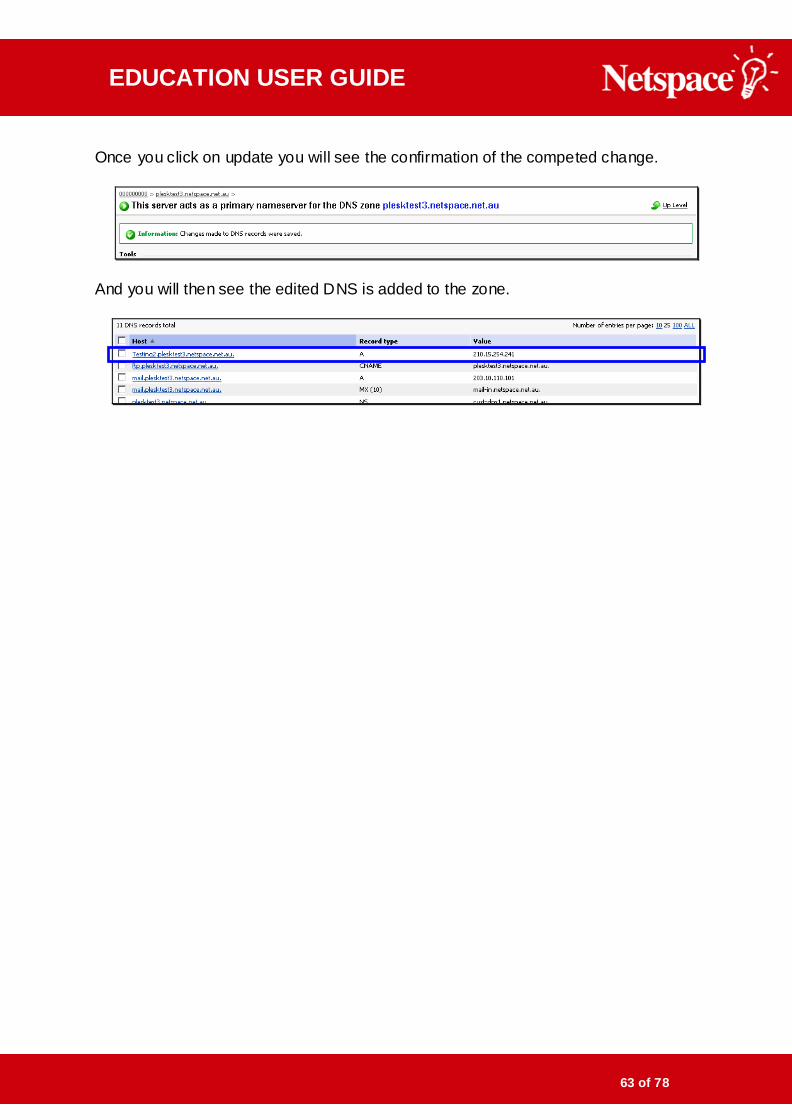
Once you click on update you will see the confirmation of the competed change.
And you will then see the edited DNS is added to the zone.

EDUCATION USER GUIDE
64 of 78
7.9.8. How do I delete a DNS record?
Select the DNS record(s) you wish to delete by placing a tick in the appropriate check box:
Click Remove Selected -
A confirmation message will appear
Tick Confirm removal and click OK

EDUCATION USER GUIDE
65 of 78
An information bar will be displayed to advise you the DNS record has not been saved yet – And to click on „Update‟ to apply the changes.
Once it is complete – A confirmation screen is displayed and the DNS entry has been
removed.

EDUCATION USER GUIDE
66 of 78
7.10. Domain Aliases
A domain alias is used to direct assign more than one domain to one web site.
Example: If you have the domain ‘example.edu.au” and set up as an alias the hosting account for ‘anotherexample.edu.au’ - Anyone browsing the web to ‘example.edu.au’
will be directed to ‘anotherexample.edu.au’ The „Domain Aliases‟ button is found in Plesk by clicking on „Home‟- And then clicking
on the specific domain. It is located in the „Domains‟ area.
After clicking on „Domain Aliases‟ you will be then see an option to „Add Domain Aliases‟ as well as see any other Aliases that have been attributed to the domain.
To add an alias, click on „Add Domain Alias‟. Now you can type in the domain name and specify any attributes the alias has in relation to the website.
Once complete you will see a confirmation of the created alias.

EDUCATION USER GUIDE
67 of 78
7.11. Subdomains
In the Domain Name System (DNS) hierarchy, a subdomain is a domain that is part of a larger domain. To demonstrate, in regards to the domain – „mail.example.edu.au‟ –
„mail‟ is a subdomain of example.edu.au
A common use for a subdomain by an organisation is to assign a unique name to a particular department, function, or service related to the organisation.
You can access the „Subdomains‟ tool by clicking on „Home‟
Click on the specific domain.
„Subdomain‟ can be located in the „Hosting‟ area.
After clicking on „Subdomains‟ you can now see the „Add New Subdomain‟ tool as well as a list of all present Subdomains.
To add a subdomain, click on „Add New Subdomain‟

EDUCATION USER GUIDE
68 of 78
In this screen you will have the option to name a subdomain – In this case „testspecial‟ Then assign „FTP‟ access and specify other services that may be available, if they are
required..
Once complete click „Ok‟ to finalise the settings
You will then see confirmation that the subdomain has been created successfully and it will be listed under the subdomain name list on the bottom of the screen.

EDUCATION USER GUIDE
69 of 78
8. FTP There are several commonly used programs such as FileZilla, WS_FTP and CuteFTP.
The following demonstrates the basic use of the FTP Client – FileZilla. FileZilla is freely available from http://filezilla-project.org/ and is supported by Netspace support staff.
Using FileZilla FTP Client After starting FileZilla, the following details will need to be entered.
Address - eg. www.schooldomain.vic.edu.au
Username - eg. vschoolname
Password - eg. a1b2c3F
Note: Username and Password will be the same credentials that you use to log into Plesk.
Click on „QuickConnect‟ - The left-hand window will contain your local files and folders
whilst the right-hand window will contain the remote file and folders.
To upload a file or folder, drag it from the left-hand window to the right-hand
window.
To backup a file or folder, drag it from the right-hand window to the left-hand
window.
Note: Ensure your web site files and folders are stored within the /httpdocs/ folder.

EDUCATION USER GUIDE
70 of 78
9. Onsite Services
Onsite Services on the Education network are coordinated and facilitated through the DEECD Broadband Team.
Please email: [email protected] to get started on setting up your onsite services in the Education DMZ.
Once the DEECD Education Team has determined the appropriate schema and setup
you can use our DNS self-management tools to create and apply all necessary DNS entries to support external connectivity to these services.

EDUCATION USER GUIDE
71 of 78
10. Index
A
A record, 59 ACL, 8, 13, 14, 16, 18, 22, 24, 70, 72 ACS, 2, 10, 70
ACS Proxy, 2, 28 ACS Web Logs, 2, 32, 34, 35, 36
ACS Web Logs – Top 100, 2, 9, 32, 36 Admin, 8, 10, 15, 18, 20, 22, 24 Application Vault, 3, 47, 54, 55, 72
B
Bad Word Filtering, 2, 42
Batch Export, 2, 25 Batch Import, 2, 23, 24, 25 Blacklist, 2, 13, 19, 20, 28, 37, 44
C
Canonical Name, 59
Curric, 8, 15
D
DEECD, 9, 16, 28, 29, 30, 66, 70
DMZ, 15, 66, 70 DNS Management, 3, 58
Domain Alias, 3, 63, 72
E
Edulist, 8, 13, 14, 16, 70 eduPaSS Proxy, 2, 9, 30
F
Filtered, 8, 13, 14, 16, 24 FTP, 3, 46, 64, 65, 70
G
Global Block / Allow, 2, 29
I
IMAP, 2, 9, 39, 70

EDUCATION USER GUIDE
72 of 78
M
Mail, 2, 8, 9, 22, 26, 37, 38, 41, 43, 45, 59, 71 Mail Exchange, 59 Managing Usage, 2, 32
P
Permstats, 2, 9, 32, 33, 34
Plesk Control Panel, 2, 46 POP3, 9, 39, 70
S
Scripting, 3, 53 Spam Filtering, 9
SSH Access, 3, 52, 71, 72 Start of Authority, 59
Subdomain, 64 Synchronise Mail, 2, 8, 22, 26, 37, 38
U
User, 21
V
Virtual Web Server, 2, 9, 46 Virus Filtering, 2, 9, 37, 45
W
Webmail, 2, 40, 41, 42, 69 Whitelist, 2, 14, 19, 20, 28, 37, 44, 58

EDUCATION USER GUIDE
73 of 78
11. FAQ’s How do I block / un-block some of these sites that have a lot of sub-domains?
YouTube - Many schools wish to, through the white listing function, make available
access to certain YouTube resources. However the structure of YouTube is such that to make some resources available you must in fact make all of YouTube available.
If you have fully considered the ramifications of making potentially inappropriate material inadvertently accessible to staff and students and you still wish to proceed with
white listing YouTube then simply place a white list entry for the two following entries: youtube.com
v*.cache.googlevideo.com/get_video Free or 3rd Party Webmail - Free webmail services are blocked as there is not
generally a valid educational need and they can be a source of cyber bullying. If your school determines there is a valid educational need for a particular webmail service,
such as Gmail to utilise Google Docs Facility. The school may white list the site as per the white listing instructions.
Gmail:
*.gmail.com
mail.google.com Hotmail:
sn127w.snt127.mail.live.com/mail/todaylight.aspx sn127w.snt127.mail.live.com/mail/logout.aspx
sn127w.snt127.mail.live.com/mail/inboxlight.aspx *mail.live.com/default.aspx*
*mail.live.com* *login.live.com* *hotmail.passport.com/cgi-bin/login*
*hotmail.com* *home.live.com*
*ninemsn.com.au* *.by123w.bay123.mail.live.com*
ITunes:
*itunes.apple.com
*ax.itunes.apple.com *albert.apple.com *gs.apple.com

EDUCATION USER GUIDE
74 of 78
12. Glossary
ACS – Access Control System
ACL – Access Control List
Blacklist – A list of internet sites or email addresses that have been identified as
inappropriate or spam
CSV - Comma-separated values (CSV) file is used for the digital storage of data
structured in a table of lists form, where each associated item in a group is in
association with others also separated by the commas. DEECD – Department of Education and Early Childhood
DMZ - In computer security, a DMZ, or demilitarized zone is a physical or logical sub-
network that contains and exposes an organization's external services to a larger un-trusted network, usually the Internet. DNS – Domain Name System: Is a hierarchical naming system for computers, services,
or any resource connected to the Internet or a private network.
Edulist - The Edulist is the “Whitelist” of websites service that allows a school to restrict
access to only these sites. Schools choose to do this as a way of providing a highly
controlled and protected environment for student safety. The feature can be switched on and off at the school's level OR drawn down at the school to allow further
administration. FTP – File Transfer Protocol: Is a standard network protocol used to copy a file from
one host to another over a TCP/IP-based network, such as the Internet. IMAP - Internet Message Access Protocol - Is one of the two most prevalent internet
standard protocols for e-mail retrieval. IP Address - Is a numerical label that is assigned to devices participating in a computer
network that uses the Internet Protocol for communication between its nodes. Example:
www.netspace.net.au = 210.15.254.234 Plesk – Software which allows a server administrator to set up new websites, accounts,
e-mail accounts, and DNS entries through a web-based interface. The administrator can create client and site templates, which predetermine resource allocation parameters for
the domains and / or clients.

EDUCATION USER GUIDE
75 of 78
POP - Post Office Protocol is an application-layer Internet standard protocol used by
local e-mail clients to retrieve e-mail from a remote server over a TCP/IP connection.
Proxy - In computer networks, a proxy server is a server (a computer system or an
application) that acts as an intermediary for requests from clients seeking resources
from other servers. SMTP - Simple Mail Transfer Protocol is an Internet standard for e-mail transmission
across IP networks. Spam - Is the abuse of electronic messaging systems to send unsolicited bulk
messages indiscriminately.
SSH - Is a network protocol that allows data to be exchanged using a secure channel
between two networked devices.
SSL - Are cryptographic protocols that provide security for communications over
networks such as the Internet. URL - Uniform Resource Locator (URL) is a Uniform Resource Identifier (URI) that
specifies where an identified resource is available. Example: www.netspace.net.au Whitelist - A list of internet sites or email addresses that have been identified as
appropriate for use

EDUCATION USER GUIDE
76 of 78
13. Document Control Version 4.3 March 2011 Changes All new screenshots updated
Edited some text to reflect the minor changes in menu layout New screenshots added – where appropriate to demonstrate any new dialogue in the
ACS frontend. Version 4.2 December 2010 Changes
Removed setup checklist Updated welcome page – new address
Version 4.1 October 2010 Changes
Updated Weblogs Updated Mail Synchronisation – And associated images
New Screen dumps for all menus on LHS of text Version 4.0 July 2010 Changes
Updated information on Network configuration in regards to the Black and White lists.
Version 3.9 May 2010 Changes Rewritten entire document - Updated formatting and examples New screen-captures throughout document where required
Created glossary Created basic network topology page
Created contact details page Created FAQ section Created index
Updated Plesk information – 4PSA Integrator (Removed and updated installation info) Re-wrote mailing lists – updated server information
Removed welcome to Netspace Re-Organised several sections into logical order Edited document for grammar and spelling
Version 3.8 March 2010 Changes
Rewritten ACL examples Version 3.7 January 2010 Changes
Entire document re-paginated New Header/Footer
Introduction of time restricted access Introduction of group based filtering Introduction of local school bad word filter
Repurposing of Application Vault Mailing list removed for revision and inclusion in ver. 3.8
Version 3.6 Date June 2008 Changes Introduction to Plesk File Manager
EDUCATION USER GUIDE
77 of 78
Introduction to SSH Access Introduction to Domain Aliases
Introduction to Subdomains Version 3.5 Date June 2007 Changes
Introduction of 4PSA Integrator
Version 3.4 Date May 2007 Changes Introduction of DNS self management tools Removal of VicOne Redirection Form
Introduction of priority contact numbers for support

EDUCATION USER GUIDE
78 of 78


![User Guide...User. {{]}]} {}]}](https://img.dokumen.tips/doc/110x75/60918ca14327954d24291644/-user-guide-user-.jpg)