Embed Size (px)
Citation preview

NetSolutions Guide

020112
©2012 Blackbaud, Inc. This publication, or any part thereof, may not be reproduced or transmitted in any form or by any means, electronic, or mechanical, including photocopying, recording, storage in an information retrieval system, or otherwise, without the prior written permission of Blackbaud, Inc.
The information in this manual has been carefully checked and is believed to be accurate. Blackbaud, Inc., assumes no responsibility for any inaccuracies, errors, or omissions in this manual. In no event will Blackbaud, Inc., be liable for direct, indirect, special, incidental, or consequential damages resulting from any defect or omission in this manual, even if advised of the possibility of damages.
In the interest of continuing product development, Blackbaud, Inc., reserves the right to make improvements in this manual and the products it describes at any time, without notice or obligation.
The Raiser’s Edge, MatchFinder, ParaGon, RE:Alum, RE:Event, RE:Member, RE:Queue, RE:Tribute, RE:Volunteer, RE:Zip, RE:Open, and Blackbaud are registered trademarks of Blackbaud, Inc.
All other products and company names mentioned herein are trademarks of their respective holder.
RE7.91 - NetSolutionsGuide-020112

Contents
REGISTERING WITH NETSOLUTIONS . . . . . . . . . . . . . . . . . . . . . . . . . . . . . . . . . . . . . . . 1
System Requirements . . . . . . . . . . . . . . . . . . . . . . . . . . . . . . . . . . . . . . . . . . . . . . . . . . . . . . . . . . . . . . . . . 2Security . . . . . . . . . . . . . . . . . . . . . . . . . . . . . . . . . . . . . . . . . . . . . . . . . . . . . . . . . . . . . . . . . . . . . . . . . . . . 2Registering with NetSolutions (The Raiser’s Edge 7.85 or lower) . . . . . . . . . . . . . . . . . . . . . . . . . . . . . . 3Registering with NetSolutions (The Raiser’s Edge 7.9 or higher) . . . . . . . . . . . . . . . . . . . . . . . . . . . . . . . 7
CONFIGURE & CUSTOMIZE. . . . . . . . . . . . . . . . . . . . . . . . . . . . . . . . . . . . . . . . . . . . . 11
Requirements for NetSolutions . . . . . . . . . . . . . . . . . . . . . . . . . . . . . . . . . . . . . . . . . . . . . . . . . . . . . . . . 13Navigating . . . . . . . . . . . . . . . . . . . . . . . . . . . . . . . . . . . . . . . . . . . . . . . . . . . . . . . . . . . . . . . . . . . . . . . . . 14Configuring Your Web Pages . . . . . . . . . . . . . . . . . . . . . . . . . . . . . . . . . . . . . . . . . . . . . . . . . . . . . . . . . . 23
NETDONORS . . . . . . . . . . . . . . . . . . . . . . . . . . . . . . . . . . . . . . . . . . . . . . . . . . . . . . 57
Requirements For NetDonors . . . . . . . . . . . . . . . . . . . . . . . . . . . . . . . . . . . . . . . . . . . . . . . . . . . . . . . . . 59Navigating . . . . . . . . . . . . . . . . . . . . . . . . . . . . . . . . . . . . . . . . . . . . . . . . . . . . . . . . . . . . . . . . . . . . . . . . . 60Designing your NetDonors Page . . . . . . . . . . . . . . . . . . . . . . . . . . . . . . . . . . . . . . . . . . . . . . . . . . . . . . . 62Viewing your Donation Page . . . . . . . . . . . . . . . . . . . . . . . . . . . . . . . . . . . . . . . . . . . . . . . . . . . . . . . . . . 90Deleting a Donation Web Page . . . . . . . . . . . . . . . . . . . . . . . . . . . . . . . . . . . . . . . . . . . . . . . . . . . . . . . . 92Viewing Donation Statistics . . . . . . . . . . . . . . . . . . . . . . . . . . . . . . . . . . . . . . . . . . . . . . . . . . . . . . . . . . . 93
NETMAIL. . . . . . . . . . . . . . . . . . . . . . . . . . . . . . . . . . . . . . . . . . . . . . . . . . . . . . . . . 97
How it Works . . . . . . . . . . . . . . . . . . . . . . . . . . . . . . . . . . . . . . . . . . . . . . . . . . . . . . . . . . . . . . . . . . . . . . . 99Requirements for NetMail . . . . . . . . . . . . . . . . . . . . . . . . . . . . . . . . . . . . . . . . . . . . . . . . . . . . . . . . . . . . 99Navigating . . . . . . . . . . . . . . . . . . . . . . . . . . . . . . . . . . . . . . . . . . . . . . . . . . . . . . . . . . . . . . . . . . . . . . . . 100Accessing NetMail . . . . . . . . . . . . . . . . . . . . . . . . . . . . . . . . . . . . . . . . . . . . . . . . . . . . . . . . . . . . . . . . . . 100Creating a New Email File . . . . . . . . . . . . . . . . . . . . . . . . . . . . . . . . . . . . . . . . . . . . . . . . . . . . . . . . . . . 103Submitting an Email Message . . . . . . . . . . . . . . . . . . . . . . . . . . . . . . . . . . . . . . . . . . . . . . . . . . . . . . . . 126Viewing Email Statistics . . . . . . . . . . . . . . . . . . . . . . . . . . . . . . . . . . . . . . . . . . . . . . . . . . . . . . . . . . . . . 128Copying an Email File . . . . . . . . . . . . . . . . . . . . . . . . . . . . . . . . . . . . . . . . . . . . . . . . . . . . . . . . . . . . . . . 130Deleting an Email File . . . . . . . . . . . . . . . . . . . . . . . . . . . . . . . . . . . . . . . . . . . . . . . . . . . . . . . . . . . . . . . 131
NETEVENTS . . . . . . . . . . . . . . . . . . . . . . . . . . . . . . . . . . . . . . . . . . . . . . . . . . . . . . 135
System Requirements . . . . . . . . . . . . . . . . . . . . . . . . . . . . . . . . . . . . . . . . . . . . . . . . . . . . . . . . . . . . . . . 136Navigating . . . . . . . . . . . . . . . . . . . . . . . . . . . . . . . . . . . . . . . . . . . . . . . . . . . . . . . . . . . . . . . . . . . . . . . . 136

Publishing an Event to Your Web Site . . . . . . . . . . . . . . . . . . . . . . . . . . . . . . . . . . . . . . . . . . . . . . . . . . 140Viewing an Event Web Page . . . . . . . . . . . . . . . . . . . . . . . . . . . . . . . . . . . . . . . . . . . . . . . . . . . . . . . . . . 158Deleting an Event Web Page . . . . . . . . . . . . . . . . . . . . . . . . . . . . . . . . . . . . . . . . . . . . . . . . . . . . . . . . . 159Viewing Event Page Statistics . . . . . . . . . . . . . . . . . . . . . . . . . . . . . . . . . . . . . . . . . . . . . . . . . . . . . . . . . 161
NETDIRECTORIES . . . . . . . . . . . . . . . . . . . . . . . . . . . . . . . . . . . . . . . . . . . . . . . . . . 165
Requirements for NetDirectories . . . . . . . . . . . . . . . . . . . . . . . . . . . . . . . . . . . . . . . . . . . . . . . . . . . . . . 167Navigating . . . . . . . . . . . . . . . . . . . . . . . . . . . . . . . . . . . . . . . . . . . . . . . . . . . . . . . . . . . . . . . . . . . . . . . . 168Accessing NetDirectories . . . . . . . . . . . . . . . . . . . . . . . . . . . . . . . . . . . . . . . . . . . . . . . . . . . . . . . . . . . . 168Publishing an Alumni Directory on Your Web Site . . . . . . . . . . . . . . . . . . . . . . . . . . . . . . . . . . . . . . . . 171Publishing a Professional Directory on Your Web Site . . . . . . . . . . . . . . . . . . . . . . . . . . . . . . . . . . . . . 183Publishing a Constituent Directory on Your Web Site . . . . . . . . . . . . . . . . . . . . . . . . . . . . . . . . . . . . . 194Publishing a Donor Recognition Page on Your Web Site . . . . . . . . . . . . . . . . . . . . . . . . . . . . . . . . . . . 205Viewing a Web Page . . . . . . . . . . . . . . . . . . . . . . . . . . . . . . . . . . . . . . . . . . . . . . . . . . . . . . . . . . . . . . . . 213Deleting a Page from Your Web Site . . . . . . . . . . . . . . . . . . . . . . . . . . . . . . . . . . . . . . . . . . . . . . . . . . . 214Viewing Directory Page Statistics . . . . . . . . . . . . . . . . . . . . . . . . . . . . . . . . . . . . . . . . . . . . . . . . . . . . . 215
NETVOLUNTEERS . . . . . . . . . . . . . . . . . . . . . . . . . . . . . . . . . . . . . . . . . . . . . . . . . . 217
Requirements for NetVolunteers . . . . . . . . . . . . . . . . . . . . . . . . . . . . . . . . . . . . . . . . . . . . . . . . . . . . . . 219Navigating . . . . . . . . . . . . . . . . . . . . . . . . . . . . . . . . . . . . . . . . . . . . . . . . . . . . . . . . . . . . . . . . . . . . . . . . 220Publishing a Volunteer Registration Form to Your Web Site . . . . . . . . . . . . . . . . . . . . . . . . . . . . . . . . 223Publishing a Job to Your Web Site . . . . . . . . . . . . . . . . . . . . . . . . . . . . . . . . . . . . . . . . . . . . . . . . . . . . . 236Viewing a Job Web Page . . . . . . . . . . . . . . . . . . . . . . . . . . . . . . . . . . . . . . . . . . . . . . . . . . . . . . . . . . . . . 250Deleting a Job Web Page . . . . . . . . . . . . . . . . . . . . . . . . . . . . . . . . . . . . . . . . . . . . . . . . . . . . . . . . . . . . 251Viewing Volunteer Page Statistics . . . . . . . . . . . . . . . . . . . . . . . . . . . . . . . . . . . . . . . . . . . . . . . . . . . . . 253
NETMEMBERS . . . . . . . . . . . . . . . . . . . . . . . . . . . . . . . . . . . . . . . . . . . . . . . . . . . . 257
Requirements for NetMembers . . . . . . . . . . . . . . . . . . . . . . . . . . . . . . . . . . . . . . . . . . . . . . . . . . . . . . . 259Navigating . . . . . . . . . . . . . . . . . . . . . . . . . . . . . . . . . . . . . . . . . . . . . . . . . . . . . . . . . . . . . . . . . . . . . . . . 259Publishing Membership Information on Your Web Site . . . . . . . . . . . . . . . . . . . . . . . . . . . . . . . . . . . . 262Viewing a Membership Web Page . . . . . . . . . . . . . . . . . . . . . . . . . . . . . . . . . . . . . . . . . . . . . . . . . . . . . 289Deleting a Membership Web Page . . . . . . . . . . . . . . . . . . . . . . . . . . . . . . . . . . . . . . . . . . . . . . . . . . . . 290Viewing Membership Page Statistics . . . . . . . . . . . . . . . . . . . . . . . . . . . . . . . . . . . . . . . . . . . . . . . . . . . 292
DOWNLOADING TRANSACTIONS. . . . . . . . . . . . . . . . . . . . . . . . . . . . . . . . . . . . . . . . 295
Accessing Downloaded Transactions . . . . . . . . . . . . . . . . . . . . . . . . . . . . . . . . . . . . . . . . . . . . . . . . . . . 297Downloading Information from Your Donation Pages . . . . . . . . . . . . . . . . . . . . . . . . . . . . . . . . . . . . . 299Downloading Information from Your Event Web Pages . . . . . . . . . . . . . . . . . . . . . . . . . . . . . . . . . . . . 319Downloading Information from Your Job Web Pages . . . . . . . . . . . . . . . . . . . . . . . . . . . . . . . . . . . . . . 324Downloading Information from Your Membership Web Pages . . . . . . . . . . . . . . . . . . . . . . . . . . . . . . 329Downloading Advocacy Information . . . . . . . . . . . . . . . . . . . . . . . . . . . . . . . . . . . . . . . . . . . . . . . . . . . 337Downloading Constituent Registration Information . . . . . . . . . . . . . . . . . . . . . . . . . . . . . . . . . . . . . . 341

Downloading Change of Address Information . . . . . . . . . . . . . . . . . . . . . . . . . . . . . . . . . . . . . . . . . . . 346Downloading Email Opt-Out Information from your Web Site . . . . . . . . . . . . . . . . . . . . . . . . . . . . . . 352Downloading Undeliverable Email Address Information . . . . . . . . . . . . . . . . . . . . . . . . . . . . . . . . . . . 355Exporting Downloaded Data to Excel . . . . . . . . . . . . . . . . . . . . . . . . . . . . . . . . . . . . . . . . . . . . . . . . . . 359Exporting Downloaded Data . . . . . . . . . . . . . . . . . . . . . . . . . . . . . . . . . . . . . . . . . . . . . . . . . . . . . . . . . 360Printing Downloaded Data . . . . . . . . . . . . . . . . . . . . . . . . . . . . . . . . . . . . . . . . . . . . . . . . . . . . . . . . . . . 362Searching Download Grid . . . . . . . . . . . . . . . . . . . . . . . . . . . . . . . . . . . . . . . . . . . . . . . . . . . . . . . . . . . . 364
CUSTOMIZING CONFIRMATIONS . . . . . . . . . . . . . . . . . . . . . . . . . . . . . . . . . . . . . . . . 367
Composing a Message . . . . . . . . . . . . . . . . . . . . . . . . . . . . . . . . . . . . . . . . . . . . . . . . . . . . . . . . . . . . . . 368Previewing a Message . . . . . . . . . . . . . . . . . . . . . . . . . . . . . . . . . . . . . . . . . . . . . . . . . . . . . . . . . . . . . . 371Adding Links to Your Message . . . . . . . . . . . . . . . . . . . . . . . . . . . . . . . . . . . . . . . . . . . . . . . . . . . . . . . . 373
CHANGING PAGE STYLE . . . . . . . . . . . . . . . . . . . . . . . . . . . . . . . . . . . . . . . . . . . . . . 387
Background Style . . . . . . . . . . . . . . . . . . . . . . . . . . . . . . . . . . . . . . . . . . . . . . . . . . . . . . . . . . . . . . . . . . 388Logo and Title . . . . . . . . . . . . . . . . . . . . . . . . . . . . . . . . . . . . . . . . . . . . . . . . . . . . . . . . . . . . . . . . . . . . . 389Image Captions . . . . . . . . . . . . . . . . . . . . . . . . . . . . . . . . . . . . . . . . . . . . . . . . . . . . . . . . . . . . . . . . . . . . 391Header . . . . . . . . . . . . . . . . . . . . . . . . . . . . . . . . . . . . . . . . . . . . . . . . . . . . . . . . . . . . . . . . . . . . . . . . . . . 392Detail . . . . . . . . . . . . . . . . . . . . . . . . . . . . . . . . . . . . . . . . . . . . . . . . . . . . . . . . . . . . . . . . . . . . . . . . . . . . 393Body Text . . . . . . . . . . . . . . . . . . . . . . . . . . . . . . . . . . . . . . . . . . . . . . . . . . . . . . . . . . . . . . . . . . . . . . . . . 394Table Legends . . . . . . . . . . . . . . . . . . . . . . . . . . . . . . . . . . . . . . . . . . . . . . . . . . . . . . . . . . . . . . . . . . . . . 395Table Headers . . . . . . . . . . . . . . . . . . . . . . . . . . . . . . . . . . . . . . . . . . . . . . . . . . . . . . . . . . . . . . . . . . . . . 396Table Text . . . . . . . . . . . . . . . . . . . . . . . . . . . . . . . . . . . . . . . . . . . . . . . . . . . . . . . . . . . . . . . . . . . . . . . . . 397Error Text . . . . . . . . . . . . . . . . . . . . . . . . . . . . . . . . . . . . . . . . . . . . . . . . . . . . . . . . . . . . . . . . . . . . . . . . . 398
GLOSSARY . . . . . . . . . . . . . . . . . . . . . . . . . . . . . . . . . . . . . . . . . . . . . . . . . . . . . . . 401
INDEX . . . . . . . . . . . . . . . . . . . . . . . . . . . . . . . . . . . . . . . . . . . . . . . . . . . . . . . . . . 407

1chapter
Registering with NetSolutions
System Requirements . . . . . . . . . . . . . . . . . . . . . . . . . . . . . . . . . . . . . . . . . . . . . . . . . . . . . . . . . . . . . . . . . . . . . . . . . 2Security . . . . . . . . . . . . . . . . . . . . . . . . . . . . . . . . . . . . . . . . . . . . . . . . . . . . . . . . . . . . . . . . . . . . . . . . . . . . . . . . . . . . 2Registering with NetSolutions (The Raiser’s Edge 7.85 or lower) . . . . . . . . . . . . . . . . . . . . . . . . . . . . . . . . . . . . . . 3Registration Page. . . . . . . . . . . . . . . . . . . . . . . . . . . . . . . . . . . . . . . . . . . . . . . . . . . . . . . . . . . . . . . . . . . . . . . . . . . . . . . . 3
Establishing a Merchant Account. . . . . . . . . . . . . . . . . . . . . . . . . . . . . . . . . . . . . . . . . . . . . . . . . . . . . . . . . . . . . . . . 3Completing the Registration Page . . . . . . . . . . . . . . . . . . . . . . . . . . . . . . . . . . . . . . . . . . . . . . . . . . . . . . . . . . . . . . . 3
Registering with NetSolutions (The Raiser’s Edge 7.9 or higher) . . . . . . . . . . . . . . . . . . . . . . . . . . . . . . . . . . . . . . . 7Registration Page. . . . . . . . . . . . . . . . . . . . . . . . . . . . . . . . . . . . . . . . . . . . . . . . . . . . . . . . . . . . . . . . . . . . . . . . . . . . . . . . 7
Completing the Registration Page . . . . . . . . . . . . . . . . . . . . . . . . . . . . . . . . . . . . . . . . . . . . . . . . . . . . . . . . . . . . . . . 7

2 CH A PT E R
NetSolutions is comprised of a number of components, working together, connecting you with your donors via the Internet. All these components rely on services hosted by Blackbaud. We maintain the servers, host the NetSolutions Web pages, and collect the constituent data entered from these Web pages.
System Requirements• An Internet connection.• The Raiser’s Edge 7.x.• Fax verification [IRS Determination Letter, 501(c)(3)] of the organizaction’s tax-exempt status to
1-843-216-6104.
• Internet Explorer 5.x (fully supported) is needed to set up your Web pages and download transactions. However, you can also use any HTML 3.2 compliant browsers
• A merchant account with an authorization service such as Blackbaud Merchant Services or Interational Automated Ticket Systems (IATS)
• No additional hardware requirements beyond what you need to run The Raiser’s Edge.
Security
User rights are assigned in Security, accessed by clicking Admin on the Raiser’s Edge bar. The security settings affect only your users’ ability to access the NetSolutions functions. Users also need applicable Raiser’s Edge rights, corresponding to the functions they perform in NetSolutions. For example, to edit the membership category in NetMembers a user must have rights to edit Membership Management in The Raiser’s Edge. Also, to avoid problems, you may want to consider assigning the user downloading transactions from your NetSolutions Web page(s) administrative rights. For example, if the user does not have rights to see credit card numbers in The Raiser’s Edge, the user cannot download credit card transactions, regardless of his NetSolutions rights. For more information about security, see the Security chapter in the Configuration & Security Guide.
To protect your online constituents, Blackbaud uses Secure Sockets Layer (SSL) technology. SSL is the leading industry protocol that provides security for transmitting personal information over the Internet, keeping your donor’s personal information secure. This means that credit card numbers are encrypted and cannot be copied. Your browser displays a lock or key on the browser status bar, indicating encryption is activated.
Warning: Depending on the processor used by your Internet Merchant Account issuer, a separate terminal ID may be required if you are going to use multiple credit card processes and processors. Check with your issuer before you start accepting online donations.
NetSolutions fully supports only Microsoft’s Internet Explorer Browser, however, donors can also use HTML 3.2-compliant browsers as well.
Warning: The privilege to download transactions implies the user can also create a batch. The user assigned downloading privileges can create the NetSolutions batch even if the Raiser’s Edge “Create Batch” privilege has not been assigned.
Warning: If a user has the NetSolutions privileges to access funds, he can search and select funds from the drop-down list available throughout the program, even if he does not have the appropriate Raiser’s Edge rights.

RE G I S TE R I N G W I T H N ETS O L U T I O N S 3
Registering with NetSolutions (The Raiser’s Edge 7.85 or lower)
Before you start working in NetSolutions, you must register with Blackbaud. To access the NetSolutions Registration page, click NetSolutions on the Raiser’s Edge bar. If you purchased the service but did not register, the online registration screen appears. Once you complete the registration page and submit it to Blackbaud, we contact you via email, telling you when your registration application is processed. You are then free to work in NetSolutions.
The Registration Page
Before you can register with NetSolutions, you must establish a merchant account with International Automated Ticket Systems (IATS). This account allows you to accept online donations using NetSolutions.When you complete the NetSolutions online registration form, click Submit.Your information is transmitted to Blackbaud, and your NetSolutions account is established. Blackbaud confirms your registration via email. Once registered, you are ready to work in NetSolutions, customizing your donation page, accepting online donations, accepting online registration to events, and much more.
Establishing a Merchant AccountBefore you can register with NetSolutions, you must establish a merchant account with International Automated Ticket Systems (IATS). This account allows you to accept online donations using NetSolutions. To establish an account with IATS, visit the website at www.iatspayments.com/SetupDocs/BBNSNC/bb.html.After you establish your account, you are ready to register with NetSolutions.
Completing the Registration PageThe following procedure shows you how to complete the NetSolutions registration page. You must have your merchant account information to complete the registration.
Registering with NetSolutions
If you already registered with Blackbaud, a message appears telling you to enter your Login ID and Login password. You enter this information in Configure & Customize. For more information, see “Configure & Customize” on page 11.
Warning: Depending on the processor used by your merchant account issuer, a separate terminal ID may be required if you use multiple credit card processes and processors. Check with your issuer before you start to accept online donations.
Warning: Registration information included in this guide is subject to change. For the most up-to-date information, use the NetSolutions Guide included on the Blackbaud website at www.blackbaud.com.

4 CH A PT E R
1. On the Raiser’s Edge bar, click NetSolutions. The NetSolutions page appears.
If you purchased the product but have not registered, a screen appears offering to link you to the registration page.
2. Click OK. The registration page appears. The first half of the page includes instructions about how to register. You must have merchant account to complete your NetSolutions registration.
3. The second section of the NetSolutions Registration page includes the Nonprofit Registration Information frame. In this section, enter basic biographical information about your organization.
4. You must complete all required fields. Required fields include an * after the field name. Enter the Login ID and Password provided by your credit card processor for your authorization service merchant account. You must also enter your organization’s URL in the URL field.
Note: For information about purchasing NetSolutions, see the Blackbaud website at www.blackbaud.com.

RE G I S TE R I N G W I T H N ETS O L U T I O N S 5
5. In the NetSolutions Primary Contact Information frame, enter information about the person Blackbaud should call when we need to contact your organization. Required fields include an * after the field name.
6. Complete the IATS Account Information frame. IATS provides the information needed to complete this section when you create an account with them.
Warning: Registration information included in this guide is subject to change. For the most up-to-date information, use the NetSolutions Guide included on the Blackbaud website at www.blackbaud.com.

6 CH A PT E R
7. Click Submit. A page appears confirming your registration and displays your login ID. Instructions on configuring your Web page are also included.
8. To start accepting donations online, copy the block of code provided and paste it to your Web page. We recommend that someone familiar with the design of your Web page add this code.
Once your account is activated, on the Blackbaud confirmation page, you can also click the Click here to donate to link and run through an example of the donating process.You are notified via email when Blackbaud activates your account.
9. To return to the NetSolutions page, click NetSolutions on the Raiser’s Edge bar. You are now ready to configure and customize your Blackbaud Web pages. For information, see “Configure & Customize” on page 11
Warning: Depending on the processor used by your IATS/Internet Merchant Account issuer, a separate terminal ID may be required if you are going to use multiple credit card processes and processors. Check with your issuer before you start accepting online donations.
Note: You cannot accept donations until Blackbaud activates your account. We suggest you wait until after your account is activated to add the button to your Web page.
RE G I S TE R I N G W I T H N ETS O L U T I O N S 7
Registering with NetSolutions (The Raiser’s Edge 7.9 or higher)
Before you start working in NetSolutions, you must register with Blackbaud. To access the NetSolutions Registration page, click NetSolutions on the Raiser’s Edge bar. If you purchased the service but did not register, the online registration screen appears. Once you complete the registration page and submit it to Blackbaud, we contact you via email, telling you when your registration application is processed. You are then free to work in NetSolutions.
The Registration Page
Before you can register with NetSolutions, you must establish a merchant account with an credit card authorization service such as Blackbaud Merchant Services or International Automated Ticket Systems (IATS). This account allows you to accept online donations using NetSolutions.
• To establish an account with Blackbaud Merchant Services, visit the website at https://bbmsmerchant.blackbaud.com.
• To establish an account with IATS, visit the website at www.iatspayments.com/SetupDocs/BBNSNC/bb.html.When you complete the NetSolutions online registration form, click Submit.Your information is transmitted to Blackbaud, and your NetSolutions account is established. Blackbaud confirms your registration via email. Once registered, you are ready to work in NetSolutions, customizing your donation page, accepting online donations, accepting online registration to events, and much more.
Completing the Registration PageThe following procedure shows you how to complete the NetSolutions registration page. You must have your merchant account information to complete the registration.
Registering with NetSolutions
Note: If you already registered with Blackbaud, a message appears telling you to enter your Login ID and Login password. You enter this information in Configure & Customize. For more information, see “Configure & Customize” on page 11.
Note: For more information about how to set up an account with Blackbaud Merchant Services, refer to Getting Started with Blackbaud Merchant Services at http://www.blackbaud.com/files/support/guides/bbps/bbmstart.pdf.
Warning: Registration information included in this guide is subject to change. For the most up-to-date information, use the NetSolutions Guide included on the Blackbaud website at www.blackbaud.com. Select Support, User Guides from the menu bar.

8 CH A PT E R
1. On the Raiser’s Edge bar, click NetSolutions. The NetSolutions page appears.
If you purchased the product but have not registered, a screen appears offering to link you to the registration page.
2. Click OK. The registration page appears. The first half of the page includes instructions about how to register. You must have a merchant account to complete your NetSolutions registration.
3. The second section of the NetSolutions Registration page includes the Nonprofit Registration Information frame. In this section, enter basic biographical information about your organization.
4. You must complete all required fields. Required fields include an * after the field name. Enter the Login ID and Password provided by your merchant account provider. You must also enter your organization’s URL in the URL field.
Note: For information about purchasing NetSolutions, see the Blackbaud website at: www.blackbaud.com.

RE G I S TE R I N G W I T H N ETS O L U T I O N S 9
5. In the NetSolutions Primary Contact Information frame, enter information about the person Blackbaud should call when we need to contact your organization. Required fields include an * after the field name.
6. Click Submit. A page appears confirming your registration and displays your login ID. Instructions on configuring your Web page are also included.
7. To start accepting donations online, copy the block of code provided and paste it to your Web page. We recommend that someone familiar with the design of your Web page add this code.
Once your account is activated, on the Blackbaud confirmation page, you can also click the Click here to donate to link and run through an example of the donating process.You are notified via email when Blackbaud activates your account.
8. To return to the NetSolutions page, click NetSolutions on the Raiser’s Edge bar. You are now ready to configure and customize your Blackbaud Web pages. For information, see “Configure & Customize” on page 11.
Warning: Registration information included in this guide is subject to change. For the most up-to-date information, use the NetSolutions Guide included on the Blackbaud website at www.blackbaud.com.
Note: You cannot accept donations until Blackbaud activates your account. We suggest you wait until after your account is activated to add the button to your Web page.

10 CH A PT E R
For information about entering merchant account information in The Raiser’s Edge, see the Business Rules section of the Configuration chapter in the Configuration & Security Guide.

2chapter
Configure & Customize
Requirements . . . . . . . . . . . . . . . . . . . . . . . . . . . . . . . . . . . . . . . . . . . . . . . . . . . . . . . . . . . . . . . . . . . . . . . . . . . . . . 13Processing Credit Cards . . . . . . . . . . . . . . . . . . . . . . . . . . . . . . . . . . . . . . . . . . . . . . . . . . . . . . . . . . . . . . . . . . . . . . . . . 13
Blackbaud Payment Service . . . . . . . . . . . . . . . . . . . . . . . . . . . . . . . . . . . . . . . . . . . . . . . . . . . . . . . . . . . . . . . . . . . 13Navigating . . . . . . . . . . . . . . . . . . . . . . . . . . . . . . . . . . . . . . . . . . . . . . . . . . . . . . . . . . . . . . . . . . . . . . . . . . . . . . . . . 14Processing Credit Cards . . . . . . . . . . . . . . . . . . . . . . . . . . . . . . . . . . . . . . . . . . . . . . . . . . . . . . . . . . . . . . . . . . . . . . . . . 13Accessing Configure and Customize . . . . . . . . . . . . . . . . . . . . . . . . . . . . . . . . . . . . . . . . . . . . . . . . . . . . . . . . . . . . . . . 14Tabs . . . . . . . . . . . . . . . . . . . . . . . . . . . . . . . . . . . . . . . . . . . . . . . . . . . . . . . . . . . . . . . . . . . . . . . . . . . . . . . . . . . . . . . . . 15Buttons . . . . . . . . . . . . . . . . . . . . . . . . . . . . . . . . . . . . . . . . . . . . . . . . . . . . . . . . . . . . . . . . . . . . . . . . . . . . . . . . . . . . . . 23Configuring Your Web Pages . . . . . . . . . . . . . . . . . . . . . . . . . . . . . . . . . . . . . . . . . . . . . . . . . . . . . . . . . . . . . . . . . . 23Account Information . . . . . . . . . . . . . . . . . . . . . . . . . . . . . . . . . . . . . . . . . . . . . . . . . . . . . . . . . . . . . . . . . . . . . . . . . . . 24Organization Information . . . . . . . . . . . . . . . . . . . . . . . . . . . . . . . . . . . . . . . . . . . . . . . . . . . . . . . . . . . . . . . . . . . . . . . . 28Site Customization Defaults . . . . . . . . . . . . . . . . . . . . . . . . . . . . . . . . . . . . . . . . . . . . . . . . . . . . . . . . . . . . . . . . . . . . . . 29
Customizing the Background of your Web Page . . . . . . . . . . . . . . . . . . . . . . . . . . . . . . . . . . . . . . . . . . . . . . . . . . 30Customizing the Logo and Title of your Web Page . . . . . . . . . . . . . . . . . . . . . . . . . . . . . . . . . . . . . . . . . . . . . . . . 31Customizing the Image Caption of your Web Page . . . . . . . . . . . . . . . . . . . . . . . . . . . . . . . . . . . . . . . . . . . . . . . . 32Customizing the Header of your Web Page . . . . . . . . . . . . . . . . . . . . . . . . . . . . . . . . . . . . . . . . . . . . . . . . . . . . . . 33Customizing the Detail Information of your Web Page . . . . . . . . . . . . . . . . . . . . . . . . . . . . . . . . . . . . . . . . . . . . . 34Customizing the Body Text of your Web Page . . . . . . . . . . . . . . . . . . . . . . . . . . . . . . . . . . . . . . . . . . . . . . . . . . . . 35Customizing the Table Legends of your Web Page . . . . . . . . . . . . . . . . . . . . . . . . . . . . . . . . . . . . . . . . . . . . . . . . 36Customizing the Table Headers of your Web Page . . . . . . . . . . . . . . . . . . . . . . . . . . . . . . . . . . . . . . . . . . . . . . . . 37Customizing the Table Text of your Web Page . . . . . . . . . . . . . . . . . . . . . . . . . . . . . . . . . . . . . . . . . . . . . . . . . . . 38Customizing the Error Text of your Web Page . . . . . . . . . . . . . . . . . . . . . . . . . . . . . . . . . . . . . . . . . . . . . . . . . . . . 39
Home Page . . . . . . . . . . . . . . . . . . . . . . . . . . . . . . . . . . . . . . . . . . . . . . . . . . . . . . . . . . . . . . . . . . . . . . . . . . . . . . . . . . . 40Donor Profiling . . . . . . . . . . . . . . . . . . . . . . . . . . . . . . . . . . . . . . . . . . . . . . . . . . . . . . . . . . . . . . . . . . . . . . . . . . . . . . . . 48Additional Links . . . . . . . . . . . . . . . . . . . . . . . . . . . . . . . . . . . . . . . . . . . . . . . . . . . . . . . . . . . . . . . . . . . . . . . . . . . . . . . . 49Tell a Friend . . . . . . . . . . . . . . . . . . . . . . . . . . . . . . . . . . . . . . . . . . . . . . . . . . . . . . . . . . . . . . . . . . . . . . . . . . . . . . . . . . . 50Site Map/Links . . . . . . . . . . . . . . . . . . . . . . . . . . . . . . . . . . . . . . . . . . . . . . . . . . . . . . . . . . . . . . . . . . . . . . . . . . . . . . . . 52
Adding a Change of Address Link to Your Home Page . . . . . . . . . . . . . . . . . . . . . . . . . . . . . . . . . . . . . . . . . . . . . . 54Submitting Configuration and Customization Information to Blackbaud. . . . . . . . . . . . . . . . . . . . . . . . . . . . . . . . . . 56
Procedures
Accessing Configure and Customize . . . . . . . . . . . . . . . . . . . . . . . . . . . . . . . . . . . . . . . . . . . . . . . . . . . . . . . . . . . . . . . 14Entering account information . . . . . . . . . . . . . . . . . . . . . . . . . . . . . . . . . . . . . . . . . . . . . . . . . . . . . . . . . . . . . . . . . . . . 24Entering your organization information . . . . . . . . . . . . . . . . . . . . . . . . . . . . . . . . . . . . . . . . . . . . . . . . . . . . . . . . . . . . 28Entering background site customization defaults . . . . . . . . . . . . . . . . . . . . . . . . . . . . . . . . . . . . . . . . . . . . . . . . . . . . 30Entering logo and title site customization defaults . . . . . . . . . . . . . . . . . . . . . . . . . . . . . . . . . . . . . . . . . . . . . . . . . . . 31Entering image caption site customization defaults . . . . . . . . . . . . . . . . . . . . . . . . . . . . . . . . . . . . . . . . . . . . . . . . . . 32Entering header site customization defaults . . . . . . . . . . . . . . . . . . . . . . . . . . . . . . . . . . . . . . . . . . . . . . . . . . . . . . . . 33Entering detail site customization defaults . . . . . . . . . . . . . . . . . . . . . . . . . . . . . . . . . . . . . . . . . . . . . . . . . . . . . . . . . 34Entering body text site customization defaults . . . . . . . . . . . . . . . . . . . . . . . . . . . . . . . . . . . . . . . . . . . . . . . . . . . . . . 35

12 CH A PT E R
Entering table legend site customization defaults . . . . . . . . . . . . . . . . . . . . . . . . . . . . . . . . . . . . . . . . . . . . . . . . . . . 36Entering table header site customization defaults . . . . . . . . . . . . . . . . . . . . . . . . . . . . . . . . . . . . . . . . . . . . . . . . . . . 37Entering table text site customization defaults . . . . . . . . . . . . . . . . . . . . . . . . . . . . . . . . . . . . . . . . . . . . . . . . . . . . . . 38Entering error message site customization defaults . . . . . . . . . . . . . . . . . . . . . . . . . . . . . . . . . . . . . . . . . . . . . . . . . . 39Entering Home page information . . . . . . . . . . . . . . . . . . . . . . . . . . . . . . . . . . . . . . . . . . . . . . . . . . . . . . . . . . . . . . . . . 40Entering donor profiling information . . . . . . . . . . . . . . . . . . . . . . . . . . . . . . . . . . . . . . . . . . . . . . . . . . . . . . . . . . . . . . 48Adding links to your online registration page. . . . . . . . . . . . . . . . . . . . . . . . . . . . . . . . . . . . . . . . . . . . . . . . . . . . . . . . 49Entering Tell a Friend Information. . . . . . . . . . . . . . . . . . . . . . . . . . . . . . . . . . . . . . . . . . . . . . . . . . . . . . . . . . . . . . . . . 50Viewing site links . . . . . . . . . . . . . . . . . . . . . . . . . . . . . . . . . . . . . . . . . . . . . . . . . . . . . . . . . . . . . . . . . . . . . . . . . . . . . . 52Add a Change of Address link to your organization’s Home page . . . . . . . . . . . . . . . . . . . . . . . . . . . . . . . . . . . . . . . 54Submitting information to Blackbaud . . . . . . . . . . . . . . . . . . . . . . . . . . . . . . . . . . . . . . . . . . . . . . . . . . . . . . . . . . . . . . 56

C O N F I G U RE & CU S T O M I ZE 13
Blackbaud’s NetSolutions is comprised of several components, working together to help you improve communications with your donors and to help you manage online donations, appeals, events, and more. To keep hardware requirements to a minimum, Blackbaud servers host these services. We maintain the servers and provide data interchange between the Internet and your Raiser’s Edge database. To make the online transactions between your Web site and the Blackbaud-hosted servers as seamless as possible, you can configure all aspects of the Web pages hosted by Blackbaud. Through the Configure and Customize link, you enter login, title, mission, email, and Home URL information. You also define colors, include images, and select font information. This chapter takes you step-by-step through the configuration and customization process.
Requirements for NetSolutionsTo use this service, you must have the following:• A Web page.• The Raiser’s Edge 7.x• Internet Explorer 5.x or higher is fully supported; however donors can use HTMl 3.2 compliant browsers as well.
Processing Credit Cards
In compliance with PCI rules, The Raiser’s Edge 7.9 and higher does not store credit card numbers locally or in the database; all numbers are stored remotely on the Blackbaud Payment Service. In addition, retention of credit card information associated with donor logins is not possible.
If you use a version of The Raiser’s Edge earlier than 7.86, donation transactions process using a direct connection to IATS or PayPal; the Blackbaud Payment Service is not used for these transactions. In addition, credit card numbers are not included when downloading transactions to an older version of The Raiser’s Edge.After you upgrade from an older version of The Raiser’s Edge to 7.9 or higher, you must resubmit your NetSolutions site configuration to Blackbaud to update your account on the server. To resubmit your configuration, click Submit from Configure and Customize. All existing merchant accounts are then sent to the Blackbaud Payment Service server. After your merchant account information transfers to Blackbaud Payment Service, the Merchant account field on the Account Information tab in Configure and Customize houses the merchant account created on the payment service server. For more information, see “Account Information” on page 24.
Blackbaud Payment ServiceThe Blackbaud Payment Service stores donor credit card information to a remote server. This method of storage complies with Payment Card Industry Data Security Standards (PCI DSS) and allows your organization to better protect your donors’ credit card information.The first time you open NetSolutions after you upgrade to The Raiser’s Edge 7.9 or higher from an earlier version of the application, a screen appears to inform you your NetSolutions account information does not exist in the Blackbaud Payment Service. To move the information to the server, open Configure and Customize and click Submit . You cannot work in NetSolutions until you the credit card information appears in the Blackbaud Payment Service.
Note: You can edit existing merchant account information, including Password and Login ID credentials, from the Business Rules functionality accessed in Config. You can also add new merchant accounts.

14 CH A PT E R
NavigatingIn The Raiser’s Edge, you access Configure and Customize through NetSolutions on the Raiser’s Edge bar.
Accessing Configure and Customize
Multiple users can access different areas of NetSolutions simultaneously.
Accessing Configure and Customize1. On the Raiser’s Edge bar, click NetSolutions. The NetSolutions page appears.
Warning: Before you start working in NetSolutions, you must register as a NetSolutions user. For more information, see “Registering with NetSolutions” on page 1.
Note: Although the Login password field entry is masked, if you have Supervisor rights, you can access the password by highlighting the field and hitting F7 on your keyboard.

C O N F I G U RE & CU S T O M I ZE 15
2. Click Configure and Customize. The NetSolutions - Configure and Customize screen appears, displaying the Account Information tab.
3. Complete all eight tabs. For more information about completing these tabs, see “Configuring Your Web Pages” on page 23.
4. To send your configuration specifications to Blackbaud, click Submit.5. To exit this screen, click Close. You return to the NetSolutions page.
Tabs
Eight tabs make up the NetSolutions - Configure and Customize screen. Every Web page designed adheres to the formatting instructions you select on these tabs.
Note: If you change your login identification or password, you must notify Blackbaud about the change.
Note: For information about Capwiz, go to: www.capwiz.com.
Note: For more information about advocacy, see the Actions chapter of the Constituent Data Entry Guide.

16 CH A PT E R
Account Information. On the Account Information tab, enter the Login ID and Login password established when you registered for the product. Also, to download advocacy action data to The Raiser’s Edge, you must enter your Advocacy login and Advocacy password. This is the same information you enter to access your Capwiz account. You may also specify the code to use when NetSolutions creates a new constituent in The Raiser’s Edge by selecting it from the Enter the code to use when creating a new constituent record for an advocate drop down menu. Finally on this tab, you select the type of Merchant account your company uses to accept credit card information in NetSolutions.
For information about the Click here to view transaction statistics button, see page 25.For information about the Click here for advanced options button, see page 26.
C O N F I G U RE & CU S T O M I ZE 17
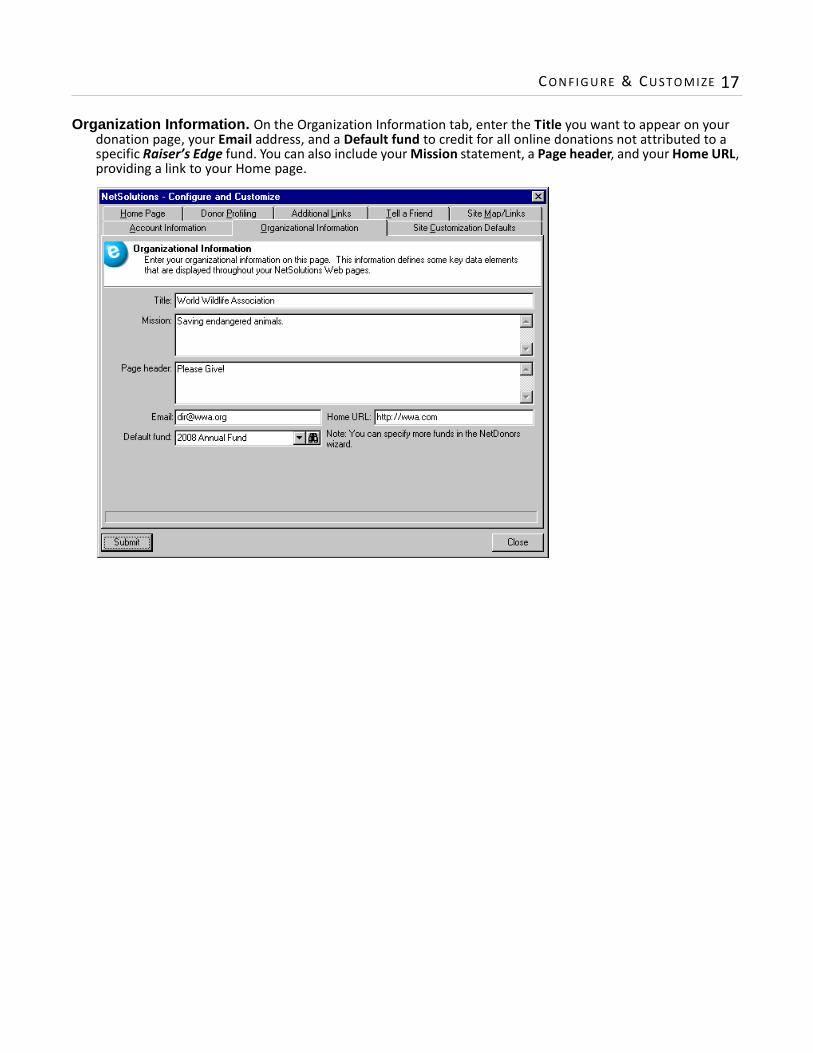
Organization Information. On the Organization Information tab, enter the Title you want to appear on your donation page, your Email address, and a Default fund to credit for all online donations not attributed to a specific Raiser’s Edge fund. You can also include your Mission statement, a Page header, and your Home URL, providing a link to your Home page.

18 CH A PT E R
Site Customization Defaults. On the Site Customization Defaults tab, you select the section of the Web page to customize. You select the feature of your page that you want to modify from the Page section field. For example, you can design the Web page background, add an image and select font faces, font sizes, text color, and hyperlink color.
For information about completing this tab, see “Site Customization Defaults” on page 29.

C O N F I G U RE & CU S T O M I ZE 19
Home page. On this tab, you design your NetSolutions Home page. This page provides your online constituents with links to all NetSolutions functions. You can accept the default page designed by Blackbaud, or you can design your own Home page. You identify the section of the Web page to define by selecting it from the Page section field. You may then alter the page’s text to your liking. Changes made to the page are instantly reflected in the preview window on the right. You can view the full page in your web browser by clicking Preview.
For information about completing this tab, see “Home Page” on page 40.

20 CH A PT E R
Donor Profiling. On this tab, you can enter questions to appear on your online constituent registration form to help you better understand your donors. For example, if you want to know if donors are responding to a mailing you sent out, you can enter the question, “Did you receive our mailing?”. The question appears on the donation page with Yes and No options. This information is stored on the Attributes tab of the constituent record when you download donations.
The profiling questions you enter here function as program defaults. You can create Web page-specific questions in other areas of the program. For example, if you want a separate set of profiling questions asked just on your donation page, you can enter them in NetDonors. These questions will then appear just on your donation page.
Note: All additional links you define must have an image associated with them.

C O N F I G U RE & CU S T O M I ZE 21
Additional Links. From the Additional Links tab, you can add links to related Web sites. For example, an animal protection organization wants to include a link on its online registration page taking visitors to an animal adoption Web site. This link can be added using the Additional Links tab.

22 CH A PT E R
Tell a Friend. The Tell a Friend page is seen by your web site’s users when they click the Tell a Friend link on your site. On the Tell a Friend tab, enter the text to be displayed on this page when visitors view it on your Web site (there is a 2,147,483,647 character limit in this box).

C O N F I G U RE & CU S T O M I ZE 23
Site Map/Links. On the Site Map/Links tab, we provide the code you can add to your Web page to add links to the various NetSolutions functions.
Buttons
Configure and Customize has two buttons.
The Submit button sends to Blackbaud all information entered on the Configure and Customize tabs. We use this information to design your NetSolutions Web pages.
The Close button closes the Configure and Customize link without submitting the information to Blackbaud. If you have not submitted your changes a screen appears to verify that you want to close without saving.
Configuring Your Web PagesThe configuration information you enter from the Configure and Customize link affects all NetSolutions Web pages we host in your name. This link is divided into seven tabs. The following procedures take you step-by-step through completing each tab.
Multiple users can access different areas of NetSolutions simultaneously.
Warning: Before you start working in NetSolutions, you must register as a NetSolutions user. For more information, see “Registering with NetSolutions” on page 1.

24 CH A PT E R
Account Information
The Account Information tab includes login identifications, passwords, and advance setup options.
Entering your account information1. On the Raiser’s Edge bar, click NetSolutions. The NetSolutions page appears.
2. Click Configure and Customize. The NetSolutions - Configure and Customize screen appears displaying the Account Information tab.
3. Enter the Login ID and Login password you established when you registered with NetSolutions. For more information, see “Registering with NetSolutions (The Raiser’s Edge 7.85 or lower)” on page 3.
4. The Serial number field fills in automatically. You cannot change this number. Blackbaud registers you using the default number.
5. Select the type of Merchant account your organization uses to accept credit card information. You add merchant account information in Business Rules accessed through Config.
6. To confirm you can connect to Blackbaud’s servers, click the Click here to test connection button. A screen appears confirming the connection.
7. Click OK.
Note: Although the Login password field entry is masked, if you have Supervisor rights, you can access the password by highlighting the field and hitting F7 on your keyboard.
Note: Unless you change the default colors in User Options, required fields appear in cyan.

C O N F I G U RE & CU S T O M I ZE 25
8. To view a breakdown of your NetSolutions transactions, click the Click here to view transaction statistics button. The NetSolutions - Transaction Statistics screen appears.
9. Select the month and year for which to view transaction statistics. Click Retrieve Results. The screen displays the updated statistics.
10. To close the NetSolutions - Transactions Statistics screen and return to the NetSolutions - Configure and Customize screen, click the “X” in the upper right corner.
11. On the bottom half of the NetSolutions - Configure and Customize screen, to download advocacy action data to The Raiser’s Edge, you must enter your Advocacy login and Advocacy password. This is the same information you enter to access your Capwiz account.
12. In the Enter the code to use when creating a new constituent record for an advocate: field, enter the constituent code you want used when importing new constituents into The Raiser’s Edge from the Import Advocacies grid in the Download Transactions section of NetSolutions.
Note: For information about Capwiz, go to: www.capwiz.com.
Note: For more information about advocacy, see the Actions chapter of the Constituent Data Entry Guide.

26 CH A PT E R
13. To include advanced security options, click Click here for advanced options. The Advanced Options screen appears displaying the General tab.
On the General tab of the Advanced Options screen, you have the following options:• If you want to allow visitors to your NetSolutions Web pages to create accounts they can access using
login names and passwords, mark the Allow donors to create accounts checkbox. If you mark this checkbox, visitors to your NetSolutions Web pages have the option of creating an account. They are not required to create an account.If you mark this checkbox, a screen similar to the following appears when repeat visitors access your NetSolutions Web pages.

C O N F I G U RE & CU S T O M I ZE 27
• From the Advanced Options screen, mark the Do not use browser cookies checkbox and cookies are not added to the computers of visitors to your NetSolutions Web pages.
• When a donor completes your online Registration Information screen, a checkbox is included - I wish to receive future email correspondence. If you want this checkbox to default as unmarked (“no”), mark For future email correspondence, set default to opt in (unchecked). If you want the online checkbox to default as marked (“yes”), do not mark For future email correspondence, set default to opt in (unchecked).
• If you want card information (truncated card number, card holder name, expiration date, and card token associating it with the card number saved to the Blackbaud Payment Service), mark Download credit card information from the server. If you mark this option, to save the credit card information to the constituent record when you download online information, mark Save credit card information to constituent record.If you do not mark Download credit card information from the server, the card token name and expiration date remain on the NetSolutions server gift record and the actual card number remains on the Blackbaud Payment Service server.
• To include a link to Blackbaud’s information privacy explanation, mark Show Blackbaud’s privacy link on donation pages.
• You can enter a minimum acceptable online donation in the Donations less than or equal to the specified amount will be declined field. If the amount donated does not satisfy the amount entered in this field, the program voids the transaction.
14. On the Batch tab, you can select contact information you want added to your constituent records when you download information from your Web pages.
On the Batch tab of the Advanced Options screen, you have the following options:
Warning: Users of Raiser’s Edge 7.85 or earlier, credit card information is not downloaded from the NetSolutions server regardless of the Advanced Options selected.
Warning: If your organization accepts recurring credit card gifts, mark the Download credit card information from the server checkbox. If you do not, credit card numbers for recurring gifts are not downloaded. As a result, recurring gift payments are not generated and paid.

28 CH A PT E R
• In the When adding constituent phones use this type field, select the phone type to assign phone numbers downloaded from your Web pages to individual constituent records in The Raiser’s Edge. The type you assign appears next to the downloaded phone number in the Type column of the Phones/Email/Links grid on the Bio 1 tab of the individual constituent record.
• In the When adding contact phones use this type field, select the phone type you want to assign phone numbers downloaded from your Web pages to contact constituent records in The Raiser’s Edge. The type you assign appears next to the downloaded phone number in the Type column of the Phones/Email/Links grid on the General 1 tab of the organization relationship record.
• In the When adding org phones use this type field, select the phone type you want to assign phone numbers downloaded from your Web pages to organization constituent records in The Raiser’s Edge. The type you assign appears next to the downloaded phone number in the Type column of the Phones/Email/Links grid on the Org 1 tab of the constituent record.
• In the When adding constituent email addresses use this type field, select the phone type you want to assign email addresses downloaded from your Web pages to individual constituent records in The Raiser’s Edge. The type you assign appears next to the downloaded email address in the Type column of the Phones/Email/Links grid on the Bio 1 tab of the individual constituent record.
• In the When adding contact email addresses use this type field, select the phone type you want to assign email addresses downloaded from your Web pages to contact constituent records in The Raiser’s Edge. The type you assign appears next to the downloaded phone number in the Type column of the Phones/Email/Links grid on the General 1 tab of the organization relationship record.
15. When you complete the Advanced Options screen, click OK. You return to the Account Information tab on the NetSolutions - Configure and Customize screen.
16. When you complete the Account Information tab, you can select another tab, click Submit to send the configuration information to Blackbaud, or click Close to return to the NetSolutions page without submitting the configuration information to Blackbaud. If you have not submitted your changes a screen will appear to verify that you want to close without saving.
Organizational Information
Organization information includes your organization’s email address, a mission statement, a title for your Web page, and other general information.
Entering your organization information1. On the Raiser’s Edge bar, click NetSolutions. The NetSolutions page appears.2. Click Configure and Customize. The NetSolutions - Configure and Customize screen appears displaying
the Account Information tab.

C O N F I G U RE & CU S T O M I ZE 29
3. Select the Organizational Information tab.
4. Enter the Title to appear on your donation page. The title appears at the top of the page.
5. Enter an Email address to appear on the Web site. This same email address is used in NetMail.6. Enter a Page header. The page header appears under the title bar. If you include your mission statement,
the page header appears under the mission statement. There is a 2,147,483,647 character limitation7. Enter a Default fund. Any online donations not designated to a specific fund are credited to the Default
fund.8. You can include your organization’s Mission statement. If you enter a mission statement, it appears at the
top of your donation page. There is a 1,024 character limitation.
9. Enter your organization’s Home URL to provide a link from the Blackbaud hosted Web pages to your Home page.
10. When you complete the Organizational Information tab you can select another tab, click Submit to send the configuration information to Blackbaud, or click Close to return to the NetSolutions page without submitting the configuration information to Blackbaud. If you have not submitted your changes a screen will appear to verify that you want to close without saving.
Site Customization Defaults
Site customization defaults are the colors, fonts, and images you want to use on your NetSolutions Web site. Using the Site Customization Defaults tab, you can personalize your entire NetSolutions Web site, using the following options: Background, Logo and Title, Image, Header, Detail, Body, Table Legend, Table Headers, Table Text, Error Text. Each option is explained in this section.
Note: The Raiser’s Edge is compliant only with MAPI email software, such as Microsoft Outlook.

30 CH A PT E R
Customizing the Background of your Web SiteFrom the Site Customization Defaults tab, you can select background images and colors, hyperlink colors, and much more.
Entering background site customization defaults1. From the NetSolutions page, click the Configure and Customize link. For information about opening
Configure and Customize, see “Accessing Configure and Customize” on page 14.2. Select the Site Customization Defaults tab.3. In the Page section field, select “Background”.
4. In the Background field, enter the background image you want to use. To map to the directory and folder in which the image is saved, click the ellipsis to access the Open screen and map to the image location.
5. In the Position field, select where on the Web page you want the image positioned. For example, if you want the image in the center of the page, select Center Center; if you want the image centered on the page, but at the bottom, select Center Bottom. The preview screen on the right side of the tab shows how the image will look on the page.

C O N F I G U RE & CU S T O M I ZE 31
6. Mark Tile image if you want duplicates of the image to fill in the entire Web page, as shown in the following picture.
7. Mark Watermark and the text on the Web page scrolls to the image. The image is then always visible on the page.
8. In the Back color field, select the background color to use on your Web page.9. In the Hyperlink field, select the color in which you want hyperlinks on the Web page displayed.
10. In the Visited Link field, select the color in which you want links visited by your users to display. 11. A preview screen appears on the right side of the tab shows how the selection you made will appear on
your Web page. Click Preview to visit a full-size sample.12. Select another Page section to define. Or, if you completed this tab, you can select another tab, click
Submit to send the configuration information to Blackbaud, or click Close to return to the NetSolutions page. If you have not submitted your changes, a screen appears to verify that you want to close without saving.
Customizing the Logo and Title of your Web SiteFrom the Site Customization Defaults tab, you can select your Web page title’s font, text color, background color, logo, alignment, and more.
Entering logo and title site customization defaults1. From the NetSolutions page, click the Configure and Customize link. For information about opening
Configure and Customize, see “Accessing Configure and Customize” on page 14.2. Select the Site Customization Defaults tab.
Note: The fields available on the Site Customization Defaults tab change, based on your selection in the Page section field.

32 CH A PT E R
3. In the Page section field, select “Logo and Title”.
4. In the Title frame, design the title for your Web page.• Select the Font to use in your title and enter the font size.• In the Text color field, select the color to use for the title text.• In the Back color field, select a background color to use behind your title.• In the Alignment field, select where on the Web page you want the title aligned: Left, Center, or Right.• Mark Bold to bold the title text; mark Italics to italicize the title text; mark Hide to hide the title.
5. In the Logo frame, you can select to include a logo in your title.• In the Logo file field, click the ellipsis to access the Open screen. Locate the directory and file in which
your logo image is saved and select the image.• In the Alignment field, select where on the Web page you want the logo aligned: Left, Center, or Right.
6. A preview screen on the right side of the tab, shows how the selection you made will appear on your Web page. Click Preview to visit a full-size sample.
7. Select another Page section to define. Or, if you completed this tab, you can select another tab, click Submit to send the configuration information to Blackbaud, or click Close to return to the NetSolutions page. If you have not submitted your changes a screen appears to verify that you want to close without saving.
Customizing the Image Caption of your Web SiteFrom the Site Customization Defaults tab, you can customize the Web site image caption, selecting fonts, text color, background color, and more.
Entering image caption site customization defaults1. From the NetSolutions page, click the Configure and Customize link. For information about opening
Configure and Customize, see “Accessing Configure and Customize” on page 14.2. Select the Site Customization Defaults tab.

C O N F I G U RE & CU S T O M I ZE 33
3. In the Page section field, select “Image”.
4. In the Image caption frame, design the caption used for your Web page image.• Select the Font to use in your caption and enter the font size.• In the Text color field, select the color to use for the caption.• In the Back color field, select a background color you want to use behind your caption.• In the Alignment field, select where on the Web page you want the caption aligned: Left, Center, or
Right.• Mark Bold to bold the caption text; mark Italics to italicize the caption text.
5. A preview screen on the right side of the tab shows you how the selection you made will appear on your Web page. Click Preview to visit a full-size sample.
6. Select another Page section to define. Or, if you completed this tab, you can select another tab, click Submit to send the configuration information to Blackbaud, or click Close to return to the NetSolutions page. If you have not submitted your changes a screen will appear to verify that you want to close without saving.
Customizing the Header of your Web SiteFrom the Site Customization Defaults tab, you can customize the header used on your Web page, selecting fonts, text color, background color, and more.
Entering header site customization defaults1. From the NetSolutions page, open the Configure and Customize link. For information about opening
Configure and Customize, see “Accessing Configure and Customize” on page 14.2. Select the Site Customization Defaults tab.

34 CH A PT E R
3. In the Page section field, select “Header”.
4. In the Header frame, design the header for your Web page.• Select the Font to use in your header and enter the font size.• In the Text color field, select the color to use for the header.• In the Back color field, select a background color to use behind your header.• Mark Bold, to bold the header; mark Italics to italicize the header.
5. In the Header text frame, design the text to appear under your header on your Web page.• Select the Font you want to use in your header text and enter the font size.• In the Text color field, select the color to use for the header text.• In the Back color field, select a background color to use behind your header text.• Mark Bold to bold the header text; mark Italics to italicize the header text.
6. A preview screen on the right side of the tab shows how the selection you made will appear on your Web page. Click Preview to visit a full-size sample.
7. Select another Page section to define. Or, if you completed this tab, you can select another tab, click Submit to send the configuration information to Blackbaud, or click Close to return to the NetSolutions page. If you have not submitted your changes a screen appears to verify that you want to close without saving.
Customizing the Detail Information of your Web SiteFrom the Site Customization Defaults tab, you can determine how the detail information explaining your organization appears on your Web page. You can select fonts, text color, background color, and more.
Entering detail site customization defaults1. From the NetSolutions page, click the Configure and Customize link. For information about opening
Configure and Customize, see “Accessing Configure and Customize” on page 14.2. Select the Site Customization Defaults tab.

C O N F I G U RE & CU S T O M I ZE 35
3. In the Page section field, select “Detail”.
4. In the Detail frame, design the detail header for your Web page.• Select the Font to use in your detail header and enter the font size.• In the Text color field, select the color to use for the detail header.• In the Back color field, select a background color to use behind your detail header.• Mark Bold to bold the detail header; mark Italics to italicize the detail header.
5. In the Detail text frame, design the text to appear under your detail header on your Web page.• Select the Font to use in your detail text and enter the font size.• In the Text color field, select the color to use for the detail text.• In the Back color field, select a background color to use behind your detail text.• Mark Bold to bold the detail text; mark Italics to italicize the detail text.
6. A preview screen on the right side of the tab shows you how the selection you made will appear on your Web page. Click Preview to visit a full-size sample.
7. Select another Page section to define. Or, if you completed this tab, you can select another tab, click Submit to send the configuration information to Blackbaud, or click Close to return to the NetSolutions page. If you have not submitted your changes a screen appears to verify that you want to close without saving.
Customizing the Body Text of your Web SiteFrom the Site Customization Defaults tab, you can format the body text used on your Web page. You can select fonts, text color, background color, and more.
Entering body text site customization defaults1. From the NetSolutions page, click the Configure and Customize link. For information about opening
Configure and Customize, see “Accessing Configure and Customize” on page 14.2. Select the Site Customization Defaults tab.

36 CH A PT E R
3. In the Page section field, select “Body”.
4. In the Body text frame, design appearance of the body text for your Web page.• Select the Font to use in your body text and enter the font size.• In the Text color field, select the color to use for the body text.• In the Back color field, select a background color to use behind your body text.• Mark Bold to bold the body text; mark Italics to italicize the body text.
5. A preview screen on the right side of the tab shows you how the selection will appear on your Web page. Click Preview to visit a full-size sample.
6. Select another Page section to define. Or, if you completed this tab, you can select another tab, click Submit to send the configuration information to Blackbaud, or click Close to return to the NetSolutions page. If you have not submitted your changes a screen appears to verify that you want to close without saving.
Customizing the Table Legends of your Web SiteFrom the Site Customization Defaults tab, you can format table legends you include on your Web. You can select fonts, text color, background color, and more.
Entering table legend site customization defaults1. From the NetSolutions page, click the Configure and Customize link. For information about opening
Configure and Customize, see “Accessing Configure and Customize” on page 14.2. Select the Site Customization Defaults tab.

C O N F I G U RE & CU S T O M I ZE 37
3. In the Page section field, select “Table Legend”.
4. In the Table legend frame, define the table legends for your Web page.• Select the Font to use in your table legend and enter the font size.• In the Text color field, select the color to use for the table legend.• In the Back color field, select a background color to use behind your table legend.• Mark Bold to bold the table legend text; mark Italics to italicize the table legend text.
5. Select another Page section to define. Or, if you completed this tab, you can select another tab, click Submit to send the configuration information to Blackbaud, or click Close to return to the NetSolutions page. If you have not submitted your changes a screen appears to verify that you want to close without saving.
Customizing the Table Headers of your Web SiteFrom the Site Customization Defaults tab, you can format table headers you include on your Web page. You can select fonts, text color, background color, and more.
Entering table header site customization defaults1. From the NetSolutions page, click the Configure and Customize link. For information about opening
Configure and Customize, see “Accessing Configure and Customize” on page 14.2. Select the Site Customization Defaults tab.

38 CH A PT E R
3. In the Page section field, select “Table Headers”.
4. In the Table header frame, design the table headers for your Web page.• Select the Font to use in your table header and enter the font size.• In the Text color field, select the color to use for the table header.• In the Back color field, select a background color to use behind your table header.• Mark Bold to bold the table header; mark Italics to italicize the table header.
5. In the Table row headers frame, design your table row header text.• Select the Font to use in your table row header text and enter the font size.• In the Text color field, select the color to use for the table row header text.• In the Back color field, select a background color to use behind your table row header text.• Mark Bold to bold the table row header text; mark Italics to italicize the table row header text.
6. A preview screen on the right side of the tab shows you how the selection you made will appear on your Web page. Click Preview to visit a full-size sample.
7. Select another Page section to define. Or, if you completed this tab, you can select another tab, click Submit to send the configuration information to Blackbaud, or click Close to return to the NetSolutions page. If you have not submitted your changes a screen appears to verify that you want to close without saving.
Customizing the Table Text of your Web PageFrom the Site Customization Defaults tab, you can determine how any text entered into tables included on your Web site appears. You can select fonts, text color, background color, and more.
Entering table text site customization defaults1. From the NetSolutions page, click the Configure and Customize link. For information about opening
Configure and Customize, see “Accessing Configure and Customize” on page 14.2. Select the Site Customization Defaults tab.

C O N F I G U RE & CU S T O M I ZE 39
3. In the Page section field, select “Table text”.
4. In the Table input frame, select how you want text entered into tables included on your Web page to appear.• Select the Font to use for your table input text and enter the font size.• In the Text color field, select the color to use for the table input text.
5. In the Table confirmed input frame, select how you want confirmed text entered into tables included on your Web page to appear.• Select the Font to use for your table confirmed input text and enter the font size.• In the Text color field, select the color to use for the table confirmed input text.• In the Back color field, select a background color to use behind your table confirmed input text.• Mark Bold to bold the table confirmed input text; mark Italics to italicize the table confirmed input
text.6. A preview screen on the right side of the tab shows you how the selection you made will appear on your
Web page. Click Preview to visit a full-size sample.7. Select another Page section to define. Or, if you completed this tab, you can select another tab, click
Submit to send the configuration information to Blackbaud, or click Close to return to the NetSolutions page. If you have not submitted your changes a screen appears to verify that you want to close without saving.
Customizing the Error Text of your Web PageFrom the Site Customization Defaults tab, you can determine the appearance of any error messages users may receive while working on your Web page. You can select fonts, text color, background color, and more.
Entering error message site customization defaults1. From the NetSolutions page, click the Configure and Customize link. For information about opening
Configure and Customize, see “Accessing Configure and Customize” on page 14.2. Select the Site Customization Defaults tab.

40 CH A PT E R
3. In the Page section field, select “Error text”.
4. In the Error text frame, define the error text you want to use for your Web page.• Select the Font to use in your error text and enter the font size.• In the Text color field, select the color to use for the error text.• In the Back color field, select a background color to use behind your error text.• Mark Bold to bold the error text; mark Italics to italicize the error text.
5. A preview screen on the right side of the tab shows you how the selection you made will appear on your Web page. Click Preview to visit a full-size sample.
6. Select another Page section to define. Or, if you completed this tab, you can select another tab, click Submit to send the configuration information to Blackbaud, or click Close to return to the NetSolutions page. If you have not submitted your changes a screen appears to verify that you want to close without saving.
Home Page
The NetSolutions Home page serves as a navigation center for your Web users. Blackbaud provides you with this default Home page, which includes all previously defined NetSolutions links. For example, if you have a NetSolutions page for NetDonors and NetMail, you can include links to both pages on the NetSolutions Home page. Using the Home Page tab available in Configure and Customize, you can customize the NetSolutions Home page, making it look more like your organization’s Web site.
Entering Home page information1. On the Raiser’s Edge bar, select NetSolutions. The NetSolutions page appears.2. Click Configure and Customize. The NetSolutions - Configure and Customize screen appears displaying
the Account Information tab.

C O N F I G U RE & CU S T O M I ZE 41
3. Select the Home Page tab. Blackbaud automatically generates a default Home page for your NetSolutions links. The fields on this tab allow you to customize the Home page to match the design of your Web site.
4. In the Page section field, select the section of the Web page you are formatting. You can define formats for the following: Page Header, Registration, Donations, Events, Directories, Volunteer, Membership, and Contact.
5. If, in the Page section field, you select “Page Header”, in the Header box, enter what you want to appear at the top of your Home page.
A preview screen on the right side of the tab shows you how your Home page will look based on your selections on this tab. The information entered in the preceding example appears as follows on your Home page.
Note: If you want to use your Web site’s existing Home page to host the NetSolutions links, you can add these links using the Site Map/Links tab.

42 CH A PT E R
6. If, in the Page section field, you select “Registration”, you can enter information guiding visitors from your Home page to the online constituent registration page.
In the Header field, enter what you want to appear at the top of the prospect registration section of your Home page.In the Detail box, you can enter information about prospect registration.In the Link text field, enter what you want the link to the prospect registration page to say.A preview screen on the right side of the tab shows you how your Home page will look based on your selections on this tab. The information entered in the preceding example appears as follows on your Home page.

C O N F I G U RE & CU S T O M I ZE 43
7. If, in the Page section field, you select “Donations”, you can enter information guiding visitors from your NetSolutions Home page to online donation information.
In the Header field, enter what you want to appear at the top of the donation section on your NetSolutions Home page.In the Detail box, you can enter additional donation information.A preview screen on the right side of the tab shows you how your NetSolutions Home page will look based on your selections on this tab. The information entered in the preceding example appears as follows on your NetSolutions Home page.

44 CH A PT E R
8. If, in the Page section field, you select “Events”, you can enter information guiding visitors from your NetSolutions Home page to your online events page.
In the Header field, enter what you want to appear at the top of the events section on your NetSolutions Home page.In the Detail box, you can enter additional event information.A preview screen on the right side of the tab shows you how your NetSolutions Home page will look based on your selections on this tab. The information entered in the preceding example appears as follows on your NetSolutions Home page.

C O N F I G U RE & CU S T O M I ZE 45
9. If in the Page section field, you select “Directories”, this information guides visitors from your NetSolutions Home page to your online directories.
In the Header field, enter what you want to appear at the beginning of the directories section.In the Detail box, you can enter additional information about your online directories.A preview screen on the right side of the tab shows you how your NetSolutions Home page will look based on your selections on this tab. The information entered in the preceding example appears as follows on your NetSolutions Home page.

46 CH A PT E R
10. If in the Page section field, you select “Volunteer”, you can enter on your NetSolutions Home page information about online volunteer opportunities and provide links to additional volunteer information.
In the Header field, enter what you want to appear at the beginning of the volunteer section of your NetSolutions Home page.In the Detail box, you can enter additional information about your online volunteer opportunities.In the Link text field, enter the text you want to appear as a link to the email address.A preview screen on the right side of the tab shows you how your NetSolutions Home page will look based on your selections on this tab. The information entered in the preceding example appears as follows on your NetSolutions Home page.

C O N F I G U RE & CU S T O M I ZE 47
11. If in the Page section field, you select “Membership”, you can enter on your NetSolutions Home page information about online membership opportunities and provide links to additional membership information.
In the Header field, enter what you want to appear at the beginning of the membership section of your NetSolutions Home page.In the Detail box, you can enter additional information about your online memberships.A preview screen on the right side of the tab shows you how your NetSolutions Home page will look based on your selections. The information entered in the preceding example appears as follows on your NetSolutions Home page.

48 CH A PT E R
12. If in the Page section field, you select “Contact”, you can enter contact email addresses on your NetSolutions Home page.
In the Header field, enter what you want to appear at the beginning of the contact section on your NetSolutions Home page.In the Detail box, you can enter additional contact information.In the Link text field, enter the text to appear as a link to your email address.A preview screen on the right side of the tab shows you how your NetSolutions Home page will look based on your selections. The information entered in the preceding example appears as follows on your NetSolutions Home page.
13. When you complete this tab, select another tab, click Submit to send the configuration information to Blackbaud, or click Close to return to the NetSolutions page without submitting the configuration information to Blackbaud.
Donor Profiling
Donor profiling allows you to include questions on your NetSolutions Web page to gather additional information from donors. These questions help you segment, target, and cultivate your constituency.
Entering donor profiling information1. On the Raiser’s Edge bar, click NetSolutions. The NetSolutions page appears.2. Click Configure and Customize. The NetSolutions - Configure and Customize screen appears displaying
the Account Information tab.

C O N F I G U RE & CU S T O M I ZE 49
3. Select the Donor Profiling tab.
On this tab, you can enter questions to appear on your NetSolutions Registration page. The questions can help you better understand your donors.
4. For example, in the Donor Profiling Question column, you can ask the question “Did you receive our mailing?”. This question then appears at the end of the donor registration page with a Yes and No option.
5. In the Attribute to Use column, you must assign the question to a constituent attribute in your database. In the example above, if the registrant selects Yes for the Did you get our mailing? option on the donation page, the information appears on the Attributes tab of the constituent record.On the constituent record, “Mailing” appears in the Category column and “Yes” appears in the Description column.
6. When you complete this tab, select another tab, click Submit to send the configuration information to Blackbaud, or click Close to return to the NetSolutions page without submitting the configuration information to Blackbaud.
Additional Links
From the Additional Links tab, you can add links to related Web sites. For example, an animal protection organization may want to include a link on its online registration page taking visitors to an animal adoption Web site. This link can be added using the Additional Links tab.
Adding links to your online registration screen1. On the Raiser’s Edge bar, click NetSolutions. The NetSolutions page appears.2. Click Configure and Customize. The NetSolutions - Configure and Customize screen appears displaying
the Account Information tab.
Note: Only yes/no constituent attributes appear in the Attribute to Use column. You can add new attributes on the fly.

50 CH A PT E R
3. Select the Additional Links tab.
On this tab, you can add links to your online registration page, taking visitors to other Web sites.4. In the Image column, you must map to an image to use as the hyperlink on your registration page.
(Images are set to resize to 54px × 62px. If they don't fit that ratio, they will squish to fit.)5. In the Caption column, enter the text you want visitors to see when they hover their mouse over the
hyperlink image.6. In the URL column, enter the address of the Web site to which you are adding a link. The column accepts
the URL with or without the <http://.7. When you complete this tab, select another tab, click Submit to send the configuration information to
Blackbaud, or click Close to return to the NetSolutions page without submitting the configuration information to Blackbaud.
Tell a Friend
NetSolutions provides a Tell a Friend link on your Web pages. On the Tell a Friend tab, you can enter the text you want to appear when visitors to your site click the Tell a Friend link.
Entering Tell a Friend information1. On the Raiser’s Edge bar, click NetSolutions. The NetSolutions page appears.2. Click Configure and Customize. The NetSolutions - Configure and Customize screen appears displaying
the Account Information tab.

C O N F I G U RE & CU S T O M I ZE 51
3. Select the Tell a Friend tab.
4. In the text box you can enter a message, encouraging visitors to your Web site to share information about your organization with a friend. You can accept the default message or enter a new message. This message appears when users click the Tell a Friend link on your Web site.
Note: If you choose to not enter a customized message on the Tell a Friend page, the following default message appears: “Have you found some part of our Web site to be of value to yourself and your colleagues? Please share your find so that we can continue to grow and flourish. This form will send emails to the addresses of your choice.”

52 CH A PT E R
The link takes visitors to another page, where they can enter contact information about their friend.
5. When you complete this tab, select another tab, click Submit to send the configuration information to Blackbaud, or click Close to return to the NetSolutions page without submitting the configuration information to Blackbaud.
Site Map/Links (Add Links to Your Existing Home Page)
If you do not want to use the Home page included with your NetSolutions account, you can add to your organization’s existing Web page links to any NetSolutions Web page using the Site Map/Links tab. This tab provides the code needed to add links to any online pages.
Viewing site links1. On the Raiser’s Edge bar, click NetSolutions. The NetSolutions page appears.2. Click Configure and Customize. The NetSolutions - Configure and Customize screen appears displaying
the Account Information tab.

C O N F I G U RE & CU S T O M I ZE 53
3. Select the Site Map/Links tab.
If you are using the Home page provided by Blackbaud, you do not need the links provided on this tab.4. On the Site Map/Links tab, we provide code you can add to your Web page and add links to the various
NetSolutions functions. For example, to provide a link on your Web page to the donation page you establish in NetDonors, under Donation Pages, click the Page Link For link. A screen similar to the following appears.
5. To view this page, click Click here to view this page.6. To copy the code contained on this page, highlight the code and click Copy.
Note: We recommend that someone familiar with the design of your Web page perform this procedure.

54 CH A PT E R
7. To exit the screen, click OK. You can then paste the code into your Web page, adding a donation link to your page.
Adding a Change of Address Link to Your Home PageAlthough there is not an option in NetSolutions from which you can create a customized Change of Address page to provide your users, you can provide a link to the standard Change of Address page included with NetSolutions.
From this page, users enter their new address information and submit it to the NetSolutions server. The information is then available from Download Transactions.You can also include Change of Address links in your NetMail correspondences. For more information, see “Including a Change of Address Link in Your Email Message” on page 119.
Add a Change of Address link to your organization’s Home page1. From Configure and Customize, select the the Site Map/Links tab.
Note: For information about downloading transactions, see “Downloading Transactions” on page 295

C O N F I G U RE & CU S T O M I ZE 55
2. Scroll down to the Change of Address Page.
3. Click Change of Address Page Link. The Change of Address Page - Link Properties screen appears. This screen includes the HTML code needed to add the Change of Address link to your organization’s Home page.
4. Click Copy to copy the code to your clip board.To view the default Change of Address page, click Click here to view this page.
5. When you are ready to close the screen and copy the HTML code to your Home page, click OK. You return to the Configure and Customize screen. The code you just copied is available to paste from your clip board to your Home page source code.
Note: We recommend that someone familiar with the design of your Web page perform this procedure.

56 CH A PT E R
Submitting Configuration and Customization Information
After you enter all the configuration and customization information you want Blackbaud to use when creating your NetSolutions Web page, sending the information to Blackbaud is a simple as clicking a button.
Submitting information to Blackbaud
1. From any tab on the NetSolutions - Configure and Customize screen, click Submit.
A screen appears warning you the information you entered will update your NetSolutions Web pages.2. To continue, click Yes. A screen appears telling you when the update is complete.
3. Click OK. Your NetSolutions Web site is configured. You return to the NetSolutions - Configure and Customize screen.
4. To return to the NetSolutions page, click Close.
Warning: Before you submit your information to Blackbaud, you should verify that the titles table from your Raiser’s Edge database is clean and acceptable for online display. Every time you submit your information to Blackbaud, the active titles from your database are sent to the server and are visible on your NetSolutions pages.

3chapter
NetDonors
Requirements . . . . . . . . . . . . . . . . . . . . . . . . . . . . . . . . . . . . . . . . . . . . . . . . . . . . . . . . . . . . . . . . . . . . . . . . . . . . . . 59Interacting with The Raiser’s Edge . . . . . . . . . . . . . . . . . . . . . . . . . . . . . . . . . . . . . . . . . . . . . . . . . . . . . . . . . . . . . . . . 59Navigating . . . . . . . . . . . . . . . . . . . . . . . . . . . . . . . . . . . . . . . . . . . . . . . . . . . . . . . . . . . . . . . . . . . . . . . . . . . . . . . . . 60Accessing NetDonors . . . . . . . . . . . . . . . . . . . . . . . . . . . . . . . . . . . . . . . . . . . . . . . . . . . . . . . . . . . . . . . . . . . . . . . . . . . 60Buttons . . . . . . . . . . . . . . . . . . . . . . . . . . . . . . . . . . . . . . . . . . . . . . . . . . . . . . . . . . . . . . . . . . . . . . . . . . . . . . . . . . . . . . 62Designing your NetDonors Page . . . . . . . . . . . . . . . . . . . . . . . . . . . . . . . . . . . . . . . . . . . . . . . . . . . . . . . . . . . . . . . 62Page Customization . . . . . . . . . . . . . . . . . . . . . . . . . . . . . . . . . . . . . . . . . . . . . . . . . . . . . . . . . . . . . . . . . . . . . . . . . . . . 63Page Style . . . . . . . . . . . . . . . . . . . . . . . . . . . . . . . . . . . . . . . . . . . . . . . . . . . . . . . . . . . . . . . . . . . . . . . . . . . . . . . . . . . . 65Designations . . . . . . . . . . . . . . . . . . . . . . . . . . . . . . . . . . . . . . . . . . . . . . . . . . . . . . . . . . . . . . . . . . . . . . . . . . . . . . . . . . 65Sources . . . . . . . . . . . . . . . . . . . . . . . . . . . . . . . . . . . . . . . . . . . . . . . . . . . . . . . . . . . . . . . . . . . . . . . . . . . . . . . . . . . . . . 67Gift Types Information . . . . . . . . . . . . . . . . . . . . . . . . . . . . . . . . . . . . . . . . . . . . . . . . . . . . . . . . . . . . . . . . . . . . . . . . . . 69Frequency . . . . . . . . . . . . . . . . . . . . . . . . . . . . . . . . . . . . . . . . . . . . . . . . . . . . . . . . . . . . . . . . . . . . . . . . . . . . . . . . . . . . 75Giving Levels . . . . . . . . . . . . . . . . . . . . . . . . . . . . . . . . . . . . . . . . . . . . . . . . . . . . . . . . . . . . . . . . . . . . . . . . . . . . . . . . . . 75Miscellaneous . . . . . . . . . . . . . . . . . . . . . . . . . . . . . . . . . . . . . . . . . . . . . . . . . . . . . . . . . . . . . . . . . . . . . . . . . . . . . . . . . 77
Selecting a Default Constituent Code . . . . . . . . . . . . . . . . . . . . . . . . . . . . . . . . . . . . . . . . . . . . . . . . . . . . . . . . . . . 78Selecting a Default Gift Code . . . . . . . . . . . . . . . . . . . . . . . . . . . . . . . . . . . . . . . . . . . . . . . . . . . . . . . . . . . . . . . . . . 79Customizing Receipts . . . . . . . . . . . . . . . . . . . . . . . . . . . . . . . . . . . . . . . . . . . . . . . . . . . . . . . . . . . . . . . . . . . . . . . . 79Entering a Donation Confirmation Email Address . . . . . . . . . . . . . . . . . . . . . . . . . . . . . . . . . . . . . . . . . . . . . . . . . 79Accepting Corporate Donations Online . . . . . . . . . . . . . . . . . . . . . . . . . . . . . . . . . . . . . . . . . . . . . . . . . . . . . . . . . 80Accepting Honor/Memorial Donations Online . . . . . . . . . . . . . . . . . . . . . . . . . . . . . . . . . . . . . . . . . . . . . . . . . . . 81Accepting Anonymous Donations . . . . . . . . . . . . . . . . . . . . . . . . . . . . . . . . . . . . . . . . . . . . . . . . . . . . . . . . . . . . . . 82Accepting Online Comments . . . . . . . . . . . . . . . . . . . . . . . . . . . . . . . . . . . . . . . . . . . . . . . . . . . . . . . . . . . . . . . . . . 83
Donor Profiling . . . . . . . . . . . . . . . . . . . . . . . . . . . . . . . . . . . . . . . . . . . . . . . . . . . . . . . . . . . . . . . . . . . . . . . . . . . . . . . . 84Additional Links . . . . . . . . . . . . . . . . . . . . . . . . . . . . . . . . . . . . . . . . . . . . . . . . . . . . . . . . . . . . . . . . . . . . . . . . . . . . . . . . 86Merchant Account Information . . . . . . . . . . . . . . . . . . . . . . . . . . . . . . . . . . . . . . . . . . . . . . . . . . . . . . . . . . . . . . . . . . 87The Finish Screen . . . . . . . . . . . . . . . . . . . . . . . . . . . . . . . . . . . . . . . . . . . . . . . . . . . . . . . . . . . . . . . . . . . . . . . . . . . . . . 89Viewing your Donation Page . . . . . . . . . . . . . . . . . . . . . . . . . . . . . . . . . . . . . . . . . . . . . . . . . . . . . . . . . . . . . . . . . . 90Deleting a Donation Web Page . . . . . . . . . . . . . . . . . . . . . . . . . . . . . . . . . . . . . . . . . . . . . . . . . . . . . . . . . . . . . . . . 92Viewing Donation Statistics . . . . . . . . . . . . . . . . . . . . . . . . . . . . . . . . . . . . . . . . . . . . . . . . . . . . . . . . . . . . . . . . . . . 93
Procedures
Accessing NetDonors . . . . . . . . . . . . . . . . . . . . . . . . . . . . . . . . . . . . . . . . . . . . . . . . . . . . . . . . . . . . . . . . . . . . . . . . . . . 60Page Customization screen . . . . . . . . . . . . . . . . . . . . . . . . . . . . . . . . . . . . . . . . . . . . . . . . . . . . . . . . . . . . . . . . . . . . . . 63Designations screen . . . . . . . . . . . . . . . . . . . . . . . . . . . . . . . . . . . . . . . . . . . . . . . . . . . . . . . . . . . . . . . . . . . . . . . . . . . . 66Sources screen . . . . . . . . . . . . . . . . . . . . . . . . . . . . . . . . . . . . . . . . . . . . . . . . . . . . . . . . . . . . . . . . . . . . . . . . . . . . . . . . 68Gift options screen . . . . . . . . . . . . . . . . . . . . . . . . . . . . . . . . . . . . . . . . . . . . . . . . . . . . . . . . . . . . . . . . . . . . . . . . . . . . . 70Giving levels screen . . . . . . . . . . . . . . . . . . . . . . . . . . . . . . . . . . . . . . . . . . . . . . . . . . . . . . . . . . . . . . . . . . . . . . . . . . . . 76Selecting a default constituent code . . . . . . . . . . . . . . . . . . . . . . . . . . . . . . . . . . . . . . . . . . . . . . . . . . . . . . . . . . . . . . 78Selecting a default gift code. . . . . . . . . . . . . . . . . . . . . . . . . . . . . . . . . . . . . . . . . . . . . . . . . . . . . . . . . . . . . . . . . . . . . . 79Entering an email address for you donation confirmations . . . . . . . . . . . . . . . . . . . . . . . . . . . . . . . . . . . . . . . . . . . . 80

58 CH A PT E R
Accepting corporate donations online . . . . . . . . . . . . . . . . . . . . . . . . . . . . . . . . . . . . . . . . . . . . . . . . . . . . . . . . . . . . . 81Accepting honor/memorial donations online . . . . . . . . . . . . . . . . . . . . . . . . . . . . . . . . . . . . . . . . . . . . . . . . . . . . . . . 82Accepting comments with online donations . . . . . . . . . . . . . . . . . . . . . . . . . . . . . . . . . . . . . . . . . . . . . . . . . . . . . . . . 84Adding donor profiling information for donation page . . . . . . . . . . . . . . . . . . . . . . . . . . . . . . . . . . . . . . . . . . . . . . . . 85Adding links to your online donation page . . . . . . . . . . . . . . . . . . . . . . . . . . . . . . . . . . . . . . . . . . . . . . . . . . . . . . . . . . 87Adding different merchant account information . . . . . . . . . . . . . . . . . . . . . . . . . . . . . . . . . . . . . . . . . . . . . . . . . . . . 88Finishing the NetDonors page . . . . . . . . . . . . . . . . . . . . . . . . . . . . . . . . . . . . . . . . . . . . . . . . . . . . . . . . . . . . . . . . . . . . 89Viewing donation Web pages . . . . . . . . . . . . . . . . . . . . . . . . . . . . . . . . . . . . . . . . . . . . . . . . . . . . . . . . . . . . . . . . . . . . 90Deleting a donation page . . . . . . . . . . . . . . . . . . . . . . . . . . . . . . . . . . . . . . . . . . . . . . . . . . . . . . . . . . . . . . . . . . . . . . . 92Viewing donation page statistics . . . . . . . . . . . . . . . . . . . . . . . . . . . . . . . . . . . . . . . . . . . . . . . . . . . . . . . . . . . . . . . . . 93

N ETD O N O RS 59
NetDonors offers a simple solution to the complex task of accepting online donations. With this service, Blackbaud acts as the application service provider (ASP) and handles the logistics of managing a donation page on your Web site. We handle everything. We host the donation page, store donation data, ensure data security, and validate credit card information.You tell us what you want your donation page to offer; you can include a number of donation page options, online source information, giving levels, and honor/memorials. You can also add images to your donation page, select a default constituent code to assign new donors, customize your receipts, and much more.
Requirements For NetDonorsTo use this service, you must have the following:• A Web page• The Raiser’s Edge 7.x• A merchant account with a credit card authorization service such as Blackbaud Merchant Services or IATS• Verification of your (c)3, (c)4, or (c)6 certification. You must fax us an IRS Determination Letter at
843-216-6104.• Internet Explorer 5.x or higher is fully supported; however donors can use HTMl 3.2 compliant browsers as well
Interacting with The Raiser’s Edge
Using NetDonors in conjunction with The Raiser’s Edge, your organization saves many hours in data entry time. With the Download Transaction link included with NetSolutions, you can link all donation information to the appropriate Raiser’s Edge records or create new records for donors who are not yet constituents. The online donation information appears on the Gift tab of the constituent record.Also, after you download the data from your Web site, the online information is available for use in Raiser’s Edge reports, queries, and exports.
Warning: Before you start working in NetDonors, you must register as a NetSolutions user and enter your Login ID and Login Password in Configure and Customize. For more information, see “Registering with NetSolutions” on page 1 and “Configure & Customize” on page 11.

60 CH A PT E R
NavigatingIn The Raiser’s Edge, you access NetDonors by clicking NetSolutions on the Raiser’s Edge bar.
Accessing NetDonors
Multiple users can access different areas of NetSolutions simultaneously.
Accessing NetDonors1. On the Raiser’s Edge bar, click NetSolutions. The NetSolutions page appears.

N ETD O N O RS 61
2. Click NetDonors. The NetSolutions - NetDonors screen appears.
This screen displays all donation pages designed for NetDonors. The <default page> is the basic donation page. The page style is based entirely on your selections in Configure and Customize. Using NetDonors, you can, however, change the style of your donation page and select to include a number of features. For information about creating a new page, see “Designing your NetDonors Page” on page 62.
3. To view the default Web page, click Visit this donation page. The default donation screen appears.
Note: The Optional Login box appears only if you marked the Allow donors to create accounts checkbox on the Advanced Options screen in Configure and Customize. For more information, see the Account Information tab section in “Configure & Customize” on page 11.

62 CH A PT E R
4. To create a new donation page, click New Page. The NetSolutions - Donation Page Wizard appears.
5. For more information about creating a new donation page, see “Designing your NetDonors Page” on page 62.
6. To return to the NetSolutions - NetDonors screen, click Cancel.
Buttons
NetDonors has two buttons to help you navigate through the program.
The New Page button opens the Donation Page Wizard, allowing you to design a new donation page.
The Statistics button displays two graphs: one breaking down the number of online donations received from each donation page and another displaying the number of visits to your online donation pages.
Designing your NetDonors Page
Although NetDonors comes with a default donation page, you may find you need more than one page to satisfy your organization’s needs, or you many want to style your donation page differently than your other NetSolutions pages. To help you best meet your fund raising needs and maintain consistency between your organization’s Web site and the NetSolutions Web pages maintained by Blackbaud, you can design your own donation pages.
Warning: Before you start working in NetDonors, you must register as a NetSolutions user and enter your Login ID and Login Password in Configure and Customize. For more information, see “Registering with NetSolutions” on page 1 and “Configure & Customize” on page 11.

N ETD O N O RS 63
Page Customization
This is the first procedure in a series of procedures, explaining the Donation Page Wizard. The following procedures should be used in succession.• “Page Customization” on page 63• “Page Style” on page 65• “Designations” on page 65• “Sources” on page 67• “Gift Types” on page 69• “Giving Levels” on page 75• “Miscellaneous” on page 77• “Donor Profiling” on page 84• “Additional Links” on page 86• “Merchant Account Information” on page 87• “The Finish Screen” on page 89Using the Page Customization screen, you can configure the general appearance on your Web page. You can specify things such as the page’s name and description, as well as specify a picture to be displayed on your page.Multiple users can access different areas of NetSolutions simultaneously.
Completing the Page Customization screen1. On the Raiser’s Edge bar, click NetSolutions. The NetSolutions page appears.2. Click NetDonors. The NetSolutions - NetDonors screen appears.

64 CH A PT E R
3. Click New Page. The Donation page Wizard appears.
The Title, Mission, Page header, and Home URL fields default to the information you entered in Configure and Customize. You can change any default information on this screen.
4. Enter a Page name. This is used for the link taking your Web site visitors to your donation page. 5. Enter a Description to appear under the link. There is a 1,024 character limit.6. To include an image on your donation page, in the Image/Caption fields, click the ellipsis to access the
Open screen.
7. Locate the image to include and click Open. You return to the Donation Page Wizard screen.8. In the second Image/Caption field, enter the caption to appear under the image.
Note: For more information about Configure and Customize, see “Configure & Customize” on page 11.

N ETD O N O RS 65
9. In Configure and Customize, you design a Tell a Friend link which appears on your Web pages. The link takes visitors to another page, where they can enter contact information about their friend. If you do not want this link to appear on your donation page, unmark the Display Tell a Friend checkbox. Keep the checkbox marked if you want the link to appear on your donation page.
10. Click Next to move to the Page Style screen, or click Cancel to return to the NetSolutions page.
Page Style
This is the second procedure in a series of procedures, explaining the Donation Page Wizard. The following procedures should be used in succession.• “Page Customization” on page 63• “Page Style” on page 65• “Designations” on page 65• “Sources” on page 67• “Gift Types” on page 69• “Giving Levels” on page 75• “Miscellaneous” on page 77• “Donor Profiling” on page 84• “Additional Links” on page 86• “Merchant Account Information” on page 87• “The Finish Screen” on page 89Using the Page Style screen, you can give a donation page a unique look, setting it apart from your other NetSolutions pages. The style you established in Configure and Customize defaults to all your NetSolutions Web pages, but you can change the style for each donation page using the Page Style screen. The fields and checkboxes available on this screen change based on the Page section you select. You can change background, logo and title, image, header, detail, body, table legend, table headers, table text, and error text styles.For more information about changing your donation pages’ style, see “Changing Page Style” on page 387.If you are happy with the page style you established in Configure and Customize, do not make any changes on this screen. Click Next to move to the Designations screen, or click Cancel to return to the NetSolutions page.
Designations
This is the third procedure in a series of procedures, explaining the Donation Page Wizard. The following procedures should be used in succession.• “Page Customization” on page 63• “Page Style” on page 65• “Designations” on page 65• “Sources” on page 67• “Gift Types” on page 69• “Giving Levels” on page 75• “Miscellaneous” on page 77• “Donor Profiling” on page 84

66 CH A PT E R
• “Additional Links” on page 86• “Merchant Account Information” on page 87• “The Finish Screen” on page 89Including designations on your donation page gives your donors a voice in deciding where their money goes. For example, the Wildlife Protection Association can include a “Endangered Animals” designation. They can then attach this designation to the Raiser’s Edge fund they use for their Endangered Animals project.
Completing the Designations screen
1. Once you complete the Page Style page, click Next. The Designations screen appears asking you to enter designations.
Designations are options donors select to indicate where their donation should be used. Any designation information entered on your donation page appears in the Reference field on the Gift tab of the constituent record when you download the transaction.
2. On the Designations screen, in the Online Designation column, enter the description to appear on the donation page. For example, the Wildlife Protection Association included two designations — “Endangered Animals” and “Rescue Mission”.
3. In the Fund to Credit column, select the Raiser’s Edge fund you want credited for any donation given to the corresponding designation.
4. If a donor fails to select one of these options, the money goes into the fund selected in the If no designation is specified use this fund field.
Note: The If no designation is specified use this fund field defaults to the fund you selected in Configure and Customize. However, you can change your selection on this screen.
Note: For detailed instructions about downloading information from your donation page, see “Downloading Transactions” on page 295.

N ETD O N O RS 67
5. In the Default column, mark the designation you want to default as the selected option on the Web page.
Information entered in the example above appears in a drop-down menu at the bottom of the Donation Information frame on your donation page.This is what your online donor sees in the Designation field.
6. Click Next and move to the Sources screen, or click Cancel to return to the NetSolutions page.
Sources
This is the fourth procedure in a series of procedures, explaining the Donation Page Wizard. The following procedures should be used in succession.• “Page Customization” on page 63• “Page Style” on page 65• “Designations” on page 65• “Sources” on page 67

68 CH A PT E R
• “Gift Types” on page 69• “Giving Levels” on page 75• “Miscellaneous” on page 77• “Donor Profiling” on page 84• “Additional Links” on page 86• “Merchant Account Information” on page 87• “The Finish Screen” on page 89Including source options on your donation page tells what attracted donors to your Web site. For instances, in the following example, the Wildlife Protection Association included “Visiting Web Site” and “Mailing” as source options. They also attached each source option to a Raiser’s Edge appeal; so whenever a donor selects one of the source options, the corresponding appeal is credited with the donation.
Completing the Sources screen1. Once you complete the Designations screen, click Next. The Sources screen appears.
If you include sources on your donation page, you can keep track of what draws donors to your donation page. You can also credit appeal records for any gifts.
2. In the Source header field, enter a heading for the online source section of your Web page. There is a 255 character limitation.
3. In the Online Source column, enter the options you want to appear on your Web page. In the following example, the Wildlife Protection Association included “Visiting Web Site” and “Mailing” as source options.
4. In the Appeal to Credit column, enter the appeal you want credited with donations associated with the source.

N ETD O N O RS 69
5. In the If no source is specified use this appeal field, select a default appeal to use should the donor not select a source. For instance, in the following example, donors have two source options to select when giving online: “Visiting Web Site” or “Mailing”. If they select “Visiting Web Site” the “Internet/Web Site solicitations” appeal is credited for the donation; if they select “Mailing” the “Direct Mailing” appeal is credited for the donation. If no source is selected, the “Internet/Web Site solicitations” appeal is credited for the donation.
Information entered in the example above appears in a drop-down menu at the bottom of your donation page.This is what your online donor sees.
6. Click Next and move to the Gift Types screen, or click Cancel to return to the NetSolutions page.
Gift Types
This is the fifth procedure in a series of procedures, explaining the Donation Page Wizard. The following procedures should be used in succession.• “Page Customization” on page 63• “Page Style” on page 65• “Designations” on page 65• “Sources” on page 67

70 CH A PT E R
• “Gift Types” on page 69• “Giving Levels” on page 75• “Miscellaneous” on page 77• “Donor Profiling” on page 84• “Additional Links” on page 86• “Merchant Account Information” on page 87• “The Finish Screen” on page 89On the Gift Types screen, you can select the gift types available to donors on your donation page: Credit card gifts, Credit card gifts and pledges, Recurring credit card gifts, or Recurring direct debit gifts. You can select only one.
Completing the Gift Types screen1. Once you complete the Sources screen, click Next. The Gift Types screen appears.
2. Select the gift type you want available on your donation page.
• The Credit card gifts option requires the online donor to enter credit card information. When you download the gift to The Raiser’s Edge, a gift record is created.
Note: You establish security and rules regarding credit card donations on the Advanced Options screen, accessed from the Account Information tab in Configure and Customize. For more information, see “Configure & Customize” on page 11.

N ETD O N O RS 71
This is what your online donor sees.
• The Credit card gifts and Pledges option allows the online donor to choose between the Credit Card and Bill me later options online. When you download the gift into The Raiser’s Edge, a pledge record is created if the client selected Bill me later and a gift record is created if the donor selected Credit Card.
This is what your online donor sees.

72 CH A PT E R
• The Recurring credit card gifts option allows the online donor to make scheduled payments on the gift, using their credit card. If you select this option and click Next, the Frequency screen appears asking you to select scheduling options.
Mark the checkbox next to each frequency you want available online. To establish a specific schedule for each frequency, click the Define Schedule button next to the frequency checkbox. The Define Schedule screen for the selected frequency appears. Enter the requested frequency information, and click OK.When you download the gift to The Raiser’s Edge, a recurring gift record is created.From the Web page, the online donor can choose to make his first payment now. If the donor does not mark Charge the first payment to my credit card now, the charges are applied based on the selection on the Frequency screen.

N ETD O N O RS 73
This is what your online donor sees.
• The Recurring direct debit gifts option allows the online donor to make scheduled payments on the gift using their debit card. If you select this option and click Next, the Frequency screen appears asking you to select scheduling options.
Mark the checkbox next to each frequency you want available online. To establish a specific schedule for each frequency, click the Define Schedule button next to the frequency checkbox. The Define Schedule screen for the selected frequency appears. Enter the requested frequency information and click OK.When you download the gift to The Raiser’s Edge, a recurring gift record is created.From the Web page, the online donor must enter their account information.

74 CH A PT E R
This is what your online donor sees.
3. From the Donation Page Wizard screen, if you selected the Recurring credit card gifts option or the Recurring debit card gifts option, click Next to move to the Frequency screen. Otherwise, click Next to move to the Giving Levels screen, or click Cancel to return to the NetSolutions page.

N ETD O N O RS 75
Frequency
If you selected the Recurring credit card gifts option or the Recurring debit card gifts option on the Gift Types screen, the Frequency screen appears when you click Next. On this screen you establish schedule options to appear on the donation page. The online donor can then choose a payment schedule for his gift.
Mark the checkbox next to each frequency you want available online. To establish a specific schedule for each frequency, click the Define Schedule button next to the frequency checkbox. The Define Schedule screen for the selected frequency appears. Enter the requested frequency information and click OK. The frequency options selected on this page will appear as options in the Frequency column on the Giving Levels screen.Click Next to move to the Giving Levels screen, or click Cancel to return to the NetSolutions page.
Giving Levels
This is the sixth procedure in a series of procedures, explaining the Donation Page Wizard. The following procedures should be used in succession. • “Page Customization” on page 63• “Page Style” on page 65• “Designations” on page 65• “Sources” on page 67• “Gift Types” on page 69• “Giving Levels” on page 75• “Miscellaneous” on page 77• “Donor Profiling” on page 84• “Additional Links” on page 86• “Merchant Account Information” on page 87

76 CH A PT E R
• “The Finish Screen” on page 89By including giving level options on your donation page, you can suggest donation amounts to your online donors. For example, in the following example, the Wildlife Protection Association defined three levels of giving: $10, $100, and $1,000. They also attach a description to each option, suggesting what their organization can potentially do with each amount. If they specified Recurring credit card gifts or the Recurring debit card gifts on the Gift Types screen, they can also define the frequency of each giving level.
Completing the Giving levels screen
1. Once you complete the Gift Types screen, click Next. The Giving Levels screen appears.
2. In the Level Amount column, enter the donation amount for this level. In the following example, the Wildlife Protection Association included $10, $100, and $1,000 suggested amounts.
3. In the Frequency column, suggest a frequency for each giving level. The Frequency column appears only if you select the Recurring credit card gifts or the Recurring debit card gifts option on the Gift Types screen. You specify the options available for this column on the Frequency screen. In the following example, the Wildlife Protection Association suggests a monthly gift of $10; or a quarterly gift of $100; or an annual gift of $1,000.
Note: If on the Gift Types screen you selected a recurring gift option, a Frequency column is added to the Giving Levels screen. The frequency options are based on your selections on the Frequency screen.

N ETD O N O RS 77
4. In the Description column, enter the description you want to appear on your donation page. In the following example, the Wildlife Protection Association described the $10 donation as “Save a fish”, the $100 donation as “Save a whale”, and $1,000 as “Save an ocean.
5. To allow online donors to specify an amount other than the amounts you enter on the Giving Levels screen, mark Allow donor to specify another amount.Entries in the preceding example appear in the Donation Information frame on your donation page.This is what your online donor sees.
6. Click Next and move to the Miscellaneous screen, where you can enter a default constituent code, customize your gift receipt, and more; or click Cancel to return to the NetSolutions - NetDonors page.
Miscellaneous
This is the seventh procedure in a series of procedures, explaining the Donation Page Wizard. The following procedures should be used in succession. • “Page Customization” on page 63• “Page Style” on page 65• “Designations” on page 65• “Sources” on page 67• “Gift Types” on page 69

78 CH A PT E R
• “Giving Levels” on page 75• “Miscellaneous” on page 77• “Donor Profiling” on page 84• “Additional Links” on page 86• “Merchant Account Information” on page 87• “The Finish Screen” on page 89On the Miscellaneous screen, you can enter a default constituent code for new constituents making online donations, customize your gift receipt, and allow for online honor/memorials, corporate donations, and comments.
Selecting a Default Constituent CodeWith NetSolutions, you can create a new constituent record when you download online gifts from first-time donors. To keep records as complete as possible, you can select to include a specific constituent code for all constituent records created when downloading gifts from your donation page. For example, if you want all records created while downloading online gifts assigned the constituent code of Online Donor, you can set this code as your default, using the Miscellaneous screen in the Donation Page Wizard.
Selecting a default constituent code1. From the Giving Levels screen in the Donation Page Wizard, click Next. The Miscellaneous screen appears.
2. In the Constituent Code frame, select a default constituent code in the Enter the code to use when creating a new constituent record for a donor field. The Raiser's Edge uses this constituency when creating records for online donors that do not have a constituent record in The Raiser's Edge database. For example, if you select “Online Donor”, all new constituents resulting from online donations are assigned the “Online Donor” constituent code.
3. Complete another section of the Miscellaneous screen. Or, if you completed this screen, click Next and move to “Donor Profiling” on page 84, or click Cancel to return to the NetSolutions - NetDonors page.

N ETD O N O RS 79
Selecting a Default Gift CodeWith NetSolutions, you can download online gifts from online donors. To keep your records as complete as possible, you can select to include a specific gift code for all gifts downloaded from your donation page.
Selecting a default gift code1. From the Giving Levels screen in the Donation Page Wizard, click Next. The Miscellaneous screen appears.
2. In the Gift Code frame, select a default gift code in the Enter the code to use when adding donations field. The Raiser's Edge uses this code when adding gifts to the online donors records in The Raiser's Edge database.
3. Complete another section of the Miscellaneous screen. Or, if you completed this screen, click Next and move to “Donor Profiling” on page 84, or click Cancel to return to the NetSolutions - NetDonors page.
Customizing LayoutWith NetDonors, you can customize donation confirmations automatically sent via email to your online donors. For more information, see “Customizing Confirmations” on page 367.
Entering a Donation Confirmation Email AddressIn Configure and Customize, you enter an Email address that appears in the From field of all email confirmations sent from NetSolutions. If, however, you want a different email address to appear in donation confirmation email, you can enter the address on the Miscellaneous screen. The new address overrides the address entered in Configure and Customize.

80 CH A PT E R
Entering an email address for your donation confirmations1. From the Giving Levels screen in the Donation Page Wizard, click Next. The Miscellaneous screen appears.
2. In the Email field, enter the email address to appear in the From field of all email confirmations sent from NetDonors. This address overrides the address entered in Configure and Customize.
3. Complete another section of the Miscellaneous screen. Or, if you completed this screen, click Next and move to “Donor Profiling” on page 84, or click Cancel to return to the NetSolutions - NetDonors page.
Accepting Corporate Donations OnlineYou can choose to accept corporate donations online by marking one checkbox.

N ETD O N O RS 81
Accepting corporate donations online1. From the Giving Levels screen in the Donation Page Wizard, click Next. The Miscellaneous screen appears.
2. In the Donation Options frame, mark Allow corporate donations to accept corporate donations from your online giving page. If you mark this checkbox, the This donation is on behalf of a company checkbox is added to the bottom of the Donation Information frame on your donation page.This is what your online donor sees.
3. Complete another section of the Miscellaneous screen. Or, if you completed this screen, click Next and move to “Donor Profiling” on page 84, or click Cancel to return to the NetSolutions - NetDonors page.
Accepting Honor/Memorial Donations OnlineIf your organization has Honor/Memorial Tracking, you can choose to accept honor/memorial donations online by marking one checkbox. Donors can also enter acknowledgee information online.

82 CH A PT E R
Accepting honor/memorial donations online1. From the Giving Levels screen in the Donation Page Wizard, click Next. The Miscellaneous screen appears.
2. In the Donation Options frame, mark Allow donors to enter honor/memorial information to accept honor/memorial donations from your online giving page. If you mark the Allow donors to enter honor/memorial information, the This gift is in honor or memory of someone special frame is added to your donation page. It also allows for acknowledgment information.This is what your online donor sees.
3. Complete another section of the Miscellaneous screen. Or, if you completed this screen, click Next and move to “Donor Profiling” on page 84, or click Cancel to return to the NetSolutions - NetDonors page.
Accepting Anonymous DonationsYou can choose to accept anonymous donations from your online donors by marking one checkbox.

N ETD O N O RS 83
Accepting anonymous donations with online donations1. From the Giving Levels screen in the Donation Page Wizard, click Next. The Miscellaneous screen appears.
2. In the Donation Options frame, mark Allow donors to give anonymously so donors can give anonymously on your online giving page. If you mark this checkbox, a checkbox appears at the bottom of the Registration Information frame on your donation page.This is what your online donor sees:
3. Complete another section of the Miscellaneous screen. Or, if you completed this screen, click Next and move to “Donor Profiling” on page 84, or click Cancel to return to the NetSolutions - NetDonors page.
Accepting Online CommentsYou can accept comments from your online donors by marking one checkbox.

84 CH A PT E R
Accepting comments with online donations1. From the Giving Levels screen in the Donation Page Wizard, click Next. The Miscellaneous screen appears.
2. In the Donation Options frame, mark Allow donors to enter comments to include a Comments section on your online giving page. If you mark this checkbox, a Comments box appears at the bottom of the Payment Information frame on your donation page.This is what your online donor sees.
3. Complete another section of the Miscellaneous screen. Or, if you completed this screen, click Next and move to the Donor Profiling screen, or click Cancel to return to the NetSolutions - NetDonors page.
Donor Profiling
This is the eighth procedure in a series of procedures, explaining the Donation Page Wizard. The following procedures should be used in succession.• “Page Customization” on page 63

N ETD O N O RS 85
• “Page Style” on page 65• “Designations” on page 65• “Sources” on page 67• “Gift Types” on page 69• “Giving Levels” on page 75• “Miscellaneous” on page 77• “Donor Profiling” on page 84• “Additional Links” on page 86• “Merchant Account Information” on page 87• “The Finish Screen” on page 89Donor profiling allows you to include questions on your donation page to gather additional information from donors. These questions help you segment, target, and cultivate your constituency. On the Donor Profiling screen, you can enter a profiling question specific to this donation page. The default donor profiling information, used for all NetSolutions functions, is entered in Configure and Customize.
Adding donor profiling information for your donation page1. Once you complete the screen asking you to enter miscellaneous options, click Next. The Donor Profiling
screen appears.
On this screen, enter questions to appear on your donation page. The questions can help you better understand your donors.

86 CH A PT E R
2. For example, in the Donor Profiling Question column, you can ask the question “Did you receive our mailing?”. This question then appears at the end of the donor registration page. The question is limited to 120 characters.
3. In the Attribute to Use column, you must assign the question to a constituent attribute in your database. In the example above, if the registrant marks Did you receive our mailing? on the donation page, the information appears on the Attribute tab of the constituent record.On the constituent record, “Mailing” appears in the Category column and “Yes” appears in the Description column.
4. From the Donation Page Wizard screen, click Next and move to the Additional Links screen, or click Cancel to return to the NetSolutions - NetDonors page.
Additional Links
This is the ninth procedure in a series of procedures, explaining the Donation Page Wizard. The following procedures should be used in succession.• “Page Customization” on page 63• “Page Style” on page 65• “Designations” on page 65• “Sources” on page 67
Note: Only yes/no constituent attributes appear in the Attribute to Use column.

N ETD O N O RS 87
• “Gift Types” on page 69• “Giving Levels” on page 75• “Miscellaneous” on page 77• “Donor Profiling” on page 84• “Additional Links” on page 86• “Merchant Account Information” on page 87• “The Finish Screen” on page 89From the Additional Links screen, you can add links to related Web pages. For example, you can add a link to a detailed explanation of your privacy policy.
Adding links to your online donation page1. Once you complete the Donor Profiling screen, click Next. The Additional Links screen appears.
2. In the Image column, you must map to an image to use as the hyperlink on your donation page. 3. In the Caption column, enter the text visitors see when they hover their mouse over the hyperlink image.4. In the URL column, enter the address of the Web page to which you are adding a link. The column accepts
the URL with or without the <http://.5. The Path column displays the location of the Image you selected.
6. From the Donation Page Wizard screen, click Next and move to the Merchant Account Information screen, or click Cancel to return to the NetSolutions - NetDonors page.
Merchant Account Information
This is the tenth procedure in a series of procedures, explaining the Donation Page Wizard. The following procedures should be used in succession.• “Page Customization” on page 63

88 CH A PT E R
• “Page Style” on page 65• “Designations” on page 65• “Sources” on page 67• “Gift Types” on page 69• “Giving Levels” on page 75• “Miscellaneous” on page 77• “Donor Profiling” on page 84• “Additional Links” on page 86• “Merchant Account Information” on page 87• “The Finish Screen” on page 89On the Internet Merchant Account screen, you can change the Internet merchant account to use for this donation page. The default Internet merchant account, used for all NetSolutions functions, is entered in Configure and Customize.
Adding different merchant account information1. Once you complete the Additional Links screen, click Next. The Internet Merchant Account screen
appears.
2. To activate this screen, mark Use a different Internet Merchant Account for this page. 3. In the Merchant account field, select the account you want used for this page. You establish accounts in
Business Rules accessed through Config.
4. Click Next and move to The Finish Screen, where you can complete your NetDonors page, or click Cancel to return to the NetSolutions - NetDonors page.

N ETD O N O RS 89
The Finish Screen
This is the last procedure in a series of procedures, explaining the Donation Page Wizard. The following procedures should be used in succession.• “Page Customization” on page 63• “Page Style” on page 65• “Designations” on page 65• “Sources” on page 67• “Gift Types” on page 69• “Giving Levels” on page 75• “Miscellaneous” on page 77• “Donor Profiling” on page 84• “Additional Links” on page 86• “Merchant Account Information” on page 87• “The Finish Screen” on page 89On the Finish screen, you can review all the information you entered in the NetSolutions - Denotation Page Wizard.
Finishing the NetDonors page1. After you enter all the necessary information on the various Donation page Wizard screens, a final screen
appears, summarizing the settings you selected for your donation page.
2. To change any information, click Back and return to the screen you want to change.

90 CH A PT E R
3. If the information is correct, click Finish to submit the information to Blackbaud. A screen appears with a link to your new donation page.
4. To see how your donation page looks, click the Click here to visit the donation page link.5. To add the donation page you just designed to your Web site, the code necessary to add the page to your
site appears. Copy and paste this code to your Web site.6. To exit the Donation page Wizard, click Close. You return to the NetSolutions - NetDonors screen. The new
donation page link appears on the screen.7. Click the “X” in the upper right corner to close the NetSolutions - NetDonors screen and return to the
NetSolutions page.
Viewing your Donation PageAfter you create your donation Web page, you can access and edit the page through NetSolutions.
Viewing donation Web pages1. On the Raiser’s Edge bar, click NetSolutions. The NetSolutions page appears.
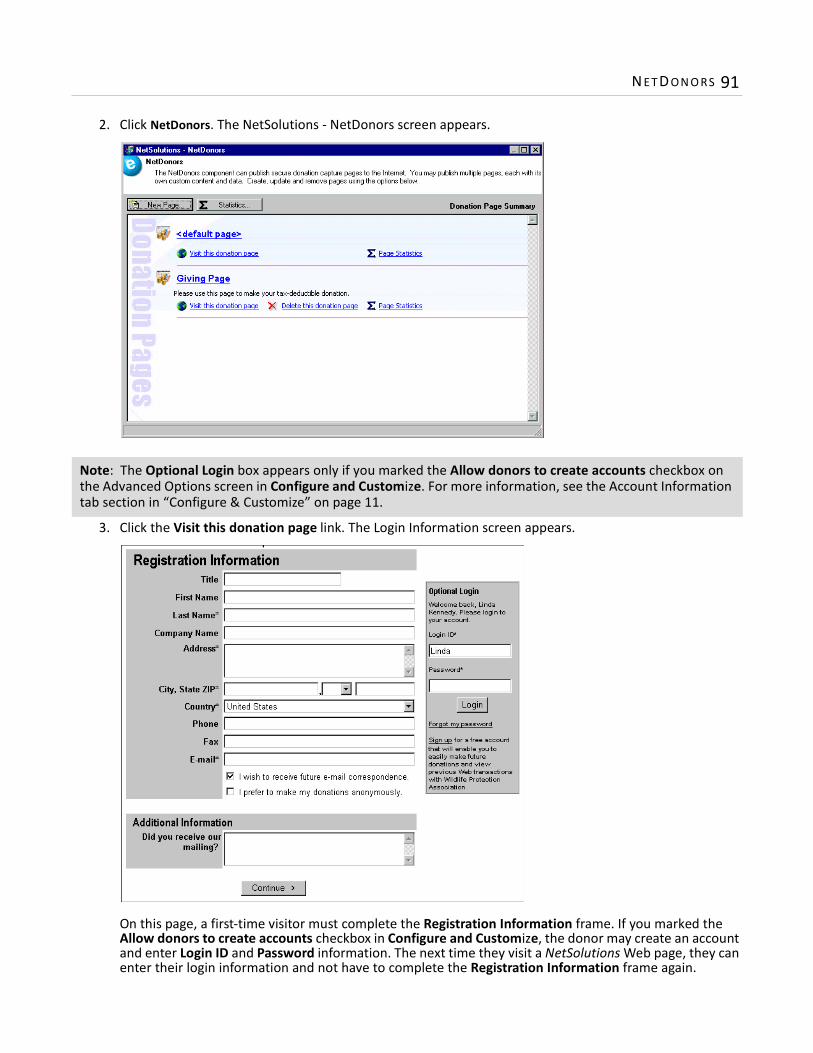
N ETD O N O RS 91
2. Click NetDonors. The NetSolutions - NetDonors screen appears.
3. Click the Visit this donation page link. The Login Information screen appears.
On this page, a first-time visitor must complete the Registration Information frame. If you marked the Allow donors to create accounts checkbox in Configure and Customize, the donor may create an account and enter Login ID and Password information. The next time they visit a NetSolutions Web page, they can enter their login information and not have to complete the Registration Information frame again.
Note: The Optional Login box appears only if you marked the Allow donors to create accounts checkbox on the Advanced Options screen in Configure and Customize. For more information, see the Account Information tab section in “Configure & Customize” on page 11.

92 CH A PT E R
4. To exit the NetSolutions - NetDonors screen and return to the NetSolutions page, click the X in the upper right corner.
Deleting a Donation Web PageYou can permanently remove a donation page from your Web site.
Deleting a donation page1. On the Raiser’s Edge bar, click NetSolutions. The NetSolutions page appears.2. Click NetDonors. The NetSolutions - NetDonors screen appears. All donation pages created in NetDonors
appear.
3. Click Delete this donation page under the donation page you want to delete. A warning message appears.

N ETD O N O RS 93
4. Click Yes. The NetSolutions - NetDonors screen appears, minus the deleted donation page.
5. To exit this screen and return to the NetSolutions page, click the “X” in the upper right corner.
Viewing Donation StatisticsNetSolutions keeps track of how many times your online donation pages are visited and how much money each page generates. You can view statistics for all donation pages or for one page.
Viewing donation page statistics1. On the Raiser’s Edge bar, click NetSolutions. The NetSolutions page appears.2. Click NetDonors. The NetSolutions - NetDonors screen appears.

94 CH A PT E R
3. To view a statistical overview of traffic and donations on all your donation pages, click Statistics. The NetDonors - Donation Page Statistics screen appears.
• Page Hits, on the left side of the screen, shows how many times each donation page was visited. In the preceding example, the <default page> was visited one time, the Giving Page was visited two times, and the New Building page was visited two times.
• Donations, on the right side of the screen, shows how much money each page generated. In the preceding example, the Giving Page generated $450, and the New Building page generated $1,000.
• If you want to see statistics for a specific period, enter a Start Date and End Date, and click Update.• Click Print Chart above each graph to print the graph.
4. To view statistics for a specific page, from the NetDonors page, click the Page Statistics link included below the donation page link. The Donation Page Statistics screen appears.
• To see statistics for a specific period, enter a Start Date and End Date, and click Update.• Click Print Chart above the graph to print the statistic information.• In the drop-down field above the chart, select to view Donations by Fund or Total Amount by Fund.

N ETD O N O RS 95
• If you mark the Data checkbox, the graphic is replaced by columns, showing the Fund name and either the Amount given to each fund or the Number of gifts given to each fund, depending on what you select in the drop-down field: Donations by Fund or Total Amount by Fund.
• The left screen displays the number of Page Hits, Total Donations, and Total Amount donated from the donation page.
5. To close the screen and return to the NetSolutions - NetDonors screen, click the “X” in the upper right corner.

96 CH A PT E R

4chapter
NetMail
Requirements . . . . . . . . . . . . . . . . . . . . . . . . . . . . . . . . . . . . . . . . . . . . . . . . . . . . . . . . . . . . . . . . . . . . . . . . . . . . . . 99Navigating . . . . . . . . . . . . . . . . . . . . . . . . . . . . . . . . . . . . . . . . . . . . . . . . . . . . . . . . . . . . . . . . . . . . . . . . . . . . . . . . 100Buttons . . . . . . . . . . . . . . . . . . . . . . . . . . . . . . . . . . . . . . . . . . . . . . . . . . . . . . . . . . . . . . . . . . . . . . . . . . . . . . . . . . . . . 102Creating a New email File . . . . . . . . . . . . . . . . . . . . . . . . . . . . . . . . . . . . . . . . . . . . . . . . . . . . . . . . . . . . . . . . . . . . 103Composing Your email Message . . . . . . . . . . . . . . . . . . . . . . . . . . . . . . . . . . . . . . . . . . . . . . . . . . . . . . . . . . . . . . . . . 103Adding a Link to Your Home Page . . . . . . . . . . . . . . . . . . . . . . . . . . . . . . . . . . . . . . . . . . . . . . . . . . . . . . . . . . . . . . . . 106Adding a Link to Your Online Registration Page . . . . . . . . . . . . . . . . . . . . . . . . . . . . . . . . . . . . . . . . . . . . . . . . . . . . . 108Adding a Donation Page Link to Your email . . . . . . . . . . . . . . . . . . . . . . . . . . . . . . . . . . . . . . . . . . . . . . . . . . . . . . . . 109Adding an Online Event Registration Page Link to Your email . . . . . . . . . . . . . . . . . . . . . . . . . . . . . . . . . . . . . . . . . . 111Adding an Online Directory Link to Your email . . . . . . . . . . . . . . . . . . . . . . . . . . . . . . . . . . . . . . . . . . . . . . . . . . . . . . 113Adding an Online Job Link to Your email . . . . . . . . . . . . . . . . . . . . . . . . . . . . . . . . . . . . . . . . . . . . . . . . . . . . . . . . . . . 115Adding a Membership Page Link to your email . . . . . . . . . . . . . . . . . . . . . . . . . . . . . . . . . . . . . . . . . . . . . . . . . . . . . 116Including a Change of Address Link in your email . . . . . . . . . . . . . . . . . . . . . . . . . . . . . . . . . . . . . . . . . . . . . . . . . . . 119Including an Advocacy Link in your email . . . . . . . . . . . . . . . . . . . . . . . . . . . . . . . . . . . . . . . . . . . . . . . . . . . . . . . . . . 120Adding an Email Address to Your Email Message. . . . . . . . . . . . . . . . . . . . . . . . . . . . . . . . . . . . . . . . . . . . . . . . . . . . 121Adding Links to Non-NetSolutions Web Pages . . . . . . . . . . . . . . . . . . . . . . . . . . . . . . . . . . . . . . . . . . . . . . . . . . . . . . 123Adding Images to Your Email . . . . . . . . . . . . . . . . . . . . . . . . . . . . . . . . . . . . . . . . . . . . . . . . . . . . . . . . . . . . . . . . . . . . 124Submitting an Email Message . . . . . . . . . . . . . . . . . . . . . . . . . . . . . . . . . . . . . . . . . . . . . . . . . . . . . . . . . . . . . . . . 126Viewing Email Statistics . . . . . . . . . . . . . . . . . . . . . . . . . . . . . . . . . . . . . . . . . . . . . . . . . . . . . . . . . . . . . . . . . . . . . 128Copying an Email File . . . . . . . . . . . . . . . . . . . . . . . . . . . . . . . . . . . . . . . . . . . . . . . . . . . . . . . . . . . . . . . . . . . . . . . 130Deleting an Email File . . . . . . . . . . . . . . . . . . . . . . . . . . . . . . . . . . . . . . . . . . . . . . . . . . . . . . . . . . . . . . . . . . . . . . . 131
Procedures
Accessing NetMail . . . . . . . . . . . . . . . . . . . . . . . . . . . . . . . . . . . . . . . . . . . . . . . . . . . . . . . . . . . . . . . . . . . . . . . . . . . . 100Composing your email message . . . . . . . . . . . . . . . . . . . . . . . . . . . . . . . . . . . . . . . . . . . . . . . . . . . . . . . . . . . . . . . . . 103Adding a Home page link to your email . . . . . . . . . . . . . . . . . . . . . . . . . . . . . . . . . . . . . . . . . . . . . . . . . . . . . . . . . . . 107Adding an online registration page link to your email . . . . . . . . . . . . . . . . . . . . . . . . . . . . . . . . . . . . . . . . . . . . . . . 108Adding a link to your donation page . . . . . . . . . . . . . . . . . . . . . . . . . . . . . . . . . . . . . . . . . . . . . . . . . . . . . . . . . . . . . 109Adding a link to your online event page . . . . . . . . . . . . . . . . . . . . . . . . . . . . . . . . . . . . . . . . . . . . . . . . . . . . . . . . . . . 111Adding an online directory link to your email . . . . . . . . . . . . . . . . . . . . . . . . . . . . . . . . . . . . . . . . . . . . . . . . . . . . . . 113Adding an online job link to your email . . . . . . . . . . . . . . . . . . . . . . . . . . . . . . . . . . . . . . . . . . . . . . . . . . . . . . . . . . . 115Adding a link to your online membership page . . . . . . . . . . . . . . . . . . . . . . . . . . . . . . . . . . . . . . . . . . . . . . . . . . . . . 117Adding a change of address link to your email. . . . . . . . . . . . . . . . . . . . . . . . . . . . . . . . . . . . . . . . . . . . . . . . . . . . . . 119Adding an advocacy link in your email . . . . . . . . . . . . . . . . . . . . . . . . . . . . . . . . . . . . . . . . . . . . . . . . . . . . . . . . . . . . 120Adding email addresses to your email . . . . . . . . . . . . . . . . . . . . . . . . . . . . . . . . . . . . . . . . . . . . . . . . . . . . . . . . . . . . 122Adding links to non-NetSolutions Web pages . . . . . . . . . . . . . . . . . . . . . . . . . . . . . . . . . . . . . . . . . . . . . . . . . . . . . . 123Adding images to your email message . . . . . . . . . . . . . . . . . . . . . . . . . . . . . . . . . . . . . . . . . . . . . . . . . . . . . . . . . . . . 125Submitting an email message . . . . . . . . . . . . . . . . . . . . . . . . . . . . . . . . . . . . . . . . . . . . . . . . . . . . . . . . . . . . . . . . . . . 126

98 CH A PT E R
Viewing statistics for an email . . . . . . . . . . . . . . . . . . . . . . . . . . . . . . . . . . . . . . . . . . . . . . . . . . . . . . . . . . . . . . . . . . 128Copying an email . . . . . . . . . . . . . . . . . . . . . . . . . . . . . . . . . . . . . . . . . . . . . . . . . . . . . . . . . . . . . . . . . . . . . . . . . . . . . 130Deleting an email file . . . . . . . . . . . . . . . . . . . . . . . . . . . . . . . . . . . . . . . . . . . . . . . . . . . . . . . . . . . . . . . . . . . . . . . . . . 132
NE TMA I L 99
With NetMail you can create, send, and track email messages. This link provides you with an easy way to create an email message, using fields from The Raiser's Edge. Once you create and send the message, you can save the file to use again at a later date or to simply help you keep track of the email messages sent to constituents.
How it WorksNetMail works with export files you create in The Raiser’s Edge. Using Export, you select the group of constituents from your database to whom you want the message sent. You also select The Raiser’s Edge fields you want available for your message. The export file functions as a data source in NetMail. You access the export file through the Select Export field in NetMail. All the fields you include in your export file are available in the tree view under Available Fields.
For example, if you include First Name and Last Name in your export file, in NetMail, when composing your email message, you can enter “Dear” then move <First Name> and <Last Name> from the tree view into your message box. The message is personalized with the constituent’s first and last name (Dear Robert Datko or Dear Linda Kennedy).The email editor included in NetMail makes this possible. The process is similar to that used when doing a mail merge in a word processor or with The Raiser’s Edge. With this editor, in addition to including exported fields in your message, you can include links to your donation pages, Web sites, email addresses, and much more.When you submit the email message, Blackbaud sends it to all constituents included in the export file. If for some reason an email address does not work and the message returns to Blackbaud’s server, you can download this information from the Download Transactions link available on the NetSolutions page. For detailed instructions on downloading this information, see “Downloading Transactions” on page 295.
Requirements for NetMailTo use this service, you must have the following:• Internet Explorer 5.x or higher is fully supported; however donors can use HTMl 3.2 compliant browsers as well• The Raiser’s Edge 7.x
Warning: Before you start working in NetMail, you must register as a NetSolutions user and enter your Login ID and Login password in Configure and Customize. For more information, see “Registering with NetSolutions” on page 1 and “Configure & Customize” on page 11.

100 CH A PT E R
NavigatingIn The Raiser’s Edge, you access NetMail by clicking NetSolutions on the Raiser’s Edge bar.
Accessing NetMailMultiple users can access different areas of NetSolutions simultaneously.
Accessing NetMail1. On the Raiser’s Edge bar, click NetSolutions. The NetSolutions page appears.

NE TMA I L 10
2. Click NetMail. The NetMail screen appears.
The first time you open the link, this screen appears blank. Once you create and save an email file, the saved email file appears.
3. To create a new email file, click New email. The New Mail screen appears.
Note: The Raiser’s Edge is compliant only with MAPI email software, such as Microsoft Outlook.
Note: For more information about completing this screen, see “Creating a New Email File” on page 103.
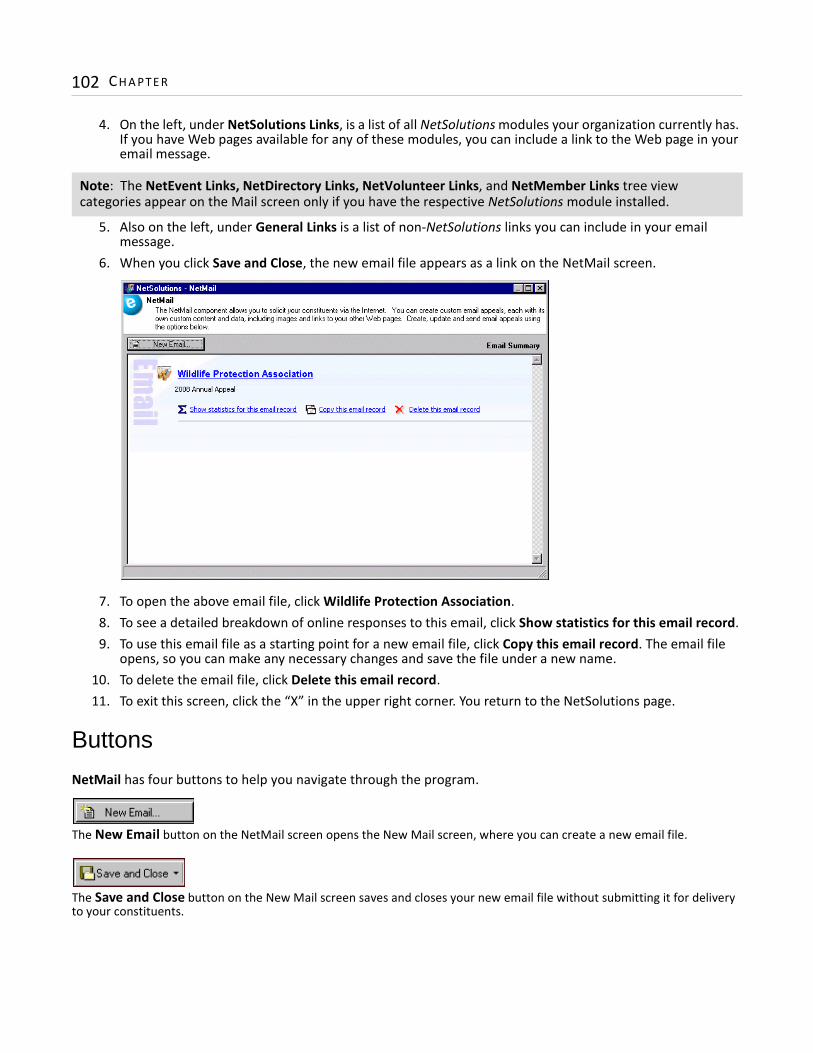
102 CH A PT E R
4. On the left, under NetSolutions Links, is a list of all NetSolutions modules your organization currently has. If you have Web pages available for any of these modules, you can include a link to the Web page in your email message.
5. Also on the left, under General Links is a list of non-NetSolutions links you can include in your email message.
6. When you click Save and Close, the new email file appears as a link on the NetMail screen.
7. To open the above email file, click Wildlife Protection Association. 8. To see a detailed breakdown of online responses to this email, click Show statistics for this email record. 9. To use this email file as a starting point for a new email file, click Copy this email record. The email file
opens, so you can make any necessary changes and save the file under a new name. 10. To delete the email file, click Delete this email record.11. To exit this screen, click the “X” in the upper right corner. You return to the NetSolutions page.
Buttons
NetMail has four buttons to help you navigate through the program.
The New Email button on the NetMail screen opens the New Mail screen, where you can create a new email file.
The Save and Close button on the New Mail screen saves and closes your new email file without submitting it for delivery to your constituents.
Note: The NetEvent Links, NetDirectory Links, NetVolunteer Links, and NetMember Links tree view categories appear on the Mail screen only if you have the respective NetSolutions module installed.

NE TMA I L 10
Click the Submit email button on the New Mail screen to submit your email for delivery to all selected constituents.
Click the Microsoft Word Functions button to access Word’s Spelling check and Thesaurus.
Creating a New Email File
When you create an email, you can choose to include a number of links to other sections of NetSolutions. For example, you can add a link taking recipients to your online jobs page or your giving page. Multiple users can access different areas of NetSolutions simultaneously.
Composing an Email Message
You compose the message on the New Mail screen in NetMail. The New Mail screen includes an email editor. With this editor, you access your data source (the export file) and add any field you included in your export file in your message. For example, if you include the First Name and Last Name fields in your export file, you can include both fields in your message. So if you enter “Dear «First Name» «Last Name»”, each constituent’s first and last name appear in their email message.
Composing your email message1. On the Raiser’s Edge bar, click NetSolutions. The NetSolutions page appears.
2. Click NetMail. The NetMail screen appears.
Warning: Before you start working in NetMail, you must register as a NetSolutions user and enter your Login ID and Login password in Configure and Customize. For more information, see “Registering with NetSolutions” on page 1 and “Configure & Customize” on page 11.
Note: The Raiser’s Edge is compliant only with MAPI email software, such as Microsoft Outlook.

104 CH A PT E R
3. Click New Email. The New Mail screen appears.
4. In the Select export field, you must select the export file containing the constituents to whom to send this message and the fields to include in your message. Click the binoculars to access the Open screen.
Note: The NetEvent Links, NetDirectory Links, NetVolunteer Links, and NetMember Links tree view categories appear on the Mail screen only if you have the respective NetSolutions module installed.
Warning: You can use only constituent exports. Also, only flat export formats work (word processor mail merge, simple, .csv). For more information about export formats, see the Export chapter in the Query & Export Guide.

NE TMA I L 10
5. In the Find Exports that meet these criteria frame, enter criteria to narrow the export file search, and click Find Now. For example, you can enter an Export type and Export format. Or, you can leave the criteria fields blank, and click Find Now to access all export files saved in your database.All exports satisfying the selected criteria appear in the export grid. For more information about using the Open screen, see the Program Basics Guide.
6. Select an existing export and click Open. OrClick Add New to open Export and create a new export file. Once you select or create an export, the export name appears in the Select export field on the New Mail screen.
7. In the Name field, enter a name for this email file. This name appears on the NetMail screen when you save and close the email message.
8. In the From field, defaults from the Email field on the Account Information tab of Configure and Customize.
9. In the Subject field, enter the purpose of the email. This appears in the Subject field of the sent email message. For example, if you are sending this email to announce your 2008 Annual Appeal, you can enter this in the Subject field.
10. In the Email Type field, select the email type to use when sending the email message. The options available depend on the phone types created in the Phone Types table in Configuration. For more information, see the Configuration chapter of the Configuration and Security Guide.
11. Mark the Create static query when submitted checkbox to create a query of all constituents to whom the email was sent. You can use the query to determine which constituents in the export did not receive the email and investigate why or send them the message using a nonelectronic mailing.
Warning: If you change the export file, you may invalidate fields already in the email. For example, you first select an export with the field <Last Name>, and you insert this field into your email (Dear Mr. <Last Name>). You then change to a second export that does not include <Last Name>. A message appears warning you some fields are invalid. The invalid fields are highlighted.

106 CH A PT E R
12. Select the Send copy of email to From address if you want the email address included in the From field to receive a copy of the email.
13. Select the Send copy of email to this address if you want another email address to receive a copy of the email. Enter the email address to which you want a copy sent in the corresponding field.
14. Select the Do not send a copy of this email if you want only those addresses included in the export file to receive this email.
15. Compose your message in the box on the right. To include exported fields, click the plus sign to the left of the fields in the Available Fields category in the tree view. A list of all fields you can include in your message appears.
All fields you include in your export file are available. When composing your message, double-click the fields you want to include in your message. This moves the field into the box on the right. For instance, in the preceding example, “First Name” was moved into the box on the right. When constituent Robert Brown receives this message, it begins “Dear Robert”; when constituent Linda Kennedy receives this message, it begins “Dear Linda”.
16. Select another category from the tree view; or click Save and Close to save your message and return to the NetSolutions - Net Mail screen; or select File, Submit from the menu bar to send your message. For more information on submitting your message, see “Submitting an Email Message” on page 126.
Adding a Link to Your Home Page
If your organization uses the Blackbaud-hosted Home page, containing all functions offered in NetSolutions, you can include a link to this Home page in your email message. With this link, an email recipient can access all your NetSolutions Web pages — NetDonors, NetMail, NetEvents, NetVolunteers, NetMembers, and NetDirectories. For more information about the Blackbaud-hosted Home page, see “Configure & Customize” on page 11.
This procedure is a continuation from the Composing your email message procedure. For more information about composing your email message, see “Composing your email message” on page 103.
Note: The NetEvent Links, NetDirectory Links, NetVolunteer Links, and NetMember Links tree view categories appear on the Mail screen only if you have the respective NetSolutions module installed.

NE TMA I L 10
Adding a Home page link to your email1. Open the message to which you want to add a Home page link. For information about opening a message,
see “Navigating” on page 100.
In the tree view, under the NetSolutions Links category, all available NetSolutions links appear. 2. To include a link to the Blackbaud-hosted Web page, in the tree view, double-click Default Start Page. The
Insert Link to Default Start Page screen appears.
3. In the Description field, enter what you want the link to say in your email message. 4. Click OK. The new link appears in your message.
5. On the New Mail screen, select another category from the tree view; or click Save and Close to save your message and return to the NetMail screen; or select File, Submit from the menu bar to submit your message. For more information on submitting your message, see “Submitting an Email Message” on page 126.

108 CH A PT E R
Adding a Link to Your Online Registration Page
To encourage constituents to use the online options included with NetSolutions, there is an online registration page. On this page, visitors enter basic biographical information, such as name, address, telephone number, as well as a login and password. The login and password make return visits to your Web pages easy, allowing constituents direct access to your donation page, event registration page, etc., without requiring them to reenter their biographical information. This procedure is a continuation of the Composing your email message procedure. For more information about composing your email message, see “Composing your email message” on page 103.
Adding an online registration page link to your email1. Open the message in which you want to add an online registration link. For information about opening a
message, see “Navigating” on page 100.
In the tree view, under the NetSolutions Link category, all available NetSolutions links appear. 2. To include a link to your online registration page, double-click Sign-up/Prospecting Page in the tree view.
The Insert Link to Sign-up/Prospecting Page appears.
3. In the Description field, enter what the link is to say in your email message. For example, enter “register
with the WPA”.
Note: The NetEvent Links, NetDirectory Links, NetVolunteer Links, and NetMember Links tree view categories appear on the Mail screen only if you have the respective NetSolutions module installed.
Note: The online registration page allows visitors to register a login and password, making subsequent visits to your NetSolutions Web pages easier. It also helps you cultivate new constituents.

NE TMA I L 10
4. Click OK. The new link appears in your message.
5. Select another category from the tree view; or click Save and Close to save your message and return to the NetMail screen; or select File, Submit from the menu bar to submit your message. For more information on submitting your message, see “Submitting an Email Message” on page 126.
Adding a Donation Page Link to Your Email
To encourage constituents to donate online, include a link to your online donation page. To add this link, you must have NetDonors.
This procedure is a continuation from the Composing your email message procedure. For more information about composing your email message, see “Composing your email message” on page 103.
Adding a link to your donation page1. Open the message in which to add a donation page link. For information about opening a message, see
“Navigating” on page 100.
In the tree view, under the NetSolutions Links category, all available NetSolutions links appear.
Note: The NetEvent Links, NetDirectory Links, NetVolunteer Links, and NetMember Links tree view categories appear on the Mail screen only if you have the corresponding optional NetSolutions module.

110 CH A PT E R
2. To include a link to your the online donation page(s) you created in NetDonors, double-click NetDonor Links in the tree view. All available donation pages appear under NetDonor Links.
3. Double-click the page to which you want to create a link. The Insert Link to NetDonor Page screen appears.
4. In the Description, field, enter what you want the link to say in your message. In the proceeding example, the donor will click on the words “Donate to the WPA” to access your donation page.
5. Enter the Campaign, Fund, Appeal, or Package to be credited for any donations.6. For record keeping and reporting purposes, you can keep an up-to-date count of the number of
constituents sent this message by marking the Update number solicited for this appeal checkbox. This information may prove helpful when trying to evaluate the success of the email effort. When you download your online transactions, the No. solicited field on the General tab of the appeal record is updated.
7. If the email is an appeal and your organization tracks appeals on constituent records, mark Add this appeal to the constituent’s record. You can then enter the Date to appear with the appeal and any Comment.
Note: For more information about NetDonors, see “NetDonors” on page 57.

NE TMA I L 11
8. Click OK. The new link appears in your message.
9. On the New Mail screen, select another category from the tree view; or click Save and Close to save your message and return to the NetMail screen; or select File, Submit from the menu bar to submit your message. For more information on submitting your message, see “Submitting an Email Message” on page 126.
Adding an Online Event Page Link to Your Email
To help promote an upcoming event, use NetMail to send event announcements to your constituents. You can also include a link to your event Web page. To add this link, you must have NetEvents.
This procedure is a continuation from the Composing your email message procedure. For more information about composing your email message, see “Composing your email message” on page 103.
Adding a link to your online event page1. Open the message in which to add an event page link. For information about opening a message, see
“Navigating” on page 100.
In the tree view, under the NetSolutions Links category, all available NetSolutions links appear.
Note: The NetEvent Links, NetDirectory Links, NetVolunteer Links, and NetMember Links tree view categories appear on the Mail screen only if you have the respective NetSolutions module installed.

112 CH A PT E R
2. To include a link to your online event page(s) created in NetEvents, double-click NetEvent Links in the tree view. All available event pages appear under NetEvent Links.
3. Double-click the event page to which you want to create a link. The Insert Link to NetEvent Page screen appears.
4. In the Description field, enter what you want the link to say in your message. In the above example, the donor will click on the words “Afternoon Tea” to access your online event page.
5. Enter the Campaign, Fund, Appeal, or Package to be credited for any registration fees paid online.6. For record keeping and reporting purposes, you can keep an up-to-date count of the number of
constituents sent this message by marking the Update number solicited for this appeal checkbox. This information is helpful when trying to evaluate the success of the email. When you download your online transactions, the No. solicited field on the General tab of the appeal record is updated.
7. If the email is an appeal, and your organization records appeals on constituent records, mark Add this appeal to the constituent’s record. You can then enter the Date you want to appear with the appeal and any Comment.

NE TMA I L 11
8. Click OK. The new link appears in your message.
9. Select another category from the tree view; or click Save and Close to save your message and return to the NetSolutions - Net Mail screen; or select File, Submit from the menu bar to submit your message. For more information on submitting your message, see “Submitting an Email Message” on page 126.
Adding an Online Directory Link to Your Email
You can include in your email message a link to any online directory pages you created in NetDirectories. To add this link, you must have NetDirectories.
This procedure is a continuation from the Composing your email message procedure. For more information about composing your email message, see “Composing your email message” on page 103.
Adding an online directory link to your email1. Open the message in which to add a directory page link. For information about opening a message, see
“Navigating” on page 100.
In the tree view, under the NetSolutions Links category, all available NetSolutions links appear.
Note: The NetEvent Links, NetDirectory Links, NetVolunteer Links, and NetMember Links tree view categories appear on the Mail screen only if you have the respective NetSolutions module installed.

114 CH A PT E R
2. To include a link to the online directory page(s) you created in NetDirectories, double-click NetDirectory Links in the tree view. All available directory pages appear under NetDirectory Links.
3. Double-click the directory page to which you want to create a link. The Insert Link to NetDirectory Page screen appears.
4. In the Description field, enter what you want the link to say in your message. In the previous example, the donor will click on the words “Board Members Directory” to access the online directory.
5. The Directory Page field, displays the online directory to which this description is linked.6. Click OK. The new link appears in your message.
If an email recipient clicks the Board Members Directory link, he is taken to the online directory search page. This page is formatted based on your selections in Configure and Customize and NetDirectories.
7. Select another category from the tree view; or click Save and Close to save your message and return to the NetSolutions - Net Mail screen; or select File, Submit from the menu bar to submit your message. For more information on submitting your message, see “Submitting an Email Message” on page 126.
Note: For more information about online directories, see “NetDirectories” on page 165.

NE TMA I L 11
Adding an Online Job Page Link to Your Email
To encourage constituents to volunteer, use NetMail to send them an email message and include any volunteer opportunities. If you have NetVolunteers, you can include a link to your online job page, where they can view details about the job and even sign up.
This procedure is a continuation from the Composing your email message procedure. For more information about composing your email message, see “Composing your email message” on page 103.
Adding a link to your online job page1. Open the message in which to add a job page link. For information about opening a message, see
“Navigating” on page 100.
In the tree view, under the NetSolutions Links category, all available NetSolutions links appear. 2. To include a link to the online job page(s) you created in NetVolunteers, double-click NetVolunteer Links
in the tree view. All available job pages and the volunteer sigh up page appear under NetVolunteer Links.
Note: The NetEvent Links, NetDirectory Links, NetVolunteer Links, and NetMember Links tree view categories appear on the Mail screen only if you have the respective NetSolutions module installed.

116 CH A PT E R
3. Double-click the page to which you want to create a link. The Insert Link to NetVolunteer Page screen appears.
4. In the Description field, enter what the link will say in your message. In the previous example, the donor will click on the words “Special Events Coordinator” to access your online job page.
5. In the Job Page field, the title of the selected job’s Web page defaults.6. Click OK. The new link appears in your message.
If an email recipient clicks the Special Events Coordinator link, they are taken to your online job page. This page is formatted based on your selections in Configure and Customize and NetVolunteers.
7. Select another category from the tree view; or click Save and Close to save your message and return to the NetSolutions - Net Mail screen; or select File, Submit from the menu bar to submit you message. For more information on submitting your message, see “Submitting an Email Message” on page 126.
Adding a Membership page Link to Your Email
If you have a membership page created with NetMembers, you can encourage email recipients to visit the page and establish memberships with your organization.
This procedure is a continuation from the Composing your email message procedure. For more information about composing your email message, see “Composing your email message” on page 103.
Note: For information about working in NetVolunteers, see “NetVolunteers” on page 217.
Note: The NetMember Links tree view category appear on the Mail screen only if you have the NetSolutions module NetMembers

NE TMA I L 11
Adding a link to your online membership page1. Open the message in which you want to add a membership page link. For information about opening a
message, see “Navigating” on page 100.
In the tree view on the left, under the NetSolutions Links category, all available NetSolutions links appear, one link for each NetSolutions Web page you have.
2. To include a link to the online membership page(s) you created in NetMembers, double-click NetMember Links in the tree view. All available membership pages appear under NetMember Links.
Note: The NetMember Links tree view category appear on the Mail screen only if you have the NetSolutions module NetMembers

118 CH A PT E R
3. Double-click the membership page to which to create a link. The Insert Link to NetMember Page screen appears.
4. In the Description field, enter what the link will say in your message. In the previous example, the donor will click on the words “Adopt an Animal - Patron” to access your online membership page.
5. In the Membership Page field, the title of the selected membership Web page defaults.6. Enter the Campaign, Fund, Appeal, or Package you want credited for any donation.7. For record keeping and reporting purposes, you can keep an up-to-date count of the number of
constituents sent this message by marking the Update number solicited for this appeal checkbox. This information may prove helpful when trying to evaluate the success of the email effort. When you download your online transactions, the No. solicited field on the General tab of the appeal record is updated.
8. If the email is an appeal, and your organization is in the habit of tracking appeals on constituent records, mark Add this appeal to the constituent’s record. You can then enter the Date you want to appear with the appeal and any Comment.
9. Click OK. The new link appears in your message.
Note: For information about working in NetMembers, see “NetMembers” on page 257.
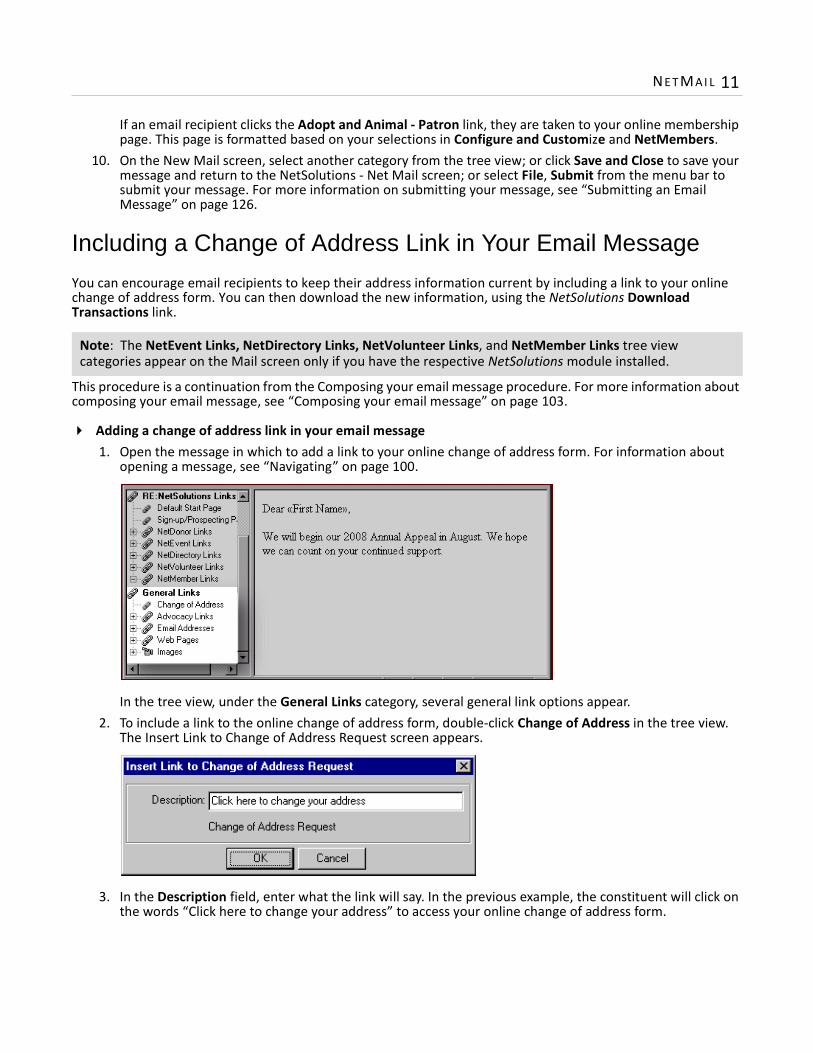
NE TMA I L 11
If an email recipient clicks the Adopt and Animal - Patron link, they are taken to your online membership page. This page is formatted based on your selections in Configure and Customize and NetMembers.
10. On the New Mail screen, select another category from the tree view; or click Save and Close to save your message and return to the NetSolutions - Net Mail screen; or select File, Submit from the menu bar to submit your message. For more information on submitting your message, see “Submitting an Email Message” on page 126.
Including a Change of Address Link in Your Email Message
You can encourage email recipients to keep their address information current by including a link to your online change of address form. You can then download the new information, using the NetSolutions Download Transactions link.
This procedure is a continuation from the Composing your email message procedure. For more information about composing your email message, see “Composing your email message” on page 103.
Adding a change of address link in your email message1. Open the message in which to add a link to your online change of address form. For information about
opening a message, see “Navigating” on page 100.
In the tree view, under the General Links category, several general link options appear. 2. To include a link to the online change of address form, double-click Change of Address in the tree view.
The Insert Link to Change of Address Request screen appears.
3. In the Description field, enter what the link will say. In the previous example, the constituent will click on the words “Click here to change your address” to access your online change of address form.
Note: The NetEvent Links, NetDirectory Links, NetVolunteer Links, and NetMember Links tree view categories appear on the Mail screen only if you have the respective NetSolutions module installed.

120 CH A PT E R
4. Click OK. The new link appears in your message.
If an email recipient clicks the Click here to change your address link, they are taken to an online address update form. Once they complete the form and submit the updated information, you can download the new address, using the Download Transaction link.
5. On the New Mail screen, select another category from the tree view; or click Save and Close to save your message and return to the NetSolutions - Net Mail screen; or select File, Submit from the menu bar to submit your message. For more information on submitting your message, see “Submitting an Email Message” on page 126.
Including an Advocacy Link in Your email Message
Nonprofits engage in advocacy whenever they work to change public policy. This means activities such as lobbying or partisan political activity, but it also means activities such as community organizing, working with the media, educating voters, researching, and reporting on problems facing communities, conducting voter registration and get-out-to-vote campaigns, protesting in the streets, and more.If your organization engages in advocacy, in The Raiser’s Edge you can use actions with a category of Advocacy to record constituent actions taken in response to an action email from your organization. In addition, with Blackbaud NetAdvocacy, you can download advocacy action data to The Raiser’s Edge from NetSolutions.
Blackbaud NetAdvocacy works with Capwiz subscription service, allowing you to include pages on your Web site where users can email influential individuals (such as Congressional, state, and local officials) to encourage their support on particular causes. When sending advocacy alert email from NetSolutions you can link the advocate’s actions to their Raiser’s Edge record once the action is complete. For information about setting up action alerts on your site using Blackbaud NetAdvocacy and Capwiz, see your Capwiz site control page.
This procedure is a continuation from the Composing your email message procedure. For more information about composing your email message, see “Composing your email message” on page 103.
Adding an advocacy link in your email message1. Open the message in which to add a link to your online advocacy page. For information about opening a
message, see “Navigating” on page 100.
Note: For detailed instructions about downloading updated address information, see “Downloading Transactions” on page 295.
Note: You download advocacy data into The Raiser’s Edge using the Download Transactions link in NetSolutions. For more information, see “Downloading Transactions” on page 295.
Note: The NetEvent Links, NetDirectory Links, NetVolunteer Links, and NetMember Links tree view categories appear on the Mail screen only if you have the respective NetSolutions module installed.

NE TMA I L 12
In the tree view, under the General Links category, several general link options appear. 2. To include a link to the online advocacy page, double-click New Advocacy Link, displayed under Advocacy
in the tree view. The Insert Link to Advocacy Site screen appears.
3. In the Description field, enter what the link will say. In the previous example, the constituent will click on the words “Frank Domo” to access your advocacy page.
4. In the Address field, enter the Web address for your advocacy page.5. Click OK. The new link appears in your message.
If an email recipient clicks the Frank Domo link, they are taken to your advocacy site. NetSolutions tracks all constituents who visit the site using this link. You can download actions for these constituents using the Download Transaction link.
6. On the New Mail screen, select another category from the tree view; or click Save and Close to save your message and return to the NetSolutions - Net Mail screen; or select File, Submit from the menu bar to submit your message. For more information on submitting your message, see “Submitting an Email Message” on page 126.
Adding an Email Address to Your Email Message
If there is a specific contact person in your organization, you can use NetMail and include links to the individual’s email address in your message.
Warning: The Advocacy Links category appears in NetMail only if a valid password was entered on the Account Information tab in Configure and Customize.
Warning: Your advocacy link Address must include both “capwiz.com” and “?alertid” in the URL to be valid.
Note: The NetEvent Links, NetDirectory Links, NetVolunteer Links, and NetMember Links tree view categories appear on the Mail screen only if you have the respective NetSolutions module installed.

122 CH A PT E R
This procedure is a continuation from the Composing your email message procedure. For more information about composing your email message, see “Composing your email message” on page 103.
Adding email addresses to your email message1. Open the message in which to add an email link. For information about opening a message, see
“Navigating” on page 100.
In the tree view, under the General Links category, several general link options appear. 2. To include a link to an email address, double-click Email Addresses in the tree view. New Email Addresses
appears under the Email Address category. 3. Double-click New Email Addresses. The Insert Email Address screen appears.
4. In the Name field, enter a name for the email address link you are including in the message. For example, in the previous example, the email recipient will click “Brenda Smathers” to bring up Brenda’s email address.
5. In the Address field, enter the individual’s email address.6. Click OK. A link to the email address appears in your email message.

NE TMA I L 12
If an email recipient clicks the Brenda Smathers link, a blank message screen appears with Brenda’s name in the To field.
7. After you add all the email links you want to include in your message, you can select additional links in the tree view; or click Save and Close to save your message and return to the NetSolutions - Net Mail screen; or select File, Submit from the menu bar to submit your message. For more information about submitting your message, see “Submitting an email message” on page 126.
Adding links to Non-NetSolutions Web Pages
With NetMail, you are not restricted to including only NetSolutions Web page links in your message. You can also include links to Web pages hosted by your organization.
This procedure is a continuation from the Composing your email message procedure. For more information about composing your email message, see “Composing your email message” on page 103.
Adding links to non-NetSolutions Web pages Not housed by NetSolutions1. Open the message in which to add a Web page link. For information about opening a message, see
“Navigating” on page 100.
In the tree view, under the General Links category, several general link options appear. 2. To include a link to an non-NetSolutions Web page, under General Links, double-click the Web Pages
category. The New Web Page Link option appears.
Note: The NetEvent Links, NetDirectory Links, NetVolunteer Links, and NetMember Links tree view categories appear on the Mail screen only if you have the respective NetSolutions module installed.

124 CH A PT E R
3. Double-click New Web Page Link. The Insert Link to a Web Page screen appears.
4. In the Description field, enter what the link will say in your message. In the previous example, the donor will click on the words “WPA Home Page” to access the link address.
5. In the Address field, enter the address of the Web page.6. Click OK. A link to the Web page now appears in your message.
If an email recipient clicks the WPA Home Page link, they are taken to the Web page address you entered in the Address field.
7. After you add all the Web page links to include in your message, you can select additional links in the tree view; or click Save and Close to save your message and return to the NetMail screen; or select File, Submit from the menu bar to submit your message. For more information on submitting your message, see “Submitting an email message” on page 126.
Adding Images to Your Email
When composing an email message in NetMail, you can also choose to include an image or picture. The functionality allows for *.gif and *.jpg files.
This procedure is a continuation from where Composing your email message procedure ends. For more information about composing your email message, see “Composing your email message” on page 103.
Note: The NetEvent Links, NetDirectory Links, NetVolunteer Links, and NetMember Links tree view categories appear on the Mail screen only if you have the respective NetSolutions module installed.

NE TMA I L 12
Adding images to your email message1. Open the message in which to add an image. For information about opening a message, see “Navigating”
on page 100.
In the tree view, under the General Links category, several general link options appear.
2. To include an image in your email message, under General Links, double-click Images. The New Image Link appears.
3. Double-click New Image Link. The Insert Image screen appears.
4. In the Description field, enter a title for the image. This title appears under Images in the Tree View. This same image can be added to other messages by double-clicking on the description.
5. In the Image File field, click the ellipsis to access the Open screen.Select the image file to include in your message and click Open to return to the Insert Image screen.
6. On the Insert Image screen, select an Alignment: • Left (Default) aligns the object to the left of the surrounding text. All preceding and subsequent text
flows to the right of the object. • Right aligns the object to the right of the surrounding text. All subsequent text flows to the left of the
object. • Top aligns the top of the object with the top of the text. The top of the text is the baseline plus the
standard height of an ascender in the text. • Middle aligns the middle of the object with the surrounding text. • Bottom aligns the bottom of the object with the bottom of the surrounding text. The bottom is equal
to the baseline minus the standard height of a descender in the text.
Note: In NetMail, you cannot include *.pdfs in your email message. However, if you save your *.pdf as a *.jpg, you can added the image to your message.

126 CH A PT E R
7. Click OK. The image appears in your message.
8. After you add all the images to your message, you can select additional links in the tree view; or click Save and Close to save your message and return to the NetMail screen; or select File, Submit from the menu bar to submit your message. For more information on submitting your message, see “Submitting an email message” on page 126.
Submitting an Email MessageAfter you create the email message, you can submit the message to Blackbaud. We process the information and send the email to your constituents.
Submitting an email message1. On the Raiser’s Edge bar, click NetSolutions. The NetSolutions page appears.2. Click NetMail. The NetMail screen appears.
Note: For detailed instructions about how to create an email message, see “Creating a New Email File” on page 103.

NE TMA I L 12
3. Open an existing email file by double-clicking the link or create a new email file by clicking New email. The mail screen appears.
4. After you complete your email message, select File, Submit from the menu bar. The Submit email screen appears.
5. On the HTML Format Preview tab, you can see how your message appears on systems accepting HTML format. On the Text Format Preview tab, you can see how your message appears on systems accepting text format.
6. If most of your constituents cannot accept HTML emails, mark the Send as text only checkbox.7. Click Submit. If when creating your email, you marked Create static query, the Save Static Query screen
appears.
Enter a Query name and Description to help you remember the content of the query. You can mark the Other users may execute this query and Other users may modify this query checkboxes.
Note: For detailed instructions about how to create and effectively use queries, see the Query and Export Guide.

128 CH A PT E R
8. Click Save. The Upload Email progress bar appears.
When the upload is complete and the information is submitted, a confirmation message appears.
If for some reason an email address does not work and the message returns to Blackbaud’s server, NetSolutions saves this information. To see which constituent email addresses failed, use the Show statistics for this email record link on the NetMail screen. To see which email addresses were rejected as undeliverable, use the Download Transactions link available on the NetSolutions page. For detailed instructions on downloading this information, see “Downloading Transactions” on page 295.
9. To return to the New Mail screen, click OK.10. Click the “X” in the upper right corner to close the New Mail screen and return to the NetMail screen.
Viewing Email StatisticsOn the NetMail screen, you can view important statistics about your email. You can see how many email recipients clicked a Web page link, how many recipients donated using a Web page link, the total amount generated from a Web page link, the number and types of bounced emails, as well as the number of recipients that chose to opt-out.
Viewing statistics for an email1. On the Raiser’s Edge bar, click NetSolutions. The NetSolutions page appears.

NE TMA I L 12
2. Click NetMail. The NetMail screen appears.
3. Under the email file for which you want to view statistics, click Show statistics for this email record.A screen appears displaying information about each link included in the email message.

130 CH A PT E R
4. To view more statistical information, click Show additional statistics. The Page Statistics screen appears.
• To see statistics for a specific period, enter a Start Date and End Date, and click Update.• Click the Print Chart button included above the graph to print the statistic information.• In the drop-down field above the chart, you can select to view Donations by Fund or Total Amount by
Fund. 5. To close the screen and return to the NetMail screen, click the “X” in the upper right corner.6. To close the statistics display, click Hide statistics for this email record.7. To exit the NetMail screen and return to the NetSolutions page, click the “X” in the upper right corner.
Copying an Email FileOnce you create and save an email file, you can use the file as a starting point when creating new email files. For example, if you are sending out your Annual Appeal, you can open the Annual Appeal you sent last year as a copy, make the necessary changes, and save the new appeal. You then have two Annual Appeal files, the one from last year, still intact, and this year’s appeal.
Copying an Email 1. On the Raiser’s Edge bar, click NetSolutions. The NetSolutions page appears.

NE TMA I L 13
2. Click NetMail. The NetMail screen appears.
3. Under the email file you want to copy, click Copy this email record. A copy of the email file opens. The Name field is blank.
4. Enter a new Name for this email and make the necessary changes.5. Click Save and Close. Both email files appear on the NetSolutions - NetMail screen.
6. To exit this screen and return to the NetSolutions page, click the “X” in the upper right corner.
Deleting an Email FileIf you discover you no longer need a saved email file, you can delete if from your system.

132 CH A PT E R
Deleting an email file1. On the Raiser’s Edge bar, click NetSolutions. The NetSolutions page appears.2. Click NetMail. The NetMail screen appears.
3. Under the email file you want to delete, click Delete this email record. A warning message appears.

NE TMA I L 13
4. To permanently delete the record, click Yes. You return to the NetSolutions - NetMail screen.
5. To exit this screen and return to the NetSolutions page, click the “X” in the upper right corner.

134 CH A PT E R

5chapter
NetEvents
Requirements . . . . . . . . . . . . . . . . . . . . . . . . . . . . . . . . . . . . . . . . . . . . . . . . . . . . . . . . . . . . . . . . . . . . . . . . . . . . . 136Interacting with The Raiser’s Edge . . . . . . . . . . . . . . . . . . . . . . . . . . . . . . . . . . . . . . . . . . . . . . . . . . . . . . . . . . . . . . . 136Navigating . . . . . . . . . . . . . . . . . . . . . . . . . . . . . . . . . . . . . . . . . . . . . . . . . . . . . . . . . . . . . . . . . . . . . . . . . . . . . . . . 136Accessing NetEvents . . . . . . . . . . . . . . . . . . . . . . . . . . . . . . . . . . . . . . . . . . . . . . . . . . . . . . . . . . . . . . . . . . . . . . . . . . 137Buttons . . . . . . . . . . . . . . . . . . . . . . . . . . . . . . . . . . . . . . . . . . . . . . . . . . . . . . . . . . . . . . . . . . . . . . . . . . . . . . . . . . . . . 139Publishing an Event to Your Web Site . . . . . . . . . . . . . . . . . . . . . . . . . . . . . . . . . . . . . . . . . . . . . . . . . . . . . . . . . . 140Publish an Event to the Web . . . . . . . . . . . . . . . . . . . . . . . . . . . . . . . . . . . . . . . . . . . . . . . . . . . . . . . . . . . . . . . . . . . . 140Order Events in Group . . . . . . . . . . . . . . . . . . . . . . . . . . . . . . . . . . . . . . . . . . . . . . . . . . . . . . . . . . . . . . . . . . . . . . . . . 144Allow Online Registration . . . . . . . . . . . . . . . . . . . . . . . . . . . . . . . . . . . . . . . . . . . . . . . . . . . . . . . . . . . . . . . . . . . . . . 144Allow Additional Donations . . . . . . . . . . . . . . . . . . . . . . . . . . . . . . . . . . . . . . . . . . . . . . . . . . . . . . . . . . . . . . . . . . . . . 146Prices for the Event . . . . . . . . . . . . . . . . . . . . . . . . . . . . . . . . . . . . . . . . . . . . . . . . . . . . . . . . . . . . . . . . . . . . . . . . . . . 147Event Description . . . . . . . . . . . . . . . . . . . . . . . . . . . . . . . . . . . . . . . . . . . . . . . . . . . . . . . . . . . . . . . . . . . . . . . . . . . . . 149Page Style . . . . . . . . . . . . . . . . . . . . . . . . . . . . . . . . . . . . . . . . . . . . . . . . . . . . . . . . . . . . . . . . . . . . . . . . . . . . . . . . . . . 150Custom Confirmation . . . . . . . . . . . . . . . . . . . . . . . . . . . . . . . . . . . . . . . . . . . . . . . . . . . . . . . . . . . . . . . . . . . . . . . . . . 150Sources. . . . . . . . . . . . . . . . . . . . . . . . . . . . . . . . . . . . . . . . . . . . . . . . . . . . . . . . . . . . . . . . . . . . . . . . . . . . . . . . . . . . . . 151Event Profiling . . . . . . . . . . . . . . . . . . . . . . . . . . . . . . . . . . . . . . . . . . . . . . . . . . . . . . . . . . . . . . . . . . . . . . . . . . . . . . . . 152Additional Links . . . . . . . . . . . . . . . . . . . . . . . . . . . . . . . . . . . . . . . . . . . . . . . . . . . . . . . . . . . . . . . . . . . . . . . . . . . . . . . 154Internet Merchant Account . . . . . . . . . . . . . . . . . . . . . . . . . . . . . . . . . . . . . . . . . . . . . . . . . . . . . . . . . . . . . . . . . . . . . 155Publish the Event . . . . . . . . . . . . . . . . . . . . . . . . . . . . . . . . . . . . . . . . . . . . . . . . . . . . . . . . . . . . . . . . . . . . . . . . . . . . . 156Viewing an Event Web Page . . . . . . . . . . . . . . . . . . . . . . . . . . . . . . . . . . . . . . . . . . . . . . . . . . . . . . . . . . . . . . . . . . 158Deleting an Event Web Page . . . . . . . . . . . . . . . . . . . . . . . . . . . . . . . . . . . . . . . . . . . . . . . . . . . . . . . . . . . . . . . . . 159Viewing Event Page Statistics . . . . . . . . . . . . . . . . . . . . . . . . . . . . . . . . . . . . . . . . . . . . . . . . . . . . . . . . . . . . . . . . . 161
Procedures
Accessing NetEvents . . . . . . . . . . . . . . . . . . . . . . . . . . . . . . . . . . . . . . . . . . . . . . . . . . . . . . . . . . . . . . . . . . . . . . . . . . 137The Publish an Event to the Web screen . . . . . . . . . . . . . . . . . . . . . . . . . . . . . . . . . . . . . . . . . . . . . . . . . . . . . . . . . . 140The Allow online registration screen . . . . . . . . . . . . . . . . . . . . . . . . . . . . . . . . . . . . . . . . . . . . . . . . . . . . . . . . . . . . . 145Allow additional donations screen . . . . . . . . . . . . . . . . . . . . . . . . . . . . . . . . . . . . . . . . . . . . . . . . . . . . . . . . . . . . . . . 146Prices for the event screen . . . . . . . . . . . . . . . . . . . . . . . . . . . . . . . . . . . . . . . . . . . . . . . . . . . . . . . . . . . . . . . . . . . . . 147The Event description screen . . . . . . . . . . . . . . . . . . . . . . . . . . . . . . . . . . . . . . . . . . . . . . . . . . . . . . . . . . . . . . . . . . . 149Sources screen . . . . . . . . . . . . . . . . . . . . . . . . . . . . . . . . . . . . . . . . . . . . . . . . . . . . . . . . . . . . . . . . . . . . . . . . . . . . . . . 151Adding event profiling information to your event page . . . . . . . . . . . . . . . . . . . . . . . . . . . . . . . . . . . . . . . . . . . . . . 153Adding links to your online events page . . . . . . . . . . . . . . . . . . . . . . . . . . . . . . . . . . . . . . . . . . . . . . . . . . . . . . . . . . . 155Changing event Internet merchant account information . . . . . . . . . . . . . . . . . . . . . . . . . . . . . . . . . . . . . . . . . . . . . 156Viewing event Web pages . . . . . . . . . . . . . . . . . . . . . . . . . . . . . . . . . . . . . . . . . . . . . . . . . . . . . . . . . . . . . . . . . . . . . . 158Deleting an event Web page . . . . . . . . . . . . . . . . . . . . . . . . . . . . . . . . . . . . . . . . . . . . . . . . . . . . . . . . . . . . . . . . . . . . 159Viewing donation page statistics . . . . . . . . . . . . . . . . . . . . . . . . . . . . . . . . . . . . . . . . . . . . . . . . . . . . . . . . . . . . . . . . 161

136 CH A PT E R
With NetEvents, you can publicize upcoming events, such as golf tournaments, dances, and dinners using your Web site. You can publish the event information one of two ways.First, you can publish information about the event. No online registration link is provided. Second, you can publish event information pages that include the ability for users to register online.If, while visiting your event Web page, visitors enter any information — complete the constituent registration form or register for an event — you can download this information to The Raiser’s Edge, using the Download Transactions link. You can then generate batch entries for the downloaded information and commit the new information to records in The Raiser’s Edge.If you offer online event registration, you must define pricing units for the event in The Raiser’s Edge. If you fail to define pricing units when you create the event record, you can access the event record from NetEvents and add the pricing information. You cannot, however, add pricing units in NetEvents.
Although Blackbaud hosts your event Web page, you control the page design. Through Configure and Customize and NetEvents, you can select page and font colors, add images, include titles and descriptions, and much more. For information about Configure and Customize, see “Configure & Customize” on page 11.
System RequirementsTo use NetEvents, you must have the following:• A Web page• Internet Explorer 5.x or higher is fully supported; however donors can use HTMl 3.2 compliant browsers as well• Event Management
Interacting with The Raiser’s Edge
Using NetEvents in conjunction with The Raiser’s Edge saves your organization hours in data entry time. The Download Transactions link included with NetSolutions automatically links all event registration information to the appropriate Raiser’s Edge records. For example, if a constituent registers online for an event, with Download Transactions the constituent is added as an event participant on the Participant tab of the event record in The Raiser’s Edge. Any guests entered by the constituent are added as guests of the participant on the Participant tab of the event record. The gift generated by the registration transaction is entered as a gift record and linked to the participant record. The registration fees are added to Registration Fees tab of the participant record.Also, the online information is included in the standard Raiser’s Edge reports, queries, and exports regardless of whether the information is added through the automatic download facility or entered manually.
Navigating
Warning: Before you start working in NetEvents, you must register as a NetSolutions user and enter your Login ID and Login Password in Configure and Customize. For more information, see “Registering with NetSolutions” on page 1 and “Configure & Customize” on page 11.
Note: NetEvents does not support multiple sign-up pages for each event. An event record can be published only once.
Note: Before you can access NetEvents, you must register for NetSolutions with Blackbaud. Also, you must click Configure and Customize and enter your login information.

N ETEVE N T S 13
In The Raiser’s Edge, you access NetEvents by clicking NetSolutions on the Raiser’s Edge bar.
Accessing NetEvents
Multiple users can access different areas of NetSolutions simultaneously.For more information, see the Security chapter in the Configuration & Security Guide.
Accessing NetEvents1. On the Raiser’s Edge bar, click NetSolutions. The NetSolutions page appears.2. Click NetEvents. The NetSolutions - NetEvents screen appears.

138 CH A PT E R
The first time you open the link, this screen appears blank. Once you create and save an NetEvents file, a link to the saved file appears.
3. To create an online event Web page, click New Event. The Web Event Wizard screen appears.
For information about publishing an event to your Web site, see “Publishing an Event to Your Web Site” on page 140.

N ETEVE N T S 13
4. After you enter and save an online event, it appears as a link on the NetSolutions - NetEvents screen.
5. To open the event, click the link — Afternoon Tea. 6. To see how the Web page looks, click Visit this event page. 7. To delete the event Web page, click Delete this event page.8. To view a statistical overview of an event page, click Page Statistics under the event page to access the
information.9. To view a statistical overview of all of your event pages, click Statistics.
10. To exit this screen, click the “X” in the upper right corner. You return to the NetSolutions page.
Buttons
Three buttons to help you navigate through NetEvents.
The New Event button on the NetSolutions - NetEvents screen opens the Web Event Wizard, where you enter information for a new online event.
The Statistics button on the NetSolutions - NetEvents screen, charts the number of online registrants and online fees collected from your online event pages.
The Edit event button on the Web Event Wizard screen opens the event record in The Raiser’s Edge. You can then make any necessary changes to the event before publishing it to your Web site.

140 CH A PT E R
Publishing an Event to Your Web SiteWith NetEvents, you can take event information from The Raiser’s Edge and make it available on your Web site. You can also choose to publish a single event or a group of events that you have specified and give your visitors an online registration option. The events Web page is hosted by Blackbaud but formatted based on your selections in Configure and Customize and the Web Event Wizard. For more information about Configure and Customize, see “Configure & Customize” on page 11.
Publish an Event to the Web
On the Publish an Event to the Web screen, you select the Raiser’s Edge event record to publish on your Web site.
Completing the The Publish an Event to the Web screen1. On the Raiser’s Edge bar, click NetSolutions. The NetSolutions page appears.2. Click NetEvents. The NetSolutions - NetEvents page appears.

N ETEVE N T S 14
3. Click New Event. The Web Event Wizard appears.
On the Publish an Event to the Web screen, select either a single event or an event group record from The Raiser’s Edge to place on your Web page.
4. To select a single event, select Select Single Event.To select the record, click the binoculars. The Open screen for events appears.
a. In the Find Events that meet these criteria frame, enter criteria, narrowing the event search, and click Find Now. All event records satisfying the criteria appear in the grid.
b. You can select an existing record, and click Open.
Note: For information about defining groups of events in The Raiser’s Edge, see the Multiple Registrations for Grouped Events chapter of the Event Management Data Entry Guide.

142 CH A PT E R
Or
You can select Add New to create a new event record. Once an event is selected or created, it appears in the Select Event field on the Web Event Wizard screen.
This is what registrants for a single event see.
5. To select an event group, select Select Event Group. To select an event group record, click the down arrow and select the group from the drop down menu.
Note: For information about creating and working with event records, see the Event Management Data Entry Guide.

N ETEVE N T S 14
This is what registrants for a multiple event group will see.
6. Click Next and move to the Allow Online Registration? screen, or click Cancel to return to the NetSolutions - NetEvents page.
Warning: If you click Cancel, any information you entered in the Web Event Wizard is lost.

144 CH A PT E R
Order Events in Group
On the Order events in a group page, you can select the order in which you want your group of events to appear on your Web page. This screen appears if you select the Select Event Group on the Publish an Event to the Web page.
All events included in the selected group appear in the Event Name grid. Use the up and down arrows to the right of the grid to arrange the events.
Allow Online Registration?
On the Allow online registration? page, you can allow visitors to your Web page to register for an event online. You can limit the number of online registrations, select a constituent code to use when creating a constituent record, and allow registrants to make comments when they pay their registration fees.

N ETEVE N T S 14
Completing the Allow online registration? screen1. Once you complete the Publish an Event to the Web screen, click Next. The Allow online registration?
screen appears.
2. To include a registration link on the event Web page, mark Allow participants to register online.This is what your registrants see.
3. To include a space for comments on the event Web page, mark Allow registrants to enter comments with their registration fee. A Comments field is included at the bottom of the Payment Information frame on your Web page. This checkbox is enabled only if you mark Allow participants to register online.This is what your registrants see.

146 CH A PT E R
4. On the Allow online registration? screen, to limit the number of online registrants, mark Limit the maximum number of participants that can register online and enter a number in the box next to (maximum participants).
5. In the Select a constituent code to use when creating a constituent record field, select the constituent code to assign online registrants who are not already constituents in your database. This code is then assigned any new constituents downloaded from this Web page. It is added to the Bio 2 tab of the constituent record.
6. Click Next and move to the Allow Additional Donations? screen, if you marked Allow participants to register online. Otherwise, move to the Event Description screen. Or click Cancel to return to the NetSolutions - NetEvents page. For information about completing the Event Description screen, see page 149.
Allow Additional Donations?
On the Allow additional donations? screen, you can give users of your Web site the option of donating money in addition to the event registration fees.
Completing the Allow additional donations screen
1. Once you complete the Allow online registration? screen, if you marked Allow participants to register online, the Allow additional donations? screen appears when you click Next.
2. Mark Allow registrants to make an additional donation on this page to allow online registrants to make additional donations.The Additional Donation Text field will become available.
Warning: If you click Cancel, any information you entered in the Web Event Wizard is lost.
Note: If you did NOT mark the Allow participants to register online on the Allow online registration screen, skip to “Event Description” on page 149.
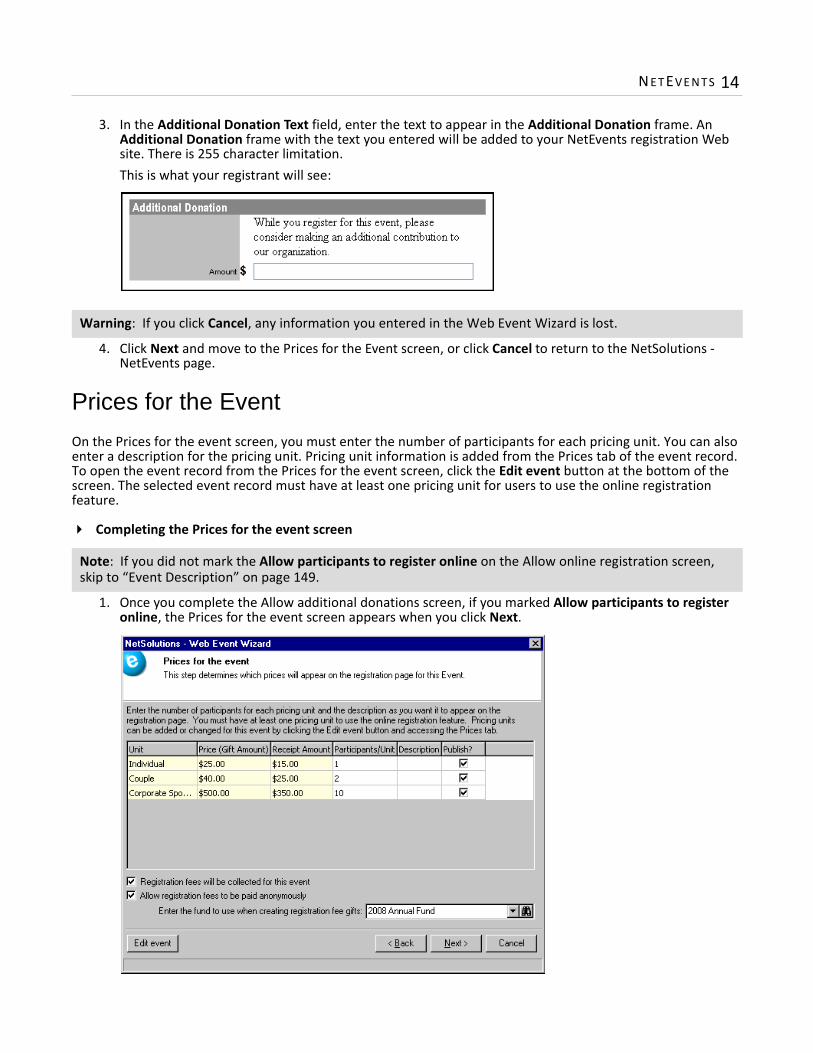
N ETEVE N T S 14
3. In the Additional Donation Text field, enter the text to appear in the Additional Donation frame. An Additional Donation frame with the text you entered will be added to your NetEvents registration Web site. There is 255 character limitation.This is what your registrant will see:
4. Click Next and move to the Prices for the Event screen, or click Cancel to return to the NetSolutions - NetEvents page.
Prices for the Event
On the Prices for the event screen, you must enter the number of participants for each pricing unit. You can also enter a description for the pricing unit. Pricing unit information is added from the Prices tab of the event record. To open the event record from the Prices for the event screen, click the Edit event button at the bottom of the screen. The selected event record must have at least one pricing unit for users to use the online registration feature.
Completing the Prices for the event screen
1. Once you complete the Allow additional donations screen, if you marked Allow participants to register online, the Prices for the event screen appears when you click Next.
Warning: If you click Cancel, any information you entered in the Web Event Wizard is lost.
Note: If you did not mark the Allow participants to register online on the Allow online registration screen, skip to “Event Description” on page 149.

148 CH A PT E R
The entries that appear in the Unit, Price (Gift Amount), and Receipt Amount columns are based on information entered on the Prices tab of the event record in The Raiser’s Edge.If you chose to publish an Event Group, an Event column appears, indicating the individual event each entry belongs to.To edit or add information to these columns, you must do so from the event record. To access the event record, click Edit event. For more information about working in event records, see the Event Management Data Entry Guide.
2. In the Participants/Units column, you must enter the number of participants.For instance, the “Individual” unit in the preceding step represents one participant, while the “Corporate Sponsor” unit represents 10.
3. In the Description column, enter the unit description to appear on the event Web page. If you leave the Description column blank, the entries in the Unit column appear on the Web page.
This is what your registrants see. They select the number of registrations to purchase by entering the number next to each defined Unit. In addition, they can choose to designate themselves as one of the purchased registrations by marking the I am attending as a(n) checkbox and selecting the unit for which they would like to be counted.
4. In the Publish? column, mark the checkbox for price points that will be available on the resulting event registration page. Only events with at least one published price will appear on the registration page. At least one price must be published to continue through the wizard. The default is checked.
5. On the Prices for the event screen, the program assumes Registration fees will be collected for this event, and this checkbox defaults to marked. If you are not collecting registration fees for this event, unmark the checkbox. The Enter the fund to use when creating registration fee gifts field is then disabled.
6. If Registration fees will be collected for this event is marked, you must select a fund in the Enter the fund to use when creating registration fee gifts field. This fund is credited with any online registration fees collected for this event when you download the online information to The Raiser’s Edge.
7. If Allow registration fees to be paid anonymously is marked, registrants can pay their fees anonymously. A checkbox to donate anonymously appears on the registration page.This is what your registrant sees:
Note: For the registrant, each registration purchased is equal to one specified Unit. So if one Unit is specified to equal 10 participants and a registrant purchases two Units, they will pay to register 20 participants total.

N ETEVE N T S 14
8. Click Next and move to the Event Description screen, or click Cancel to return to the NetSolutions - NetEvents page.
Event Description
On the Event Description screen, you can enter information about your event, such as the event name, description, and any details you want visitors to your Web page to know. You can also select an image and a caption to include on the page.
Event description screen1. Once you complete the Allow online registration or the Prices for the event screen, click Next. The Event
description screen appears.
2. Enter an Event Name. The event record name defaults because you selected the event on the Publish an Event to the Web screen, but you can change the name on this screen. The name appears at the top of your event Web page, under the Title information you entered in Configure and Customize.
3. Enter a Description of the event. This appears under the Event Name. There is a 1,024 character limit.4. In the Details box, enter any additional event information. For example, you can enter ticketing
information. There is a 2,147,483,647 character limitation.5. In the first Image/Caption field you can include an image on your event Web page. Click the ellipsis to
access the Open screen.Select the image file to include on the event Web page, and click Open to return to Web Event Wizard screen.
6. In the second Image/Caption field, you can enter a caption to appear under the image.
Warning: If you click Cancel, any information you entered in the Web Event Wizard is lost.

150 CH A PT E R
7. In Configure and Customize you design a Tell a Friend link, which appears on your Web pages. The link takes visitors to another page, where they can enter contact information about their friend. If you do not want this link to appear on your event page, unmark the Display Tell a Friend checkbox. Keep the checkbox marked if you want the link to appear on your event page.
8. To see how the information you added on this screen appears on the event Web page, click Preview. This is what your registrants see.
9. Click Next and move to the Page Style screen, or click Cancel to return to the NetSolutions - NetEvents page.
Page Style
Using the Page Style screen, you can give your event pages a unique look, setting it apart from your other NetSolutions pages. The style you established in Configure and Customize defaults to all your NetSolutions Web pages, but you can change the style for each event page using the Page Style screen. The fields and checkboxes available on this screen change based on the Page section you select. You can change the background, logo and title, image, header, detail, body, table legend, table headers, table text, and error text styles.For more information, see “Changing Page Style” on page 387.
If you are happy with the page style you established in Configure and Customize, do not make any changes on this screen, and click Next to move to the Customize the Event Confirmation screen, or the Publish the Event screen depending upon your earlier choices. Or click Cancel to return to the NetSolutions - NetEvents page. For information, on the Publish the Event screen, see “Publish the Event” on page 156.
Customize the Event Confirmation
With NetEvents, you can customize registration confirmation messages automatically sent via email to your online registrants. For more information, see “Customizing Confirmations” on page 367.
When you are satisfied with your confirmation letter, click Next to move to the Sources screen or click Cancel to return to the NetSolutions - NetEvents page.
Warning: If you click Cancel, any information you entered in the Web Event Wizard is lost.
Warning: If you click Cancel, any information you entered in the Web Event Wizard is lost.
Warning: If you click Cancel, any information you entered in the Web Event Wizard is lost.

N ETEVE N T S 15
Sources
Including source options on your event page lets you know what attracted registrants to your Web site. For instance, in the following example, the Wildlife Protection Association included “Visiting Web Site” and “Mailing” as source options. They also attached each source option to a Raiser’s Edge appeal. So, whenever a registrant selects one of the source options, the corresponding appeal is credited with the registration fee.
Completing the Sources screen1. Once you complete the Customize the event confirmation screen, click Next. The Sources screen appears.
If you include sources on your event page, you can keep track of what draws registrants to your Web site. You can also credit appeal records for any fees.
2. In the Source header field, enter a heading for the online source section of your Web page. There is a 255 character limitation.
3. In the Online Source column, enter the options to appear on your Web page. In the following example, the Wildlife Protection Association included “Visiting Web Site” and “Mailing” as source options.
4. In the Appeal to Credit column, enter the appeal credited with fees/donations associated with the source.

152 CH A PT E R
5. In the If no source is specified use this appeal field, select a default appeal to use should the donor not select a source. For instance, in the following example, registrants have two source options to select when registering online: “Visiting Web Site” or “Mailing”. If they select “Visiting Web Site” the “Internet/Web Site solicitations” appeal is credited for the donation; if they select “Mailing” the “Direct Mailing” appeal is credited for the donation. If no source is selected, the “Internet/Web Site solicitations” appeal is credited for the donation.
Information entered in the example above appears as a drop-down menu at the bottom of your registration page.This is what your online donor sees.
6. Click Next and move to the Event Profiling screen, or click Cancel to return to the NetSolutions - NetEvents page.
Event Profiling
Event profiling allows you to include questions on your event page to gather additional information from registrants. These questions can help you segment, target, and cultivate your constituency. On the Event Profiling screen, you can enter profiling question specific to this event. The default donor profiling information, used for all NetSolutions functions, is entered in Configure and Customize.
Warning: If you click Cancel, any information you entered in the Web Event Wizard is lost.

N ETEVE N T S 15
Adding event profiling information for your event page1. Once you complete the Sources screen, click Next. A screen appears in which to enter event profiling
questions for this event page.
On this screen, you can enter questions to appear on your event page. The questions can help you better understand your donors.

154 CH A PT E R
2. For example, in the Donor Profiling Question column, you can ask the question “Did you receive our event booklet?”. This question then appears at the end of the donor registration page. The question is limited to 120 characters.
3. In the Attribute to Use column, you must assign the question to an constituent attribute in your database. In the example above, if the registrant marks Did you get our mailing? on the event page, the information appears on the Attributes tab of the constituent record.On the constituent record, “Mailing” appears in the Category column and “Yes” appears in the Description column.
4. From the Donation Page Wizard screen, click Next and move to a screen where you can enter new merchant account information, or click Cancel to return to the NetSolutions - NetDonors page.
5. Click Next and move to the Additional Links screen, or click Cancel to return to the NetSolutions - NetEvents page.
Additional Links
From the Additional Links screen, you can add links to related Web pages. For example, you can add a link to a detailed explanation of your privacy policy.
Note: Only yes/no constituent attributes appear in the Attribute to Use column.
Warning: If you click Cancel, any information you entered in the Web Event Wizard is lost.

N ETEVE N T S 15
Adding links to your online event page1. Once you complete the Donor Profiling screen, click Next. A screen appears to add links to your event
page.
2. In the Image column, you must map to an image to use as the hyperlink on your event page. 3. In the Caption column, enter the text visitors see when they hover their mouse over the hyperlink image.4. In the URL column, enter the address of the Web page to which you are adding a link. The column accepts
the URL with or without the <http://.5. The Path column displays the location of the Image you selected.
6. Click Next and move to the Internet Merchant Account screen, or click Cancel to return to the NetSolutions page.
Internet Merchant Account
On the Internet Merchant Account screen, you can change the Internet merchant account to use for this event Web page. The default internet merchant account, used for all NetSolutions functions, is entered in Configure and Customize.
Warning: If you click Cancel, any information you entered in the Web Event Wizard is lost.

156 CH A PT E R
Changing event Internet merchant account information1. Once you complete the Additional Links screen, click Next. A screen appears so you can enter a different
Internet merchant account for this event page.
2. To activate this screen, mark Use a different Internet Merchant Account for this page. 3. In the Merchant account field, select the account you want used for this page. You establish accounts in
Business Rules accessed through Config.
4. Click Next and move to the Publish the Event screen, where you can complete your NetEvent page, or click Cancel to return to the NetSolutions - NetEvent page.
Publish the Event
On the Publish the Event screen, you can review all the information you entered in the Web Event Wizard.
Warning: If you click Cancel, any information you entered in the Web Event Wizard is lost.

N ETEVE N T S 15
Completing the Publish the Event screen1. From the Internet Merchant Account screen, click Next. A screen summarizing the information you
included in the Web Event Wizard appears.
2. Click Finish. A screen appears with a link to your new event Web page.
3. Click the Click here to visit the event registration page link. The Web event page you just designed appears.
4. To add the Web event to your existing Web site, cut and paste the code provided in the field beneath the Click here to visit the event registration page link.

158 CH A PT E R
5. To exit the Web Event Wizard screen, click Close. You return to the NetSolutions - NetEvents screen.
The new online event appears as a link on the screen.6. To add the event page you just designed to your Web site, open Configure and Customise and select the
Site Map/Links tab. Click the link under Event Registration Pages. The code necessary to add the page to their Web site appears. Paste this code to your Web site.
7. To close the NetSolutions - NetEvents screen and return to the NetSolutions page, click the “X” in the under right corner.
Viewing an Event Web PageAfter you create an event Web page, you can access the page through NetSolutions. Working through NetSolutions you can easily make changes to the Web page.
Viewing event Web pages1. On the Raiser’s Edge bar, click NetSolutions. The NetSolutions page appears.

N ETEVE N T S 15
2. Click NetEvents. The NetSolutions - NetEvents screen appears.
3. Click the Visit this event page link. The Web page appears.
4. To exit the NetSolutions - NetEvents screen and return to the NetSolutions page, click the “X” in the upper right corner.
Deleting an Event Web PageOnce an event Web page has served its purpose, you can permanently remove it from your Web site.
Deleting event Web pages1. On the Raiser’s Edge bar, click NetSolutions. The NetSolutions page appears.

160 CH A PT E R
2. Click NetEvents. The NetSolutions - NetEvents screen appears.
3. Under the Web page link, click Delete this event page. A warning message appears.
4. Click Yes. The NetSolutions - NetEvents screen appears, minus the deleted event Web page.
5. To exit this screen and return to the NetSolutions page, click the “X” in the upper right corner.

N ETEVE N T S 16
Viewing Event Page StatisticsNetSolutions keeps track of how many registrants you have for each event and how much money each event page generates. You can view statistics for all event pages or for one page.
Viewing donation page statistics1. On the Raiser’s Edge bar, click NetSolutions. The NetSolutions page appears.2. Click NetEvents. The NetSolutions - NetEvents screen appears.
3. To view a statistical overview of registrants on all your event pages, click Statistics. The Event Registration Page Statistics screen appears.
• On the left side of the screen, Page Hits, shows you how many times each donation page was visited. In the preceding example, the Afternoon Tea page was visited two times and the Spring Ball page was visited four times.

162 CH A PT E R
• On the right side of the screen, Registrants, shows you how many online registrants you have for each page. In the preceding example, the Afternoon Tea page has two primary registrants and eight guests the Spring Ball page has four primary registrants and 29 guests.
• To see statistics for a specific period, enter a Start Date and End Date, and click Update.• To see how much money was raised in registration fees, select “Fees” in the drop-down menu above
the right pane. The right graph changes, displaying fee information for each event page.
• Click Print Chart above each graph to print the graph.4. To view statistics for a specific page, from the NetEvents page, click Page Statistics below the event page
link. The Statistics screen appears.
• To see statistics for a specific period, enter a Start Date and End Date, and click Update.• Click Print Chart above the graph to print the statistic information.• In the drop-down menu above the chart, you can select to view Fees by Pricing Unit or Registrants by
Pricing Unit.

N ETEVE N T S 16
• If you mark the Data checkbox, the graphic is replaced by columns, showing the Pricing Unit and either the Amount or the Primary Registrants and Guests, depending on what you select in the above bullet: Fees by Pricing Unit or Registrants by Pricing Unit.
• On the left, the number of Page Hits, Total Registrants, Primary Registrants, Guests, and Total Amount raised from online registration fees appears.
5. To close the screen and return to the NetSolutions - NetEvents screen, click the “X” in the upper right corner.

164 CH A PT E R

6chapter
NetDirectories
Requirements . . . . . . . . . . . . . . . . . . . . . . . . . . . . . . . . . . . . . . . . . . . . . . . . . . . . . . . . . . . . . . . . . . . . . . . . . . . . . 167Navigating . . . . . . . . . . . . . . . . . . . . . . . . . . . . . . . . . . . . . . . . . . . . . . . . . . . . . . . . . . . . . . . . . . . . . . . . . . . . . . . . 168Accessing NetDirectories . . . . . . . . . . . . . . . . . . . . . . . . . . . . . . . . . . . . . . . . . . . . . . . . . . . . . . . . . . . . . . . . . . . . . . . 168Buttons . . . . . . . . . . . . . . . . . . . . . . . . . . . . . . . . . . . . . . . . . . . . . . . . . . . . . . . . . . . . . . . . . . . . . . . . . . . . . . . . . . . . . 171Publishing an Alumni Directory on Your Web Site . . . . . . . . . . . . . . . . . . . . . . . . . . . . . . . . . . . . . . . . . . . . . . . . 171Alumni Directory Page Customization . . . . . . . . . . . . . . . . . . . . . . . . . . . . . . . . . . . . . . . . . . . . . . . . . . . . . . . . . . . . 172Alumni Directory Content . . . . . . . . . . . . . . . . . . . . . . . . . . . . . . . . . . . . . . . . . . . . . . . . . . . . . . . . . . . . . . . . . . . . . . 174Alumni Directory Addressee/Salutations . . . . . . . . . . . . . . . . . . . . . . . . . . . . . . . . . . . . . . . . . . . . . . . . . . . . . . . . . . 175Alumni Directory Pages . . . . . . . . . . . . . . . . . . . . . . . . . . . . . . . . . . . . . . . . . . . . . . . . . . . . . . . . . . . . . . . . . . . . . . . . 178Alumni Directory Page Style . . . . . . . . . . . . . . . . . . . . . . . . . . . . . . . . . . . . . . . . . . . . . . . . . . . . . . . . . . . . . . . . . . . . 180The Alumni Directory Finish Screen . . . . . . . . . . . . . . . . . . . . . . . . . . . . . . . . . . . . . . . . . . . . . . . . . . . . . . . . . . . . . . 180Publishing a Professional Directory on Your Web Site . . . . . . . . . . . . . . . . . . . . . . . . . . . . . . . . . . . . . . . . . . . . . 183Professional Page Customization . . . . . . . . . . . . . . . . . . . . . . . . . . . . . . . . . . . . . . . . . . . . . . . . . . . . . . . . . . . . . . . . 183Professional Directory Content . . . . . . . . . . . . . . . . . . . . . . . . . . . . . . . . . . . . . . . . . . . . . . . . . . . . . . . . . . . . . . . . . . 185Professional Addressee/Salutations . . . . . . . . . . . . . . . . . . . . . . . . . . . . . . . . . . . . . . . . . . . . . . . . . . . . . . . . . . . . . . 186Professional Directory Pages . . . . . . . . . . . . . . . . . . . . . . . . . . . . . . . . . . . . . . . . . . . . . . . . . . . . . . . . . . . . . . . . . . . . 189Professional Directory Page Style Screen . . . . . . . . . . . . . . . . . . . . . . . . . . . . . . . . . . . . . . . . . . . . . . . . . . . . . . . . . . 191Professional Directory Finish Screen . . . . . . . . . . . . . . . . . . . . . . . . . . . . . . . . . . . . . . . . . . . . . . . . . . . . . . . . . . . . . 192Publishing a Constituent Directory on Your Web Site . . . . . . . . . . . . . . . . . . . . . . . . . . . . . . . . . . . . . . . . . . . . . 194Constituent Page Customization . . . . . . . . . . . . . . . . . . . . . . . . . . . . . . . . . . . . . . . . . . . . . . . . . . . . . . . . . . . . . . . . . 194Constituent Directory Content . . . . . . . . . . . . . . . . . . . . . . . . . . . . . . . . . . . . . . . . . . . . . . . . . . . . . . . . . . . . . . . . . . 196Constituent Addressee/Salutations . . . . . . . . . . . . . . . . . . . . . . . . . . . . . . . . . . . . . . . . . . . . . . . . . . . . . . . . . . . . . . 197Constituent Directory Pages . . . . . . . . . . . . . . . . . . . . . . . . . . . . . . . . . . . . . . . . . . . . . . . . . . . . . . . . . . . . . . . . . . . . 200Constituent Directory Page Style Screen . . . . . . . . . . . . . . . . . . . . . . . . . . . . . . . . . . . . . . . . . . . . . . . . . . . . . . . . . . 202Constituent Directory Finish Screen . . . . . . . . . . . . . . . . . . . . . . . . . . . . . . . . . . . . . . . . . . . . . . . . . . . . . . . . . . . . . . 202Publishing a Donor Recognition Page on Your Web Site . . . . . . . . . . . . . . . . . . . . . . . . . . . . . . . . . . . . . . . . . . . 205Donor Recognition Page Customization . . . . . . . . . . . . . . . . . . . . . . . . . . . . . . . . . . . . . . . . . . . . . . . . . . . . . . . . . . . 205Donor Recognition Page Addressee/Salutations . . . . . . . . . . . . . . . . . . . . . . . . . . . . . . . . . . . . . . . . . . . . . . . . . . . . 206Donor Recognition Page . . . . . . . . . . . . . . . . . . . . . . . . . . . . . . . . . . . . . . . . . . . . . . . . . . . . . . . . . . . . . . . . . . . . . . . 208Donor Recognition Page Style Screen . . . . . . . . . . . . . . . . . . . . . . . . . . . . . . . . . . . . . . . . . . . . . . . . . . . . . . . . . . . . . 210Donor Recognition Page Finish . . . . . . . . . . . . . . . . . . . . . . . . . . . . . . . . . . . . . . . . . . . . . . . . . . . . . . . . . . . . . . . . . . 210Completing the Page Style Screen . . . . . . . . . . . . . . . . . . . . . . . . . . . . . . . . . . . . . . . . . . . . . . . . . . . . . . . . . . . . . 213Viewing a Web Page . . . . . . . . . . . . . . . . . . . . . . . . . . . . . . . . . . . . . . . . . . . . . . . . . . . . . . . . . . . . . . . . . . . . . . . . 213Deleting a Page from Your Web Site . . . . . . . . . . . . . . . . . . . . . . . . . . . . . . . . . . . . . . . . . . . . . . . . . . . . . . . . . . . 214Viewing Directory Page Statistics . . . . . . . . . . . . . . . . . . . . . . . . . . . . . . . . . . . . . . . . . . . . . . . . . . . . . . . . . . . . . 215
Procedures
Accessing NetDirectories . . . . . . . . . . . . . . . . . . . . . . . . . . . . . . . . . . . . . . . . . . . . . . . . . . . . . . . . . . . . . . . . . . . . . . . 169Customizing your alumni directory page . . . . . . . . . . . . . . . . . . . . . . . . . . . . . . . . . . . . . . . . . . . . . . . . . . . . . . . . . . 172Alumni directory content screen . . . . . . . . . . . . . . . . . . . . . . . . . . . . . . . . . . . . . . . . . . . . . . . . . . . . . . . . . . . . . . . . 175

166 CH A PT E R
Alumni Directory addressee/salutations screen . . . . . . . . . . . . . . . . . . . . . . . . . . . . . . . . . . . . . . . . . . . . . . . . . . . . 176Alumni directory page . . . . . . . . . . . . . . . . . . . . . . . . . . . . . . . . . . . . . . . . . . . . . . . . . . . . . . . . . . . . . . . . . . . . . . . . . 179Finishing the Alumni Directory Wizard . . . . . . . . . . . . . . . . . . . . . . . . . . . . . . . . . . . . . . . . . . . . . . . . . . . . . . . . . . . . 181Professional directory Page Customization screen . . . . . . . . . . . . . . . . . . . . . . . . . . . . . . . . . . . . . . . . . . . . . . . . . . 183Professional directory content screen . . . . . . . . . . . . . . . . . . . . . . . . . . . . . . . . . . . . . . . . . . . . . . . . . . . . . . . . . . . . 186Professional directory addressee/salutation screen . . . . . . . . . . . . . . . . . . . . . . . . . . . . . . . . . . . . . . . . . . . . . . . . . 187Professional Directory Page screen . . . . . . . . . . . . . . . . . . . . . . . . . . . . . . . . . . . . . . . . . . . . . . . . . . . . . . . . . . . . . . 190Finishing the Professional Directory Wizard . . . . . . . . . . . . . . . . . . . . . . . . . . . . . . . . . . . . . . . . . . . . . . . . . . . . . . . 192Constituent directory page customization screen . . . . . . . . . . . . . . . . . . . . . . . . . . . . . . . . . . . . . . . . . . . . . . . . . . 195Constituent directory content screen . . . . . . . . . . . . . . . . . . . . . . . . . . . . . . . . . . . . . . . . . . . . . . . . . . . . . . . . . . . . 197Constituent directory addressee/salutation screen . . . . . . . . . . . . . . . . . . . . . . . . . . . . . . . . . . . . . . . . . . . . . . . . . 198Constituent directory page . . . . . . . . . . . . . . . . . . . . . . . . . . . . . . . . . . . . . . . . . . . . . . . . . . . . . . . . . . . . . . . . . . . . . 201Constituent directory finish screen . . . . . . . . . . . . . . . . . . . . . . . . . . . . . . . . . . . . . . . . . . . . . . . . . . . . . . . . . . . . . . 203Donor recognition page customization screen . . . . . . . . . . . . . . . . . . . . . . . . . . . . . . . . . . . . . . . . . . . . . . . . . . . . . 205Donor recognition page addressee/salutations screen . . . . . . . . . . . . . . . . . . . . . . . . . . . . . . . . . . . . . . . . . . . . . . 207Donor recognition page screen . . . . . . . . . . . . . . . . . . . . . . . . . . . . . . . . . . . . . . . . . . . . . . . . . . . . . . . . . . . . . . . . . . 209Donor recognition page finish screen . . . . . . . . . . . . . . . . . . . . . . . . . . . . . . . . . . . . . . . . . . . . . . . . . . . . . . . . . . . . 211Viewing a Web page . . . . . . . . . . . . . . . . . . . . . . . . . . . . . . . . . . . . . . . . . . . . . . . . . . . . . . . . . . . . . . . . . . . . . . . . . . 213Deleting a page from your Web site . . . . . . . . . . . . . . . . . . . . . . . . . . . . . . . . . . . . . . . . . . . . . . . . . . . . . . . . . . . . . . 214Viewing directory page statistics . . . . . . . . . . . . . . . . . . . . . . . . . . . . . . . . . . . . . . . . . . . . . . . . . . . . . . . . . . . . . . . . 215

N ETD I RE C T O R I ES 16
With NetDirectories, you can create and publish alumni, professional, and constituent directories or donor recognition Web pages, using data from your Raiser’s Edge database. You determine the information available in each page by selecting a constituent query from The Raiser’s Edge.
Using NetDirectories, you select the specific constituent information to include in your directory or recognition page. For example, if you want visitors to your Web page to have access to contact information for your organization’s board members, you create an online directory based on a Raiser’s Edge query of your board members. You can include information entered on the board members records — addresses, telephone numbers, email addresses. You can publish multiple directories, update directories, and delete directories using this link.Although Blackbaud hosts your directories and recognition pages, you have control over the design. Through the Configure and Customize link, you can select page and font colors, add images, include titles and descriptions, and much more. For more information on configuring your Web page, see “Configure & Customize” on page 11.Also, in NetDirectories, there are additional formatting options specific to the online directory and recognition page. For example, you can add an image and caption to the page, select layout options, enter contact information, select page style options different from what you selected in Configure and Customize, and more.
Requirements for NetDirectoriesTo use NetDirectories, you must have the following:
• A Web page.• Internet Explorer 5.x or higher is fully supported; however donors can use HTMl 3.2 compliant browsers as well• The Raiser’s Edge 7.x• Alumni Tracking, to publish alumni directories online.
Note: For information about creating queries in The Raiser’s Edge, see the Query chapter of the Query & Export Guide.
Warning: Before you start working in NetDirectories, you must register as a NetSolutions user and enter your Login ID and Login Password in Configure and Customize. For more information, see “Registering with NetSolutions” on page 1 and “Configure & Customize” on page 11.

168 CH A PT E R
NavigatingIn The Raiser’s Edge, you access NetDirectories by clicking NetSolutions on the Raiser’s Edge bar.
Accessing NetDirectoriesMultiple users can access different areas of NetSolutions simultaneously.

N ETD I RE C T O R I ES 16
Accessing NetDirectories1. On the Raiser’s Edge bar, click NetSolutions. The NetSolutions page appears.
2. Click NetDirectories. The NetSolutions - NetDirectories screen appears.
The first time you open the link, this screen appears blank. Once you create and save a NetDirectories file, the saved file appears on this screen.

170 CH A PT E R
3. To place information online, click New Directory. You must then select the type of information — Alumni, Professional, or Constituent directory or a Donor Recognition Page. A wizard screen appears specific to the information type you select.
4. For information about:• Publishing an alumni directory on your Web site, see “Publishing an Alumni Directory on Your Web Site” on
page 171• Publishing a professional directory on your Web site, see “Publishing a Professional Directory on Your Web
Site” on page 183• Publishing a constituent directory on your Web site, see “Publishing a Constituent Directory on Your Web
Site” on page 194• Publishing a donor recognition page to your Web site, see “Publishing a Donor Recognition Page on Your
Web Site” on page 205

N ETD I RE C T O R I ES 17
5. After you publish an online directory or recognition page, it appears as a link on the NetSolutions - NetDirectories screen.
• To open an existing directory, click the directory name link. For example, in the example above, click Board Members to open the board members directory.
• To see how the directory Web page looks, click Visit this directory page under the directory you want to visit.
• To delete the directory Web page, click Delete this directory page under the directory you want to delete.6. To exit this screen, click the “X” in the upper right corner. You will return to the NetSolutions page.
Buttons
In NetDirectories, two buttons help you navigate through the program.
The New Directory button on the NetSolutions - NetDirectories screen opens the NetSolutions - Directories Wizard, where you can enter information for a new online directory.
The Statistics button on the NetSolutions - NetDirectories screen generates a chart that tracks activity on your Web pages.
Publishing an Alumni Directory on Your Web Site
Note: For more information, see “Configure & Customize” on page 11.

172 CH A PT E R
With NetDirectories, you can take alumni information from your Raiser’s Edge database and create an online directory. You can make selected alumni address, telephone, and email information from The Raiser’s Edge available on your Web site. The type of directory you create determines the information you can select to include. For example, “Class of” information is available to include in Alumni Directories only.The directory Web page is hosted by Blackbaud but formatted based on your selections in Configure and Customize and NetDirectories.
Alumni Directory Page Customization
This is the first procedure in a series of procedures, explaining the Alumni Directory Wizard. The following procedures should be used in succession.• “Alumni Directory Page Customization” on page 172• “Alumni Directory Content” on page 174• “Alumni Directory Addressee/Salutations” on page 175• “Alumni Directory Page” on page 178• “Alumni Directory Page Style” on page 180• “The Alumni Directory Finish Screen” on page 180On the Page Customization screen, select the query of records to include in your online directory. You also must select the school to which the alumni directory is associated, enter a directory name, and enter a description of the directory.
Customizing your Alumni Directory page
1. On the Raiser’s Edge bar, click NetSolutions. The NetSolutions page appears.
Warning: Before you start working in NetDirectories, you must register as a NetSolutions user and enter your Login ID and Login Password in Configure and Customize. For more information, see “Registering with NetSolutions” on page 1 and “Configure & Customize” on page 11.
Note: To publish an alumni directory online, you must have Alumni Tracking.

N ETD I RE C T O R I ES 17
2. Click NetDirectories. The NetSolutions - NetDirectories screen appears.
3. Click New Directory, and select Alumni Directory. The Alumni Directory Wizard screen appears.
To complete this screen, you must have a constituent query saved. It must include all records you want available in your online alumni directory.
Note: For information about creating queries in The Raiser’s Edge, see the Query chapter of the Query & Export Guide.
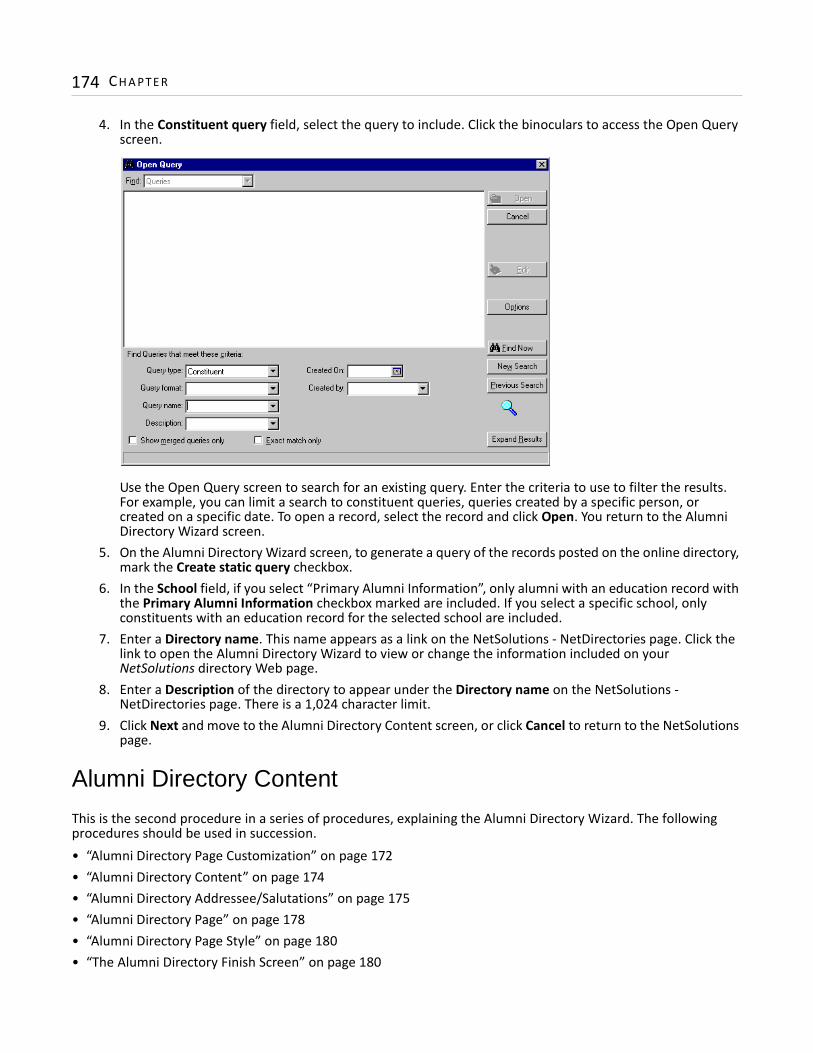
174 CH A PT E R
4. In the Constituent query field, select the query to include. Click the binoculars to access the Open Query screen.
Use the Open Query screen to search for an existing query. Enter the criteria to use to filter the results. For example, you can limit a search to constituent queries, queries created by a specific person, or created on a specific date. To open a record, select the record and click Open. You return to the Alumni Directory Wizard screen.
5. On the Alumni Directory Wizard screen, to generate a query of the records posted on the online directory, mark the Create static query checkbox.
6. In the School field, if you select “Primary Alumni Information”, only alumni with an education record with the Primary Alumni Information checkbox marked are included. If you select a specific school, only constituents with an education record for the selected school are included.
7. Enter a Directory name. This name appears as a link on the NetSolutions - NetDirectories page. Click the link to open the Alumni Directory Wizard to view or change the information included on your NetSolutions directory Web page.
8. Enter a Description of the directory to appear under the Directory name on the NetSolutions - NetDirectories page. There is a 1,024 character limit.
9. Click Next and move to the Alumni Directory Content screen, or click Cancel to return to the NetSolutions page.
Alumni Directory Content
This is the second procedure in a series of procedures, explaining the Alumni Directory Wizard. The following procedures should be used in succession.• “Alumni Directory Page Customization” on page 172• “Alumni Directory Content” on page 174• “Alumni Directory Addressee/Salutations” on page 175• “Alumni Directory Page” on page 178• “Alumni Directory Page Style” on page 180• “The Alumni Directory Finish Screen” on page 180

N ETD I RE C T O R I ES 17
On the Directory Content screen, select the information to include in your online directory. If the constituent record includes the items you select on this screen, the information is included with the directory.
Customizing the Alumni Directory Content screen1. Once you complete the Page Customization screen, click Next. The Directory Content screen appears.
2. The Items box contains all information available to include in your online directory. The Include these Items box contains all items selected to be included in the online directory. All Primary Address information defaults in the Include these Items box. If you do not want to include an address item, from the Include these Items box, select the item you want to remove and click the left arrow button.To add an item, from the Items box, select the item to include and click the right arrow button.
3. In the Phone field, select the Phone type to include in the directory. The options available depend on the phone types created in the Phone Types table in Configuration. For more information, see the Configuration chapter of the Configuration and Security Guide.
4. In the Email field, select the email type to include in the directory. The options available depend on the phone types created in the Phone Types table in Configuration. For more information, see the Configuration chapter of the Configuration and Security Guide.
5. Click Next and move to the Alumni Directory Addressee/Salutations screen, or click Cancel to return to the NetSolutions page.
Alumni Directory Addressee/Salutations
This is the third procedure in a series of procedures, explaining the Alumni Directory Wizard. The following procedures should be used in succession.• “Alumni Directory Page Customization” on page 172• “Alumni Directory Content” on page 174• “Alumni Directory Addressee/Salutations” on page 175

176 CH A PT E R
• “Alumni Directory Page” on page 178• “Alumni Directory Page Style” on page 180• “The Alumni Directory Finish Screen” on page 180On the Addressee/Salutations screen, select the addressee/salutation format to use with names in your online directory.
Customizing the Alumni Directory Addressee/Salutations screen1. Once you complete Directory Content screen, click Next. A screen appears asking you to select an
Addressee/Salutation format for your online directory.
2. If you select Use Individual Name, no addressee/salutation is used in the directory; only the individual’s name appears.

N ETD I RE C T O R I ES 17
If you select From Individual, the addressee/salutation used in your online directory is based on information entered in the individual’s constituent record.
In the Use this addressee/salutation if present on the individual field select the addressee/salutation you want the program to look for first. If the program does not find your first choice on the individual’s record, it uses the addressee/salutation selected in the Otherwise use field. If neither is present, the individual name is used.
Note: For more information about addressee/salutation information, see the Configuration chapter in the Configuration & Security Guide.

178 CH A PT E R
If you select From Configuration, the addressee/salutation used in your online directory is based on information entered in Configuration.
In the Use this addressee/salutation from Configuration field, select the addressee/salutation to use in this directory. All selections entered through Business Rules in Configuration are available.
3. Click Next and move to the Alumni Directory Page screen, or click Cancel to return to the NetSolutions page.
Alumni Directory Page
This is the fourth procedure in a series of procedures, explaining the Alumni Directory Wizard. The following procedures should be used in succession.• “Alumni Directory Page Customization” on page 172• “Alumni Directory Content” on page 174• “Alumni Directory Addressee/Salutations” on page 175• “Alumni Directory Page” on page 178• “Alumni Directory Page Style” on page 180• “The Alumni Directory Finish Screen” on page 180On the Alumni Directory Pages screen, you can enter detailed formatting information for your online directory page. You can enter a header, detail information, search options, layout information, footers, and more.

N ETD I RE C T O R I ES 17
Customizing the Alumni Directory Page1. Once you complete the Addressee/Salutation screen, click Next. The Alumni Directory Page appears.
2. In the first Image/Caption field, you can include an image on your online directory page. Click the ellipsis to access the Open screen.Select the image file to include on the online directory page, and click Open to return to the NetSolutions - NetDirectory Wizard screen.
3. In the second Image/Caption field, enter a caption to appear under the image.
4. Enter a Header. For example, you can enter “Directory”. This appears at the top of your online directory page, under the Title information you entered in Configure and Customize.
5. Enter any Header text. This is an explanation to appear under the Header. 6. In the Detail box, enter any additional directory information.7. In the Search field, select how visitors will search your online directory.
• “Alphabet List”: The alphabet appears on your directory page under the header information. Clicking a letter generates a list of all individuals in the directory whose last name begins with the selected letter.
• “Class of List - Year”: Year options appear under the header information. The directory displays all years, starting with the earliest “Class Of” and going to the latest.
• “Class of List - Decade”: Decade options appear under the header information. The directory displays all decades, starting with the earliest and going to the latest, and all decades in between.
8. In the Layout field, select the number of columns you want used to display results. • “Layout One”: Displays results in one column. • “Layout Two”: May display results in two columns, depending on the fields you selected to include in
your directory. • “Layout Three”: May display results in three columns, depending on the fields you selected to include
in your directory.
Note: For more information about adding your logo to the directory Web page, see “Configuring Your Web Pages” on page 23.
180 CH A PT E R
• “Layout Four”: May display results in four columns, depending on the fields you selected to include in your directory.
9. You can also enter a Footer to appear at the bottom of all directory pages.10. In the Contact Detail field, enter the text you want to precede an email link. For example, enter “For more
information, contact”.11. In the Link text field, enter the text to use for the email link.12. In the Email field, enter the email address of the person to use as your organization contact. A link
appears on the directory page.13. Click Preview to see how the information you added on this screen appears online. 14. Click Next and move to the Alumni Directory Page Style screen, or click Cancel to return to the
NetSolutions page.
Alumni Directory Page Style
This is the fifth procedure in a series of procedures, explaining the Alumni Directory Wizard. The following procedures should be used in succession.• “Alumni Directory Page Customization” on page 172• “Alumni Directory Content” on page 174• “Alumni Directory Addressee/Salutations” on page 175• “Alumni Directory Page” on page 178• “Alumni Directory Page Style” on page 180• “The Alumni Directory Finish Screen” on page 180Using the Page Style screen, you can give your directory page a unique look, setting it apart from your other NetSolutions pages. The style you established in Configure and Customize defaults to all your NetSolutions Web pages, but you can change the style for each page using the Page Style screen. The fields and checkboxes available on this screen change based on the Page section you select. You can change the background, logo and title, image, header, detail, body, table legend, table headers, table text, and error text styles. For detailed instructions about each option, see “Changing Page Style” on page 387.If you are happy with the page style you established in Configure and Customize, do not make any changes on this screen, and click Next to move to The Alumni Directory Finish Screen.
The Alumni Directory Finish Screen
This is the sixth procedure in a series of procedures, explaining the Alumni Directory Wizard. The following procedures should be used in succession.• “Alumni Directory Page Customization” on page 172• “Alumni Directory Content” on page 174• “Alumni Directory Addressee/Salutations” on page 175• “Alumni Directory Page” on page 178• “Alumni Directory Page Style” on page 180• “The Alumni Directory Finish Screen” on page 180On the Finish screen, you can review all the information you entered in the Alumni Directory Wizard.

N ETD I RE C T O R I ES 18
Finishing the Alumni Directory Wizard 1. After you enter all the necessary information on the various Alumni Directory Wizard screens, the Finish
screen appears, summarizing all parameter settings you selected for your online directory.
2. Click Finish. If you marked the Create static query checkbox on the Page Customization screen, the Save Static Query screen appears.
3. Enter a Query name; enter a Description to help remember the details regarding this query. You can also mark the Other users may execute this query and Other users may modify this query checkboxes, allowing others to work in and change this query.

182 CH A PT E R
4. Click Save. The directory page is processed. A screen appears with a link to your new online directory page.
5. Click the Click here to visit the directory page link. The online directory page you just designed appears.6. To add this directory to your existing Web site, cut and paste the code provided in the box beneath the
Click here to visit the directory page link.7. To exit the Alumni Directory Wizard screen, click Close. You return to the NetSolutions - NetDirectories
screen. The new online directory appears as a link on the screen.
8. To close the NetSolutions - NetDirectories screen and return to the NetSolutions page, click the “X” in the upper right corner of the screen.

N ETD I RE C T O R I ES 18
Publishing a Professional Directory on Your Web SiteWith NetDirectories, you can take professional information from your database and create an online directory. You can make selected professional information from The Raiser’s Edge available on your Web site. The type of directory selected determines the information you can select to include. The directory Web page is hosted by Blackbaud but formatted based on your selections in Configure and Customize and NetDirectories. For more information, see “Configure & Customize” on page 11.
Professional Page Customization
This is the first procedure in a series of procedures, explaining the Professional Directory Wizard. The following procedures should be used in succession.• “Professional Page Customization” on page 183• “Professional Directory Content” on page 185• “Professional Addressee/Salutations” on page 186• “Professional Directory Page” on page 189• “Professional Directory Page Style” on page 191• “Professional Directory Finish Screen” on page 192On the Page Customization screen, select the query of records to include in your online directory. You also must enter a directory name and description.
Filling out the Professional Directory Page Customization screen1. On the Raiser’s Edge bar, click NetSolutions. The NetSolutions page appears.2. Click NetDirectories. The NetSolutions - NetDirectories screen appears.

184 CH A PT E R
3. Click New Directory and select Professional Directory. The Professional Directory Wizard screen appears.
To complete this screen, you must have a query saved. It must include all records you want available in your online directory.
4. In the Constituent query field, select the query to include. Click the binoculars to access the Open Query screen.
Note: For information about creating queries in The Raiser’s Edge, see the Query chapter of the Query & Export Guide.

N ETD I RE C T O R I ES 18
You can use the Open Query screen to search for an existing query. You can enter the criteria to use to filter the results. For example, you can limit a search to constituent queries, queries created by a specific person, or created on a specific date. To open a record, select the record and click Open. You return to the Professional Directory Wizard screen.
5. To generate a query of records posted on the online directory, mark the Create static query checkbox. 6. Enter a Directory name. This name appears as a link on the NetSolutions - NetDirectories page. Click the
link to open the Professional Directory Wizard and view or change the information included on your NetSolutions directory Web page.
7. Enter a Description of the directory to appear under the Directory name on the NetSolutions - NetDirectories page. There is a 1,024 character limit.
8. Click Next and move to the Professional Directory Content screen, or click Cancel to return to the NetSolutions page.
Professional Directory Content
This is the second procedure in a series of procedures, explaining the Professional Directory Wizard. The following procedures should be used in succession.• “Professional Page Customization” on page 183• “Professional Directory Content” on page 185• “Professional Addressee/Salutations” on page 186• “Professional Directory Page” on page 189• “Professional Directory Page Style” on page 191• “Professional Directory Finish Screen” on page 192On the Directory Content screen, select all the information to include in your online directory. If the constituent record includes the items you select on this screen, the information is included with the directory.

186 CH A PT E R
Customizing the Professional Directory Content screen1. Once you complete the Page Customization screen, click Next. The Directory Content screen appears.
2. The Items box contains all information available to include in your online directory. The Include these Items box contains all items selected to be included in the online directory. If you do not want to include an item, from the Include these Items box, select the item to remove and click the left arrow button.To add an item, from the Items box, select the item to include and click the right arrow button.
3. In the Phone field, select the Phone type to include in the directory. The options available depend on the phone types created in the Phone Types table in Configuration. For more information, see the Configuration chapter of the Configuration and Security Guide.
4. In the Email field, select the email type to include in the directory. The options available depend on the phone types created in the Phone Types table in Configuration. For more information, see the Configuration chapter of the Configuration and Security Guide.
5. In the Business phone field, select the business phone type to include in the directory. The options available depend on the phone types created in the Phone Types table in Configuration. For more information, see the Configuration chapter of the Configuration and Security Guide.
6. In the Business email field, select the business email type to include in the directory. The options available depend on the phone types created in the Phone Types table in Configuration. For more information, see the Configuration chapter of the Configuration and Security Guide.
7. Click Next and move to the Professional Addressee/Salutations screen, or click Cancel to return to the NetSolutions page.
Professional Addressee/Salutations
This is the third procedure in a series of procedures, explaining the Professional Directory Wizard. The following procedures should be used in succession.• “Professional Page Customization” on page 183

N ETD I RE C T O R I ES 18
• “Professional Directory Content” on page 185• “Professional Addressee/Salutations” on page 186• “Professional Directory Page” on page 189• “Professional Directory Page Style” on page 191• “Professional Directory Finish Screen” on page 192On the Addressee/Salutations screen, select the addressee/salutation format to use with names in your online directory.
Customizing the Professional Directory Addressee/Salutation screen1. Once you complete the Directory Content screen, click Next. The Addressee/Salutations screen appears.
2. In the Addressee/Salutation to Use for Individuals frame, if you select From Individual Name, no addressee/salutation is used in the directory; only the individual name appears.

188 CH A PT E R
If you select From Individual, the addressee/salutation used in your online directory is based on information entered in the individual’s constituent record.
In the Use this addressee/salutation if present on the individual field enter the addressee/salutation you want the program to look for first. If the program does not find your first choice on the individual record, it uses the addressee/salutation selected in the Otherwise use field. If neither is present, the individual name is used.
Note: For more information about addressee/salutation information entered in Configuration, see the Configuration chapter in the Configuration & Security Guide.

N ETD I RE C T O R I ES 18
If you select From Configuration, the addressee/salutation used in your online directory is based on information entered in Configuration.
In the Use this addressee/salutation from Configuration field, select the addressee/salutation you want the program to use. All selections entered through Business Rules in Configuration are available.
3. In the Addressee/Salutation to Use for Organizations frame, you can select the Organization name only or Leave blank.
4. Click Next and move to the Professional Directory Page screen, or click Cancel to return to the NetSolutions page.
Professional Directory Page
This is the fourth procedure in a series of procedures, explaining the Professional Directory Wizard. The following procedures should be used in succession.• “Professional Page Customization” on page 183• “Professional Directory Content” on page 185• “Professional Addressee/Salutations” on page 186• “Professional Directory Page” on page 189• “Professional Directory Page Style” on page 191• “Professional Directory Finish Screen” on page 192On the Directory Pages screen, you can enter detailed formatting information for your online directory page. You can enter a header, detail information, search options, layout information, footers, and more.

190 CH A PT E R
Customizing the Professional Directory Page screen1. Click Next. A screen appears asking you to enter directory page information.
2. In the first Image/Caption field, you can include an image on your online directory page. Click the ellipsis to access the Open screen.Select the image file to include on the online directory page, and click Open to return to the Professional Directory Wizard screen.
3. In the second Image/Caption field, enter a caption to appear under the image.
4. Enter a Header. This appears at the top of your online directory page, under the Title information you entered in Configure and Customize.
5. Enter any Header text. This is an explanation to appear under the Header.6. In the Detail box, enter any additional directory information. For example, you can enter how often you
update the online directory.7. In the Search field, select how visitors will search your online directory.
• “Alphabet List”: The alphabet appears on your directory page under the header information. Clicking a letter generates a list of all individuals in the directory whose last name begins with the selected letter.
• “Profession”: All professions included in the query appear under the header information.8. In the Layout field, select the number of columns used to display results.
• “Layout One”: Displays results in one column. • “Layout Two”: May display results in two columns, depending on the fields you selected to include in
your directory. • “Layout Three”: May display results in three columns, depending on the fields you selected to include
in your directory.9. You can also enter a Footer to appear at the bottom of all directory pages.
Note: For more information on adding your logo to the directory Web page, see “Configuring Your Web Pages” on page 23.

N ETD I RE C T O R I ES 19
10. In the Contact Detail field, enter text to precede an email link. For example, enter “For more information, contact”.
11. In the Link text field, enter text used for the email link.12. In the Email field, enter the email address of the person to use as your organization contact. A link
appears on the directory page.13. Click Preview to see how the information you added on this screen appears online.
Based on the information in the preceding example, this is what visitors to your online Professional Directory will see.
14. Click Next and move to the Professional Directory Page Style screen, or click Cancel to return to the NetSolutions page.
Professional Directory Page Style
This is the fifth procedure in a series of procedures, explaining the Professional Directory Wizard. The following procedures should be used in succession.• “Professional Page Customization” on page 183• “Professional Directory Content” on page 185• “Professional Addressee/Salutations” on page 186• “Professional Directory Page” on page 189• “Professional Directory Page Style” on page 191• “Professional Directory Finish Screen” on page 192Using the Page Style screen, you can give your directory page a unique look, setting it apart from your other NetSolutions pages. The style you established in Configure and Customize defaults to all your NetSolutions Web pages, but you can change the style for each page using the Page Style screen. The fields and checkboxes available on this screen change based on the Page section you select. You can change the background, logo and title, image, header, detail, body, table legend, table headers, table text, and error text styles. For detailed instructions about each option, see “Changing Page Style” on page 387.If you are happy with the page style you established in Configure and Customize, do not make any changes on this screen, and click Next to move to the Professional Directory Finish Screen.

192 CH A PT E R
Professional Directory Finish Screen
This is the sixth procedure in a series of procedures, explaining the Professional Directory Wizard. The following procedures should be used in succession.“Professional Page Customization” on page 183“Professional Directory Content” on page 185“Professional Addressee/Salutations” on page 186“Professional Directory Page” on page 189“Professional Directory Page Style” on page 191“Professional Directory Finish Screen” on page 192On the Finish screen, you can review all the information you entered in the Professional Directory Wizard.
Finishing the Professional Directory Wizard 1. After you enter all the necessary information on the various Professional Directory Wizard screens, the
Finish screen appears, summarizing all parameter settings you selected for your online directory.

N ETD I RE C T O R I ES 19
2. Click Finish. If you marked the Create static query checkbox on the Page Customization screen, the Save Static Query screen appears.
3. Enter a Query name; enter a Description to help you remember the details regarding this query. You can also mark the Other users may execute this query and Other users may modify this query checkboxes, allowing others to work in and change this query.
4. Click Save. The directory page is processed. A screen appears with a link to your new online directory page.
5. Click the Click here to visit the directory page link. The online directory page you just designed appears.6. To add this directory to your existing Web site, cut and paste the code provided in the box beneath the
Click here to visit the directory page link.

194 CH A PT E R
7. To exit the Professional Directory Wizard screen, click Close. You return to the NetSolutions - NetDirectories screen. The new online directory appears as a link on the screen.
8. To close the NetSolutions - NetDirectories screen and return to the NetSolutions page, click the “X” in the upper right corner of the screen.
Publishing a Constituent Directory on Your Web SiteWith NetDirectories, you can take constituent information from your database and create an online directory. You can make selected address, telephone, and email information from The Raiser’s Edge available on your Web site. The type of directory selected determines the information you can select to include.The directory Web page is hosted by Blackbaud but formatted based on your selections in Configure and Customize and NetDirectories. For more information, see “Configure & Customize” on page 11.
Constituent Page Customization
This is the first procedure in a series of procedures, explaining the Constituent Directory Wizard. The following procedures should be used in succession.• “Constituent Page Customization” on page 194• “Constituent Directory Content” on page 196• “Constituent Addressee/Salutations” on page 197• “Constituent Directory Page” on page 200• “Constituent Directory Page Style” on page 202• “Constituent Directory Finish Screen” on page 202On the Page Customization screen, select the query of records to include in your online directory. You also must enter a directory name and description.

N ETD I RE C T O R I ES 19
Filling out the Constituent Directory Page Customization screen1. On the Raiser’s Edge bar, click NetSolutions. The NetSolutions page appears.2. Click NetDirectories. The NetSolutions - NetDirectories screen appears.
3. Click New Directory, and select Constituent Directory. The Constituent Directory Wizard screen appears.
Before you can complete this screen, you must have a query saved. It must include all records you want available in the online directory.
Note: For information about creating queries in The Raiser’s Edge, see the Query chapter of the Query & Export Guide.

196 CH A PT E R
4. In the Constituent query field, select the query to include. Click the binoculars to access the Open Query screen.
You can use the Open Query screen to search for an existing query. You can enter the criteria to use to filter the results. For example, you can limit a search to constituent queries, queries created by a specific person, or created on a specific date. To open a record, select the record and click Open. You return to the Constituent Directory Wizard screen.
5. To generate a query of records posted on the online directory, mark the Create static query checkbox. 6. Enter a Directory name. This name appears as a link on the NetSolutions - NetDirectories page. You can
click the link to open Constituent Directory Wizard and view or change the information included on your NetSolutions directory Web page.
7. Enter a Description of the directory to appear under the Directory name on the NetSolutions - NetDirectories page. There is a 1,024 character limit.
8. Click Next and move to the Constituent Directory Content screen, or click Cancel to return to the NetSolutions page.
Constituent Directory Content
This is the second procedure in a series of procedures, explaining the Constituent Directory Wizard. The following procedures should be used in succession.• “Constituent Page Customization” on page 194• “Constituent Directory Content” on page 196• “Constituent Addressee/Salutations” on page 197• “Constituent Directory Page” on page 200• “Constituent Directory Page Style” on page 202• “Constituent Directory Finish Screen” on page 202On the Directory Content screen, select all information to include in your online directory. If the constituent record includes the items you select on this screen, the information is included with the directory.

N ETD I RE C T O R I ES 19
Customizing the Constituent Directory Content screen1. Once you complete the Page Customization screen, click Next. The Directory Content screen appears.
2. The Items box contains all information available to include in your online directory. The Include these Items box contains all items selected to be included in the online directory. If you do not want to include an item from the Include these Items box, select the item to remove and click the left arrow button.To add an item from the Items box, select the item to include and click the right arrow button.
3. In the Phone field, select the Phone type to include in the directory. The options available depend on the phone types created in the Phone Types table in Configuration. For more information, see the Configuration chapter of the Configuration and Security Guide.
4. In the Email field, select the email type to include in the directory. The options available depend on the phone types created in the Phone Types table in Configuration. For more information, see the Configuration chapter of the Configuration and Security Guide.
5. In the Business phone field, select the business phone type to include in the directory. The options available depend on the phone types created in the Phone Types table in Configuration. For more information, see the Configuration chapter of the Configuration and Security Guide.
6. In the Business email field, select the business email type to include in the directory. The options available depend on the phone types created in the Phone Types table in Configuration. For more information, see the Configuration chapter of the Configuration and Security Guide.
7. Click Next and move to the Constituent Addressee/Salutations screen, or click Cancel to return to the NetSolutions page.
Constituent Addressee/Salutations
This is the third procedure in a series of procedures, explaining the Constituent Directory Wizard. The following procedures should be used in succession.• “Constituent Page Customization” on page 194

198 CH A PT E R
• “Constituent Directory Content” on page 196• “Constituent Addressee/Salutations” on page 197• “Constituent Directory Page” on page 200• “Constituent Directory Page Style” on page 202• “Constituent Directory Finish Screen” on page 202On the Addressee/Salutations screen, select the addressee/salutation format to use with names in your online directory.
Customizing the Constituent Directory Addressee/Salutation screen1. Once you complete Directory Content screen, click Next. A screen appears asking you to select an
Addressee/Salutation format for your online directory.
2. In the Addressee/Salutation to Use for Individuals frame, if you select Use Individual Name, no addressee/salutation is used in the directory; only the individual’s name appears.

N ETD I RE C T O R I ES 19
If you select From Individual, the addressee/salutation used in your online directory is based on information entered on the individual’s constituent record.
In the Use this addressee/salutation if present on the individual field, enter the addressee/salutation the program should look for first. If the program does not find your first choice on the individual’s record, it will use the addressee/salutation selected in the Otherwise use field. If neither is present, the individual name is used.
Note: For more information about addressee/salutation information entered in Configuration, see the Configuration chapter in the Configuration & Security Guide.

200 CH A PT E R
If you select From Configuration, the addressee/salutation used in your online directory is based on information entered in Configuration.
In the Use this addressee/salutation from Configuration field, select the addressee/salutation the program should use. All selections entered through Business Rules in Configuration are available.
3. In the Addressee/Salutation to Use for Organizations frame, you can select the Organization name only or Leave blank.
4. Click Next and move to the Constituent Directory Page screen, or click Cancel to return to the NetSolutions page.
Constituent Directory Page
This is the fourth procedure in a series of procedures, explaining the Constituent Directory Wizard. The following procedures should be used in succession.• “Constituent Page Customization” on page 194• “Constituent Directory Content” on page 196• “Constituent Addressee/Salutations” on page 197• “Constituent Directory Page” on page 200• “Constituent Directory Page Style” on page 202• “Constituent Directory Finish Screen” on page 202On the Directory Pages screen, you can enter detailed formatting information for your online directory page. You can enter a header, detail information, search options, layout information, footers, and more.

N ETD I RE C T O R I ES 20
Customizing the Constituent Directory page1. Once you complete the Addressee/Salutation screen, click Next. The Constituent Directory Page appears.
2. In the first Image/Caption field, you can include an image on your online directory page. Click the ellipsis to access the Open screen.Select the image file to include on the online directory page, and click Open to return to the Constituent Directory Wizard screen.
3. In the second Image/Caption field, you can enter a caption to appear under the image.
4. Enter a Header. This appears at the top of your online directory page, under the Title information you entered in Configure and Customize.
5. Enter any Header text. This is an explanation to appear under the Header.6. In the Detail box, enter any additional directory information. 7. The Search field is disabled for constituent directories. “Alphabet List” is the only option.8. In the Layout field, select the number of columns used to display results.
• “Layout One”: Displays results in one column.• “Layout Two”: May display results in two columns, depending on the fields you selected to include in
your directory.• “Layout Three”: May display results in three columns, depending on the fields you selected to include
in your directory.9. You can also enter a Footer to appear at the bottom of all directory pages.
10. In the Contact Detail field, enter text to precede an email link. For example, enter “For more information, contact”.
11. In the Link text field, enter text used for the email link.
Note: For more information on adding your logo to the directory Web page, see “Configuring Your Web Pages” on page 23.

202 CH A PT E R
12. In the Email field, enter the email address of the person to use as your organization contact. A link appears on the directory page.
13. Click Preview to see how the information you added on this screen appears online.Based on the information in the preceding example, this is what visitors to your online Alumni Directory will see.
14. Click Next and move to the Constituent Directory Page Style screen, or click Cancel to return to the NetSolutions page.
Constituent Directory Page Style
This is the fifth procedure in a series of procedures, explaining the Constituent Directory Wizard. The following procedures should be used in succession.• “Professional Page Customization” on page 183• “Professional Directory Content” on page 185• “Professional Addressee/Salutations” on page 186• “Professional Directory Page” on page 189• “Professional Directory Page Style” on page 191• “Professional Directory Finish Screen” on page 192Using the Page Style screen, you can give your directory page a unique look, setting it apart from your other NetSolutions pages. The style you established in Configure and Customize defaults to all your NetSolutions Web pages, but you can change the style for each page using the Page Style screen. The fields and checkboxes available on this screen change based on the Page section you select. You can change the background, logo and title, image, header, detail, body, table legend, table headers, table text, and error text styles. For detailed instructions about each option, see “Changing Page Style” on page 387.If you are happy with the page style you established in Configure and Customize, do not make any changes on this screen, and click Next to move to the Constituent Directory Finish Screen.
Constituent Directory Finish Screen
This is the sixth procedure in a series of procedures, explaining the Constituent Directory Wizard. The following procedures should be used in succession.• “Professional Page Customization” on page 183

N ETD I RE C T O R I ES 20
• “Professional Directory Content” on page 185• “Professional Addressee/Salutations” on page 186• “Professional Directory Page” on page 189• “Professional Directory Page Style” on page 191• “Professional Directory Finish Screen” on page 192On the Finish screen, you can review all the information you entered in the Constituent Directory Wizard.
Completing the Constituent Directory Finish screen1. After you enter all the necessary information on the various Constituent Directory Wizard screens, the
Finish screen appears, summarizing all parameter settings you selected for your online directory.
2. Click Finish. If you marked the Create static query checkbox on the Page Customization screen, the Save Static Query screen appears.
3. Enter a Query name; enter a Description to help you remember the details regarding this query. You can also mark the Other users may execute this query and Other users may modify this query checkboxes, allowing others to work in and change this query.

204 CH A PT E R
4. Click Save. The directory page is processed. A screen appears offering a link to your new online directory page.
5. Click the Click here to visit the directory page link. The online directory page you just designed appears.6. To add this directory to your existing Web site, cut and paste the code provided in the box beneath the
Click here to visit the directory page link.7. To exit the Constituent Directory Wizard screen, click Close. You return to the NetSolutions -
NetDirectories screen. The new online directory appears as a link on the screen.
8. To close the NetSolutions - NetDirectories screen and return to the NetSolutions page, click the “X” in the upper right corner of the screen.

N ETD I RE C T O R I ES 20
Publishing a Donor Recognition Page on Your Web SiteWith NetDirectories, you can use your Web site to recognize outstanding donors, using information from your Raiser’s Edge database. To create a donor recognition page, you simply create a Donor Category Report in Reports. The report must include all records and information you want to include on your Web page. After you have the report created and saved, go to NetDirectories and create your donor recognition page.The recognition page is hosted by Blackbaud but formatted based on your selections in Configure and Customize and NetDirectories. For more information, see “Configure & Customize” on page 11.
Donor Recognition Page Customization
This is the first procedure in a series of procedures, explaining the Donor Recognition Page Wizard. The following procedures should be used in succession.• “Donor Recognition Page Customization” on page 205• “Donor Recognition Page Addressee/Salutations” on page 206• “Donor Recognition Page” on page 208• “Donor Recognition Page Style” on page 210• “Donor Recognition Page Finish” on page 210On the Page Customization screen, select the query of records to include in your recognition page. You also must enter a page name and description.
Completing the Donor Recognition page Customization screen1. On the Raiser’s Edge bar, click NetSolutions. The NetSolutions page appears.2. Click NetDirectories. The NetSolutions - NetDirectories screen appears.

206 CH A PT E R
3. Click New Directory and select Donor Recognition Page. The Page Customization screen appears.
Before you can complete this screen, you must have a Donor Category report saved. It must include all records and information you want available in your online page.
4. In the Record name field, select the Donor Category Report to use in your donor recognition page.5. Enter a Directory name. This name appears as a link on the NetSolutions - NetDirectories page. You can
click the link to open the Donor Recognition page Wizard and view or change the information included on your NetSolutions Web page.
6. Enter a Description of the page to appear under the Directory name on the NetSolutions - NetDirectories page. There is a 1,024 character limit.
7. Click Next and move to the Donor Recognition Page Addressee/Salutations screen, or click Cancel to return to the NetSolutions page.
Donor Recognition Page Addressee/Salutations
This is the second procedure in a series of procedures, explaining the Donor Recognition Page Wizard. The following procedures should be used in succession.• “Donor Recognition Page Customization” on page 205• “Donor Recognition Page Addressee/Salutations” on page 206• “Donor Recognition Page” on page 208• “Donor Recognition Page Style” on page 210• “Donor Recognition Page Finish” on page 210On the Addressee/Salutations screen, select the addressee/salutation format to use with names in your online donor recognition page.
Note: For information about creating reports in The Raiser’s Edge, see the Reports Guide.

N ETD I RE C T O R I ES 20
Customizing the Donor Recognition page Addressee/Salutations screen1. Once you complete Page Customization screen, click Next. The Addressee/Salutations screen appears.
2. If you select Use Individual Name, no addressee/salutation is used; only the individual’s name appears.3. If you select From Individual, the addressee/salutation used is based on information entered in the
individual’s constituent record.

208 CH A PT E R
In the Use this addressee/salutation if present on the individual field, enter the addressee/salutation the program should look for first. If the program does not find your first choice on the individual’s record, it uses the addressee/salutation selected in the Otherwise use field. If neither is present, the individual name is used.
4. If you select From Configuration, the addressee/salutation used is based on information entered in Configuration.
In the Use this addressee/salutation from Configuration field, select the addressee/salutation you want the program to use. All selections entered through Business Rules in Configuration are available.
5. Click Next and move to the Donor Recognition Page screen, or click Cancel to return to the NetSolutions page.
Donor Recognition Page
This is the third procedure in a series of procedures, explaining the Donor Recognition Page Wizard. The following procedures should be used in succession.• “Donor Recognition Page Customization” on page 205• “Donor Recognition Page Addressee/Salutations” on page 206• “Donor Recognition Page” on page 208• “Donor Recognition Page Style” on page 210• “Donor Recognition Page Finish” on page 210On the Donor Recognition Page screen you can enter detailed formatting information for your online directory page. You can enter a header, detail information, search options, layout information, footers, and more.
Note: For more information about addressee/salutation information, see the Configuration chapter in the Configuration & Security Guide.

N ETD I RE C T O R I ES 20
Customizing the Donor Recognition page screen1. Once you complete the Addressee/Salutations screen, click Next. The Donor Recognition Page appears.
2. In the first Image/Caption field, you can include an image on your page. Click the ellipsis to access the Open screen.Select the image file to include, and click Open to return to the Donor Recognition page Wizard screen.
3. In the second Image/Caption field, you can enter a caption to appear under the image.
4. Enter a Header. For example, you can enter “Top 10 Donors”. This appears at the top of your online directory page, under the Title information you entered in Configure and Customize, or if you selected to include an image and caption on the page, it appears under the caption.
5. Enter any Header text. This is an explanation to appear under the Header. 6. In the Detail box, enter any additional donor recognition information.7. In the Search field, select how you want information arranged on your donor recognition page.
• “Donor category”: The donors are listed under their donor category. For example, if Founder is one of your donor categories, any donor who gave to this category appears under the heading of Founder.
• “Donor category (Amount)”: The donors are listed under their donor category plus the amount associated with each category in your database is also included in the heading. For example, if the Founder category price is $2,500 in your Raiser’s Edge database, Founder ($2,500) appears in the category heading.
• “Donor category (Low - High)”: The donors are listed under their donor category plus the low amount and high amount associated with each category in your database is also included in the heading. For example, if the Friend category price is $10 to $249.99 in your Raiser’s Edge database, Friend ($10 - $249.99) appears in the category heading.
8. In the Layout field, select the number of columns used to display results.
Note: For more information about adding your logo to the directory Web page, see “Configuring Your Web Pages” on page 23.

210 CH A PT E R
• “Layout One”: Displays results in one column.• “Layout Two”: Displays results in two columns.• “Layout Three”: Displays results in three columns.• “Layout Four”: Displays results in four columns.
9. You can also enter a Footer to appear at the bottom of the page.10. In the Contact Detail field, enter text to precede an email link. For example, enter “For more information,
contact”.11. In the Link text field, enter text to use for the email link.12. In the Email field, enter the email address of the person to use as your organization contact. A link
appears on the directory page.13. Click Preview to see how the information you added on this screen appears online. 14. Click Next and move to the Donor Recognition Page Style screen, or click Cancel to return to the
NetSolutions page.
Donor Recognition Page Style
This is the fourth procedure in a series of procedures, explaining the Donor Recognition Page Wizard. The following procedures should be used in succession.• “Donor Recognition Page Customization” on page 205• “Donor Recognition Page Addressee/Salutations” on page 206• “Donor Recognition Page” on page 208• “Donor Recognition Page Style” on page 210• “Donor Recognition Page Finish” on page 210Using the Page Style screen, you can give your directory page a unique look, setting it apart from your other NetSolutions pages. The style you established in Configure and Customize defaults to all your NetSolutions Web pages, but you can change the style for each page using the Page Style screen. The fields and checkboxes available on this screen change based on the Page section you select. You can change the background, logo and title, image, header, detail, body, table legend, table headers, table text, and error text styles. For detailed instructions about each option, see “Changing Page Style” on page 387.If you are happy with the page style you established in Configure and Customize, do not make any changes on this screen, and click Next to move to Donor Recognition Page Finish.
Donor Recognition Page Finish
This is the final procedure in a series of procedures, explaining the Donor Recognition Page Wizard. The following procedures should be used in succession.• “Donor Recognition Page Customization” on page 205• “Donor Recognition Page Addressee/Salutations” on page 206• “Donor Recognition Page” on page 208• “Donor Recognition Page Style” on page 210• “Donor Recognition Page Finish” on page 210The Finish screen confirms your online directory has been published on the Web. It also includes a link to your new online directory.

N ETD I RE C T O R I ES 21
Completing the Donor Recognition Page Finish screen1. After you enter all the necessary information on the various Donor Recognition page Wizard screens, the
Finish screen appears, summarizing all parameter settings you selected for your page.
2. Click Finish. If you marked the Create static query checkbox on the Page Customization screen, the Save Static Query screen appears.
3. Enter a Query name; enter a Description to help you remember the details regarding this query. You can also mark the Other users may execute this query and Other users may modify this query checkboxes, allowing others to work in and change this query.

212 CH A PT E R
4. Click Save. The directory page is processed. A screen appears with a link to your new online directory page.
5. Click the Click here to visit the directory page link. The online directory page you just designed appears.6. To add this directory to your existing Web site, cut and paste the code provided in the box beneath the
Click here to visit the directory page link.7. To exit the Donor Recognition page Wizard screen, click Close. You return to the NetSolutions -
NetDirectories screen. The new online donor recognition page appears as a link on the screen.
8. To close the NetSolutions - NetDirectories screen and return to the NetSolutions page, click the “X” in the upper right corner of the screen.

N ETD I RE C T O R I ES 21
Viewing a Web PageAfter you create a new page for your Web site, you can access the page anytime through NetSolutions. You can preview the page without going online. Working through NetSolutions, you can easily make changes to the Web page.
Viewing a Web page1. On the Raiser’s Edge bar, click NetSolutions. The NetSolutions page appears.2. Click NetDirectories. The NetSolutions - NetDirectories screen appears.
3. Click the Visit this directory page link. The Web page appears.
4. To close this screen, click the “X” in the upper right corner.

214 CH A PT E R
5. To exit the NetSolutions - NetDirectories screen and return to the NetSolutions page, click the “X” in the upper right corner.
Deleting a Page from Your Web SiteOnce a Web page has served its purpose, you can permanently remove it from your Web site.
Deleting a page from your Web site1. On the Raiser’s Edge bar, click NetSolutions. The NetSolutions page appears.2. Click NetDirectories. The NetSolutions - NetDirectories screen appears.
3. Under the Web page link to delete, click Delete this directory page. A warning message appears.

N ETD I RE C T O R I ES 21
4. Click Yes. The NetSolutions - NetDirectories screen appears, minus the deleted directory page.
5. To exit this screen and return to the NetSolutions page, click the “X” in the upper right corner.
Viewing Directory Page StatisticsNetSolutions keeps track of how many times your online directory pages are visited and the number of searches on each page. Through the Statistics button on the NetSolutions - NetDirectories screen, you can view and print charts tracking this information.
Viewing directory page statistics1. On the Raiser’s Edge bar, click NetSolutions. The NetSolutions page appears.

216 CH A PT E R
2. Click NetDirectories. The NetSolutions - NetDirectories screen appears.
3. Click the Statistics button. The Directory Page Statistics screen appears.
4. On the left side of the screen, a graph appears showing you the number of times someone visited your directory page.
5. On the right side of the screen, a graph appears showing you the number of searches conducted on each directory page.
6. Click Print Chart above each graph to print the graph.7. To close the screen and return to the NetSolutions - NetDirectories screen, click the “X” in the upper right
corner.

7chapter
NetVolunteers
Requirements for NetVolunteers . . . . . . . . . . . . . . . . . . . . . . . . . . . . . . . . . . . . . . . . . . . . . . . . . . . . . . . . . . . . . . 219Navigating . . . . . . . . . . . . . . . . . . . . . . . . . . . . . . . . . . . . . . . . . . . . . . . . . . . . . . . . . . . . . . . . . . . . . . . . . . . . . . . . 220Accessing NetVolunteers . . . . . . . . . . . . . . . . . . . . . . . . . . . . . . . . . . . . . . . . . . . . . . . . . . . . . . . . . . . . . . . . . . . . . . . 220Buttons . . . . . . . . . . . . . . . . . . . . . . . . . . . . . . . . . . . . . . . . . . . . . . . . . . . . . . . . . . . . . . . . . . . . . . . . . . . . . . . . . . . . . 223Publishing a Volunteer Registration Form to Your Web Site . . . . . . . . . . . . . . . . . . . . . . . . . . . . . . . . . . . . . . . . 223Volunteer Registration Page . . . . . . . . . . . . . . . . . . . . . . . . . . . . . . . . . . . . . . . . . . . . . . . . . . . . . . . . . . . . . . . . . . . . 223Page Style . . . . . . . . . . . . . . . . . . . . . . . . . . . . . . . . . . . . . . . . . . . . . . . . . . . . . . . . . . . . . . . . . . . . . . . . . . . . . . . . . . . 226General Volunteer Page Options . . . . . . . . . . . . . . . . . . . . . . . . . . . . . . . . . . . . . . . . . . . . . . . . . . . . . . . . . . . . . . . . . 227Volunteer Assignment Interests . . . . . . . . . . . . . . . . . . . . . . . . . . . . . . . . . . . . . . . . . . . . . . . . . . . . . . . . . . . . . . . . . 230Volunteer Profiling . . . . . . . . . . . . . . . . . . . . . . . . . . . . . . . . . . . . . . . . . . . . . . . . . . . . . . . . . . . . . . . . . . . . . . . . . . . . 232Additional Links . . . . . . . . . . . . . . . . . . . . . . . . . . . . . . . . . . . . . . . . . . . . . . . . . . . . . . . . . . . . . . . . . . . . . . . . . . . . . . . 233Update the Volunteer Sign-up Page . . . . . . . . . . . . . . . . . . . . . . . . . . . . . . . . . . . . . . . . . . . . . . . . . . . . . . . . . . . . . . 234Publishing a Job to Your Web Site . . . . . . . . . . . . . . . . . . . . . . . . . . . . . . . . . . . . . . . . . . . . . . . . . . . . . . . . . . . . . 236Publish a Job to the Web . . . . . . . . . . . . . . . . . . . . . . . . . . . . . . . . . . . . . . . . . . . . . . . . . . . . . . . . . . . . . . . . . . . . . . . 236Job Page . . . . . . . . . . . . . . . . . . . . . . . . . . . . . . . . . . . . . . . . . . . . . . . . . . . . . . . . . . . . . . . . . . . . . . . . . . . . . . . . . . . . 239Page Style . . . . . . . . . . . . . . . . . . . . . . . . . . . . . . . . . . . . . . . . . . . . . . . . . . . . . . . . . . . . . . . . . . . . . . . . . . . . . . . . . . . 240Miscellaneous . . . . . . . . . . . . . . . . . . . . . . . . . . . . . . . . . . . . . . . . . . . . . . . . . . . . . . . . . . . . . . . . . . . . . . . . . . . . . . . . 241Qualifications . . . . . . . . . . . . . . . . . . . . . . . . . . . . . . . . . . . . . . . . . . . . . . . . . . . . . . . . . . . . . . . . . . . . . . . . . . . . . . . . 243Job Profiling . . . . . . . . . . . . . . . . . . . . . . . . . . . . . . . . . . . . . . . . . . . . . . . . . . . . . . . . . . . . . . . . . . . . . . . . . . . . . . . . . . 245Additional Links . . . . . . . . . . . . . . . . . . . . . . . . . . . . . . . . . . . . . . . . . . . . . . . . . . . . . . . . . . . . . . . . . . . . . . . . . . . . . . . 247Publish the Job . . . . . . . . . . . . . . . . . . . . . . . . . . . . . . . . . . . . . . . . . . . . . . . . . . . . . . . . . . . . . . . . . . . . . . . . . . . . . . . 248Viewing a Job Web Page . . . . . . . . . . . . . . . . . . . . . . . . . . . . . . . . . . . . . . . . . . . . . . . . . . . . . . . . . . . . . . . . . . . . . 250Deleting a Job Web Page . . . . . . . . . . . . . . . . . . . . . . . . . . . . . . . . . . . . . . . . . . . . . . . . . . . . . . . . . . . . . . . . . . . . 251Viewing Volunteer Page Statistics . . . . . . . . . . . . . . . . . . . . . . . . . . . . . . . . . . . . . . . . . . . . . . . . . . . . . . . . . . . . . 253
Procedures
Accessing NetVolunteers . . . . . . . . . . . . . . . . . . . . . . . . . . . . . . . . . . . . . . . . . . . . . . . . . . . . . . . . . . . . . . . . . . . . . . . 220Completing the Volunteer registration page screen . . . . . . . . . . . . . . . . . . . . . . . . . . . . . . . . . . . . . . . . . . . . . . . . . 223Completing the General volunteer page options screen . . . . . . . . . . . . . . . . . . . . . . . . . . . . . . . . . . . . . . . . . . . . . 227Completing the Volunteer assignment interest screen . . . . . . . . . . . . . . . . . . . . . . . . . . . . . . . . . . . . . . . . . . . . . . 231Adding volunteer profiling information to your volunteer sign-up page . . . . . . . . . . . . . . . . . . . . . . . . . . . . . . . . . 232Adding links to your online volunteer sign-up page. . . . . . . . . . . . . . . . . . . . . . . . . . . . . . . . . . . . . . . . . . . . . . . . . . 234Completing the Update the volunteer sign-up page screen . . . . . . . . . . . . . . . . . . . . . . . . . . . . . . . . . . . . . . . . . . 235Completing the Publish a job to the web screen . . . . . . . . . . . . . . . . . . . . . . . . . . . . . . . . . . . . . . . . . . . . . . . . . . . . 236Completing the Job page screen . . . . . . . . . . . . . . . . . . . . . . . . . . . . . . . . . . . . . . . . . . . . . . . . . . . . . . . . . . . . . . . . . 239Completing the Miscellaneous screen . . . . . . . . . . . . . . . . . . . . . . . . . . . . . . . . . . . . . . . . . . . . . . . . . . . . . . . . . . . . 242Completing the Qualifications screen . . . . . . . . . . . . . . . . . . . . . . . . . . . . . . . . . . . . . . . . . . . . . . . . . . . . . . . . . . . . 244Adding job profiling information for your job page . . . . . . . . . . . . . . . . . . . . . . . . . . . . . . . . . . . . . . . . . . . . . . . . . . 246Adding links to your online job page . . . . . . . . . . . . . . . . . . . . . . . . . . . . . . . . . . . . . . . . . . . . . . . . . . . . . . . . . . . . . . 248

218 CH A PT E R
Completing the Publish the job screen . . . . . . . . . . . . . . . . . . . . . . . . . . . . . . . . . . . . . . . . . . . . . . . . . . . . . . . . . . . 249Viewing an online job page . . . . . . . . . . . . . . . . . . . . . . . . . . . . . . . . . . . . . . . . . . . . . . . . . . . . . . . . . . . . . . . . . . . . . 250Deleting an online job page . . . . . . . . . . . . . . . . . . . . . . . . . . . . . . . . . . . . . . . . . . . . . . . . . . . . . . . . . . . . . . . . . . . . . 252Viewing volunteer page statistics . . . . . . . . . . . . . . . . . . . . . . . . . . . . . . . . . . . . . . . . . . . . . . . . . . . . . . . . . . . . . . . . 253

N ETVO L U N T E E RS 21
With NetVolunteers, you can publicize volunteer opportunities available with your organization on your Web site. You can create an online volunteer registration form, advertising as many volunteer positions as you want; and you can create a Web page for specific volunteer jobs, such as Volunteer Coordinator or Special Events Coordinator, using the job information entered in the Raiser’s Edge database.If, while visiting your online job or volunteer registration page, visitors submit information, you can download this information for use in The Raiser’s Edge. Using the Download Transactions link, you bring the online information into the system and commit the new information to the proper records in The Raiser’s Edge.Also, even though Blackbaud hosts your NetSolutions Web pages, you can control the design and content of these pages. Through Configure and Customize and NetVolunteers, you can select page and font colors, add images, include titles and descriptions, and much more. This chapter includes detailed procedures about working in NetVolunteers. For more information about the Configure and Customize link, see “Configure & Customize” on page 11. For information about downloading online transactions into The Raiser’s Edge, see “Downloading Transactions” on page 295.
Requirements for NetVolunteersTo use NetVolunteers, you must have the following:• A Web page.• Internet Explorer 5.x or higher is fully supported; however donors can use HTMl 3.2 compliant browsers as well• The Raiser’s Edge 7.x• Volunteer Management.
Warning: Before you start working in NetVolunteers, we recommend you familiarize yourself with the Volunteer Management module and the Volunteers & Jobs Data Entry Guide.

220 CH A PT E R
NavigatingIn The Raiser’s Edge, you access NetVolunteers by clicking NetSolutions on the Raiser’s Edge bar.
Accessing NetVolunteers
Multiple users can access different areas of NetSolutions simultaneously.
Accessing NetVolunteers1. On the Raiser’s Edge bar, click NetSolutions. The NetSolutions page appears.

N ETVO L U N T E E RS 22
2. Click NetVolunteers. The NetSolutions - NetVolunteer screen appears.
The first time you open NetVolunteers, only the Volunteer Sign-up Page link appears. 3. Visitors to your Web site can use this page to inquire about volunteer opportunities. To customize the
sign-up page, click the Volunteer Sign-up Page link. The Volunteer Sign-up Page Wizard screen appears.
For instructions on completing this wizard, see “Publishing a Volunteer Registration Form to Your Web Site” on page 223.

222 CH A PT E R
4. To publish specific volunteer job opportunities on your Web site, on the NetSolutions - NetVolunteer screen, click New Job. The Web Job Wizard screen appears.
For information about completing this wizard, see “Publishing a Job to Your Web Site” on page 236.5. To open an existing online job page, from the NetVolunteer screen, click the page title link. In this
example, click Special Events Coordinator.
6. To visit an existing online job page, click Visit this job page. 7. To delete an online job page, click Delete this job page.8. To view statistics on a specific job page, under the job title link, click Page Statistics.9. To view statistics on all job pages, click the Statistics button.
10. To exit this screen, click the “X” in the upper right corner. You return to the NetSolutions page.

N ETVO L U N T E E RS 22
Buttons
In NetVolunteers, three buttons help you navigate through the program.
The New job button on the NetSolutions - NetVolunteer Screen opens the Web Job Wizard, where you enter information for a new online job page.
The Statistics button on the NetSolutions - NetVolunteer screen generates a chart, tracking the number of volunteers registered for each online job page.
The Edit Job button on the Web Job Wizard screen opens the job record in The Raiser’s Edge. You can make necessary changes to the job record before publishing it to your Web site. This button is available only in a saved and reopened job.
Publishing a Volunteer Registration Form to Your Web SiteWith NetVolunteers, visitors to your Web site can volunteer to work for your organization. The form requires they enter biographical information, such as name, address, and telephone number. Also, based on the selections you make when designing your online form, potential volunteers can select the assignments they are interested in and when they are available to work.
Volunteer Registration Page
This is the first procedure in a series of procedures, explaining the Volunteer Sign-up Page Wizard. The following procedures should be used in succession.• “Volunteer Registration Page” on page 223• “Volunteer Page Style” on page 226• “General Volunteer Page Options” on page 227• “Volunteer Assignment Interests” on page 230• “Volunteer Profiling” on page 232• “Additional Links” on page 233• “Update the Volunteer Sign-up Page” on page 234On the Volunteer Registration Page screen, you can enter a header to appear on your online registration page and preview the page.
Completing the Volunteer registration page screen1. On the Raiser’s Edge bar, click NetSolutions. The NetSolutions page appears.

224 CH A PT E R
2. Click NetVolunteers. The NetSolutions - NetVolunteer screen appears.
3. Click Volunteer Sign-up Page. The Volunteer Sign-up Page Wizard screen appears, displaying the Volunteer Registration Page screen.
4. In the Header box (1,024 character limit), enter any information you want to appear at the top of your online registration page.

N ETVO L U N T E E RS 22
5. To include an image on your volunteer page, in the Image/Caption fields, click the ellipsis to access the Open screen.
6. Locate the image to include and click Open. You return to the Donation Page Wizard screen.7. In the second Image/Caption field, enter the caption to appear under the image.
8. To preview your online registration page, click Preview.

226 CH A PT E R
This is what your online volunteer registrant sees.
9. Click Next to move to the Volunteer Page Style screen, or click Close to return to the NetVolunteer screen.
Volunteer Page Style
This is the second step in a series of procedures explaining the Volunteer Sign-up Page Wizard. The following procedures should be used in succession.• “Volunteer Registration Page” on page 223• “Volunteer Page Style” on page 226• “General Volunteer Page Options” on page 227• “Volunteer Assignment Interests” on page 230• “Volunteer Profiling” on page 232• “Additional Links” on page 233• “Additional Links” on page 233• “Update the Volunteer Sign-up Page” on page 234Using the Page Style screen, you can give a donation page a unique look, setting it apart from your other NetSolutions pages. The style you established in Configure and Customize defaults to all your NetSolutions Web pages, but you can change the style for each donation page using the Page Style screen. The fields and checkboxes available on this screen change based on the Page section you select. You can change the background, logo and title, image, header, detail, body, table legend, table headers, table text, and error text styles. For detailed instructions about each option, see “Changing Page Style” on page 387.If you are happy with the page style you established in Configure and Customize, do not make any changes on this screen, and click Next to move to the General Volunteer Page Options screen.

N ETVO L U N T E E RS 22
General Volunteer Page Options
This is the third step in a series of procedures, explaining the Volunteer Sign-up Page Wizard. The following procedures should be used in succession.• “Volunteer Registration Page” on page 223• “Volunteer Page Style” on page 226• “General Volunteer Page Options” on page 227• “Volunteer Assignment Interests” on page 230• “Volunteer Profiling” on page 232• “Additional Links” on page 233• “Additional Links” on page 233• “Update the Volunteer Sign-up Page” on page 234On the General volunteer page options screen, you can enter the constituent code assigned to new constituent records, customize your thank-you response, and select the volunteer options to use when volunteer information is imported from your Web page into The Raiser’s Edge.
Completing the General volunteer page options screen1. After you complete the Page Style screen, click Next. The General volunteer page options screen appears.
2. In the Enter the code to use when creating a new constituent record for a volunteer field, select the constituent code to assign online volunteer registrants who are not already constituents in your database. For example, if you select “Volunteer”, when you commit the online information to The Raiser’s Edge, “Volunteer” appears in the Constituent Codes grid of the Bio 2 tab on the constituent record.

228 CH A PT E R
3. NetVolunteers includes a default thank-you response automatically emailed to your online volunteer registrants. To view the default response, click Preview Confirmation. The Preview Confirmation screen appears.
4. To create your own thank-you response, click Customize Layout. The Receipt for Volunteer Sign-up Page screen appears.
For detailed instructions about creating a receipt, see “Customizing Confirmations” on page 367.
Warning: On the job record you can use the Tools, Find Volunteers menu option to automatically find jobs and assign them to a volunteer. To use this function effectively, we recommend you enter a volunteer Type on the Volunteer tab of the the constituent record only if a type is required by your organization. If a volunteer can be one of several types to perform a job, you can actually eliminate jobs when using this option, because the information in this column becomes required criteria.

N ETVO L U N T E E RS 22
5. On the General volunteer page options screen, in the Email: field, enter an email address to include in the From: field of your email thank-you message. The email information you entered in Configuration and Customize defaults, but you can edit the address on this screen.
6. In the Volunteer Options frame, select a Volunteer type and Volunteer status to assign any online volunteer records.For example, in the Volunteer type field select “General” and in the Volunteer status field select “Active”. When you commit information entered online to The Raiser’s Edge, the Volunteer type and Volunteer status appear in the Volunteer Types grid accessed through the General tree view category on the Volunteer tab of the constituent record.
7. In the Volunteer Options frame, to include a list of assignment interests from which online volunteer registrants can choose, mark the Collect interest information checkbox. An Interests frame is added to your online registration form.This is what your online volunteer registrant sees. The interests included depend on your selections on the Volunteer Assignment Interests screen.
8. To include availability information, on the Volunteer Sign-up Page Wizard screen, mark the Collect availability information checkbox. An Availability frame is added to your online registration form. If you mark this checkbox, and an online volunteer enters availability information, this information overwrites any existing availability information on the Volunteer tab of the volunteer’s constituent record.This is what your online volunteer registrant sees.
9. To accept comments from your online volunteer registrants, on the Volunteer Sign-up Page Wizard screen, mark the Allow volunteers to enter comments checkbox. An Additional Comments frame is added to your online registration form.
Note: For more information about the Volunteer tab, see the Volunteers & Jobs Data Entry Guide.

230 CH A PT E R
This is what your online volunteer registrant sees.
10. From the Volunteer Sign-up Page Wizard screen, click Next. If you marked Collect Interest Information, the Volunteer Assignment Interests screen appears. Otherwise, the Volunteer Profiling screen appears. Click Close to exit the Volunteer Sign-up Page Wizard and return to the NetVolunteer screen. For information about the Volunteer Assignment Interest screen, see Volunteer Assignment Interests; for information about the Volunteer Registration screen, see “Volunteer Profiling” on page 232.
Volunteer Assignment Interests
If you marked Collect Interest Information on the General volunteer page options screen, this is the fourth procedure in a series of procedures explaining the Volunteer Sign-up Page Wizard. If you did not mark this checkbox, skip to “Volunteer Profiling” on page 232. The following procedures should be used in succession.• “Volunteer Registration Page” on page 223• “Volunteer Page Style” on page 226• “General Volunteer Page Options” on page 227• “Volunteer Assignment Interests” on page 230• “Volunteer Profiling” on page 232• “Additional Links” on page 233• “Additional Links” on page 233• “Update the Volunteer Sign-up Page” on page 234
On the Volunteer Assignment Interests screen, you can select the assignment interests to publish on your Web site, and you can also enter a description for each interest.
Note: You create volunteer interests in the Assignment Interests table in the Tables section of Configuration. For more information, see the Configuration chapter in the Configuration & Security Guide.

N ETVO L U N T E E RS 23
Completing the Volunteer assignment interest screen1. After you complete the General volunteer page options screen, click Next. If you marked Collect interest
information checkbox, the Volunteer Assignment Interests screen appears.
2. Click in the Assignment Interest column and select the assignment interests published on your volunteer registration page. To change the assignment interest name for online publication, enter the new name in the Online Designation column.
3. Click Next to move to the Volunteer Profiling screen, or click Close to return to the NetVolunteer screen.

232 CH A PT E R
Volunteer Profiling
If you marked Collect Interest Information on the General volunteer page options screen, this is the fifth procedure in a series of procedures explaining the Volunteer Sign-up Page Wizard. If you did not mark this option, this is your fourth procedure. The following procedures should be used in succession.• “Volunteer Registration Page” on page 223• “Volunteer Page Style” on page 226• “General Volunteer Page Options” on page 227• “Volunteer Assignment Interests” on page 230• “Job Profiling” on page 245• “Additional Links” on page 233• “Update the Volunteer Sign-up Page” on page 234Volunteer profiling allows you to include questions on your job sign-up page to gather additional information from potential volunteers. These questions help you segment, target, and cultivate your constituency. On the Volunteer Profiling screen, you can enter profiling question specific to this job page. The default donor profiling information, used for all NetSolutions functions, is entered in Configure and Customize.
Adding volunteer profiling information for your volunteer sign-up page1. Once you complete either the General volunteer page options screen or the Volunteer Assignment
Interest screen, click Next. The Volunteer Profiling screen appears.
On this screen, enter questions to appear on your job sign-up page. The questions help you better understand your volunteers.

N ETVO L U N T E E RS 23
2. For example, in the Donor Profiling Question column, you can ask the question, “Did you receive our 2008 jobs list?”. This question then appears at the end of the job sign-up page. The question is limited to 120 characters.
3. In the Attribute to Use column, you must assign the question to an constituent attribute in your database. In the example above, if the registrant marks Did you receive our 2008 jobs list? on the job sign-up page, the information appears on the Attributes tab of the constituent record.On the constituent record, “Mailing” appears in the Category column and “Yes” appears in the Description column.
4. From the Volunteer Sign-up Page Wizard screen, click Next and move to the Additional Links screen.
Additional Links
If you marked Collect Interest Information on the General volunteer page options screen, this is the sixth procedure in a series of procedures explaining the Volunteer Sign-up Page Wizard. If you did not mark this option, this is your fourth procedure. The following procedures should be used in succession.• “Volunteer Registration Page” on page 223• “Volunteer Page Style” on page 226• “General Volunteer Page Options” on page 227• “Volunteer Assignment Interests” on page 230• “Volunteer Profiling” on page 232
Note: Only yes/no constituent attributes appear in the Attribute to Use column.

234 CH A PT E R
• “Additional Links” on page 233• “Update the Volunteer Sign-up Page” on page 234From the Additional Links screen, you can add links to related Web pages. For example, add a link to a detailed explanation of your privacy policy.
Adding links to your online volunteer sign-up page1. Once you complete the Volunteer Profiling screen, click Next. The Additional Links screen appears.
2. In the Image column, you must map to an image to use as the hyperlink on your sign-up page. 3. In the Caption column, enter the text visitors see when they hover their mouse over the hyperlink image.4. In the URL column, enter the address of the Web page to which you are adding a link. The column accepts
the URL with or without the <http://.5. The Path column displays the location of the Image you selected.6. From the Volunteer Sign-up Page Wizard screen, click Next and move to the Update the Volunteer Sign-up
Page screen.
Update the Volunteer Sign-up Page
This is the final step in a series of procedures explaining the Volunteer Sign-up Page Wizard. The following procedures should be used in succession.• “Volunteer Registration Page” on page 223• “Volunteer Page Style” on page 226• “General Volunteer Page Options” on page 227• “Volunteer Assignment Interests” on page 230• “Volunteer Profiling” on page 232• “Additional Links” on page 233• “Update the Volunteer Sign-up Page” on page 234

N ETVO L U N T E E RS 23
On the Update the Volunteer Sign-up Page screen, you can review all the information you entered in the Volunteer Sign-up Page Wizard.
Completing the Update the volunteer sign-up page screen1. After you complete the Additional Links screen, click Next. The Update the Volunteer Sign-up Page screen
appears.
2. Click Finish. The volunteer registration page information is submitted to Blackbaud and the Congratulations screen appears.

236 CH A PT E R
3. Click the Click here to visit the volunteer sign-up page to preview your new online Volunteer Request Form.
4. To add the Volunteer Registration Form to your existing Web site, cut and paste the code provided in the box beneath the Click here to visit the volunteer sign-up page link.
5. To return to the NetSolutions - Net Volunteers screen, click Close.
Publishing a Job to Your Web SiteWith NetVolunteers, you can take job information from The Raiser’s Edge and make it available on your Web site. The jobs Web page is hosted by Blackbaud but formatted based on your selections in Configure and Customize and NetVolunteers.
Publish a Job to the Web
This is the first step in a series of procedures explaining the Web Job Wizard. The following procedures should be used in succession.• “Publish a Job to the Web” on page 236• “Job Page” on page 239• “Job Page Style” on page 240• “Miscellaneous” on page 241• “Qualifications” on page 243• “Job Profiling” on page 245• “Additional Links” on page 247• “Publish the Job” on page 248On the Publish a Job to the Web screen, you select the job record in The Raiser’s Edge to publish on your Web site.
Completing the Publish a job to the web screen1. On the Raiser’s Edge bar, click NetSolutions. The NetSolutions page appears.

N ETVO L U N T E E RS 23
2. Click NetVolunteers. The NetSolutions - NetVolunteer screen appears.
3. To create a new online job page, click the New Job button. The Web Job Wizard screen appears.

238 CH A PT E R
4. In the Select Job field, you must select the job from The Raiser’s Edge to make available online. Click the binoculars. The Open screen appears.
5. In the Find Jobs that meet these criteria frame, enter criteria, narrowing the job search, and click Find Now. All job records satisfying the criteria appear in the grid. Or, leave all criteria fields blank and click Find Now to view all job records available in the database.If the job does not exist, click Add New. The New Job screen appears, and you can create the job to post on your Web site.
6. Once you select a job, click Open.
The selected job appears in the Select Job field on the NetSolutions - Web Job Wizard screen.
Note: For information about adding a job record to your database, see the Volunteers & Jobs Data Entry Guide.

N ETVO L U N T E E RS 23
7. If at any point you need to change information entered on the selected job record, click Edit Job in the bottom left corner of the screen. The job record appears displaying the General tab.You can make the necessary changes to the job record and click Save and Close to return to the Web Job Wizard.
8. Click Next to move to the Job Page screen, or click Close to return to the NetVolunteer screen.
Job Page
This is the second step in a series of procedures explaining the Web Job Wizard. The following procedures should be used in succession.• “Publish a Job to the Web” on page 236• “Job Page” on page 239• “Job Page Style” on page 240• “Miscellaneous” on page 241• “Qualifications” on page 243• “Job Profiling” on page 245• “Additional Links” on page 247• “Publish the Job” on page 248On the Job Page screen, you enter information describing your online job. You can enter a job name, the hours required, a description, and details about the job. You can also include an image and a caption.
Completing the Job page screen1. After you complete the Publish a Job to the Web screen, click Next. The Job Page appears.
2. The Job Name field defaults to the job entered in the Select Job field on the Publish a Job on the Web screen. If you entered a job description on the General tab of the Job record it defaults in the Description field. There is a 1,024 character limit.

240 CH A PT E R
3. In the Time field, enter the specific time and days a volunteer for this position will work.4. In the Commitment field, enter the total number of hours the volunteer must commit to this job.5. In the Detail comment box, enter any additional information potential volunteers should know about this
job.6. In the first Image/Caption field, select an image to include on your job Web page. Click the ellipsis to
access the Open screen.Select the image file to include on the online job page, and click Open to return to Web Job Wizard screen.
7. In the second Image/Caption field, enter a caption to appear under the image.8. Keep the Display Tell a Friend link checkbox marked if the Tell a Friend link you designed in Configure and
Customize should appear on your page.
9. To preview the information you added on this screen on your online job page, click Preview. 10. To close the preview page and return to the Web Job Wizard screen, click the “X” in the upper right
corner.11. From the Job Page screen, click Next to move to the Job Page Style screen, or click Close to return to the
NetVolunteer screen.
Job Page Style
This is the third step in a series of procedures explaining the Web Job Wizard. The following procedures should be used in succession.• “Publish a Job to the Web” on page 236• “Job Page” on page 239• “Job Page Style” on page 240
Note: For more information about adding your logo to the job Web page, see “Configuring Your Web Pages” on page 23.

N ETVO L U N T E E RS 24
• “Miscellaneous” on page 241• “Qualifications” on page 243• “Job Profiling” on page 245• “Additional Links” on page 247• “Publish the Job” on page 248Using the Page Style screen, you can give your Web page a unique look, setting it apart from your other NetSolutions pages. The style you established in Configure and Customize defaults to all of your NetSolutions Web pages, but you can change the style for each page using the Page Style screen. The fields and checkboxes available on this screen change based on the Page section you select. You can change the background, logo and title, image, header, detail, body, table legend, table headers, table text, and error text styles.For detailed instructions about each option, see “Changing Page Style” on page 387.If you are happy with the page style you established in Configure and Customize, do not make any changes on this screen, and click Next to move to the Miscellaneous screen.
Miscellaneous
This is the fourth step in a series of procedures explaining the Web Job Wizard. The following procedures should be used in succession.• “Publish a Job to the Web” on page 236• “Job Page” on page 239• “Job Page Style” on page 240• “Miscellaneous” on page 241• “Qualifications” on page 243• “Job Profiling” on page 245• “Additional Links” on page 247• “Publish the Job” on page 248On the Miscellaneous screen you select the constituent code to use when creating a new constituent record for a volunteer, customize your thank-you message, and select volunteer options to include on the Web site.

242 CH A PT E R
Completing the Miscellaneous screen1. After you complete the Page Style screen, click Next. The Miscellaneous screen appears.
2. In the Enter the code to use when creating a new constituent record for a volunteer field, select the constituent code to assign online job volunteers who are not already constituents in your database. For example, if you select “Volunteer”, when you commit the online information to The Raiser’s Edge, “Volunteer” appears in the Constituent Codes grid of the Bio 2 tab on the new constituent record.
3. NetVolunteers includes a default thank-you response, automatically emailed to your online volunteers. To view the default response, click Preview Confirmation. The Preview Confirmation screen appears.

N ETVO L U N T E E RS 24
4. To create your own thank-you response, click Customize Layout. The Confirmation screen appears.
For detailed instructions about creating a receipt, see “Customizing Confirmations” on page 367.5. On the Miscellaneous screen, in the Email: field, enter an email address to include in the From: field of
your email thank-you message. The email information you entered in Configuration and Customize defaults, but you can edit the address on this screen.
6. To encourage online volunteers to enter comments, mark the Allow volunteers to enter comments checkbox. A Comments box is included on the online registration page.This is what your online volunteer sees.
7. From the Miscellaneous screen, click Next to move to the Qualifications screen, or click Close to return to the NetVolunteer screen.
Qualifications
This is the fifth step in a series of procedures explaining the Web Job Wizard. The following procedures should be used in succession.• “Publish a Job to the Web” on page 236• “Job Page” on page 239• “Job Page Style” on page 240• “Miscellaneous” on page 241

244 CH A PT E R
• “Qualifications” on page 243• “Job Profiling” on page 245• “Additional Links” on page 247• “Publish the Job” on page 248On the Qualifications screen, you select the skills, experience, courses and training the volunteer position requires. You can add qualifications from the job record. If you need to add qualifications to the job record, open the record by clicking the Edit job button at the bottom of the screen.
Completing the Qualifications screen1. After you complete the Miscellaneous screen, click Next. The Qualifications screen appears.
2. In the Skills and Experience frame, Description, Skill Level, and License Type information entered on the Details tab of the job record appear. To include this information on your Web page, mark the checkbox in the Include column.To add or change Skills and Experience or Courses and Training information, click Edit Job. The job record appears. Select the Details tab and make any necessary changes.
Click Save and Close to save the changes and return to the Web Job Wizard screen.3. In the Courses and Training frame, Course Name and Certification information entered on the Details tab
of the job record appear. To include this information on your Web page, mark the checkbox in the Include column.
Warning: Entering Skills and Experience and Courses and Training may severely limit your search criteria if you use the Tools, Find Volunteers menu option on the Volunteer tab of a constituent record.
Note: For more information about job records, see the Volunteers & Jobs Data Entry Guide.

N ETVO L U N T E E RS 24
4. In the Additional Qualifications frame, enter any additional qualification information to appear on your Web page that is not included on the job record.
This is what your online volunteer sees.
5. From the Qualifications screen, click Next to move to the Job Profiling screen, or click Close to return to the NetVolunteer screen.
Job Profiling
This is the sixth step in a series of procedures explaining the Web Job Wizard. The following procedures should be used in succession.• “Publish a Job to the Web” on page 236• “Job Page” on page 239

246 CH A PT E R
• “Job Page Style” on page 240• “Miscellaneous” on page 241• “Qualifications” on page 243• “Job Profiling” on page 245• “Additional Links” on page 247• “Publish the Job” on page 248Job profiling allows you to include questions on your job page to gather additional information from potential volunteers. These questions help you segment, target, and cultivate your constituency. On the Job Profiling screen, you can enter profiling question specific to this job page. The default profiling information, used for all NetSolutions functions, is entered in Configure and Customize.
Adding job profiling information for your job page1. Once you complete the Qualifications screen, click Next. The Job Profiling screen appears.

N ETVO L U N T E E RS 24
2. For example, in the Donor Profiling Question column, you can ask the question “What are your normal business hours?”. This question then appears at the end of the job page. The question is limited to 120 characters.
3. In the Attribute to Use column, you must assign the question to an constituent attribute in your database. The information appears on the Attributes tab of the constituent record when you download the data from your Web pages.
4. From the Web Job Wizard screen, click Next and move to the Additional Links screen.
Additional Links
This is the seventh step in a series of procedures explaining the Web Job Wizard. The following procedures should be used in succession.• “Publish a Job to the Web” on page 236• “Job Page” on page 239• “Job Page Style” on page 240• “Miscellaneous” on page 241• “Qualifications” on page 243• “Job Profiling” on page 245• “Additional Links” on page 247• “Additional Links” on page 247• “Publish the Job” on page 248

248 CH A PT E R
From the Additional Links screen, you can add links to related Web pages. For example, you can add a link to a detailed explanation of your privacy policy.
Adding links to your online jobs page1. Once you complete the Job Profiling screen, click Next. The Additional Links screen appears.
2. In the Image column, you must map to an image to use as the hyperlink on your jobs page. 3. In the Caption column, enter the text visitors see when they hover their mouse over the hyperlink image.4. In the URL column, enter the address of the Web page to which you are adding a link. The column accepts
the URL with or without the <http://.5. The Path column displays the location of the Image you selected.6. From the Web Job Wizard screen, click Next and move to the Publish the Job screen.
Publish the Job
This is the final step in a series of procedures explaining the Web Job Wizard. The following procedures should be used in succession.• “Publish a Job to the Web” on page 236• “Job Page” on page 239• “Job Page Style” on page 240• “Miscellaneous” on page 241• “Qualifications” on page 243• “Job Profiling” on page 245• “Additional Links” on page 247• “Publish the Job” on page 248The Publish the Job screen summarizes the selections you made on the Web Job Wizard.

N ETVO L U N T E E RS 24
Completing the Publish the job screen1. After you complete the Additional Links screen, click Next. The Publish the Job screen appears.
2. Click Finish. A screen appears displaying a link to your new job Web page.
3. Click the Click here to visit the job page link. The Web page you just designed appears.4. To add the Web Job Form to your existing Web site, cut and paste the code provided in the box beneath
the Click here to visit the directory page link.5. To close the preview page and return to the Web Job Wizard screen, click the “X” in the upper right
corner.

250 CH A PT E R
6. To exit the Web Job Wizard screen, click Close. You return to the NetSolutions - NetVolunteer screen. The new online job appears as a link on the screen.
7. To add the jobs page you just designed to your Web site, open Configure and Customize and select the Site Map/Links tab. Click the link under Volunteer Opportunities. The code necessary to add the page to their Web site appears. Paste this code to your Web site.
8. To exit the NetSolutions - NetVolunteer screen and return to the NetSolutions page, click the “X” in the upper right corner.
Viewing a Job Web PageAfter you create an online job page, you can access and edit the page through NetSolutions.
Viewing an online job page1. On the Raiser’s Edge bar, click NetSolutions. The NetSolutions page appears.

N ETVO L U N T E E RS 25
2. Click NetVolunteers. The NetSolutions - NetVolunteer screen appears.
3. Click the Visit this job page link. The Web page appears.
4. To exit the Web page and return to NetSolutions - NetVolunteer screen, click the “X” in the upper right corner.
Deleting a Job Web PageOnce an online job page has served its purpose, you can permanently remove it from your Web site.

252 CH A PT E R
Deleting an online job page1. On the Raiser’s Edge bar, click NetSolutions. The NetSolutions page appears.2. Click NetVolunteers. The NetSolutions - NetVolunteer screen appears.
3. Under the Web page link that you want to delete, click Delete this job page. A warning message appears.

N ETVO L U N T E E RS 25
4. Click Yes. The NetSolutions - NetVolunteer screen appears, minus the deleted job Web page.
5. To exit this screen and return to the NetSolutions page, click the “X” in the upper right corner.
Viewing Volunteer Page StatisticsNetSolutions keeps track of how many times your online job pages are visited and how many volunteers each page attracts. You can view statistics for all job pages or for one page.
Viewing volunteer page statistics1. On the Raiser’s Edge bar, click NetSolutions. The NetSolutions page appears.

254 CH A PT E R
2. Click NetVolunteers. The NetSolutions - NetVolunteer screen appears.
3. To view a statistical overview of traffic and registrations on all your jobs pages, click the Statistics button. The Volunteer Page Statistics screen appears.
• On the left side of the screen, Page Hits, you can see how many times each job page was visited. In the preceding example, the Photographer page was visited one time and the Special Events Coordinator page was visited six times.
• On the right side of the screen, Volunteers, you can see how many volunteers registered on each page. In the preceding example, the Photographer page attracted one volunteer and the Special Events Coordinator page attracted two volunteers.
• To see statistics for a specific period, enter a Start Date and End Date, and click Update.• Click Print Chart above each graph to print the graph.

N ETVO L U N T E E RS 25
4. To view statistics for a specific page from the NetVolunteers page, click Page Statistics below the job page link. The Statistics screen appears.
• To see statistics for a specific period, enter a Start Date and End Date, and click Update.• Click Print Chart above the graph to print the statistic information.• If you mark the Data checkbox, the graphic is replaced by columns, showing the Interest and the
Number of volunteers for each interest.• The left side displays the number of Page Hits and Total Volunteers.
5. To close the screen and return to the NetSolutions - NetVolunteer screen, click the “X” in the upper right corner.

256 CH A PT E R

8chapter
NetMembers
Requirements for NetMembers . . . . . . . . . . . . . . . . . . . . . . . . . . . . . . . . . . . . . . . . . . . . . . . . . . . . . . . . . . . . . . . 259Navigating . . . . . . . . . . . . . . . . . . . . . . . . . . . . . . . . . . . . . . . . . . . . . . . . . . . . . . . . . . . . . . . . . . . . . . . . . . . . . . . . 259Accessing NetMembers . . . . . . . . . . . . . . . . . . . . . . . . . . . . . . . . . . . . . . . . . . . . . . . . . . . . . . . . . . . . . . . . . . . . . . . . 260NetMembers Buttons . . . . . . . . . . . . . . . . . . . . . . . . . . . . . . . . . . . . . . . . . . . . . . . . . . . . . . . . . . . . . . . . . . . . . . . . . 261Publishing Membership Information on Your Web Site . . . . . . . . . . . . . . . . . . . . . . . . . . . . . . . . . . . . . . . . . . . 262Publish a Membership Category to the Web . . . . . . . . . . . . . . . . . . . . . . . . . . . . . . . . . . . . . . . . . . . . . . . . . . . . . . . 262Allow Donors to Join and to Renew?. . . . . . . . . . . . . . . . . . . . . . . . . . . . . . . . . . . . . . . . . . . . . . . . . . . . . . . . . . . . . . 264Allow Additional Donations? . . . . . . . . . . . . . . . . . . . . . . . . . . . . . . . . . . . . . . . . . . . . . . . . . . . . . . . . . . . . . . . . . . . . 268Gift Types . . . . . . . . . . . . . . . . . . . . . . . . . . . . . . . . . . . . . . . . . . . . . . . . . . . . . . . . . . . . . . . . . . . . . . . . . . . . . . . . . . . 270Allow Gifts of Membership? . . . . . . . . . . . . . . . . . . . . . . . . . . . . . . . . . . . . . . . . . . . . . . . . . . . . . . . . . . . . . . . . . . . . 272Membership Description . . . . . . . . . . . . . . . . . . . . . . . . . . . . . . . . . . . . . . . . . . . . . . . . . . . . . . . . . . . . . . . . . . . . . . . 275Page Style . . . . . . . . . . . . . . . . . . . . . . . . . . . . . . . . . . . . . . . . . . . . . . . . . . . . . . . . . . . . . . . . . . . . . . . . . . . . . . . . . . . 277Customize the Membership Confirmation Message . . . . . . . . . . . . . . . . . . . . . . . . . . . . . . . . . . . . . . . . . . . . . . . . . 278Default Settings for Downloads . . . . . . . . . . . . . . . . . . . . . . . . . . . . . . . . . . . . . . . . . . . . . . . . . . . . . . . . . . . . . . . . . 278Sources. . . . . . . . . . . . . . . . . . . . . . . . . . . . . . . . . . . . . . . . . . . . . . . . . . . . . . . . . . . . . . . . . . . . . . . . . . . . . . . . . . . . . . 280Member Profiling . . . . . . . . . . . . . . . . . . . . . . . . . . . . . . . . . . . . . . . . . . . . . . . . . . . . . . . . . . . . . . . . . . . . . . . . . . . . . 282Additional Links . . . . . . . . . . . . . . . . . . . . . . . . . . . . . . . . . . . . . . . . . . . . . . . . . . . . . . . . . . . . . . . . . . . . . . . . . . . . . . . 284Internet Merchant Account . . . . . . . . . . . . . . . . . . . . . . . . . . . . . . . . . . . . . . . . . . . . . . . . . . . . . . . . . . . . . . . . . . . . . 286Publish the Membership Category . . . . . . . . . . . . . . . . . . . . . . . . . . . . . . . . . . . . . . . . . . . . . . . . . . . . . . . . . . . . . . . 287Viewing a Membership Web Page . . . . . . . . . . . . . . . . . . . . . . . . . . . . . . . . . . . . . . . . . . . . . . . . . . . . . . . . . . . . . 289Deleting a Membership Web Page . . . . . . . . . . . . . . . . . . . . . . . . . . . . . . . . . . . . . . . . . . . . . . . . . . . . . . . . . . . . 290Viewing Membership Page Statistics . . . . . . . . . . . . . . . . . . . . . . . . . . . . . . . . . . . . . . . . . . . . . . . . . . . . . . . . . . . 292
Procedures
Accessing NetMembers . . . . . . . . . . . . . . . . . . . . . . . . . . . . . . . . . . . . . . . . . . . . . . . . . . . . . . . . . . . . . . . . . . . . . . . . 260Publish a membership category to the Web screen . . . . . . . . . . . . . . . . . . . . . . . . . . . . . . . . . . . . . . . . . . . . . . . . . 262Allow donors to join and to renew? screen . . . . . . . . . . . . . . . . . . . . . . . . . . . . . . . . . . . . . . . . . . . . . . . . . . . . . . . . 265Allow additional donations? screen . . . . . . . . . . . . . . . . . . . . . . . . . . . . . . . . . . . . . . . . . . . . . . . . . . . . . . . . . . . . . . 268Gift types screen . . . . . . . . . . . . . . . . . . . . . . . . . . . . . . . . . . . . . . . . . . . . . . . . . . . . . . . . . . . . . . . . . . . . . . . . . . . . . 271Allow gifts of membership? screen . . . . . . . . . . . . . . . . . . . . . . . . . . . . . . . . . . . . . . . . . . . . . . . . . . . . . . . . . . . . . . 273Membership description screen . . . . . . . . . . . . . . . . . . . . . . . . . . . . . . . . . . . . . . . . . . . . . . . . . . . . . . . . . . . . . . . . . 276Default settings for downloads screen . . . . . . . . . . . . . . . . . . . . . . . . . . . . . . . . . . . . . . . . . . . . . . . . . . . . . . . . . . . . 279Sources screen . . . . . . . . . . . . . . . . . . . . . . . . . . . . . . . . . . . . . . . . . . . . . . . . . . . . . . . . . . . . . . . . . . . . . . . . . . . . . . . 280Adding member profiling information to your membership page . . . . . . . . . . . . . . . . . . . . . . . . . . . . . . . . . . . . . . 283Adding links to your online membership page. . . . . . . . . . . . . . . . . . . . . . . . . . . . . . . . . . . . . . . . . . . . . . . . . . . . . . 285Changing Membership Internet Merchant Account . . . . . . . . . . . . . . . . . . . . . . . . . . . . . . . . . . . . . . . . . . . . . . . . . 286Publish the membership category screen . . . . . . . . . . . . . . . . . . . . . . . . . . . . . . . . . . . . . . . . . . . . . . . . . . . . . . . . . 288Viewing an online membership page . . . . . . . . . . . . . . . . . . . . . . . . . . . . . . . . . . . . . . . . . . . . . . . . . . . . . . . . . . . . . 289Deleting an online membership page . . . . . . . . . . . . . . . . . . . . . . . . . . . . . . . . . . . . . . . . . . . . . . . . . . . . . . . . . . . . 290

258 CH A PT E R
Viewing membership page statistics . . . . . . . . . . . . . . . . . . . . . . . . . . . . . . . . . . . . . . . . . . . . . . . . . . . . . . . . . . . . . 292

NE TME M B E RS 25
With NetMembers, you can design a membership Web page and solicit for new members using your Web site. While designing the membership page, you decide the membership categories to advertise online. You can include pages for an unlimited number of membership categories. You can also include links for renewing memberships, adding new memberships, set a default gift amount for the membership category, allow donors to select subcategories, select the gift types available for online memberships (credit card and/or pledges), allow gifts of membership, include a description of the membership category, add an image to the Web page, customize your confirmation message, and establish a default constituent code and fund for the downloaded gifts.
NetSolutions makes transferring online membership information into The Raiser’s Edge easy. Using the Download Transactions link, you can add the online information into the system and commit the new information to the proper records in The Raiser’s Edge. For more information about downloading transactions, see “Downloading Transactions” on page 295.Finally, even though Blackbaud hosts your NetSolutions Web pages, you have a great deal of control over the design of these pages. Through the Configure and Customize link, you can select page and font colors, add images, include titles and descriptions, and much more. For more information about the Configure and Customize link, see “Configure & Customize” on page 11. You can also override the settings you specified in Configure and Customize on a page by page basis in each of the NetMembers pages you define.
Requirements for NetMembersTo use NetMembers, you must have the following:• A Web page.• Internet Explorer 5.x or higher is fully supported; however donors can use HTMl 3.2 compliant browsers as well• The Raiser’s Edge 7.x
• Membership Management.
Navigating
Warning: Before you start working in NetMembers, you must register as a NetSolutions user and enter your Login ID and Login Password in Configure and Customize. For more information, see “Registering with NetSolutions” on page 1 and “Configure & Customize” on page 11.
Warning: Before you start working in NetMembers, we recommend you familiarize yourself with Membership Management and read the Membership Data Entry Guide.
Warning: Before you start working in NetMembers, you must register as a NetSolutions user and enter your Login ID and Login Password in Configure and Customize. For more information, see “Registering with NetSolutions” on page 1 and “Configure & Customize” on page 11.

260 CH A PT E R
In The Raiser’s Edge, access NetMembers by clicking NetSolutions on the Raiser’s Edge bar.
Accessing NetMembers
Multiple users can access different areas of NetSolutions simultaneously.
Accessing NetMembers1. On the Raiser’s Edge bar, click NetSolutions. The NetSolutions page appears.2. Click NetMembers. The NetSolutions - NetMembers screen appears.

NE TME M B E RS 26
The first time you open NetMembers, it appears blank. If you already created a NetMembers Web page, it appears on the NetSolutions - NetMembers screen as a link.
3. To open an existing online membership page, click the link. In the preceding example, click Adopt an Animal - Patron.
4. To exit this screen, click the “X” in the upper right corner. You return to the NetSolutions page.
NetMembers Buttons
In NetMembers, three buttons help you work in the program.
The New Membership button on the NetSolutions - NetMembers screen opens the Web Membership Wizard, where you enter information for a new online membership page.
The Statistics button on the NetSolutions - NetMembers screen generates a chart, tracking activity on your membership Web page(s).
The Edit membership category button, available on the Web Membership Wizard screens, opens the selected membership category record in The Raiser’s Edge. You can then make any necessary changes to the record before publishing it to your Web site.

262 CH A PT E R
Publishing Membership Information on Your Web Site
With NetMembers, visitors to your membership Web page can purchase or renew memberships for themselves and/or gift memberships for others. The online registration form requires they enter biographical information, such as name, address, and email information. Also, based on the selections you make when designing your online form, donors can create a login account, determine who receives the benefits included with a gift membership, include a personal message with gift memberships, and much more.
Publish a Membership Category to the Web
This is the first procedure, in a series of procedures, explaining the Web Membership Wizard. The following procedures should be used in succession.• “Publish a Membership Category to the Web” on page 262• “Allow Donors to Join and to Renew?” on page 264• “Allow Additional Donations?” on page 268• “Gift Types” on page 270• “Allow Gifts of Membership?” on page 272• “Membership Description” on page 275• “Page Style” on page 277• “Customize the Membership Confirmation Message” on page 278• “Default Settings for Downloads” on page 278• “Sources” on page 280• “Member Profiling” on page 282• “Additional Links” on page 284• “Internet Merchant Account” on page 286• “Publish the Membership Category” on page 287On the Publish a Membership Category to the Web screen, you select the membership category in The Raiser’s Edge to publish on your Web site.
Completing the Publish a membership category to the Web screen1. On the Raiser’s Edge bar, click NetSolutions. The NetSolutions page appears.
Warning: Before you start working in NetMembers, you must register as a NetSolutions user and enter your Login ID and Login Password in Configure and Customize. For more information, see “Registering with NetSolutions” on page 1 and “Configure & Customize” on page 11.

NE TME M B E RS 26
2. Click NetMembers. The NetSolutions - NetMembers screen appears.
3. Click New Membership. The NetSolutions - Web Membership Wizard screen appears.
Note: For information about establishing membership categories in Configuration, see the Configuration chapter of the Configuration & Security Guide.

264 CH A PT E R
4. In the Membership category field, select the membership category to publish on your Web site. The options available depend on the membership categories you establish in Configuration.
5. To edit any information included in the selected membership category, click Edit membership category in the bottom left corner of the screen. The membership category record appears, and you can make the necessary changes. Click Save and Close to return to the NetSolutions - Web Membership Wizard screen. You can access the membership category record from anywhere on the NetSolutions - Web Membership Wizard.
6. Click Next and move to the Allow Donors to Join and to Renew? screen, or click Cancel to return to the NetMembers page.
Allow Donors to Join and to Renew?
This is the second procedure, in a series of procedures, explaining the Web Membership Wizard. The following procedures should be used in succession.• “Publish a Membership Category to the Web” on page 262• “Allow Donors to Join and to Renew?” on page 264• “Allow Additional Donations?” on page 268• “Gift Types” on page 270• “Allow Gifts of Membership?” on page 272• “Membership Description” on page 275• “Page Style” on page 277• “Customize the Membership Confirmation Message” on page 278• “Default Settings for Downloads” on page 278
Note: For information about working with membership categories, see the Membership Data Entry Guide.
Warning: If you click Cancel, any information you entered in the Web Membership Wizard is lost.

NE TME M B E RS 26
• “Sources” on page 280• “Member Profiling” on page 282• “Additional Links” on page 284• “Internet Merchant Account” on page 286• “Publish the Membership Category” on page 287If you choose to not allow donors to join or renew online, skip to “Membership Description” on page 275.On the Allow donors to join and to renew? screen, you can allow visitors to your Web site to join your organization or renew an existing membership. You can also enter a default amount to appear on the Web page, allow donors to select a subcategory, and encourage donors to enter comments with their memberships dues.
Completing the Allow donors to join and to renew? screen1. From the Publish a Membership Category to the Web screen, click Next. The Allow donors to join and to
renew? screen appears.
2. Mark Allow donors to join online and online donors can establish new memberships from your Web site. A link is added to your Web page.
When they click this link, they are taken to the Registration Information screen online.3. Mark Allow donors to renew a membership online and existing members can renew from your Web site.
A link is added to your Web page.
When they click this link, they are taken to the Registration Information screen online. If they established a login ID and password, they can skip this screen and go directly to entering membership dues information and payment information.

266 CH A PT E R
4. If the membership category requires a fee, mark the A membership fee is required for this membership checkbox. This is what your online visitors will see.
Both the Membership Dues Information and Payment Information frames are added to your membership Web page.If no fee is required, do not mark the A membership fee is required for this membership checkbox.
Only a Membership Information frame is added to your membership Web page.

NE TME M B E RS 26
5. In the Default gift amount field, if you marked the A membership fee is required for this membership checkbox, you can enter an amount for the online memberships.
The amount is then included on your membership page as a suggested donation.6. On the Allow donors to join and to renew? screen, the Allow the donor to select a subcategory checkbox
allows donors to select a membership subcategory when entering membership information. For example, the Adopt an Animal category may have the subcategories of Lion, Panda, Koala, Polar Bear, and Sea Turtle. If you mark this checkbox, the Group field is added to your Web page.
The subcategory information must exist on the Raiser’s Edge membership category in order for it to appear online. If no subcategory information is entered on the membership category, and you mark the Allow the donor to select a subcategory checkbox, no subcategory options appear on the online membership page.

268 CH A PT E R
7. On the Allow donors to join and to renew? screen, mark Allow the donor to enter comments with their membership dues and a Comments box appears with the online membership registration form.
8. On the Allow donors to join and to renew? screen, mark Allow the donor to waive benefits and a checkbox appears with the online membership registration form. If you do not mark Allow the donor to waive benefits the checkbox does not appear on the Web page.
9. On the Allow donors to join and to renew? screen, mark Allow donors to give anonymously and a checkbox appears with the online membership registration form. If you do not mark Allow donors to give anonymously the checkbox does not appear on the Web page.
10. Click Next and move to the Allow Additional Donations? screen, or click Cancel to return to the NetMembers page. If you choose to not allow donors to join or renew online, skip to “Membership Description” on page 275.
Allow Additional Donations?
If you choose to allow donors to join or renew online this is the third procedure, in a series of procedures, explaining the Web Membership Wizard. The following procedures should be used in succession.
Warning: If you click Cancel, any information you entered in the Web Membership Wizard is lost.

NE TME M B E RS 26
• “Publish a Membership Category to the Web” on page 262• “Allow Donors to Join and to Renew?” on page 264• “Allow Additional Donations?” on page 268• “Gift Types” on page 270• “Allow Gifts of Membership?” on page 272• “Membership Description” on page 275• “Page Style” on page 277• “Customize the Membership Confirmation Message” on page 278• “Default Settings for Downloads” on page 278• “Sources” on page 280• “Member Profiling” on page 282• “Additional Links” on page 284• “Internet Merchant Account” on page 286• “Publish the Membership Category” on page 287On the Allow additional donations? screen, you choose whether users can make additional donations during the registration process.
Completing the Allow additional donations? screen1. From the Allow donors to join and to renew screen, click Next. The Allow additional donations? screen
appears.
2. To allow additional donations to be made during the registration process, mark the Allow registrants to make an additional donation on this page checkbox.

270 CH A PT E R
3. Add the additional text to be included in the Additional Donation Text field. The text will appear as it is entered on the page in a separate Additional Donation frame. There is 255 character limitation.
4. Click Next and move to the Gift Types screen, or click Cancel to return to the NetMembers page.
Gift Types
If you choose to allow donors to join or renew online this is the fourth procedure, in a series of procedures, explaining the Web Membership Wizard. The following procedures should be used in succession.• “Publish a Membership Category to the Web” on page 262• “Allow Donors to Join and to Renew?” on page 264• “Allow Additional Donations?” on page 268• “Gift Types” on page 270• “Allow Gifts of Membership?” on page 272• “Membership Description” on page 275• “Page Style” on page 277• “Customize the Membership Confirmation Message” on page 278• “Default Settings for Downloads” on page 278• “Sources” on page 280• “Member Profiling” on page 282• “Additional Links” on page 284• “Internet Merchant Account” on page 286• “Publish the Membership Category” on page 287On the Gift Types screen, you can select the gift types available to members registering online: Credit card gifts and Credit card gifts and Pledges.
Warning: If you click Cancel, any information you entered in the Web Membership Wizard is lost.

NE TME M B E RS 27
Completing the Gift types screen1. From the Allow additional donations? screen, click Next. The Gift Types screen appears.
2. When you select Credit card gifts, visitors to your membership Web page must use a credit card when renewing or creating a membership.
Note: For more information about pledges, see the Pledges chapter of the Gift Records Guide.

272 CH A PT E R
3. When you select Credit card gifts and Pledges, visitors to your membership Web page can use a credit card or select the Bill me later option when renewing or creating a membership.
4. Click Next and move to the Allow Gifts of Membership? screen, or click Cancel to return to the NetMembers page.
Allow Gifts of Membership?
If you choose to allow donors to join or renew online this is the fifth procedure, in a series of procedures, explaining the Web Membership Wizard. The following procedures should be used in succession. • “Publish a Membership Category to the Web” on page 262• “Allow Donors to Join and to Renew?” on page 264• “Allow Additional Donations?” on page 268• “Gift Types” on page 270• “Allow Gifts of Membership?” on page 272• “Membership Description” on page 275• “Page Style” on page 277• “Customize the Membership Confirmation Message” on page 278• “Default Settings for Downloads” on page 278• “Sources” on page 280• “Member Profiling” on page 282• “Additional Links” on page 284• “Internet Merchant Account” on page 286• “Publish the Membership Category” on page 287On the Allow gifts of membership? screen, you allow visitors to your Web site to give a gift of membership.
Warning: If you click Cancel, any information you entered in the Web Membership Wizard is lost.

NE TME M B E RS 27
Completing the Allow gifts of membership? screen1. From the Gift Types screen, click Next. The Allow gifts of membership? screen appears.
2. To activate the checkboxes included on this screen mark Allow gifts of membership. If you mark this checkbox alone the This is a gift of membership frame is added to your Web page, including fields for the gift recipient’s name and address information.
3. When you allow gifts of membership, you can mark any of the following checkboxes, governing how the gift membership can be handled by the donor.• Allow the donor to choose who should receive benefits: Membership benefits are gifts your
organization gives to constituents, depending on their level of membership or the dues they pay. Mark this checkbox so your online donors can decide if they should receive the membership benefits or the person receiving the gift of membership should receive the benefits.

274 CH A PT E R
The Send benefits to field is added to the This is a gift of membership frame.
• Allow the donor to choose who should receive renewal notices: Membership renewal notices serve as a reminder to constituents that a membership is about to expire. Mark this checkbox so your online donors can decide if they should receive the renewal notice, if the person receiving the gift of membership should receive the renewal notice, or if both should receive the renewal notice.
The Send renewal notices to field is added to the This is a gift of membership frame.
• Allow the donor to include a special message with the gift of membership: This allows the donor to personalize the gift of membership with a note to include when you notify the recipient of the gift.
Note: The Allow the donor to choose who should receive renewal notice checkbox is disabled if on the Raiser’s Edge membership category the Renewal Information tab includes renewal instructions, governing gifts of membership.

NE TME M B E RS 27
The Special message field is added to the This is a gift of membership frame.
4. Click Next and move to the Membership Description screen, or click Cancel to return to the NetMembers page.
Membership Description
If you selected the Allow members to join and to renew? screen this is the sixth procedure, in a series of procedures, explaining the Web Membership Wizard. The following procedures should be used in succession.• “Publish a Membership Category to the Web” on page 262• “Allow Donors to Join and to Renew?” on page 264• “Allow Additional Donations?” on page 268• “Gift Types” on page 270• “Allow Gifts of Membership?” on page 272• “Membership Description” on page 275• “Page Style” on page 277• “Customize the Membership Confirmation Message” on page 278• “Default Settings for Downloads” on page 278• “Sources” on page 280• “Member Profiling” on page 282• “Additional Links” on page 284• “Internet Merchant Account” on page 286• “Publish the Membership Category” on page 287On the Membership description screen, you enter information describing your online membership category. You can enter a category name, a description, dues, and details about the membership. You can also include an image and caption.
Warning: If you click Cancel, any information you entered in the Web Membership Wizard is lost.

276 CH A PT E R
Completing the Membership description screen1. From the Allow gift of membership? screen, click Next. The Membership description screen appears.
2. The Category and Dues fields fill in automatically, based on the membership category you selected. On the Web page, the Category information appears at the top of the page, under the Title information you entered in Configure and Customize.
3. In the Description box, enter information describing the membership category. On the Web page, this appears under the Category name. There is a 1,024 character limit.
4. In the Details box, enter any additional membership information. For example, you can remind potential members that their dues are tax-deductible. There is a 2,147,483,647 character limitation.
5. In the first Image/Caption field, you can include an image on your membership Web page. To access the Open screen, click the ellipsis.Select the image file to include on the Web page, and click Open to return to NetSolutions - Web Membership Wizard screen.In the second Image/Caption field, you can enter a caption to appear under the image.
6. In Configure and Customize, you design a Tell a Friend link, which appears on your Web pages. The link takes visitors to another page, where they can enter contact information about their friend. If you do not want this link to appear on your membership page, unmark the Display Tell a Friend checkbox. Keep the checkbox marked if you want the link to appear on your membership page.
Note: For information about establishing membership categories in Configuration, see the Configuration chapter of the Configuration & Security Guide.

NE TME M B E RS 27
7. To see how the information you added on this screen appears on the Web page, you can use the zoom button provided to the right of the sample screen. This enlarges the screen so you can better see how your Web page will look. Or, you can click Preview.
8. From the Membership description screen, click Next and move to the Page Style screen, or click Cancel to return to the NetMembers page. If you choose to not allow donors to join or renew online, skip to “Publish the Membership Category” on page 287.
Page Style
If you choose to allow donors to join or renew online this is the seventh procedure, in a series of procedures, explaining the Web Membership Wizard. The following procedures should be used in succession.• “Publish a Membership Category to the Web” on page 262• “Allow Donors to Join and to Renew?” on page 264• “Allow Additional Donations?” on page 268• “Gift Types” on page 270• “Allow Gifts of Membership?” on page 272• “Membership Description” on page 275• “Page Style” on page 277• “Customize the Membership Confirmation Message” on page 278• “Default Settings for Downloads” on page 278• “Sources” on page 280• “Member Profiling” on page 282• “Additional Links” on page 284• “Internet Merchant Account” on page 286• “Publish the Membership Category” on page 287
Warning: If you click Cancel, any information you entered in the Web Membership Wizard is lost.

278 CH A PT E R
Using the Page Style screen, you can give your membership page a unique look, setting it apart from your other NetSolutions pages. The style you established in Configure and Customize defaults to all of your NetSolutions Web pages, but you can change the style for each membership page using the Page Style screen. The fields and checkboxes available on this screen change based on the Page section you select. You can change the background, logo and title, image, header, detail, body, table legend, table headers, table text, and error text styles. For detailed information about each option, see “Changing Page Style” on page 387.If you are happy with the page style you established in Configure and Customize, do not make any changes on this screen, and click Next to move to the Customize the Membership Confirmation Message screen.
Customize the Membership Confirmation Message
If you choose to allow donors to join or renew online, this is the eighth procedure in a series of procedures, explaining the Web Membership Wizard. The following procedures should be used in succession.• “Publish a Membership Category to the Web” on page 262• “Allow Donors to Join and to Renew?” on page 264• “Allow Additional Donations?” on page 268• “Gift Types” on page 270• “Allow Gifts of Membership?” on page 272• “Membership Description” on page 275• “Page Style” on page 277• “Customize the Membership Confirmation Message” on page 278• “Default Settings for Downloads” on page 278• “Sources” on page 280• “Member Profiling” on page 282• “Additional Links” on page 284• “Internet Merchant Account” on page 286• “Publish the Membership Category” on page 287With NetMembers, you can customize membership confirmation messages automatically sent via email to your online registrants. For more information, see “Customizing Confirmations” on page 367.
When you have completed customizing your confirmation message click Next and move to the Default Settings for Downloads screen, or click Cancel to return to the NetMembers page.
Default Settings for Downloads
If you choose to allow donors to join or renew online, this is the ninth procedure in a series of procedures, explaining the Web Membership Wizard. The following procedures should be used in succession.• “Publish a Membership Category to the Web” on page 262• “Allow Donors to Join and to Renew?” on page 264• “Allow Additional Donations?” on page 268• “Gift Types” on page 270• “Allow Gifts of Membership?” on page 272• “Membership Description” on page 275
Warning: If you click Cancel, any information you entered in the Web Membership Wizard is lost.

NE TME M B E RS 27
• “Page Style” on page 277• “Customize the Membership Confirmation Message” on page 278• “Default Settings for Downloads” on page 278• “Sources” on page 280• “Member Profiling” on page 282• “Additional Links” on page 284• “Internet Merchant Account” on page 286• “Publish the Membership Category” on page 287On the Default settings for Downloads screen, you can select the constituent code used when creating a constituent record and select the fund to use when creating a dues gift.
Customizing the Default settings for downloads screen1. When you complete the Customize the membership confirmation message screen, click Next. The Default
settings for downloads screen appears.
2. In the Select a constituent code to use when creating a constituent record field, select the constituent code to assign online members who are not already constituents in your database. For example, if you select “Member”, when you commit the online information to The Raiser’s Edge, “Member” appears in the Constituent Codes grid on the Bio 2 tab of the constituent record.
3. In the Enter the fund to use when creating membership dues gifts field, select the Raiser’s Edge fund credited for any membership dues generated from your online membership page.
4. Click Next and move to the Sources screen, or click Cancel to return to the NetMembers page.
Note: For information about constituent codes, see the Constituent Data Entry Guide.
Warning: If you click Cancel, any information you entered in the Web Membership Wizard is lost.

280 CH A PT E R
Sources
If you choose to allow donors to join or renew online, this is the tenth procedure in a series of procedures, explaining the Web Membership Wizard. The following procedures should be used in succession.• “Publish a Membership Category to the Web” on page 262• “Allow Donors to Join and to Renew?” on page 264• “Allow Additional Donations?” on page 268• “Gift Types” on page 270• “Allow Gifts of Membership?” on page 272• “Membership Description” on page 275• “Page Style” on page 277• “Customize the Membership Confirmation Message” on page 278• “Default Settings for Downloads” on page 278• “Sources” on page 280• “Member Profiling” on page 282• “Additional Links” on page 284• “Internet Merchant Account” on page 286• “Publish the Membership Category” on page 287Including source options on your membership page lets you know what attracted donors to your Web site. For instance, in the following example, the Wildlife Protection Association included “Visiting Web Site” and “Mailing” as source options. They also attached each source option to a Raiser’s Edge appeal. So, whenever a donor selects one of the source options, the corresponding appeal is credited with the donation.
Customizing the Sources screen1. Once you complete the Default settings for downloads screen, click Next. The Sources screen appears. If
you include sources on your membership page, you can keep track of what draws donors to your Web site. You can also credit appeal records for any gifts.

NE TME M B E RS 28
2. In the Source header field, enter a heading for the online source section of your Web page. There is a 255 character limitation.
3. In the Online Source column, enter the options to appear on your Web page. In the following example, the Wildlife Protection Association included “Visiting Web Site” and “Mailing” as source options.
4. In the Appeal to Credit column, enter the appeal credited with donations associated with the source.5. In the If no source is specified use this appeal field, select a default appeal to use should the donor not
select a source. For instance, in the following example, donors have two source options to select when giving online: “Visiting Web Site” or “Mailing”. If they select “Visiting Web Site” the “Internet/Web Site solicitations” appeal is credited for the donation; if they select “Mailing” the “Direct Mailing” appeal is credited for the donation. If no source is selected, the “Internet/Web Site solicitations” appeal is credited for the donation.
Information entered in the example above appears as a drop-down menu at the bottom of your donation page.This is what your online donor sees.
6. Click Next and move to the Member Profiling screen, where you can enter member profiles, or click Cancel to return to the NetSolutions page.
Warning: If you click Cancel, any information you entered in the Web Membership Wizard is lost.

282 CH A PT E R
Member Profiling
If you choose to allow donors to join or renew online, this is the eleventh procedure in a series of procedures, explaining the Web Membership Wizard. The following procedures should be used in succession.• “Publish a Membership Category to the Web” on page 262• “Allow Donors to Join and to Renew?” on page 264• “Allow Additional Donations?” on page 268• “Gift Types” on page 270• “Allow Gifts of Membership?” on page 272• “Membership Description” on page 275• “Page Style” on page 277• “Customize the Membership Confirmation Message” on page 278• “Default Settings for Downloads” on page 278• “Sources” on page 280• “Member Profiling” on page 282• “Additional Links” on page 284• “Internet Merchant Account” on page 286• “Publish the Membership Category” on page 287Member profiling allows you to include questions on your membership page to gather additional information from your members. These questions can help you segment, target, and cultivate your constituency. On the Member Profiling screen, you can enter profiling questions specific to this page. The default profiling information, used for all NetSolutions functions, is entered in Configure and Customize.

NE TME M B E RS 28
Adding member profiling information for your membership page1. Once you complete the Sources screen, click Next. The Member Profiling screen appears, so you can
enter member profiling questions for this membership page. On this screen, you can enter questions to appear on your membership page. The questions help you better understand your members.

284 CH A PT E R
2. For example, in the Donor Profiling Question column, you can ask the question, “Did you receive our mailing?”. This question then appears at the end of the membership registration page. The question is limited to 120 characters.
3. In the Attribute to Use column, you must assign the question to a constituent attribute in your database. In the example above, if the registrant marks Did you receive our mailing? on the membership registration page, the information appears on the Attributes tab of the constituent record.On the constituent record, “Mailing” appears in the Category column and “Yes” appears in the Description column.
4. From the Web Membership Wizard screen, click Next and move to the Additional Links screen.
Additional Links
If you choose to allow donors to join or renew online, this is the twelfth procedure in a series of procedures, explaining the Web Membership Wizard. The following procedures should be used in succession.• “Publish a Membership Category to the Web” on page 262• “Allow Donors to Join and to Renew?” on page 264• “Allow Additional Donations?” on page 268• “Gift Types” on page 270
Note: Only yes/no constituent attributes appear in the Attribute to Use column.
Warning: If you click Cancel, any information you entered in the Web Membership Wizard is lost.

NE TME M B E RS 28
• “Allow Gifts of Membership?” on page 272• “Membership Description” on page 275• “Page Style” on page 277• “Customize the Membership Confirmation Message” on page 278• “Default Settings for Downloads” on page 278• “Sources” on page 280• “Member Profiling” on page 282• “Additional Links” on page 284• “Internet Merchant Account” on page 286• “Publish the Membership Category” on page 287From the Additional Links screen, you can add links to related Web pages. For example, you can add a link to a detailed explanation of your privacy policy.
Adding links to your online membership page1. Once you complete the Donor Profiling screen, click Next. The Additional Links screen appears so you can
add links to your membership page.
2. In the Image column, you must map to an image to use as the hyperlink on your membership page. 3. In the Caption column, enter the text visitors see when they hover their mouse over the hyperlink image.4. In the URL column, enter the address of the Web page to which you are adding a link. The column accepts
the URL with or without the <http://.5. The Path column displays the location of the Image you selected.
6. From the Additional Links screen, click Next and move to the Internet Merchant Account screen.
Warning: If you click Cancel, any information you entered in the Web Membership Wizard is lost.

286 CH A PT E R
Internet Merchant Account
If you choose to allow donors to join or renew online, this is the thirteenth procedure in a series of procedures, explaining the Web Membership Wizard. The following procedures should be used in succession.• “Publish a Membership Category to the Web” on page 262• “Allow Donors to Join and to Renew?” on page 264• “Allow Additional Donations?” on page 268• “Gift Types” on page 270• “Allow Gifts of Membership?” on page 272• “Membership Description” on page 275• “Page Style” on page 277• “Customize the Membership Confirmation Message” on page 278• “Default Settings for Downloads” on page 278• “Sources” on page 280• “Member Profiling” on page 282• “Additional Links” on page 284• “Internet Merchant Account” on page 286• “Publish the Membership Category” on page 287On the Internet Merchant Account screen, you can change the internet merchant account used for this membership Web page. The default internet merchant account, used for all NetSolutions functions, is entered in Configure and Customize.
Changing membership Internet merchant account information1. Once you complete the Additional Links screen, click Next. The Internet Merchant Account screen
appears so you can enter a different Internet merchant account for this membership page.
2. To activate this screen, mark Use a different Internet Merchant Account for this page.

NE TME M B E RS 28
3. In the Merchant account field, select the account you want used for this page. You establish accounts in Business Rules accessed through Config
4. Click Next and move to the Publish the Membership Category screen, where you can complete your NetMembers page, or click Cancel to return to the NetSolutions - NetMembers page.
Publish the Membership Category
This is the last procedure in a series of procedures, explaining the Web Membership Wizard. The following procedures should be used in succession.• “Publish a Membership Category to the Web” on page 262• “Allow Donors to Join and to Renew?” on page 264• “Allow Additional Donations?” on page 268• “Gift Types” on page 270• “Allow Gifts of Membership?” on page 272• “Membership Description” on page 275• “Page Style” on page 277• “Customize the Membership Confirmation Message” on page 278• “Default Settings for Downloads” on page 278• “Sources” on page 280• “Member Profiling” on page 282• “Additional Links” on page 284• “Internet Merchant Account” on page 286• “Publish the Membership Category” on page 287The Publish the Membership Category screen summarizes your selections on the Web Membership Wizard.
Warning: If you click Cancel, any information you entered in the Web Membership Wizard is lost.

288 CH A PT E R
Viewing the Publish the Membership Category screen1. From the Internet Merchant Account screen, click Next. The Publish the Membership Category screen
appears.
2. Confirm the information is correct. If you need to change anything, click Back. If the information is correct, click Finish.The membership category information is submitted to Blackbaud, and the Congratulations! screen appears with a link to the new membership Web page.

NE TME M B E RS 28
3. Click the Click here to visit the membership page link. The Web page you just designed appears.4. To add the Web Membership Form to your existing Web site, cut and paste the code provided in the box
beneath the Click here to visit the directory page link.5. To exit the NetSolutions - Web Membership Wizard screen, click Close. You return to the NetSolutions -
NetMembers screen.
The new online membership category appears as a link on the screen.6. To add the membership page you just designed to your Web site, open Configure and Customize and
select the Site Map/Links tab. Click the link under Membership Opportunities. The code necessary to add the page to their Web site appears. Paste this code to your Web site.
7. To exit the NetSolutions - Web Membership Wizard screen and return to the NetSolutions page, click the “X” in the upper, right corner.
Viewing a Membership Web PageAfter you create an online membership page, you can access and edit the page through NetSolutions.
Viewing an online membership page1. On the Raiser’s Edge bar, click NetSolutions. The NetSolutions page appears.

290 CH A PT E R
2. Click NetMembers. The NetSolutions - NetMembers screen appears.
3. Click the Visit this membership page link. The Web page appears.
4. To exit the Web page and return to NetSolutions - NetMembers screen, click the “X” in the upper right corner.
Deleting a Membership Web PageOnce an online membership page has served its purpose, you can permanently remove it from your Web site.
Deleting an online membership page1. On the Raiser’s Edge bar, click NetSolutions. The NetSolutions page appears.

NE TME M B E RS 29
2. Click NetMembers. The NetSolutions - NetMembers screen appears.
3. Under the Web page link to delete, click Delete this Membership page. A warning message appears.
4. Click Yes. The NetSolutions - NetMembers screen appears, minus the deleted membership Web page.
5. To exit this screen and return to the NetSolutions page, click the “X” in the upper right corner.

292 CH A PT E R
Viewing Membership Page StatisticsNetSolutions keeps track of how many times your online membership pages are visited and how much money each page generates. Through the Statistics button on the NetSolutions - NetMembers screen, you can view and print charts tracking this information. You can view statistics for all membership pages or for one page.
Viewing membership page statistics1. On the Raiser’s Edge bar, click NetSolutions The NetSolutions page appears.2. Click NetMembers. The NetSolutions - NetMembers screen appears.
3. To view a statistical overview of traffic and membership fees generated on all your membership pages, click the Statistics button. The Membership Page Statistics screen appears.
• On the left side of the screen, Memberships, you can see how many memberships were generated on each page. In the preceding example, the Adopt an Animal page generated two memberships and the Arts Program generated 1.

NE TME M B E RS 29
• On the right side of the screen, Dues, you can see how much money each page generated. In the preceding example, the Adopt an Animal page generated $750 and the Arts Program page generated $1,250.
• To see statistics for a specific period, enter a Start Date and End Date, and click Update.• Click Print Chart above each graph to print the graph.
4. To view statistics for a specific page, from the NetMembers page, click the Page Statistics link included below the membership page link. The Statistics screen appears.
• To see statistics for a specific period, enter a Start Date and End Date, and click Update.• Click Print Chart above the graph to print the statistic information.• In the drop-down field above the chart, you can select to view the following graphs:
Primary vs. GOM (Gift of membership)

294 CH A PT E R
Dues by Subcategory
Renewals by Subcategory
• If you mark the Data checkbox, the graphic is replaced by columns.• The left side displays the number of Page Hits, Total Memberships, Primary Memberships, Gift of
Memberships, and Total Amount generated from the membership page.5. To close the screen and return to the NetSolutions - NetMembers screen, click the “X” in the upper right
corner.

9chapter
Downloading Transactions
Accessing Downloaded Transactions . . . . . . . . . . . . . . . . . . . . . . . . . . . . . . . . . . . . . . . . . . . . . . . . . . . . . . . . . . . 297Downloading Information from Your Donation Pages . . . . . . . . . . . . . . . . . . . . . . . . . . . . . . . . . . . . . . . . . . . . . 299Individual Donations . . . . . . . . . . . . . . . . . . . . . . . . . . . . . . . . . . . . . . . . . . . . . . . . . . . . . . . . . . . . . . . . . . . . . . . . . . . 300Corporate Donations. . . . . . . . . . . . . . . . . . . . . . . . . . . . . . . . . . . . . . . . . . . . . . . . . . . . . . . . . . . . . . . . . . . . . . . . . . . 305Recurring Direct Debit Gifts . . . . . . . . . . . . . . . . . . . . . . . . . . . . . . . . . . . . . . . . . . . . . . . . . . . . . . . . . . . . . . . . . . . . . 312Tribute Gifts . . . . . . . . . . . . . . . . . . . . . . . . . . . . . . . . . . . . . . . . . . . . . . . . . . . . . . . . . . . . . . . . . . . . . . . . . . . . . . . . . . 314Downloading Corporate Donations . . . . . . . . . . . . . . . . . . . . . . . . . . . . . . . . . . . . . . . . . . . . . . . . . . . . . . . . . . . . 305Downloading Information from Your Event Web Pages . . . . . . . . . . . . . . . . . . . . . . . . . . . . . . . . . . . . . . . . . . . 319Downloading Information from Your Job Web Pages . . . . . . . . . . . . . . . . . . . . . . . . . . . . . . . . . . . . . . . . . . . . . 324Downloading Information from Your Membership Web Pages . . . . . . . . . . . . . . . . . . . . . . . . . . . . . . . . . . . . . 329Downloading Advocacy Information . . . . . . . . . . . . . . . . . . . . . . . . . . . . . . . . . . . . . . . . . . . . . . . . . . . . . . . . . . . 337Downloading Constituent Registration Information . . . . . . . . . . . . . . . . . . . . . . . . . . . . . . . . . . . . . . . . . . . . . . 341Downloading Change of Address Information . . . . . . . . . . . . . . . . . . . . . . . . . . . . . . . . . . . . . . . . . . . . . . . . . . . 346Downloading Email Opt-Out Information from your Web Site . . . . . . . . . . . . . . . . . . . . . . . . . . . . . . . . . . . . . . 352Downloading Undeliverable Email Address Information . . . . . . . . . . . . . . . . . . . . . . . . . . . . . . . . . . . . . . . . . . . 355Exporting Downloaded Data to Excel . . . . . . . . . . . . . . . . . . . . . . . . . . . . . . . . . . . . . . . . . . . . . . . . . . . . . . . . . . 359Exporting Downloaded Data . . . . . . . . . . . . . . . . . . . . . . . . . . . . . . . . . . . . . . . . . . . . . . . . . . . . . . . . . . . . . . . . . 360Printing Downloaded Data . . . . . . . . . . . . . . . . . . . . . . . . . . . . . . . . . . . . . . . . . . . . . . . . . . . . . . . . . . . . . . . . . . . 362Searching Download Grid . . . . . . . . . . . . . . . . . . . . . . . . . . . . . . . . . . . . . . . . . . . . . . . . . . . . . . . . . . . . . . . . . . . . 364
Procedures
Accessing transactions from your NetSolutions Web pages . . . . . . . . . . . . . . . . . . . . . . . . . . . . . . . . . . . . . . . . . . 297Downloading individual donations . . . . . . . . . . . . . . . . . . . . . . . . . . . . . . . . . . . . . . . . . . . . . . . . . . . . . . . . . . . . . . . 300Downloading corporate donations . . . . . . . . . . . . . . . . . . . . . . . . . . . . . . . . . . . . . . . . . . . . . . . . . . . . . . . . . . . . . . . 305Downloading recurring direct debit gifts . . . . . . . . . . . . . . . . . . . . . . . . . . . . . . . . . . . . . . . . . . . . . . . . . . . . . . . . . . 312Downloading tributes . . . . . . . . . . . . . . . . . . . . . . . . . . . . . . . . . . . . . . . . . . . . . . . . . . . . . . . . . . . . . . . . . . . . . . . . . 314Downloading event transactions . . . . . . . . . . . . . . . . . . . . . . . . . . . . . . . . . . . . . . . . . . . . . . . . . . . . . . . . . . . . . . . . 319Downloading job transactions from your Web site . . . . . . . . . . . . . . . . . . . . . . . . . . . . . . . . . . . . . . . . . . . . . . . . . 324Downloading membership information from your Web site . . . . . . . . . . . . . . . . . . . . . . . . . . . . . . . . . . . . . . . . . . 329Downloading advocacy actions . . . . . . . . . . . . . . . . . . . . . . . . . . . . . . . . . . . . . . . . . . . . . . . . . . . . . . . . . . . . . . . . . . 337Downloading constituent registration information . . . . . . . . . . . . . . . . . . . . . . . . . . . . . . . . . . . . . . . . . . . . . . . . . 341Downloading change of address information . . . . . . . . . . . . . . . . . . . . . . . . . . . . . . . . . . . . . . . . . . . . . . . . . . . . . . 346Downloading email opt-out information from your Web site . . . . . . . . . . . . . . . . . . . . . . . . . . . . . . . . . . . . . . . . . 352Downloading undeliverable email address information . . . . . . . . . . . . . . . . . . . . . . . . . . . . . . . . . . . . . . . . . . . . . . 355Exporting downloaded data to Excel . . . . . . . . . . . . . . . . . . . . . . . . . . . . . . . . . . . . . . . . . . . . . . . . . . . . . . . . . . . . . 359

296 CH A PT E R
Exporting downloaded data . . . . . . . . . . . . . . . . . . . . . . . . . . . . . . . . . . . . . . . . . . . . . . . . . . . . . . . . . . . . . . . . . . . . 360Printing downloaded data . . . . . . . . . . . . . . . . . . . . . . . . . . . . . . . . . . . . . . . . . . . . . . . . . . . . . . . . . . . . . . . . . . . . . . 362Reaching downloaded data . . . . . . . . . . . . . . . . . . . . . . . . . . . . . . . . . . . . . . . . . . . . . . . . . . . . . . . . . . . . . . . . . . . . . 364

D O W N L O AD I N G TRA N S A C T I O N S 29
The Download Transactions link allows you to download all information entered on your NetSolutions Web pages. The online information is organized based on the Web page on which it was added.
For example, if someone enters information on your NetEvents Web page, that information is accessed through the link under Special Event Registrations; if someone enters information on your NetDonors Web page, that information is accessed through the link under Donations; and if someone completes the online constituent registration form but does not register for an event or make a donation, that information is accessed through the link under Constituent Registrations.
Accessing Downloaded TransactionsYou can download information from your NetSolutions Web pages at any time. The links provided on the Download Transactions screen import all information and organize it based on the Web page from which it originates.
When you download your transactions NetSolutions will attempt to match registrant information to existing constituents in your Raiser’s Edge database. If duplicate individuals or corporations exist, NetSolutions will automatically complete the appropriate information in the required fields for import into The Raiser’s Edge.
Accessing transactions from your NetSolutions Web pages1. On the Raiser’s Edge bar, click NetSolutions. The NetSolutions page appears.
Note: The Raiser's Edge encrypts credit card numbers entered in your database. If someone attempts to access your database through the back end, the credit card data will appear illegible. Data displayed in the front end, or user interface, depends on the security settings you establish for credit card numbers and the user's security rights. For more information about setting security in The Raiser's Edge, see the Security chapter in the Configuration & Security Guide
Note: Criteria for handling duplicate individuals and corporations can be modified in The Raiser’s Edge by changing the settings in Configuration, Business Rules, Duplicates.

298 CH A PT E R
2. Click Download Transactions. The Download Transactions screen appears.
3. Click the Click Here to check for and download new transactions link. A screen appears, displaying the number of transactions downloaded.
4. Click OK. All online transactions appear.

D O W N L O AD I N G TRA N S A C T I O N S 29
• Information downloaded from your NetDonors Web pages appears either under Donations or Corporate Donations. If the donor marked the This donation is on behalf of a corporation when donating online, the gift appears under Corporate Donations, otherwise, the gift appears under Donations. For detailed instructions about entering Donations information into The Raiser’s Edge, see “Downloading Information from Your Donation Pages” on page 299; for information about entering Corporate Donations information into The Raiser’s Edge, see “Corporate Donations” on page 305.
• Information downloaded from your NetEvents Web pages appears under Special Event Registrations. For detailed instructions about entering this information into The Raiser’s Edge, see “Downloading Information from Your Event Web Pages” on page 319.
• Information downloaded from your NetVolunteers Web pages appears under Volunteer Requests. For detailed instructions about entering this information into The Raiser’s Edge, see “Downloading Information from Your Job Web Pages” on page 324.
• Information downloaded from your NetMembers Web pages appears under Memberships. For detailed instructions about entering this information into The Raiser’s Edge, see “Downloading Information from Your Membership Web Pages” on page 329.
• Information downloaded from your Capwiz advocacy Web site, appears under Advocacy. For detailed instructions about entering this information into The Raiser’s Edge, see “Downloading Advocacy Information” on page 337.
• Information downloaded from your constituent online registration page appears under Constituent Registration. For detailed instructions about entering this information into The Raiser’s Edge, see “Downloading Constituent Registration Information” on page 341.
• Information downloaded from your online change of address form appears under Change of Address Requests. For detailed instructions about entering this information into The Raiser’s Edge, see “Downloading Change of Address Information” on page 346.
• Email opt-out information downloaded from your NetSolutions Web pages appears under Email “Opt-Outs”. For detailed instructions about entering this information into The Raiser’s Edge, see “Downloading Email Opt-Out Information from your Web Site” on page 352.
• Undeliverable email information downloaded from the Blackbaud server appears under Undeliverable Email. For detailed instructions about creating a query with this information, see “Downloading Undeliverable Email Address Information” on page 355.
5. To exit the Download Transactions screen and return to the NetSolutions page, click Close.
Downloading Information from Your Donation PagesYou can download donation information, including tributes, entered on your NetDonors Web pages using the Download Transactions link in NetSolutions.
Once downloaded, you can generate a batch file. The batch file allows you to commit all downloaded information to The Raiser’s Edge. However, before creating the batch file, you must match downloaded constituent information with records in your Raiser’s Edge database. If a record does not exist, you must create one.
Note: The program does not overwrite downloaded transactions.
Note: The Raiser's Edge encrypts credit card numbers entered in your database. If someone attempts to access your database through the back end, the credit card data will appear illegible. Data displayed in the front end, or user interface, depends on the security settings you establish for credit card numbers and the user's security rights. For more information about setting security in The Raiser's Edge, see the Security chapter in the Configuration & Security Guide

300 CH A PT E R
Individual Donations
If the online donor does not mark This donation is on behalf of a corporation when donating online, the gift is assumed to be from an individual and appears under Donations on the Download Transactions screen. The donation must be matched to an individual constituent record in your database. If the record does not exist, you must create one. For information about downloading corporate donations, see “Corporate Donations” on page 305.
Downloading individual donations1. On the Raiser’s Edge bar, click NetSolutions. The NetSolutions page appears.2. Click Download Transactions. The Download Transactions screen appears.
3. Click the Click here to check for and download new transactions link. A screen appears, displaying the number of transactions downloaded.
Note: NetSolutions downloads up to a maximum of 1,000 online transactions at a time. If, after downloading transactions, the Status fields on the Transaction Download Summary screen add up to 1,000 transactions, you may want to click the Click here to check for and download new transactions link a second time, to make sure you download all online data.

D O W N L O AD I N G TRA N S A C T I O N S 30
4. Click OK. The Download Transactions screen appears.
Links to the downloaded transactions appear. The information on this screen is arranged based on the Web page from which the transactions were downloaded.
For instance, in the previous example, 17 donations appear under Donations. These were downloaded from the NetDonors Web page. Seven event registrations appear under Special Event Registrations. These were downloaded from the NetEvents Web page.
Note: The program does not overwrite downloaded transactions.
Note: The Raiser’s Edge keeps a record of the batch links. Consequently, you do not have to repeat steps 6-9 for subsequent donations made by the same constituent.

302 CH A PT E R
5. To import the donations into The Raiser’s Edge, under Donations, click the Click here to import donations into The Raiser’s Edge link. The Import Donations Wizard screen appears, displaying all the information downloaded from your NetDonors Web page.
6. Before using Batch to enter the information into The Raiser’s Edge, you must match the donor with an individual constituent record in your database, using the RE Constituent column. If the constituent record does not exist, you must create one. Place your cursor in the RE Constituent column next to the donor to enter. Press F8 on your keyboard to create a constituent record in The Raiser’s Edge, based on the information downloaded from NetSolutions.
Note: You can create a batch of linked transactions even if there are other transactions unlinked. For example, if you have 300 donations downloaded, link the first 50 and create a batch leaving the other 250 in the grid to link at a later date.
Note: If the constituent information defaults into the RE Constituent column when you open the Import Donation Wizard screen, the program has remembered the constituent from a previous download. You do not have to match them again with a Raiser’s Edge constituent record.

D O W N L O AD I N G TRA N S A C T I O N S 30
7. To match the donor with an individual constituent record in your database, place your cursor in the RE Constituent column next to the donor to enter. Press F7 on your keyboard. The Open screen appears.
The donor’s name defaults into the name fields at the bottom of the screen.• If a constituent record already exists, the donor’s name appears in the Constituent Name grid.
Select the name and click Open.• If the name does not already exist, click Add New to add the record.
You must then identify the new record as “Individual”, and the New Individual screen appears.
All information included in the donor’s online record defaults into the new constituent record. Click Save and Close or add additional information. For more information about adding a constituent record, see the Constituent Data Entry Guide.
Warning: Use caution when matching donors with constituent records. Make sure the donor is the constituent to whom you are linking the online donation.

304 CH A PT E R
Click Save and Close. You return to the Import Donations Wizard screen.
The Donor information now appears in the RE Constituent column.8. If you accept recurring direct debit gifts online, you must also match each online recurring direct debit gift
with a bank record in your database. For detailed instructions, see “Recurring Direct Debit Gifts” on page 312.
9. If you accept tribute gifts online, you must also match each online honor/memorial gift with a tribute record in your database. For detailed instructions, see “Tribute Gifts” on page 314.
10. In the Enter the batch number to create or leave blank to use next available field, enter the number to assign the batch file created with the downloaded information. To use the next number available in Batch, leave this field blank.
11. After you match the downloaded information with records in The Raiser’s Edge, click Create Batch. The program generates a batch entry, and a screen appears displaying the batch number.
12. Click OK. The Import Donations Wizard screen appears with no donor information.

D O W N L O AD I N G TRA N S A C T I O N S 30
13. To return to the Download Transactions screen, click Close.
You are now ready to open Batch and commit the donor information to The Raiser’s Edge. For information on committing batch entries, see the Batch Guide.
14. To return to the NetSolutions page, click Close.
Corporate Donations
If you marked Allow corporate donations on the Miscellaneous screen in NetDonors, you agreed to accept online donations on behalf of companies. You download these donations, using the link under Corporate Donations on the Download Transactions screen.
Once downloaded, you can generate a batch file. The batch file allows you to commit all the downloaded information to The Raiser’s Edge. However, before creating the batch file, you must complete the following steps:• Link the downloaded organization contact information with an individual constituent record in your Raiser’s
Edge database. If a record does not exist, you must create one. • Link the downloaded organization information to the organization contact record in your The Raiser’s Edge
database. If the link does exist, you must create one; if the donating organization does not have a constituent record, you must create one.
• If you allow recurring direct debit gifts online, you must link any such donations with bank/financial institution records in your Raiser’s Edge database. If the record does not exist, you must create one.
Downloading corporate donations1. On the Raiser’s Edge bar, click NetSolutions. The NetSolutions page appears.
Note: If the donor did not mark the This donation is on behalf of a corporation checkbox when donating online, the gift appears under Donations.

306 CH A PT E R
2. Click Download Transactions. The Download Transactions screen appears.
3. Click the Click here to check for and download new transactions link. A screen appears, displaying the number of transactions downloaded.
Note: NetSolutions downloads up to a maximum of 1,000 online transactions at a time. If, after downloading transactions, the Status fields on the Transaction Download Summary screen add up to 1,000 transactions, you may want to click the Click here to check for and download new transactions link a second time, to make sure you download all online data.

D O W N L O AD I N G TRA N S A C T I O N S 30
4. Click OK. The Download Transactions screen appears.
Links to the downloaded transactions appear. The information on this screen is arranged based on the Web page from which the transactions were downloaded.
For instance, in the previous example, four donations appear under Corporate Donations. These were downloaded from the NetDonors Web page. Seven event registrations appears under Special Event Registrations. These were downloaded from the NetEvents Web page.
Note: The program does not overwrite downloaded transactions.
Note: The Raiser’s Edge keeps a record of the batch links. Consequently, you do not have to repeat steps 6-9 for subsequent donations made by the same constituent.

308 CH A PT E R
5. To import the donations into The Raiser’s Edge, under Corporate Donations, click the Click here to import corporate donations into The Raiser’s Edge link. The Import Donations Wizard screen appears, displaying all the corporate donation information downloaded from your NetDonors Web page.
6. When a corporation makes an online donation, the donor must enter at least the last name of an individual associated with the company. This is the company’s contact. When you download this information, you must link this organization contact with an individual constituent record in your database. If the constituent record does not exist, you must create one. Press F8 on your keyboard to create a constituent record in The Raiser’s Edge, based on the information downloaded from NetSolutions.
7. If the constituent does exist, or you would like to search for one manually, place your cursor in the RE Contact column next to the gift to enter. Press F7 on your keyboard. The Open screen appears.
Note: You can create a batch of the linked transactions even if there are other transactions unlinked. For example, if you have 300 donations downloaded, link the first 50 and create a batch leaving the other 250 in the grid to link at a later date.

D O W N L O AD I N G TRA N S A C T I O N S 30
The contact’s name defaults in the name fields at the bottom of the screen. • If an individual constituent record already exists for the contact, the contact’s name appears in the
Individual column. Select the name and click Open. You return to the Import Donations Wizard screen. • If the individual record does not already exist, click Add New to add the record. The New Individual
screen appears.
All contact information included in the online record defaults into the new individual constituent record. Click Save and Close or add additional information. For more information about adding a constituent record, see the Constituent Data Entry Guide.When you click Save and Close, you return to the Import Donations Wizard screen.
The contact information now appears in the RE Contact column.

310 CH A PT E R
8. Next, you must link the contact’s individual constituent record to the donating organization and create an organization constituent record, if necessary. To do this, place your cursor in the RE Constituent column next to the gift to enter. Press F7 on your keyboard. The Search relationships screen appears.
• If a relationship already exists in your database between the contact’s individual constituent record and the donating organization’s constituent record, the corporation’s name appears in the Org Name column. Select the name and click Open to confirm the link and return to the Import Donation Wizard screen.
• If a relationship does not exist, click Add New. The New Organization Relationship screen appears.
All information about the donating organization entered with the online donation defaults. You can add/edit information on this screen.

D O W N L O AD I N G TRA N S A C T I O N S 31
Because the organization must be a constituent in the database, from the menu bar, select Relationship, Add this organization as a constituent. The Raiser’s Edge screen appears.
Enter a Constituency for this organization record. A constituency defines the relationship a constituent has with your organization. In other words, it tells you why the individual is in your database. Examples of constituencies are Board Member, Alumnus, Trustee, Current Parent, and Friend. Each constituent record in your database should have at least one constituency listed. If you list more than one, always list the most important active constituency first. The Raiser’s Edge recognizes the first constituency listed as primary.If the constituency you select expires, enter the Date from and Date to. For example, today is April 4, 2008. The Constituency you selected is Member, and your memberships are good for one year. You would enter 04/04/2008 in the Date From field and 04/04/2009 in the Date to field. If the Constituency does not expire, do not complete the Date to and Date from fields.Click OK. You return to the New Organization Relationship screen.Click Save and Close. A screen appears asking to reciprocate the new organization record with the contact record.
Click Yes. You return to the Import Donation Wizard screen. The new organization information appears in the RE Constituent column.

312 CH A PT E R
9. If you accept recurring direct debit gifts online, you must also match each online recurring direct debit gift with a bank record in your database. For detailed instructions, see “Recurring Direct Debit Gifts” on page 312.
10. If you accept tribute gifts online, you must also match each online tribute gift with a tribute record in your database. For detailed instructions, see “Tribute Gifts” on page 314.
11. In the Enter the batch number to create or leave blank to use next available field, enter the number to assign the batch file created with the downloaded information. To use the next number available in Batch, leave this field blank.
12. After you match the downloaded information with records in your database, click Create Batch. The program generates a batch entry, and a screen appears displaying the batch number.
13. Click OK. The Import Donations Wizard screen appears with no donor information.14. To return to the Download Transactions screen, click Close.
You are now ready to open Batch and commit the donor information to The Raiser’s Edge. For information on committing batch entries, see the Batch Guide.
15. To return to the NetSolutions page, click Close.
Recurring Direct Debit Gifts
If you marked Recurring direct debit gifts on the Gift Types screen in NetDonors, you agreed to accept recurring gifts from donors using their bank debit card. The Gift Information column on the Import Donation Wizard screen displays the type of gift. If you download any recurring direct debit gifts, you must match the bank card with a bank record in your database. If the record does not exist, you must create one.
Downloading recurring direct debit gifts1. To match an online recurring direct debit gift with a bank record in your database, place your cursor in the
RE Constit Bank column next to the donor to enter.
Note: To mark the EFT? field when downloading recurring gifts from NetSolutions, add the EFT? field to the Batch Setup once the gifts have been downloaded.

D O W N L O AD I N G TRA N S A C T I O N S 31
2. Press F7 on your keyboard. The Search Relationships screen appears.
Any existing bank records for the constituent appear in the grid. 3. To use an existing bank record, select the record and click Open.
If the record does not already exist, click Add New. The New Bank/Financial Institution screen appears.
All information included in the donor’s online record defaults into the new bank/financial Institution record. Click Save and Close or add additional information.
Note: For information about completing the New Bank/Financial Institution screen, see the Constituent Data Entry Guide.
Note: You can create a batch of the linked transactions even if there are other transactions unlinked. For example, if you have 300 donations downloaded, link the first 50 and create a batch leaving the other 250 in the grid to link at a later date.

314 CH A PT E R
4. When you click Save and Close, you return to the Import Donations Wizard screen.
The constituent bank information you just selected/created appears in the RE Constit Bank column. 5. Return to the “Downloading individual donations” on page 300 or “Downloading corporate donations” on
page 305 to complete the download process.
Tribute Gifts
If, when creating your online donation page in NetDonors, you marked the Allow donors to enter honor/memorial information checkbox, any tribute information entered on the donation page downloads along with the donation. If the online donor gives a tribute gift, you must match the gift with a tribute record in your database. If the record does not exist, you must create one. The Tribute column on the Import Donation Wizard screen displays any downloaded tribute gifts. If <Not Linked> appears in the column, you must link the gift.
Downloading tributes1. From the Import Donation Wizard screen, identify any downloaded tribute gifts.

D O W N L O AD I N G TRA N S A C T I O N S 31
If the donation is a tribute and not linked to a tribute record in your database, <Not Linked> appears in the Tribute column. You must then link the tribute to a tribute record.
2. To link tribute information to tribute record, on the Import Donation Wizard screen, place your cursor in the Tribute column. Press F7 on your keyboard. The Link Donation Tribute Information screen appears.
The Donation in Honor of field changes based on what the donor entered. For example, if the gift is in memory of an individual, the field reads Donation in Memory of. The honor/memorial name defaults into this field.
Note: If the constituent and/or tribute information defaults into the RE Constituent and Tribute columns when you open the Import Event Registration Wizard screen, the program remembers the constituent/tribute from a previous download. You do not have to match them again with a constituent record.

316 CH A PT E R
3. In the RE Hon/Mem Record field, click the binoculars. The Open screen appears.
The honor/memorial name defaults in the name fields at the bottom of the screen. If the honor/memorial has a record in your database, this name appears in the Individual grid.
4. Select the name and click Open.If the name does not already exist in your database, click Add New to add the constituent record to your database. The New Individual screen appears displaying the Bio 1 tab. • Select the Honor/Memorial tab.

D O W N L O AD I N G TRA N S A C T I O N S 31
• Make sure the Constituent is an honor/memorial checkbox is marked.• Click New Tribute. The New Tribute screen appears.
• Enter the tribute information. To link this tribute to your donor, you must mark Gifts may be given to this tribute. For information about completing this screen, see the Tribute Data Entry Guide.
• To return to the constituent record, click Save and Close.
• To return to the Link Donation Tribute Information screen, click Save and Close.

318 CH A PT E R
• Using the information you entered on the tribute record, the program automatically completes the RE Hon/Mem Record field. If the constituent has only one tribute record, the fields in step 2 of the Link Donation Tribute Information screen are also automatically completed. If there is more than one tribute, you must select the tribute in the Select the Tribute field.
• If the donor entered acknowledgee information, it defaults in the box in the Add the Donation Acknowledgee frame. Although an acknowledgee does not have to be a constituent in your database, he must be listed as a relationship on the Relationships tab of the honoree’s constituent record. If a relationship does not exist, the acknowledgee entered by the donor is not included in the Acknowledgee grid in step 2. If you would like to add the Acknowledgee as a constituent in The Raiser’s Edge, mark the Add acknowledgee as a constituent checkbox.
Click Add this Acknowledgees to include the new acknowledgee. The Link Tribute Acknowledgee screen appears.

D O W N L O AD I N G TRA N S A C T I O N S 31
• If the relationship record exists, select the record, and click Link. If the record does not exist, click Add New. The relationship is added, and you return to the Link Donation Tribute Information screen.
• Click OK. The Import Donations Wizard screen appears. The Tribute column is complete.
5. Return to the “Downloading individual donations” on page 300 or “Downloading corporate donations” on page 305 to complete the download process.
Downloading Information from Your Event Web PagesYou can download all online event registration information entered on your NetEvents Web pages, using the Download Transactions link in NetSolutions. Once downloaded, you can generate a batch file. With the batch file, you can commit all the downloaded information into The Raiser’s Edge. However, before creating the batch file, you must match the downloaded information with constituent records in your Raiser’s Edge database. If a constituent record does not exist, you must create one.
Downloading event transactions1. On the Raiser’s Edge bar, click NetSolutions. The NetSolutions page appears.

320 CH A PT E R
2. Click Download Transactions. The Download Transactions screen appears.
3. Click the Click Here to check for and download new transactions link. A screen appears, displaying the number of transactions downloaded.
4. Click OK. The Download Transactions screen appears.

D O W N L O AD I N G TRA N S A C T I O N S 32
Links to the downloaded transactions appears. The information is arranged based on the Web page from which the transactions were downloaded.
For instance, in the preceding example, seven event registrations were downloaded from the NetEvents Web page, and five corporate donations were downloaded from the NetDonors Web page.
5. To import the event registrants into The Raiser’s Edge, click the Click here to import event registrations into The Raiser’s Edge link under Special Event Registrations. The Import Event Registrations Wizard screen appears.
6. Before using Batch to enter the event information to Raiser’s Edge records, you must match the registrant with a constituent record in your database, using the RE Constituent column. If the constituent record does not exist, you must create one. Place your cursor in the RE Constituent column next to the registrant to enter. Press F8 on your keyboard to create a constituent record in The Raiser’s Edge, based on the information downloaded from NetSolutions.
Note: The program does not overwrite downloaded transactions.
Note: If the constituent information defaults into the RE Constituent column when you open the Import Event Registration Wizard screen, the program has remembered the constituent from a previous download. You do not have to match them again with a constituent record.
Note: You can create a batch of the linked transactions even if there are other transactions unlinked. For example, if you have 300 event registrations downloaded, link the first 50 and create a batch leaving the other 250 in the grid to link at a later date.

322 CH A PT E R
To match the registrant with a constituent record, place your cursor in the RE Constituent column next to the registrant to enter. Press F7 on your keyboard. The Open screen appears.
The registrant’s name defaults into the name fields at the bottom of the screen. • If a constituent record already exists, the registrant’s name appears in the Constituent Name column.
Select the name, and click Open. You return to the Import Event Registration Wizard screen.• If the name does not already exist, click Add New to add the record.

D O W N L O AD I N G TRA N S A C T I O N S 32
You must then identify the new record as “Individual” or “Organization”, and the New Individual/Organization screen appears.
All information included in the registrant’s online record defaults into the new constituent record. Click Save and Close or add additional information. For more information about adding a constituent record, see the Constituent Data Entry Guide.
7. When you click Save and Close, you return to the Import Event Registrations Wizard screen.
Warning: Use caution when matching registrants with constituent records. Make sure the registrant is the constituent to whom you are linking the online request.

324 CH A PT E R
The registrant’s information now appears in the RE Constituent column.8. In the Enter the batch number to create or leave blank to use next available field, enter the number to
assign the batch file created with the downloaded information. To use the next number available in Batch, leave this field blank.
9. After you match the registrants with records in The Raiser’s Edge, click Create Batch. The program generates a batch entry, and a screen appears, displaying the batch number.
10. Click OK. The Import Event Registrations Wizard screen appears with no registrant information.11. To return to the Download Transactions screen, click Close.
You are now ready to open Batch and commit the registrant information to The Raiser’s Edge. For information on committing batch entries, see the Batch Guide.
Downloading Information from Your Job Web PagesYou can download all online job registration information entered on your NetVolunteers Web pages, using the Download Transactions link in NetSolutions. Once downloaded, you match the downloaded information with the correct constituent records in your Raiser’s Edge database. If a constituent record does not exist, you must create one.
Downloading job transactions from your Web site1. On the Raiser’s Edge bar, click NetSolutions. The NetSolutions page appears.

D O W N L O AD I N G TRA N S A C T I O N S 32
2. Click Download Transactions. The Download Transactions screen appears.
3. Click the Click Here to check for and download new transactions link. A screen appears displaying the number of transactions downloaded.
4. Click OK. The Download Transactions screen appears.

326 CH A PT E R
Links to the downloaded transactions appear. The information is arranged based on the Web page from which the transactions were downloaded.
For instance, in the preceding example, five transactions were downloaded from the Web page created in NetVolunteers, and five online membership registrations were downloaded from the Web page created in NetMembers.
5. To import the job requests into The Raiser’s Edge, click the Click here to import volunteer requests into The Raiser’s Edge link under Volunteer Requests. The Import Volunteers screen appears.
6. Before entering the information into The Raiser’s Edge, you must match the online Volunteer Information with a constituent record in your database, using the RE Constituent column. If the constituent record does not exist, you must create one. Place your cursor in the column next to the registrant to enter. Press F8 on your keyboard to create a constituent record in The Raiser’s Edge, based on the information downloaded from NetSolutions.
Note: The program does not overwrite downloaded transactions.
Note: If the constituent information defaults into the RE Constituent column when you open the Import Volunteers screen, the program has remembered the constituent from a previous download. You do not have to match them again with a constituent record.

D O W N L O AD I N G TRA N S A C T I O N S 32
To manually search for and enter a constituent, place your cursor in the column next to the registrant to enter. Press F7 on your keyboard. The Open screen appears.
The registrant’s name defaults into the name fields at the bottom of the screen. • If a constituent record already exists for the registrant, the registrant’s name appears in the grid.
Select the name, and click Open to return to the Import Volunteers screen.• If the name does not already exist, click Add New to add the record.
You must then identify the new record as “Individual” or “Organization”, and the New Individual/Organization screen appears.
All information included in the volunteer’s online record defaults into the new constituent record. Click Save and Close or add additional information. For more information about adding a constituent record, see the Constituent Data Entry Guide.
Warning: Use caution when matching volunteers with constituent records. Make sure the volunteer is the constituent to whom you are linking the online information.

328 CH A PT E R
7. When you click Save and Close, you return to the Import Volunteers screen.
The volunteer information now appears in the RE Constituent column.8. After you match the volunteers with records in The Raiser’s Edge, click Import Now. The program imports
the information. A confirmation screen appears, telling you the requests have been imported.
9. Click OK. The NetSolutions- Import Volunteer screen appears with no volunteer information.

D O W N L O AD I N G TRA N S A C T I O N S 32
10. To return to the Download Transactions screen, click Close.
Downloading Information from Your Membership Web PagesYou can download all online membership information entered on your NetMemberships Web pages, using the Download Transactions link in NetSolutions. Once downloaded, you can commit all downloaded information to The Raiser’s Edge. However, before committing information, you must match the downloaded information with constituent records in your Raiser’s Edge database. If a constituent record does not exist, you must create one.
Downloading membership information from your Web site1. On the Raiser’s Edge bar, click NetSolutions. The NetSolutions page appears.2. Click Download Transactions. The Download Transactions screen appears.
3. Click the Click Here to check for and download new transactions link. A screen appears, displaying the number of transactions downloaded.

330 CH A PT E R
4. Click OK. The Download Transactions screen appears.
Links to the downloaded transactions appear. The information is arranged based on the Web page from which the transactions were downloaded.
For instance, in the preceding example, five transactions were downloaded from the Web page created in NetVolunteers, and five online membership registrations were downloaded from the Web page created in NetMembers.
Note: The program does not overwrite downloaded transactions.
Note: If the constituent information defaults into the RE Constituent column when you open the Import Membership Wizard screen, the program has remembered the constituent from a previous download. You do not have to match them again with a constituent record.

D O W N L O AD I N G TRA N S A C T I O N S 33
5. To import the membership information into The Raiser’s Edge, click the Click here to import memberships into The Raiser’s Edge link under Memberships. The Import Memberships Wizard screen appears.
6. Before entering the information into The Raiser’s Edge, you must match online Donor Information with a constituent record in your database, using the RE Constituent column. If the constituent record does not exist, you must create one. Place your cursor in the RE Constituent column next to the Donor information to enter. Press F8 on your keyboard to create a constituent record in The Raiser’s Edge, based on the information downloaded from NetSolutions.To manually search for and match Donor Information with a constituent record in your database, place your cursor in the RE Constituent column next to the Donor information to enter. Press F7 on your keyboard. The Open screen appears.
Note: You can create a batch of the linked transactions even if there are other transactions unlinked. For example, if you have 300 memberships downloaded, link the first 50 and create a batch leaving the other 250 in the grid to link at a later date.

332 CH A PT E R
The donor’s name defaults into the name fields at the bottom of the screen.
• If a constituent record exists, the donor’s name appears in the Constituent Name column. Select the name, and click Open. You return to the Import Membership Wizard screen.
• If the name does not exist, click Add New to add the record.You must then identify the new record as “Individual” or “Organization”, and the New Individual/Organization screen appears.All information included in the donor’s online record defaults into the new constituent record. You can add additional information, and click Save and Close. You return to the Import Membership Wizard screen.
The donor’s information now appears in the RE Constituent column.
Repeat this procedure for all online donors.7. If the donation is a gift membership, the recipient of the membership appears in the Membership
Recipient column. In the RE Membership Recipient column, you must match each Membership Recipient with a constituent record in your database. If the constituent record does not exist, you must create one.
Note: For more information about adding a constituent record, see the Constituent Data Entry Guide.
Warning: Use caution when matching online donors with constituent records. Make sure the donor is the constituent to whom you are linking the online gift.

D O W N L O AD I N G TRA N S A C T I O N S 33
8. To complete the RE Membership Recipient column, place your cursor in the column next to the Membership Recipient name to enter. Press F7 on your keyboard. The Open screen appears.
The membership recipient name defaults into the name fields at the bottom of the screen. • If a constituent record already exists, the membership recipient name appears in the grid. Select the
name, and click Open. You return to the Import Memberships Wizard screen.• If the name does not already exist, click Add New to add the record.
You must then identify the new record as “Individual” or “Organization”, and the New Individual/Organization screen appears.All information included in the membership recipient’s online record defaults into the new constituent record. You can add additional information and click Save and Close. You return to the Import Memberships Wizard screen.
The membership recipient information now appears in the RE Membership Recipient column.Repeat this procedure for all membership recipients.
Note: For more information about adding a constituent record, see the Constituent Data Entry Guide.

334 CH A PT E R
9. You must also match the online Membership Request with an RE Membership. This is a membership record in The Raiser’s Edge. If the membership record exists and matches the online information, the RE Membership column completes automatically. If the RE Membership record cannot be located automatically, you must manually complete the column.
10. To manually complete the RE Membership column, place your cursor in the column next to the Membership Request to enter.
11. Press F7 on your keyboard. The Link Membership Information screen appears.
• If no membership record matching the request exists for the membership recipient create a new membership by selecting Yes, create a new <Program - Category - Subcategory> membership for <membership recipient>.

D O W N L O AD I N G TRA N S A C T I O N S 33
• If the membership recipient has an existing membership record linked to his constituent record, it appears in the grid. To activate the grid and select the existing membership record, select the No, add a new transaction to an existing membership for <membership recipient> option.
In the Select column, mark the checkbox next to the membership to link to the request.
In the New transaction type field, designate the updated membership as an “Upgrade” or “Downgrade”.The first date field at the bottom of the screen changes, based on your selections in the upper part of the screen: Joined on/Upgrade or/Downgraded on. The date defaults to the date the information is added.Enter an Expires date.Click View Membership to view the existing membership to which you are linking the membership request. The Membership screen appears.You cannot change this screen from Downloading Transaction. You must open the record in The Raiser’s Edge to make any changes. To close this screen and return to the Link Membership Information screen, click the “X” in the upper right corner.
Note: Options, fields, and checkboxes included on the Link Membership Information screen change based on information included in the membership record, preferences selected, and the transaction specified by the online donor. This page offers just one example of the Link Membership Information screen.
Note: For detailed instructions about working in a membership record, see the Membership Data Entry Guide.

336 CH A PT E R
Click OK. You return to the Import Memberships Wizard screen. The RE Membership column is complete.
The Import Membership Wizard screen also displays Gift information downloaded from the membership Web page and, if the donor used a credit card, it displays Credit Card information.
12. In the Enter the batch number to create or leave blank to use next available field, enter the number to assign the batch file created with the downloaded information. To use the next number available in Batch, leave this field blank.
13. After you complete the Import Membership Wizard screen, click Create Batch. The program generates a batch entry, and a screen appears displaying the batch number.
14. Click OK. The Import Memberships Wizard screen appears with no membership information.15. To return to the Download Transactions screen, click Close.
You are now ready to open Batch and commit the membership information to The Raiser’s Edge. For information on committing batch entries, see the Batch Guide.
Note: Gifts created in Batch are linked to the corresponding membership.

D O W N L O AD I N G TRA N S A C T I O N S 33
Downloading Advocacy InformationWith NetSolutions, you can include a link in your NetMail email messages advocating recipients to take a specific action, such as contact their representative or show up for a protest march. Using Download Transactions you can download a list of constituents who visited the link.Once downloaded, you must match the new information with constituent records in your Raiser’s Edge database. If a constituent record does not exist, you must create one. The information is added to the constituent action record.
Downloading advocacy actions
1. On the Raiser’s Edge bar, click NetSolutions. The NetSolutions page appears.2. Click Download Transactions. The Download Transactions screen appears.
3. Click the Click here to check for and download new transactions link. A screen appears, displaying the number of transaction downloaded.
Warning: Advocacy users working in NetSolutions without security rights to credit card information can download transactions. They cannot, however, import the transactions into The Raiser’s Edge.
Note: NetSolutions downloads up to a maximum of 1,000 online transactions at a time. If, after downloading transactions, the Status fields on the Transaction Download Summary screen add up to 1,000 transactions, you may want to click the Click here to check for and download new transactions link a second time, to make sure you download all online data.

338 CH A PT E R
4. Click OK. The Download Transactions screen appears, displaying links to the downloaded transactions. The information is arranged based on the Web page from which the transactions were downloaded.
For instance, in the preceding example, 83 advocacy hits were downloaded from your Capwiz Web page.
5. To import the advocacy action information into The Raiser’s Edge, click the Click here to import advocacies into The Raiser’s Edge link under Advocacy. The Import Advocacies screen appears.
Note: The program does not overwrite downloaded transactions.
Note: If the constituent information defaults into the RE Constituent column when you open the Import Advocacies screen, the program has remembered the constituent from a previous download. You do not have to match them again with a constituent record in your database.

D O W N L O AD I N G TRA N S A C T I O N S 33
Downloaded information appears in the Advocate information column.
6. You must match the Advocate Information with a constituent record in your database using the RE Constituent column. If the constituent record does not exist, you must create one. Place your cursor in the RE Constituent column next to the advocate to enter. Press F8 on your keyboard to create a constituent record in The Raiser’s Edge, based on the information downloaded from NetSolutions.To manually search for and match the Advocate Information with a constituent record in your database, place your cursor in the RE Constituent column next to the advocate to enter. Press F7 on your keyboard. The Open screen appears.
The registrant’s name defaults in the name fields at the bottom of the screen.• If a constituent record already exists, the registrant’s name appears in the Constituent Name column.
Select the name, and click Open. You return to the Import Advocacies screen.• If the name does not already exist, click Add New to add the record.
You must then identify the new record as “Individual” or “Organization”. The New Individual/Organization screen appears.
All information included in the online record defaults into the new constituent record. Click Save and Close or add additional information. For more information about adding a constituent record, see the Constituent Data Entry Guide.
Note: You can create a batch of the linked transactions even if there are other transactions unlinked. For example, if you have 300 advocacy transactions downloaded, link the first 50 and create a batch leaving the other 250 in the grid to link at a later date.
Warning: Use caution when matching online advocates with constituent records in The Raiser’s Edge. Make sure the advocate is the constituent to whom you are linking the online information.

340 CH A PT E R
When you click Save and Close, you return to the Import Advocacies screen.
The Advocate Information now appears in the RE Constituent column.7. The read-only Action Taken column displays information from Capwiz based on the action taken by the
constituent. • Alert: The title of the alert set up by your organization• Message: The email subject used in the advocacy email you sent the client• Date: The date the action was taken• Subject: The subject of the action
8. Next, assign an issue to the downloaded advocate using the Issue column on the Import Advocacies screen.
In the Issue column, select the issue associated with the downloaded advocate. Options available in the Issue column depend on information entered in the Issue table in The Raiser’s Edge. The options are also tied to the “alert ID” in Capwiz, so when an issue is selected, all records with the same “alert ID” are automatically associated with the same issue. However, you can manually change any issue.
9. After you match the advocates with constituent records and issues in The Raiser’s Edge, click Import Now. The program creates an action record for all linked transactions. A screen appears confirming the information downloaded.
10. Click OK. The Import Advocacies screen appears with no advocate information.11. To return to the Download Transactions screen, click Close.
Note: For more information about the Issue table, see the Configuration chapter in the Configuration & Security Guide.

D O W N L O AD I N G TRA N S A C T I O N S 34
Downloading Constituent Registration InformationWith NetSolutions, you can include a link on your NetSolutions Web page, encouraging visitors to the Web page to register as a constituent with your organization. The visitors do not have to make a donation, register for an event, or volunteer for a job. They simply enter basic biographical information you can download into your Raiser’s Edge database. You can then use the information for prospecting purposes. You download this information using the Download Transactions link. Once downloaded, you must match the new information with records in your Raiser’s Edge database, or if a constituent record does not exist, you must create one.
Downloading constituent registration information 1. On the Raiser’s Edge bar, click NetSolutions. The NetSolutions page appears.2. Click Download Transactions. The Download Transactions screen appears.
3. Click the Click Here to check for and download new transactions link. A screen appears, displaying the number of transaction downloaded.

342 CH A PT E R
4. Click OK. The Download Transactions screen appears.
Links to the downloaded transactions appear. The information is arranged based on the Web page from which the transactions were downloaded.
For instance, in the preceding example, one membership gift was downloaded from the NetMembers Web page, and two constituent registrations were downloaded from the Online Registration Web page.
Note: The program does not overwrite downloaded transactions.
Note: If the constituent information defaults into the RE Constituent column when you open the Import Constituent Registrations screen, the program has remembered the constituent from a previous download. You do not have to match them again with a constituent record in your database.

D O W N L O AD I N G TRA N S A C T I O N S 34
5. To import the online constituent into The Raiser’s Edge, click the Click here to import constituents into The Raiser’s Edge link under Constituent Registrations. The Import Constituent Registrations screen appears.
Downloaded information appears in the Registrant information column.6. You must match the Registrant Information with a constituent record in your database, using the RE
Constituent column. If the constituent record does not exist, you must create one. 7. Place your cursor in the RE Constituent column next to the registrant to enter. Press F8 on your keyboard
to create a constituent record in The Raiser’s Edge, based on the information downloaded from NetSolutions.

344 CH A PT E R
To manually search for and match the Registrant Information with a constituent record in your database, place your cursor in the RE Constituent column next to the registrant to enter. Press F7 on your keyboard. The Open screen appears.
The registrant’s name defaults in the name fields at the bottom of the screen.• If a constituent record already exists, the registrant’s name appears in the grid.
Select the name, and click Open. You return to the Import Constituent Registrations screen.• If the name does not already exist, click Add New to add the record.
You must then identify the new record as “Individual” or “Organization”, and the New Individual/Organization screen appears.
All information included in the registrant’s online record defaults into the new constituent record. Click Save and Close or add additional information. For more information about adding a constituent record, see the Constituent Data Entry Guide.
Warning: Use caution when matching online constituent registrants with constituent records in The Raiser’s Edge. Make sure the registrant is the constituent to whom you are linking the online information.

D O W N L O AD I N G TRA N S A C T I O N S 34
When you click Save and Close, you return to the Import Constituent Registrations screen.
The Registrant information now appears in the RE Constituent column.8. After you match the registrants with records in The Raiser’s Edge, click OK. A screen appears confirming
the registrations linked to the constituent records.

346 CH A PT E R
9. Click OK. The Import Constituent Registrations screen appears with no registrant information.
10. To return to the Download Transactions screen, click Close.
Downloading Change of Address InformationWith NetSolutions, you can include a link in your NetMail messages, so the email recipients can change their address information. Also, constituents visiting your NetSolutions Web pages can update their address information. Using the Download Transactions link, you download any online address updates to your Raiser’s Edge database.
Downloading change of address information 1. On the Raiser’s Edge bar, click NetSolutions. The NetSolutions page appears.
Note: Online address changes are allowed for individual constituent records only. You cannot change organization records.

D O W N L O AD I N G TRA N S A C T I O N S 34
2. Click Download Transactions. The Download Transactions screen appears.
3. Click the Click Here to check for and download new transactions link. A screen appears, displaying the number of transactions downloaded.
4. Click OK. The Download Transactions screen appears.

348 CH A PT E R
Links to the downloaded transactions appear. The information is arranged based on the Web page from which the transactions were downloaded. Scroll down to Change of Address Requests.
In the example above, two change of address requests were downloaded from the NetSolutions server.
5. To import the new address information into The Raiser’s Edge, click the Click here to import change of address requests into The Raiser’s Edge link under Change of Address Requests. The Import Change of Address screen appears.
The updated address information appears in the Downloaded Information column, and the constituent record appears in the corresponding row in the RE Constituent column.
6. If the RE Constituent column appears empty, you must manually match the downloaded address with a constituent record in your database. If no constituent record exists, you must create one.
Note: The program does not overwrite downloaded transactions.
Note: If the constituent information defaults into the RE Constituent column when you open the Import Change of Address Requests screen, the program has remembered the constituent from a previous download. You do not have to match them again with a constituent record in your database.

D O W N L O AD I N G TRA N S A C T I O N S 34
7. To manually complete the RE Constituent column, place your cursor in the column next to the downloaded address to enter. Press F7 on your keyboard. The Open screen appears.
The updating constituent’s name defaults into the name fields at the bottom of the screen. • If a constituent record already exists, the constituent name appears in the grid. Select the name and
click Open. You return to the Import Change of Address Requests screen.• If the name does not already exist, click Add New to add the record.
You must then identify the new record as “Individual” or “Organization”, and the New Individual/Organization screen appears.All information included in the downloaded record defaults into the new constituent record. Add any additional information, and click Save and Close. You return to the Import Change of Address Requests screen. For more information about adding a constituent record, see the Constituent Data Entry Guide.
The constituent and new address appear in the RE Constituent column.

350 CH A PT E R
8. In the Update Option column, select how you want the new address added to the constituent record. The program defaults to the “Update preferred address” option. This overrides the existing preferred address with the new address. However, you can opt to add the new address to the record as the preferred address and keep the old address.Place your cursor in the Update Option column next to the Downloaded Information to update. Press F7 on your keyboard. The Change of Address Update Options screen appears.
9. Select the Update the preferred address with the downloaded information default option, or select to Add the downloaded information as a new address for this constituent.
The Add the downloaded information as a new address for this constituent option saves the old address and adds the new address as preferred. To designate the new address as preferred on the constituent record, mark the Make this new address the preferred address checkbox. The old address still remains on the constituent record, but it is no longer designated the preferred address. This option also updates all constituents linked to the address, linking them to the new preferred address.

D O W N L O AD I N G TRA N S A C T I O N S 35
10. To return to the Import Change of Address Request screen, click OK .
11. Once you match the Downloaded Information with records in The Raiser’s Edge and select update options, click Import Now. A screen appears, confirming the change of address information has been imported.
12. Click OK. The Import Change of Address Requests screen appears with all columns blank.

352 CH A PT E R
13. To return to the Download Transactions screen, click Close.
Downloading Email Opt-Out Information from your Web SiteIf existing Raiser’s Edge constituents visiting a NetSolutions Web page unmark the I wish to receive future email correspondence checkbox on the online Registration Information form, you can update their existing record with this information, using the Download Email Opt-Outs link. This link also downloads email opt-outs entered through messages sent using NetMail.
Downloading email opt-out information from your Web site1. On the Raiser’s Edge bar, click NetSolutions. The NetSolutions page appears.2. Click Download Transactions. The Download Transactions screen appears.
3. Click the Click Here to check for and download new transactions link. A screen appears, displaying the number of transactions downloaded.

D O W N L O AD I N G TRA N S A C T I O N S 35
4. Click OK. The Download Transactions screen appears, displaying a link to the downloaded transactions.
The information is arranged based on the Web page from which the transactions were downloaded. 5. Scroll down to the Email “Opt-Outs” heading at the bottom of the screen.
The screen displays how many online constituents unmarked the I wish to receive future email correspondence check mark on the online constituent Registration Information form. In the preceding example, one downloaded record has this checkbox unmarked.
6. Click the Click here to import email opt-outs into The Raiser’s Edge link under Email “Opt-Outs”. The Import Email “Opt-Outs” screen appears.
Note: The program does not overwrite downloaded transactions.

354 CH A PT E R
• The information downloaded appears. If constituent information defaults in the RE Constituent column, the program automatically matched the constituent with the email address.
• If the RE Constituent column is empty, you must manually locate the downloaded email with a constituent record in your database using the RE Constituent column. To complete the RE Constituent column, place your cursor in the column. Press F7 on your keyboard. The Open screen appears.
The constituent’s name defaults into the name fields at the bottom of the screen. If a constituent record already exists, the name appears in the Constituent Name column. Select the name and click Open.
• If the name does not already exist, click Add New to add the record.You must then identify the new record as “Individual” or “Organization”, and the New Individual/Organization screen appears.
All information included in the online record defaults into the new constituent record. Click Save and Close or add additional information. For more information about adding a constituent record, see the Constituent Records chapter of the Constituent Data Entry Guide.
7. When you click Save and Close. You return to the Import Email “Opt-Outs” screen. The constituent information now appears in the RE Constituent column.
8. Once you match the downloaded email addresses with records in The Raiser’s Edge, click Import Now. The program imports the information.
9. To return to the Download Transactions screen, click Close.
Warning: Use caution when matching registrants with constituent records. Make sure the registrant is the constituent to whom you are linking the online donation.

D O W N L O AD I N G TRA N S A C T I O N S 35
Downloading Undeliverable Email Address InformationWhen working in NetMail, you can track all email messages returned to Blackbaud's server as undeliverable using the Download Transactions link in NetSolutions.There are two types of undeliverable email tracked by NetMail:• A hard undeliverable email message is an email message returned to the sender because the recipient’s
address is invalid. This may occur because the domain name does not exist or because the recipient is unknown.
• A soft undeliverable email message is an email message that gets as far as the recipient’s mail server but is deemed undeliverable before it gets to the intended recipient. This may occur because the recipient's inbox is full. A soft undeliverable message may be deliverable at another time or may be forwarded manually by the network administrator in charge of redirecting mail on the recipient's domain.
You can see which constituent email addresses failed, and you can also create a query of these records.From Download Transactions, use the Click here to import undeliverable email into The Raiser’s Edge link available under the Undeliverable Email frame at the bottom of the Transaction Download Summary screen. You can view the undeliverable email addresses, see the type of undeliverable (hard or soft), and create a query of the email information to use in other Raiser’s Edge applications.
Downloading undeliverable email address information1. On the Raiser’s Edge bar, click NetSolutions. The NetSolutions page appears.
2. Click Download Transactions. The Download Transactions screen appears.
Note: NetSolutions downloads up to a maximum of 1,000 online transactions at a time. If, after downloading transactions, the Status fields on the Transaction Download Summary screen add up to 1,000 transactions, you may want to click the Click here to check for and download new transactions link a second time, to make sure you download all online data.

356 CH A PT E R
3. Click the Click here to check for and download new transactions link. A screen appears, displaying the number of transactions downloaded.
4. Click OK. The Download Transactions screen appears, displaying a link to the downloaded transactions. The information is arranged based on the Web page from which the transactions were downloaded.
5. Scroll to the Undeliverable Email frame at the bottom of the screen.
Note: To help you track undeliverable email addresses, a note is automatically added on the Notes tab of the constituent record when you download undeliverable email information. The note includes the text of the returned message along with the date. You can remove this information using Global Delete. In the Record type field, select “Notepads - Constituents”. On the Delete Options tab, move “NetMail” into the Delete Notes with Types box.
Note: The Type column on the Undeliverable Email screen is editable, so you can change the entry based on the text of the message.

D O W N L O AD I N G TRA N S A C T I O N S 35
6. Click the Click here to import undeliverable email into The Raiser’s Edge link under Undeliverable Email. The Import Undeliverable Email screen appears.
The information downloaded appears. If you have not changed the constituent information included in the export file used in your NetMail campaign, the information in the Email Address column is automatically matched with the RE Constituent, as shown in the previous picture.
7. If you changed information in your constituent records and that information is used in the NetMail export file, the program cannot automatically match the undeliverable Email Address with the RE Constituent, as shown in the picture below.
To create queries with this information, you must manually match the email address with a constituent record in your database, create a new record with the email address, or delete the address from the Undeliverable Email screen.
Note: For information about why the email message was undeliverable, hover your mouse over the email address in the download grid.

358 CH A PT E R
To manually match the email address with a constituent record in your database, place your cursor in the RE Constituent column next to the Email Address. Press F7 on your keyboard. The Open screen appears.
If you know the constituent record to which the undeliverable email address belongs, enter the information you know in the criteria fields at the bottom of the Open screen, click Find Now, select the record in the grid, and click Open. You return to the Import Undeliverable Email screen. The RE Constituent column is now complete. Also, if this email address appears more than once on the Import Undeliverable Email screen, the RE Constituent column fills in for all instances.If you do not know the constituent record to which the undeliverable email address belongs, you must create a new constituent record or delete the email address.• To create a new record, click Add New. A new constituent record screen appears.• To delete the email address, on the Import Undeliverable Email screen, select the row, and click Delete
Row. A confirmation screen appears. Click Yes to delete the row.After all the undeliverable email addresses are matched with a constituent record, create a query. You can use the query in other Raiser’s Edge application, such as Global Change, to replace the undeliverable email addresses; Global Delete, to delete these records from your database; or in a Mail task, to send a hardcopy appeal to these constituents.
8. To create a query, click Create Queries. The program processes the request and creates two queries: one with hard undeliverable email addresses and one with soft undeliverable email addresses.
When the confirmation screen appears, take note of the query names. You will need the name to open the query file later in Query.

D O W N L O AD I N G TRA N S A C T I O N S 35
9. Once you have the query names, click OK. You return to a blank Import Undeliverable Email screen.
10. To return to the Download Transactions screen, click Close.
Exporting Downloaded Data to ExcelFrom any of the download grids, you can export downloaded data to a Microsoft Excel spreadsheet. This is helpful if members of your organization without access to NetSolutions need to review the downloaded information.The following procedure is based on exporting donations data downloaded from an NetDonors Web page to Excel. The same procedure applies to all download options in Download Transactions.
Exporting downloaded data to Excel1. For example, to export donations downloaded from your NetDonors Web page, open the Import
Donation Wizard by clicking Click here to import donation into The Raiser’s Edge on the Download Transactions screen.
2. Right-click anywhere within the download grid. The right-click menu appears.

360 CH A PT E R
3. Select Export <Donation> Grid to Excel.4. The program processes the export and the downloaded data appears in an Excel spreadsheet.
Exporting Downloaded DataFrom any of the download grids, you can export downloaded data to an outside application, such as Microsoft Word or Notepad. This is helpful if members of your organization without access to NetSolutions need to review the downloaded information.The following procedure is based on exporting data downloaded from an NetMembers Web page to a format that can be access from Notepad. The same procedure applies to all download options in Download Transactions.
Exporting downloaded data1. For example, to export donations downloaded from your NetMembers Web page, open the Import
Membership Wizard by clicking Click here to import memberships into The Raiser’s Edge on the Download Transactions screen.

D O W N L O AD I N G TRA N S A C T I O N S 36
2. Right-click anywhere within the download grid. The right-click menu appears.
3. Select Export <Membership> Grid. The Export screen appears.
4. In the Export file type field, select an export format. This determines the way the data exported from your database appears in the data file and with which application it is used. There are several export formats that work with The Raiser’s Edge: Text, Microsoft Access, Character Separated Value, Comma Separated Value. For a complete list and description of the formats, see the Export Formats section of the Export chapter in the Query & Export Guide.
5. In the Export file name field, browse to where you want the exported information saved.
6. Click Export Now. The program processes the export and saves the file in the selected location.

362 CH A PT E R
7. To access the exported data, open the outside application with which to work. In this example, we used Notepad. Map to the location of the saved export file.
8. Open the saved export file.
Printing Downloaded DataFrom any of the download grids, you can print downloaded data. This is helpful if members of your organization want to review the information before creating the batch file.The following procedure is based on printing data downloaded from an NetVolunteers Web page. The same procedure applies to all download options in Download Transactions.
Printing downloaded data1. For example, to print data downloaded from a NetVolunteers Web page, open the Import Volunteers by
clicking Click here to import volunteers into The Raiser’s Edge on the Download Transactions screen.2. Right-click anywhere within the download grid. The right-click menu appears.

D O W N L O AD I N G TRA N S A C T I O N S 36
3. Select Print. The Print Grid Options screen appears.
4. In the Header field, enter a heading to appear at the top of you report.5. In the Footer field, enter the information to appear at the bottom of each report page.6. In the Paper orientation field, select the paper orientation for you report: Portrait, Landscape, Use printer
default, or Best fit.7. The series of checkboxes at the bottom of the screen offer additional printing options. Mark any or all of
the options:• Display row grid lines• Display column grid lines• Ignore grid color settings• Number pages• Size columns to fit page• Print row headers

364 CH A PT E R
8. Select the Sample Output tab to preview the report layout before printing.
9. Click Print to print a hardcopy of your downloaded data.
Searching Download GridThe Find in grid menu option helps you locate information you need quickly. For example, if you downloaded a large number of online memberships and want to find a new arts program member, you can use the Find in grid menu option.The following procedure is based on searching data downloaded from an NetMembers Web page. The same procedure applies to all download options in Download Transactions.
Searching downloaded data1. For example, to search data downloaded from your NetMembers Web page, open the Import
Membership Wizard by clicking Click here to import memberships into The Raiser’s Edge on the Download Transactions screen.

D O W N L O AD I N G TRA N S A C T I O N S 36
2. Right-click anywhere within the download grid. The right-click menu appears.
3. Select Find in grid. The Find screen appears.
4. In the Field field, select what section of the downloaded data grid to search. For example, if you are looking for a specific constituent, that information is stored in the RE Constituent column of the grid. So you would select, “RE Constituent”.
5. In the Find what field, enter the specific information to find. For example, to find Ben Smith, enter any part of his name.
6. In the Match field, enter how much of the text you entered in the Find what field must match before a record is selected. For example, if you are not sure of the constituent’s entire name, select “Any part of field”. The program will then display any records found with the either the word “Ben” or “Smith”.
7. Mark Match case to make your search case-sensitive.8. Click Find First to locate the first record satisfying your criteria.9. If you fail to find the record you are looking for, click Find Next.

366 CH A PT E R

10chapter
Customizing Confirmations
Composing a Message . . . . . . . . . . . . . . . . . . . . . . . . . . . . . . . . . . . . . . . . . . . . . . . . . . . . . . . . . . . . . . . . . . . . . . 368Previewing a Message . . . . . . . . . . . . . . . . . . . . . . . . . . . . . . . . . . . . . . . . . . . . . . . . . . . . . . . . . . . . . . . . . . . . . . . 371Adding Links to Your Message . . . . . . . . . . . . . . . . . . . . . . . . . . . . . . . . . . . . . . . . . . . . . . . . . . . . . . . . . . . . . . . . 373Default Start Page . . . . . . . . . . . . . . . . . . . . . . . . . . . . . . . . . . . . . . . . . . . . . . . . . . . . . . . . . . . . . . . . . . . . . . . . . . 373Sign-up/Prospecting Page . . . . . . . . . . . . . . . . . . . . . . . . . . . . . . . . . . . . . . . . . . . . . . . . . . . . . . . . . . . . . . . . . . . . 374NetDonor Links . . . . . . . . . . . . . . . . . . . . . . . . . . . . . . . . . . . . . . . . . . . . . . . . . . . . . . . . . . . . . . . . . . . . . . . . . . . . 375NetEvent Links . . . . . . . . . . . . . . . . . . . . . . . . . . . . . . . . . . . . . . . . . . . . . . . . . . . . . . . . . . . . . . . . . . . . . . . . . . . . . 377NetDirectory Links . . . . . . . . . . . . . . . . . . . . . . . . . . . . . . . . . . . . . . . . . . . . . . . . . . . . . . . . . . . . . . . . . . . . . . . . . . 379NetVolunteers Links . . . . . . . . . . . . . . . . . . . . . . . . . . . . . . . . . . . . . . . . . . . . . . . . . . . . . . . . . . . . . . . . . . . . . . . . 380NetMembers Links . . . . . . . . . . . . . . . . . . . . . . . . . . . . . . . . . . . . . . . . . . . . . . . . . . . . . . . . . . . . . . . . . . . . . . . . . 381New Email Address . . . . . . . . . . . . . . . . . . . . . . . . . . . . . . . . . . . . . . . . . . . . . . . . . . . . . . . . . . . . . . . . . . . . . . . . . 383Web Pages . . . . . . . . . . . . . . . . . . . . . . . . . . . . . . . . . . . . . . . . . . . . . . . . . . . . . . . . . . . . . . . . . . . . . . . . . . . . . . . . 384Images . . . . . . . . . . . . . . . . . . . . . . . . . . . . . . . . . . . . . . . . . . . . . . . . . . . . . . . . . . . . . . . . . . . . . . . . . . . . . . . . . . . 385
Procedures
Composing confirmations/messages . . . . . . . . . . . . . . . . . . . . . . . . . . . . . . . . . . . . . . . . . . . . . . . . . . . . . . . . . . . . . 368Previewing a Message . . . . . . . . . . . . . . . . . . . . . . . . . . . . . . . . . . . . . . . . . . . . . . . . . . . . . . . . . . . . . . . . . . . . . . . . . 371Adding a link to your Blackbaud-hosted Home page . . . . . . . . . . . . . . . . . . . . . . . . . . . . . . . . . . . . . . . . . . . . . . . . 373Adding a link to your online registration page . . . . . . . . . . . . . . . . . . . . . . . . . . . . . . . . . . . . . . . . . . . . . . . . . . . . . 374Adding a link to your donation page . . . . . . . . . . . . . . . . . . . . . . . . . . . . . . . . . . . . . . . . . . . . . . . . . . . . . . . . . . . . . 375Adding a link to your event page . . . . . . . . . . . . . . . . . . . . . . . . . . . . . . . . . . . . . . . . . . . . . . . . . . . . . . . . . . . . . . . . 377Adding a link to your directory page . . . . . . . . . . . . . . . . . . . . . . . . . . . . . . . . . . . . . . . . . . . . . . . . . . . . . . . . . . . . . 379Adding a link to your job page . . . . . . . . . . . . . . . . . . . . . . . . . . . . . . . . . . . . . . . . . . . . . . . . . . . . . . . . . . . . . . . . . . 380Adding a link to your membership page . . . . . . . . . . . . . . . . . . . . . . . . . . . . . . . . . . . . . . . . . . . . . . . . . . . . . . . . . . 381Adding a link an email address . . . . . . . . . . . . . . . . . . . . . . . . . . . . . . . . . . . . . . . . . . . . . . . . . . . . . . . . . . . . . . . . . . 383Adding a link a non-NetSolutions Web page . . . . . . . . . . . . . . . . . . . . . . . . . . . . . . . . . . . . . . . . . . . . . . . . . . . . . . . 384Adding an image . . . . . . . . . . . . . . . . . . . . . . . . . . . . . . . . . . . . . . . . . . . . . . . . . . . . . . . . . . . . . . . . . . . . . . . . . . . . . . 385

368 CH A PT E R
With the Customize Layout button available in several NetSolutions modules, you can personalize confirmation messages sent via email to online visitors to your various Web pages. A Preview Confirmation button, also available, allows you to view your message before committing it to the Blackbaud server. The two buttons are available in the following areas: NetDonors, NetEvents, NetVolunteers, and NetMembers. This chapter shows you how to create a customized confirmation/message. Although the procedure uses the NetDonors Donation Page Wizard to illustrate the process, the procedure applies to NetDonors, NetEvents, NetVolunteers, and NetMembers. Only the location of the Customize Layout and Preview Confirmation buttons vary between the modules:• In NetDonors, the buttons are located on the Miscellaneous screen of the Donation Page Wizard. For
information about the Donation Page Wizard, see “Designing your NetDonors Page” on page 62.• In NetEvents, the buttons are located on the Customize the event confirmation screen of the Web Event
Wizard. For information about the Web Event Wizard, see “Publishing an Event to Your Web Site” on page 140.• In NetVolunteers, the buttons are located on the Miscellaneous screen of the Web Job Wizard and the General
volunteer page options screen of the Volunteer Sign-up Page Wizard. For more information about the Web Job Wizard, see “Publishing a Job to Your Web Site” on page 236. For more information about the Volunteer Sign-up Page Wizard, see “Publishing a Volunteer Registration Form to Your Web Site” on page 223.
• In NetMembers, the buttons are located on the Customize the membership confirmation message screen of the Web Members Wizard. For more information about the Web Members Wizard, see “Publishing Membership Information on Your Web Site” on page 262.
Composing a MessageYou can edit the default confirmation/message included in NetSolutions. You can delete the entire message and start over, you can delete sections, and you can add sections. The process is similar to creating a message for a mail merge within Microsoft Word.The default message includes fields and text for messages sent to individual constituents and fields and text for message sent to corporate constituents. Using your cursor, you can change either message. You can also enter who sent the message and include a subject for the email message.There is a 2,147,483,647 character limitation.
Composing confirmations/messages
Note: The background image specified in Configure and Customize or the background image specified in Page Design will be used for the default background in the HTML view of your Confirmation Message.

CU ST O M I Z I N G CO N F I R M AT I O N S 36
1. From NetDonors, NetEvents, NetVolunteers, or NetMembers, click the Customize Layout button. The Confirmation screen appears.
2. In the From field, the email address entered in the Email field of the wizard screen defaults. This is the same email address you entered in Configure and Customize.For example, in NetDonors, the Email field is under the Customize Layout button on the Miscellaneous screen of the Donation Page Wizard.

370 CH A PT E R
3. In the Subject field of the Confirmation screen, enter the purpose of the email. This displays in the Subject field of the sent email message.
4. A default message appears in the right pane of the Confirmation screen. On the Confirmation screen, in the right pane, all of the fields used to compose the default confirmation/message appear. To delete any field or text you do not want, highlight it with your cursor, and press DELETE on your keyboard.
5. To add a Raiser’s Edge field, place your cursor in the right pane in the location you want to add a field. Select Insert, Fields from the menu bar.
Select the field you want to add, and you return to the Confirmation screen.6. If you remove or add fields and then find you want the default message back, select Insert, Reset to
Default Confirmation from the menu bar.7. You must distinguish between individual and corporate donors when composing your email message. • When adding fields or text specific to your individual donors, you must include the <Individual Donor
Section Begins> tag.• When ending fields or text specific to your individual donors, you must include the <Individual Donor
Section Ends> tag. • For corporate information, use the <Corporate Donor Section Begins> and <Corporate Donor Section
Ends> tags.For example, to include the donor’s address in the confirmation/message and you accept both individual and corporate donations online, you must create two separate address blocks in the right message pane.
a. In the first address block, add the <Individual Donor Section Begins> tag. b. Then add all of the Raiser’s Edge fields you want to include in the address block: <Donor Title>,
<Donor First Name>, <Donor Last Name>, etc.
Note: Alternatively, to include Raiser’s Edge fields in your email message using the left pane, double-click the Available Fields category. A list of all fields you can include in your message appears. Double-click on the field to move into the right pane.

CU ST O M I Z I N G CO N F I R M AT I O N S 37
c. When you finish adding address block fields, add the <Individual Donor Section Ends> tag. You message will look similar to the following:
<Individual Donor Section Begins><Donor Title> <Donor First Name> <Donor Last Name> <Address Block>
<City>, <State> <ZIP><Individual Donor Section Ends>
8. To include the address for corporate donors, repeat the process above, only use the <Corporate Donor Section Begins> and <Corporate Donor Section Ends> tags.
9. You must distinguish between corporate and individual donors when composing the salutation. A salutation section for both corporate and individual donors, may look similar to the following:<Individual Donor Section Begins>Dear <Donor Title> <Donor Last Name>:<Individual Donor Section Ends><Corporate Donor Section Begins>Dear <Contact Title> <Contact Last Name>:<Corporate Donor Section Ends>
10. Type the body text of your message wherever you want it to appear in the message. You can also include any Raiser’s Edge fields available from the Insert, Fields menu or in the Available Fields category in the left pane.For example, to include gift information, your message may look similar to the following:Thank you for your generous «Gift Type» of «Gift Amount».
On the actual message, this may read: Thank you for your generous cash gift of $50.If you want to also include a recognition of the company responsible for the gift in any message sent to corporate donors, your message would look similar to the following:Thank you for your generous «Gift Type» of «Gift Amount»«Corporate Donor Section Begins» on behalf of «Donor Company Name»«Corporate Donor Section Ends».
On the actual message, this may read: Thank you for your generous cash gift of $50 on behalf of the XYZ Company.
11. Once you complete your message, you can add links to various Web pages, email contact information, a change of address link. If you are done with your message, click Save and Close to return to the wizard screen.
Previewing a MessageYou can preview the confirmation message on the same wizard screen that enables you do edit it.You can see what the message sent by NetSolutions will look like by using the Preview Confirmation button. In the Preview Confirmation screen you can see HTML and Plain Text versions of your message, in addition to viewing versions of the message sent to both individual and corporate donors. You can also toggle the view of the tribute section.
Warning: If you change the font type, size, or style settings of the body text after submitting a page to Blackbaud, the changes are not reflected in the custom confirmation unless you open the confirmation and select Insert, Reset to Default Confirmation from the menu bar. However, if you change the font color of your body text, the color of any text in the confirmation does change.

372 CH A PT E R
Previewing a Confirmation Message1. To preview a confirmation message from NetDonors, NetEvents, NetVolunteers, or NetMembers, click
the Preview Confirmation button on the wizard screen.
2. The Preview Confirmation screen appears.
The default confirmation/message includes one message for individual donors and another for corporate donors.
• To view the corporate donor message, click Show Corporate Donor Section at the top to the preview screen.
• To toggle the view of the tribute section, click Toggle Tribute Section.

CU ST O M I Z I N G CO N F I R M AT I O N S 37
• To view the message in text format, select the Text Format Preview tab.
3. Click Close to close this screen and return to the wizard screen.
Adding Links to Your MessageWhen customizing your NetSolutions confirmations/messages, you can include a number of links, taking recipients to your various NetSolutions Web pages, your organization’s email contact, non-NetSolutions Web pages, and more.
Default Start Page
You can include a link in your message to the Blackbaud-hosted Home page. This page includes links to all your NetSolutions Web pages.
Adding a link to your Blackbaud-hosted Home page1. From NetDonors, NetEvents, NetVolunteers, or NetMembers, click the Customize Layout button. The
Confirmation screen appears.2. From the Confirmation screen, place your cursor in the right message pane in the location you want to
add a Home page link.3. In the left pane tree view, double-click Default Start Page. The Insert Link to Default Start Page screen
displays.
4. In the Description field, enter what you want the link to say in your email message.

374 CH A PT E R
5. Click OK. The new link displays in your message.
6. After you add all the links and images you want to include in your message, click Save and Close to save your message and return to the wizard screen.
Sign-up/Prospecting Page
You can include a link in your message to your online registration page.
Adding a link to your online registration page1. From NetDonors, NetEvents, NetVolunteers, or NetMembers, click the Customize Layout button. The
Confirmation screen appears.2. From the Confirmation screen, place your cursor in the right message pane in the location you want to
add an online registration page link.3. Double-click Sign-up/Prospecting Page in the tree view. The Insert Link to Sign-up/Prospecting Page
displays.
4. In the Description field, enter what you want the link to say in your email message. For example, enter “register with the WPA”.

CU ST O M I Z I N G CO N F I R M AT I O N S 37
5. Click OK. The new link displays in your message.
6. After you add all the links and images you want to include in your message, click Save and Close to save your message and return to the wizard screen.
NetDonor Links
You can include a link in your message to the online donation page you created in NetDonors.
Adding a link to your donation page1. From NetDonors, NetEvents, NetVolunteers, or NetMembers, click the Customize Layout button. The
Confirmation screen appears.2. From the Confirmation screen, place your cursor in the right pane in the location you want to add a
donation page link.3. Double-click NetDonor Links in the left pane tree view. All available donation pages appear under
NetDonor Links.

376 CH A PT E R
4. Double-click the page to which you want to create a link. The Insert Link to NetDonor Page screen displays.
5. In the Description, field, enter what you want the link to say in your message. In the proceeding example, the donor will click on the words “Donate to the WPA” to access your donation page.
6. Enter the Campaign, Fund, Appeal, and/or Package you want credited for any donations.7. For record keeping and reporting purposes, keep an up-to-date count of the number of constituents sent
this message by marking the Update number solicited for this appeal checkbox. This information is helpful when trying to evaluate the success of the email effort. When you download your online transactions, the No. solicited field on the General tab of the appeal record is updated.
8. If the email is an appeal and your organization is in the habit of tracking appeals on constituent records, mark Add this appeal to the constituent’s record. Enter the Date you want to appear with the appeal and any Comment.

CU ST O M I Z I N G CO N F I R M AT I O N S 37
9. Click OK. The new link displays in your message.
10. After you add all the links and images you want to include in your message, click Save and Close to save your message and return to the wizard screen.
NetEvent Links
You can include a link in your message to the online event page(s) you created in NetEvents.
Adding a link to your event page1. From NetDonors, NetEvents, NetVolunteers, or NetMembers, click the Customize Layout button. The
Confirmation screen appears.2. From the Confirmation screen, place your cursor in the right pane in the location you want to add an
event page link.3. Double-click NetEvents Links in the left pane tree view. All available event pages appear under NetEvents
Links.

378 CH A PT E R
4. Double-click the page to which you want to create a link. The Insert Link to NetEvent Page screen displays.
5. In the Description field, enter what you want the link to say in your message. In the above example, the donor will click on the words “Spring Ball” to access your online event page.
6. Enter the Campaign, Fund, Appeal, and/or Package you want credited for any donation.7. For record keeping and reporting purposes, keep an up-to-date count of the number of constituents sent
this message by marking the Update number solicited for this appeal checkbox. This information is helpful when trying to evaluate the success of the email. When you download your online transactions, the No. solicited field on the General tab of the appeal record is updated.
8. If the email is an appeal, and your organization is in the habit of tracking appeals on constituent records, mark Add this appeal to the constituent’s record. Enter the Date you want to appear with the appeal and any Comment.

CU ST O M I Z I N G CO N F I R M AT I O N S 37
9. Click OK. The new link displays in your message.
10. After you add all the links and images you want to include in your message, click Save and Close to save your message and return to the wizard screen.
NetDirectory Link
You can include a link in your message to the online directory page(s) you created in NetDirectories.
Adding a link to your directory page1. From NetDonors, NetEvents, NetVolunteers, or NetMembers, click the Customize Layout button. The
Confirmation screen appears.2. From the Confirmation screen, place your cursor in the right pane in the location you want to add a
directory page link.3. Double-click NetDirectory Links in the left pane tree view. All available directory pages appear under
NetDirectory Links.
4. Double-click on the directory page to which you want to create a link. The Insert Link to NetDirectory Page screen displays.
Note: For more information about online directories, see “NetDirectories” on page 165.

380 CH A PT E R
5. In the Description field, enter what you want the link to say in your message. In the previous example, the donor will click on the words “Board Members Directory” to access the online directory.
6. The Directory Page field, displays the online directory to which this description is linked.7. Click OK. The new link displays in your message.
8. After you add all the links and images you want to include in your message, click Save and Close to save your message and return to the wizard screen.
NetVolunteers Link
You can include a link in your message to the online job page you created in NetVolunteers.
Adding a link to your job page1. From NetDonors, NetEvents, NetVolunteers, or NetMembers, click the Customize Layout button. The
Confirmation screen appears.2. From the Confirmation screen, place your cursor in the right pane in the location you want to add a job
page link.3. Double-click NetVolunteer Links in the left pane tree view. All available job pages appear under
NetVolunteer Links.

CU ST O M I Z I N G CO N F I R M AT I O N S 38
4. Double-click the page to which you want to create a link. The Insert Link to NetVolunteer Page screen displays.
5. In the Description field, enter what you want the link to say in your message. In the previous example, the donor will click on the words “Special Events Coordinator” to access your online job page.
6. In the Job Page field, the title of the selected job’s Web page defaults.7. Click OK. The new link displays in your message.
8. After you add all the links and images you want to include in your message, click Save and Close to save your message and return to the wizard screen.
NetMembers Link
You can include a link in your message to the online membership page(s) you created in NetMembers.
Adding a link to your membership page1. From NetDonors, NetEvents, NetVolunteers, or NetMembers, click the Customize Layout button. The
Confirmation screen appears.
Note: For information about working in NetVolunteers, see “NetVolunteers” on page 217.

382 CH A PT E R
2. From the Confirmation screen, place your cursor in the right pane in the location you want to add a membership page link.
3. Double-click NetMember Links in the tree view. All available membership pages appear under NetMember Links.
4. Double-click the membership page to which you want to create a link. The Insert Link to NetMember Page screen displays.
5. In the Description field, enter what you want the link to say in your message. In the previous example, the donor will click on the words “Adopt an Animal - Patron” to access your online membership page.
6. In the Membership Page field, the title of the selected membership Web page defaults.7. Enter the Campaign, Fund, Appeal, and/or Package you want credited for any donations.8. For record keeping and reporting purposes, keep an up-to-date count of the number of constituents sent
this message by marking the Update number solicited for this appeal checkbox. This information is helpful when trying to evaluate the success of the email effort. When you download your online transactions, the No. solicited field on the General tab of the appeal record is updated.
9. If the email is an appeal and your organization is in the habit of tracking appeals on constituent records, mark Add this appeal to the constituent’s record. Enter the Date you want to appear with the appeal and any Comment.
Note: For information about working in NetMembers, see “NetMembers” on page 257.

CU ST O M I Z I N G CO N F I R M AT I O N S 38
10. Click OK. The new link displays in your message.
11. After you add all the links and images you want to include in your message, click Save and Close to save your message and return to the wizard screen.
New Email Address
You can include in your message an email address link.
Adding an email address link1. From NetDonors, NetEvents, NetVolunteers, or NetMembers, click the Customize Layout button. The
Confirmation screen appears.2. From the Confirmation screen, place your cursor in the right pane in the location you want to add an
email address link.3. Double-click Email Address in the tree view. New Email Addresses displays under the Email Address
category. 4. Double-click New Email Addresses. The Insert Email Address screen displays.
5. In the Name field, enter a name for the email address link you are including in the message. For example, in the previous example, the email recipient will click “Brenda Smathers” to bring up Brenda’s email address.

384 CH A PT E R
6. In the Address field, enter the individual’s email address.7. Click OK. A link to the email address displays in your email message.
8. After you add all the links and images you want to include in your message, click Save and Close to save your message and return to the wizard screen.
Web Page Link
You can include in your message a link to a non-NetSolutions Web page.
Adding a link to a non-NetSolutions Web page1. From NetDonors, NetEvents, NetVolunteers, or NetMembers, click the Customize Layout button. The
Confirmation screen appears.2. From the Confirmation screen, place your cursor in the right pane in the location you want to add a
non-NetSolutions Web page link.3. Double-click the Web Pages category. The New Web Page Link option displays.4. Double-click New Web Page Link. The Insert Link to a Web Page screen displays.
5. In the Description field, enter what you want the link to say in your message. In the previous example, the donor will click on the words “WPA Home Page” to access the link address.

CU ST O M I Z I N G CO N F I R M AT I O N S 38
6. In the Address field, enter the address of the Web page.7. Click OK. A link to the Web page now displays in your message.
8. After you add all the links and images you want to include in your message, click Save and Close to save your message and return to the wizard screen.
Images
You can include an image in your message. You can use any saved picture file or logo.
Adding an image1. From NetDonors, NetEvents, NetVolunteers, or NetMembers, click the Customize Layout button. The
Confirmation screen appears.2. From the Confirmation screen, place your cursor in the right pane in the location you want to add an
image.3. Double-click Images. The New Image Link displays.4. Double-click New Image Link. The Insert Image screen displays.

386 CH A PT E R
5. In the Description field, enter a title for the image. This title displays under Images in the tree view. This image can be added to other messages by double-clicking on the description.
6. In the Image File field, click the ellipsis to access the Open screen.7. Select the image file you want to include in your message and click Open to return to the Insert Image
screen.8. On the Insert Image screen, select an Alignment:
Left (Default) aligns the object to the left of the surrounding text. All preceding and subsequent text flows to the right of the object. Right aligns the object to the right of the surrounding text. All subsequent text flows to the left of the object. Top aligns the top of the object with the top of the text. The top of the text is the baseline plus the standard height of an ascender in the text. Middle aligns the middle of the object with the surrounding text. Bottom aligns the bottom of the object with the bottom of the surrounding text. The bottom is equal to the baseline minus the standard height of a descender in the text.
9. Click OK. The image displays in your message.
10. After you add all the links and images you want to include in your message, click Save and Close to save your message and return to the wizard screen.

11chapter
Changing Page Style
Background Style . . . . . . . . . . . . . . . . . . . . . . . . . . . . . . . . . . . . . . . . . . . . . . . . . . . . . . . . . . . . . . . . . . . . . . . . . . . 388Logo and Title . . . . . . . . . . . . . . . . . . . . . . . . . . . . . . . . . . . . . . . . . . . . . . . . . . . . . . . . . . . . . . . . . . . . . . . . . . . . . . 389Image Captions. . . . . . . . . . . . . . . . . . . . . . . . . . . . . . . . . . . . . . . . . . . . . . . . . . . . . . . . . . . . . . . . . . . . . . . . . . . . . 391Header . . . . . . . . . . . . . . . . . . . . . . . . . . . . . . . . . . . . . . . . . . . . . . . . . . . . . . . . . . . . . . . . . . . . . . . . . . . . . . . . . . . 392Detail. . . . . . . . . . . . . . . . . . . . . . . . . . . . . . . . . . . . . . . . . . . . . . . . . . . . . . . . . . . . . . . . . . . . . . . . . . . . . . . . . . . . . 393Body Text . . . . . . . . . . . . . . . . . . . . . . . . . . . . . . . . . . . . . . . . . . . . . . . . . . . . . . . . . . . . . . . . . . . . . . . . . . . . . . . . . 394Table Legends. . . . . . . . . . . . . . . . . . . . . . . . . . . . . . . . . . . . . . . . . . . . . . . . . . . . . . . . . . . . . . . . . . . . . . . . . . . . . . 395Table Headers. . . . . . . . . . . . . . . . . . . . . . . . . . . . . . . . . . . . . . . . . . . . . . . . . . . . . . . . . . . . . . . . . . . . . . . . . . . . . . 396Table Text . . . . . . . . . . . . . . . . . . . . . . . . . . . . . . . . . . . . . . . . . . . . . . . . . . . . . . . . . . . . . . . . . . . . . . . . . . . . . . . . . 397Error Text . . . . . . . . . . . . . . . . . . . . . . . . . . . . . . . . . . . . . . . . . . . . . . . . . . . . . . . . . . . . . . . . . . . . . . . . . . . . . . . . . 398
Procedures
Changing the Background Style . . . . . . . . . . . . . . . . . . . . . . . . . . . . . . . . . . . . . . . . . . . . . . . . . . . . . . . . . . . . . . . . . . 388Changing the Logo and Title. . . . . . . . . . . . . . . . . . . . . . . . . . . . . . . . . . . . . . . . . . . . . . . . . . . . . . . . . . . . . . . . . . . . . 389Changing the Image Captions . . . . . . . . . . . . . . . . . . . . . . . . . . . . . . . . . . . . . . . . . . . . . . . . . . . . . . . . . . . . . . . . . . . 391Changing the appearance of the Header Text . . . . . . . . . . . . . . . . . . . . . . . . . . . . . . . . . . . . . . . . . . . . . . . . . . . . . . 392Changing the appearance of the Detail Text . . . . . . . . . . . . . . . . . . . . . . . . . . . . . . . . . . . . . . . . . . . . . . . . . . . . . . . 393Changing the appearance of the Body Text . . . . . . . . . . . . . . . . . . . . . . . . . . . . . . . . . . . . . . . . . . . . . . . . . . . . . . . . 394Changing the appearance of Table Legends . . . . . . . . . . . . . . . . . . . . . . . . . . . . . . . . . . . . . . . . . . . . . . . . . . . . . . . . 395Changing the appearance of Table Headers . . . . . . . . . . . . . . . . . . . . . . . . . . . . . . . . . . . . . . . . . . . . . . . . . . . . . . . . 396Changing the appearance of the Table Text . . . . . . . . . . . . . . . . . . . . . . . . . . . . . . . . . . . . . . . . . . . . . . . . . . . . . . . . 397Changing the appearance of Error Text . . . . . . . . . . . . . . . . . . . . . . . . . . . . . . . . . . . . . . . . . . . . . . . . . . . . . . . . . . . 398

388 CH A PT E R
Using the Page Style screen, you can give Web page(s) you create within the individual NetSolutions modules a unique look, setting them apart from your other NetSolutions pages. The style you established in Configure and Customize defaults to all of your NetSolutions Web pages, but you can change the style for each page using the Page Style screen. The fields and checkboxes available on this screen change based on the Page section you select. You can change the background, logo and title, image, header, detail, body, table legend, table headers, table text, and error text styles. Every option you change on the Page Style screen is immediately reflected in the preview window. A Page Style screen is present in the following NetSolutions modules:NetDonorsNetEventsNetDirectoriesNetVolunteersNetMembers
Although the procedure covered in this section uses the NetDirectories Page Style screen to illustrate the process, the procedure also applies to each module that allows you to edit Page Styles. Each option is explained in this section.
Background StyleFrom the Page Style screen you can select background images and colors, hyperlink colors, and much more.
Entering background styles for your Web page
1. From the Page Style screen, in the Page section field, select “Background”.
Note: Although the examples included in this procedure are based on the Alumni Directory within NetDirectories, this procedure is applicable to any of the modules that feature a Page Style screen.

CH A N G I N G PA G E ST Y L E 38
2. To use the page style you defined in Configure and Customize, mark Use defaults.To define a new style for your Web page, unmark Use defaults. All options and fields on the screen are activated.
3. In the Background field, enter a background image to use. To map to the directory and folder in which the image is saved, click the ellipsis. The Open screen appears so you can map to the image location.
4. In the Position field, select where on the Web page the image should be positioned. For example, if the image should be in the center of the page, select Center Center; if the image should be centered on the page, but at the bottom, select Center Bottom.
5. Mark Tile image to have duplicates of the image to fill in the entire Web page.6. Mark Watermark and the text on the Web page scrolls to the image. The image is then always visible on
the page.7. In the Back color field, select the background color to use on your Web page.8. In the Hyperlink field, select the color hyperlinks on the Web page will be displayed.9. In the Visited link field, select the color in which links visited by your users should appear.
10. Click Preview to visit a full-size sample page.11. Select another Page section to define. Or, if you completed this screen, click Next and move to the next
wizard screen.
Logo and TitleFrom the Page Style screen you can select your Web page’s title font, text color, background color, logo, alignment, and more.
Note: A preview screen on the right side of the Page Style screen shows you how the selections you made will appear on your Web page.

390 CH A PT E R
Entering logo and title styles for your Web page
1. From the Page Style screen, in the Page section field, select “Logo and Title”.2. To use the page style you defined in Configure and Customize, mark Use defaults. To define a new style
for your Web page, unmark Use defaults. All options and fields on the screen are activated.
3. In the Title frame, design the title for your Web page.• Select the Font to use in your title and enter the font size.• In the Text color field, select the color to use for the title text.• In the Back color field, select a background color to use behind your title.• In the Alignment field, select where on the Web page the title should be aligned: Left, Center, or Right.• Mark Bold to bold the title text; mark Italics to italicize the title text; mark Hide to hide the title.
4. In the Logo frame, you can select to include a logo in your title.• In the Alignment field, select where on the Web page the logo should be aligned: Left, Center, or Right;
mark Hide to hide the logo.
5. Click Preview to visit a full-size sample page.6. Select another Page section to define. Or, if you completed this screen, click Next and move to the next
wizard screen.
Note: Although the examples included in this procedure are based on the Alumni Directory within NetDirectories, this procedure is applicable to any of the modules that feature a Page Style screen.
Note: A preview screen on the right side of the Page Style screen shows you how the selections you made will appear on your Web page.

CH A N G I N G PA G E ST Y L E 39
Image CaptionsFrom the Page Style screen you can customize the Web page image caption by selecting fonts, text color, background color, and more.
Entering image caption styles for your Web page
1. From the Page Style screen, in the Page section field, select “Image”.2. To use the page style you defined in Configure and Customize, mark Use defaults. To define a new style
for your Web page, unmark Use defaults. All options and fields on the screen are activated.
3. In the Image caption frame, design the caption used for your Web page image.• Select the Font to use in your caption and enter the font size.• In the Text color field, select the color to use for the caption.• In the Back color field, select a background color to use behind your caption.• In the Alignment field, select where on the Web page the caption should be aligned: Left, Center, or
Right.• Mark Bold to bold the caption text; mark Italics to italicize the caption text.
4. Click Preview to visit a full-size sample page.5. Select another Page section to define. Or, if you completed this screen, click Next and move to the next
wizard screen.
Note: Although the examples included in this procedure are based on the Alumni Directory within NetDirectories, this procedure is applicable to any of the modules that feature a Page Style screen.
Note: A preview screen on the right side of the Page Style screen shows you how the selections you made will appear on your Web page.

392 CH A PT E R
HeaderFrom the Page Style screen you can customize the header used on your Web page by selecting fonts, text color, background color, and more.
Entering header styles for your Web page
1. From the Page Style screen, in the Page section field, select “Header”.2. To use the page style you defined in Configure and Customize, mark Use defaults. To define a new style
for your Web page, unmark Use defaults. All options and fields on the screen are activated.
3. In the Header frame, design the header for your Web page.• Select the Font to use in your header and enter the font size.• In the Text color field, select the color to use for the header.• In the Back color field, select a background color to use behind your header.• Mark Bold to bold the header; mark Italics to italicize the header.
4. In the Header text frame, design the text to appear under your header on your Web page.• Select the Font to use in your header text and enter the font size.• In the Text color field, select the color to use for the header text.• In the Back color field, select a background color to use behind your header text.• Mark Bold to bold the header text; mark Italics to italicize the header text.
Note: Although the examples included in this procedure are based on the Alumni Directory within NetDirectories, this procedure is applicable to any of the modules that feature a Page Style screen.
Note: A preview screen on the right side of the Page Style screen shows you how the selections you made will appear on your Web page.

CH A N G I N G PA G E ST Y L E 39
5. Click Preview to visit a full-size sample page.6. Select another Page section to define. Or, if you completed this screen, click Next and move to the next
wizard screen.
DetailFrom the Page Style screen, you can determine how the detail information, explaining your organization appears on your Web page. You can select fonts, text color, background color, and more.
Entering detail styles for your Web page
1. From the Page Style screen, in the Page section field, select “Detail”.2. To use the page style you defined in Configure and Customize, mark Use defaults. To define a new style
for your Web page, unmark Use defaults. All options and fields on the screen are activated.
3. In the Detail frame, design the detail header for your Web page.• Select the Font to use in your detail header and enter the font size.• In the Text color field, select the color to use for the detail header.• In the Back color field, select a background color to use behind your detail header.• Mark Bold to bold the detail header; mark Italics to italicize the detail header.
4. In the Detail text frame, design the text to appear under your detail header on your Web page.• Select the Font to use in your detail text and enter the font size.• In the Text color field, select the color to use for the detail text.• In the Back color field, select a background color to use behind your detail text.• Mark Bold to bold the detail text; mark Italics to italicize the detail text.
Note: Although the examples included in this procedure are based on the Alumni Directory within NetDirectories, this procedure is applicable to any of the modules that feature a Page Style screen.

394 CH A PT E R
5. Click Preview to visit a full-size sample page.6. Select another Page section to define. Or, if you completed this screen, click Next and move to the next
wizard screen.
Body TextFrom the Page Style screen, you can format the body text used on your Web page. You can select fonts, text color, background color, and more.
Entering body text styles for your Web page
1. From the Page Style screen, in the Page section field, select “Body”.2. To use the page style you defined in Configure and Customize, mark Use defaults. To define a new style
for your Web page, unmark Use defaults. All options and fields on the screen are activated.
3. In the Body text frame, design the body text for your Web page.• Select the Font to use in your body text and enter the font size.• In the Text color field, select the color to use for the body text.• In the Back color field, select a background color to use behind your body text.• Mark Bold to bold the body text; mark Italics to italicize the body text.
Note: A preview screen on the right side of the Page Style screen shows you how the selections you made will appear on your Web page.
Note: Although the examples included in this procedure are based on the Alumni Directory within NetDirectories, this procedure is applicable to any of the modules that feature a Page Style screen.
Note: A preview screen on the right side of the Page Style screen shows you how the selections you made will appear on your Web page.

CH A N G I N G PA G E ST Y L E 39
4. Click Preview to visit a full-size sample page.5. Select another Page section to define. Or, if you completed this screen, click Next and move to the next
wizard screen.
Table LegendsFrom the Page Style screen, you can format table legends you include on your Web page. You can select fonts, text color, background color, and more.
Entering table legend styles for your Web page
1. From the Page Style screen, in the Page section field, select “Table Legend”.2. To use the page style you defined in Configure and Customize, mark Use defaults. To define a new style
for your Web page, unmark Use defaults. All options and fields on the screen are activated.
3. In the Table legend frame, define the table legends for your Web page.• Select the Font to use in your table legend and enter the font size.• In the Text color field, select the color to use for the table legend.• In the Back color field, select a background color to use behind your table legend.• Mark Bold to bold the table legend text; mark Italics to italicize the table legend text.
4. Click Preview to visit a full-size sample page.
Note: Although the examples included in this procedure are based on the Alumni Directory within NetDirectories, this procedure is applicable to any of the modules that feature a Page Style screen.
Note: A preview screen on the right side of the Page Style screen shows you how the selections you made will appear on your Web page.

396 CH A PT E R
5. Select another Page section to define. Or, if you completed this screen, click Next and move to the next wizard screen.
Table HeadersFrom the Page Style screen you can format table headers you include on your Web page. You can select fonts, text color, background color, and more.
Entering table header styles for your Web page
1. From the Page Style screen, in the Page section field, select “Table Header”.2. To use the page style you defined in Configure and Customize, mark Use defaults. To define a new style
for your Web page, unmark Use defaults. All options and fields on the screen are activated.
3. In the Table header frame, design the table headers for your Web page.• Select the Font to use in your table header and enter the font size.• In the Text color field, select the color to use for the table header.• In the Back color field, select a background color to use behind your table header.• Mark Bold to bold the table header; mark Italics to italicize the table header.
4. In the Table row headers frame, design your table row header text.• Select the Font to use in your table row header text and enter the font size.• In the Text color field, select the color to use for the table row header text.• In the Back color field, select a background color to use behind your table row header text.• Mark Bold to bold the table row header text; mark Italics to italicize the table row header text.
Note: Although the examples included in this procedure are based on the Alumni Directory within NetDirectories, this procedure is applicable to any of the modules that feature a Page Style screen.

CH A N G I N G PA G E ST Y L E 39
5. Click Preview to visit a full-size sample page.6. Select another Page section to define. Or, if you completed this screen, click Next and move to the next
wizard screen.
Table TextFrom the Page Style screen, you can format text entered into tables included on your Web page. You can select fonts, text color, background color, and more.
Entering table text styles for your Web page
1. From the Page Style screen, in the Page section field, select “Table Text”.2. To use the page style you defined in Configure and Customize, mark Use defaults. To define a new style
for your Web page, unmark Use defaults. All options and fields on the screen are activated.
3. In the Table input frame, select how text entered into tables included on your Web page should appear.• Select the Font to use for your table input text and enter the font size.• In the Text color field, select the color to use for the table input text.
4. In the Table confirmed input frame, select how confirmed text entered into tables included on your Web page should appear.• Select the Font to use for your table confirmed input text and enter the font size.• In the Text color field, select the color to use for the table confirmed input text.
Note: A preview screen on the right side of the Page Style screen shows you how the selections you made will appear on your Web page.
Note: Although the examples included in this procedure are based on the Alumni Directory within NetDirectories, this procedure is applicable to any of the modules that feature a Page Style screen.

398 CH A PT E R
• In the Back color field, select a background color to use behind your table confirmed input text.• Mark Bold to bold the table confirmed input text; mark Italics to italicize the table confirmed input
text.
5. Click Preview to visit a full-size sample page.6. Select another Page section to define. Or, if you completed this screen, click Next and move to the next
wizard screen.
Error TextFrom the Page Style screen, you can format error messages users may receive while working on your Web page. You can select fonts, text color, background color, and more.
Entering error message styles for your Web page
1. From the Page Style screen, in the Page section field, select “Error Text”.2. To use the page style you defined in Configure and Customize, mark Use defaults. To define a new style
for your Web page, unmark Use defaults. All options and fields on the screen are activated.
3. In the Error text frame, define the error text to use for your Web page.• Select the Font to use in your error text and enter the font size.• In the Text color field, select the color to use for the error text.• In the Back color field, select a background color to use behind your error text.
Note: A preview screen on the right side of the Page Style screen shows you how the selections you made will appear on your Web page.
Note: Although the examples included in this procedure are based on the Alumni Directory within NetDirectories, this procedure is applicable to any of the modules that feature a Page Style screen.

CH A N G I N G PA G E ST Y L E 39
• Mark Bold to bold the error text; mark Italics to italicize the error text.
4. Click Preview to visit a full-size sample page.5. Select another Page section to define. Or, if you completed this screen, click Next and move to the next
wizard screen.
Note: A preview screen on the right side of the Page Style screen shows you how the selections you made will appear on your Web page.

400 CH A PT E R

12chapter
Glossary
This section defines words and phrases you need to know as you work with NetSolutions. If you come across an unfamiliar term when reading this or any other section in The Raiser’s Edge documentation, make sure you check the online glossary in the help file.Adobe® Acrobat® Reader. Adobe® Acrobat® Reader is a third-party software application that enables electronic
distribution of formatted documents. Adobe® Acrobat® Reader can be downloaded free from the Adobe Web site.
ASP. ASP stands for Application Service Provider. An application service provider is a company offering individuals or enterprises access over the Internet to application programs and related services that would otherwise have to be located in their own personal or enterprise computers.
Assignment interest. An assignment interest is a task a volunteer expresses a desire to perform. For example, your organization is an aquarium. Rosa Shapiro lets you know she would like to help feed the seals or penguins. Because Rosa lets you know the tasks she is interested in, you can assign her to the jobs she enjoys. You can track volunteer assignment interests on the Volunteer tab of a constituent record.
Attribute. An attribute is a reporting tool you use to group information based on a common theme. With attributes defined, you can filter information to your specifications. Examples of The Raiser’s Edge attributes include account attributes, project attributes, transaction attributes, action attributes, vendor attributes, purchase order attributes, and invoice/credit memo attributes.
Batch. A batch is a group of debit and credit transactions you can post to your ledger accounts. By placing transactions into a batch, you can group transactions according to source, date, time, and function.
Batch validation. Batch validation is a process used to make sure your batches are in balance before posting. The program looks at each transaction to ensure that all required fields are entered and each entry meets certain requirements.
Bitmap. A bitmap is a scanned image. These images are saved with the *.bmp file name. For example, electronic signatures are saved as bitmaps.
Business rule. A business rule is a system-wide preference you set in Configuration to customize standard procedures and requirements. With business rules, you can control functions and displays affecting all users in the program.
Configuration. Configuration is a shared area of The Raiser’s Edge you use to set up your system and define settings to customize the program for individual users.
Constituent code. A constituent code defines the relationship a constituent has with your organization. In other words, a constituent code tells you why the individual is in your database. Examples of constituent codes are Board Member, Alumnus, Trustee, Current Parent, and Friend.
Contact. A contact is the name of the primary person with whom you conduct business. For example, you can enter contact information about a vendor on the Vendor tab of a vendor record, or you can enter contact information on the Banks tab of an open bank record.

402 CH A PT E R
Cookie. A cookie is information a Web site puts on your hard disk so it can remember something about you at a later time. It is a mechanism that allows the server to store its own information about a user on the user’s own computer.
Database. A database is a collection of information organized so that a computer program can quickly select desired pieces of data. It works much like an electronic filing system. Traditional databases are organized by fields, records, and files. A field is a single piece of information; a record is a set of fields; and a file is a collection of records.
Default. A default is a field entry you select on the Options screen to help increase the ease and speed of data entry by providing a preset value.
Default Set. A default set is a record of default transaction information you can create and load in a batch. Once loaded, the defaults appear on the record.
Dynamic query. A dynamic query is a query that refreshes and updates results automatically each time the query is run, providing the most current results.
Encryption. Encryption is the conversion of data into a form called ciphertext. Ciphertext cannot be easily understood by unauthorized people.
Field. A field is a data entry box in which you add and store information on records in your database.
Find Jobs button. Find Jobs is a button on the action bar on the Volunteer tab of a constituent record. You can use the Find Jobs button to automatically find multiple jobs and assign them to a volunteer. When you use the Find Jobs button, you can assign only those jobs having criteria that matches exactly criteria listed on the Volunteer tab.
Find Volunteers menu option. Tools, Find Volunteers is found on the menu bar of a job record. You can use Tools, Find Volunteers to automatically find multiple volunteers and assign them to a job. When you use Tools, Find Volunteers, you can assign only those volunteers having criteria that matches exactly criteria listed on the job record.
Firewall. A firewall is a set of related programs, located at a network gateway server, that protects the network resources from user on another network. A firewall works closely with the router program, examines each network packet, and determines if it is safe to forward the packet on to its destination in the network.
Gift of membership. A gift of membership describes a situation in which a constituent is the primary beneficiary of membership benefits, but is not responsible for the membership dues. For example, a parent can give a gift of membership to a child. The parent pays the membership dues, and the child benefits from the membership. The donor, or person paying the membership dues, and the member receiving the benefits must have a constituent record in your database.
Home page. The Home page is a feature common to all The Raiser’s Edge programs that provides a central location for quick and easy access to all areas of the program. Using links and tabs, you can customize your Home page to display records and functions you use most frequently.
Hypertext link. A hypertext link is text or a graphic in a help file or Web page that, when selected, takes you to another location. Hypertext links are typically blue and underlined.
HTTP. HTTP stands for Hyper Text Transfer Protocol. This protocol is most often used to transfer information from World Wide Web servers to browsers, which is why Web addresses begin with http://. This is also called Hypertext Transport Protocol.

GL O S S A R Y 40
HTTPS. HTTPS stands for Hyper Text Transmission Protocol Secure. This protocol is a Web protocol built into the browser that encrypts and decrypts user page requests as well as the pages that are returned by the Web server. For example, you visit a Web site and view a catalog. When you are ready to order, you are given a Web page order form with a URL that starts with https://. When you click Send, to send the page back to the catalog retailer, your browser's HTTPS layer encrypts the page. The acknowledgement you receive from the server also travels encrypted, arriving with an https:// URL. The page is decrypted for you by your browser's HTTPS sublayer.
Job. A job is a task, or miscellaneous piece of work, assigned to a volunteer of your organization. For example, your organization is a hospital and you run a gift shop. You have volunteers who come in to run the cash register and volunteers who come in to stock shelves. You have several volunteers who come in to create gift baskets and another volunteer who helps with computer data entry. Each of these tasks, performed by a volunteer, is a volunteer job.
Job assignment. A job assignment is a record you create when you assign a volunteer to a job. You can manually find a job and assign it to a volunteer by using the New Job Assignment button on the Volunteer tab of his constituent record or you can automatically find jobs and assign them to a volunteer by using the Find Jobs button on the same tab. For added convenience, you can also automatically find volunteers and assign them to a job by using Tools, Find Volunteers from the menu bar of the job record itself.
Lifetime membership. You can establish and track lifetime memberships for your constituents. Once you set up a lifetime membership, you can always track membership information, even after the constituent is deceased. Lifetime memberships do not expire, nor do they receive membership renewals.
Media. Media is any stored information related to a record, such as an article, media clip, or image file.
Membership benefit. A membership benefit is a bonus your organization gives to constituents depending on their level of membership or the dues they pay. For example, you may give discounts in your gift shop and free passes to your museum with each family membership. You can determine the membership benefits associated with each membership category in advance or you can enter this information from the membership record.
Membership category. A membership category defines the level of giving required for a constituent to gain membership into one of your membership groups or clubs. Membership categories can be linked to a specific membership program. For example, a zoo may have the categories of Junior Curator and Young Explorer under the Kid’s Club membership program. While dues for a Young Explorer are $15, a member of the Junior Curator category, the next level of membership in the Kid’s Club program, pays $25 in dues.
Membership program. A membership program is the overall umbrella description for a group of membership categories. For example, a museum may have an Arts Program with membership categories of Individual, Student, Family, Sustainer, and Patron.
Membership record. The membership record is the record in which constituent membership information is stored and maintained. The membership record is composed of three tabs: the Membership tab, the Membership History tab, and the Attributes/Notes tab.
Membership standing. A membership standing is used to describe the status of a specific membership. The membership standing appears in the top right-hand corner of a membership record and changes when the membership expires or a membership transaction is entered and saved. The membership standings are New, Active, Lapsed, and Dropped. In User Options, you can also change the color or style of print for the membership standing as it appears on the membership record for easy reference.
Membership subcategory. A membership subcategory defines, more specifically, the member’s area of interest. For example, a zoo with a Junior Curator category in the Kid’s Club program may also have the subcategories of Lion, Panda, Koala, Polar Bear, and Sea Turtle, to which each member who is most interested in that animal belongs.

404 CH A PT E R
Membership transaction. A membership transaction is used to describe the separate membership activities comprising a membership record. The activities can include adding, renewing, rejoining, upgrading, downgrading, and dropping a membership. For example, in February 2002, you add an individual membership for Mr. David Murphy. In January 2003, David decides to renew his membership. In this case, you made two separate transactions for David’s membership record.
Option. An option is a preference you select that specifies defaults in The Raiser’s Edge. Options are password-specific and follow the user, regardless of the workstation he logs into.
Password. A password is a series of typed characters required to access a computer program. This prevents unauthorized users from entering the program.
PDF (Portable Document Format). A PDF is a type of document viewed with Adobe® Acrobat® Reader that maintains its formatting and displays correctly on any output device. For example, The Raiser’s Edge user guides are saved as PDFs and can be printed or accessed from the Help file, Online Manual page of the program, or the installation CD. PDF files contain hyperlinks so you can jump from topic to topic.
Preferences. See “Option” on page 404.
Qualification. A qualification is a skill, experience, course, or training a volunteer must have to qualify, or be accepted, as a volunteer for the jobs at your organization. For example, your humanitarian organization is looking for people with certain talents to help build homes for families in need. You are looking for volunteers with carpentry, plumbing, roofing, and painting skills. Your organization runs a health clinic and you are looking for volunteers with medical experience. Your organization requires that volunteers take a Health and Sanitation class before they start work in your soup kitchen or attend a Volunteer Orientation training session before they start any job. All these things are qualifications.
Query. Query is the means by which you flag, group, and list selected records from your database. You can create dynamic and static queries specific to key areas of The Raiser’s Edge based on a set of criteria you define. Although queries group entire records, you can limit and sort the output information included in query results. You can use saved queries to limit the information processed in Records, Mail, and other areas of The Raiser’s Edge. Using queries in this manner reduces data processing time.
Query format. Queries can be created in one of two formats: Dynamic and Static. Static queries search the database and generate a list of records that match the specified criteria at a specific point in time. Dynamic queries search the database and return records that match the criteria using the current database of information.
Query type. Query types correspond to specific application records. These vary according to the program you are using. Your selection identifies the record type you want to query and makes a list of that record’s fields available for filtering, output, and sorting.
Record. A record is a page in The Raiser’s Edge from which you add, edit, and delete information such as names, addresses, relationships, gifts, memberships, events. Records is also an area in The Raiser’s Edge where you can manage records.
Renewal Notice. If you have Membership Management, you can print renewal notices for memberships that have lapsed or will lapse. Sending renewal notices can increase your membership retention rate. For example, last year John Smith donated $50 to become a member of Friends of the Orchestra. His membership is scheduled to expire in three months. You can send him a renewal notice to encourage and remind him to extend his membership an additional year. If you do not send a renewal notice, John may forget to extend his membership or decide it is not worth the trouble to contact you again.
Security. Security is a shared area in The Raiser’s Edge in which you establish access rights for users. With Security you can control what specific groups of users are allowed to view, add, edit, or delete information.
Security group. A Security group is a group of users you define in Administration. You control security in The Raiser’s Edge by creating groups with specific rights and assigning users to groups based on how much system access you want them to have. You can edit the rights of existing groups.

GL O S S A R Y 40
Server. A server is a powerful computer or processor dedicated to managing disk drives, printers, or network traffic. Servers are often dedicated, meaning they perform no tasks other than server tasks. For example, a dedicated database server for processing database queries has no other functions besides processing the queries.
Shared component. A shared component is a feature shared by all The Raiser’s Edge programs and modules.
Shared table. A shared tables is a table common throughout The Raiser’s Edge.
Shell. The shell is a central area from which you can access all areas of The Raiser’s Edge. When you click a link to access an area, it appears as a page in the shell.
Shortcut menu. A shortcut menu is a list of commonly used commands you can select to quickly perform actions or to display properties. Open, Delete, Print, and Properties are common shortcut menu items. To access shortcut menus, place your cursor in a field or grid and click the right mouse button.
Special need. A special need indicates a volunteer’s special consideration or request that can prevent her from being assigned to a job. For example, Rebecca Schmidt, a volunteer at your organization, lets you know she needs you to provide a baby-sitting service before she can volunteer at your upcoming phonathon. You are not providing a baby-sitting service at this event. On the Details tab of the phonathon job record, you enter Baby-Sitting Service so you can eliminate any volunteer having this special need. On the Volunteer tab of Rebecca’s constituent record, you enter Baby-Sitting Service as a special need. When you assign volunteers to the phonathon jobs, Rebecca will potentially be eliminated because the special needs match. Special needs are beneficial for you and your volunteers because they help you schedule volunteers’ work appropriately.
SSL. SSL stands for Secure Sockets Layer. It is designed to provide secure communications on the Internet.
Static query. A static query is a query that provides a record of query output that existed at the time you established the query. If you run a report two months later using the same query, the system restricts the new output to only the records from the original query. Data entered after the original query is disregarded.
Status bar. The status bar is a horizontal strip at the bottom of a screen that displays important messages to assist you in the program. For example, when the cursor is in a field with a table lookup available, “Press F7 for Table Lookup” appears in the status bar.
Tab. A tab is a design element that appears at the top of some screens in The Raiser’s Edge. Tabs work to separate options into themed groups. For instance, you will find formatting options on various system Format tabs.
Table. A table is a field in which you can pre-define entries to save time and promote consistency for your data entry.
Table lookup. A table lookup is a table from which you can select and enter information into fields to speed data entry. To access a table lookup, place your cursor in a lookup field and press F7.
Title bar. A title bar is a horizontal strip at the top of a screen that identifies a program or file.
Toolbar. A toolbar is a horizontal strip with buttons that, when clicked, perform specific tasks. It is located under the title bar at the top of a screen. Common toolbar buttons include New, Open, Save, and Print.
Transaction Log. Also called a “Change File,” this file records transactional changes occurring in the database, providing a basis for updating a master file and establishing an audit trail.
Tree View. A tree view is a hierarchical list used throughout The Raiser’s Edge. Tree Views differ from standard lists in that items in a tree view contain branches represented by dotted lines. Some tree views automatically display all branches; for others you must click a plus sign to view the branches.
URL. URL stands for Uniform Resource Locator (formerly Universal Resource Locator). This is an Internet address which tells a browser where to find an Internet resource. For example, the URL for Blackbaud is http://www.blackbaud.com/.
User option. See “Option” on page 404.

406 CH A PT E R
Volunteer. A volunteer is a person who voluntarily undertakes a task, or a specialized piece of work, for an organization and expects no pay in return. For example, your organization holds a Spring Gala every year. Several members of the community help you plan the gala. Others help you decorate, send out invitations, and hire entertainment. You hold a golf tournament and two individuals offer to take event photos for your newsletter. A group of people come to your organization on a weekly basis to help with office work and computer data entry. You are sending out a membership mailing and a group of people volunteer to fold letters and stuff envelopes. The individuals who give their time to your organization and request no pay in return are volunteers.
Volunteer availability. The dates, days, and times each volunteer is available to work is the volunteer availability. For example, James Rooney, a volunteer at your animal shelter, lets you know he is available to work every Friday this year, from 8:00 a.m. until noon. You can track volunteer availability on the Volunteer tab of a constituent record.
Volunteer status. Volunteer status denotes whether a volunteer is active or not. A volunteer can have multiple statuses. For example, Shannon Thompson, a volunteer at your organization, is assigned two volunteer types: Gift Shop Staff and Business Office Staff. Shannon is currently working in the gift shop and has discontinued working in your business office. She worked in your business office regularly last year. In the Volunteer Types grid, you can assign the status of Active in the Status column on the same row as the Gift Shop Staff type and a status of Inactive on the same row as the Business Office Staff type.
Volunteer type. Volunteer type denotes the capacity in which a volunteer can serve your organization. For example, Ashley Ziegler, a volunteer with your organization, works in your gift shop. You assign a Type of “Gift Shop Staff” in the Volunteer Types grid on the Volunteer tab of her constituent record. A volunteer can be multiple types. For example if Ashley also starts volunteering in your business office, you can add another Type of “Business Office Staff” in the Volunteer Types grid.
XML. XML stands for eXtensible Markup Language. This language is used to structure and describe data that a broad range of applications can understand. XML is a meta language; it describes other languages. For example, it works much like grammar, which describes language with verbs, subjects, adjectives, etc. A data-centric language, XML describes the kind of information in a document, unlike standard languages, such as HTML that tell only how the document should look.

Index
Aaccepting corporate donations online 80accepting honor/memorial donations online 81accepting online comments 83account information tab 15, 24adding
advocacy link to e-mail message 120alumni directory to Web site 172change of address link to e-mail message 119constituent directory to Web site 195constituent registration page link to e-mail
message 108directory page link to e-mail message 113donation page link to e-mail message 109donor recognition page 205e-mail address links to e-mail message 122event page link to e-mail message 111event page to Web site 140home page link to e-mail message 106home URL to web page 29images to e-mail message 124job page link to e-mail message 115jobs to Web site 236membership information to Web site 262membership page link to e-mail message 116mission statement to web page 29professional directory to Web site 183volunteer registration form to Web site 223Web page link to e-mail message 123
additional links 247events 154memberships 285NetVolunteers 233
additional links tab 21, 49additional links, NetDonors 86address
adding change of address link to e-mail 119downloading change of address information 346
addressee/salutationalumni directory 176, 198constituent directory 198donor recognition page, publishing online 207professional directory 187
advocacy information, downloading 337advocacy link, adding to email message 120alignment
default styleimage caption, Web page 33
title 32NetDirectories
image caption 391title 390
allow donor to specify another amount 77allow donors to create accounts 26allow participants to register online 145allow registrants to enter comments with their
registration fee 145alumni directory
publishing onlineaddressee/salutation information 176, 198constituent query 174contact detail 180create static query 174directory content 175directory name 174e-mail 180header 179image/caption 179layout 179link text 180school 174search 179
appeal to credit 68, 151, 281application service provider, defined 401ASP, see Application Service Providerassignment interest, defined 401attribute to use
configure and customize 49NetDonors 86NetEvents 154NetMembers 284NetVolunteers 233, 247
availability, collecting information 229available fields 106
Bback color 31
NetDirectories 389background
default style 30NetDirectories 389
background colordefault style
body text, Web page 36detail text, Web page 35

408
detail, Web page 35error text, Web page 40header text, Web page 34header, Web page 34image caption, Web page 33table headers, Web page 38table legend, Web page 37table row headers, Web page 38title 32
NetDirectoriesbody text 394detail 393detail text 393error text 398header 392header text 392image caption 391table headers 396table legend 395table row headers 396title 390
body textdefault style 36NetDirectories 394
bounce back e-mail addresses 355browser cookies 27buttons
Configure and Customize 23NetDirectories 171NetDonors 62NetEvents 139NetMail 102NetMembers 261NetVolunteers 223
Ccaption
NetDirectories 391Web page images 33
caption column 50captions, entering 64, 225change of address link, add to Home page 54change of address, see addresscollect availability information 229collect interest information 229comments, online 83Configure and Customize
account information tab 15Additional Links tab 21close button 23donor profiling tab 20home page tab 19organization information tab 17requirements 13site customization defaults tab 18site map/links tab 23
submit button 23submit information to Blackbaud 56tell a friend tab 22
configuring web pages 11constituent code, defined 401constituent code, selecting default 78constituent directory
publishing onlineaddressee/salutation 198constituent query 196contact detail 201create static query 196directory content 197directory name 196e-mail 202header 201image/caption 201layout 201link text 201search 201
constituent registration pagedesigning home page links 42downloading information 341e-mail, adding link to 108
contact information, designing home page link 48cookie, defined 402copying e-mail message 130corporate online donations, accepting 80credit card information, saving 27customize layout button 368
NetEvents 150NetVolunteers
jobs page 242volunteer registration page 228
customize receipts/messagesadd links 373compose message 368default start page 373e-mail address 383explained 368image 385netdirectory link 379netdonor link 375netevent link 377netmembers link 381netvolunteers link 380sign-up/prospecting page 374web page 384
customizing web pages 11customizing, see designing
Ddefault
constituent code 78fund 29gift code 79

I N D EX 409
start page 107default start page, customize receipts/messages 373default styles 29deleting
donation page 92donor recognition page 214e-mail file 131job page 251membership page 290online directory 214online event 159
designations, NetDonors 65designing
donations page 62NetSolutions web pages 23receipt
NetEvents 150NetMembers 278
detaildefault style 35NetDirectories 393
detail textdefault style 35NetDirectories 393
directory pagealumni, publishing online 171constituent, publishing online 194deleting 214designing home page link 45donor recognition page, publishing online 205e-mail, adding link to 113professional, publishing online 183publishing online
alumni 172constituent 195professional 183
statistics 215viewing online 213
donation page 57allow anonymous 82deleting 92designing 62designing home page link 43downloading corporate donations 305downloading individual donations 300downloading transactions with tribute
information 314e-mail, adding link to 109recurring direct debit gifts 312statistics 93viewing online 90
donation page email address 79donor profiling
NetMembers 282NetVolunteers 232
donor profiling questionconfigure and customize 49NetDonors 86
NetEvents 154NetMembers 284NetVolunteers 233, 247
donor profiling tab 20, 22, 48donor profiling, NetDonors 84donor recognition page
deleting 214publishing online 205
contact detail 210directory name 206e-mail 210header 209image/caption 209layout 209link text 210publishing online, addressee/salutation
information 207record name 206search 209
viewing online 213download constituent code, setting default 78Download Transactions
advocacy information 337change of address information 346constituent registration information 341donation page
corporate donations 305individual donations 300recurring direct debit gifts 312tribute information 314
e-mail opt-out information 352e-mail undeliverable information 355event page 319export downloaded data 360export downloaded data to Excel 359job page 324membership information 329opening 297print data from grid 362search grid 364
downloading transactions 295
Eedit event button 139edit job button 223edit membership category button 261e-mail
addingaddress links 122advocacy link 120change of address link 119constituent registration page link 108directory page link 113donations page link 109event page link 111home page link 106

410
images 124job page link 115membership page link 116web page 123
copying message 130creating in NetMail 103deleting 131statistics 128submitting 126
e-mail address, customize receipts/messages 383e-mail correspondence 27e-mail opt-out, downloading information 352email type 105e-mail undeliverable, downloading information 355encryption, defined 402enter the code to use when adding donations 79enter the code to use when creating a new
constituent record for a donor 78enter the code to use when creating a new
constituent record for a volunteerjob page 242volunteer registration page 227
enter the fund to use when creating registration fee gifts 148
error textdefault style 40NetDirectories 398
eventNetEvents 135
event name 149event page statistics 161events page
allow anonymous registration payment 148deleting 159designing home page link 44downloading transactions 319e-mail, adding link to 111publishing online 140viewing online 158
export downloaded data 360export downloaded data to Excel 359export file name 361export file type 361eXtensible markup language, defined 406
Ffind first 365find in grid 364find jobs button 402find next 365find volunteers menu option 402find what 365firewall, defined 402font
default stylebody text, Web page 36
detail text, Web page 35detail, Web page 35error text, Web page 40header text, Web page 34header, Web page 34image caption, Web page 33table headers, Web page 38table legend, Web page 37table row headers, Web page 38table text, Web page 39title 32
NetDirectoriesbody text 394detail 393detail text 393error text 398header 392header text 392image caption 391table headers 396table legend 395table row headers 396table text 397title 390
frequency, giving level 76from 105fund to credit 66
Ggift code, selecting default 79gift membership
defined 402downloading 332
gift membership, allowing on Web page 273gift types
NetDonors 69NetMembers 270
Hheader
default style 34NetDirectories 392
header textdefault style 34NetDirectories 392
home page tab 19, 40home page, adding link in e-mail message 106home URL, adding to web page 29honor/memorial donations, accepting online 81honor/memorial information, downloading 314HTTP, see hyper text transfer protocolhyper text transfer protocol, defined 402hyper text transmission protocol secure, defined
403

I N D EX 411
hyperlink 31, 389hyperlink color
default style 31NetDirectories 389
IIATS, entering account information 5image
customize receipts/messages 385image caption
default style 33NetDirectories 391
image column 50image/caption
donation page, adding to 64, 225events page, adding to 149job page, adding to 240membership page 276
images, adding to e-mail message 124interest, collecting information 229internet merchant account
events 155memberships 286requirements 59
Jjob
adding to Web site 236defined 403deleting online page 251downloading transactions 324e-mail, adding link to 115qualifications, adding to Web site 244viewing online page 250
job assignment, defined 403job name 239job profiling 245
Llevel amount 76lifetime membership, defined 403limit the maximum number of participants that can
register online 146link properties 53logging into NetSolutions 24logo
default styletitle 32
Mmatch field 365membership
allow anonymous 268allow donor to select subcategory 267allow gifts of membership 273allow the donor to enter comments with their
membership dues 268benefits 273credit card gifts 269, 271deleting online page 290e-mail, adding link to 116pledges 269, 271renewal notices 274statistics 292viewing online page 289
membership benefits, defined 403membership category
defined 403editing from NetMembers 264selecting 264
membership pagedesigning home page link 47
membership page, downloading information 329membership program, defined 403membership record, defined 403membership standing, defined 403membership subcategory, defined 403membership transaction, defined 404merchant account, NetDonors 87minimum online donation, set 27miscellaneous, NetDonors 77mission statement, adding to web page 29multiple event publishing 142
Nname 105NetDirectories 165
deleting an online directory 214deleting donor recognition page 214new directory button 171opening 168publishing a directory online
alumni 172constituent 195professional 183
publishing a donor recognition page 205requirements 167viewing donor recognition page 213viewing online directory 213
netdirectory link, customize receipts/messages 379netdonor link, customize receipts/messages 375NetDonors 57
additional links 86deleting a donation page 92

412
designations 65designing donation page 62donor profiling 84gift types 69merchant account 87miscellaneous 77new page button 62page customization 63requirements 59sources 67, 69, 75, 77statistics button 62viewing donation page 90working with The Raiser’s Edge 59
netevent link, customize receipts/messages 377NetEvents 135
additional links 154deleting an online event 159edit event button 139internet merchant account, change 155new event button 139opening 136publishing an event online 140requirements 136viewing online event 158working with The Raiser’s Edge 136
NetMail 97adding
advocacy link 120change of address link 119directory page link 113donations page link 109e-mail address link 122event page link 111home page link 106images 124job page link 115membership page link 116online registration page link 108web page links 123
composing e-mail message 103copying e-mail message 130deleting e-mail 131new e-mail button 102new e-mail message 103opening 100requirements 99save and close button 102sending e-mail 126statistics 128submit button 102
NetMembers 257additional links 285allow donor to select subcategory 267allow gifts of membership 273allow the donor to enter comments with their
membership dues 268benefits 273credit card gifts 269, 271
default gift amount 267deleting membership page 290gift types 270image/caption, adding 276internet merchant account, change 286member profiling 282message, including with gift of membership 274opening 259page style 277pledges 269, 271publishing membership information online 262renewal notices 274requirements 259sources 280viewing membership page 289
netmembers link, customize receipts/messages 381NetSolutions
Blackbaud Payment Service 13configuring web pages 11credit card processing 13customize web pages 11downloading transactions 295NetDirectories 165NetDonors 57NetEvents 135NetMail 97registering 1site map/links 52
NetSolutionsdesigning web pages 23logging in 24
NetVolunteers 217additional links 233, 247deleting job page 251job profiling 245jobs, adding to Web site 236opening 220requirements 219viewing job page 250volunteer profiling 232volunteer registration forms, publishing 223
netvolunteers link, customize receipts/messages 380
new directory button 171new event button 139new job button 223new membership button 261new page button 62nonprofit registration information form 4, 8
Oonline designation 66online source 68, 151, 281opening
Configure and Customize 14Download Transactions 297

I N D EX 413
NetDirectories 168NetDonors 60NetEvents 136NetMail 100NetMembers 259NetVolunteers 220
organization information tab 17, 28
Ppage customization, NetDonors 63page header
account information 29home page 41
page name 64page section
home pagecontact 48directories 45donations 43events 44membership 47page header 41registration 42volunteer 46
NetDirectoriesbackground 388body 394detail 393error 398header 392image 391logo and title 390table header 396table legend 395table text 397
site customization defaultsbackground 30body text 36detail 35error 40header 34image 33logo and title 32table headers 38table legend 37table text 39
page styleNetMembers 277
Page Style Customization 387phone types, setting 27preview receipt button 368price (gift amount), defined 148primary contact information form 5, 9print downloaded data from grid 362privacy link, include on donation pages 27professional directory
publishing onlineaddressee/salutation 187constituent query 184contact detail 191create static query 185directory content 186directory name 185e-mail 191header 190image/caption 190layout 190link text 191search 190
publishmultiple events 142
publishing multiple events 142
Qqualifications
adding to job page 244defined 404
RRaiser’s Edge, The
NetDonors, working with 59NetEvents, working with 136NetVolunteers, working with 217
RE Membership Recipient column 332receipt amount, defined 148receipt, customize
NetEvents 150NetMembers 278NetVolunteers
jobs page 242volunteer registration page 228
recurring direct debit gifts, downloading 312registering NetSolutions 3registration form, volunteers 223registration link from home page 42removing, see deletingremoving, see deletingrenewal notices 274requirements
Configure and Customize 13NetDirectories 167NetDonors 59NetEvents 136NetMail 99NetMembers 259
Ssearch download grid 364

414
secure sockets layer, defined 405security 2select constituent code to use when creating a
constituent record 146select event 141select export 104select job 238sending e-mail 126server, test connection to 24sign-up/prospecting page, customize
receipts/messages 374site customization defaults tab 18, 30site map/links 52site map/links tab 50, 52source header 68, 151, 281sources
NetMembers 280sources, NetDonors 67, 69, 75, 77special need, defined 405statistics
directories page 215donation page 93Download Transactions 25events page 161membership page 292NetDonors 62NetEvents 139NetMail 128NetMembers 171, 261NetVolunteers 223volunteer page 253
subject 105submitting e-mail message 126submitting information to Blackbaud 56
Ttable headers
default style 38NetDirectories 396
table legenddefault style 37NetDirectories 395
table row headersdefault style 38NetDirectories 396
table textdefault style 39NetDirectories 397
tabsaccount information 24additional links 49Configure and Customize, overview 15donor profiling 48home page 40organization information 28site customization defaults 30
site map/links 50, 52tell a friend 50
tell a friend tab 50test server connection 24text color
default stylebody text, Web page 36detail text, Web page 35detail, Web page 35error text, Web page 40header text, Web page 34header, Web page 34image caption, Web page 33table headers, Web page 38table legend, Web page 37table row headers, Web page 38table text, Web page 39title 32
NetDirectoriesbody text 394detail 393detail text 393error text 398header 392header text 392image caption 391table headers 396table legend 395table row headers 396table text 397title 390
titledefault style 32NetDirectories 390
transactions, tracking 25tributes, downloading 314
Uuniform resource locator, defined 405unit, defined 148universal resource locator, see uniform resource
locatorURL column 50URL, see uniform resource locatoruse custom receipt layout 150
Vvisited link 31, 389visited link color
default style 31NetDirectories 389
volunteeravailability 406defined 406

I N D EX 415
job, publishing to Web site 236registration form, adding to Web site 223status 229, 406type 229, 406
volunteer information, see job informationvolunteer page, designing home page link 46volunteer page, statistics 253
Wweb page
job, adding 236membership information, adding 262title
font 32volunteer registration form, adding 223
web page link, customize receipts/messages 384web site
adding a directoryalumni 172constituent 195professional 183
adding a donor recognition page 205adding an event 140designing 23download
advocacy information 337change of address information 346constituent registration information 341corporate donations 305donations with tribute information 314e-mail opt-out information 352e-mail undeliverable information 355event information 319individual donations 300job information 324membership information 329recurring direct debit gifts 312
e-mail, links 123
XXML, see eXtensible markup language

416