Embed Size (px)
Citation preview

NETePay 5.0 Installation & Configuration Guide
SecureNet With Dial Backup
Part Number: 8711.60
NETePay 5.0 for SecureNet with Dial Backup 2
NETePay Installation & Configuration Guide Copyright © 2010 Datacap Systems Inc. All rights reserved.
This manual and the hardware/software described in it are copyrighted materials with all rights reserved. Under copyright laws, the manual and the information contained in it may not be copied, in whole or in part, without written consent from Datacap Systems, Inc except as may be required in normal use to make a backup copy of the software. Our policy of continuous development may cause the information and specifications contained herein to change without notice.
Datacap, Datacap Systems, NETePay, DIALePay, DSIClient, DSIClientX, DSIEMVClientX, ePay Administrator, IPTran, TwinTran, DialTran, DataTran are trademarks of the Datacap Systems Inc.
Microsoft, Windows NT 4.0, Windows 2000 Professional, Windows XP, Windows Server 2003, Windows Server 2008, Windows Vista and Windows 98 are registered trademarks of the Microsoft Corporation.
Other products or company names mentioned herein may be the trademarks or registered trademarks of their respective companies.
Revised: 18 August 2010
Version Support This document supports the following application versions:
NETePay, Version 5.00 SecureNet (VITAL)
DSIClientX, Version 3.85
DSIClient Transaction Utility, Version 2.50
ePay Administrator for NETePay, Version 4.00
Payment Processor Support This document supports the following payment processor:
SecureNet (VITAL) with Dial Backup

NETePay 5.0 for SecureNet with Dial Backup 3
CONTENTS
OVERVIEW ................................................................................................................................................................. 5
INTRODUCTION ........................................................................................................................................................... 5 About NETePay with Dial Backup......................................................................................................................... 5
WHAT’S INCLUDED ON YOUR CD ............................................................................................................................... 5 HOW IT WORKS ........................................................................................................................................................... 6
SECURITY IMPLEMENTATION GUIDELINE.................................................................................................... 7 INTRODUCTION ........................................................................................................................................................... 7 ACCESS CONTROL....................................................................................................................................................... 8 REMOTE ACCESS CONTROL ........................................................................................................................................ 8 WIRELESS ACCESS CONTROL ..................................................................................................................................... 9 NETWORK ENCRYPTION............................................................................................................................................ 10 NETWORK SECURITY ................................................................................................................................................ 10 NETEPAY COMPLIANCE ........................................................................................................................................... 10 BASELINE SYSTEM CONFIGURATION ........................................................................................................................ 11 ADDITIONAL SYSTEM SECURITY RECOMMENDATIONS............................................................................................. 11 POS SYSTEM CONSIDERATIONS ............................................................................................................................... 12 REMOVAL OF HISTORICAL DATA.............................................................................................................................. 12 INFORMATION HANDLING AND COLLECTION CRITERIA............................................................................................ 12 SECURITY ACTION PLAN........................................................................................................................................... 13 IMPLEMENTATION GUIDE REVIEWS AND UPDATES .................................................................................................. 13 DEVELOPMENT AND DEPLOYMENT OF SECURITY UPDATES ..................................................................................... 14 MORE INFORMATION ................................................................................................................................................ 14
INSTALLATION ....................................................................................................................................................... 15 INTRODUCTION ......................................................................................................................................................... 15 REQUIREMENTS ........................................................................................................................................................ 15
Baseline System Configuration ............................................................................................................................ 15 Network Requirements ......................................................................................................................................... 16
INSTALLATION PROCEDURES .................................................................................................................................... 16 Accessing the NETePay CD-ROM....................................................................................................................... 16 Installing/Upgrading Microsoft Internet Explorer .............................................................................................. 18 Installing MSDE (Required for Windows 2000, XP, Windows Server 2003) .................................................... 18 Installing SQL Express 2005 (Required for Windows Vista, Windows Server 2008)........................................ 18 Installing SQL Express 2008 (Required for Windows Vista, Windows 7) ......................................................... 19 Installing NETePay (Required)............................................................................................................................ 19 Installing DSIClient Application (Optional) ....................................................................................................... 19 Installing ePay Administrator for NETePay (Required)...................................................................................... 20 Installing Datacap DialLink modem (Required for Dial Operations)................................................................. 21
NETEPAY CONFIGURATION............................................................................................................................... 22 INTRODUCTION ......................................................................................................................................................... 22 ACTIVATION AND PARAMETER DOWNLOAD............................................................................................................. 22 TESTING.................................................................................................................................................................... 31

NETePay 5.0 for SecureNet with Dial Backup 4
OPERATIONAL CONSIDERATIONS.............................................................................................................................. 31 USING THE DSICLIENT TRANSACTION UTILITY TO TEST NETEPAY SERVER................................. 32
INTRODUCTION ......................................................................................................................................................... 32 Supported Transaction Types............................................................................................................................... 32
DSICLIENT TRANSACTION UTILITY SETUP .............................................................................................................. 33 Verifone 2000 PIN pad Setup............................................................................................................................... 35 PDC Setup............................................................................................................................................................ 36
PROCESSING TEST TRANSACTIONS ........................................................................................................................... 38 USING THE NETEPAY - DATABASE MANAGER ............................................................................................ 40
INTRODUCTION ......................................................................................................................................................... 40 Maintenance Functions........................................................................................................................................ 40
USING THE NETEPAY DATABASE MANAGER........................................................................................................... 41 INDEX......................................................................................................................................................................... 48

NETePay 5.0 for SecureNet with Dial Backup 5
CHAPTER 1 OVERVIEW
Introduction About NETePay with Dial Backup Developed by Datacap Systems, NETePay enables retail, restaurant and other businesses to perform fast electronic payment authorizations via the Internet. NETePay also incorporates automatic dialup backup direct to the processing host in the event of an Internet outage. The dial backup operation is completely automatic and switches back to Internet operation without operator intervention.
NETePay is multi-threaded to accept simultaneous requests from multiple clients, and scalable so that customers can configure their store systems to fit their requirements and get the most favorable rates from their payment service.
NETePay is available in two versions: SL and ML. The SL (Single Lane) version is designed for single station, non-LAN POS systems; the ML (Multi Lane) version is designed for multiple POS stations on a LAN. This User Guide is applicable to both versions.
What’s Included on your CD The NETePay CD-ROM includes client and server applications for Windows 2000, XP and Vista Business Edition operating systems for both single and multi-pay point users.
• NETePay with Dial Backup – server-side software that enables you to process payment authorization requests via the Internet or other TCP/IP Virtual Private Network (VPN) services.
• DSIClientX – an ActiveX control that integrates with a Point of Sale application and sends encrypted payment authorization requests from client machines on a LAN to NETePay for processing. DSIClientX also includes a utility program to enter test payment transactions called DSIClient.
• ePay Administrator for NETePay – a software application that provides payment transaction batch management. You can also use ePay Administrator to enter and process payment transactions.
For more information about using ePay Administrator for NETePay, see the ePay User Guide
• Microsoft MSDE Database Engine – this software provides database services to NETePay and ePay Administrator using Microsoft MSDE for Windows 2000 and XP users.
• SQL Express 2005 - this software provides database services to NETePay and ePay Administrator using Microsoft SQL Express for Windows Vista or Windows Server 2008 users.
NETePay 5.0 for SecureNet with Dial Backup 6
• SQL Express 2008 - this software provides database services to NETePay and ePay Administrator using Microsoft SQL Express for Windows Vista and Windows 7 users.
• Microsoft Internet Explorer 6.0 – this version (or later) of Microsoft Internet Explorer will ensure that you can install the necessary encryption capability required for NETePay.
How it works NETePay is an application that resides on a server (either at the store level or remotely, at the enterprise level) monitors encrypted transaction requests from client machines using a POS or restaurant application integrated with DSIClientX, Datacap’s XML ActiveX control.
When NETePay receives an encrypted transaction request from a client machine, it sends the request to the bankcard processor for approval via the Internet or PSTN dialup direct to the processing host. The transactions are then stored in a database that resides on the server. NETePay makes use of 128-bit encryption to provide secure transactions over the Internet.
By using ePay Administrator, you can view the transactions, settle and close batches, generate reports and process payment transactions. For more information about using ePay Administrator, see the ePay Administrator User Guide.
Single Remote Client

NETePay 5.0 for SecureNet with Dial Backup 7
CHAPTER 2 SECURITY IMPLEMENTATION GUIDELINE
Introduction
Systems which process payment transactions necessarily handle sensitive cardholder account information. The card associations (VISA, MasterCard) have developed security standards for handling cardholder information in a published document named Payment Card Industry (PCI) Data Security Standard (DSS).
The security requirements defined in the standard apply to all members, merchants, and service providers that store, process or transmit cardholder data.
The PCI Data Security Requirements apply to all system components which is defined as any network component, server, or application included in, or connected to, the cardholder data environment. Network components, include, but are not limited to, firewalls, switches, routers, wireless access points, network appliances, and other security appliances. Servers include, but are not limited to, Web, database, authentication, Domain Name Service (DNS), mail, proxy, and Network Time Protocol (NTP). Applications include all purchased and custom applications, including internal and external (Web) applications.
The following 12 Requirements comprise the Payment Card Industry Data Security Standard.
Build and Maintain a Secure Network 1. Install and maintain a firewall configuration to protect data 2. Do not use vendor-supplied defaults for system passwords and other security parameters
Protect Cardholder Data 3. Protect Stored Data 4. Encrypt transmission of cardholder data and sensitive information across public networks
Maintain a Vulnerability Management Program 5. Use and regularly update anti-virus software 6. Develop and maintain secure systems and applications
Implement Strong Access Control Measures 7. Restrict access to data by business need-to-know 8. Assign a unique ID to each person with computer access 9. Restrict physical access to cardholder data
Regularly Monitor and Test Networks 10. Track and monitor all access to network resources and cardholder data 11. Regularly test security systems and processes
Maintain an Information Security Policy 12. Maintain a policy that addresses information security

NETePay 5.0 for SecureNet with Dial Backup 8
Access Control
The PCI standard requires that access to all systems in the payment processing environment be protected through use of unique users and complex passwords. Unique user accounts indicate that every account used is associated with an individual user and/or process with no use of generic group accounts used by more than one user or process. Additionally any default accounts provided with operating systems, databases and/or devices should be removed/disabled/renamed if possible, or at least should have complex passwords and should not be used. Examples of such default administrator accounts include administrator (Windows systems), sa (SQL/MSDE), and root (UNIX/Linux).
The PCI standard requires the following password complexity for compliance:
• Passwords must be at least 7 characters • Passwords must be include both numeric and alphabetic characters • Passwords must be changed at least every 90 days • New passwords can not be the same as the last 4 passwords
Below are the other PCI account requirements beyond uniqueness and password complexity:
• If an incorrect password is provided 6 times the account should be locked out • Account lock out duration should be at least 30 min. (or until an administrator resets it)
• Sessions idle for more than 15 minutes should require re-entry of username and password to reactivate the session.
These same account and password criteria must also be applied to any applications or databases included in payment processing to be PCI compliant.
Remote Access Control
The PCI standard requires that if employees, administrators, or vendors can access the payment processing environment remotely; access should be authenticated using a 2-factor authentication mechanism (username/ password and an additional authentication item such as a token or certificate).
In the case of vendor remote access accounts, in addition to the standard access controls, vendor accounts should only be active while access is required to provide service, should include only the access rights required for the service rendered, and should be robustly audited.
Access to hosts within the payment processing environment via 3 rd party remote access software such as Remote Desktop (RDP)/Terminal Server, PCAnywhere, etc. requires that when such programs are used that there sessions are encrypted with at least 128 bit encryption (this requirement is in addition to the requirement for 2-factor authentication required for users connecting from outside the payment processing environment). For RDP/Terminal Services this means using the high encryption setting on the server, and for PCAnywhere it means using symmetric or public key options for encryption.

NETePay 5.0 for SecureNet with Dial Backup 9
NETePay 5.0 does not directly support remote access for maintenance, monitoring, operation, troubleshooting or updates. Datacap Systems does not use remote access software to deliver any services, software, or support to users of NETePay 5.0. If merchants, integrators or resellers elect to use third party remote access independent of NETePay 5.0, they should observe the following remote access procedures:
• Change default settings in the remote access software (for example, change default passwords and use unique passwords for each customer).
• Allow connections only from specific (known) IP/MAC addresses. • Use strong authentication and complex passwords for logins according to PCI DSS
Requirements 8.1, 8.3, and 8.5.8–8.5.15 • Enable encrypted data transmission according to PCI DSS Requirement 4.1 • Enable account lockout after a certain number of failed login attempts according to PCI
DSS Requirement 8.5.13 • Configure the system so a remote user must establish a Virtual Private Network
“VPN”) connection via a firewall before access is allowed. • Enable the logging function. • Restrict access to customer passwords to authorized reseller/integrator personnel. • Establish customer passwords according to PCI DSS Requirements 8.1, 8.2, 8.4, and
8.5.
Wireless Access Control
The PCI standard requires the encryption of cardholder data transmitted over wireless connections. The following items identify the PCI standard requirements for wireless connectivity to the payment environment:
• Firewall/port filtering services should be placed between wireless access points and the payment processing environment with rules restricting access
• Use of appropriate encryption mechanisms such as VPN, SSL/TPS at 128 bit, WEP at 128 bit, and/or WPA
• If WEP is used the following additional requirements must be met:
• Another encryption methodology must be used to protect cardholder data • If automated WEP key rotation is implemented key change should occur every 10-30
minutes • If automated key change is not used, keys should be manually changed at least
quarterly and when key personnel leave the organization
• Vendor supplied defaults (administrator username/password, SSID, and SNMP community values) should be changed
• Access point should restrict access to known authorized devices (using MAC Address filtering)
NETePay 5.0 for SecureNet with Dial Backup 10
Network Encryption
The PCI standard requires the use of strong cryptography and encryption techniques (at least 128 bit); such as Secure Sockets Layer (SSL) and Internet Protocol Security (IPSEC) to safeguard sensitive cardholder data during transmission over public networks (like the Internet).
Additionally PCI requires that cardholder information never be sent via e-mail without strong encryption of the data.
Network Security
ePay Administrator and ePay Administrator for NETePay may be installed on other computers on the network rather than on the computer on which the NETePay server is installed. If either of these ePay Administrators is installed remotely in this manner, you should enable SSL encryption for the instance of MSD or SQL Express by using Microsoft Management Console.
NETePay Compliance
All versions of NETePay at or above Version 5.00 implement all of the PCI Data Security Standard requirements that are applicable to a payment processing application.
• NETePay does not store any magnetic stripe (Track 1 or 2), card verification (CVV, CVV2, etc.) or PIN data, ever.
• NETePay truncates all account and expiration date information for transactions which have been settled in every area where it is either stored or displayed.
• NETePay encrypts account numbers and expiration dates for transactions which have not yet been settled.
• NETePay logs only record truncated account number and expiration date information and never record any magnetic stripe (Track 1 or 2), card verification (CVV, CVV2, etc) or PIN data, ever. NETePay 5.0 logs are fixed in function, format and contents and cannot be disabled or configured by any user.
• NETePay utilities which present data in a user interface (display or print) always truncate account number and expiration date data and never display magnetic stripe (Track 1 or 2), card verification (CVV, CVV2, etc) or PIN data, ever.
• NETePay encrypts all IP transmissions that contain cardholder data using current SSL/TLS standards.
• NETePay does not allow or facilitate sending of PANs (Primary Account Numbers) by end user messaging technologies; however if a merchant, integrator or reseller transmits information of this type, a solution that implements strong cryptography should be employed.

NETePay 5.0 for SecureNet with Dial Backup 11
Baseline System Configuration
To realize the maximum security from NETePay, the server on which it is installed should meet or exceed the following system requirements:
• Microsoft Windows 2000 Professional with Service Pack 4, Windows XP Pro with Service Pack 2, Windows Vista Business Edition, Windows 7, Windows Server 2003 or 2008. All latest updates and hotfixes should be applied.
• 1 GB of RAM minimum, 2 GB or higher recommended
• 10 GB of available hard-disk space
• Microsoft Internet Explorer with 128-bit encryption, Microsoft Internet Explorer 6.0 or higher recommended
• TCP/IP network connectivity.
• Microsoft Internet Explorer with 128-bit encryption, Microsoft Internet Explorer 6.0 or higher recommended
• TCP/IP network connectivity.
• Available COM port (if using dial backup or dial primary communications)
• Datacap DialLink modem (if using dial backup or dial primary communications)
• Persistent Internet Connection (DSL, cable, frame relay, etc.)
Additional System Security Recommendations
Although NETePay 5.0 implements all of the PCI Data Security Standard requirements which are applicable to a payment processing application, additional overall security can be realized by implementing the following:
• Use a router which implements NAT (Network Address Translation).
• Use antivirus software with auto update capability, from vendors such as McAfee, Norton, Panda, Kaspersky, Trend Micro, etc.
• Enable firewall services (either software based like Windows Firewall or hardware based) between the payment processing environment and the internet access device (typically an ISP provided router/modem).
• Define and use strong passwords to restrict access to authorized personnel.
• Test and install security related Windows and SQL/MSDE updates, service packs and hotfixes promptly. Consider using automatic updating.
NETePay 5.0 for SecureNet with Dial Backup 12
POS System Considerations
Although NETePay 5.0 implements all of the PCI Data Security Standard (DSS) requirements that are applicable to a payment processing application, your POS application may not handle cardholder information in such a secure fashion.
PCI Data Security requirements must be implemented in all the components of a system which handle cardholder data in order to provide comprehensive security. The PCI Data Security requirements must be implemented in your POS system and any other applications which handle cardholder data. You should verify with your POS system provider that the version of the POS software you are using is compliant.
Removal of Historical Data
If you are upgrading to NETePay 5.0 from a previous version, you should securely delete the previous NETePay database and logs before upgrade installation. NETePay normally truncates and deletes any sensitive information for all settled transactions but to assure there are no residual unsettled transactions; the following procedure should be followed to delete the previous NETePay database, any backups and all logs:
1. Shut down NETePay 2. Using Windows Control Panel, select Add/Remove Programs 3. Select NETePay and remove it 4. Locate the NETePay folder in <bootdrive>:/Program Files/Datacap Systems and use a
secure file deletion utility to remove it 5. Install NETePay 5.0 6. From the Programs/Software from Datacap group, run the NETePay Database
Manager 7. Select Connect 8. Select Create New Database 9. Shut down NETePay Database Manager 10. Start NETePay 5.0
Information Handling and Collection Criteria
NETePay 5.0 and all of its components handle sensitive cardholder data in accordance with the PA-DSS 1.2 standard of the PCI Data Security Council. However, NETePay 5.0 does not monitor the activities of users or other software to assure that they accord sensitive data the same standards. Merchant, and reseller/integrators should adhere to the following guidelines if they handle cardholder information:
• Collect sensitive authentication only when needed to solve a specific problem. • Store such data only in specific, known locations with limited access. • Collect only the limited amount of data needed to solve a specific problem. • Encrypt sensitive authentication data while stored. • Securely delete such data immediately after use.

NETePay 5.0 for SecureNet with Dial Backup 13
NETePay 5.0 only stores cardholder information only for unsettled transactions. Once NETePay 5.0 settles transactions, all cardholder information is either deleted or truncated. The merchant, integrator or reseller does not need to manage retention of cardholder data in NETePay 5.0 beyond assuring that transactions are settled in a timely manner.
NETePay 5.0 logs are fixed in function, format and contents and cannot be disabled or configured by any user. NETePay 5.0 logs only record truncated account number and expiration date information and never record any magnetic stripe (Track 1 or 2), card verification (CVV, CVV2, etc) or PIN data.
NETePay 5.0 does not allow or facilitate sending of PANs (Primary Account Numbers) by end user messaging technologies; however if a merchant, integrator or reseller transmits information of this type, a solution that implements strong cryptography should be employed.
Security Action Plan
In addition to the preceding security recommendations, a comprehensive approach to assessing the security compliance of your entire system is necessary to protect you and your data. The following is a basic plan every merchant should adopt.
1. Read the PCI Standard in full and perform a security gap analysis. Identify any gaps between existing practices in your organization and those outlined by the PCI requirements.
2. Create an action plan for on-going compliance and assessment. Once the gaps are identified, companies must determine the steps needed to close the gaps and protect cardholder data. It could mean adding new technologies to shore up firewall and perimeter controls, or increasing the logging and archiving procedures associated with transaction data.
3. Implement, monitor and maintain the plan. Compliance is not a one-time event. Regardless of merchant or service provider level, all entities must complete annual self-assessments using the PCI Self Assessment Questionnaire.
4. Call in outside experts as needed. Visa has published a Qualified Security Assessor List of companies that can conduct on-site CISP compliance audits for Level 1 Merchants, and Level 1 and 2 Service Providers. MasterCard has a Compliant Security Vendor List of SDP-approved scanning vendors.
Implementation Guide Reviews and Updates
Datacap Systems reviews the NETePay 5.0 Implementation Guide and issues updates to maintain compliance at least once per year or whenever a software change warrants. This implementation guide is also incorporated as part of every NETePay Installation and User Guide. The latest version, which is supplied on the distribution CD, may also be downloaded from Datacap’s site at www.datacapepay.com in the NETePay section separately at any time.

NETePay 5.0 for SecureNet with Dial Backup 14
Development and Deployment of Security Updates
Datacap is committed to timely development and deployment of security patches. When a vulnerability is detected, we will develop and deploy an updated NETePay executable within 30 days of discovery. These update will be delivered using a known chain of trust. A technical notice will be sent out via email and the update will be made available on our web site. The update file can then be downloaded directly. The update files are digitally signed to verify their authenticity.
More Information
You may download a copy of the Payment Card Industry (PCI) Data Security Standard from the PCI Security Standards Council website at the following Internet address:
https://www.pcisecuritystandards.org/security_standards/pci_dss_download_agreement.html
Additional information for merchants from the PCI Security Standards Council is available at the following Internet address:
http://www.pcisecuritystandards.org/education/fact_sheets.shtml
A listing in PDF format of qualified security assessors from the PCI Security Standards Council is available at the following Internet address:
http://www.pcisecuritystandards.org/pdfs/pci_qsa_list.pdf

NETePay 5.0 for SecureNet with Dial Backup 15
CHAPTER 3 INSTALLATION
Introduction This chapter explains how to install and configure the following NETePay components.
• NETePay • DSIClientX • ePay Administrator • Microsoft MSDE or SQL Express Database Engine • Microsoft Internet Explorer 6.0 (or later) with High Encryption
You will need to install all the components on the server.
Each client machine will require DSIClientX installed. ePay Administrator is installed on one or more client machines (for more information about using ePay Administrator, see the ePay Administrator User Guide).
If you are using version 5.1 (or later) of Microsoft Internet Explorer that already has high encryption, installation of Microsoft Internet Explorer 6.0 (or later) with High Encryption is optional. If you are using a version prior to 5.1, you must upgrade your Internet Explorer installation.
Requirements Baseline System Configuration To successfully install and run NETePay on your server, it should meet or exceed the following system requirements:
• Microsoft Windows 2000 Professional with Service Pack 4, Windows XP Pro with Service Pack 2, Windows Vista Business Edition, Windows Server 2003 or 2008, or Windows 7. All latest updates and hotfixes should be applied.
• 1 GB of RAM minimum, 2 GB or higher recommended
• 5 GB of available hard-disk space
• Microsoft Internet Explorer with 128-bit encryption, Microsoft Internet Explorer 6.0 or higher recommended
• TCP/IP network connectivity.
• Available COM port (if using dial backup or dial primary communications)
• Datacap DialLink modem (if using dial backup or dial primary communications)
• Persistent Internet Connection (DSL, cable, frame relay, etc.)
NETePay 5.0 for SecureNet with Dial Backup 16
Network Requirements • Before installing NETePay or any of its components, you should know the names and IP
addresses of the servers receiving transactions. For remote servers or enterprise systems, it may be necessary to contact your network administrator or your merchant service provider
• You should also make port 9000 on the NETePay server available for incoming traffic if you are behind a firewall and connected to the default port.
Installation Procedures Accessing the NETePay CD-ROM Before you begin installing NETePay and its components, you should close all unnecessary programs and disable any anti-virus software.
Use either of the following procedures to access the folders that contain the setup programs for NETePay and its components:
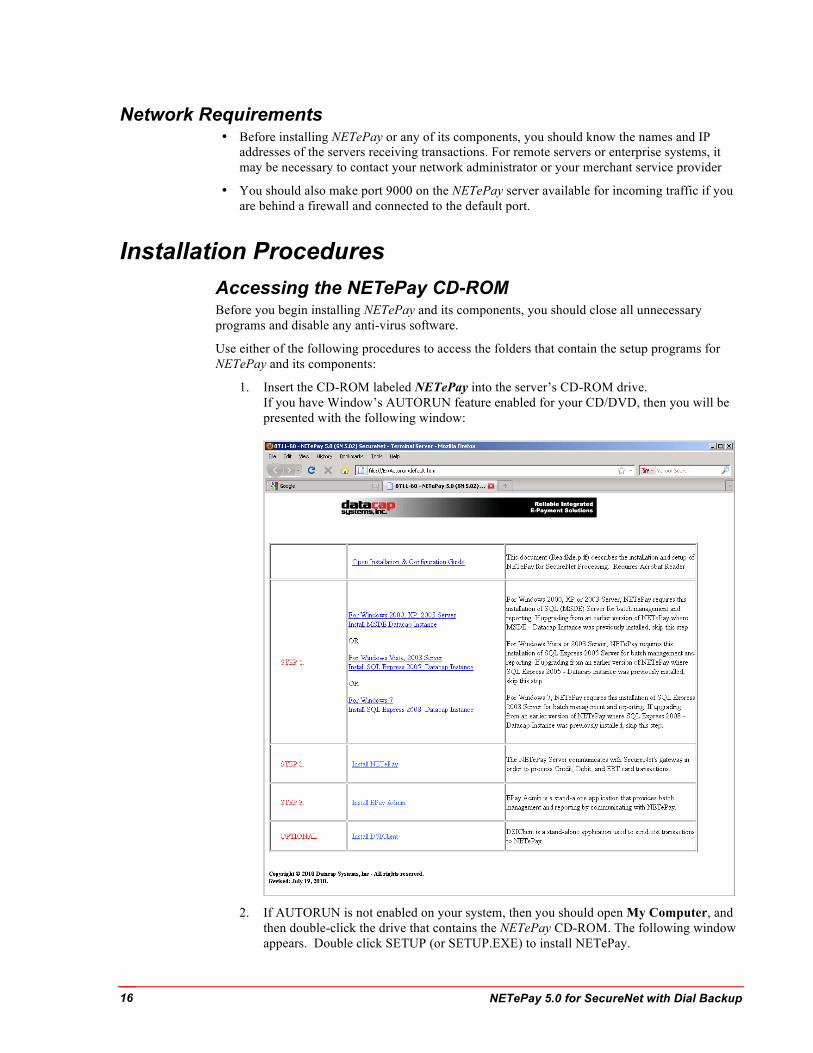
1. Insert the CD-ROM labeled NETePay into the server’s CD-ROM drive. If you have Window’s AUTORUN feature enabled for your CD/DVD, then you will be presented with the following window:
2. If AUTORUN is not enabled on your system, then you should open My Computer, and
then double-click the drive that contains the NETePay CD-ROM. The following window appears. Double click SETUP (or SETUP.EXE) to install NETePay.

NETePay 5.0 for SecureNet with Dial Backup 17
From either of these windows, you can install NETePay and it components.
3. You must be logged in as an ‘Administrator’ to install NETePay and all of it’s components. Installations performed when logged on as another user with rights less than ‘Administrator’ will not operate correctly.
NETePay 5.0 for SecureNet with Dial Backup 18
Installing/Upgrading Microsoft Internet Explorer NETePay uses Windows encryption services and requires that Internet Explorer with 128 bit encryption strength be installed on each system in the LAN. If needed, you must install or upgrade your server and each computer on the LAN with a version of Microsoft Internet Explorer that supports 128-bit encryption.
If needed, use the Windows Update on each PC to upgrade an existing version of IE to one that supports at least 128 bit encryption.
Installing MSDE (Required for Windows 2000, XP, Windows Server 2003) Note: You must be logged in as an ‘Administrator’ to install NETePay and all of it’s components. Installations performed when logged on as another user with rights less than ‘Administrator’ will not operate correctly. Do not use MSDE for Vista installation; see next section for SQL Express installation.
To install the MSDE Database Engine:
1. Open the MSDE-DatacapInstance folder on the NETePay CD-ROM and double-click setup (or setup.exe).
2. Accept all default values and click NEXT or INSTALL as requested.
3. Upon successful completion, you will be prompted to restart.
4. Click Yes to restart the computer. It is very important to restart at this time to avoid configuration problems!
Note: When MSDE is installed, an application named NETePay Database Manager is also installed in the Software from Datacap program group. This application provides basic maintenance functions, such as backup, restore and purge, and is covered in Chapter 5.
Installing SQL Express 2005 (Required for Windows Vista, Windows Server 2008) Note: You must be logged in as an ‘Administrator’ to install NETePay and all of it’s components. Installations performed when logged on as another user with rights less than ‘Administrator’ will not operate correctly.
To install the SQL Express 2005:
1. Open the SQL Express 2005 DatacapInstance 1.00 folder on the NETePay CD-ROM and double-click setup (or setup.exe).
2. Accept all default values and click NEXT or INSTALL as requested.
3. Upon successful completion, you will be prompted to restart.
4. Click Yes to restart the computer. It is very important to restart at this time to avoid configuration problems!
Note: When SQL Express 2005 DatacapInstance is installed, an application named NETePay Database Manager is also installed in the Software from Datacap program group. This application provides basic maintenance functions, such as backup, restore and purge, and is covered in Chapter 5.
NETePay 5.0 for SecureNet with Dial Backup 19
Installing SQL Express 2008 (Required for Windows Vista, Windows 7) Note: You must be logged in as an ‘Administrator’ to install NETePay and all of it’s components. Installations performed when logged on as another user with rights less than ‘Administrator’ will not operate correctly.
To install the SQL Express 2008:
1. Open the SQL Express 2008 DatacapInstance 1.00 folder on the NETePay CD-ROM and double-click setup (or setup.exe).
2. Accept all default values and click NEXT or INSTALL as requested.
3. Upon successful completion, you will be prompted to restart.
4. Click Yes to restart the computer. It is very important to restart at this time to avoid configuration problems!
Note: When SQL Express 2008 DatacapInstance is installed, an application named NETePay Database Manager is also installed in the Software from Datacap program group. This application provides basic maintenance functions, such as backup, restore and purge, and is covered in Chapter 5.
Installing NETePay (Required)
Note: You must be logged in as an ‘Administrator’ to install NETePay and all of it’s components. Installations performed when logged on as another user with rights less than ‘Administrator’ will not operate correctly.
To install the NETePay Server software:
1. Open the NETePay Server folder on the NETePay CD-ROM and double-click setup (or setup.exe).
2. The installation wizard will start. When the Welcome screen appears, click Next.
3. Read and accept the End User License agreement and click Next.
4. Enter your User Name and Organization. If available on your operating system, make the application available to all users.
5. Click Next, then click Install. The installation wizard will then begin installing the necessary files on your computer.
6. Click Finish to complete the installation. A pop-up message will then appear and inform you to restart the computer.
7. Click Yes to restart the computer. It is very important to restart at this time to avoid configuration problems!
Installing DSIClient Application (Optional)
Note: You must be logged in as an ‘Administrator’ to install NETePay and all of it’s components. Installations performed when logged on as another user with rights less than ‘Administrator’ will not operate correctly.

NETePay 5.0 for SecureNet with Dial Backup 20
The DSIClient application provides a convenient means to test operation of the NETePay server and the store LAN configuration. It is not suitable for normal transaction processing since it does not cannot print drafts or receipts. Your POS system should be used for normal transaction processing through NETePay.
To install the DSIClient application (includes the DSIClientX ActiveX control):
1. Open the DSIClient folder on the NETePay CD-ROM and double-click, setup.exe.
2. The installation wizard will start. When the Welcome screen appears, click Next.
3. Read and accept the End User License agreement and click Next. 4. Read the notes pertaining to DSIClient installation and click Next.
5. Enter your User Name and Organization.
6. If the option is available, make the application available to all users.
7. To begin installing the necessary files on your computer, click Next, then click Install.
8. To complete the installation process, click Finish. A pop-up message will then appear and inform you to restart the computer.
9. Click Yes to restart the computer.
Installing ePay Administrator for NETePay (Required)
Note: You must be logged in as an ‘Administrator’ to install NETePay and all of it’s components. Installations performed when logged on as another user with rights less than ‘Administrator’ will not operate correctly.
Note: The ePay Administrator for NETePay software is designed to use the LAN to perform transaction editing and reporting. Best security practices advise that you to install the ePay Administrator for NETePay software on a workstation on the LAN, not on the server.
To install ePay Administrator for NETePay:
1. Open the ePayAdmin folder on the NETePay CD-ROM and double-click setup.exe.
2. The installation wizard will start. When the Welcome screen appears, click Next.
3. Read and accept the End User License agreement and click Next.
4. Enter your User Name and Organization.
If available on your operating system, make the application available to all users.
5. Click Next, then click Install. The installation wizard will then begin installing the necessary files on your computer.
6. Click Finish to complete the installation. A pop-up message will then appear and inform you to restart the computer.
7. Click Yes to restart the computer.
For more information about using ePay Administrator for NETePay, see the ePay Administrator for NETePay User Guide

NETePay 5.0 for SecureNet with Dial Backup 21
Installing Datacap DialLink modem (Required for Dial Operations)
Note: To use the dial capabilities of NETePay (either as backup or primary communications), a Datacap DialLink modem (not a DataTran) must be attached to an available COM port on the PC.
To install the Datacap DialLink modem for NETePay:
1. Connect the uDIN8 connector of the interface cable to the Datacap DialLink modem PC/ECR port.
2. Connect the DB9 end of the interface cable to the intended COM port on the PC.
3. Connect one end of the RJ11 cable to the TELCO connector on the Datacap DialLink modem.
4. Connect the other end of the RJ11 cable to a working phone line jack. No other devices should be connected to this phone line and plain old telephone service (POTS) line is best
5. Connect the transformer to the POWER connector on the Datacap DialLink modem.
6. Plug the transformer into a suitable 110VAC outlet. It is strongly recommended that a surge protector be used with the Datacap DialLink modem.
.
NETePay 5.0 for SecureNet with Dial Backup 22
CHAPTER 4 NETePay CONFIGURATION
Introduction
This chapter explains how to activate and configure NETePay 5.0 for use.
NETePay is activated and programmed over the Internet so a working Internet connection is required for the process.
Note Firewalls, routers or other systems which can block IP network traffic must allow NETePay to accept traffic on port 9000.
NETePay must complete two actions on the Internet before it is ready to process transactions. The first is to obtain a license file from Datacap’s PSCS (Payment Systems Configuration Server) system. The second is to retrieve merchant parameters from Datacap’s PSCS server.
Activation and Parameter Download
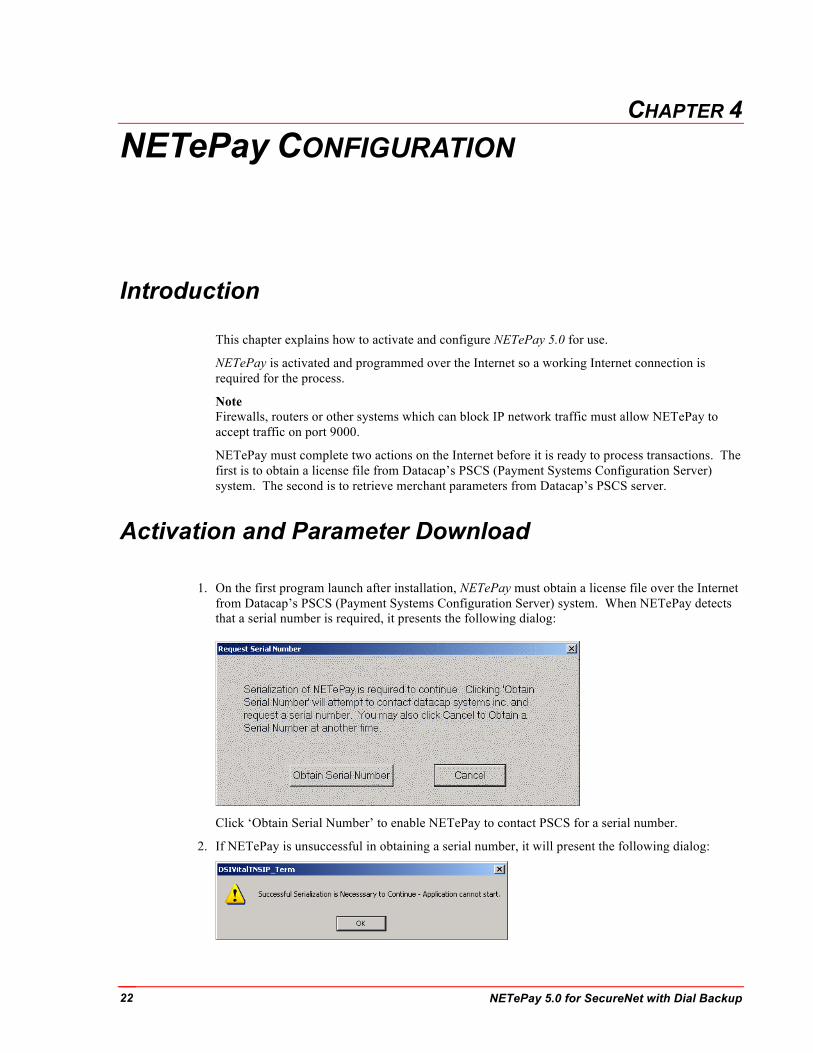
1. On the first program launch after installation, NETePay must obtain a license file over the Internet from Datacap’s PSCS (Payment Systems Configuration Server) system. When NETePay detects that a serial number is required, it presents the following dialog:
Click ‘Obtain Serial Number’ to enable NETePay to contact PSCS for a serial number.
2. If NETePay is unsuccessful in obtaining a serial number, it will present the following dialog:
NETePay 5.0 for SecureNet with Dial Backup 23
Click ‘OK’ and NETePay will close. Failure to successfully obtain a serial number means that NETePay was not able to contact Datacap’s PSCS server over the Internet to obtain a serial number. Assure that the Internet connection is operating properly by using the default web browser on the machine where NETePay is installed to contact www.datacapsystems.com. If you are successful in contacting Datacap’s website, close the browser, restart NETePay and click ‘Obtain Serial Number’ again. If you continue to experience difficulties in obtaining a serial number, contact your network administrator to assure that there are no firewall or DNS issues.
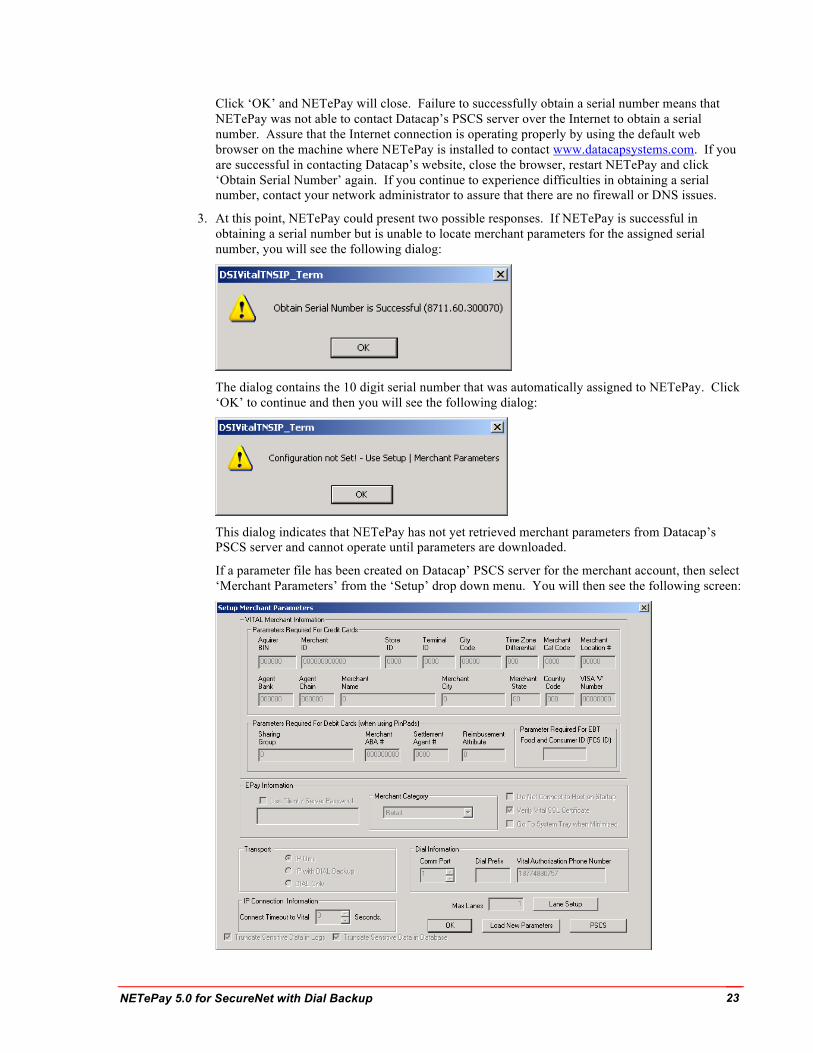
3. At this point, NETePay could present two possible responses. If NETePay is successful in obtaining a serial number but is unable to locate merchant parameters for the assigned serial number, you will see the following dialog:
The dialog contains the 10 digit serial number that was automatically assigned to NETePay. Click ‘OK’ to continue and then you will see the following dialog:
This dialog indicates that NETePay has not yet retrieved merchant parameters from Datacap’s PSCS server and cannot operate until parameters are downloaded.
If a parameter file has been created on Datacap’ PSCS server for the merchant account, then select ‘Merchant Parameters’ from the ‘Setup’ drop down menu. You will then see the following screen:
NETePay 5.0 for SecureNet with Dial Backup 24
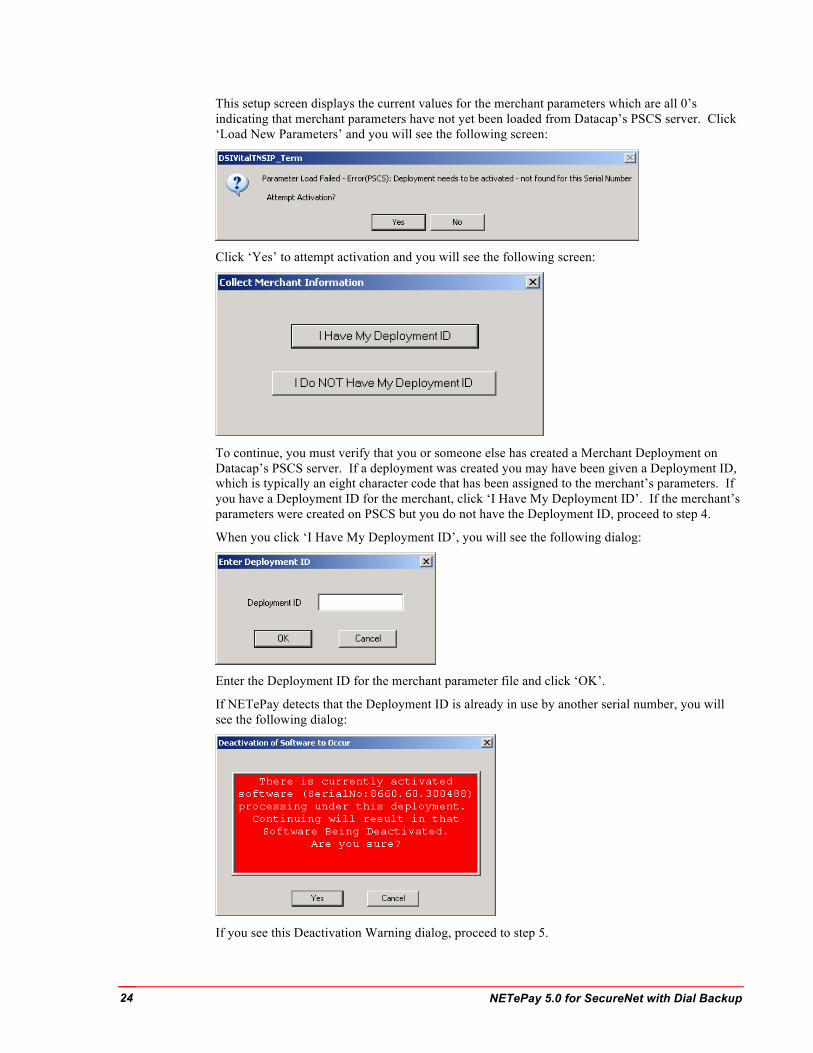
This setup screen displays the current values for the merchant parameters which are all 0’s indicating that merchant parameters have not yet been loaded from Datacap’s PSCS server. Click ‘Load New Parameters’ and you will see the following screen:
Click ‘Yes’ to attempt activation and you will see the following screen:
To continue, you must verify that you or someone else has created a Merchant Deployment on Datacap’s PSCS server. If a deployment was created you may have been given a Deployment ID, which is typically an eight character code that has been assigned to the merchant’s parameters. If you have a Deployment ID for the merchant, click ‘I Have My Deployment ID’. If the merchant’s parameters were created on PSCS but you do not have the Deployment ID, proceed to step 4.
When you click ‘I Have My Deployment ID’, you will see the following dialog:
Enter the Deployment ID for the merchant parameter file and click ‘OK’.
If NETePay detects that the Deployment ID is already in use by another serial number, you will see the following dialog:
If you see this Deactivation Warning dialog, proceed to step 5.
NETePay 5.0 for SecureNet with Dial Backup 25
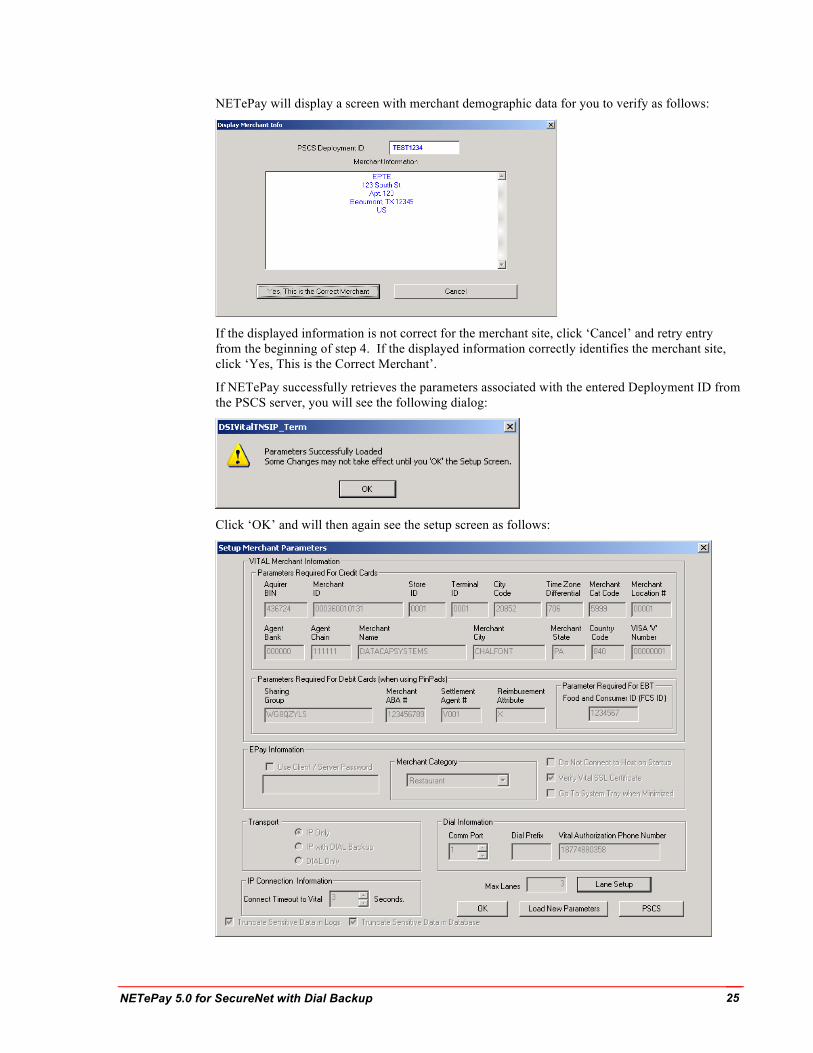
NETePay will display a screen with merchant demographic data for you to verify as follows:
If the displayed information is not correct for the merchant site, click ‘Cancel’ and retry entry from the beginning of step 4. If the displayed information correctly identifies the merchant site, click ‘Yes, This is the Correct Merchant’.
If NETePay successfully retrieves the parameters associated with the entered Deployment ID from the PSCS server, you will see the following dialog:
Click ‘OK’ and will then again see the setup screen as follows:

NETePay 5.0 for SecureNet with Dial Backup 26
The setup screen now contains non-zero values in the text boxes throughout the screen indicating the values retrieved from Datacap’s PSCS server. You should verify that the parameters are correct and then click ‘OK’ to complete the setup process. You will then see the NETePay main status window indicating that NETePay is now programmed and ready to process transactions.
NETePay setup is complete.
4. If you don’t have the PSCS Deployment ID for the merchant, click ‘I Do NOT Have My Deployment ID’ in the following dialog:
You will then see a dialog that will allow you to retrieve the PSCS merchant parameters from Datacap’s PSCS server using merchant demographic information as follows:
You need the following information to complete the demographics dialog entries:

NETePay 5.0 for SecureNet with Dial Backup 27
• The PSCS user under which the merchant parameter file was created on the PSCS server • The merchant location street number (e.g. enter ‘123’ for 123 Main St.) • The merchant location 5 digit zip code or 6 character Canadian postal code
After entering this information, click ‘OK’.
If NETePay is successful in retrieving the merchant parameters from Datacap’s PSCS server, then you will see the following screen:
If the displayed information is not correct for the merchant site, click ‘Cancel’ and retry entry from the beginning of step 4. If the displayed information correctly identifies the merchant site, click ‘Yes, This is the Correct Merchant’.
If NETePay detects that the selected merchant is already in use by another serial number, you will see the following dialog:
If you see this Deactivation Warning dialog, proceed to step 5.
If the parameters are successfully loaded, you will see the following dialog:
Click ‘OK’ and you will then see the setup screen as follows:

NETePay 5.0 for SecureNet with Dial Backup 28
The setup screen now contains non-zero values in the text boxes throughout the screen indicating the values retrieved from Datacap’s PSCS server. You should verify that the parameters are correct and then click ‘OK’ to complete the setup process. You will then see the NETePay main status window indicating that NETePay is now programmed and ready to process transactions.
NETePay setup is complete.
NETePay 5.0 for SecureNet with Dial Backup 29
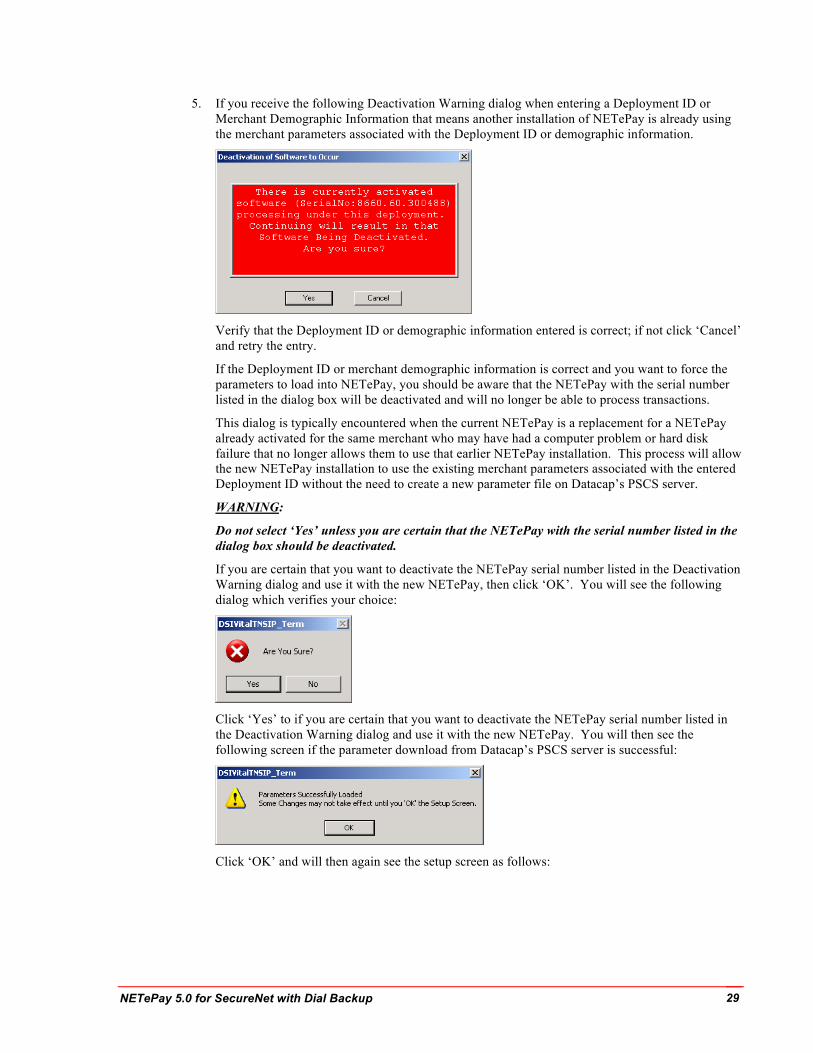
5. If you receive the following Deactivation Warning dialog when entering a Deployment ID or Merchant Demographic Information that means another installation of NETePay is already using the merchant parameters associated with the Deployment ID or demographic information.
Verify that the Deployment ID or demographic information entered is correct; if not click ‘Cancel’ and retry the entry.
If the Deployment ID or merchant demographic information is correct and you want to force the parameters to load into NETePay, you should be aware that the NETePay with the serial number listed in the dialog box will be deactivated and will no longer be able to process transactions.
This dialog is typically encountered when the current NETePay is a replacement for a NETePay already activated for the same merchant who may have had a computer problem or hard disk failure that no longer allows them to use that earlier NETePay installation. This process will allow the new NETePay installation to use the existing merchant parameters associated with the entered Deployment ID without the need to create a new parameter file on Datacap’s PSCS server.
WARNING:
Do not select ‘Yes’ unless you are certain that the NETePay with the serial number listed in the dialog box should be deactivated.
If you are certain that you want to deactivate the NETePay serial number listed in the Deactivation Warning dialog and use it with the new NETePay, then click ‘OK’. You will see the following dialog which verifies your choice:
Click ‘Yes’ to if you are certain that you want to deactivate the NETePay serial number listed in the Deactivation Warning dialog and use it with the new NETePay. You will then see the following screen if the parameter download from Datacap’s PSCS server is successful:
Click ‘OK’ and will then again see the setup screen as follows:

NETePay 5.0 for SecureNet with Dial Backup 30
The setup screen now contains non-zero values in the text boxes throughout the screen indicating the values retrieved from Datacap’s PSCS server. You should verify that the parameters are correct and then click ‘OK’ to complete the setup process. You will then see the NETePay main status window indicating that NETePay is now programmed and ready to process transactions.
NETePay setup is complete.
NETePay 5.0 for SecureNet with Dial Backup 31
Testing Important! - Before You Start You should arrange with your bank and payment processor for testing NETePay and all other related components before going live. You should perform a sale and return transaction of $1.00 for each card type you will be accepting using live credit cards. You should then verify with your processing provider that all transactions were credited properly.
It is the sole responsibility of the merchant account holder to verify that the merchant information entered into NETePay is complete and correct. You should only process actual customer payments after you have verified with your merchant account provider that all test transactions have been successfully processed.
Operational Considerations Important! NETePay relies on numerous services provided by Windows and other Microsoft software such as MSDE or SQLExpress 2005. Proper computer operation is imperative to ensure reliable NETePay operation and prevent possible loss and/or corruption of transaction data.
The following operational guidelines must be observed to ensure reliable NETePay operation:
• Always quit NETePay from the File|Exit pull down menu before restarting or shutting down Windows.
• Always quit NETePay and then shut down Windows before turning off the computer power. Never turn off the computer power without first quitting NETePay and shutting down Windows.
• Always quit NETePay and shut down Windows before pressing the reset button on the computer.
• If the computer is subject to unplanned power losses, the use of an UPS (Uninterruptible Power Supply) is highly recommended.
• If you operate a backup copy of NETePay, you must procure unique terminal and/or merchant account information for each copy of NETePay from your processing provider. Operation of multiple copies of NETePay with identical merchant setup information may cause transactions to be lost or duplicated at your processing provider.
NETePay 5.0 for SecureNet with Dial Backup 32
CHAPTER 5 USING THE DSIClient TRANSACTION UTILITY TO TEST NETEPAY SERVER
Introduction
This chapter explains how to use the DSIClient Transaction Utility program as a stand-alone application to test the operation of the NETePay server.
It is strongly recommended that you test each card type with the DSIClient Transaction Utility and verify that the processor has received the transactions into your merchant account. NOTE: Before you process any transactions using the DSIClient Transaction Utility, you should have NETePay running.
Supported Transaction Types DSIClient supports the following types of credit transactions via the keyboard, and/or a Verifone PINpad 2000:
• Credit Sale – enables you to process a transaction for a payment for goods or services using a credit card (VISA, MasterCard, American Express, Discover, etc.).
• Credit Refund – enables you to issue a credit to the cardholder for the return or credit of goods or services using a credit card.
• Credit Post Authorization – enables you to process a transaction for which voice authorization code was obtained due to the payment-processing network being unavailable and places the transaction in the current batch for settlement and payment.
• Credit Authorization Only – enables you to authorize a credit card without settlement. In most cases, this transaction is used to determine if a credit card has sufficient remaining credit to process a sale.
• Credit Void – enables you to cancel a previously completed sale transaction in the current batch via a keyboard, PIN pad or magnetic card reader.
• Override Duplicate – enables you to force a network to authorize a credit transaction, when the first attempt for authorization resulted in a duplicate transaction error (such as “AP DUP”).
• Debit Sale - enables you to process a transaction for a payment for goods or services using a bank ATM card.
• Debit Refund – enables you to issue a credit to the cardholder for the return or credit of goods or services using a bank ATM card.
NETePay 5.0 for SecureNet with Dial Backup 33
DSIClient Transaction Utility Setup
Before you can use the DSIClient Transaction Utility, you must configure it for use.
To setup the DSIClient Transaction Utility:
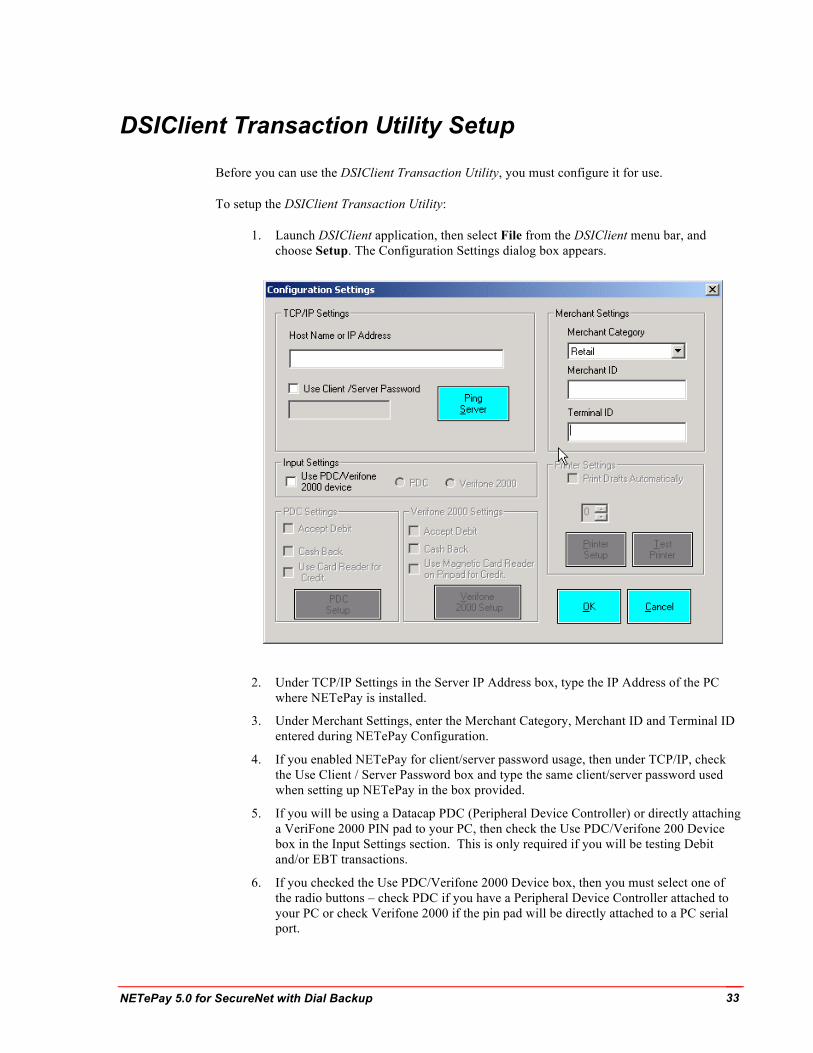
1. Launch DSIClient application, then select File from the DSIClient menu bar, and choose Setup. The Configuration Settings dialog box appears.
2. Under TCP/IP Settings in the Server IP Address box, type the IP Address of the PC where NETePay is installed.
3. Under Merchant Settings, enter the Merchant Category, Merchant ID and Terminal ID entered during NETePay Configuration.
4. If you enabled NETePay for client/server password usage, then under TCP/IP, check the Use Client / Server Password box and type the same client/server password used when setting up NETePay in the box provided.
5. If you will be using a Datacap PDC (Peripheral Device Controller) or directly attaching a VeriFone 2000 PIN pad to your PC, then check the Use PDC/Verifone 200 Device box in the Input Settings section. This is only required if you will be testing Debit and/or EBT transactions.
6. If you checked the Use PDC/Verifone 2000 Device box, then you must select one of the radio buttons – check PDC if you have a Peripheral Device Controller attached to your PC or check Verifone 2000 if the pin pad will be directly attached to a PC serial port.

NETePay 5.0 for SecureNet with Dial Backup 34
7. The Printer Settings section is not supported and requires no settings.
8. To test a connection to the server (the PC where NETePay is installed), click Ping Server. If a successful connection is made, a response message appears. It should show at least one active server.
9. If you do not get at least 1 Server Active, then verify that the IP address for the server is correct and that the NETePay server is running and try again. You must have at least one server active to process transactions.
10. Click OK to continue.
11. To configure the Verifone 2000 PIN pad for use with the DSIClient application, proceed to the next section. If will not be processing debit, then you should skip the Verifone 2000 PIN Pad setup section.
12. To save the settings and exit the Configurations Settings, click OK.
NETePay 5.0 for SecureNet with Dial Backup 35
Verifone 2000 PIN pad Setup To configure a Verifone 2000 PIN pad attached directly to a PC serial port to process debit and/or EBT transactions with the DSIClient application:
1. Connect the Verifone PINpad 2000 to an available serial port and record the serial port number for later reference.
2. In the DSIClient Settings window, in the Verifone 2000 Settings section, make the following choices:
1. To process debit transactions, check the Accept Debit box.
2. If you selected to accept debit and will offer cash back to the customer, check the Cash Back box.
3. To use the Verifone PINpad 2000’s magnetic card reader to process credit card transactions, check the Use the Magnetic Card Reader on PIN pad for Credit box.
NOTE: By making a selection, the Verifone 2000 Setup button becomes active.
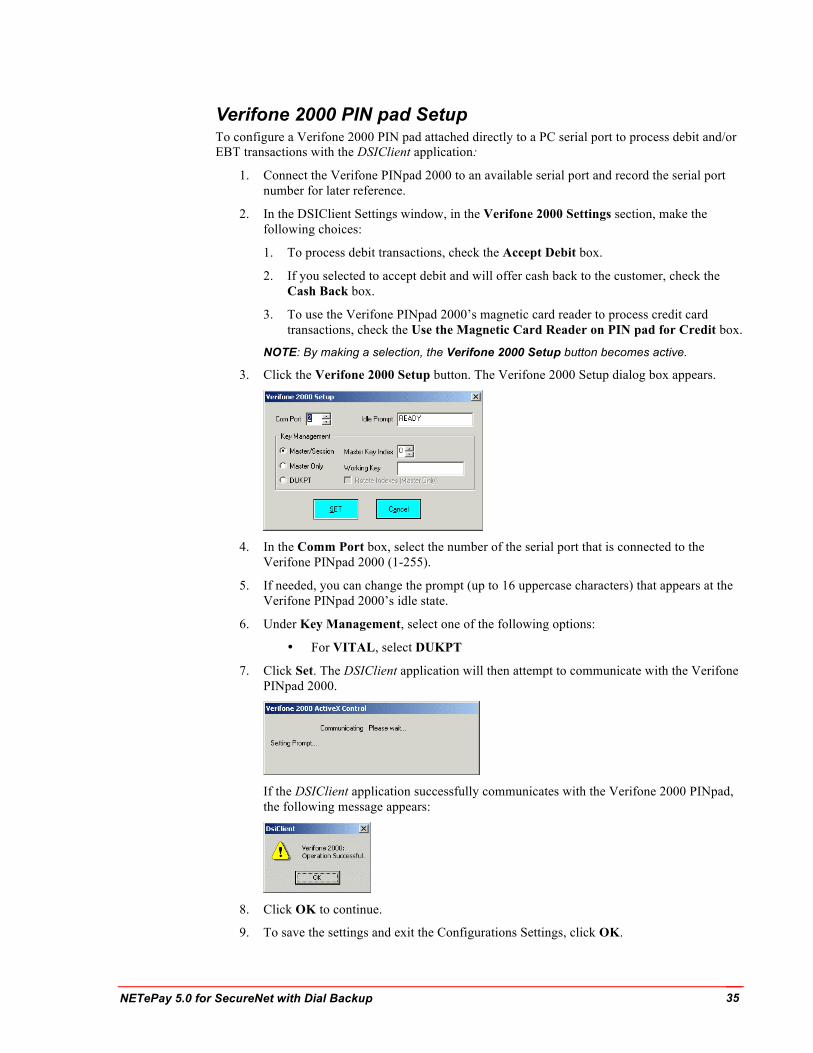
3. Click the Verifone 2000 Setup button. The Verifone 2000 Setup dialog box appears.
4. In the Comm Port box, select the number of the serial port that is connected to the
Verifone PINpad 2000 (1-255).
5. If needed, you can change the prompt (up to 16 uppercase characters) that appears at the Verifone PINpad 2000’s idle state.
6. Under Key Management, select one of the following options:
• For VITAL, select DUKPT
7. Click Set. The DSIClient application will then attempt to communicate with the Verifone PINpad 2000.
If the DSIClient application successfully communicates with the Verifone 2000 PINpad, the following message appears:
8. Click OK to continue.
9. To save the settings and exit the Configurations Settings, click OK.
NETePay 5.0 for SecureNet with Dial Backup 36
PDC Setup
To configure a PDC (Peripheral Device Controller) attached to a PC serial port to process transactions with the DSIClient Transaction Utility:
1. Connect the PDC to an available serial port and record the serial port number for later reference.
2. In the DSIClient Settings window, in the PDC Settings section, make the following choices:
2. To process debit transactions, check the Accept Debit box.
3. If you selected to accept debit and will offer cash back to the customer, check the Cash Back box.
4. To use an optional magnetic card reader attached to the PDC to process credit card transactions, check the Use Card Reader for Credit box.
NOTE: By making a selection, the PDC Setup button becomes active.
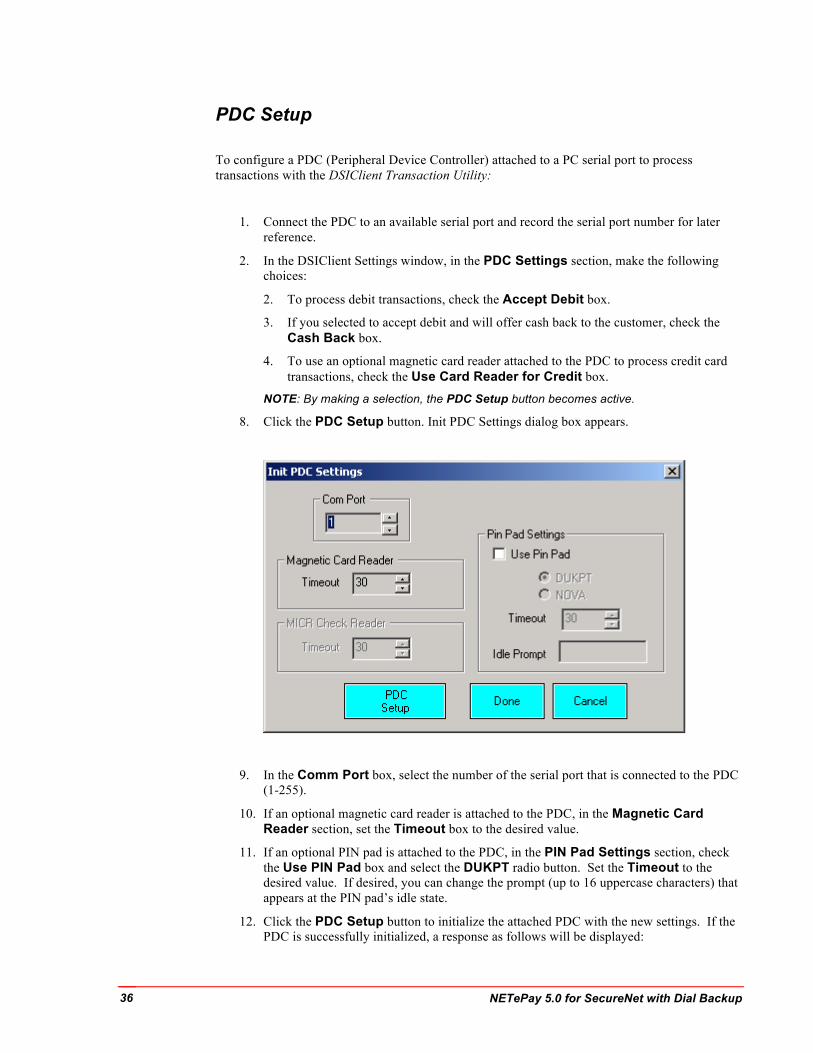
8. Click the PDC Setup button. Init PDC Settings dialog box appears.
9. In the Comm Port box, select the number of the serial port that is connected to the PDC (1-255).
10. If an optional magnetic card reader is attached to the PDC, in the Magnetic Card Reader section, set the Timeout box to the desired value.
11. If an optional PIN pad is attached to the PDC, in the PIN Pad Settings section, check the Use PIN Pad box and select the DUKPT radio button. Set the Timeout to the desired value. If desired, you can change the prompt (up to 16 uppercase characters) that appears at the PIN pad’s idle state.
12. Click the PDC Setup button to initialize the attached PDC with the new settings. If the PDC is successfully initialized, a response as follows will be displayed:

NETePay 5.0 for SecureNet with Dial Backup 37
If you receive a response where the <CmdStatus> is other than Success, recheck all connections to the PDC and try again. If you continue to experience problems, refer to the PDC Integration Guide which is in the Documentation folder within the DSIClient folder.
13. Click OK on the response.
14. Click Done on the Init PDC Settings window.
15. Click OK on the Configuration Settings window to get back to the DSIClient Transaction Utility main window.
NETePay 5.0 for SecureNet with Dial Backup 38
Processing Test Transactions In order to process a transaction using the DSIClient application, NETePay must be running on the server.
To process a transaction using the DSIClient Transaction Utility:
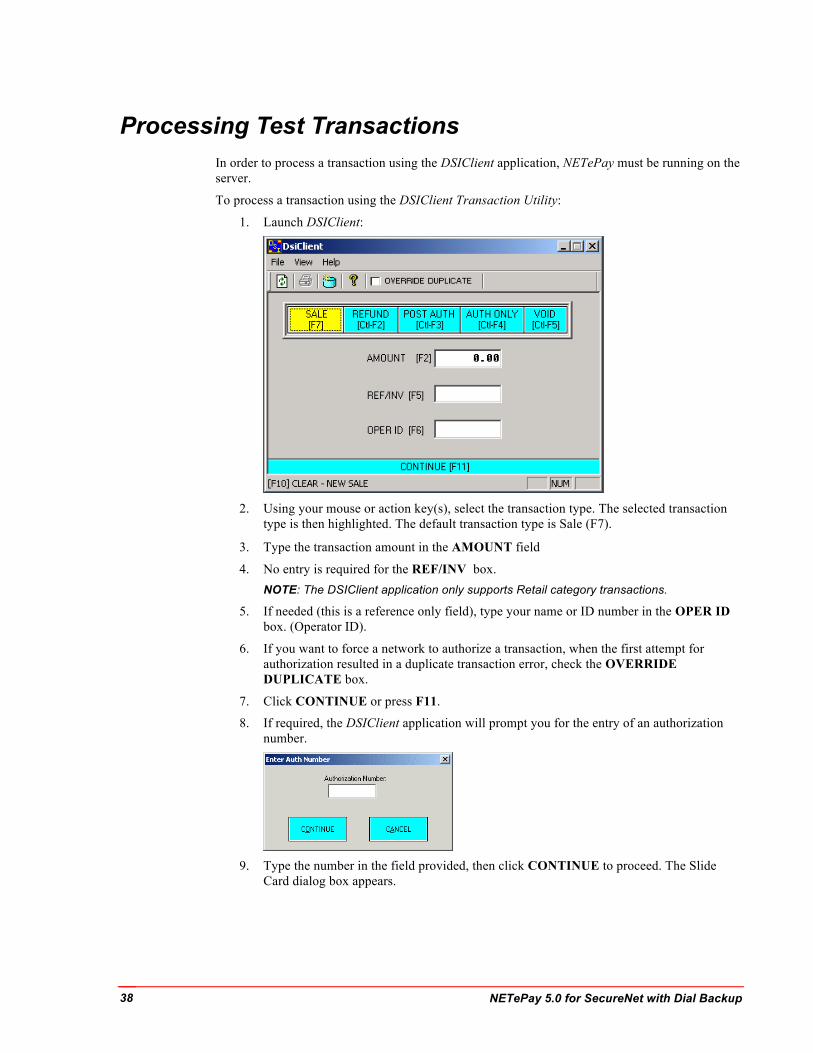
1. Launch DSIClient:
2. Using your mouse or action key(s), select the transaction type. The selected transaction
type is then highlighted. The default transaction type is Sale (F7).
3. Type the transaction amount in the AMOUNT field
4. No entry is required for the REF/INV box. NOTE: The DSIClient application only supports Retail category transactions.
5. If needed (this is a reference only field), type your name or ID number in the OPER ID box. (Operator ID).
6. If you want to force a network to authorize a transaction, when the first attempt for authorization resulted in a duplicate transaction error, check the OVERRIDE DUPLICATE box.
7. Click CONTINUE or press F11.
8. If required, the DSIClient application will prompt you for the entry of an authorization number.
9. Type the number in the field provided, then click CONTINUE to proceed. The Slide
Card dialog box appears.

NETePay 5.0 for SecureNet with Dial Backup 39
10. Either slide the credit card through the Verifone PINpad 2000’s card reader or click
MANUAL INPUT.
When using manual entry, the Slide Card dialog box will prompt you to enter an Account Number and Expiration Date. NOTE: When entering the date use the format: MMYY (Month, Year).
11. After entering the account number and expiration date, click CONTINUE to process the
transaction.
12. The system will then generate a response message either approving or declining the transaction
or
13. In either case, click OK to continue. If you receive a response with No Response from
Any Server, verify that NETePay is running and that you have entered the correct IP address for the NETePay server in the DSIClient application setup.
14. You can now process another transaction. Press F10 to clear the form.

NETePay 5.0 for SecureNet with Dial Backup 40
CHAPTER 6 USING THE NETEPAY - YATABASE MANAGER
Introduction
This chapter explains how to use the NETePay Database Manager program to perform maintenance functions on NETePay’s MSDE database. The NETePay Database Manager program is installed as part of the NETePay installation. The NETePay Database Manager program is available in the Software from Datacap program group available under the Programs menu under the Windows Start button.
Maintenance Functions The NETePay Database Manager can perform the following functions:
• Connect – Before any of the maintenance functions can be performed, the NETePay Database Manager must be connected to the database.
• Backup Database – This function will backup the current database to a file that is automatically named with the current date (or a user defined name). These backup files can subsequently be Restored if there’s a database problem. It is strongly recommended that you regularly backup the database.
• Purge & Shrink – This function allows you to control the size of the database by removing older transaction data based on its age. This function will prevent the database from growing too large and using disk storage inefficiently. It is strongly recommended that you keep only the oldest transactions required by your processing provider and delete any older to save disk space.
• Create New Database – This function allows you to create a new, empty database with no transactions. Normally, this type of function would be used only when instructed by a technical support person.
• Restore Database - This function allows you to restore a previously saved backup database file.
• Export Database – This function allows you to export a copy of the data to a CSV (comma separated value) format file. Note that only open records (i.e. transactions which have not been settled) are included in the export file.
NETePay 5.0 for SecureNet with Dial Backup 41
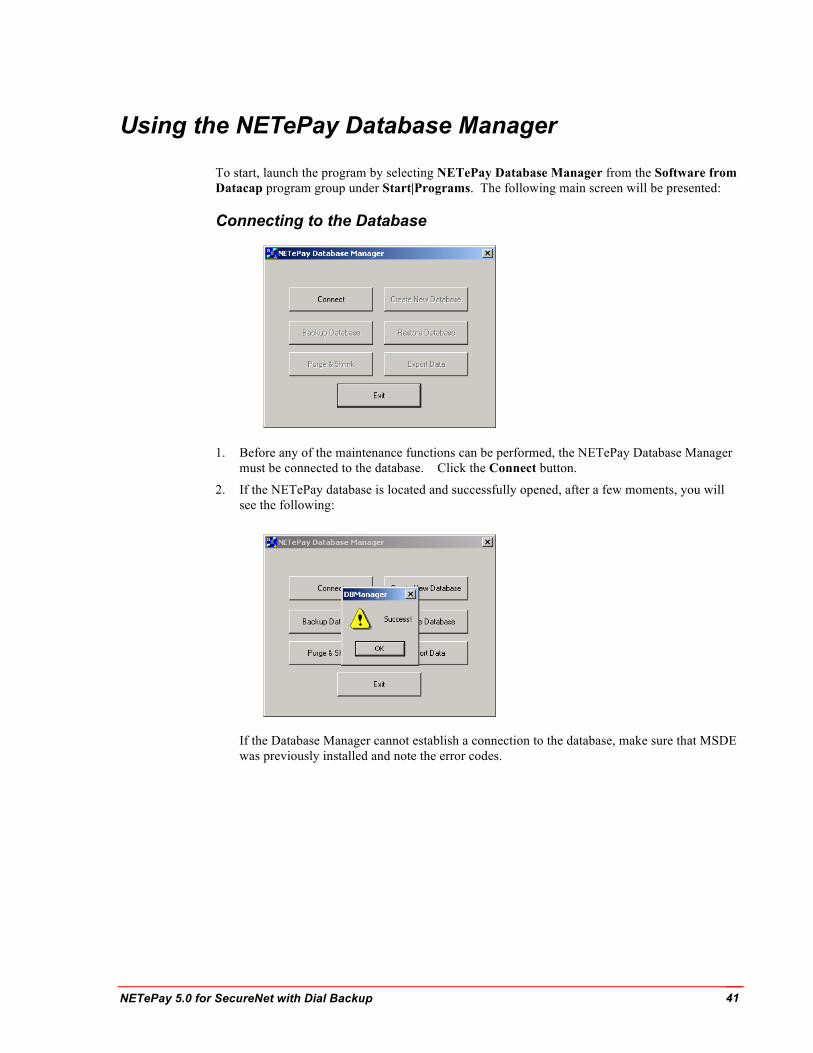
Using the NETePay Database Manager
To start, launch the program by selecting NETePay Database Manager from the Software from Datacap program group under Start|Programs. The following main screen will be presented:
Connecting to the Database
1. Before any of the maintenance functions can be performed, the NETePay Database Manager must be connected to the database. Click the Connect button.
2. If the NETePay database is located and successfully opened, after a few moments, you will see the following:
If the Database Manager cannot establish a connection to the database, make sure that MSDE was previously installed and note the error codes.

NETePay 5.0 for SecureNet with Dial Backup 42
Backing Up Your Database
1. To backup the current database, click the Backup Database button. The following dialog will be displayed:
2. A file name with today’s date will automatically be generated. If that is acceptable, click OK. If you want a different file name to be used for the backup file, you may type it in the text box and click OK.
3. If the backup operation is successful, after a few moments, you will see the following:
Note: This function will backup the current database with the most recent transactions. Backup files can subsequently be Restored if there’s a database problem. It is strongly recommended that you regularly backup the database file.
NETePay 5.0 for SecureNet with Dial Backup 43
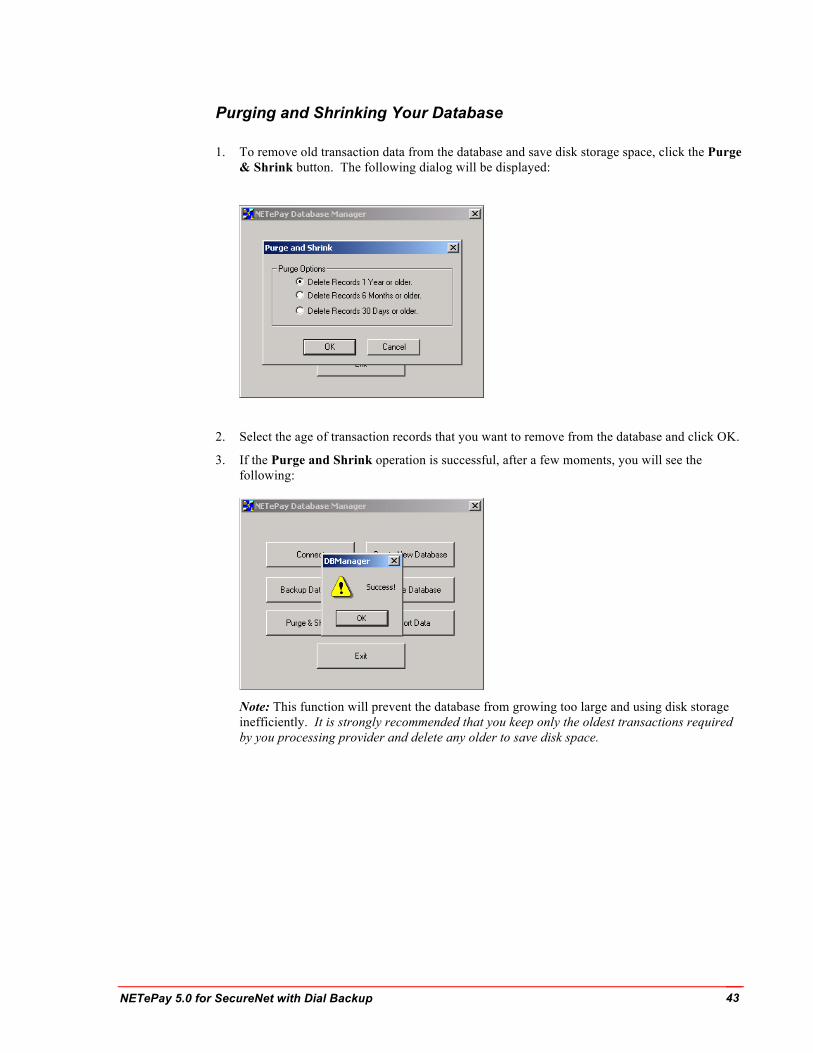
Purging and Shrinking Your Database
1. To remove old transaction data from the database and save disk storage space, click the Purge & Shrink button. The following dialog will be displayed:
2. Select the age of transaction records that you want to remove from the database and click OK.
3. If the Purge and Shrink operation is successful, after a few moments, you will see the following:
Note: This function will prevent the database from growing too large and using disk storage inefficiently. It is strongly recommended that you keep only the oldest transactions required by you processing provider and delete any older to save disk space.
NETePay 5.0 for SecureNet with Dial Backup 44
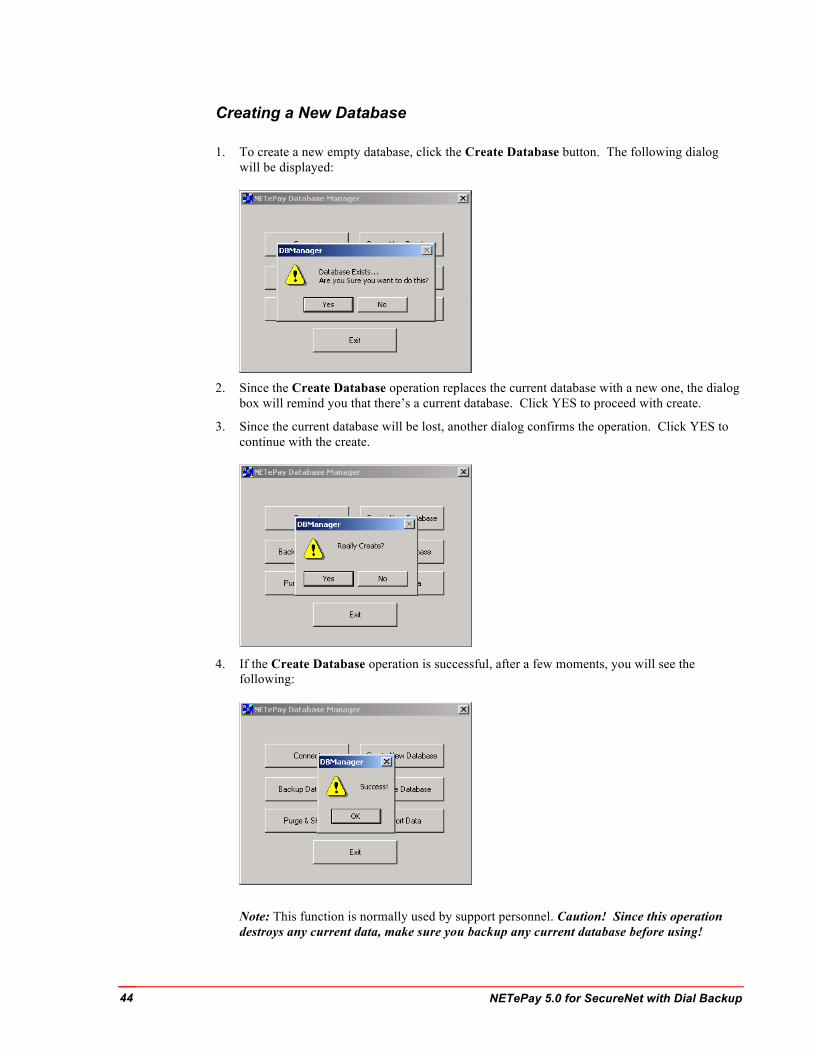
Creating a New Database
1. To create a new empty database, click the Create Database button. The following dialog will be displayed:
2. Since the Create Database operation replaces the current database with a new one, the dialog
box will remind you that there’s a current database. Click YES to proceed with create.
3. Since the current database will be lost, another dialog confirms the operation. Click YES to continue with the create.
4. If the Create Database operation is successful, after a few moments, you will see the
following:
Note: This function is normally used by support personnel. Caution! Since this operation destroys any current data, make sure you backup any current database before using!

NETePay 5.0 for SecureNet with Dial Backup 45
Restoring Your Database
1. To restore and previously backed up database, click the Restore Database button. A file dialog will be presented and you should select the file that you want to restore to the current database:
2. Since the restore operation replaces the current database with an older one, the dialog box will
remind you that there’s a current database. Click YES to proceed with restore.
3. Since the current database will be lost, another dialog confirms the operation. Click YES to
continue with the restore.
4. If the Restore Database operation is successful, after a few moments, you will see the following:

NETePay 5.0 for SecureNet with Dial Backup 46
Note: This function will prevent the database from growing too large and using disk storage inefficiently. It is strongly recommended that you keep only the oldest transactions required by you processing provider and delete any older to save disk space.
NETePay 5.0 for SecureNet with Dial Backup 47
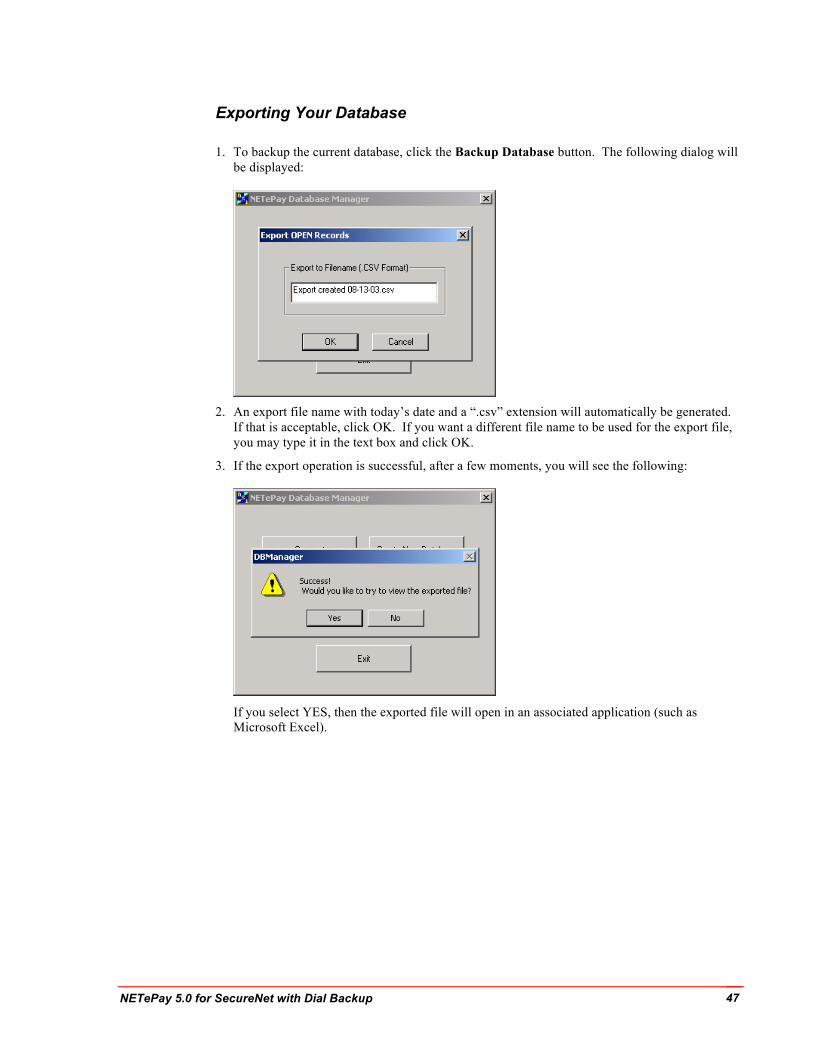
Exporting Your Database
1. To backup the current database, click the Backup Database button. The following dialog will be displayed:
2. An export file name with today’s date and a “.csv” extension will automatically be generated.
If that is acceptable, click OK. If you want a different file name to be used for the export file, you may type it in the text box and click OK.
3. If the export operation is successful, after a few moments, you will see the following:
If you select YES, then the exported file will open in an associated application (such as Microsoft Excel).

NETePay 5.0 for SecureNet with Dial Backup 48
INDEX
A About NETePay, 5
C Credit Authorization Only, 32 Credit Post Authorization, 32 Credit Refund, 32 Credit Sale, 32, 40 Credit Void, 32
D DSIClient Transaction Utility Processing Transactions, 38 Setup, 33, 41 Supported Transaction Types, 32, 40
E ePay Administrator Installation, 20, 21
H How it works, 6
I Installation, 15 Installation Procedures, 16 Accessing the NETePay CD‐ROM, 16 ePay Administrator, 20, 21 NETePay, 18, 19
N NETePay Installation, 18, 19 Testing, 31
Network Requirements, 16
O Override Duplicate, 32 Overview, 5
R Requirements Network, 16 Server, 15
S Server Requirements, 15
U Upgrading Microsoft Internet Explorer, 18 Using the DSIClient Transaction Utility, 32, 40
V Verifone PINpad 2000 Setup, 35, 36
W What’s Included on your CD, 5


![20100818 agile2010 report [DRAFT]](https://img.dokumen.tips/doc/110x75/545398a0af79591d308b5700/20100818-agile2010-report-draft.jpg)