Embed Size (px)
Citation preview

NETCOMM FIBRE™ SERIES
Dual Band WiFi Data and VoIP Gateway
NF3ADV - Quick Start Guide

This router has been designed to be placed on a desktop. All of the cables exit from the rear
for better organization. The LED indicator display is visible on the front of the gateway to
provide you with information about network activity and the device status. See below for an
explanation of each of the indicator lights.
ICON NAME ICON DESCRIPTION
Power Lights up when powered on
ADSL Lights up when connected to an ADSL service
3G Lights up when there is a connection to 3G through a USB modem
Internet Lights up with an active Internet connection
Ethernet 1, 2, 3 Lights up when there is a device connected to the Ethernet port
WAN Lights up when connected to the Internet via the Gigabit WAN port
WiFi Solid light when WiFi is enabled. Flashing when WPS available
VoIP Indicates the status of an available VoIP service
DECT Indicates the status of a connected DECT device
NOTE: All lights will flash simultaneously if a firmware upgrade takes place

REAR PANEL DESCRIPTION
1 DSL Connects to a telephone socket with an active ADSL service
2 Line Connects to a telephone socket for backup phone calls over the landline. Recommend use as an ADSL2+ splitter/filter
3 Telephone Connect a telephone handset to use with a VoIP service
4 WiFi Using a paper clip, press this button to turn WiFi on and off
5 Reset button Using a paper clip, hold this button down for more than 10 seconds to reset to factory defaults
6 WAN port Connect an Ethernet based WAN device (NBN)
7 LAN 1-3 Gigabit LAN ports for wired Ethernet clients (computers, laptops, etc)
8 On/Off Turn the NF3ADV on or off
9 Power Power connector, connects to a DC 12V 3A Power Adapter
10 DECT Hold and release this button within 3 seconds for connecting your DECT handset
11 WPS Hold and release this button within 3 seconds to enable the WPS push-button connect function
12 3G Attach a 3G/4G USB modem with an active SIM card to utilise a mobile broadband Internet connection
13 File storage Attach an external USB storage device to share content with connected computers

Internet connection options11. If you are using ADSL, connect the supplied RJ-11 cable to the DSL port on your device
and to the phone port that supplies your ADSL service.
2. If you are using Fibre, connect your RJ-45 Ethernet cable from the blue WAN Ethernet
port to your NBN supplied termination device (ONT).
3. If you are using 3G/4G, insert your 3G/4G USB modem (with an active SIM card) into the
3G USB slot on the side of the NF3ADV.
ADSL Fibre
3G/4G

Connecting the cables21. Connect the supplied RJ-45 Ethernet cable from one of the yellow Ethernet Ports on
the back of the device to your computer.
2. Connect the power adapter and press the on/off button
OPTIONAL
Connect an RJ-11 cable from the telephone port on the back of your device to a telephone
handset to enable use with a VoIP service.

Login to the web interface31. After establishing a wired connection, open your Web browser and type
http://192.168.1.1 into the address bar at the top of the web browser window and
press Enter.
2. Enter “admin” into both the username and password fields and click “Login”.
3. The “First-Time Setup Wizard” will then be displayed. Click on the “Yes, let’s get
started with the wizard” button to configure your device.
4. Select your chosen connection type. You can select from:
- ADSL
- 3G
- WAN (Ethernet WAN for Fibre)

1. Select the ADSL connection type and enter the username/password as supplied by
your ADSL provider.
2. Unless you have specific VPI and VCI values, keep these as the default 8/35.
3. To enable a backup connection via 3G/4G, tick the checkbox and enter the appropriate
3G/4G connection information as supplied by your 3G/4G provider (see the instructions
on Step 5 of this quick start guide).
You will also need to enter a high availability website in the Remote Host box in order to
verify that your ADSL based internet connection remains active.
4. Click “Next” to complete the wizard. Please see from step 7 in this quick start guide for
how to complete the wizard
ADSL4

51. For 3G/4G users, select your country of residence and your service provider from
the dropdown boxes and the network name (APN) will automatically appear.
2. Enter your username/password and SIM PIN if required as supplied by your 3G/4G
provider. Not all 3G/4G providers require a username and password or a SIM PIN
3. Click “Next” to complete the wizard. Please see from step 7 in this quick start guide
for how to complete the wizard
3G/4G

1. For Ethernet WAN users, select the WAN type and enter the username/password as
supplied by your Internet Service Provider.
2. To enable a backup connection via 3G/4G, tick the checkbox and enter the appropriate
3G/4G connection information as supplied by your 3G/4G provider (see the instructions
on Step 5 of this quick start guide).
You will also need to enter a high availability website in the Remote Host box in order to
verify that your ADSL based internet connection remains active.
3. Click “Next” to complete the wizard. Please see from step 7 in this quick start guide for
how to complete the wizard
WAN6

Completing the wizard72.4GHz WiFi
1. Select to enable or disable your wireless network (Wireless on/off), show or hide
your wireless network (SSID Broadcast) or change the wireless network name (SSID
Broadcast Name). After making the appropriate changes, click “Next”. (If you do not
want to change the default settings, simply click “Next”)
2. Select the wireless security type and wireless security key you would like to use on
your wireless network and click “Next”. (If you do not want to change the default
settings, simply click “Next”)
5GHz WiFi
3. Repeat the steps above for the 5GHz WiFi setup
WAN
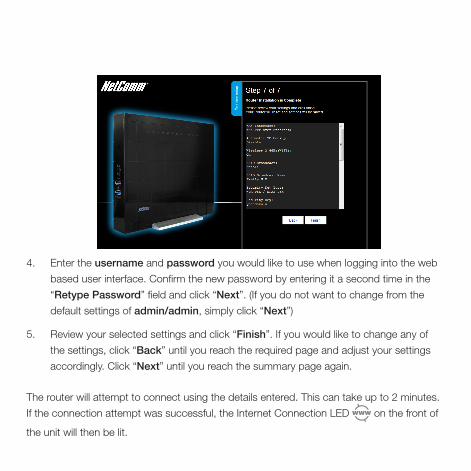
4. Enter the username and password you would like to use when logging into the web
based user interface. Confirm the new password by entering it a second time in the
“Retype Password” field and click “Next”. (If you do not want to change from the
default settings of admin/admin, simply click “Next”)
5. Review your selected settings and click “Finish”. If you would like to change any of
the settings, click “Back” until you reach the required page and adjust your settings
accordingly. Click “Next” until you reach the summary page again.
The router will attempt to connect using the details entered. This can take up to 2 minutes.
If the connection attempt was successful, the Internet Connection LED on the front of
the unit will then be lit.

Connecting via WiFi8Laptop Gaming Console
Smart PhoneIPTV
2.4 GHz 5 GHz
1. Ensure WiFi is enabled on your device (computer/laptop/smart phone/gaming console).
2. Scan for wireless networks in your area and connect to the network name that was
entered when completing the setup wizard
3. When prompted for your wireless security password, enter the wireless security key
that was entered when completing the setup wizard
NOTE: If the wireless network name and wireless security key were not entered in the setup
wizard, your router will use the unique default settings. The default wireless network name
and wireless security key can be found on the Wireless Security Card (included in the box).
4. Wait approximately 30 seconds for the connection to establish.

DECT Handset Registration9DECT handsets can be registered to the router to enable them to utilise the configured VoIP
service. To do this, click the DECT button on the side of the NF3ADV and then set your
DECT handset to register with a base station
Once registered, the handset information should appear in the Status page.
DECT handset
DECT handset

101. If a USB mass storage device is plugged into the File Storage USB port, it will be
auto detected
2. You can access the files on the storage device from any computer connected to
the router
3. To access the files, open a web browser and type \\NAS\.
4. You will need to enter the same username and password that allows access to the
web user interface to access the files. The default username and password is “admin”
(without quotes)
USB Storage
USB storage device