Embed Size (px)
Citation preview

Technical Report
NetApp AltaVault
Cloud-Integrated Storage Appliances Solution Deployment: AltaVault with Veritas NetBackup
Christopher Wong, NetApp
November 2017 | TR-4412
Abstract
This solution deployment guide outlines how easy it is to deploy and use a NetApp®
AltaVault™ cloud-integrated storage appliance with Veritas™ NetBackup™. AltaVault
appliances provide a simple, efficient, and secure way to offsite data to either public or private
cloud storage providers. Using advanced deduplication, compression, and encryption,
AltaVault enables organizations to eliminate reliance on older, less reliable data protection
solutions while improving backup windows and disaster recovery capabilities.

2 NetApp AltaVault Cloud-Integrated Storage Appliances Solution Deployment: AltaVault with Veritas NetBackup
© 2017 NetApp, Inc. All rights reserved.
TABLE OF CONTENTS
1 AltaVault Overview ......................................................................................................................4
1.1 Executive Overview ...............................................................................................................................................4
1.2 NetBackup Architecture Overview ........................................................................................................................4
1.3 AltaVault Appliance Overview ...............................................................................................................................5
2 Deploy and Configure AltaVault with NetBackup ........................................................................5
2.1 AltaVault Solution Configuration Topography ......................................................................................................6
2.2 Hardware and Software Prerequisites ..................................................................................................................6
3 Configure NetBackup ..................................................................................................................6
3.1 Configure a Basic Disk Storage Unit.....................................................................................................................7
3.2 Configure an Advanced Disk Storage Unit ...........................................................................................................9
3.3 Create a Storage Lifecycle Policy (Advanced Disk Only) ..................................................................................15
3.4 Modify a Backup Policy........................................................................................................................................16
3.5 Perform a Test Backup ........................................................................................................................................17
3.6 Monitor the Backup ..............................................................................................................................................18
3.7 Restore a Backup.................................................................................................................................................19
4 Solution Recommendations and Best Practices ....................................................................... 21
4.1 NetBackup Best Practices ...................................................................................................................................21
4.2 Windows Best Practices ......................................................................................................................................22
4.3 Solaris Best Practices ..........................................................................................................................................23
5 Disaster Recovery Process ....................................................................................................... 23
5.1 Predisaster Recovery Checklist ..........................................................................................................................24
5.2 AltaVault Appliance Recovery .............................................................................................................................25
5.3 NetBackup Recovery ...........................................................................................................................................28
5.4 Production Systems Recovery ............................................................................................................................31
Where to Find Additional Information ............................................................................................. 31
Version History ............................................................................................................................... 31
LIST OF TABLES
Table 1) NetBackup best practices. ....................................................................................................................................21
Table 2) Datastore prepopulation command parameters. .................................................................................................27
LIST OF FIGURES
Figure 1) NetBackup component view. .................................................................................................................................5

3 NetApp AltaVault Cloud-Integrated Storage Appliances Solution Deployment: AltaVault with Veritas NetBackup
© 2017 NetApp, Inc. All rights reserved.
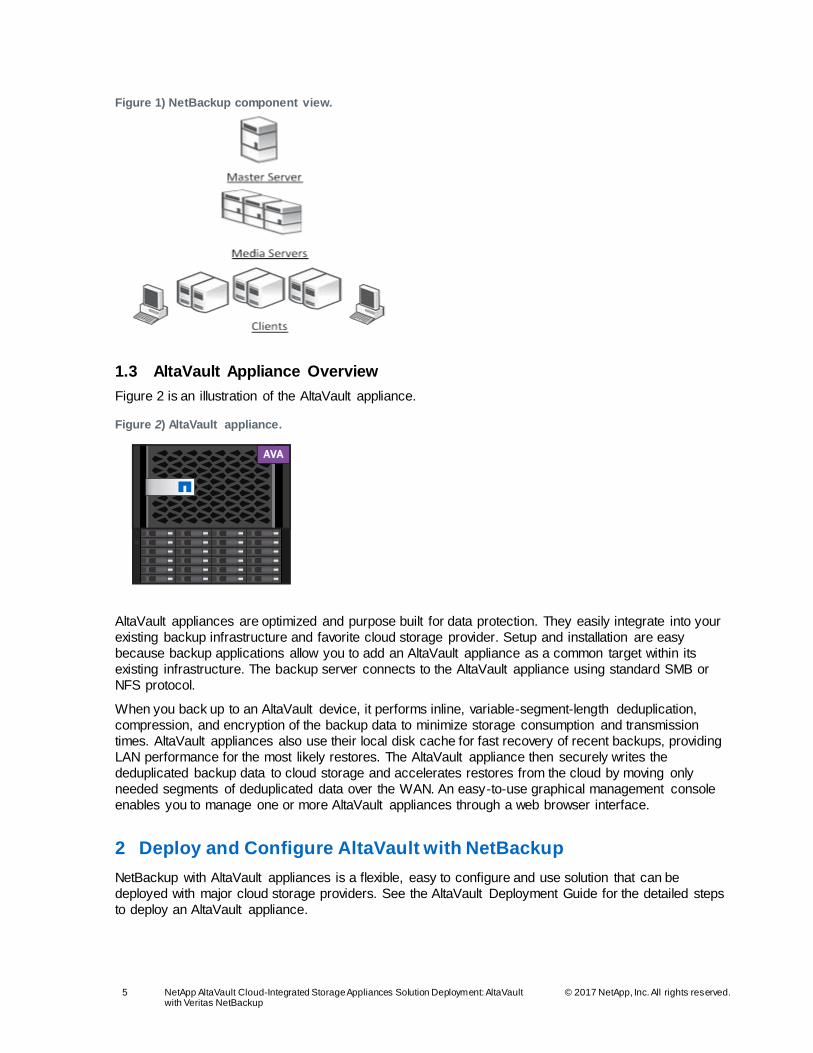
Figure 2) AltaVault appliance. ...............................................................................................................................................5
Figure 3) AltaVault ecosystem...............................................................................................................................................6
Figure 4) Disaster recovery overview..................................................................................................................................23

4 NetApp AltaVault Cloud-Integrated Storage Appliances Solution Deployment: AltaVault with Veritas NetBackup
© 2017 NetApp, Inc. All rights reserved.
1 AltaVault Overview
This chapter is an overview of the solution components.
1.1 Executive Overview
NetApp AltaVault storage enables customers to securely back up data to any cloud at up to 90% lower
cost compared with on-premises solutions. AltaVault gives customers the power to tap into cloud
economics while preserving investments in existing backup infrastructure and meeting backup and
recovery SLAs. AltaVault appliances simply act as a network-attached storage (NAS) target within a
backup infrastructure, enabling organizations to eliminate their reliance on tape infrastructure and all its
associated capital and operational costs, while improving backup windows and disaster recovery
capabilities.
It’s easy to set up the AltaVault appliance and start moving data to the cloud in as little as 30 minutes,
compared to setting up tape or other disk replication infrastructures, which can take days.
By applying industry-leading deduplication, compression, and WAN optimization technologies, AltaVault
appliances shrink dataset sizes by 10x to 30x, substantially reducing cloud storage costs, accelerating
data transfers, and storing more data within the local cache, which speeds recovery.
Security is provided by encrypting data on site or in flight, as well as in the cloud, using 256-bit AES
encryption and TLS v1.1/1.2. AltaVault appliances provide a dual layer of encryption, which means that
any data moved into the cloud is not compromised, and it creates a complete end-to-end security solution
for cloud storage.
Because an AltaVault appliance is an asymmetric, stateless appliance, no hardware is needed in the
cloud, and you can recover the last known good state of a broken or destroyed AltaVault appliance to a
new AltaVault appliance. AltaVault appliances offer the flexibility to scale cloud storage as business
requirements change. All capital expenditure planning required with tape and disk replication-based
solutions is avoided, saving organizations up to 90%.
1.2 NetBackup Architecture Overview
NetBackup is a “three-tiered architecture.” The first tier is a master server that provides functions such as
configuration services, policy creation, scheduling, reporting, and logging. It is the “communications
mechanism” of the backup application. The master server allocates resources to the media servers. The
master server programs provide CPU-intensive processes, such as job scheduling, running binaries, and
metadata gathering (catalog). The master server disks should enable fast writes and should have the
capability to be expanded without interruption, preventing the server from going down. The master server
also needs a disk space where any log files need to be written.
The media server is the mainstay of the NetBackup environment and it is the second tier. The media
server needs to be a high rate of data I/O data importer and exporter that is enabled through the use of
multiple network interface cards (NICs) and host bus adapters (HBAs). The connections to disk, tape
drives, the SAN, and the LAN depend on the backup and storage requirements. The media server must
be able to transfer huge quantities of data and data types from source to target under the supervision of
the master server. The AltaVault appliance is used by the media server to send backups to a public cloud,
as described later in this report.
The final tier is the clients tier. The clients are the systems in which the data resides and that must be
protected. Certain aspects obscure the line between client and media server; however, from the
NetBackup standpoint, when a media server sends its own data to a device for backup, it is considered a
client. See Figure 1 for an image of the NetBackup tiers.
5 NetApp AltaVault Cloud-Integrated Storage Appliances Solution Deployment: AltaVault with Veritas NetBackup
© 2017 NetApp, Inc. All rights reserved.
Figure 1) NetBackup component view.
1.3 AltaVault Appliance Overview
Figure 2 is an illustration of the AltaVault appliance.
Figure 2) AltaVault appliance.
AltaVault appliances are optimized and purpose built for data protection. They easily integrate into your
existing backup infrastructure and favorite cloud storage provider. Setup and installation are easy
because backup applications allow you to add an AltaVault appliance as a common target within its
existing infrastructure. The backup server connects to the AltaVault appliance using standard SMB or
NFS protocol.
When you back up to an AltaVault device, it performs inline, variable-segment-length deduplication,
compression, and encryption of the backup data to minimize storage consumption and transmission
times. AltaVault appliances also use their local disk cache for fast recovery of recent backups, providing
LAN performance for the most likely restores. The AltaVault appliance then securely writes the
deduplicated backup data to cloud storage and accelerates restores from the cloud by moving only
needed segments of deduplicated data over the WAN. An easy-to-use graphical management console
enables you to manage one or more AltaVault appliances through a web browser interface.
2 Deploy and Configure AltaVault with NetBackup
NetBackup with AltaVault appliances is a flexible, easy to configure and use solution that can be
deployed with major cloud storage providers. See the AltaVault Deployment Guide for the detailed steps
to deploy an AltaVault appliance.

6 NetApp AltaVault Cloud-Integrated Storage Appliances Solution Deployment: AltaVault with Veritas NetBackup
© 2017 NetApp, Inc. All rights reserved.
2.1 AltaVault Solution Configuration Topography
Figure 3 illustrates the AltaVault solution configuration topology.
Figure 3) AltaVault ecosystem.
2.2 Hardware and Software Prerequisites
To install and deploy AltaVault in a backup environment, you must first complete the following
prerequisites:
1. Have at least one server that acts as the master and media server. NetApp recommends that you separate the master and media servers so that the systems are not overloaded. These servers, along
with clients, need minimum hardware features as identified by the backup application. Check the Veritas Support site and related compatibility lists where applicable.
2. Obtain server systems and related software media supported by NetBackup and the AltaVault
appliance.
3. A physical AltaVault appliance or virtual AltaVault appliance must be online and connected to the
physical network infrastructure. A minimum of two IP addresses must be available for AltaVault.
4. Procure and set up all necessary software licenses from each vendor, using vendor-specific
guidelines, including cloud storage credentials from your designated cloud storage provider.
5. Provide physical stacking and racking of equipment at each site. All cabling and power must be
operational.
6. Verify that all LAN and WAN connections are functioning to and from your Internet and cloud storage
providers.
7. If applicable, have available a Windows directory service (Active Directory) or UNIX Kerberos server.
3 Configure NetBackup
AltaVault can be configured within NetBackup in one of three ways:
1. Basic Disk
2. OpenStorage, also referred to as OST (starting at AltaVault v4.2). To configure AltaVault and
NetBackup with OST, refer to the AltaVault OST Plug-in Deployment Guide.
3. Advanced Disk (starting at AltaVault v4.3). Along with OST which also uses Advanced Disk, AltaVault
can leverage NetBackup storage lifecycle policies (SLP).
7 NetApp AltaVault Cloud-Integrated Storage Appliances Solution Deployment: AltaVault with Veritas NetBackup
© 2017 NetApp, Inc. All rights reserved.
The following sections will describe configuring basic and advanced disk types with AltaVault, and how to
modify a backup policy to perform and restore backups.
3.1 Configure a Basic Disk Storage Unit
The following steps describe how to create a basic disk storage unit and associate it to the AltaVault
appliance. If you want to create a basic disk storage unit, refer to section 3.2 Configure an Advanced Disk
Storage Unit below.
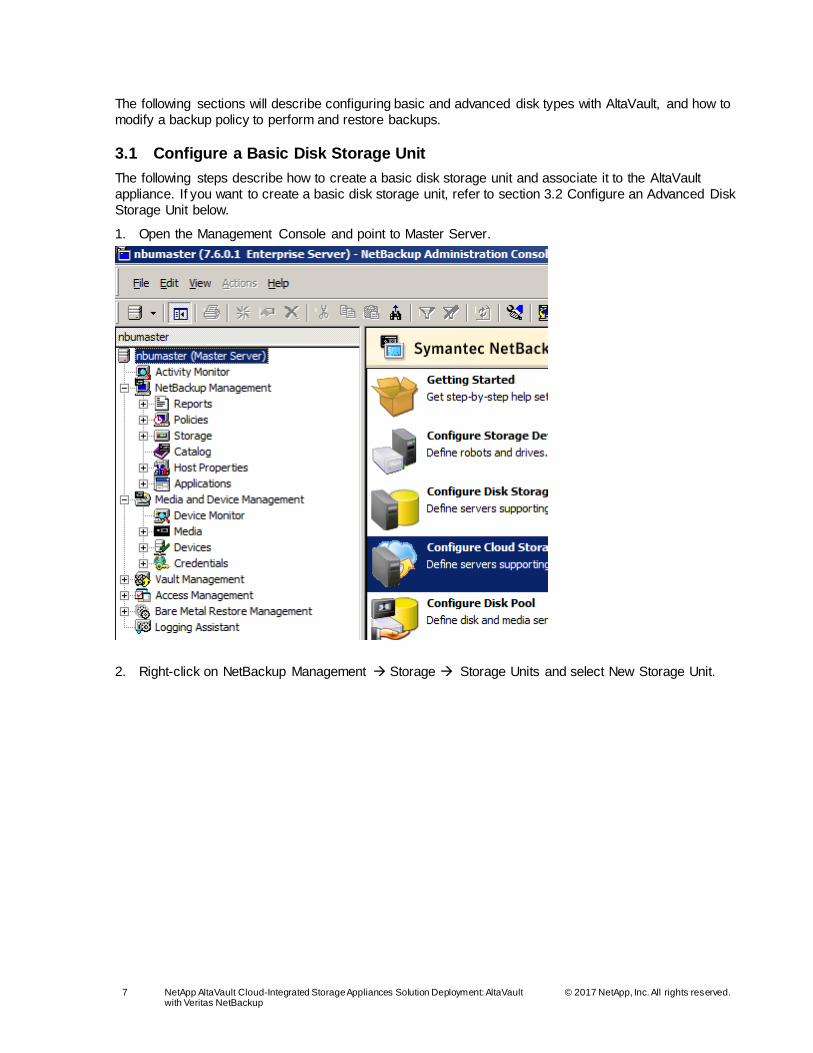
1. Open the Management Console and point to Master Server.
2. Right-click on NetBackup Management Storage Storage Units and select New Storage Unit.

8 NetApp AltaVault Cloud-Integrated Storage Appliances Solution Deployment: AltaVault with Veritas NetBackup
© 2017 NetApp, Inc. All rights reserved.
3. Create the Storage Unit with the following settings.
Storage Unit Name. Type a unique name for the storage unit. The storage unit name will be used to specify a storage unit for policies.

9 NetApp AltaVault Cloud-Integrated Storage Appliances Solution Deployment: AltaVault with Veritas NetBackup
© 2017 NetApp, Inc. All rights reserved.
Storage Unit Type. The storage unit type that applies to the AltaVault appliance is Disk.
Disk Type. The disk type that should be used with the AltaVault appliance is BasicDisk.
Media Server. Select the media server from the drop-down box that will own this storage unit.
Absolute Pathname to Directory. The absolute pathname will be the IP or DNS of one of the data interfaces defined on the AltaVault appliance and a SMB share created on the AltaVault appliance.
Maximum Concurrent Jobs. Maximum concurrent jobs specifies the number of jobs written to
the storage unit at a time. The default value is 1; it can be increased. NetApp recommends an initial value of 5 or less; it can be increased accordingly to improve performance. NetBackup can split large backup jobs from a client into multiple jobs for better throughput. To allow a backup job from a client to be split into streams, enable multiple streams in the policy. Steps are shown in the policy section of this document.
Reduce Fragment Size to. The fragment size is the maximum-size object that NetBackup can create to store backups. AltaVault performs optimally receiving large sequential streams of data from the backup application. NetApp recommends using 100GB objects for the best balance of backup and restore performance.
Note: To back up data with NetBackup to an AltaVault SMB share in a Windows environment, you
must first configure the NetBackup Remote Manager and Monitor Service and the NetBackup Client Service. Failure to perform these configurations can result in the NetBackup failure status 800, “resource request failed.” Refer to the documentation in the Veritas NetBackup Administrator’s Guide: https://www.veritas.com/support/en_US/article.000094423
4. Open the Windows Control Panel.
5. Select Administrative Tools.
6. Select Services.
7. Double-click on NetBackup Remote Manager and Monitor Service.
8. Select Stop to stop the service.
9. Select the LogOn tab.
10. Select the This Account radio button and enter valid credentials that match the credentials for an
AltaVault SMB user. Refer to the AltaVault Administration Guide for further information on how to configure a SMB user account.
11. Select the General tab and select Start to start the service.
12. Repeat steps 4–7 for the NetBackup Client Service.
13. Use Windows Explorer to map a network drive from the NetBackup media server to the AltaVault
SMB share using the same user credentials to verify that access is available for NetBackup.
3.2 Configure an Advanced Disk Storage Unit
The following steps describe how to create an advanced disk storage unit and associate it to the AltaVault
appliance. If you want to create a basic disk storage unit, refer to section 3.1 Configure a Basic Disk
Storage Unit above.
1. Open the Management Console and point to Master Server. Select Media and Device Management from the left tree hierarchy, and from the right pane select Configure Disk Storage Servers.

10 NetApp AltaVault Cloud-Integrated Storage Appliances Solution Deployment: AltaVault with Veritas NetBackup
© 2017 NetApp, Inc. All rights reserved.
2. In the Storage Server Configuration Wizard page, select Advanced Disk, then click Next. Verify the configuration on the subsequent page and click Next to create the storage server.
3. After the storage server creation step is complete in the task window, select the checkbox ‘Create a disk pool using the storage server you have just created” and click Next.

11 NetApp AltaVault Cloud-Integrated Storage Appliances Solution Deployment: AltaVault with Veritas NetBackup
© 2017 NetApp, Inc. All rights reserved.
4. On the Volume Selection page, click on Add New Volume and provide the share path to the AltaVault SMB share. Click on Validate and Add, and verify the volume appears and is selected in the Volume Selection Page. Click Next.

12 NetApp AltaVault Cloud-Integrated Storage Appliances Solution Deployment: AltaVault with Veritas NetBackup
© 2017 NetApp, Inc. All rights reserved.
5. On the Additional Disk Pool Information page, fill in the following options as appropriate. Click Next.

13 NetApp AltaVault Cloud-Integrated Storage Appliances Solution Deployment: AltaVault with Veritas NetBackup
© 2017 NetApp, Inc. All rights reserved.
Disk Pool Name. Provide the name of the disk pool that you are creating.
Comments. Optionally, describe the disk pool.
High Water Mark/Low Water Mark. Leave these as the default values of 98% and 80%
respectively.
Limit I/O Streams to Prevent Disk Overload. Do not select this checkbox.
6. Verify the disk pool configuration summary and click Next to create the disk pool.
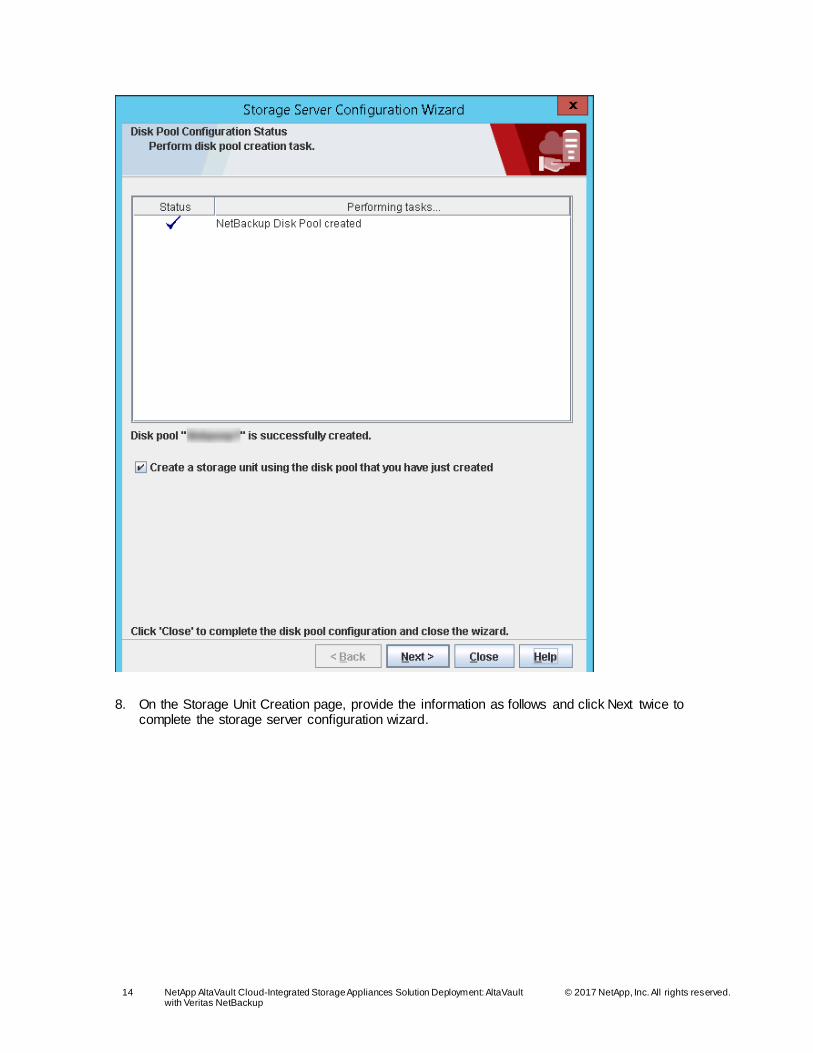
7. After the disk pool is created in the status task page, select the checkbox “Create a storage unit using
the disk pool that you have just created” and click Next.
14 NetApp AltaVault Cloud-Integrated Storage Appliances Solution Deployment: AltaVault with Veritas NetBackup
© 2017 NetApp, Inc. All rights reserved.
8. On the Storage Unit Creation page, provide the information as follows and click Next twice to complete the storage server configuration wizard.

15 NetApp AltaVault Cloud-Integrated Storage Appliances Solution Deployment: AltaVault with Veritas NetBackup
© 2017 NetApp, Inc. All rights reserved.
Storage Unit Name. Provide a name for the storage unit you are creating.
Only Use the Selected Media Servers. Identify the NetBackup media servers which can use this
storage unit.
Maximum Concurrent Jobs. This establishes how many writers are allowed by data protection clients. Tune performance by setting a value higher than 1. The value will depend on your available resources and infrastructure environment. Adjust the number of streams accordingly based on your observed performance.
Maximum Fragment Size. The fragment size is the maximum-size object that NetBackup can create to store backups. AltaVault performs optimally receiving large sequential streams of data from the backup application. NetApp recommends using 100GB objects for the best balance of backup and restore performance.
3.3 Create a Storage Lifecycle Policy (Advanced Disk Only)
NetBackup storage lifecycle policies describe how backup job data will be directed to specific storage disk
pools, and ultimately which advanced disk storage unit to use for operations. Refer to NetBackup
documentation for creating or implementing AltaVault as a storage lifecycle tier. An example storage
lifecycle policy that points to an advanced disk storage unit based on AltaVault is shown below.

16 NetApp AltaVault Cloud-Integrated Storage Appliances Solution Deployment: AltaVault with Veritas NetBackup
© 2017 NetApp, Inc. All rights reserved.
3.4 Modify a Backup Policy
NetBackup policies determine when backups occur, to which backup targets the data is written, and how
long backup versions are maintained. Policies include schedules for automatic calendar-based schedules
to perform unattended backups of clients. Policies can be run manually or as directed by the user as
needed. A policy also needs to be associated to a storage unit or storage unit group to write the backup
jobs. Use the following steps to associate a NetBackup policy to an AltaVault based storage unit or
storage unit group.
1. Right-click on an existing policy under NetBackup Management > Policies and select Change.
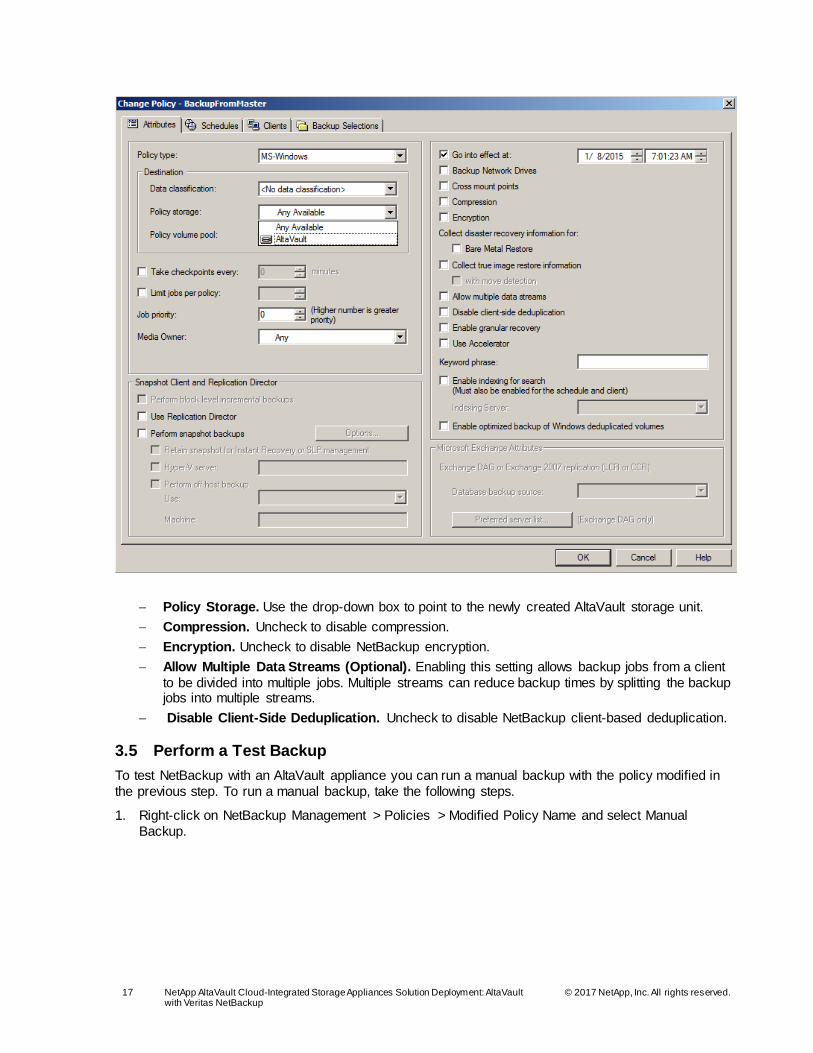
2. Modify the existing policy properties to point backups to an AltaVault based storage unit as follows.
17 NetApp AltaVault Cloud-Integrated Storage Appliances Solution Deployment: AltaVault with Veritas NetBackup
© 2017 NetApp, Inc. All rights reserved.
Policy Storage. Use the drop-down box to point to the newly created AltaVault storage unit.
Compression. Uncheck to disable compression.
Encryption. Uncheck to disable NetBackup encryption.
Allow Multiple Data Streams (Optional). Enabling this setting allows backup jobs from a client
to be divided into multiple jobs. Multiple streams can reduce backup times by splitting the backup jobs into multiple streams.
Disable Client-Side Deduplication. Uncheck to disable NetBackup client-based deduplication.
3.5 Perform a Test Backup
To test NetBackup with an AltaVault appliance you can run a manual backup with the policy modified in
the previous step. To run a manual backup, take the following steps.
1. Right-click on NetBackup Management > Policies > Modified Policy Name and select Manual
Backup.

18 NetApp AltaVault Cloud-Integrated Storage Appliances Solution Deployment: AltaVault with Veritas NetBackup
© 2017 NetApp, Inc. All rights reserved.
2. Select the schedule and clients to back up. Within a given policy, select one or more clients for manual backup. In most cases all clients are run from policies defined during a set schedule. Administrators run policies for certain clients manually after jobs fail and need to be rerun. Highlight
the schedule and clients for backup and click OK. You will be prompted to view the progress in the Activity Monitor.
3.6 Monitor the Backup
The following describes how to view job details. To view the details of a specific job, double-click on the
job in the Jobs table. The Job Details dialog box appears that contains detailed job information on two
tabs: a Job Overview tab and a Detailed Status tab. Information about the elapsed time, transfer rate (in
KB/sec), and current object processed are shown below.

19 NetApp AltaVault Cloud-Integrated Storage Appliances Solution Deployment: AltaVault with Veritas NetBackup
© 2017 NetApp, Inc. All rights reserved.
3.7 Restore a Backup
When the backup is complete, perform a restore to validate that the AltaVault appliance can restore the
backed-up data.
1. From the client system, go to Windows Start > All Programs > Veritas NetBackup, and click the Backup, Archive, and Restore icon. The following window appears.
2. Click Select for Restore. In the screen that appears, place a checkmark next to the files that need to
be restored. From the left toolbar select the Restore button to start the restore.
20 NetApp AltaVault Cloud-Integrated Storage Appliances Solution Deployment: AltaVault with Veritas NetBackup
© 2017 NetApp, Inc. All rights reserved.
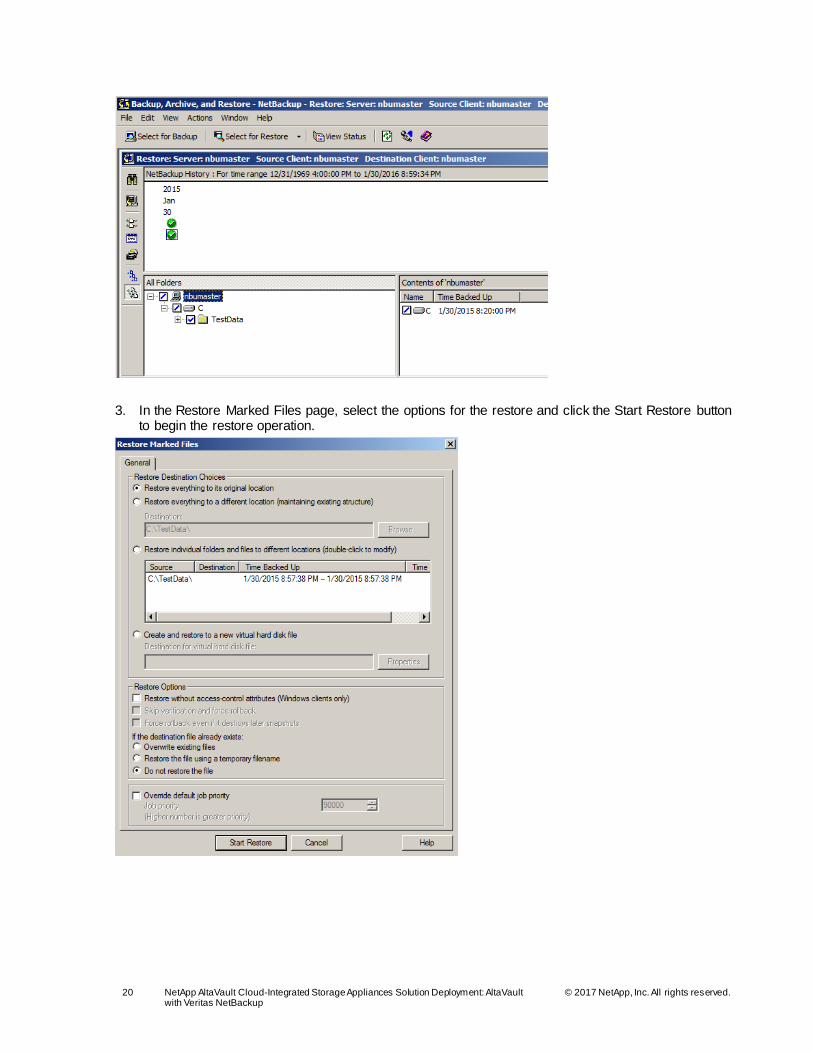
3. In the Restore Marked Files page, select the options for the restore and click the Start Restore button to begin the restore operation.

21 NetApp AltaVault Cloud-Integrated Storage Appliances Solution Deployment: AltaVault with Veritas NetBackup
© 2017 NetApp, Inc. All rights reserved.
4 Solution Recommendations and Best Practices
This chapter lists recommendations and best practices for deploying AltaVault in NetBackup
environments. The best practices are not requirements, but NetApp recommends that you follow these
suggestions for the best solution experience.
4.1 NetBackup Best Practices
Table 1 describes the recommended best practices for using NetBackup with AltaVault.
Table 1) NetBackup best practices.
Item Description
Use basic disk storage
units
AltaVault has been tested with basic disk storage units. Advanced disk storage
units are not officially supported.
Use 100GB (102400MB)
storage unit fragment size
The fragment size is the maximum-size object that NetBackup can create to store backups. AltaVault performs optimally receiving large sequential streams
of data from the backup application. NetApp recommends using 100GB objects for the best balance of backup and restore performance. If needed, adjust the size based on your requirements. Note that while very large values can improve throughput and decrease volume counts created by the backup application, it can result in more data being downloaded from the cloud and increased costs if
these larger volumes need to be prepopulated from the cloud for recovery
operations.

22 NetApp AltaVault Cloud-Integrated Storage Appliances Solution Deployment: AltaVault with Veritas NetBackup
© 2017 NetApp, Inc. All rights reserved.
Item Description
Disable Compression, Encryption, and Deduplication in backup
policies
This frees resources and allows AltaVault to optimize data.
Enable Allow multiple data
streams in backup policies
This allows NetBackup to maximize throughput to AltaVault with multiple
connections.
NetBackup services must explicitly run with the user
account specified (could be a domain user/domain admin), so that the services don’t startup with “Local System Account” as
default
The NetBackup Client Service, NetBackup Remote Manager and Monitor Service, and NetBackup Service Layer Service, must all use a Windows
Domain administrator account in order for write operations to AltaVault to occur successfully. Adjust the service properties within Windows Services, and then shut down and start NetBackup using the following Windows Powershell commands from the C:\Program Files\Veritas\Netbackup\bin folder: .\bpdown.exe –f –v
.\bpup.exe –f –v
Deploying AltaVault with Veritas OST
(OpenStorage)
Deployment and configuration steps for Veritas OST and NetBackup are described in the AltaVault OST Plugin Deployment Guide. They are beyond the
scope of this technical report.
Set the NET_BUFFER_SZ
parameter to 0
Tuning the network buffers can potentially improve performance of data to and from AltaVault from a NBU media server, but if not tuned correctly it can instead reduce performance. Veritas recommends setting a value of 0 to enable auto-
tuning of this parameter. Refer to article 000026262 for further details.
NUMBER_DATA_BUFFERS
should be set to 256 for Windows NetBackup
media servers
Tuning the number of simultaneous data buffers can improve performance.
Refer to article 000004792 for further details on setting this parameter.
SIZE_DATA_BUFFERS
should be set to 1048576 for Windows NetBackup
media server
Tuning the size of a data buffer can improve performance. Refer to article
000004792 for further details on setting this parameter.
4.2 Windows Best Practices
You can modify Windows networking parameters for SMB to improve overall backup application
performance. To make these changes, go to the Start menu and enter regedit to start the Windows
registry editor. Enter administrative permissions if prompted. Changes made in the Windows registry
editor are permanent upon entry, so use extreme caution when making the changes or additions. A
reboot is required.
[HKEY_LOCAL_MACHINE\SYSTEM\CurrentControlSet\Services\lanmanworkstation\parameters]
"SESSTIMEOUT"=DWORD:00000e10
[HKEY_LOCAL_MACHINE\SYSTEM\CurrentControlSet\Services\AFD\Parameters]
"DefaultSendWindow"=DWORD:00040000
"DefaultReceiveWindow"=dword:00040000
[HKEY_LOCAL_MACHINE\SYSTEM\CurrentControlSet\Services\Tcpip\Parameters]
"GlobalMaxTcpWindowSize"=dword:00040000
"TcpWindowSize"=dword:00040000
"Tcp1323Opts"=dword:00000003
If Windows 2012 or Windows 8 or later is used with AltaVault versions earlier than 4.2, the Secure
Negotiate feature in those products requires SMB signing negotiation messages to be signed themselves;

23 NetApp AltaVault Cloud-Integrated Storage Appliances Solution Deployment: AltaVault with Veritas NetBackup
© 2017 NetApp, Inc. All rights reserved.
otherwise, the connection fails. AltaVault versions earlier than 4.2 do not sign negotiation messages, and
this can cause the SMB connections to AltaVault to fail repeatedly. To work around this limitation, if you
cannot upgrade AltaVault to version 4.2 or later, disable the Secure Negotiate feature on the Windows
server by using the following command from Windows PowerShell. Refer to Microsoft Knowledge Base
article 2686098 for details.
Set-ItemProperty -Path "HKLM:\SYSTEM\CurrentControlSet\Services\LanmanWorkstation\Parameters"
RequireSecureNegotiate -Value 0 -Force
4.3 Solaris Best Practices
NFS networking parameters on Solaris operating systems should be configured to optimally send data to
AltaVault through configured NFS mounts. In addition to tuning the rsize and wsize mount options
appropriately, nfs3_max_transfer_size and nfs3_bsize should also be tuned. nfs3_max_transfer_size and
nfs3_bsize should be greater than or equal to the minimum of rsize and wsize. To set the values, edit the
/etc/system file and change/add the following lines to the file:
nfs:nfs3_max_transfer_size=<value>
nfs:nfs3_bsize=<value>
A reboot of the system is required for the configuration changes to take effect.
5 Disaster Recovery Process
Disaster recovery (DR) is the process of recovering the technology infrastructure after a natural or man-
made disaster.
Figure 4) Disaster recovery overview.
For example, consider a NetBackup DR scenario with an AltaVault appliance in which the entire
production site, including the AltaVault appliance and the NetBackup master server, are lost. At least one
or more backups of that production environment exist in the cloud storage, so to recover the data at the
DR site you need a new NetBackup master server and a new physical or virtual AltaVault appliance.
Note: You do not need an AltaVault license to restore the data. Moreover, you can download the virtual AltaVault from the NetApp Support site at http://support.netapp.com.

24 NetApp AltaVault Cloud-Integrated Storage Appliances Solution Deployment: AltaVault with Veritas NetBackup
© 2017 NetApp, Inc. All rights reserved.
5.1 Predisaster Recovery Checklist
1. Export the current AltaVault configuration and encryption key. Browse to the menu Configure
Setup Wizard and select Export Configuration to export the configuration file. By default the name of the file is altavault_config_(HOSTNAME)_(DATETIME).tgz.
Note: NetApp recommends that you store the exported configuration file in different physical locations. You should also keep the configuration file within the DR site. The file contains information about the configuration, including the encryption key.
2. Back up the NetBackup catalog files to the same AltaVault appliance target as the NetBackup data.
Create a NBU Catalog Backup Policy using the Backup Policy Configuration Wizard. When prompted for the target location to write the catalog backup, specify the appropriate AltaVault share. Refer to the NetBackup Administrator’s Guide for further details on using the Backup Policy Configuration Wizard.

25 NetApp AltaVault Cloud-Integrated Storage Appliances Solution Deployment: AltaVault with Veritas NetBackup
© 2017 NetApp, Inc. All rights reserved.
5.2 AltaVault Appliance Recovery
The first step to recover from a catastrophic failure of a production site is to install and configure for
disaster recovery a new physical AltaVault appliance or virtual AltaVault. NetApp recommends using a
virtual AltaVault for the initial recovery; it can be downloaded from the NetApp Support website and
quickly deployed within a VMware, Hyper-V, or KVM environment at the DR site. Although it is not
required, NetApp suggests that the AltaVault appliance at the DR site have the same or greater local
storage capacity as the original AltaVault appliance at the lost production site in case you decide to make
the resources at the DR site your production resources after DR is complete. The following describes the
steps needed to fully recover and restore the backup data from the cloud to the new AltaVault appliance.
1. Configure the AltaVault appliance to the new network environment at the DR site.
a. Plug a serial cable into the console port and a terminal; for a virtual AltaVault appliance use the
hypervisor console.
b. Log in to the AltaVault CLI using the default login admin and the default password password.
c. Configure the AltaVault network information. For details, see the NetApp AltaVault Cloud
Integrated Storage Administration Guide.

26 NetApp AltaVault Cloud-Integrated Storage Appliances Solution Deployment: AltaVault with Veritas NetBackup
© 2017 NetApp, Inc. All rights reserved.
2. Recover the original configuration of the AltaVault appliance to the new AltaVault appliance at the DR site. Browse to the menu Configure Setup Wizard and import the previously saved AltaVault_config_(HOSTNAME)_(DATETIME).tgz configuration file. Make sure you leave the default
Import Shared Data Only checkbox selected.
3. Configure AltaVault Data Interfaces to the new network environment at the DR site. Browse to the menu Configure > Data Interfaces and configure Data Interfaces network information.
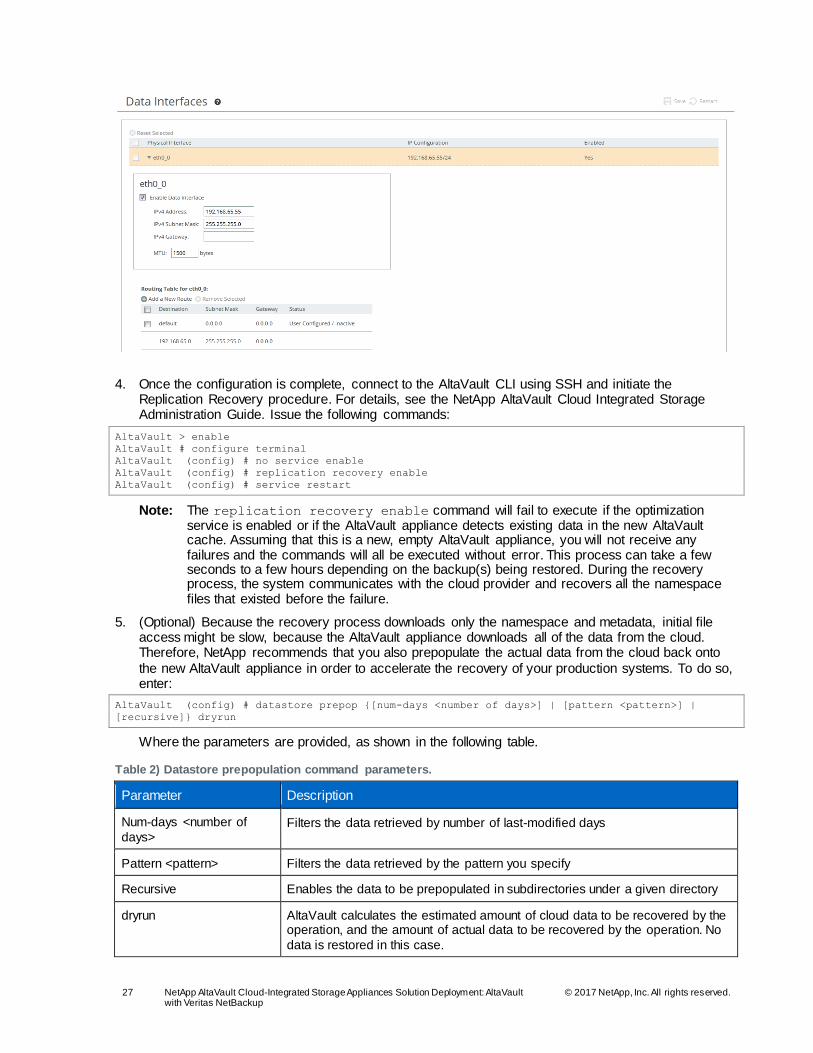
27 NetApp AltaVault Cloud-Integrated Storage Appliances Solution Deployment: AltaVault with Veritas NetBackup
© 2017 NetApp, Inc. All rights reserved.
4. Once the configuration is complete, connect to the AltaVault CLI using SSH and initiate the Replication Recovery procedure. For details, see the NetApp AltaVault Cloud Integrated Storage Administration Guide. Issue the following commands:
AltaVault > enable
AltaVault # configure terminal
AltaVault (config) # no service enable
AltaVault (config) # replication recovery enable
AltaVault (config) # service restart
Note: The replication recovery enable command will fail to execute if the optimization service is enabled or if the AltaVault appliance detects existing data in the new AltaVault cache. Assuming that this is a new, empty AltaVault appliance, you will not receive any failures and the commands will all be executed without error. This process can take a few seconds to a few hours depending on the backup(s) being restored. During the recovery process, the system communicates with the cloud provider and recovers all the namespace files that existed before the failure.
5. (Optional) Because the recovery process downloads only the namespace and metadata, initial file access might be slow, because the AltaVault appliance downloads all of the data from the cloud. Therefore, NetApp recommends that you also prepopulate the actual data from the cloud back onto
the new AltaVault appliance in order to accelerate the recovery of your production systems. To do so, enter:
AltaVault (config) # datastore prepop {[num-days <number of days>] | [pattern <pattern>] |
[recursive]} dryrun
Where the parameters are provided, as shown in the following table.
Table 2) Datastore prepopulation command parameters.
Parameter Description
Num-days <number of
days> Filters the data retrieved by number of last-modified days
Pattern <pattern> Filters the data retrieved by the pattern you specify
Recursive Enables the data to be prepopulated in subdirectories under a given directory
dryrun AltaVault calculates the estimated amount of cloud data to be recovered by the operation, and the amount of actual data to be recovered by the operation. No
data is restored in this case.
28 NetApp AltaVault Cloud-Integrated Storage Appliances Solution Deployment: AltaVault with Veritas NetBackup
© 2017 NetApp, Inc. All rights reserved.
Note: If the AltaVault appliance storage capacity is less than the space used in the cloud, you can still initiate the recovery process. However, in this case the AltaVault appliance will recover only as much actual data as the size of its storage. If the recovery process attempts to bring back more data than the disaster recovery AltaVault appliance can handle, then the recovery process might fail. Virtual AltaVault, for example, can store up to 8TB of cloud data. For more details on virtual AltaVault appliance sizes, see the NetApp AltaVault Cloud Integrated Storage Installation and Service Guide for Virtual Appliance.
At this point the AltaVault Recovery procedure is complete. Now you need to recover the NetBackup media server.
5.3 NetBackup Recovery After the AltaVault appliance has been recovered, you need to install and configure the NetBackup master/media server.
1. Install NetBackup master/media server software in a new host system at the DR site.
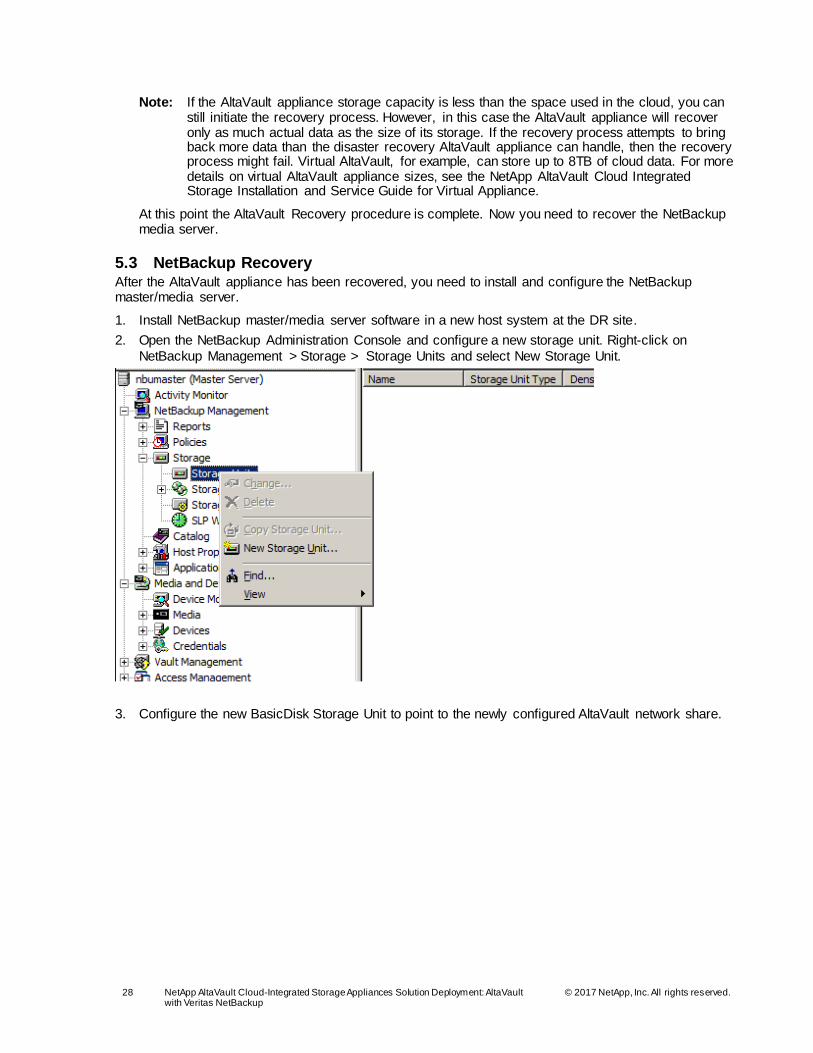
2. Open the NetBackup Administration Console and configure a new storage unit. Right-click on
NetBackup Management > Storage > Storage Units and select New Storage Unit.
3. Configure the new BasicDisk Storage Unit to point to the newly configured AltaVault network share.
29 NetApp AltaVault Cloud-Integrated Storage Appliances Solution Deployment: AltaVault with Veritas NetBackup
© 2017 NetApp, Inc. All rights reserved.
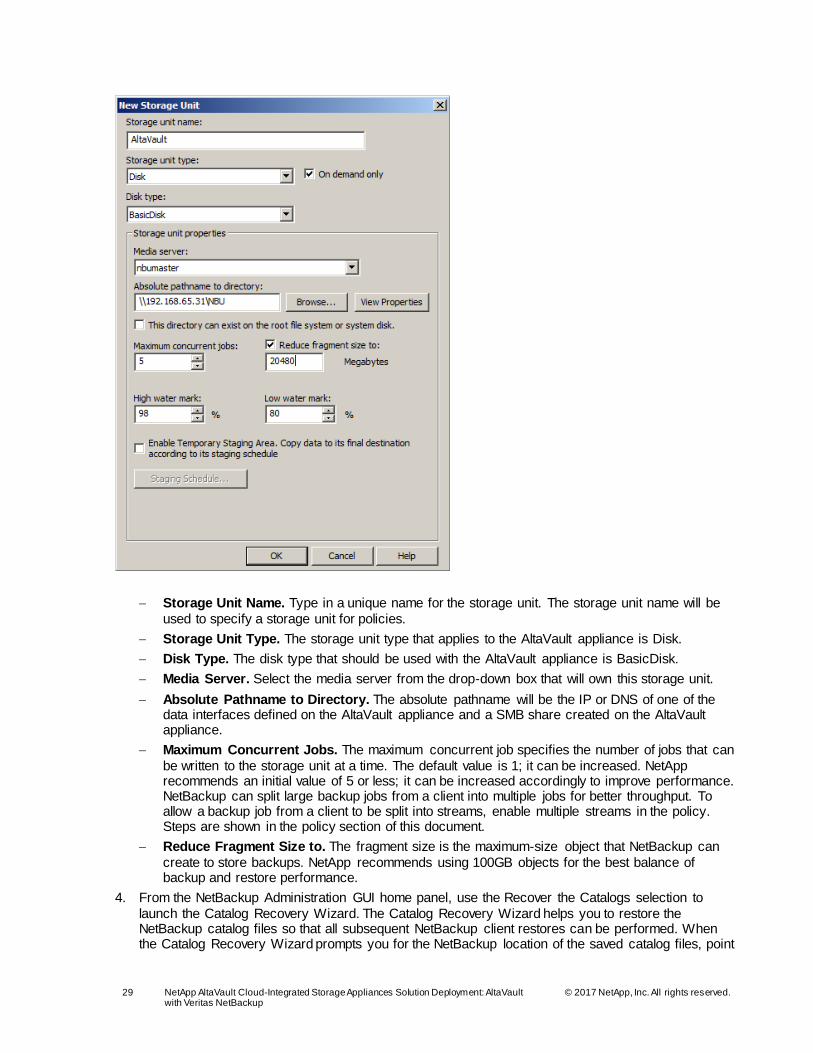
Storage Unit Name. Type in a unique name for the storage unit. The storage unit name will be
used to specify a storage unit for policies.
Storage Unit Type. The storage unit type that applies to the AltaVault appliance is Disk.
Disk Type. The disk type that should be used with the AltaVault appliance is BasicDisk.
Media Server. Select the media server from the drop-down box that will own this storage unit.
Absolute Pathname to Directory. The absolute pathname will be the IP or DNS of one of the data interfaces defined on the AltaVault appliance and a SMB share created on the AltaVault appliance.
Maximum Concurrent Jobs. The maximum concurrent job specifies the number of jobs that can
be written to the storage unit at a time. The default value is 1; it can be increased. NetApp recommends an initial value of 5 or less; it can be increased accordingly to improve performance. NetBackup can split large backup jobs from a client into multiple jobs for better throughput. To allow a backup job from a client to be split into streams, enable multiple streams in the policy. Steps are shown in the policy section of this document.
Reduce Fragment Size to. The fragment size is the maximum-size object that NetBackup can
create to store backups. NetApp recommends using 100GB objects for the best balance of backup and restore performance.
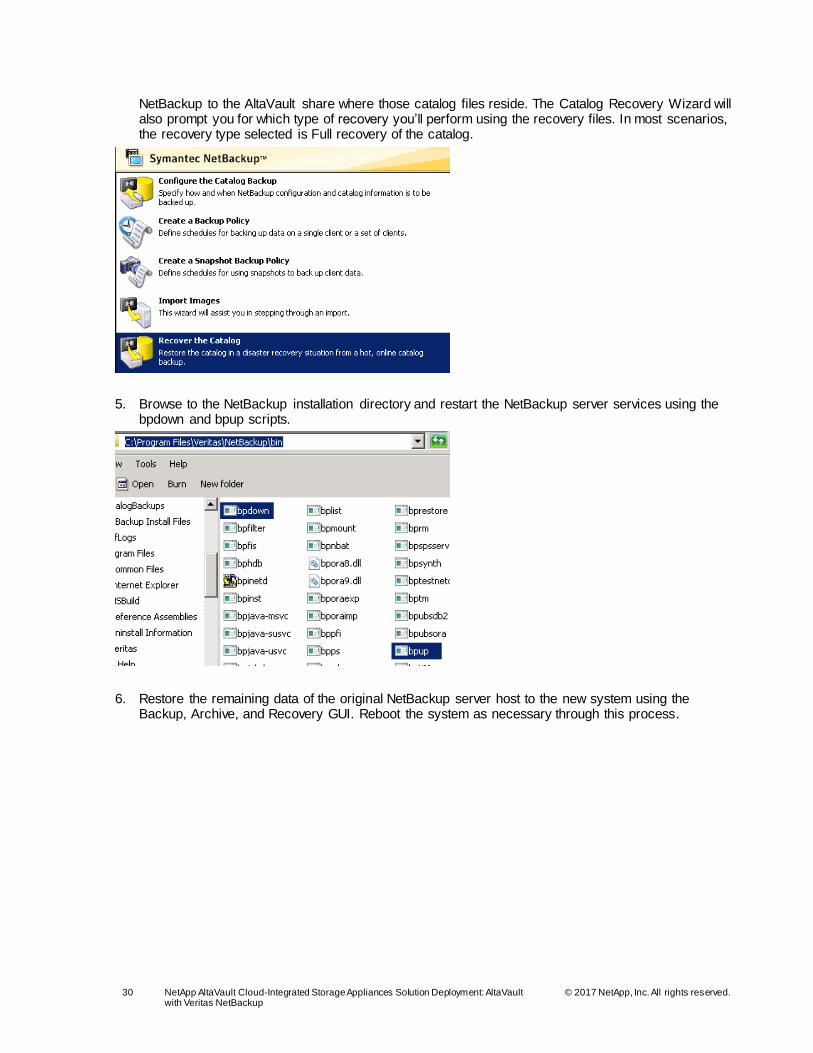
4. From the NetBackup Administration GUI home panel, use the Recover the Catalogs selection to
launch the Catalog Recovery Wizard. The Catalog Recovery Wizard helps you to restore the NetBackup catalog files so that all subsequent NetBackup client restores can be performed. When the Catalog Recovery Wizard prompts you for the NetBackup location of the saved catalog files, point
30 NetApp AltaVault Cloud-Integrated Storage Appliances Solution Deployment: AltaVault with Veritas NetBackup
© 2017 NetApp, Inc. All rights reserved.
NetBackup to the AltaVault share where those catalog files reside. The Catalog Recovery Wizard will also prompt you for which type of recovery you’ll perform using the recovery files. In most scenarios, the recovery type selected is Full recovery of the catalog.
5. Browse to the NetBackup installation directory and restart the NetBackup server services using the bpdown and bpup scripts.
6. Restore the remaining data of the original NetBackup server host to the new system using the Backup, Archive, and Recovery GUI. Reboot the system as necessary through this process.

31 NetApp AltaVault Cloud-Integrated Storage Appliances Solution Deployment: AltaVault with Veritas NetBackup
© 2017 NetApp, Inc. All rights reserved.
Note: You do NOT need to restore any data in the following directories:
install_path\NetBackup\db
install_path\NetBackupDB
install_path\NetBackup\var
install_path\Volmgr\database
These directories were recovered with the Catalog Recovery Wizard. Overwriting them with regular
backups leaves the catalogs in an inconsistent state.
5.4 Production Systems Recovery
The AltaVault appliance and NetBackup are now configured as they were prior to the disaster. You can
now perform system restores of any production systems that need to be recovered at the DR site using
normal NetBackup recovery strategies such as Intelligent Disaster Recovery. Refer to NetBackup
documentation for recovering additional systems.
Where to Find Additional Information
To learn more about the information described in this document, refer to the following documents and/or
websites:
• AltaVault Cloud-Integrated Storage product page
http://www.netapp.com/us/products/cloud-storage/altavault-cloud-backup.aspx
• AltaVault Resources page http://mysupport.netapp.com/altavault/resources
Version History
Version Date Document Version History
Version 1.0 May 2015 Initial version
Version 1.1 November 2015 Updated for 4.1 release
Version 1.2 April 2016 Updated for 4.2 release
Version 1.3 August 2016 Updated for 4.2.1 release
Version 1.4 January 2017 Updated for 4.3 release

32 NetApp AltaVault Cloud-Integrated Storage Appliances Solution Deployment: AltaVault with Veritas NetBackup
© 2017 NetApp, Inc. All rights reserved.
Version Date Document Version History
Version 1.5 April 2017 Updated for 4.3.1 release
Version 1.6 November 2017 Updated for 4.4 release

33 NetApp AltaVault Cloud-Integrated Storage Appliances Solution Deployment: AltaVault with Veritas NetBackup
© 2017 NetApp, Inc. All rights reserved.
Refer to the Interoperability Matrix Tool (IMT) on the NetApp Support site to validate that the exact product and feature versions described in this document are supported for your specific environment. The NetApp IMT defines the product components and versions that can be used to construct configurations that are supported by NetApp. Specific results depend on each customer’s installation in accordance with
published specifications.
Copyright Information
Copyright © 2017 NetApp, Inc. All rights reserved. Printed in the U.S. No part of this document covered by copyright may be reproduced in any form or by any means—graphic, electronic, or mechanical, including photocopying, recording, taping, or storage in an electronic retrieval system—without prior written permission of the copyright owner.
Software derived from copyrighted NetApp material is subject to the following license and disclaimer:
THIS SOFTWARE IS PROVIDED BY NETAPP “AS IS” AND WITHOUT ANY EXPRESS OR IMPLIED WARRANTIES, INCLUDING, BUT NOT LIMITED TO, THE IMPLIED WARRANTIES OF MERCHANTABILITY AND FITNESS FOR A PARTICULAR PURPOSE, WHICH ARE HEREBY DISCLAIMED. IN NO EVENT SHALL NETAPP BE LIABLE FOR ANY DIRECT, INDIRECT, INCIDENTAL, SPECIAL, EXEMPLARY, OR CONSEQUENTIAL DAMAGES (INCLUDING, BUT NOT
LIMITED TO, PROCUREMENT OF SUBSTITUTE GOODS OR SERVICES; LOSS OF USE, DATA, OR PROFITS; OR BUSINESS INTERRUPTION) HOWEVER CAUSED AND ON ANY THEORY OF LIABILITY, WHETHER IN CONTRACT, STRICT LIABILITY, OR TORT (INCLUDING NEGLIGENCE OR OTHERWISE) ARISING IN ANY WAY OUT OF THE USE OF THIS SOFTWARE, EVEN IF ADVISED OF THE POSSIBILITY OF SUCH DAMAGE.
NetApp reserves the right to change any products described herein at any time, and without notice.
NetApp assumes no responsibility or liability arising from the use of products described herein, except as expressly agreed to in writing by NetApp. The use or purchase of this product does not convey a license under any patent rights, trademark rights, or any other intellectual property rights of NetApp.
The product described in this manual may be protected by one or more U.S. patents, foreign patents, or pending applications.
RESTRICTED RIGHTS LEGEND: Use, duplication, or disclosure by the government is subject to
restrictions as set forth in subparagraph (c)(1)(ii) of the Rights in Technical Data and Computer Software clause at DFARS 252.277-7103 (October 1988) and FAR 52-227-19 (June 1987).
Trademark Information
NETAPP, the NETAPP logo, and the marks listed at http://www.netapp.com/TM are trademarks of NetApp, Inc. Other company and product names may be trademarks of their respective owners.
TR-4412-1117