Embed Size (px)
Citation preview

7/24/2019 Nec Community Edition
http://slidepdf.com/reader/full/nec-community-edition 1/101

7/24/2019 Nec Community Edition
http://slidepdf.com/reader/full/nec-community-edition 2/101
Community Edition - Compiled by Anthony Case
Front cover artwork courtesy of Will Beck.
Special thanks to the worldwide Necromunda community, whose years of continuing discussions are instrumental.
Note this fan rulebook is completely unofficial and in no way endorsed by Games Workshop.
Community Edition - Compiled by Anthony Case
Front cover artwork courtesy of Will Beck.
Special thanks to the worldwide Necromunda community, whose years of continuing discussions are instrumental.
Note this fan rulebook is completely unofficial and in no way endorsed by Games Workshop.

7/24/2019 Nec Community Edition
http://slidepdf.com/reader/full/nec-community-edition 3/101
4
9
10
13
22
25
27
32
48
59
74
82
84
85
92
96
100
109
INTRODUCTION
THE TURN
MOVEMENT
SHOOTING
HAND-TO-HAND COMBAT
LEADERSHIP
ADVANCED RULES
WEAPONS
EQUIPMENT
NECROMUNDA BACKGROUND
CREATING A GANG
NECROMUNDA CAMPAIGNS
SERIOUS INJURIES
EXPERIENCE
TERRITORY
TRADING POSTS
HIRED GUNS
SCENARIOS
CONTENTS
NECROMUNDA
2
CONTENTS
INTRODUCTION
THE TURN
MOVEMENT
SHOOTING
HAND-TO-HAND COMBAT
LEADERSHIP
ADVANCED RULES
WEAPONS
EQUIPMENT
NECROMUNDA BACKGROUND
CREATING A GANG
NECROMUNDA CAMPAIGNS
SERIOUS INJURIES
EXPERIENCE
TERRITORY
TRADING POSTS
HIRED GUNS
SCENARIOS
4
9
10
13
22
25
27
32
48
59
74
82
84
85
92
96
100
109

7/24/2019 Nec Community Edition
http://slidepdf.com/reader/full/nec-community-edition 4/101

7/24/2019 Nec Community Edition
http://slidepdf.com/reader/full/nec-community-edition 5/101
7/24/2019 Nec Community Edition
http://slidepdf.com/reader/full/nec-community-edition 6/101
Long
8-16
8-16
8-16
-
8-16
8-16
8-168-16
6-9
Short
0-8
0-8
0-8
-
0-8
0-8
0-8 0-8
0-6
RangePistols
Stub Gun
Autopistol
Laspistol
Hand Flamer
Bolt Pistol
Plasma Pistol (Low)
Plasma Pistol (Max)Needle Pistol
Web Pistol
Long
-1
-
-
-
-
-
--
-1
Short
+1
+2
+1
-
+2
+1
+2+2
-
To HitStrength
3
3
3
3
4
4
53
-
Damage
1
1
1
1
1
1
11
-
SaveModifier
-
-
-
-1
-1
-1
-2-1
-
AmmoRoll
4+
4+
2+
5+
6+
4+
6+6+
6+
Special
-
-
-
Flamer, Ammo Roll, Catch Fire (5+)
-
-
Gets HotToxic Dart, Injuries, Silent
Webbed Targets, Solvent, Capture
12-24
4-18
4-18
4-18
4-18
4-24
8-328-24
12-24
0-12
0-4
0-4
0-4
0-4
0-4
0-80-8
0-12
Basic Weapons
Autogun
Shotgun (Solid Slug)
Shotgun (Scatter Shot)
Shotgun (Manstopper)
Shotgun (Hot Shot)
Shotgun (Bolt)
Hunting RifleLasgun
Boltgun
-
-1
-1
-
-1
-
--
-
+1
+1
+1
+1
+1
+1
-1+1
+1
3
4
3
4
4
4
33
4
1
1
1
1
1
1
11
1
-
-
-
-
-
-1
--
-1
4+
4+
4+
4+
6+
6+
4+2+
6+
-
Knock-back
Pellets
Knock-back
Knock-back, Catch Fire (5+)
-
Critical Shot-
-
12-24
-
14-28
8-24
12-24
6-12
16-32
0-12
-
0-14
0-8
0-12
0-6
0-16
Special Weapons
Autoslugger
Flamer
Grenade Launcher
Plasma Gun (Low)
Plasma Gun (Max)
Meltagun
Needle Rifle
-
-
-1
-
-
-
-
+1
-
-
+1
+1
+1
+1
3
4
-
5
6
8
3
1
1
-
1
1
D6
1
-
-2
-
-2
-3
-5
-1
5+
4+
6+
4+
6+
4+
6+
Sustained Fire (1)
Flamer, Ammo Roll, Catch Fire (4+)
Ammo
-
Sustained Fire (1), Gets Hot
High Impact
Toxic Dart, Injuries, Silent
-
20-40
20-40
20-72
20-72
20-40
20-72
20-72
20-60
-
0-20
0-20
0-20
0-20
0-20
0-20
0-20
0-20
Heavy Weapons
Heavy Flamer
Heavy Stubber
Heavy Bolter
Missile Launcher (Frag)
Missile Launcher (Krak)
Heavy Plasma Gun (Low)
Heavy Plasma Gun (Max)
Autocannon
Lascannon
-
-
-
-
-
-
-
-
-
-
-
-
-
-
-
-
-
-
5
4
5
4
8
7
8
8
9
D3
1
D3
1
D6
D3
D6
D6
2D6
-3
-1
-2
-2
-5
-4
-5
-5
-6
3+
4+
6+
6+
6+
4+
6+
4+
2+
Flamer, A. Roll, C. Fire (3+), M.&Fire
Sustained Fire (2)
Sustained Fire (2)
Gas Cloud
High Impact
Blast, High Impact
Gas Cloud , High Impact
Sustained Fire (1), High Impact
High Impact, Terrifying Force
H-T-H Weapons
Knife
Chain, Flail
Club, Maul, Bludgeon
Massive Weapon
Sword
Chainsword
Power Axe
Shock Maul
Power Sword
Power Fist
Str.
User
User+1
User+1
User+2
User
4
User+3
5
User+2
User+5
Dam.
1
1
1
1
1
1
1
1
1
D3
Special
-
Nullify, Clumsy
-
2hand, Draw, M.Blow
Parry
Parry , Noisy
Dual-handed
Out of Action, Injury
Parry
-
Save Mod
-
-
-
-
-
-2
-
-2
-
-
Grenades
Smoke Bombs
Choke
Scare
Photon Flares
Frag
Plasma
Krak
Melta BombsHallucinogen
Str.
-
-
-
-
3
5
6
8-
Dam.
-
-
-
-
1
1
D6
2D6-
Special
Gas Cloud, Smoke
Gas Cloud, Choke
Gas Cloud, Scare
Blast, Blind
Gas Cloud
Blast, Plasma Ball
-1 Hit, Demolition
DemolitionGas Cloud, Halluc
Save Mod
-
-
-
-
-1
-2
-3
-5 -

7/24/2019 Nec Community Edition
http://slidepdf.com/reader/full/nec-community-edition 7/101
Necromunda is a game of fierce combat between rivalgang fighters in the dangerous underworld of the
Necromundan hives.
A hive is an ancient and incomprehensibly vast city, builtup layer upon layer, stretching ten miles into theplanet's atmosphere. To those who live in the depthsthe dark and ruinous Underhive offers everyopportunity for wealth and power. Its collapsed cavernsconceal the riches of the distant past: rare and preciousmetals, unfathomable archeotech devices, wondrousmutated fungi and much more. It is also a place ofdanger, where mutant creatures, renegades and killershide from the laws of House and Hive. And, of course,there are others who want the riches of the Underhivefor themselves.
Outside the hives the planet's surface is covered byendless miles of toxic ash wastes and the atmosphere isso polluted that it corrodes the hive's armoured walls. Above is a harsh sky and the sun's deadly light. Beyondthe planet itself is the wider galaxy and the great realmof the Imperium of Man, an empire of a million worldsheld in thrall by the Adeptus of Earth. But such thingsare nothing but legends in the Underhive where sky andspace, planets and even the ground itself are conceptsso wild and abstract that many refuse to believe theyexist.
TABLETOP CONFLICTThe Necromunda game allows you to fight conflictsbetween rival Underhive gangs on the tabletop. Theopposing gangs are represented by models, assembledand painted by yourself, each representing an individualgang fighter. You'll find more information about thedifferent cultures and peoples of Necromunda in thelater sections of this book. Your tabletop becomes a partof the Underhive, the scene of the action, with ruinedbuildings, gantries and multi-level walkways.
The aim of the game is to outfight your opponent, which requires a mixture of skill and luck. You'll soonlearn how to arm and equip your gang efficiently, and
how to exploit the ruins and other terrain to your bestadvantage. You'll also want to expand your gangsbeyond the models provided in the game. Many modelsare available for the different gangs and new models arecoming out all the time. With these you can expand
your collection, equip fighters with different weapons,and add more powerful characters.
BUILDING THE GANGEvery time you play Necromunda you earn theopportunity to improve your gang. By winning games you gain territory, discover ancient artifacts, uncovermineral wealth, and so on. With this wealth you can buymore weaponry and hire more gang fighters.
Your gang will also improve with time. Every time agang fights, its members gain in skill and experience.
Young juves quickly progress to become full gangfighters, and fighters learn new abilities which makethem superior combatants.
As the gang’s leader becomes richer and his followersever more deadly, his fame will spread throughoutthe Underhive. Famous gunfighters and otherrenegades will come and seek him out, perhaps to join him, maybe to collect the inevitable bounty thatpiles upon his head!
By recording the details of your gang you can watch itgrow from a bunch of young hopefuls to hardenedfighters feared and respected throughout the domes.
THE RULEBOOKThis book, the Necromunda rulebook, contains therules of the game. You don’t need to learn all therules to play, but we suggest you read through therulebook before attempting your first game. The mostimportant rules are summarised on the separateplaysheets, and you’ll quickly find these are all youneed in most situations. For more detailed rules andto resolve more complex situations, you can alwaysrefer to the rulebook itself.
NEW PLAYERSIf you’re new to Games Workshop games then you’llbe reassured to know that finding other players isn’tnormally a problem – you’ll be surprised how manythere are! There may be a Games Workshop storenearby, where you can obtain models, paints andgame supplements. Games Workshop stores are not just shops, they are hobby centres where the staff willhappily help you learn the rules, show you how topaint, and suggest ways to use and develop yourcollection. Games Workshop staff are also players who collect and paint their own forces and fightbattles themselves.
WHAT IS THE COMMUNITY EDITION
The NCE is not an attempt to overhaul or hugelyexpand the Necromunda game, instead it's intendedto be a fan update to an already solid set of rules.
There are three main aims to this project. To betterbalance the weapons and skills alongside minortweaks to improve general gameplay. To clarifyambiguities and patch up rule holes. And finally tointroduce select new equipment and scenarios thatconform with the spirit of the game and add variety.
All changes to the official rules are marked in red.Their origins stem from many years of discussions byplayers from all over the world, each of whom
deserves a big ol' bottle of Wildsnake!
INTRODUCTION
4
NECROMUNDA

7/24/2019 Nec Community Edition
http://slidepdf.com/reader/full/nec-community-edition 8/101
WHAT YOU WILL NEED
MODELS Games of Necromunda are fought out using modelfighters, each approximately 28mm tall. Beforeplaying you need enough models to assemble acomplete ‘gang’ as detailed later in the rules. A large
variety of different models are available from Games Workshop, illustrations of which can be foundthroughout this book, and particular in the colour
section at its centre.
TEMPLATES Special templates are used to determine the effects ofmany weapons. For example, grenade and shellbursts, and the gout of burning fire projected by aflamer. You can find these near the front of the book. You can photocopy the page and cut out thetemplates for use in your games, or alternativelypurchase more sturdy plastic versions available from
Games Workshop.
DICE A variety of different dice are used in the Necromundagame, as follows.
From left to right: Two D6’s, a scatter dice, and anartillery dice
Ordinary dice (known as D6’s) are marked 1 to 6 inthe usual way. These dice are used a lot during playand to save space on charts they are always referredto as D6 (where ‘D’ stands for dice). So, when therules call upon you to roll a D6 we are simply asking you to roll a dice. D6+1 means roll a dice and add 1to the score. 2D6 means roll two dice and add thescores together to obtain a score of 2-12.
The Scatter dice is marked with four arrows and twoHIT symbols. This dice is used to determine wheregrenades and shells land if they miss their target,hence ‘scatter’. The dice can be used to establish anyrandom direction from a point. Note that the HIT
symbol also has a small arrow on it to facilitate this.
The Artillery dice is marked 2, 4, 6, 8, 10 andMISFIRE. This dice is used in conjunction with theScatter dice to determine how far shells land fromtheir mark. A MISFIRE result can result in a shellproving dud or even exploding in the breach.
In some cases, you will also find references to a dicecalled a D3. There isn’t actually any such thing as a 3-sided dice, instead a D3 means roll a D6 and halve theresult rounding up.
So, for a D3, a roll of a 1 or 2 = 1, a roll of 3 or 4 = 2
and a roll of 5 or 6 = 3.
RE-ROLLSSometimes you may be offered the chance to re-roll adice throw. This is exactly what it sounds like, pick upthe dice and roll them again. You must accept theresult of the second roll even if it's worse than the
first roll and re-rolled dice cannot ever be re-rolled asecond time. Note if you re-roll a single 2D6 or D66roll then both dice must re-rolled. For example, when taking a Leadership test you cannot re-roll justone of the dice, both dice must be re-rolled.
HALVING VALUESSometimes you may need to halve a value, in whichcase fractions are always rounded up – eg a fighter with a Weapon Skill of 5 that finds himself inside asmoke cloud must halve his Weapon Skill to 3.
WHAT ELSE YOU WILL NEEDIn addition to the game components mentioned
above you will need two or more players and a firm,level tabletop or area of floor. A kitchen table will dofine. Some gamers make their own gaming tablesfrom a sheet of chipboard or something similar. Sucha table can be slightly larger than the table or trestlesthat support it, and can be divided into two or morepieces for ease of storage.
You will need at least one retractable tape measuremarked in feet and inches. All distances inNecromunda are given in Imperial units.
Pens and pencils, and plenty of paper will also berequired. When you play a game you will need to
keep track of wounds suffered by your fighters, the weapons they are carrying, and other details. This ismost easily done using a roster sheet, an example of which is included in this book. We recommend that you copy or photocopy additional roster sheets anduse them to record details during the game. We’llexplain more about roster sheets and how to usethem later in this book.
5
NECROMUNDA

7/24/2019 Nec Community Edition
http://slidepdf.com/reader/full/nec-community-edition 9/101
8
THE RULES
CHARACTERISTICS
The Underhive fighters of Necromunda have wildly varied martial skills and physical abilities. Some arefaster than others, some are stronger, some moredetermined, some are better shots, and so forth. Thistremendous variety is fully represented in the form ofcharacteristics and special skills. Right now we won’t worry about the special skills – these come later withpractice and battle experience.
Each model fighter is defined by their characteristics which are assigned a value of between 1 and 10. Thehigher value your model has for any characteristic thebetter – for example, a model with a Strength of 6 isstronger than a model with a Strength of 2.
Descriptions of the characteristics are given below.
Move (M): A model’s move shows the number ofinches it can move in a turn. The usual number is 4 asalmost all fighters move 4" per turn, although theycan move faster when they are running or charging.
Weapon Skill (WS): Weapon Skill is a measure ofclose combat ability – how good the person is athand-to-hand fighting.
Ballistic Skill (BS): Ballistic Skill shows how good ashot the person is. When you shoot a gun the chanceof hitting a target depends upon your Ballistic Skill.
Strength (S): Strength simply shows how strong aperson is! Strength is especially important when youfight hand-to-hand combat because the stronger youare the harder you can hit or thrust.
Toughness (T): Toughness is a measure of how easily an individual can withstand a hit from a weapon or ablow from a club, hand weapon or fist. The tougher you are the harder you are to wound or kill.
Wounds (W): A model’s Wounds value shows howmany times a fighter can be wounded before hecollapses and goes down dead or incapacitated. Mostindividuals have a Wounds value of only 1 but tough
veteran gangers might have a value of 2 or more.
Initiative (I). The Initiative value represents alertnessand reaction speed. It determines a fighter’s chance ofdodging a sudden blow or gathering his wits whileshells and bombs explode around him.
Attacks (A). The Attacks value indicates the number of‘Attack dice’ rolled when the model fights in hand-to-hand combat. The more dice you roll the more chance you have of beating your opponent!
Leadership (Ld). Leadership represents raw courageand self-control. The higher a person’s Leadership themore likely he is to remain steadfast in combat whileothers run off or are slain around him.
CHARACTERISTIC PROFILE
A model’s characteristic values are written in the formof a convenient chart which we call his characteristicprofile. Below is the average profile for a 'Ganger'.
When you raise your first gang it will include manygangers with exactly this profile. As you fight gamesagainst other players your fighters will get better andtheir characteristics will rise. All these details arerecorded using your gang rosters. This is explainedproperly later on. For now it’s enough to know whatthe characteristics are and how the values vary.
Ganger
Mak McMadd
M
4
WS
3
BS
3
S
3
T
3
W
1
I
3
A
1
Ld
7
NECROMUNDA
MINIMUM VALUESGang fighters can sometimes suffer penalties to theircharacteristic profile, usually due to serious injuries.Even if a model suffers multiple penalties to the same value it's not possible to modify a characteristic tobelow 1. The only exception to this is Wounds whichcan be reduced to 0 if the fighter becomes injured.
CHARACTERISTIC TESTsDuring a game fighters will often be required to take
characteristic tests. For example, a model hit by ascare grenade must take a Toughness test to see if hesuccumbs to the effects of the gas.
If a model must take a characteristic test then roll aD6. If the result is equal to or below the characteristicinvolved then the test is passed. If the result is higherthan the characteristic then the test has been failed.
Leadership tests work in exactly the same way exceptthat the test is rolled using 2D6. The two scores areadded together and compared against the model'sLeadership value to see if the test is passed.
Some experienced gangers can have a characteristic
value that is 6 or even greater. Obviously it's notpossible to roll above that value using a D6, but it'sstill possible for the model to fail the test. If a modelis required to take a characteristic test against a valuethat is 6 or above and you roll a 6, roll a second D6. If you a roll 1-3 then the test is failed, while a roll of 4-6results in the test being passed. Note Leadership testsignore this rule as gang fighters cannot have aLeadership value of 12 or greater.
It's possible for a model to have two separate Strength values, one for each arm. This can happen if thefighter suffers an Arm Wound or is using a bionic arm.If the model is required to take a Strength test thenthe arm with the highest Strength is used for the test.

7/24/2019 Nec Community Edition
http://slidepdf.com/reader/full/nec-community-edition 10/101
1 MOVEMENTDuring the movement phase you may move
your gang fighters according to the rules givenlater for movement.
2 SHOOTINGIn the shooting phase you may shoot with anyappropriate weapons as described in the rules
for shooting.3 HAND-TO-HANDDuring the hand-to-hand phase all models inhand-to-hand combat may fight. Note that bothsides fight in hand-to-hand combat regardlessof whose turn it is.
4 RECOVERYDuring the recovery phase you can attempt torecover the nerve of broken fighters, or see theextent of injuries for downed fighters. Theseare explained in detail later on.
9
THE TURNDuring the game you take command of a gang ofNecromundan Underhive fighters. Youropponent commands a rival gang, your deadlyopponents in the forthcoming conflict.
The model fighters and scenery are set up on the
tabletop as appropriate for the encounter youare fighting (see the Scenarios section in theSourcebook). There are many different types ofencounter, varying from the straightforwardshoot-out to rescue missions, ambushes anddaring raids. Depending on the encounterplayed, you can set the gang fighters up indifferent ways, but all the games are basicallyplayed in the same fashion.
To begin with one side takes a turn, then theother side, then the original side and so on,much like a game of draughts or chess. When itis your turn you can move all your models, shoot
with any fighters that are able to do so, and fighthand-to-hand combats. Once your turn iscomplete it is your opponent’s turn to move,shoot and fight with his gang.
PHASESTo keep track of who’s doing what and when, your turn is divided into four distinct phases asfollows. Each phase is completed before
beginning the next. So, begin by moving all yourmodels, then shoot with all models that can doso, then fight hand-to-hand, and finally recoverany models that have run from the fight.
Once your turn is complete it is your opponent’sturn. Your opponent works through each phase,moving, shooting, fighting hand-to-hand andrecovery, after which his turn is over.
Games last until one side either gives in or isforced into defeat as described later. You can alsobe obliged to withdraw from the fight if your sidetakes too many casualties. During someencounters, there is a specific objective which youmust achieve, perhaps to destroy a machine orrescue a captive. Each of the special encountersdescribes what you must do to win, and thereforeend, the game.
NECROMUNDA

7/24/2019 Nec Community Edition
http://slidepdf.com/reader/full/nec-community-edition 11/101
10
NECROMUNDA
Movement
During the movement phase you can move yourmodels as you wish in accordance with the rulesgiven below. Move your model fighters one at atime and finish moving each before moving the
next one. You can move your fighters in anyorder except where noted below.
1 CHARGERSIf you want a model to charge at an enemy andattack him hand-to-hand then you must do thisbefore moving any other models. When youcharge you must declare to your opponent that
you are charging and indicate which enemymodel you are attacking.
2 COMPULSORY MOVESSometimes a model is obliged to move in acertain way and this is called a ‘compulsory
move’. For example, a fighter whose nervebreaks must run away from his enemies andtake cover. Make all your compulsory movesbefore finishing any remaining movement.
3 THE RESTOnce you have moved chargers andcompulsory movers you can move the rest of
your models as you wish.RUNNINGThe normal 4" move represents a person movingat a fairly rapid rate but allowing time to aim andshoot a weapon and generally observe what isgoing on around him. If you wish a model canmove much quicker than this – he can run! A
running fighter can move at double speed: 8"rather than 4", for example.
A running model loses his chance to shoot in theturn. He is concentrating on running and is notprepared to fight, having shouldered his weaponsor replaced them in holsters. You should declarethat models are running as they move, as this willhelp to remind both players that the model isunable to shoot that turn.
If a fighter starts the turn with any enemy models within 8" then he cannot run that turn. Thefighter is unwilling to holster his weapons with
enemy gang members so close and must stay alertto them. Note this applies even if the fightercannot visually see the enemy as he could wellhave heard them moving or loading their guns.
Any enemy models in hiding are ignored as thefighter is unaware of their presence.
MOVINGDuring their movement phase models can move
up to their move rate in inches in any direction.Most fighters have a move characteristic (M) of 4and so can move 4" in any direction including upor down ladders.
In normal circumstances you do not have tomove the full permitted distance or at all if you donot wish. Any exceptions are described later andinvariably involve charging or compulsory moves.
At the end of a fighter's move the model can beturned to face in any direction. Pivoting on thespot does not count as movement. This isimportant to remember as some weapons can
only be fired if the model remained stationary.
Justice in the Underhive is a rough and ready affair, administered chiefly by the local GuilderCourts under the supervision of each settlement’s
most powerful Guilders. These rich andinfluential individuals keep the peace inside thetowns and oversee any trading that goes ontheremerchant posts.
The Guilders hire local fighters called Watchmento man the gates and walk the streets duringlights out. If bigger problems arise, such asoutlaw gangs raiding the surrounding holes, theGuilders pay local gang leaders to deal withthem. This provides a lucrative income for themost successful gangs. Strangers, trouble-makers
and quarrelsome citizens are targeted by the diligent Watchmen and dealt with by means of a swift crack on the head or a night in the pit.
Belligerent or persistent types are hauled upbefore the next Guilder Court for trial and sentence.

7/24/2019 Nec Community Edition
http://slidepdf.com/reader/full/nec-community-edition 12/101
NECROMUNDA
11
CHARGE!If you wish a model to engage an enemy in hand-to-hand combat then you must declare and makea special move called a charge. The reason we dothis is that the enemy may get a chance to shootas you leap towards him waving your weapons
and yelling a bloodcurdling cry. Withoutmeasuring the distance, declare that you arecharging and indicate which enemy model you
wish to attack. You can declare a charge againstany enemy model that is not in hiding, evenenemy models that the charger cannot see at thestart of his move.
A charge is like a run, at double move rate, butends with the attacker touching his enemy base-to-base. Once opposing models are touchingbases in this way they are engaged in hand-to-hand combat. Models are also engaged in hand-to-hand combat if separated by a low wall or
obstacle, where it is literally impossible for thebases to touch because the wall is in the way.
If you can move your fighter into base-to-basecontact with more than one enemy model withhis charge move, he can charge them both. Thismight be inadvisable as he will then be fightingtwo enemies at once!
It can happen that you charge an enemy but failto reach him because you have miscalculated thedistance. If this happens the model is moved asfar as possible towards his enemy and can donothing for the rest of the turn.
Note that you cannot move models into hand-to-hand combat except by charging – any moveintended to bring a fighter into hand-to-handcombat is a charge by definition.
HIDINGThe Hiding rule allows us to represent the factthat real people can duck down and concealthemselves in a way our unmoving anddramatically posed models cannot. A hidingfighter keeps as still as possible, just peeking out
over his cover or around a corner. Hiding issometimes useful if you want to keep out of afight until the enemy gets within close range, or if you want a breather to recover and to regroup your forces.
A model can hide if it is behind a low wall orcolumn, at the corner of a building, or in a similarposition where a person might reasonablyconceal himself. The player declares that hisfighter is hiding at any point during the move andcan indicate this by placing a Hidden counterbeside the model.
While hidden a fighter cannot be seen or shot at,even if a portion of the model is actually stickingup or out from its cover. While hidden a modelcannot shoot without giving away its position orcoming out of hiding. If a hiding model shoots ormoves so that it can be seen then it is no longerhidden and can be shot at as normal.
A model that runs or charges is not able to hidethat turn. His sudden burst of speed does notgive him time to conceal himself from view.
A model may stay hidden over several turns solong as it remains behind a concealing wall orsimilar feature. It may even move around behindcover so long as it remains concealed while itdoes so. If an enemy moves into a position wherehe would clearly be able to see the hidden fighter,then the model cannot claim to be hidden anylonger and the counter is removed.
A model may not hide if it is too close to anenemy – he will be seen or heard no matter how
well concealed he may be. This distance variesaccording to the enemy fighter, who will alwayssee, hear, or otherwise spot hidden foes withinhis Initiative value in inches. So, a fighter whoseInitiative value is 3 will automatically spot all
hidden enemy within 3").
Silent Attacks
Normally a hidden fighter that shoots must comeout of hiding, the sound of the gunshot and flareof its muzzle flash easily giving away his position.However, some weapons emit no sound nor flare.If a hidden fighter fires a silent weapon then thereis a chance he will remain undetected. After theshot has been made, roll a D6. On a roll of 4+ theenemy gang is unable to detect the shooter'sposition and so will remain in hiding. On anyother roll the shooter is spotted and must comeout of hiding as normal.

7/24/2019 Nec Community Edition
http://slidepdf.com/reader/full/nec-community-edition 13/101
NECROMUNDA
12
TERRAINBattles mostly take part in open areas wheremovement is easiest. Obviously high walls andother constructions will block your progress, butthe ground level and raised surfaces arereasonably solid. However, should you find
yourself struggling over shifting ash wastes or upto your elbows in marshes of bubbling pollutant, your progress will be impeded as indicatedbelow.
OPEN GROUNDThe tabletop surface, building floors, connecting
walkways and ladders are all considered to beopen ground which does not affect yourmovement. You can also move through doors orhatches without slowing your speed.
DIFFICULT GROUNDDifficult ground includes steep or treacherousslopes, dense stands of hive foliage such as giantfungi, pools of pollutant liquid or effluvia, andthick or sodden hive dust. Models move overdifficult ground at half speed or half rate, so 1" ofmovement counts as 2". For example, to cross a 11/2" wide pool of bubbling algal slime you mustexpend 3" of your move. Similarly, if moving overa steep mound of ash waste you’ll move at 2" perturn rather than 4".
A fighter who is running is slowed down bydifficult ground. He will run at 4" rather than 8"over steep slopes for example, because all modelsmove at half speed over difficult terrain.
VERY DIFFICULT GROUNDThis is the really nasty stuff you wouldn’t want togo near. It includes tar pits, deep or noxiouspools of liquid wastes, and narrow crawlholesthrough the rubble. Models move over verydifficult ground at a quarter rate, so each 1" ofmovement counts as 4".
IMPASSABLE GROUNDMuch of the Underhive is simply impossible tomove over or through, such as deep or corrosivepools, enveloping layers of soft hive dust, and, ofcourse, solid walls, collapsed tunnels and the like.
WALLS AND BARRIERS Walls, pipelines, small heaps of debris, and otherlow obstacles form barriers that you can either goaround or leap over. A model can leap over abarrier less than 1" high and no more than 1"deep without impeding its movement at all. Abarrier between 1" and 2" high, and no more than1" deep, can still be crossed by climbing over but
you must give up half of your total move that turn
to do so. For example, if you would otherwisemove 4" then you must give up 2". A barrierhigher than 2" is too tall to climb over and iseffectively impassable.
7/24/2019 Nec Community Edition
http://slidepdf.com/reader/full/nec-community-edition 14/101
NECROMUNDA
13
SHOOTING
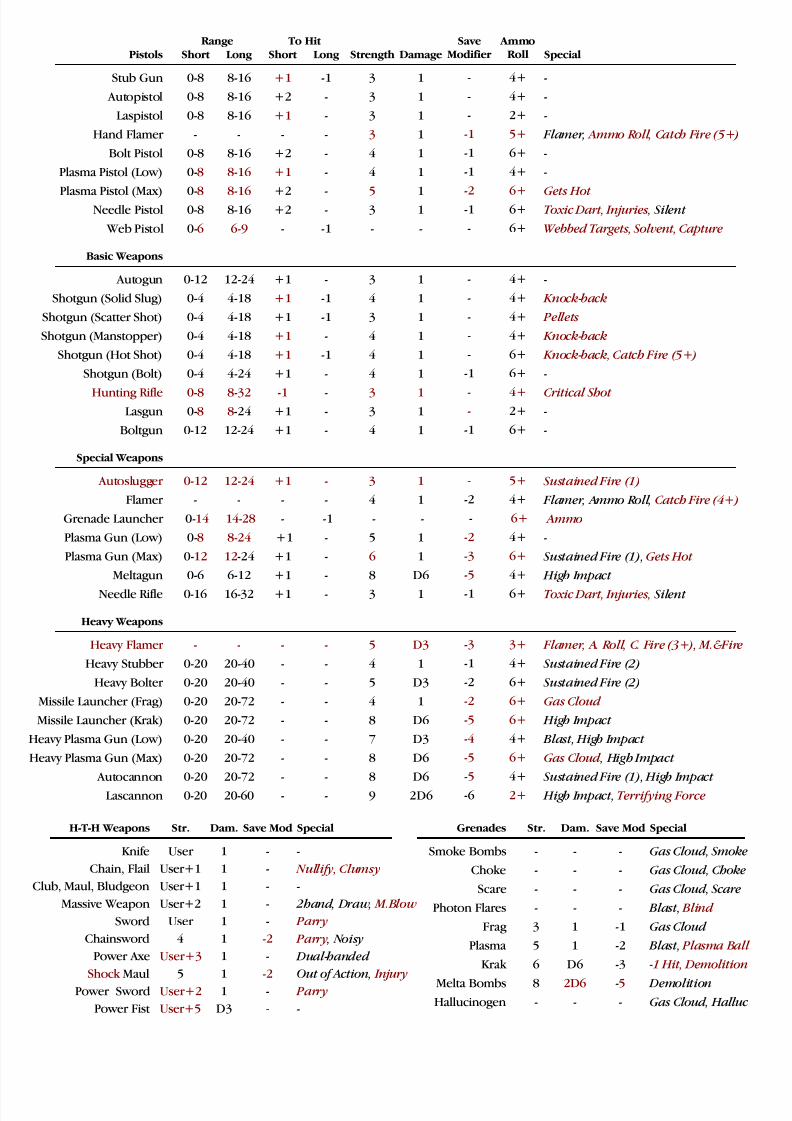
Necromundan Underhive fighters carry a varietyof weaponry. Individual fighters often haveseveral different weapons such as grenades,pistols, knives and guns.
During the shooting phase of your turn each of your fighters may shoot once with one of his weapons. So you can either shoot a laspistol, firea boltgun, or throw a grenade, for example.
Work through your models one at a time. Pick which fighter is going to shoot, nominate histarget, work out if he hits his enemy and, if hedoes so, any wounds or injuries caused, and thencontinue to the next shooter. You can take shotsin any order you wish.
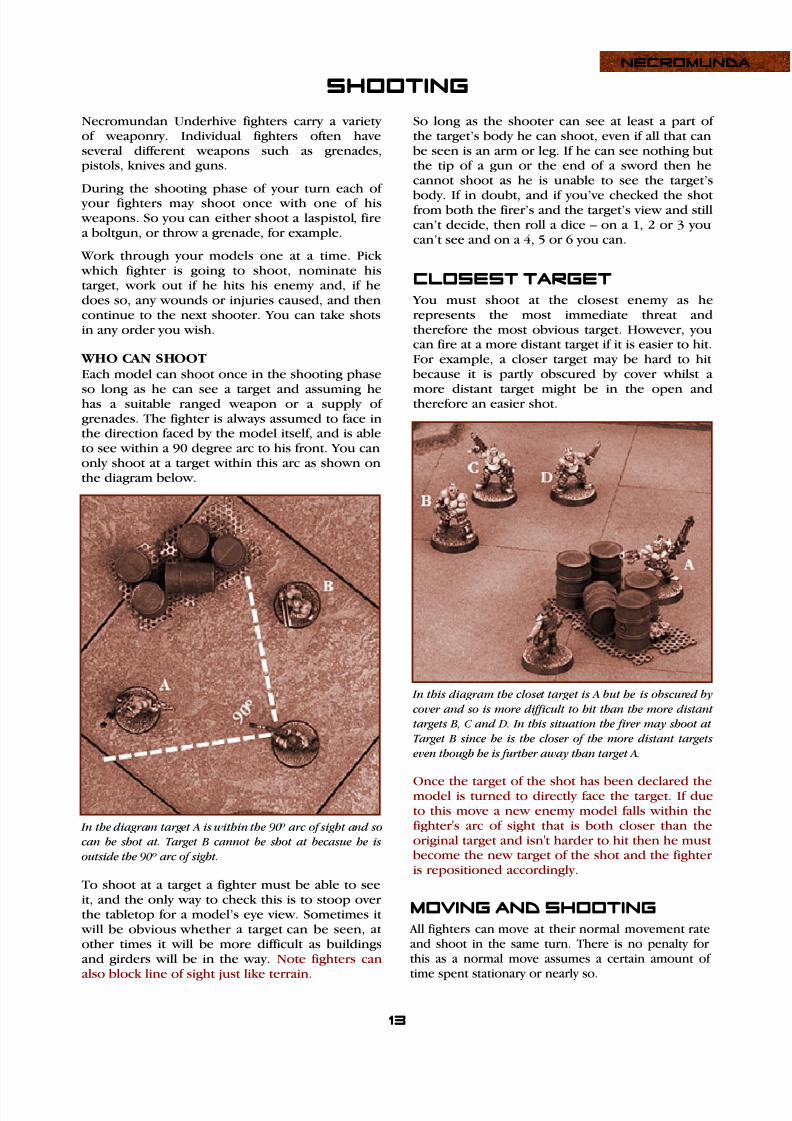
WHO CAN SHOOTEach model can shoot once in the shooting phase
so long as he can see a target and assuming hehas a suitable ranged weapon or a supply ofgrenades. The fighter is always assumed to face inthe direction faced by the model itself, and is ableto see within a 90 degree arc to his front. You canonly shoot at a target within this arc as shown onthe diagram below.
In the diagram target A is within the 90º arc of sight and so
can be shot at. Target B cannot be shot at becasue he is
outside the 90º arc of sight.
To shoot at a target a fighter must be able to seeit, and the only way to check this is to stoop overthe tabletop for a model’s eye view. Sometimes it
will be obvious whether a target can be seen, atother times it will be more difficult as buildingsand girders will be in the way. Note fighters canalso block line of sight just like terrain.
So long as the shooter can see at least a part ofthe target’s body he can shoot, even if all that canbe seen is an arm or leg. If he can see nothing butthe tip of a gun or the end of a sword then hecannot shoot as he is unable to see the target’s
body. If in doubt, and if you’ve checked the shotfrom both the firer’s and the target’s view and stillcan’t decide, then roll a dice – on a 1, 2 or 3 youcan’t see and on a 4, 5 or 6 you can.
CLOSEST TARGET You must shoot at the closest enemy as herepresents the most immediate threat andtherefore the most obvious target. However, youcan fire at a more distant target if it is easier to hit.For example, a closer target may be hard to hitbecause it is partly obscured by cover whilst a
more distant target might be in the open andtherefore an easier shot.
In this diagram the closet target is A but he is obscured by
cover and so is more difficult to hit than the more distant
targets B, C and D. In this situation the firer may shoot at
Target B since he is the closer of the more distant targets
even though he is further away than target A.
Once the target of the shot has been declared themodel is turned to directly face the target. If dueto this move a new enemy model falls within thefighter's arc of sight that is both closer than theoriginal target and isn't harder to hit then he mustbecome the new target of the shot and the fighteris repositioned accordingly.
MOVING AND SHOOTING All fighters can move at their normal movement rateand shoot in the same turn. There is no penalty forthis as a normal move assumes a certain amount oftime spent stationary or nearly so.

7/24/2019 Nec Community Edition
http://slidepdf.com/reader/full/nec-community-edition 15/101
NECROMUNDA
14
RANGEOnce you have decided to shoot and have chosen
your target you must measure to see whether theshot is within range. Each type of weapon has amaximum range as indicated later in the Armourysection. The following examples show the short
range, long range and maximum ranges of sometypical weapons.
Weapon
Laspistol
Bolt Pistol
Autogun
Lasgun
Meltagun
Shotgun
Missile Launcher
Heavy Stubber
MaxRange
16"
16"
24"
24"
12"
18"
72"
40"
LongRange
8-16"
8-16"
12-24"
8-24"
6-12"
4-18"
20-72"
20-40"
ShortRange
0-8"
0-8"
0-12"
0-8"
0-6"
0-4"
0-20"
0-20"
Assuming your target is within range you canproceed with the shot. If the target is out of rangethen you have automatically missed, but you stillhave to test to see whether your weapon developsa fault (see Ammo Rolls, later in this section).
HITTING THE TARGETTo determine whether a shot hits its target roll aD6. The dice score needed will depend uponhow good a shot the firer is (as indicated by hisBallistic Skill or BS). The chart below shows the
minimum D6 roll needed to score a hit.
BS
D6 score
1
6
2
5
3
4
4
3
5
2
6
1
7
0
8
-1
10
-3
9
-2
For example: If the shooter is a ganger with a BSof 3, a dice roll of a 4 or more is required to hitthe target. An easy way to remember this is simplyto subtract the firer’s BS from 7 to find thenumber needed to hit.
You will notice that the chart covers scores of 1and even less. However, a dice roll of a 1 is alwaysa miss regardless of circumstances. There is no
such thing as a certain hit – if the dice turns up a1 you have missed!
HIT MODIFIERSSome shots are easier than others. It is easier tohit a target that is in the open compared to atarget behind cover. Usually it is easier to hit atarget if it is close compared to one further away.These are represented by the following modifiers.
-1 IN PARTIAL COVERUp to half the target is obscured as defined inthe section on cover.
-2 IN COVERMore than half the target is obscured asdefined in the section on cover.
-1 OVERWATCHThe shooter is firing at a target whilst onoverwatch.
-1 CHARGINGThe shooter is firing at a target that is charging
him whilst on overwatch.
-1 RAPID MOVING TARGETThe target moved 12" or more in his previousmove phase.
-1 SMALL TARGETThe whole target is less than 1/2" tall or wide.Such targets might include unexploded bombs,mechanical devices, or a specific point on thefloor. Gang models are always larger than this!
+1 LARGE TARGETThe whole target is 2" tall or wide. Such targetsinclude large processor tanks, bulkhead doors
and other sizeable bits of industrial equipment.
Modifiers for range depend upon the weaponused. All weapons have their own range bandsand different modifiers at short or long range, asindicated in the Armoury section of this book.The following examples show how this works.
Pistols, basic and special weapons are sensitive torange: they are likely to hit at short range but canbe inaccurate at long range. Remember, longrange isn’t very far in the case of a pistol! Heavy
weapons aren't sensitive to range. With these weapons it is as easy to hit at a distance as it is atshort range because a close moving target is hardto track with a weighty or clumsy weapon.
Weapon
Bolt Pistol
Autogun
Shotgun (solid slug)
Grenade LauncherPlasma Gun
Heavy Bolter
Long Range
-
-
-1
-1-
-
Short Range
+2
+1
+1
-+1
-

7/24/2019 Nec Community Edition
http://slidepdf.com/reader/full/nec-community-edition 16/101

7/24/2019 Nec Community Edition
http://slidepdf.com/reader/full/nec-community-edition 17/101
TARGET'S TOUGHNESS
S
T
R
E
N
G
T
H
1
43
2
2
2
2
2
2
2
2
12
3
4
5
6
7
8
9
10
2
54
3
2
2
2
2
2
2
2
3
65
4
3
2
2
2
2
2
2
4
66
5
4
3
2
2
2
2
2
5
N6
6
5
4
3
2
2
2
2
6
N
6
6
5
4
3
2
2
2
8
N
6
6
5
4
3
2
9
N
6
6
5
4
3
10
N
6
6
5
4
7
N
6
6
5
4
3
2
2
NECROMUNDA
16
PINNED As soon as a fighter is hit the model is knocked overand placed face up. We say the model has beenpinned by enemy fire.
The force of the shot has knocked the fighter off hisfeet. The shot may have hurt or even killed him, or he
may be lucky and escape without significant harm.Even if he survives he is momentarily confused, or, atbest, his instincts force him to hit the dirt and keephis head down.
Later we’ll deal with what happens to the pinnedfighter if he survives unharmed. First, we’ll find out whether the shot has wounded him.
WOUNDOnce you have hit a target you must test to see whether a wound is inflicted. A shot may fail to causea wound because it hits part of the target’s equipment
or weaponry, or perhaps it just scratches the skin orcauses some very minor injury which the fighterbravely ignores. If you fail to cause a wound then thetarget is unharmed but is still pinned by enemy fire asdescribed later.
To determine whether your shot has caused a wound you must compare the Strength value of the weapon with the Toughness (T) characteristic of the target. You will find a complete description of the various weapons together with their Strength and Damage values in the Armoury section, but a few examples aregiven opposite.
The chart below shows the D6 score required to turna hit into a wound. Remember, an average Toughnesscharacteristic value is 3 for gangers and otherhumans. However, the Underhive depths containmany foul denizens and monstrous beasts whosetoughness can range from average to unbelievablehigh proportions.
DamageIf a shot successfully inflicts a wound on a target thenhe will usually suffer a single wound. However, some wounds are more severe than others and especiallypowerful weapons can inflict truly horrific wounds.This is represented by the weapon's Damage value,some examples of which are given below.
Each hit that passes its to wound roll, and isn't savedby an armour or special saving throw, will inflict anumber of wounds equal to the weapon's Damage value. Sometimes the amount of damage is random,in which case you simply roll the dice shown todetermine how many wounds are inflicted. Forexample, a meltagun has D6 Damage, so can inflictbetween 1 and 6 wounds.
WeaponLaspistol
Boltgun
Heavy Flamer
Meltagun
Lascannon
Strength3
4
5
8
9
Damage1
1
D3
D6
2D6

7/24/2019 Nec Community Edition
http://slidepdf.com/reader/full/nec-community-edition 18/101
NECROMUNDA
17
INJURIESMost fighters have a Wound characteristic of 1 butsome have a value of 2 or more. If the target hasmore than 1 wound then deduct 1 wound fromhis total for each wound he suffers. Make a noteon the roster sheet. So long as the model has a
least 1 wound left he can continue to fight. As soon as a fighter suffers his last remaining wound roll to determine the extent of hisinjuries. The player who inflicted the wound rollsa D6 consults the following chart.
1 FLESH WOUNDThe target has sustained a minor wound.Deduct -1 from both his Weapon Skill andBallistic Skill for the rest of the game.
2-5 DOWNThe target falls down to the ground where he
lies wounded and barely conscious. Turn themodel over or face down, to show that thefighter has gone ‘down’.
6 OUT OF ACTIONThe target has been badly wounded and falls tothe ground unconscious. He takes no furtherpart in the game and the model is immediatelyremoved from play.
Flesh Wound
If a model only sustains a flesh wound then hesuffers a mild injury and is able to fight on. His
Wounds value is reinstated to 1 and he can moveand act as normal.
A fighter can sustain several flesh wounds and stillcontinue to fight, albeit at reduced effectiveness.Make a note on your roster sheet and apply thepenalties indicated for the rest of the game. Leavethe model lying face uppermost to show it is stillpinned (see later).
Each time a model suffers a flesh wound, it losesa further point of WS and BS to a minimum of 1.Once a model with a Weapon Skill and BallisticSkill of 1 suffers a further flesh wound then thefighter drifts into unconsciousness due to servere
loss of blood and is taken out of action.
Down
When a fighter goes down he is either badlyinjured or temporarily knocked senseless: hemight recover or he might lapse intounconsciousness and even die. Turn the modelface down to show the fighter has gone down. Amodel which goes down may do nothing exceptcrawl as noted below.
A player must roll to see what happens to any of hisfighters who are down at the end of his recoveryphase. Fighters may recover, stay down, or go out ofaction. Roll a D6 and consult the Injury chart again.Models which recover to flesh wounded can continueto fight but suffer the -1 WS/BS penalty, and arepinned for one turn (see Pinned). Turn the model
face up to show this. Models which stay down remainface down and unchanged. Models which go out ofaction are removed.
During his movement phase a model who is downcan crawl 2", but other than this the fighter cannot doanything else. This enables a badly woundedcharacter to get behind cover (if he’s lucky!).
Out of Action‘Out of action’ indicates a man is out of combat andalso out of the game. Remove the model from thetabletop. It is impossible to tell whether the fighter isalive or dead, but for game purposes it makes no
difference at this stage. After the fight is over you cantest to see whether he survives and if he sustains anyserious lasting injuries as a result of his wounds (seethe later Campaign sections for details).
MULTIPLE WOUNDSSome weapons inflict more than 1 wound whenthey hit. A model cannot be reduced to fewerthan zero wounds, but each extra wound inflictedmeans you roll another Injury dice. So, if a fighterhas 1 wound remaining and suffers 4 wounds herolls four Injury dice.
Multiple ‘down’ results are ignored but a fightercan suffer multiple flesh wounds. A fighter whosuffers flesh wounds and goes down at the sametime is treated as going down but suffers thepenalties indicated for his flesh wounds as well.
HIGH IMPACTSome weapons inflict hits with such devastatingforce that any fighters struck by them are likely tobe severely injured. All weapons with a strengthof 7 or more are known as high impact weapons.
When a fighter is hit by a high impact weaponthey will go out of action on a roll of 5 or 6 on theinjury chart rather than the normal 6. In addition,if a 5 or 6 is rolled then make a special note onthe gang roster as there is a greater chance of theimpact causing fatal injuries.
Note these rules only apply when making theinitial injury rolls. Injury rolls made during therecovery phase follow all of the normal rules asdecribed in the Down paragraph instead.

7/24/2019 Nec Community Edition
http://slidepdf.com/reader/full/nec-community-edition 19/101
NECROMUNDA
18
SAVING THROWS Armour is less important and less readily available inthe confines of the Underhive than on a conventionalbattlefield. Gangers rely more upon the natural coverof the hive and their own wits to avoid injury.However, some fighters wear protective clothing
which may save them from a wound if they are lucky. Armour is represented in the game by saving throws.
Armour Saving ThrowIf a fighter is wearing armour and suffers a woundthen roll a D6. If the dice roll is sufficiently high thenthe wounding shot has struck the armour and nothurt the wearer at all. The dice score required variesaccording to the type of armour. The most commonarmour types and the D6 roll required to effect a saveare given below.
Armour
Flak
Mesh
Carapace
Saving Throw
6+
5+
4+
For example: A fighter is hit by a shot from alaspistol and suffers a wound. Fortunately, he iswearing carapace armour, a hardened armaplas jacket. He rolls a D6 and scores 5 – easily enough to deflect the shot and save him.
If a fighter has multiple armour saving throws thenthe score required to save against a wound iscombined into a single roll. For example, a fighter wearing mesh armour (5+) who is fitted with a bionic
chest (6+) receives a single 4+ armour saving throw.However, an original roll of 1 is always a failure, evenif the fighter has a saving throw greater than 2+.
Some weapons are better at penetrating armour thanothers. A shot from a laspistol might be deflectedrelatively easily, but a shot from a huge lascannon is adifferent matter! To represent this, each weapon hasan armour save modifier as indicated in itsdescription in the Armoury section. For example, aboltgun has a -1 save modifier so all armour savesmust deduct 1 from the dice roll.
Special Saving Throw
Some exotic equipment and special skills confer aspecial save instead of an armour save. Special savingthrows work in exactly the same way as an armoursaving throw except in the following ways.
Special saves ignore all save modifiers so the fighter will always receive the saving throw, even against highStrength weapons such as a lascannon. Special savescannot be combined into a single roll, instead eachspecial save must be rolled separately. If a fightersuccessfully rolls a special save then the model notonly avoids the wound, but also the hit. This meansthat the fighter will not be pinned, even if the hitoriginated from a template.
PINNED FIGHTERSOften a fighter is hit and pinned by enemy fire butdoesn’t go down or out of action. He might be hitand not wounded, or he might suffer a flesh wound.
A model that is pinned remains knocked over lyingface up. Whilst pinned a fighter cannot do anything
except crawl up to 2" during the movement phase.
A model which is pinned at the start of his turn willautomatically recover from pinning at the end of thatturn. In effect, the model misses his turn and is thenready to fight once more in his following turn. At theend of the turn stand the model up to show that he isno longer pinned.
If a model has at least one other model from the gang within 2" then he can try to escape pinning at the startof his turn by taking an Initiative test. If the test ispassed then stand the model up as the fighter will nothave to miss his turn at all. The fighter can move and
fight normally that turn.
Note that when testing to escape pinning at the startof the turn juves, fighters who are down, and fighters whose nerve is broken do not count. Rather thanreassuring the fighter and offering covering fire, theproximity of these unreliable comrades will onlyencourage him to keep his head down!
SHOOTING INTO
HAND-TO-HAND COMBATNormally it would be considered very rash indeed toshoot at fighters who are grappling with each other atclose quarters – it would be very easy to hit the wrongman! Although the models themselves are immobilethe fighters are actually ducking, diving and rollingabout in a whirlwind of action. Note you do not have
to shoot at an enemy model that is involved in hand-to-hand combat with your own gang fighter, even ifhe is the closest target.
Should you wish to shoot at a model engaged inhand-to-hand combat roll to hit as normal. If you hitthen you must decide whether you have hit theintended model or his hand-to-hand opponent. Thereis as much chance of hitting the target as there is ofhitting each model he is fighting. So, if there are twomodels fighting, a D6 roll of 1-3 indicates one model while a 4-6 roll indicates the other. If the target isfighting two opponents then you’ll need a 5 or 6 tohit the right man, and so on.
HITS & PINNINGThere are several instances where a fighter may suffera 'hit' that wasn't from enemy fire. His weapon mayhave exploded or perhaps he landed clumsily when
jumping down from a ledge. Unless specificallymentioned otherwise, any model that suffers a hit isalso pinned, even if no damage is inflicted.
7/24/2019 Nec Community Edition
http://slidepdf.com/reader/full/nec-community-edition 20/101
NECROMUNDA
19
SHOOTING AT A
FIGHTER WHO IS DOWN You do not have to shoot at a target who is downeven if he is the closest target. However, you canshoot at a fighter who is down if you want to and heis the closest or easiest shot. You can... If you’re really
that mean. You are... Read on!
If a fighter who is already down takes a further woundor wounds, roll again on the Injury table and applythe result. A flesh wound will inflict further WS/BSpenalties. If the fighter goes down again then ignorethe result. If he goes out of action remove the modelfrom combat.
Generally speaking, it is rare for players to shoot atenemy fighters who are down unless they arestranded in the open and there are no other targetsavailable. However, it sometimes happens that blast weapons scatter from their point of aim and
accidentally hit men who are already down.
BLAST WEAPONSSome weapons fire an exploding shell or energy blast which inflicts damage over a large area. The spread ofthis shot is represented by the circular blast and gascloud templates.
When you shoot a weapon that uses a blast or gascloud template nominate your target and roll to hitexactly as you would with any other weapon. If thetarget lies beyond the weapon’s range then the shotdissipates harmlessly causing no damage. Otherwise
take the template and proceed as follows.
If you hit the target place the template with its centredirectly over the target model. The target is hit, andany other model that lies wholly inside the template ishit too. If a model lies partially within the templatethen it is hit on a further D6 roll of a 4, 5 or 6. Roll for wounds and injuries on each model that is hitfollowing the usual rules.
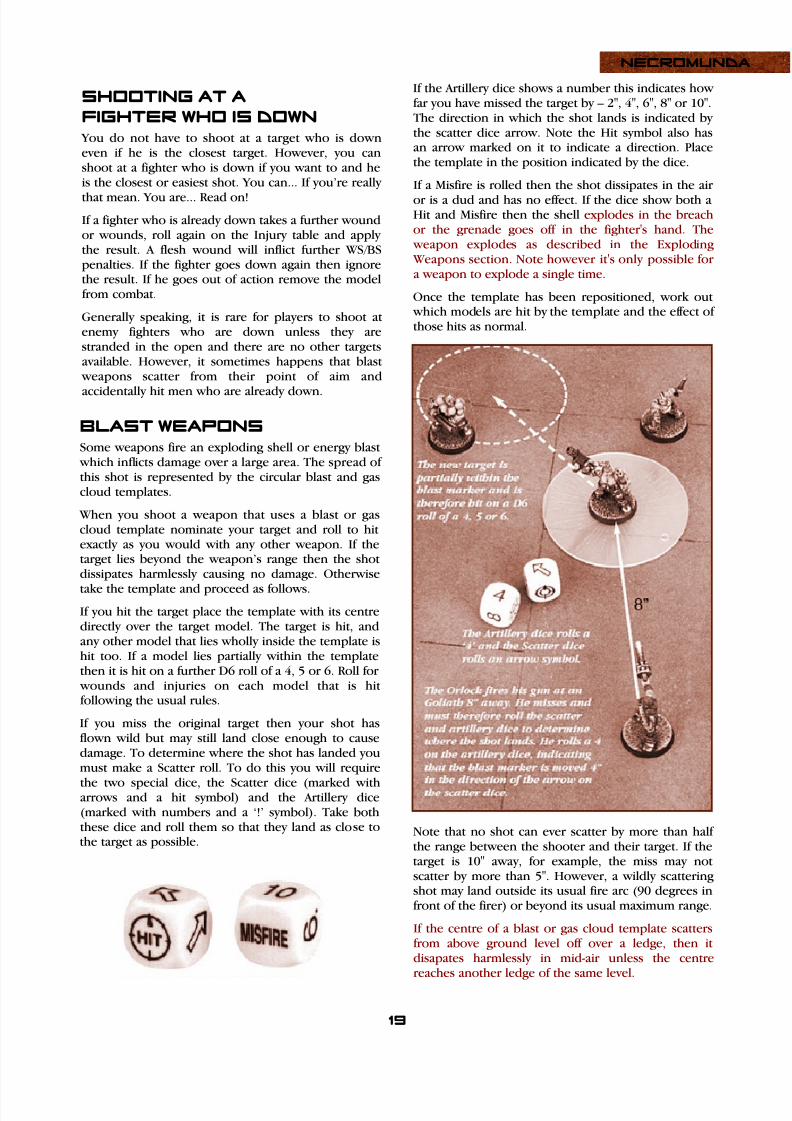
If you miss the original target then your shot hasflown wild but may still land close enough to causedamage. To determine where the shot has landed youmust make a Scatter roll. To do this you will require
the two special dice, the Scatter dice (marked witharrows and a hit symbol) and the Artillery dice(marked with numbers and a ‘!’ symbol). Take boththese dice and roll them so that they land as close tothe target as possible.
If the Artillery dice shows a number this indicates howfar you have missed the target by – 2", 4", 6", 8" or 10".The direction in which the shot lands is indicated bythe scatter dice arrow. Note the Hit symbol also hasan arrow marked on it to indicate a direction. Placethe template in the position indicated by the dice.
If a Misfire is rolled then the shot dissipates in the air
or is a dud and has no effect. If the dice show both aHit and Misfire then the shell explodes in the breachor the grenade goes off in the fighter's hand. The weapon explodes as described in the Exploding Weapons section. Note however it's only possible fora weapon to explode a single time.
Once the template has been repositioned, work out which models are hit by the template and the effect ofthose hits as normal.
Note that no shot can ever scatter by more than halfthe range between the shooter and their target. If thetarget is 10" away, for example, the miss may notscatter by more than 5". However, a wildly scatteringshot may land outside its usual fire arc (90 degrees infront of the firer) or beyond its usual maximum range. If the centre of a blast or gas cloud template scattersfrom above ground level off over a ledge, then itdisapates harmlessly in mid-air unless the centrereaches another ledge of the same level.

7/24/2019 Nec Community Edition
http://slidepdf.com/reader/full/nec-community-edition 21/101
NECROMUNDA
20
GRENADESThere are many different sorts of grenades availableto gang fighters. The most common are explosivefragmentation grenades and implosive grenadescalled krak. If a model carries grenades then it isassumed that he has enough to last the entire battle,
regardless of how many he might actually throw. A model can throw a grenade rather than shoot a weapon. A grenade throw is treated exactly like anyother shot, so roll to hit using the thrower’s BallisticSkill (BS) characteristic. The maximum range of athrown grenade depends upon the Strengthcharacteristic of the fighter. A fighter can throw agrenade a distance equal to his Strength x3. Forexample, a ganger with a Strength of 3 can throw agrenade up to 9".
ScatteringGrenades that use a template scatter if they miss just
like other weapons with blast markers. Work outscatter as described already, except that the numberon the Artillery dice is always halved becausegrenades are thrown at very short ranges. On theother hand, the maximum scatter limit does not applyto grenades, which can bounce around all over theplace before going off! A grenade thrown at a target 2"away may therefore scatter up to 5" in any direction.Note this doesn't apply to grenade launchers.
CoverGrenades are especially good at blasting fighters outfrom behind cover as they can be simply lobbed overbarricades or bounced around bulkheads. A fighterthrowing a grenade reduces the to hit penalty whentargeting a model in cover by 1. So, partial cover isignored and cover counts as -1 to hit rather than -2.Note this bonus doesn't apply to grenade launchers.
High GroundTo represent the unique arc of a grenade, if a modelthrows a grenade at a target that is on a level belowhim then the distance is not measured from model tomodel as with any other ranged attack, instead onlythe horizontal distance is measured. This allowsgrenades to be thrown over a greater distance if afighter has the high ground. Note this bonus doesn't
apply to grenade launchers.
Smoke Bombs As the name suggests, smoke bombs are designed toproduce clouds of smoke which are used to providecover. When you throw a smoke bomb you don’t want to actually throw it at an enemy fighter but at aspecific point on the ground. You can do this bysimply nominating the point you wish to aim thegrenade at, as such the normal targeting restrictionsdo not apply. Note that since the smoke bomb isbeing thrown towards an area of the ground, itdoesn't count as a small target.
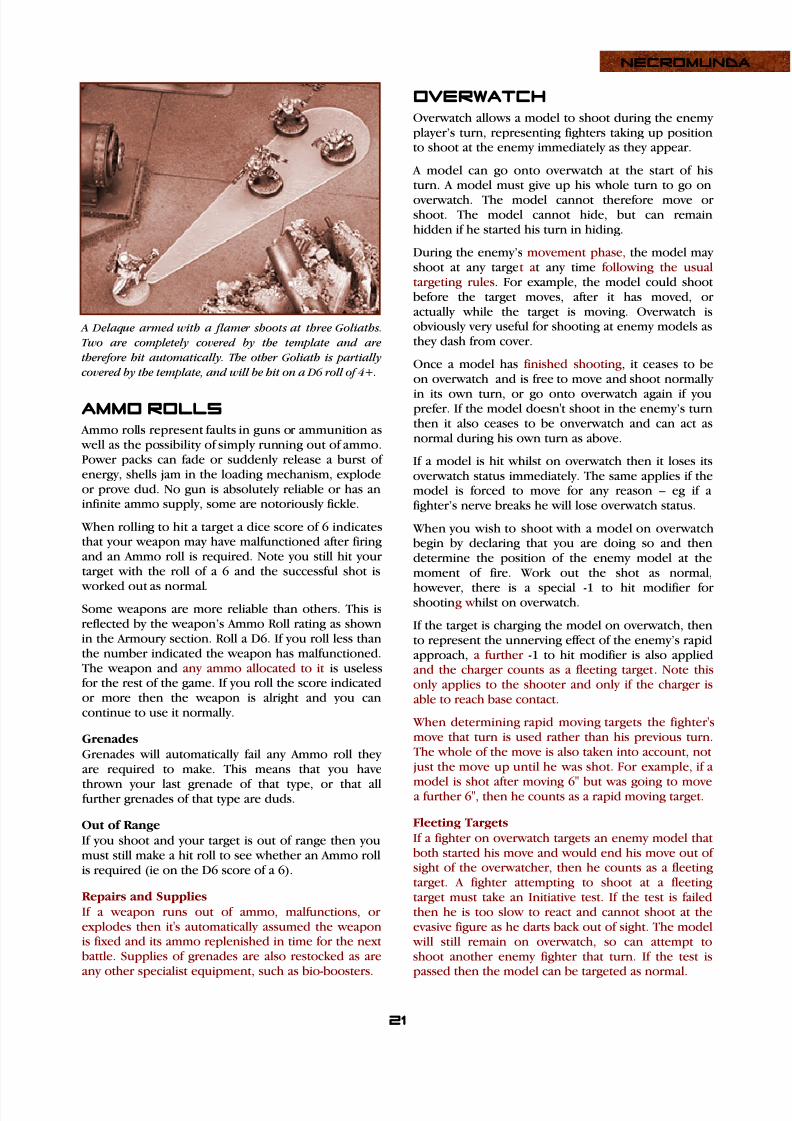
FLAMER TEMPLATE All flamer type weapons use a special teardrop-shapedtemplate to represent the jet of flame.
To shoot a flamer weapon take the flamer templateand place it with the narrow end touching the base ofthe shooter and the broad end over your target. Takespecial care when positioning the template as it mustbe centrally directed at the targeted model. Youcannot for example adjust the direction of thetemplate in order to hit more enemy models. Anymodels wholly covered by the template are hitautomatically and any models partially covered are hiton a further D6 roll of a 4, 5 or 6.
Any hits are resolved as normal, roll for wounds andthen determine injuries for any wounded models.Note that the hit modifiers for range, cover, and suchlike do not apply to flamer weapons. Flamers areespecially good at winkling enemy fighters frombehind cover!
SUSTAINED SHOOTINGSome especially large and dangerous weapons canfire a sustained burst of shells which may hit severaltargets at a time. This is called sustained shooting orsustained fire. Weapons which are capable of makingsustained shots are indicated in the Armoury section.
Basically, these are machine gun type weapons suchas the heavy stubber and autocannon which can raketargets with a hail of shells.
When you shoot with a weapon of this kind declare whether you are firing a normal single shot or asustained shot. A single shot is worked out as normalfollowing the usual shooting rules, while a sustainedshot is worked out as follows.
First roll to determine how many separate shots the weapon makes by rolling a number of D3s equal tothe weapon's sustained fire value. If the weapon has asustained fire value of greater than 1 then you canchoose to either roll the number of dice indicated, or you can roll less if you prefer. You may choose to rollfewer dice as this can reduce the chances of runningout of ammo.
The number of shots rolled is how many rangedattacks the fighter can make that turn which followthe usual shooting rules. Each shot is treated as aseparate shot and must all be worked through beforemoving on to another fighter. Each of the shots followthe usual targeting restrictions and all shots musttarget either the same model or another model within4” of the first original target.
All of the shots indicated by the sustained fire dicemust be fired. If the fighter can no longer see anytargets but he still has shots remaining then they are wasted. Wasted shots must still roll a to hit dice incase it causes an Ammo roll.
7/24/2019 Nec Community Edition
http://slidepdf.com/reader/full/nec-community-edition 22/101
NECROMUNDA
21
AMMO ROLLS Ammo rolls represent faults in guns or ammunition as well as the possibility of simply running out of ammo.Power packs can fade or suddenly release a burst ofenergy, shells jam in the loading mechanism, explodeor prove dud. No gun is absolutely reliable or has aninfinite ammo supply, some are notoriously fickle.
When rolling to hit a target a dice score of 6 indicatesthat your weapon may have malfunctioned after firingand an Ammo roll is required. Note you still hit yourtarget with the roll of a 6 and the successful shot is
worked out as normal.Some weapons are more reliable than others. This isreflected by the weapon’s Ammo Roll rating as shownin the Armoury section. Roll a D6. If you roll less thanthe number indicated the weapon has malfunctioned.The weapon and any ammo allocated to it is uselessfor the rest of the game. If you roll the score indicatedor more then the weapon is alright and you cancontinue to use it normally.
GrenadesGrenades will automatically fail any Ammo roll theyare required to make. This means that you have
thrown your last grenade of that type, or that allfurther grenades of that type are duds.
Out of RangeIf you shoot and your target is out of range then youmust still make a hit roll to see whether an Ammo rollis required (ie on the D6 score of a 6).
Repairs and SuppliesIf a weapon runs out of ammo, malfunctions, orexplodes then it's automatically assumed the weaponis fixed and its ammo replenished in time for the nextbattle. Supplies of grenades are also restocked as areany other specialist equipment, such as bio-boosters.
OVERWATCHOverwatch allows a model to shoot during the enemyplayer’s turn, representing fighters taking up positionto shoot at the enemy immediately as they appear.
A model can go onto overwatch at the start of histurn. A model must give up his whole turn to go on
overwatch. The model cannot therefore move orshoot. The model cannot hide, but can remainhidden if he started his turn in hiding.
During the enemy’s movement phase, the model mayshoot at any target at any time following the usualtargeting rules. For example, the model could shootbefore the target moves, after it has moved, oractually while the target is moving. Overwatch isobviously very useful for shooting at enemy models asthey dash from cover.
Once a model has finished shooting, it ceases to beon overwatch and is free to move and shoot normally
in its own turn, or go onto overwatch again if youprefer. If the model doesn't shoot in the enemy’s turnthen it also ceases to be onverwatch and can act asnormal during his own turn as above.
If a model is hit whilst on overwatch then it loses itsoverwatch status immediately. The same applies if themodel is forced to move for any reason – eg if afighter’s nerve breaks he will lose overwatch status.
When you wish to shoot with a model on overwatchbegin by declaring that you are doing so and thendetermine the position of the enemy model at themoment of fire. Work out the shot as normal,
however, there is a special -1 to hit modifier forshooting w hilst on overwatch.
If the target is charging the model on overwatch, thento represent the unnerving effect of the enemy’s rapidapproach, a further -1 to hit modifier is also appliedand the charger counts as a fleeting target. Note thisonly applies to the shooter and only if the charger isable to reach base contact.
When determining rapid moving targets the fighter'smove that turn is used rather than his previous turn.The whole of the move is also taken into account, not just the move up until he was shot. For example, if a
model is shot after moving 6" but was going to movea further 6", then he counts as a rapid moving target.
Fleeting TargetsIf a fighter on overwatch targets an enemy model thatboth started his move and would end his move out ofsight of the overwatcher, then he counts as a fleetingtarget. A fighter attempting to shoot at a fleetingtarget must take an Initiative test. If the test is failedthen he is too slow to react and cannot shoot at theevasive figure as he darts back out of sight. The model will still remain on overwatch, so can attempt toshoot another enemy fighter that turn. If the test ispassed then the model can be targeted as normal.
A Delaque armed with a flamer shoots at three Goliaths.
Two are completely covered by the template and are
therefore hit automatically. The other Goliath is partially
covered by the template, and will be hit on a D6 roll of 4+.
7/24/2019 Nec Community Edition
http://slidepdf.com/reader/full/nec-community-edition 23/101
NECROMUNDA
22
HAND-TO-HAND COMBAT
Hand-to-hand fighting is a dangerous and desperatekind of combat. With adversaries using swords andknives, point blank fire from pistols, and even fists,feet and heads to take out an opponent. It is either a very brave or foolish ganger to iniate hand-to-hand.
WHO CAN FIGHTModels which are touching base-to-base are said to beengaged in hand-to-hand combat. This can onlyhappen once a fighter has charged an enemy, asmodels are not otherwise allowed to move intophysical contact. See the Charge! section of theMovement rules.
In the hand-to-hand combat phase all close quarterfighting is worked out. Regardless of whose turn it is,all models that are engaged in hand-to-hand combat will fight. Unlike shooting, a model in hand-to-handcombat can fight all round against enemies to its side,front or rear. In reality the models are constantlymoving, dodging, ducking and weaving as theystruggle to kill their adversaries.
Models fighting in hand-to-hand combat cannot doanything else as they are far too busy struggling withtheir adversaries. Any very close range shots they areable to make with pistols are taken into account inthe hand-to-hand combat rules that follow.
PROCEDURECombats are worked out as described below. Workthrough each combat one at a time until every fighterhas fought all enemy models that they are involved in
hand-to-hand combat with. The player whose turn itis may decide the order of the combats.
1 THROW ATTACK DICEBoth players roll a number of D6’s equal totheir model’s Attacks characteristic.
2 WORK OUT COMBAT SCOREEach player picks his highest scoring dice andadds his model’s Weapon Skill (WS) to thescore. He then adds any Combat Scoremodifiers as shown on the opposite page. Thetotal is the Combat Score.
3 DETERMINE WINNERThe player with the highest Combat Score
wins. In the case of a tie the model with thehighest Initiative characteristic wins. If there isstill a tie the combat is a stand-off.
4 NUMBER OF HITSCompare the Combat Scores of bothcombatants. The difference between theirCombat Scores is the number of times the
winner has hit the loser. If you win the combaton a tie you still cause 1 hit.
5 THROW TO WOUNDFor each hit scored the winner rolls a D6 onthe Wound chart in exactly the same way ashits from shooting. The Strength value willdepend upon the weapon used.
6 SAVING THROWModels which are wearing armour or thatreceive a special saving throw can attemptsaves in the same way as troops hit by shooting. 7 RESOLVE INJURIESResolve injuries in the same way as you wouldfor wounds inflicted by shooting.
ATTACK DICERoll the number of Attack dice indicated by themodel’s Attacks characteristic. This will normally beone but some especially mean fighters may have twoor more Attacks.
Although a model can roll more than one Attack diceit is only the best result that counts towards theCombat Score. The advantage of rolling more dice isthat it gives you a better chance of rolling high,however, it will also increase the chances of a modelfumbling as described later.

7/24/2019 Nec Community Edition
http://slidepdf.com/reader/full/nec-community-edition 24/101

7/24/2019 Nec Community Edition
http://slidepdf.com/reader/full/nec-community-edition 25/101
NECROMUNDA
24
HITSIf a fighter is using a single weapon then any hitsinflicted in hand-to-hand fighting are assumed to havebeen made with that weapon – be it a sword, knife,pistol etc. Resolve the hit using the Strength of the weapon as indicated in the Armoury section.
If a fighter uses two weapons (one in each hand) thenany hits are inflicted alternately, first with one handand then the other. For example, a fighter carrying asword and a laspistol who inflicts 2 hits will strikeonce with the sword and once with the laspistol. Anyodd hits can be resolved with either weapon.
ARMOUR MODIFIERSKnives, swords and other close combat weaponsoften use the fighter’s own Strength. The chart belowis used to determine any saving throw modifiers whena model’s own Strength is used.
Model's Strength
3 or less
4
5
6
7
8
9 or more
Armour Save Modifier
0
-1
-2
-3
-4
-5
-6
THE PARRY
Fighters armed with swords can attempt to turn asidean opponent’s blows. To represent this, a model witha parry can force an opponent to re-roll one of hishighest scoring Attack dice before working out hisCombat Score. However, you can only parry if youropponent's highest scoring Attack dice is greater than your own highest scoring Attack dice. For example, if you rolled a 5 and your opponent rolled a 3 then hecannot be parried, but he can parry you. Remember,if your opponent has 2 or more Attack dice he canalways choose his next highest score rather than thescore of the re-rolled dice.
If both combatants are fighting with swords then the
ability to parry cancels out and neither may do so. Inthe unlikely event that a model carries two swords itmay parry twice – that is, it may force two re-rolls orone re-roll against a model with a single sword.
FUMBLEIn the mayhem of close combat it is only too easy totrip or overbalance and leave yourself open to a quickpunch or stab. Any Attack dice rolls of a 1 indicatethat you have tripped, dropped a weapon, orotherwise fumbled. For each fumble rolled youropponent may add +1 to his own Combat Score.
CRITICAL HITS A critical hit represents a lucky blow, a spectacularfeint or a cunning trick. You must roll at least two 6’sto score a critical hit. The first 6 is taken as yourhighest score and each extra 6 counts as a critical hitadding a further +1 to your total.
MULTIPLE COMBAT When two or more models are fighting a singleenemy this is called a multiple combat. Theoutnumbered model must fight each of hisopponents during the hand-to-hand combat phase.Having chosen the first model to fight the combat is worked out exactly as described for one-on-one fights. If the outnumbered model survives he must go on tofight his second opponent. The combat is worked outas before except that the outnumbering model nowrolls an extra Attack dice and adds a +1 bonus to his
Combat Score.If the outnumbered model again survives then hegoes on to fight the third, fourth, fifth and eachsuccessive enemy until there are none remaining.Each subsequent enemy he fights gains a further Attack dice and adds a further +1 to his CombatScore. For example the third enemy has +2 Attackdice and +2 Combat Score, the fourth has +3 Attackdice and +3 Combat Score, and so on.
FOLLOW-UPIf all of a model’s hand-to-hand opponents go out of
action, or break from the combat, the model maymake a special follow-up move. This is an exceptionto the normal turn sequence and it makes nodifference whose turn it is. The model can beimmediately moved up to 2". You can use this 2"move to get behind cover, to engage another modelin hand-to-hand combat, or in any way you wish. Youcan cross an obstacle without penalty during a follow-up, but other terrain penalties apply as normal.
If you use a follow-up move to engage another enemythen move the model but don’t work out furthercombat that turn. The fight continues in the nexthand-to-hand combat phase. This is because the
fighter has insufficient time to do anything other thanfollow-up. Note using a follow-up in this way isconsidered a continuation of hand-to-hand combat,so the fighter will not receive the usual chargingbonus to his Combat Score nor can he swap weapons. Note that a follow-up doesn’t affect a model’s abilityto move in its following movement phase. The follow-up is an extra bonus move which reflects the intenseactivity of close quarter fighting.

7/24/2019 Nec Community Edition
http://slidepdf.com/reader/full/nec-community-edition 26/101
NECROMUNDA
25
FIGHTERS DOWNFighters who are wounded and go down arecompletely at the mercy of their enemy. In a one-on-one combat any model that goes down isautomatically out of action. His enemy finishes himoff with a quick blow and the model is removed.
In multiple combats a fighter who goes down hasmore chance of survival. Where all models on oneside go down they are automatically taken out ofaction. Where two or more models are fighting on thesame side, some can go down and crawl away at 2" intheir movement phase so long as at least one friendlymodel continues to fight.
PINNED FIGHTERS AND
HAND-TO-HAND COMBATFighters cannot be pinned when fighting hand-to-hand combat. A fighter who is hit whilst engaged in
hand-to-hand combat, even if hit by shooting in theshooting phase, is not pinned. If a fighter is alreadypinned when he is charged then the pin is discountedas soon as he is engaged. The pressing need todefend himself galvanises the fighter into action.
MOVING FROM COMBATOnce models are engaged in hand-to-hand fightingthey cannot move away in their movement phase.They must stand and fight until they are taken out ofaction, until they take out their enemies, or until oneor the other breaks and runs as described later. The
only exception to this is in a multiple combat, wherefighters who go down can crawl away so long asfriends continue to fight.
CHARGING DOWN FIGHTERS A fighter can charge an enemy model that is downand finish him off. This is a useful way of quicklytaking fighters out of action instead of waiting forthem to roll a 6 on the injury chart. The downedmodel is taken out of action during the hand-to-handphase. Note this counts as a hand-to-hand combat sothe fighter can make a follow-up move.
KEEPING YOUR NERVEThis section of the rules is concerned with how yourfighters react under fire: whether they bravelycontinue to fight while shells explode around them or
whether they turn tail and run for cover. Regardless of your own feelings or those of the gang’s leader, eventhe most hardened gang fighter can be driven off orforced to take cover as the action hots up.
LEADERSHIP
BROKEN FIGHTERS As soon as a fighter is broken he turns tail and runsfor cover. This movement takes place outside thenormal turn sequence and is worked outimmediately. The fighter makes a dash of up to 2D6"away from his enemy and towards cover. Roll the diceand determine how far the model runs.
If he can reach a position of cover within this distance where he cannot be seen then he stops there.
If he is unable to reach cover where he cannot beseen the fighter runs the full distance rolled. Insubsequent movement phases he continues to move2D6" away from the enemy until he reaches such aposition. If he can get out of sight by staying where heis and hiding then he will do so instead (see theMovement section).
A broken fighter can do nothing other than run tocover and remain there while he attempts to recoverhis nerve. He may not otherwise move nor shoot.
Breaking FightersIf a gang fighter goes down or out of action, theneach friendly model within 2" must take an immediatenerve test.
If the model was hit from a high impact weapon thenany resulting nerve tests incur a -1 Leadershippenalty. The sight of a fellow ganger being ripped toshreds by such a devastating weapon is enough toknock the confidence of even the hardiest of fighters.
If the nerve test is failed then the fighter is brokenand you can indicate this by placing a Broken counterby the model if you wish.
The broken fighter is momentarily panicked orshaken and will attempt to run for cover. He mightrecover sufficiently to return to the fray once he hassteeled himself to fight on.
Special InjuriesSome weapons have special injury rules such as theshock maul and high impact hand-to-hand weapons.These special rules only apply if the weapon inflicteda wound in hand-to-hand combat and rolled an Outof Action injury result. If the fighter was usingmultiple weapons which each inflicted an Out of Action injury then you can choose which one of the weapon's special rules will take effect. Note this onlyapplies to wounding injuries inflicted in hand-to-handcombat, down fighters that are automatically takenout of action ignore this rule.
Nerve Tests A fighter may be called upon to take a test to see if hisnerve holds. A nerve test works in the same way as aLeadership test. If the test is passed then the fighterkeeps his nerve and there is no further effect.

7/24/2019 Nec Community Edition
http://slidepdf.com/reader/full/nec-community-edition 27/101
NECROMUNDA
Combat with Broken Fighters
Should a broken fighter be charged and forced into ahand-to-hand engagement then he is in deep trouble! While broken a fighter’s WS counts as 1. If hesurvives the hand-to-hand phase, even if he wins, heautomatically breaks from combat and runs for coverat the end of the phase as described below.
Breaking from Hand-to-hand Combat
A fighter who loses his nerve and breaks whilefighting hand-to-hand combat turns away from hisenemy and runs away 2D6" just like any other brokenfighter. Because a broken fighter is turning his backupon the enemy he is very likely to be struck as heturns to flee. To represent this the model takes oneautomatic hit from his enemy. Work this out as soonas the fighter breaks and before he is moved.
Recovering Your Nerve
A broken fighter may attempt to recover his nerveduring his recovery phase so long as he is in coverand he cannot be seen by an enemy model. Toattempt to recover a fighter’s nerve, the model musttake a nerve test. If the test is passed then he can fightnormally from then on. If the test is failed then heremains broken.
Broken That Turn
It is not possible to be broken and recover your nerveduring the same turn. Consequently, a fighter wholoses his nerve during his own side’s turn will not beable to recover in the recovery phase of that turn.
Pinned Fighters
If a pinned fighter is broken then he automaticallyescapes from pinning and makes a dash for cover asnormal. Broken fighters cannot be pinned.
Downed Fighters
Fighters that are down can be broken as normal,however their injuries mean that they must crawl 2"towards cover instead of the usual 2D6" dash.
THE BOTTLE ROLLThe Bottle roll is a special test the player must makeat the start of his turn, before all other actions, if aquarter (25%) or more of his gang is down or out ofaction. For example, in a gang of 10 men a test isrequired if 3 or more men are down or out of action.
Sometimes not all gang members will show up to afight. Only the fighters that have participated in thegame thus far are used to determine when a Bottleroll is needed – ie not the total size of the full gang.
Some scenarios also allow fighters to voluntarily leavethe fight. For example, attackers in a Hit & Run canmove off a table edge when they have completed theirmission. Fighters that leave a fight do not count asdown or out of action for purposes of the Bottle roll.
To take a Bottle test roll 2D6. If the score is morethan the Gang leader’s Leadership characteristic thenthe test is failed and the gang bottles out of combat.The game ends immediately and surviving fightersretreat from the area. A failed Bottle roll is the mostcommon way for a game to end. If the score is equalto or less than the Leadership characteristic the player
has passed the test and may continue to fight.
If the gang’s leader is down, broken or out of action,then the player may not use his Leadership to take thetest. Instead, use a model's Leadership characteristicof your choosing amongst the remaining fighters whoare neither down, broken, nor out of action.
A player may voluntarily fail a Bottle roll if he wishesto do so. In which case there is no need to actuallytake the test, it is assumed to automatically fail as thegangers melt into the shadows and retreat. Note thatall the conditions for taking a Bottle roll (25%causalities) still need to be met.
26
7/24/2019 Nec Community Edition
http://slidepdf.com/reader/full/nec-community-edition 28/101
NECROMUNDA
27
ADVANCED RULES
This section includes a variety of new rules which add further detail and complexity to the game. They are notnecessary in order to play, and for this reason the rules have been gathered together at the end here to avoid
potential confusion.We recommend that new players ignore this section to start with, or at least until they are familiar with the waythe game works. If you consider yourself to be an experienced games player then you’ll have no problemintroducing these more complex elements as you go along.
FALLING
The multiple levels and gantries of the Underhiveafford fighters ample opportunity to fall from a greatheight.
TEST TO FALLIf a fighter becomes pinned or goes down within 1" ofan edge there is a chance he will slip and fall off. Todetermine this he must take an Initiative test. If thetest is failed then he falls over the edge to the ground.
If a fighter is engaged in hand-to-hand fighting within1" of an edge then he may fall off if he loses thecombat. The fighter must take an Initiative test. If thetest is failed then he falls over the edge to the ground.
If a fighter is forced to move in a random direction,such as due to moving through smoke, then there is achance he may fall if he touches an edge. The fightermust take an Initiative test. If the test is failed then hefalls over the edge to the ground. If the test is passedthen the fighter ends his move at the edge.
DAMAGE A fighter who falls sustains an automatic hit at astrength equal to the height of the fall in inches. Where a wound is suffered a fall of up to 3" will inflict1 wound, and a fall of more than 3" will inflict D6 wounds. A dizzying fall of more than 10" is assumedto automatically take the fighter out of action. Anyfalls of 7" or more also count as High Impact.
Armour saves do apply to wounds sustained byfalling. Save modifiers are the same as for hand-to-hand combat hits from combatants with highstrengths. So S4 counts -1, S5 -2, S6 -3 and so forth.See the Hand-to-Hand Combat section for the fullchart. A model which falls without going down or outof action is pinned, just as if he was hit by enemy fire.
FALLING ONTO ANOTHER MODELIn the unlikely event that someone else lies directly inthe path of a plummeting fighter then he may also behurt. The hapless individual is hit on a D6 roll of a 4,5 or 6. He sustains the same strength hit as the faller,suffering 1 or D6 wounds depending on the distanceof the fall. If struck by the falling fighter, andassuming he doesn’t go down or out of action, the victim is pinned as if hit by a shot. Assuming the fallerand victim survive, position the models 1" apart tomake it clear they are not in hand-to-hand combat.
JUMPING DOWN
A model can jump down from a higher level toanother below if the height is 3" or less and he hasenough movement to cover the fall. If the fighterelects to do this then he may take an Initiative test.
If the test is failed the fighter lands clumsily andsuffers a hit just as if he fell. If the test is passed thenthe fighter lands safely and can continue his move.Each 1" fallen costs 1/2" of movement. So forexample, if a ganger moved 2" to a ledge andsuccessfully jumped down 2" then he will have used3" of movement.
JUMPING ACROSS
A model can attempt to jump across a horizontal gapfrom one side to the other as long as he has enoughmovement to cover the gap.
Move the model up to the gap and roll a D6. If thenumber rolled is equal to or greater than the numberof inches required to jump the gap then hesuccessfully leaps over to the other side. The fightercan continue his move if he has any remainingmovement left. Each 1" leapt costs 1" of movement. Ifhe fails to cover the gap, either because the D6 wastoo low or he doesn't have enough movement left,then the fighter plummets down as per a fall.

7/24/2019 Nec Community Edition
http://slidepdf.com/reader/full/nec-community-edition 29/101
NECROMUNDA
28
STRAY SHOTS
When a fighter shoots and misses it sometimeshappens that the path of the shot passes close to oneof your own fighters.
If a shot passes within 1/2" of a friend at any pointalong its path then there is a chance of accidentallyhitting the friend. This can only happen when youmiss and roll a 1 to hit.
Roll a further D6 to determine if the stray shot hitsthe intervening model. On the roll of a 1 theintervening model is hit. Work out whether the targetis wounded as normal.
There may be a choice of more than one model thatcould be hit by a stray shot. In this case randomise which target is hit in some convenient way – eg 1, 2or 3 the target on the left, 4, 5 or 6 the target on theright.
Orlock A shoots at the Goliath, but rolls a 1 on his ‘to hit’
roll. As Orlock B is within 1/2” of the line of fire, there is a
chance he will be hit by the stray shot.
EXPLODING WEAPONS
Badly maintained weapons, home-made ammunitionand old corroded power packs can explodedamaging the weapon and probably harming theshooter. This represents the weapon overheating,plasma leakage, or a magazine exploding as the next
shell is auto-loaded. While not as dangerous as adirect hit from the weapon, this is still bad news andcan easily take a man down or out of action.
When a 6 is rolled to hit then an Ammo roll isrequired as already described in the Shootingsection. In the case of flamers, an Ammo roll isrequired every time a weapon shoots.
If an Ammo dice roll is a 1 then the weapon is notonly useless for the rest of the game (as a 1 willinevitably fail) but there is a chance it might explode.Roll a further D6. If the score is less than the
weapon’s standard Ammo Roll rating then the
weapon explodes.
If a weapon’s ammo rating is ‘auto’ then itautomatically fails an Ammo roll so none is taken.However, roll a dice anyway with the weaponexploding on the roll of a 1.
An exploding weapon inflicts an automatic hit on theuser as if he were struck by his own weapon but witha Strength value of 1 less than normal (the SaveModifier is also reduced if applicable). In the case of weapons that use templates, no template is used: theblast is confined solely to the firing model.

7/24/2019 Nec Community Edition
http://slidepdf.com/reader/full/nec-community-edition 30/101
NECROMUNDA
29
ATTACKING TERRAIN
Sometimes a fighter may want to attack an inanimateobject rather than an enemy. Perhaps he wants tocave in a door, destroy a fuel pipe, rip apart a powercable, or smash a water still. These are all structuralfeatures and can be attacked as described below. Notethe following rules can only be used as described inthe scenarios or under special conditions if agreed byboth players. You cannot for example shoot a blast
weapon at a bulkhead next to a model simply inorder to avoid a cover modifier.
Although not strictly accurate it is convenient to thinkof structures as being able to take a fixed number of
'wounds’, just like fighters. Structures also have aToughness value and they can sustain a certainnumber of wounds before they are destroyed ordamaged. For example, the water still in the Hit andRun scenario has a Toughness of 6 and 1 Wound.
A structure can be shot at just like an enemy fighter. You must therefore roll to hit and score wounds asnormal. Many structures will be easier to hit thanfighters because they are large targets (+1 to hit).
A fighter can also use Krak grenades or Melta bombsas demolition charges. The device can be placed upona structure within 1" of the fighter during theshooting phase. This is considered to be shootingalthough no roll is required to hit. The bomb isfastened to the structure by means of its magneticcasing, it explodes, and the target is hit automatically.
A fighter can strike a structure in base contact in thehand-to-hand combat phase. He cannot fight hand-to-hand combat against an enemy or shoot his weaponin the same turn. In effect the fighter is attacking thestructure during the turn, hacking away at it with whatever weapons he has. A fighter automaticallystrikes 1 hit on a structure for each Attack on hisprofile. Work out the result of hits in the normal way.
catching FIRE
Some weapons fire short bursts of flaming chemicalsthat not only burn the victim's flesh but can also settheir clothes on fire. If a fighter is hit by a flame weapon then he stands a chance of catching fire. The
chance of this happening is based on the weaponused as the more powerful flame weapons canunleash a more concentrated sheet of fire. Anymodels that suffer a hit from a flame weapon and thatdon't go out of action must roll a D6. If the score isequal to or greater than the number shown belowthen the unfortunate fighter has caught fire!
Weapon
Hot Shot Shells
Hand Flamer
Flamer
Heavy Flamer
Chance of Catching Fire
5+
5+
4+
3+
Any models that are on fire must take a Strength testat the start of their turn. If the test is passed then thefighter manages to beat out the flames. The model isno longer on fire but cannot do anything else for theremainder of the turn.
If the test is failed then the fighter is unable toextinguish the flames and he continues to burn. Themodel automatically suffers a flesh wound and isunable to do anything except he staggers D6" in arandom direction.
Any friendly fighters in base-to-base contact with a
model on fire at the start of his turn can help beat outthe flames. The model cannot do anything else thatturn. If the fighter helps out in this way then hisStrength characteristic is added to the model's whenhe takes the Strength test.
Fighters that are down can catch fire and follow therules as above, except that if the fighter fails theStrength test then he doesn't move at all that turn.Fighters that are on fire are immune from pinningand nerve tests and so will automatically recover ifalready pinned or broken.
Any fighters that are on fire cannot be involved in
hand-to-hand combat and so cannot be charged. If afighter was already in hand-to-hand combat beforecatching fire then the combat is immediately brokenand the two models are separated from base contact.
FLYING
Some winged beasties are capable of flying throughthe ruinous Underhive. Models that can fly can movein any direction and ignore any difficult and verydifficult ground penalties. Note the model must end
its turn on the ground – ie not flapping in mid-air.
Flying models can also glide between structures aslong as the whole move is downwards. Each 1" downallows the model to move an extra +1". However, theextra move cannot exceed the model's base move. Forexample, a model with a Move characteristic of 4 cangain a max bonus of +4" when moving normally, or amax bonus of +8" if the model runs.

7/24/2019 Nec Community Edition
http://slidepdf.com/reader/full/nec-community-edition 31/101
NECROMUNDA
FEAR
Fear is a natural reaction to horrific mutants,unearthly psychic powers, and some particularlygruesome injuries. To represent this, models musttake a nerve test when confronted by fearsome
creatures or circumstances.
If the fighter is charged by a model which causes fearand reaches base-to-base contact then he must take anerve test. If the test is failed then the fighter isbroken. However, the fighter is rooted to the spot infear and so does not immediately break from combat,but will still break at the end of the phase as normal.
If the fighter declares a charge against a model whichcauses fear then he must take a nerve test. If the testis failed then the fighter cannot charge and he ismomentarily transfixed by fear. The model is unableto do anything else for the rest of the turn.
TERROR
Terror is a more potent form of fear. Just as somehorrific creatures are so ghastly they cause fear, othersare even worse and cause terror instead.
Circumstances which cause terror automatically causefear as described above. In addition, a nerve test isrequired if the model is within 8" of a creature whichcauses terror at the start of the model's turn. If thetest is failed then the fighter is broken as described in
the Leadership section.
SPECIAL FEAR AND TERROR LIABILITIESLater on you may acquire fighters who are sufficientlyrepulsive to cause fear themselves! Obviouslyindividuals who are so impressively hideous are notgoing to be put off by others of their kind.
A model which causes fear does not have to take testsfor fear. It treats any enemy which causes terror as
causing fear instead – ie, it does not have to test justbecause the model is within 8" at the start of its turn. A model that causes terror cannot be affected byeither fear or terror.
STUPIDITY
Many large and severely mutated creatures are sodim-witted that they often behave in a fairly randomand stupid way. A gang fighter can also sometimes bereduced to a state of bafflement as a result of injuries
or shock. Such individuals are described as stupid.
Stupid models must take a Leadership test at the startof each of their turns to determine how they react. Ifthe test is passed the model may act normally. If thetest is failed the following rules apply until the start ofthe next turn.
If fighting in hand-to-hand combat the model istemporarily disoriented or confused. Roll a D6before each hand-to-hand phase.
1-3:
4-6:
If not fighting in hand-to-hand combat roll a D6to determine how the model moves at the startof your movement phase.
1-3:
4-6:
The model can do nothing else this turn. Thefighter will not shoot weapons or otherwisemove unless he loses his nerve and runs 2D6" tocover as described in the Leadership section.
The model does not have to take any furtherLeadership-based tests for fear or terror. It muststill take tests to keep its nerve as described inthe Leadership section. If such a test is failed themodel will run 2D6" to cover. The rules forbroken fighters override the rules for stupidity.
1
2
3
4
Roll no Attack dice this turn. Your WS stillcounts towards the Combat Score
representing basic instincts only.Fight normally.
Roll a Scatter dice. The arrow indicates thedirection in which the model moves thisturn. The model moves its full normal movedistance. If the model moves into contact with an enemy it becomes engaged in hand-to-hand combat and may or may not fight(roll as above).
The model does not move.
30

7/24/2019 Nec Community Edition
http://slidepdf.com/reader/full/nec-community-edition 32/101
NECROMUNDA
31
FRENZY
A frenzied model must always charge the closestenemy within his charge move (usually 8") ifable to do so.
The frenzied model doubles his Attackscharacteristic. For example, A1 becomes A2, A2becomes A4 and so on.
Frenzied models cannot parry (see Parry in theHand-to-Hand Combat section).
Frenzied models must use their 2" follow-upmove to engage in hand-to-hand combat ifpossible. Otherwise they must use the extramove to move closer to their enemy. They maynot use a follow-up move to get behind cover orretreat (see Hand-to-Hand Combat).
Frenzied models are never affected by fear orterror, nor are they affected by stupidity orhatred.
If a frenzied model loses his nerve and is brokenas described in the Leadership section, then theFrenzy rules no longer apply. The fighter hastaken a beating and his sense of selfpreservationasserts itself.
A player may try to gain full control over afrenzied model at the start of his turn. This ispurely up to you – you may not wish yoursplendidly berserk fighter to calm down andbehave sensibly! To gain control over the modeltake a Leadership test as you would for testing your nerve. If the test is passed then the fighteris under control and can act normally –
however, none of the special Frenzy rulesdescribed above will apply. This control lastsuntil the start of your following turn.
1
2
34
5
6
7
Some fighters are more than a bit crazed and can bedriven into a frenzy of slaughter during combat. Such wild and dangerous individuals are described asfrenzied. How or exactly why a fighter may go over
the edge in this way is not particularly important – hecould be psychotically deranged, under the influenceof dangerous hive fungi, or affected by localised gasesor radiation.
If an individual is frenzied the following rules apply.
HATRED
If a fighter can see a hated adversary then allnerve tests are taken as if he had a Leadership
characteristic of 10. A model fighting hand-to-hand combat with ahated foe can re-roll any of his own Attack dicein the first turn of any hand-to-hand combatengagement. After the first turn the model has vented his pent-up anger and fights as normal.
A model in hand-to-hand combat must use his 2"follow-up move to engage a hated enemy ifpossible. Otherwise he must use the follow-upto move towards a hated enemy he can see. Hemay not use follow-up to move away from hatedenemies or take cover if there are any hatedenemy models in sight.
1
2
3
Hate is a powerful emotion and in the Underhivethere is plenty of opportunity for gangs to developbitter rivalries. Grudges and ingrained animosity canlead to feuds that tear gangs apart and leave dozensdead. This is represented by the special rules forhatred. Hatred can often develop following disturbinginjuries.
Most gangs will have fighters that hate an enemy gangmember over the course of a campaign. The followingrules apply to models which hate their rivals.
WILDSNAKE
The favoured drink of Underhivers is the potent spirit known as Wildsnake. It isbrewed from the skins and flesh of snakescaught in the wilds of the badzones. Some
hunters and farmers can spend their wholelives catching and breeding snakes for theWildsnake industry, such is the popularity ofthe drink. The provenance of each bottle is guaranteed by the dead snake preservedwithin. Wildsnake is a clear sharp tastingliquid the bitterness of which is derived fromthe venom in the snakes themselves.
For those who cannot afford the price ofWildsnake the next best is quite literally Second Best. Second Best is brewed from rat pelts too mouldy to use for anything else, slugs too rancid to sell as slave food, and
household waste so disgusting that it’s betternot to think about it.
Conveniently, it is almost impossible tothink about anything after drinking a bottleof Second Best...

7/24/2019 Nec Community Edition
http://slidepdf.com/reader/full/nec-community-edition 33/101
NECROMUNDA
32
ARMOURY
This section of the Necromunda rulebook describes the different weapons which gang fighters carry as well asother equipment such as armour and gunsights. In addition to commonplace weapons and easily obtained
items of equipment there are many unusual or exotic weapons and rare devices of various kinds. These much sought after and expensive items are carried only by the richest and most successful gangs, but they have beencollated here for ease of reference.
Some of the items described on the following pagesare used in the various scenarios given in the ‘Playinga Campaign Game’ section (see page 109). Forexample, screamers and stummers are used with thespecial rules in the Raid and Rescue scenarios, beingalarm devices and sound mufflers respectively. Playersfighting these scenarios will appreciate how usefulsuch devices can be.
Other items are used in the context of the broader
Necromundan Underhive campaign described later inthe ‘Playing a Campaign Game’ section (see page109). For example, the lobo-chip will cure a fighter ofthe longterm effects of a head wound sustained in aprevious game. Other devices can help to acquireterritory. For example, the Isotropic fuel rod enablesa gang to set up a new settlement, while the Ratskinmap guides the gang through secret passages and intoold treasure domes.
Don’t worry about learning the rules for every weapon and item of equipment as this isn’t necessary.The pages that follow provide you with all sorts ofinformation which can be referred to as and whenneeded. There is a summary chart for the various weapons for convenience. To start with, playersshould familiarise themselves with the weapons theirgang is armed with. Once players have masteredthese, new weapons and unusual items of equipmentmay be introduced as required.
This section describes the different weapons thatgang fighters can carry. Some of these weapons arecommon, simple and even cheap, whilst others arerare, technically complex and expensive.
A gang may be equipped with any weapons it canafford within the limits discussed later. Models are
available with a wide variety of weaponry, and arealways assumed to carry the weapons they aredepicted with. Holstered pistols can obviouslyrepresent any pistol weapon, whilst grenades can beassumed to be concealed, so a model not depicted with grenades can still carry them. All fighters areassumed to carry a knife even if the model itself doesnot visibly have one.
TYPES OF WEAPON All weapons are divided into one of the followingbroad categories.
Hand-to-Hand Combat WeaponsThese are weapons designed for use purely at closequarters such as swords, knives, axes and crude clubs.Such weapons cannot be used for shooting but onlyin hand-to-hand combat.
PistolsPistols are small hand-held firearms which can beused at close quarters or at longer range. A fighter canshoot with a pistol or use it in hand-to-hand combat.
Basic WeaponsBasic weapons are larger, heavier firearms generallycarried and fired using two hands. You can shoot inthe shooting phase with such a weapon but it confersno advantage in hand-to-hand fighting.
Special WeaponsSpecial weapons are similar to basic weapons in termsof their size and the way they are used. However, theyare more complex in design, costly, and far morespecialised in nature. Due to this, only the gang'sleader and heavies can use special weapons.
Heavy WeaponsHeavy weapons are even larger and heavier than basic weapons, and are generally more powerful and have alonger effective range. Many can spit out vast amountsof bullets while others are designed to punch holes intanks or create large blasts. Heavy weapons aredifficult to maintain and are cumbersome to fire soonly the gang's heavies can use them. In hand-to-hand
combat a weighty weapon is a disadvantage andfighters carrying one will suffer a penalty.
GrenadesGrenades are small bombs or grenades that arethrown by hand and which explode on impact. Amodel can throw a grenade instead of shooting a weapon in the shooting phase.
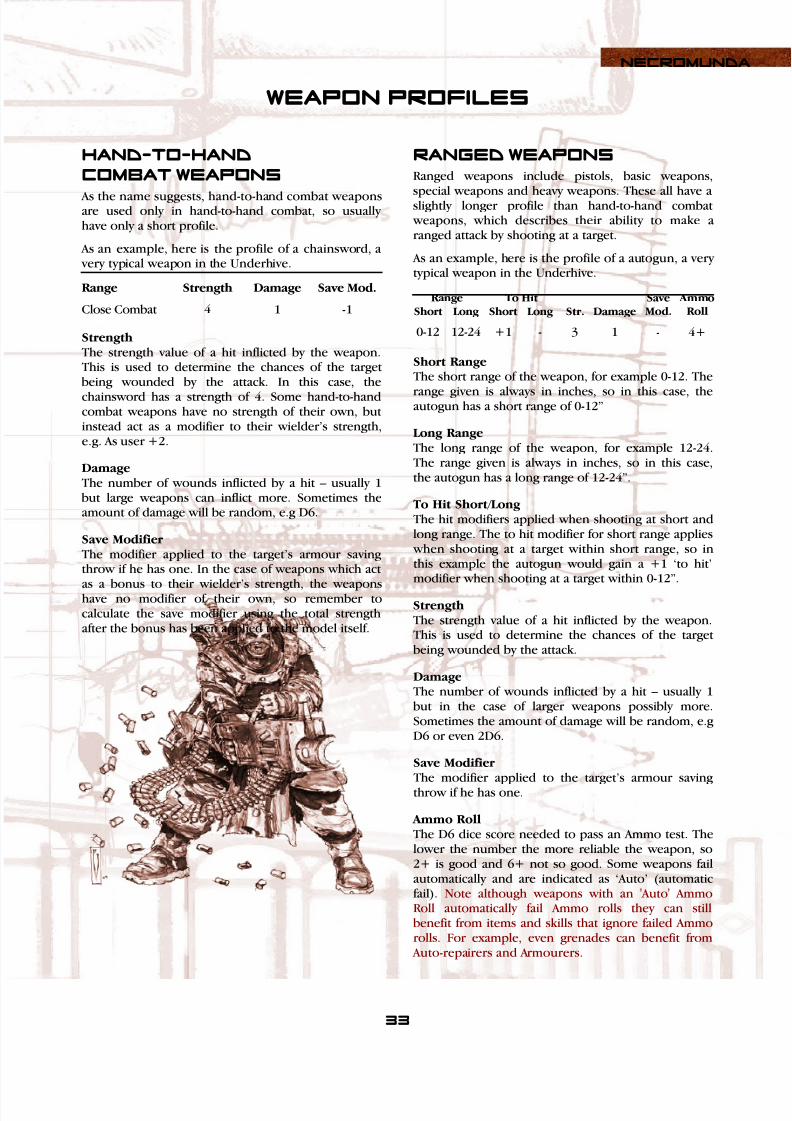
7/24/2019 Nec Community Edition
http://slidepdf.com/reader/full/nec-community-edition 34/101
NECROMUNDA
33
WEAPON PROFILES
HAND-TO-HAND
COMBAT WEAPONS
As the name suggests, hand-to-hand combat weaponsare used only in hand-to-hand combat, so usuallyhave only a short profile.
As an example, here is the profile of a chainsword, a very typical weapon in the Underhive.
StrengthThe strength value of a hit inflicted by the weapon.This is used to determine the chances of the targetbeing wounded by the attack. In this case, the
chainsword has a strength of 4. Some hand-to-handcombat weapons have no strength of their own, butinstead act as a modifier to their wielder’s strength,e.g. As user +2.
DamageThe number of wounds inflicted by a hit – usually 1but large weapons can inflict more. Sometimes theamount of damage will be random, e.g D6.
Save ModifierThe modifier applied to the target’s armour savingthrow if he has one. In the case of weapons which act
as a bonus to their wielder’s strength, the weaponshave no modifier of their own, so remember tocalculate the save modifier using the total strengthafter the bonus has been applied to the model itself.
Range
Close Combat
Strength
4
Damage
1
Save Mod.
-1
RANGED WEAPONSRanged weapons include pistols, basic weapons,
special weapons and heavy weapons. These all have aslightly longer profile than hand-to-hand combat weapons, which describes their ability to make aranged attack by shooting at a target.
As an example, here is the profile of a autogun, a verytypical weapon in the Underhive.
Short RangeThe short range of the weapon, for example 0-12. The
range given is always in inches, so in this case, theautogun has a short range of 0-12”
Long RangeThe long range of the weapon, for example 12-24.The range given is always in inches, so in this case,the autogun has a long range of 12-24”.
To Hit Short/LongThe hit modifiers applied when shooting at short andlong range. The to hit modifier for short range applies when shooting at a target within short range, so inthis example the autogun would gain a +1 ‘to hit’modifier when shooting at a target within 0-12”.
StrengthThe strength value of a hit inflicted by the weapon.This is used to determine the chances of the targetbeing wounded by the attack.
DamageThe number of wounds inflicted by a hit – usually 1but in the case of larger weapons possibly more.Sometimes the amount of damage will be random, e.gD6 or even 2D6.
Save ModifierThe modifier applied to the target’s armour savingthrow if he has one.
Ammo RollThe D6 dice score needed to pass an Ammo test. Thelower the number the more reliable the weapon, so2+ is good and 6+ not so good. Some weapons failautomatically and are indicated as ‘Auto’ (automaticfail). Note although weapons with an 'Auto' AmmoRoll automatically fail Ammo rolls they can stillbenefit from items and skills that ignore failed Ammorolls. For example, even grenades can benefit from
Auto-repairers and Armourers.
Str.
3
Damage
1
Long
-
Short
+1
Long
12-24
Short
0-12
Range To Hit SaveMod.
-
AmmoRoll
4+

7/24/2019 Nec Community Edition
http://slidepdf.com/reader/full/nec-community-edition 35/101
34
NECROMUNDA
HAND-TO-HAND COMBAT WEAPONS Hand-to-hand combat weapons include a whole variety of primitive weapons intended to inflict vicious injuriesup close and personal, as well as more advanced weaponry such as power axes. These weapons cannot be usedto shoot, they are used exclusively for hand-to-hand fighting.
Special Rules: All Necromundan fighters carry a knife in addition to whatever other weapons they carry. If not
apparent on the model it is assumed to be tucked into a boot or concealed by the fighter’s clothes.
MASSIVE AXE, SWORD OR CLUB
A few unhinged individuals prefer to fight with amassive sword, club, metal bar, axe, hammer or some
other large and unlikely implement. A massive weapon is hard to swing because of its weight, but when it strikes an enemy it will cut him in two orcrush him to a pulp.
Range
Close Combat
Strength
As user +2
Damage
1
Save Mod.
-
Two-handed: It requires two hands to swing amassive weapon so it can never be used together withanother weapon.
Mighty Blow: The sheer mass of a massive weaponcombined with the momentum of a charge makes it
difficult to retaliate against such an onslaught. If youcharged into combat that turn then your opponentrolls one less attack dice for the duration of the turn(to a minimum of 1).
Draws: Due to the ponderous lurching swingrequired to wield this weapon your opponent is likelyto catch you on the upswing. If the combat ends in adraw then your Initiative is halved when working out which fighter wins.
CLUBS, MAULS & BLUDGEONS
Simple primitive weapons are often used by juves,impoverished fighters and the hordes of mutantcreatures that plague the Underhive. This type of weapon comprises crude clubs or metal bars,murderous hammers or axes, and other weighty bluntinstruments such as spiked mauls and bludgeons.They can be used with one hand, leaving the otherfree to carry a pistol or another close combat weapon.
Because these weapons are crude and heavy they aremarginally more dangerous than bladed weapons,although it is impossible to use them to parry.
Range
Close Combat
Strength
As user +1
Damage
1
Save Mod.
-
CHAINSWORD
The chainsword is a deadly if noisy weapon with apowered chainsaw edge. Its rending saw-teeth aremade from sub-atomically honed adamantium andcan slice through plasteel. It is an expensive andprestigious weapon favoured by gang leaders.
Range
Close Combat
Strength
4
Damage
1
Save Mod.
-2
Parry: You can parry with a chainsword, as describedin the game rules.
Noisy: This weapon emits a loud and distinctivesound so must test to sound the alarm when usedduring scenarios such as The Raid.
CHAINS & FLAILS
A length of chain or a chain fastened to a metal bar isa dangerous and unpredictable weapon. Only the
most maniacal fighters would use a weapon like this,swinging it around their head with long powerfulstrokes. It is also a dangerous weapon to use becausethe wielder must struggle to keep his balance whilstavoiding the chain itself.
Range
Close Combat
Strength
As user +1
Damage
1
Save Mod.
-
Nullify: Each flail cancels out an opponent's parry.Note any parries that nullify each other takeprecedence. For example, a fighter equipped with aflail and a sword cannot parry against an opponent
equipped with a sword. Clumsy: Each flail will double one of your fumbles.For example, if a fighter uses two flails then the firsttwo fumbles he rolls will each add +2 to youropponent’s Combat Score.

7/24/2019 Nec Community Edition
http://slidepdf.com/reader/full/nec-community-edition 36/101
NECROMUNDA
35
SWORDS & KNIVES
Every Necromundan fighter carries a knife of somekind. Heavy bladed single-edge fighting knives are themost common type, but needle thin stilettos and longdouble-edged daggers are favoured by some fighters.
Longer blades are carried by some fighters as well astheir knives. Short, broad-bladed weapons are easy tocarry and are well suited to fast and bloody combat.Fighters make use of a great variety of other bladed weapons including cleavers and machetes. All of thesebladed weapons are essentially similar and they havethe same weapon profile. The principle difference isthat fighters with swords are able to parry.
Range
Close Combat
Strength
As user
Damage
1
Save Mod.
-
Parry: Fighters with swords are able to parry asdescribed in the game rules.
POWER SWORD
The power sword may look much like an ordinarysword but it is actually a technically sophisticated and very deadly weapon. The sword’s hilt and bladeincorporate an energy source and a disruptorgenerator which sheathes the blade in a shimmeringblue energy field. The field demolecularises any solidmatter allowing the sword to easily tear through eventhe hardest of materials.
Range
Close Combat
Strength
As user +2
Damage
1
Save Mod.
-
Parry: Fighters with swords are able to parry asdescribed in the game rules.
POWER AXE
The power axe is a large bladed weapon often as tallas a man. It utilises the same energy field technology
as the power sword and is even more devastating onaccount of its greater size and more powerfuldisruptor generator. Because of its size the weapon isoften wielded with both hands, although it can beused one-handed with a slight reduction in effect.
Range
Close Combat
Strength
As user +3
Damage
1
Save Mod.
-
Dual-handed: A power axe can be wielded in onehand using the profile above. Alternatively you canchoose to wield a power axe with both hands, in which case it receives a further +1 Strength bonus.
POWER FIST
The power fist is the most potent weapon of its kind,being even more deadly than a power axe. It is a veryrare weapon and requires a powerful energy sourcefor its large generator. The fist is a massive armoured
glove surrounded by a shimmering blue energy field.The demolecularisation field allows the user to tear and punch huge chunks out of his target. Whilstfighting hand-to-hand it's impossible to hold another
weapon in the power fist, but at other times it can bedeactivated and used to hold another weapon.
Range
Close Combat
Strength
As user +5
Damage
D3
Save Mod.
-
SHOCK MAUL
Shock mauls are used by Arbitrators and Enforcers,the uniformed guardians of Imperial justice. Arbitrators are almost never seen in the Underhive.Their duties go beyond the laws of individual planets,and their concerns rarely interfere with planetarygovernment except on the very highest level. None-the-less, shock mauls can sometimes reach theUnderhive where they make a prestigious alternativeto the power sword. The maul contains an adjustableenergy generator that can produce a powerfulelectrical discharge. This allows the user to bash ahole through a wall or conveniently stun a victim.
RangeClose Combat
Strength5
Damage1
Save Mod.-2
Out of Action: A fighter who goes down to a blowfrom a shock maul will go out of action automatically,even in multiple combats where this would notnormally be the case.
Injury: Due to the unique nature of the shock maul,any models taken out of action by it must roll on thefollowing injury chart instead of the normal SeriousInjuries chart.
D6
1
2
3
4-5
6
Result
Chest Wound
Shell Shock
Old Battle Wound
Full Recovery
Captured

7/24/2019 Nec Community Edition
http://slidepdf.com/reader/full/nec-community-edition 37/101
NECROMUNDA
PISTOLS Pistols are small hand-held weapons that are especially useful for close ranged fighting and hand-to-handcombat. At short ranges their lightness means they are easy to aim and fire, though at longer ranges their lack of stability and power means they are inaccurate.
36
AUTOPISTOL
The autopistol is a rapid firing automatic pistol,effectively a smaller and handier version of the largerautogun. Auto weapons are easy to manufacture andsimple to use, and are amongst the most commonlyemployed weapons in the Underhive.
Most weapons are made in the factories of the HiveCity and traded down through the hive. Crude buteffective versions are made in the Underhive workshops themselves. Ammunition, spares andrepair facilities are relatively easy to find throughout
the Underhive, and traders always have guns andammunition for sale. Because of its high rate of fire,the autopistol is astonishingly accurate at the shortranges favoured by some gang fighters.
Str.
3
Damage
1
Long
-
Short
+2
Long
8-16
Short
0-8
Range To Hit SaveMod.
-
AmmoRoll
4+
BOLTPISTOL
Bolt weapons are sophisticated weapons that fire self-
propelled explosive ammunition in the form of smallmissiles called bolts. Bolt pistols and boltguns aremanufactured in the factories of the Hive City, but thefine engineering tolerances and quality materialsrequired means few if any are made in the Underhive.For the same reason bolt weapons are hard tomaintain, spares are rare, and ammunition isexpensive. Furthermore, ammunition made in theUnderhive is often unreliable. On the whole this is a weapon best suited to the technically sophisticatedarmies of Space Marines for which it was designed.
Despite its drawbacks the bolt pistol is still a highlyfavoured weapon. It may not always work, but whenit does the results are usually impressive. For onething, it makes a lot of noise and creates a great dealof obvious damage. More deadly and far moreobvious than an autopistol or laspistol, it makes theideal side-arm for a gang leader keen to impress rivals.
Str.
4
Damage
1
Long
-
Short
+2
Long
8-16
Short
0-8
Range To Hit SaveMod.
-1
AmmoRoll
6+
LASPISTOL
Laser weapons are manufactured in vast quantities inthe factories of the Hive City and are exported to thearmed forces of the Imperium throughout the galaxy.Laspistols find their way into the Underhive via theGuilder traders. Power packs come from the samesource and some are made in local settlements.Supplies of parts are plentiful and repairs are cheap.
Laser technology is reliable and easy to replicate, andalthough the weapons are not the most powerful theyare certainly the most trustworthy. A laser power pack will last for many shots and can be recharged from a
standard power source or by exposing its thermalcells to heat or light. In an emergency a pack can berecharged by placing it in a fire, although suchtreatment tends to shorten the life of the pack andincrease the probability of it failing. Manyexperienced fighters prefer the laspistol over morepowerful weapons for these very reasons.
Str.
3
Damage
1
Long
-
Short
+1
Long
8-16
Short
0-8
Range To Hit SaveMod.
-
AmmoRoll
2+
STUB GUN
The stubber or slugger is a primitive hand gun whichfires solid bullets. It is recognisable as a revolver orsmall automatic of the kind used since the Twentiethcentury. Stub guns are made locally in the Underhiveand are readily available, simple to maintain, andfairly reliable. The quality and appearance ofindividual weapons varies a great deal.
Str.
3
Damage
1
Long
-1
Short
+1
Long
8-16
Short
0-8
Range To Hit SaveMod.
-
AmmoRoll
4+
Dum-dum Bullets: A stub gun can be loaded withdum-dum bullets. A supply of these powerful hand-made bullets costs extra, but they are more effectivethan standard ammunition adding +1 to the Strengthof any hits (Strength 4 rather than 3). However, a stubgun firing dum-dums must test to see if it explodes onan Ammo roll of 1, 2 or 3 instead of just a roll of 1.Dum-dum bullets follow the usual ammo rules asexplained in the Ammuntion & Gunsights section.

7/24/2019 Nec Community Edition
http://slidepdf.com/reader/full/nec-community-edition 38/101
NECROMUNDA
37
NEEDLE PISTOL
The needle pistol or needler is a complexlaserpowered weapon. Its tight laser beam carries atiny toxic needle or dart which pierces the target’sflesh to send its deadly poisons into their body. The
laser carrier beam will dissolve or blow away armouror clothing and burrow into exposed flesh enablingthe darts to penetrate more deeply. The needler is arare and expensive weapon in the Underhive. Its chiefadvantage is that it is virtually silent, andconsequently the favoured weapon for assassins andother unwelcome characters.
Str.
3
Damage
1
Long
-
Short
+2
Long
8-16
Short
0-8
Range To Hit SaveMod.
-1
AmmoRoll
6+
Toxic Dart: No wound roll is required when shooting
a needler: if the target is hit then the toxins willautomatically inflict 1 wound. Armour may still save atarget as normal. Note this only applies against livingtargets. If a needle pistol hits an unliving target, suchas a water still, then a normal to wound roll must bemade using the Strength shown in the profile.
Injuries: A target suffering his final wound from atoxic dart does not roll on the standard Injury chart.Instead, roll on the chart below both when the injuryis inflicted and in subsequent recovery phases.
D6
1
2-4
5-6
Result
No Effect: The toxin has no effect or wears off.
The target may continue to fight in the same wayas if he’d suffered a flesh wound except that hesuffers no penalties on his WS/BS.
Comatose: The target is knocked comatose andfalls to the ground. The model counts as downexcept he cannot move.
Out of Action: The target slumps lifelessly to theground. He may be dead or barely living, but isovercome by the toxin for the rest of the game.Remove the model as you would any other that was out of action.
If a needle pistol hits a model that is already down
and inflicts a Comatose result, then the model mustcontinue to roll on the chart above in subsequentrecovery phases instead of the standard injury chart.
Silent : This weapon emits no noise so when fireddoesn't test to sound the alarm during scenarios suchas The Raid.
PLASMA PISTOL
Plasma weapons fire energy shells of bright glowingplasma – matter in a super-heated energised state.
When a plasma shell strikes its target there is atremendous release of energy and the target blowsapart in an almighty explosion. Plasma weapons areextremely effective and very dangerous, however, they are also highly unstable, difficult to maintain andfrequently malfunction. The user can mitigate this byfiring as short a blast as possible with slightly reducedeffectiveness.
Str.
4
Damage
1
Long
-
Short
+1
Long
8-16
Short
0-8
Range To Hit SaveMod.
-1
AmmoRoll
4+
Firing on Low Energy:
Energy Levels: You can choose to shoot the plasmapistol on a low energy setting or maximum power.The profiles for each setting are different. If you shootthe plasma pistol on maximum power then after allshots with the gun have been resolved you must roll aD6 on the Gets Hot table below to see if the weaponmalfunctions. Note a plasma pistol cannot be fired onmaximum power during hand-to-hand combat.
1-2
3-4
5-6
Gets Hot
Critical: The weapon vents super-heated gasesthat inflict a D3 Strength hit against the user. The weapon also cannot be fired again for a full turn.
Overheat: The weapon cannot be fired again fora full turn as it needs to cool down.
Stable: The weapon remains stable and can befired again as normal next turn.
Str.
5
Damage
1
Long
-
Short
+2
Long
8-16
Short
0-8
Range To Hit SaveMod.
-2
AmmoRoll
6+
Firing on Maximum Power:

7/24/2019 Nec Community Edition
http://slidepdf.com/reader/full/nec-community-edition 39/101
NECROMUNDA
38
WEB PISTOL
The web pistol, or glue gun as it is cheerfully called, isa common sight in the Hive City. It's used byenforcers or the Houses’ security forces to suppresscrowds and take captives without harming them.
The weapon fires a tangle of gluey threads whichenvelop and ensnare their target, trapping andrendering them immobile. The sticky mass quicklyshrinks and hardens holding the target fast andpreventing them from making the slightest move. A victim who struggles too hard may be strangled orcrushed by the constricting mesh. Web pistols arebulky with a coned nozzle and a distinctive canistercontaining the web chemical. Although easilyavailable uphive, both the weapon and its chemicalammo are hard to get hold of by Underhive traders.
Str.-
Damagespecial
Long-1
Short-
Long6-9
Short0-6
Range To Hit Save
Mod.-
Ammo
Roll6+
Webbed Targets: Once a web pistol has hit its targetthe victim is automatically enmeshed – there is no rollfor wounds and no armour saving throw is allowed.This also applies in hand-to-hand combat, any extrahits that must be allocated to the pistol are wasted.
A webbed target cannot move or do anything elseother than attempt to struggle free at the start of histurn. If the fighter wishes to make an attempt tostruggle free roll a D6 and add the model’s Strength.If the total is 9 or more the victim frees himself but
may not do anything for the rest of the turn. If thetotal is less than 9 then he automatically suffers 1 wound, though an armour save can be attempted. If a webbed model is involved in hand-to-hand combatthen treat him as if he was down.
Friendly fighters in base contact with a webbed modelat the start of their turn can help cut away the steely webbing. The model cannot do anything else thatturn. If the fighter helps out in this way then hisStrength characteristic is added to the D6 roll.
Web Solvent: All web pistols incorporate a solventspray for removing the web material. Any model that
has a web pistol can automatically free a webbedfighter at the start of the turn if he is in base contactand doesn't do anything else that turn. However, amodel can never free itself from a web using a webpistol, as the strands are far too tight to allow thefighter to reach his solvent spray.
Capture: If a fighter equipped with a web pistol takesan enemy model out of action in hand-to-handcombat then he will be automatically captured on aroll of 4+. Models captured in this way do not have tomake a roll on the Serious Injuries chart. Note thisrule only applies so long as the web pistol has not ranout of ammo.
HAND FLAMER
Amongst the Underhive gangs this weapon is alsoknown as the flame pistol or burner. It fires a shortburst of flaming chemical, an unstable sticky materialthat ignites upon contact with air. This volatile fuel is
held within a small pressurised container that fits intothe weapon. A single container contains very little fuelso hand flamers often run out of ammo. The unstableand temperamental nature of the fuel also means thatsome containers prove useless whilst others explodeunexpectedly as they are loaded. Nevertheless, thehand flamer is a very dangerous weapon that spreadsa sheet of flame over a short distance which allows itto claim several victims with a single shot.
Str.
3
Damage
1
Long
-
Short
-
LongShortRange To Hit Save
Mod.
-1
AmmoRoll
5+Template
Flamer: The hand flamer’s shot is represented by theflamer template. This is used as described in theShooting section. However, due to the hand flamer'slimited ammo, any models partially covered by thetemplate are not hit at all.
Ammo Roll: The hand flamer must take an Ammo rolleach time it fires, except during hand-to-hand combat. Catch Fire: Any models hit by a hand flamer catch fireon a roll of 5+. Note the hand flamer cannot sethand-to-hand combat opponents on fire.

7/24/2019 Nec Community Edition
http://slidepdf.com/reader/full/nec-community-edition 40/101
NECROMUNDA
39
BASIC WEAPONSThis section covers weapons designed to be carried and used with two hands like an automatic rifle or sub-machine gun. These comprise some of the most common and effective weapons available to the Underhive fighters.
AUTOGUN
The autogun is a rapid firing automatic weapon. Auto weapons are easy to manufacture and simple to use,and are amongst the most commonly employed weapons in the Underhive.
The majority of autoguns are made in the factories ofHive City and traded down through the hive. Butsome crude but effective versions are also made in theramshackle Underhive workshops. Ammo, spares andrepair facilities are relatively easy to find throughoutthe Underhive, and traders always have plenty of guns
and ammunition for sale.
Str.
3
Damage
1
Long
-
Short
+1
Long
12-24
Short
0-12
Range To Hit SaveMod.
-
AmmoRoll
4+
BOLTGUN
The boltgun or bolter is the standard armament of theImperium’s finest fighting forces the Space Marines. Itis a weapon made in limited quantities and to thehighest standards using the most costly materials.Boltguns require constant attention and regularexpert maintenance if they are to work properly.
Bolt weapons fire a self-propelled armour-penetratingmass-reactive explosive missile called a bolt. Evenbolts are expensive to make and cannot be easilyfabricated in the Underhive. Overall, boltguns arerare, expensive and prone to going wrong. However,they are very effective indeed.
Despite their drawbacks boltguns are still highlyfavoured weapons. They make a great deal of noiseand cause immense damage to any target they hit.They are prestige weapons carried by gang leaders
and other fighters who are wealthy and don’t mindadvertising the fact. A fighter with a bolter meansbusiness.
Str.
4
Damage
1
Long
-
Short
+1
Long
12-24
Short
0-12
Range To Hit SaveMod.
-1
AmmoRoll
6+
LASGUN
Laser weapons are manufactured in vast quantities inthe Hive City and are exported to the armed forces ofthe Imperium throughout the galaxy. Lasguns aretraded in Underhive settlements and the Guildersbring shipments from the factories above. Powerpacks come from the same source and some are madelocally. Supplies of parts are plentiful and repairseasily effected.
Laser technology is reliable and easy to replicate, andalthough the weapons are not the most powerful they
are certainly the most trustworthy. A laser power pack will last for many shots and can be recharged from astandard power source or by exposing its thermalcells to heat or light. In an emergency a pack can berecharged by placing it in a fire, although suchtreatment tends to shorten the life of the pack andincrease the probability of it failing. Manyexperienced fighters prefer the lasgun over morepowerful weapons for these very reasons.
Str.
3
Damage
1
Long
-
Short
+1
Long
8-24
Short
0-8
Range To Hit SaveMod.
-
AmmoRoll
2+
HUNTING RIFLE
The bolt action hunting rifle is designed to accuratelydeliver bullets over extreme ranges. Due to theclaustrophobic and ruinous nature of the Underhivedomes, hunting rifles aren't especially popular withthe gangs that live there. But they have garneredniche markets among hivers excelling in long rangedcombat and in particular open areas of the badzones,such as the Ash Flat Wastes.
Str.
3
Damage
1
Long
-
Short
-1
Long
8-32
Short
0-8
Range To Hit SaveMod.
-
AmmoRoll
4+
Critical Shot: If a fighter shooting a hunting rifleremained stationary that turn and rolled a to woundscore of 6, then that wound will inflict D3 Damage.
7/24/2019 Nec Community Edition
http://slidepdf.com/reader/full/nec-community-edition 41/101
NECROMUNDA
40
SHOTGUN
A shotgun is a simple low velocity weapon which anyUnderhive workshop can make to order. They vary inappearance, often incorporating special features ordecoration to the taste of the owner or the gunsmith.
Some are pump-action guns, fed from a tubularmagazine slung under the barrel, others have boxmagazines or long ammo belts. The ammunition itselfis easy to make, and many owners make their ownshells. There are several recognised types, eachtailored to a particular type of shot or range. Theingenuity of the Underhive gunsmiths is quiteremarkable in this respect.
Knock-back: The high impact of a shotgun is quitecapable of knocking a man off balance or even off hisfeet. To represent this a target making a roll for fallingover an edge as a result of a shotgun hit from a solidslug, manstopper or hot shot shell counts his
Initiative with a -1 penalty. For example, if his I is 3 he will fall on a score of 3-6 rather than 4-6.
Ammo: A variety of shell types are available and theirdifferent effects are summarised on the profile. Eachtype has its advantages. Some are effective butexpensive and often unreliable. Shotgun ammofollows the usual ammo rules as explained in the Ammuntion & Gunsights section.
Solid SlugThis is the standard type of solid ammunition. It takesthe form of a heavy shell which is fairly inaccurate butquite powerful.
Str.
4
Damage
1
Long
-1
Short
+1
Long
4-18
Short
0-4
Range To Hit SaveMod.
-
AmmoRoll
4+
Scatter ShotThis is a cartridge filled with lots of small pellets. Although it’s not as powerful as other types ofammunition it is very useful for blasting enemies outof cover. The hundreds of pellets ricochet around andoften score hits on partially concealed targets. Whenfiring a scatter shot, disregard any cover modifiers forhitting the target – the hundreds of pellets saturate
the area with shot and can catch partially concealedtargets as if they were in the open. In addition, roll adice for any other models in base contact with thetarget model. A ny such models are hit on a 4+, in asimilar way to blast weapons. Resolve hits as normal.
Str.
3
Damage
1
Long
-1
Short
+1
Long
4-18
Short
0-4
Range To Hit SaveMod.
-
AmmoRoll
4+
Manstopper ShellThis is a particularly heavy solid cartridge with amassive propellant charge. It is more powerful than anormal solid shot and more accurate over longerranges. However, it is more expensive than anordinary solid shot.
Str.
4
Damage
1
Long
-
Short
+1
Long
4-18
Short
0-4
Range To Hit SaveMod.
-
AmmoRoll
4+
Hot Shot ShellThis is a hollowed out shot which contains a smallcharge of flamer chemical. If a target is hit by a hotshot shell then he will catch fire on a roll of 5+.
Str.
4
Damage
1
Long
-1
Short
+1
Long
4-18
Short
0-4
Range To Hit SaveMod.
-
AmmoRoll
6+
Bolt Shell
This is a small self-propelled missile. In fact it is acharge adapted from a boltgun round, and has similarproperties including being somewhat temperamental.
Str.
4
Damage
1
Long
-
Short
+1
Long
4-24
Short
0-4
Range To Hit SaveMod.
-1
AmmoRoll
6+

7/24/2019 Nec Community Edition
http://slidepdf.com/reader/full/nec-community-edition 42/101
NECROMUNDA
41
SPECIAL WEAPONS Special weapons are similar in size and design to basic weapons and like them require both hands to fire. These are expensive and technically sophisticated weapons which require above average care and skill to use. For thisreason not everyone can use such a weapon and they are mostly carried by heavies or gang leaders.
FLAMER
The flamer fires a burst of flaming chemical, anunstable sticky material that ignites upon contact withair. This volatile fuel is held within a pressurisedcontainer that fits underneath the weapon or isattached by a separate fuel pipe. A canister containslittle fuel, so flamers often run out of power after afew shots. The unstable and temperamental nature ofthe fuel also means that some containers proveuseless whilst others explode unexpectedly as they
are loaded.The flamer is a very dangerous weapon that spreads asheet of flame over a short distance. At this range it isalmost impossible to miss and several victims can beclaimed with a single shot.
Flamer: The flamer’s shot is represented by theflamer template. This is used as described in theShooting section.
Ammo Roll: The flamer is required to take an Ammoroll each and every time it fires.
Catch Fire: Any models hit by a flamer catch fire on aroll of 4+.
Str.
4
Damage
1
Long
-
Short
-
LongShortRange To Hit Save
Mod.
-2
AmmoRoll
4+Template
GRENADE LAUNCHER
A grenade launcher is a light tubular launcher capableof firing grenades by a compressed gas charge. Themost common grenades are explosive frag grenadesand implosive krak grenades which are designed forcracking open tough and well armoured targets.These grenades are often home-made affairs, simpledevices manufactured in the Underhive itself. Thelauncher is a very robust and straightforward weapon.Its supply of compressed gas is soon expended, but
recharging is a simple matter using a high pressuresource to fill its internal tank.
Str.
-
Damage
-
Long
-1
Short
-
Long
14-28
Short
0-14
Range To Hit SaveMod.
-
AmmoRoll
6+
Ammo: Grenades need to be specially modified inorder for them to be fired from a launcher, so theymust be allocated their own supply of grenades.Grenades allocated to the launcher cannot be thrownduring a game. Likewise, grenades not allocated tothe launcher cannot be fired from it. Grenade ammofollows the usual ammo rules as explained in the
Ammuntion & Gunsights section.
Grenades can be easily modified by the gang so youcan freely choose whether a supply of grenades isallocated to the launcher or not after each game.
MELTAGUN
The meltagun is also known as the melter, cooker or vape gun. It works by means of sub-molecularthermal agitation, literally cooking, and eventually vaporising the target. A meltagun can melt plasteel
and its effect upon living tissue is horrible indeed.The weapon itself makes no noise when fired.However, the passage of the beam heats the air tosuper-hot temperatures, causing a distinctive hiss which becomes a roaring blast as living flesh is hit andbody moisture vaporises explosively.
Str.
8
Damage
D6
Long
-
Short
+1
Long
6-12
Short
0-6
Range To Hit SaveMod.
-5
AmmoRoll
4+
Autoslugger
An autoslugger is a crude weapon assembled in theUnderhive workshops and rarely seen uphive. Theirdesign widely varies and often incorporate canablisedparts from other guns, but they all share the same
purpose, to rapidly fire a hail of bullets. They aresimple weapons and cheap to maintain so havebecome popular with the Underhive gangs, especiallyamongst outlaws who find it difficult to find, affordand maintain the more powerful heavy weapons.
Str.
3
Damage
1
Long
-
Short
+1
Long
12-24
Short
0-12
Range To Hit SaveMod.
-
AmmoRoll
5+
Sustained Fire: 1 dice.

7/24/2019 Nec Community Edition
http://slidepdf.com/reader/full/nec-community-edition 43/101
NECROMUNDA
42
NEEDLE RIFLE
The needle rifle is a sniper’s weapon and for thisreason it is often referred to as a needle sniper rifle. Itis a complex laser powered device and relatively rarein the Underhive. Its tight laser beam carries a tiny
toxic needle or dart which can easily penetrate fleshto send its deadly poisons into the target. The lasercarrier beam will dissolve or blow away armour orclothing and burrow into exposed flesh enabling thedarts to penetrate more deeply. The needler’s chiefadvantage is that it is virtually silent, andconsequently the favoured weapon for assassins andother unwelcome characters.
Str.
3
Damage
1
Long
-
Short
+1
Long
16-32
Short
0-16
Range To Hit SaveMod.
-1
AmmoRoll
6+
PLASMA GUN
Plasma weapons fire energy shells of bright glowingplasma – matter in a super-heated energised state. When a plasma shell strikes a target energy is releasedand the target blows apart in an almighty explosion.
Plasma weapons are extremely effective and verydangerous weapons, however, they are also highlyunstable, difficult to maintain and frequentlymalfunction. The user can mitigate this by firing asshort a blast as possible which has slightly reducedeffectiveness.
Str.
5
Damage
1
Long
-
Short
+1
Long
8-24
Short
0-8
Range To Hit SaveMod.
-2
AmmoRoll
4+
Firing on Low Energy:
Str.
6
Damage
1
Long
-
Short
+1
Long
12-24
Short
0-12
Range To Hit SaveMod.
-3
AmmoRoll
6+
Firing on Maximum Power:Toxic Dart: No wound roll is required when shooting
a needler: if the target is hit then the toxins willautomatically inflict 1 wound. Armour may still save atarget as normal. Note this only applies against livingtargets. If a needle rifle hits an unliving target, such asa water still, then a normal to wound roll must bemade using the Strength shown in the profile.
Injuries: A target suffering his final wound from atoxic dart does not roll on the standard Injury chart.Instead, roll on the chart below both when the injuryis inflicted and in subsequent recovery phases.
D6
1
2-4
5-6
Result
No Effect: The toxin has no effect or wears off.The target may continue to fight in the same wayas if he’d suffered a flesh wound except that hesuffers no penalties on his WS/BS.
Comatose: The target is knocked comatose andfalls to the ground. The model counts as downexcept he cannot move.
Out of Action: The target slumps lifelessly to theground. He may be dead or barely living, but isovercome by the toxin for the rest of the game.Remove the model as you would any other that was out of action.
If a needle rifle hits a model that is already down andinflicts a Comatose result, then the model mustcontinue to roll on the chart above in subsequentrecovery phases instead of the standard injury chart.
Silent : This weapon emits no noise so when fireddoesn't test to sound the alarm during scenarios suchas The Raid.
Sustained Fire: 1 dice. Note that sustained fire canonly be used when shooting on maximum power.
Energy Levels: You can choose to shoot the plasmagun on a low energy setting or maximum power. Theprofiles for each setting are different. If you shoot theplasma gun on maximum power then after all shots with the gun have been resolved that turn you mustroll a D6 on the Gets Hot table below to see if the weapon malfunctions.
1-2
3-4
5-6
Gets Hot
Critical: The weapon vents super-heated gasesthat inflict a D3 Strength hit against the user. The weapon also cannot be fired again for a full turn.
Overheat: The weapon cannot be fired again fora full turn as it needs to cool down.
Stable: The weapon remains stable and can befired again as normal next turn.

7/24/2019 Nec Community Edition
http://slidepdf.com/reader/full/nec-community-edition 44/101
43
NECROMUNDA
HEAVY WEAPONSThis category covers particularly large and powerful weapons. They are too heavy and clumsy to be used by all fighters, and are also difficult to maintain and repair. Only fighters with appropriate technical skills can hopeto own heavy weaponry of this kind, though most gangs have one or two fighters who carry heavy weapons.These individuals are known as ‘heavies’ on account of the weapons they carry and also because they tend to bebig, muscular fighters able to bear the weight of their weapon, ammunition and spares.
Special Rules: All of the heavy weapons described below are weighty, cumbersome affairs which take quite a bit ofphysical strength and energy to carry and use. Spare parts, ammunition and a basic tool kit all add to the weight aheavy must bear. Because of this, a fighter cannot fire a heavy weapon if he moved during his movement phase. Asthis rule applies to all heavy weapons it is not included in the special rules for individual weapons.
AUTOCANNON
The autocannon is a heavy automatic weapon – alarger and more powerful version of the autogun. It isa rapid firing, high-velocity weapon capable of
spitting out a hail of deadly shells. The blaze of shells,scream of the loading mechanism and brutal recoilmean that it is a difficult and energy sapping weaponto use. It is also extremely effective, and one of themost popular heavy weapons.
Str.
8
Damage
D6
Long
-
Short
-
Long
20-72
Short
0-20
Range To Hit SaveMod.
-5
AmmoRoll
4+
Sustained Fire: 1 dice.
HEAVY BOLTER
All bolt weapons are highly advanced and technicallysophisticated, and the heavy version is the mosteffective and most complex weapon of its type. Theyare extremely bulky and are often known as the ‘backbreaker’ by those who carry them. Like all bolters it isnoisy and the shells explode when they hit theirtarget causing great devastation.
Only very experienced and relatively wealthy fighterscan afford to own and use a heavy bolter. Theconstant and demanding maintenance routine alsomakes it an unwise choice for a novice. For those who
know what they’re doing it is a prestigious weaponcarried by the most dangerous of fighters.
Str.
5
Damage
D3
Long
-
Short
-
Long
20-40
Short
0-20
Range To Hit SaveMod.
-2
AmmoRoll
6+
Sustained Fire: 2 dice.
HEAVY PLASMA GUN
The heavy plasma gun, or sun gun, fires energy shellsof bright glowing plasma – matter in a super-heatedenergised state. When a plasma shell strikes a target
energy is released and the target blows apart in analmighty explosion. Plasma weapons are extremelyeffective and very dangerous and the heavy version isthe most deadly of all, however, they are also highlyunstable, difficult to maintain and frequentlymalfunction. The user can mitigate this by firing the weapon on a low energy discharge.
Str.
7
Damage
D3
Long
-
Short
-
Long
20-40
Short
0-20
Range To Hit SaveMod.
-4
AmmoRoll
4+
Firing on Low Energy:
Str.
8
Damage
D6
Long
-
Short
-
Long
20-72
Short
0-20
Range To Hit SaveMod.
-5
AmmoRoll
6+
Firing on Maximum Power:
Blast/Gas Cloud: A heavy plasma gun shot envelopsan entire area in a searing discharge so uses the blasttemplate. If it is fired on maximum power then it usesthe gas cloud template instead.
Energy Levels: You can choose to shoot the heavyplasma gun on a low energy setting or maximumpower. If shot on maximum power then after the shothas been resolved you must roll a D6 on the Gets Hottable below to see if the weapon malfunctions.
1-2
3-4
5-6
Gets Hot
Critical: The weapon vents super-heated gasesthat inflict a D3 Strength hit against the user. The weapon also cannot be fired again for a full turn.
Overheat: The weapon cannot be fired again fora full turn as it needs to cool down.
Stable: The weapon remains stable and can befired again as normal next turn.

7/24/2019 Nec Community Edition
http://slidepdf.com/reader/full/nec-community-edition 45/101
NECROMUNDA
44
LASCANNON
The lascannon is the most powerful of the lasertechnology weapons available in the Underhive. It is amilitary weapon, made in the factories of the HiveCity for the armed forces of the Imperium. Examples
find their way into the hands of gang fighters, thoughthe Guilders are reluctant to trade such powerful weaponry into the anarchic Underhive.
The lascannon fires a powerful energy burst, a singlemighty blast of energy that can burn up a target or vaporise plasteel. It is designed for destroying largearmoured vehicles and other fighting machines, itsmassive energy discharge is reckoned unnecessarilypotent in the cramped Underhive where targets aregenerally living men. As a result it is not highlyfavoured, most fighters preferring something whichspreads its shots over a wide area or fires rapidly.
Str.
9
Damage
2D6
Long
-
Short
-
Long
20-60
Short
0-20
Range To Hit SaveMod.
-6
AmmoRoll
2+
Terrifying Force: The effects of a lascannon blast on aliving target are horrifying to behold. Usually if aganger goes down or out of action then friendlyfighters within 2" must take a nerve test, however, thisrange is extended to 6" when struck by a lascannon.
HEAVY STUBBER
This heavy and old-fashioned weapon is affectionatelyknown as the ‘big stubber’. It rattles off a hail of heavybullets sufficient to stop a man in his tracks. The workshops of the Underhive can turn out weapons
like this quite easily, all slightly different in design butbasically the same in terms of their effect. It is asimple weapon to maintain and relatively cheap tobuy. Many gangs start out with a big stubber to backthem up, and its deadly rain of bullets has put an endto the aspirations of many an Underhive fighter.
Str.
4
Damage
1
Long
-
Short
-
Long
20-40
Short
0-20
Range To Hit SaveMod.
-1
AmmoRoll
4+
Sustained Fire: 2 dice.
HEAVY FLAMER
The heavy flamer fires a concentrated tide of flamingchemical, an unstable sticky material that ignites uponcontact with air. This volatile fuel is held withinpressurised canisters carried in a backpack whichcontains enough fuel for several shots. The heavyflamer spreads a sheet of flame over a short distance. At this range it is impossible to miss and multiple victims can be claimed with a single shot.
Move And Fire: Unlike other heavy weapons the heavy flamer has no recoil and requires little aiming, so afighter can move and fire it just like a normal gun.
Flamer: The heavy flamer’s shot is represented by theflamer template. However, the sheer intensity of theheavy flamer's breath means any models partiallycovered by the template are also automatically hit.
Ammo Roll: The heavy flamer is required to take an Ammo roll each and every time it fires.
Catch Fire: Any models hit by a heavy flamer catch fireon a roll of 3+.
Str.
5
Damage
D3
Long
-
Short
-
LongShortRange To Hit Save
Mod.
-3
AmmoRoll
3+Template
MISSILE LAUNCHER
The missile launcher is a complex and weighty pieceof machinery. Although expensive the weapon ishighly regarded on account of its versatility, and those who can afford the exorbitant costs of maintenanceand ammunition often choose to carry a missilelauncher. Not all launchers are identical but most aresimilar, deriving from the armaments factories of theHive City rather than individual workshops in theUnderhive. A few Underhive gunsmiths will adapt ormodify missile launchers, but this requiresconsiderable skill. Powered missiles are fed into the
weapon by means of a magazine or hopper, thoughsome versions must be loaded one shot at a time.
Ammo: Missile ammo follows the usual ammo rules asexplained in the Ammuntion & Gunsights section.
Str.
-
Damage
-
Long
-
Short
-
Long
20-72
Short
0-20
Range To Hit SaveMod.
-
AmmoRoll
6+
Super Krak MissileThis missile contains a powerful implosive chargedesigned to crack open heavy armoured targets.
Strength
8
Damage
D6
Save Mod.
-5
Special
High Impact
Frag MissileThis missile scatters shrapnel over a wide area makingit ideal for scything down groups of exposed fighters.
Strength
4
Damage
1
Save Mod.
-2
Special
Gas Cloud
Gas Cloud : A frag missile spills its explosive contentsover a large area, and so uses the gas cloud template.

7/24/2019 Nec Community Edition
http://slidepdf.com/reader/full/nec-community-edition 46/101
NECROMUNDA
GRENADESGrenades are thrown by hand or can be fired from a grenade launcher, a tubular device powered bycompressed gas or an electromagnetic charge. There are many different kinds of grenade available in theUnderhive, including strange and unreliable devices concocted by the Underhive fighters themselves, but themost common by far are Frag and Krak grenades.
Whatever type of grenade you carry, a grenade throwcounts as a ‘shot’ in the shooting phase, so a fightercan shoot a gun or throw a grenade, but not both. Forthe rules on grenades see the Shooting section of themain rules.
When you equip a fighter with grenades he isassumed to carry enough actual grenades to last theentire encounter. His supply of grenades willautomatically run out if an Ammo roll is required, iethe Ammo roll is ‘auto’ for all grenades.
KRAK Grenades
Krak grenades are designed to pierce armouredtargets by means of a concentrated implosive charge. Although a Krak grenade can easily kill a man, itscontained blast makes it less useful than Fraggrenades for Underhive fighting. However, it is veryeffective at destroying hard targets, buildingstructures, and for blasting into defended holes.
Strength
6
Damage
D6
Save Mod.
-3
Special
-
-1 to Hit: A krak grenade is a heavy and cumbersomegrenade with a concentrated blast. It is thereforeharder to hit a target with a krak grenade than withother grenades and a -1 to hit penalty is imposed when throwing one. Note this penalty doesn't applyto krak grenades fired from a grenade launcher.
Demolition: The krak grenade can be affixed to anystationary structure as explained in the AttackingTerrain part of the Advanced Rules section. Note krakgrenades allocated to a grenade launcher cannot beused in this way.
FRAG Grenades
A Frag grenade contains an explosive charge as well asa casing which is designed to fragment into deadlyshrapnel. It is a common weapon, easy to make andeffective in use. Frag grenades are often home-madein Underhive workshops or by the gang fightersthemselves.
Strength
3
Damage
1
Save Mod.
-1
Special
Gas Cloud
Gas Cloud: As the name would suggest, afragmentation or 'frag' grenade spills its explosivecontents over a substantial area, and hence uses thegas cloud template.
MELTA BOMBS
Melta bombs or thermal bombs contain a subatomicthermal charge capable of melting through a sheet ofplasteel or vaporising flesh. The intense heat causedis very localised in effect, so the weapon is little use in
conventional fighting, its primary purpose is as ademolition charge to melt doors or machines. Forthese purposes it has a special contact plate used toaffix it to stationary targets.
Strength
8
Damage
2D6
Save Mod.
-5
Special
-
Demolition Only: The melta bomb cannot be thrownlike an ordinary grenade and its size prevents its usein a grenade launcher. Instead it may be affixed to anystationary structure as explained in the AttackingTerrain part of the Advanced Rules section.
45

7/24/2019 Nec Community Edition
http://slidepdf.com/reader/full/nec-community-edition 47/101
NECROMUNDA
46
GAS GRENADES
There are many different kinds of gas grenades or gasbombs. Some of these weapons are made in thefactories of the Hive City, others are fabricated bycunning armourers in the Underhive itself. All of
these weapons are rare and somewhat specialised innature, so they are not commonly used by gangfighters. The different effects of the various gasgrenades are discussed below.
When you throw a gas grenade choose your targetand work out where the grenade hits. Place a gascloud marker, or a patch of cotton wool, to representthe gas. Models within the cloud are hit automatically;models partially within the cloud are hit on a D6 rollof 4 or more, exactly as for ordinary weapons.Fighters hit by gas are not pinned as a result. In other words, although ‘hit’ the targets are not actuallystruck or hurt so the hit doesn’t count in quite the
same way as a regular weapon hit.
Any model hit by gas must take a Toughness test. Ifthe test is passed then they are unaffected by the gas.If the test is failed then they cannot do anythingexcept as described below. A model that is not alreadyaffected by the gas must make this roll if it finds itself within the gas cloud at the start of its turn. Fighterscan move into a gas cloud but must test to see if theyare affected as soon as they enter it and are 'hit'following the usual template rules.
Gas clouds can last for several turns, or slowlydisperse or drift away altogether. Test at the
beginning of both players’ turns. At the start of eachturn roll a D6. Note if a cloud dissipates it still affectsmodels within it at the start of the turn, and if a clouddrifts it affects all models ‘hit’ by the gas as it drifts.
ChokeFighters affected by Choke fall to the floor and arehelpless whilst they remain in the cloud. Models cancrawl 2" and attempt to leave the cloud, but theycannot shoot or do anything else if within the cloudat the start of their turn. Affected models in hand-to-hand combat are treated as down so may be taken outof action. Once they have crawled free of the gas or ithas dispersed they recover by the end of the turn.
1
2
3
4
5
6
Resist! Wild and dizzying visions spin before the victim’s eyes as he battles to overcome his inner
madness. The model must take a Leadership test.If passed the victim resists the visions and isunaffected. If failed, roll again on this chart.
They’re Crawling All Over Me! The victim isconvinced that he is covered with spiders, plaguerats, or other unpleasant creatures. The victim ispinned in place by sheer horror just as if he hadbeen hit by a shot. He cannot test to avoid thisand can do nothing for his next turn.
Over There! The victim is convinced the enemy isall around him, hiding behind every piece ofcover, lurking just out of sight, ready to drop from
above. The victim doesn't move this turn but mustblast off a random weapon once in a randomdirection. The nearest model, friend or foe, thatlies in the 90 degree arc becomes the shot's target.If there is no eligible target then roll a diceanyway to see if an Ammo roll is required.
Run For It! The victim is overcome with terror,his eyes widen and he starts to dribble and gibber.The model is automatically broken, just as if hehad failed a nerve test.
Traitors! The victim becomes convinced hisfellow fighters are out to get him and that the
whole thing is a set-up. The victim doesn't movethis turn but pivots to shoot at the nearest friendthat he can draw a line of sight to. He shoots withthe highest Strength weapon that is within rangeand if he can shoot multiple times then he will tryto hit as many different friendly fighters as manytimes as possible starting with the nearest.
Errrr... The victim lapses into a mindlessslackjawed state for the remainder of the game.The fighter is immediately taken out of action butis automatically assumed to roll a Full Recoveryresult on the Serious Injuries chart.
Scare A fighter affected by scare gas is sent into a mindlesspanic and is immediately broken, just as if he hadfailed a nerve test. The effect of the gas wears off oncehe manages to recover his nerve.
HallucinogenFighters affected by this dangerous hallucinogenic gasbecome subject to all kinds of strange delusions andcan behave in an extraordinary manner. If an affected model is within the gas cloud at the start of his turnroll a D6 and consult the chart below. Note if ahallucinogen cloud dissipates it still affects models within it at the start of the turn, and if a cloud drifts itaffects all models ‘hit’ by the gas as it drifts. If a modelfails the original Toughness test when struck by thegrenade then he's automatically affected by the gas atthe start of the turn.
1-2
3-5
6
The cloud shrinks to a blast template in size. If thecloud has already been shrunk then it dissipates with no further effect.
The cloud remains where it is.
The gas cloud drifts D6" in a random direction.Models will be hit by the moving cloud followingthe usual template rules. If the cloud drifts fromabove ground level off over a ledge, then thecloud dissipates in mid-air unless it reachesanother ledge of the same level.

7/24/2019 Nec Community Edition
http://slidepdf.com/reader/full/nec-community-edition 48/101
NECROMUNDA
47
PLASMA Grenades
Plasma is a dangerous and unstable matter in a highlyenergised state. When a Plasma grenade explodes itcreates a plasma ball like a miniature sun.
Strength5
Damage1
Save Mod.-2
SpecialBlast
Use: Throw the grenade as normal and when youhave established where it lands place a blast templateon the spot. Work out damage on the targets withinthe plasma ball in the usual way. Once casualties havebeen determined do not remove the marker as younormally would but leave it in place. The areaindicated is undergoing a matter energytransformation and is glowing like a small sun.
A plasma ball can persist for several turns. Test at thebeginning of each player’s turn. At the start of each
turn roll a D6.
1-3
4-5
6
The plasma ball collapses in upon itself anddisappears causing no further damage.
The plasma ball remains in place. Any fighters thatmove into the ball or end the turn in contact withit are hit following the usual template rules.
The plasma ball expands to a gas cloud templatesize before collapsing in upon itself. Any modelsthat come into contact with it are hit following theusual template rules. Any models that started theturn inside the ball also suffer a hit.
Because of the nature of the shining plasma ball it'snot possible to see or to shoot through it. The height
of the plasma ball is assumed to be 2".
PHOTON FLASH FLARES
Also known as the flash bomb, Photon grenade orsimply as a flare, this device explodes with a burst ofintense light, blinding or stunning those nearby. APhoton grenade can dazzle fighters and damagesensitive range finding equipment such as targeters.
Strength
-
Damage
-
Save Mod.
-
Special
Blast
Use: Throw the grenade and place the template asnormal. Models hit by the flash may be affected asdescribed below, however, fighters hit by a flash arenot pinned. In other words, although ‘hit’ the targetsare not actually struck or hurt so the hit doesn’t countthe same as a regular weapon hit. Each model hit by aphoton flare must take an Initiative test.
If the fighter passes the Initiative test then he ismerely dazzled until the end of his turn, counting his WS and BS as 1. Otherwise the fighter is unharmed.
Any models that fail the Initiative test are blinded.Blinded fighters are unable to see so cannot doanything except stagger around in a haphazardmanner . If they do decide to move then they do so at
half speed and in a random direction. If engaged inhand-to-hand combat they can fight but their WS isreduced to 1.
A model who is blinded remains blinded, but can testat the end of each of his turns to recover his sight.Roll a D6. On the score of a 5 or 6 the model recoversbut remains dazzled until the end of his next turn.
SMOKE BOMBS
A Smoke grenade or smoke bomb releases a cloud of
oily smoke that is impossible to see through withoutspecial visual devices such as bionic eyes.
When you throw a Smoke grenade you must aim at aspecific point of ground. W ork out where the grenadelands and place a a gas cloud template to show theextent of the smoke cloud. You can use a patch ofcotton wool to represent this if you like. The height ofthe cloud is assumed to be 2".
Models cannot see through smoke unless equippedto do so, and therefore cannot fire through it. Models within a smoke cloud can see nothing so cannot doanything except attempt to move out of the cloud in
their movement phase. Models moving within a cloudalways move in a random direction (established usingthe Scatter dice) and at half speed.
If any fighters find themselves engaged in hand-to-hand combat within a smoke cloud they still fight, buttheir Weapon Skill is halved.
A smoke cloud can last for several turns, slowlydisperse or drift away altogether. At the beginning ofboth players' every turn, roll a D6.
1-2
3-5
6
The cloud shrinks to a blast template in size. If thecloud has already been shrunk then it dissipates
with no further effect.The cloud remains where it is.
The smoke cloud drifts D6" in a random directionestablished using a Scatter dice. If the cloud driftsfrom above ground level off over a ledge, thenthe cloud dissipates in mid-air unless it reachesanother ledge of the same level.

7/24/2019 Nec Community Edition
http://slidepdf.com/reader/full/nec-community-edition 49/101
NECROMUNDA
ARMOURThe armed forces of the far future make use of advanced powered armoured suits and energy fields which arenecessary to protect them against the awesome weaponry used on the battlefields of the 41st millennium. Armour is much less useful in the depths of the Underhive. Its bulk hinders movement amongst the tangled ruins and its cost is beyond the reach of most gangs. Although advanced armour is sometimes traded, by far the mostcommon forms of protection are the simpler types of armour.
Special Rules: A fighter can only wear one suit of armour at a time, either flak, mesh or carapace armour.
CARAPACE ARMOUR
Carapace armour is made of rigid plates of armaplas
moulded to fit parts of the body. A typical suit ofcarapace covers the vital chest region, with separateplates for the arms and legs. The armaplas plates offerquite good protection from low-powered weaponrybut are rather heavy.
Armour Save: A fighter wearing carapace armourreceives a 4+ armour saving throw.
Initiative: Because of its cumbersome weight a fighter wearing carapace armour suffers a -1 Initiativecharacteristic penalty .
FORCE FIELD
Force fields are the simplest and most common formof protective energy shield used throughout theImperium. Nevertheless, personal force fields are anexpensive rarity in the Underhive and only gangs withthe right connections can ever hope to own one.
All ranged attacks made against a fighter protected bya force field suffer a -1 penalty to their Strength andSave Modifier. Note a force field offers no protectionagainst hits struck in hand-to-hand combat.
FLAK ARMOUR
Flak armour is made from high-tensile padded fabricusually in the form of a sleeveless jacket which coversthe upper torso. Flak is rather uncomfortable and notespecially popular despite its low cost. It offersminimal protection against low powered weaponsand is most useful against blasts and explosive impactfrom near-misses.
Armour Save: A fighter wearing flak armour has abasic D6 saving throw of 6 against a wound. This isincreased to 5 or 6 against weapons which use atemplate as these are generally the low velocity weapons that flak is most effective against – flamers,blast weapons and Frag grenades, for example. Thesave modifiers for these weapons may reduce orcancel out this save in many cases.
MESH ARMOUR
Mesh armour is a fabric-like material made from tinycells of bonded thermoplas. The resultant mesh islight but very strong and can be fashioned intogarments or used as a protective lining. Mesh absorbsphysical blows or heat energy by becomingmomentarily solid, effectively absorbing the energy ofan attack to switch from one morphic state to
another. Repeated hits to the same area will tend toerode this effect and reduce the protective value ofthe mesh.
Armour Save: A fighter wearing mesh armour receivesa 5+ armour saving throw.
48

7/24/2019 Nec Community Edition
http://slidepdf.com/reader/full/nec-community-edition 50/101
49
NECROMUNDA
AMMUNITION & GUNSIGHTSThis section covers special types of gun ammunition and advanced gunsights which are rare and highly sought after in the depths of the Underhive.
Special Rules: Alternate ammo and sights are specific to individual guns so you must note down which weapon it'sfor. A weapon can be fitted with any number of sights, but a fighter can only benefit from using one sight. Before
taking a shot you must declare which sight and ammo type the model is using. You can decide not to use a sight, which can be useful to avoid the target spotting the dot from a laser sight. If a gun is bought alternate ammo thenthe fighter will still also have a supply of regular ammo. If a model can make multiple ranged attacks in the sameturn then it must use the same weapon combination for all shots.
HOTSHOT LASER POWER PACK
The hotshot pack uses a more expensive and lessrobust power matrix, with the advantage that it canforce more power through a standard laser weapon.However, the risk of burning out the weapon orexhausting the pack itself is much greater.
A laspistol or lasgun firing hotshot packs receive a +1Strength bonus. In addition, if the target is hit then he will catch fire on a roll of 6+. However, the weapon’s Ammo roll is reduced to 5+ if a hotshot pack is fired.
INFRA-RED SIGHT
An infra-red sight is calibrated to register infra-redrather than visible light. The enhanced image appearsin the scope and makes it easier to pick out concealedtargets behind cover. The sight works effectively from
a stable platform but offers no benefit to a shooter whose own movement disrupts the sensor's image.
An infra-red sight can be fitted to a basic weapon. Astationary fighter using a weapon with an infra-redsight reduces the to hit penalty when shooting at amodel in cover by 1. So, partial cover is ignored andcover counts as -1. The fighter is also immune to theeffects of smoke clouds when shooting.
MONO-SIGHT
A mono-sight is an optical sensor worn over one eye,attached to the fighter’s weapon by a power link. Thefighter sees an enhanced image and superimposedtargetting reticule with its crosshairs clearly showing where his shot will land. The high resolution of theimage makes this sight useful only from a stableplatform, it is of no advantage to a moving shooter.
A mono-sight can be fitted to either a basic, special orheavy weapon. A stationary fighter using a weapon with a mono-sight receives a +1 to hit bonus.
RED-DOT LASER SIGHT
This sight shines a continuous low-powered red laserbeam, placing a red dot wherever it's aimed. Waryfighters look out for the glint of the laser beam andtake cover if they spy a red-dot scanning nearby.
A red-dot sight can be fitted to either a pistol, basic weapon or special weapon. A fighter using a weapon with a red-dot sight receives a +1 to hit bonus.
A fighter hit by a weapon with a red-dot sight stands achance of spotting the red dot and ducking aside. Ifthe shooter is within the vision arc of the target thenhe receives a 6+ special save. If the target is a sentryand spots the dot then the alarm will also be raised.
TELESCOPIC SIGHT
A telescopic sight is a simple optical aid to accuracy.The sight can be fitted to most rifle type weapons toincrease the shooter’s chances of scoring a hit atextreme range. It requires concentration to use and isonly a benefit to shooters who stop and aim carefully.
A telescopic sight can be fitted to a basic weapon. Astationary fighter using a weapon with a telescopicsight increases the weapon's Long Range by a numberof inches equal to its Short Range – eg, a lasgun'smaximum range becomes 32".
HELLFIRE BOLTS
The core of hellfire bolts contain highly corrosiveacids that inflict horrendous wounds on unprotectedflesh. Poorly maintained hellfire bolts are notoriouslyexplosive as any leaking acid can eat away at the bolt weapon's innards.
A hit from a bolt pistol or boltgun firing hellfire boltsinflicts D3 Damage. However, a gun firing hellfirebolts must test to see if it explodes on an Ammo rollof 1, 2 or 3 instead of just a roll of 1.
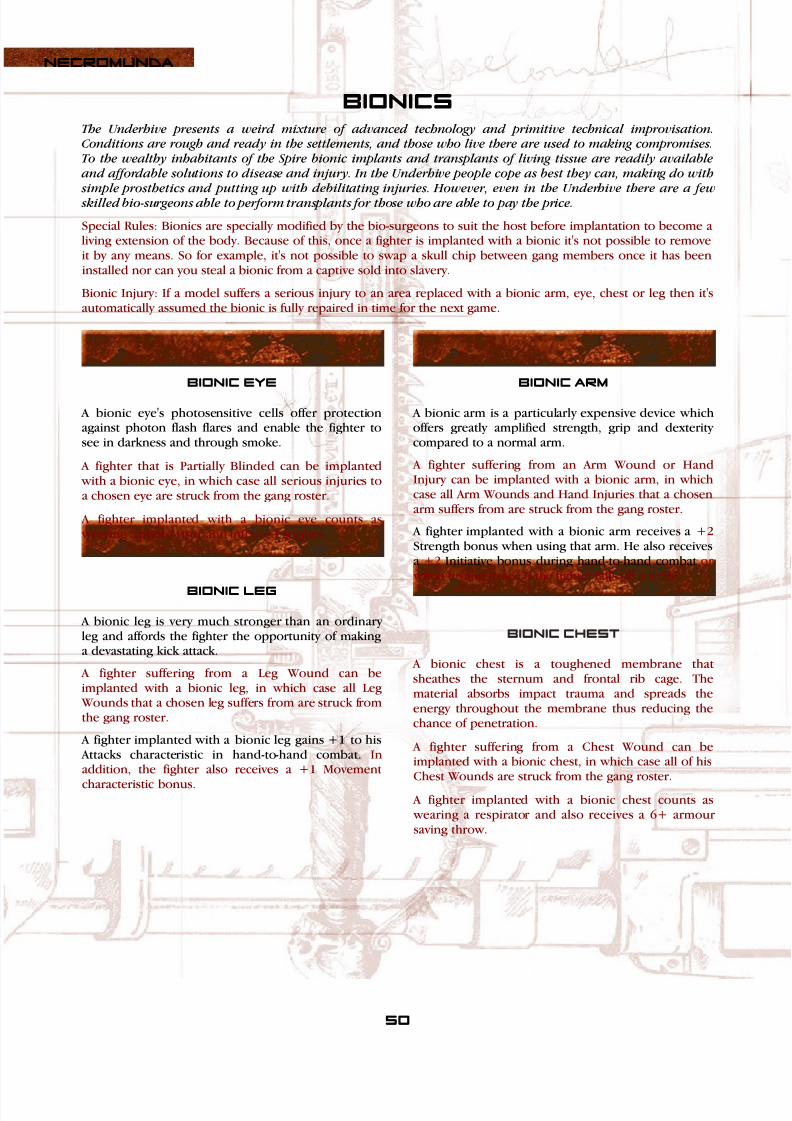
7/24/2019 Nec Community Edition
http://slidepdf.com/reader/full/nec-community-edition 51/101
NECROMUNDA
BIONICSThe Underhive presents a weird mixture of advanced technology and primitive technical improvisation.Conditions are rough and ready in the settlements, and those who live there are used to making compromises.To the wealthy inhabitants of the Spire bionic implants and transplants of living tissue are readily available and affordable solutions to disease and injury. In the Underhive people cope as best they can, making do with simple prosthetics and putting up with debilitating injuries. However, even in the Underhive there are a few skilled bio-surgeons able to perform transplants for those who are able to pay the price.
Special Rules: Bionics are specially modified by the bio-surgeons to suit the host before implantation to become aliving extension of the body. Because of this, once a fighter is implanted with a bionic it's not possible to removeit by any means. So for example, it's not possible to swap a skull chip between gang members once it has beeninstalled nor can you steal a bionic from a captive sold into slavery.
Bionic Injury: If a model suffers a serious injury to an area replaced with a bionic arm, eye, chest or leg then it'sautomatically assumed the bionic is fully repaired in time for the next game.
BIONIC EYE
A bionic eye's photosensitive cells offer protectionagainst photon flash flares and enable the fighter tosee in darkness and through smoke.
A fighter that is Partially Blinded can be implanted with a bionic eye, in which case all serious injuries toa chosen eye are struck from the gang roster.
A fighter implanted with a bionic eye counts as wearing a photo-visor and infra-red goggles.
BIONIC LEG
A bionic leg is very much stronger than an ordinaryleg and affords the fighter the opportunity of makinga devastating kick attack.
A fighter suffering from a Leg Wound can beimplanted with a bionic leg, in which case all Leg Wounds that a chosen leg suffers from are struck fromthe gang roster.
A fighter implanted with a bionic leg gains +1 to his Attacks characteristic in hand-to-hand combat. Inaddition, the fighter also receives a +1 Movement
characteristic bonus.
BIONIC ARM
A bionic arm is a particularly expensive device whichoffers greatly amplified strength, grip and dexteritycompared to a normal arm.
A fighter suffering from an Arm Wound or HandInjury can be implanted with a bionic arm, in whichcase all Arm Wounds and Hand Injuries that a chosenarm suffers from are struck from the gang roster.
A fighter implanted with a bionic arm receives a +2 Strength bonus when using that arm. He also receivesa +2 Initiative bonus during hand-to-hand combat or when testing to see if the fighter falls off a ledge.
BIONIC CHEST
A bionic chest is a toughened membrane thatsheathes the sternum and frontal rib cage. Thematerial absorbs impact trauma and spreads theenergy throughout the membrane thus reducing thechance of penetration.
A fighter suffering from a Chest Wound can beimplanted with a bionic chest, in which case all of hisChest Wounds are struck from the gang roster.
A fighter implanted with a bionic chest counts as wearing a respirator and also receives a 6+ armoursaving throw.
50

7/24/2019 Nec Community Edition
http://slidepdf.com/reader/full/nec-community-edition 52/101
NECROMUNDA
MISCELLANEOUS EQUIPMENT
AUTO-REPAIRER
An auto-repairer is a large device kept in the gang’shideout or one of its workshops. The machine is usedby a gang’s heavy to check and repair equipment,scan for hidden structural weaknesses and testbatteries, power packs and internal generators.
If a gang has an auto-repairer then it can be used inbetween fights to check out the gang’s weapons. Thegang must include a Heavy to do this and you mustassign a Ganger to help him. Both fighters must nothave gone out of action in the previous game and the
Ganger cannot collect income from territories orsearch for rare trade goods.
In the next game, any weapon that fails its Ammo rollmay roll a D6 and ignore the failed Ammo roll on a roll of 4, 5 or 6 regardless of the kind of weapon it is. Weapons which automatically fail an Ammo roll canstill ignore it on a 4 or more.
Note that the auto-repairer is kept in the gang’sterritory and is not associated with any specific Heavy. As it does not belong to a specific model its value isnot included in the gang’s rating. If the gang is raidedin the Raid scenario then the auto-repairer is
automatically destroyed if the encounter is lost.
BIO-BOOSTER
A bio-booster is a small chemical charge that fits into a wrist band or similar. The booster’s bio-sensor isactivated when the wearer is injured, administering ashot of booster chemical into the bloodstream bymeans of a pressure diffuser. The bio-booster is self-administering and completely automatic.
If a fighter wearing a bio-booster is required to roll on
the injury chart during his recovery phase then a rollof 1-4 counts as a flesh wound.
This only applies to the fighter’s first Injury rollduring his recovery phase – ie not subsequent Injuryrolls. If a fighter recovers and is then injured for asecond time his bio-booster will have no further effectas it has been discharged.
BIO-SCANNER
A bio-scanner detects life signs within the proximity ofthe user. The device is small, about the size of apistol, and can be worn upon a belt or around theowner’s neck. A fighter who carries such a deviceimproves his chances of spotting enemy intruders.
A bio-scanner is used in one of two ways.
If the fighter is a sentry, such as in The Raid or Rescuescenarios, then there's a chance he may spot any intruders on the bio-scanner. If at the end of the
sentry's turn there are any enemy models within 16"of him then he will sound the alarm on a roll of 4+.
Otherwise, a fighter equipped with a bio-scanner willautomatically spot any hidden enemies within 16".
BLINDNSnAkE POUCH
The Ratskins milk venom from the albino blindsnake,mix the toxin with certain secret fungi, and place theresultant paste into a small leather pouch which is worn around the neck. The spirit of the blindsnake is
said to watch out for bad spirits and to guide itsowner in the darkness. The mixture in the leatherpouch is absorbed by the fighter’s skin and enhanceshis natural psychic sensitivity, endowing him with asort of rudimentary sixth sense.
A fighter who carries a blindsnake pouch can sense when an enemy is waiting to shoot at him. If a fighteris shot at and hit from overwatch, he has a chance ofducking or weaving to avoid the shot. The modelreceives a 4+ special save against overwatch shots.
51
The Underhive merchants sell all kinds of equipment ranging from advanced gear smuggled down from HiveCity, ancient archeotech devices, mystical items fashioned from the flora and fauna unique to Hive Bottom aswell as simple accessories made to make Underhive life a little more bearable.

7/24/2019 Nec Community Edition
http://slidepdf.com/reader/full/nec-community-edition 53/101
52
NECROMUNDA
CLIP HARNESS
Fighters who must constantly climb the sheer ruinsand crumbling superstructure of the Underhive oftenchoose to make use of a clip harness to save themfrom falling. The harness is nothing more than a
safety line that is fastened round the body, with astrong steel clip or magnetic clasp which can beattached to a nearby object. If the wearer should fallthe harness will save him and enable the fighter toscramble to safety.
The end of the safety line must be fastened for it to work. A model can fasten a harness if it does notmove in its movement phase. The fighter can stillperform other actions in addition to fastening theharness, such as shoot or go onto overwatch. Theharness is automatically unfastened when the modelmoves or enters a hand-to-hand combat.
If the model becomes pinned or goes down within 1"of an edge then he does not have to test to fall. Thefastened harness prevents him from falling, just as ifhe had passed the Initiative test.
CONCEALED BLADE
Although it is possible to hide any small blade about your person, the concealed blade is something a littledifferent. This tiny blade is cunningly concealed in aspecially designed boot heel, or inside a smallbiocompartment under the owner’s skin. The blade is
not used unless the owner is captured, in which casehe can use it to try and escape.
A captured fighter can try and escape if he has aconcealed blade. Roll a D6.
1
2
3
4-6
The fighter is killed while trying to escape.
The fighter is recaptured immediately.
The fighter escapes but loses all his weapons andequipment to the capturing gang.
The fighter escapes together with his weaponsand equipment.
A concealed blade is only good for one escape
attempt.
FILTER PLUGS
Filter plugs, or ‘flugs’, are simple filters whichNecromundans stick firmly up their nostrils to purifythe air they breathe. Cheap and disposable, these areused in their millions throughout the lower regions of
Hive City and the Underhive, where hive smog,pollutant clouds and toxic gases are constant hazards.Flugs sieve out the worst of the pollution includingmost harmful substances.
A fighter wearing flugs can re-roll a failed Toughnesstest against dangerous gases including Choke,Hallucinogen and Scare.
GRAV CHUTE
The grav chute is a passive gravitic repeller whichreduces the downward pull of gravity to a fraction of
its normal strength. It enables the wearer to floatfrom great heights and land softly.
A fighter wearing a grav chute takes no damage fromfalling. He can also use it to jump down from ledgesof any height as long as he has enough movement tocover the fall.
GRAPNEL
The grapnel consists of a magnetic grapnel attachedto a long wire which is fired from a small launcher.
A fighter can fire the grapnel in the shooting phaseinstead of shooting with a weapon. Choose the spot you wish to aim for, counting it as a small target, androll to hit as for weapons fire. If you miss the targetthen it fails to grapple and is recoiled ready for thenext shot. If you hit then the magnetic grapnel sticksto the point indicated and this can be marked with asuitable counter. In his following movement phasethe model may winch itself to the position of themarker. If the fighter elects to do this then he cannotdo anything else that turn. If the fighter is forced tomove before managing to winch himself, such asbecause he becomes broken, then the grapnel is
automatically recoiled. Note the grapnel can be aimedat the edge of a level from below, thus allowing themodel to scale up on to a ledge above.
The grapnel isn’t really a weapon, but the chances aresomeone will want to use it as such. It also has an Ammo roll taken in the normal way for weapons.
Str.
2
Damage
1
Long
+1
Short
+2
Long
8-16
Short
0-8
Range To Hit SaveMod.
-
AmmoRoll
6+

7/24/2019 Nec Community Edition
http://slidepdf.com/reader/full/nec-community-edition 54/101
NECROMUNDA
53
INFRA-RED GOGGLES
These take the form of a pair of goggles or visor which allows a fighter to see the thermal images ofenemy fighters. This enables the wearer to see foes who are hiding or partially concealed behind cover.
A fighter wearing infra-red goggles can spot hiddenenemy at triple his normal distance – ie, his Initiative x 3. However, the enemy model must be within thefighter's arc of sight. Sentries wearing goggles will alsospot fighters in cover just as if they were in the open.In addition, any fighters wearing goggles are immuneto the effects of smoke clouds.
ISOTROPIC FUEL ROD
Isotropic fuel rods are used to provide power for
almost everything in the Underhive. Rods are madeuphive in the Hive City factories, and sometimes turnup as archeotech. Underhive settlers often use themto set up small out-holes in the wastes using the fuelrod to power its air-pumps, water still and generators.
If a gang has a fuel rod it can convert any one piece ofterritory into a Settlement at the start of the postgame sequence. The fuel rod can be used only onceand is kept in the gang's stash so its value is notincluded in the gang rating.
Note outlawed gangs that use a fuel rod set up anOutlaw Settlement instead. This behaves like a regularSettlement except outlaws generate the full 30 credits.
LOBO-CHIP
The lobotomy chip is similar in general function to astandard skull chip. The effect is to anaesthetise partof the brain, reducing the wearer’s sensitivity andcurbing excessive and violent behaviour.
A fighter fitted with a lobo-chip is immune from theeffects of stupidity, frenzy and hatred, as well as nervetests. However, the model's Initiative is reduced to 1and it cannot be modified in any way .
Bionic: A lobo-chip is a bionic so cannot be removedonce implanted into a fighter.
MUNG VASE
The Mung vase is a much sought after and extremelyrare kind of archeotech. Genuine vases are prized bycollectors amongst the noble houses throughoutNecromunda and first class examples are said tochange hands for millions of credits.
But for every genuine newly discovered vase found inthe deadzone wastes a thousand replicas are made inthe shanty towns of the Underhive.
If you are offered a Mung vase then the chances are itis a worthless copy or a damaged example of onlytoken value. Canny investors will no more touch aMung vase than a festering sore on a rabid plague rat,
but not everyone is so circumspect. Y ou can buy the vase if you’re feeling lucky (some would say gullible).
You must commit to buying the vase beforeestablishing the cost, which represents the process oflengthy haggling involved. The vase is kept hidden ina secret place known only to the gang’s leader. If theleader is killed the location of the vase is lost forever.The vase’s cost is not included in the gang’s rating.
You can sell the vase in any subsequent tradingsession by sending a Ganger with it to the variousspecialist shops. The Ganger must not have gone outof action in the previous game, and he cannot
perform any other post game action, such as workinga territory. If you decide to do so, roll a D6.
1
2
3-4
5
6
The trader convinces you the vase is an obviousfake, but quite a nice one, and offers D6 creditsfor it. You accept and thank the trader for hisgenerosity. The following day you learn that hehas left town in a hurry. He is never seen again.
You are offered 2D6 credits.
You are offered 30+6D6 credits.
You are offered 2D6x 10 credits.
You are offered 3D6x10 credits.
MEDI-PACK
The medi-pack is a diagnostic medical computer thatcan alleviate the major symptoms of wounds bymeans of electro-chemical impulses.
A fighter who carries a medi-pack can use it upon afriend who is down and in base contact. The fightermust move base-to-base, not run, and then spend therest of the turn attending to his comrade. He cannotshoot, fight hand-to-hand or do anything else. At theend of the turn in the recovery phase an Injury roll ismade for the down model as normal except that ascore of 1-4 recovers the injured fighter to flesh
wound, a 5 is down, and a 6 is out of action.
Note that a fighter cannot use a medi-pack on himself,nor may another individual use the medipack once itsowner is injured or otherwise incapacitated.
Note unless a 1 is rolled you don't have to accept theoffer. Indeed it may be worthwhile to hold out until you find a trader willing to part with more credits. A vase can only be valued once per game.

7/24/2019 Nec Community Edition
http://slidepdf.com/reader/full/nec-community-edition 55/101
NECROMUNDA
54
ONE IN A MILLION WEAPON
The One in a Million Weapon is a rare example of the weaponsmiths’ art, made from the best materials tothe finest standards and the most exacting tolerances.Such weapons are prized beyond mere cash. Men
have fought and died to own a weapon such as this.The weapon is normal for its type but automaticallypasses any Ammo roll it's required to make. Roll a D6to find out what kind of weapon you have beenoffered: 1-2 pistol, 3-4 basic, 5 special, 6 heavy. Youcan choose any weapon from the category rolled.
Note only the base cost of the weapon is used todetermine its cost. The cost of extra ammunitiontypes is not doubled.
PHOTO-CONTACTS
Photo-contacts are multi-layered plastic lenses wornon the eyes to enhance vision in poor lightconditions. They also incorporate a photochromaticlayer which protects the wearer’s sight against suddenbright flashes.
A fighter wearing photo-contacts cannot be blindedby a photon flash flare, instead they are always onlydazzled.
PHOTO-VISOR
A photo-visor is a special visor that enhances vision inpoor light conditions. It also incorporates aphotochromatic layer that protects the wearer againstsudden bright flashes.
A fighter wearing a photo-visor is immune to theeffects of a photon flash flar e.
SILENCER
A silencer damps out the sound of weapons fire as well as any tell-tale muzzle flash.
An autopistol, stub gun, autogun, hunting rifle orautoslugger can be fitted with a silencer. Whenequipped with a silencer the weapon is effectivelysilent, a useful factor in some of the scenarios.
SKULL CHIP
This is a small bio-chip that looks like a tiny metalplate covered in circuitry. It is attached to the skull bymeans of a fine needle-like pin which fixes straightinto the brain. The chip melds with the wearer’s mind
improving his reaction time and memory functions. A fighter wearing a skull chip can re-roll any failedInitiative tests, such as when testing to avoid pinningearly or when seeing if the model falls off a ledge.However, if the re-rolled dice fails the test then thechip's effect is exhausted and it will no longer haveany effect for the remainder of the game.
Bionic: A skull chip is a bionic so cannot be removedonce implanted into a fighter.
RATSKIN MAP
It is commonly supposed that the Underhive containshuge amounts of treasure: collapsed tunnels leadingto untapped mines, caverns containing piles ofgemstones and long lost domes brimming witharcheotech. It is also common knowledge that theRatskins know of many such places as well as pathsthrough and under the hive that no ordinary man hasever travelled. It is equally common knowledge thatanyone trying to sell you an ancient Ratskin treasuremap is inevitably on the make. On the other hand, themap looks real, it’s certainly very old, and the tradersounds genuine. Dare you take the risk?
If you decide to buy the map roll to see how accurateit is before you play your next game. If the map isaccurate it will enable you to manoeuvre round yourenemy, and gives you an advantage when deciding which scenario to fight. If it’s a good one you can usethe map from then on. Roll a D6:
1
2
3
4
Fake: Your opponent can choose the nextscenario automatically, there is no need to roll.
Treasure map: The map shows the whereaboutsof an ancient archeotech hoard. Roll a further D6to determine whether it is real or a fake. On a 1-5it is a fake. On a 6 the map is genuine and you can
add an Archeotech Hoard to your territory forfree. The map has no further use.
Vague and inaccurate: The map is a vague andinaccurate copy but it does reveal some worthwhile information. When you fight a battle you may add or subtract 1 from the Scenario chartto decide which scenario is played.
Worn and incomplete: Though badly worn andincomplete the map is essentially accurate. When you fight a battle you may add or subtract up to 2from the Scenario chart to decide which scenariois played.

7/24/2019 Nec Community Edition
http://slidepdf.com/reader/full/nec-community-edition 56/101
NECROMUNDA
55
5
6
Ancient and faded: Barely legible though it is themap is a genuine ancient relic. When you fight abattle you may add or subtract up to 2 from theScenario chart to decide which scenario is played.In addition, the map reveals the location ofancient service ducts. You can choose to addeither a Vents or Tunnels territory to your gang
roster – you must do this immediately or never. Recent and accurate: The map is recently madeand accurate. When you fight a battle you mayadd or subtract up to 3 from the Scenario chart todecide which scenario is played.
The map is carried by the gang’s leader and is lost ifhe is killed. Its cost is therefore included in theleader’s value and gang rating in the normal way. Thecost paid for the map is its value.
RESPIRATOR
Respirators are an essential item in the lower regionsof Hive City and the Underhive, where hive smog,pollutant clouds and toxic dust are everyday hazards.Respirators remove the worst of the pollutionincluding most harmful substances.
A fighter wearing a respirator is immune to the effectsof dangerous gases including Choke, Hallucinogenand Scare.
SCREAMERS & STUMMERS
Screamers are small proximity alarms used to protecta gang’s hideout. Individual screamers are tiny butthe noise they make is horrendous. A gang will scatterdozens around the perimeter of its hideout in orderto warn of approaching intruders.
Stummers look like screamers (see above). They arespread about by intruders as they move. Wherescreamers make a loud noise stummers stop noisedead. Once stummers are activated all sound within afew metres is momentarily muffled and even loudnoises are barely audible.
Screamers
Screamers can only be used for one game after whichthey are expended. The cost at the Trading Post buysenough screamers to last for one game.
If a gang owns screamers they can be deployed in theRaid and Rescue scenarios where the defenders areinitially unaware of the intruders. If any intrudermodels move in their movement phase then roll a D6for each model that moved. On a roll of a 6 one of theintruders steps on a screamer and sets off the alarm.
Screamers are not carried by any particular model andtheir value is not included in the gang rating.
StummersStummers can only be used for one game after whichthey are expended. The price at the Trading Post buysenough stummers to last for one game.
If a gang has stummers they can be used in the Raidand Rescue scenarios where the defenders are initiallyunaware of the intruders. If the intruding gang has
stummers then any rolls when sounding the alarm incur a -1 penalty. In addition, if any attackers shootor use a noisy weapon then the Strength of the weapon is halved for the purposes of setting off thealarm. Stummers also nullify screamers completely.Note the choice to use stummers is taken after youropponent decides whether or not to use screamers.
Stummers are not carried by any particular model andtheir value is not included in the gang rating.
weapon reload
When a fighter carries a weapon such as an autogunor bolter, which fires a great many individual shells ina short burst, he is assumed to carry extraammunition to last most of the battle. However, afighter can, if he wants, carry additional magazines,batteries, power packs and fuel over and above thenormal amount. This extra ammo is carried in theform of reloads. Carrying extra ammo is expensive,but it goes some way to ensure you won’t run out offirepower at the critical moment.
Although a reload is helpful it doesn’t guarantee afighter will pass an Ammo roll. The Ammo roll
doesn’t just represent the chance of running out ofammunition or carrying a defective magazine, it alsorepresents the possibility of a gun jamming,overheating or proving defective and of course extraammo is useless if the gun explodes.
If a fighter carries a reload for the weapon he is usingand the weapon fails an Ammo roll then roll a D6. Ona roll of 4+ the extra ammo comes in handy and thefailed Ammo roll is ignored. This only applies to thefirst failed Ammo roll. If the weapon fails a second Ammo roll then it really has ran dry. Note even weapons with an 'Auto' Ammo Roll can be bought a weapon reload, such as grenades.
Reloads are specific to individual weapons; when areload is bought the player must note down whichspecific weapon the reload is for. When working outthe cost of a reload only the base cost of the weaponis used. The cost of any extra ammunition typesbought for the weapon are ignored and you onlyneed to buy a reload for the weapon itself, not foreach individual ammo type. Reloads which are usedduring a game will be replaced before the next gameas part of the gang’s usual expenses.

7/24/2019 Nec Community Edition
http://slidepdf.com/reader/full/nec-community-edition 57/101
NECROMUNDA
56
SUSPENSOR
Suspensors are sophisticated devices that are able tomanipulate magnetic fields. They are used extensively within the industrial Hive City workshops to reducethe effects of gravity on heavy loads, such as when
moving large containers or machinery. Smallerpersonal units are used by nobles throughout theSpire for recreation and in every day life. NaturallyUnderhive gangs have found numerous ways toexploit the suspensors unique magnetic alteringeffects, one of which is to lighten heavy weapons toallow gangers to more easily bring them to bear ontheir rivals during a fight.
Any heavy weapon can be fitted with a suspensor. Aheavy weapon fitted with a suspensor ignores thenormal move or fire restriction allowing the model toboth move and shoot in the same turn, just like anormal gun. However, if the model both moves and
shoots then he suffers a -1 to hit penalty when firingthe heavy weapon.
BERSERKER CHIP
Berserker chips are small bio-plates that attach to theskull by means of a fine needle-like pin which plungesstraight into the brain. The chip's circuitry melds with
the wearer's mind and on command can flood thebody with adrenaline and other chemicals.
Once per game, a fighter implanted with a berserkerchip can activate it at the start of any of his turns. Ifthe chip is activated then the model gains a +2 bonusto his Movement and Strength characteristics andfollows the rules for frenzy. The effects of the chip lastuntil the start of the fighter's following turn. However,the chip is taxing to use so once its effects wear offthe model's Initiative is reduced to 1 for theremainder of the game.
Bionic: A berserker chip is a bionic so cannot be
removed once implanted into a fighter.
BIONIC IMPLANT
Bionic implants cover a variety of small cyberneticdevices tailored to an individual hiver to remove thenegative effects of a lasting injury.
If you decide to fit a bionic implant to a model then you can choose for it to nullify the effects of oneserious injury. A bionic implant is a one use onlyitem, after it has been used both the injury and thebionic implant are struck from the gang roster.
DRUM MAGAZINE
Many Underhive gunsmiths have the expertise tomodify an autogun's firing mechanisms to use largerammo feeds. Such guns commonly use 'drum'magazines capable of supplying a vast ammunitionexpenditure, though belt-fed devices are also used.
Any autopistol, autogun and autoslugger can be
modified and fitted with a drum magazine. Before thefighter shoots you can elect to use the full capabilitiesof the gun mod. If you decide to do so then themodel receives a +1 to hit bonus. However, the shot will always cause an Ammo roll, even if the hit rolldidn't score a 6.
STINGER POUCH
The healing stinger mould blooms are such a rarefungi that merchants commonly split their stock andcombine it with other curious substances to maximisetheir profits. They are sold in small pouches so that
they can be easily stored and carried around bygangers for when it's needed most.
If a fighter equipped with a stinger pouch ends thegame down and goes out of action due to rolling a4-6, then he can use the curative stinger paste on his wounds. A model using the pouch in this way doesn'tsuffer a serious injury, instead it's automaticallyassumed a Full Recovery result is rolled.
Alternatively, a stinger pouch can be used to attemptto heal a fighter's Old Battle Wound, however itsrestorative powers are no miracle cure. If the pouch isused in this way then roll a D6. On a roll 4+ the
injury is fully healed and is crossed from the roster.On any other roll the extent of the injury is toosignificent and the serious injury remains, but furtherattempts to heal it can still be made.
A stinger pouch is a one use only item, after it hasbeen used it must be struck from the gang roster.

7/24/2019 Nec Community Edition
http://slidepdf.com/reader/full/nec-community-edition 58/101
NECROMUNDA
74
CREATING A GANG
Before you are ready to play Necromunda, you need to start a gang. A gang can be from any one of the six houses which we have already described. You could start with one of the boxed set gangs, available from Games
Workshop, by simply working out a gang based on the fighters and weapons that come in the box, or you couldwork out which figures you need and purchase them individually.
CHOOSING A GANG A gang can be any size from three models upwards.To start your gang refer to the Gang Recruitment listprinted at the end of this section. The list explainshow much it costs to recruit and equip the differentgang fighters. You have a total of 1000 Guilder credits with which to recruit your gang.
A gang is always made up of fighters from one of therival Hive City Houses – Orlock, Goliath, Van Saar,
Escher, Cawdor or Delaque. You can choose any oneof these Houses for your gang.
GANG FIGHTERSThere are four types of gang fighter available for hire:Gang Leaders, Gangers, Heavies, and Juves.
The Gang Leader Your gang must be led by a gang leader. This modelrepresents the player himself in his guise as a ruthlessUnderhive fighter. A gang can only have one leader.
GangersThe ordinary gang fighters are called gangers.
Gangers can be found and hired in the Underhivebars and trading stations. They are experienced,competant and trustworthy fighters who make up thebulk of most gangs.
HeaviesFighters armed with special weaponry or technicalequipment are called heavies. They are bigger andburlier than ordinary gangers on account of the weight of the gear they carry! Heavies are alsotechnicians – good at fixing or making things. This isnecessary because their weapons are more complexthan those of other fighters and must be kept in a
good state of repair.
Juves Juves are young inexperienced fighters. Thesettlements are full of wannabe fighters eager for achance to join a gang and see some real action. Often juves are younger brothers or cousins of thefullblooded gangers, included by way of teachingthem how to fight. Juves are inevitably poor shots andprone to running off.
GANG ROSTER You’ll need a gang roster sheet to write down thedetails of your gang. You’ll find a blank roster sheet atthe beginning of this document. We suggest youphotocopy or copy as many sheets as you need, sothat you can keep a neat and accurate record of yourgang as it changes from game to game.
When you have chosen your gang take a gang rostersheet and write down the details of each fighter in the
spaces provided. It’s a good idea to work out the gangon a piece of scrap paper first, as you will have to juggle the weapons and fighters to get as close to thepermitted 1000 points as possible. If you have anycredits left after choosing your gang write this downin the space marked ‘stash’.
The gang roster is a record of your gang and is usefulto keep beside you as you play. During a battle youmay wish to make notes on the sheet itself, to recordincidental details such as exploding weapons, flesh wounds, and such like.
You will need to give your gang a name, and alsoname all your fighters. We leave it to you to inventsuitable names, though you’ll find many examplesand ideas for Necromundan names in the this book.
TERRITORY RECORDSThe gang roster includes space to keep track of yourgang’s territories. When you are playing a campaigngame each gang has a number of territories whichrepresent trading contacts, property owned by thegang, and areas they commonly have access to. As youfight more games you may win new territories, oreven lose territory to the enemy. Territories generatefunds that you can spend on hiring more fighters orbuying more weapons, as explained later.

7/24/2019 Nec Community Edition
http://slidepdf.com/reader/full/nec-community-edition 59/101
NECROMUNDA
76
GANG RECRUITMENTThe following list is used to recruit and equip your gang. To start with you have 1000 Guilder credits with which you must recruit at least three fighters including a leader. Any credits unspent are added to the gang’s stash and can be used later or hoarded to buy something more expensive.
CHOOSING THE GANG You have 1000 Guilder credits to spend on recruiting and arming your gang within the following guidelines.
• Minimum 3 Fighters: A gang must have at least three models.• Leader: Your gang must have one leader. Not more. Not less!• Gangers: You can include as many gangers as you can afford.• Heavies: A gang can have up to two heavies but no more.• Juves: No more than half the gang can be made up of juves.• Knives: All fighters are recruited together with a free knife. Fighters cannot unequip or sell their free knife
GANG LEADERCost to recruit: 120 credits
Every gang needs a leader – the biggest, toughest andbrightest fighter of the bunch. He keeps the gang inline and decides when and where to fight, when torecruit new fighters, and how to spend the gang’shard-earned stash. The gang leader is the mostrespected and formidable fighter in the gang
M
4
WS
4
BS
4
S
3
T
3
W
1
I
4
A
1
Ld
8
Weapons: The Gang Leader can be armed with weapons chosen from the Hand-to-Hand, Pistols,Basic, Special Weapons and Extras lists.
Independent: The Gang Leader is unlike the rest ofthe gang's fighters in that he can fight efficiently andeffectively even on his own. He always counts ashaving a friend within 2", regardless of whether this isthe case or not. This means he can always test toavoid being pinned early.
Leader: Any fighter within 6" of the Leader can usethe Leadership characteristic of the Gang Leader when taking any nerve tests. In addition, any fighters within 6" of the Gang Leader can use the Initiativecharacteristic of the Leader when testing to see if theyescape pinning at the start of their turn. Thisrepresents the leader’s ability to encourage andinspire his fellow gang members and push thembeyond their normal limits.
However, a leader cannot confer these benefits if he isdown or broken himself. The sight of an injured gangleader bleeding out or wildly running for cover is farfrom encouraging.
GANGERCost to recruit: 50 credits
Gangers usually form the bulk of every gang. They aredependable and experienced fighters.
M
4
WS
3
BS
3
S
3
T
3
W
1
I
3
A
1
Ld
7
Weapons: Gangers can be armed with weaponschosen from the Hand-to-Hand, Pistols, Basic Weapons and Extras lists.
and their cost is not added to the gang rating. Any 'free' knives captured from enemy fighters are treated asregular knives that follow the usual rules.

7/24/2019 Nec Community Edition
http://slidepdf.com/reader/full/nec-community-edition 60/101
NECROMUNDA
77
JUVE
Cost to recruit: 25 credits
Juves are inexperienced youngsters eager to join agang and become fighters. They are poor fighters andunreliable, but with time they will improve andbecome valuable gangers.
M
4
WS
2
BS
2
S
3
T
3
W
1
I
3
A
1
Ld
6
Weapons: Juves can be armed with weapons chosenfrom the Hand-to-Hand, Pistols and Extras lists.
ARMING YOUR MODELS
A gang fighter's weapons must be represented on the model itself. The exceptions are knives and
grenades, which are assumed to be tucked inside clothing, and pistols contained in holsters canrepresent any type. Otherwise models are armed as depicted, so it is a good idea to decide how you’d
like to arm new recruits before assembling and painting your models.
A fighter who changes his weaponry after a game must be represented by a new model, or can be
converted to carry the appropriate weapons. Other items don't always need to be modeled onto the
miniature, such as photo-visors. It's up to the player to decide how much detail they want to add.
Unless specifically mentioned otherwise, it's not possible for a gang fighter to modify or change hisequipment mid-game. For example, a fighter cannot switch a telescopic sight from one gun to another,or give a weapon to a fellow gang member, nor can he steal the equipment of enemy fighters.
Heavy
Cost to recruit: 60 credits
Heavies are heavily built or physically fit individuals well suited to lugging round heavy weaponry. Theyare also technically competent. This is a good thingbecause their weaponry requires constant repair andmaintenance if it is to function properly.
M
4
WS
3
BS
3
S
3
T
3
W
1
I
3
A
1
Ld
7
Weapons: Heavies can be armed with weaponschosen from the Hand-to-Hand, Pistols, Basic, Special,Heavy Weapons and Extras lists.

7/24/2019 Nec Community Edition
http://slidepdf.com/reader/full/nec-community-edition 61/101

7/24/2019 Nec Community Edition
http://slidepdf.com/reader/full/nec-community-edition 62/101
NECROMUNDA
HOUSE DELAQUE WEAPON LIST
Leader Only WeaponsGrenade LauncherHand FlamerSword
Hand-to-Hand Weapons
Knife (first knife free ) Pistols
AutopistolBolt Pistol Laspistol Plasma PistolStub Gun
Basic Weapons AutogunBoltgun Hunting RifleLasgunShotgun (+Solid Slug, Scatter Shot)
Special WeaponsFlamerMeltagunPlasma Gun
Heavy WeaponsHeavy BolterHeavy Plasma GunHeavy Stubber Lascannon
Cost602515
5
1525153010
2035252520
409580
180240120300
79
HOUSE ORLOCK WEAPON LIST
Leader Only WeaponsBoltgun Chainsword Grenade Launcher
Hand-to-Hand Weapons
Chain or FlailClub, Maul or BludgeonKnife (first knife free)Sword
Pistols AutopistolBolt Pistol Laspistol Plasma PistolStub Gun
Basic Weapons AutogunLasgunShotgun (+Solid Slug, Scatter Shot)
Special Weapons Autoslugger Flamer
Heavy WeaponsHeavy BolterHeavy StubberMissile Launcher
Cost352560
10105
15
1525153010
202520
4540
180120140
HOUSE VAN SAAR WEAPON LIST
Leader Only WeaponsSword
Hand-to-Hand WeaponsChainsword Knife (first knife free)
Pistols AutopistolBolt PistolLaspistolPlasma Pistol Stub Gun
Basic Weapons AutogunBoltgun Hunting RifleLasgunShotgun (+Solid Slug, Scatter Shot)
Special WeaponsGrenade Launcher MeltagunPlasma Gun
Heavy WeaponsHeavy BolterHeavy Plasma GunHeavy Stubber
Lascannon
Cost15
255
1525153010
2035252520
609580
180240120
300
HOUSE ESCHER WEAPON LIST
Leader Only WeaponsBoltgunChainswordMeltagun
Hand-to-Hand WeaponsChain or FlailClub, Maul or BludgeonKnife (first knife free)Sword
Pistols AutopistolLaspistol
Plasma PistolStub Gun
Basic Weapons AutogunLasgunShotgun (+Solid Slug, Scatter Shot)
Special WeaponsFlamerPlasma Gun
Heavy WeaponsHeavy FlamerHeavy Plasma Gun
Heavy Stubber
Cost352595
10105
15
1515
3010
202520
4080
80240
120
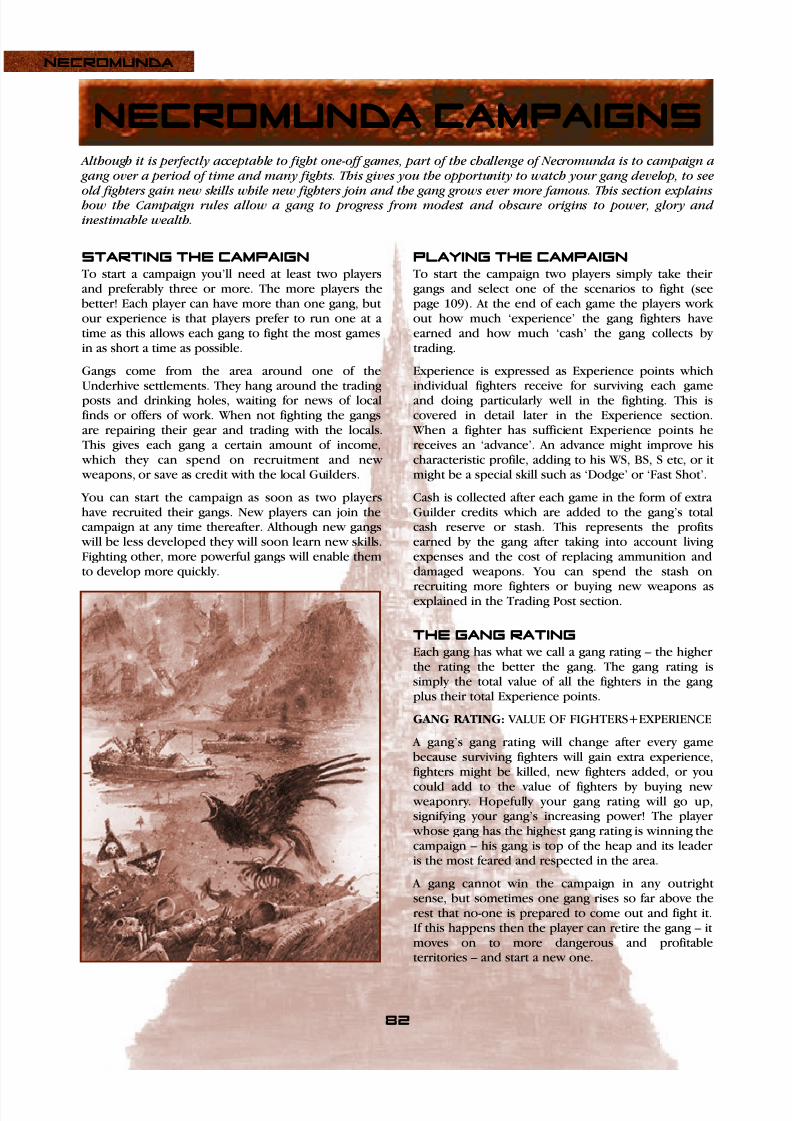
7/24/2019 Nec Community Edition
http://slidepdf.com/reader/full/nec-community-edition 63/101
82
NECROMUNDA
NECROMUNDA CAMpaigns Although it is perfectly acceptable to fight one-off games, part of the challenge of Necromunda is to campaign a gang over a period of time and many fights. This gives you the opportunity to watch your gang develop, to see
old fighters gain new skills while new fighters join and the gang grows ever more famous. This section explains how the Campaign rules allow a gang to progress from modest and obscure origins to power, glory andinestimable wealth.
STARTING THE CAMPAIGNTo start a campaign you’ll need at least two playersand preferably three or more. The more players thebetter! Each player can have more than one gang, butour experience is that players prefer to run one at atime as this allows each gang to fight the most gamesin as short a time as possible.
Gangs come from the area around one of theUnderhive settlements. They hang around the tradingposts and drinking holes, waiting for news of localfinds or offers of work. When not fighting the gangsare repairing their gear and trading with the locals.This gives each gang a certain amount of income, which they can spend on recruitment and new weapons, or save as credit with the local Guilders.
You can start the campaign as soon as two playershave recruited their gangs. New players can join thecampaign at any time thereafter. Although new gangs will be less developed they will soon learn new skills.Fighting other, more powerful gangs will enable themto develop more quickly.
PLAYING THE CAMPAIGNTo start the campaign two players simply take theirgangs and select one of the scenarios to fight (seepage 109). At the end of each game the players workout how much ‘experience’ the gang fighters haveearned and how much ‘cash’ the gang collects bytrading.
Experience is expressed as Experience points whichindividual fighters receive for surviving each gameand doing particularly well in the fighting. This iscovered in detail later in the Experience section. When a fighter has sufficient Experience points hereceives an ‘advance’. An advance might improve hischaracteristic profile, adding to his WS, BS, S etc, or itmight be a special skill such as ‘Dodge’ or ‘Fast Shot’.
Cash is collected after each game in the form of extraGuilder credits which are added to the gang’s totalcash reserve or stash. This represents the profitsearned by the gang after taking into account livingexpenses and the cost of replacing ammunition anddamaged weapons. You can spend the stash on
recruiting more fighters or buying new weapons asexplained in the Trading Post section.
THE GANG RATINGEach gang has what we call a gang rating – the higherthe rating the better the gang. The gang rating issimply the total value of all the fighters in the gangplus their total Experience points.
GANG RATING: VALUE OF FIGHTERS+EXPERIENCE
A gang’s gang rating will change after every gamebecause surviving fighters will gain extra experience,fighters might be killed, new fighters added, or you
could add to the value of fighters by buying new weaponry. Hopefully your gang rating will go up,signifying your gang’s increasing power! The player whose gang has the highest gang rating is winning thecampaign – his gang is top of the heap and its leaderis the most feared and respected in the area.
A gang cannot win the campaign in any outrightsense, but sometimes one gang rises so far above therest that no-one is prepared to come out and fight it.If this happens then the player can retire the gang – itmoves on to more dangerous and profitableterritories – and start a new one.

7/24/2019 Nec Community Edition
http://slidepdf.com/reader/full/nec-community-edition 64/101

7/24/2019 Nec Community Edition
http://slidepdf.com/reader/full/nec-community-edition 65/101
SERIOUS INJURIES CHART
11-15: DEADThe fighter is killed in action and his body abandoned
to the mutant rats of the Underhive. All the weaponsand equipment carried by the fighter are lost.
16: MULTIPLE INJURIES The fighter isn't dead but has suffered many serious wounds. Roll a further D3+1 times on this chart. AllDead, Multiple Injuries, Captured and Full Recoveryresults must be rolled again.
21: INFECTED WOUNDThe fighter eventually recovers but it takes time forhis agonising wounds to fully heal. The model mustmiss the next D3 games.
22: CHEST WOUND
The fighter has been badly wounded in the chest. Herecovers but is weakened by the injury and hisToughness characteristic is reduced by -1.
23: LEG WOUNDThe fighter has smashed a leg. He recovers from hisinjuries but he can no longer move as quickly. Thefighter’s Movement characteristic is reduced by -1.Randomly determine which leg has been hurt.
24: ARM WOUNDThe fighter has smashed one of his arms. The fighter’sStrength characteristic is reduced by -1 when usingthat arm – eg when using a sword in hand-to-hand
combat. Randomly determine which arm has been hit.
25: HEAD WOUND A serious head injury leaves the fighter unhinged. Atthe start of each game roll a D6 for each Head Wound to determine how he is affected. On a 1-3 the fighteris dazed and confused – he is affected by the rules forstupidity. On a roll of 4-6 the fighter is enraged anduncontrollable – he is affected by the rules for frenzy.
26: BLINDED IN ONE EYEThe fighter survives but loses the sight of one eye.Randomly determine which eye. A character with onlyone eye has his Ballistic Skill reduced by -1. If the
fighter is subsequently blinded in his remaining goodeye then treat it as a Dead result.
31: PARTIALLY DEAFENEDThe fighter survives but is partially deafened as aresult of his injuries. His Initiative characteristic isreduced by -1.
32: SHELL SHOCKThe fighter survives but is extremely nervous and jumpy due to the traumatic injuries he has suffered.His Leadership characteristic is reduced by -1.
33: HAND INJURYThe fighter has badly wounded one of his hands. The
fighter's Weapon Skill characteristic is reduced by -1.Randomly determine which hand has been hurt.
34-36 OLD BATTLE WOUNDThe fighter recovers but his old wound sometimesaffects his health. Roll a D6 before each game for eachOld Battle Wound suffered. On the roll of a 1 thefighter’s old wound is playing up and he is unable totake part in the forthcoming battle.
41-55: FULL RECOVERYThe fighter has been knocked unconscious or suffersa mildly incapacitating wound from which he makes afull recovery.
56: BITTER ENMITY Although he makes a full physical recovery, the fighterhas been mentally scarred by his experiences. Hedevelops a bitter enmity for the gang responsible forhis injury. Roll a D6 to see who he now hates.
1-4: The individual enemy who inflicted the injury (ifunknown, roll a random enemy model ).
5-6: The leader of the gang who inflicted the injury.
61-63: CAPTUREDThe fighter is captured. If both gangs hold captivesthen they must be exchanged one-for-one with theirgear starting with models of highest value. Remaining
captives are ransomed back to their gang. There is nofixed value for ransoms, it's up to the players tonegotiate deals on captives, their gear and how theyare paid for. If a player refuses to rescue or pay aransom then the captive must be sold to the Guildslavers, earning the captor D6x5 credits, and you maykeep their equipment. Any credits earned are addedstraight to your stash. The status of a captured fightermust be resolved before or immediately following thenext time the two gangs fight each other.
64: HORRIBLE SCARSThe fighter recovers but is left horribly disfigured. Hisscarred and distorted features means he causes fear.
65: IMPRESSIVE SCARSThe fighter recovers and is left with impressive scarsas testament to his bravery. The model receives a +1Leadership bonus. This bonus applies only once.
66: SURVIVES AGAINST THE ODDSThe fighter regains consciousness alone in thedarkness, given up for dead by his companions andoverlooked by his enemies. Despite his injuries hemakes his way back home. He recovers fully and hisuncanny survival earns him +2D6 Experience points.
NECROMUNDA
84

7/24/2019 Nec Community Edition
http://slidepdf.com/reader/full/nec-community-edition 66/101
NECROMUNDA
85
Gang fighters earn Experience points when they takepart in a battle. Once a gang fighter has enoughExperience points he gains an advance. This takes theform of either an increased characteristic or a specialskill. Gang fighters who survive long enough mayprogress to become mighty heroes with many specialabilities that they have picked up over the course oftheir combat career.
When fighters are recruited they already have someexperience. This is determined as soon as they jointhe gang. The table below shows how much
experience the different types of fighters have tobegin with. Make the appropriate dice rolls andrecord each new fighter’s Experience points on yourgang roster.
Fighter Type
Juve
Ganger
Heavy
Leader
Initial Experience
0
20 +1D6
60 +1D6
60 +1D6
EARNING EXPERIENCE
The Experience points your fighters can earn willdepend on the scenario you choose to fight. Differentscenarios have different objectives, and consequentlythe fighters earn experience in slightly different ways.In the Scavenger scenario for example, a fighter earns1 extra Experience point for each piece of valuableloot he recovers.
Extra Experience points are always added to thefighter’s total after the game is over.
If you look through the scenarios you will notice thata gang fighter always earns D6 Experience points forsurviving a battle. He earns this even if he is hurt orcaptured – so long as he lives to tell the tale!
The Playing a Campaign Game section (page 109)includes full details of the Experience points that canbe earned for each scenario.
UNDERDOGS When a gang fights an enemy gang with a higher gangrating then its fighters earn extra Experience points.The higher the enemy gang’s gang rating the morepoints the underdog earns. The number of bonuspoints is shown on the table below. This shows theextra points earned for each fighter who survives thebattle both for a win and a defeat.
Difference inGang Rating
1-4950-99
100-149
150-199
200-249
250-499
500-749
750-999
1,000-1,499
1.500+
Experience Bonus Win / Lose
+1 / +0+2 / +1
+3 / +2
+4 / +3
+5 / +4
+6 / +5
+7 / +6
+8 / +7
+9 / +8
+10 / +9
EXPERIENCE ADVANCES As fighters earn more Experience points they areentitled to make Advance rolls. The table on page 86shows how many Experience points a fighter mustearn before he can make a further roll. The roll mustbe taken immediately after the game when theadvance is gained, while both players are present to witness the result.
Example: A newly recruited ganger has 25 Experience points. During his first battle he does well and receives an extra 9 Experience points. This takes his total to 34 and moves him into the next Experience points bracket or level, entitling him to
an Advance roll. A further roll is earned when hisexperience hits 41, 51, 61, 81 etc. You will notice thatthe amount of experience needed to make advancesincreases as the fighter becomes more powerful.
JUVESOnce a Juve has earned 21 or more Experience pointshe becomes a fully fledged Ganger. The new Gangerfrom then on follows all of the usual rules associated with a Ganger. For example, he will gain access tonew skills and basic weapons and can work territoriesor search for rare trade. Note the cost value of thenew Ganger remains at 25 credits.
experience As gangers take part in fights, those who survive become more experienced, and improve their battle skills. This is represented in the campaign game by experience.

7/24/2019 Nec Community Edition
http://slidepdf.com/reader/full/nec-community-edition 67/101
Experience
0-5
6-10
11-15
16-20
21-30
31-40
41-50
51-60
61-80
81-100
101-120
121-140
141-160161-180
181-200
201-240
241-280
281-320
321-360
361-400
401+
Title
Green Juve
Juve
Juve
Top Juve
New Ganger
Ganger
Ganger
Ganger
Gang Champion
Gang Champion
Gang Champion
Gang Champion
Gang ChampionGang Champion
Gang Champion
Gang Hero
Gang Hero
Gang Hero
Gang Hero
Gang Hero
Mighty Ganger
Notes
Starting level for Gangers. Juves that reach this level become Gangers.
Starting level for Gang Leaders and Heavies
A gang fighter that reaches this level may not advance any further.
NECROMUNDA
86
EXPERIENCE ADVANCE TABLE

7/24/2019 Nec Community Edition
http://slidepdf.com/reader/full/nec-community-edition 68/101
NECROMUNDA
87
ADVANCE ROLLSMake any Advance rolls that are due immediately afterthe battle so that both players can witness the result.Roll 2D6 and consult the Advance Roll table below.
2D6
2
3-4
5
6
7
8
9
10-11
12
Result
New Skill: Choose any of the Skill tables and
randomly generate a skill from it.
New Skill: Select one of the standard Skilltables for your gang and randomly generate askill from it.
Characteristic Increase: Roll again 1-3 = +1 Strength; 4-6 = +1 Attacks.
Characteristic Increase: Roll again 1-3 = +1 WS; 4-6 = +1 BS.
Characteristic Increase: Roll again 1-3 = +1 Initiative; 4-6 = +1 Leadership.
Characteristic Increase: Roll again 1-3 = +1 WS; 4-6 = +1 BS.
Characteristic Increase: Roll again 1-3 = +1 Wounds; 4-6 = +1 Toughness.
New Skill: Select one of the standard Skilltables for your gang and randomly generate askill from it.
New Skill: Choose any of the Skill tables andrandomly generate a skill from it.
NEW SKILLSThere are seven types of skill and each has its ownseparate table: Agility, Combat, Ferocity, Muscle,Shooting, Stealth and Techno. If you refer to thesetables you’ll see that each offers six different skills.
The type of skill that a fighter can have is restricted by
the gang’s House and whether the fighter is a juve,ganger, heavy or leader. For example, Goliath juvescan only take Muscle and Ferocity skills, Goliathgangers can take Muscle, Ferocity and Combat skillsand so on. These restriction are indicated on the Skilltables on page 88.
On the roll of a 2 or 12 the fighter can ignore thenormal restrictions for his House or type, and selectfrom any of the Skill tables.
To determine a new skill for a fighter, pick the type ofskill you want from those available, then roll a D6 todetermine which skill has been learned. If you roll a
skill that the fighter already has or that he is notallowed to take for any reason, you may pick any skillof that type.
Example: A player rolls a 3 indicating a new skill for a Goliath Juve. Referring to the Skill tables he findsthat he may choose between Muscle or Ferocity skills. He decides to take a Muscle skill and thenrolls a D6, scoring a 3. Muscle skill number 3 is‘Hard as Nails’. This is noted against the fighter'sother details on the gang roster.
Characteristic Increase An Advance roll of 5-9 will increase one of a fighter’s
characteristics. For example a roll of 7 increaseseither Initiative or Leadership. Roll a D6 to see whichof the two characteristic increases applies. Tocontinue our example, a roll of 1-3 means the fighterhas gained +1 Initiative and a roll of 4-6 means hegains +1 Leadership.
However, characteristics may not be increasedbeyond maximum limits as shown on thecharacteristic profile below. If one of the twocharacteristics indicated by the advance roll hasalready reached its maximum level, you must take theother. If both have already been taken to theirmaximum level, you may choose to increase any otherpermitted characteristic by +1 instead.
M
4
WS
6
BS
6
S
4
T
4
W
3
I
6
A
3
Ld
9
Maximum
When working out if a fighter has reached hischaracteristic limit, all modifiers to his profile exceptcharacteristic advances are ignored. For example, if afighter suffers a Chest Wound then it's not possiblefor him to advance beyond a Toughness value of 3.

7/24/2019 Nec Community Edition
http://slidepdf.com/reader/full/nec-community-edition 69/101
House / Fighter
CAWDOR
Juve
Ganger
Heavy
Gang Leader
ESCHER
Juve
Ganger
Heavy
Gang Leader
DELAQUE
Juve
Ganger
Heavy
Gang Leader
GOLIATH
Juve
Ganger
Heavy
Gang Leader
ORLOCK
Juve
Ganger
Heavy
Gang Leader
VAN SAAR
Juve
Ganger
Heavy
Gang Leader
Agility
-
✓
-
✓
✓
✓
✓
✓
-
✓
-
✓
-
-
-
✓
-
-
-
✓
-
-
-
✓
Combat
✓
✓
-
✓
✓
✓
-
✓
-
-
-
✓
✓
✓
✓
✓
✓
✓
✓
✓
-
✓
✓
✓
Ferocity
✓
✓
✓
✓
-
-
-
✓
-
-
-
✓
-
✓
-
✓
-
✓
-
✓
-
-
-
✓
Muscle
-
-
✓
✓
-
-
✓
-
-
-
✓
-
✓
✓
✓
✓
-
-
✓
-
-
-
✓
-
Shooting
-
-
✓
✓
-
-
✓
✓
✓
✓
✓
✓
-
-
✓
✓
✓
✓
✓
✓
✓
✓
✓
✓
Stealth
-
-
-
-
-
✓
-
✓
✓
✓
✓
✓
-
-
-
-
-
-
-
✓
-
-
-
✓
Techno
-
-
✓
✓
-
-
✓
✓
-
-
✓
✓
-
-
✓
✓
-
-
✓
✓
✓
✓
✓
✓
SKILL TYPES AVAILABLE
NECROMUNDA
88
SKILL TABLESThe Skill tables are used to randomly determine skillsearned as advances. If you roll a 2 or 12 on the Advance table then you can make a roll on any of theSkill tables. Otherwise, your fighter is restricted tospecific Skill tables depending upon his House and whether he is a Juve, Ganger, Heavy or Leader.
The different characters of the six Houses means thatthey all have areas of strength and weakness inrelation to the skills that are commonly available tothem. For example, Goliaths encourage a spartan andrugged lifestyle and Goliath fighters are oftenphysically strong and ferocious. Conversely, they arenot very agile or stealthy.
Similarly, a fighter’s age and experience count for agreat deal in terms of what skills he is able to learn.Gangers will have fought in many different situationsand their abilities usually reflects this, while Juvesonly have a limited knowledge of how the Underhivebattles are fought.
The chart below shows what kind of skills arecommonly available to fighters of the differentHouses. To use the chart cross reference the fighteragainst the skill type. If the column is marked ‘✓’ then
you can roll on that Skill table. A blank columnindicates that you cannot roll for that type of skillunless you rolled a 2 or 12 on the Advance table.

7/24/2019 Nec Community Edition
http://slidepdf.com/reader/full/nec-community-edition 70/101
NECROMUNDA
89
AGILITY SKILLS
1: CatfallIf a model with the Catfall skill falls then he can takean Initiative test. If the test is passed then he suffersno damage from the fall but will still be pinned. Thefighter is also no longer restricted to jumping down
from heights of no more than 3", instead he can jumpdown from any height.
2: Dodge A model with this skill receives a 6+ special save against hits from shooting.
3: Jump Back At the start of his turn the model ma y disengage fromany hand-to-hand combat by jumping back . If youelect to do this then the model may immediately jump back up to 2" leaving any hand-to-handopponents behind.
4: Leap
The model can move an extra +D6" during hismovement phase if he runs or charges. Note you canroll the D6 before deciding where to move but youmust commit to a charge before the roll is made.
5: Quick Witted Before the first turn of the game begins, the fightercan make a special extra move, just as if it was hismovement phase. So for example, the model canchoose to run, charge, hide, go onto overwatch, etc.Note this skill cannot be used in scenarios that don'tallow special deployment rules.
6: Sprint
The model may triple its movement rate when it runsor charges, rather than doubling it as normal.
COMBAT SKILLS
1: Combat MasterIf the model is attacked by multiple hand-to-handopponents then he can use their numbers againstthem. Enemy models don't gain the usual Attack diceand Combat Score bonuses when fighting against him
in a multiple combat, instead the Combat Master getsthose bonuses.
2: DisarmThe model may use this skill against one close combatopponent at the start of the hand-to-hand phase. Themodel must take an Initiative test. If the test is passedthen he knocks his opponent's weapons aside and hemust fight the remainder of the turn using only aknife. It's assumed the fighter recovers his weapons intime for the next turn.
3: FeintThe fighter uses cunning feints to lure his opponent
into making mistakes. Hand-to-hand opponents willfumble on a roll of 1-2, instead of the usual roll of 1.
4: Deflect The fighter is able to knock aside blows using the flatsof his hands and the haft of his weapons. During eachhand-to-hand combat the model can force hisopponent to re-roll one of his Attack dice.
5: Counter AttackThe fighter is able to repulse his opponent's advances,swiftly turning defence into attack. Each hand-to-handcombat the model can re-roll one of his Attack dice.
6: Step Aside
The model has an uncanny ability to dodge blows inclose combat. The fighter receives a 4+ special save against any hits struck during hand-to-hand combat.

7/24/2019 Nec Community Edition
http://slidepdf.com/reader/full/nec-community-edition 71/101
NECROMUNDA
90
STEALTH SKILLS
1: AmbushIf the model goes on overwatch then he can also hide. Normally a fighter must expend his entire turn to goon overwatch, but a fighter with this skill can do both.
2: Dive
A model with this skill can run and hide in the sameturn. Normally a fighter who runs cannot hide in thesame turn, but a fighter with this skill can do both.
3: Escape ArtistIf the model is captured, such as from a serious injuryor a bounty hunter , then the fighter will automaticallyescape and it is treated as a Full Recovery seriousinjury result instead.
4: EvadeThe model ducks and weaves as he moves makinghim very hard to hit. Any enemy shooting from shortrange suffers a -2 to hit penalty, while any enemy
shooting at long range suffers a -1 penalty. Thispenalty only applies if the fighter is in the open andnot if he is benefitting from a cover modifier .
5: Infiltration A model with this skill can be deployed anywhere onthe battlefield at the end of your first turn, though not within 8" of an enemy model.
6: Sneak UpIf the model is targeted from overwatch and hecounts as a fleeting target then the shooter's Initiativecharacteristic is reduced to 1 when he takes theInitiative test to see if he reacts in time.
MUSCLE SKILLS
1: Body SlamIf the model charged that turn then he may take aStrength test at the start of the hand-to-hand phase. Ifthe test is passed then an opponent's Weapon Skill isreduced to 1 for the duration of the turn.
2: Bulging BicepsThe fighter's Strength characteristic is increased by+1. Note this can take him above the usual maximum
characteristic profile.
3: Hard as Nails If the fighter must roll on the Serious Injuries chart,roll a D6 first. On a roll of 6 it's automatically assumeda Full Recovery result was rolled.
4: Juggernaut If the model suffers a hit but isn't wounded by theattack then he may immediately take a Strength test. Ifthe test is passed then the fighter ignores the hit so won't be pinned either. Note this can allow the fighterto continue his move if attacked from overwatch.
5: Hurl OpponentOnce per turn, during the model's hand-to-handphase, he may use this skill before or after fighting hisopponent. The model must take a Strength test. If thetest is passed then the opponent is thrown in adirection of your choice up to D6". The hurled model is unharmed but pinned. He can also be hurled at anenemy fighter, in which case he will stop at the targetand both models are pinned. Note the best way to usethis skill is to throw enemy models off tall buildings!
6: Iron JawThe model receives a 6+ armour saving throw whichcan be combined with any other forms of armour.
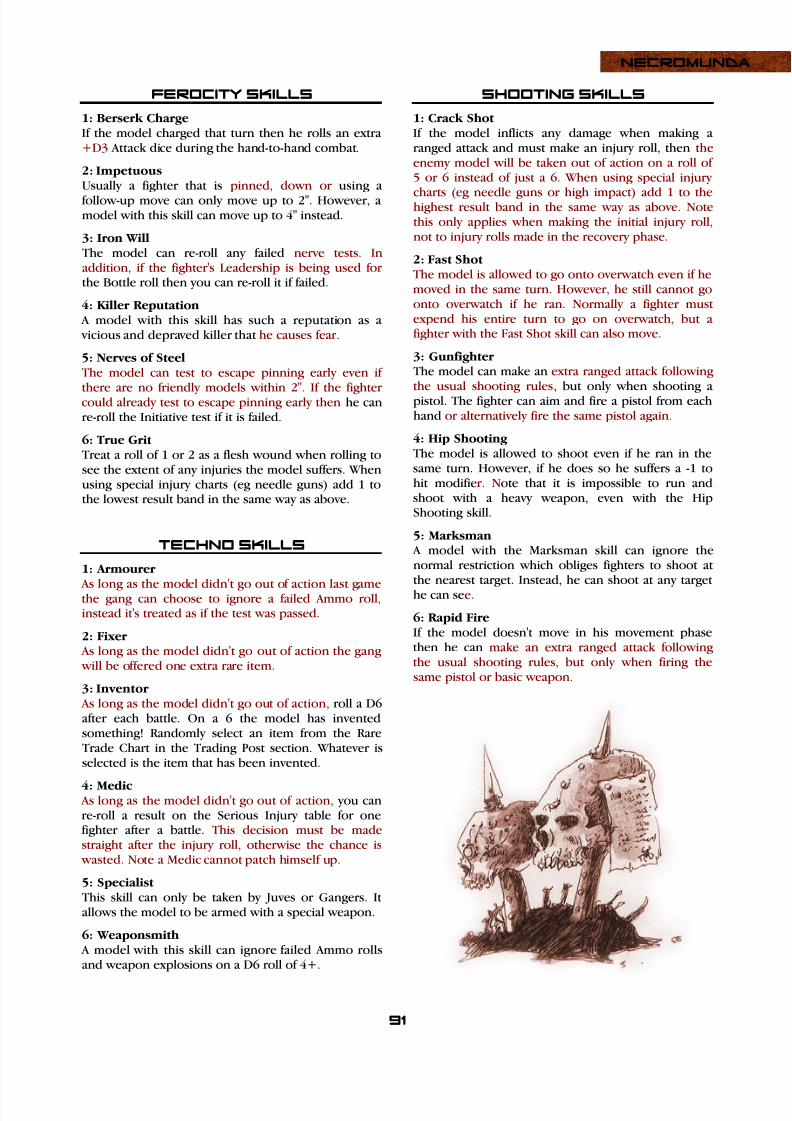
7/24/2019 Nec Community Edition
http://slidepdf.com/reader/full/nec-community-edition 72/101
NECROMUNDA
91
FEROCITY SKILLS
1: Berserk ChargeIf the model charged that turn then he rolls an extra +D3 Attack dice during the hand-to-hand combat.
2: ImpetuousUsually a fighter that is pinned, down or using a
follow-up move can only move up to 2". However, amodel with this skill can move up to 4" instead.
3: Iron WillThe model can re-roll any failed nerve tests. Inaddition, if the fighter's Leadership is being used for the Bottle roll then you can re-roll it if failed.
4: Killer Reputation A model with this skill has such a reputation as a vicious and depraved killer that he causes fear .
5: Nerves of SteelThe model can test to escape pinning early even if
there are no friendly models within 2". If the fightercould already test to escape pinning early then he canre-roll the Initiative test if it is failed.
6: True GritTreat a roll of 1 or 2 as a flesh wound when rolling tosee the extent of any injuries the model suffers. Whenusing special injury charts (eg needle guns) add 1 tothe lowest result band in the same way as above.
SHOOTING SKILLS
1: Crack ShotIf the model inflicts any damage when making aranged attack and must make an injury roll, then theenemy model will be taken out of action on a roll of5 or 6 instead of just a 6. When using special injury
charts (eg needle guns or high impact) add 1 to thehighest result band in the same way as above. Notethis only applies when making the initial injury roll,not to injury rolls made in the recovery phase.
2: Fast ShotThe model is allowed to go onto overwatch even if hemoved in the same turn. However, he still cannot goonto overwatch if he ran. Normally a fighter mustexpend his entire turn to go on overwatch, but afighter with the Fast Shot skill can also move.
3: GunfighterThe model can make an extra ranged attack following
the usual shooting rules, but only when shooting apistol. The fighter can aim and fire a pistol from eachhand or alternatively fire the same pistol again.
4: Hip ShootingThe model is allowed to shoot even if he ran in thesame turn. However, if he does so he suffers a -1 tohit modifier. Note that it is impossible to run andshoot with a heavy weapon, even with the HipShooting skill.
5: Marksman A model with the Marksman skill can ignore thenormal restriction which obliges fighters to shoot atthe nearest target. Instead, he can shoot at any targethe can see.
6: Rapid FireIf the model doesn't move in his movement phasethen he can make an extra ranged attack followingthe usual shooting rules, but only when firing thesame pistol or basic weapon.
techno SKILLS
1: Armourer
As long as the model didn't go out of action last gamethe gang can choose to ignore a failed Ammo roll,instead it's treated as if the test was passed.
2: Fixer As long as the model didn't go out of action the gang will be offered one extra rare item.
3: Inventor As long as the model didn't go out of action, roll a D6after each battle. On a 6 the model has inventedsomething! Randomly select an item from the RareTrade Chart in the Trading Post section. Whatever isselected is the item that has been invented.
4: Medic As long as the model didn't go out of action, you canre-roll a result on the Serious Injury table for onefighter after a battle. This decision must be madestraight after the injury roll, otherwise the chance is wasted. Note a Medic cannot patch himself up.
5: SpecialistThis skill can only be taken by Juves or Gangers. Itallows the model to be armed with a special weapon.
6: Weaponsmith A model with this skill can ignore failed Ammo rollsand weapon explosions on a D6 roll of 4+.

7/24/2019 Nec Community Edition
http://slidepdf.com/reader/full/nec-community-edition 73/101
NECROMUNDA
92
YOUR TERRITORYEvery gang begins with five territories generated fromthe Territory table (see page 94). Some scenariosallow gangs to gain extra territory or lose it to theirrivals (see page 109). The more and better territory agang has the richer it will become.
There is room to record the gang’s territory and howmuch income it generates on the left of the gang
roster sheet. To begin with players randomly generatefive territories and record them on their roster.
To generate a random territory from the Territorytable on pages 94-95, roll two dice. The first dice rollis taken as ‘tens’ and the second as ‘units’. This iscalled a D66 roll. The table indicates the type ofterritory, and the income it provides, with a shortdescription underneath and any special rules.
INCOME At the end of a battle a gang can collect income fromits territories as described below. This is done as soonas the game is over so that players can witness eachother’s dice rolls.
Each ganger who survives the game without going outof action can generate income from any one of thegang’s territories. This represents his effortsscavenging the wastes, trading, working, runninggambling sessions, collecting money owed anddealing with favoured contacts.
Fighters who go out of action during or after a gamecannot generate income. They are recuperatinginstead. Remember, fighters who are still down at theend of a game must test to see whether they recoveror go out of action.
Fighters who sustain flesh wounds can collect incomeas normal. Their wounds are superficial and make nodifference to their normal activities.
Leaders, Heavies and Juves never collect income –only Gangers do so. Leaders spend their timeorganising the gang’s affairs and sussing out the localnews. Heavies spend their time maintaining their own weapons, repairing the gang’s other weaponry, andtrading for or making new ammunition. Juves getused as dogsbodies and make no appreciabledifference to the gang’s income.
TERRITORYThe gang’s territory represents local resources that the gang members can exploit in various ways. Itincludes nearby wastes where the gang can scavenge for the odd bit of ore or scrap, and encompasses
the efforts of the fighters’ friends and relatives who may live inside the big settlements or in out-holes nearby. Territory also represents contacts that the gang has developed with local workshops or theowners of drinking holes and gambling dens.
This one's BIG!' exclaimed the larger of thetwo trappers as they carefully approachedthe coiled serpent.The snake regarded themwith cold obsidian eyes. It perceived tvomen, one old and lean, the othcr a youngster but big and clumsy looking. Its forked tongue flickered in and out as it
tasted thc strong man-scent. Abel, ancient and wiry, held the longcatchpole ready. The sprung metal jawswere open, ready to bite, held in place by atiny trigger. The snake rose up on its coils
and hissed at the intruders.
The old catcher struck with practisedexpertise. The jaws of the catchpole snapped shut upon the serpent's neck. Its coilserupted into a frenzy of movement, lashing about as it struggled to free itself
Abel hung on to the long shaft, fully aware
that should the creature free itself then a single bite from its fangs would bringinstant death. The thrashing coils turned the pole this way and that, so that it vas almostwrenchcd from his hands. The old catcher
hung on grimly.
'Net him! Net him Cleitus you damn fool!' he shouted, 'What are you waiting for!'
Cleitus ran forward and hurled the heavynet. The net fell upon the snake, its weights dragging the creature down to the groundwhere it lay thrashing and twisting.
'Must be ten metres long,' gasped Cleitus.'Should fetch a few credits in Dust Falls,' he agreed. 'There's a few barrels of Wild Snakein that beauty, and just look at the hide! Let's bag him quick.'
'You know Abel.' said Cleitus. 'This is such abig snake. How'll they fit it in the bottle?'
Abel shook his head and let out a long sigh.'l guess they'll need a real big bottle,' hereplied with a smirk.

7/24/2019 Nec Community Edition
http://slidepdf.com/reader/full/nec-community-edition 74/101
NECROMUNDA
93
COLLECTING INCOMEEach ganger can generate income from one territory.The player chooses the territories he wishes to collectincome from and adds up the total amountgenerated. Most territories generate a variableincome: D6x10 or 2D6x10 credits, in which case theplayer makes the appropriate dice rolls to determine
the total. It's not possible to send more than oneganger to work the same territory. Each territory canonly be worked once after each battle.
Regardless of how many territories or how manygangers a gang has it may never collect income frommore than ten.
The gang must spend a proportion of its income onbasic necessities such as food, drink, ammunition andgeneral weapon maintenance. This is determined bycross referencing the gang’s income with the numberof models in the gang.
The more models in a gang the more it costs tomaintain, to buy ammo, grub, booze and so forth.The number indicated on the chart below is the profitin credits earned after deducting basic maintenancecosts. The profit is added to the gang’s stash.
Example: A gang consists of a leader, two heavies, four gangers and three juves. The gang fights a battle and two of the gangers go out of action but surviveto fight another day. After the game is over the playerworks out his income. He has only two remaining gangers to work the gang’s territories. Thesenaturally collect income from the two best territories held by the gang, which happen to be Old Ruins (10
points) and Mine Workings (D6x10). A roll of ‘4’ forthe mine gives a total of 10+40 = 50 credits. There are 10 fighters to support so the gang is left with atotal of 15 credits profit to add to its stash.
GIANT KILLER BONUS
When a gang fights and beats an enemy with a highergang rating it receives extra income. The gang’scontacts are impressed by its success and traders arekeen to expand their dealings with the Giant Killers.
The chart below shows the extra income a gang earnsafter beating an enemy with a higher gang rating.Note this is added to the gang's income, not profit.
Difference inGang Rating
1-49
50-99
100-149150-199
200-249
250-499
500-749
750-999
1,000-1,499
1,500+
Income BonusFor Winning
+5
+10
+15+20
+25
+50
+100
+150
+200
+250
SPENDING THE STASH You can spend stash on weapons, hiring new fighters,or any of the items available at the trading post. Seethe Trading Post section for details.
Income
0-29
30-49
50-79
80-119
120-169
170-229
230-299
300-379
380-459
460-559
560+
1-3
15
25
35
50
65
85
105
120
135
145
155
NUMBER OF MODELS IN GANG
4-6
10
20
30
45
60
80
100
115
130
140
150
7-9
5
15
25
40
55
75
95
110
125
135
145
10-12
0
5
15
30
45
65
85
100
115
125
135
13-15
0
0
5
20
35
55
75
90
105
115
125
16-18
0
0
0
5
15
35
55
65
80
90
100
19+
0
0
0
0
0
15
35
45
55
65
70

7/24/2019 Nec Community Edition
http://slidepdf.com/reader/full/nec-community-edition 75/101
NECROMUNDA
94
D66 Territory Income
11-12 Chem Pit 2D6
A highly dangerous chemical pit lies nearby. The pit is a source of constantly changing chemicals, sulphurous
deposits, and all kinds of poisonous and corrosive substances. Selling these chemicals earns you 2D6 credits.The work is extremely hazardous. If you roll a double w hen working out your credits then the ganger falls intothe chem pit but manages to haul himself free. He struggles back to base horrifically scarred, his skin covered withblisters. His appearance is so foul that from now on he causes fear. No income is collected.
13-16 Old Ruins 10
There is an exposed area of ancient ruins not far from your settlement. If a ganger searches through the ruins hemay find scrap pieces of archeotech, bits of old metal, or interesting old curios – enough to sell for 10 credits.
21-24 Slag 15
Near your settlement there is an extensive network of tunnels and crawlholes full of iron slag and other solidifiedchemical wastes. A ganger can work the slag by breaking it up ready to sell to the local Guilders for 15 credits.
31-34 Settlement 30
The families of your gang fighters own holes or workshops inside the settlement where the gang is based. Theseholdings help to support the gang by providing food, shelter, and a vital link with the local traders.
A ganger visiting his family collects 30 credits. In addition, there is a chance of a young relative joining your gang.Roll a D6 after each battle. On a 6 you can recruit a Juve for free if you want to, who comes equipped with a knife.If the gang doesn't have a Juve fighter type, such as Scavvies, then you can recruit a Ganger type instead.
35-36 Mine Workings D6x10
In a secret location in the wastes your gang has discovered a mine. The excavations yield carnotite gems or someother valuable ores or stones. Friends of the fighters are already working in return for a slice of the proceeds. Youcan collect D6x10 credits as your share of the profits to date.
If you capture an enemy fighter then you can opt to permanently put him to work in your mine instead of sellinghim to slavers. Each captive worker adds +1 to your D6 dice roll for income from the mine.
41-42 Tunnels 10
Your gang has found a buried entrance to a labyrinth of ancient service ducts beneath the dome floor.
When the gang fights a battle they can use these ducts to deploy up to three fighters anywhere on the battlefieldat ground level. Models are set up at the end of the player’s first turn and cannot be placed within 8" of enemymodels. No more than 50% of the gang's initially deployable fighters can use Tunnels and Vents.
43-44 Vents 10
The gang has found a concealed entrance into a network of ancient ventilation shafts. When the gang fights a battle they can use these vents to deploy up to three fighters anywhere on the top surfacelevel of any building on the battlefield. Models are set up at the end of the player’s first turn and cannot be placed within 8" of an enemy. No more than 50% of the gang's initially deployable fighters can use Vents and Tunnels.
45-46 Holestead D6x10
One of the gang fighters comes from a holestead out in the wastes. The hole produces a crop of nutritious slime which the ganger can help his family carry to the local trade post in return for a D6x10 credits cut of the proceeds.
25-26 Water Still D6x10
The gang has discovered and renovated an old water still out in the wastes. The still is worked by the family orfriends of one of the gangers. Guilder slave trains carry the water to local settlers making the gang a share of theproceeds amounting to D6x10 credits.
TERRITORY TABLE
51-52 Drinking Hole D6x10
Your gang leader has inherited an old drinking hole in payment of an outstanding gambling debt. The hole earnsD6x10 if visited by a ganger and also provides the gang with a convenient base in the local settlement.
In addition, roll a D6 after each battle. On a 6 your contacts overhear rumours about a rival gang's activities. You
can add or subtract 1 from the Scenario Table roll next game.

7/24/2019 Nec Community Edition
http://slidepdf.com/reader/full/nec-community-edition 76/101
95
NECROMUNDA
53-54 Workshop D6x10
The family or friends of one of your gang fighters runs a workshop in the local settlement. You can trade in bits ofscrap metals in return for cheap repair work or cash. Visiting the workshop will earn you D6x10 credits.
Thanks to your workshop’s meticulous care, you can choose to ignore a failed Ammo roll during each battle. It'sassumed the roll is passed instead.
63 Gambling Den 2D6x10
Your gang runs a gambling den in an old disused hole in your settlement. Although the income from running agame is good, it is a risky business because Underhivers are notorious cheats and bad losers too. If you decide torun a gambling session you receive 2D6x10 credits. However, if you roll a double you lose that number of creditsfrom that turn’s income instead – eg a double 4 means you lose 80 credits.
Note that losses are deducted from your income before making reductions for basic running costs. If a gang isunable to pay gambling debts out of its income then the difference must be made up from its stash. If this stillisn’t enough to cover the gang’s debts then weapons or equipment must be sold off.
64 Spore Cave 2D6x10
Your gang has discovered a hidden cave where many kinds of rare fungi grow, such as pearl spore and ironmould. A ganger can harvest the fungi and sell it to local traders for 2D6x10 credits.
If you roll double 1 when harvesting fungus the collecting ganger has contracted Spore Sickness. This is a fungaldisease in which plump and colourful fungi sprout from all over the victim’s body. Spore Sickness is not lethaland recovery is automatic, but the ganger will not be able to take part in future battles until he recovers by rollinga 4, 5 or 6 at the start of a game. Once recovered he may fight as normal.
65 Archeotech Hoard 2D6x10
Your gang has discovered a hidden entrance into a small unexplored dome. A ganger can collect remnants ofancient technical devices which can be sold for 2D6x10 credits.
So long as your gang is careful not to sell too many items at once no one will suspect that you have discovered anew dome. No risk is incurred by collecting 2D6x10 credits. However, if you want to work the dome moreintensely you can do so. A ganger can collect 3D6x10, 4D6x10, 5D6x10 or even 6D6x10 from the hoard, but if herolls any doubles then he has been spotted entering the dome. You still collect the income rolled but the hoard isno longer a secret and is stripped bare by treasure hunters. The territory then becomes an Old Ruins instead.
66 Green Hivers Choose
You befriend a group of settlers who have migrated from Hive City to the Underhive to start a new life. Possibly your gang has chanced upon the settlers lost or dying in the wastes. Maybe they are relatives or friends of one of your gang fighters who have deliberately sought him out. Thanks to your contacts and influence you are able togive the green hivers a good start, and naturally they are grateful for your assistance and only too pleased to helpin the future. You may choose any type of territory from the chart. The territory represents the vocation of thesettlers or a discovery they have chanced across in their journey to the Underhive.
62 Friendly Doc D6x10
One of the local medical practitioners has offered to patch up your wounded fighters at favourable rates in return
for blood and tissue donations from your gangers. If a ganger wants to part with a few pints of blood or someother renewable tissue you gain D6x10 credits.
If a gang member rolls a Dead result on the Serious Injuries chart then there is a chance the doc can patch him upbefore it's too late. Roll a D6. On a 5+ the injury roll is treated as a Multiple Injuries result instead. Note eachFriendly Doc can only patch up a single fighter per battle.
61 Mineral Outcrop D6x10
Out in the wastes there is an outcrop of mineral wastes where a ganger can collect valuable sparstones, adonitecrystals, igneous adamantorite, or one of the many other kinds of mineral gems that are formed in the Underhive.
You will earn D6x10 credits by searching the outcrop for precious stones. If a 6 is rolled then a vein of highquality gemstones is uncovered adding an extra D6x10 credits to the gang's income.
55-56 Guilder Contact D6x10
A local Guilder has offered you favourable rates in return for your business. As a result you are able to increase your income substantially. If you wish to deal with your Guilder contact you gain an extra D6x10 credits.
If you recover loot during a Scavengers, The Hoard or a Package Run scenario then you can trade it in to yourguilder contact. Each loot counter is worth an additional +5 credits of income.

7/24/2019 Nec Community Edition
http://slidepdf.com/reader/full/nec-community-edition 77/101
96
NECROMUNDA
TRADING POSTS Every medium-sized settlement has at least one trading post where Guilders and local traders sell their goods and buy items they want. The Guilders also act as bankers, exchanging items for credit which can be spent in
any trading post in the Underhive.
The trading post in a large settlement might enclose asubstantial area with many traders offering goods andservices. Small settlements are served by travellingGuilders, poor cousins to the rich merchants of theHive City, itinerant tradesmen who hike their waresfrom one place to another.
SPENDING CREDITS After every game a gang can collect income from itsterritories as described earlier. Credits can be spenton recruiting new fighters and on new equipment for
the gang.
New RecruitsNew fighters are recruited in the same way as theoriginal gang. Refer to the Recruiting a Gang section.New recruits may be armed with any of the weaponsdescribed in the Gang Recruitment list, but cannot begiven other equipment until they have fought at leastone battle.
Gangs can recruit whatever type of fighter the player wishes, but the usual restrictions apply regarding thenumber of leaders, heavies and so on. For example, aplayer cannot recruit a second leader or have more
than two heavies in a gang.
Recruiting Hired GunsPlayers may hire mercenary fighters for the gang ifthey wish. Refer to the Hired Guns section for details.Hired Guns are wanderers who are willing to selltheir expert skills to anyone prepared to pay.
WeaponsIf players want to buy new weapons or otherequipment for existing gang fighters then refer to thetrading charts below. The charts list all the equipmentavailable in the Underhive, not just the common weapons included in the Recruitment charts. Rarer
items and weapons are not always available and varyin price. Remember that each house must adhere toits own house weapons list as well.
When to BuyPlayers should preferably complete their recruitingand trading after the battle is over, making anyappropriate dice rolls while both players are present.
Alternatively, players may prefer to wait until the heatof battle has cooled and they are able to considerpurchases more carefully. Determine which rare itemsare offered for sale whilst both players are together.The players can then work out what to buy later on.
TRADINGCommon items can be bought quite readily in anyUnderhive settlement, either from a trading post ordirectly from a workshop. Players can purchase asmany of these items as they want. The price forcommon items is fixed, so players always pay thesame for them.
Rare items are hard or even impossible to find. Onlyoccasionally do such items turn up for sale and theprice asked is often way and above their true value.
Players must be prepared to snap up useful items asthey are offered, especially the really hard-to-get weapons and equipment.
To represent the scarcity of rare items each playermakes a dice roll at the start of his trading session todetermine what goods are offered to him. Todetermine how many rare items are offered roll a D3(ie, a D6 counting 1-2 as 1, 3-4 as 2 and 5-6 as 3). Thisis the number of items offered to the gang by theirdealer contacts, guilders and local merchants.
Roll D66 for each item and consult the Rare Tradechart to discover what is on offer. The player may buyany of the items offered, but only one of each itemunless the same result is rolled more than once.
Note that each player rolls separately for his trading –the gangs don’t necessarily hide out in the same placenor do they have the same contacts. One playercannot buy goods offered to another.
Gangers and TradingIf a player wishes he can use a ganger to searcharound the trade post and make enquiries aboutfurther rare items which might be for sale. A ganger who does this must not have gone out of action and cannot collect income from the gang’s territory thatturn; searching out rare items is an alternative tocollecting income.
For each ganger employed in this fashion you mayadd a further +1 randomly generated rare items tothe list of those offered for sale.
Rare Trade ChartThe following chart is used to determine what raretrade items are offered for sale to the gang. D3 itemsare offered automatically and a further +1 for eachganger sent to search them out. The prices of rareitems are given on the main trade charts.

7/24/2019 Nec Community Edition
http://slidepdf.com/reader/full/nec-community-edition 78/101
97
NECROMUNDA
SELLING A player may wish to trade-in weapons at the sametime as he buys new ones. After all, as gangs get morepowerful they often abandon their earlier armamentin favour of something better. However, the second-hand value of gear is not high due to the considerable wear and tear inflicted on it by your fighters.
Gangs can sell equipment for half its listed price. Inthe case of rare weapons which have a variable price
the gang receives half of the fixed cost component.For example, a Red-dot laser sight costs 40+3D6credits so it can be sold for 20 credits.
Old gear can be hoarded for future use (make a notein the gang's stash) or it can be swapped around thegang from one fighter to another (though notbetween gangs). As the value of old weapons is lowcompared to the cost of equipping new recruits, agang can usually find a use for its cast off armaments.
HOUSE WEAPON LISTSDuring the post game sequence your gang can buyany weapons on your house weapon list. The lists
reflect the fighting styles and character of the housesso it's unusual for gangers not to be armed with weapons from it. It's possible to still buy weapons noton your house weapon list, but to represent the rarityof this the following rules apply.
When your Gang Leader and accompanying Gangerssearch for rare trade, they can instead look for weapons not on their house weapons list. Beforedetermining what rare items are offered to your gang(by rolling D66) you can instead choose to exchangeone or more of those offers to purchase a weapon noton your house weapons list. Each non-house weapon
purchased reduces your rare trade offers by one.
11
12
13-14
15-16
21-23
24-25
26
31-33
34
35
36
41-46
51-56
61-63
64
65
66
Power Weapon: Roll again
1-3: Power Sword, 4-5: Power Axe
6: Power Fist
Rare Weapon: Roll again
1-3: Needle Weapon: Roll again
1-4: Needle Pistol
5-6: Needle Rifle
4-5: Web Pistol
6: One in a Million Weapon (see page 54)
Gas Grenades: Roll again
1-3: Choke, 4-5: Scare
6: Hallucinogen
Grenades: Roll again
1: Melta Bombs, 2-3: Photon Flash Flares
4: Plasma Grenades, 5-6: Smoke Bombs Ammo: Roll again
1-3: Hotshot Laser Power Packs
4-5: Drum Magazine, 6: Hellfire Bolts
Gunsight: Roll again
1-2: Red-dot Laser, 3: Mono-sight
4-5: Telescopic Sight, 6: Infra-red Sight
Heavy Gear: Roll again
1-4: Auto-repairer
5-6: Suspensor
Armour: Roll again
1-3: Flak, 4-5: Mesh
6: Exotic Armour: Roll again
1-4: Carapace, 5-6: Force Field
Medi-pack
Isotropic Fuel Rod
Bionic: Choose one of the following:
Bionic Arm, Eye, Leg, Chest or Implant
Items: Roll again
1: Skull Chip, 2: Shock Maul
3: Grapnel, 4: Grav Chute
5: Bio-scanner, 6: Bio-booster
Items: Roll again1: Concealed Blade, 2: Respirator
3: Photo-visor , 4: Berserker Chip
5: Blindsnake Pouch, 6: Infra-red Goggles
Raid Gear: Roll again
1-3: Silencer
4-6: Choose one of the following:
Screamers or Stummers
Stinger Pouch
Ratskin Map
Mung Vase
RARE TRADE CHART

7/24/2019 Nec Community Edition
http://slidepdf.com/reader/full/nec-community-edition 79/101
NECROMUNDA
98
PRICE CHARTThe following charts indicate the cost of itemsavailable for sale at the trading post. The cost of rareitems is included, but such items cannot be boughtunless they are offered for sale as already described.In some cases the cost of an item is variable, andincludes a base cost plus a variable extra amount, for
example 40+3D6 credits. In these instances the extra variable cost is the additional rarity value of the item –the premium which must be paid to own it. Likewise,the cost of all common items is included, thoughagain these are restricted to the particular gangs whohave them listed on their House’s weapon lists.
Cost
10
25
10
515
35+3D6
85+3D6
40+3D6
35+3D6
15
Availability
Common
Common
Common
CommonCommon
Rare
Rare
Rare
Rare
Common
Hand-to-Hand Weapons
Chain or Flail
Chainsword
Club, Maul or Bludgeon
Knife (1st knife is free)Massive Axe, Sword or Club
Power Axe
Power Fist
Power Sword
Shock Maul
Sword
Cost
15
25
25
15
80+4D6
30
10
120+4D6
Availability
Common
Common
Common
Common
Rare
Common
Common
Rare
Pistols
Autopistol
Bolt Pistol
Hand Flamer
Laspistol
Needle Pistol
Plasma Pistol
Stub Gun
Web Pistol
Cost
20
35
2525
20
Availability
Common
Common
CommonCommon
Common
Basic Weapons
Autogun
Boltgun
Hunting RifleLasgun
Shotgun (+Solid, Scatter)
Cost
260
180
80
240
120
300
140
Availability
Common
Common
Common
Common
Common
Common
Common
Heavy Weapons
Autocannon
Heavy Bolter
Heavy Flamer
Heavy Plasma Gun
Heavy Stubber
Lascannon
Missile Launcher
Cost
15+2D6
25
40+4D6
40
40+3D620+2D6
35+3D6
20+2D6
10+3D6
Availability
Rare
Common
Rare
Common
RareRare
Rare
Rare
Rare
Grenades
Choke Grenades
Frag Grenades
Hallucinogen Grenades
Krak Grenades
Melta BombsPhoton Flash Flares
Plasma Grenades
Scare Grenades
Smoke Bombs
Cost
35
50
Availability
Common
Common
Missiles
Frag Missiles
Super Krak Missiles
Cost
15
5
20+3D6
515+2D6
5
Availability
Common
Common
Rare
CommonRare
Common
Ammo
Bolt Shells
Dum-dum Bullets
Hellfire Bolts
Hot Shot ShellsHotshot Laser Power Packs
Manstopper Shells
Cost
45
40
60
95
180+4D6
80
Availability
Common
Common
Common
Common
Rare
Common
Special Weapons
Autoslugger
Flamer
Grenade Launcher
Meltagun
Needle Rifle
Plasma Gun

7/24/2019 Nec Community Edition
http://slidepdf.com/reader/full/nec-community-edition 80/101
99
NECROMUNDA
ADJUSTING
THE GANG RATINGThe gang rating of each gang is equal to the value ofits fighters plus their Experience points. As the valueof fighters includes their equipment, players mustalter the sub-totals on the gang roster sheet everytime equipment is bought, sold or swapped.
Any weaponry or other equipment that the gangkeeps but does not give to a fighter is hoarded. Itremains unissued in your hideout and its value is notincluded in the gang rating.
Where the cost of equipment varies the variableamount is discounted when calculating a fighter’stotal worth. So, a fighter with a bionic leg is worth anextra 80 credits not 80+3D6. The variable cost of rare weaponry and other equipment represents anadditional ‘rarity’ cost charged over and above theactual worth of the item.
DEATH OF A FIGHTER When a fighter is killed all of his equipment is lost.This is very important to remember as it is notpossible to reallocate his equipment once he is dead.
Cost
60+3D6
10+2D6
100+4D6
25+2D6
Availability
Rare
Rare
Rare
Rare
Armour
Carapace Armour
Flak Armour
Force Field
Mesh Armour
Cost
80+3D6
50+3D6
50+3D6
80+3D6
Availability
Rare
Rare
Rare
Rare
Bionics
Bionic Arm
Bionic Chest
Bionic Eye
Bionic Leg
Cost
80+4D6
25+3D6
40+4D6
50+3D6
50+3D6
30+2D6
10
10+D615+2D6
10
30+4D6
40+4D6
30+3D6
50+4D6
20
80+4D6
D6x10
Weapon x2
1525+2D6
D6x10
15+2D6
10+D6
10+2D6
30+3D6
10+3D6
10+3D6
50+3D6
Weapon ÷2
Availability
Rare
Rare
Rare
Rare
Rare
Rare
Common
RareRare
Common
Rare
Rare
Rare
Rare
Common
Rare
Rare
Rare
CommonRare
Rare
Rare
Rare
Rare
Rare
Rare
Rare
Rare
Common
Miscellaneous
Auto-repairer
Berserker Chip
Bio-booster
Bio-scanner
Bionic Implant
Blindsnake Pouch
Clip Harness
Concealed BladeDrum Magazine
Filter Plugs
Grapnel
Grav Chute
Infra-red Goggles
Isotropic Fuel Rod
Lobo-chip
Medi-pack
Mung Vase
One in a Million Weapon
Photo ContactsPhoto-visor
Ratskin Map
Respirator
Screamers
Silencer
Skull Chip
Stinger Pouch
Stummers
Suspensor
Weapon Reload
Cost
30+3D6
40+3D6
40+3D6
20+3D6
Availability
Rare
Rare
Rare
Rare
Sights
Infra-red Sight
Mono Sight
Red-dot Laser Sight
Telescopic Sight

7/24/2019 Nec Community Edition
http://slidepdf.com/reader/full/nec-community-edition 81/101
NECROMUNDA
100
HIRED GUNSThis section of the Campaign rules introduces Hired Guns into the game. Hired Guns are mercenary adventurers who fight for money. They are essentially loners who wander the Underhive selling their services at
the trade posts in settlements like Dust Falls, Two Tunnels and Dead End Pass.
RECRUITING HIRED GUNS A player can recruit Hired Guns when he creates hisgang. Hired Guns can also be recruited from the tradepost after any game. A gang can dispense with theservices of a Hired Gun after any game.
Hired Guns don’t belong to the gang they fight withand they don’t help the gang except by fighting. Thismeans that Hired Guns don’t count as members ofthe gang for purposes of collecting income or fordeducting cost of living expenses. Hired Guns count
as gang members for the purposes of working out when the gang must start taking Bottle rolls, however,a hired gun's Leadership characteristic cannot be usedfor the Bottle roll if the gang's leader is incapacitated.
HIRE FEEThe gang must pay the hire fee for the Hired Gun when he is recruited and after each battle includingthe first. This cost comes from the gang’s stash. Note
Hired guns must be paid even if they don't participatein the game. If the gang dispenses with a Hired Gunthen he must still be paid for his services that game.
However, if the Hired Gun dies or is forced to miss agame, such as because he was suffering from anInfected Wound or is captured, then understandablyhe does not have to be paid for his services that game.
If there is insufficient credit in the gang's stash to paya Hired Gun, then he leaves the gang and the gangmay not recruit further Hired Guns until it has foughtanother battle.
For purposes of the gang rating the value of a HiredGun is his hire fee x5.
Although Hired Guns are good value, especially fornew gangs, there are disadvantages. Firstly they don'taccumulate Experience and cannot advance beyondthe level they are at when hired. This means that theyare less useful for established gangs that already havegood quality fighters. Secondly, the hiring fee of thesemercenaries reduces the cash available to recruit newfighters and gear, which are vital to a gang’s future.
A player cannot buy extra weapons or equipment fora Hired Gun, and he cannot swap or sell a HiredGun’s gear. Hired Guns earn no Experience pointscannot gain further skills or characteristic advances.They must roll for serious injuries if taken out ofaction just like regular gang members.
In ages past a trickle of waste seeped downthrough the hive and into an abandoned dome. In time the trickle became a torrent, and the dome’s roof collapsed under therelentless pressure. The falling fluids broughtmasses of debris into the dome, burying the floor beneath a thick layer of sediment.
Eventually, further erosion of the dome’s floor caused it to collapse too, and the fall plunged into a yet older dome beneath.
The effluent flow grew year by year, carrying debris further down, and wearing away awhole series of domes to produce a roaring fall of multi-hued effluent and a gapingchasm into the deepest levels of the hive.
Today the effluent is gone but a thin trickleof dust still cascades from above. In its steadthere is the shaft itself, plunging through the
Underhive to the darkness of the hivebottom. This is called the Abyss, a mile-deep hole that pierces dome after dome in the path of the old river falls.
Perched upon the edge of the Abyss is Dust Falls, a large settlement where ambitious gangs can take the steep path down into the depths of the hive. The trail leads to the Hive Bottom itself and the pollutant sump lake ofchemical slime that lies at its base.
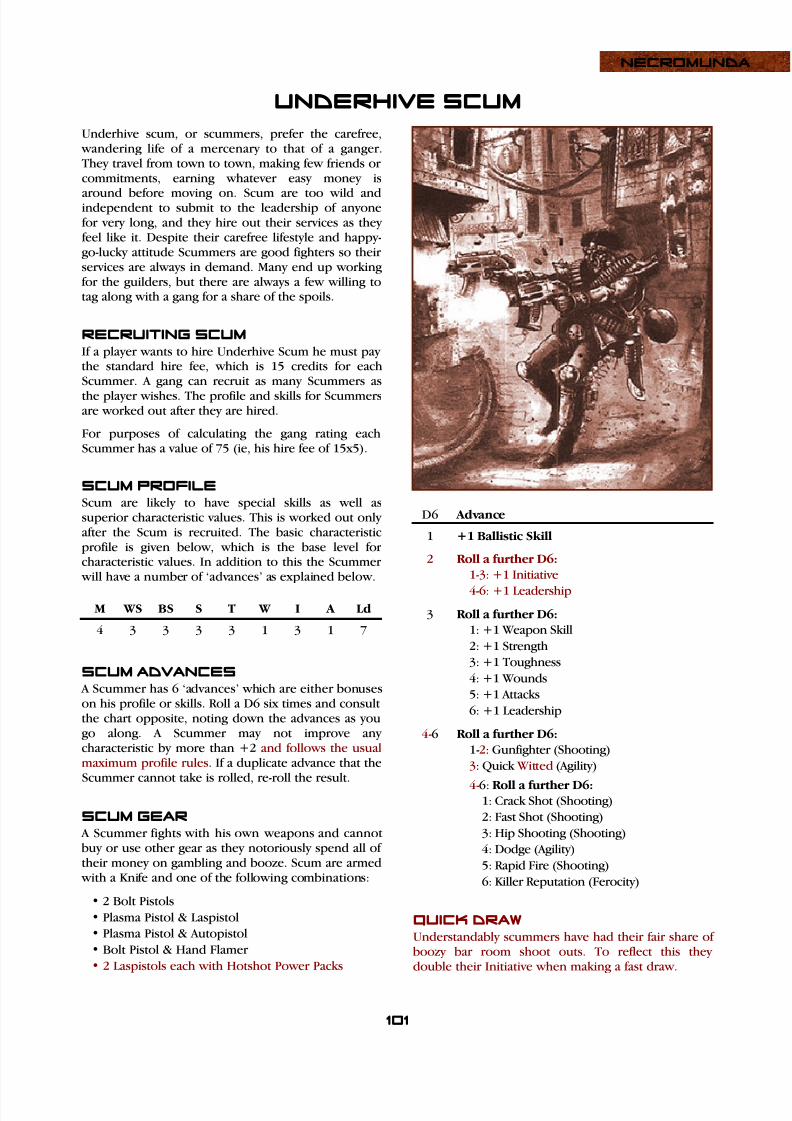
7/24/2019 Nec Community Edition
http://slidepdf.com/reader/full/nec-community-edition 82/101
NECROMUNDA
101
UNDERHIVE SCUM
Underhive scum, or scummers, prefer the carefree, wandering life of a mercenary to that of a ganger.They travel from town to town, making few friends orcommitments, earning whatever easy money is
around before moving on. Scum are too wild andindependent to submit to the leadership of anyonefor very long, and they hire out their services as theyfeel like it. Despite their carefree lifestyle and happy-go-lucky attitude Scummers are good fighters so theirservices are always in demand. Many end up workingfor the guilders, but there are always a few willing totag along with a gang for a share of the spoils.
RECRUITING SCUMIf a player wants to hire Underhive Scum he must paythe standard hire fee, which is 15 credits for eachScummer. A gang can recruit as many Scummers as
the player wishes. The profile and skills for Scummersare worked out after they are hired.
For purposes of calculating the gang rating eachScummer has a value of 75 (ie, his hire fee of 15x5).
SCUM PROFILEScum are likely to have special skills as well assuperior characteristic values. This is worked out onlyafter the Scum is recruited. The basic characteristicprofile is given below, which is the base level forcharacteristic values. In addition to this the Scummer will have a number of ‘advances’ as explained below.
M
4
WS
3
BS
3
S
3
T
3
W
1
I
3
A
1
Ld
7
SCUM ADVANCES A Scummer has 6 ‘advances’ which are either bonuseson his profile or skills. Roll a D6 six times and consultthe chart opposite, noting down the advances as yougo along. A Scummer may not improve anycharacteristic by more than +2 and follows the usualmaximum profile rules. If a duplicate advance that theScummer cannot take is rolled, re-roll the result.
SCUM GEAR A Scummer fights with his own weapons and cannotbuy or use other gear as they notoriously spend all oftheir money on gambling and booze. Scum are armed with a Knife and one of the following combinations:
• 2 Bolt Pistols
• Plasma Pistol & Laspistol
• Plasma Pistol & Autopistol
• Bolt Pistol & Hand Flamer
• 2 Laspistols each with Hotshot Power Packs
D6
1
2
3
4-6
Advance
+1 Ballistic Skill
Roll a further D6:
1-3: +1 Initiative
4-6: +1 Leadership
Roll a further D6:
1: +1 Weapon Skill
2: +1 Strength
3: +1 Toughness
4: +1 Wounds
5: +1 Attacks
6: +1 Leadership
Roll a further D6:
1-2: Gunfighter (Shooting)
3: Quick Witted (Agility)
4-6: Roll a further D6: 1: Crack Shot (Shooting)
2: Fast Shot (Shooting)
3: Hip Shooting (Shooting)
4: Dodge (Agility)
5: Rapid Fire (Shooting)
6: Killer Reputation (Ferocity)
Quick DrawUnderstandably scummers have had their fair share ofboozy bar room shoot outs. To reflect this theydouble their Initiative when making a fast draw.

7/24/2019 Nec Community Edition
http://slidepdf.com/reader/full/nec-community-edition 83/101

7/24/2019 Nec Community Edition
http://slidepdf.com/reader/full/nec-community-edition 84/101
103
NECROMUNDA
BOUNTY HUNTER GEAR A Bounty Hunter fights with his own weapons asdescribed below. They are invariably armed to theteeth (it goes with the job). Bounty Hunters cannotbuy or use other weapons or equipment as theyhoard all of their money and dream of retiring to theopulent Spire.
Bounty Hunters are armed with the following:
• Knife
• Bolt Pistol with Red-dot Laser Sight
• Boltgun, Lasgun or Hunting Rifle • Chainsword
• Shotgun (Solid, Scatter, and Manstopper Shells)
• Respirator or Filter Plugs
• Photo-visor or Photo-contacts
Plus any one of the following:
• Bio-Booster
• Blindsnake pouch
• Infra-red Goggles
• Weapon Reload ( for all weapons )
• Mesh Armour
• Any one Bionic
CAPTUREIf a Bounty Hunter takes an enemy ‘out of action’ inhand-to-hand combat then the enemy fighter isautomatically captured rather than rolling on theSerious Injury chart after the game. However, if theBounty Hunter is taken out of action then his captivesare left to their fate and must roll for serious injuriesinstead as normal.
CLAIM BOUNTYFor every enemy fighter captured by the gang that wasn't from an outlawed gang, roll a D6. On a 6 theBounty Hunter recognises the fighter as a wantedoutlaw. The gang can turn in the wanted outlaw tothe Guilders. Note that the player doesn’t have toturn in an outlaw, he may still prefer to ransom thecaptive back to his own gang.
If an outlaw is turned in for bounty the gang's rewardis a number of credits equal to his total Experiencepoints plus D6x5, which is added to the gang's stash.The gang may also keep any of his equipment.
To find out what happens to a gang fighter who isturned over to the Guilders roll a D6.
1
2
3
4
5
6
Sold into Slavery: The fighter disappears forever.
Fined: His value in credits and equipmentconfiscated. His gang may free the fighter bypaying his value in credits including the value ofhis weapons and equipment. All of his weapons,and any equipment that is not physically part ofhim (bionics/lobo chip etc) are confiscated by theGuilders.
Fined: His value in credits including the value ofhis weapons and equipment. His gang may freethe fighter together with his weapons andequipment by paying his fine.
Fined: D6x10 credits. His gang may free the
fighter by paying his fine as above.
Fined or Sentenced: The gang may choose tofree the fighter for D6x5 credits or let him servehis sentence in the pit, in which case he missesthe next game.
Insufficient Evidence: Released immediately.
Fines must be paid out of the gang’s stash before thegang’s next game. If a player is unable or unwilling topay the fine the fighter is sold to the slavers and neverseen again. Only in the case of a ‘Fined or Sentenced’result does the gang have the choice of paying ormissing a game.
IndependentBounty Hunters are used to working alone and preferit that way too. To reflect their self reliance a BountyHunter can always test to escape pinning early even ifthere are no friendly fighters within 2".

7/24/2019 Nec Community Edition
http://slidepdf.com/reader/full/nec-community-edition 85/101
104
NECROMUNDA
Ratskins are the native inhabitants of the Underhive.They know its ruinous domes, ancient tunnels andlabyrinthine passages far better than the Underhivesettlers themselves. Most Ratskins care little for the
ways of these settlers who they regard as desecratingthe hive’s great and noble spirit so will avoid hivertowns if they can.
Some adventurous Ratskins hire out to Underhivegangs as guides or trackers and become semicivilisedas a result of this contact, though sadly they oftenacquire a taste for intoxicants, gambling and riotousliving. They can be found and hired in the largersettlements such as Dust Falls, Glory Hole and DeadEnd Pass. There are few expeditions that would venture into unknown zones without the expert aidof a Ratskin Scout.
RECRUITING RATSKIN SCOUTSIf a player wants to hire a Ratskin Scout he must paythe standard hire fee, which is 15 credits. A gang canhave only one Ratskin Scout. The profile and skills forRatskin Scouts are worked out after they are hired.
For purposes of calculating the gang rating a RatskinScout has a value of 75 (ie, his hire fee of 15x5).
RATSKIN SCOUT PROFILERatskin Scouts may have special skills and superiorcharacteristic values. This is worked out only after the
Ratskin Scout is recruited. The basic characteristicprofile is given below, which is the base level forcharacteristic values. In addition to this the RatskinScout will have a number of ‘advances’ as explainedin the Ratskin Scout Advances section.
M
4
WS
3
BS
3
S
3
T
3
W
1
I
3
A
1
Ld
7
GUIDE A gang which includes a Ratskin Scout is able toexploit his knowledge of the Underhive and itscountless half-forgotten passages and tunnels. This
gives the gang a distinct advantage when it comes toconfronting an enemy, permitting the gang to moverapidly to their objective.
To represent this a gang that includes a Ratskin Scoutcan add or subtract 1 from the Scenario dice roll todetermine which scenario the players will fight. Ifboth sides include a Ratskin Scout this ability iscancelled out.
If a gang has a Ratskin Map which also gives a bonuson the Scenario roll then the Ratskin Scout confers nofurther advantage. The gang already has access to allthe hidden tunnels and passages in the area.
RATSKIN SCOUT ADVANCES A Ratskin Scout has 3 ‘advances’ which are eitherbonuses on his profile or skills. Roll a D6 three timesand consult the chart below, noting down theincreases and skills as you go along. A Ratskin Scoutmay not improve any characteristic by more than +2and follows the usual maximum profile rules. If aduplicate advance that the Ratskin Scout cannot takeis rolled, re-roll the result.
D6
1
2
3-6
Advance
Roll a further D6:
1-3: +1 Weapon Skill
4-6: +1 Initiative
Roll a further D6:
1: +1 Ballistic Skill
2: +1 Strength
3: +1 Toughness
4: +1 Wounds
5: +1 Attacks
6: +1 LeadershipRoll a further D6:
1: Dodge (Agility)
2: Leap (Agility)
3: Sprint (Agility)
4-6: Roll a further D6:
1: Catfall (Agility)
2: Dive (Stealth)
3: Ambush (Stealth)
4: Evade (Stealth)
5: Sneak Up (Stealth)
6: Infiltration (Stealth)
RATSKIN SCOUT

7/24/2019 Nec Community Edition
http://slidepdf.com/reader/full/nec-community-edition 86/101
105
NECROMUNDA
ratskin scout gear A Ratskin Scout fights with his own weapons asdescribed below. They cannot buy or use other weapons or equipment. Ratskin Scouts are rumouredto spend every penny they earn on drink andhallucinogenic fungus which is why so many go badand become renegades.
Ratskins are armed with the following:
• Knife
• Club, Maul or Bludgeon
• Blindsnake Pouch
Plus one of the following:• Shotgun (Solid, Scatter and Manstopper Shells)
• Autogun
• Lasgun
• Hunting Rifle
RESILIENCE All Ratskins are remarkably resilient to injury and havea natural ability to survive even in the harshest depthsof the Underhive. They are less likely to get lost orcaptured than ordinary gang fighters and, if hurt, theyare better at hiding from danger.
To represent their resilience to injury a Ratskin Scout who goes out of action can re-roll the result whenrolling on the Serious injuries chart.
NativeRatskins are utterly at home within the Hive Bottom'senvironments as they are born and bred inunimaginably harsh conditions. Due to this, RatskinScouts are immune from the effects of TreacherousConditions. If a Blind Fight scenario is being foughtthen Ratskin Scouts are immune from the Vision and
Running special rules.
1
2-5
6
Lost: The Ratskin disappears and is neither seennor heard from again.
Nothing to See: The Ratskin reports no usefuldiscoveries in this area.
Discovery: The Ratskin finds enough resources
for a new territory. Refer to the Territory tableand randomly determine a new territory. This isimmediately added to the gang’s existing territoryunless it is an Archeotech Hoard or Green Hivers.Ratskins regard ancient places as sacred, and thediscovery of an Archeotech Hoard will not bereported to the gang. Similarly, if he discoversGreen Hivers the Ratskin will say nothing andleave them to their fate, for such is the will of thehive spirit. The Ratskin Scout reports nodiscoveries instead.
ExploreIf the gang that has hired a Ratskin Scout wins thescenario and the Scout didn't go out of action then he
is allowed to explore the local area for new territoryafter the game. The Ratskin searchs for mineraldeposits, likely looking places for settlement, funguscaves, and other possibly useful finds.
If the player wishes to send his Ratskin exploring thesurrounding domes roll a D6.

7/24/2019 Nec Community Edition
http://slidepdf.com/reader/full/nec-community-edition 87/101
109
NECROMUNDA
PLAYING A CAMPAIGN GAMEWhen playing a campaign game you have two extra things to do. Firstly, before the game starts, you must decide where the fight is to take place and sort out any other pre-battle details. Secondly, after the game is over, you must roll for income, injuries and other post-battle details.
PRE-BATTLE SEQUENCEBefore the battle can begin the players work their waythrough the following pre-battle sequence.
The player with the lowest gang rating rolls onthe Scenario Table to determine which scenario will be played. If the scenario has an attackerand a defender, then the player who picks thescenario must attack.
Roll for fighters with Old Battle Wounds or Head Wounds to see what part they play in the battle.
Set up the terrain and gangs according to therules for the scenario you are playing.
1
2
3
POST BATTLE SEQUENCE After the battle is over the players work their waythrough the following sequence. You do not have to work through the entire sequence at once, as youmay wish to consider further purchases, but any dicerolls required must be observed by both players or aneutral third party. It is convenient to complete up toSection 4 (Collecting Income) straight after the game.
Determine the extent of injuries for each fighterout of action at the end of the game. Fighters who are down at the end of the game areconsidered to be out of action on the D6 roll ofa 4, 5 or 6 and must also roll for injuries. See theSerious Injuries chart.
Allocate Experience points for your fighters andmake any Advance rolls. See the Experiencesection and Scenarios for details of how this works.
Re-allocate territory if appropriate. Territory maybe lost or won according to the scenario played.
Collect income from territory as described in theTerritory section.
Recruit new fighters and buy new equipment asdescribed in the Trading Post section.
Update your total gang rating and you are readyto fight again.
1
2
34
56
2D6
2
3-4 5-6
7-11
12
Result
The player whose gang has the highest gangrating may choose which scenario is played.This is also a grudge match so any Experienceearned from causing wounding hits is doubled.In addition, if any fighters taken out of actionroll a Full Recovery result then it is treated as aBitter Enmity result instead.
The player with the higher gang rating chooses.Play the Gang Fight scenario.
The player with the lower gang rating chooses.
The player with the lower gang rating maychoose which scenario is played. In addition,this is a grudge match as outlined in the 2 roll.
SCENARIO TABLE
DISBANDING GANGS You may choose to disband your gang at the end ofany game and start again with a new one. All of theold gang’s territories are lost, but gang fighters maybe hired for the new gang if you wish. Gang fighters who are ‘re-hired’ have a cost equal to the value listedfor them in the gang list plus their equipment, plus 1credit per Experience point. Note the normal fightercost is still used for purposes of the gang rating.
The leader of a disbanded gang, if he is still alive, maynot be hired into the new gang. He wanders alone
and defeated into the wastes and is never seen again.
Scenario modifiersSometimes a gang may be able to modify the ScenarioTable roll. If both gangs are able to modify the rollthen each point will nullify each other's bonus. Forexample, if a gang hires a Ratskin Scout (+/-1) whilethe opposing gang is using a worn and incompleteRatskin Map (+/-2) then he will only be able tomodify the Scenario Table roll by 1 point.
WOUNDING HIT AWARDSGang fighters earn +5 Experience points for inflictingan unsaved wounding hit on an enemy model.
Fighters don't receive this award if the hit roll failed
or if the target has zero Wounds. For example, blaststhat scattered or shooting down models won't count.
If a model with at least 1 Wounds is 'finished off' inbase contact, such as a webbed model, then it willconfer a wounding hit award.
If a template weapon hits then all models wounded inthe blast confer wounding hit awards.
Weapons that inflict multiple Damage score an awardfor each wound inflicted until the model is reducedto zero Wounds.
In hand-to-hand combat each wound inflicted confersan award until the model is reduced to zero Wounds.

7/24/2019 Nec Community Edition
http://slidepdf.com/reader/full/nec-community-edition 88/101
110
NECROMUNDA
GANG FIGHT
Gangs run the risk of encountering rivals as they explore the ruined Underhive landscape. Not all encountersend in violence. Sometimes two gangs meet and, finding no good reason to fight, go their own way. Otherencounters end in bloody fire-fights with neither side prepared to give way. Ultimately, every gang must be prepared to defend itself, to protect friends or family in the wastes, or simply to maintain the respect of its
trading contacts and rivals.
The Gang Fight scenario represents one such encounter. Two rival gangs meet while travelling through a ruineddome. Both gang leaders are looking for trouble – neither is prepared to turn his back and let his opponent getaway without a fight. They yell insults and test each other's nerve until finally gunfire echoes through the dome.
TERRAINEach player takes it in turn to place a piece of terrain,either a ruined building structure or a connecting walkway. It is suggested that the terrain is set up within an area 4' x 4' or slightly smaller so that thegangs start off a reasonable distance apart.
GANGSEach player rolls a dice. The low scorer chooses which table edge he wishes to set up on, and placesall of his gang fighters within 8" of that edge. Hisopponent then sets up within 8" of the opposite tableedge.
STARTING THE GAMEBoth players roll a D6. The highest scoring playertakes the first turn.
ENDING THE GAME
The Gang Fight has no specific objective other than todrive off the enemy gang.
If a gang fails a Bottle roll, or one player volunteers tobottle out, the game ends immediately. The gang thatbottles out loses and the other gang wins.
EXPERIENCEFighters who take part in the game – ie are deployedon the table – earn Experience points as noted below.
+D6
+5
+10
Survives: If a fighter survives the battle then D6points are earned. Even fighters who are wounded and taken out of action receiveexperience for taking part.
Per Wounding Hit: A fighter earns 5 points foreach wounding hit he inflicts during the battle.Make a note on the gang roster every time thishappens as described in the Playing A CampaignGame section.
Winning Gang Leader: The Gang Leader of the winning side earns +10 Experience points.
SPECIALIf the losing gang has at least three enemy modelstaken out of action, and suffers at least three times as
many casualties out of action as the opposing gang,then the winners can take over a random territoryfrom the losers. To randomly determine a piece ofterritory roll a D6 and count down from the top ofthe opposing player’s territory list, or use some othersuitable method as appropriate.
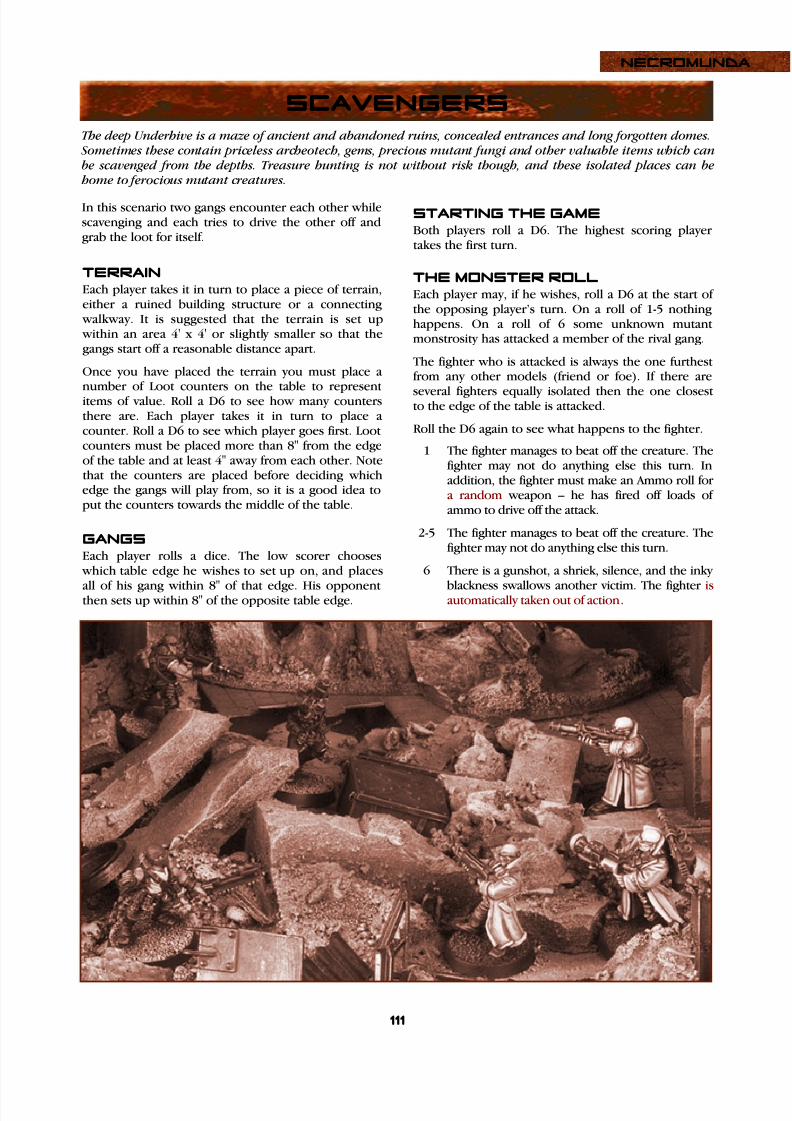
7/24/2019 Nec Community Edition
http://slidepdf.com/reader/full/nec-community-edition 89/101
111
NECROMUNDA
SCAVENGERS
The deep Underhive is a maze of ancient and abandoned ruins, concealed entrances and long forgotten domes. Sometimes these contain priceless archeotech, gems, precious mutant fungi and other valuable items which canbe scavenged from the depths. Treasure hunting is not without risk though, and these isolated places can be home to ferocious mutant creatures.
In this scenario two gangs encounter each other whilescavenging and each tries to drive the other off andgrab the loot for itself.
TERRAINEach player takes it in turn to place a piece of terrain,either a ruined building structure or a connecting walkway. It is suggested that the terrain is set up within an area 4' x 4' or slightly smaller so that thegangs start off a reasonable distance apart.
Once you have placed the terrain you must place a
number of Loot counters on the table to representitems of value. Roll a D6 to see how many countersthere are. Each player takes it in turn to place acounter. Roll a D6 to see which player goes first. Lootcounters must be placed more than 8" from the edgeof the table and at least 4" away from each other. Notethat the counters are placed before deciding whichedge the gangs will play from, so it is a good idea toput the counters towards the middle of the table.
GANGSEach player rolls a dice. The low scorer chooses which table edge he wishes to set up on, and places
all of his gang within 8" of that edge. His opponentthen sets up within 8" of the opposite table edge.
STARTING THE GAMEBoth players roll a D6. The highest scoring playertakes the first turn.
THE MONSTER ROLLEach player may, if he wishes, roll a D6 at the start ofthe opposing player’s turn. On a roll of 1-5 nothinghappens. On a roll of 6 some unknown mutantmonstrosity has attacked a member of the rival gang.
The fighter who is attacked is always the one furthestfrom any other models (friend or foe). If there are
several fighters equally isolated then the one closestto the edge of the table is attacked.
Roll the D6 again to see what happens to the fighter.
1
2-5
6
The fighter manages to beat off the creature. Thefighter may not do anything else this turn. Inaddition, the fighter must make an Ammo roll fora random weapon – he has fired off loads ofammo to drive off the attack.
The fighter manages to beat off the creature. Thefighter may not do anything else this turn.
There is a gunshot, a shriek, silence, and the inky
blackness swallows another victim. The fighter isautomatically taken out of action.

7/24/2019 Nec Community Edition
http://slidepdf.com/reader/full/nec-community-edition 90/101
PICKING UP LOOTLoot counters may be picked up by any model thatpasses over them during its movement. A fighter cancarry any number of pieces of loot without affectinghis movement or ability to shoot or fight.
Fighters who go out of action drop Loot counters
where they happen to be at the time. Remove themodel but leave the counters in place. Models cantransfer loot to other models in base-to-base contactduring the shooting phase, but neither model mayshoot during the turn.
If a fighter takes an enemy out of action in hand-to-hand combat he automatically captures any loot themodel is carrying.
ENDING THE GAMEThe fight continues until one of the gangs is drivenoff or until one gang has all of the loot in itspossession as described below.
If a gang fails a Bottle roll, or one player volunteers tobottle out, the game ends immediately. The gang thatbottles out loses and the winner is left in possessionof the battlefield.
If a gang succeeds in capturing all the Loot counters,and the fighters carrying them are within 8" of theirown table edge at the start of their turn, then thegame ends and that gang has won.
The winner of the scenario can claim Loot counters which are loose on the table when the game ends.
EXPERIENCEFighters who take part in the game – ie are deployedon the table – earn Experience points as noted below.
+D6
+1
+5
+10
Survives: If a fighter survives the battle then D6points are earned. Even fighters who are wounded and taken out of action receiveexperience for taking part.
Loot Carrier: If a fighter is carrying loot at theend of the game he receives +1 Experiencepoint per Loot counter.
Per Wounding Hit: A fighter earns 5 points foreach wounding hit he inflicts during the battle.Make a note on the gang roster every time thishappens as described in the Playing A CampaignGame section.
Winning Gang Leader: The Gang Leader of the winning side earns an extra 10 Experiencepoints.
SPECIAL After the game is over each gang is allowed to cash inits loot. The income generated is added to the incomefrom the gang’s territory. Each Loot counter is worth1D6 x 5 credits.
112
NECROMUNDA

7/24/2019 Nec Community Edition
http://slidepdf.com/reader/full/nec-community-edition 91/101
113
NECROMUNDA
HIT & RUN
Gangs who want to explore far from their home settlement rely upon isolated hideouts where they keep stocks of supplies, emergency rations, spare ammo and the like. Sometimes they hole up in lone slime farms or mines runby friends or family.
The Hit and Run scenario represents a daring raid ona rival gang’s hideout. The aim isn't to destroy thehideout, just to cause a bit of damage and remindrivals that your gang is a force to be reckoned with.
TERRAINIn this scenario the player who picked the scenario isthe attacker and the other player is the defender.
Starting with the defender, each player takes it in turnto place a piece of terrain, either a ruined buildingstructure or a connecting walkway. The area of ruinsrepresents the defenders’ hideout. It is suggested thatthe terrain is set up within an area of roughly 4' x 4'.
Once the terrain is set up the defender places a Lootcounter to represent a hoard which the gang hascollected ready to take back to their main settlement.The defender also places the Water Still piece whichrepresents the collecting vanes of a vapour trap, adevice that extracts water from the atmosphere.
The defender can place the loot anywhere on thetable, and can place the water still on the top surfacelevel of any building. He must place the loot and the water still at least 8" apart. These are not necessarilygoing to play an important part in the game. The water still is only of significance in the Blitz mission,
whilst the loot is used in the Stick Up mission.
THE MISSION After the terrain is placed the attacker secretly rolls aD6 on the table opposite and notes down what hismission is. The defender shouldn't know the mission,it's up to him to guess the attacker's intentions.
1
2
3
4
5
6
Blitz: The attackers try to wreck the water still vapour collecting vanes. The water still has aToughness of 6 and the raiders win if it's damagedby sustaining 1 or more ‘wounds’.
Bushwack: The raiders try to gun down theopposing Gang Leader. They win if the GangLeader is taken out of action. If the Gang Leader isunable to take part in the game, such as due to anOld Battle Wound, then re-roll this result.
Scrag: The attackers aim to ambush and ‘scrag’an enemy gang fighter who they have a personalgrudge against. The target gang fighter is chosen
randomly from the initially deployed defenders before the attackers are set up. The raiders win byputting the target fighter out of action in hand-to-hand combat.
Shoot Up: The raiders plan to make a passthrough the area, firing weapons in the air, whooping and yelling, and generally scaring thehell out of everyone. They win by setting up within 12" of one table edge and exiting at leastone model from the opposite edge.
Stick Up: The raiders try and steal the opposinggang’s loot. They win if a raider leaves the table
with it. The Loot counter can be picked up andmoved exactly as described in the Scavengerscenario. If successful the raiders gain D6x10credits to add to their income after the battle, andthe losers’ income is reduced by that amount.
Choose: The attacker can choose any of the fivemissions described above.

7/24/2019 Nec Community Edition
http://slidepdf.com/reader/full/nec-community-edition 92/101
114
NECROMUNDA
GANGSThe defender sets up first. He deploys D6 of his gangto represent fighters in the immediate area aroundthe gang’s camp. The defender chooses which fightershe wishes to deploy and may place them anywhere onthe table, but must be placed at least 8" away from atable edge. Special deployment rules cannot be used
by the defenders – eg Infiltration, Vents etc.
The attacker then deploys his gang anywhere on thetable but not within 12" of an enemy fighter.However, note that in the Shoot Up mission attackersmust be placed within 12" of one table edge.
The attacker has a randomly determined number ofgang fighters taking part in the Hit and Run. Roll aD6: 1-2 = 4 fighters, 3-4 = 5 fighters, 5-6 = 6 fighters.The remaining fighters are not available as they havebeen left behind so as not to draw attention to theraiding party and to protect the gang’s own territoryagainst reprisals. The attacker can choose which of his
fighters he will commit to the hit and run.
STARTING THE GAMEBoth players roll a D6. The highest scoring playertakes the first turn.
REINFORCEMENTS At the start of each of his turns after his first thedefender can bring reinforcements onto the table.Roll a D6 at the start of each turn after the first: 1-2 =up to 1 fighter, 3-4 = up to 2 fighters, 5-6 up to 3fighters. The fighters all arrive on the same table edge.To see what table edge they appear on, first nominatea number for each of the table sides, then roll a D6.On a roll of 1-4 the reinforcements arrive on the tableedge that corresponds with the nominated number.On a roll of 5-6 the defender can choose which tableedge they appear on. Defenders arriving at the start ofthe turn may move and fight normally that turn.
ENDING THE GAMEThe game ends once all the attackers are down, takenout of action, or have moved off a table edge. Thegame also ends if the attacker bottles out. If the gameends without the attackers fulfilling their objective
then the defending gang wins.
As the attackers have so few raiders and because theyare hyped up for the attack, the gang does not have totake Bottle rolls until it has lost 50% of its fightersrather than the usual 25%.
The defender is protecting his gang’s family, friendsor vital possessions, and so doesn’t have to takeBottle tests at all. The defender won’t bottle out inthis scenario and cannot bottle out voluntarily.
EXPERIENCEFighters who take part in the game – ie are deployed
on the table – earn Experience points as noted below.
+D6
+5
+10
Survives: If a fighter survives the battle then D6points are earned. Even fighters who are wounded and taken out of action receiveexperience for taking part.
Per Wounding Hit: A fighter earns 5 points foreach wounding hit he inflicts during the battle.Make a note on the gang roster every time thishappens as described in the Playing A CampaignGame section.
Winning Raider: Each surviving raider earns anextra 10 Experience points if the attackers win.

7/24/2019 Nec Community Edition
http://slidepdf.com/reader/full/nec-community-edition 93/101
115
NECROMUNDA
AMBUSH
The debris strewn ruins of the Underhive afford ample opportunity for gangs to ambush their rivals.
In the Ambush scenario one gang has set a trap forthe other. The ambushers must plan their ambush
very carefully, however, because if their opponentsare able to avoid it the hunters could very quicklybecome the hunted!
TERRAINIn this scenario the player who picked the scenario isthe attacker (the ambusher) and the other player isthe defender (whose gang is about to be ambushed).
Starting with the attacker, each player takes it in turnto place a piece of terrain, either a ruined buildingstructure or a connecting walkway. It is suggested thatthe terrain is set up within an area roughly 4' x 4'.
GANGSBefore setting up his gang the defender splits hisfighters into one or more groups each of two or moremodels. The defender chooses one group and placesit in the approximate centre of the table.
The attacker then sets up his entire gang. All theattacking fighters must set up behind cover and inhiding. They may not set up within 12" of a defendingfighter, but otherwise can be placed where you wish.
The defender then sets up the rest of his gang onegroup at a time. He nominates the group he wishes todeploy and rolls a D6. On a roll of 1-5 the fightersmust set up within 4" of one defender that has alreadybeen placed. On a roll of 6 the group may be placedanywhere on the table, though must still set up within4" of one another . This enables them to ambush theambushers! Special deployment rules cannot be usedby the defenders – eg Infiltration, Vents etc.
Note that although attackers may not set up within12" of a defender, this is not true of the defendingfighters who may set up within 1" of ambushers. Theycannot set up in hand-to-hand combat.
EXPERIENCEFighters who take part in the game – ie are deployed
on the table – earn Experience points as noted below.
+D6
+5
+10
Survives: If a fighter survives the battle then D6points are earned. Even fighters who are wounded and taken out of action receiveexperience for taking part.
Per Wounding Hit: A fighter earns 5 points foreach wounding hit he inflicts during the battle.Make a note on the gang roster every time thishappens as described in the Playing A CampaignGame section.
Winning Gang Leader: The Gang Leader of the
winning side earns an extra 10 Experiencepoints.
SPECIALIf the losing gang has at least three enemy modelstaken out of action, and suffers at least three times asmany casualties out of action as the opposing gang,then the winners can take over a random territoryfrom the losers. To randomly determine a piece ofterritory roll a D6 and count down from the top ofthe opposing player’s territory list, or use some othersuitable method.
STARTING THE GAME
Once both sides have completed their set-up thedefending player rolls a D6 for each group that he was allowed to place freely (that he rolled a 6 for). Ona total of 0-5 the attacking player gets the first turn.On a total of 6 or more the defender goes first.
ENDING THE GAMEIf a gang fails a Bottle roll, or a player voluntarilybottles out, the game ends immediately. The gangthat bottles out loses and the other gangautomatically wins the fight.

7/24/2019 Nec Community Edition
http://slidepdf.com/reader/full/nec-community-edition 94/101
116
NECROMUNDA
THE RAID
Gangs rely upon trading contacts and friends to generate their income, either by providing cash, food, shelter,or by trading things the gangs discover in the wastes. These are all known as territories, although someterritories actually take the form of contacts with third parties rather than physical places in the Underhive. A gang’s territories are always vulnerable to attack by other gangs, and one of the most effective ways of crushing
a rival gang is to raid its territories.
In the Raid scenario one gang attacks the territory ofanother. The territory is guarded by one or moresentries and additional reinforcements are close athand. The raiders must eliminate or get past thesentries, destroy the objective and then get away asquickly as possible.
This scenario introduces new rules for sentries whichmake the game particularly nail-biting. The scenario isslightly more complex than earlier ones and fornewer players it's worth leaving this scenario asideuntil you have a firm grasp of the game rules.
TERRAINIn this game the player who picked the scenario is theattacker and the other player is the defender.
Starting with the defender, each player takes it in turnto place a piece of terrain, either a ruined buildingstructure or a connecting walkway. It is suggested thatthe terrain is set up within an area 4' x 4' or thereabouts.
The tabletop represents the most valuable of thedefender’s territories. However, the attackers don'thave to raid the territory of highest value, instead the
attackers can choose any one of the defender'sterritories to raid. The terrain is either the territoryitself or the entrance to it (such as a mine or tunnelentrance, hole or water still) or a part of theUnderhive that a contact has asked you to protect orsearch in (such as a Guilder contact, Friendly Doc, theowner of a workshop, or friends in an Underhivesettlement.)
raid objective After the terrain is set up the defender places theGateway piece anywhere on the ground level of thetable. This represents the entrance way to the mine,
hole, tunnels etc. Possibly it leads to an undergroundstore containing a valuable find that one of thedefenders’ contacts has asked them to protect ortransport. Players should feel free to invent somethingthey feel is appropriate for the type of territory beingraided. The raiders must destroy the Gateway to winthe game.
The Gateway structure has a Toughness of 6 and cansustain the equivalent of 3 wounds. Once theGateway has been reduced to zero Wounds it countsas destroyed.
GANGSThe defender sets up first. He deploys up to D6 of hisgang as sentries, choosing which fighters he wishes toput on sentry duty. Sentries can be placed anywhereon the table at least 8" away from a table edge.
The attacker then deploys his gang within 8" of arandomly selected table edge. The attacker has arandom number of gang fighters taking part in TheRaid. Roll a D6: 1-2 = 4 fighters, 3-4 = 5 fighters, 5-6= 6 fighters. The remaining fighters are not availableas they have been left behind so as not to drawattention to the raiding party. The attacker can choose which of his fighters he will commit to the raid.Special deployment rules cannot be used by eithergang in The Raid scenario – eg Infiltration, Vents etc.
STARTING THE GAMEThe attacker takes the first turn of the game.
sentriesSentries move D6-3 inches per turn, rolling separatelyfor each sentry. If the distance is negative then theattacking player can move the sentry model instead,though cannot move him into an obviously harmfulposition (such as walk him straight off a ledge). Forexample, a roll of 1 gives a move of -2, so the attackermoves the sentry up to 2". Note if a 3 is rolled thenthe sentry remains facing the same way.
SOUNDING THE ALARMUntil the alarm is sounded sentries move as describedabove, their Weapon Skill is halved and they cannotshoot or do anything else. After the alarm is soundedsentries can move and attack as normal. The alarmcan be sounded in a number of different ways:
Spotting: Roll a D6 at the start of the defender’s turn.Sentries can try to spot any raiders that are withintheir Initiative distance multiplied by the dice score solong as they could normally be seen – ie they are within his arc of sight and not hidden. Raiders in theopen will be spotted on a roll of 2+. Raiders in partialcover will be spotted on a D6 roll of 4+. Raiders incover w ill be spotted on a D6 roll of a 6.
Sentries will spot any raider within their Initiativedistance in inches r egardless of cover or hiding.

7/24/2019 Nec Community Edition
http://slidepdf.com/reader/full/nec-community-edition 95/101
117
NECROMUNDA
Raiders are also spotted if they move within sight of asentry during their own turn. The sentry’s spottingrange being the same as in his turn.
If a sentry spots a raider or is hit by a ranged attackand isn't taken down then he sounds the alarm if hesurvives the turn. Sentries taken out of action cannotgive the alarm. Sentries that end the turn down sound
the alarm on a roll of 4+. If at the end of the turn asentry can see a persistent template (e.g. a smokecloud) then he sounds the alarm on a roll of 4+.
Shooting: If a fighter shoots a weapon, roll 2D6 andadd the weapon’s Strength to the score. If the result isover 10 then the alarm is sounded. However, this ruledoes not apply to silent weapons, or any weapons without a Strength. Note that shooting can sound thealarm even if there are no sentries left.
Fighting: A sentry who is attacked in hand-to-handcombat will sound the alarm if he survives the turn. Ifthe raider shoots a pistol or uses a chainsword in
hand-to-hand combat then you must roll as describedabove to see whether the shots sound the alarm evenif the sentry is killed.
The noise of fighting may also cause the alarm to besounded even if the sentry doesn’t survive to do sohimself. Roll a D6. If the score is not more than thenumber of raiders fighting in the hand-to-handcombat then the scuffle has been noticed and thealarm is sounded. For example, if three raiders mug asentry then a roll of 4+ will not sound the alarm.
Gateway: The alarm is automatically sounded if theGateway is destroyed.
Note although it's possible to set off the alarm mid-turn, the special sentry rules still apply until the endof that turn.
REINFORCEMENTS At the start of the game the defender divides anyfighters not deployed as sentries into groups of oneor more models as he sees fit. These fighters are notset up on the table, but can enter as reinforcements.
Once the alarm is sounded the defender can attemptto bring on one group of reinforcements per turn.Nominate the group you wish to bring on and roll a
D6. If the roll equals or beats the number of modelsin the group, or on the roll of a 6, then the group mayenter the table. If the dice roll required to enter is lessthan the size of the group then no reinforcementsenter that turn. As you can see, the larger the groupthe less likely it is to enter, so the defender must tryto enter as many models as he dares each turn.
Reinforcements enter together on any of the threetable edges other than the edge where the attackerdeployed. Roll a D6 to determine which edge theyenter as shown on the diagram. Reinforcementscannot be placed within 8" of an attacker but can
move and fire normally on the turn they are placed.
Attacker's Edge
3-6
1 2
ENDING THE GAMEThe game ends if the Gateway is destroyed and allsurviving raiders leave the table by the edge wherethey originally set up. The game also ends if all theraiders are down or taken out of action or if theattacker bottles out.
As the attackers have so few raiders and because theyare hyped up for the attack, the gang does not have totake Bottle rolls until it has lost 50% of its fightersrather than the usual 25%.
The defender is protecting his gang’s family, friendsor vital possessions, and so doesn’t have to takeBottle tests. The defender won’t bottle out in thisscenario and cannot bottle out voluntarily.
If the Gateway is destroyed then the attackers win thegame otherwise the defenders win.
EXPERIENCEFighters who take part in the game – ie are deployedon the table – earn Experience points as noted below.
+D6
+5
+5
+10
Survives: If a fighter survives the battle then D6points are earned. Even fighters who are wounded and taken out of action receiveexperience for taking part.
Per Wounding Hit: A fighter earns 5 points foreach wounding hit he inflicts during the battle.Make a note on the gang roster every time thishappens as described in the Playing A CampaignGame section.
Destroy Gateway: A raider earns 5 points if heinflicts a hit which destroys the Gateway.
Successful Defence: If the defender wins thenhis Gang Leader earns 10 Experience points.
SPECIALIf the Gateway was destroyed then roll a D6. On a 1-4the territory is disrupted. It cannot be worked afterthe battle and confers no bonuses, but it can be worked again in subsequent games. On a 5 theterritory is damaged. It cannot be worked after thebattle and confers no bonuses. The territory must alsobe repaired so cannot be worked until D3 games havepassed. On a 6 the territory is destroyed and must bestruck from the gang roster.

7/24/2019 Nec Community Edition
http://slidepdf.com/reader/full/nec-community-edition 96/101
118
NECROMUNDA
RESCUE MISSION
Gang fighters injured during a battle can easily fall into the hands of the enemy. Even a victorious gang can discover that one of its fighters has staggered unwittingly into the clutches of their rivals. Rather than kill theircaptives, gangs will normally ransom them for a price. If a gang cannot pay the ransom, or simply refuses to,then the captive can be sold as a slave or forced into the mines to toil for his new masters.
This scenario represents a rescue mission. One of your gang fighters has been captured and you havediscovered where he is being held. A small group ofraiders is poised to mount a daring rescue bid.
This scenario can only be chosen when one of yourgang members has been captured by your opponent.Before rolling on the Scenario Table the player whohas lost his fighter may attempt a rescue rather thanpay a ransom. If the player refuses to attempt a rescuethen a roll is made on the Scenario Table as normal. Except where noted otherwise below the rules are the
same as for the Raid scenario already described. Notethe Gateway is not used in a Rescue scenario.
THE PRISONER When he sets up his gang the defending player placeshis captives anywhere he likes on the table. Theprisoner s may not move until they are freed. Thedefender is not allowed to attack or ‘execute’ hisprisoner, but must attempt to drive off the rescuers.Once the captive is freed he may be attacked or shotat like any other fighter.
A prisoner is rescued and free to move and fight once
cut free by a friendly fighter. The friend moves intobase contact with the captive and spends the rest ofthe turn cutting him free. He may not shoot, fighthand-to-hand, or do anything else during the turn.Note the captive has no weapons or other equipmentapart from any bionics, but is given a knife by hisliberator. It's assumed his equipment is scooped upinto a bag and cannot be used during the game.
ENDING THE GAMEThe game ends if all the captives and attackers areeither down, out of action or leave the table edge which the attackers were deployed from. The gamealso ends if the attacker bottles out. The defender isguarding his gang’s hideout so doesn’t have to takeBottle rolls and cannot bottle out voluntarily. Theattackers are hyped up for the attack so the gang doesnot have to take Bottle rolls until it has lost 50% of itsfighters rather than the usual 25%.
If all captives are rescued then the attackers win thegame otherwise the defenders win. If any prisonersare not rescued then another attempt cannot be madeand they may be sold to the guilders as a slave.
EXPERIENCEFighters who take part in the game – ie are deployedon the table – earn Experience points as noted below.
+D6
+5
+5
+10
Survives: If a fighter survives the battle then D6points are earned. Even fighters who are takenout of action receive experience for taking part.
Per Wounding Hit: A fighter earns 5 points for
each wounding hit he inflicts. Make a note everytime this happens as described in the Playing ACampaign Game section.
Free Captive: A raider earns 5 points if he cutsthe captive free.
Successful Defence: If the defenders win thentheir Gang Leader earns 10 Experience points.

7/24/2019 Nec Community Edition
http://slidepdf.com/reader/full/nec-community-edition 97/101
119
NECROMUNDA
SHOOT OUT
Settlements of any significant size are regarded as neutral territory by gang fighters and other Underhivers alike. The Guild traders take a dim view of gangs who bring their disputes into town – especially when innocentcustomers get hurt and property damaged. Existence in the Underhive is precarious enough without the added danger of rampaging gangs using local settlements as battlegrounds. Only outlaw gangs pay no heed to this
unwritten code, shooting up settlements, killing Underhivers and robbing drinking holes.
In this scenario fighters from two rival gangs meet in asmall wastezone settlement. The situation is tensebecause neither side wants to be seen breaking thepeace. The locals hide behind closed doors, fearfulthat a firefight may develop. Meanwhile the fightersconverge from opposite sides of the settlement. Asthey catch sight of each other they prepare to standtheir ground, neither willing to give w ay, but not
wishing to be seen drawing a weapon first. Soon theystand almost face to face, hands hovering above guns,eyes fixed intently upon their targets.
The objective of the Shoot-out scenario is not to drawa weapon before your enemy. At the same time youmust entice your rival to draw first and then drive himout of town with your return fire.
TERRAINThe terrain represents a small wastezone settlement.Each player takes it in turn to place a piece of terrain,either a ruined building or a connecting walkway.Terrain that blocks line of sight cannot be placed inbetween the two gangs. It is suggested that the terrainis set up within an area 4' x 4' or thereabouts.
GANGSEach player rolls a D6 to see how many of his gangare present: 1-3 = 3 fighters, 4-5 = 4 fighters, and 6 =5 fighters. These models are randomly selected fromthe gang – ie you cannot choose the fighters involved.
The two gangs are set up 16" apart at ground leveland in a position where they are in full view of eachother. Roll a dice to decide which side sets up first.Each gang must set up in a small group with nomodel more than 1" away from any other model.Special deployment rules cannot be used by either
gang – eg Infiltration, Vents etc.
THE BUILD-UPThe build-up to a shoot-out is a tense affair. Torecreate the tense atmosphere at the start of ashootout a special series of turns called the build-upis used.
Each turn of build-up has its own sequence of play.First both sides move, then both sides test to keeptheir nerve as described below. If both sides pass thistest then proceed to the next turn, and so on, untilone side loses its nerve, at which point the hecticshooting begins!
During the build-up both gangs move at the sametime rather than one after the other. The fighters walkslowly and deliberately towards each other untilsomebody’s nerve fails and guns are drawn. Torepresent this, gang fighters must mov e 1" per turn.Fighters must move towards the enemy and may notmove into cover. Once models are within 4" of theenemy they stop. Players take it in turn to move onemodel, starting with the player that has the most.
After both sides have moved each player must make aNerve roll. Each player rolls a D6 and writes down thescore. At the end of the next move each player makesanother Nerve roll, and adds it to their previousturn’s score. Both players keep on rolling a dice at theend of each move and adding it to their score untilone player’s total score goes over 15.
Important: A roll of ‘6’ counts as ‘0’ when making anerve roll, so if you roll a 6 your score stays the sameas it was on the previous turn.
Once a player’s score goes over 15 his gang’s nervehas cracked and they go for their guns (see The FastDraw below). If both players’ scores go over 15 onthe same turn then the player who has the highest
total score is the one that is assumed to have gone forhis guns first. If both players have exactly the samescore, then they both go for their guns at exactly thesame moment!
Assuming that one player drew first, then each of theopposing gang fighters gets a number of Experiencepoints equal to the difference between the twoplayers’ scores, to represent the fact that they haveheld their nerve in the face of great danger. Forexample, if one player ended up with a total of 14points and his opponent had a total of 17, then eachganger belonging to the player with the lower score
would get 3 Experience points.

7/24/2019 Nec Community Edition
http://slidepdf.com/reader/full/nec-community-edition 98/101
120
NECROMUNDA
THE FAST DRAWOnce a fighter goes for his gun everyone draws their weapons and the shooting starts. For a second or twoall hell breaks loose as guns are drawn and shotsfired. This is called the fast draw. During the fast drawneither side can move but both sides can makeranged attacks, such as shoot or lob a grenade.
In the fast draw both sides can shoot but the order in which individual models shoot is determinedseparately. To decide the firing order roll a D6 foreach model and add the fighter’s Initiativecharacteristic to the score. Then add +1 if the fighteris not equipped with any basic, special or heavy weapons and subtract -1 if armed with a heavy weapon. The result is the fighter’s Fast Draw score.
Work out the Fast Draw score for each fighter – thefighter with the highest score shoots first. Work outthe shot exactly as you would normally. However, anynerve tests due to friendly fighters going down or out
of action are only taken after the Fast Draw hasended. Once the first model has shot, the next highestscore shoots, then the next, and so on. In the case ofa tie all shots are assumed to be simultaneous. Thismeans that it is possible for two gang fighters to shooteach other at the same time! Fighters who are hitbefore they get a chance to fire lose their shot.
Once all fighters have shot the normal sequence ofplay resumes. Each player rolls a D6, and the playerthat scores the highest gets the first turn.
ENDING THE GAME
The game ends if one side fails a Bottle roll, or volunteers to bottle out. The other side automatically wins the shoot-out and the bottling gang loses.
SPECIALIf you win the shoot-out and the defeated gang drewfirst, roll a D6. On a roll of 1-5 your opponent canonly draw half his normal income following the fightas his gang’s contacts are reluctant to deal with thetroublemaker. On a roll of 6 the defeated gang drawshalf its normal income and must surrender onerandom territory to the winner – associates of thegang no longer have faith in its leadership.
EXPERIENCEFighters who take part in the game – ie are deployedon the table – earn Experience points as noted below.
+D6
+5
+?
+D6
Survives: If a fighter survives the battle then D6points are earned. Even fighters who are
wounded and taken out of action receiveexperience for taking part.
Per Wounding Hit: A fighter earns 5 points foreach wounding hit he inflicts during the battle.Make a note on the gang roster every time thishappens as described in the Playing A CampaignGame section.
Held Nerve: Each surviving gang fighter of theside that held their nerve the longest scores anumber of victory points equal to the differencebetween the two sides’ scores (see The BuildUp rules above).
Winning Side: Each surviving fighter on the winning side earns an extra D6 points.

7/24/2019 Nec Community Edition
http://slidepdf.com/reader/full/nec-community-edition 99/101
NECROMUNDA
121
THE HOARD
The Underhive settlements are full of gangers passing the time of day in the drinking holes, trade posts and gambling dens. They wait for rumours of ore strikes, caravan raids and any information that might lead themto a fortune. Rumours, real or false, spread faster than rat pox and when news of a newly discovered valuable hoard becomes common knowledge it's a race against time to secure and loot the hoard before rival gangs can
seize control.
The Hoard scenario represents one gang's lucrativediscovery being attacked by a rival gang beforereinforcements have arrived to secure and loot thehoard. It could also represent a gang being hired bythe guilders to protect something of value with theopposing gang launching a daring raid to get oneover on their rivals.
TERRAINIn this scenario the player who picked the scenario isthe attacker and the other player is the defender.
Firstly the defender must choose a table edge andplaces a loot counter to represent the hoard 18" awayfrom that edge in the middle. Starting with thedefender, each player then takes it in turn to place apiece of terrain, either a ruined building structure ora connecting walkway. It is suggested that the terrainis set up within an area roughly 4' x 4'.
GANGSThe defender has a randomly determined number ofgang fighters initially protecting the hoard. Roll a D6to see how many models this is: 1-2 = 3 fighters, 3-4
= 4 fighters, 5-6 = 5 fighters. The chosen gangmembers are placed anywhere on the table but mustbe within 6" of the loot counter. The defenders canalso choose to start the game on overwatch.
The attacker then sets up his entire gang within 8" ofthe opposite table edge.
STARTING THE GAMEThe attacker takes the first turn of the game.
REINFORCEMENTS After the defender's first turn there is a chance the rest
of the gang will show up to help defend the hoard. Atthe start of each of the defender's subsequent turns,roll a D6. On the first roll, a score of 6 will result inthe reinforcements arriving. The remainder of thegang can enter anywhere along the defender's tableedge and can move and fight normally from that turnonwards. If the reinforcements don't show up theneach subsequent roll receives a cumulative +1modifier. So for example, if the reinforcements fail toshow up the first time then they will show up at thestart of the following turn on a roll of 5+, and a rollof 4+ on the turn after that, and so on.
ENDING THE GAMEIf a gang fails a Bottle roll, or a player voluntarilybottles out, the game ends immediately. The gangthat bottles out loses and the other gang wins thefight. However, the defenders don't start taking Bottletests until their reinforcements have arrived.
EXPERIENCEFighters who take part in the game – ie are deployedon the table – earn Experience points as noted below.
+D6
+5
+10
Survives: If a fighter survives the battle then D6points are earned. Even fighters who are
wounded and taken out of action receiveexperience for taking part.
Per Wounding Hit: A fighter earns 5 points foreach wounding hit he inflicts during the battle.Make a note on the gang roster every time thishappens as described in the Playing A CampaignGame section.
Successful Defence: If the defender wins thentheir Gang Leader earns 10 Experience points.
SPECIALThe winning gang takes control of the valuable hoard
which is worth 3D6x5 credits. The income generatedis added to the income from the gang's territories.
THE HOARDThe hoard is represented by a loot counter, thoughit's recommended you model your own gleamingtreasure trove to represent it. The hoard cannot bepicked up, destroyed or affected in any way. Fightersclose to the hoard are naturally emboldened by itspresence and are much more willing to fight on tosecure its contents. To reflect this, any models within6" of the hoard temporarily gain the Iron Will andNerves of Steel skills.

7/24/2019 Nec Community Edition
http://slidepdf.com/reader/full/nec-community-edition 100/101
NECROMUNDA
122
Package Run
The Underhive regions beyond the reach of the relatively civilised settlements are lawless deadzones wheremarauding outlaws terrorise those that dare venture through them. Merchants are especially vulnerable toraiders so they regularly pay the gangs to deliver their wares to hivers in nearby settlements. These contractscan be lucrative so gangs employ all manner of strategies to secretly and safely make delivery, but occasionally
a rival can be tipped off about a planned package run. Ambushing gangs that steal merchant packages eitherransack its contents or deliver it for themselves to receive the waiting fee and make a score against the other gangs.
The Package Run scenario represents a group ofgangers hoping to ambush the package runners andattempt to steal the wares for themselves.
TERRAINIn this scenario the player who picked the scenario isthe attacker and the other player is the defender.
Starting with the defender, each player takes it in turn
to place a piece of terrain, either a ruined buildingstructure or a connecting walkway. The area of ruinsrepresents the defenders’ hideout. It is suggested thatthe terrain is set up within an area of roughly 4' x 4'.
GANGSThe attacker has a randomly determined number ofgang fighters taking part. Roll a D6: 1-2 = 4 fighters,3-4 = 5 fighters, 5-6 = 6 fighters. The attacker canchoose which fighters to commit and are deployed within 24" of a chosen table edge. They must start thegame behind cover and in hiding.
A randomly determined number of defending fighters
are attempting to deliver the package. Roll a D6: 1 =3 fighters, 2-3 = 4 fighters, 4-5 = 5 fighters, 6 = 6fighters. The defender chooses which gang fighters will take part and deploys them within 8" of theopposite table edge. Special deployment rules cannotbe used by the defenders – eg Infiltration, Vents etc.
Before the game starts the defender must give each ofhis fighers a loot counter. One of these loot countersis the real package, the rest are decoys.
STARTING THE GAMEThe defender takes the first turn of the game.
The PackageThe real package is well concealed by the runners sothe attacking gang has no way of knowing which ofthe defenders has it until they are searched. Both thepackage and decoys follow all of the usual rules forloot counters (refer to the Scavengers scenario fordetails). Only when an attacking fighter picks up aloot counter can it be flipped over to find out whether it's the real package or a decoy. Decoys areremoved from the game when found. Once the realpackage is found all decoys are also removed.
ENDING THE GAMEThe game ends if a gang member holding the packagemoves off the attacker's table edge. The gang inpossession of the package wins and the opposinggang loses. The game also ends if a gang bottles out.The bottled gang loses and the opposing gang wins.
The defenders are eager to fulfil their lucrativecontract so do not start taking Bottle rolls until atleast 50% of the gang have gone down or out ofaction. If a gang member is currently in possession of
the package then that gang does not take any Bottlerolls and cannot bottle out voluntarily.
EXPERIENCEFighters who take part in the game – ie are deployedon the table – earn Experience points as noted below.
+D6
+5
+10
Survives: If a fighter survives the battle then D6points are earned. Even fighters who are wounded and taken out of action receiveexperience for taking part.
Per Wounding Hit: A fighter earns 5 points foreach wounding hit he inflicts during the battle.
Make a note on the gang roster every time thishappens as described in the Playing A CampaignGame section.
Successful Delivery: If a defender with thepackage moves off the attacker's table edge thenthe fighter earns 10 Experience points.
SPECIALThe winning gang can ransack or deliver the package which is worth D6x10 credits. The income generatedis added to the income from the gang's territories.
It is possible, and encouraged, for the defender toplay all sorts of mind tricks to confuse the attackers.For example, you could pretend for a ganger to handover the package to a runner, perhaps with multipleswitches taking place, who promptly makes a maddash for the table edge. The attacking player mustreact but only later finds out it was all one bigdistraction, it was actually the plucky juve who snuckacross from the other side of the table and was
carrying the package all along!

7/24/2019 Nec Community Edition
http://slidepdf.com/reader/full/nec-community-edition 101/101
NECROMUNDA
Blind Fight
Outside of the Underhive settlements and their connecting hiveways, many of the domes beneath Hive City are swathed in pitch black. Gang fighters are well-versed to moving and fighting in gloomy conditions, but poorlight is still a good deal better than no light and even veteran gangers think twice before venturing out to fightin an area of total darkness. The gangs have learnt that the darkness can not only be a dangerous enemy, but
also a valuable ally. After all, if you can't see the enemy then surely they can't see you too, or can they?
It's uncommon for gangs to meet in domes shroudedin total darkness, though it isn't unheard of. The inkyblackness offers the perfect cover for sneaking aroundthus allowing gangs to continue about their businessundisturbed. Newly discovered lucrative hoards areoften uncovered in dilapidated lightless domes, andgangs equipped with specialist photo-devices caneasily get the jump on their unprepared r ivals.
If a player picks the Blind Fight scenario then roll aD6 to find out in what circumstances the gangs meet.
1
2
3-4
5-6
Hit & Run
Scavengers
The Hoard
Ambush
The scenario is fought using the usual rules for itstype, however, to reflect the blind conditions thefollowing rules also apply.
VISION A gang would never venture out in total darknessunprepared. All Underhivers make use of cheap
commonly available devices, such as blue-lights andphotonoculars, which allow them to see a few metresin front of them. During a Blind Fight scenario, gangfighters are only able to see within a distance of 12".This means enemy models beyond this range cannotbe shot at nor charged.
RUNNINGRunning in pitch black is fraught with danger. Therubble strewn floors, overhanging girders and broken walkways are all hazards to runners that are difficultto see until it's too late.
If a model attempts to run or charge then the playermust first nominate the path he will take before thenrolling 2D6. If the number rolled is equal to or morethan the number of inches that the model wouldmove, then he safely traverses the path and cancontinue his turn as normal. However, if the numberis less than the total number of inches then he tripsup and hits the dirt. The model trips at the pointalong the path equal to the number of inches rolled. A fighter that trips is unharmed but cannot finish themove or do anything else that turn. If he trips within1" of a ledge then he must also test to fall. If he 'trips'in mid air then he counts as falling from that point.
Any fighters that are using photo-contacts roll 3D6instead of 2D6 when testing to see if they trip While
Some specialist gear is designed to augment a fighter's vision in total darkness, though since there isn't muchlight to begin with they don't help a great deal.
A model wearing photo-contacts has a vision range of18", while a fighter wearing a photo-visor has a visionrange of 24". A fighter wearing infra-red goggles canalways see enemy models, as can a fighter using aninfra-red scope.
Models that are on fire can always be seen. If a fighteris using a red-dot laser sight then his target can spotthe dot on a roll of 4+ instead of 6.