Embed Size (px)
Citation preview

Natural Engineer
Version 8.2
Advanced Services

Manual Order Number: NEE82-017WIN
Copyright © February 2014, Generation Systems Ltd., East Grinstead, UK.
This document applies to Natural Engineer version 8.2 and to all subsequent releases.
Specifications contained herein are subject to change, and these changes will be reported in
subsequent revisions or editions.
Readers’ comments are welcomed. Comments may be addressed to the Documentation Department at
the address on the back cover. Internet users may send comments to the following e-mail address:
Acknowledgements
Adabas, Natural and all other referenced Software AG products are either trademarks or registered
trademarks of Software AG.
Microsoft, Windows, Windows NT, Visio and Visual Basic are either trademarks or registered
trademarks of Microsoft Corporation in the United States and/or other countries.
IBM, CICS, z/OS, z/VSE and WebSphere are either trademarks or registered trademarks of the IBM
Corporation in the United States and/or other countries.
Sun, iPlanet and Solaris are either trademarks or registered trademarks of Sun Microsystems
Corporation in the United States and/or other countries.
Netscape is a trademark or registered trademark of the Netscape Communications Corporation in the
United States and/or other countries.
All other trademarks and registered trademarks are the sole property of their respective owners.

I
TABLE OF CONTENTS
ABOUT THIS MANUAL ....................................................................................... 1
Purpose of this manual ............................................................................................................... 1 Target Audience ......................................................................................................................... 1 Typographical Conventions used in this manual .......................................................................... 2 How this manual is organized ..................................................................................................... 3 Terminology .............................................................................................................................. 4 Related Literature ....................................................................................................................... 7
NATURAL FOR AJAX CONVERSION ............................................................... 9
Chapter Overview ...................................................................................................................... 9 Natural for Ajax Conversion Overview ..................................................................................... 10 Natural for Ajax Conversion Workflow Window ...................................................................... 11 Separate Processing Rules from Maps....................................................................................... 14 Natural Map Extraction ............................................................................................................ 15 Inline Map Extraction ............................................................................................................... 19 Cross-Reference to Adapters .................................................................................................... 23 Code Conversion ...................................................................................................................... 30
REFACTORING .................................................................................................. 35
Chapter Overview .................................................................................................................... 35 Preparation Tasks ..................................................................................................................... 36 Preparation Tasks Processes ..................................................................................................... 40 Reporting to Structured Mode Conversion ................................................................................ 41 Separate Processing Rules from Maps....................................................................................... 42 Convert Back References to Labels........................................................................................... 54 Check for Redundant Code ....................................................................................................... 57 Check for Conversational Database Loops ................................................................................ 60 Check for Unused Variables ..................................................................................................... 63 Expand Copycodes ................................................................................................................... 66 Componentization .................................................................................................................... 75 Component Builder .................................................................................................................. 77 Similar Code Identifier ............................................................................................................. 84 Database Split .......................................................................................................................... 92 Data Definition Module Selection ............................................................................................. 94 User View Analysis .................................................................................................................. 99 Refactor Database Access ....................................................................................................... 100

Natural Engineer Advanced Services
II
BUSINESS RULES ............................................................................................ 105
Chapter Overview .................................................................................................................. 105 Business Rules Overview ....................................................................................................... 106 Business Rules Workflow ....................................................................................................... 107 Rule Type Maintenance .......................................................................................................... 109 Candidate Creation ................................................................................................................. 112 Candidate Maintenance........................................................................................................... 115 Rule Definition ....................................................................................................................... 118 Component Generation ........................................................................................................... 127
INDEX ................................................................................................................ 133

1
ABOUT THIS MANUAL
Purpose of this manual
This manual contains the full documentation for the Advanced Services functions within
Natural Engineer.
Advanced Services provides the facility to apply and impose standards onto Natural
objects and reorganize the internal structure of Natural applications.
The topics covered are:
Natural for Ajax Conversion.
The individual Refactoring processes required to successfully reorganize the internal
structure of Natural applications.
Business Rules.
Target Audience
The target audience for this manual is intended to be any User of Natural Engineer at any
level of experience.

Natural Engineer Advanced Services
2
Typographical Conventions used in this manual
The following conventions are used throughout this manual:
UPPERCASE
TIMES
Commands, statements, names of programs and utilities referred to in text paragraphs appear in normal (Times) uppercase.
UPPERCASE BOLD
COURIER In illustrations or examples of commands, items in uppercase bold courier must be typed in as they appear.
< > Items in angled brackets are placeholders for user-supplied information.
For example, if asked to enter <file number>, you must type the number of the required file.
Underlined Underlined parts of text are hyperlinks to other parts within the online source manual. This manual was written in MS-Word 97 using the "hyperlink" feature.
The following symbols are used for instructions:
Marks the beginning of an instruction set.
Indicates that the instruction set consists of a single step.
1. Indicates the first of a number of steps.

About this Manual
3
How this manual is organized
This manual is organized to reflect all the Advanced Services functions of Natural
Engineer in the following chapters:
Chapter Contents
1 Describes the Natural for Ajax Refactoring processes.
2 Describes the individual Refactoring processes used to reorganize the internal structure of Natural applications.
3 Describes the Business Rules processes to identify Natural code that are applicable to user defined Business Rules.

Natural Engineer Advanced Services
4
Terminology
This section offers some of the terms that are specific to the Natural Engineer product.
Note: Familiarity is assumed with the general terminology of Natural, Adabas, Microsoft
and Mainframe operating systems.
Analysis
The Analysis process of Natural Engineer searches application data within the Natural Engineer Repository, according to specified Search Criteria and generates reports on the search results.
Application
An Application is a library or group of related libraries, which define a complete Application. In
Natural Engineer, the Application can have a one-to-one relationship with a single library of the same name, or a library of a different name, as well as related steplibs. The Application refers to all the source code from these libraries, which Natural Engineer loads into the Repository.
Browser
An Internet Browser such as Microsoft Internet Explorer or Netscape.
Candidate
Candidates are used within the Business Rules processes. A Candidate is a piece of Natural Code that…..
Category
Categories in Natural Engineer specify whether and how a Modification is applied to the Natural code. Valid categories are: Automatic change, Manual change, Reject the default Modification, No change to the data item, and the data item is in Generated Code.
A category is further broken down according to type of change (for example: Keyword, Literal, Data Item, Database Access, Definition).
Cobol
Abbreviation of Common Business Orientated Language. A programming language.
Cobol Link
A Cobol Link is the link between the individual Cobol modules and the executable Cobol program referenced in the JCL object.
Consistency
An option in the Analysis process that causes Natural Engineer to trace an Impact through the code, using left and right argument resolution to identify further code impacted by the code found.

About this Manual
5
Database Access Definition
A collective term used to identify DDMs, SQL Tables or Predict User Views.
Data Item
A collective term used for any data fields within a programming object. These can be user-defined variables, DDM fields or System Variables. It is inter-changeable with the term ‘variable’.
Environment
The Environment process is the means by which Natural Engineer generates a structured view of the
application code in the Natural Engineer Repository. This provides application analysis reports and inventory information on the application and is used as the basis for Impact Analysis.
Exception
An Exception is an Item identified as impacted that does not require a Modification. Where there are a few similar Exception Items, they can be treated as Exceptions, and rejected in the Modification review process. Where there are many similar (therefore not Exceptions), consideration should be given to changing the Search Criteria so they are not identified as impacted in the first place.
Generated Code
This is code which has been generated by a Natural code generator, such as Construct, and which is not normally modified directly in the Natural editor.
Impact
An Impact is an instance of a Natural code Item; e.g., data item or statement (a “hit” scored by the Analysis process) that matches the defined Search Criteria used in the Analysis process.
Iteration
An Iteration is one examination cycle of a field identified according to the specified Search Criteria.
For example, one Iteration is reading the field right to left. Multiple Iterations are performed when the option of ‘Consistency’ or Multi Search is requested for Analysis, and Natural Engineer performs as many Iterations as necessary to exhaust all possibilities of expressing and tracing the field, and can be limited by a setting in the NATENG.INI file.
JCL
Job Control Language.
JCL object
A JCL object is a collection of Job Control statements in the order which they are to be executed in a mainframe batch environment. Commonly referred to as JCL.
Library
A single library of source code, which exists in the Natural system file.

Natural Engineer Advanced Services
6
Modification
A Modification is a change suggested or made to an object or data item resulting in the required compliance of that object or data item. Modifications in Natural Engineer are classified according to Category and Type.
Refactoring
Improving a computer program by reorganizing its internal structure without altering its external behavior.
Soft Link
A Soft Link is where a link between two objects has been defined using an alphanumeric variable rather than a literal constant.
TLM
Text Logic Members are used to contain the code required to support inclusion of common code into the application. An example of this is the code to include into an application before updating a database.
Type
The Type of Modification available, for example: Data Item, Keyword and Literal.
Variable
A collective term used for any data fields within a programming object. These can be user-defined variables, DDM fields or System Variables. It is inter-changeable with the term ‘data item’.

About this Manual
7
Related Literature
The complete set of Natural Engineer manuals consists of:
1 Natural Engineer Concepts and Facilities (NEE82-006ALL)
The Concepts and Facilities manual describes the many application systems problems and
solutions offered by Natural Engineer, providing some guidelines and usage that can be applied to Natural applications.
2 Natural Engineer Release Notes (NEE82-008ALL)
The Release Notes describe all the information relating to the new features, upgrades to existing functions and documentation updates that have been applied to Natural Engineer.
3 Natural Engineer Installation Guide (NEE82-010ALL)
The Installation Guide provides information on how to install Natural Engineer on both PC and mainframe platforms.
4 Natural Engineer Administration Guide (NEE82-040WIN)
Natural Engineer Administration Guide (NEE82-040MFR)
The Administration Guide provides information on all the various control settings available to control the usage of the different functions within Natural Engineer.
5 Natural Engineer Application Management (NEE82-020WIN)
Natural Engineer Application Management (NEE82-020MFR)
The Application Management manual describes all the functions required to add Natural applications into the Repository.
6 Natural Engineer Application Documentation (NEE82-022WIN)
Natural Engineer Application Documentation (NEE82-022MFR)
The Application Documentation manual describes all the available functions to document a Natural application within the Repository. These functions will help enhance / supplement any existing systems documentation such as BSD / CSD / Specifications etc.
7 Natural Engineer Application Analysis and Modification (NEE82-023WIN)
Natural Engineer Application Analysis and Modification (NEE82-023MFR)
The Application Analysis and Modification manual describes all the available functions to
carry out analysis of Natural applications; including basic keyword searches. The modification process is described and detailed to show how it can be applied to modify single selected objects within a Natural application, or the entire Natural application in one single execution.

Natural Engineer Advanced Services
8
8 Natural Engineer Application Restructuring (NEE82-024WIN)
Natural Engineer Application Restructuring (NEE82-024MFR)
The Application Restructuring manual describes the analysis and modification functionality required to carry out some of the more sophisticated functions such as Object Builder.
9 Natural Engineer Utilities (NEE82-080WIN)
Natural Engineer Utilities (NEE82-080MFR)
The Utilities manual describes all the available utilities found within Natural Engineer and, when and how they should be used.
10 Natural Engineer Reporting (NEE82-025ALL)
The Reporting manual describes each of the reports available in detail, providing report layouts, how to trigger the report and when the report data becomes available. The various report-producing mediums within Natural Engineer are also described.
11 Natural Engineer Batch Processing [Mainframes] (NEE82-026MFR)
The Batch Processing manual describes the various batch jobs (JCL) and their functionality.
12 Natural Engineer Messages and Codes (NEE82-060ALL)
The Messages and Codes manual describes the various messages and codes produced by Natural Engineer.
13 Natural Engineer Advanced Services (NEE82-017WIN)
The Advanced Services manual describes various advanced options such as the Refactoring of Natural application source code with Natural Engineer, conversion of applications for Natural for Ajax and Business Rule processing.

9
1 NATURAL FOR AJAX CONVERSION
Chapter Overview
This chapter describes the Natural for Ajax Conversion option available from the
Refactoring option on the Advanced Services menu.
The following topics are covered:
1. Natural for Ajax Conversion Overview
2. Natural for Ajax Conversion Workflow
3. Separate Processing Rules from Maps
4. Natural Map Extraction
5. Inline Map Extraction
6. Cross-Reference to Adapters
7. Code Conversion
Natural Engineer Advanced Services
10
1
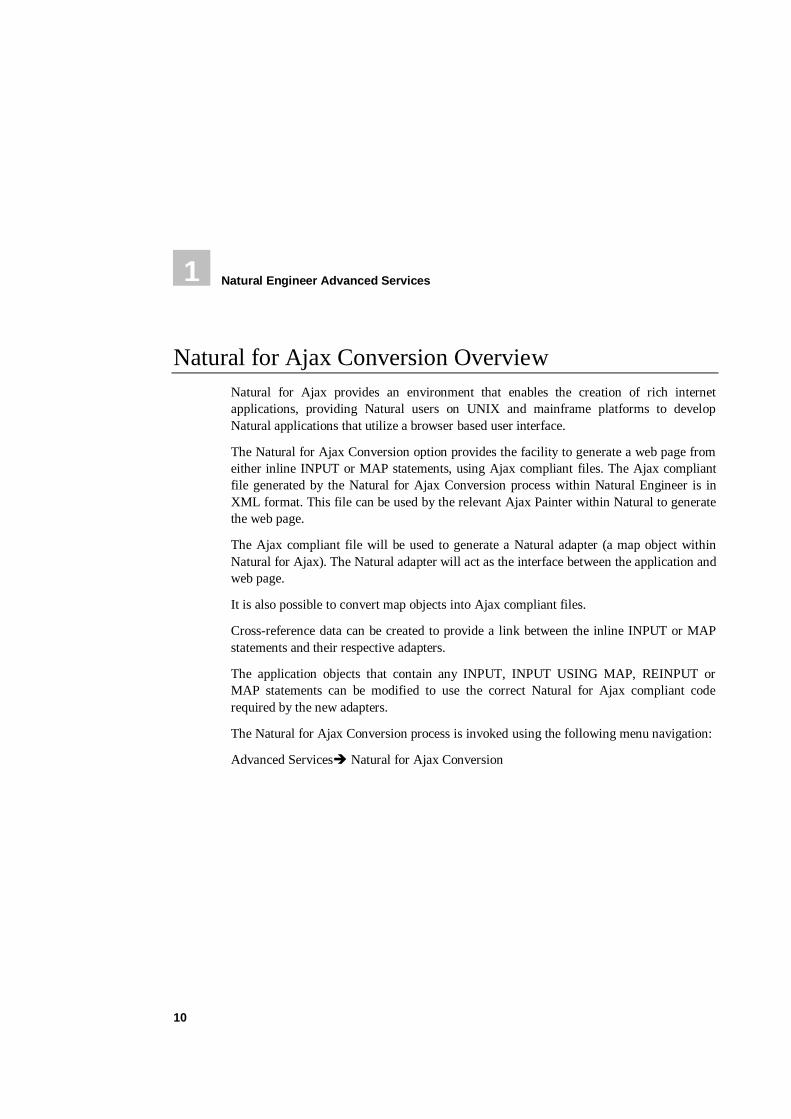
Natural for Ajax Conversion Overview
Natural for Ajax provides an environment that enables the creation of rich internet
applications, providing Natural users on UNIX and mainframe platforms to develop
Natural applications that utilize a browser based user interface.
The Natural for Ajax Conversion option provides the facility to generate a web page from
either inline INPUT or MAP statements, using Ajax compliant files. The Ajax compliant
file generated by the Natural for Ajax Conversion process within Natural Engineer is in
XML format. This file can be used by the relevant Ajax Painter within Natural to generate
the web page.
The Ajax compliant file will be used to generate a Natural adapter (a map object within
Natural for Ajax). The Natural adapter will act as the interface between the application and
web page.
It is also possible to convert map objects into Ajax compliant files.
Cross-reference data can be created to provide a link between the inline INPUT or MAP
statements and their respective adapters.
The application objects that contain any INPUT, INPUT USING MAP, REINPUT or
MAP statements can be modified to use the correct Natural for Ajax compliant code
required by the new adapters.
The Natural for Ajax Conversion process is invoked using the following menu navigation:
Advanced Services Natural for Ajax Conversion

Natural for Ajax Conversion
11
1
Natural for Ajax Conversion Workflow Window
The Natural for Ajax Conversion Workflow screen provides all the options that are
available to apply the Natural for Ajax Conversion process.
The following Figure 1-1 illustrates the Natural for Ajax Conversion Workflow screen.
Figure 1-1 Natural for Ajax Conversion Workflow screen

Natural Engineer Advanced Services
12
1
SCREEN ITEMS DESCRIPTION
Separate Processing
Rules from Maps
This option provides the facility to remove any in-line processing rules
within map objects, encompassing them within new generated subprogram objects.
Note: This option is only available if any processing rules have been found within the currently selected application.
Natural Map Extraction
This option provides the facility to generate Ajax compliant files for any Natural map objects.
Inline Map Extraction
This option provides the facility to generate Ajax compliant files for any in-line INPUT or MAP statements.
Inline Input Cross-
Reference to Adapters
This option provides the facility to generate cross-reference data for any in-line INPUT or MAP statements with existing adapters.
Code Conversion This option provides the facility to convert relevant Natural statements to Natural for Ajax statements.
BUTTON NAME DESCRIPTION
Start Processing
Rules Separation
Invoke the Processing Rules Separation process.
For more information refer to the section Separate Processing Rules from Maps.
Start Natural Map
Extraction
Invoke the Natural Map Extraction process.
For more information refer to the section Natural Map Extraction.
Start Inline Map Extraction
Invoke the Inline Map Extraction process.
For more information refer to the section Inline Map Extraction.
Start Cross-
Reference to Adapters
Invoke the Cross-Reference to Adapters process.
For more information refer to the section Cross-Reference to Adapters.
Start Code
Conversion
Invoke the Code Conversion process.
For more information refer to the section Code Conversion.
Cancel Cancel the Natural for Ajax Conversion Workflow process and return back to the main Natural Engineer screen.

Natural for Ajax Conversion
13
1
STATUS BAR ITEM DESCRIPTION
The Natural for Ajax Conversion status bar is divided into 2 individual panes.
Pane 1 Name of the selected application.
Pane 2 Any Natural for Ajax Conversion processing messages.

Natural Engineer Advanced Services
14
1
Separate Processing Rules from Maps
Any processing rules that are present within map objects, for the selected application, will
need to be removed first.
This is done by using the Separate Processing Rules from Maps process, which will
identify any in-line processing rules, separate them from their respective maps and
generate new subprograms containing the processing rules. Existing calling objects for
each map are then modified to reference the new processing rules subprograms.
This process is part of the Application Refactoring processes available within Natural
Engineer.
Note: For more information on the Separate Processing Rules from Maps process, refer to
the Separate Processing Rules from Maps section in Chapter 2 of this manual.
The Separate Processing Rules from Maps option is invoked by using the ‘Start Processing
Rules Separation’ button on the Natural for Ajax Conversion Workflow screen.

Natural for Ajax Conversion
15
1
Natural Map Extraction
The Natural Map Extraction option provides the facility to select existing map objects
within an application, and convert them into Ajax compliant files.
The Ajax compliant files can then be used as Natural adapters to form the interface
between the application code and the web page.
Natural Map Extraction Window
The Natural Map Extraction option is invoked by using the ‘Start Natural Map Extraction’
button on the Natural for Ajax Conversion Workflow screen.
The following Figure 1-2 illustrates the Natural Map Extraction screen.
Figure 1-2 Natural Map Extraction screen

Natural Engineer Advanced Services
16
1
SCREEN ITEMS DESCRIPTION
Map List List all the map objects within the currently selected application.
The list of map objects can be tailored to your requirements using the
options 'Change Start Position of Map List…' from the Map List context menu and the All Maps/Unprocessed Maps radio buttons.
The Map List title reflects the map objects being listed and will append any reposition values that may have been specified.
Map objects can be selected by using a double click with the left hand mouse button.
Note: Any map objects listed that have already been processed will have an ‘*’ (asterisk) appended to the right hand side of the map object name.
Selected List all the map objects that have been selected for Natural Map Extraction processing.
Note: At least one map object must be selected to run the Natural Map Extraction process.
Map objects can be de-selected by using a double click with the left hand mouse button.
BUTTON NAME DESCRIPTION
Map List group:
Prev Scrolls the map object list to previous page.
This button will be available/unavailable depending on the value specified in the LISTBOXMAX parameter in the NATENG.INI file.
More Scrolls the map object list forward one page.
This button will be available/unavailable depending on the value specified in the LISTBOXMAX parameter in the NATENG.INI file.
All Maps If selected, then all processed and unprocessed map objects are listed.
Unprocessed Maps If selected, then only the map objects that have not yet been processed are listed.

Natural for Ajax Conversion
17
1
BUTTON NAME DESCRIPTION
Selection / De-selection buttons:
>>> Select all map objects in the map list (when more than one page is
available, as set by the LISTBOXMAX parameter in the NATENG.INI file).
>> Select all map objects on the current page in the map list.
> Select all selected map objects in the map list.
< De-select all selected map objects in the selected list.
<< De-select all map objects on the current page in the selected list.
<<< De-select all map objects in the selected list (when more than one page is
available, as set by the LISTBOXMAX parameter in the NATENG.INI file).
Selected group:
Prev Scrolls the selected list to previous page.
This button will be available/unavailable depending on the value specified in the LISTBOXMAX parameter in the NATENG.INI file.
More Scrolls the selected list forward one page.
This button will be available/unavailable depending on the value specified in the LISTBOXMAX parameter in the NATENG.INI file.
Natural Map Extraction screen:
Execute Invoke the Natural Map Extraction process for the selected map objects.
Cancel Cancel any map object selection and return back to the Natural for Ajax conversion screen.
Note: For more information on the NATENG.INI file parameter LISTBOXMAX refer to
Chapter 1 in the Natural Engineer Administration Guide for Windows manual.
STATUS BAR ITEM DESCRIPTION
Pane Any Natural Map Extraction processing messages.

Natural Engineer Advanced Services
18
1
Natural Map Extraction Context Menu
The Natural Map Extraction context menu is invoked by placing the cursor on any of the
map objects listed in the Map list and using the right hand mouse button with a single
click.
CONTEXT MENU ITEM DESCRIPTION
Change Start Position of Map
List…
Reposition the list of map objects to start from a particular map object name.
The reposition value can be input using either a complete name or part name using an '*' (asterisk) wildcard.
The reposition value is appended to the map list title to highlight the type of repositioning being applied.
Possible reposition values are:
Value Result
' ' (blank) Reposition to the top of the map list.
* Reposition to the top of the map list.
ABC* Only show map objects that are prefixed by 'ABC'.
XYZ Reposition to the first map object that either matches or is greater than 'XYZ' and then continue the map list from that point.

Natural for Ajax Conversion
19
1
Inline Map Extraction
The Inline Map Extraction option provides the facility to select programming objects that
contain any inline INPUT or MAP statements, and convert them into Ajax compliant files.
The Ajax compliant files can then be used as Natural adapters to form the interface
between the application code and the web page.
Inline Map Extraction Window
The Inline Map Extraction option is invoked by using the ‘Start Inline Map Extraction’
button on the Natural for Ajax Conversion Workflow screen.
The following Figure 1-3 illustrates the Inline Map Extraction screen.
Figure 1-3 Inline Map Extraction screen

Natural Engineer Advanced Services
20
1
SCREEN ITEMS DESCRIPTION
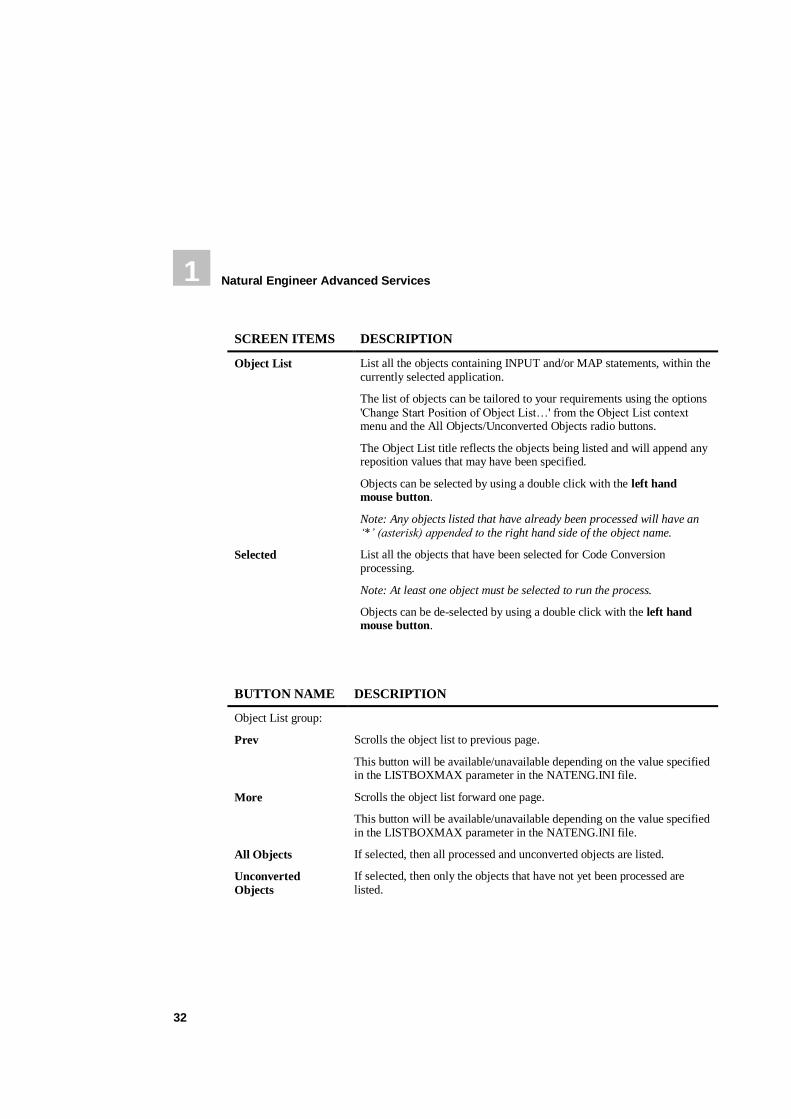
Object List List all the objects containing INPUT and/or MAP statements, within the currently selected application.
The list of objects can be tailored to your requirements using the options
'Change Start Position of Object List…' from the Object List context menu and the All Objects/Unprocessed Objects radio buttons.
The Object List title reflects the objects being listed and will append any reposition values that may have been specified.
Objects can be selected by using a double click with the left hand mouse button.
Note: Any objects listed that have already been processed will have an ‘*’ (asterisk) appended to the right hand side of the object name.
Selected List all the objects that have been selected for Inline Map Extraction processing.
Note: At least one object must be selected to run the process.
Objects can be de-selected by using a double click with the left hand mouse button.
BUTTON NAME DESCRIPTION
Object List group:
Prev Scrolls the object list to previous page.
This button will be available/unavailable depending on the value specified in the LISTBOXMAX parameter in the NATENG.INI file.
More Scrolls the object list forward one page.
This button will be available/unavailable depending on the value specified in the LISTBOXMAX parameter in the NATENG.INI file.
All Objects If selected, then all processed and unprocessed objects are listed.
Unprocessed
Objects
If selected, then only the objects that have not yet been processed are listed.

Natural for Ajax Conversion
21
1
BUTTON NAME DESCRIPTION
Selection / De-selection buttons:
>>> Select all objects in the object list (when more than one page is available, as set by the LISTBOXMAX parameter in the NATENG.INI file).
>> Select all objects on the current page in the object list.
> Select all selected objects in the object list.
< De-select all selected objects in the selected list.
<< De-select all objects on the current page in the selected list.
<<< De-select all objects in the selected list (when more than one page is available, as set by the LISTBOXMAX parameter in the NATENG.INI file).
Selected group:
Prev Scrolls the selected list to previous page.
This button will be available/unavailable depending on the value specified in the LISTBOXMAX parameter in the NATENG.INI file.
More Scrolls the selected list forward one page.
This button will be available/unavailable depending on the value specified in the LISTBOXMAX parameter in the NATENG.INI file.
Inline Map Extraction screen:
Execute Invoke the Inline Map Extraction process for the selected objects.
Cancel Cancel any object selection and return back to the Natural for Ajax conversion screen.
Note: For more information on the NATENG.INI file parameter LISTBOXMAX refer to
Chapter 1 in the Natural Engineer Administration Guide for Windows manual.
STATUS BAR ITEM DESCRIPTION
Pane Any Inline Map Extraction processing messages.

Natural Engineer Advanced Services
22
1
Inline Map Extraction Context Menu
The Inline Map Extraction context menu is invoked by placing the cursor on any of the
objects listed in the Object list and using the right hand mouse button with a single click.
CONTEXT MENU ITEM DESCRIPTION
Change Start Position of Object List…
Reposition the list of objects to start from a particular object name.
The reposition value can be input using either a complete name or part name using an '*' (asterisk) wildcard.
The reposition value is appended to the object list title to highlight the type of repositioning being applied.
Possible reposition values are:
Value Result
‘ ‘ (blank) Reposition to the top of the object list.
* Reposition to the top of the object list.
ABC* Only show objects that are prefixed by 'ABC'.
XYZ Reposition to the first object that either
matches or is greater than 'XYZ' and then continue the object list from that point.

Natural for Ajax Conversion
23
1
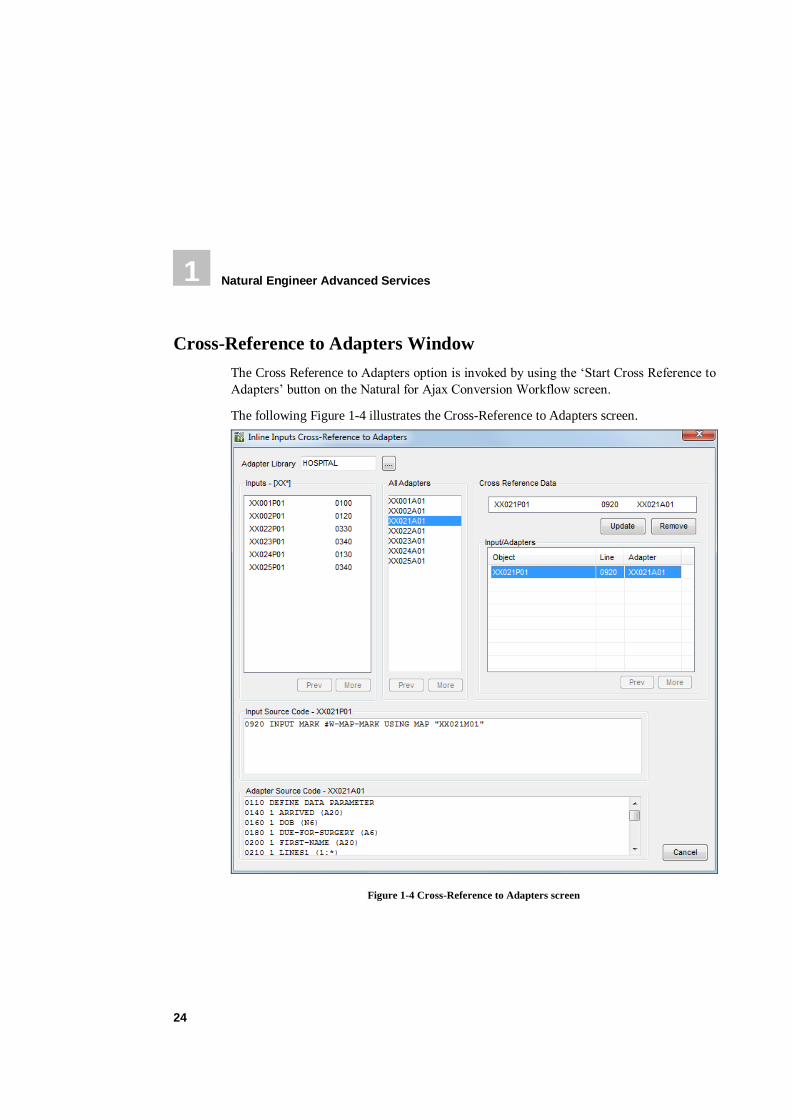
Cross-Reference to Adapters
The Cross-Reference to Adapters option provides the facility to create cross-reference data
between the inline INPUT, MAP and INPUT USING MAP statements and their respective
Adapters (map objects).
The Adapters can be selected either from the currently selected application or from any
other applications by using the general selection option.
For INPUT USING MAP statements the user may use the supplied User Exit 4
(NEEUEX4) to generate the Adapter name. Typically the use exit would contain similar
rules to that used to generate the Adapter name in Application Designer.
Note: The user exit module supplied is named ‘NEEUEX4X’ on the Natural Engineer
SYSNEE library. This is to avoid overwriting any existing (modified) versions on the
production SYSNEE library during Natural Engineer installation. If this user exit has not
been loaded before, then it will need to be renamed to ‘NEEUEX4’ before making use of
the User Exit functionality.
Natural Engineer Advanced Services
24
1
Cross-Reference to Adapters Window
The Cross Reference to Adapters option is invoked by using the ‘Start Cross Reference to
Adapters’ button on the Natural for Ajax Conversion Workflow screen.
The following Figure 1-4 illustrates the Cross-Reference to Adapters screen.
Figure 1-4 Cross-Reference to Adapters screen

Natural for Ajax Conversion
25
1
SCREEN ITEMS DESCRIPTION
Adapter Library The name of the library from which the Adapter List is populated.
Note: The Adapter Library is synonymous with Natural libraries.
All Inputs List The list of objects containing inline INPUT, MAP or INPUT USING
MAP statements found within the currently selected application. Statement Line numbers are also shown for each inline input.
The list of Inputs can be tailored to your requirements using the options 'Change Start Position of Object List…' from the All Input List context menu.
Adapter List List all the Adapter objects within the currently selected Adapter library.
The list of Adapter objects can be tailored to your requirements using the
options 'Change Start Position of Adapter List…' from the Adapter List context menu.
Cross Reference Data group:
Object & Line Number
The name of the object and the line number for selected the INPUT or MAP statement.
Adapter Name The name of the Adapter to be associated with the selected object and line number.
Input/Adapters List of available object, line number and Adapter relationships.
Input Source Code Displays all the relevant source code for the selected Inline Input.
The name of the object containing the inline input will be appended to the Inline Input Source Code frame title.
Adapter Source Code Displays all the relevant source code for the selected Adapter.
The name of the selected adapter will be appended to the Adapter Source Code frame title.
BUTTON NAME DESCRIPTION
Adapter Library
Selection [….]
Invokes the General Selection screen, listing all the Natural Libraries.
Note: The Adapter Library is synonymous with Natural libraries.

Natural Engineer Advanced Services
26
1
BUTTON NAME DESCRIPTION
Inline Inputs List group:
Prev Scrolls the All Inputs object list to previous page.
This button will be available/unavailable depending on the value specified in the LISTBOXMAX parameter in the NATENG.INI file.
More Scrolls the All Inputs object list forward one page.
This button will be available/unavailable depending on the value specified in the LISTBOXMAX parameter in the NATENG.INI file.
Adapters List group:
Prev Scrolls the Adapters object list to previous page.
This button will be available/unavailable depending on the value specified in the LISTBOXMAX parameter in the NATENG.INI file.
More Scrolls the Adapters object list forward one page.
This button will be available/unavailable depending on the value specified in the LISTBOXMAX parameter in the NATENG.INI file.
Cross Reference Data group:
Add/Update Add or update cross reference data relationship.
Remove Remove cross reference data relationship.
Prev Scrolls the Input/Adapters list to previous page.
This button will be available/unavailable depending on the value specified in the LISTBOXMAX parameter in the NATENG.INI file.
More Scrolls the Input/Adapters list forward one page.
This button will be available/unavailable depending on the value specified in the LISTBOXMAX parameter in the NATENG.INI file.
Cross-Reference to Adapters screen:
Cancel Cancel the Cross-Reference to Adapters process and return back to the Natural for Ajax conversion screen.
Note: For more information on the NATENG.INI file parameter LISTBOXMAX refer to
Chapter 1 in the Natural Engineer Administration Guide for Windows manual.

Natural for Ajax Conversion
27
1
Cross-Reference to Adapters Context Menus
The Cross-Reference to Adapters context menus are invoked by placing the cursor on any
of the items listed in the All Inputs, Adapter or the Input/Adapters lists and using the right
hand mouse button with a single click.
All Inputs List Context Menu
CONTEXT MENU ITEM DESCRIPTION
Change Start Position of
Object List…
Reposition the list of objects to start from a particular object name.
The reposition value can be input using either a complete name or part name using an '*' (asterisk) wildcard.
The reposition value is appended to the object list title to highlight the type of repositioning being applied.
Possible reposition values are:
Value Result
‘ ‘ (blank) Reposition to the top of the object list.
* Reposition to the top of the object list.
ABC* Only show objects that are prefixed by 'ABC'.
XYZ Reposition to the first object that either
matches or is greater than 'XYZ' and then continue the object list from that point.
View Source Code Display the selected object source code in a browser.

Natural Engineer Advanced Services
28
1
Adapter List Context Menu
CONTEXT MENU ITEM DESCRIPTION
Change Start Position of
Adapter List…
Reposition the list of Adapter objects to start from a particular Adapter object name.
The reposition value can be input using either a complete name or part name using an '*' (asterisk) wildcard.
The reposition value is appended to the Adapter list title to highlight the type of repositioning being applied.
Possible reposition values are:
Value Result
‘ ‘ (blank) Reposition to the top of the Adapter object list.
* Reposition to the top of the Adapter object list.
ABC* Only show Adapter objects that are prefixed by 'ABC'.
XYZ Reposition to the first Adapter object that
either matches or is greater than 'XYZ' and then continue the Adapter object list from that point.

Natural for Ajax Conversion
29
1
Input/Adapters List Context Menu
CONTEXT MENU ITEM DESCRIPTION
Change Start Position of
Input/Adapter List…
Reposition the list of Input/Adapter objects to start from a particular Input/Adapter object name.
The reposition value can be input using either a complete name or part name using an '*' (asterisk) wildcard.
The reposition value is appended to the Input/Adapter list title to highlight the type of repositioning being applied.
Possible reposition values are:
Value Result
‘ ‘ (blank) Reposition to the top of the Input/Adapter object list.
* Reposition to the top of the Input/Adapter object list.
ABC* Only show Input/Adapter objects that are prefixed by 'ABC'.
XYZ Reposition to the first Input/Adapter object
that either matches or is greater than 'XYZ' and then continue the Input/Adapter object list from that point.

Natural Engineer Advanced Services
30
1
Code Conversion
The Code Conversion option provides the facility to select objects that contain any
INPUT, INPUT USING MAP, REINPUT or MAP statements, and modify them to use the
correct Natural for Ajax compliant code required by the new Adapters.
Certain types of statements are not modified as they are not compatible with Natural for
Ajax. For example:
INPUT with no literal or Map – assumes INPUT from STACK
REINPUT USING HELP
INPUT NO ERASE
When the Code Conversion is complete a window is shown which shows warning
messages, manual intervention required and user information e.g., if an Adapter is not
cross referenced to a statement or User Exit 4 is not used to generate the Adapter Names
for a Natural Map then the statement is converted but with a default Adapter name. The
user then needs to manually apply the correct Adapter to the code.
The modified objects are located in the Modification library.

Natural for Ajax Conversion
31
1
Code Conversion Window
The Code Conversion option is invoked by using the ‘Start Code Conversion’ button on
the Natural for Ajax Conversion Workflow screen.
The following Figure 1-5 illustrates the Code Conversion screen.
Figure 1-5 Code Conversion screen
Natural Engineer Advanced Services
32
1
SCREEN ITEMS DESCRIPTION
Object List List all the objects containing INPUT and/or MAP statements, within the currently selected application.
The list of objects can be tailored to your requirements using the options
'Change Start Position of Object List…' from the Object List context menu and the All Objects/Unconverted Objects radio buttons.
The Object List title reflects the objects being listed and will append any reposition values that may have been specified.
Objects can be selected by using a double click with the left hand mouse button.
Note: Any objects listed that have already been processed will have an ‘*’ (asterisk) appended to the right hand side of the object name.
Selected List all the objects that have been selected for Code Conversion processing.
Note: At least one object must be selected to run the process.
Objects can be de-selected by using a double click with the left hand mouse button.
BUTTON NAME DESCRIPTION
Object List group:
Prev Scrolls the object list to previous page.
This button will be available/unavailable depending on the value specified in the LISTBOXMAX parameter in the NATENG.INI file.
More Scrolls the object list forward one page.
This button will be available/unavailable depending on the value specified in the LISTBOXMAX parameter in the NATENG.INI file.
All Objects If selected, then all processed and unconverted objects are listed.
Unconverted
Objects
If selected, then only the objects that have not yet been processed are listed.

Natural for Ajax Conversion
33
1
BUTTON NAME DESCRIPTION
Selection / De-selection buttons:
>>> Select all objects in the object list (when more than one page is available, as set by the LISTBOXMAX parameter in the NATENG.INI file).
>> Select all objects on the current page in the object list.
> Select all selected objects in the object list.
< De-select all selected objects in the selected list.
<< De-select all objects on the current page in the selected list.
<<< De-select all objects in the selected list (when more than one page is available, as set by the LISTBOXMAX parameter in the NATENG.INI file).
Selected group:
Prev Scrolls the selected list to previous page.
This button will be available/unavailable depending on the value specified in the LISTBOXMAX parameter in the NATENG.INI file.
More
Scrolls the selected list forward one page.
This button will be available/unavailable depending on the value specified in the LISTBOXMAX parameter in the NATENG.INI file.
Include CALLNAT
to PF Key User Exit
When selected, the PF Key user exit will be included in the converted code.
Code Conversion screen:
Execute Invoke the Code Conversion process for the selected objects.
Cancel Cancel any object selection and return back to the Natural for Ajax conversion screen.
Note: For more information on the NATENG.INI file parameter LISTBOXMAX refer to
Chapter 1 in the Natural Engineer Administration Guide for Windows manual.
STATUS BAR ITEM DESCRIPTION
Pane Any Code Conversion processing messages.

Natural Engineer Advanced Services
34
1
Code Conversion Context Menu
The Code Conversion context menu is invoked by placing the cursor on any of the objects
listed in the Object list and using the right hand mouse button with a single click.
CONTEXT MENU ITEM DESCRIPTION
Change Start Position of Object List…
Reposition the list of objects to start from a particular object name.
The reposition value can be input using either a complete name or part name using an '*' (asterisk) wildcard.
The reposition value is appended to the object list title to highlight the type of repositioning being applied.
Possible reposition values are:
Value Result
‘ ‘ (blank) Reposition to the top of the object list.
* Reposition to the top of the object list.
ABC* Only show objects that are prefixed by 'ABC'.
XYZ Reposition to the first object that either
matches or is greater than 'XYZ' and then continue the object list from that point.
35
2 REFACTORING
Chapter Overview
This chapter describes the Refactoring option available from the Advanced Services menu.
Refactoring is used to reorganize the internal structure of a Natural application.
The topics covered are:
1. Preparation
2. Componentization
3. Database Split
Natural Engineer Advanced Services
36
2
Preparation Tasks
The Refactoring Preparation screen is used to control and initiate all the tasks required to
prepare the Natural application for the subsequent Refactoring processes.
Tasks are grouped into two categories:
1. Mandatory
These tasks must be performed before progressing to the next Refactoring phase.
2. Optional
These tasks are optional and provide the facility to review and apply further
refinements to the application. For example, identify redundant source code and
remove it from the application to improve the maintainability of the refactored
application.
Preparation Tasks Screen
The Preparation Tasks screen shows all the mandatory and optional tasks available to
prepare a Natural application for future Refactoring processes. The tasks are organized
into three pages and can be navigated using the ‘Previous’ and ‘Next’ buttons.
The Preparation Tasks screen is accessed by using the following menu navigation:
Advanced ServicesRefactoring Preparation from the main Natural Engineer screen.

Refactoring
37
2
The following Figure 2-1 illustrates the Refactoring - Preparation Tasks screen showing
the mandatory tasks.
Figure 2-1 Refactoring - Preparation Tasks screen showing the mandatory tasks

Natural Engineer Advanced Services
38
2
The following Figure 2-2 illustrates the Refactoring - Preparation Tasks screen showing
optional tasks.
Figure 2-2 Refactoring - Preparation Tasks screen showing optional tasks

Refactoring
39
2
The following Figure 2-3 illustrates the Refactoring – Preparation Tasks screen showing
further optional tasks.
Figure 2-3 Refactoring – Preparation Tasks screen showing further optional tasks

Natural Engineer Advanced Services
40
2
Preparation Tasks Processes
This chapter describes the individual Refactoring processes available to prepare a Natural
application for subsequent Refactoring processes. The topics covered are:
Reporting to Structured Mode Conversion
Separate Processing Rules from Maps
Convert Back References to Labels
Check for Redundant Code
Check for Conversational Database Loops
Check for Unused Variables
Expand Copycodes
Refactoring
41
2
Reporting to Structured Mode Conversion
The Reporting to Structured Mode Conversion task is mandatory and should be the first
task performed under the Refactoring Preparation Tasks.
The Reporting to Structured Mode Conversion task is invoked by using the ‘Start Mode
Conversion’ button on the Refactoring Preparation Tasks screen.
This will invoke the Mode Conversion process, which will convert all Natural Reporting
mode objects into Natural Structured mode objects.
Note: For more information on the Mode Conversion process, refer to Chapter 3 in the
Natural Engineer Utilities for Windows manual.

Natural Engineer Advanced Services
42
2
Separate Processing Rules from Maps
The Separate Processing Rules from Maps task is mandatory and should be the second task
performed under the Refactoring Preparation Tasks.
The Separate Processing Rules from Maps task is invoked by using the ‘Start Processing
Rules Separation’ button on the Refactoring Preparation Tasks screen.
This will invoke the Separate Processing Rules from Maps process, which will identify
any in-line processing rules, separate them from their respective maps and generate new
subprograms containing the processing rules. Existing calling objects for each map are
then modified to reference the new processing rules subprograms.

Refactoring
43
2
Processing Rule Separation Screen
The Processing Rule Separation screen provides all the options required to separate the in-
line processing rules from maps into new subprograms, apply modification to the map
calling objects to reference the new processing rules subprograms and restart the
Processing Rule Separation process.
The Processing Rule Separation screen is accessed by using the ‘Start Processing Rules
Separation’ button from the Refactoring Preparation Tasks screen.
The following Figure 2-4 illustrates the Processing Rule Separation screen.
Figure 2-4 Processing Rule Separation screen

Natural Engineer Advanced Services
44
2
BUTTON NAME DESCRIPTION
Separate Rules from
Maps…
Invoke the Separate Rules from Maps process.
Note: For more information refer to the section Separate Rules from Maps Screen.
Apply Separated
Rules to Objects…
Invoke the Apply Separated Rules to Objects process.
Note: For more information refer to the section Apply Separated Rules to Objects Screen.
Restart Processing Rule Separation
Restart the Processing Rule Separation process.
Note: For more information refer to the section Restart Processing Rule Separation.
Cancel Cancel the Processing Rule Separation process and return back to the main Natural Engineer screen.
STATUS BAR ITEM DESCRIPTION
Pane Any Processing Rule Separation processing messages.

Refactoring
45
2
Separate Rules from Maps Screen
The Separate Rules from Maps screen allows you to select the map objects from which the
processing rules will be separated.
The Separate Rules from Maps screen is accessed by using the ‘Separate Rules from
Maps…’ button from the Processing Rule Separation screen.
The following Figure 2-5 illustrates the Separate Rules from Maps screen.
Figure 2-5 Separate Rules from Maps screen
Natural Engineer Advanced Services
46
2
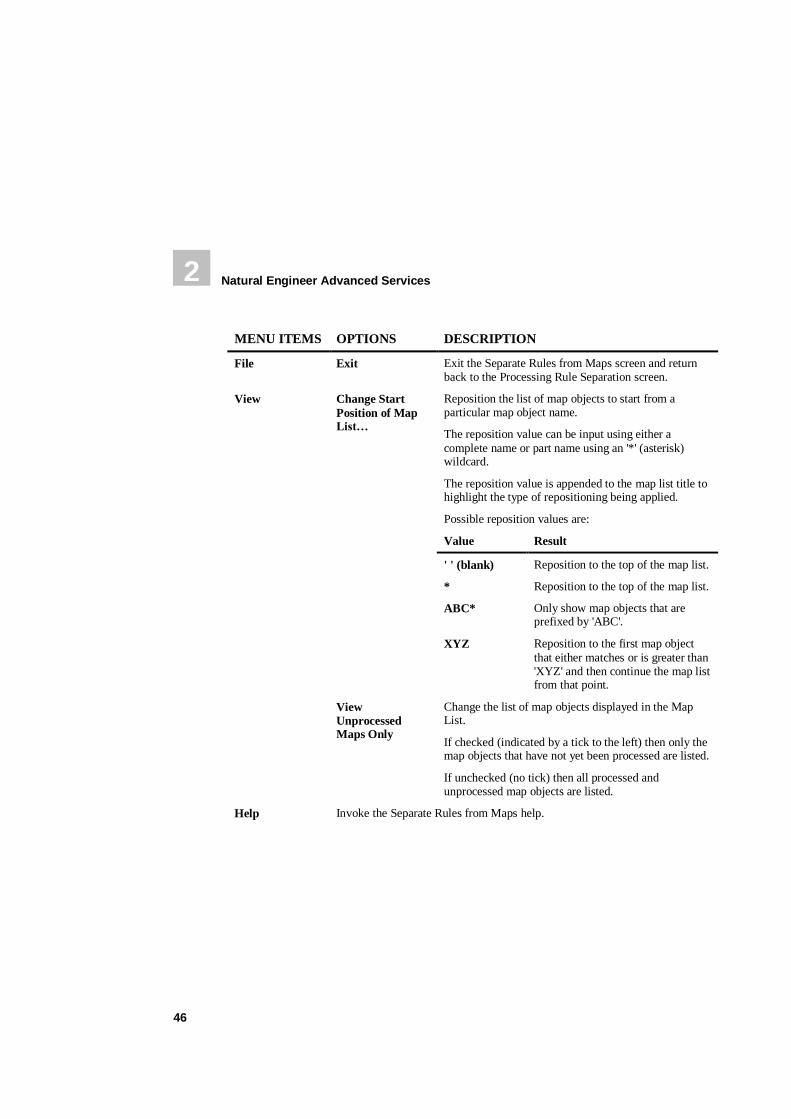
MENU ITEMS OPTIONS DESCRIPTION
File Exit Exit the Separate Rules from Maps screen and return back to the Processing Rule Separation screen.
View Change Start
Position of Map List…
Reposition the list of map objects to start from a particular map object name.
The reposition value can be input using either a
complete name or part name using an '*' (asterisk) wildcard.
The reposition value is appended to the map list title to highlight the type of repositioning being applied.
Possible reposition values are:
Value Result
' ' (blank) Reposition to the top of the map list.
* Reposition to the top of the map list.
ABC* Only show map objects that are prefixed by 'ABC'.
XYZ Reposition to the first map object
that either matches or is greater than 'XYZ' and then continue the map list from that point.
View
Unprocessed Maps Only
Change the list of map objects displayed in the Map List.
If checked (indicated by a tick to the left) then only the map objects that have not yet been processed are listed.
If unchecked (no tick) then all processed and unprocessed map objects are listed.
Help Invoke the Separate Rules from Maps help.

Refactoring
47
2
SCREEN ITEMS DESCRIPTION
Map List List all the map objects with processing rules used by the currently selected application.
The list of map objects can be tailored to your requirements using the
options 'Change Start Position of Map List…' and ‘View Unprocessed Maps Only’ from the View menu.
The Map List title reflects the map objects being listed and will append any reposition values that may have been specified.
Map objects can be selected by using a double click with the left hand mouse button.
Note: Any map objects listed that have already been processed will have an ‘*’ (asterisk) appended to the right hand side of the map object name.
Selected List all the map objects that have been selected for Separate Rules from Maps processing.
Note: At least one map object must be selected to run the separation.
Map objects can be de-selected by using a double click with the left hand mouse button.
BUTTON NAME DESCRIPTION
Map List group:
Prev Scrolls the map object list to previous page.
This button will be available/unavailable depending on the value specified in the LISTBOXMAX parameter in the NATENG.INI file.
More Scrolls the map object list forward one page.
This button will be available/unavailable depending on the value specified in the LISTBOXMAX parameter in the NATENG.INI file.

Natural Engineer Advanced Services
48
2
BUTTON NAME DESCRIPTION
Selection / De-selection buttons:
>>> Select all map objects in the map list (when more than one page is
available, as set by the LISTBOXMAX parameter in the NATENG.INI file).
>> Select all map objects on the current page in the map list.
> Select all selected map objects in the map list.
< De-select all selected map objects in the selected list.
<< De-select all map objects on the current page in the selected list.
<<< De-select all map objects in the selected list (when more than one page is
available, as set by the LISTBOXMAX parameter in the NATENG.INI file).
Selected group:
Prev Scrolls the selected list to previous page.
This button will be available/unavailable depending on the value specified in the LISTBOXMAX parameter in the NATENG.INI file.
More Scrolls the selected list forward one page.
This button will be available/unavailable depending on the value specified in the LISTBOXMAX parameter in the NATENG.INI file.
Separate Rules from Maps screen:
Execute Invoke the Separate Rules from Maps process for the selected map objects.
Cancel Cancel any map object selection and return back to the Processing Rule Separation screen.
Note: For more information on the NATENG.INI file parameter LISTBOXMAX refer to
Chapter 1 in the Natural Engineer Administration Guide for Windows manual.
STATUS BAR ITEM DESCRIPTION
Pane Any Separate Rules from Maps processing messages.
Refactoring
49
2
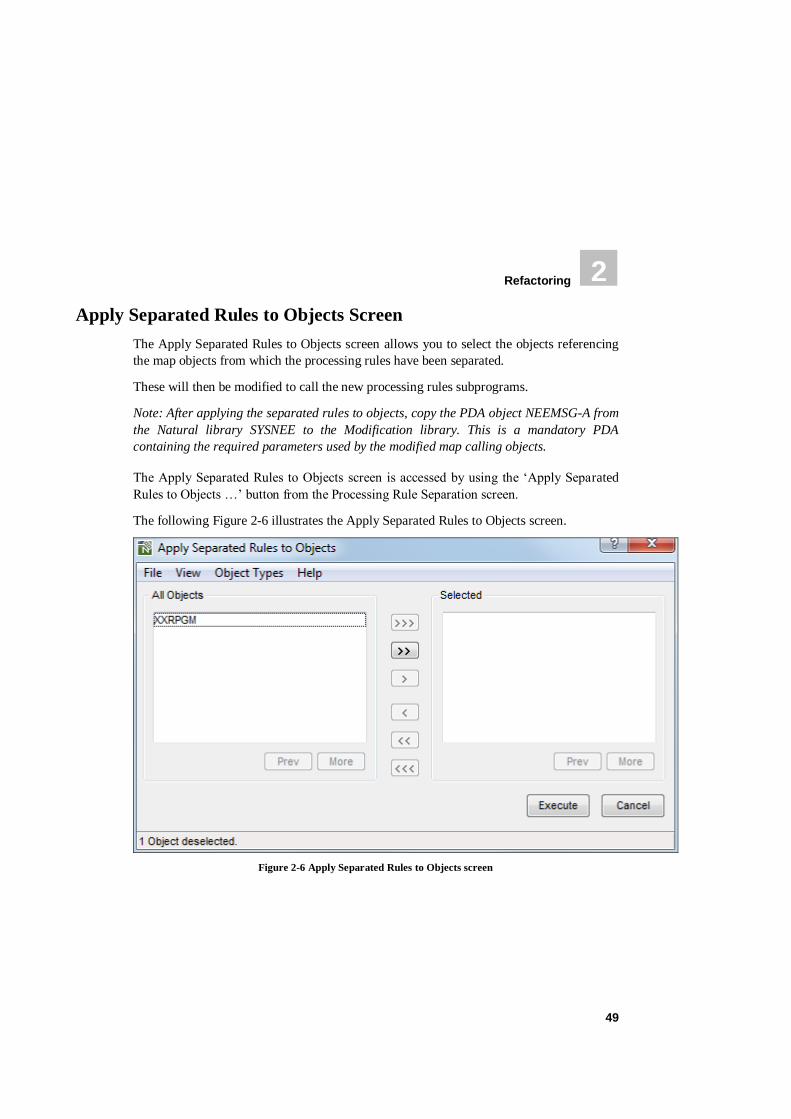
Apply Separated Rules to Objects Screen
The Apply Separated Rules to Objects screen allows you to select the objects referencing
the map objects from which the processing rules have been separated.
These will then be modified to call the new processing rules subprograms.
Note: After applying the separated rules to objects, copy the PDA object NEEMSG-A from
the Natural library SYSNEE to the Modification library. This is a mandatory PDA
containing the required parameters used by the modified map calling objects.
The Apply Separated Rules to Objects screen is accessed by using the ‘Apply Separated
Rules to Objects …’ button from the Processing Rule Separation screen.
The following Figure 2-6 illustrates the Apply Separated Rules to Objects screen.
Figure 2-6 Apply Separated Rules to Objects screen

Natural Engineer Advanced Services
50
2
MENU ITEMS OPTIONS DESCRIPTION
File Exit Exit the Apply Separated Rules to Objects screen and return back to the Processing Rule Separation screen.
View Change Start
Position of Object List…
Reposition the list of objects to start from a particular object name.
The reposition value can be input using either a
complete name or part name using an '*' (asterisk) wildcard.
The reposition value is appended to the object list title to highlight the type of repositioning being applied.
Possible reposition values are:
Value Result
' ' (blank) Reposition to the top of the object list.
* Reposition to the top of the object
list.
ABC* Only show objects that are prefixed
by 'ABC'.
XYZ Reposition to the first object that
either matches or is greater than 'XYZ' and then continue the object list from that point.
View
Unprocessed Objects Only
Change the list of objects displayed in the Object List.
If checked (indicated by a tick to the left) then only the objects that have not yet been processed are listed.
If unchecked (no tick) then all processed and unprocessed objects are listed.
Object Types Allows you to select the types of object to be listed.
Available selections are:
All Objects
Helproutines
Programs
Subprograms Subroutines
Help Invoke the Apply Separated Rules to Objects help.

Refactoring
51
2
SCREEN ITEMS DESCRIPTION
Object List List all the objects referencing maps with processing rules used by the currently selected application.
The list of objects can be tailored to your requirements using the options
available in the Object Types menu. Further refinement can be made using the options 'Change Start Position of Object List…' and ‘View Unprocessed Objects Only’ from the View menu.
The Object List title reflects the objects being listed and will append any reposition values that may have been specified.
Objects can be selected by using a double click with the left hand
mouse button.
Note: Any objects listed that have already been processed will have an ‘*’ (asterisk) appended to the right hand side of the object name.
Selected List all the objects that have been selected for Apply Separated Rules to Objects processing.
Note: At least one object must be selected to run the process.
Objects can be de-selected by using a double click with the left hand mouse button.
BUTTON NAME DESCRIPTION
Object List group:
Prev Scrolls the object list to previous page.
This button will be available/unavailable depending on the value specified in the LISTBOXMAX parameter in the NATENG.INI file.
More Scrolls the object list forward one page.
This button will be available/unavailable depending on the value specified in the LISTBOXMAX parameter in the NATENG.INI file.

Natural Engineer Advanced Services
52
2
BUTTON NAME DESCRIPTION
Selection / De-selection buttons:
>>> Select all objects in the object list (when more than one page is available, as set by the LISTBOXMAX parameter in the NATENG.INI file).
>> Select all objects on the current page in the object list.
> Select all selected objects in the object list.
< De-select all selected objects in the selected list.
<< De-select all objects on the current page in the selected list.
<<< De-select all objects in the selected list (when more than one page is available, as set by the LISTBOXMAX parameter in the NATENG.INI file).
Selected group:
Prev Scrolls the selected list to previous page.
This button will be available/unavailable depending on the value specified in the LISTBOXMAX parameter in the NATENG.INI file.
More Scrolls the selected list forward one page.
This button will be available/unavailable depending on the value specified in the LISTBOXMAX parameter in the NATENG.INI file.
Apply Separated Rules to Objects screen:
Execute Invoke the Apply Separated Rules to Objects process for the selected map objects.
Cancel Cancel any object selection and return back to the Processing Rule Separation screen.
Note: For more information on the NATENG.INI file parameter LISTBOXMAX refer to
Chapter 1 in the Natural Engineer Administration Guide for Windows manual.
STATUS BAR ITEM DESCRIPTION
Pane Any Apply Separated Rules to Objects processing messages.
Refactoring
53
2
Restart Processing Rule Separation
The Restart Processing Rule Separation option will delete any internal cross-reference
records created by the Separate Rules from Maps process.
Any modified objects generated by the Apply Separated Rules to Objects will not be
deleted from the Modification library. This needs to be done manually.
When this option is selected, a warning screen is displayed providing the facility to either
proceed with the restart or cancel it.
The following Figure 2-7 illustrates the Restart Processing Rule Separation warning
screen.
Figure 2-7 Restart Processing Rule Separation warning screen
Natural Engineer Advanced Services
54
2
Convert Back References to Labels
The Convert Back References to Labels task is mandatory and should be the third task
performed under the Refactoring Preparation tasks.
The Convert Back References to Labels task is invoked by using the ‘Start Back Reference
Conversion’ button on the Refactoring Preparation Tasks screen.
This will invoke the Convert Back References to Labels process, which uses the Impact
Analysis function within Natural Engineer, using the combination search keyword
REFACTORING with sub criteria ‘Convert Back References to Labels’.
Impact Analysis will look for any numeric back references which can be converted to
labels.
After the Impact results have been reviewed, the Modification function within Natural
Engineer can be used to convert any numeric back references to use the new labels.
Refactoring
55
2
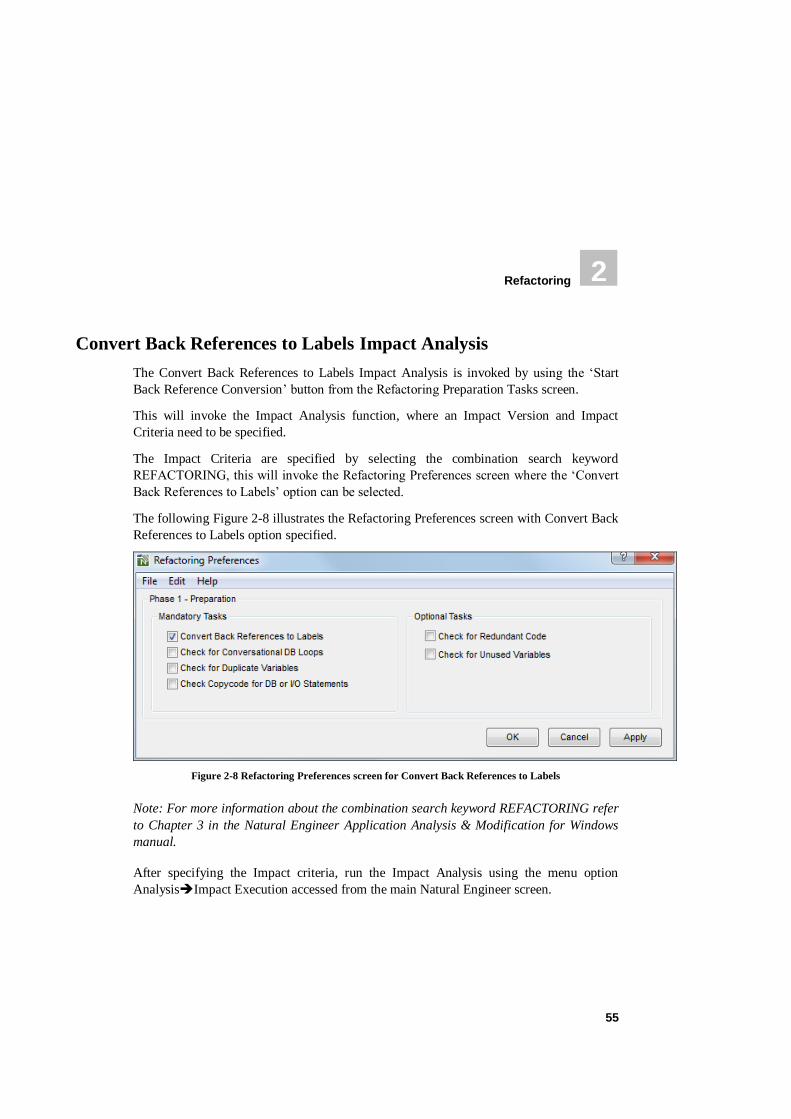
Convert Back References to Labels Impact Analysis
The Convert Back References to Labels Impact Analysis is invoked by using the ‘Start
Back Reference Conversion’ button from the Refactoring Preparation Tasks screen.
This will invoke the Impact Analysis function, where an Impact Version and Impact
Criteria need to be specified.
The Impact Criteria are specified by selecting the combination search keyword
REFACTORING, this will invoke the Refactoring Preferences screen where the ‘Convert
Back References to Labels’ option can be selected.
The following Figure 2-8 illustrates the Refactoring Preferences screen with Convert Back
References to Labels option specified.
Figure 2-8 Refactoring Preferences screen for Convert Back References to Labels
Note: For more information about the combination search keyword REFACTORING refer
to Chapter 3 in the Natural Engineer Application Analysis & Modification for Windows
manual.
After specifying the Impact criteria, run the Impact Analysis using the menu option
AnalysisImpact Execution accessed from the main Natural Engineer screen.

Natural Engineer Advanced Services
56
2
Convert Back References to Labels Modification
After reviewing the Impact results, the impacted objects can be modified using the
Modification function accessed using the menu option ModificationExecute
Modification for All Objects.
The modified objects can be found in the Modification library.
Note: For more information about the Modification function refer to Chapter 2 in the
Natural Engineer Application Analysis & Modification for Windows manual.

Refactoring
57
2
Check for Redundant Code
The Check for Redundant Code task is optional.
The Check for Redundant Code task is invoked by using the ‘Start Redundant Code
Check’ button on the Refactoring Preparation Tasks screen.
This will invoke the Check for Redundant Code process, which uses the Impact Analysis
function within Natural Engineer, using the combination search keyword REFACTORING
with sub criteria ‘Check for Redundant Code’.
Impact Analysis will look for any unused source code lines within programming objects
within the Natural application. Impacts are only made for Structured mode objects.
After the Impact results have been reviewed, manual modification will need to be applied
to the impacted objects. No automated Modification is available for this option.
Natural Engineer Advanced Services
58
2
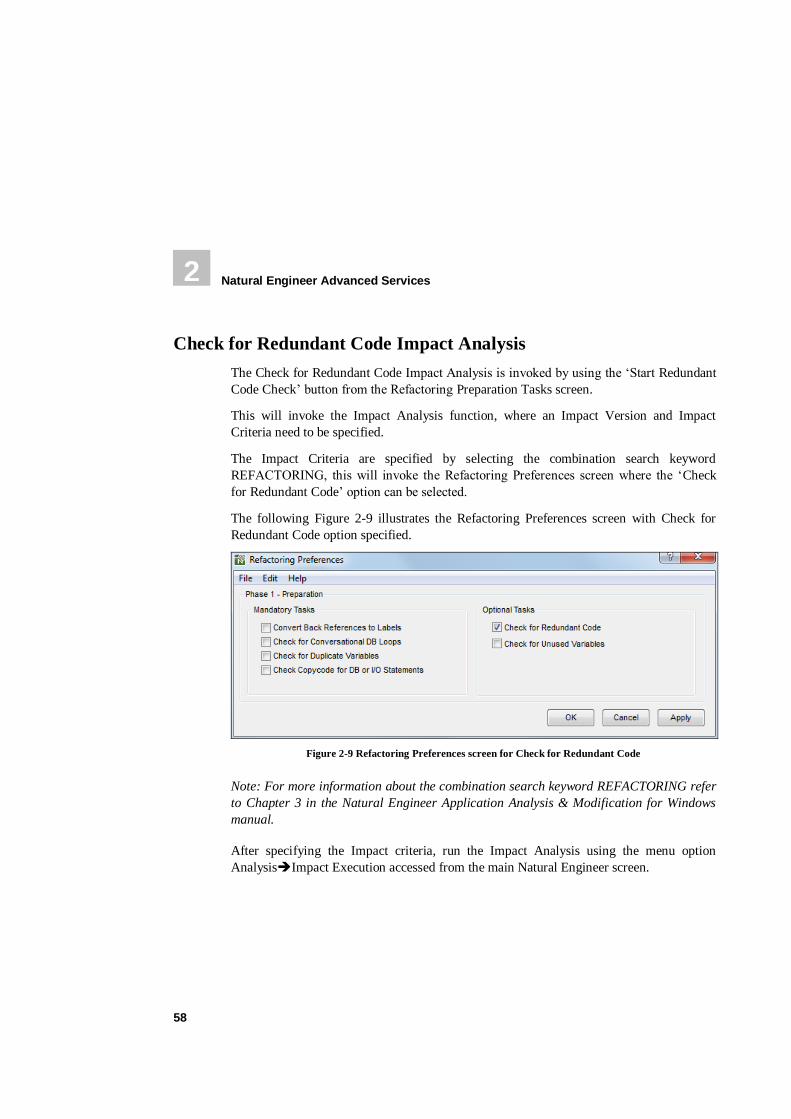
Check for Redundant Code Impact Analysis
The Check for Redundant Code Impact Analysis is invoked by using the ‘Start Redundant
Code Check’ button from the Refactoring Preparation Tasks screen.
This will invoke the Impact Analysis function, where an Impact Version and Impact
Criteria need to be specified.
The Impact Criteria are specified by selecting the combination search keyword
REFACTORING, this will invoke the Refactoring Preferences screen where the ‘Check
for Redundant Code’ option can be selected.
The following Figure 2-9 illustrates the Refactoring Preferences screen with Check for
Redundant Code option specified.
Figure 2-9 Refactoring Preferences screen for Check for Redundant Code
Note: For more information about the combination search keyword REFACTORING refer
to Chapter 3 in the Natural Engineer Application Analysis & Modification for Windows
manual.
After specifying the Impact criteria, run the Impact Analysis using the menu option
AnalysisImpact Execution accessed from the main Natural Engineer screen.
Refactoring
59
2
Check for Redundant Code Modification
After reviewing the Impact results, the impacted objects need to be modified manually as
Natural Engineer does not apply automatic modification for this option.
The modified objects can be found in the Modification library.
Note: For more information about the Modification function refer to Chapter 2 in the
Natural Engineer Application Analysis & Modification for Windows manual.

Natural Engineer Advanced Services
60
2
Check for Conversational Database Loops
The Check for Conversational Database Loops task is optional.
The Check for Conversational Database Loops task is invoked by using the ‘Start
Conversational DB Loops Check’ button on the Refactoring Preparation Tasks screen.
This will invoke the Check for Conversational Database Loops process, which uses the
Impact Analysis function within Natural Engineer, using the combination search keyword
REFACTORING with sub criteria ‘Check for Conversational DB Loops’.
Impact Analysis will look for any screen I/O statements within database processing loops.
After the Impact results have been reviewed, manual modification will need to be applied
to the impacted objects. No automated Modification is available for this option.

Refactoring
61
2
Check for Conversational Database Loops Impact Analysis
The Check for Conversational Database Loops Impact Analysis is invoked by using the
‘Start Conversational DB Loops Check’ button from the Refactoring Preparation Tasks
screen.
This will invoke the Impact Analysis function, where an Impact Version and Impact
Criteria need to be specified.
The Impact Criteria are specified by selecting the combination search keyword
REFACTORING, this will invoke the Refactoring Preferences screen where the ‘Check
for Conversational DB Loops’ option can be selected.
The following Figure 2-10 illustrates the Refactoring Preferences screen with Check for
Conversational DB Loops option specified.
Figure 2-10 Refactoring Preferences screen for Check for Conversational DB Loops
Note: For more information about the combination search keyword REFACTORING refer
to Chapter 3 in the Natural Engineer Application Analysis & Modification for Windows
manual.
After specifying the Impact criteria, run the Impact Analysis using the menu option
AnalysisImpact Execution accessed from the main Natural Engineer screen.

Natural Engineer Advanced Services
62
2
Check for Conversational Database Loops Modification
After reviewing the Impact results, the impacted objects need to be modified manually as
Natural Engineer does not apply automatic modification for this option.
The modified objects can be found in the Modification library.
Note: For more information about the Modification function refer to Chapter 2 in the
Natural Engineer Application Analysis & Modification for Windows manual.

Refactoring
63
2
Check for Unused Variables
The Check for Unused Variables task is optional.
The Check for Unused Variables task is invoked by using the ‘Start Unused Variables
Check’ button on the Refactoring Preparation Tasks screen.
This will invoke the Check for Unused Variables process, which uses the Impact Analysis
function within Natural Engineer, using the combination search keyword REFACTORING
with sub criteria ‘Check for Unused Variables’.
Impact Analysis will look for any unused user-defined or logical view variables.
After the Impact results have been reviewed, the Modification function within Natural
Engineer can be used to comment out any unused variables.

Natural Engineer Advanced Services
64
2
Check for Unused Variables Impact Analysis
The Check for Unused Variables Impact Analysis is invoked by using the ‘Start Unused
Variables Check’ button from the Refactoring Preparation Tasks screen.
This will invoke the Impact Analysis function, where an Impact Version and Impact
Criteria need to be specified.
The Impact Criteria are specified by selecting the combination search keyword
REFACTORING, this will invoke the Refactoring Preferences screen where the ‘Check
for Conversational DB Loops’ option can be selected.
The following Figure 2-11 illustrates the Refactoring Preferences screen with Check for
Unused Variables option specified.
Figure 2-11 Refactoring Preferences screen for Check for Unused Variables
Note: For more information about the combination search keyword REFACTORING refer
to Chapter 3 in the Natural Engineer Application Analysis & Modification for Windows
manual.
After specifying the Impact criteria, run the Impact Analysis using the menu option
AnalysisImpact Execution accessed from the main Natural Engineer screen.

Refactoring
65
2
Check for Unused Variables Modification
After reviewing the Impact results, the impacted objects can be modified using the
Modification function accessed using the menu option ModificationExecute
Modification for All Objects.
The modified objects can be found in the Modification library.
Note: For more information about the Modification function refer to Chapter 2 in the
Natural Engineer Application Analysis & Modification for Windows manual.

Natural Engineer Advanced Services
66
2
Expand Copycodes
The Expand Copycodes task is optional.
The Expand Copycodes task is invoked by using the ‘Start Copycode Expansion’ button
on the Refactoring Preparation Tasks screen.
This will invoke the Expand Copycodes process, which provides the facility to select the
objects within an application that use copycodes, to have the copycodes expanded within
the objects.
Exclusions can be specified to prevent unwanted expansion of copycodes.

Refactoring
67
2
Copycode Expansion Screen
The Copycode Expansion screen allows you to select the objects within an application
containing copycodes, to apply the necessary modification to expand the copycode within
them.
The Copycode Expansion screen is accessed by using the ‘Start Copycode Expansion’
button from the Refactoring Preparation Tasks screen.
The following Figure 2-12 illustrates the Copycode Expansion screen.
Figure 2-12 Copycode Expansion screen

Natural Engineer Advanced Services
68
2
MENU ITEMS OPTIONS DESCRIPTION
File Exit Exit the Copycode Expansion screen and return back to the Refactoring Preparation Tasks screen.
View Change Start
Position of Object List…
Reposition the list of objects to start from a particular object name.
The reposition value can be input using either a
complete name or part name using an '*' (asterisk) wildcard.
The reposition value is appended to the object list title to highlight the type of repositioning being applied.
Possible reposition values are:
Value Result
' ' (blank) Reposition to the top of the object list.
* Reposition to the top of the object
list.
ABC* Only show objects that are prefixed
by 'ABC'.
XYZ Reposition to the first object that
either matches or is greater than 'XYZ' and then continue the object list from that point.
View
Unprocessed Objects Only
Change the list of objects displayed in the Object List.
If checked (indicated by a tick to the left) then only the objects that have not yet been processed are listed.
If unchecked (no tick) then all processed and unprocessed objects are listed.
Object Types Allows you to select the types of object to be listed.
Available selections are:
All Objects
Helproutines
Programs
Subprograms Subroutines
Help Invoke the Copycode Expansion help.

Refactoring
69
2
SCREEN ITEMS DESCRIPTION
Object List List all the objects containing copycodes within the currently selected application.
The list of objects can be tailored to your requirements using the options
available in the Object Types menu. Further refinement can be made using the options 'Change Start Position of Object List…' and ‘View Unprocessed Objects Only’ from the View menu.
The Object List title reflects the objects being listed and will append any reposition values that may have been specified.
Objects can be selected by using a double click with the left hand
mouse button.
Note: Any objects listed that have already been processed will have an ‘*’ (asterisk) appended to the right hand side of the object name.
Selected List all the objects that have been selected for Copycode Expansion processing.
Note: At least one object must be selected to run the process.
Objects can be de-selected by using a double click with the left hand mouse button.
BUTTON NAME DESCRIPTION
Object List group:
Prev Scrolls the object list to previous page.
This button will be available/unavailable depending on the value specified in the LISTBOXMAX parameter in the NATENG.INI file.
More Scrolls the object list forward one page.
This button will be available/unavailable depending on the value specified in the LISTBOXMAX parameter in the NATENG.INI file.

Natural Engineer Advanced Services
70
2
BUTTON NAME DESCRIPTION
Selection / De-selection buttons:
>>> Select all objects in the object list (when more than one page is available, as set by the LISTBOXMAX parameter in the NATENG.INI file).
>> Select all objects on the current page in the object list.
> Select all selected objects in the object list.
< De-select all selected objects in the selected list.
<< De-select all objects on the current page in the selected list.
<<< De-select all objects in the selected list (when more than one page is available, as set by the LISTBOXMAX parameter in the NATENG.INI file).
Selected group:
Prev Scrolls the selected list to previous page.
This button will be available/unavailable depending on the value specified in the LISTBOXMAX parameter in the NATENG.INI file.
More Scrolls the selected list forward one page.
This button will be available/unavailable depending on the value specified in the LISTBOXMAX parameter in the NATENG.INI file.
Copycode Expansion screen:
Excludes Invoke the Copycode Exclusion process.
Execute Invoke the Copycode Expansion process. This will modify the selected
objects by expanding any copycode objects that have not been excluded. The modified objects can be located in the Modification library.
Note: This button is only enabled if any selections have been made.
Cancel Cancel any object selection and return back to the Refactoring Preparation Tasks screen.
Note: For more information on the NATENG.INI file parameter LISTBOXMAX refer to
Chapter 1 in the Natural Engineer Administration Guide for Windows manual.
STATUS BAR ITEM DESCRIPTION
Pane Any Copycode Expansion processing messages.

Refactoring
71
2
Copycode Exclusion Screen
The Copycode Exclusion screen allows you to select the copycode objects, within an
application that you do not want to have expanded within the objects using them.
The Copycode Exclusion screen is accessed by using the ‘Excludes’ button from the
Copycode Expansion screen.
The following Figure 2-13 illustrates the Copycode Exclusion screen.
Figure 2-13 Copycode Exclusion screen

Natural Engineer Advanced Services
72
2
MENU ITEMS OPTIONS DESCRIPTION
File Exit Exit the Copycode Exclusion screen and return back to the Copycode Expansion screen.
View Change Start
Position of Copycode List…
Reposition the list of copycode objects to start from a particular copycode object name.
The reposition value can be input using either a
complete name or part name using an '*' (asterisk) wildcard.
The reposition value is appended to the copycode list title to highlight the type of repositioning being applied.
Possible reposition values are:
Value Result
' ' (blank) Reposition to the top of the copycode object list.
* Reposition to the top of the copycode object list.
ABC* Only show copycode objects that are
prefixed by 'ABC'.
XYZ Reposition to the first copycode
object that either matches or is greater than 'XYZ' and then continue the copycode object list from that point.
Help Invoke the Copycode Exclusion help.

Refactoring
73
2
SCREEN ITEMS DESCRIPTION
Copycode List List all the copycode objects within the currently selected application.
The list of copycode objects can be tailored to your requirements using
the option 'Change Start Position of Copycode List…' from the View menu.
The Copycode List title reflects the copycode objects being listed and will append any reposition values that may have been specified.
Copycode objects can be selected by using a double click with the left hand mouse button.
Selected List all the copycode objects that have been selected for Copycode Exclusion processing.
Note: At least one object must be selected to run the process.
Copycode objects can be de-selected by using a double click with the left hand mouse button.
BUTTON NAME DESCRIPTION
Copycode List group:
Prev Scrolls the copycode object list to previous page.
This button will be available/unavailable depending on the value specified in the LISTBOXMAX parameter in the NATENG.INI file.
More Scrolls the copycode object list forward one page.
This button will be available/unavailable depending on the value specified in the LISTBOXMAX parameter in the NATENG.INI file.

Natural Engineer Advanced Services
74
2
BUTTON NAME DESCRIPTION
Selection / De-selection buttons:
>>> Select all copycode objects in the copycode list (when more than one page
is available, as set by the LISTBOXMAX parameter in the NATENG.INI file).
>> Select all copycode objects on the current page in the copycode list.
> Select all selected copycode objects in the copycode list.
< De-select all selected copycode objects in the selected list.
<< De-select all copycode objects on the current page in the selected list.
<<< De-select all copycode objects in the selected list (when more than one
page is available, as set by the LISTBOXMAX parameter in the NATENG.INI file).
Selected group:
Prev Scrolls the selected list to previous page.
This button will be available/unavailable depending on the value specified in the LISTBOXMAX parameter in the NATENG.INI file.
More Scrolls the selected list forward one page.
This button will be available/unavailable depending on the value specified in the LISTBOXMAX parameter in the NATENG.INI file.
Copycode Exclusion screen:
OK Saves the Copycode Exclusion settings and close the current screen.
Note: This button is only enabled if any selections have been made.
Cancel Cancel any copycode object selection and return back to the Copycode Expansion screen.
Note: For more information on the NATENG.INI file parameter LISTBOXMAX refer to
Chapter 1 in the Natural Engineer Administration Guide for Windows manual.
STATUS BAR ITEM DESCRIPTION
Pane Any Copycode Exclusion processing messages.

Refactoring
75
2
Componentization
The Refactoring Componentization screen is used to control and initiate all the tasks
required to restructure Natural applications.
The topics covered are:
1. Component Builder
2. Similar Code
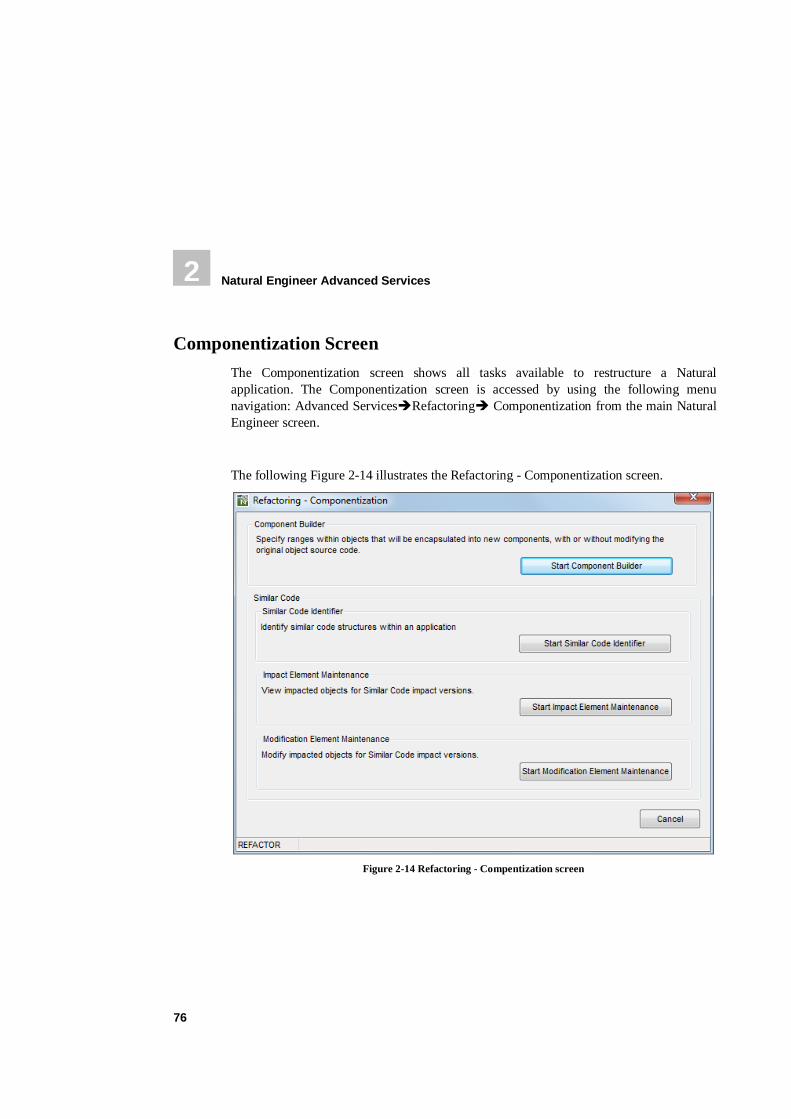
Natural Engineer Advanced Services
76
2
Componentization Screen
The Componentization screen shows all tasks available to restructure a Natural
application. The Componentization screen is accessed by using the following menu
navigation: Advanced ServicesRefactoring Componentization from the main Natural
Engineer screen.
The following Figure 2-14 illustrates the Refactoring - Componentization screen.
Figure 2-14 Refactoring - Compentization screen

Refactoring
77
2
Component Builder
The Component Builder option provides the facility to specify line ranges which will be
encapsulated into new Natural components. These components may then be used as
independent Natural objects.
The following tasks may be actioned depending on the selections made.
1. Generate new subprogram objects.
New subprogram objects are created in the Modification library with the source code for
the selected line ranges from the original object copied into it. If a subprogram name has
been specified for the line range, this will be used to create the new object.
2. Generate Parameter Data Area (PDA) objects.
PDA objects are generated for any data that needs to be passed between the calling object
and the new subprogram. If a PDA name has been specified for the line range, this will be
used to create the new object.
3. Generate Local Data Area (LDA) objects.
LDA objects are generated for all the data items that are found within the selected line
range. If an LDA name has been specified for the line range, this will be used to create the
new object.
4. Modify the original object to reference the new subprogram object.
The original object will be modified to remove the source code for the line range specified.
This is replaced with a CALLNAT statement to call the new subprogram and pass any
required parameters. Only valid where only one line range has been selected.

Natural Engineer Advanced Services
78
2
Component Builder Window
The Component Builder screen can be accessed by using the 'Component Builder' button
from the Refactoring - Componentization screen.
The following Figure 2-15 illustrates the Component Builder screen.
Figure 2-15 Component Builder screen

Refactoring
79
2
MENU ITEMS OPTIONS DESCRIPTION
File Exit Exit the Component Builder screen and return back to the Refactoring Componentization screen.
View Change Start
Position of Object List…
Reposition the list of objects to start from a particular object name.
The reposition value can be input using either a
complete name or part name using an '*' (asterisk) wildcard.
The reposition value is appended to the object list title to highlight the type of repositioning being applied.
Possible reposition values are:
Value Result
' ' (blank) Reposition to the top of the object list.
* Reposition to the top of the object
list.
ABC* Only show objects that are prefixed
by 'ABC'.
XYZ Reposition to the first object that
either matches or is greater than 'XYZ' and then continue the object list from that point.
Object Types Allows you to select the types of object to be listed.
Available selections are:
All Objects
Helproutines
Programs
Subprograms Subroutines
Help Invoke the Component Builder help.

Natural Engineer Advanced Services
80
2
SCREEN ITEMS DESCRIPTION
Object List List of all the objects used by the currently selected application.
The list of objects can be tailored to your requirements using the options
available in the Object Types menu. Further refinement can be made using the option 'Change Start Position of Object List…' from the View menu.
The Object List title reflects the Object Types being listed and will append any reposition values that may have been specified.
Objects can be selected using the left mouse button with a single click.
Any objects that have had line ranges saved will show with an asterisk (*) to the right of the object name. For example: XX021P01 *.
Line Range group:
Start The start of range statement line number.
End The end of range statement line number.
Generated Object Names:
PDA Name for the generated PDA object.
If left blank the object will be derived from the mask setting of COMPONENT_OBJECT_NAME in the NATENG.INI file.
LDA Name for the generated LDA object.
If left blank the object will be derived from the mask setting of COMPONENT_OBJECT_NAME in the NATENG.INI file.
Subprogram Name for the generated subprogram object.
If left blank the object will be derived from the mask setting of COMPONENT_OBJECT_NAME in the NATENG.INI file.
Line Ranges group:
Line Ranges List List of all the line ranges that have been saved for an object.
Source Code Display the selected source code for the currently selected object. Any
source code lines that are part of a saved line range will be colored blue and will have the following in the first 2 bytes of the line:
CS Indicates that the line is the start of a range.
CE Indicates that the line is the end of a range.

Refactoring
81
2
BUTTON NAME DESCRIPTION
Object List group:
Both This button provides additional refinement of the objects listed in the
Objects List box. This button has three different states, with the button text changing accordingly:
Both The default for the screen is to list all objects whether they have line ranges saved or not.
OEM O Only list objects that have line ranges saved, i.e., OEM data available.
N OEM Only list objects that have no line ranges saved, i.e., no OEM data available.
Prev Scrolls the object list to previous page. This button will be
available/unavailable depending on the value specified in the LISTBOXMAX parameter in the NATENG.INI file.
More Scrolls the object list to forward one page. This button will be available/unavailable depending on the value specified in the LISTBOXMAX parameter in the NATENG.INI file.
Details group:
Discard Reset the current Line Range details.
Add / Replace Add / Replace the current Line Range details.
Button text will read 'Add' for new details and 'Replace' for any existing details (when selecting existing saved Line Ranges).
Line Ranges group:
Delete Delete the selected line range.
Component Builder screen:
Build Subprogram(s) only
Enabled when at least one line range has been added. Subprogram objects will be generated for each line range along with any necessary PDA and
LDA objects. Objects are written to the Modification library for this application.
Modify Object &
Build Subprogram
Enabled when no or only one line range has been added. A Subprogram
object will be generated for the line range along with a PDA and LDA object as necessary. The original object will be modified to remove the code within the line range and replace with a ‘callnat’ to the new subprogram. Objects are written to the Modification library for this application.

Natural Engineer Advanced Services
82
2
BUTTON NAME DESCRIPTION
Object List group:
Cancel Cancel the Component Builder process and return back to the Refactoring Componentization screen.
Note: For more information on the NATENG.INI file parameter LISTBOXMAX refer to
Chapter 1 in the Natural Engineer Administration Guide for Windows manual.

Refactoring
83
2
STATUS BAR ITEM DESCRIPTION
The Component Builder status bar is divided into 3 individual panes.
Pane 1 Name of the selected object.
If the selected object is from a steplib, then the steplib library name will also be shown here.
Pane 2 Object type of the selected object.
Pane 3 Any Component Builder processing messages.

Natural Engineer Advanced Services
84
2
Similar Code Identifier
The Similar Code option provides the facility to search for similar source code structures
within an application. For example, to find instances of a particular read of a database file
within an application, to find date or currency conversions.
The process to locate similar code structures is invoked by simply reviewing the existing
objects within an application and selecting the start and end line number range of the
source code required. This will pinpoint the keywords and their respective order, which
Impact will use to identify the similar source code.
Once all the selections have been completed, Impact Analysis needs to be executed and the
Impact results reviewed.
For example; the following source code start and end line range is selected:
::::
0150 READ VEHICLES
0160 DISPLAY MAKE MODEL *ISN
0170 END-READ
::::
This will pinpoint the keywords and their respective order to be
READ
DISPLAY
END-READ
And result in identifying the following source code structures:
::::
0150 READ VEHICLES
0160 DISPLAY MAKE MODEL *ISN
0170 END-READ
::::
0620 READ EMPLOYEES
0630 DISPLAY PERSONNEL-ID NAME
0640 END-READ
::::

Refactoring
85
2
But not the following source code structure:
::::
1050 READ VEHICLES
1060 ADD 1 TO #RECORDS-COUNTER
1070 DISPLAY MAKE MODEL *ISN
1080 END-READ
::::
This is because the code structure block contains an extra keyword ‘ADD’, which was not
part of the original selection.

Natural Engineer Advanced Services
86
2
Similar Code Identifier Window
The Similar Code screen can be accessed by using the 'Similar Code Identifier’ button
from the Refactoring Componentization screen.
The following Figure 2-16 illustrates the Similar Code Identifier screen.
Figure 2-16 Similar Code Identifier screen

Refactoring
87
2
SCREEN ITEMS DESCRIPTION
Impact Versions group:
Impact Versions Change the Impact version to review alternate Similar Code Impact Criteria for the application.
Select ‘Add a new Impact Version’ to define new Similar Code Identifier criteria.
Impact Nbr The number of the Impact version
Description The Description of the Impact version
Object Filtering Options group:
Object Types Allows you to select the types of object to be listed.
Available selections are:
All Objects
Programs
Subprograms
Maps
Subroutines Copycodes
Language Allows you to select the programming language of the objects to be listed.
Available selections are dependent on the type of objects loaded into the repository but may include:
All
Cobol
JCL Natural

Natural Engineer Advanced Services
88
2
Object List group:
Object List List of all the objects used by the currently selected application.
The list of objects can be tailored to your requirements using the options available in the Object Types menu. Further refinement can be made using the option 'Change Start Position of Object List…' from the View menu.
The Object List title reflects the Object Types being listed and will append any reposition values that may have been specified.
Objects can be selected using the left mouse button with a single click.
Any objects that have had line ranges saved will show with an asterisk (*) to the right of the object name. For example: XX021P01 *.
Details - Line Range group:
Start The start of range statement line number.
End The end of range statement line number.
Replacement TLM The name of the Text Logic Member (TLM) to replace the impacted range in the object source code.
Tolerance Level (%) Allows for a level of mis-match between the selected code and the Similar Code Criteria.
Details - Current Selected Range group:
Object The name of the object containing the selected line range.
Start The start of range statement line number.
End The end of range statement line number.
Current Selected Keywords group:
Keyword List List of all the keywords that have been found in the specified line ranges.
These will be used by the Impact process to identify similar code structures throughout the application.
Including Fields If selected, then the Similar Code Identifier process will also check the fields that are part of the marked syntax. For example:
MOVE #A TO #B
With the Including Fields selected, the process would look for MOVE
statements with the fields #A and #B. If not selected, then the fields would be ignored, and only MOVE statements identified.

Refactoring
89
2
Source Code group:
Source Code Display the selected source code for the currently selected object. Any source code lines that are part of a saved line range will be colored blue and will have the following in the first 2 bytes of the line:
CS Indicates that the line is the start of a range.
CE Indicates that the line is the end of a range.
Note: If a single line has been selected for start and end ranges, e.g., 0100-0100, then the indicator will show only CS.
BUTTON NAME DESCRIPTION
Object List group:
Prev Scrolls the object list to previous page.
This button will be available/unavailable depending on the value specified in the LISTBOXMAX parameter in the NATENG.INI file.
More Scrolls the object list to forward one page.
This button will be available/unavailable depending on the value specified in the LISTBOXMAX parameter in the NATENG.INI file.
Line Range group:
Discard Reset the current Line Range start and end details.
Add / Replace Add / Replace the Current Selected Range and Current Selected Keywords details.
Button text will read 'Add' for new details and 'Replace' if there are any previously saved details.
Current Selected Range group:
Delete Delete the selected line range.
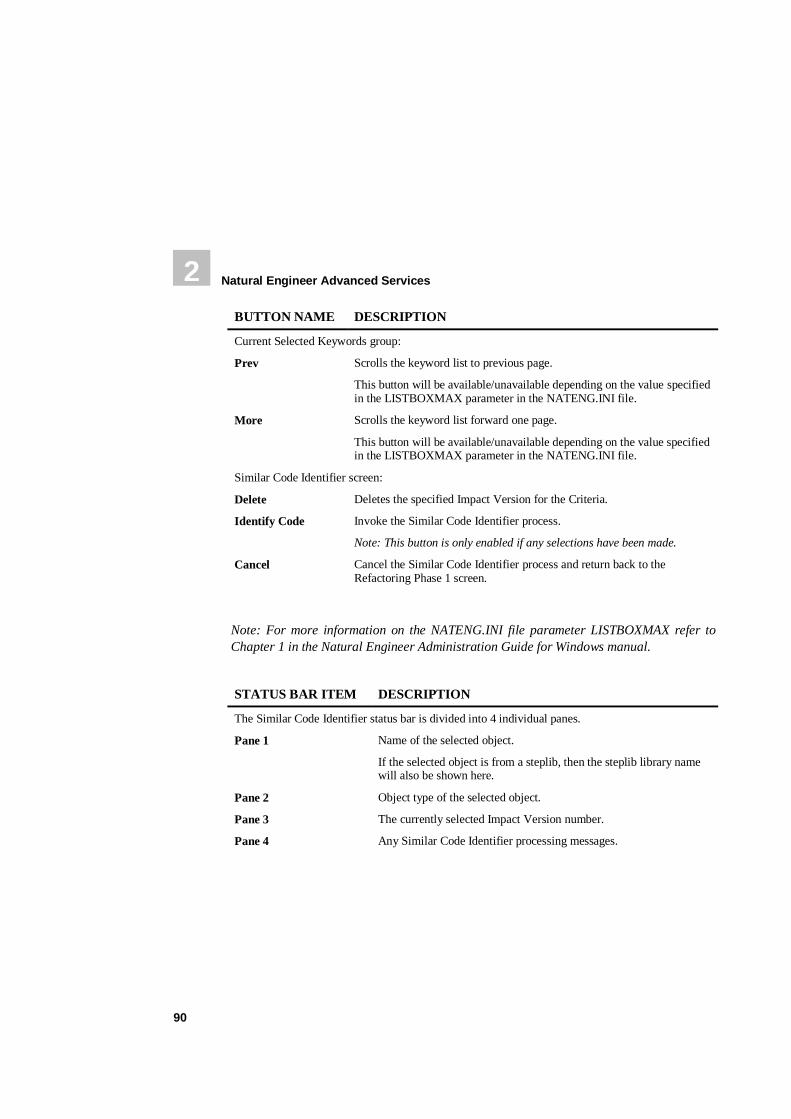
Natural Engineer Advanced Services
90
2
BUTTON NAME DESCRIPTION
Current Selected Keywords group:
Prev Scrolls the keyword list to previous page.
This button will be available/unavailable depending on the value specified in the LISTBOXMAX parameter in the NATENG.INI file.
More Scrolls the keyword list forward one page.
This button will be available/unavailable depending on the value specified in the LISTBOXMAX parameter in the NATENG.INI file.
Similar Code Identifier screen:
Delete Deletes the specified Impact Version for the Criteria.
Identify Code Invoke the Similar Code Identifier process.
Note: This button is only enabled if any selections have been made.
Cancel Cancel the Similar Code Identifier process and return back to the Refactoring Phase 1 screen.
Note: For more information on the NATENG.INI file parameter LISTBOXMAX refer to
Chapter 1 in the Natural Engineer Administration Guide for Windows manual.
STATUS BAR ITEM DESCRIPTION
The Similar Code Identifier status bar is divided into 4 individual panes.
Pane 1 Name of the selected object.
If the selected object is from a steplib, then the steplib library name will also be shown here.
Pane 2 Object type of the selected object.
Pane 3 The currently selected Impact Version number.
Pane 4 Any Similar Code Identifier processing messages.

Refactoring
91
2
Similar Code Identifier - Impact Element Maintenance
The Impact Element Maintenance option provides the facility to review the results of the
executed Impact Analysis for the Similar Code Identifier Option. All impacted objects
within the chosen applications are available for selection. Once selected the impacted
items within the object are listed.
The impacted items can be selected to reveal the source code context within the object and
the impact match reason showing why the item has been impacted. The context of the data
item within the data definitions of the selected object are also shown.
Note: For more information on the Impact Element Maintenance Screen refer to Chapter
1 in the Natural Engineer Application Analysis & Modification for Windows manual.
Similar Code Identifier - Modification Element Maintenance
The Modification Element Maintenance option provides the facility to review and modify
interactively, the default modifications to be applied to objects from the Similar Code
Identifier Impact execution. All impacted objects within an application are available for
selection; once selected a list of the impacted items within the object are listed.
The Modification Element Maintenance option allows each modification to be updated to
change the modification types, categories and replacement values as desired. The
Modification changes to be applied can be reviewed before they are implemented, using
the Browser.
The Modification Element Maintenance option also provides the facility to review the
Impact results in the Browser.
Note: For more information on the Modification Element Maintenance Screen refer to
Chapter 2 in the Natural Engineer Application Analysis & Modification for Windows
manual.

Natural Engineer Advanced Services
92
2
Database Split
The Database Split screen provides a series of tasks to control and initiate all the tasks
required to separate any Database Access from a Natural Application.
The topics covered are:
1. DDM Selection
2. User View Analysis
3. Refactor Database Access

Refactoring
93
2
Database Split Screen
The Database Split screen shows all tasks available to separate any Database Access from
a Natural Application.
The Database Split screen is accessed by using the following menu navigation: Advanced
ServicesRefactoring Database Split from the main Natural Engineer screen.
The following Figure 2-17 illustrates the Refactoring – Database Split screen.
Figure 2-17 Refactoring – Database Split screen

Natural Engineer Advanced Services
94
2
Data Definition Module Selection
The Data Definition Module Selection task is invoked by using the ‘Start DDM Selection’
button on the Refactoring – Database Split screen.
This will invoke the Data Definition Module Selection process, which provides the facility
to select the DDMs within an application that are to be processed during the User View
Analysis and Refactor Database Access processes. If no DDMs are selected, then the User
View Analysis and Refactor Database Access processes will process all the DDMs within
the application.

Refactoring
95
2
DDM Selection Screen
The DDM Selection screen allows you to select the DDMs within an application, to which
to apply the necessary modification to encapsulate each database access in a new
generated subprogram, and change the original database access to call the new
subprogram.
For each selected DDM, the User View Analysis and Refactor Database Access processing
will only process the database accesses for these selected DDMs. All non-selected DDMs
will be ignored.
If no DDMs are selected, then all the DDMs will be processed during the User View
Analysis and Refactor Database Access processing.
The DDM Selection screen is accessed by using the ‘Start DDM Selection’ button from
the Refactoring – Database Split screen.
The following Figure 2-18 illustrates the DDM Selection screen.
Figure 2-18 DDM Selection screen

Natural Engineer Advanced Services
96
2
MENU ITEMS OPTIONS DESCRIPTION
File Exit Exit the DDM Selection screen and return back to the Refactoring – Database Split screen.
View Change Start
Position of DDM List…
Reposition the list of DDM objects to start from a particular DDM object name.
The reposition value can be input using either a
complete name or part name using an '*' (asterisk) wildcard.
The reposition value is appended to the DDM list title to highlight the type of repositioning being applied.
Possible reposition values are:
Value Result
' ' (blank) Reposition to the top of the DDM list.
* Reposition to the top of the DDM
list.
ABC* Only show DDMs that are prefixed
by 'ABC'.
XYZ Reposition to the first DDM object
that either matches or is greater than 'XYZ' and then continue the DDM list from that point.
Help Invoke the DDM Selection help.

Refactoring
97
2
SCREEN ITEMS DESCRIPTION
DDM List List all the DDM objects used by the currently selected application.
The list of DDM objects can be tailored to your requirements using the option 'Change Start Position of DDM List…'from the View menu.
The DDM List title reflects the DDM objects being listed and will append any reposition values that may have been specified.
DDM objects can be selected by using a double click with the left hand mouse button.
Selected List all the DDM objects that have been selected for User View Analysis and Refactor Database Access processing.
DDM objects can be de-selected by using a double click with the left
hand mouse button.
BUTTON NAME DESCRIPTION
DDM List group:
Prev Scrolls the DDM object list to previous page.
This button will be available/unavailable depending on the value specified in the LISTBOXMAX parameter in the NATENG.INI file.
More Scrolls the DDM object list forward one page.
This button will be available/unavailable depending on the value specified in the LISTBOXMAX parameter in the NATENG.INI file.

Natural Engineer Advanced Services
98
2
BUTTON NAME DESCRIPTION
Selection / De-selection buttons:
>>> Select all DDM objects in the DDM list (when more than one page is
available, as set by the LISTBOXMAX parameter in the NATENG.INI file).
>> Select all DDM objects on the current page in the DDM list.
> Select all selected DDM objects in the DDM list.
< De-select all selected DDM objects in the selected list.
<< De-select all DDM objects on the current page in the selected list.
<<< De-select all DDM objects in the selected list (when more than one page
is available, as set by the LISTBOXMAX parameter in the NATENG.INI file).
Selected group:
Prev Scrolls the selected list to previous page.
This button will be available/unavailable depending on the value specified in the LISTBOXMAX parameter in the NATENG.INI file.
More Scrolls the selected list forward one page.
This button will be available/unavailable depending on the value specified in the LISTBOXMAX parameter in the NATENG.INI file.
DDM Selection screen:
OK Saves the DDM Selection settings.
Cancel Cancel any DDM object selection and return back to the Refactoring – Database Split screen.
Note: For more information on the NATENG.INI file parameter LISTBOXMAX refer to
Chapter 1 in the Natural Engineer Administration Guide for Windows manual.
STATUS BAR ITEM DESCRIPTION
Pane Any DDM Selection processing messages.
Refactoring
99
2
User View Analysis
The User View Analysis task is invoked by using the ‘Start User View Analysis’ button on
the Refactoring – Database Split screen.
This will invoke the User View Analysis process, which will identify all the database
accesses within a Natural application’s objects, new consolidated Views are identified
adding all the fields for the DDM being referenced for each new View.
Note: The database accesses are controlled by the DDMs that have been selected using the
Data Definition Module Selection task. If no DDMs have been selected then all DDMs and
database accesses will be processed. For more information refer to the section Data
Definition Module Selection.
The User View Analysis task identifies two types of view:
1. Access Views
These are views that are used by read only database access statements.
2. Update Views
These are views that are used by update database access statements.
The new Access and Update Views are generated internally for use by Natural Engineer
during the Refactor Database Access process.
Natural Engineer Advanced Services
100
2
Refactor Database Access
The Refactor Database Access task is invoked by using the ‘Start Refactor Database
Access’ button on the Refactoring – Database Split screen.
This will invoke the Refactor Database Access process, which provides the facility to
select the objects within an application containing database accesses and modify them to
remove the database access statements into new generated subprograms. The original
objects containing the database accesses are changed to call the new subprograms.
Note: The database accesses are controlled by the DDMs that have been selected using the
Data Definition Module Selection task. If no DDMs have been selected then all DDMs and
database accesses will be processed. For more information refer to the section Data
Definition Module Selection.
The modified objects and new generated subprograms are found in the Modifcation
library.
Note: If any of the objects need to be refactored again, then it is recommended that the
modification library is empty and that the User View Analysis process is re-run first.

Refactoring
101
2
Refactor Database Access Screen
The Refactor Database Access screen allows you to select the objects within an application
containing database access statements, to apply the necessary modification to encapsulate
each database access in a new generated subprogram, and change the original database
access to call the new subprogram.
All modified and new generated objects are located in the Modification library.
The Refactor Database Access screen is accessed by using the ‘Start Refactor Database
Access’ button from the Refactoring – Database Split screen.
The following Figure 2-19 illustrates the Refactor Database Access screen.
Figure 2-19 Refactor Database Access screen

Natural Engineer Advanced Services
102
2
MENU ITEMS OPTIONS DESCRIPTION
File Exit Exit the Refactor Database Access screen and return back to the Refactoring – Database Split screen.
View Change Start
Position of Object List…
Reposition the list of objects to start from a particular object name.
The reposition value can be input using either a
complete name or part name using an '*' (asterisk) wildcard.
The reposition value is appended to the object list title to highlight the type of repositioning being applied.
Possible reposition values are:
Value Result
' ' (blank) Reposition to the top of the object list.
* Reposition to the top of the object
list.
ABC* Only show objects that are prefixed
by 'ABC'.
XYZ Reposition to the first object that
either matches or is greater than 'XYZ' and then continue the object list from that point.
View
Unprocessed Objects Only
Change the list of objects displayed in the Object List.
If checked (indicated by a tick to the left) then only the objects that have not yet been processed are listed.
If unchecked (no tick) then all processed and unprocessed objects are listed.
Object Types Allows you to select the types of object to be listed.
Available selections are:
All Objects
Helproutines
Programs
Subprograms Subroutines
Help Invoke the Refactor Database Access help.

Refactoring
103
2
SCREEN ITEMS DESCRIPTION
Object List List all the objects within the currently selected application that contain database access statements.
The list of objects can be tailored to your requirements using the options
available in the Object Types menu. Further refinement can be made using the options 'Change Start Position of Object List…' and ‘View Unprocessed Objects Only’ from the View menu.
The Object List title reflects the objects being listed and will append any reposition values that may have been specified.
Objects can be selected by using a double click with the left hand
mouse button.
Note: Any objects listed that have already been processed will have an ‘*’ (asterisk) appended to the right hand side of the object name.
Selected List all the objects that have been selected for Refactor Database Access processing.
Note: At least one object must be selected to run the process.
Objects can be de-selected by using a double click with the left hand mouse button.
BUTTON NAME DESCRIPTION
Object List group:
Prev Scrolls the object list to previous page.
This button will be available/unavailable depending on the value specified in the LISTBOXMAX parameter in the NATENG.INI file.
More Scrolls the object list forward one page.
This button will be available/unavailable depending on the value specified in the LISTBOXMAX parameter in the NATENG.INI file.

Natural Engineer Advanced Services
104
2
BUTTON NAME DESCRIPTION
Selection / De-selection buttons:
>>> Select all objects in the object list (when more than one page is available, as set by the LISTBOXMAX parameter in the NATENG.INI file).
>> Select all objects on the current page in the object list.
> Select all selected objects in the object list.
< De-select all selected objects in the selected list.
<< De-select all objects on the current page in the selected list.
<<< De-select all objects in the selected list (when more than one page is available, as set by the LISTBOXMAX parameter in the NATENG.INI file).
Selected group:
Prev Scrolls the selected list to previous page.
This button will be available/unavailable depending on the value specified in the LISTBOXMAX parameter in the NATENG.INI file.
More Scrolls the selected list forward one page.
This button will be available/unavailable depending on the value specified in the LISTBOXMAX parameter in the NATENG.INI file.
Refactor Database Access screen:
Execute Invoke the Refactor Database Access process for the selected objects.
Cancel Cancel any object selection and return back to the Refactoring – Database Split screen.
Note: For more information on the NATENG.INI file parameter LISTBOXMAX refer to
Chapter 1 in the Natural Engineer Administration Guide for Windows manual.
STATUS BAR ITEM DESCRIPTION
Pane Any Refactor Database Access processing messages.

105
3 BUSINESS RULES
Chapter Overview
This chapter describes the Business Rules option available from the Advanced Services
option on the main Natural Engineer menu.
The following topics are covered:
1. Business Rules Overview
2. Business Rules Workflow
3. Rule Type Maintenance
4. Candidate Creation
5. Candidate Maintenance
6. Rule Definition
7. Component Generation

Natural Engineer Advanced Services
106
3
Business Rules Overview
The Business Rules screen provides a series of tasks to identify and specify business logic
and their associated code snippets. The topics are invoked via the Business Rules
Workflow screen.
As a precursor to Business Rules processing it is recommended that copycodes should be
expanded for all Applications/Objects to be used within the Business Rules process. This
may be performed by using the following menu navigation: Advanced
ServicesRefactoringPreparationExpand Copycodes from the main Natural
Engineer screen.
The individual topics covered are:
1. Rule Type Maintenance
2. Candidate Creation
3. Candidate Maintenance
4. Rule Definition
5. Component Generation

Business Rules
107
3
Business Rules Workflow
The Business Rules Workflow screen is accessed by using the following menu navigation:
Advanced ServicesBusiness Rules from the main Natural Engineer screen.
The following Figure 3-1 illustrates the Business Rules Workflow screen.
Figure 3-1 Refactoring – Business Rules screen

Natural Engineer Advanced Services
108
3
SCREEN ITEMS DESCRIPTION
Rule Type
Maintenance
This option provides the facility to add, update or delete Business Rule
Types. Rule types contain the criteria by which Candidate Rules can be found within the existing system when applied against an impact version.
Candidate Creation This option provide the facility to find candidates that meet that criteria
for the selected impact analysis based on the criteria within the Rule Type chosen,. These Candidates can form the building blocks of Business Rules and their associated components.
Candidate Maintenance
This option provides the facility to add, update or delete Candidate Rules and snippets.
Rule Definition This option provides the facility to define a Business Rule and assign code snippets to it.
Component
Generation
This option provides the facility to generate the new object based on the rules specified.
BUTTON NAME DESCRIPTION
Start Rule Type
Maintenance
Invoke the Rule Type Maintenance process.
For more information refer to the section Rule Type Maintenance.
Start Candidate Creation
Invoke the Candidate Creation process.
For more information refer to the section Candidate Creation.
Start Candidate Maintenance
Invoke the Candidate Maintenance process.
For more information refer to the section Candidate Maintenance.
Start Rule
Definition
Invoke the Rule Definition process.
For more information refer to the section Rule Definition.
Start Component
Generation
Invoke the Component Generation process.
For more information refer to the section Component Generation.
Cancel Cancel the Business Rules Workflow process and return back to the main Natural Engineer screen.
STATUS BAR ITEM DESCRIPTION
The Business Rules Workflow status bar is divided into 2 individual panes.
Pane 1 Name of the selected application.
Pane 2 Any Business Rules Workflow processing messages.
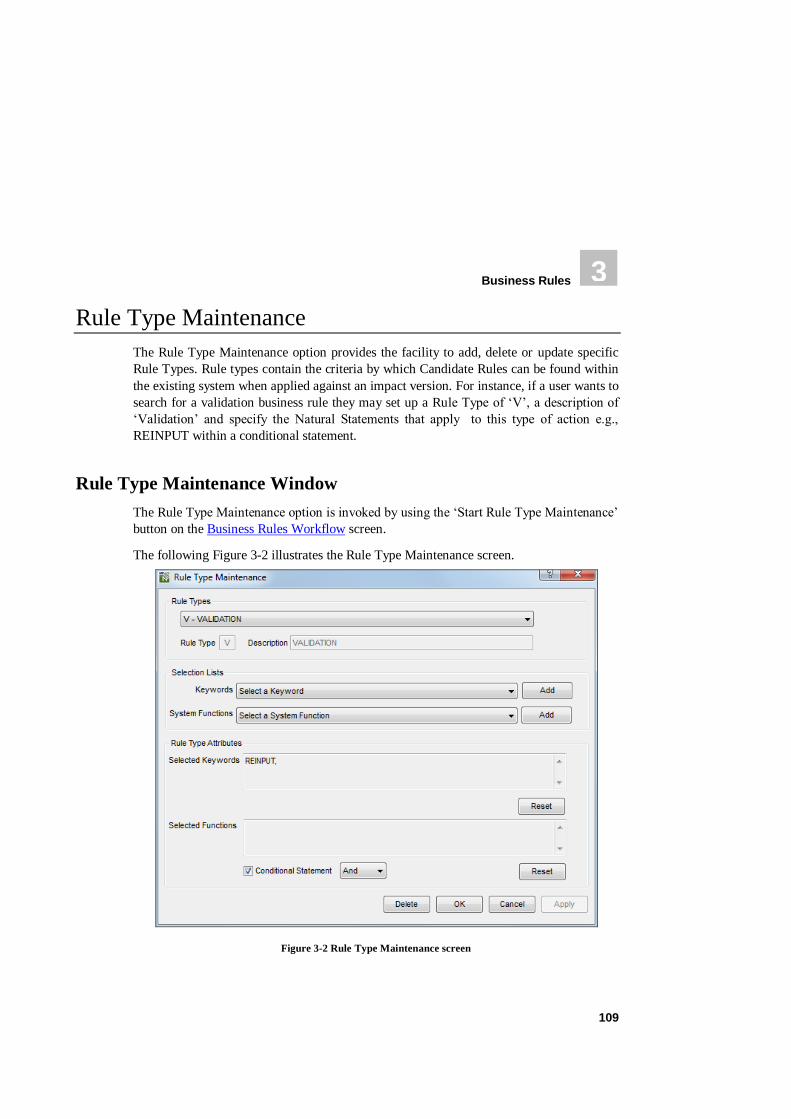
Business Rules
109
3
Rule Type Maintenance
The Rule Type Maintenance option provides the facility to add, delete or update specific
Rule Types. Rule types contain the criteria by which Candidate Rules can be found within
the existing system when applied against an impact version. For instance, if a user wants to
search for a validation business rule they may set up a Rule Type of ‘V’, a description of
‘Validation’ and specify the Natural Statements that apply to this type of action e.g.,
REINPUT within a conditional statement.
Rule Type Maintenance Window
The Rule Type Maintenance option is invoked by using the ‘Start Rule Type Maintenance’
button on the Business Rules Workflow screen.
The following Figure 3-2 illustrates the Rule Type Maintenance screen.
Figure 3-2 Rule Type Maintenance screen
Natural Engineer Advanced Services
110
3
SCREEN ITEMS DESCRIPTION
Rule Types group:
Rule Types
Selection
Existing Rule Types may be selected or a new one added. If ‘Add a new
Rule Type’ is selected the Rule Type and Rule Type Description fields will become available for input.
Rule Type The unique identifier of the Rule Type.
Rule Type Description
The description of the Rule Type.
Selection Lists group:
Keywords Selects any Natural Keywords that apply to the Rule Type.
System Functions Selects any Natural System Functions that apply to the Rule Type.
Rule Types Attributes group:
Selected Keywords Lists all the selected keywords for the Rule Type.
Selected Functions Lists all the selected functions for the Rule Type.
Conditional
Statement
This option determines if the Rule Type attributes are located within a
conditional block within the Natural Code e.g., within an IF or DECIDE statement.
If selected the following options apply:
AND All the selected attributes must be located within a conditional block.
OR At least one selected attribute must be located within a conditional block.
BUTTON NAME DESCRIPTION
Selection Lists group:.
Add Keywords Adds the Keyword to the Rule Types Attributes selected keyword list.
Add System
Functions
Adds the System Function to the Rule Types Attributes selected functions list.
Rule Types Attributes group:
Reset Selected
Keywords
Removes all selected keywords for the selected Rule Type.

Business Rules
111
3
BUTTON NAME DESCRIPTION
Reset Selected
Functions
Removes all selected functions for the selected Rule Type.
Rule Type Maintenance screen:
Delete Deletes the selected Rule Type.
OK Save changes and close the current screen.
Cancel Cancel the Rule Type Maintenance process and return back to the Business Rules screen.
Apply Save changes and retain the current screen.
Note: This button is only enabled if any changes have been made.

Natural Engineer Advanced Services
112
3
Candidate Creation
The Candidate Creation option provides the facility to find candidates (pieces of Natural
Code) that meet that criteria for the selected impact analysis based on the criteria within
the Rule Type chosen. These Candidates can form the building blocks of Business Rules
and their associated components and are stored as Candidate Snippets with Natural
Engineer. The impact analysis would have been pre-run against an application.
Candidate Creation Window
The Candidate Creation option is invoked by using the ‘Start Candidate Creation’ button
on the Business Rules Workflow screen.
The following Figure 3-3 illustrates the Candidate Creation screen.
Figure 3-3 Candidate Creation screen

Business Rules
113
3
SCREEN ITEMS DESCRIPTION
Candidate Creation Criteria group:
Rule Type Select the Rule Type to apply to the impact results.
Application The Application name.
Impact Versions The Impact Version.
Object Selection group:
Object List List all the objects within the currently selected application that have been impacted.
The list of objects can be tailored to your requirements using the options 'Change Start Position of Object List…' from the Object List context menu.
Objects can be selected by using a double click with the left hand mouse
button.
Note: Any objects listed that have already been processed will have an ‘*’ (asterisk) appended to the right hand side of the object name.
Selected List all the objects that have been selected for Candidate Creation processing.
Note: At least one object must be selected to run the process.
Objects can be de-selected by using a double click with the left hand
mouse button.
BUTTON NAME DESCRIPTION
Candidate Creation Criteria group:
Application
Selection [….]
Invokes the General Selection screen, listing all the available Applications.
Objects group:
Prev Scrolls the object list to previous page.
This button will be available/unavailable depending on the value specified in the LISTBOXMAX parameter in the NATENG.INI file.

Natural Engineer Advanced Services
114
3
BUTTON NAME DESCRIPTION
More Scrolls the object list forward one page.
This button will be available/unavailable depending on the value specified in the LISTBOXMAX parameter in the NATENG.INI file.
Selection / De-selection buttons:
>>> Select all objects in the list (when more than one page is available. The
amount of entries on a page is controlled by the LISTBOXMAX parameter in the NATENG.INI file).
>> Select all objects on the current page in the list.
> Select all selected objects in the list.
< De-select all selected objects in the selected list.
<< De-select all objects on the current page in the selected list.
<<< De-select all objects in the selected list (when more than one page is
available. The amount of entries on a page is controlled by the LISTBOXMAX parameter in the NATENG.INI file).
Selected group:
Prev Scrolls the selected list to previous page.
This button will be available/unavailable depending on the value specified in the LISTBOXMAX parameter in the NATENG.INI file.
More Scrolls the selected list forward one page.
This button will be available/unavailable depending on the value specified in the LISTBOXMAX parameter in the NATENG.INI file.
Candidate Creation screen:
Execute Invoke the Candidate Creation process for the selected objects.
Cancel Cancel the Candidate Creation process and return back to the Business Rules screen.

Business Rules
115
3
Candidate Maintenance
The Candidate Maintenance option provides the option provides the facility to add, update
or delete Candidate Rules and snippets. These may be rules and snippets created by the
Candidate Creation process or new ones based on code samples.
Candidate Maintenance Window
The Candidate Maintenance option is invoked by using the ‘Start Candidate Maintenance’
button on the Business Rules Workflow screen.
The following Figure 3-4 illustrates the Candidate Maintenance screen.
Figure 3-4 Candidate Maintenance screen

Natural Engineer Advanced Services
116
3
SCREEN ITEMS DESCRIPTION
Candidate Rules group:
Candidate Rule Selection
Existing Candidate Rules may be selected or a new one added. If ‘Add a new Candidate Rule’ is selected the Candidate Rule field will become available for input. Snippets for a particular Application and Object may then be selected using the Select an Object process.
Candidate Rule The unique identifier of the Candidate Rule.
Candidate Snippets group:
Application The name of the Application where the snippet derived from.
Object The name of the Object where the snippet derived from.
Start The starting statement number of the snippet.
End The ending statement number of the snippet.
Select an Object group:
This allows additional snippets to be added to the selected Candidate Rule from any
Application/Object within the repository. So a Candidate Rule could contain snippets from more than one application.
Application The name of the Application to select the snippet from.
Object The name of the Object to select the snippet from.
Candidate Maintenance screen:
Source Code Display the selected source code for the currently selected object. Any source code lines that are part of a saved line range will be colored blue and will have the following in the first 2 bytes of the line:
CS Indicates that the line is the start of a range.
CE Indicates that the line is the end of a range.
Note: If a single line has been selected for start and end ranges, e.g., 0100-0100, then the indicator will show only CS.
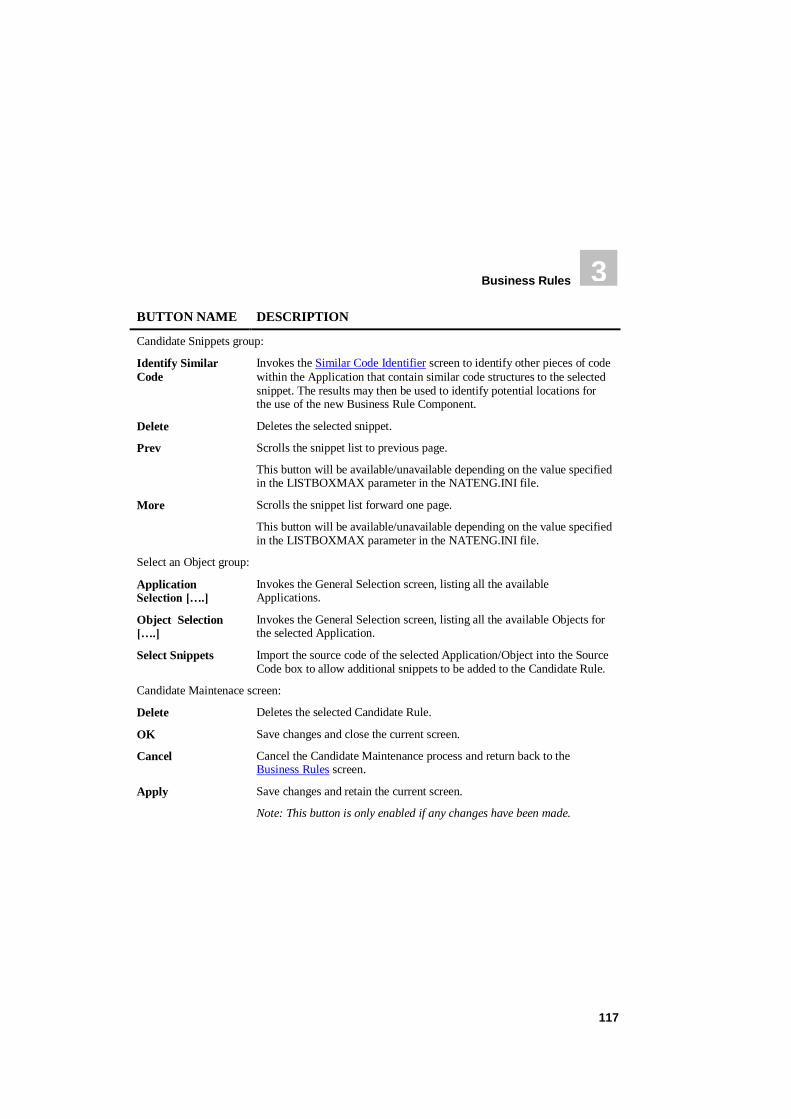
Business Rules
117
3
BUTTON NAME DESCRIPTION
Candidate Snippets group:
Identify Similar
Code
Invokes the Similar Code Identifier screen to identify other pieces of code
within the Application that contain similar code structures to the selected snippet. The results may then be used to identify potential locations for the use of the new Business Rule Component.
Delete Deletes the selected snippet.
Prev Scrolls the snippet list to previous page.
This button will be available/unavailable depending on the value specified in the LISTBOXMAX parameter in the NATENG.INI file.
More Scrolls the snippet list forward one page.
This button will be available/unavailable depending on the value specified in the LISTBOXMAX parameter in the NATENG.INI file.
Select an Object group:
Application Selection [….]
Invokes the General Selection screen, listing all the available Applications.
Object Selection [….]
Invokes the General Selection screen, listing all the available Objects for the selected Application.
Select Snippets Import the source code of the selected Application/Object into the Source Code box to allow additional snippets to be added to the Candidate Rule.
Candidate Maintenace screen:
Delete Deletes the selected Candidate Rule.
OK Save changes and close the current screen.
Cancel Cancel the Candidate Maintenance process and return back to the Business Rules screen.
Apply Save changes and retain the current screen.
Note: This button is only enabled if any changes have been made.

Natural Engineer Advanced Services
118
3
Rule Definition
The Rule Definition option provides the facility to define a Business Rule or select an
existing Business Rule. Code snippets from existing Candidate Rules may be assigned to
the Business Rule or new code snippets from other objects may be imported into the rule.
The list of selected snippets determines the code that is generated in the new object. This is
done on a hierarchical basis with the snippet at the top of the list getting incorporated into
the generated object first.
Rule Definition Window
The Rule Definition option is invoked by using the ‘Start Rule Definition’ button on the
Business Rules Workflow screen.
The following Figure 3-5 illustrates the Rule Definition screen.
Figure 3-5 Rule Definition screen

Business Rules
119
3
SCREEN ITEMS DESCRIPTION
Business Rules group:
Business Rule
Selection
Existing Business Rules may be selected or a new one added. If ‘Add a
new Business Rule’ is selected the Business Rule field will become available for input.
Rule Name The unique identifier of the Business Rule.
Candidate Rules This allows the selection of an existing Candidate Rule where snippets may be imported into the Business Rule.
Snippets may be imported directly from an object by using the
Application/Object buttons in the Objects Containing Candidate Snippets Group and selecting specific code structures.
Objects Containing Candidate Snippets group:
Application The name of the Application where the object containing the candidate snippets reside.
Object The name of the object containing the candidate snippet.
Objects can be selected by using a double click with the left hand mouse
button. This will invoke the Select Snippets screen allowing the selection of the snippets to be imported from the particular object.
Selected Snippets group:
Application The name of the application where the particular snippet comes from.
Object The name of the object where the particular snippet comes from.
Start The starting line number of the snippet.
End The ending line number of the snippet.
NB: Snippets may be promoted or demoted in the list by using the Selected Snippets Context Menu.
Rule Definition screen:
Selected Source
Code
Display the selected source code for the currently selected object. Any
source code lines that are part of a saved line range will be colored blue and will have the following in the first 2 bytes of the line:
CS Indicates that the line is the start of a range.
CE Indicates that the line is the end of a range.
Note: If a single line has been selected for start and end ranges, e.g., 0100-0100, then the indicator will show only CS.

Natural Engineer Advanced Services
120
3
BUTTON NAME DESCRIPTION
Business Rules group:
Maintain
Description and Keywords
Invokes the Maintain Description and Keywords screen to add and maintain the description and keywords for the Business Rule.
If a description and/or keywords have been added then an asterix ‘*’ will be shown on the button.
Objects Containing Candidate Snippets group:
Prev Scrolls the object list to previous page.
This button will be available/unavailable depending on the value specified in the LISTBOXMAX parameter in the NATENG.INI file.
More Scrolls the object list forward one page.
This button will be available/unavailable depending on the value specified in the LISTBOXMAX parameter in the NATENG.INI file.
Selected Snippets group:
Identify Similar
Code
Invokes the Similar Code Identifier screen to identify other pieces of code
within the Application that contain similar code structures to the selected snippet. The results may then be used to identify potential locations for the use of the new Business Rule Component.
Select Addl. Invokes the Select Snippets screen to choose additional snippets to be added to the Business Rule.
Remove Remove the selected snippet from the Business Rule.
Prev Scrolls the snippet list to previous page.
This button will be available/unavailable depending on the value specified in the LISTBOXMAX parameter in the NATENG.INI file.
More Scrolls the snippet list forward one page.
This button will be available/unavailable depending on the value specified in the LISTBOXMAX parameter in the NATENG.INI file.

Business Rules
121
3
BUTTON NAME DESCRIPTION
Rule Definition screen:
Delete Deletes the selected Business Rule.
OK Save changes and close the current screen.
Cancel Cancel the Rule Definition process and return back to the Business Rules screen.
Apply Save changes and retain the current screen.
Note: This button is only enabled if any changes have been made.
Selected Snippets Context Menu
The Selected Snippets context menu is invoked by placing the cursor on any of the
snippets listed in the Selected Snippets list and using the right hand mouse button with a
single click.
CONTEXT MENU ITEM DESCRIPTION
Move Snippet up one place Promote the snippet in the hierarchical list of code to be added to the new generated object.
Move Snippet down one place Demote the snippet in the hierarchical list of code to be added to the new generated object.

Natural Engineer Advanced Services
122
3
Maintain Description and Keywords
The Maintain Description and Keywords screen is invoked from the Rule Definition
screen. It provides the ability to add a description for the selected Business Rule and to add
Keywords to help identify the Business Rules. These keywords are used by the Keyword
Catalogue which is accessed from the Utilities menu.
The following Figure 3-6 illustrates the Maintain Description and Keywords screen.
Figure 3-6 Maintain Description and Keywords screen

Business Rules
123
3
SCREEN ITEMS DESCRIPTION
Rule Description The description of the Business Rule.
Search Keywords The Keywords associated with the Business Rule.
BUTTON NAME DESCRIPTION
OK Save changes and close the current screen.
Cancel Cancel the Maintain Description and Keywords process and return back to the Rule Definition screen.
Apply Save changes and retain the current screen.
Note: This button is only enabled if any changes have been made.

Natural Engineer Advanced Services
124
3
Select Snippets
The Select Snippets screen is invoked from the Rule Definition screen. It gets invoked
when an object from a candidate rule is selected or when the “Select Addl.” button is
selected. It provides the ability to choose additional snippets to be added to the list of
snippets within the business rule or remove existing snippets.
The following Figure 3-7 illustrates the Select Snippets screen.
Figure 3-7 Select Snippets screen

Business Rules
125
3
SCREEN ITEMS DESCRIPTION
Selected Object group:
Application The name of the application to select the snippet from.
Object The name of the object to select the snippet from.
Suggested Snippets group:
Application The application name related to the chosen snippet.
Object The object name related to the chosen snippet.
Start The starting line number of the chosen snippet.
End The ending line number of the chosen snippet.
Select Object screen:
Source Code Display the selected source code for the currently selected object. To select a line click within the Source Code box on the line required.
Any source code lines that are part of a saved line range will be colored blue and will have the following in the first 2 bytes of the line:
CS Indicates that the line is the start of a range.
CE Indicates that the line is the end of a range.
Note: If a single line has been selected for start and end ranges, e.g., 0100-0100, then the indicator will show only CS.

Natural Engineer Advanced Services
126
3
BUTTON NAME DESCRIPTION
Selected Object group:
Application
Selection [….]
Invokes the General Selection screen, listing all the available Applications.
This button will not be available if invoked from the Objects containing candidate snippets list on the Rule Definition screen.
Object Selection
[….]
Invokes the General Selection screen, listing all the available objects for the selected Application.
This button will not be available if invoked from the Objects containing candidate snippets list on the Rule Definition screen.
Selected Snippets group:
Remove Removes the snippet from the chosen snippet list.
Prev Scrolls the snippet list to previous page.
This button will be available/unavailable depending on the value specified in the LISTBOXMAX parameter in the NATENG.INI file.
More Scrolls the snippet list forward one page.
This button will be available/unavailable depending on the value specified in the LISTBOXMAX parameter in the NATENG.INI file.
Select Object screen:
OK Save changes and close the current screen.
Cancel Cancel the Select Snippet process and return back to the Rule Definition screen.
Apply Save changes and retain the current screen.
Note: This button is only enabled if any changes have been made.

Business Rules
127
3
Component Generation
The Component Generation option provides the facility to generate a new object based on
the snippets selected for a specified Business Rule.
For a particular Business Rule names need to be specified for the generated objects and a
modification library defined. Field/Variable Analysis would then be performed which
extracts the field and variable information from the snippets that will be required for the
new object. Further classification of variables may then be undertaken to determine which
fields are to be used as parameter or local data.
Component Generation Window
The Component Generation option is invoked by using the ‘Start Component Generation’
button on the Business Rules Workflow screen.
The following Figure 3-8 illustrates the Component Generation screen.
Figure 3-8 Component Generation screen

Natural Engineer Advanced Services
128
3
SCREEN ITEMS DESCRIPTION
Business Rules group:
Business Rules This shows a list of the Business Rules.
PDA Name The name of the Parameter Data Area that will be generated.
Subprogram Name The name of the Subprogram that will be generated.
Modification Library
The name of the Natural Library where the generated objects will be stored.
System Variables as
Parameters
This ensures that any System Variables that are used within the snippets
will get passed as parameters to the generated objects. This would be required if the generated objects are to be called by non-natural objects.
Field Variables group:
Parameters sub-group:
Name The name of the field to be used as Parameter Data.
I/O Documentation feature that specifies if the parameter is used as an Input parameter, Output parameter or both.
Format The format of the field.
Array Any array definitions of the field.
Local sub-group:
Name The name of the field to be used as Local Data.
Format The format of the field.
Array Any array definitions of the field.
BUTTON NAME DESCRIPTION
Business Rules group:
Prev Scrolls the Business Rule list to previous page.
This button will be available/unavailable depending on the value specified in the LISTBOXMAX parameter in the NATENG.INI file.
More Scrolls the Business Rule list forward one page.
This button will be available/unavailable depending on the value specified in the LISTBOXMAX parameter in the NATENG.INI file.

Business Rules
129
3
BUTTON NAME DESCRIPTION
Field/Variable
Analysis
Invokes the Field/Variable Analysis process to identify suggested parameter and local fields to be used with the generated object.
If an Analysis has already been performed a confirmation box will be
presented where the analysis may be re-run or the previous results presented.
Field/Variables group:
Parameters sub-group:
Prev Scrolls the parameter variable list to previous page.
This button will be available/unavailable depending on the value specified in the LISTBOXMAX parameter in the NATENG.INI file.
More Scrolls the parameter variable list forward one page.
This button will be available/unavailable depending on the value specified in the LISTBOXMAX parameter in the NATENG.INI file.
Assign as Local Moves the selected field to be local data.
Locals sub-group:
Prev Scrolls the local variable list to previous page.
This button will be available/unavailable depending on the value specified in the LISTBOXMAX parameter in the NATENG.INI file.
More Scrolls the local variable list forward one page.
This button will be available/unavailable depending on the value specified in the LISTBOXMAX parameter in the NATENG.INI file.
Assign as Parameter Moves the selected field to be parameter data.
Component Generation screen:
Create Component This will create the generated object based on the hierarchical order of the snippets selected.
OK Save changes and close the current screen.
Cancel Cancel the Component Generation process and return back to the Business Rules Workflow screen.
Apply Save changes and retain the current screen.
Note: This button is only enabled if any changes have been made.

Natural Engineer Advanced Services
130
3
Generated Object Structure
The generated object may utilize certain data structures and coding techniques depending
on the structure of the code selected to be part of the new component.
NAVPDA-A and NEEMSG-A are data areas that are provided in source form in the
SYSNEE library that contain the standard fields used to control the sequence of calls
between the calling object and the newly generated component. This ensures that the new
business logic is executed in the same sequence as per the original source code.
For example the navigation field #NAV-FLAG is set in the generated component to
certain values depending on the type of navigation structures that are used.
The following table illustrates the possible values that can be assigned to #NAV-FLAG
and the resulting outcome:
Value Translation Outcome
M REINPUT Re-display the screen and retain control in current object.
B ESCAPE BOTTOM Exit the screen and retain control in current object.
R ESCAPE ROUTINE Exit the screen and transfer control to the calling object.
T ESCAPE TOP Re-display the screen and retain control in current object.
F FETCH / STACK COMMAND Exit the screen and transfer control to a new object.

Business Rules
131
3
Any object that calls the generated object could check the navigation feedback parameters
to ensure the appropriate screen navigation is applied.
For example:
::::
0600 * --------------------------------------------------------------------
0610 * Navigation Feedback
0620 * --------------------------------------------------------------------
0630 DEFINE SUBROUTINE ##NAV-FEEDBACK
0640 DECIDE ON FIRST VALUE OF #NAV-FLAG
0650 VALUE 'B'
0660 ESCAPE BOTTOM
0670 VALUE 'T'
0680 ESCAPE TOP
0690 VALUE 'M'
0700 INCLUDE NEEREC01
0710 NONE VALUES
0720 IGNORE
0730 END-DECIDE
0740 END-SUBROUTINE
0750 END
::::
.

133
INDEX
B
Business Rules, 105 Candidate Creation
Overview, 112
Candidate Maintenance
Overview, 115
Window, 115
Component Generation
Generated Object Structure, 130
Overview, 127
Window, 127
Overview, 106
Rule Definition
Maintain Description and Keywords, 122
Overview, 118
Select Snippets, 124
Window, 118
Rule Type Maintenance
Overview, 109
Window, 109
Screen, 107
N
Natural for Ajax Conversion, 9
Code Conversion
Context Menu, 34
Overview, 30
Window, 31
Cross Reference to Adapters
Context Menus, 27 Overview, 23
Window, 24
Inline Map Extraction
Context Menu, 22
Overview, 19
Window, 19
Natural Map Extraction
Context Menu, 18
Overview, 15
Window, 15
Overview, 10
Separate Processing Rules from Maps, 14
Workflow window, 11
R
Refactoring, 35
Chapter Overview, 35
Componentization, 75
Component Builder, 77 Screen, 78
Screen, 76
Similar Code Identifier, 84
Screen, 86
Data Definition Module Selection, 94
Screen, 95
Database Split, 92
Screen, 93
Preparation Tasks, 36
Check for Conversational DB Loops,
60 Impact Analysis, 61
Modification, 62
Check for Redundant Code, 57
Impact Analysis, 58
Modification, 59
Check for Unused Variables, 63
Impact Analysis, 64
Modification, 65
Convert Back References to Labels, 54
Impact Analysis, 55
Modification, 56
Expand Copycodes, 66

134
Exclusion Screen, 71
Expansion Screen, 67
Processes, 40
Reporting to Structured Mode
Conversion, 41 Screen, 36
Separate Processing Rules from Maps,
42
Apply Separated Rules to Objects
Screen, 49
Restart Processing Rule Separation, 53
Separate Rules from Maps Screen, 45
Refactor Database Access, 100
Screen, 101
Similar Code Identifier
Impact Element Maintenance, 91 Modification Element Maintenance, 91
User View Analysis, 99
Refactoring Processes
Separate Processing Rules from Maps
Processing Rule Separation Screen, 43