Embed Size (px)
Citation preview

National Student Loan Data System
Perkins Spreadsheet Submittal Instruction Guide
Final
July 2016

Perkins Spreadsheet Submittal Instruction Guide
Table of Contents
1 Federal Perkins Loan Data Reporting .............................................................................................. 3
2 Perkins Loans on NSLDS ...................................................................................................................... 4
How to Sign Up ............................................................................................................................... 4 2.1
Using NSLDS Online ...................................................................................................................... 4 2.2
Menu 6 2.2.1
Financial Aid .............................................................................................................................. 7 2.2.2
Enrollment ................................................................................................................................. 9 2.2.3
Organization ............................................................................................................................. 9 2.2.4
Report 11 2.2.5
Transfer Student Monitoring ............................................................................................ 13 2.2.6
Perkins Reporting Comparisons .............................................................................................. 14 2.3
3 Perkins Loan Spreadsheet Submittal ............................................................................................. 17
Perkins Loan Spreadsheet Submittal Basics ......................................................................... 17 3.1
Process Overview .................................................................................................................. 17 3.1.1
Spreadsheet Creation .......................................................................................................... 17 3.1.2
Rename Worksheet .............................................................................................................. 18 3.1.3
Spreadsheet with Field Names ........................................................................................ 19 3.1.4
Spreadsheet without Field Names .................................................................................. 20 3.1.5
Data Entry ................................................................................................................................ 21 3.1.6
NSLDS Professional Access File Upload ................................................................................ 21 3.2
Perkins Spreadsheet Submittal Page ............................................................................. 21 3.2.1
Perkins Spreadsheet Submittal Page Result Presentation ..................................... 22 3.2.2
Working Errors ............................................................................................................................... 26 3.3
Appendix A: Record Layout Index – Perkins Spreadsheet Submittal File .............................. 28
1

Perkins Spreadsheet Submittal Instruction Guide
Table of Figures
Figure 2-1: NSLDS Professional Access website after log on ............................................................. 5
Figure 2-2: NSLDSFAP Menu .......................................................................................................................... 6
Figure 2-3, Menu Page, Navigation Tabs ................................................................................................... 7
Figure 2-4, Aid Tab Showing Loan History Page ..................................................................................... 8
Figure 2-5, Enrollment Tab Showing Enrollment Summary Page ..................................................... 9
Figure 2-6, Organization Contact List........................................................................................................ 10
Figure 2-7, Report List ..................................................................................................................................... 12
Figure 2-8, Web Report List .......................................................................................................................... 13
Figure 2-9: Perkins Loan Reporting Options ........................................................................................... 14
Figure 3-1: Rename Worksheet ................................................................................................................... 18
Figure 3-2: Renamed Worksheet ................................................................................................................ 19
Figure 3-3: Spreadsheet Creation with Field/Column Names .......................................................... 19
Figure 3-4: Spreadsheet Creation with Field Names and Empty Optional Fields...................... 20
Figure 3-5: Spreadsheet Creation without Field Names ..................................................................... 20
Figure 3-6: Spreadsheet Creation without Field Names and Empty Optional Fields ............... 21
Figure 3-7: Perkins Loan Spreadsheet Submittal Page ........................................................................ 22
Figure 3-8: Result Presentation .................................................................................................................... 23
Figure 3-9: Number of Errors Example ...................................................................................................... 25
Figure 3-10: Result File with Yellow Highlight and Tool Tip .............................................................. 26
Figure 3-11: Result File with Error Column in the first available right hand column................. 26
2

Perkins Spreadsheet Submittal Instruction Guide
1 Federal Perkins Loan Data Reporting
The National Student Loan Data System (NSLDS) has been enhanced to allow the reporting of Federal Perkins loan data to occur on the NSLDS Professional Access (FAP) Web site. Perkins loan data providers may use this new functionality to provide loans not previously reported to NSLDS, provide updates to loans currently found on NSLDS, or assist in closing loans in their portfolio.
This document will provided step-by-step detailed instructions on how to use the spreadsheet submittal tool, and in conjunction with the Perkins Loan Data Provider Instructions (DPI), how to provide specific data elements to NSLDS. The current version of the DPI can be found on the NSLDS Reference Material Section of IFAP.
For more information regarding the Federal Perkins Loan Liquidation and Closeout Procedures, please refer to: http://ifap.ed.gov/ifap/cbp.jsp.
3

Perkins Spreadsheet Submittal Instruction Guide
2 Perkins Loans on NSLDS
Every user of NSLDS must obtain their own FSA ID user id which can’t be shared by any other person. The following section describes how to obtain an FSA ID for use with online activity.
How to Sign Up 2.1
Schools having awarded Perkins Loans are required to establish their service for Batch Perkins Loan data reporting to NSLDS through the FSAWebenroll website. Once designating the mailbox for SAIG batch submissions, schools can report Perkins loans through the SAIG method. Separately, Perkins loans may be reported to NSLDS online. As such, each user must have his or her own FSA User ID to access NSLDS Perkins Loan Submittal features. Additionally, a person from each location that is involved with students who have received financial aid may need access as well. To apply for batch and online reporting access, go to www.fsawebenroll.ed.gov.
The Primary Destination Point Administrator (PDPA) for the organization must complete the application request for NSLDS online default services, with additional services as appropriate. The PDPA must also enforce the security requirements as outlined in the SAIG User Statement including the completion and maintenance of this statement. Your President/Chief Executive Officer (CEO)/Chancellor/designee/equivalent person must approve each designated individual that applies for NSLDS online access.
After applying through www.fsawebenroll.ed.gov, you will be assigned an FSA User ID that is used for online access. Each person involved in reviewing student data must have their own FSA User ID. The ID must not be shared. The Rules of Behavior and Privacy Act statement presented at log on outlines the appropriate uses of all Federal Student Aid Systems including the NSLDSFAP website and the consequences of inappropriate actions.
For additional information or assistance with the sign up process, call CPS/SAIG Technical Support at 800/330-5947 (TDD/TTY 800/511-5806) or send an email to [email protected].
For existing users of NSLDS with the appropriate level of access from a previous request, no change needs to be made to the FSA User ID in order to access the Perkins Loan Submittal features.
Using NSLDS Online 2.2
When you initiate your session on the NSLDSFAP website by logging on at the https://www.nsldsfap.ed.gov/nslds_FAP/default.jsp address, the Click to Continue page
4

Perkins Spreadsheet Submittal Instruction Guide
displays. Click the button to connect to the FSA Login page and enter your FSA User ID and password. Once your identity is authenticated, you will be taken to the Organization selection page associated with your FSA User ID. If your ID is associated with multiple schools, select the location for which you want access for this session.
Figure 2-1: NSLDS Professional Access website after log on
After correctly entering the image on the User Access Verification page, you will reach the main Menu Page.
5

Perkins Spreadsheet Submittal Instruction Guide
Figure 2-2: NSLDSFAP Menu
Note: If you are having trouble getting started, remember that this site works best when you use the Microsoft Internet Explorer (version 7.x or higher) browser. You can call the Customer Support Center at 1-800-999-8219 if you have any problems.
Menu 2.2.1The main Menu provides an overview of the functions available to you by way of the Navigation Tabs which are located across the top of every page. Each tab provides a link to the main page of each corresponding section. When clicked, these tabs allow you to navigate to a specific section within the tab without having to return to the Menu page. The Navigation Bar is directly below the Navigation Tabs and includes links to the other pages within that section.
6

Perkins Spreadsheet Submittal Instruction Guide
Figure 2-3, Menu Page, Navigation Tabs
The Menu page allows users to view system messages and access Financial Aid, Enrollment Data, Organization Information, and Reports. The Menu page also includes help-related links and icons, which are used throughout the site as quick and easy information and navigation tools. A list of system messages appears under the Messages heading on the Menu page. Each line of the list displays the date a message was posted and the beginning words of the message. To display the full message, click it. The message text appears at the bottom of the Menu page.
Financial Aid 2.2.2Links to the financial aid pages appear under the Aid heading. The financial aid pages contain data about a borrower’s loans, Federal grants for students, and overpayments of Federal aid as well as exit counseling history and an access to the student view of NSLDS data. Based on your access authority, you can view some or all of these pages. To access a borrower’s loan history, type the student’s Social Security number (SSN), First Name, and Date of Birth (DOB) and click the “Retrieve” button.
7

Perkins Spreadsheet Submittal Instruction Guide
Figure 2-4, Aid Tab Showing Loan History Page
Details on each loan are available by clicking on the blue number beside the loan or on the “Loan Detail” button for that loan.
8

Perkins Spreadsheet Submittal Instruction Guide
Additional functions found beneath the Aid tab can be accessed by clicking the associated link found in the Navigation bar.
Enrollment 2.2.3The Enrollment (Enroll) tab contains pages with information about student enrollment at every school where enrollment has been reported for a student. Links to the Enrollment pages, Exit Counseling Submittal, and Gainful Employment pages appear under the Enrollment heading on the Menu page.
Figure 2-5, Enrollment Tab Showing Enrollment Summary Page
Detailed information regarding the Enrollment Reporting process, or the Gainful Employment Reporting process, and the responsibilities of the schools can be found on www.ifap.ed.gov under NSLDS Reference Materials, NSLDS User Documentation in the associated documentation (NSLDS Enrollment Reporting Guide or NSLDS Gainful Employment User Guide).
Organization 2.2.4The Organization (ORG) tab allows you to look at information about an organization, depending on your access. Links to the Organization pages appear under the Org Heading on the Menu page. The organization search bar is located directly below the Navigation Bar. The Type, Code, and Name boxes appear here. When an organization is retrieved or selected, the organization identifier information appears at the top of each organization page. NSLDS encourages all schools, lenders, and GAs to provide as many contacts as possible for their organization and to keep the NSLDSFAP Web site ORG contacts current and always list at least a Primary Contact for an organization.
9

Perkins Spreadsheet Submittal Instruction Guide
Figure 2-6, Organization Contact List
2.2.4.1 Data Provider Schedule Page
The Data Provider Schedule page displays current, past, and future scheduled data provider submittals. The table displays information based on your user id and cannot be updated.
For schools that provide data on Perkins Loans, the table displays:
• Scheduled Submittal Date—The date NSLDS expects to process the submittal.
• Received Date—The date NSLDS received the incoming submittal from SAIG.
• Processed Date—The date on which NSLDS completely processed the submittal.
• Loan Records Submitted—The total number of detail records on the submittal file transmitted to NSLDS. This number may include records that were in error and did not update the NSLDS database.
• Loan Records Extracted—The total number of detail records extracted from the data provider database for this submission.
• Two fields are viewable only by the school that submits the data:
– Loans with Errors—The total number of detail records extracted from the data provider database that included errors and did not update the NSLDS database.
– Submittal Pass Rate (%)—The percentage of detail records extracted from the
10

Perkins Spreadsheet Submittal Instruction Guide
data provider database that contained no errors and updated the NSLDS database.
Note: The statistics appearing on this screen are reflective of those files which are submitted over the SAIG network from the TG mailbox associated with Perkins loan data reporting batch service established on www.fsawebenroll.ed.gov. Spreadsheet submittals are not calculated into the Submittal Pass Rate, do not count toward or display on the monthly submittal schedule statistics. See the NSLDS Perkins Data Provider Instructions, Chapters 2.2 and 8.1.1.
Report 2.2.5NSLDS Users, depending upon their access, can request reports on the NSLDS Professional Access Web site. The Report Tab contains two options, Report List and Web Report List. The list that is displayed is associated with your FSA User ID. You will have a list to select from that pertains to the data you use from NSLDS.
11

Perkins Spreadsheet Submittal Instruction Guide
Figure 2-7, Report List
12
Perkins Spreadsheet Submittal Instruction Guide
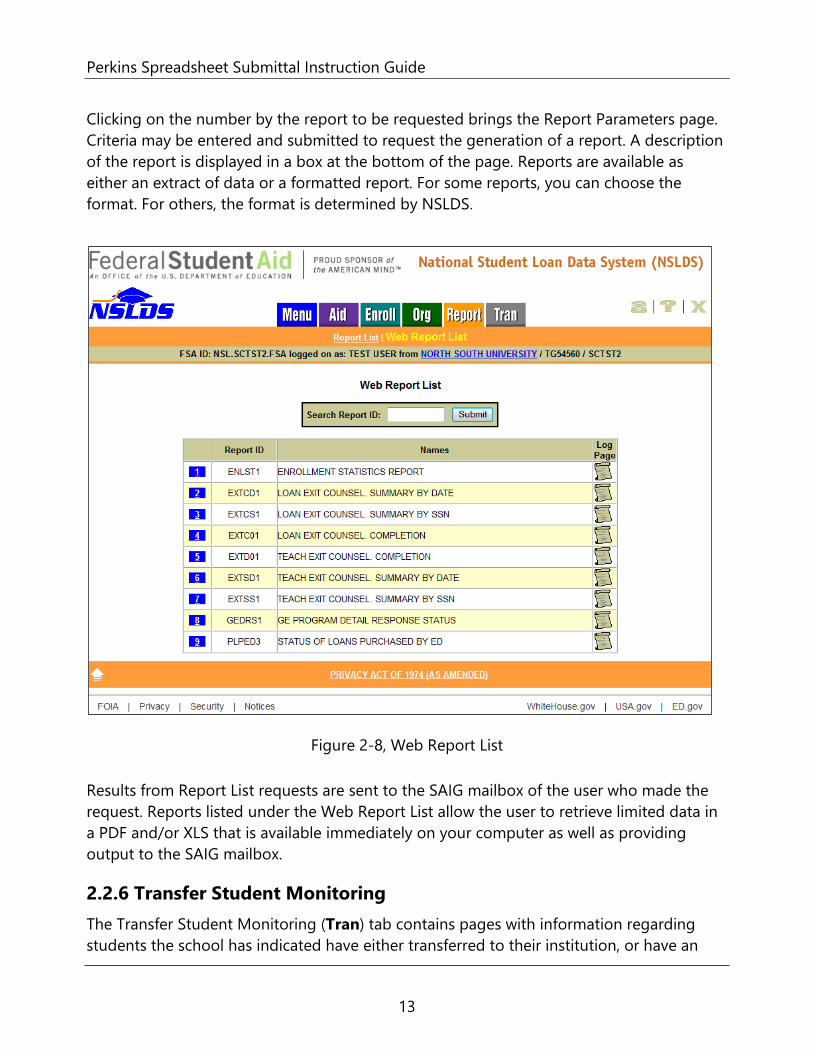
Clicking on the number by the report to be requested brings the Report Parameters page. Criteria may be entered and submitted to request the generation of a report. A description of the report is displayed in a box at the bottom of the page. Reports are available as either an extract of data or a formatted report. For some reports, you can choose the format. For others, the format is determined by NSLDS.
Figure 2-8, Web Report List
Results from Report List requests are sent to the SAIG mailbox of the user who made the request. Reports listed under the Web Report List allow the user to retrieve limited data in a PDF and/or XLS that is available immediately on your computer as well as providing output to the SAIG mailbox.
Transfer Student Monitoring 2.2.6The Transfer Student Monitoring (Tran) tab contains pages with information regarding students the school has indicated have either transferred to their institution, or have an
13
Perkins Spreadsheet Submittal Instruction Guide
interest in transferring to their institution and the school would like to receive transfer monitoring alerts of financial aid history information for those students. Initiated by the inform process, users enter a list of students they have an interest in and NSLDS monitors and alerts schools to their information regarding those students, including any changes in financial aid information or status to the school for a specific period of time. For more information on this process, please see the Transfer Student Monitoring User Guide posted on IFAP.
Perkins Reporting Comparisons 2.3
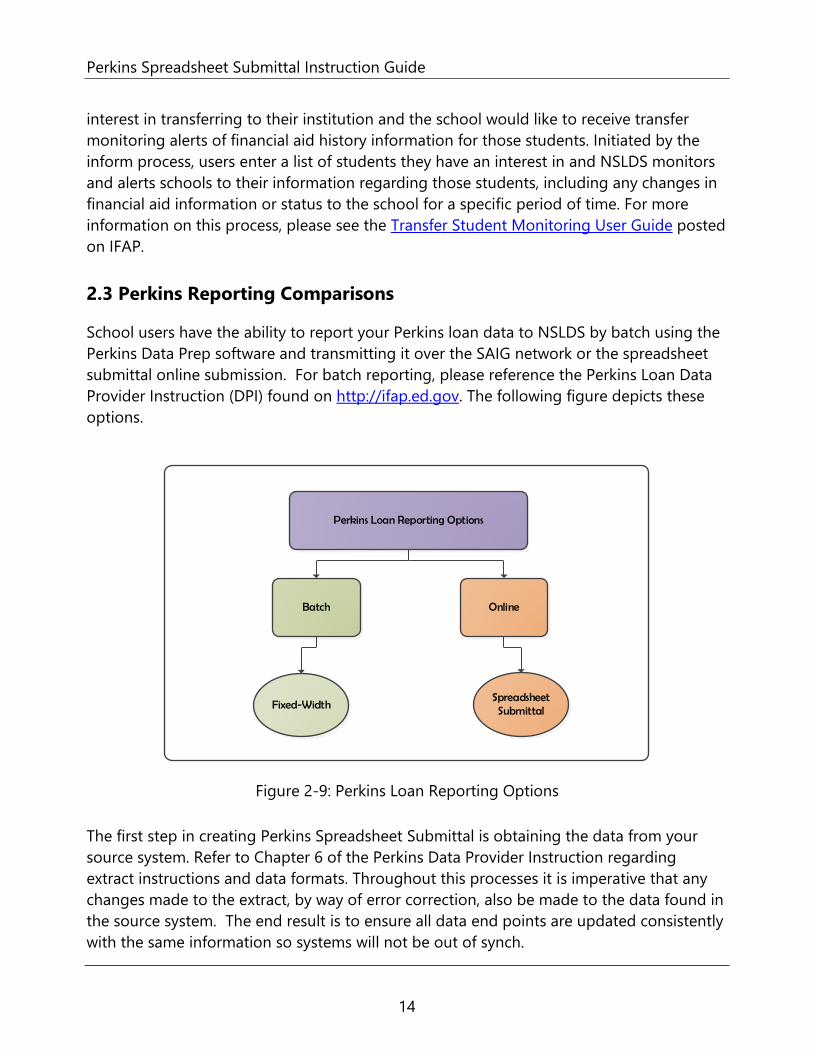
School users have the ability to report your Perkins loan data to NSLDS by batch using the Perkins Data Prep software and transmitting it over the SAIG network or the spreadsheet submittal online submission. For batch reporting, please reference the Perkins Loan Data Provider Instruction (DPI) found on http://ifap.ed.gov. The following figure depicts these options.
Batch
Fixed-Width
Online
Spreadsheet Submittal
Perkins Loan Reporting Options
Figure 2-9: Perkins Loan Reporting Options
The first step in creating Perkins Spreadsheet Submittal is obtaining the data from your source system. Refer to Chapter 6 of the Perkins Data Provider Instruction regarding extract instructions and data formats. Throughout this processes it is imperative that any changes made to the extract, by way of error correction, also be made to the data found in the source system. The end result is to ensure all data end points are updated consistently with the same information so systems will not be out of synch.
14

Perkins Spreadsheet Submittal Instruction Guide
Unlike the batch process which uses the DataPrep software to assist with file preparation prior to submission, the online process does not have a data preparation tool to be used prior to submitting data online. All errors which are encountered during the online submittal process will be returned to the user in real-time so corrections/updates can be made on the spreadsheet itself and resubmitted. Detailed instruction regarding errors can be found in section 3.3 below.
Another difference between the batch process and the online submittal process is the Past Period Change (PPC) record. PPC records are only supported by the batch process and cannot be submitted with the spreadsheet. More information on the PPC record type can be found in section 6.2.3 of the Perkins Data Provider Instructions.
As mentioned in section 2.2.4.1, each data provider is given a Data Provider Schedule in which to supply their batch data. Unlike the batch process, the online spreadsheet submittal process can be utilized at any point in time, regardless of submittal schedule timing.
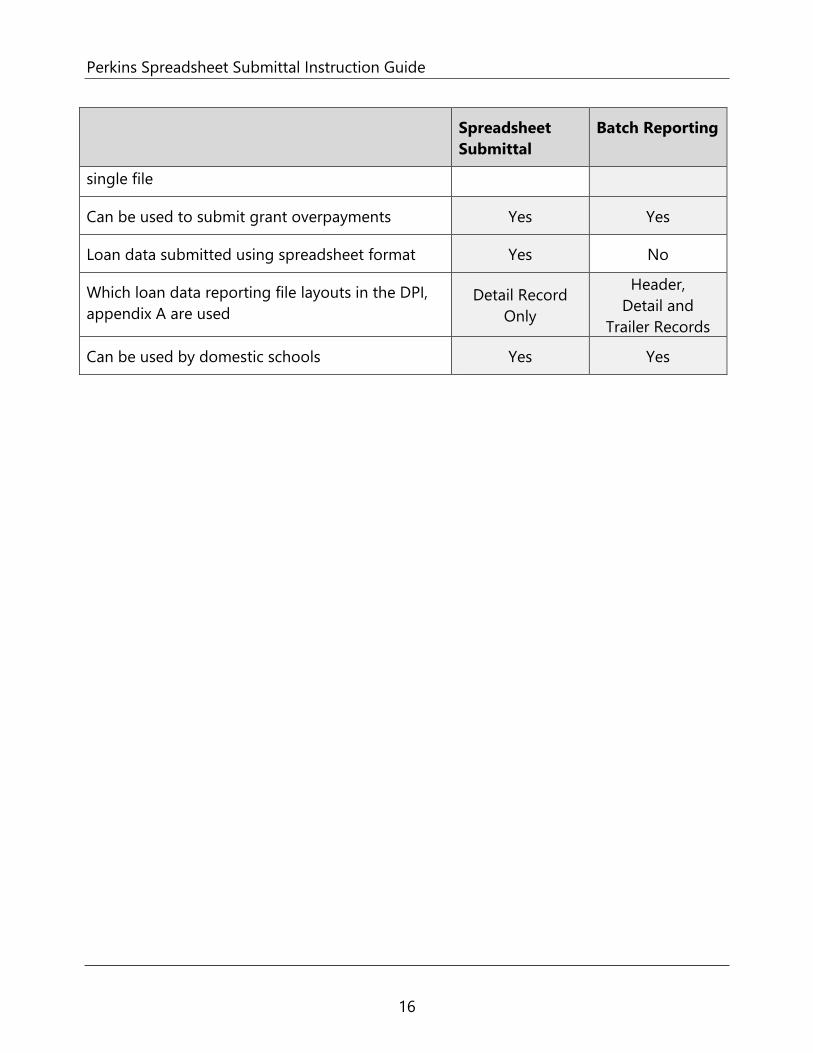
Spreadsheet Submittal
Batch Reporting
Must utilize ED’s DataPrep software No Yes
Are errors presented in real-time Yes No
Can be used to close loans in the portfolio Yes Yes
Data corrections must be made to source data Yes Yes
Is the data provider statistics web page updated to reflect records submitted No Yes
Can be submitted at any time, including multiple times a day Yes No
Must conform to the NSLDS monthly submital Data Provider Schedule found on the Professional Access Web site
No Yes
Can report Past Period Change Records (PPC) No Yes
Can submit loan records for multiple OPEIDs in a No Yes
15
Perkins Spreadsheet Submittal Instruction Guide
Spreadsheet Submittal
Batch Reporting
single file
Can be used to submit grant overpayments Yes Yes
Loan data submitted using spreadsheet format Yes No
Which loan data reporting file layouts in the DPI, appendix A are used
Detail Record Only
Header, Detail and
Trailer Records
Can be used by domestic schools Yes Yes
16

Perkins Spreadsheet Submittal Instruction Guide
3 Perkins Loan Spreadsheet Submittal
The Perkins Loan Spreadsheet Submittal process was created to assist schools and loan servicers, having online access for the school they’re reporting on behalf of, in submitting and/or updating Perkins loan records on the NSLDS Professional Access Web site. This process allows for the creation of a spreadsheet containing loan data which can be linked to existing loans on NSLDS, or can create new loans.
These instructions have been created to assist you with the creation of the spreadsheet, usage of the NSLDS Professional Access web site, and usage of the Spreadsheet Submittal tool.
Perkins Loan Spreadsheet Submittal Basics 3.1
Process Overview 3.1.1The Perkins Loan Spreadsheet Submittal is accomplished when a user creates a spreadsheet by populating the Perkins loan data and uses the instructions found in this guide. The spreadsheet is created using the file layout in Appendix A. It can be created wholly by the user, utilizing the instructions below, or the template can be used. The Perkins Loan Spreadsheet Submittal Format template is available on Federal Student Aid Download (FSAdownload) to assist with ensuring the data in the spreadsheet is correctly completed for submission. The template is pre-populated with the field (column) names and is named correctly for immediate usage. The user only needs to supply the Perkins loan data. The following sections describe the creation and usage processes in detail.
Spreadsheet Creation 3.1.2The spreadsheet has a file size limit of 1,000 KB (approximately 1 MB). Any file size over this limit will cause the spreadsheet to be rejected. File size varies depending on the version of software used.
The spreadsheet can be created with the first row containing the field names found in Appendix A, Index 1 of this document, or without the field names. Each method will be described in the following sub-sections. NSLDS does not have a preferred method. The decision whether or not to include this row is done at your discretion. When creating the spreadsheet, the Perkins Spreadsheet Submittal File layout found in Appendix A of this document must be used as a reference.
During the creation of the spreadsheet there are a few rules to remember specific to Perkins Spreadsheet Submittal that are different from what is found in Appendix A of the Perkins DPI:
17

Perkins Spreadsheet Submittal Instruction Guide
• OPEID associated with the FSA User ID must match the Code for Original School (Field Code 220, represented in Column A)
• Only one unique OPEID can be submitted in a spreadsheet by any online school user at that submitting institution.
• Past Period Change Records (PPCs) are not permitted in the spreadsheet
If not opting to use the FSADownload Perkins Submittal Spreadsheet template, it is imperative that the user created spreadsheet be saved in a secure manner. With either spreadsheets used, it is recommended that the spreadsheet have a unique name so that it can be easily identified during the upload process. Please ensure that when saving the file it is saved as a spreadsheet file in a format with an extension of xls or xlsx (Excel™ format). Any other extensions will cause the entire file to be rejected.
Rename Worksheet 3.1.3The first step in creating the spreadsheet is to rename the spreadsheet worksheet that will be utilized for data entry and subsequent data upload. The name of this worksheet should be changed to be “upload file”. To rename the worksheet:
• Right click on the worksheet tab name (Figure 3-1)
• Select Rename
• When the current name of the tab is highlighted, type “upload file”
• Click out of the tab and the name will be stored (Figure 3-2)
Figure 3-1: Rename Worksheet
18

Perkins Spreadsheet Submittal Instruction Guide
Figure 3-2: Renamed Worksheet
NSLDS will look for a worksheet with the name “upload file”. If the worksheet has any other name, NSLDS will attempt to load the data found in the first tab, or Sheet 1, of the spreadsheet. If Sheet 1 is empty, the user will receive the message “Spreadsheet has no data”. So it is suggested that the worksheet be renamed. Also, NSLDS will only process one worksheet per spreadsheet. Any other worksheets will be ignored if they are present in the file, as will any records they may contain.
Spreadsheet with Field Names 3.1.4When creating the spreadsheet with field names, the column names of the fields appearing in the Spreadsheet Submittal File, as listed in Appendix A, Index 1 of this document can be created by the user by typing them into a spreadsheet. The names of the fields must precisely match those presented in the Appendix A and each name must be contained within an individual column. The column names of the fields will appear in Row One, beginning in column A as “Code for Original School” and ending in column AQ with “Data Provider Identifier”.
The submittal detail data record is to be completed as a single row at a time beneath Row One of the spreadsheet, with the first loan record appearing in Row Two.
Figure 3-3: Spreadsheet Creation with Field/Column Names
19

Perkins Spreadsheet Submittal Instruction Guide
Fields identified as optional do not require the data to be populated. However, the column for the field name must still appear in Row One of the spreadsheet, even if the data is not being supplied, as shown in Figure 3-4.
Figure 3-4: Spreadsheet Creation with Field Names and Empty Optional Fields
Spreadsheet without Field Names 3.1.5When creating the spreadsheet without field names Row One of the spreadsheet will contain the first submittal loan Detail Record, beginning in column A and ending in column AQ. The loan detail record data is to be completed as a single row at a time beginning in Row One of the spreadsheet, with the second loan record appearing in Row Two, as shown in Fig #-# .
Figure 3-5: Spreadsheet Creation without Field Names
Fields identified as optional do need to have data provided. However, the column must still appear in the spreadsheet, even if the data is not being supplied, as shown in Figure 3-6.
20

Perkins Spreadsheet Submittal Instruction Guide
Figure 3-6: Spreadsheet Creation without Field Names and Empty Optional Fields
Data Entry 3.1.6The spreadsheet can be populated with data by typing the data in manually, cutting and pasting the data into the spreadsheet from another source, or importing the data into the spreadsheet from another data source or toolset. Spreadsheets assume that all numbers typed into them are going to be used for math purposes. Therefore, it automatically removes any zero which precedes a number. In other words, it strips out leading zeros. As in the case, for example, for an OPEID if typed in as “06788900” it may appear in the spreadsheet as “6789900” if the format wasn’t defined as text.
To compensate and assist with the default formatting, the spreadsheet upload was created with various types of formatting issues in mind. While some loan reporting fields have specific formatting requirements, others do not. Please refer to Appendix A of this document for the cross-walk for formatting of specific fields.
NSLDS Professional Access File Upload 3.2
Perkins Spreadsheet Submittal Page 3.2.1The Perkins Spreadsheet Submittal page is found on the menu under the Aid tab. This page is used to submit a file via the NSLDS Professional Access Web site.
The actual file upload process starts by selecting the completed spreadsheet file stored in a secure manner on the local hard drive of the user’s computer, or stored in a secure manner on an external medium, such as a flash drive or network. The Perkins Spreadsheet Submittal page allows the user to click on the Browse button, and then use the Browse function to search for a file, and upload it from the location where it is stored. Once the file is located, the user needs to make some decisions regarding the presentation of any errors which the system may return.
21

Perkins Spreadsheet Submittal Instruction Guide
Figure 3-7: Perkins Loan Spreadsheet Submittal Page
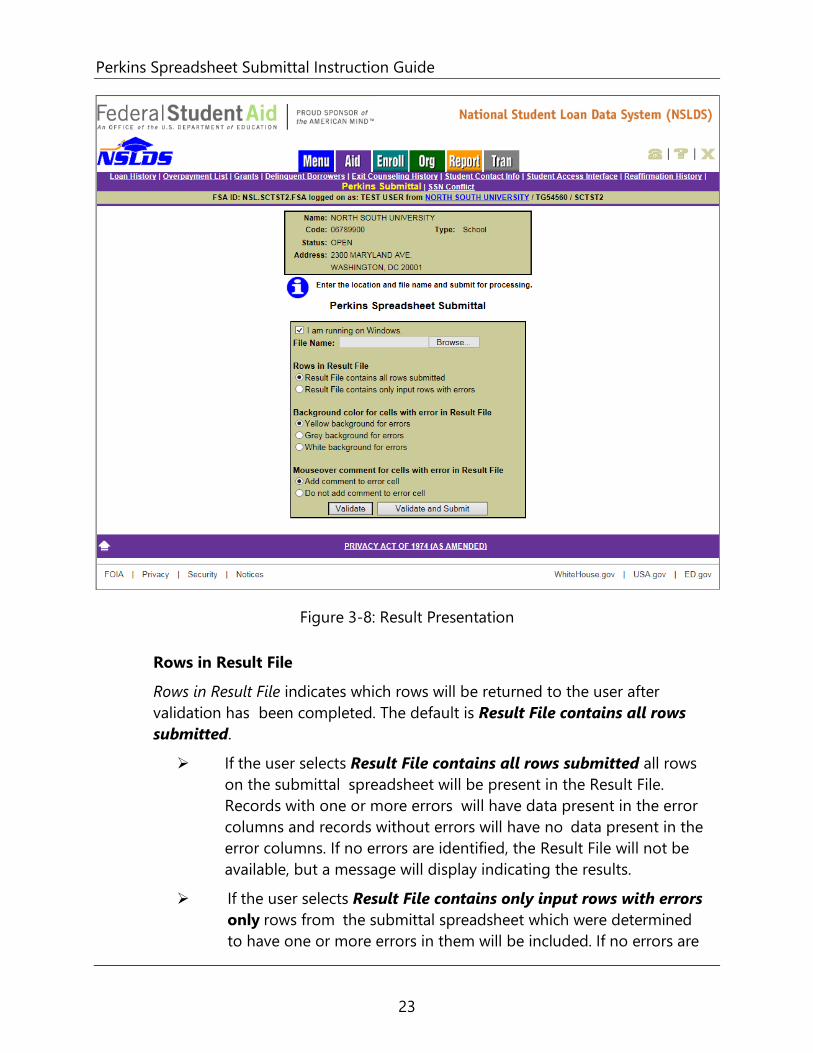
Perkins Spreadsheet Submittal Page Result Presentation 3.2.2The following section explains the use of each option. There are multiple options available to users regarding how they view any errors which may have resulted from the validation which occurs while uploading the Perkins loan spreadsheet. A radio button must be selected for each option prior to clicking the Validate or Validate and Submit buttons.
22
Perkins Spreadsheet Submittal Instruction Guide
Figure 3-8: Result Presentation
Rows in Result File
Rows in Result File indicates which rows will be returned to the user after validation has been completed. The default is Result File contains all rows submitted.
If the user selects Result File contains all rows submitted all rows on the submittal spreadsheet will be present in the Result File. Records with one or more errors will have data present in the error columns and records without errors will have no data present in the error columns. If no errors are identified, the Result File will not be available, but a message will display indicating the results.
If the user selects Result File contains only input rows with errors only rows from the submittal spreadsheet which were determined to have one or more errors in them will be included. If no errors are
23

Perkins Spreadsheet Submittal Instruction Guide
identified, the Result File will not be available but a message will display indicating the results.
Background color for cells with error in Result File
Background color for cells with error in Result File indicates what color the cells which contain errors will be after validation has completed. Data cells with errors will be indicated by a color highlight. The default is Yellow background for errors. Mouse over comment for cells with error in Result File
Mouse over comment for cells with error in Result File indicates whether or not the Result file, which is created after validation has completed, contains comments which appear when the mouse is moved over them. Regardless of the selection made, the error codes and messages will appear on the far right hand side of the spreadsheet Result file. The default is Add comment to error cell.
If the user selects Add comment to error cell a red Tooltip triangle will appear in the cell which houses the field in error. When the computer mouse is moved over this error, the error applicable to this field will appear on the screen.
If the user selects do not add comment to error cell the Tooltip triangle will not appear.
Validate / Validate and Submit
There are two options for reviewing data available at the bottom of the screen. When clicked, the
• Validate button will review all data in the spreadsheet for errors. No data has been loaded to NSLDS during the validation process when the Validate button has been clicked. The upload process MUST be repeated and the Validate and Submit button selected in order to load the data to NSLDS.
• Validate and Submit button is selected, all data will be validated, even if it has been previously validated by the system and any data without error will be submitted and stored in NSLDS. Data will be presented to the user according to the Result File preference radio button selections.
Once the submittal file has been validated by clicking either the Validate or Validate and Submit buttons, a message will be returned to the user on the screen regarding the number of total records in the spreadsheet and the number of records in error. Also a pop-up box appears, presenting the option to Open, Save or Cancel the Result File which was created by the submission.
24

Perkins Spreadsheet Submittal Instruction Guide
Figure 3-9: Number of Errors Example
If Open is selected, the Result File will open in the computer’s default spreadsheet software and the errors in the right hand column will be presented in the manner previously selected on the Perkins Spreadsheet Submittal web page. The file will have the same name as that which was uploaded, however “- Result” will be appended to the end of the name. For example: if the name of the spreadsheet being submitted is “Perkins Loan Online Submittal.xlsx”, the name of the Result file will be “Perkins Loan Online Submittal – Result.xlsx”.
Note: The user MUST click the Validate and Submit button for the data to be processed and updated on NSLDS.
25
Perkins Spreadsheet Submittal Instruction Guide
Working Errors 3.3
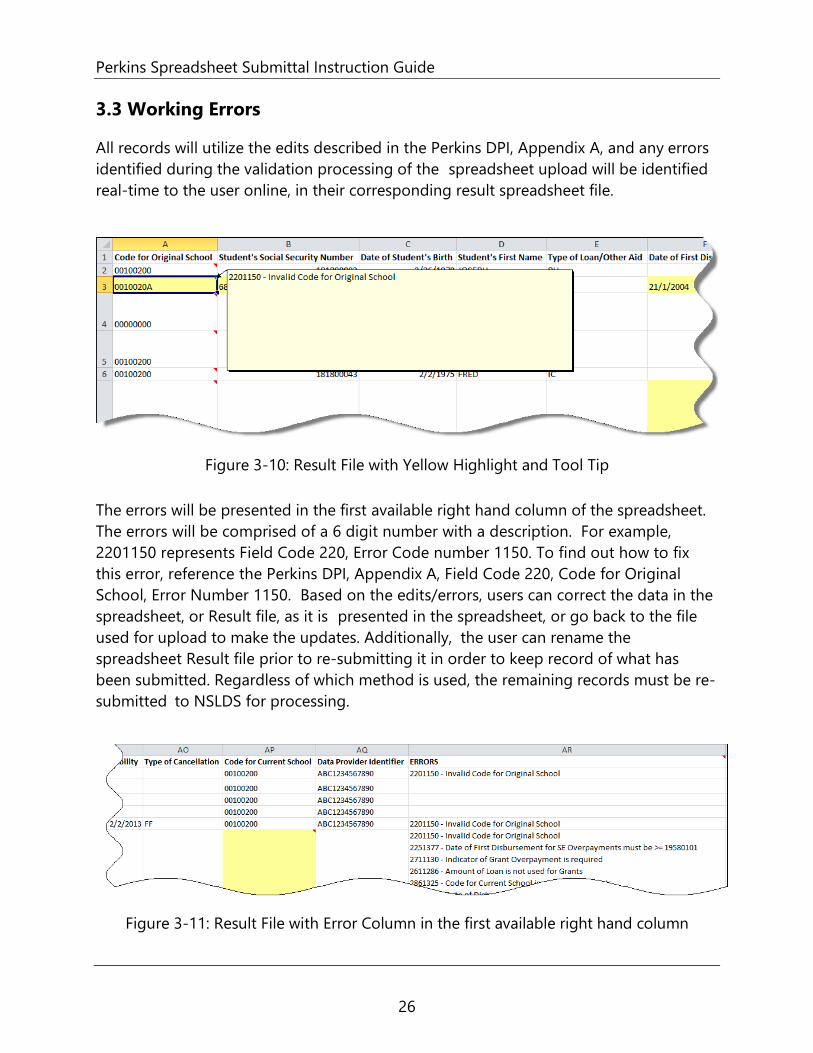
All records will utilize the edits described in the Perkins DPI, Appendix A, and any errors identified during the validation processing of the spreadsheet upload will be identified real-time to the user online, in their corresponding result spreadsheet file.
Figure 3-10: Result File with Yellow Highlight and Tool Tip
The errors will be presented in the first available right hand column of the spreadsheet. The errors will be comprised of a 6 digit number with a description. For example, 2201150 represents Field Code 220, Error Code number 1150. To find out how to fix this error, reference the Perkins DPI, Appendix A, Field Code 220, Code for Original School, Error Number 1150. Based on the edits/errors, users can correct the data in the spreadsheet, or Result file, as it is presented in the spreadsheet, or go back to the file used for upload to make the updates. Additionally, the user can rename the spreadsheet Result file prior to re-submitting it in order to keep record of what has been submitted. Regardless of which method is used, the remaining records must be re-submitted to NSLDS for processing.
Figure 3-11: Result File with Error Column in the first available right hand column
26

Perkins Spreadsheet Submittal Instruction Guide
During the process of correcting errors, it may be determined that a record needs to be removed from the file. Although spreadsheet software provides the Clear function, NSLDS does not recommend using this function. If records or rows need to be removed from the worksheet, the Delete Sheet Rows function use the Excel Spreadsheet ribbon or highlight each Excel row, then right click and select delete must be used in order to ensure that all data is removed from the spreadsheet.
27
Perkins Spreadsheet Submittal Instruction Guide
Appendix A: Record Layout Index – Perkins Spreadsheet Submittal File
The following section provides specifications of the Detail records that are part of the Perkins Spreadsheet Submittal file. NSLDS has utilized features found within typical spreadsheet tools to assist with the data creation and submission of Perkins loan data to NSLDS. The definitions of each column remain the same as those field names found in the Perkins Data Provider Instructions (DPI) Appendix.
This appendix defines the layout for each record/row within the Perkins loan spreadsheet file and each column within the record. You must ensure the accuracy of the reported data, the correct placement within the spreadsheet and use the appropriate codes as defined in the DPI.
Please refer to the Perkins Data Provider Instruction (DPI) for specific formatting and edit criteria for each field. Field codes noted in the following Index are those field codes found in Appendix A of the DPI.
28

Perkins Spreadsheet Submittal Instruction Guide
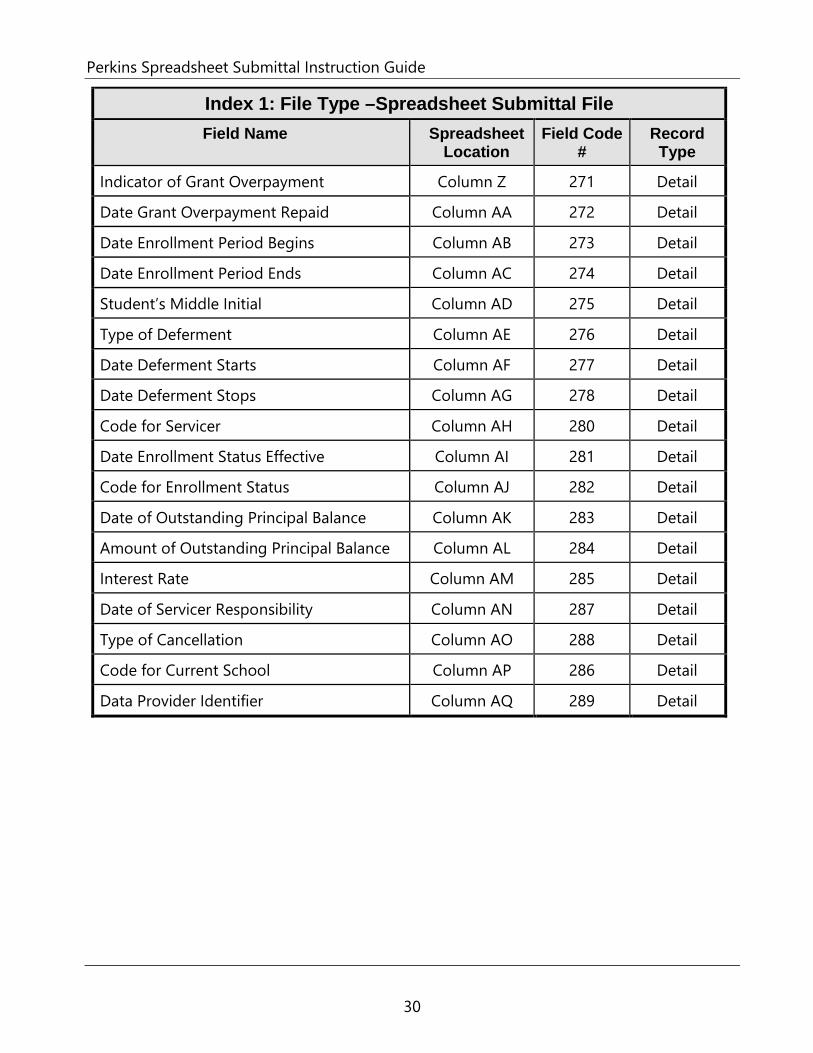
Index 1: File Type –Spreadsheet Submittal File
Field Name Spreadsheet Location
Field Code #
Record Type
Code for Original School Column A 220 Detail
Student’s Social Security Number Column B 221 Detail
Date of Student’s Birth Column C 222 Detail
Student’s First Name Column D 223 Detail
Type of Loan/Other Aid Column E 224 Detail
Date of First Disbursement Column F 225 Detail
Record Type Indicator Column G 226 Detail
Action Code Column H 227 Detail
New Code for Original School Column I 240 Detail
New Student’s Social Security Number Column J 241 Detail
New Date of Student’s Birth Column K 242 Detail
New Student’s First Name Column L 243 Detail
New Type of Loan/Other Aid Column M 244 Detail
New Date of First Disbursement Column N 245 Detail
Date Entered Repayment Column O 260 Detail
Amount of Loan Column P 261 Detail
Date of Loan Status Column Q 262 Detail
Code for Loan Status Column R 263 Detail
Date of Cancellation Column S 264 Detail
Amount of Cancellation Column T 265 Detail
Date of Disbursement Column U 266 Detail
Amount of Disbursement Column V 267 Detail
Student’s Last Name Column W 268 Detail
Student’s Social Security Number Indicator Column X 269 Detail
Student’s Academic Level Column Y 270 Detail
29
Perkins Spreadsheet Submittal Instruction Guide
Index 1: File Type –Spreadsheet Submittal File
Field Name Spreadsheet Location
Field Code #
Record Type
Indicator of Grant Overpayment Column Z 271 Detail
Date Grant Overpayment Repaid Column AA 272 Detail
Date Enrollment Period Begins Column AB 273 Detail
Date Enrollment Period Ends Column AC 274 Detail
Student’s Middle Initial Column AD 275 Detail
Type of Deferment Column AE 276 Detail
Date Deferment Starts Column AF 277 Detail
Date Deferment Stops Column AG 278 Detail
Code for Servicer Column AH 280 Detail
Date Enrollment Status Effective Column AI 281 Detail
Code for Enrollment Status Column AJ 282 Detail
Date of Outstanding Principal Balance Column AK 283 Detail
Amount of Outstanding Principal Balance Column AL 284 Detail
Interest Rate Column AM 285 Detail
Date of Servicer Responsibility Column AN 287 Detail
Type of Cancellation Column AO 288 Detail
Code for Current School Column AP 286 Detail
Data Provider Identifier Column AQ 289 Detail
30