Embed Size (px)
Citation preview
1
National Park Service
Manual of Instruction for the Safe Use of Reproduction Percussion Muskets in Interpretive Demonstrations

2
3
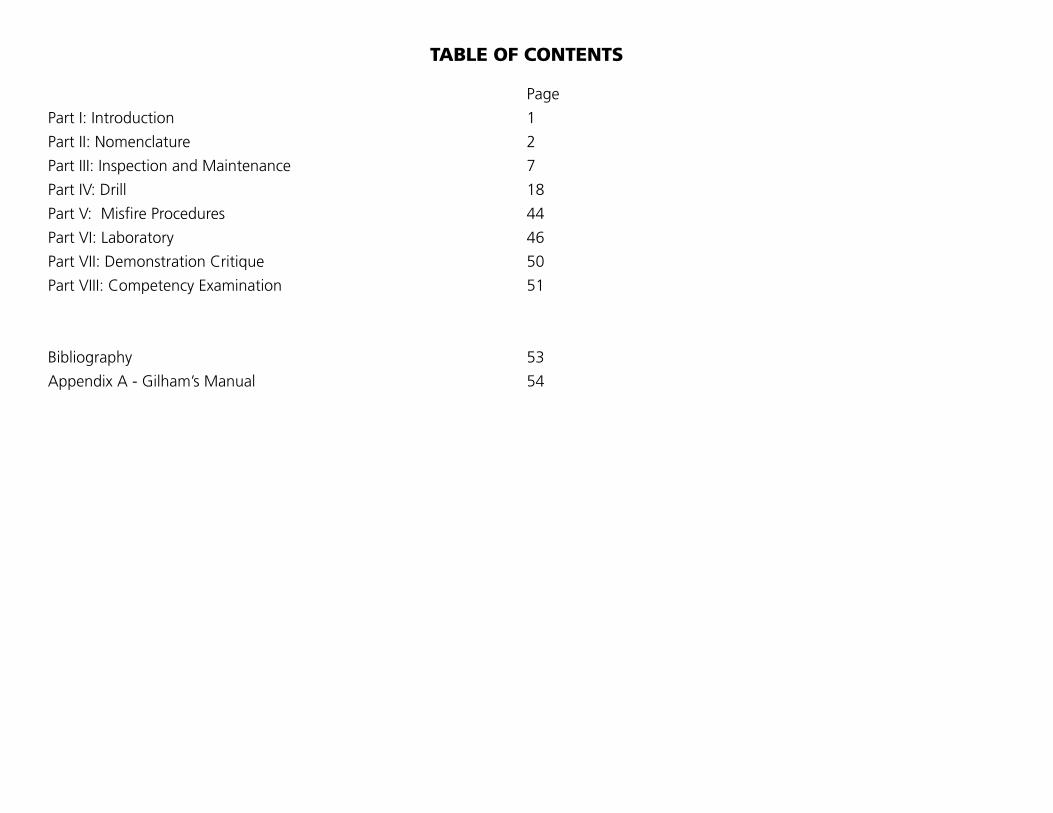
TABLE OF CONTENTS
Page
Part I: Introduction 1
Part II: Nomenclature 2
Part III: Inspection and Maintenance 7
Part IV: Drill 18
Part V: Misfire Procedures 44
Part VI: Laboratory 46
Part VII: Demonstration Critique 50
Part VIII: Competency Examination 51
Bibliography 53
Appendix A - Gilham’s Manual 54

4

1
PART I - INTRODUCTION
This manual sets forth the procedures that must be followed by persons demonstrating 19th century muskets to the public in areas administered by the National Park Service (NPS). It also provides instruction on proper maintenance, inspection and repair procedures. This manual must be used in conjunction with Director’s Orders 6 - Historic Weapons Demonstra-tion Safety Standards and the Historic Weapons Program Manual (DO-6).
Once an individual has completed training based on this manual, he/she will be able to perform historic weapons demonstrations that meet all NPS regulations and avoid all four of the primary causes of artillery accidents. This manual addresses basic nomenclature, equipment maintenance, ammunition manufacture, and drill. For additional interpretive information see the 19th Century Historic Weapons Reference Manual.
The information below largely comes from primary sources of the period
during which the weapons described were used. Several generations of NPS historic weapons personnel have modified these original texts in order to improve demonstrator and visitor safety, make the original texts more comprehensible, and to incorporate knowledge gained from years of actually using these weapons in the field.
The Park’s Certified Historic Weapons Supervisor is responsible for the training and safety of the demonstrators, as well as the safety of the visitors. The following criteria will help determine when a demonstrator has been adequately trained.

2
PART II - NOMENCLATURE
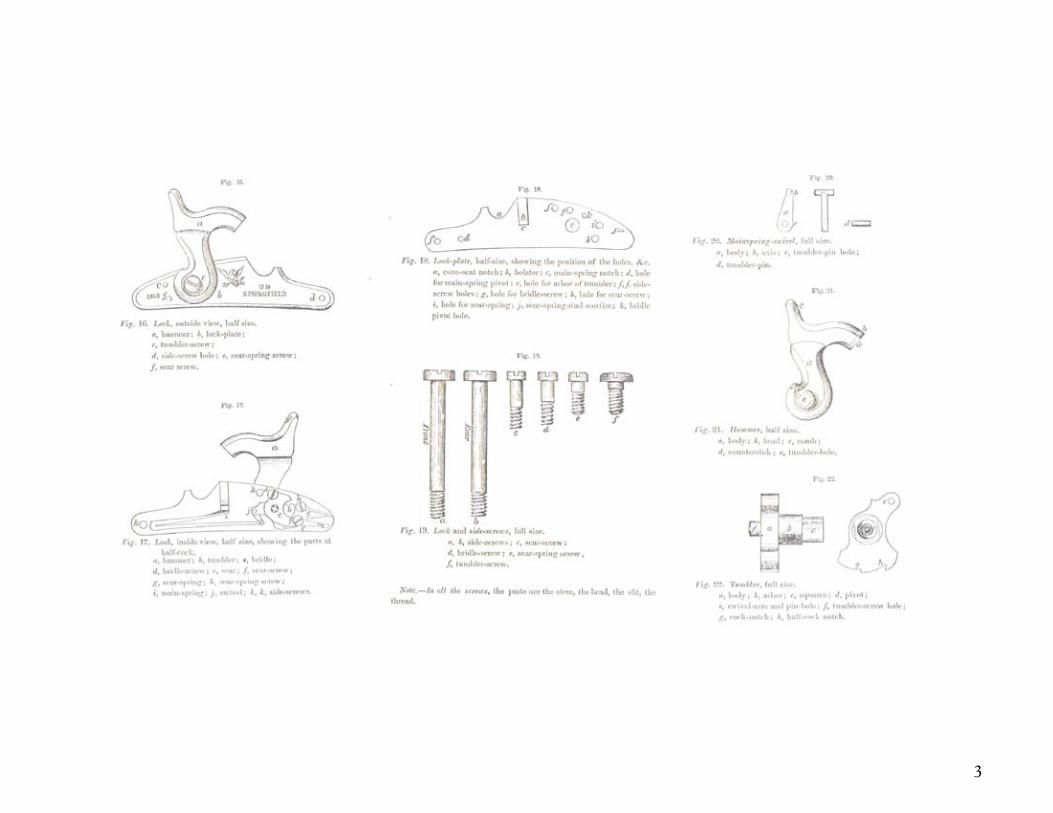
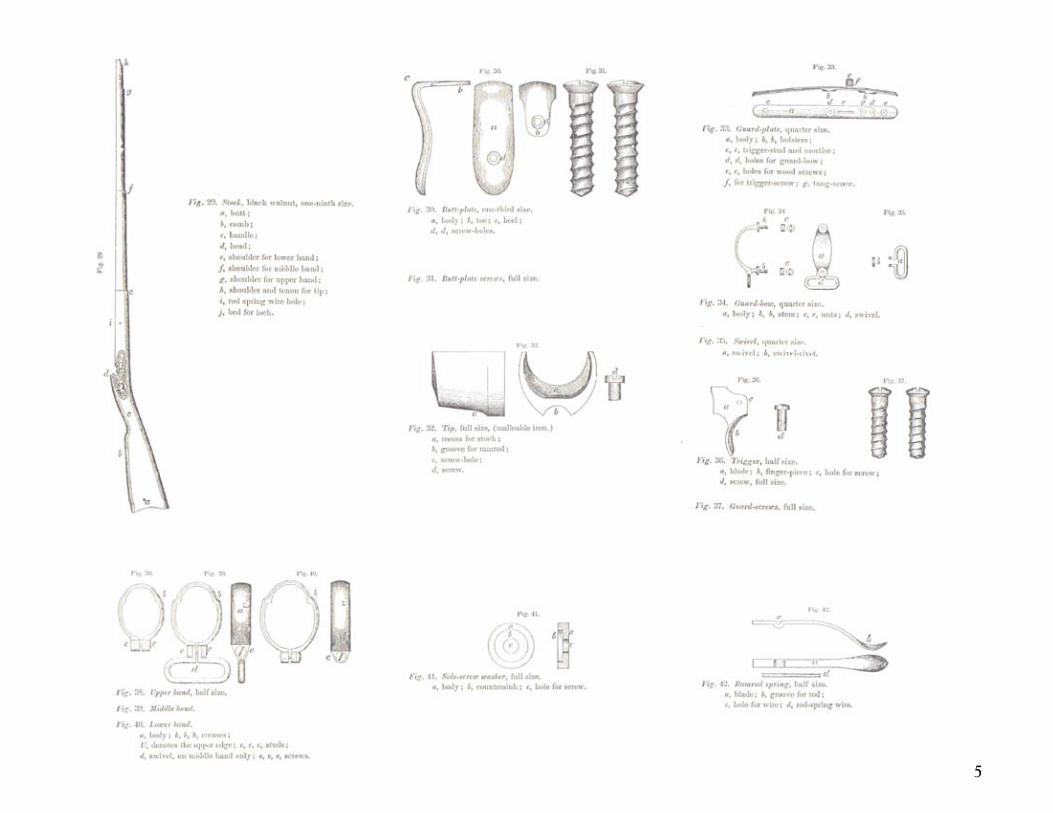
A critical safety and interpretive element of hsitoric weapons demonstrations is a thorough understanding of the weapon(s) being used. The park Historic Weapons Supervisor must know the parts of every weapon used in his/her park as well as how the weapon(s) properly functions in order to properly properly perform inspections, repairs, and maintenance. The following diagrams were taken from Rules for the Management and Cleaning of the Rifle Musket, Model 1863
3

4
5

6
Springfield Rifle Musket, Model 1863 (.58 caliber)
The model of 1863 corresponds with the model of 1861, except in the following particulars, viz.:
BARREL - The cone seat is reduced in length about two-tenths of an inch, fixing the center of the cone or vent on a line with the face of the barrel, and dispensing with the cone-seat screw. The end of the muzzle is rounded to prevent being bruised.
HAMMER - The form of the hammer is changed to conform to that of the barrel, and otherwise improved.
RAMROD - The “swell” is omitted and the body made larger, with a ball-screw cut on the small end, and a brass cap to protect it from injury.
RAMROD-SPRING - Adopted instead of the swell to hold the rod in its place.
BANDS - Open bands fastened by screws instead of tight bands.
BAND-SPRINGS - Dispensed with as unnecessary.
LOCK - The lock is case-hardened in colors; the bands, swivels, and guard are blued in the same manner as the rear sight instead of being left bright.
APPENDAGES - The compound appendage for taking apart the arm is adopted in place of the spring-vise, ball-screw, tumbler, and hand-spring punch of model 1861.
NOTE: The rules for dismounting and
reassembling the rifle-musket model
1855 will apply to the model of 1863 by
omitting the band-springs and the parts
of the lock that apply to the “Maynard
primer.”

7
PART III - INSPECTION AND MAINTENANCE
INSPECTIONS
Frequency of Inspections
All weapons shall be inspected before demonstrations and after the final cleaning on that particular day. Weapons in storage should be periodically checked for rust or other types of damage due to moisture.
If a weapon does not meet safety standards for any reason, a large string tag should be tied to it detailing the specific problem. Repairs should be affected as soon as possible. Problems Encountered During Inspections
1. Overall poor cleaning - If a musket is not cleaned immediately after use, the residue in the barrel will harden. Effective cleaning is made more difficult and there is a possibility of coke buildup in the bore. This is very dangerous, as, in subsequent firings, this coke buildup can retain a spark or smolder and ignite the fresh
powder charge as soon as it drops into the barrel. Even if the primers alone are fired, they leave a corrosive residue both around the cone and in the breech area of the barrel. If this is not removed, rust will occur in these areas.There is also the possibility of a buildup of solid material around the cone which could be dislodged in subsequent firings, with the possibility of injury to the demonstrator or a visitor.
2. Weak mainspring - When cocking the piece, if there appears to be a weak mainspring, it should be replaced or taken to a competent gunsmith to be hardened. Complaints of blow-back through the vent of the cone may be the result of a weak mainspring. If the spring is weak, pressure from firing may cause gases and unfired powder to escape from the vent.
3. Weapon fires on half cock - This is probably due to wear of the half-cock notch on the tumbler. It may also be the fault of a weak or broken
sear-spring. If the tumbler is at fault, it may be corrected or broken sear-spring. If the tumbler is at fault, it may be corrected by carefully deepening the half-cock notch. If the tumbler is badly worn, it should be replaced 4. Worn or damaged cone - When this occurs, the cone should be replaced. A common cause of blow-back is the vent of the cone being worn to a larger diameter, allowing excess gases to escape when the weapon is fired.
5. Bent or bulged barrel - This problem is fairly easy to see and should be noticed during any good inspection. If it is not badly bent, it can be straightened by any competent gunsmith; however, it is recommended that it be replaced. Bulged barrels are caused by firing ball ammunition (“live rounds”) without seating the minie ball all the way down on the powder charge. THIS SHOULD NEVER BE DONE. A bulged or even a burst barrel will result. If a minie ball cannot be seated firmly on the powder charge by

8
normal pressure of the ramrod, the ball and charge should be withdrawn by use of the ball puller.
6. Blown skirt or cleaning patch lodged in barrel - Attempt to remove a stuck patch or suspected blown minie ball skirt by careful use of the wiper. Always turn the wiper in a clockwise direction or the wiper may unscrew itself from the cleaning rod. If this procedure doesn’t work, it may be necessary to pull the breech-plug. See instructions for removal of breech-plugs elsewhere in the manual. (Page XX.).
RECOMMENDED LIST OF INSPECTION AND MAINTENANCE TOOLS
1. Cone wrench. Most cones have an outside diameter of 1/4 inch.
2. Ball puller.
3. Wiper.
4. Bronze bore-brush. Use in conjunction with a cleaning rod long enough to reach the bottom of thebore. If brushes cannot be procured locally, a 20 gauge shotgun brush will suffice for .58 caliber and a12 gauge shotgun brush will suffice for .69 caliber.
5. Small wooden or brass head mallet.
6. An assortment of gunsmith’s screwdrivers.
7. A set of jewelers files.
8. A bench vise with jaws wide enough to accommodate a musket barrel, allowing for leaden or wood padding to protect the barrel.
9. Penetrating oil.
10. Gun oil.
11. Cotton cleaning patches.
The following checklist should be used when inspecting individual firearms. Newly purchased firearms should be inspected using this checklist prior to placing into service.

9
Div
isio
n o
f In
terp
reta
tio
n a
nd
Ed
uca
tio
n
Nat
ion
al P
ark
Serv
ice
U.S
. Dep
artm
ent
of
the
Inte
rio
r
His
tori
c W
eapo
ns
Pro
gram
EX
PE
RIE
NC
E Y
OU
R A
ME
RIC
A
Per
cuss
ion
Mu
sket
& R
ifle
Insp
ecti
on C
heck
list
Park
:___
____
____
____
___
Wea
po
n:_
____
____
____
____
__S.
N./
Pro
p.#
____
____
____
____
__
Bef
ore
Dis
asse
mb
ly(
)
Fire
arm
is c
onfir
med
to b
e un
load
ed b
y sp
ringi
ng th
era
mm
er.
(
)Yo
ur o
vera
ll fir
st im
pres
sion
is fa
vora
ble.
The
Sto
ck:
(
)N
o cr
acks
or
split
s.(
)
Butt
pla
te, t
rigge
r gua
rd, e
tc.,
fit ti
ghtly
.(
)
No
burr
s on
but
t pla
te, t
rigge
r gua
rd o
r bar
rel b
and
scre
whe
ads
that
wou
ld s
nag
clot
hing
or h
ands
.(
)
No
burn
s on
top
of th
e lo
ck.
(
)N
o sp
linte
rs o
r rou
gh e
dges
on
the
stoc
k.(
)
Do
barr
el b
and
sprin
gs w
ork
smoo
thly
.(
)**
If pi
n fa
sten
ed –
all
pins
tig
ht a
nd in
pla
ce.
(
)A
ny ra
mro
d sp
ring
or s
poon
wor
ks fr
eely
.(
)
Two-
piec
e st
ocks
hav
e se
ctio
ns s
ecur
ely
join
ed.
The
Lock
:(
)
Lock
wor
ks s
moo
thly
.(
)
Ham
mer
fits
tigh
tly o
n th
e tu
mbl
er.
(
)A
ll po
sitio
ns a
re fi
rm a
nd s
olid
.(
)
The
half-
cock
(saf
ety)
pos
ition
wor
k co
rrec
tly.
(
)Sm
ooth
trig
ger p
ull w
ith n
o ca
tchi
ng o
f hal
f-co
ck.
(
)C
orre
ct tr
igge
r pul
l – n
ot to
o hr
avy,
not
“ha
ir” tr
igge
r.(
)
The
strik
ing
face
of
the
ham
mer
is n
ot b
atte
red.
(
)H
amm
er f
ace
strik
es t
he c
one
squa
rely
and
in t
he c
ente
r.
The
Bar
rel:
(
)Th
e ba
rrel
fits
in t
he s
tock
cor
rect
ly.
(
)Fr
ee f
rom
vis
ible
den
ts o
r cr
acks
.(
)
The
muz
zle
is n
ot d
ente
d or
wor
n.(
)
Con
e is
wel
l sea
ted
and
not
batt
ered
.(
)
The
open
ing
of t
he c
one
is c
lear
and
of
acce
ptab
le s
ize.
(
)Th
e sh
ould
ers
of th
e co
ne a
re n
ot w
orn.
(
)N
o si
gns
of h
eavy
cor
rosi
on a
roun
d th
e co
ne.
(
)Si
ghts
are
com
plet
e an
d op
erab
le.
(
)Th
e ba
rrel
ban
ds h
old
the
barr
el s
ecur
ely.
(
)Th
e ra
mro
d is
str
aigh
t and
fits
the
stoc
k co
rrec
tly.
(
)Th
e ra
mro
d he
ad is
tigh
t on
the
ram
rod.
(
)Th
e ra
mro
d th
read
s ar
e cl
ean
and
free
of
burr
s.
Aft
er D
isas
sem
bly
The
Sto
ck:
(
)Th
ere
are
no s
hiny
spo
ts in
the
lock
rec
ess
from
rub
bing
by t
he m
etal
par
ts o
f th
elo
ck a
ssem
bly.
(
)Lo
ck r
eces
s is
cle
an a
nd f
ree
of s
plin
ters
and
cra
cks.
(
)N
o sp
littin
g or
cra
ckin
g ar
ound
the
tang
scr
ew a
nd ta
ngre
cess
.(
)
The
barr
el b
ed is
cle
an.
( )
**A
ny n
ose
cap
– is
sec
urel
y fa
sten
ed t
o th
e st
ock.
(
)Re
chec
k tw
o-pi
ece
stoc
k fo
r firm
sec
ure
join
t.
The
Lock
:(
)
All
inte
rnal
scr
ews
are
tight
.(
)
No
inte
rnal
par
ts a
re b
roke
n or
chi
pped
.(
)
The
nose
of
the
sear
and
the
tru
mbl
er n
otch
es a
re s
harp
and
in g
ood
cond
ition
.(
)
No
sign
s of
met
al r
ubbi
ng o
n th
e in
side
of
the
lock
plat
e.(
)
No
sign
s of
inco
rrec
t rep
airs
or i
ncor
rect
repl
acem
ent
part
s.(
)
With
ham
mer
fully
forw
ard,
the
mai
nspr
ing
does
not
disc
onne
ct fr
om th
e tu
mbl
erno
r doe
s an
y pa
rt o
f the
mai
nspr
ing
prot
rude
bel
ow th
elo
ckpl
ate.
The
Bar
rel:
(
)A
ll pa
rts
are
clea
n an
d lig
htly
oile
d.(
)
The
bree
ch p
lug
is f
ully
sea
ted
and
corr
ectly
alig
ned.
( )
**“P
aten
t Br
eech
es”
– th
ere
is n
o in
dica
tion
of s
eam
sepa
ratio
n.(
)
Bore
che
ck w
ith li
ght
or r
efle
ctor
– C
lean
and
in g
ood
cond
ition
.(
)
Bore
wip
er c
heck
-pat
ch c
omes
out
cle
an.
( )
**O
n pi
n fa
sten
ed p
iece
s –
all b
arre
l lug
s ar
e co
mpl
ete
and
in g
ood
cond
ition
.(
)
Park
Sta
ff re
port
s no
pro
blem
s in
usi
ng th
e fir
earm
.
** S
peci
al f
eatu
re n
ot f
ound
on
all w
eapo
ns

10
7th. Take off the upper band (38) by first loosening the screw (e).
Note: Bands with band springs are removed by depressing the
spring.
8th Take off the middle band (39) in the same manner.
9th. Take off the lower band (40) in the same manner.
Note: The letter U on the bands is to indicate the upper (lock-
plate) side in assembling.
10th. Take out the barrel (1). In doing this, turn the musket horizontally, with the barrel downward, holding the barrel loosely with the left hand below the rear sight (6), the right hand grasping the stock by the handle; and if it does not leave the stock, tap the tompion in the muzzle gently against the ground or floor, which will loosen the breech end form the stock. This is preferable to lifting the barrel out by the muzzle, because if the tang of the breech-screw (2) should bind in the wood, the head of the stock (29 d) would be liable to be split by raising the muzzle first.
The foregoing parts are all that should usually be taken off or dismounted.
DISASSEMBLING AND ASSEMBLING SMALL ARMSRULES FOR DISMOUNTING THE RIFLE MUSKET (Model of 1863)
Note: Prior to disassembling small arms, the piece must be confirmed to be unloaded by springing the rammer in the barrel. The numbers in parenthesis correspond with the figures illustrated in Part II. Nomenclature.
1st. Unfix the bayonet (15).
2nd. Put the tompion (44) into the muzzle of the barrel.
3rd. Draw the ramrod (5).
4th. Turn out the tang-screw (3).
5th. Take off the lock (16); to do this, first put the hammer at half cock, then unscrew partially the side-screws (19 a, b), and, with a slight tap on the head of each screw with a wooden instrument, loosen the lock form its bed in the stock, then turn out the side- screws and remove the lock with the left hand.
6th. Remove the side-screws (19 a, b), taking care not to disturb the washers (41).

11
The demonstrator should never dismount the guard, side-screw, washers, butt-plate, rear-sight, and cone, except when the park Historic Weapons Program Supervisor considers it necessary. The breech-screw should be taken out only by an armorer (gunsmith), and never in ordinary cleaning. The lock should not be taken apart, nor the bayonet clasp taken off, except when absolutely necessary in the opinion of park Historic Weapons Program Supervisor. If proper and regular care be taken of the arm, this will be very seldom necessary.
TO REASSEMBLE THE MUSKET
The parts of the musket are put together in the inverse order of taking them apart, viz.:
1st. Drop the barrel into its place in the stock and squeeze it down with the hand; give the butt of the stock a gentle tap against the floor to settle the breech end of the barrel against the head of the stock (29d).
2nd. Put on the lower band with the letter U upward (lock-plate side), being careful to loosen the screw so as not to mar the stock or barrel in sliding it into its place; screw it on firmly.
3rd. Put on the middle, and
4th. the upper band in the same manner.
5th. The lock. First, half-cock the hammer; take the lock in the right hand, with the mainspring and sear toward you, holding the stock with the left hand by the swell, with the butt between the knees. Enter the lock fairly into the lock bed, taking care to keep the arm of the sear clear of the trigger; press the plate well down into the wood, and then turn the musket over, holding the lock and stock together with the left hand.
6th. With the right hand, turn in the side screws, after having touched their screw-threads with oil. Observe that the point of the rear screw is flat, and should not project beyond the plate, to interfere with the hammer. The front screw sometimes has a round point.
7th. Turn in the tang-screw, after having oiled the screw thread. Be careful to see that each of these screws are turned firmly home, but not forced. As rust and dirt are produced by exploding caps and primers, although no charge be fired, the parts of the barrel and cone exposed should be carefully wiped and oiled after such practice. Besides all the precautions in dismounting, remounting, and cleaning, which have been pointed out in the foregoing pages, habitual care in handling the arms is necessary to keep them in good and serviceable condition.

12
DISASSEMBLY OF THE LOCK
This procedure should only be performed when absolutley necessary. Historic Weapons Program Supervisors are encouraged to practice disassembly and reassembly using a spare lock to keep their skills sharp.
1. Full cock the piece and apply the spring vise to the mainspring, the thumbscrew down. Give the thumbscrew a turn sufficient to liberate the spring from the swivel and mainspring notch.
2. Remove the spring.
3. Remove the sear-spring screw. Before turning this screw out entirely, strike the elbow of the spring with a screwdriver, so as to disengage the pivot from the mortise. Then remove the screw and spring.
4. Remove the sear-screw and sear.
5. Remove the bridle-screw and bridle.
6. Remove the tumbler-screw.
7. Remove the tumbler. This is driven out with a punch inserted into the screw hole.
8. Detach the mainspring swivel from the tumbler with a drift punch.
ASSEMBLY OF THE LOCK
The lock is assembled in the inverse order of its disassembly. Before replacing the screws, oil them slightly with good gun oil, putting a drop on the point of each screw; also on the arbor and pivot of the tumbler; between the movable branches of the springs and the lock-plate; and on the hook and notches of the tumbler. After the lock is put together, avoid turning the screws in so hard as to make the limbs (parts) bind: to insure this, try the motion of each limb before and after its spring is mounted, and see that it moves without friction.
REMOVAL OF THE BREECH SCREW
WARNING: This operation should be done very carefully,
or costly damage can occur. It is recommended that only a
trained gunsmith perform this procedure.
MAINTENANCE AND CLEANING
Tools and Supplies Needed:
-- Cotton patches-- Warm, soapy water-- Plastic funnel-- Small bucket ( 1 gallon capacity)-- Gun oil (Breakfree CLP is preferred, but light machine oil, i.e. “3-in-One” oil will suffice)

13
-- Wiper-- Soft cloth towel(s)-- Fiber-glass or aluminum cleaning rod with tip/jag-- Copper bore brush of correct size
Note on Lubricants: WD-40 is a light, water displacement
lubricant. It can be used best for cleaning when the same piece
is used regularly. Gun oils such as Breakfree CLP, or “3-in-
One” are for tougher cleaning when longer term storage is
used in low humidity areas. Gun Grease may be necessary in
humid areas for storage if gun oil does not suffice. Grease is
water proof and must be removed with a solvent.
TO CLEAN THE PIECE IN THE LABORATORY
The preferred method of cleaning the piece is in a “laboratory” setting with a work bench where tools and supplies are at hand. The piece should be cleaned as soon as possible.
1. Determine the piece is unloaded.
2. Dismount the barrel as described previously.
3. Place the bucket with hot soapy water on the floor. Take the breech end of the barrel and place it in the water so the cone is fully submerged. Pour 4 ounces of hot soapy water down the barrel.
4. Take a wet patch and affix it to the tip on the cleaning rod. Run the patch down the bore to remove any air in the bore.
5. Use an up and down “pumping” motion of the cleaning rod to force water into and out of the bore through the cone. This will flush out fouling concentrated at the breech. Change the water as necessary until all fouling is flushed out of the barrel. Remove the barrel from the bucket. Dry outside of the barrel with a cloth.
6. Run a bore brush through the bore a couple of times to remove any hardened fouling.
7. Run clean patches to dry the bore, and to force out any remaining water through the cone.
8. Remove the cone and dry it and the recess in bolster with a patch. Lightly oil the threads of the cone and replace
9. Run lightly oiled patches down the bore and on the exterior of the barrel.
10. Clean around the lock, the recess of the hammer and stock at the breech with a damp patch. Remove excess moisture with a dry patch. Clean the ram rod with a damp patch. Dry and oil the ram rod.

14
11. Reassemble the piece as described previously.
12. Wipe down the piece, including the trigger guard and trigger with a soft cloth.
Note: To clean the exterior of the barrel dismounted from
the stock, lay it flat on a bench or a board to avoid bending it.
The practice of supporting the barrel at each end and rubbing
it with a strap or buff-stick, or with a ramrod, or any other
instrument to burnish it is pernicious, and should be strictly
forbidden. Fine emery cloth is the best article to clean rust from
the exterior of the barrel.
TO CLEAN THE PIECE IN THE FIELD
The piece can be “field cleaned” when a laboratory setting is not available. This method is as described in Description and Rules for the Management of the Springfield Rifle-Musket.
1. Determine the piece is unloaded.
2. Remove the rammer.
3. Half cock the piece and remove the cap, if necessary. Place a folded patch on the coneand lower the hammer.
4. Wrap a soft cloth towel around below the muzzle to prevent any water from entering the barrel bed of the stock. Place a plastic funnel in the muzzle.
5. Pour 4 ounces of warm soapy water into the muzzle; let it stand a short time to soften the deposit of the powder. Shake the water up and down the barrel well; pour this out and repeat the washing until the water comes out clear; rinse once with clear warm water. Turn the muzzle downwards to let the water drain for a few moments.
6. Screw a wiper onto the end of the ramrod (or use a cleaning rod with a jag) and put a patch dry cloth around it, sufficient to prevent it from chafing the grooves of the barrel; wipe the barrel dry, changing the patch as necessary. If patches continue to come out dirty, pass a bronze bore-brush through the bore once or twice. Then repeat steps one and two. Do this until the patches come out clean.
Put no oil into the vent as it will clog the passage, and cause the cap to misfire: but, with a slightly oiled rag on the wiper, rub the bore of the barrel and the face of the breech-screw (2e).

15
TO REMOVE THE CONE
The cone can be removed using a cone-wrench which snugly fits the cone. Do not use pliers or vice grips as these may damage the shoulder and square. If the hard fouling is found in the vent, a drill bit of sufficient size may be used by hand to clean the vent. The threads should be lightly oiled when replacing the cone. Care should be exercised when replacing the cone not to damage the treads in the bolster.
TO CLEAN THE LOCK
If loose dirt occurs inside the lock, wipe it off with a dry cloth or a small soft brush. Oil lightly. If rust occurs, disassemble the lock completely and remove the rust with fine emery cloth, wipe any residue with a clean cloth, and reassemble the lock.
TO CLEAN THE MOUNTINGS
For the mountings, and all of the iron and steel parts, use a lightly oiled patch. If rust occurs, use fine emery cloth moistened with oil. For brass, use any brass polish that does not have too high of a content of solid abrasives. Use the tip of the finger or a soft cloth to apply. Buff with a soft cloth.
ADDITIONAL CLEANING AND MAINTENANCE TIPS
- Remove dirt form the screw holes by screwing a piece of soft wood into them.
- Wipe clean with a soft cloth and oil lightly.
- In cleaning the arms, great care should be observed to preserve the qualities essential to service rather than to obtain a bright polish.
- Burnishing the barrel (or other parts) should be strictly avoided, as it tends to crook the barrel, and also to destroy the uniformity of the exterior finish of the arm.
- In ordering arms on parade, let the butt be brought gently to the ground, especially when the exercises take place on pavements or hard ground. This will save the mechanism of the lock from shocks, which are very injurious to it, and which tend to loosen and mar the screws and split the stock.
- The ramrod should not be sprung in the bore with unnecessary force. It batters the head of the rod and wears injuriously the grooves. The soldier should let the rod slide down gently, supported by the thumb and finger; and the inspecting officer can satisfy himself of the condition of the bottom of the bore by

16
gently tapping with the rod.
- The face of the breech can be polished, after washing, by means of a cork fixed on the wiper or ball screw; the polished surface can be seen if the muzzle is turned to the light.
- In stacking arms, care should be taken not to injure the bayonets by forcibly straining the edges against each other. The stack can be as well secured without such force being used.
- No cutting, marking, or scraping, in any way, the wood or iron should be allowed; and no part of the gun should be touched with a file. Take every possible care to prevent water from getting in between the lock, or barrel, and stock. If any should get there, dismount the gun as soon as possible, clean and oil the parts as directed, and see that they are perfectly dry before reassembling them.
LONG-TERM STORAGE AND MAINTENANCE
Small arms should be kept in a locked cabinet in a climate-controlled structure protected with a monitored alarm system. Access to the cabinets should be limited.
Small arms in storage should be checked periodically to see that the effects of moisture (rust) are not present. Areas with high humidity may have to take special precautions, such as
treating small arms with grease or installing a de-humidifier in the arms room.
The stock should be treated occasionally with linseed oil (or 50-50 mixture of linseed oil and turpentine). It is recommended that oiling the stock should be done while the piece is dismounted. Oil the stock well, let it stand a few hours and then rub it with a woolen rag until the wood is perfectly dry. This will help make the stock resistant to the effects of moisture and will help keep the stock from drying out and possibly cracking or splitting.
Note: The stocks of many replica firearms are manufactured
with a polyurethane coating. The polyurethane finish will
prevent the linseed oil from soaking into the pores of the wood.

17
PART IV - PERCUSSION MUSKET DRILL
The National Park Service drill for 19th century percussion small arms is based upon the School of the Soldier, Infantry
Tactics, 1862 by Brig. Gen. Silas Casey, U. S. Army. The paragraph numbers correspond with those of the original manual. Other manuals such as the Rifle and Light Infantry
Tactics, 1855 by Brevet Lieutenant Colonel W.J. Hardee are almost identical however they will have different page numbers. Please note that slight changes have been made from the original manual for safety considerations.
The demonstrator shall be dressed in an all natural fabric uniform of the period and equipped with a snugly fitting waist-belt, cap pouch (with cone pick) located on the right front of the belt, cartridge box (with tins) located on the right hip, cartridge box sling (as appropriate), bayonet and bayonet scabbard located on the left side of the belt. The demonstrator shall practice the movements with haversack, canteen, knapsack and overcoat (as appropriate) in order to become familiar with the drill while wearing these items.
All demonstrators must be provided with proper hearing protection.
It is highly recommended that the demonstrator become familiar with the infantry tactics of their historical period. Several manuals are available, many in reprinted form, and the information contained in them varies little between
versions. The demonstrator should become well familiar with the organization of the company, the “School of the Soldier” and “Instructions for Skirmishers.”
The demonstrator shall become familiar with the manual to understand the safe and proper handling of 19th century percussion small arms and their interpretation to the visitor. The demonstrator should bear in mind proper military conduct while presenting programs before the public.
This drill can be applied to any civilian percussion small arms, such as hunting rifles and shotguns.

18
COMMANDS
There are three kinds.
1. The command of caution, which is attention.
2. The preparatory command, which indicates the movement which is to be executed.
3. The command of execution, such as march or halt, or, in the manual of arms, the part of command which causes an execution.
The tone of the command should be animated, distinct, and of loudness proportioned to the number of demonstrators under instruction.
The command attention is pronounced at the top of the voice, dwelling on the last syllable.
The command of execution will be pronounced in a tone firm and brief.
The commands of caution, and the preparatory commands, are herein distinguished by italics, those of execution by CAPITALS.
Those preparatory commands which, from their length, are difficult to be pronounced at once, must be divided into two or three parts, with an ascending progression in the tone
of command, but always in such a manner that the tone of execution may be more energetic and elevated; the divisions are indicated by a hyphen. The parts of commands which are placed in a parenthesis are not pronounced.
SCHOOL OF THE SOLDIER
POSTION OF A SOLDIER
Heels in the same line, as near each other as the conformation of the man will permit;
- The feet turned out equally, and forming with each other something less than a right angle;- The knees straight without stiffness;- The body erect on the hips, inclining a little forward;- The shoulders square and falling equally;- The arms hanging naturally;- The palm of the hand turned a little to the front, the little finger behind the seam of the pantaloons;- The head erect and square to the front, without constraint;- The chin near the stock, without covering it;- The eyes fixed straight to the front, and striking the ground about the distance of fifteen paces.

19
REMARKS ON THE POSITION OF THE SOLDIER
Heels on the same line;
Because, if one were in rear of the other, the shoulder on that side would be thrown back, or the position of the soldier would be constrained.
Heels more or less closed;
Because men who are knock-kneed, or who have legs with large calves, cannot, without constraint, make their heels touch while standing.
The feet turned equally out, and not forming too large an angle;
Because, if one foot were turned out more than the other, a shoulder would be deranged, and if both feet be too much turned out, it would not be practicable to incline the upper part of the body forward without rendering the whole position unsteady.
Knees extended without stiffness;
Because, if stiffened, constraint and fatigue would be unavoidable.
The body erect on the hips;
Because it gives equilibrium to the position. The instructor will observe that many recruits have the bad habit of dropping a shoulder. Of drawing in a side, or advancing a hip, particularly the right, when under arms. These are defects he will labor to correct.
The upper part of the body inclining a little forward;
Because commonly, recruits are disposed to do the reverse, to project the belly, and to throw back the shoulders, when they wish to hold themselves erect, from which result great inconveniences in marching. The habit of inclining forward the upper part of the body is so important to contract, tat the instructor must enforce it at the beginning, particularly with the recruits who have naturally the opposite habit.

20
Shoulders square;
Because if the shoulders be advanced beyond the line of the breast, and the back arched (the defect called round shouldered, not uncommon among recruits), the man cannot align himself, nor use his piece with address. It is important, then, to correct this defect, and necessary to that end that the coat should set easy about the shoulders and arm-pits; but in correcting this defect, the instructor will take care that the shoulders be not thrown to much to the rear, which would cause the belly to project, and the small of the back to be curved.
The arms hanging naturally, elbows near the body, the palm of the hand a little turned to the front, the little finger behind the seam of the pantaloons;
Because these positions are equally important to the shoulder-arms, and to prevent the man from occupying more space in a rank than is necessary to free use of the piece; they have, moreover, the advantage of keeping in
the shoulders.
The face straight to the front, without constraint;
Because, if there be stiffness in the latter position, it would communicate itself to the whole of the upper part of the body, embarrass its movements, and give pain and fatigue.
Eyes direct to the front;
Because this is the surest means of maintaining the shoulders in line--an essential object, to be insisted on and attained.
FACINGS
Facing to the right and left will be executed in one time, or pause. The instructor will command:
1. Squad. 2. Right (or left)--FACE.
At the second command, raise the right foot slightly, turn on the left heel, raising the toes a little, and then replace the right heel by the side of the left, and
on the same line.
The full face to the rear (or front) will be executed in two times, or pauses. The instructor will command:
1. Squad. 2. ABOUT-FACE.
(First time.) At the word about, the recruit will turn on the left heel, bring the left toe to the front, carry the right foot to the rear, the hollow opposite to, and full three inches from, the left heel, the feet square to each other.
21
(Second time.) At the word face, the recruit will turn on both heels, raise the toes a little, extend the hams, face to the rear, bringing, at the same time, the right heel by the side of the left.
100. The instructor will take care that these motions do not derange the position of the body.
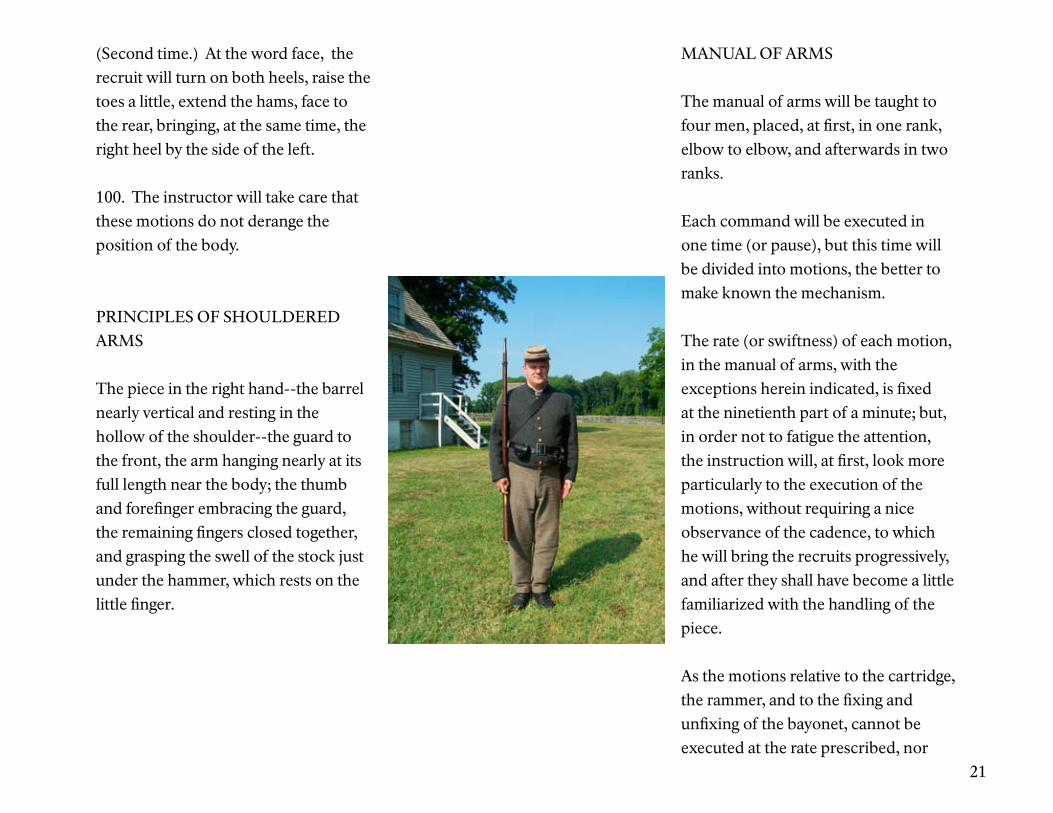
PRINCIPLES OF SHOULDERED ARMS
The piece in the right hand--the barrel nearly vertical and resting in the hollow of the shoulder--the guard to the front, the arm hanging nearly at its full length near the body; the thumb and forefinger embracing the guard, the remaining fingers closed together, and grasping the swell of the stock just under the hammer, which rests on the little finger.
MANUAL OF ARMS
The manual of arms will be taught to four men, placed, at first, in one rank, elbow to elbow, and afterwards in two ranks.
Each command will be executed in one time (or pause), but this time will be divided into motions, the better to make known the mechanism.
The rate (or swiftness) of each motion, in the manual of arms, with the exceptions herein indicated, is fixed at the ninetienth part of a minute; but, in order not to fatigue the attention, the instruction will, at first, look more particularly to the execution of the motions, without requiring a nice observance of the cadence, to which he will bring the recruits progressively, and after they shall have become a little familiarized with the handling of the piece.
As the motions relative to the cartridge, the rammer, and to the fixing and unfixing of the bayonet, cannot be executed at the rate prescribed, nor

22
even with a uniform swiftness, they will not be subjected to that cadence. The instructor will, however, labor to cause these motions to be executed with promptness, and, above all, with regularity.
The last syllable of the command will decide the brisk execution of the first motion of each time (or pause). The commands two, three, and four, will decide the brisk execution of the other motions. As soon as the recruits shall well comprehend the positions of the several motions of a time, they will be taught to execute the time without resting on its different motions; the mechanism of the time will nevertheless be observed, as well to give a perfect use of the piece, as to avoid the sinking of, or slurring over, either of the motions.
The manual of arms will be taught in the following progression; the instructor will command:
Support--Arms.One time and three motions.
(First motion.) Bring the piece, with the right hand, perpendicularly to the front and between the eyes, the barrel to the rear; seize the piece with the left hand and the lower band, raise at the same time with the right hand four inches below the hammer.
(Second motion.) Turn the piece with the right hand, the barrel to the front; carry the piece to the left shoulder, and pass the fore-arm extended on the breast between the right hand and the hammer; support the hammer against the left fore-arm, and the left hand resting on the right breast.
(Third motion.) Drop the right hand by the side.
When the instructor may wish to give repose in this position, he will command:

23
REST.
At the command, the recruits will bring up smartly the right hand to the handle of the piece (small of the stock), when they will not be required to preserve silence, or steadiness of position.
When the instructor may wish the recruits to pass from this position to that of silence and steadiness, he will command:
1. Attention. 2. SQUAD.
At the second word, the recruits will resume the position of the third motion of support arms.
Shoulder--ARMS.One time and three motions.
(First motion.) Grasp the piece with the right hand under and against the left fore-arm; seize it with the left hand at the lower band, the thumb extended; detach the piece slightly from the shoulder, the left fore-arm along the stock.
(Second motion.) Carry the piece vertically to the right shoulder with both hands, the rammer to the front, change the position of the right hand so as to embrace the guard with the thumb and fore-finger, slip the left hand to the height of the shoulder, the fingers extended and joined, the right arm straight.
(Third motion.) Drop the left hand quickly by the side.

24
Shoulder--ARMS.One time and two motions.
(First motion.) Bring the piece to the right shoulder, at the same time change the position of the right hand so as to embrace the guard with the thumb and fore-finger, slip up the left hand to the height of the shoulder, the fingers extended and joined, the right arm nearly straight.
(Second motion.) Drop the left hand quickly by the side.
Present--ARMS.One time and two motions.
(First motion.) With the right hand bring the piece erect before the centre of the body, the rammer to the front; at the same time seize the piece with the left hand half-way between the guide sight and lower band, the thumb extended along the barrel and against the stock, the fore-arm horizontal and resting against the body, the hand as high as the elbow.
(Second motion.) Grasp the small of the stock with the right hand, below and against the guard.

25
Order--ARMS.One time and two motions.
(First motion.) Seize the piece briskly with the left hand near the upper band, and detach it slightly from the shoulder with the right hand: loosen the grasp with the right hand, lower the piece with the left, reseize the piece with the right hand above the lower band, the little finger in the rear of the barrel, the butt about four inches from the ground, the right hand supported against the hip, drop the left hand by the side. If the rifle musket is used the piece will be seized by the left hand a little above the middle band, and it will be seized by the right hand, just above the lower band.
(Second motion.) Let the piece slip through the right hand to the ground by opening slightly the fingers, and take the position about to be described.
POSTION OF ORDER ARMS.
The hand low, the barrel between the thumb and fore-finger extended along the stock; the other fingers extended and joined; the muzzle about two inches from the right shoulder; the rammer in front; the toe (or beak) of the butt, against, and in line with, the toe of the right foot, the barrel perpendicular.
REST.
At this command, the recruits will not be required to preserve silence or steadiness.
When the instructor may wish the recruits to pass from this position to that of silence and steadiness, he will command:
1. Attention. 2. SQUAD.
At the second word, the recruits will resume the position of order arms.

26
Shoulder--ARMS.One time and two motions.
(First motion.) Raise the piece vertically with the right hand to the height of the right breast, and opposite the shoulder, the elbow close to the body; seize the piece with the left hand below the right, and drop quickly the right hand to grasp the piece at the swell of the stock, the thumb and fore-finger embracing the guard; press the piece against the shoulder with the left hand, the right arm nearly straight.
(Second motion.) Drop the left hand quickly by the side.
27
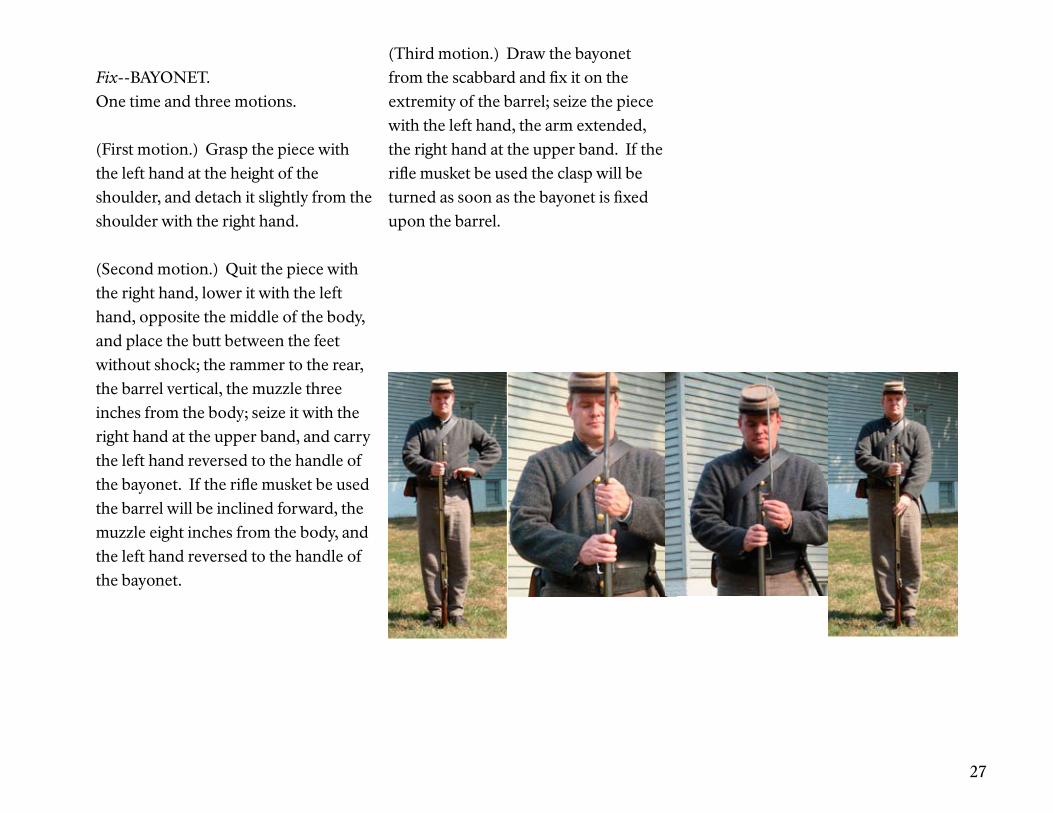
Fix--BAYONET.One time and three motions.
(First motion.) Grasp the piece with the left hand at the height of the shoulder, and detach it slightly from the shoulder with the right hand.
(Second motion.) Quit the piece with the right hand, lower it with the left hand, opposite the middle of the body, and place the butt between the feet without shock; the rammer to the rear, the barrel vertical, the muzzle three inches from the body; seize it with the right hand at the upper band, and carry the left hand reversed to the handle of the bayonet. If the rifle musket be used the barrel will be inclined forward, the muzzle eight inches from the body, and the left hand reversed to the handle of the bayonet.
(Third motion.) Draw the bayonet from the scabbard and fix it on the extremity of the barrel; seize the piece with the left hand, the arm extended, the right hand at the upper band. If the rifle musket be used the clasp will be turned as soon as the bayonet is fixed upon the barrel.

28
Shoulder--ARMS.One time and two motions.
(First motion.) Raise the piece with the left hand and place it against the right shoulder, the rammer to the front: seize the piece at the same time with the right thumb and fore-finger embracing the guard, the right arm nearly extended.
(Second motion.) Drop briskly the left hand by the side.
Charge--BAYONET.One time and two motions.
(First motion.) Raise the piece slightly with the right hand and make a half face to the right on the left heel; place the hollow of the right foot opposite to, and three inches from the left heel, the feet square: seize the piece at the same time with the left hand a little above the lower band.
(Second motion.) Bring down the piece with both hands, the barrel uppermost, the left elbow against the body; seize the small of the stock, at the same time, with the right hand, which will be supported against the hip; the point of the bayonet as high as the eye.

29
Shoulder--ARMS.One time and two motions.
(First motion.) Throw up the piece briskly with the left hand in facing to the front, place it against the right shoulder, the rammer to the front; turn the right hand so as to embrace the guard, slide the left hand to the height of the shoulder, the right hand nearly extended.
(Second motion.) Drop the left hand smartly by the side.
Trail--ARMS.One time and two motions.
(First motion.) The same as the first motion of order arms.
(Second motion.) Incline the muzzle slightly to the front, the butt to the rear and about four inches from the ground. The right hand supported at the hip, will so hold the piece that the rear rank men may not touch with their bayonets the men in the front rank.
Shoulder--ARMS.
208. At the command shoulder, raise the piece perpendicularly in the right hand, the little finger in the rear of the barrel; at the command arms, execute what has been prescribed for the shoulder from the position of order arms.
30
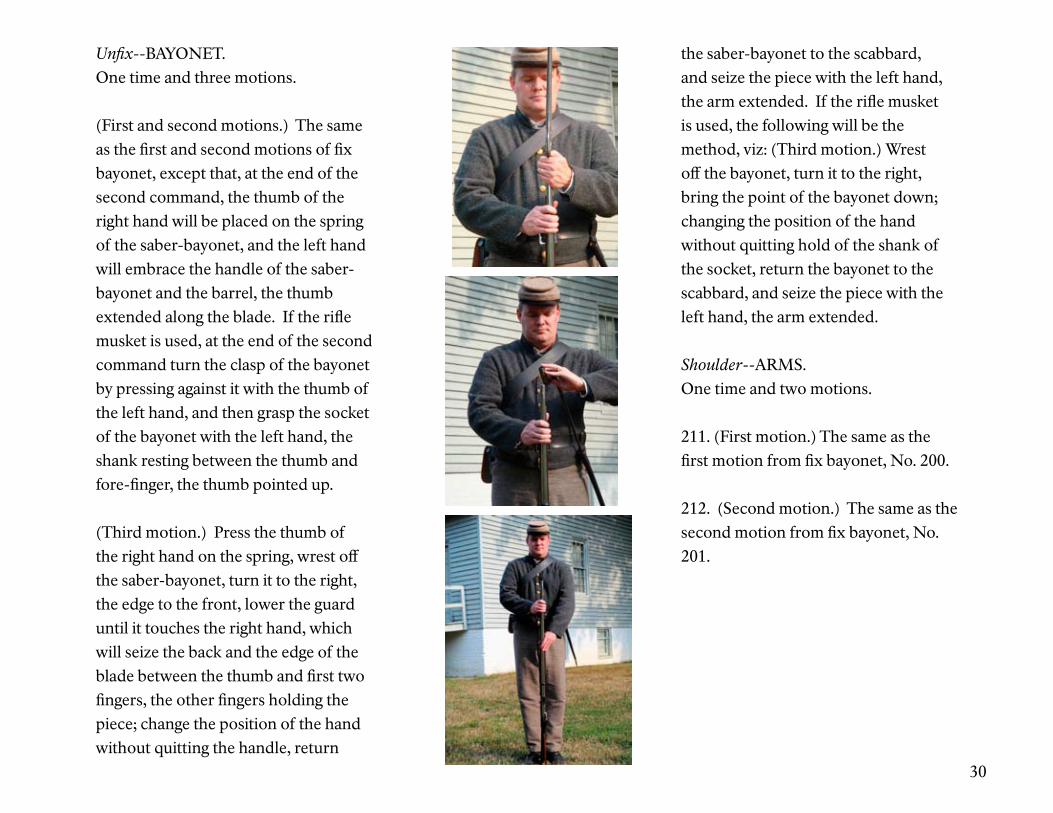
Unfix--BAYONET.One time and three motions.
(First and second motions.) The same as the first and second motions of fix bayonet, except that, at the end of the second command, the thumb of the right hand will be placed on the spring of the saber-bayonet, and the left hand will embrace the handle of the saber-bayonet and the barrel, the thumb extended along the blade. If the rifle musket is used, at the end of the second command turn the clasp of the bayonet by pressing against it with the thumb of the left hand, and then grasp the socket of the bayonet with the left hand, the shank resting between the thumb and fore-finger, the thumb pointed up.
(Third motion.) Press the thumb of the right hand on the spring, wrest off the saber-bayonet, turn it to the right, the edge to the front, lower the guard until it touches the right hand, which will seize the back and the edge of the blade between the thumb and first two fingers, the other fingers holding the piece; change the position of the hand without quitting the handle, return
the saber-bayonet to the scabbard, and seize the piece with the left hand, the arm extended. If the rifle musket is used, the following will be the method, viz: (Third motion.) Wrest off the bayonet, turn it to the right, bring the point of the bayonet down; changing the position of the hand without quitting hold of the shank of the socket, return the bayonet to the scabbard, and seize the piece with the left hand, the arm extended.
Shoulder--ARMS.One time and two motions.
211. (First motion.) The same as the first motion from fix bayonet, No. 200.
212. (Second motion.) The same as the second motion from fix bayonet, No. 201.

31
Secure--ARMS.One time and three motions.
213. (First motion.) The same as the first motion of support arms, No. 140, except with the right hand seize the piece at the small of the stock.
214. (Second motion.) Turn the piece with both hands, the barrel to the front; bring it opposite the left shoulder, the butt against the hip, the left hand at the lower band, the thumb as high as the chin and extended on the rammer; the piece erect and detached from the shoulder, the left fore-arm against the piece.
215. (Third motion.) Reverse the piece, pass it under the left arm, the left hand remaining at the lower band, the thumb on the rammer to prevent it from sliding out, the little finger resting against the hip, the right hand falling at the same time by the side.
Shoulder--ARMS.One time and three motions.
216. (First motion.) Raise the piece with the left hand, and seize it with the right hand at the small of the stock. The piece erect and detached from the shoulder, the butt against the hip, the left fore-arm along the piece.
217. (Second motion.) The same as the second motion of shoulder arms from a support.
218. (Third motion.) The same as the third motion of shoulder arms from a support.

32
Right shoulder shift--ARMS.One time and two motions.
219. (First motion.) Detach the piece perpendicularly from the shoulder with the right hand, and seize it with the left between the lower band and guide-sight, raise the piece, the left hand at the height of the shoulder and four inches from it; place, at the same time, the right hand on the butt, the tow between the first two fingers, the other two fingers under the butt plate.
220. (Second motion.) Quit the piece with the left hand, raise and place the piece on the right shoulder with the right hand, the lock plate upward; let fall at the same time, the left hand by the side.
Shoulder--ARMS.One time and two motions.
221. (First motion.) Raise the piece perpendicularly by extending the right arm to its full length, the rammer to the front; at the same time seize the piece with the left hand between the lower band and guide sight.
222. (Second motion.) Quit the butt with the right hand, which will immediately embrace the guard, lower the piece to the position of shoulder arms, slide up the left hand to the height of the shoulder, the fingers extended and closed. Drop the left hand by the side.

33
230. The recruits being at ordered arms, when the instructor shall wish to cause the pieces to be placed on the ground, he will command:
Ground--ARMS.One time and two motions.
231. (First motion.) Turn the piece with the right hand, the barrel to the left, at the same time seize the cartridge box with the left hand, bend the body, advance the left foot, the heel opposite the lower band: lay the piece on the ground with the right hand, the toe of the butt on a line with the right toe, the knees slightly bent, the right heel raised.
232. (Second motion.) Rise up, bring the left foot by the side of the right, quit the cartridge box with the left hand, and drop the hands by the side.
Raise--ARMS.One time and two motions.
233. (First motion.) Seize the cartridge box with the left hand, bend the body, advance the left foot opposite the lower band, and seize the piece with the right hand.
234. (Second motion.) Raise the piece, bringing the left foot by the side of the right; turn the piece with the right hand, the rammer to the front; at the same time quit the cartridge box with the left hand, and drop this hand by the
side.
Being on parade and at order arms, if it be wished to give the men rest, the command will be:
Parade--REST.
At the command rest, turn the piece on the heel of the butt, the barrel to the left, the muzzle in front of the centre of the body; seize it at the same time with the left hand just above, and with the right at the upper band; carry the right foot six inches to the rear, the left knee slightly bent.
34
MANUAL OF FIRING
Note: The recruits are at the position of shoulder arms.
LOAD IN NINE TIMES.
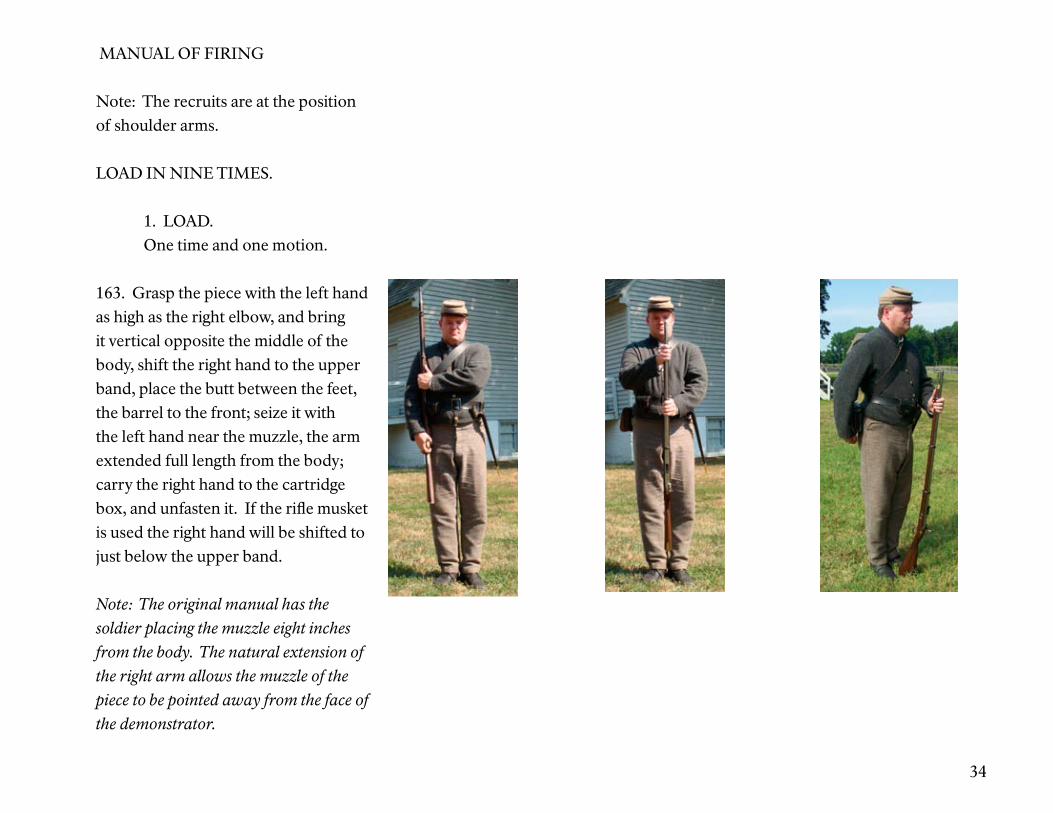
1. LOAD. One time and one motion.
163. Grasp the piece with the left hand as high as the right elbow, and bring it vertical opposite the middle of the body, shift the right hand to the upper band, place the butt between the feet, the barrel to the front; seize it with the left hand near the muzzle, the arm extended full length from the body; carry the right hand to the cartridge box, and unfasten it. If the rifle musket is used the right hand will be shifted to just below the upper band.
Note: The original manual has the
soldier placing the muzzle eight inches
from the body. The natural extension of
the right arm allows the muzzle of the
piece to be pointed away from the face of
the demonstrator.

35
2. Handle--CARTRIDGE.One time and one motion.
164. Raise the flap, and withdraw a cartridge. Seize the cartridge with the thumb and next two fingers, and place it between the teeth.
3. Tear--CARTRIDGE. One time and one motion.
165. Tear the paper to the powder, hold the cartridge upright between the thumb and first two fingers, near the top; in this position place it to the side of and near the muzzle--the back of the hand to the right.
Note: The original manual has the
soldier placing the back of the right
hand to the front. Having the back
of the hand to the right makes for a
more natural motion in charging the
cartridge, and reduces the likelihood that
the demonstrator will pull the muzzle
towards the body when charging the
cartridge with the back of the hand to the
front.

36
4. Charge--CARTRIDGE. One time one motion.
166. Empty the powder charge into the bore. Then, using the first finger and thumb of the right hand, quickly place the empty cartridge paper into the bore. Seize the head of the rammer with the thumb and forefinger of the right hand, the other fingers closed, the elbows near the body. Loosen the ram rod from its bed.
Note: Take care to place the cartridge paper in the bore as quickly as possible
without needlessly exposing the hand before the muzzle. Do not use the first finger
to poke the cartridge paper down into the bore! If the cartridge paper can not be
quickly and easily placed down the bore it can be dropped to the ground.
5. Draw--RAMMER. One time three motions.
167. (First motion.) Half draw the rammer by extending the right arm; steady it in this position in the bed of the stock, with the left thumb; grasp the rammer near the muzzle with the tips of the fingers and thumb of the right hand, the little finger uppermost, the nails to the left, the thumb extended along rammer.
168. (Second motion.) Clear the rammer from the bed of the stock by again extending the arm; the rammer in the prolongation of the bed.

37
169. (Third motion.) Turn the rammer, the little end of the rammer passing near the left shoulder; touch the head of the rammer to the right side of the muzzle, keeping it clear of the muzzle. The back of the hand is to the front.
6. Ram--CARTRIDGE. One time and one motion.
170-172. Insert the rammer as far as the right hand allows and quit the rammer with the right hand. Seize the rammer at the small end with the thumb and forefinger of the right hand, the back of the hand to the front; press the cartridge home. Draw the rammer out, and grasp it near the muzzle with the finger tips and thumb tip of the right hand, the little finger uppermost, the nails to the front; clear the rammer from the bore by extending the arm, the nails to the front, the rammer in the prolongation of the bore.
Note: The original manual has removing the rammer in No. 171, Return Rammer.
For enhanced safety, the rammer will be withdrawn from the bore as soon as the
cartridge is seated, so the rammer will not become a projectile should the piece
discharge prematurely. Turn the rammer, the head of the rammer passing near
the left shoulder, and insert in the bed of the stock until the right hand reaches the
muzzle, the nails to the right.

38
7. Return--RAMMER. One time and one motion.
173. Force the rammer home by placing the little finger of the right hand on the head of the rammer, the thumb toward the body; pass the left hand down the barrel to the extend of the arm, without depressing the shoulder.
8. PRIME One time and two motions.
174. (First motion.) With the left hand, raise the piece till the hand is as high as the eye, grasp the small of the stock with the right hand; half face to the right; place, at the same time, the right foot behind and at right angles with the left; the hollow of the right foot against the left heel. Slip the left hand down to the lower band, the thumb along the stock, the left elbow against the body; bring the piece to the right side, the butt below the right forearm, the small of the stock against the body and two inches below the right breast, the barrel upwards, the muzzle on a level with the eye.

39
175. (Second motion.) Half cock with the thumb of the right hand, the fingers supported against the guard and the small of the stock, remove the old cap with one of the fingers of the right hand, and with the thumb and forefinger of the same hand, take a cap from the pouch, place it on the cone, and press it down with the thumb; seize the small of the stock with the right hand.
Note: In the original manual the 9th
count is shoulder arms with ready, aim,
and fire having no designated number.
Due to safety concerns regarding
the carrying of a loaded and capped
firearm, the shoulder arms command
has been eliminated and the 9th count
has been re-assigned to ready.
9. READY. One time one motion.
180. Cock, and seize the piece at the small of the stock without deranging the position of the butt. With the thumb of the right hand, bring the hammer to full cock making sure that the fingers of the right hand are outside the trigger guard.
AIM. One time and two motions.
181. (First motion.) Raise the piece with both hands, and support the butt against the right shoulder; the left elbow down, the right as high as the shoulder; incline the head upon the butt, so that the right eye may perceive quickly the notch of the hausse, the front sight, and the object aimed at; the left eye closed, the right thumb extended along the stock.
Note: The original manual has aim as
one motion however listing the placing of
the finger on the trigger as the last part.
Separating the placing of the forefinger
on the trigger as a separate motion
is added to enhance safety and yet in
keeping with the intent of the original
manual.

40
FIRE. One time and one motion.
184. Press the forefinger against the trigger, fire, without lowering or turning the head, and remain in this position.
185. Instructors will be careful to observe when the men fire, that they aim at some distinct object, and that the barrel be so directed that the line of fire and the line of sight be in the same vertical plane. They will often cause the firing to be executed on ground of different inclinations, in order to accustom the men to fire at objects either above or below them.
LOAD.One time and one motion.
186. Bring down the piece with both hands, at the same time face to the front and take the position of load as indicated, No. 163.
187. The men being in this position, the instructor will cause the loading to be continued by the commands
and means prescribed, No. 163 and following.
188. If, after firing, the instructor should not wish the recruits to reload, he will command:
Shoulder--ARMS.One time and one motion.
189. Throw up the piece briskly with the left hand and resume the position of shoulder arms, at the same time face to the front, turning on the left heel, and bring the right heel on a line with the left.
190. To accustom the recruits to wait for the command fire, the instructor,
when they are in the position of aim, will command:
Recover--ARMS. One time and one motion.
191. At the first part of the command, withdraw the finger from the trigger; at the command arms, retake the position of ready.

41
REMARKS ON LOADING AND FIRING.
182. When recruits are formed in two ranks to execute the firings, the front rank men will raise a little less the right elbow, in order to facilitate the aim of the rear rank men.
183. The rear rank men, in loading, will ensure the will ensure that the muzzle of the piece is not directly pointed at the man in front of them. The rear rank men, in aiming, will each carry the right foot about eight inches to the right, and towards the left heel of the man next on the right, inclining the upper part of the body forward so the lower band is lined up with the top of the shoulder of the man in front of him.
194. Whenever the loadings and firings are to be executed, and the cartridge-boxes are slung upon the waist-belt, the instructor will cause them to be brought to the front.
TO LOAD AT WILL.
265. The instructor will next teach loading at will, which will be executed as loading in nine times, but continued, and without resting on either of the times. He will command:
1. Load at will. 2. LOAD.
Note: The demonstrator loads the piece to include prime.
266. The instructor will habituate the recruits, by degrees, to load with the greatest possible promptitude, each without regulating himself by his neighbor, and above all without waiting for him.
267. The cadence prescribed No. 136, is not applicable for loading at will.
FIRINGS
THE DIRECT FIRE.
269. The instructor will give the following commands:
1. Fire by Squad. 2. Squad. 3. READY. 4. AIM. 5. FIRE. 6. LOAD.
270. These several commands will be executed as has been prescribed in the Manual of Arms. At the third command, the men will come to the position of ready, as heretofore explained. At the fourth they will aim according to the rank in which each may find himself placed, the rear rank men inclining forward a little the upper part of the body, in order that their pieces may reach as much beyond the front rank as possible.
271. At the sixth command, they will load their pieces and return immediately to the position of ready.
272. The instructor will recommence the firing by the commands:
42
1. Squad. 2. AIM. 3. FIRE. 4. LOAD.
273. When the instructor wishes the firing to cease, he will command:
Cease--FIRING.
274. At this command the men will cease firing, but will load their pieces if unloaded.
TO FIRE BY FILE.
282. The fire by file will be executed by the two ranks, the files of which will fire successively, and without regulating on each other, except for the first fire.
283. The instructor will command:
1. Fire by file. 2. Squad. 3. READY. 4. COMMENCE FIRING.
284. At the third command, the two ranks will take the position prescribed in the direct fire.
285. At the fourth command, the file on the right (emphasis added) will aim and fire; the rear-rank man in aiming will take the position indicated in No. 183.
286. The men of this file will load their pieces briskly and fire a second time; reload and fire again, and so on in continuation.
287. The second file will aim, at the instant the first brings down pieces to reload, and will conform in all respects to that which has just been prescribed for the first file.
288. After the first fire, the front and rear rank men will not be required to fire at the same time.
289. When the instructor wishes for the fire to cease, he will command:
Cease--FIRING.
291. At this command, the men will cease firing. If they have fired, they will load their pieces and bring the second position of prime.
TO FIRE BY RANK.
292. The fire by rank will be executed by each entire rank, alternately,
293. The instructor will command:
1. Fire by rank. 2. Squad. 3. READY. 4. Rear rank.5. AIM. 6. FIRE. 7. LOAD.
294. At the third command, the two ranks will take the position of ready, as prescribed in the direct fire.
295. At the seventh command, the rear rank will execute that which has been prescribed in the direct fire, and afterward take the position of ready.
296. As soon as the instructor sees several men of the rear rank in the position of ready, he will command:
43
1. Front rank. 2. AIM. 3. FIRE. 4. LOAD.
297. At these commands, the men of the front rank will execute what has been prescribed for the rear rank, but they will not step off with the right foot.
298. The instructor will recommence the firing by the rear rank, and will thus continue to alternate from rank to rank, until he shall wish the firing to cease, when he will command, cease firing, which will be executed as heretofore prescribed.
Spring—RAMMERS
243. Put the rammer in the barrel as has been explained above and immediately retakes the position of ordered arms.
244. The instructor, for the purpose stated, can take the rammer by the end, and spring it lightly in the barrel, or cause each recruit to make it ring in the barrel.
245. Each recruit, after the instructor passes him, will return rammer, and resume the position of ordered arms.

44
PART V - MISFIRE PROCEDURES
Each park shall develop a written Misfire Plan to address the action necessary to render a firearm safe in the event of a Level I or Level II Misfire.
TYPES OF MISFIRES
A “Level I Misfire” is defined as a misfire that can be cleared on the demonstration area and the demonstration can continue.
A “Level II Misfire” is defined as a misfire that cannot be cleared at the demonstrations area without disrupting the demonstration. Specialized equipment is needed to render the firearm safe.
CAUSES OF MISFIRES
--Improperly cleaned firearm: If a firearm is not properly cleaned immediately after use, the residue in the barrel will harden, rust and corrosion will form. This buildup of fouling will likely obstruct the vent. Excessive oil may pool in the breech and obstruct the vent or neutralize the powder charge.
--Obstruction of the vent: The vent may become obstructed by fouling, excessive oil, or particles from the percussion cap. New firearms with re-occurring misfires should be checked to see if the vent of the cone properly aligns with the vent in the bolster.
--Poor quality percussion caps: The fulminate of mercury used in the percussion cap will deteriorate if stored a damp environment, making the caps ineffective.
--Improper loading procedure: The powder charge is not properly seated
under the vent. Once fire has been introduced to the bore, do not re-ram the charge!
LEVEL I MISFIRE PROCEDURES
Should a misfire occur:
1. Remain at position of aim. Count to ten.
2. Lower the piece to the first position of prime. Half-cock the piece, remove the spent cap and visually inspect the vent of the cone. Use the cone pick if necessary to remove obstructions of the vent.
3. Repeat prime, ready, aim and fire procedure.
4. Repeat procedure two times. If the weapon still misfires, it must be removed from the visitor area, taken to a secure area, as designated in the Park Misfire plan, and the following procedure is used.
45
LEVEL II MISFIRE PROCEDURES
LEVEL II MISFIRE—CO2 DISCHARGER
1. Keep the piece pointed in a safe direction. 2. Half cock the piece and remove the cap.
3. Place the CO2 discharger with adapter over the cone evenly for a good seal. Press the discharger lever quickly and release.
4. Clean and inspect the piece before attempting to load it again.
MISFIRE PROCEDURE: FIRING IN RANKS
1. During demonstrations involving multiple demonstrators in ranks, the demonstrator shall announce or signal to the demonstration supervisor that a misfire has occurred before applying the appropriate misfire procedure. Once the piece has been reprimed, the demonstrator will remain in the position of recover arms and wait to fire on command with the rest of the unit.
2. If the after repeating the repriming procedure two times, the demonstrator should bring the piece to shoulder arms, and remain at that position until the completion of the demonstration when the piece will be will be removed as described below.
LEVEL II MISFIRE—UNLOADING THROUGH THE MUZZLE
Should the CO2 discharger not be available or fail to remove the charge, the piece must be unloaded through the muzzle:
1. Soak the powder charge with water poured down the muzzle.
2. When the powder charge is sufficiently wet, remove the obstruction with a wiper.
3. Clean and inspect the piece before attempting to load it again.

46
PART VI - LABORATORY
MANUFACTURING BLANK CARTRIDGES
Materials Needed
- Hardwood Cutting Board- Wood Ruler- Knife or Scissors- Paper (Newsprint or Kraft Paper)- Round Ball or Marble of same caliber as weapon (.54 caliber for .58 caliber bore and .65 caliber for .69 caliber bore)- Elmer’s Glue- Ffg Black Powder- Former - Same diameter as the ball adn six inches long with one end slightly concave- Trapezoid Pattern
.58 Caliber Rounds
Height - 3.75 inchesLong Base - 4.25 inchesShort Base - 2.5 inches
.69 Caliber Rounds
Height - 4.5 inchesLong Base - 5.25 inches
Short Base - 3 inches
HEIG
HT
LONG BASE
SHO
RT BASE

47
Procedure
1. Lay paper on the cutting board and cut the number of trapezoids needed by cutting along the edge of the pattern. You can alsotrace a number of trapezoids using the pattern before cutting. The ordnance manual states that a sheet of paper 13 inches wide by 16 1/2 inches should be used for making cartridges. If you use paper of this size, you can get up to twelve trapezoids with little or no wasted paper.
2. Place one trapezoid on the cutting board with the long side to the left. Place former on the bottom with the concave end pointed to the left. Make sure to leave enough paper beyond the concave end of the former for crimping. Roll paper tightly on the former.
3. After the tube is rolled, fold in one half of the exposed end into the concave part of the former. Carefully place drop of glue on the folded paper, then fold down the other half of the exposed paper. Roll the concave end of the former over the ball to seal the tube.
Another method for closing the tube is to
tightly twist the exposed end of the paper
and press it into the concave end. Press the
end down on the cutting board or the ball to
crimp the twisted paper into place.
4. Remove the former and put the proper charge of powder into the tube (see the Table of Maximum Loads). Tap the cartridge against the board to settle the powder.
5. Flatten the empty part of the cylinder and bend it flush with the powder at a right angle to the cartridge. Fold the flattened part lengthwise with two from the edges meeting in the middle. Bend this folded end back on itself and strike the top of the cartridge on the boeard to set the folds.
The blank cartiridge is now ready for packaging or firing.

48
National Park ServiceTABLE OF MAXIMUM LOADS - SMALL ARMS
Weapon Types Caliber Max Blank Charge
18th Century Flintlock
“Brown Bess” Musket .75 125 grains FfgCharleville Musket .69 125 grains Ffg American Musket .69 125 grains FfgKentucky Rifle Variable 90 grains FfgPistols & Horse Pistols Variable 90 grains Ffg
19th Century Percussion
U.S. Rifle M1841 .54/.58 60 grains FfgU.S. Musket, M1842 .69 75 grains FfgU.S. Rifle Musket, M1855-1864 .58 60 grains FfgBritish Enfield Rifle .577/.58 60 grains FfgU.S. Rifle, Musketoon .58 60 grains FfgSharps Carbine/Rifle .54 60 grains FfgRevolver .36/.44 27 grains Fffg
19th Centiry Metallic Cartridge
U.S. Rifle, M1866-1870 .45 70 grains Ffg Sharps Carbine .50 55 grains FfgU.S. Rifle, M1873-1884 .45 70 grains FfgU.S. Carbine, M1873-1884 .45 55 grains FfgHenry Repeating Rifle .44 28 grains FfgColt/S&W Revolver .45 28 grains Ffg
MANUFACTURING LIVE OR DUMMY CARTRIDGES
Materials Needed
In addition to the materials needed for the manufacture of blank rounds, you will need:
- White Cotton Thread (or a modern thread that looks like cotton),
- Former with an end rounded like the Minie Ball with a shallow groove four inches from the end for rifle musket cartridges,
_ Inert Substance for Dummy Cartridges,
- Choking String about nine inches long with a wooden toggle at the end (fastened to the table), and
- Lead Projectile.
Note: Before a ball is placed in a
cartridge it should be immeresed in a
mixture of one part tallow and eight
parts beeswax and then dried.

49
Procedure
1. Lay paper on the cutting board and cut the number of trapezoids needed by cutting along the edge of the pattern. You will need two trapezoids for each round.
2. Place one trapezoid on the board with the long side to the left. Place the former on the paper with the pointed end to the left and roll paper tightly to the former. Make sure you leave enough paper at the end for twisting and threading.
3. Twist and secure the end with the choking string, taking one trun around the cylinder about 1/3 of an inch from the end. Hold the former firmly with the left and and gently draw on the ckoing string. While drawing the choking string, press down with the left forefinger upon the projecting end of the cylinder to fold it neatly down on the ball (or pointed end of the former).
4. Take thread in the right hand and take two half hitches around the choked part making sure all is tight and secure. Thread close to the knot and press the choke on the table to produce a neat finish.
5. Place a bullet or ball on the tied end on the cylinder while it is still on the former.
6. Repeat Steps 2-4.
7. Pour proper charge of powder (or inert substance for dummy rounds) into cartridge then tap on the board to settle.
8. Flatten the empty part of the cylinder and bend it flush with the powder at a right angle to the cartridge. Fold the flattened part lengthwise with two from the edges meeting in the middle. Bend this folded end back on itself and strike the top of the cartridge on the boeard to set the folds.
The blank cartiridge is now ready for packaging or firing.

50
PART VII - SMALL ARMS DEMONSTRATION CRITIQUE
BEFORE( ) The piece has been inspected, inside and out. Bore is clean of foreign material.( ) The demonstrator approaches the demonstration area carrying the firearm in a safe and military fashion.( ) He is not encumbered with superfluous equipment.( ) Misfire equipment is in place at the demonstration area.( ) Visitors have a good filed of vision of the demonstration.( ) The interpreter has a clear view of all the visitors and down range area.( ) Physical barriers between the visitors and the demonstration area are in place.( ) Conditions are not too dry or windy to risk a range fire from the muzzle blast.( ) First aid kit and emergency communications are available.
DURING( ) He is competent with the manual he is using.( ) There is sufficient additional people for interpretation and crowd control.( ) The demonstration area is safe for the size of the audience.( ) The firearm is always pointed in a safe direction.( ) At no time are there any parts of the demonstrator’s body placed in a hazardous position in relation to the firearm.( ) In the event of a misfire or other unscheduled event the demonstrator reacts properly.
AFTER( ) The demonstrator maintains military bearing and leaves the area carrying the firearm safely and in a military fashion.( ) The demonstration area is policed for dropped cartridges, cartridge papers, etc.( ) Any remaining cartridges are returned to storage facility( ) The piece is cleaned, dried and oiled. The piece is returned to the storage facility.( ) Any accessories are accounted for.( ) Your overall impression is favorable.

51
PART VIII - PERCUSSION MUSKET COMPETENCY EXAM
GENERAL
_____ Inspects weapon immediately upon drawing it.
_____ Muzzle Control
_____ Attention To Orders
MANUAL OF ARMS
_____ Executes movements with correct motions
LOADING & FIRING
LOAD
_____ Correct Muzzle Position
_____ Right slaps cartridge box and unfastens it.
HANDLE CARTRIDGE
_____ Holds cartridge between thumb and forefinger.
TEAR CARTRIDGE
_____ Tears paper at the powder line.
_____ Covers powder with thumb and moves cartridge near the muzzle quickly.
CHARGE CARTRIDGE
_____ Keeps finger clear of the muzzle while charging.
DRAW RAMMER
_____ Draws rammer with two pulls handling the rammer with the thumb and forefinger.
_____ Spins rammer over left shoulder.
_____ Places swelled end near, but not in, the muzzle.
RAM CARTRIDGE
_____ Handles rammer with thumb and forefinger.
_____ Uses smooth, firm ramming motion.
_____ Removes rammer and starts returning it immediately.
RETURN RAMMER
_____ Keeps fingers clear of the muzzle.
_____ Slides left hand to middle barrel band.
PRIME
_____ Proper foot position.
_____ Muzzle held at eye level.
_____ Hammer brought to half cock.

52
READY
_____ Brings hammer to full cock.
AIM
_____ Finger is placed on trigger and not before.
FIRE
_____ Remains aimed in after pulling trigger.
LEVEL I MISFIRE
_____ If in a group, verbally indicates that msifire has occured.
_____ Waits ten seconds before executing misfire procedure.
_____ Maintains muzzle control during procedure.

53
BIBLIOGRAPY
Casey, Brig. Gen. Silas. Infantry Tactics for the Instruction, Exercise, and Manuevers of the Soldier, a Company, Line of
Skirmishers, Battalion, Brigade, or Corps D’Armee. D. Van Norstrand, 1862.
Gilham, Maj. William. Manual for Volunteers and Militia. 1861
Scott, H. L., Military Dictionary, D. Van Nostrand, New York, 1864
Springfield Armory. Rules for the Management and Cleaning of the Rifle Musket, Model 1863, for the Use of Soldiers with
Descriptive Plates. Government Printing Office, 1863.
U.S. Army, The Ordnance Manual for the Use of the Officers of the United States Army, 3rd edition, J. B. Lippincott and Co., Philadelphia, 1861.

54
APPENDIX A
Gilham’s Manual
The following movements and motions are described in the School of the Soldier, per Manual for Volunteers and
Militia, 1861, Maj. William Gilham and are presented here for use in firing demonstrations where this manual of firing is historically appropriate. Note that slight differences are included to correspond with precautions in the rifle/rifle-musket manual. Historically, the piece was habitually loaded with bayonet fixed.
Principles of Shouldered Arms
94. The piece in the left hand, the arm very slightly bent, the elbow back near the body, the palm of the hand pressing on the outer flat of the butt ; the outer edge of the latter on the upper joints of the fingers, the heel of the butt between the middle and fore-fingers, the thumb on the front screw of the butt plate, the remaining fingers under the butt, the butt more or less kept back
according to the conformation of the man, so that the piece , seen from the front, shall appear perpendicular, and, also, that the movement of the thigh, in marching, may not raise it or cause it to waver; the stock, below the tail-band, resting against the hollow of the shoulder, just within the joint , the right arm hanging naturally as prescribed in the position of the soldier.
Load in ten times.
1. LOAD.One time and two motions.
106. First motion. Drop the piece by a smart extension of the left arm, seize it with the right hand above and hear the lower band; at the same time carry the right foot forward, the heel against the hollow of the left foot.
Second motion. Drop the piece with the right hand along the left thigh, seize it with the left hand above the right, and with the left hand let it descend to the ground, without shock, the piece touching the left thigh, and the muzzle opposite the centre of the body and pointed away from the face; carry the right hand quickly to the cartridge box and unfasten it. (Fig. 32.)
2. Handle--CARTRIDGE.One time and one motion.
107. Seize a cartridge with the thumb and the next two fingers, and place it between the teeth.
3. Tear--CARTRIDGE.One time and one motion.
108. Tear the paper down to the powder, hold the cartridge upright between the thumb and the two next fingers, near the top; in this position,

55
place it to the side of and near the muzzle, the back of the hand to the right.
4. Charge--CARTRIDGE.
109. Fix the eye on the muzzle, turn quickly the back of the right hand to the left, in order to discharge the powder into the barrel, raise the elbow to the height of the wrist, shake the cartridge, place the empty cartridge paper in the bore. (Note: Take care to place the cartridge paper into the bore as quickly as possible without needlessly exposing the hand before the muzzle. Do not use the first finger to poke the cartridge paper down the bore!). Leave the hand reversed, the fingers closed, but not clenched. (Fig. 33.)
5. Draw--RAMMER.One time and two motions.
110. First motion. Drop the right elbow smartly, and seize the rammer between the thumb and fore-finger bent, the other fingers shut; draw it smartly, extending the arm, seize the
rammer again at the middle between the thumb and fore-finger, the hand reversed, the palm to the front, the nails up, the eyes following the movement of the hand, clear the rammer from the pipes by extending the arm.
Second motion. Turn rapidly the rammer between the bayonet and the face, closing the fingers, the rammer parallel to the bayonet, the arm extended, the butt of the rammer opposite to the muzzle but not yet inserted, the eyes fixed on the muzzle.
6. Ram--CARTRIDGE.One time and four motions.
111. First motion. Insert the butt of the rammer, and force it down as low as the hand. Extend the arm its full length to seize the rammer between the right thumb extended and the fore-finger bent, the tips of the other fingers on the rammer, press the cartridge home, the other right elbow touching the body.
Second motion. Draw the rammer briskly, seize it at the middle between the thumb and fore-finger, the
hand reversed, the palm to the front, the nails up, the eyes following the hand, clear the rammer from the barrel by extending the arm.
Third motion. Turn the rammer rapidly between the bayonet and the face, closing the fingers, the rammer parallel to the bayonet, the arm extended, the little end of the rammer opposite of the first pipe, the eyes fixed on the pipe.
Fourth motion. Insert the small end, and with the thumb, which will follow the movement, force it as low as the middle band; raise the hand quickly, a little bent, place the little finger on the butt of the rammer and force it down.
7. Return--RAMMER.One time and one motion.
112. Force the rammer home with the little finger of the right hand on the butt of the rammer, lower the left hand on the barrel to the extent of the arm without depressing the shoulder.
56
8. Cast--ABOUT.One time and two motions.
113. First motion. With the left hand bring up the piece vertically against the left shoulder, seize it smartly with the right hand at the small of the stock, and slide the left hand down as low as the chin. Second motion. Make a half face to the right on the left heel, bring the left toe to the front, place the right foot at the same time close behind, and at right angles with the left, the hollow of the right foot against the left heel; carry the piece opposite to the right shoulder; bring down the piece with the right hand into the left, which will seize it at the tail band, the thumb extended on the stock, the butt under the right fire-arm, the small fo the stock against the body, and about two inches under the right breast, the muzzle at the height of the eye, the left elbow supported against the side, the right grasping the small of the stock. (Fig. 34)
9. Prime.One time and one motion.
114. Place the thumb of the right hand on the hammer (the fingers remaining under and against the guard), and half-cock the piece; brush of the old cap, and with the thumb and first two fingers of the right hand take a cap from the pouch, place it firmly on the cone by pushing it down with the thumb, and seize the piece by the small of the stock with the right hand.
Note: Normally the 10th count is
shoulder arms with ready, aim, and
fire having no designated number. Due
to safety problems the shoulder arms
command has been eliminated and the
10th count has been re-assigned to ready.
10. Ready(From the position of prime.)One time and one motion.
116. Place the thumb of the right hand on the hammer (the fingers remaining under and against the guard.), cock the piece, and seize the small of the stock
AIM.One time and one motion.
118. Raise the butt to the shoulder, the left elbow a little down, shut the left eye, direct the right along the barrel, drop the head upon the butt to catch the object, and place the fore-finger on the trigger.
FIRE.
119. Apply the fore-finger with force to the trigger without further lowering or turning the head, and remain in that position.