Embed Size (px)
Citation preview

1
NATIONAL OPEN UNIVERSITY OF NIGERIA
FACULTY OF AGRICULTURAL SCIENCES
DEPARTMENTOF
CROP AND SOIL SCIENCES
FPY/SIWES PRACTICAL GUIDE MANUAL
CRP 405FARM DESIGN SURVEY AND LAND USE PLANNING
Course WriterDr. Keswet Andrew

2
National Open University of NigeriaPlot 91, Cadastral Zone, University VillageNnamdi Azikiwe ExpresswayJabi, Abuja
Lagos Liaison Office14/16 Ahmadu Bello WayVictoria Island, Lagos
e-mail: [email protected]: www.nou.edu.ng
This publication is made available in Open Access under the Attribution-ShareAlike4.0(CC-BY-SA 4.0) license (http://creativecommons.org/licenses/by-sa/4.0/). By using thecontent of this publication, the users accept to be bound by the terms of use of theNational Open University of Nigeria Open Educational Resources Repository:http://www.nounonline.net/oer
Published by National Open University of NigeriaPrinted by NOUN [email protected] 2018

3
CONTENT PAGE
INTRODUCTION - - - - - - - 5
OBJECTIVES OF LAND SURVEY - - - - -
DISTANCE - - - - - - - -
PRINCIPLES - - - - - - - -
INSTRUCTIONAL TASK (PROCEDURES) - - - -
RULES FOR TAPING - - - - - - -
PRINCIPLES OF DIFFERENT LEVELING - - - -
INSTRUCTIONAL TASK / PROCEDURE - - - -
PROCEDURE FOR DIFFERENTIAL LEVELING - - -
ESSENTIAL FACTORS IN FARMSTEAD PLANNING - - -
PROCEDURE FOR ZONE PLANNING - - -
ZONE PLANNING - - - - - - -
SUMMARY - - - - - - - -

4

5
INTRODUCTION
This practical guide is designed for students of agriculture who are in 300 level and need to
know about land survey and farmstead planning. As student of agriculture, land plays an
important role in agriculture as there can be no agricultural production without the use of the
land. By going through this practical students will have a hand-on some of the equipment used
and know the concept of what land survey and farmstead planning is all about. Students will
learn about the tools equipment use and learn about some of the procedures employ.
OBJECTIVES OF LAND SURVEY
1. it enables the farmer know the area of farm land
2. it enable the farmer know about the hydrology of the land
3. it enable the farmer have security over his farm land
4. it adds to the farmers security against intruders
5. it is good for collateral
6. it enables the farmer secures the boundaries of his land
7. it helps the farmer know how useful is his land
8. it is basis for farm design
9. it allows for decision making.
according to the American congress and surveying and mapping (ACSM) land surveying is the
sand and out of making all essential measurements to determine the relative points and or
physical and cultural details above, on beneath the surface of the earth and to depict them in a
usable farm, or to establish the position of points and or details. The techniques use land survey
are:
- distance measurement
- angle measurement
- leveling
- determining
- reference network

6
DISTANCE
Objectives:
1. Given a measure of length expressed in a particular unit, be able to express the given
length in any unit (inches, feet, yard, rod, mile, meter, kilometer).
2. List and described the methods and equipment used in measuring distance and be able to
work problems involving measuring by odometer, pacing or stadia.
3. Be able to write a distance measurement in terms of “full” or “plus” stations.
4. Describe the procedure for horizontal taping on sloping ground.
PRINCIPLES
Measuring distance is probably the most common procedure used in agricultural surveying. The
instruments used are simple, but a high degree of accuracy can be achieved with practice and
careful work. Greater errors are introduced in agricultural surveying by inaccurate measurement
of distance than by any other cause. In this section you will become acquainted with the basic
methods and techniques of measuring distance.
INSTRUCTIONAL TASK (PROCEDURES)
Since several common units of length or distance are used in agricultural surveying, you will
need to become familiar with the different sizes of length units and be able to change from or
make connections from one unit to the other.
Common English units are
1 toot (ft) = 12 inches (in)
1 tard (yd) = 3 feet (ft)
1 rod = 16.5 (ft) = 5.5 yd
1 mile (mi) = 5280 ft = 1760 yds = 320 rods
Metric system of measure
1 centimetre (cm) = 10 millimetre (mm)
1 Meter (m) = 100 centimetre (cm)
1 Kilometre = 1000 metres (m)

7
Conversion of one system of unit to the other
1 m = 39.37 in = 3.28ft
1 ft = 0.306m
1 km = 0.621 ml
1 ml = 1.609km
Practice
Express 550 yds as rod
Express 10km as yd
Express 75 rods as meter
Express 12600 ft as kilometre
Instructional Task II
The principal methods of measuring distance are:
(1) Odometer readings
(2) Pacing
(3) Stadia
(4) Taping or Chairing
Odometer
A device that counts the revolutions of a wheel rolled along the line to be measured. There are
special types of wheels with counters but a bicycle or any round object may be use.
To be accurate the wheel must roll along the ground without slipping. The circumference of the
wheel must be known and is equal to II (3.14) times. The diameter the measured distance is then
the product of the wheel circumference and the number of wheel towns. This is expressed in the
following equation.
MD = ( D) x (N)
MD = Measured distance in ft or in
D = Wheel diameter in ft or cm/m
N = number of wheel revolutions.

8
Pacing
This is the oldest, simplest and easiest method of obtaining a measured distance. You must
determine your pace distances (pd) and this can be found by multiplying the number of steps
between two points by a predetermined pace factor (pf). The pace factor vary with individuals.
Pace factor varies with the topography of the land and its shape. Pace factor can be determined
by pacing a measured length severally, say 3 to 4 times and taken the average. Pace factor vary
with individual. Pace factor can be determined by using your normal stride or walk length. For
example; to determine his pace factor, a man takes 62, 60 and 64 steps on 3 trials to travel a
measured distance of 200ft what is his pf.
The average steps is 62 + 60 + 64 = 62 steps
3
His pace factor is 200ft = 3.23ft per step
62 steps
St he counts or measured 400 steps on a ground, what is the pace distance covered.
pd = steps x pf
= 400 x 3.23
= 1292 ft
Taping
This is the most common and most accurate method of measuring horizontal distance using a
steel tape. Tapes come in various sizes and graduations some come in meters or feet or both.
Before attempting to measure with a tape, it is important to note the marks or graduations,
especially where the tape is sub-divided into tenths and hundredths of feet or metres. There are
six basic steps involved in taping. There are:
(1) Lining in (2) applying tension (3) plumbing (4) marking tape length (5) reading the tape
and (6) recording the distance

9
Surveyor’s steel tape 100ft or meters long
1. Metallic tape: made of high grade linen re-inforce with fine copper wire.
2. Mostly found in soft long and comes in a leather case with a keel
3. Chaining pins: sometimes called “surveyors” arrows” are used to mark the and of
each tape length. They are made of heavy gange wire and are 12 to 15
4. in long. Mostly painted red and white and have bright plastic cloth attached to help
locate them in tall grass.
5. Range poles: usually lin diameter tubular steel or wooden shafts 6 to 10ft long with
one end pointed. They are painted red and white and are mostly used “lining in” when
taping or measuring angles.
6. Plum bobs: has 6 to 10ft of cord attached and are used when taping on sloping or
irregular ground to transfer the distance from the horizontally held tape to a point on the
ground.
Station in survey
Survey distances are referred to as “STATION” A distance of 100ft is called a “Full station” and
is written as 1+00. Similarly a distance of 200 ft is written as 2+00. A fractional part of a
distance between full stations is called a “plus station” .4216.8 ft is called station 2 +16.8
Express the following survey distance in terms of full and plus stations.
1) s1081.5ft = 10+ 81.5
2) 65.7ft = 0+65.7
3) 927.0ft = 27.0
4) 230.0ft = 2+30.0
Instructional Task
All distances in surveying are measured horizontally there are two methods 1) tape held
horizontally, and 2) tape on the sloping ground. Of the latter method is used the percent slope
must be measured and the horizontal distance calculated by trigonometry or obtain from tables.

10
With the horizontal tape method one end is held on the ground, while the other end may be a
considerable elevation above the ground the fave distance is transferred to the ground from the
elevated end of the tape by a plumb 606. If the slope is more than 5 or 6% it is necessary to use a
process called “breaking chain” in this method the head chain man lays out the full length of the
tape. The 100ft length is then divided into convenient increments, always plumbing down to the
ground from the horizontal tape. (see diagram below).
The 100ft length is then divided into convenient increments, always plumbing to the ground
from the horizontal tape.
Taping equipment
25ft
3070 slope
Plumb line
200-201ft – distance measured by breaking chain
209-210ft – distance measured along the ground
25ft 25ft 25ft 25ft 25ft
25ft 25ft 25ft 25ft 25ft25ft 25ft
200 – 201ft – Distance measured by breaking chain209 -210ft – Distance measured along the ground

11
Hand level: this consists of a small sighting tube 5 to 6 in long equipped with a spirit level. The
image of the bubble is reflected by a trism and can be observed by the operator as he/she looks
the rough the tube. The instrument is held to the operator’s eye and is leveled by raising.
RULES FOR TAPING
1) Line in the tape carefully and keep the tape and the line being measured
2) Keep a uniform tension of about 15k pull on the tape for each measurement.
3) Keep in mind the type/style of tape being used to avoid error of measurement.
4) “Break chain” on slopes as necessary to keep the tape level, or calculate the percent.
Slope if measuring with the tape on the ground.
5) Carefully mark each station and keep an accurate count of the stations
AREAS
Objectives
1. Be able to express the given area in any of the units earlier talked about
2. Given a hit of area formulas as (e.g triangles, rectangles, circle, trapezoids, etc) and
appropriate data (description or sketch of an unknown area be able to select the correct
formula to calculate the area.
3. Given a dimensioned sketch of an rectangular field (with straight and curved sides) be
able to subdivided the land into various sizes and use correct formula to calculate their
areas.
Objective
One of the most common applications of surveying is to measure the area of a given land field or
farm. If great accuracy is required, a professional engineer or land surveyor should be employed.
He will measure the angles with a transit and the distance with a steel tape, and calculate the
areas accurately.
1. Express 200 square rods as acres
1 sq rod = area

12
200 sq rod = 200 x ac
= 1.25 qcre. (ac)
2. Express 890 acres as sq mile
3. 1 ac = sq ml.
890 ac = 890 x sq ml
= 1.39 sq. ml
Express 640 acres as hectares
1 ac = 0.405 ha
640 ac = 640 x 0. 405 ha
= 259 ha.
TRIANGLES:
Formula for calculating triangles with equal sizes. find the areas in meters of a triangle with a
base 15m and height 10m
h
100
15 bbase
Area = (b x h)
= (15x10)
= x 15 x 10
=
=
A = (b x h)
B = base
H = height

13
With the length of the three sides known but not equal.
A –
A = Area
S = Total sum of
For example; find the area of triangle in areas and hectares whose size are given as 650, 428, 282
S = = 680
A =
=
=
= 4.52 x sq ft
Since 1 sqft = ac.
4.52 x sqft = 4.52 x ac
= 1.04 ac.
b
a
c

14
Triangle: with two sides plus an angle known
A = area
A and B = know side
Angle between sides
Find the area of a triangle, in hectares, having sides measurement 555m 350m and 450 angle.
A = (ab sin ø)
= (350 x 555 x 0.707).
= 6.87 x sqm
Since 1sqm = ha
6. 87 x sqm = 6.87 x 10⁴ x ha
= 6.87 ha
Rectangle: either square or parallelogram
c
B
bC
a
A

15
A square rectangle has 7 sides equal.
Area = a x b
Find the area in acres of a rectangular area measuring 1320ft by 660ft.
A = 1320 x 660
= 8.71 x sqft
1sq.ft = a
= 20 ac.
Circle or part of a circle
Ana whole circle
A =
Circular sector
A = A=
Find the area of a circle in sqft having a radius of 75ft.
A = R2
R
Q
R
Arc length

16
= 3.14 (75 x 75)
= 17,663 sq ft
Find the area of a circular sector, in sq meters. Having a radius of B5 meters and an angle of 600
A = =
A = 9538 sq m
Trapezoid:
A = h
A = area
H = perpendicular distance
A x b = length of parallel size
What is the area in acres of a trapezoid whore sides are 300ft and 450ft and a perpendicular
distance of 120ft.
H = 120
A = 300
B = 450
Area = = A.5 x sq ft
= 4.5 x sq ft = 4.5 x x ac
= 1.03 ac.
a
h
b

17
The trapezoid formula is used to find the area of a triangular shape area having three straight
sides and curved side
Area = d
A = Area
D = equal distance between offset
ho and hn = and of offsets
£h = sum of all interior offsets minus and offsets
Area = d + £h +
Ana = 200 + 510 + 310 + 300 + 500 + 485 +
= 200 (205 + 2105 + 280)
= 200 (2590)
= 518,000 sq ft
Since 1 sq ft = ac
A = 11.89 ac.
410 525310
300 300485 560
dddddd200A B

18
Differential leveling
Objectives:
1. Be able to describe what is meant by
a. Differential leveling
b. Bench mark (Bm)
c. Back sight (Bs)
d. Height of instruments (Hi)
e. Foresight (Fs)
f. Twining point (Tp)
g. Be able to describe the procedure used in differential leveling
PRINCIPLES OF DIFFERENT LEVELING
Leveling is the process of determining the differences in the elevation of points on below or a as
the above the surface of the earth e.g. such as the ground tops of stakes of various part of a
building. Leveling ranks next to the measurement of distance in importance as a surveying
technique. Practically, no planning or construction can be due without prior leveling. Differential
and profile leveling are two surveying methods very useful for agricultural and horticultural
project
The two main purposes of leveling are:
1. For planning: to establish the necessary elevations to develop plans for such structures as
buildings roads and terraces, etc.
2. For layout: prior to construction of structures such as building to the elevations shown on
the plans the equipment used in leveling consists of 1 leveling instrument 2 leveling rod.
The leveling instrument is a telescope to indicate when the instrument is in a level
position. The level many be tripod – mounted or hand – held. The leveling rod is a
wooden scale about 13ft bug graduated into feet, tenths and hundredths of feet/meters or
4.5 6m long adro graduated in meter tenths hundredths of meter.

19
Differential leveling is the process of finding the different in elevation between two points.
Two rod reading, must be made for each up of the leveling instrument. The difference in rod
readings represent the difference in elevation between the two points
Profile leveling is the process of determining the elevation of points at measured distance
along a selected line. This line may be the counter of a proposed ditch, street, tile line,
teviace channel, etc. using the information gained by this type of surveying we can plot the
elevation and distance of each point on a graph called a profile. With the aid of the plotted
profile we can make studies relating to grades, depths, high or low spots, and make
estimation of cuts and fills.
Topographic leveling: is the process which the elevation of spaced grid points in a field are
determined. This information is need to plot a topographic map of the field by contour lines
we can show the natural and artificial features in the field such as hills, valleys, ridge, slopes,
dams, etc
INSTRUCTIONAL TASK / PROCEDURE
All leveling sway, there are certain terms used which students must be formula with to make
the survey work easier, quicker and faster.
Bench may (BM): A permanent point of known elevation above sea level in which all
elevation of other sway work are done.
Back sight (BS): A rod reading taken on a point of known elevation it is the vertical distance
between the line of sight and the point of known elevation on which the rod is held.
Twining point (TP): is a temporary bench mark upon which tore sight and book sight rod
reading are taken for the purpose of continuing the line of levels
Fore sight (FS): is a rod reading taken on any point. The elevation of which is to be
determined.
Height of instrument (HI): is the elevation of the line of sight when the instrument is leveled.
It is found by doing the BS rod reading to a known elevation.

20
PROCEDURE FOR DIFFERENTIAL LEVELING
Below are the instruments for differential leveling
A Dumpy-Type Engineers Level

21
Two types of locke hand levels

22
The survey begins with the instrument man setting the level a distance say 300 – 400ft away
farm the Bm. The rod man sets the rod on Bm, and the level is set to look towards the
direction of the rod where is takes a reading on the rod as shown by the cross hairs in the

23
level. Assuming this reading is 3.03 this is called BS reading so the BS reading is added to
the BM known elevation (100.00) to give a HI 103.03 the rodman goes toward in HO
direction of taken the survey area sets the rod some distance from the instrument man, the
instrument man twins his level and sight the rod and takes a reading where the crosshairs of
the level meets the rod. This is the FS reading say 3.86. it is subtracted from the previous HI
to give 99.1 where the rodman sets the rod after the BM, if called the TP, the instrument man
can now move forward and sets up the level; takes a reading on TP I. this reading becomes
BS (2.60) reading and is added to reading at TP1. Say 99. 17 + 2. 00 = 101.77 this is the HI
reading at TP1. Again a new TP2 is selected and a rod reading is taken to be 4.53 is recorded
as FS reading. This reading is subtracted from HI 101.77 to give a new elevation (101.77 -
4.53 = 97.24) for TP2. This process is repeated until the lavation for BM2 is established to be
95.30
Note keeping procedure for leveling sway.
Five columns are needed from left to rights and the column headings are station (STA), back
sight (BS), higher of instrument (HI), foresight (FS), and elevation (elev).
TP1
HI
BM
FSBSFS

24
BM2
Elev = 95.30

25
Differential leveling
STA BS HI FS ELEV
BM1 303
103.03
TP1 2.60 3.86 99.17
101.77
TP2 4.22 453 97.24
101.46
6.43 6.16 95.74
101.73
TP3 3.85 4.44 97.25
101.14
TP4 5.11 2.96 98.18
BM1 3.30 99.99
£BS =25.4 £FS 25.5
£BS - £FS 25.24 – 25.25 = 0.01
BM1
100.00 BM2 (end)
99.99
Check 100.00 – 99.99 = 0.01
= 0.01
26
Summary of leveling procedure
.
1) Set up instrument
2) Establish BM, and take BS
reading
3) Establish TP and take FS reading
4) Move instrument also set up again
5) Take BF on TP
6) Establish next TP and take FS
reading
7) Move instrument and set up again
8) Repeat step 5.1
BM elevation + BS = HI
HI – FS = TP elevation
TP elevation + BS = HI
HI – FS = TP elevation
And so forth
In profile leveling there are several foresight (FS) reading and few back sights (BS) several FS
reading can be taken an any given BM. Or TP, before profile can be made sway crew set stakes
where the rod reading are to be o obtained. The stakes are set at equidistance apart e.g 25,50 or
100ft apart. In profile leveling a station marking a full 100ft is called a full station and the other
points along the line are called plus station e.g 225 = 2 + 25.0
Instructional task/procedure for profile leveling
The procedure for profile leveling and note keeping are practically the same as in differential
leveling. With the level set up near the line to be profiled, the rod was held on the BM and the

27
BS reading (3.66) is taken the HI was observed (HI = 100.00 + 3.66) next the rod was held on
the hub stake for station 0 + 00, 1 + 00, 2 + 00 and so on and rod reading of 5.23, 3.76 and 3.42
were taken. The elevation of each point was calculated by subtracting the red reading from the
H1.(note the some H1was used for all the stations up to 6+00):
When it becomes necessary to select a twining point the rod was held on the top of stake and a
FS(4.12) is taken, the elevation of tp, was determined by subtracting the FS from the H1(TP,
elevation=103.66-4.12=99.54).The level was moved forward and set up at a new location and a
BS (1.38) taken on the tp. The new H1 (100.92) was observed. This procedure is repeated in the
same way until the elevation of BMZ was calculated
Example of profile leveling and note keeping

28
Field notes for profile leveling

29
ESSENTIAL FACTORS IN FARMSTEAD PLANNING
I. WATER; very important for
domestic animals and farm use. Quantity and quality very important. Keep source
flowing. water is essential for use.
II. DRAINAGE: surface and
subsurface drainage is a top priority to avoid pounding hence sickness and diseases.
proper drainage is good keep town steed dry
III. DON’T BUILT IN HOLES =can
cause problem of drainage, collapse of facilities of building. Difficult to maintain plus (+)
and or a minus(-) effect on all activities in the farm
OFF FARMSTEAD FACTORS
Farmstead development at a particular site may be limited by off-farm factor. Consider rural
housing ;urban subdivision ; local state and federal building and zoning codes ;air and water
pollution control requirements. A legal restrain can close your operation and may prevent
recovering your investment . always clear your plans with appropriate authority.
MAKING A PLAN
Preparing a good farmstead plan takes time and effort. it can be a rewarding and interesting
experience : some tools to accumulate are ;
1. GOALS-identify your instead
goals and set priorities
2. MEHANICAL ITEMS-all the
requirements for paperwork, survey, etc.
3. INVENTORY; prepare a scale
map of the farmstead area, showing slope’ underground utilities lines, building location,
electric power lines, drives, service and other important physical features review present
building-usefulness, condition, location and adaptability

30
4. INFORNATION; identify
facilities needed, additional services registered, traffic routes, feed handling methods
family living desire and tax and insurance considerations. Establish realistic space
requirement for activities and enterprises within the farmstead area.
FARM STEAD PLANNING
What is farmstead: this is a farm house and the binding near it.
Planning is the part of or process of arranging or putting things together. Planning includes all
the elements of research e.g how, what, when, where and who. Farmstead planning is a process
or a systematic process of arranging things and putting those things together in order to achieve a
purpose or goal.
Farms stead planning like in any planning activity usually starts with a problem: e.g can this be
done; how do you achieve your goals or objectives. Where do you get what you want. The
objectives of planning include expansion, improved performance higher capacity and better use
of labor.
Careful planning includes reviewing the present assessing the near future and providing for the
more distant future. For agricultural activities, farm stead planning means looking at the whole
problem, the whole farm business as objectively as possible and as far into the future as possible
it is better to plan on paper where a mistake can easily be changed.
In farmstead planning it is good for you to look ahead as far as you confidently can. Think big
about space, mechanization, processes and operational changes that might occur so there can be
adjustment when the need arises.
Farms stead planning includes mapping where things are and evaluating how useful they are. As
you plan use all the factors, look closely at all farm activities, for example, a building in the
wrong place is 20 years mistake and this can be very expensive
DEVELOPING A FARMSTEAD
Farmstead planning once started, is a continuing part of farm management adjustment and
additions to your plan buildings equipment, land, and management will reflect farming changes.

31
First develop an accurate an accurate plan of what the farmstead looks like now. Then decides
what is good and what’s bad, analyze current needs, and anticipate future needs.
PROCEDURE FOR ZONE PLANNING
Before starting detail planning, get or prepare at least one map of any site to be considered.
Aerial photographs are helpful and this will show major surface features, etc.
Contour maps are useful in planning drainage, building location, and adequate slope for drives,
lots and drainage lines.
Use several different overlays and return to your plan from time to time to think of new
arrangements that may be better. Take proposal to the field for a visual check. Look for ideas or
other farmstead plans with situations similar to your own. Stake out proposals. Lay out proposal
road, binding or distance zone to help visualize your revised farmstead. The best method is to use
zone planning.
ZONE PLANNING
Zoning is a useful tool in planning new or remodeled farmstead after the general site has been
selected. For a farmstead with a family living area, place the house at the centre of the planning
zones, for a farmstead without a house, the farm court is usually the center, because vehicles,
materials and labor tend to work from the court.
ZONE 1: family living lawns, recreation space and vegetable gardens, and guest parking are
close to the house. Protect zone 1 farm noise, order, and dust as much as possible.
ZONE 2: machinery centre, shop, storage and related services that are relatively quiet dry and
odor free are in zone 2. Consider screening the center from family view.
Much of the driveway and farm court may be in zone2 put fuel and clerical storage toward the
outer edge near the machinery, but removing odors, fire danger, and some hazards to children 40
– 60m from the home.
ZONE 3: grain, feed and some livestock. These areas come dust, noise, traffic and odor there
tons they are moved another zone further form the house.
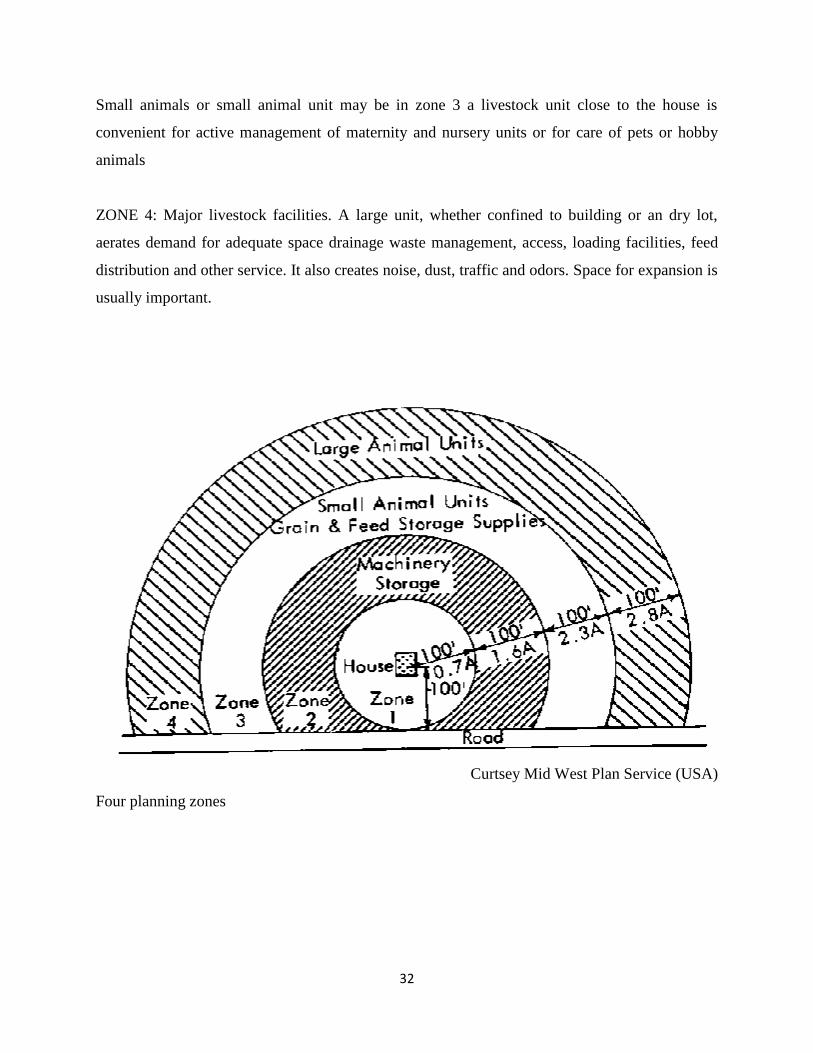
32
Small animals or small animal unit may be in zone 3 a livestock unit close to the house is
convenient for active management of maternity and nursery units or for care of pets or hobby
animals
ZONE 4: Major livestock facilities. A large unit, whether confined to building or an dry lot,
aerates demand for adequate space drainage waste management, access, loading facilities, feed
distribution and other service. It also creates noise, dust, traffic and odors. Space for expansion is
usually important.
Curtsey Mid West Plan Service (USA)
Four planning zones

33
Management factors of farmstead planning

34
The type and volume of enterprise or combination of enterprises will determine type of
farmstead and its management. Factors to manage are:
Size of enterprise: if small size locate in zone 2 0r 3 but large size locale further away
because of noise, use of heavy trucks and or equipment, heavy traffic, etc.
Pollution: air and water can be polluted easily with waste management chemicals storage
including fertilizers / pesticides and fuels. Keep them for away residential area
Nuisance: this include noise dust chaff insects and heavy traffic locate annoying
activities so they do not detract comfort of living
Appearance: location, paints, lawn and type of building affects appearance.
Topographic Factors: these are concerned with the lay of the land. Site selection is finding the
best location for an enterprise with enough space, good drainage, access to water and other
utilities and their proximity. Also consider view, access to neighbors of using same to
topography.
Drainage: surface and subsurface drainage very important features of an effective farmstead.
Natural drainage and preferable but artificial or manmade may sometimes not to be available.
Drainage keeps the farmstead clean an ideal slope for drainage should be between 2%. It should
not cause erosion.
Slope: enough space is important for all major farmstead activities and for expansion. Avoid
location near river, rough topography, sandy sub-soils, rocky or mountainous areas.
Climatic factors: these include wind, sun and rainfall they affect temperature and humidity which
can have either a negative or positive effect on farmstead.
Service factors: the connecting links between farmstead buildings and activities; they help the
farmstead operate effectively. They include drives, utilities, water, electricity, gas, telephone fire
prevention and security.
Planning activity center.
A) family living center essentials to be considered include

35
- Water
- Drainage
- Site location
B) Fuel chemical and fertilizer storage essential consideration include
- Distance
- Topography
- Service factors
Livestock production: essential considerations include
- Water
- Drainage
- Production volume
- Waste disposal
NOTE: the general consideration in farmstead planning is safety, this affects every aspect of the
enterprises. Safety from the view point of theft, fire, flooding, wind, heat from the sun, cold,
intruders, poor drainage, wind, animals, etc. safety is important to safe guard the investment.
SUMMARY
Land survey and farmstead planning is an important agricultural tool necessary for the success of
any agricultural enterprise. While land survey deals with knowing the details of the land such as
soil type, topography, slopes, land and its measurements and sizes, etc. Farmstead planning
deals with how the farm business is suppose to be organized or arranged for effective
management and for profit maximization. Farmstead enables the farmer mitigate risks taking that
may eventually become very expensive in the future.