Embed Size (px)
Citation preview

22
design*spongeat home
name
Grace Bonney
location
Brooklyn, new york
In the bedroom, most people play around with
colorful bedding and keep their headboard
basic and neutral.
But there was a bold red fabric pattern that I was dying to try, so I
decided to use the print on my headboard, which
I upholstered myself. This bold stroke helps to highlight an accent wall
in the room and gives me and my husband a soft place to rest our heads
when we’re reading in bed at night.
Turn to page 264 to learn how to make my headboard.
I share my apartment with my husband, Aaron, and our two cats, Turk and Ms.
Jackson. I have fantasies of my dream home—or dream homes, actually: The
city girl in me longs for a townhouse complete with a small backyard garden and
fountain, while the country girl in me fantasizes about a farmhouse somewhere in rural
Georgia. In the meantime, I make do with reality—our comfortable, sweet apartment
in Brooklyn’s Park Slope. We were living in a 500-square-foot studio when we first saw
this space, which is about 900 square feet. I was swayed by the large bedroom and great
location, which is a block or two away from some of the best restaurants, shops, and hot
spots in the area. Perhaps that is why I managed to overlook some of the apartment’s
more difficult quirks, like a serious lack of natural light and a ten-degree slant throughout
the rooms.

sneak peeks
23
I have a penchant for red. But it wasn’t until I brought home this vintage red horsehead lamp that all of the smaller red things I’ve collected over the years—from red highlights in the artwork above the couch to the floral stitching in the throw pillow from K Studio —really felt like a unified color theme in the space. It can be challenging to display small art prints such as the ones I love to collect on Etsy. On their own, they get lost on the wall; grouped together, they have a greater impact. I mount them in affordable frames from Ikea and hang them salon style.
Once again, red accents brighten the space—here in the form of the dining chairs and the lettering in our favorite print from the New York design studio Oddhero, which shows letters and numbers in a type font called Morgan Tower, designed in 2001 by the Portuguese designer Mario Feliciano.
My closet was a mess of crumbling plaster and mismatched paint. Rather than repair and repaint, I hid the less-than-desirable details by covering the inside of the door and inside walls with an owl-print wallpaper from Trustworth Studios. I also attached caster wheels to a vintage wooden soda box to create a rolling shoe storage container.
One of my favorite design juxtapositions is the contrast between hard and soft textures. This Paul McCobb chair,
which I bought at a store called Scout in Chicago, has a teak backrest and metal frame whose hard edges are softened by the seat’s fuzzy plaid upholstery, which reminds me of a lumberjack’s shirt.

202
design*spongeat home
project
Succulent Brick Wall
diy projects
203
materials
Potting soil
Cactus soil
Large plastic bucket (a 4 gallon works well)
Succulents (look for mature succulents that have anywhere from a 2-inch blossom diameter to a 3-inch blossom diameter)
9 ∞ 12-inch baking pan
Engineering bricks (these come in a variety of
types, most commonly with 3 large holes, although you can find some that have 10 or 16
small holes)
1 long, skinny spoon
designer
Lily Huynh
cost
$80–$90
time
2–3 hours
difficulty# # # #
M any of us long to have a lush backyard filled with trees and room to
garden but are faced with the reality of limited space, fire escapes,
and cement patios. Looking to create an “urban greenscape” for
the backdrop of her wedding ceremony, Lily Huynh of Nincomsoup decided to
turn to bricks to create the structure she would need for her wall of greenery.
By planting tiny succulents into the holes in each brick, Lily was able to get
the lush, green feel she wanted without having an actual garden out back.
She loved her finished succulent wall so much she decided to move it from
the background of her wedding ceremony to the front, where it served as
a makeshift altar. Whether you’re planning for a wedding decoration or
just want to create a small wall of greenery on your deck, this is a fun and
affordable way to build a small greenspace without a backyard.
instructions
1 Mix the potting soil and cactus soil in a 1:1 ratio, filling a bucket, and set aside.
2 Separate the succulents into individual florets that will fit the various sizes of the brick holes,
and trim the roots to about 1 inch in length.
3 Fill the baking pan with about 1⁄2 inch of water.
4 Place a brick into the baking pan with the holes facing up. Spoon the soil mixture into each
hole, until the holes are loosely full. Then, using the back side of the spoon, pack the soil into
the holes a bit (not too tightly).
5 Arrange the different sizes of florets into each of the brick holes. Pack the florets with
additional soil mixture, making sure that each is held firmly in place. Remove the brick from
the baking pan and set it aside. Repeat the process, replenishing the water in the baking pan as
needed, until you have created enough bricks.
6 Let the succulent-filled bricks sit upright for a few days to acclimate, then stack the bricks on
their sides to build the wall of succulents. If the succulents begin to look dry, spray them with
a spray bottle.
note: The number of bricks and succulents and the amount of soil needed depend on how large a wall you plan to build.

diy basics
285
Making a Slipcover
instructions
1 Measureandsketcheachsectionofthefurnituretobecovered.Determineifanytwoadjacent
surfacescanbecutoutasonepiece,whichwillsaveyouwork.
2 Usingthesketchesasyourtemplate,cuteachfabricsection2to4incheslargerthaneach
surfacemeasurement.Ifyourchairhasanattachedseatcushionand/orbackcushion,allow2
inchesextraatseamsthatwillneedtotuckdownintothechairsidesandback.(Ifthechair
hasaremovableseatcushionorbackcushion,seeNotes.)
3 Placethethreearmpieces(thetopofthearms,theoutsidearms,andtheinsidearms)onthe
chairwrongsideupandsecurethemwithafewpins.Fitthepiecessnugly,butnottightly,by
liningupthecutedgesandpinningthemtogether.Placethepinsparalleltothecutedgesto
indicatethestitchlines.
4 Removethepinnedpiecesandstitchthemtogether.Makesuretoremovethepinsbeforethey
goundertheneedle.Turnthepiecesrightsideoutandcheckthefit.Ifthearmpiecesfit,cut
theseamallowancesoitmeasures1⁄2inchbeyondallthestitchlines.Ifnot,useaseamripper
toremovethestitchingintheareathatdoesn’tfit,repinit,andstitchitagain.
Notes
Use 54-inch-wide medium-weight cotton, linen, or twill fabric.
Wash or dry-clean all fabric prior to cutting.
Measure and mark the center of the chair front and back as well as the center of the slipcover front and back pieces. The center points will guide you throughout your construction.
The juncture of three seams is tricky. You’ll need to work with the juncture to see which seam to stitch first. Trim seam allowances to allow the fabric to release and lie flat. Steam the seams with a hot iron when finished.
Use the old seat cushion cover as a pattern to make the new cushion cover. Close the back of the cushion cover with a strip of Velcro or install a zipper in the back band of the cushion.
If you are covering a love seat or sofa, you will need to allow for a seam in the center of the width, as the width of the fabric won’t cover the whole piece. Make sure the seams on the outside back, inside back, deck, and front band all line up. Some fabrics are railroaded, meaning that the pattern runs the length of the fabric instead of the width. In this case, no seam is necessary.
step 2 step 3
step 4

flower workshop
311
page 17
we usedPeach garden roses,
tuberose
alternativesThis arrangement is all about
color and fragrance. When going small like this, it’s
worth splurging on a nice flower or two, but if you want to keep costs even lower you
can replace the roses with similarly colored carnations.
vaseA long-necked vase that
flares at the opening
Fragrant arrangement
inspiration
Carol Neiley’s Lyon apartment
approximate cost
$20
the French are serious about flowers—and are known to
pay particular attention to the fragrance of their blooms. The pale peach color
in Basic French owner Carol Neiley’s bedroom helped determine the color of
this fragrant nosegay set in a petite parfait glass. We have a feeling Carol’s
French neighbors would approve of this fragrant bunch.
instructions
To create this simple arrangement, start by using primary flowers clustered in threes. The main
ingredient here is a set of three garden roses; the secondary flower, tuberose, is added behind as
an astute pair. Don’t be afraid to leave things simple—sometimes less is more when it comes to
fragrant flowers. You don’t want to overwhelm the room with scent, so stick to a small number of
fragrant blooms.
312
design*spongeat home
page 158
Tip
When working with one color in an arrangement it’s best to focus on variations in shade, texture, and size.
Look for plants, leaves, vines, and flowers that
represent a wide range of your color and you’ll create an arrangement with more
depth. To add a visual “pop” try mixing in a small bit of
complementary color. In this case, green enhances the
richness of the red blooms.
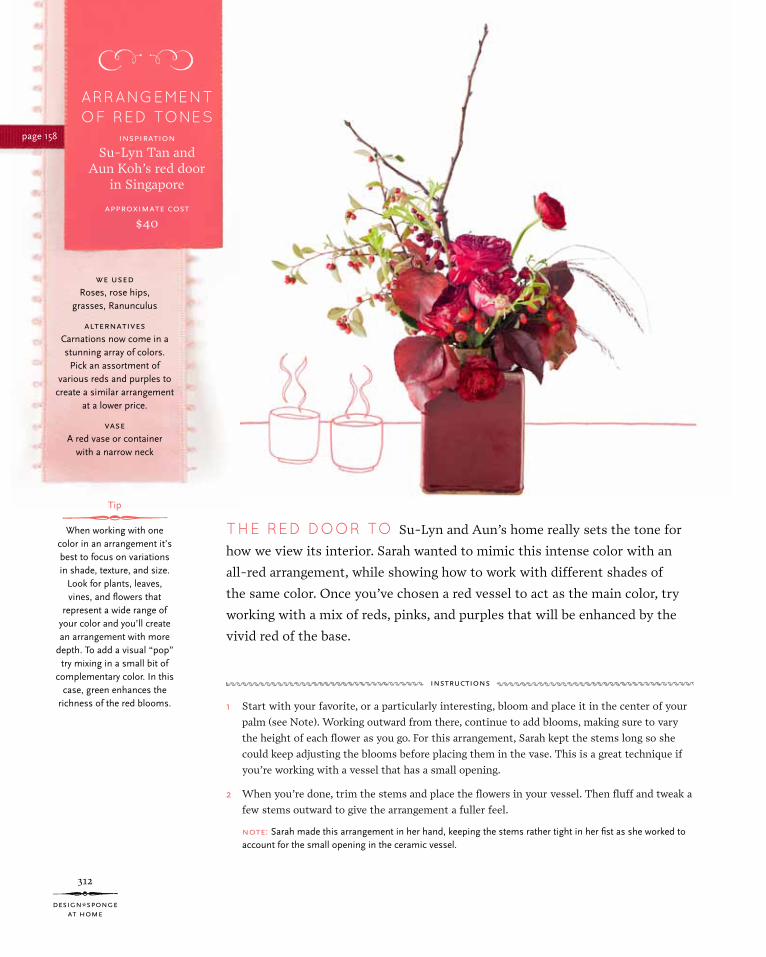
we usedRoses, rose hips,
grasses, Ranunculus
alternativesCarnations now come in a stunning array of colors.
Pick an assortment of various reds and purples to
create a similar arrangement at a lower price.
vaseA red vase or container
with a narrow neck
ArrAngement of red tones
inspiration
Su-Lyn Tan and Aun Koh’s red door
in Singapore
approximate cost
$40
the red door to Su-Lyn and Aun’s home really sets the tone for
how we view its interior. Sarah wanted to mimic this intense color with an
all-red arrangement, while showing how to work with different shades of
the same color. Once you’ve chosen a red vessel to act as the main color, try
working with a mix of reds, pinks, and purples that will be enhanced by the
vivid red of the base.
instructions
1 Start with your favorite, or a particularly interesting, bloom and place it in the center of your
palm (see Note). Working outward from there, continue to add blooms, making sure to vary
the height of each flower as you go. For this arrangement, Sarah kept the stems long so she
could keep adjusting the blooms before placing them in the vase. This is a great technique if
you’re working with a vessel that has a small opening.
2 When you’re done, trim the stems and place the flowers in your vessel. Then fluff and tweak a
few stems outward to give the arrangement a fuller feel.
note: Sarah made this arrangement in her hand, keeping the stems rather tight in her fist as she worked to account for the small opening in the ceramic vessel.

324
design*spongeat home
after
before
cost
$10
time
8 hours
difficulty# # # #
Sara’S Table
Newlywed couple K. C. and Sara Giessen wanted to
decorate their Atlanta home with new furniture but were
faced with a tight budget. So this clever couple opted
to transform their hand-me-down table into a one-of-
a-kind dining centerpiece. After cutting a plate-and-
utensils template by hand, Sara painted a reverse stencil
design on the tabletop in a vibrant neon green color.
When the stencil was dry the final result was a colorful
new table with playful spots for plates and silverware.

before & after
325
before
after
When interior designer and stylist Lauren Nelson
first brought this wooden chair to her Cambridge,
Massachusetts, home, her boyfriend was not excited
about its prospects. But Lauren said, “Trust me, it has
potential.” After cleaning, sanding, and repainting the
frame, Lauren used a bold purple and white fabric from
Stout Brothers to give it a crisp, clean look. Lauren’s
boyfriend now agrees it is their favorite chair in the house.
cost
$271
time
4 hours
difficulty# # # #
Lauren’s Chair

372
resource guide
resource guide
Alameda Flea MarketAlameda, California (first Sunday of every month)www.antiquesbybay.comThis flea market is legendary among Bay Area
locals, designers, and our Design*Sponge editors
in San Francisco. You’ll find a fantastic selection of
vintage housewares—just be sure to arrive early!
Annex Antique Fair & Flea MarketAvenue of the Americas between 24th and 27th Streets, New York, New York (every Saturday and Sunday)In addition to furniture and vintage fashion, you’ll
find unexpected objects like small frames, old
hotel keys, and vintage sporting equipment.
Bell’occhiowww.bellocchio.comWe love Bell’occhio for vintage trims and
knickknacks
Brimfield Antique ShowBrimfield, Massachusetts (May, July, and September; dates vary) www.brimfield.comThe Design*Sponge team heads to this antiques
fair as often as we can—it’s our favorite shopping
destination for vintage and antique home goods.
Craigslistwww.craigslist.orgThe utility of Craigslist can vary depending on your
location, but if you’re vigilant you can score some
great deals on vintage furniture and lighting.
eBaywww.ebay.comWe love eBay for everything from tableware and
clothing to furniture and jewelry. Be sure to set up
eBay watch lists for items you’re hunting for on a
regular basis.
Ethan Olliewww.etsy.comBeautiful vintage pieces at reasonable prices. Great
resource for art, glassware, vessels, lamps, and
other trinkets.
Factory 20www.factory20.comFactory 20 is based in Sterling, Virginia, but they
have a well-curated collection of vintage and
antique furniture and décor available through their
website.
1stdibswww.1stdibs.comAn online marketplace representing some of the
best antiques dealers in the world. Prices can be
high, but the quality almost always justifies the cost.
Fyndeswww.fyndes.comFyndes is an online gallery and shop that
showcases a mix of antique and contemporary
designs from artists across the globe.
Goodwillwww.goodwill.orgLike the Salvation Army, Goodwill shops are a
great place to source inexpensive vintage goods.
The quality of the collections varies based on your
local stores, but they're great jumping off points
for before-and-after projects and decorating.
Hindsvikwww.etsy.comA beautiful collection of vintage pieces from stylish
Canadian couple Daniel and Valeria. Always has
a great selection of industrial and rustic vintage
objects ranging from crates and furniture to books
and art prints.
The J. Peterman Companywww.jpeterman.comWhen you think of J. Peterman, you may imagine
his goofy fictionalized character on Seinfeld, but
this website actually carries a stunning collection
of one-of-a-kind antiques and collectibles.
Old Goode Thingswww.ogtstore.comOld Goode Things specializes in unique vintage
and antique items. In addition to great furniture,
it also carries beautiful lighting and antique
hardware like doorknobs and pulls.
Ruby Lanewww.rubylane.comA great online collection of vintage and antique
collectibles.
Salvation Armywww.salvationarmyusa.orgThe strength of the selection at these stores
depends on your local shop, but they're still great
places to start when searching for affordable
vintage furniture and accessories.
Scott Antique Marketwww.scottantiquemarket.comThis Atlanta market is legendary for its amazing
collection of vintage and antique sellers. In
addition to monthly shows in Atlanta, they also set
up a show in Columbus, Ohio, during the fall and
spring. Check their website for the full schedule.
Surfing Cowboyswww.surfingcowboys.comThis Southern California shop carries a fantastic
collection of midcentury modern furniture, and it
ships across the country.
antiques & flea markets