Embed Size (px)
Citation preview

NAC Out of Band with AD-SSO and LDAP role mapping
Lab Exercises
December 1st, 2008

2
Table of Contents Introduction......................................................................................................................... 3 Exercise 1: Prepare for Launch Meeting........................................................................... 6 Exercise 2: Verify Initial Connectivity – Baseline Acme Network .................................... 6 Exercise 3: SNMP Setup on Switch ................................................................................... 7 Exercise 4: Basic CAM Configuration and Role Creation.............................................. 11 Exercise 5: Create Switch Profile and Define Switch in CAM........................................ 25 Exercise 6: Initial NAC Server Setup............................................................................... 32 Exercise 7: Agent Installation.......................................................................................... 37 Exercise 8: Configure AD-SSO........................................................................................ 42 Exercise 9: Configure LDAP based Role Assignment ..................................................... 57 Exercise 10: Institute Posture Test for Windows SP Installation .................................... 65 Appendix A: Answers to Exercise Questions ................................................................... 72 Appendix B: Additional Information................................................................................ 82
December 1st, 2008 NAC Lab Procedures

3
Introduction Acme, Inc. is a small sales and marketing organization currently occupying the 1st floor of their building. Sales are going well and Acme is looking to expand. Acme has several key initiatives planned for the next 12 to 18 months.
Goal 1: Institute technology to enforce Acme’s Security Policy that calls for current OS patches on all its Windows workstations to achieve compliance. Solution: Deploy a NAC OOB pilot to assess the impact on the Network, Applications, and the user’s experience. This is funded and the SoW has already been signed. (You are the post sales SE that will execute this deployment today.) Goal 2: Increase switching capacity and add redundancy at the network level. Solution: 6 Months from now Acme will move from their single switch deployment to dual core switches with integrated layer 3. Goal 3: 12 Months from now Acme will expand to the 2nd floor of their building and will double their headcount. Ensure their computing infrastructure is prepared to support their planned expansion. Solution: Ensure that all infrastructure and network designs being used today are such that they will support this future expansion.
Your company has won the business to deploy the NAC pilot (goal 1) and you are the post-sales SE executing the work. A key factor in the winning the business was the well prepared SoW you provided to Acme and how you conducted the design meeting you had with them prior to crafting that SoW. During this meeting you discovered Acme’s initiatives and impressed them with your detailed business and technical questions. You assured them that you understood their goals and would deploy NAC in a way that would scale to support their tactical and strategic initiatives! Your focus is to perform well for the customer (keeping their future goals in mind) in hopes that it will help you become their preferred partner for the future projects. Lastly, a few additional things you discovered in the design meeting included:
• Acme requires Single Sign On and all their users are on the Windows Domain. • Acme just deployed a new CRM application that is Multicast based. • When Acme expands their workforce in 12 months they will use contractors, for
various internal Acme projects, and want the ability to have them associated to a different NAC policy. These contractors will be on the Acme domain.
December 1st, 2008 NAC Lab Procedures

4
Logical Topology The diagram below depicts the logical L3 topology of the network for this lab. Please note that the UserPCs and Servers are VMWare images. Unless otherwise specified, userids are “administrator” and passwords are “cisco123”, all in lower case. The default VNC password is “cisco123”.
192.168.5.0/24
.254
e0/0
e0/1
.254
inside (100)
outside (0)
167.21.6.0/24VLAN 16
User PC 2
.50
User PC 1.50
.10Win 2k DCDNS
DHCPIIS
SyslogACS 4.1
Windows Servers
Security Services
User VLAN
VLAN 12
VLAN 14
VLAN 13
Core Router2811
Fa0.0.15.1
Firewall Outside
NAC-CAM
.33
192.168.2.0/24
192.168.3.0/24
192.168.4.0/24
fa0/0.14
fa0/0.13
fa0/0.12
.1
.1
.1
Win200 Pro SP4
Win200 Pro SP4
3550g network Management
interface
.250
192.168.1.0/24Net MgtVLAN 11
fa0/0.11.1
4.1.3.1MAC Agent 4.1.3.1Win Agent 4.1.3.2Web Agent 4.1.3.10
CCA OoB trusted VLANVLAN 17
192.168.7.0/24
fa0/0.17.1
NAC-CAS Out of band
.10
4.1.2.1
VLAN 817
192.168.7.0/24
User PC1 in NAC OoB LAB if in unauthenticated role
CCA OoB untrusted VLAN
Bridged S
ame P
C
December 1st, 2008 NAC Lab Procedures

5
Disclaimer This lab is intended to be a simple sample of one way to configure NAC Out-of-Band with AD-SSO and LDAP based role mapping. There are many ways NAC can be configured which vary depending on the situation, the customer’s goals/requirements. Please ensure that you consult all current official Cisco documentation before proceeding with a design or installation. This Lab is primarily intended to be a learning tool and may not necessarily follow best practice recommendation at all time in order to convey specific information. Documentation for NAC can be found on CCO: http://www.cisco.com/en/US/products/ps6128/index.html Additional training materials can be found on CCO under the Partner E-Learning Connection / PEC as follows; (requires a CCO Login): http://cisco.partnerelearning.com/peclms/lang-en/management/LMS_LearnerHome.aspx (From this location select Technologies, then Security to see available NAC offering as well as other security training) Version information is as follows: The labs were constructed using the following software version
NAC Manager 4.1.3.1 NAC Server 4.1.3.1 NAC Windows Agent 4.1.3.2 NAC Web Agent 4.1.3.10 NAC Guest Server 1.1.1 ACS 4.1.3 (build12) ASA 8.0.2
Prerequisite knowledge This lab is the 3rd module in a series of NAC labs. The 1st lab module in the series included detailed information on the initial configuration and licensing of the NAC appliances. The 2nd lab module included information on built in guest features and integrating with the NAC Guest Server. This information will not be covered as in depth here and is considered a prerequisite at this point. It is suggested that you take the modules in the recommended order unless you are all ready familiar with the information in the previous modules.
December 1st, 2008 NAC Lab Procedures

6
Exercise 1: Prepare for Launch Meeting Most of this design was discussed as part of the pre-sales process and the detailed design meetings that occurred in order to prepare an accurate statement of work. The Logical Topology above was created and has been blessed off by the customer. You completed significant analysis to complete the diagram and prepare for the deployment. The full details of this analysis are available in Appendix B. Exercise 2: Verify Initial Connectivity – Baseline Acme Network Section 2.1: Access the lab topology diagram and review it as you execute the following baseline verification tests Access UserPC2. Note: Most of the configuration work will be done from this PC since UserPC1 will be the OOB test device and therefore moving between VLANs throughout the lab. Establish a VPN connection from UserPC2 to the ACME Intranet using the Prod VPN Entry and rrunner/cisco123 as the username/password.
Ping the following devices to establish baseline connectivity:
192.168.3.10 DC / ACS Server / Test IIS Server 192.168.1.250 Switch SVI in Mgt. VLAN 192.168.2.33 NAC Manager (post bootstrap) 192.168.7.10 NAC OoB Server trusted interface e0 (post bootstrap)
December 1st, 2008 NAC Lab Procedures

7
Connect to UserPC1 with the credentials wecoyote / cisco123 and open a command prompt. Issue an ipconfig to ensure that you have an ip address in the 192.168.4.0 /24 subnet. Then ping the following items to establish baseline connectivity:
192.168.4.1 UserPC1’s default gateway 192.168.5.254 ASA Inside interface 192.168.3.10 DC / ACS Server / Test IIS Server 192.168.1.250 Switch SVI in Mgt. VLAN 192.168.2.33 NAC Manager (post bootstrap) 192.168.7.10 NAC OOB Server trusted interface e0 (post bootstrap)
Open Internet Explorer and browse to the test Intranet Web Site http://192.168.3.10
Exercise 3: SNMP Setup on Switch Section 3.1: Configure SNMP setting on the switch to allow the NAC Manager to access the switch and control port VLAN membership From UserPC2, telnet to an SVI of the switch (192.168.1.250) and create a named standard access list to restrict what devices can contact the switch via SNMP. Only the NAC Manager should be permitted and the ACL name should be self documenting: enable cisco123 term mon
! config t
December 1st, 2008 NAC Lab Procedures

8
! ip access-list standard restrict-snmp remark ## Control SNMP RO and RW access ## remark ## Host entry to allow NAC Manager ## permit host 192.168.2.33 deny any log exit !
Set the SNMP read only and read write community strings and reference the ACL created in the previous step:
snmp-server community cisco123 RO restrict-snmp snmp-server community cisco321 RW restrict-snmp
Section 2.2: Configure SNMP setting on the switch to send traps to the NAC Manager which will facilitate the tracking of port and CAM table status Set the SNMP trap setting to generate traps when CAM Table entries change and when ports transition state:
snmp-server enable trap snmp linkup linkdown snmp-server enable trap mac-notification
Set the SNMP trap setting to send traps to the NAC Manager using SNMP V3:
snmp-server host 192.168.2.33 trap version 3 noauth ciscocam Increase the default CAM table entry flush timer to 1 hour as per Cisco best practice recommendations for NAC OoB: mac-address-table aging-time 3600
December 1st, 2008 NAC Lab Procedures

9
Section 2.3: Verify SNMP traps are being sent to the NAC Manager Display SNMP and look at how many messages have been sent to 192.168.2.33 so far:
end show snmp
Bring interface FastEthernet 0/2, that connects to UserPC1, down and then back up.
config t interface fa0/2 shut no shut
December 1st, 2008 NAC Lab Procedures

10
Display the SNMP settings again and verify the number of traps sent has increased end
show snmp
Q3.1: What version of SNMP are we using? Q3.2: Could we improve this SNMP Deployment? If so how? Q3.3: Why does Cisco recommend increasing the CAM Table timer for NAC OoB?
December 1st, 2008 NAC Lab Procedures

11
Exercise 4: Basic CAM Configuration and Role Creation Section 4.1: Access the NAC Manager and verify initial setup From UserPC2, web to the NAC Manager and install license files: https://192.168.2.33 Username: admin Password: cisco123 Note: When you initially connect to the NAC manager’s web interface, you will normally be required to provide licensing information. Based on this, it is very important that you keep track of the software keys and provide them to the customer with the final documentation package. Would it not also be a good idea to also include and ISO images of the current software? Add the license file for the NAC Manager by browsing to it. This step is done for you in the lab but the screens are shown below:
After adding the NAC Manager License file you will be presented with the login screen. Again, the userid is administrator and the password is cisco123.
December 1st, 2008 NAC Lab Procedures

12
Login and verify the software version from the default screen. Note: The default screen, at login, is the summary option in the monitoring pane.
Add the license file for the NAC Server. Start by selecting the CCA Manager option from the Administration pane.
December 1st, 2008 NAC Lab Procedures

13
Then select the licensing tab on the top right to display the following page.
Browse to the NAC Server license file and select the install license button. Verify the installed licenses using the information display at the bottom of the preceding screen (Again, the license files are already installed for you in the lab.)
December 1st, 2008 NAC Lab Procedures

14
Verify the network setting entered during the bootstrap process by Access the CCA Manager option from the Administration Pane and checking the settings.
Next, select the System Time tab to view the time setting. Set the Time Servers field to 192.168.0.1 and click on Sync Current Time to synchronize with this NTP server. This should be the current time on the East Coast – EDT or EST.
December 1st, 2008 NAC Lab Procedures

15
Section 4.2: Create new NAC role and update access policy for that role to allow all traffic From the User Management pane on the left of the screen, select the User Roles option to access the screen shown below (default Roles are shown).
Select the New Role tab and add a role. This will be the role for all of ACME’s current internal users at the HQ site. You will later add requirements to this role. The settings are show in the following 2 screen shots (showing top and bottom of screen) Role name: General_Internal_Users
Role Description: ACME internal users NOTE: There are multiple ways to configure NAC OOB with various settings that all work together. At this point we are going to leave the Out-Of-Band User Role VLAN to the default settings of VLAN ID with no VLAN ID. This way we can use the switch port profile, we will create later, to assign both the Access VLAN and Auth VLAN based on the switch port that the PC is connected to and not the Role of the user accessing the PC. Therefore users can access the network anywhere, without the need for a specific user VLAN to exist everywhere. Out-Of-Band User Role VLAN fields: Leave default but read comment. Refresh IP After Login (OOB): Leave enabled but read comments. Take the defaults for remaining settings and Create Role.
December 1st, 2008 NAC Lab Procedures

16
Q4.1: If we assigned the Access VLAN on a Role basis instead of a port basis, and a user needed to log onto various PCs plugged into several different switches spread around the network, would that effect the VLAN /STP/VTP design?
December 1st, 2008 NAC Lab Procedures

17
After clicking Create Role you will be returned to the List of Roles tab. Select the Policies icon next to the new Role you just created.
Select the Add Policy link to begin the policy addition for this Role. Note: The Role currently has no access.
December 1st, 2008 NAC Lab Procedures

18
Select the ALL TRAFFIC option in the Category field, add a meaningful comment, and click on the Add Policy button to create the new policy allowing all traffic for this Role.
Section 4.3: Create an internal user in NAC and assign it to the newly created role From the User Management Pane select the Local Users option and then select the Local Users tab.
December 1st, 2008 NAC Lab Procedures

19
From the Local Users page select the New sub-tab and add a new internal user. This user will be used for initial testing and can be deleted after you configure AD-SSO.
User Name: wecoyote Password: cisco123 Description: 1st Floor Test User on UserPC1 Role: General_Internal_Users
Section 4.4: Require use of NAC Agent for the new role just created In the Device Management pane select Clean Access and the select the General Setup tab.
December 1st, 2008 NAC Lab Procedures

20
Next select the Agent Login sub-tab and pick the General_Internal_Users Role from the User Role drop menu. Click the option to enable Require Use of Clean Access Agent.
Move to the bottom of the screen, check the box for the last two options listed, set their timers to 5 seconds, and then click Update.
December 1st, 2008 NAC Lab Procedures

21
In the Device Management pane select Clean Access and the select the Clean Access Agent tab and Distribution sub-tab. Uncheck the box for Current Clean Access Agent Patch is a mandatory upgrade. Check the box for Do not offer current Clean Access Agent Patch to users for upgrade. Click Update.
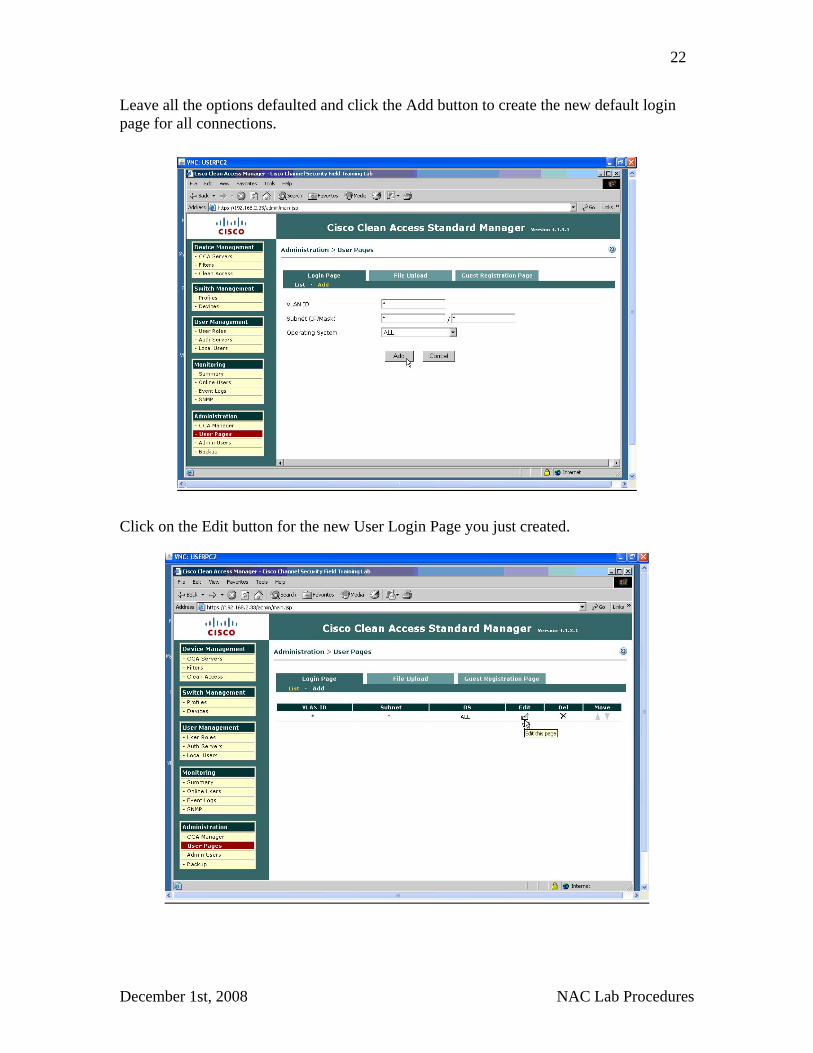
Section 4.5: Create and customize NAC login page From the Administration pane select User Pages and then under the Login Page tab select the Add sub-tab.
December 1st, 2008 NAC Lab Procedures
22
Leave all the options defaulted and click the Add button to create the new default login page for all connections.
Click on the Edit button for the new User Login Page you just created.
December 1st, 2008 NAC Lab Procedures

23
Select the Content sub-sub-tab under the Edit sub-tab to edit the page appearance.
Modify the page to represent the Acme Company by removing the Cisco Image and updating the various text fields to appropriate Acme information. Click on the Update button when complete.
December 1st, 2008 NAC Lab Procedures

24
Click the View button to review your changes and then close the review box.
Q4.2: Do you think the customer will want this page customized? Q4.3: When, if ever, will a user see this page?
December 1st, 2008 NAC Lab Procedures

25
Exercise 5: Create Switch Profile and Define Switch in CAM Section 5.1: Set up the Switch and Port Profiles and configure the SNMP settings From UserPC2 use IE to access the NAC Manager and from the Switch Management pane click the Profiles option. From the Profiles main page select the Group tab and then the New sub-tab.
Set the Group Name to Acme_HQ_Switches and Description to Switches at Acme HQ, then click the Add button to create a new Group.
December 1st, 2008 NAC Lab Procedures

26
When the task completes, select the Switch tab and then the New sub-tab to begin to define the switch profile.
Fill in the settings and then click the Add button:
Profile Name: 1st_floor_switches Switch Model: Cisco Catalyst 3560 series Description: 1st Floor Access Switches Read String: cisco123 (matches switch config from Exercise 3) Write String: cisco321 (matches switch config from Exercise 3)
December 1st, 2008 NAC Lab Procedures

27
Next select the SNMP Receiver tab and SNMP Trap sub-tab. Fill in the fields and then click Update to save the settings:
V1 String: not-default1 V2C String: not-default2 V3 Security Method: NoAuthNoProv (matches switch config from Exercise 3) V3 User Name : ciscocam (matches switch config from Exercise 3)
Q4.4: What is the use of these strings? When will they be used? Why did we use not-default1 and not-default2? Q4.5: Why do we configure V1, V2, and V3 SNMP? Why is V3 set to NoAuthNoProv? Why did we create the ACL when we configured the switch? The NAC Manager doesn’t have ACL capabilities so what can you do to secure it?
Select the Port tab and then the New sub-tab. Fill in the fields to define the 1st floor Access switch:
Profile Name: 1st_floor_3560_1 Description: 1st Floor Access Switch Manage this port: should be checked Auth VLAN: VLAN ID and 817 Default Access VLAN: VLAN ID and 14 Access VLAN: User Role VLAN (point at the Role which points
back to here as the Default Access VLAN) VLAN Profile: Leave set to Default
December 1st, 2008 NAC Lab Procedures

28
Read the description and then check the boxes for the last 4 options on this page. Click the Add button when completed to create the switch port profile.
Does what you just configured make sense? If not, you might want to return to and review Exercise 1 Section 1. Q4.6: Once Acme expands to the 2nd floor, how would you configure the switch port profile for that floor and the associated VLANs? Section 5.2: Define the 1st floor switch to the NAC Manager using the profiles just created Select Devices under the Switch Management pane and under the Switches tab and select the New sub-tab.
December 1st, 2008 NAC Lab Procedures

29
Fill in the fields and click the Add button to add the new switch to the NAC Manager. Note: It is VERY important that you set the default Port Profile to Uncontrolled in the Lab.
Switch Profile: 1st_floor_switches Switch Group: Acme_HQ_Switches Default Port Profile: uncontrolled (*mandatory in the lab for connectivity) IP Addresses: 192.168.1.250 Description: 1st Floor Switch
December 1st, 2008 NAC Lab Procedures

30
After clicking to add the switch, the NAC Manager will connect to the switch. From the Switches tab and the List sub-tab click on the Ports icon to manage the ports in the switch.
The only port we would like to manage for this lab is fa0/2. Select 1st_floor_3560_1 for the profile and click Update. Click OK in both pop-ups windows.
December 1st, 2008 NAC Lab Procedures
31
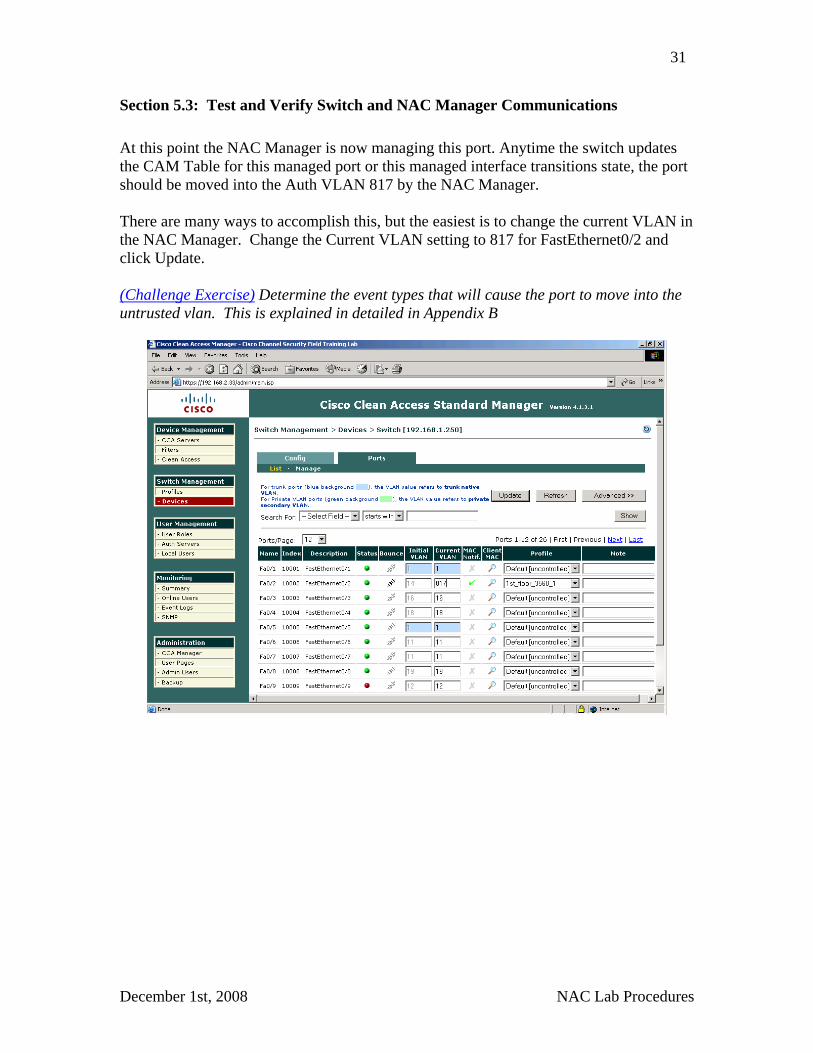
Section 5.3: Test and Verify Switch and NAC Manager Communications At this point the NAC Manager is now managing this port. Anytime the switch updates the CAM Table for this managed port or this managed interface transitions state, the port should be moved into the Auth VLAN 817 by the NAC Manager. There are many ways to accomplish this, but the easiest is to change the current VLAN in the NAC Manager. Change the Current VLAN setting to 817 for FastEthernet0/2 and click Update. (Challenge Exercise) Determine the event types that will cause the port to move into the untrusted vlan. This is explained in detailed in Appendix B
December 1st, 2008 NAC Lab Procedures

32
Exercise 6: Initial NAC Server Setup Section 6.1: Set up NAC Server and connect the untrusted interface to the network Now it is time to bring up the NAC Server. It is important to recall that the Untrusted interface of the NAC Server must NOT be connected to the network until the VLAN Mappings are completed or STP Inconsistencies can occur. The interface is currently connected but the NAC Server is not configured as an L2 Virtual Gateway yet so we are not having any issues right now. From UserPC2, telnet to the access switch at 192.168.1.250. CAREFULY remove the untrusted VLAN 817 from interface fa0/1 (the lab equivalent of disconnecting the untrusted NAC Server interface from the switch). enable cisco123 show interface trunk !
config t int fa0/1 switchport trunk allow vlan remove 817
Display the trunk again and verify VLAN 817 is removed from the allowed list on fa0/1. From UserPC2, access the NAC Manager at https://192.168.2.33 and select the CAA Servers option in the Device Management pane. Then select the New Servers tab, fill in the fields, and click the Add Clean Access Server button to add the NAC Server.
Server IP Address: 192.168.7.10 Server Location: Acme Data Center Server Type: Out-of-Band Virtual Gateway (be careful here!)
December 1st, 2008 NAC Lab Procedures

33
Once the NAC Server is added go to the List of Servers tab and click on the Manage button to access the configuration pages for the server you just added.
December 1st, 2008 NAC Lab Procedures

34
After connecting to the Server you will be taken to the main page to manage this server. On this page select the Network tab and verify the settings entered during the bootstrap.
Now select the Advanced tab and the VLAN Mapping sub-tab to access the VLAN mapping information. Check the Enable VLAN Mapping box and click the Update button to enable VLAN mapping. This “unlocks” the mapping assignment settings. Now enter the mapping for the untrusted to trusted connection, 817 to 17, and add a description. Click the Add Mapping button to complete the mapping.
December 1st, 2008 NAC Lab Procedures

35
Before going to the switch to bring up the untrusted interface, take a moment to set up NTP on the NAC server. You executed this on the NAC Manager in Exercise 4 but there is a unique setting on the NAC Server. Note that NTP on the NAC Server is CRITICAL for the upcoming AS-SSO authentication section. Kerberos in the AD world can not be more than 5 minutes out of sync! Select the Misc tab and then the Time sub-tab. Enter the IP address of the NTP server in the Time Servers field and click the Sync Current Time button to sync to the NTP server.
Time Servers: 192.168.0.1 (loopback address of the 2811 ISR)
Return to the switch and CAREFULLY add back in the untrusted VLAN to the trunk allowed list on interface g0/1.
config t interface fa0/1 switchport trunk allow vlan add 817
December 1st, 2008 NAC Lab Procedures

36
December 1st, 2008 NAC Lab Procedures

37
Exercise 7: Agent Installation Section 7.1: Login and Install the NAC Agent and validate Address Renewal UserPC1 was started before the NAC Server was configured so it has an IP in the trusted network. Initiate an ipconfig /release && ipconfig /renew from a command prompt and verify that UserPC1 receives an IP in the 192.168.7.0/24 subnet. This puts UserPC1 in the unauthenticated Role which allows DNS and DHCP through the NAC Server. From UserPC1, browse to http://192.168.2.33 so that the NAC Server can redirect the traffic and prompt you for a login. Verify you get the Login Page you customized in Exercise 4. Enter the Userid and Password you created in that exercise, which should be wecoyote/cisco123, and click on the Continue button to login to NAC.
Click ‘Download Clean Access Agent 4.1.3.1’ to begin agent installation. Follow the prompts and install the agent taking the defaults during the agent installation.
December 1st, 2008 NAC Lab Procedures

38
After the installation is successful, the NAC Agent will load and prompt you to enter you userid and password again. Enter your credential (wecoyote / cisco123) and close the original browser.
Accept the Security Alert. This is due to the using self-signed certificates in the lab environment. Cisco recommends acquiring trusted certificates for customer deployments.
December 1st, 2008 NAC Lab Procedures

39
Now that you have the agent installed you meet the current requirements for the General_Internal_Users Role, your login will succeed. The Agent will renew your address for you without bouncing the NIC.
December 1st, 2008 NAC Lab Procedures

40
Now check the IP Address and validate you are in the Access VLAN, 192.168.4.0/24.
Execute a few pings and attempt to access the intranet web site again.
December 1st, 2008 NAC Lab Procedures

41
Section 7.3: Emulate a reboot and consider the users experience Note: Since we are in a LAB environment and UserPC1 is a VMware image, rebooting or disabling and re-enabling the LAB NIC will NOT cause the switch port to go down and come back up. This is because the VMware host server will keep it up. To simulate this, remove the device from the Clean Access Certified list in the NAC Manager on UserPC2. In the Device Management pane, select Clean Access. On the Certified Devices List sub-tab click Clear Certified.
On UserPC1 issue an ipconfig /release && ipconfig /renew to obtain an IP address in the Auth vlan (192.168.7.0 /24). After the “reboot”, observer the UserPC1 experience. It should be automatic except for the login to NAC. After you login to NAC again (wecoyote / cisco123), please execute a few pings and verify you can browse to the Intranet website again.
Ping 192.168.3.10 DC/DNS/DHCP/IIS 192.168.4.1 Your Default Gateway 192.168.2.33 NAC Manager
December 1st, 2008 NAC Lab Procedures

42
Exercise 8: Configure AD-SSO Section 8.1: Configure AD-SSO on NAC Manager and Server At this point we are going to configure AD-SSO and set the default Role to General_Internal_Users with no LDAP Mapping Server. We will be using the LDAP server mapping in the next exercise. At that point we will add an LDAP server and use it to map the users to their Role. We will also set the default role to Unauthenticated and point to the newly defined mapping server. From UserPC2, access the NAC Manager and select Auth Servers from the User Management Pane. Select the Auth Servers tab and then the New sub-tab. Fill in the fields and click the Add button.
Authentication Type: Active Directory SSO Provider Name: adsso Default Role: General_Internal_Users LDAP Lookup Server: None Description: AD SSO
December 1st, 2008 NAC Lab Procedures

43
Now access that NAC Server by selecting CAA Servers under Device Management and clicking the Manage button to mange the Server. This will take you to the Status tab by default. Observe the status of Active Directory SSO. (It should have a status of stopped at this point.)
Select the Authentication tab, the Windows Auth sub-tab, and then the Active Directory SSO sub-sub-tab. Fill in the fields using the data shown. Note be VERY careful on this screen. Items are case sensitive. Do NOT check the Enable box yet! We will return to this screen later to enable.
Active Directory Server (FQDN): w2k-server.acme.com Active Directory Domain: ACME.COM Account Name for CAS: ssksso Account Password for CAS: cisco123 Active Directory SSO Auth Server: adsso
When complete, click the Update button. Again, do NOT check the enable box yet! Note: We are doing this for a Single Active Directory server. The configuration is slightly different for multiple servers.
December 1st, 2008 NAC Lab Procedures

44
Section 8.2: Build AD-SSO Account on Windows and authorize it for Kerberos using the ktpass command In order for the NAC Server to check with the AD Server to see if a Kerberos ticket is valid, the ID we created in the above section, nacsso, needs to be created in AD and given Kerberos rights with the ktpass command. This command is part of the additional support tools for Windows Servers. Access the Windows Server Desktop from the main interface and navigate to the C:\SUPPORT\TOOLS folder and run 2000rkst installer. Take the defaults for the installation. Note: The support folder was copied from the Windows installation CD.
December 1st, 2008 NAC Lab Procedures

45
Now select Active Directory Users and Computers on the desktop and add the ssksso user with a password of cisco123. Set the password to never expire. This user needs no additional access here. First name = Full Name = User logon name = ssksso
December 1st, 2008 NAC Lab Procedures

46
Kerberos is sensitive to clock and skew cannot be greater than five minutes. Make sure the time on the NAC Server is synchronized with the Domain Controller. If it is not, update the clock on the Domain Controller to match the time of the NAC Server. To verify the time on the NAC Server, select CAA Servers under Device Management and click the Manage button to manage the NAC Server. Select the Misc tab and Time sub tab.
December 1st, 2008 NAC Lab Procedures

47
With the ssksso userid added to AD and time synchronized, we need to run the ktpass command to grant this user access to check Kerberos tickets. Open a CMD prompt and enter the ktpass command with the required switches. Note: This is a long command, and case sensitive. In order to improve accuracy, we have the command in a text file from which you can cut and paste. Navigate to Software\NAC OoB folder, on the Desktop, and open the KTPASS CMD info.txt into notepad. Paste the text within this file into the CMD prompt window and press Enter.
The ktpass command is described in detail in the configuration guides and Microsoft tech articles. One important thing to keep in mind is that you need to take a screen shot of the output from entering the command and keep it for Cisco TAC assistance, should you need their help. Here is the command as entered in our lab: ktpass.exe -princ ssksso/[email protected] -mapuser ssksso -pass cisco123 -out c:\ssksso.keytab -ptype KRB5_NT_PRINCIPAL +DesOnly
December 1st, 2008 NAC Lab Procedures

48
Return to the NAC Manager on UserPC2 and enable AD-SSO. Select CAA Servers under Device Management and click the Manage button to manage the NAC Server. Now select the Authentication tab and then the Windows Auth sub-tab. You will be defaulted to the Active Directory SSO sub-sub-tab. We can now check the box to Enable Agent-Based Windows Single Sign-on and click the Update button.
After clicking update, select the Status tab and check verify the Active Directory SSO Service is now started. If Active Directory SSO is not started, follow these troubleshooting steps: Verify all configuration requirements in the lab. Verify that you ran the correct ktpass command. If not, delete the active directory account, create a new account and run ktpass again. Make sure Active Directory Domain is in CAPS and NAC Server can resolve FQDN in DNS. Review the Configuring Active Directory Single Sign-On (AD SSO) section in the NAC Server admin guide from cisco.com.
December 1st, 2008 NAC Lab Procedures

49
Section 8.3: Update Unauthorized Role to Allow the PC to get a Kerberos Ticket from the AD Server At this point the NAC Server has the right to ask the AD server if Kerberos tickets are valid. We need to set up the policy for the Unauthorized Role to allow UserPC1 to get a Kerberos ticket from the AD Server. Remember the process flow: PC contacts the NAC Server; NAC server tells PC to get a ticket; PC talks to the AD Server and receives a ticket; PC passes the ticket to the NAC Server which checks it with the AD Server and authenticates the user provided the ticket is valid. From UserPC2 access the NAC manager and select the User Roles option under the User Management Pane. Next select the Traffic Control tab and then the IP sub-tab. Select the Unauthenticated Role, in the drop menu, and click the Select button.
December 1st, 2008 NAC Lab Procedures

50
Now click on the Add Policy link to open the policy window for this Role. Update the policy to permit the following TCP ports to the DC which is 192.168.3.10.
88 Kerberos 135 RPC 389 LDAP 636 LDAP w/ ssl 1025 non-standard RPC 1026 non-standard RPC
Click Add Policy to add the policy to this Role.
December 1st, 2008 NAC Lab Procedures

51
Now click on the Add Policy link to open the policy window for this Role. Add a second policy to permit the following UDP ports to the DC which is 192.168.3.10. Ensure that you select UDP from the protocol dropdown box.
88 Kerberos 389 LDAP 636 LDAP w/ ssl
Click Add Policy to add the policy to this Role.
December 1st, 2008 NAC Lab Procedures
52
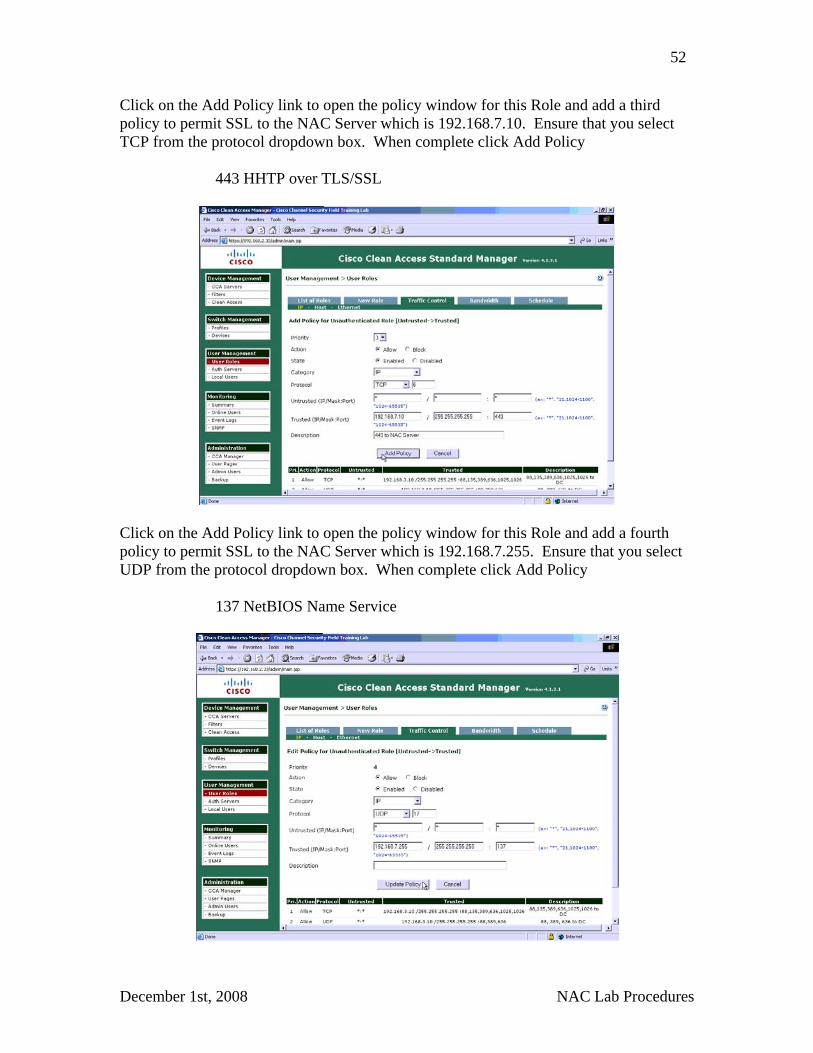
Click on the Add Policy link to open the policy window for this Role and add a third policy to permit SSL to the NAC Server which is 192.168.7.10. Ensure that you select TCP from the protocol dropdown box. When complete click Add Policy
443 HHTP over TLS/SSL
Click on the Add Policy link to open the policy window for this Role and add a fourth policy to permit SSL to the NAC Server which is 192.168.7.255. Ensure that you select UDP from the protocol dropdown box. When complete click Add Policy
137 NetBIOS Name Service
December 1st, 2008 NAC Lab Procedures

53
After adding the four policies, your unauthenticated role policies should be the same as the following.
Section 8.3: Test SSO Verify that the system time on UserPC1 matches the time on the NAC Server, NAC Manger, and Domain Controller. If not, update the system time on UserPC1. From the Device Management pane on the NAC Manager, select Clean Access. If UserPC1 is in the certified Device list, select the Clear Certified button. On UserPC1 issue an ipconfig /release && ipconfig /renew from the command prompt. Verify that UserPC1 has an IP in the 192.168.7.0/24 subnet. Wait for the agent to launch.
December 1st, 2008 NAC Lab Procedures

54
If AD SSO is not successful, follow these troubleshooting steps. Verify all configuration requirements in the lab. Make sure the user is logged in with the domain account and not a local account. Verify that UserPC1 has the correct Service Ticket by double-clicking the KERBTRAY icon on the desktop. Then right click the icon in the system try and select List Tickets. The ticket you are looking for is ssksso/w2k-server.acme.com. If UserPC1 does not have this ticket, there is likely a communication error for UserPC1 in the Unauthenticated Rol. Troubleshoot and close the NAC Agent manual authentication window on to UserPC1 to obtain the correct ticket from the DC. Confirm the Traffic Control Policies for the Unauthenticated Role. If AD SSO works with an Allow All Traffic policy in the Unauthenticated Role, it is likely that you are missing a required port in the access policy. Review the Configuring Active Directory Single Sign-On (AD SSO) section in the NAC Server admin guide from cisco.com. As you are troubleshooting follow these steps to reset the user credentials to determine if AD SSO is working. Issue an ipconfig /release on UserPC1
December 1st, 2008 NAC Lab Procedures

55
Clear Certified on the NAC Manager
Purge Tickets on UserPC1
Make any configuration changes as required in your troubleshooting of NAC ADSSO. Issue an ipconfig /renew on UserPC1
December 1st, 2008 NAC Lab Procedures

56
Wait for NAC AD SSO. This can take a few minutes because this is a lab environment and the servers and hosts are running on shared hardware.
Verify wecoyote is on the Certified Device List
Q8.1: Does the NAC Server have the user’s credentials to the domain? Q8.2: As we have it configured, what would happen if our Domain Controller failed?
Congratulations AD-SSO is now operational
December 1st, 2008 NAC Lab Procedures

57
Exercise 9: Configure LDAP based Role Assignment Section 9.1: Configure the NAC Manager for LDAP based role mapping Access the NAC Manager from UserPC2 and select Auth Servers under the User Management Pane. Select the Lookup Servers tab followed by the New sub-tab.
Fill in the fields VERY carefully. These fields are case sensitive! Click the Add button when complete.
Provider Name: ldap1 Server URL: ldap://192.168.3.10:389 Search Base Context: CN=Users,DC=ACME,DC=COM Search Filter: sAMAccountName=$user$ Search(Admin) Full DN: CN=NAC lookup,CN=Users,dc=acme,dc=com Search(Admin) Password: cisco123
Take the defaults for the remaining items.
December 1st, 2008 NAC Lab Procedures
58
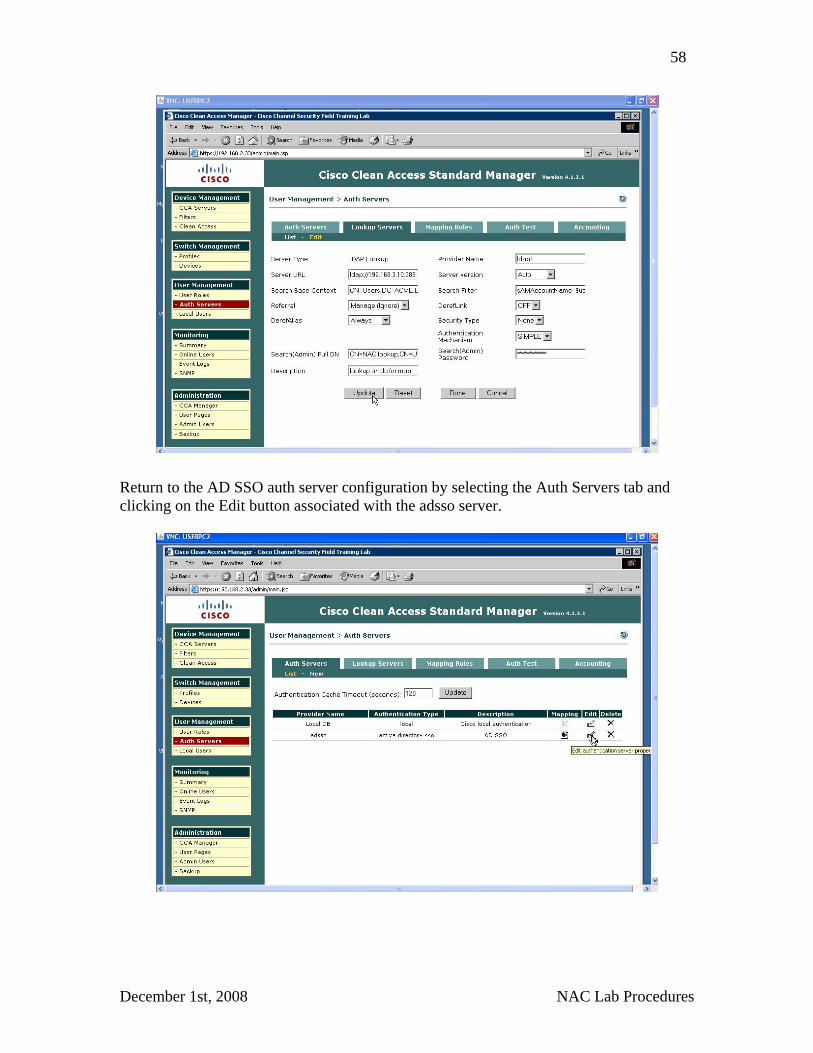
Return to the AD SSO auth server configuration by selecting the Auth Servers tab and clicking on the Edit button associated with the adsso server.
December 1st, 2008 NAC Lab Procedures

59
Switch the Default Role to the Unauthenticated Role and the LDAP Lookup Server to the one you just added (ldap). Click Update. Now users accessing this Auth Server will be placed in the Unauthenticated Role unless the Mapping Server can map them to the appropriate role.
Select the Mapping Rules tab and then select the ldap1 server from the drop menu. Click the Add Mapping Role link.
December 1st, 2008 NAC Lab Procedures

60
Start with the fields in the lower half of the window and add a condition by CAREFULLY setting the fields as follows. Click the Add Condition button to add the condition: Note: Click Add Condition NOT Add Mapping.
Condition Type: Attribute Operator: contains Attribute Name: memberOf (upper case o) Attribute Value: sales (an existing Group in AD that all the users are in)
Now, from the upper part of this window, select the General_Internal_Users Role from the Role Name drop down and set a description. Click the Add Mapping button to complete the mapping. Note: Click Add Mapping, not Add Condition.
December 1st, 2008 NAC Lab Procedures

61
Section 9.2: Add the Windows Userid that NAC Manager will use to do LDAP lookups on the AD Server Return to the DC and access Active Directory Users and Computers. Just as we did in Exercise 3, add a new user and make him a member of the Domains Admin group. It is VERY important that the Display Name (DN) and password match the settings you just added for the mapping server above in the Search(admin) full DN and password fields. This is CASE SENSITIVE.
First name: NAC Last name: lookup User logon name: naclookup Full Name: NAC lookup Password: cisco123 Check Password Never Expires box
Section 9.3: Test AD-SSO with the Role mappings Simulate a workstation reboot:
Remove UserPC1 from the certified Device list in the NAC Manager. Perform an ipconfig /release && ipconfig /renew on UserPC1
December 1st, 2008 NAC Lab Procedures
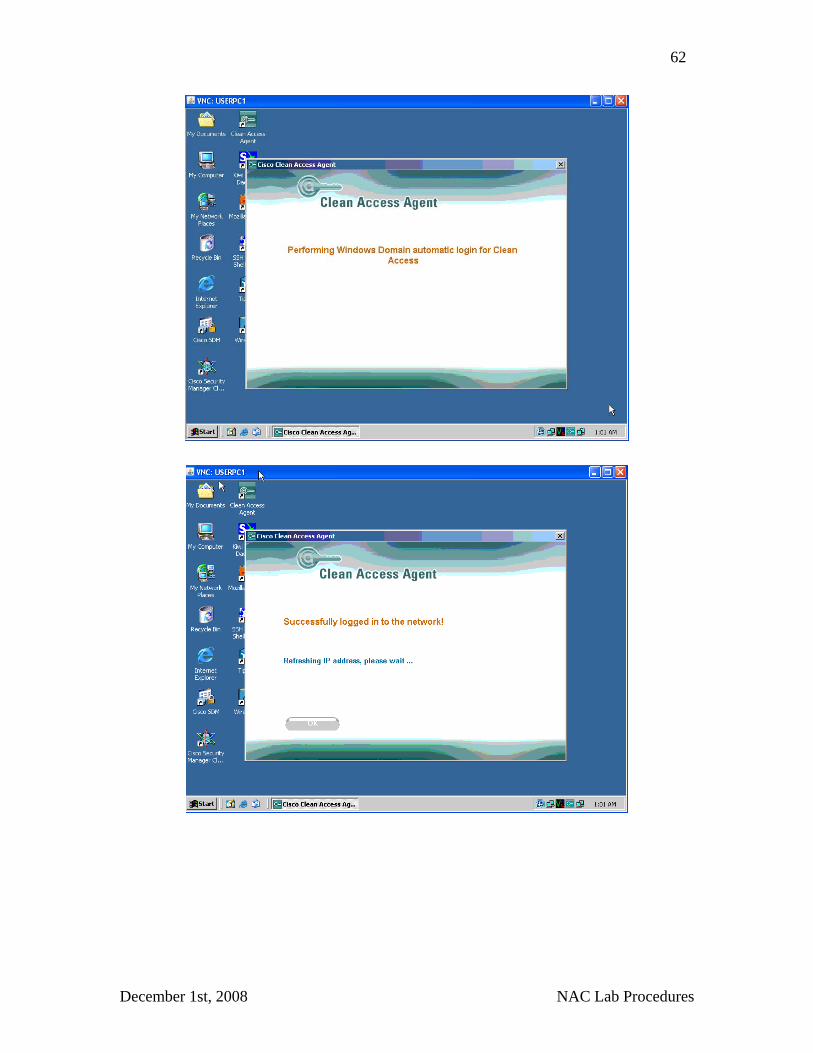
62
December 1st, 2008 NAC Lab Procedures

63
Once UserPC1 is on the network, return to the NAC Manager and verify that the User is in the correct Role showing that the mapping was successful. Do so by selecting Online Users in the Monitoring Pane, then the View Online Users tab, and finally the Out-of-Band sub-tab. View the Role and validate it is General_ Internal_Users.
December 1st, 2008 NAC Lab Procedures

64
Q9.1: What would the user’s experience be if the LDAP server was down? Q9.2: How could we improve upon the LDAP design we’ve created here in this lab?
Congratulations AD-SSO with LDAP role mapping is complete!
December 1st, 2008 NAC Lab Procedures

65
Exercise 10: Institute Posture Test for Windows SP Installation Section 10.1: Deploy Posture Assessment for Windows Patch Level To complete the work for the customer, the remaining task is to institute a simple posture assessment test to check for Service Pack4 on their Windows 2000 PCs. From UserPC2 access the NAC Manager and select the Clean Access option in the Device Management Pane. Select the Clean Access Agent tab, then the Rules sub-tab, and finally the Check List sub-sub-tab. (Be patient as this will take a moment.) Locate the pc_Windows_2k_SP4 check and copy its name into your clipboard. (The check is already built but you will reference the name of the check in the next step.)
December 1st, 2008 NAC Lab Procedures

66
Still under the Rules sub tab, select the New Rule sub-sub-tab and fill in the fields:
Rule Name: Windows_2k_Patch_level Rule Description: Checks for w2k PCs Operating System: check windows 2000 Rule Expression: Paste the Check name you just copied or type:
pc_Windows-2K-SP4 Click the Add Rule button to add the new rule.
December 1st, 2008 NAC Lab Procedures

67
Now select the Requirements sub-tab and the New Requirement sub-sub-tab and fill in the fields:
Requirement Type: Windows Update Enforce Type: Mandatory Requirement Name: Windows_2k_patch_level Description: Check for Win2k SP4 Operating System: Windows 2000
Click the Add Requirement button to add the requirement.
Select the Requirement-Rules sub-sub-tab still under the Requirements tab and fill in the fields as follows:
Requirement Name: Windows_2k_patch_level Navigate to the bottom of the screen and check the box to include the w2k patch
rule we just created in the previous step called Windows_2k_Patch_level. Navigate back up to the top of the screen and click the Update button to tie the Rule and Requirement together.
December 1st, 2008 NAC Lab Procedures

68
December 1st, 2008 NAC Lab Procedures

69
Select the Role-Requirements sub-tab and select General_Internal_Users from the Uesr Role drop down box. Check the box next to the Windows_2k_patch_level requirement. Click the Update button to associate the newly created requirement with this role.
Section 10.2: Test Simulate a workstation reboot:
Remove UserPC1 from the certified Device list in the NAC Manager. Perform an ipconfig /release && ipconfig /renew on UserPC1.
After the UserPC1 is back on the Network, return to the NAC Manager and select the Clean Access option under the Device Management Pane. Then select the Clean Access Agent tab and the Reports sub-tab.
December 1st, 2008 NAC Lab Procedures

70
Click on the View button and open the report to verify SP4 was validated.
December 1st, 2008 NAC Lab Procedures

71
☺ Congratulations this completes the Out of Band NAC lab!
December 1st, 2008 NAC Lab Procedures
72
Appendix A: Answers to Exercise Questions Q1.1: Do the NAC Server interfaces need to be set as trunks? Technically no, but if we need to have more than one pair of Auth and Access VLANs going thought this NAC Server, then we will need to trunk. So to meet Acme’s growth requirements trunking will be needed on both interfaces. Q1.2: What would be the IP address on UserPC1 at this phase? The IP address of UserPC1 should be something in the 192.168.7.0/24 VLAN. When the PC moves between the Auth and Access VLANs its IP address will need to change. Q1.3: At this phase, what NAC role is UserPC1 in and what access will it have on the network? At this stage UserPC1 is in the Unauthenticated Role. It will have access to whatever is permitted for this Role under in the NAC Policy for the User Role. By default only UDP will be permitted, so that DNS and DHCP can function. This UDP access can not be removed in this Role and should be blocked on the 1st hop router if required. Q1.4: What is the IP address on UserPC1 now? The IP address of UserPC1 should be something in the 192.168.4.0/24 VLAN. As the PC moves between the Auth and Access VLANs, the IP address will need to change. Q1.5: What role is UserPC1 in and what access does it have on the network? At this stage UserPC1 will be in the Role assigned to the user that logged in. The VLAN in our example, based on the Acme case study, will be selected by the switch port profile and not the user’s role. Q1.6: Assuming the x4 Access VLAN already exists, how many additional VLANs numbers are you asking Acme to provide at this point in time? Four new VLANs will need to be created. To deploy the NAC Server into the network two VLANs are needed for the untrusted/trusted networks. To meet best practices, two more VLANs are needed for the “dead end” native VLANs on the trunks connecting to the NAC Server. These “dead end” VLANs are used to ignore/drop any untagged frames that might reach the NAC Server. Q1.7: Assuming Acme does the 1st phase of their future expansion plan, to add dual core switches with integrated L3 as shown above, how will this impact the NAC design? The phase of adding dual core switches brings into play the use of L3 routing and Cisco’s best practices of NOT having L2 redundant links to the access switches. This is called the “V” design. This design impacts NAC since NAC Server needs VLANs throughout the network topology for its untrusted (UnAuthenticated) side as well as knowledge of what VLAN the PC needs to be put into once authenticated. Q1.8: In the diagram above, is the placement of the NAC Server and NAC Manager optimized from an HA perspective? How could this design be improved?
December 1st, 2008 NAC Lab Procedures

73
If there were a failure of either CoreA or CoreB the NAC environment would break. For HA there should be at least a NAC Server directly connected to each core device. Q1.9: How many VLANs were added and why? Is there one missing on the picture? A total of 3 new VLANs were created. 2 are created to accommodate the 2nd floor untrusted/trusted VLAN mapping in the NAC Server and 1 is for the PCs, once they have authenticated through NAC (aka the Access VLAN for that floor). Yes there is one missing it is recommended that a separate VLAN be used for management access that is not part of a VLAN mapping pair (try this as a challenge if you complete the lab and have time remaining). Q1.10: If the same user needs the ability to log onto the network on either the 1st or 2nd floor, what will his Auth and Access VLANs be? Would there be a way to have him in the same Access VLAN on either floor? During the NAC authorization phase the VLAN associated to the access switch ports is 8x7 for the 1st floor and 9x7 for the 2nd floor. Once authenticated through NAC a user will be re-assigned to x4 on the 1st floor and 2x4 on the 2nd floor. A user could be assigned the same Access VLAN by associating the role they authenticate to with an Access VLAN instead of taking the switch port profile VLAN assignment. Note: Both Access VLANs would have to be allowed to both floors or the user could be assigned a VLAN that is not allowed through the trunk ports to the core thus “black holing” this user from the network. Q3.1: What version of SNMP are we using? The switch is set up to use V1 or V2c for its read and read/write strings. It is also configured to use V3 when sending traps to 192.168.2.33. Q3.2: Could we improve this SNMP Deployment? If so how? YES! The ACL was a good start. However two additional potential improvements would be to switch to V3 with Authentication and Privacy and to move from traps to informs which are acknowledged, unlike traps. Go back and try this at the end of the lab if you have time. Remember you have to make the corresponding NAC Manager changes as well. Q3.3: Why does Cisco recommend increasing the CAM Table timer for NAC OoB? If there is a change in the entries in the CAM Table on a port, the switch will notify the NAC Manager via SNMP. The NAC Manager will react to this event. If this occurred too frequently it might impact the user experience; recertifying the device more often than necessary. Q4.1: If we assigned the Access VLAN on a Role basis instead of a port basis, and a user needed to log onto various PCs plugged into several different switches spread around the network, would that effect the VLAN /STP/VTP design?
December 1st, 2008 NAC Lab Procedures

74
Yes the Role assigned VLAN would have to be allowed everywhere which would be more of a legacy “every VLAN everywhere - VTP Client/Server” deployment which is typically not recommended as a current best practice. Q4.2: Do you think the customer will want this page customized? More than likely the customer will want this login page branded for their company. This could be simple or quite advanced depending on their level of detail and the number of login pages, should they choose. Did you account for this time in the SoW? Q4.3: When, if ever, will a user see this page? Once the Agent is installed on the user’s PC they should only see the login page if SSO fails. So, though the page will rarely be seen, it is a requirement for access through NAC. Q4.4: What is the use of these strings? When will they be used? Why did we use not-default1 and not-default2? These strings are essentially the passwords that are required to request information from the NAC Manager. We changed the strings to something other than the published defaults for security purposes. Q4.5: Why do we configure V1, V2, and V3 SNMP? Why is V3 set to NoAuthNoPriv? Why did we create the ACL when we configured the switch? The NAC Manager doesn’t have ACL capabilities so what can you do to secure it? SNMP is preconfigured on the NAC Manager with preconfigured passwords. For security purposes we altered the defaults. In any event we are only using V3, as per the switch config. The switch is set to only send V3 traps to the NAC Manager. Ideally we would have used both V3 Authorization and Privacy but we have left this as a challenge exercise later in the lab. To be very clear, in the lab, we are using SNMP V3 however it is unverified and clear text. The switch has an ACL for inbound queries and will only permit the NAC Manager to gain access. We don’t have the same ability in the NAC Manager so we would need to put an ACL on the router interface, outbound, to the network where the NAC Manager resides to restrict traffic. As per best practice it is important to have a security services subnet that contains your security management devices such as NAC Manager and MARS. Q4.6: Once Acme expands to the 2nd floor, how would you configure their switch port profile and their VLANs? Remember, as per Exercise 1 Section 2 and Acme’s requirements, there are new VLANs for the 2nd floor NAC design. This implies a new switch port profile for the 2nd floor switches so that the Auth VLAN and Default Access VLAN mappings can be assigned to these new VLANs. Again, this is one of the reasons why we didn’t apply the Access VLAN in the user’s role since, depending which floor they are on, they will be assigned a different Access VLAN. Again, though we could allow the Access VLANs everywhere,
December 1st, 2008 NAC Lab Procedures

75
this would break the current Cisco best practice of routing from the core to the individual access networks. The new VLANs, for the 2nd floor, are 9x7/2x7 for Auth VLAN mapping and 2x4 for the Access VLAN. Q8.1: Does the NAC Server have the user’s credentials to the domain? No. The NAC Server only has a Kerberos ticket with which it can query AD for validity. Q8.2: As we have it configured, what would happen if our Domain Controller failed? First, the NAC Server would have no communication to AD since we only configured 1 AD server. Maybe we should have added a pool of servers? Secondly, users attempting to login to the network via AD-SSO will be offered the NAC web login page we customized in Exercise 4 Section 5. So, if the users complain about being prompted for credentials, via the NAC Agent, there may be a communications issue between the NAC Server and the DC(s) its configured to talk to. Another case where communication would fail is if, for some reason, the NAC Server and the AD server(s) that it is configured to talk to boot up at the same time. If the NAC Server, during boot, cannot find its AD servers it will not start the AD-SSO process. You may want to boot the AD servers first and then boot up the NAC Server to avoid this possible situation. Q9.1: What would the user’s experience be if the LDAP server was down? Assuming that “just” the LDAP server was unavailable but our AD-SSO Kerberos server was still accessible, the user would be able to login through NAC but would be placed in the default role (the UnAuthenticated Role). This is because our main use, in this lab, of LDAP is to gather which information about which role to place a user into. Q9.2: How could we improve upon the LDAP design we’ve created here in this lab? Again, as in the Kerberos section of the lab, we’ve only configured 1 server. Setting up a pool of servers would help ensure more availability.
December 1st, 2008 NAC Lab Procedures

76
Appendix B Prepare for Launch Meeting Section 1.1: Create simple diagrams in preparation for a project launch meeting with the Acme Network team Hopefully most of this design was discussed as part of the pre-sales process and the detailed design meetings that occurred in order to prepare an accurate statement of work. However, now the time has arrived to start the project and the Acme engineering team wants a kickoff meeting to review exactly what you will be doing so they can provide you with the details you need to begin. The main focus of the meeting is to finalize the VLAN design so the Acme engineering team can assign you the VLAN numbers in accordance with their new VLAN Scheme. They also want to verify you understand their expansion plans and ensure that the design will scale along with their expansion. Your task is to create several simple Layer2 and Layer3 topology diagrams to use in this meeting.
Q1.1: Do the NAC Server interfaces need to be set as trunks? Q1.2: What would be the IP address on UserPC1 at this phase? Q1.3: At this phase, what NAC role is UserPC1 in and what access will it have on the network?
December 1st, 2008 NAC Lab Procedures
77
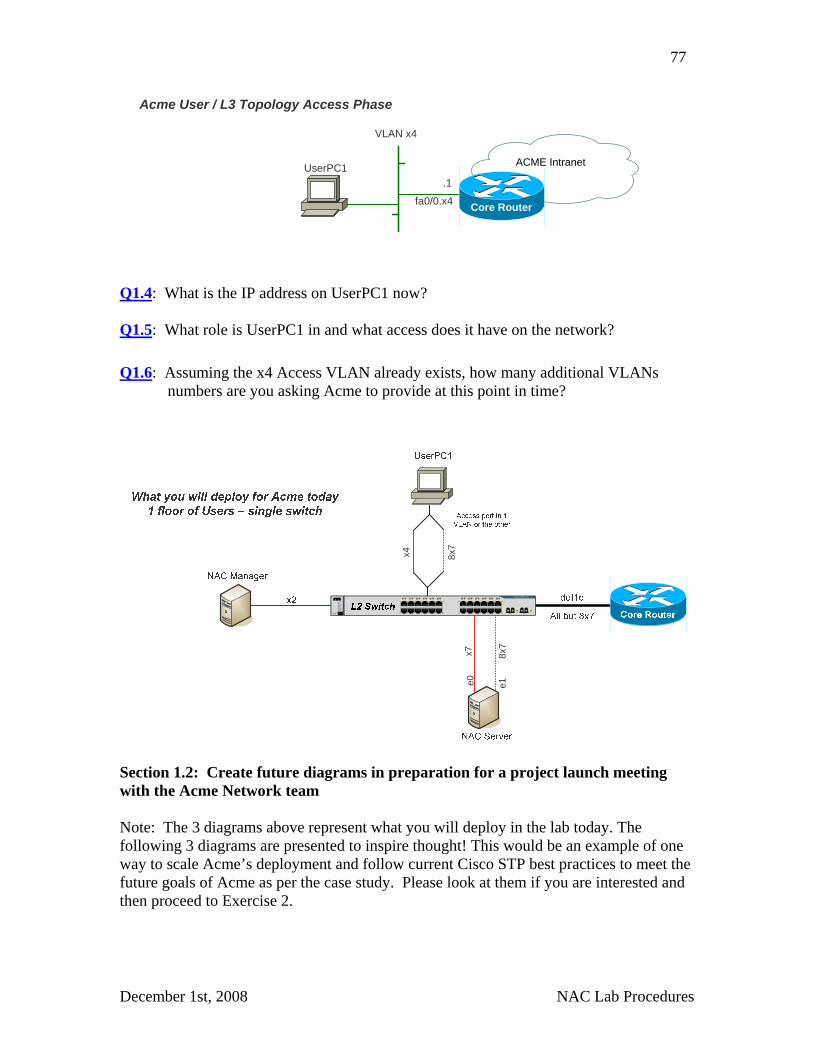
VLAN x4
Core Routerfa0/0.x4
.1
ACME IntranetUserPC1
Acme User / L3 Topology Access Phase
Q1.4: What is the IP address on UserPC1 now? Q1.5: What role is UserPC1 in and what access does it have on the network? Q1.6: Assuming the x4 Access VLAN already exists, how many additional VLANs numbers are you asking Acme to provide at this point in time?
MODE
STACKSPEEDDUPLXSTATMASTRRPSSYST
1 2 3 4 5 6 7 8 9 10 11 12
1X
2X
11X
12X
13 14 15 16 17 18 19 20 21 22 23 24
13X
14X
23X
24X
Catalyst 3750 SERIES
1 2
x4 8x7
8x7
x7e0 e1
Section 1.2: Create future diagrams in preparation for a project launch meeting with the Acme Network team Note: The 3 diagrams above represent what you will deploy in the lab today. The following 3 diagrams are presented to inspire thought! This would be an example of one way to scale Acme’s deployment and follow current Cisco STP best practices to meet the future goals of Acme as per the case study. Please look at them if you are interested and then proceed to Exercise 2.
December 1st, 2008 NAC Lab Procedures

78
MODE
STACKSPEEDDUPLXSTATMASTRRPSSYST
1 2 3 4 5 6 7 8 9 10 11 12
1X
2X
11X
12X
13 14 15 16 17 18 19 20 21 22 23 24
13X
14X
23X
24X
Catalyst 3750 SERIES
1 2L2 Switch
MODE
STACKSPEEDDUPLXSTATMASTRRPSSYST
1 2 3 4 5 6 7 8 9 10 11 12
1X
2X
11X
12X
13 14 15 16 17 18 19 20 21 22 23 24
13X
14X
23X
24X
Catalyst 3750 SERIES
1 2L3 Switch
MODE
STACKSPEEDDUPLXSTATMASTRRPSSYST
1 2 3 4 5 6 7 8 9 10 11 12
1X
2X
11X
12X
13 14 15 16 17 18 19 20 21 22 23 24
13X
14X
23X
24X
Catalyst 3750 SERIES
1 2L3 Switch
dot1q
x4
x4dot1qx4
dot1qNot x4
Common SMB design - some would argue best practice
No STP Loops
HSRP / GLBP
HA Core – 1st floor Users NAC not shown
Q1.7: Assuming Acme does the 1st phase of their future expansion plan, to add dual core switches with integrated L3 as shown above, how will this impact the NAC design?
MODE
STACKSPEEDDUPLXSTATMASTRRPSSYST
1 2 3 4 5 6 7 8 9 10 11 12
1X
2X
11X
12X
13 14 15 16 17 18 19 20 21 22 23 24
13X
14X
23X
24X
Catalyst 3750 SERIES
1 2L3 Switch
MODE
STACKSPEEDDUPLXSTATMASTRRPSSYST
1 2 3 4 5 6 7 8 9 10 11 12
1X
2X
11X
12X
13 14 15 16 17 18 19 20 21 22 23 24
13X
14X
23X
24X
Catalyst 3750 SERIES
1 2L3 Switch
dot1qx4, 8x7 **
dot1qx4, 8x7
dot1q8x7**, Not x4
NAC Server
8x7
x7
NAC Managerx2
HSRP split brain in 8x7 so must carry on port channel
between core switches
** Consider removing 8x7 from one uplink? And if no HA for NAC Server could remove it from port
channel as well
Still best practice for x4
Core A Core B
1st Floor Access Switch
HA Core 1st floor users – NAC Shown
x4 8x7
Access port in 1 VLAN or the other
MODE
STACKSPEEDDUPLXSTATMASTRRPSSYST
1 2 3 4 5 6 7 8 9 10 11 12
1X
2X
11X
12X
13 14 15 16 17 18 19 20 21 22 23 24
13X
14X
23X
24X
Catalyst 3750 SERIES
1 2L2 Switch
e0e1
Q1.8: In the diagram above, is the placement of the NAC Server and NAC Manager optimized from an HA perspective? How could this design be improved?
December 1st, 2008 NAC Lab Procedures

79
Access port in 1 VLAN or the other
x4 8x7
Access port in 1 VLAN or the other
MODE
STACKSPEEDDUPLXSTATMASTRRPSSYST
1 2 3 4 5 6 7 8 9 10 11 12
1X
2X
11X
12X
13 14 15 16 17 18 19 20 21 22 23 24
13X
14X
23X
24X
Catalyst 3750 SERIES
1 2L2 Switch
MODE
STACKSPEEDDUPLXSTATMASTRRPSSYST
1 2 3 4 5 6 7 8 9 10 11 12
1X
2X
11X
12X
13 14 15 16 17 18 19 20 21 22 23 24
13X
14X
23X
24X
Catalyst 3750 SERIES
1 2L3 Switch
MODE
STACKSPEEDDUPLXSTATMASTRRPSSYST
1 2 3 4 5 6 7 8 9 10 11 12
1X
2X
11X
12X
13 14 15 16 17 18 19 20 21 22 23 24
13X
14X
23X
24X
Catalyst 3750 SERIES
1 2L3 Switch
dot1qx4
dot1qx4, 8x7
dot1q
not x4, not 2x4 and 8x7,9x7 not needed (no redundant CAS)
NAC Server
dot1
q 8x
7,9x
7
dot1
q x7
,2x7
NAC Manager
x2
2x4
9x7
MODE
STACKSPEEDDUPLXSTATMASTRRPSSYST
1 2 3 4 5 6 7 8 9 10 11 12
1X
2X
11X
12X
13 14 15 16 17 18 19 20 21 22 23 24
13X
14X
23X
24X
Catalyst 3750 SERIES
1 2L2 Switch
dot1qdot1q2x4, 9x7
Must have trunks to NAC Server now
and multiple mappings 8x7-x7
and 9x7-2x7
1st Floor Access Switch
2nd Floor Access Switch
Core A Core B
Future Complex NAC – 2 floors of Users
2x4
e0e1
Assuming Acme completes the 2nd phase of their future expansion plans and adds the 2nd floor switch and users as depicted above: Q1.9: How many VLANs were added and why? Is there one missing on the picture? Q1.10: If the same user logs on to the network on both the 1st and 2nd floor, what will his Auth and Access VLANs be? Would there be a way to have him in the same Access VLAN on either floor?
December 1st, 2008 NAC Lab Procedures

80
Challenge Exercise After you add the switch, click refresh to see if the NAC Manager moves the port to the Auth VLAN 8x7. If it has not done so, return to UserPC1 and ping 192.168.3.10 –t from the command prompt to generate a continuous ping. This should change gig0/2 to the Auth VLAN. If a CAM table entry is already present, pinging will not change the state because the ping did not cause a CAM table change. Observe the vlan for interface gig0/2. If it is vlan 8x7, the ping successfully moved the interface to the untrusted vlan. If it is still in vlan x4, issue a shut and no shut for interface gig0/2 to generate a TRAP. Port bounce shown:
Streaming ping stops on UserPC1:
December 1st, 2008 NAC Lab Procedures

81
A page refresh on the NAC Manager shows the move to 8x7 on port gig0/2:
Now move gig0/2 from 8x7 back to x4 in the NAC Manager and click Update. Observe what occurs:
December 1st, 2008 NAC Lab Procedures

82
Notice that each time you try to move the port to the Trusted VLAN that the NAC Manager, via SNMP, will move it back to the Untrusted VLAN as soon as the switch CAM table changes.
Now you have a clear understanding of when/why a managed port is moved between the Auth and Access VLANs. Common Issues/Gotchas
1. Always remember to use caution during the initial configuration of the NAC Server to ensure that the untrusted interface is not connected to the network. This could result in spanning-tree issues until the configuration is complete.
2. The NAC Manager cannot be on the NAC Server’s trusted VLAN. Therefore always setup a VLAN “further” in the intranet for the NAC Manager.
3. NAC Server doesn’t auto negotiate a trunk port. Remember you’ll need to hard code the dot1q trunking on the switch port, if require are trunking to the NAC Server.
4. As a safety precaution, set the native VLAN on the trunk ports going to the NAC Server to non-existent (and different) VLANs.
5. If using FQDN for the NAC appliances and using signed certificates make sure that DNS is not broken for the authenticating users using the NAC Agent. (For example, when programming the Discovery Host on the NAC Manager and using a server name instead of IP address.)
6. Always remember to create the default login page. 7. Remember to ensure that the customer’s switches are on the supported switch list! 8. In larger networks or busy network, increase the snmp timeout under the
advanced snmp receivers section of the NAC Manager GUI.
December 1st, 2008 NAC Lab Procedures

83
December 1st, 2008 NAC Lab Procedures
9. Confirm domain login is complete and working without NAC before testing Windows SSO.
10. Ensure NTP is being used on the NAC Server and that its time is within 5 minutes of what the user’s PC and the AD server is. This is important for Kerberos.
11. Ensure that the DNS resolution from NAC Server for AD Server’s FQDN works. Use a separate Management VLAN as a best practice


![IBM Tivoli Directory Server 5.2 ª© ¥Î¤áºÝ Readmepublib.boulder.ibm.com/tividd/td/IBMDS/IDSCreadme... · C {í Client SDK t z v LDAP {í]LDAP 2 3 u πC NAC yÑ Client SDK ]Σ](https://img.dokumen.tips/doc/110x75/5fc00e5ac20e676211323bdc/ibm-tivoli-directory-server-52-c-client-sdk-t-z-v-ldap-ldap.jpg)
![PLMWorld Teamcenter Security.ppt [Read-Only] Security Services supports a distributed LDAP environment ... fIntegrates Teamcenter rich clients “under” the commercial SSO session](https://img.dokumen.tips/doc/110x75/5ad11a587f8b9a71028ea4c8/plmworld-teamcenter-read-only-security-services-supports-a-distributed-ldap-environment.jpg)