Embed Size (px)
Citation preview

You can download our latest manual here:www.nexigo.com
User Manual-N930AF
Thank you for choosing the NexiGo N930AF Webcam! You are now part of an exclusive club: the NexiGo family! It’s our job to make sure you enjoy your membership. If you have any problems please contact us at [email protected] at any time for further assistance. Alternatively, solutions to common problems can be found in the FAQ section at the end of this manual. This webcam is covered by our generous 1-year manufacturers warranty. Please visit www.nexigo.com for full warranty information.
From all of us here at NexiGo, we want to welcome you again to the family. We thank you deeply for your trust and your business, and we know you'll love it here. We look forward to serving you again in the near future.
Yours SincerelyThe NexiGo Team
Brand: NexiGoWebsite: www.nexigo.comManufacturer: Nexight INCEmail: [email protected]: +1(458) 215-6088Address: 11075 SW 11th St, Beaverton, OR 97005, US
What's in the box
1 x Full HD Webcam2 x Privacy Cover1 x User Manual
Welcome To The NexiGo Family!

1. HD Lens2. Noise Reduction Microphone3. Power Indicator4. Flexible Clip/base5. Tripod Attachment
Video resolution
Sensor
Field of view
Image focus
Application support
1920x1080@30fps, 1280x720@30fps, 640x480@30fps
1/2.7 inch 2.0 Megapixel CMOS image sensor
H=65 degrees
11.81 inches +
Chat software: Skype, FaceTime, Zoom, Yahoo!, Messenger, HangoutStreaming software: Open Broadcaster Software and XsplitPhoto or video: Using System Camera App (Camera for windows, Photo Booth for MAC OS)
• Internet connection• USB 2.0/USB 3.0 Port
• OS X 10.7+
• Microsoft Windows XP/7/8/10System requirements
Auto FocusFocus type
• Chrome OS

1. Place/Position your webcam
2. Connect the webcam to your computer using the USB cable
Note: Make sure you are connected to your network before starting the setup.Note: If you can not use the camera within other apps, you will need to enable access.• In Windows: Select Settings>Privacy>Camera, turn on allow apps to access your camera.• On Mac: Select Apple menu>System Preferences>Security & Privacy>Privacy>Camera, and select which apps you want to use the camera.If you still have trouble connecting the Webcam, please refer to FAQ sections starting from Page 5.
Setting Up Your Webcam
3a. View your camera: WindowsWindows users can use the Camera app, which is pre-installed with the OS. To get to the Camera program type camera in the search bar at the bottom of the screen and press enter.

4. Video calling requirements(1) A computer with speakers (or a headset), a webcam and a microphone;(2) Install video-calling application such as Skype, FaceTime, Yahoo!, Messenger, Zoom, Hangout. As well as a USB camera and video calling applications (both callers need);(3) Confirm that the person you want to speak with also has the necessary hardware and the same program installed.
3b. View your camera: MacMac users can use the Photo Booth app, which is pre-installed with the OS.This will allow you to preview the camera images, capture still frames, and video clips.To begin, select the Finder button, click Applications, and start Photo Booth.
Alternately, go to the start menu button at the bottom right corner of the screen and left click it. Scroll through the list of programs there until you get to the "C" section, Camera will be listed there.To see an image from the camera in the app, you may need to select the camerafrom the list of other camera devices.At the top right or left of your screen click the cycle camera icon (the arrow chasing itself one, not the gear) in the app menu, and keep switching until you get to the NexiGo.
Alternately, click the search button in your menu bar, type photo booth, and press return.To see an image from the camera in Photo Booth, you may need to select the camerafrom the list of attached devices in the app.At the top of your screen, click Camera in the app menu, and select the Full HD camerafrom the list of options.
Note: Focus AdjustmentManual focus webcams: Depending on the distance between you and the webcam thevideo signal from the webcam may not be in focus. You can spin the focus ring to adjustthe lens focal length.Auto-focus webcams: Wave your hand in front of the camera, the webcam will automatically adjust the focus to the clearest state.
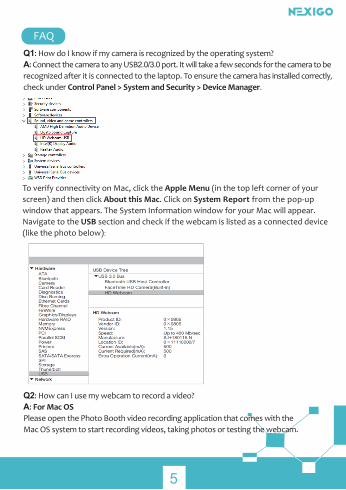
To verify connectivity on Mac, click the Apple Menu (in the top left corner of your screen) and then click About this Mac. Click on System Report from the pop-up window that appears. The System Information window for your Mac will appear. Navigate to the USB section and check if the webcam is listed as a connected device (like the photo below):
Q2: How can I use my webcam to record a video?A: For Mac OSPlease open the Photo Booth video recording application that comes with the Mac OS system to start recording videos, taking photos or testing the webcam.
Q1: How do I know if my camera is recognized by the operating system?A: Connect the camera to any USB2.0/3.0 port. It will take a few seconds for the camera to be recognized after it is connected to the laptop. To ensure the camera has installed correctly, check under Control Panel > System and Security > Device Manager.

Q3: What is the video recording frame-rate?A: The NexiGo Webcam captures crystal clear images and can record up to 1080p/ 30fps video in a well-lit environment. This can be affected by low bandwidth availability or low light levels, which can drop the frame rate down to 20 fps or lower.
Q4: Why my NexiGo webcam cannot record any sound? Why do I hear echoes during
video calls?A: In Windows: Go to Control Panel > Sound. Select the NexiGo webcam as the default communication device for playback and recording.
There are three primary icon buttons of the Photo Booth: "continuously take four photos", "take a photo" and "video recording". In photo mode the middle button acts as a shutter button, press it to take a photograph. In video capture mode, press it to start recording and press it again to stop recording.
For Windows 8/10 System:Search "Camera" in the search bar of the "Start" menu and click the "Camera" application to preview, record a video and test the camera. If you need to record a better quality video, you can download and install the AMCap video recording program (download address: https://amcap.en.softonic.com/).If you have more than one webcam installed, or if the image does not appear immediately, open the "Devices" menu in AMCap and select "Full HD Webcam" from the list. At the same time, make sure to select the microphone "USB Live Camera Audio". The video signal of the webcam will be displayed on the AMCap screen. Please do not open multiple AMCap interfaces, this may distort the video or audio.
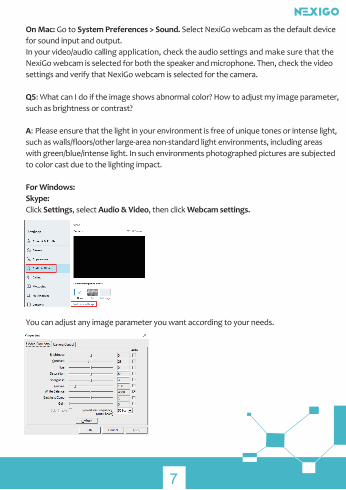
On Mac: Go to System Preferences > Sound. Select NexiGo webcam as the default device for sound input and output.In your video/audio calling application, check the audio settings and make sure that theNexiGo webcam is selected for both the speaker and microphone. Then, check the video settings and verify that NexiGo webcam is selected for the camera.
Q5: What can I do if the image shows abnormal color? How to adjust my image parameter, such as brightness or contrast?
A: Please ensure that the light in your environment is free of unique tones or intense light, such as walls/floors/other large-area non-standard light environments, including areas with green/blue/intense light. In such environments photographed pictures are subjected to color cast due to the lighting impact.
For Windows:Skype:Click Settings, select Audio & Video, then click Webcam settings.
You can adjust any image parameter you want according to your needs.
8
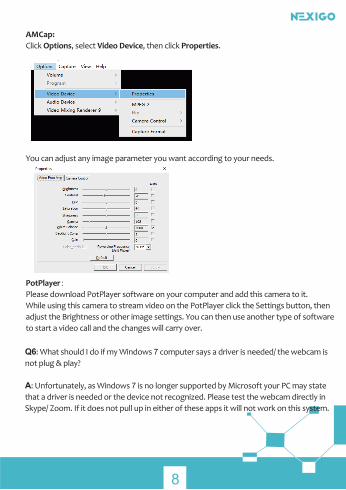
AMCap: Click Options, select Video Device, then click Properties.
You can adjust any image parameter you want according to your needs.
PotPlayer:Please download PotPlayer software on your computer and add this camera to it.While using this camera to stream video on the PotPlayer click the Settings button, then adjust the Brightness or other image settings. You can then use another type of software to start a video call and the changes will carry over.
Q6: What should I do if my Windows 7 computer says a driver is needed/ the webcam is not plug & play?
A: Unfortunately, as Windows 7 is no longer supported by Microsoft your PC may state that a driver is needed or the device not recognized. Please test the webcam directly in Skype/ Zoom. If it does not pull up in either of these apps it will not work on this system.
9
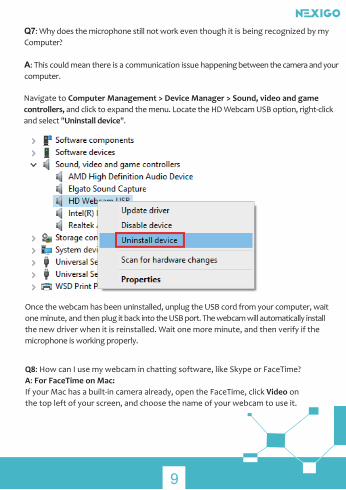
Navigate to Computer Management > Device Manager > Sound, video and game controllers, and click to expand the menu. Locate the HD Webcam USB option, right-clickand select "Uninstall device".
Once the webcam has been uninstalled, unplug the USB cord from your computer, wait one minute, and then plug it back into the USB port. The webcam will automatically install the new driver when it is reinstalled. Wait one more minute, and then verify if the microphone is working properly.
Q8: How can I use my webcam in chatting software, like Skype or FaceTime?A: For FaceTime on Mac: If your Mac has a built-in camera already, open the FaceTime, click Video on the top left of your screen, and choose the name of your webcam to use it.
Q7: Why does the microphone still not work even though it is being recognized by myComputer?
A: This could mean there is a communication issue happening between the camera and yourcomputer.

10
For Skype on Mac:
Before running Skype, please make sure that all other applications using the webcam are closed. Failure to do so may mean that Skype will not recognize the webcam. It is also highly recommended to update Skype to the latest version as this can affect the connection as well. Once you have started it select Preferences from the Skype menu in the top left corner of your screen (like the photo below).

11
In the Audio/ Video tab, select the name of your webcam in the Camera drop down menu.
For Skype on Windows 10:
Step 1. In the Skype for Business main window, click the arrow next to the Options button ,
and select Tools > Audio Device Settings.
12
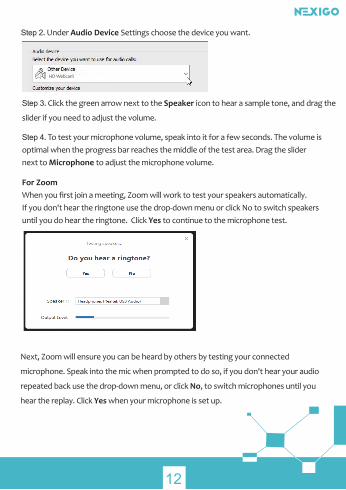
Step 2. Under Audio Device Settings choose the device you want.
HD Webcam
Step 3. Click the green arrow next to the Speaker icon to hear a sample tone, and drag the
slider if you need to adjust the volume.
Step 4. To test your microphone volume, speak into it for a few seconds. The volume is optimal when the progress bar reaches the middle of the test area. Drag the slider next to Microphone to adjust the microphone volume.
For ZoomWhen you first join a meeting, Zoom will work to test your speakers automatically. If you don't hear the ringtone use the drop-down menu or click No to switch speakers until you do hear the ringtone. Click Yes to continue to the microphone test.
Next, Zoom will ensure you can be heard by others by testing your connected
microphone. Speak into the mic when prompted to do so, if you don't hear your audio
repeated back use the drop-down menu, or click No, to switch microphones until you
hear the replay. Click Yes when your microphone is set up.

13
HD Webcam
Q9: Why is my video not in 1080p in my video calling application?
A: Check the video output settings in your video capture software, these may be set to
a lower capture format. There are various constraints on the system that could impede
the ability to attain a 1080p video calling session. They center around processing power
(i.e. CPU speed) and available network bandwidth. In all cases, review the requirements
from the video calling application. They will guide as to the system performance required
as well as the necessary bandwidth.
Click Join with Computer Audio to finish testing and join the meeting.
HD Webcam

14
For manual focus webcams please gently rotate the lens ring until it clear.
For autofocus webcams please wave your hand in front of the webcam, it will adjust the
focus automatically.
Q10: Why is there flickering or banding on the video feed when I use the webcam?
A: This might be due to lighting inconsistencies in your room. To resolve this, open the
video control panel on your video capture software and change the frequency response
rate to either 50Hz or 60Hz, depending on your region.
The camera defaults to indoor mode. Please do not aim the camera at the light source
directly.
Q11: Does my webcam support the Linux Operating System?
A: Linux is supported if your Linux distro has UVC drive-free protocols. Otherwise, you
will have to install Linux UVC drivers manually.
Q12: Why does my screen go blank or black while trying to preview images?
A: There are several reasons this could happen;
1. There is something wrong with the USB port. Please change to a different USB port
or another PC and test the camera again.
2. The PC does not recognize the camera device.
3. The operating system and computer configuration do not satisfy the requirements
of the camera.
4. The video preview feature of the application is not turned on, or the privacy feature
prohibits access to the camera.
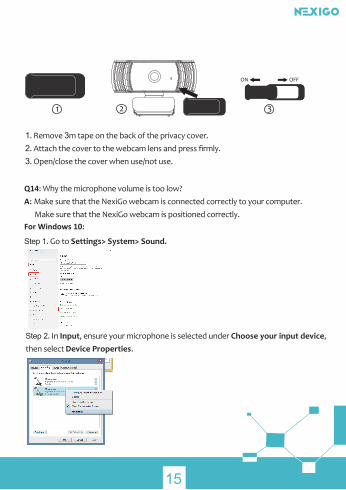
Q13: How to use the webcam privacy shutter?
15
1. Remove 3m tape on the back of the privacy cover.2. Attach the cover to the webcam lens and press firmly.3. Open/close the cover when use/not use.
ON OFF
Q14: Why the microphone volume is too low?A: Make sure that the NexiGo webcam is connected correctly to your computer. Make sure that the NexiGo webcam is positioned correctly.For Windows 10:
Step 1. Go to Settings> System> Sound.
Step 2. In Input, ensure your microphone is selected under Choose your input device, then select Device Properties.

16
Step 3. On the Levels tab of the Microphone Properties window, adjust the Microphone and Microphone Boost sliders as needed, then select OK.
Step 4. Speak into your microphone and check under Test your microphone to make sure your settings work.
Q15: How to turn off the function of auto focus?
Step 1. Go to Camera app.Step 2. Go to Settings, turn on the "Pro mode" switch.
A: For Windows
Step 3. On left side there are two options. One for brightness, one for focus.Step 4. Set your camera in the spot you wish for it to be.Step 5. Manually focus your camera for where you will be sitting or whatever you are working on is focused. Step 6. Exit camera app and open any video chat app you want to use.