Embed Size (px)
Citation preview

MyCourses Tutorial A User Guide for Tutors using
Educational Technology to Enhance Case-Based Learning

Table of Contents I. OVERVIEW OF MYCOURSES TUTORIAL ................................................................................................. 3
What is MyCourses Tutorial? ................................................................................................................... 3 Who Can Use MyCourses Tutorial? ......................................................................................................... 3 Why Should I Use MyCourses Tutorial? .................................................................................................. 4 How Can I Implement MyCourses Tutorial Into my Tutorial Sessions?.................................................. 4
II. GETTING STARTED: ACCESSING AND VIEWING MYCOURSES TUTORIAL ......................................... 6 What Is My Login and Password for MyCourses? ................................................................................... 6 What If I Don’t Have an eCommons Username and Password? .............................................................. 6 What If I Have Forgotten My eCommons Password? .............................................................................. 7 How “Computer Savvy” Do I Need to Be in Order to Use MyCourses Tutorial?.................................... 7 A Few Additional Handy Hints ................................................................................................................ 7 How Do I Log On and Set Up MyCourses Tutorial?................................................................................ 9 How Do I Access and Log on to the MyCourses Web Portal Site?.......................................................... 9 What Will I See on the MyCourses “My Portal” Page? ........................................................................... 9 How Do I View MyCourses Tutorial from “My Portal” Page?.............................................................. 11 What functions are available to view? .................................................................................................... 12
III. CUSTOMIZING TUTORIAL CONTENT ................................................................................................. 14 A) Adding Reminders and Notes ............................................................................................................ 14
Create a new note: .............................................................................................................................. 14 B) Viewing and Uploading Tutorial Resources to MyCourses Tutorial................................................. 16
Viewing Tutorial Resources on MyCourses Tutorial: ........................................................................ 16 Viewing the Full List of All Tutorial Resources: ................................................................................ 16 Uploading Tutorial Resources to MyCourses Tutorial....................................................................... 18 Adding Private Tutorial Resources..................................................................................................... 19 Editing an Already-Posted Tutorial Resource .................................................................................... 23
C) Sending Email Messages to Tutorial Group Members ...................................................................... 26 Create a new message: ....................................................................................................................... 26
D) Tracking Student Attendance............................................................................................................. 27 Viewing Attendance: ........................................................................................................................... 27 Recording Attendance for the tutorial ................................................................................................ 28 Viewing an Attendance Summary ....................................................................................................... 29
X. FREQUENTLY ASKED QUESTIONS (FAQ)............................................................................................ 30 APPENDIX A: PROFILE OF THE HMS CENTER FOR EDUCATION TECHNOLOGY .................................. 32
How Can the Center Help Faculty and Support Teaching? .................................................................... 32

I. Overview of MyCourses Tutorial
What is MyCourses Tutorial?
MyCourses Tutorial is an enhancement to the MyCourses web application allowing Harvard Medical School (HMS) tutor faculty and their students access to educational and administrative web resources that complement and support the Medical School’s case based learning environment. Using this tool, you may fully customize access to a library of on-line resources for your tutorial group, visually support and control the delivery tempo of evidence-based medicine principles into your case discussion process, and streamline tutorial administration tasks.
Combined with the application enhancement, tutorial facilities in the Tosteson Medical Education Center (TMEC) have been outfitted with fifty inch wall-mounted high resolution plasma displays. These will be used to project tutorial materials such as digital media, images, related web links etc…
Created by the HMS Educational Technology team, MyCourses Tutorial revolutionizes the educational environment for faculty, students and staff. The release of the MyCourses web portal, MyCourses Tutorial, and advanced graphical display in the TMEC positions HMS as the first medical school to implement a leading-edge e-Learning tool to fully support its medical education curriculum.
For course directors and administrators, tutor faculty and students, the MyCourses Tutorial enhancement enables you to:
• View tutorial specific notes and reminders. • View course wide and common tutorial resources. • Upload and view private tutorial resources (hand-outs, images, video clips, related web links,
etc.) • Review key points from a digitized lecture. • Systematically step through case materials at your group’s pace. • Record and review Tutorial Attendance
Who Can Use MyCourses Tutorial?
MyCourses Tutorial can be used by faculty, staff and students involved in the HMS education program, such as:
• Course Directors—Course Directors can use MyCourses Tutorial to communicate course information and tasks with tutorial faculty and students.
• Course Managers The MyCourses Tutorial is an ideal administrative and management tool for course managers to customize the flow of course information, communication, create tutor/student groups, and post common tutorial resources.
• Tutors— Tutors can use MyCourses Tutorial to keep track of tutorial-related attendance, quickly and easily generate reminders and notes and post private resources to the tutorial group. MyCourses Tutorial allows tutors extensive search capabilities across all courses for resources, images and links that could be used for tutorial or research materials. Customizing the MyCourses Tutorial page enables tutors to create links to favorite websites that support their clinical, educational and case research activities.
User Guide_Tutorial.doc 10/15/2002 3
• HMS students—With MyCourses Tutorial, students can easily access common and private tutorial resources, download hand-outs, view images and video clips, and notes. Students can enhance the learning process by access to an extensive search engine that searches both within

the MyCourses site, as well as many external sites (i.e., PubMed, OMIM and the Merck Manual).
Why Should I Use MyCourses Tutorial?
MyCourses Tutorial offers several benefits that enhance and streamline the case based educational environment at HMS. The MyCourses Tutorial is easy to learn and navigate—the short amount of time invested up front to explore the MyCourses Tutorial will provide benefits, such as:
• Access to teaching tools that strengthen the case based medical education process—MyCourses Tutorial allows tutors to post a variety of articles, notes, images, case studies and video-clips that support both the case and the teaching environments. The opportunity to use multi-media tools opens the door for tutors to explore creative, leading-edge options in which to challenge and guide students through the tutorial process.
• Increased ease of communication with students and faculty—Changes to tutorial events, venues as well as simple reminders can be easily posted on one web page.
• Reduced time completing repeated administrative tasks—MyCourses Tutorial enables course managers and administrators to upload all common tutorial resources—including case pages—to all tutorial groups. This will eliminate the amount of time spent printing, copying, assembling and distributing paper packages to students. Students will also benefit by not having to track down and photocopy articles nor will they need to store and carry many paper resources throughout their tutorial.
• Tutorial information can be standardized and kept in one location—The dissemination of tutorial resources to students can become consistent and easily retrieved. Both students and faculty will have a “one-stop” location for uploading and downloading a range of tutorial resources, greatly reducing the time spent tracking down, copying and distributing tutorial materials.
How Can I Implement MyCourses Tutorial Into my Tutorial Sessions?
To discuss how to best implement MyCourses Tutorial into your tutorial sessions, please contact the Course Manager in the Office of Educational Resources:
Core HMS Courses: (617) 432-0905.
Non-Core (Electives): (617) 432-1994
User Guide_Tutorial.doc 10/15/2002 4
Because some users may utilize different MyCourses Tutorial features, we have created a quick look-up chart (Figure 1.1) that summarizes the key functions by user. You may refer to this chart when deciding which features of the tutorial application are priorities for you to learn and use.

Figure 1.1: MyCourses Tutorial Function Chart by User Group
User Guide_Tutorial.doc 10/15/2002 5
Function Course Director
Tutors/ Tutor Subst. Students Course Manager
Viewing MyCourses Tutorial
Posting Common Tutorial Resources
Creating Tutorial Notes
Sending Email Messages
Viewing Attendance Records
Viewing tutorial materials (hand-outs, images, web sites, video clips
Recording Tutorial Attendance
Editing and creating private tutorial resources
Customizing MyCourses Tutorial web page

II. Getting Started: Accessing and Viewing MyCourses Tutorial Using the MyCourses Tutorial is straightforward, with only a few key technical and user requirements. Each tutorial room in the Medical Education Center has been outfitted with fifty inch wall-mounted high resolution plasma displays. The display and wireless keyboard /mouse will be powered on and ready for use. You will need to possess an eCommons password and be able to log into MyCourses using the eCommons credentials in order to access the MyCourses Tutorial.
What Is My Login and Password for MyCourses?
Accessing MyCourses requires a user name and a password. To login onto MyCourses, you will use your eCommons username and password. This same username and password will allow you to log on to both eCommons and MyCourses Tutorial.
What If I Don’t Have an eCommons Username and Password?
If you don’t have an eCommons username, you’ll need to register and activate your eCommons account.
To register for an eCommons account, click on or type in the following URL:
https://ecommons.med.harvard.edu/registration/index.html
You should see the following eCommons registration web page open on your screen:
Figure 2.1: eCommons Registration
Follow the prompts to complete the 5-step eCommons registration process. To successfully complete the registration process, you will require:
• A Harvard ID issued by the Medical or Dental School or Harvard School of Public Health Or • A valid e-mail address from the Harvard Medical or Dental School, or an affiliated
institution. (Step 2 of the eCommons registration process for non-Harvard ID users lists affiliated institutions)
User Guide_Tutorial.doc 10/15/2002 6
If you have neither a Harvard ID nor a valid email address from the Harvard Medical or Dental school or one of the affiliated institutions, you should contact the Center for Educational Technology (CET) office

at 617-432-1994. If you don’t know your Harvard or affiliated user e-mail address, contact the CET helpdesk at: 617-432-1994
What If I Have Forgotten My eCommons Password?
If you have an eCommons account and you know your username…but have forgotten your password, you simply need to reset your eCommons account to obtain your password.
To reset your password, click on or type in the following URL:
https://ecommons.med.harvard.edu/reset_pass/start.html
You should see the following eCommons password reset web page open up on your screen:
Figure 2.2: eCommons Password Reset
Follow the prompts, according to initial registration on eCommons (i.e., I have a Harvard ID or am a registered affiliate user).
If you have a Harvard ID, the screen will ask you to submit your ID number. The following screen will ask you the “secret question” you created during the original eCommons registration process. Answer the question correctly and your password will be provided to you via email.
If you are an affiliated user, the screen will ask you to submit your Harvard or affiliated email address (use the same address you entered during the original eCommons registrations process). The following screen will ask you the “secret question” you created during the original eCommons registration process. Answer the question correctly and your password will be provided to you via email.
How “Computer Savvy” Do I Need to Be in Order to Use MyCourses Tutorial?
MyCourses Tutorial uses a basic “point and click” technique to open its applications and functions. To activate a menu option, simply point your arrow cursor to the underlined words that describe what you want to do. Once your arrow is over the desired area, the cursor will become a pointing hand icon. Click once and your selected option will open its web page.
To type on a web page (for example, typing in a password or file name) simply take your arrow and position it over the desired white text box. Once your arrow is over the desired area, the cursor will become an “I” symbol. Click on the text box and then begin typing.
A Few Additional Handy Hints
User Guide_Tutorial.doc 10/15/2002 7
• Don’t forget that you can scroll up and down your web page with scroll bar on the far right side of the screen. If your web page contains a lot of information, chances are it will be “longer”

than the length of your computer screen. In this case, you will see the scroll bar on the far right side of your web page. You can use the up and down arrows on the bar to scroll up and down the page.
• Once you have the MyCourses site open and you are logged in, you can use the “forward” and “back” buttons to move between web pages you have opened. As illustrated in Figure 2.3, you can use a variety of other commands—i.e., “stop”, “print”, “refresh” to the stop the download of the web page, print the page or re-download the web page. Simply point your arrow cursor on the command you wish to execute and click once with your mouse.
Figure 2.3: Web Page Commands
• Before you begin uploading and downloading resources to and from the MyCourses site, you
may wish to ensure that you are comfortable with your computer’s document filing system (i.e., in which Windows folders do you typically store your course related materials?). If you wish to upload a course file to the “Resources” section of MyCourses Tutorial, you’ll need to know in which folder that file is located.
• Your MyCourses portal page (see Figure 2.5) will be the page from which you can launch MyCourses Tutorial application. Once you are logged onto MyCourses, your “My Portal” page will open. Each time you wish to start a new application, you can return to this page by clicking on the My Portal button, on the left end of the horizontal tool bar, near the top of your MyCourses window.
User Guide_Tutorial.doc 10/15/2002 8
To increase your comfort level with using the MyCourses web site portal and the “point and click” technology, you should first “play around” with the Sample course provided to each user on the MyCourses portal page. The Sample course is listed on the MyCourses portal page (after you log in) as SAMPLE under the “Course List” section or on the navigation bar on the left side of the screen. All courses that you are registered to access are listed on this bar.

How Do I Log On and Set Up MyCourses Tutorial?
Now that you know how the MyCourses Tutorial can enhance the medical education environment, you’re ready to start using the site. First, you need to know how to access and log onto the MyCourses site, understand how to navigate to your MyCourses Tutorial page, and load your tutorial information.
How Do I Access and Log on to the MyCourses Web Portal Site?
To access the MyCourses web site, type the following URL unto your browser’s address box: http://MyCourses.med.harvard.edu/
You should see the MyCourses Login screen open (Figure 2.4), prompting you to enter your user name and password. Remember, your MyCourses user name and password will be the same as your eCommons user name and password. Please refer to Section II of this user guide for instructions on how to obtain your eCommons username and password.
Type in your user name and password and click the Submit button to enter the site. Figure 2.4 MyCourses Login Prompts
What Will I See on the MyCourses “My Portal” Page?
Once you have logged onto the MyCourses web portal, your MyCourses portal page will open.
If you are a tutor faculty you will see a MyCourses portal page screen similar to Figure 3.2. On this portal page, you will have several menu options:
• Announcements—a listing of any course or HMS-related announcements sent to faculty members.
• Tasks—a listing of course tasks to be completed (e.g., student evaluations). • Applications- Here you can access the different MyCourses and other web applications. • Did You Know? - Check here to find out about new features, why they are useful, and how to
use them. • Events—a listing of any faculty events (meetings, lectures, etc) related to your courses or your
own personal calendar. • Course List—a listing of all courses to which you have been assigned by the course manager
or course director. • Links—a listing of all HMS and related web site links. • Search- Use this search feature to find items inside or outside of MyCourses
User Guide_Tutorial.doc 10/15/2002 9
On the top horizontal navigation bar, you have links to your:

• MyPortal—your MyCourses portal page. • Calendar- Find course events in a calendar format. • Links—a listing of all HMS and related web site links. • Search—a listing of medical and general interest web search engines. • Help- Click here for general MyCourses help.
On the left vertical navigation bar, you have links to your:
• Course List—Here you can add and remove courses from your course list. (Note: If you are not enrolled in the selected course you will be restricted from certain information at the discretion of the Course Director.)
• Listing of courses—in Figure 2.5 the user is assigned to one course—the “Sample” course. Figure 2.5: Example of Faculty User Portal Page
User Guide_Tutorial.doc 10/15/2002 10

How Do I View MyCourses Tutorial from “My Portal” Page?
As a Tutor, you can view any course you add to your MyCourses portal page. However, you can only view tutorial(s) or make changes to tutorial(s) for which you have been granted editing rights.
To view a tutorial on your MyCourses Portal page:
• Click once on the course button on the left sidebar to extend the drop down menu. (See Figure 2.6).
• Click on the Tutorials button to enter Tutorial.
Figure 2.6: Tutorial “People” page (default start page).
User Guide_Tutorial.doc 10/15/2002 11

What functions are available to view?
Here are some of the functions available in Tutorial:
• Notes: Here you will find notes Tutors have written about cases or discussions from the Tutorial.. See figure 2.7.
Figure 2.7: Notes.
• Tutorial Resources: You can find common tutorial resources for the course or private resources the Tutor can upload specific to his or her group. See Figure 2.8.
Figure 2.8: Tutorial Resources.
User Guide_Tutorial.doc 10/15/2002 12

Students have the ability to email the entire tutorial group, specific people, and/or tutors without leaving the MyCourses Portal. Recipients will be emailed to their regular email account and the sender will get a copy in his or her email account as well. See figure 2.9.
Figure 2.9: Email.
• Forum Here students can post messages anonymously specific to his or her tutorial group. See Figure 2.10.
Figure 2.10: Forum
User Guide_Tutorial.doc 10/15/2002 13

III. Customizing Tutorial Content Since you are connected to the MyCourses Tutorial and are now familiar with the MyCourses portal page, you are ready to try the Tutorials different features. This section will outline how to communicate with students, view, upload, edit and download information, content and resource files on MyCourses Tutorial. You will receive step-by-step instructions on how to use:
• Notes • Common and Private resources—viewing, uploading, editing and downloading course
materials • Email • Attendance
To access this functionality, go to the MyCourses “Portal Page” and click on the Tutorial’s respective Course from the “Course List” portal object. Once you are in the “Course Editor” for the course, click on the Tutorials link under the “Content” list. The next page will list the tutorial groups for the selected course that you have access to (unless you are only assigned to one, in which case that tutorial will automatically open). Click on the tutorial you wish to edit.
A) Adding Reminders and Notes
The default page when entering a tutorial is always the “Notes” tab (See Figure 3.1). Here, you can easily add reminders and notes to Tutorial.
Create a new note:
Enter a note title and text for the note. Click the save button.
Edit a note:
User Guide_Tutorial.doc 10/15/2002 14
Select the note from the option menu. The title and text will appear. Edit the text and click Save.

Figure 3.1: Tutorial Editor Default Page
Displaying Notes:
The notes you save will be displayed in Tutorial as follows: Figure 3.2 Note Displayed in Tutorial
User Guide_Tutorial.doc 10/15/2002 15

B) Viewing and Uploading Tutorial Resources to MyCourses Tutorial
MyCourses structures resource into one of three types: Course Resources, Common Tutorial Resources, or Private Tutorial Resources. Within each type there are categories such as hand-out, image files, etc.); Course Resources can be viewed by any MyCourses user—students, faculty and staff.
Common Tutorial Resources can also be viewed by any MyCourses user within the tutorial. In general, only course directors and their course managers/administrators can upload common tutorial and general course resources to MyCourses.
Private Tutorial Resources can be view only by those assigned to a tutorial group. Only Tutor faculty can upload private tutorial resources to a tutorial.
Each resource posted on the MyCourses site is copyrighted. When you post a resource you are automatically cited as the originator of the resource—this cannot be deleted. You may also enter additional information describing where you obtained the resource, if you were the person who created it. Copyright information can only be edited by the person who originally edited the resource. You can also choose your audience to view the resource—i.e., only the students enrolled in your course or all users of MyCourses Tutorial.
Viewing Tutorial Resources on MyCourses Tutorial: Students and faculty can view tutorial resources from within the Tutorial page in two different ways:
• You can open a full list of all tutorial resources by type (hand-out, lecture notes, image files, etc.); or,
• You can view resources graphically on a moveable surface.
Viewing the Full List of All Tutorial Resources: • On your MyCourses Tutorial portal page, click “Tutorial Resources” (See Figure 3.3)
User Guide_Tutorial.doc 10/15/2002 16
• You will see a list of the different resource categories and the number of resources files/category available for that tutorial. If you know what category of resource you’re looking for, click once on that resource category. If you don’t know what category you need, open the All Resources category to view all files for that course.

Figure 3.3: Tutorial Resources by Category
User Guide_Tutorial.doc 10/15/2002 17

• A page with the list of resources for that category will open. Some may have resource descriptions, while some may just have the resource title entered. Once you identify which file you would like to view, click once on the file title.
• To open and view a resource, simply click on the file title and the file will open. Once your desired file has opened, you can read, print or e-mail the file. There is also a graphical layout. To view files as place able graphics click “Graphical Layout” located on the right of the page.
If you encounter difficulties with opening, printing or e-mailing the file, please contact the HMS e-Computing Helpdesk at: 617-432-1994.
Uploading Tutorial Resources to MyCourses Tutorial
• From your MyCourses portal/portal page, click on the CourseEditor link located on your “Applications” portal object. Select to which course you are going to add the tutorial resource by clicking once on the course title.
• Click once on Tutorial option under the “Content” menu. • Select the Tutorial from the list.
User Guide_Tutorial.doc 10/15/2002 18
• The “Edit Tutorial” page will open (Figure 3.1). Click once on the Resources tab near the top of the page.

Figure 3.5: Edit a Tutorial Resource
• The “Resources Display” page (Figure 3.5) will open:
Show: Displays selected types of Tutorial Resources, common, private, or both common and private. Select a Resource category from the list below: Displays each category of Resource within the selected type. Click the Category to display a listing of that type or All Resources to display a complete listing. Click here to add a private Resource to this Tutorial: Click to open the Add a private Resource page. Show through: Set a time and date to display Resources to the Tutorial Group. Use this to control the display tempo with time sensitive tutorial materials. Example: There two images you would like to display. Image 1 is to be shown during the morning tutorial session at 9:00 a.m. and image 2 after a discussion of a possible prognosis. The discussion will end at 10:15 AM on 1/1/2002. Set the “Show Through” time and date to 10:15 a.m. on 1/1/2002. This action will suppress all tutorial resources from view through the time indicated.
Adding Private Tutorial Resources • After clicking the Add a Private Resource to this tutorial link the Add page will open asking
you to provide information on when the resource should be shown (i.e., viewing dates) and for which event (tutorial)
• If there is no specific event for your tutorial resource, simply choose the Course-wide—no specific event option in the “Event” box. If you are uploading the resource for a specific tutorial event then scroll down the “Event” box until you locate the desired date and event title. Click on this event title. Note: You can add more than one resource file to an event.
User Guide_Tutorial.doc 10/15/2002 19
• You will also need to select a title, resource category and a brief description of the resource.

• If the image is part of a collection (see Section VIII on the MyCourses User Guide) then select the This is part of a larger Collection of Resources option under the “Usage” section of the screen. If you plan on adding more than 20 files to a collection, you may wish to contact the HMS e-Computing department at 617 –432-1994 to assist with the upload.
• You will also have the option of adding the document to the ResourceBank (which will make it a searchable document, able to be retrieved by other HMS MyCourses Tutorial users outside of your course), or you will be able to restrict viewing of the resource only to students enrolled in the course.
Figure 3.6: Add a Tutorial Resource
• Once you have entered your viewing dates, resource category, title, description and viewing options, you need to upload the resource file.
User Guide_Tutorial.doc 10/15/2002 20
• To upload the file, scroll down the open “Add a Resource” page to the “Choose a Resource” section (Figure 3.7)

Figure 3.7: Choose a Resource
Your course resources to upload can be one of the following:
• A web site address • A local, electronic file from your computer • A file retrieved from the ResourceBank. The ResourceBank is a Harvard Medical School
repository of thousands of images, audio and video clips, online textbooks, journal articles, and other multimedia files that you can add to your courses. The content in the ResourceBank comes from the Program in Medical Education as well as from individual Faculty members.
If your resource to be uploaded is a web site:
• Click on the Web Address text box (i.e., the white text box that has http:// typed in). • Type in your web address. For example, if you are adding the Yahoo portal page as a resource,
then your web address would read: http://www.yahoo.com • Click once on the Save button.
If your resource to be uploaded is a local file from your computer:
• Click on the Browse button to locate the desired file from your computer’s filing system. After you have successfully selected your file, the textbox should be populated with a reference to the file you have chosen. Example: C:\myfiles\myfirsthandout.doc
• In the Source of File box, type in the name of the individual that provided the original file for upload. If the source is left blank, MyCourses Tutorial will display "none given" next to the source field.
• Click once on the Save button. If your resource needs to be searched on the ResourceBank:
• If you do not have the resource file to be uploaded saved to your computer, you may need to search the ResourceBank to locate the file.
• To search on ResourceBank, type in a file title or keyword, then click on Find (Figure 3.7). For our example, we typed in the keyword “Liver”.
Note: We were looking for an image file, so before we did our keyword search on the ResourceBank, we entered our “Resource Category” as an “Image File”
User Guide_Tutorial.doc 10/15/2002 21
• If there are image files that contain the keyword in the title and/or file description, a listing of those files will be shown on the “ResourceBank Search Results” screen. (Figure 3.8)

Figure 3.8: ResourceBank Search Results
• If you locate your desired file in the search results, click once on the “Select” option to select that resource. In our example, our first search hit, “acetaminophen toxicity” will be selected.
• Once the file is selected, the “Add a Tutorial Resource” page will re-open and contain the selected file to be uploaded, plus the relevant file title, description and source of resource. See Figure 3.9 for an example.
• You will still need to complete the event and range of viewing dates for the resource file.
User Guide_Tutorial.doc 10/15/2002 22
• Once you are finished, click once on the Save button to upload the resource file to your course.

Figure 3.9: Uploading a ResourceBank File to Your Course
Editing an Already-Posted Tutorial Resource • From your MyCourses portal page, click on the CourseEditor link located on Applications
portal object. Select to which course you are going to edit the resource by clicking once on the course title.
• Click once on the Tutorial option under the “Content” menu. • The “Edit Tutorial” page will open (Figure 3.5). Click once on the Resources tab near the top
of the page. • Select the proper Resource Category for your soon-to-be-edited resource file (i.e., hand-out,
image file, etc.). If you don’t know the resource category your file is under, scroll down to the end of the category list and select “All Resources”.
User Guide_Tutorial.doc 10/15/2002 23

Figure 3.10: Uploading a ResourceBank File to Your Course
• The next “Edit a Resource” page (Figure 3.10) will open, listing all tutorial resources posted for
that category type. Each resource will have the title, student viewing dates and times, description, resource, poster and file source noted.
• Once you have located the resource file you wish to edit, click once on the file title. NOTE: You may only edit private tutorial resources that you have created.
User Guide_Tutorial.doc 10/15/2002 24
• The resource detail page will open (Figure 3.11) and allow you to edit any resource details (i.e., viewing dates, event, title, description, audience options and resource file.

Figure 3.11: Editing a Posted Tutorial Resource File
• When you are finished editing the posted tutorial resource file, click once on Save.
User Guide_Tutorial.doc 10/15/2002 25
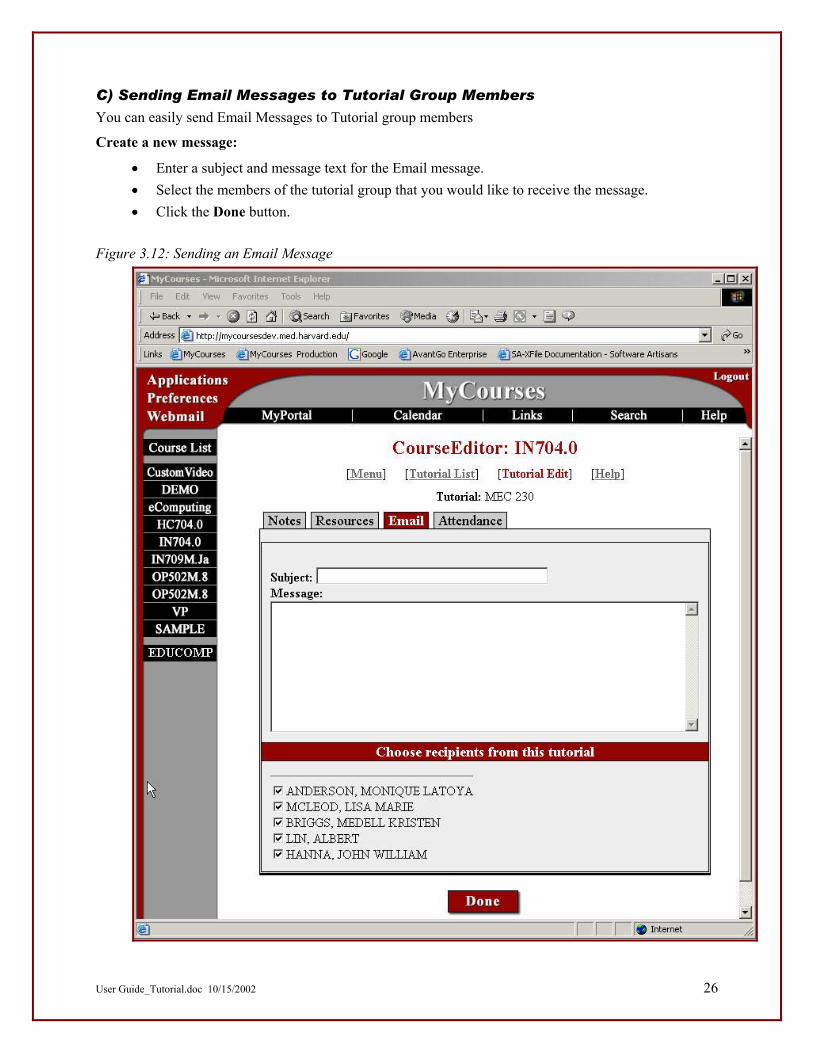
C) Sending Email Messages to Tutorial Group Members
You can easily send Email Messages to Tutorial group members
Create a new message:
• Enter a subject and message text for the Email message. • Select the members of the tutorial group that you would like to receive the message. • Click the Done button.
Figure 3.12: Sending an Email Message
User Guide_Tutorial.doc 10/15/2002 26
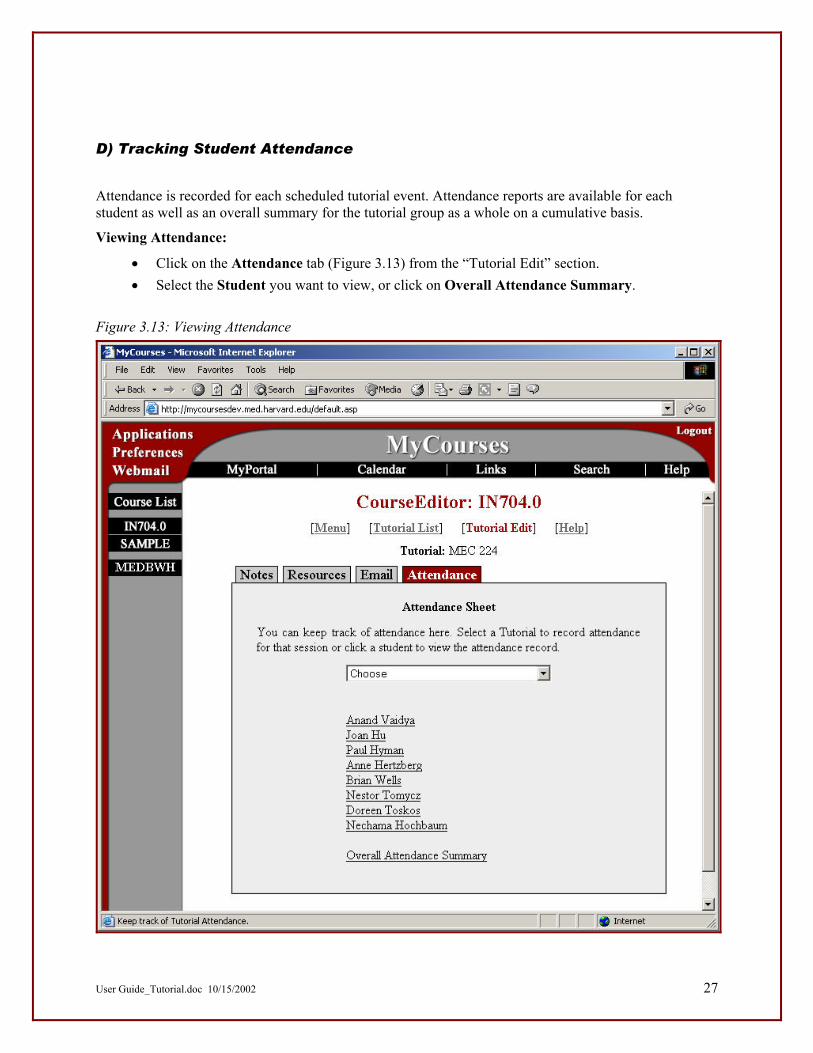
D) Tracking Student Attendance
Attendance is recorded for each scheduled tutorial event. Attendance reports are available for each student as well as an overall summary for the tutorial group as a whole on a cumulative basis.
Viewing Attendance:
• Click on the Attendance tab (Figure 3.13) from the “Tutorial Edit” section. • Select the Student you want to view, or click on Overall Attendance Summary.
Figure 3.13: Viewing Attendance
User Guide_Tutorial.doc 10/15/2002 27

Recording Attendance for the tutorial • Select the tutorial event from the drop-down menu by clicking it. A list of students will be
displayed.
• Click the appropriate status column labeled Present, Absent with Permission, or Absent. Click Store to save the results.
IMPORTANT
Tutorial attendance records must be stored by the tutor for each tutorial event for meaningful reporting.
Viewing Attendance for the Student: Click the Student's Name. A window will appear displaying the values for each tutorial event with check marks. The percent of "in attendance" is given at the bottom of the page.
User Guide_Tutorial.doc 10/15/2002 28
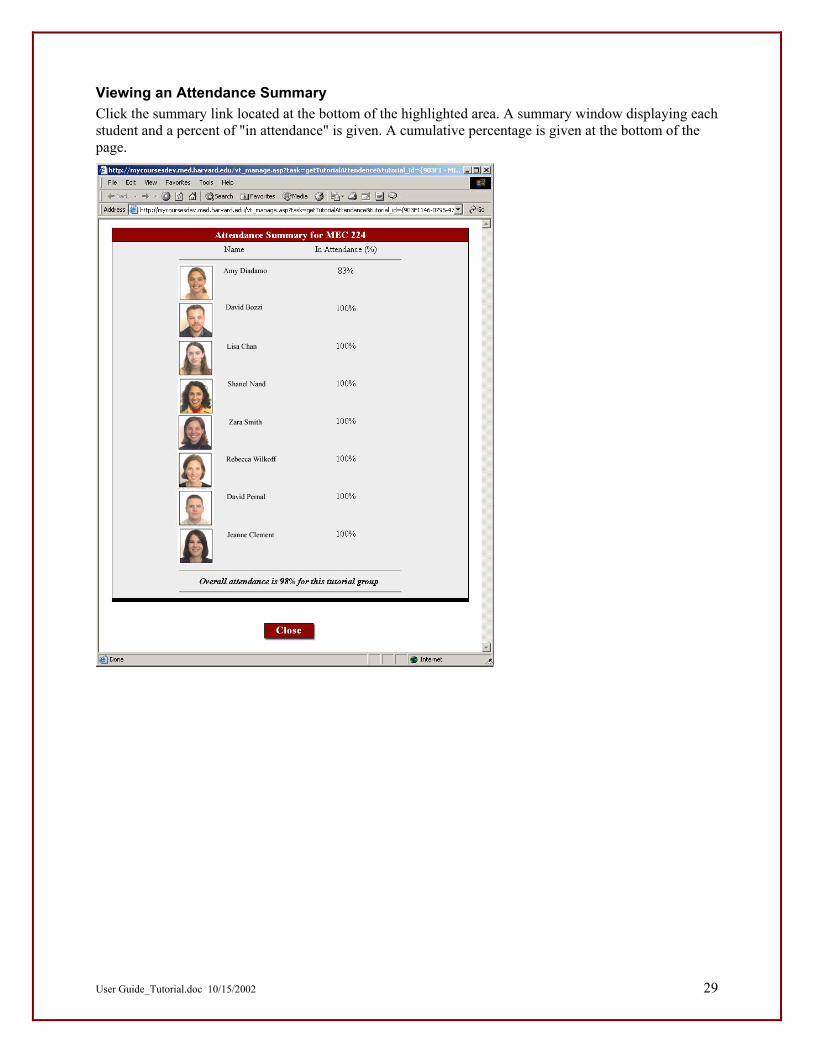
Viewing an Attendance Summary Click the summary link located at the bottom of the highlighted area. A summary window displaying each student and a percent of "in attendance" is given. A cumulative percentage is given at the bottom of the page.
User Guide_Tutorial.doc 10/15/2002 29

X. Frequently Asked Questions (FAQ)
Q: Help! My MyCourses password doesn’t work or I have forgotten my password!
A: If your MyCourses password does not work, first check to see that you have typed in your MyCourses username and password correctly by carefully re-logging onto MyCourses. If your login attempts are still not successful, you may need to re-set your MyCourses password. To do this, click on the attached link to take you to the eCommons password re-set page https://ecommons.med.harvard.edu/reset_pass/start.html and follow the instructions in Section II of this guide to re-set your password.
If your new password still does not allow you to log onto MyCourses, contact the helpdesk at 617- 432-1994.
Q: I want to post a common tutorial resource. I have tried to follow the instructions in this guide, but my MyCourses site doesn’t let me access the screens and commands necessary to post common resources! What can I do to post my resource to all tutorial groups in the course?
A: In order to effectively manage course content posted to the MyCourses site, we typically recommend that only the course manager or course director have the full course editing rights, which includes posting course announcements, events, and common tutorial resources.
Tutors may post notes and reminders, and private tutorial resources to assigned tutorial groups
If you are a tutor and would like to post an event, announcement or common tutorial resource, you should contact your course manager or course director; he/she can post your event for you, as well as attach any relevant course materials to MyCourses. If appropriate, your course manager/course administrator can provide you with editing rights that allow you to post future course events and announcements. (For an explanation of “editing rights”, please refer to Section III of this guide).
If you are a course director, course manager or course administrator and are encountering problems posting events and announcements, you may not have the correct editing rights set up for your course. Please contact the helpdesk at 617-432-1994.
Q: How often will the MyCourses change its layout, add features, etc.?
A: The HMS Center for Educational Technology (CET) modifies and adds features to the MyCourses format on an on-going basis. Users of MyCourses Tutorial provide invaluable input and ideas for simplifying and enhancing existing MyCourses Tutorial features, as well as identifying new requirements and offerings. To provide input and suggestions on MyCourses Tutorial, you can contact the CET by email, by:
–
–
–
–
Clicking on the “Info” button at the top right corner of your MyCourses Tutorial page
Click on the “Feedback” option listed near the top of the page.
An email form will open. You can select an email subject, type in your email address and type in your message in the “Description” text box.
To send the email to the CET, simply click on the “Send” button. Your message will be sent to all members of the CET team.
As the CET team issues a new release for MyCourses Tutorial, all users will be notified well in advance and updated user guides will be provided to MyCourses Tutorial users.
User Guide_Tutorial.doc 10/15/2002 30
Q: Can I access additional training in order to effectively use MyCourses Tutorial?
User Guide_Tutorial.doc 10/15/2002 31
A: Yes! Throughout the year, the CET offers MyCourses Tutorial training sessions for interested users. General MyCourses Tutorial training sessions are typically scheduled on Friday mornings and last approximately 2 hours. In the future, the CET may tailor training sessions to provide in-depth training for specific MyCourses Tutorial applications (e.g. TestBuilder, SurveyBuilder, CollectionBuilder, etc.). Please contact the CET if you have questions on training sessions offered, dates, or suggestions for future MyCourses Tutorial training topics. The CET can be contacted via email, as outlined above, or, by phone at 617-432-1994.

Appendix A: Profile of the HMS Center for Education Technology The Center for Educational Technology at Harvard Medical School provides HMS faculty with a state-of-the-art facility for the development of instructional programs and resources that support learning in medicine. The Center is open to all faculty who teach in Harvard Medical School courses and programs. Featuring a full range of digital services and equipment, educational technology expertise and technical support staff, the Center also administers a grant program for new initiatives within the HMS curriculum.
A direct outgrowth of the Dean's IT initiative in educational technology, the Center's primary purpose is to support faculty interested in 'rethinking' the way medical education is delivered through the use of innovative technologies.
How Can the Center Help Faculty and Support Teaching?
The Center offers teaching faculty access to high-end equipment, technical assistance and, in some cases, financial support to develop innovative programs for use in basic science courses and clinical clerkships.
The Center's strategy is to utilize web and wireless technologies in development projects to ensure ubiquitous access to resources by a mobile student and faculty body. The following equipment and services will be available to teaching faculty at the Center:
• MyCourses support. General technical support for incorporating the MyCourses web framework into HMS courses and programs.
• Radiographic Scanning Services. Equipment is available for high-speed digitization of radiographic films, and easy storage, retrieval and posting of images to MyCourses websites.
• Digital Microscopy. Digital Camera/microscope provides the capability of scanning glass slides and storing the images in a way that makes editing and annotating easy. Files can then be posted to the MyCourses website.
• Kodachrome slide scanning. Equipment provides for bulk scanning of Kodachrome slides, and easy storage, retrieval, annotating, and posting to the MyCourses website.
• Text scanning. Handouts, articles and other resources can be scanned and posted to the MyCourses website.
• Video editing services. Equipment and services to convert and edit video sources to streaming video format, uploadable to the MyCourses website.
All new programs and applications developed under the auspices of the Center will be delivered via the MyCourses educational portal, ensuring that students and faculty can quickly find the information they need at the moment they need it.
User Guide_Tutorial.doc 10/15/2002 32
Faculty are welcome to visit the new facility, located at Vanderbilt Hall, weekdays (excepting holidays) from 8 A.M. to 5 P.M. If you have any questions about the MyCourses site, need assistance posting course materials and videos, building image collections, or have general feedback about MyCourses Tutorial, please contact the Center for Educational Technology at 617-432-1994 or visit the CET website at http://ecomputing.med.harvard.edu
User Guide_Tutorial.doc 10/15/2002 33
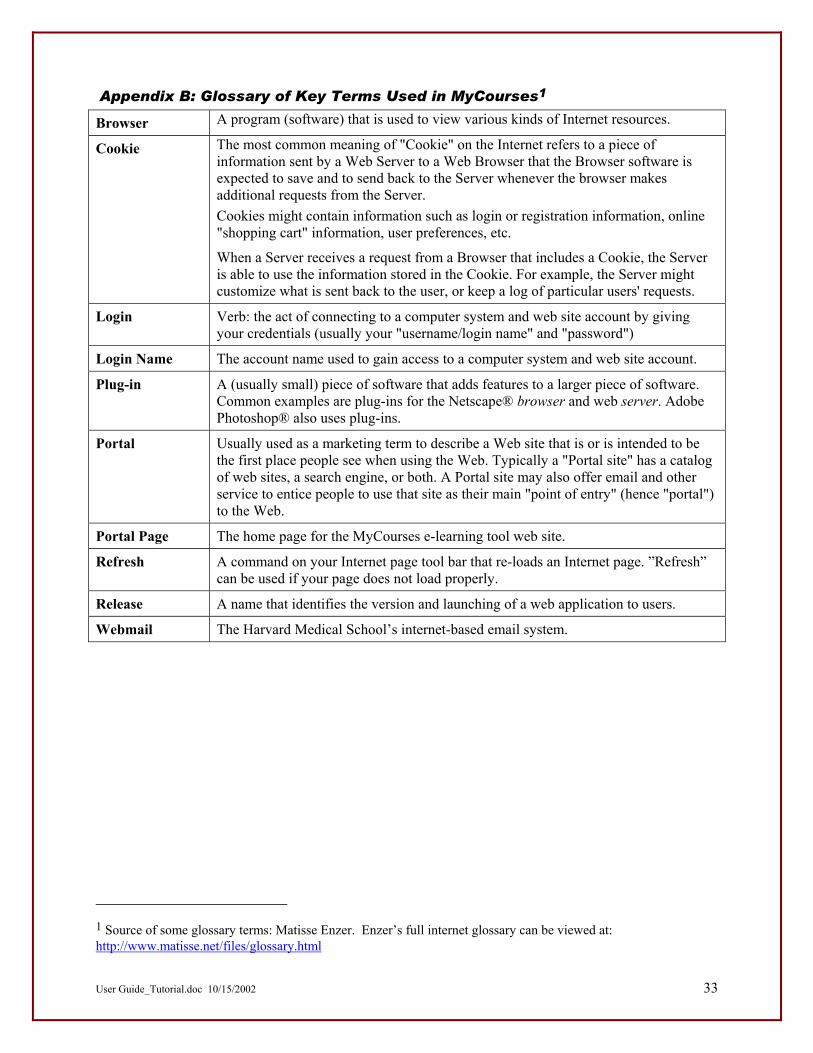
Appendix B: Glossary of Key Terms Used in MyCourses1
Browser A program (software) that is used to view various kinds of Internet resources.
Cookie The most common meaning of "Cookie" on the Internet refers to a piece of information sent by a Web Server to a Web Browser that the Browser software is expected to save and to send back to the Server whenever the browser makes additional requests from the Server. Cookies might contain information such as login or registration information, online "shopping cart" information, user preferences, etc.
When a Server receives a request from a Browser that includes a Cookie, the Server is able to use the information stored in the Cookie. For example, the Server might customize what is sent back to the user, or keep a log of particular users' requests.
Login Verb: the act of connecting to a computer system and web site account by giving your credentials (usually your "username/login name" and "password")
Login Name The account name used to gain access to a computer system and web site account.
Plug-in A (usually small) piece of software that adds features to a larger piece of software. Common examples are plug-ins for the Netscape® browser and web server. Adobe Photoshop® also uses plug-ins.
Portal Usually used as a marketing term to describe a Web site that is or is intended to be the first place people see when using the Web. Typically a "Portal site" has a catalog of web sites, a search engine, or both. A Portal site may also offer email and other service to entice people to use that site as their main "point of entry" (hence "portal") to the Web.
Portal Page The home page for the MyCourses e-learning tool web site.
Refresh A command on your Internet page tool bar that re-loads an Internet page. ”Refresh” can be used if your page does not load properly.
Release A name that identifies the version and launching of a web application to users.
Webmail The Harvard Medical School’s internet-based email system.
1 Source of some glossary terms: Matisse Enzer. Enzer’s full internet glossary can be viewed at: http://www.matisse.net/files/glossary.html