Embed Size (px)
Citation preview

My insulin pump workbook

Insulin Pump Workbook
Welcome.Welcome to insulin pump therapy and to the Animas® family!
At Animas Canada, we are committed to making your transition to pump therapy as easy
as possible.
You may have chosen pump therapy for tighter control, to decrease the occurrence and/
or severity of high and low blood glucose (BG), or to help you live a more active and flexible
lifestyle. Whatever the reason, having a sound knowledge base about pump therapy can
help you be successful in your personal goals. This workbook was designed to enhance your
understanding of the basics of pump therapy, as well as your Animas® pump.
In addition to this workbook, you will have support from your healthcare professional.
If you need to contact Animas Canada Customer Care, please call us at 1-866-406-4844.
For technical assistance 24/7, please call Animas Pump Support at 1-877-937-7867.
Good Luck!
This workbook uses various conventions (styles):
Test Your Knowledge - exercises for material covered in that section
Animas® Pump Pointer - special info and tips about pumping

Insulin Pump Workbook 1Insulin Pump Workbook
TABLE OF CONTENTS Section 1: Introduction to Pumping ................................................................................................................. 2
Great Expectations ....................................................................................................................................... 2
Pre-Pump Topics .......................................................................................................................................... 3
What Pumpers Should Know ...................................................................................................................... 3
Pump Therapy Overview ............................................................................................................................. 4
Basal Rate Details ........................................................................................................................................ 7
Bolus Dose Details ...................................................................................................................................... 9
Counting Carbohydrates ........................................................................................................................... 15
Fibre & Sugar Alcohols .............................................................................................................................. 18
Protein and Fat ........................................................................................................................................... 18
Alcohol ........................................................................................................................................................ 19
Glycemic Index ............................................................................................................................................. 19
Section 2: Starting on Insulin .......................................................................................................................... 21
Getting Ready for Your Pump Start ........................................................................................................... 22
Pump Start Doses ........................................................................................................................................ 23
Infusion Site Selection and Care ................................................................................................................. 24
Choosing the Right Infusion Set ................................................................................................................ 26
Quick Steps for Preparing Your Insulin Pump ............................................................................................ 27
Troubleshooting High Blood Glucose ....................................................................................................... 28
Low Blood Glucose ..................................................................................................................................... 31
Handling Sick Days ...................................................................................................................................... 33
Physical Activity ............................................................................................................................................ 35
Record Keeping ............................................................................................................................................ 38
Wearing the Pump ...................................................................................................................................... 40
Section 3: Advanced Pumping Features and Topics .................................................................................... 41
ezCarb .......................................................................................................................................................... 42
ezBG .............................................................................................................................................................. 43
Insulin on Board (IOB) ................................................................................................................................. 44
Combo Bolus .............................................................................................................................................. 45
Temporary Basal Rates ................................................................................................................................ 47
Multiple Basal Programs ............................................................................................................................. 47
Time Off the Pump ..................................................................................................................................... 47
Section 4: The First Few Weeks to Months .................................................................................................. 49
Fine-tuning Basal Rates ............................................................................................................................... 49
Fine-tuning Bolus Dose Formulas ............................................................................................................. 55
Section 5: Continuous Glucose Monitoring .................................................................................................. 60
Appendices:
1: Insulin Details ......................................................................................................................................... 63
2: Infection Prevention .............................................................................................................................. 64
3: The Pumper’s Kit .................................................................................................................................... 65
4: Travelling With an Insulin Pump ............................................................................................................. 66
5: Pump Travel Letter .................................................................................................................................. 68
6: Getting Started with Diasend® Software ............................................................................................ 69
7: Pump Flowsheets ................................................................................................................................. 70
8: Answers to Test Your Knowledge Questions ...................................................................................... 74

2 Insulin Pump Workbook Insulin Pump Workbook 3
PRE-PUMP TOPICSIt is important to have a good understanding of pump therapy before you start pumping! This section includes a brief overview of important topics to help your pump training go more smoothly.
Topics covered in this section include:
•WhatPumpersShouldKnow •PumpTherapyOverview •BasalRateDetails •BolusDoseDetails •CountingCarbohydrates
WHAT PUMPERS SHOULD KNOWIt is very important that you are comfortable with the mechanics of your pump and that you have a basic understanding of diabetes management before you start pumping. Even if you have had diabetes for many years, you will need to learn some new information before you begin pump therapy, including:
c Theory of basal/bolus insulin therapy
c Insulin action: onset, peak and duration
c Carbohydrate counting
c Self-monitoring blood glucose (SMBG): how often, when
c What causes high BG
c What causes low BG
c Treating high BG
c Treating low BG
c Ketones: what they are and when to check for them
c Managing BG for sick days
c Managing BG for changes in activity
c Detailed record keeping
c Inserting an infusion set c Programming/using your insulin pump
Whoa! Quite a list! Don’t let the list overwhelm you. Starting pump therapy is a process. We’re here to provide you with the information you need to be a successful pumper. Even if you know a great deal about diabetes management, you will still need to learn how to apply your knowledge specifically to pump therapy. For example, although you have been treating high BG while on injections , you will need to adjust this plan once you begin pumping. Use your time with your trainer, along with this workbook, to prepare yourself for successful pump therapy.
To Do Now:
Go to the list of topics above. Put a check mark in front of the topics you are familiar with.
Make sure you discuss this list with your diabetes educator and/or pump trainer before you begin pump therapy.
SECTION 1: INTRODUCTION TO PUMPINGGREAT EXPECTATIONSThis section will cover realistic expectations about pump therapy and help you to define your own personal goals.
You have probably heard a lot about pump therapy from your physician, diabetes educator, other pumpers and the Internet. With all this information, it may be helpful to think about your personal goals for pump therapy before you begin your training.
Take a minute to do the following activity. Place a check mark in front of the statements below that you believe apply to starting pump therapy:
c 1. I will probably feel better on a pump than on injections.
c 2. I won’t have to carry diabetes “stuff” anymore.
c 3. I will have more flexibility with my meal schedule.
c 4. I can eat whatever I want.
c 5. I won’t have to check my blood glucose (BG) as frequently since the pump will
keep my BG stable.
c 6. I will be “fine-tuned” within a week of starting.
c 7. I will have better BG management.
c 8. Now that I have my pump, I should be pumping any day now.
c 9. I won’t have the highs and lows like I did on injections.
c 10. It will take several weeks to months to adjust to pump therapy.
If you checked numbers 1, 3, 7 and 10, you have reasonable expectations of pump therapy. If you checked numbers 2, 4, 5, 6, 8 and 9, you should have further discussions with your physician, diabetes educator and/or pump trainer before getting started.
It is a good idea to review your goals, concerns and/or questions with your diabetes educator and/or pump trainer so they can provide proper support.
To Do Now:
List:
2 goals I hope to achieve by pumping:
1. ___________________________________________________________________
2. ___________________________________________________________________
Concerns about starting on a pump:_____________________________________________________________________
_____________________________________________________________________
General questions about pump therapy:_____________________________________________________________________
_____________________________________________________________________

4 Insulin Pump Workbook Insulin Pump Workbook 5
Bolus InsulinYou will need to bolus when you eat and when your BG is higher than your target. There are two main types of bolus doses: carbohydrate boluses and BG boluses (correction boluses).
Carbohydrate Bolus: The type of bolus you take when you eat or drink foods with carbs. The ezCarb feature on your Animas® pump will help you calculate the amount of insulin needed to cover the carbs.
BG Bolus (Correction Bolus): The type of bolus you take when you need to correct a high BG. The ezBG feature on your Animas® pump will help you calculate the amount of insulin to correct a high BG.
See the sections, Basal Rate Details and Bolus Dose Details on pages 7 - 14 for more information on these topics.
Day-To-Day Life With an Insulin PumpYour schedule on a pump may be different than it was on injections. After the initial period of getting used to your pump and adjusting your doses (which may take several weeks to months), most people feel that being on a pump is much easier than taking injections. Pumping helps put you in control of your diabetes and gives you greater flexibility in your life.
The comparison below shows the typical routines of people with type 1 and type 2 diabetes who are on injection therapy versus people on pumps.
Typical Routines on Injections:
Type 1 diabetes Type 2 diabetes
2-5 injections/day 1-4 injections/day, oral medications
Scheduled meals/snacks Scheduled meals/snacks
Planned exercise Planned exercise
Checking BG 2-6 times each day Checking BG 1-4 times each day
Typical Routine on a Pump: Inserting the infusion set every 2-3 days
Meals and snacks (when and if you want to eat with precise insulin dosing)
Spontaneous exercise/activity
Checking BG 4-8 times each day
PUMP THERAPY OVERVIEWInsulin pumps contain a cartridge filled with rapid-acting insulin. They have a screen and buttons for programming the pump’s internal computer and a precise motor that pushes insulin from the cartridge through tubing and an infusion set into your body. An infusion set delivers insulin just beneath the skin through a small flexible tube called a cannula. Tubing connects the cartridge to the infusion set. To meet the individual needs and preferences of pumpers, infusion sets come in a variety of cannula and tubing lengths.
Animas® pumps only use rapid-acting insulin. The most common types of rapid-acting insulin used in Animas® pumps are: NovoRapid®, Humalog® and Apidra®.
Rapid-acting insulin:
•Startsworkingwithin10-15minutesafteryouinjectinsulin.
•Peaks(orworksitshardest)about1-1½hoursafteryouinject.
•Stopsworkingaround3-5hoursafteryouinject. This is referred to as the duration of insulin action.
The times noted above are approximate and may differ in individuals.
See Appendix 1 for more information on insulin.
Your pump delivers insulin two ways:
Basal InsulinYour body needs a small amount of insulin continually throughout the day. When on a pump, basal insulin takes the place of long-acting insulin. When set correctly, your basal rates should maintain even BG levels between meals and overnight. This is what a healthy pancreas does.
Initially, your healthcare professional will estimate how much basal insulin you need. Your basal rate(s) will most likely need to be adjusted once you start pumping. Most people need different amounts of basal insulin at different times of the day to accommodate their individual needs.
Once your basal rates are programmed into your pump, your pump will deliver the same amount of insulin day after day, until you change the rate(s).
Basal: the small amount of insulin delivered continually throughout the day and night. This is called your Basal Rate(s).
Bolus: the extra insulin you deliver when you eat carbohydrates or need to correct a high BG.

6 Insulin Pump Workbook Insulin Pump Workbook 7
BASAL RATE DETAILSYour insulin pump automatically releases small, precise amounts of insulin (as small as 0.025 units per hour). This is called a basal rate of insulin. The basal rate of insulin is adjusted to keep the BG level steady between meals and during sleep, as well as assisting other important body functions, such as compensating for fluctuations in hormone levels. Basal insulin is often referred to as background insulin.
Even though the pump delivers basal insulin every three minutes, the basal rate is always stated as an hourly rate - in other words, how much you get over one hour. When you first start on the pump, you may only have one basal rate throughout the day. You can change this hourly rate multiple times per day to meet your changing basal needs. For example, your body may need more insulin in the early morning to compensate for dawn phenomenon. (Dawn phenomenon is a condition which causes a sudden rise in BG levels in early morning hours due to hormones.) Once your basal rate(s) is programmed into the pump and the program is active, it will repeat the same pattern day after day without any further input from you - unless you need to change it to improve your control. (See Fine Tuning Basal Rates on Page 49.)
Basal ProgramsYour Animas® pump provides you with the option of setting multiple basal rate programs to help meet your insulin needs for different situations. This option will need to be activated in the Advanced Setup screen 2.
Using different basal programs is an advanced feature. For now, we just want you to understand what it means when you see the programs in your pump and to know this feature is available to you in the future.
Temporary Basal RateYour Animas® pump allows you to temporarily override your active basal program by using the Temporary Basal Rate feature. This is useful when you need to increase or decrease your active basal delivery for short-term situations such as sick days or activity.
Using multiple Basal Programs and Temporary Basal Rates are
advanced pumping topics and will be covered in more detail in
the section on Advanced Features (page 41).
Basal Rates Summarized: •ABasalProgramisa24hoursetofbasalrates.
•Youcanchoosefrom1to12differentratesstartingatdifferenttimesofthedayto
accommodate your changing insulin needs. (These different rates are called segments in
the pump.)
•Youcancustomize4differentbasalprograms.
•Only1BasalProgramcanbeactive(orrunning)atatime.
•ATemporaryBasalRatewilloverridetheactiveBasalProgramforachosenamountoftime.
Since a pump does not automatically deliver the bolus doses you need (you need to program them), it is important that you consider the points listed below.
All new pumpers should:
• Check BG at least 4-8 times every day
• Learn and use carbohydrate counting
• Keep detailed records including food, BG and exercise
• Learn how to adjust insulin doses for high and low BG, carbohydrate intake, exercise, sick days, etc.
• Communicate regularly with your healthcare professional
It is important to check your BG at least 4 times a day. This is necessary to keep yourself safe on a pump. See more information in the chapter, Troubleshooting High Blood Glucose on page 28. When new to pumping, you may be asked by your doctor and/or diabetes educator to check your BG 8 to 10 times per day to help you get on track quickly.
Test Your Knowledge:
1. Animas® pumps only use rapid-acting insulin.
c True c False
2. The small continuous delivery from an insulin pump is called
c Basal c Bolus
3. Rapid-acting insulin works for up to ____ hours after it is injected.
4. The insulin I take to cover my food or to correct a high BG is called
c Basal c Bolus
5. As a pump user, I should check my BG
a minimum of ___ times per day.
Answers to “Test Your Knowledge” can befound in the back of this workbook.

8 Insulin Pump Workbook Insulin Pump Workbook 9
BOLUS DOSE DETAILSYou need to calculate a bolus dose of insulin for when you eat or to correct a high BG. In general, there are two types of boluses: Carbohydrate Boluses and Blood Glucose Boluses (correction boluses). Review the bullet points below for a summary of what you should consider before you bolus.
Bolus doses are based on the following:
•Thegramsofcarbohydrateyouplantoeat
•Yourinsulin-to-carbohydrateratio(I:Cratio)
•YourBGlevel
•Yourinsulinsensitivityfactor(ISF)
•Thetimingofyourlastbolus(InsulinonBoard)
•Recentorplannedactivity
Carbohydrate BolusTo manually calculate the amount of insulin for when you eat, you will need to know your Insulin-to-Carbohydrate Ratio. This is typically written as I:C ratio, and tells you how many grams of carbohydrate 1 unit of insulin will cover. For example, if your I:C ratio is 1:15, you need to bolus 1 unit for every 15 grams of carbohydrate you plan to eat.
Here is the formula you use to calculate carbohydrate boluses:
Carbohydrate grams = # of units to bolus
X
(X is the “C” in the I:C ratio)
Sample Carbohydrate Bolus Calculation: If your I:C ratio is 1:10 and you are planning to eat 45 grams of carbohydrate for lunch, how
much would you bolus?
45 grams of carbs ÷ 10 (I:C ratio) = 4.50 units of bolus insulin
Your Animas® pump has features (ezCarb and ezBG) which will calculate a suggested bolus dose.
Of course, the accuracy of your food bolus is only as good as your carbohydrate estimate! See section Counting Carbohydrates, page 15 for help with this.
What is my Basal Rate?Your healthcare professional will determine your starting basal rate(s). Several factors will be considered, including your current insulin regimen, weight and BG levels. Your starting basal rate(s) is an estimate that will most likely need adjusting or fine-tuning once you start pumping.
Test Your Knowledge
1. Basal insulin is the small amount of insulin my body needs throughout
the day, even when I don’t eat.
c True c False
2. Listed are two activities or situations when I might want to use the temporary basal rate feature:1. ___________________________________________________________________
2. _________________________________________________________________

10 Insulin Pump Workbook Insulin Pump Workbook 11
Blood Glucose Bolus (BG Bolus - also known as “Correction Bolus”)
The purpose of the I:C ratio is to prevent your BG from rising too high after a meal. But what if your BG was out of your target range even before the meal? This is where calculating a BG bolus (correction bolus) comes in. To calculate the amount of insulin to correct a high BG, you need to know your Insulin Sensitivity Factor (ISF). This is a number that estimates how much 1 unit of insulin will lower your blood glucose. For example, if your ISF=4.0 mmol/L, then you should expect a bolus of one unit to lower your BG about 4.0 mmol/L.
Before we look more closely at the calculation, it is important to discuss BG targets.
BG Targets
A typical BG target before meals is 5.5 mmol/L. However, when you are new to pumping, or if you don’t recognize a low BG (hypoglycemia unawareness) until you are quite low (or not at all), you may be advised to aim for a higher target of 7.0 or 8.0 mmol/L. Also, if your glucose control before starting pump therapy is in a higher range, your healthcare professional or diabetes educator may advise higher targets with the goal of gradually improving your control.
Please note that BG targets will be different during pregnancy and for children.
Some healthcare professionals and/or diabetes educators may also suggest that you use a different target at different times of the day. For example, your bedtime target may be a bit higher than during the day to guard against low BG while you are sleeping. In addition, it is common to have a different (higher) target for certain situations like driving, or operating heavy machinery.
Your Animas® pump allows you to set not only a BG target, but also a target range. For example, this means that if your BG Target is set at 5.5 +/- 1.0 mmol/L, your Animas® pump will not suggest a correction (+ or -) when your BG is within 4.5 and 6.5 mmol/L. You can think of this as your “safe zone” or “buffer zone.”
When BG is above your target range (for example, >6.5 mmol/L), your Animas® pump will suggest a correction, taking in to consideration your ISF and IOB (these topics will be discussed separately later in the workbook). This also means that when your BG is below your target range (for example, <4.5 mmol/L), your Animas® pump will suggest a negative correction, taking away insulin from your suggested bolus to help prevent hypoglycemia after a meal. The screen view below shows how you can setup your own BG Target in the Setup > Advanced menu.
Check with your healthcare professional or diabetes educator for your individual target goals!
BG Target1 of 12
Done
Time:12:00A
5.5+/- 1.0
Home<<---- ---->>
mmol/Lmmol/L
Calculating a BG BolusHere is the manual formula to calculate a BG Bolus:
Current BG – Target BG = # units for BG Bolus
ISF
Sample BG Bolus Calculation (BG is above target): If your ISF is 4.0 mmol/L and your target BG is 5.5 mmol/L, how much would you bolus if your BG is 13.9 mmol/L?
(13.9 mmol/L (BG) - 5.5 mmol/L (target BG) = 8.4 mmol/L over target}
{8.4 mmol/L over target} ÷ 4.0 mmol/L (ISF) = 2.1 units of insulin to lower BG back to target
With both the carbohydrate and BG bolus, there are other details to consider before calculating your bolus. An advanced pumping feature, called Insulin on Board (IOB), can help you adjust your boluses based on the insulin still working in your body from recent boluses. See the section Insulin on Board on page 44.
Your doctor and/or diabetes educator will help you determine your initial
BG targets, I:C ratio and ISF
Test Your Knowledge:
1. I use the ISF to calculate:
a. How much insulin to take when I eat
b. How much to bolus to correct a high BG
2. I use the I:C ratio to calculate:
a. How much insulin to take when I eat
b. How much to bolus to correct a high BG
I:C ratios and ISF’s vary from person to person. They may also vary in the individual, depending on the time of day or different circumstances. For example, you might need a different ISF when you take a BG bolus before bedtime. Perhaps your usual ISF of 2.2 mmol/L works well in the daytime, but at night it always causes a low BG. In this case, using an ISF of 2.2 mmol/L in the daytime and an ISF of 2.8 mmol/L at bedtime might be the solution.
See the section on Fine-Tuning Bolus Dose Formulas pages 55-59.

12 Insulin Pump Workbook Insulin Pump Workbook 13
BOLUS CALCULATION REVIEW:
Steps to Manually Calculate a Bolus
If you are about to eat a meal or snack, determine how much carbohydrate you will
be eating and use your I:C ratio to calculate a bolus.
Calculate a correction dose using your ISF if your BG is outside your target range.
Make sure you consider the timing of your last bolus dose and adjust this amount
accordingly.
Add the two calculations together, if needed, and bolus this total amount.
(If your BG is below target, subtract the BG bolus from the food bolus to determine
the total amount to take.)
NOTE: When advanced bolus features are activated on your Animas® pump, the ezBG and ezCarb functions will calculate a suggested bolus dose based on the carbohydrates and current BG entered, taking into consideration the Insulin on Board (IOB). For more detailed information, refer to your Owner’s Booklet.
Test Your Knowledge:
It is lunch time and I need to calculate my bolus dose.
Use the following facts to do the three examples below:
Carbs Consumed: 60 grams
I:C ratio is 1:12 ISF is 3.3 mmol/L
Target range is between 4.0 mmol/L and 7.0 mmol/L and your
Target BG is 5.5 mmol/L
BG = 6.4 mmol/L
BG = 11.2 mmol/L
BG = 3.9 mmol/L
Always check with your healthcare professional for specific recommendations when calculating your ISF between meals or making “negative” corrections.
When BG Is Below TargetYou might also calculate a BG bolus if your BG is lower than target and you are planning to eat. In this case, your BG bolus might be a negative number. This number will tell you how much to reduce your carbohydrate bolus. Basically, you are taking less insulin than you would normally take for the food you are planning to eat. This is often referred to as a negative correction. See the following example.
Sample BG Bolus Calculation (BG is below target): If your ISF is 2.8 mmol/L and your target BG is 5.5 mmol/L, how much is your BG bolus if your BG is 4.5 mmol/L?
4.5 mmol/L (BG) - 5.5 mmol/L (target BG) = -1.0 (mmol/L lower than target)
-1.0 (mmol/L lower than target) ÷ 2.8 mmol/L (ISF) =- 0.36 rounded to - 0.40 units
In the above example, you would subtract 0.40 units from your carbohydrate bolus to get your bolus total. For example, if your carbohydrate bolus was 4.50 units, you would only bolus 4.10 units (4.50 minus 0.40). It is important to note that if you were not planning to eat a meal, you should consume some fast acting carbohydrate (i.e., glucose tablets) to treat the low BG. Always check with your healthcare professional for specific treatment recommendations. See the section Low Blood Glucose, “The Rule of 15” on page 31 for more information.
It is important to treat any blood sugar less than 4.0 mmol/L with fast acting carbohydrates. In other words, eat or drink 15 grams of carbohydrate right away! In this case, after treating the low BG, you would then just take your usual carbohydrate bolus for the meal.
Note: Do not add the carbs you used to treat the low BG into your calculation.
Putting It Together
After reviewing this information, you may need to use just one of these bolus formulas, or you may need to consider them together. Consider the following situations.
•YouareeatingamealandyourBGisinyourtargetrange.JustusetheI:Cratio.
•ItisseveralhoursafteramealandyourBGishigh.Ifyouarenotplanningtoeat,justuse the ISF.
•Considerwhenyoulastbolused.Isthatbolusstillworking?SeeInsulinonBoardon page 44.
•YouareabouttoeatandyourBGisoutsideyourtargetrange.UseboththeI:CratioandISF, and add (or subtract) the results.
1
2
3

14 Insulin Pump Workbook Insulin Pump Workbook 15
COUNTING CARBOHYDRATESCounting carbs is an approach that helps you determine your food bolus. When you eat, you need to count the carbs and determine a food bolus to match. This approach gives you greater flexibility because you can match your insulin to your food choices rather than match your food intake to your insulin doses! Let’s take a look at why we count carbs and review the basics.
The BasicsFood provides us with three major nutrients from which we get calories: protein, fat and carbohydrate. We also get vitamins and minerals from food, but these micronutrients do not supply calories.
Carbohydrate is the nutrient that raises BG the most and the fastest. In fact, almost all of the carbs we eat – no matter what type of carb – will end up as glucose in our bloodstream within approximately1to1½hours.Thisisaboutthetimewhentheinsulinfromyourfoodboluswillbe working the hardest (peaking). Of course, some carbs will enter the bloodstream quicker than others; for example, fruit juice will appear in minutes.
Once the carbohydrate from your meal has been converted to glucose and absorbed into your blood stream, insulin will be required in order for that glucose to be transported back out of your blood stream and into your body’s cells where it can be burned for energy.
Balancing your carb intake with the appropriate amount of bolus insulin will help keep your BG on track after eating. To accomplish this, you need to know what foods contain carbohydrate and be able to estimate how many grams of carbohydrate you are eating at each meal and snack.
Foods With Carbohydrate Many foods contain carbs. In general, you find carbs in the following:
•Starches(bread,cereal,rice,beansandpasta)andstarchyvegetables(corn, potatoes, winter squash and peas)
•Fruitandfruitjuices
•Milkandyogurt
•Sugarandfoodsmadewithsugar(candy,bakedgoods,soda,syrups,etc.)
How Many Grams Am I Eating?There are two basic methods to counting carbs:
1. Carbohydrate Gram Counting
2. Exchange Lists for Meal Planning/Carb Choices
Carb counting is the more accurate of the two methods and it fits easily with using an Insulin-to-Carbohydrate Ratio (I:C ratio) as seen on page 9. Many people, especially those already familiar with Exchange Lists, use a combination of both methods.
If you are already familiar with the the Canadian Diabetes Association’s Beyond the Basics meal planning tool, or if you have been taught basic carb counting using carbohydrate choices (carb choices), you are at an advantage. This method provides a good reference point when moving on to counting carbs. If you have never learned carb counting, Beyond the Basics is an excellent place to start.
Rely on your knowledge of the Beyond the Basics tool to estimate your carbs. When you’re eating away from home or don’t have access to food labels, use a carb counting resource book such as Calorie King’s Pocket Calorie, Fat & Carbohydrate Counter.
Now let’s practice. Fill in the table below with your I:C ratio, ISF and your BG target. Using the example below, fill out three meals/snacks and calculate the appropriate bolus dose that you will need to take.
My I:C ratio My ISF My Target BG
(Sample I:C ratio 1:15g; ISF 2.8 mmol/L;Target BG 6.7 mmol/L; Actual BG 13.9 mmol/L)
Time Qty Food/Drink Carb grams
Time Qty Food/Drink Carb grams
85 g Chicken 0
1 cup Mashed potatoes 34
1/2 cup peas 8
1 Small roll 19
2 tsp Margarine 0
1 Small pear 21
Total carb 81 g Total carb
Bolus Calculation Bolus Calculation
Carb bolus (81 ÷ 15) 5.4 U Carb bolus (____ ÷_____)
Correction bolus (13.9-6.7)÷2.8 +2.6 U Correction bolus (___-___)÷____ +
TOTAL BOLUS 8.0 U TOTAL BOLUS
Time Qty Food/Drink Carb grams
Time Qty Food/Drink Carb grams
Bolus Calculation Bolus Calculation
Carb bolus (____ ÷_____) Carb bolus (____ ÷_____)
Correction bolus (___-___)÷____ + Correction bolus (___-___)÷____ +
TOTAL BOLUS TOTAL BOLUS
What is my I:C Ratio and ISF?Your healthcare professional will help you determine your starting I:C ratio, ISF and Target BG. Your starting bolus dose formulas are estimates that may need to be adjusted or fine-tuned once you start pumping.
16 Insulin Pump Workbook Insulin Pump Workbook 17
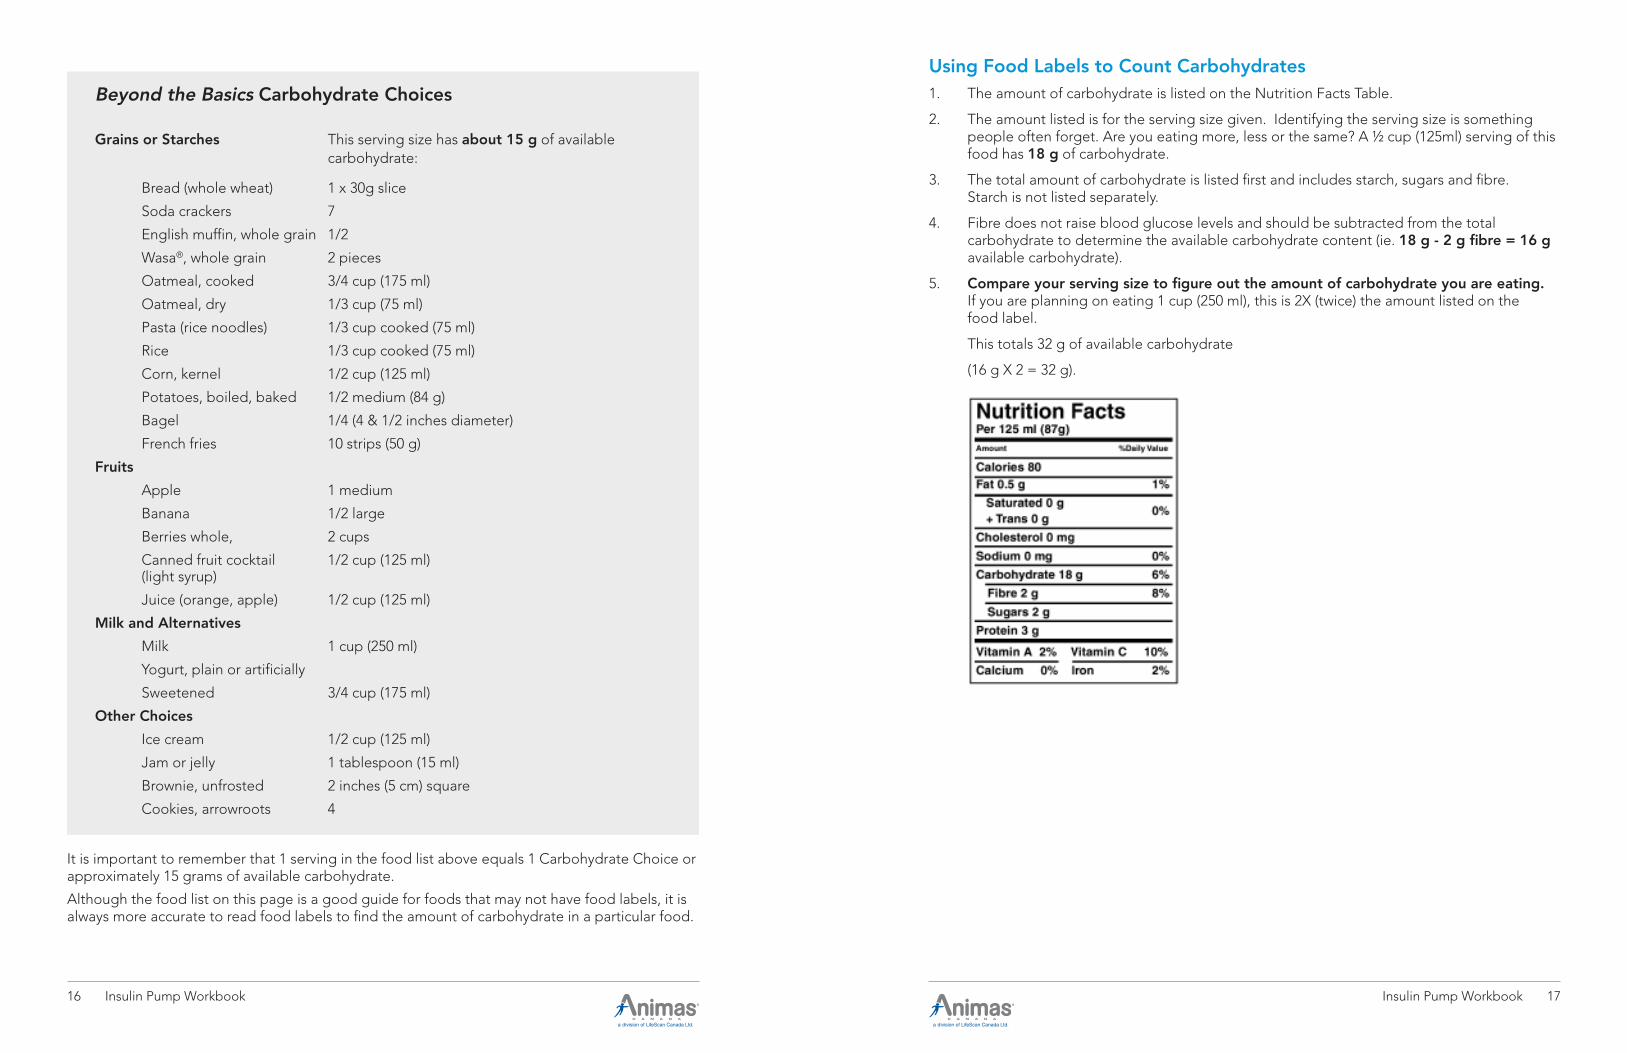
Using Food Labels to Count Carbohydrates1. The amount of carbohydrate is listed on the Nutrition Facts Table.
2. The amount listed is for the serving size given. Identifying the serving size is something peopleoftenforget.Areyoueatingmore,lessorthesame?A½cup(125ml)servingofthis food has 18 g of carbohydrate.
3. The total amount of carbohydrate is listed first and includes starch, sugars and fibre. Starch is not listed separately.
4. Fibre does not raise blood glucose levels and should be subtracted from the total carbohydrate to determine the available carbohydrate content (ie. 18 g - 2 g fibre = 16 g available carbohydrate).
5. Compare your serving size to figure out the amount of carbohydrate you are eating. If you are planning on eating 1 cup (250 ml), this is 2X (twice) the amount listed on the food label.
This totals 32 g of available carbohydrate
(16 g X 2 = 32 g).
Beyond the Basics Carbohydrate Choices
Grains or Starches This serving size has about 15 g of available carbohydrate:
Bread (whole wheat) 1 x 30g slice
Soda crackers 7
English muffin, whole grain 1/2
Wasa®, whole grain 2 pieces
Oatmeal, cooked 3/4 cup (175 ml)
Oatmeal, dry 1/3 cup (75 ml)
Pasta (rice noodles) 1/3 cup cooked (75 ml)
Rice 1/3 cup cooked (75 ml)
Corn, kernel 1/2 cup (125 ml)
Potatoes, boiled, baked 1/2 medium (84 g)
Bagel 1/4 (4 & 1/2 inches diameter)
French fries 10 strips (50 g)
Fruits
Apple 1 medium
Banana 1/2 large
Berries whole, 2 cups
Canned fruit cocktail 1/2 cup (125 ml) (light syrup)
Juice(orange,apple) 1/2cup(125ml)
Milk and Alternatives
Milk 1 cup (250 ml)
Yogurt, plain or artificially
Sweetened 3/4 cup (175 ml)
Other Choices
Ice cream 1/2 cup (125 ml)
Jamorjelly 1tablespoon(15ml)
Brownie, unfrosted 2 inches (5 cm) square
Cookies, arrowroots 4
It is important to remember that 1 serving in the food list above equals 1 Carbohydrate Choice or approximately 15 grams of available carbohydrate.
Although the food list on this page is a good guide for foods that may not have food labels, it is always more accurate to read food labels to find the amount of carbohydrate in a particular food.

18 Insulin Pump Workbook Insulin Pump Workbook 19
PROTEIN AND FATIn general, foods with large amounts of protein, especially those with fat, will slow your digestion so that the carbs enter the blood stream slower. Also, large amounts of fat in a meal can cause your body to use insulin less efficiently. Your Animas® insulin pump allows you to bolus in different ways to help you to match the slower digestion of foods/meals that are higher in protein and fat. See the section on Advanced Pumping Features for more information on Combo Boluses on page 41.
ALCOHOLAlcohol by itself does not contain carbs. Beer and many drinks made with alcohol do contain carbs. In general, alcohol can lower BG and therefore you should always eat when consuming alcoholic beverages. The Canadian Diabetes Association recommends that alcohol should be limited to 1-2 drinks per day (less than 15 standard drinks/week for men and less than 10 standard drinks/week for women). Discuss your specific questions or concerns about adjusting insulin for alcohol intake with your healthcare professional.
GLYCEMIC INDEXThe Glycemic Index (GI) is a scale that ranks carbohydrate-rich foods by how much they raise blood glucose levels compared to a standard food. The standard food is glucose or white bread. Lower GI foods raise your BG slower and lower compared to higher GI foods which raise your BG faster and higher. Try to choose lower GI foods more often.
Low GI foods High GI foods All Bran® Corn flakes
Bran Buds® Bran flakes
Oatmeal Rice Krispies®
OatBran Cheerios®
Whole grain bread white bread
Barley
Basmati/brown rice instant rice
Yam French fries
Pear, plum, peach Watermelon
Milk
Yogurt
To keep carb counting practical and simple, you count all carbs the same way. Some foods may have a bigger impact on your BG than other foods, even if the carb amounts are the same. There are many factors involved in the glycemic index and these factors can affect individuals differently. Some carbs are digested slower than others. Keep good records of foods eaten, insulin and BG to learn which foods may need special attention when you are bolusing. You may learn that there are some carbs that require earlier bolusing or even an extra bolus. Don’t forget that the advanced Combo bolus features can help you deal with these issues once you are an experienced pumper.
Carbohydrate Counting ToolsIt is important to remember that carb counting is only accurate when you pay attention to serving sizes. Measuring utensils and a food scale are very useful, especially if you are new to carb counting. Because a serving size says 1/3 cup (for example, for cooked rice), it doesn’t mean that is the amount you should eat. Serving sizes on food labels are there as reference points. It is there to tell you that the nutrition information provided is for just 1/3 cup. If you choose to eat a full cup of rice (a more realistic amount for many people), you need to know that this is 3 servings or 45 grams of carbohydrate. Estimating what 1 cup will look like on your plate is tricky. Practice your estimations by using a measuring cup to measure this amount of rice.
It is not always convenient to measure your food. Using visual reminders can be helpful. Here are a few examples: Tennis ball = 1 cup cooked rice, 1 small piece of fruit
1 Compact Disk (CD) Case = 1 slice of bread
Baseball = 1 cup of fruit
One dice = 1 tsp of peanut butter
Most women’s fists = 1 cup cooked rice, pasta or vegetables
Most men’s fists = 1 1/2 cups cooked rice, pasta or vegetables
Counting carbohydrates can be easy if you use all of the available tools and practice! On the other hand, if this is all new to you, it may seem “easier said than done.” Be patient and remember that it will get easier with time, practice and experience. Many of us eat the same foods over and over so you will have the carb content of your favourite foods memorized in no time. The following carbohydrate counting tools can help you to develop your carb counting skills.
Carb Counting Tools•Nutritionlabels
•Measuringspoons
•Weighingscales
•Yourfavouriterestaurant’s website nutritional information
Last Note: Looking up foods in carb counting resource books and reading food labels will help you become more precise with your carb counting. Regularly, double check your portion sizes with measuring utensils and/or a food scale to ensure that your carb counting is as accurate as possible.
FIBRE AND SUGAR ALCOHOLSFibre is a type of carbohydrate which is not digested. Since fibre is included in the total carbohydrate but it does not raise blood glucose, subtract out the amount of fibre from the total carbohydrate. This will give you the amount of carbohydrate that will raise your BG, called available carbohydrate.
Sugar Alcohols include lactitol, maltitol, mannitol, sorbitol, isomalt and xylitol. They have fewer calories and a smaller impact on BG levels than other carbs. Sugar alcohols are fine in reasonable quantities; too much may have a laxative effect (>10g per day for adults, less for children).
•TheCalorieKing’sCalorie, Fat and Carbohydrate Counter book and website
•TheCanadianDiabetesAssociation’sBeyond the Basics resource

20 Insulin Pump Workbook Insulin Pump Workbook 21
SECTION 2: STARTING ON INSULINFinally the day is arriving when you will wear your pump with insulin!
It is normal to be a little nervous. This is a big change in the way you manage your diabetes. If you have any questions from the earlier sections of this workbook, be sure to have them answered by your healthcare professional / pump trainer before you begin pumping.
This section will provide you with important details related to your actual insulin start on your pump.
Topics covered in this section include:
•GettingReadyForYourAnimas® Pump Start Appointment
•PumpStartDoses
•InfusionSiteSelectionandCare
•TroubleshootingHighBGandpreventingDKA
•LowBG
•HandlingSickDays
•PhysicalActivity
•Recordkeeping
•WearingthePump
As we said before, carb counting is a great method to help you determine bolus amounts. But remember, carb counting focuses only on this one nutrient. A healthy diet includes your overall food intake and should be relatively low in saturated fats and high in nutrient dense foods like vegetables, fruits, low-fat dairy products and whole grains. It is important to keep this in mind when planning any meal!
Test Your Knowledge:
1. One carbohydrate choice from the Beyond the Basics resource will have
_____ grams of carbohydrate.
2. The following meal has about ____ grams of carbs.
Turkey sandwich, medium apple, 1 cup (250 ml) of skim milk
3. The Animas® insulin pump has advanced bolus features to help you better
manage foods which digest more slowly. c True c False
4. When I eat carbs, how long does it generally take for the food to have its
biggest effect on my BG?
5. When reading nutritional information labels, it is important to look at
certain details to more accurately determine carb amounts:
a) Carbs
b) Portion size
c) Fibre
d) All of the above

22 Insulin Pump Workbook Insulin Pump Workbook 23
GETTING READY FOR YOUR PUMP START APPOINTMENT1. Time/Date: ________________________________________________________________________
Location: __________________________________________________________________________
2. Please be prepared! Review your pump orientation DVD, Quick Reference Guide, Owner’s Booklet, and this workbook. Practice with your pump, not attached to your body, by doing some basic programming. You will practice these skills again the day of your pump start.
3. Go to www.Diasend.com/animas to create your personal Diasend® account for downloading your pump data.
4. The night before your pump start: If you are using NPH®/Lantus®/Levemir® insulin, take ______ units of insulin at ____(time) the night before your pump start. Check with your healthcare professional for specific instructions.
5. The morning of your pump start:
Take Humalog®/NovoRapid®/Apidra®/Regular insulin for your food and any high BG.
Do NOT take any long acting or intermediate acting insulin the morning of your pump
start. Check with your healthcare professional for specific instructions.
6. Eat your usual breakfast the morning of your pump start. Remember to cover the carbs with short or rapid-acting insulin that your healthcare professional has prescribed.
7. Have these items prepared for the day of your pump start:
c 1 unopened vial of Humalog®, NovoRapid®, or Apidra® insulin
c Insulin pump in its box, Owner’s Booklet, 2 cartridges, 2 infusion sets, 2 skin preparation swabs
c BG meter, lancets and test strips
c Alcohol swabs
c BG logs
c Glucose tablets or another treatment for hypoglycemia
c Ketone test strips (for persons with type 1 diabetes)
c Carbohydrate counting book
c Glucagon Emergency Kit
8. Additional Information (to be provided by your healthcare professional):
____________________________________________________________________________________
____________________________________________________________________________________
____________________________________________________________________________________
For example:
•Correctionformulaforhighbloodglucosewithketones
•Prescriptionforglucagon
My Pump Start DosesBasal RateMy starting basal rate is ____________ units per hour.
Other: _____________ ______________ ______________ _____________
Food (Carb) BolusesUse the Insulin-to-Carbohydrate ratio (I:C ratio) to calculate a bolus dose before meals and snacks.
My I:C ratio ratio is ______________.
Bolus 1 unit for every ___________ grams of carbohydrate.
Formula for calculating Food (Carb) Boluses: Carbohydrate grams = # of units to bolus
X
(X is the “C” in the I:C ratio)
Daily Time Slot My I:C ratio12am
BG BolusesUse the Insulin Sensitivity Factor (ISF) to calculate a BG bolus when BG is outside of target range.
My ISF is _______.
1 unit of insulin will drop my BG approximately ______ mmol/L
Time of Day My ISF
12am
BG TargetMy target BG is ________ mmol/L with a target range of +/- ________ mmol/L
Time of Day My BG Target My BG Target Range (+/-) 12am
Formula for High BG Corrections: Current BG – Target BG = # units needed to return BG to target
ISF

24 Insulin Pump Workbook Insulin Pump Workbook 25
Test Your Knowledge:
1. How often should I change my infusion set/site?
___________________________________
2. Taking good care of infusion sites can help prevent infections.
c True c False
3. What is the most commonly recommended site location?
___________________________________
INFUSION SITE SELECTION AND CAREIt is important to take good care of your infusion sites and to pick sites that will help your insulin absorb evenly. Taking care of your sites will prevent changes in your tissue (like hardening and bumps) and will help prevent infections.
Change your set/site any time if there is discomfort or if you notice signs of infection. Signs of infection include: redness, warmth, pain or discomfort at the site, unexplained high BG, swelling, drainage or unpleasant odour.
STEP 1 SITE PREPARATION
•Washyourhands
•Makesurethattheinsertionsiteiscleananddry
•Prepareyoursitewithaproductrecommended
by your healthcare professional and/or diabetes
educator. See Appendix 2 on Infection
Prevention for some options.
STEP 2 SITE SELECTION
•Themostcommonlyusedareaisthestomach
•Avoidthewaistlineorbeltarea
•Donotinsertinareasthatareinfected,swollen,
have piercings, tattoos, bumps, etc.
•Checkyourinfusionsite2-3timesaday
Front Back
STEP 3 SITE ROTATION
Recommended rotation patterns, 2.5 - 5cm away
from last site:
5
1 2 3 4
6 7 8 9
10 11 12 13
Keyboard
5 1234
6 7 89
1011121314
S Method
STEP 4 HOW TO INSERT
A. Manually
B. With an integrated insertion device
A
B B
STEP 5 WHEN & HOW TO CHANGE
Soft cannula infusion sets every 2 to 3 days
Steel needle infusion sets every 1 to 2 days
•Removeyourinfusionsetbycarefullylifting
up the adhesive, then remove the cannula
from under the skin.
•Changeyourinfusionsetearlyintheday.
This will allow you to take action more
quickly if your insulin is not infusing properly
through the cannula. If your insulin is not
infusing properly, your BG levels will be
higher than usual.
How do I make sure that my adhesive stays on?
•Makesuretheskiniscleananddrypriorto
insertion
•Rubtheadhesiveontotheskin
•Useanadditionaltapeoradhesivedressing
•Considerusingskinpreparationwipe
(SkinPrep® or Skin TacTM)

26 Insulin Pump Workbook Insulin Pump Workbook 27
QUICK STEPS FOR PREPARING YOUR INSULIN PUMP
1. Get Ready. Gather your supplies: cartridge, infusion set, room temperature insulin, alcohol swabs, site-preparation supplies (i.e. Skin Prep®)
Wash your hands.
Check blood glucose.
Disconnect the tubing where it is attached to your body.
Remove old infusor base from your body and discard.
Unscrew cartridge cap (to be reused) and remove cartridge. Discard cartridge, any remaining insulin and the old infusion set.
2. Prepare your new cartridge. “Cycle” the cartridge by using the blue handle to pull the plunger back and forth two or three times. DO NOT twist the plunger. Do not “cycle” the cartridge too many times.
Screw needle on and fill cartridge with insulin. Fill cartridge slowly. Check with your pump trainer for the amount to fill your cartridge (to______________ units). Unscrew needle and remove blue handle by squeezing the grips on the side. Hold the plunger as you remove the blue handle. Cap cartridge with small plastic end cap.
3. Attach your tubing to the cartridge. Thread the Luer connector on the tubing through the top (small end) of the cartridge compartment cap.
Remove end cap from the cartridge.
Twist the tubing onto the cartridge. Make sure to twist tightly (1/4 turn beyond finger tight) to prevent leaking.
4. Rewind the pump and load the cartridge. From the Prime/Rewind Menu, select Rewind and then select Go Rewind.
When Rewind is complete, load cartridge into pump, attach cartridge cap securely, and select Continue.
NOTE: Never tighten cartridge cap once pump has been primed and infusion set has been connected to the body. This could result in an unplanned delivery of insulin.
5. Prime the pump. Select Continue when the Prime screen is displayed. When at Go Prime, you must press and hold the ‘OK’ button until you count 5 drops coming out the end of the tube (depending on your infusion set type, protective cap must be removed from the end of the tubing while completing this step).
Insert your infusion set according to the manufacturer’s or your pump trainer’s instructions.
Connect your tubing to the site (if necessary, depending on your infusion set type).
Select Fill Cannula and deliver _____________units using the Fill Cannula screen to fill the inserted cannula tube with insulin. Check infusion set instructions/package insert for “Fill Cannula” amount.
ALWAYS check your blood glucose 2 to 3 hours later!
Use these quick steps to help remember how to change your infusion set and insulin pump cartridge. Please see the instructions included with your pump, cartridges and infusion sets, and talk to your pump trainer for more detailed instructions.
Fill Cannula Amounts:Inset II: 0.30 units (6mm) Inset 30: 0.70 units Contact detach: N/A 0.50 units (9mm) Comfort and Comfort short: 0.70 units
CHOOSING THE RIGHT INFUSION SETDifferent sets are needed for different people with different needs. It is normal to switch to a different type of infusion set over time. Changes in body size, vision and activity levels can change infusion set requirements.
our
inset® 30 is a great option for those with a lean or muscular physique, and for those who are very active. The all-in-one insertion device is inserted on a 30 degree angle, ensuring comfort. This infusion set if often recommended for pediatrics because you are able to see your insertion site at all times.
It is a 13mm Teflon cannula and is required to change every 2-3 days.
inset® II is great for people that are not as lean or muscular, or those with a needle anxiety as you cannot see the needle prior to insertion. Its easy insertion is ideal for those who like an effortless, quick insertion.
It is available in a 6mm or 9mm Teflon cannula, and is required to change every 2-3 days.
Contact™ detach is a stainless steel needle that is inserted at a straight, 90 degree angle. This is a perfect choice for those with Teflon sensitivities or allergies.
It has to be changed every 1-2 days as it is seen as more foreign to the body than Teflon.
Comfort™ and Comfort™ Short are options for people who prefer to insert their infusion set manually. It can be inserted on a 20-45 degree angle, depending on physique. Comfort™ is a 17mm cannula, and Comfort™ Short is 13mm cannula. Both are made of Teflon.
When using these sets, insert in one motion – quickly and precisely.
Try different infusion sets to find the one that works best for you. The infusion set that you feel most comfortable with is often the best choice.
28 Insulin Pump Workbook Insulin Pump Workbook 29
TROUBLESHOOTING HIGH BLOOD GLUCOSE (HYPERGLYCEMIA)When pumping, high BG must be taken seriously as insulin pumps deliver only short or rapid- acting insulin. Without any long-acting insulin “on board,” BG can rise quickly if the insulin flow is accidentally interrupted and a condition called diabetic ketoacidosis (DKA) can develop. Understanding DKA will help you to recognize the signs and symptoms so that you can act quickly and lessen the severity.
Diabetic Ketoacidosis (DKA): some facts•DKAresultswhenthereisnotenoughinsulinforyourbodytouseglucoseforenergy.
•HighBGcombinedwithketonesisalife-threateningmedicalproblemthatmustbetreated immediately.
•Insulinisneededtogetglucoseoutofthebloodstreamandintothebody’scellswhereitis used for energy. Without insulin, your body will begin to burn fat for energy. Ketones are an acidic byproduct of the fat being broken down.
•Ketones(acids)buildupinthebloodandurinewhenyoudon’thaveenoughinsulin.Urine ketones can be checked with a visual test strip and ketones in the blood can be detected more quickly than urine using a specific blood ketone testing system and strips. Ask your healthcare professional when and how to test for ketones.
•Aseriousillnessorinfectioncanalsocauseketones.
•IfyouhavemoderatetolargeketonesandanelevatedBG,youshouldalwaysgive insulin by injection first, and then check the insulin delivery from your pump, as usually the problem is related to the infusion set or site.
•YouwilllikelyneedextrainsulintocorrecthighBGwhenketonesarepresent.
Contact your healthcare professional for specific instructions.
Symptoms of DKA:Early Signs: Unusually tired, stomach pain, nausea, fruity odour to breath
Advanced Signs: Rapid or difficulty breathing, dry mouth, thirsty, vomiting
DKA is serious and scary, but it can be prevented! Check your BG regularly (at least 4 times each day) and follow the tips below to be prepared.
• Always carry a syringe and vial of insulin (or an insulin pen with rapid acting insulin) as a back up plan
• Follow the “Action Plan for High BG” on page 29 for high BG
• Troubleshoot your infusion set/site and pump and see the following questions for what to look for
• If the high BG is unexplainable, check for ketones and follow the “Action Plan”
• Call your doctor immediately if your BG remains high and you have ketones or nausea after 2 correction doses given by injection
• If you have ketones and begin vomiting, go to the nearest emergency room
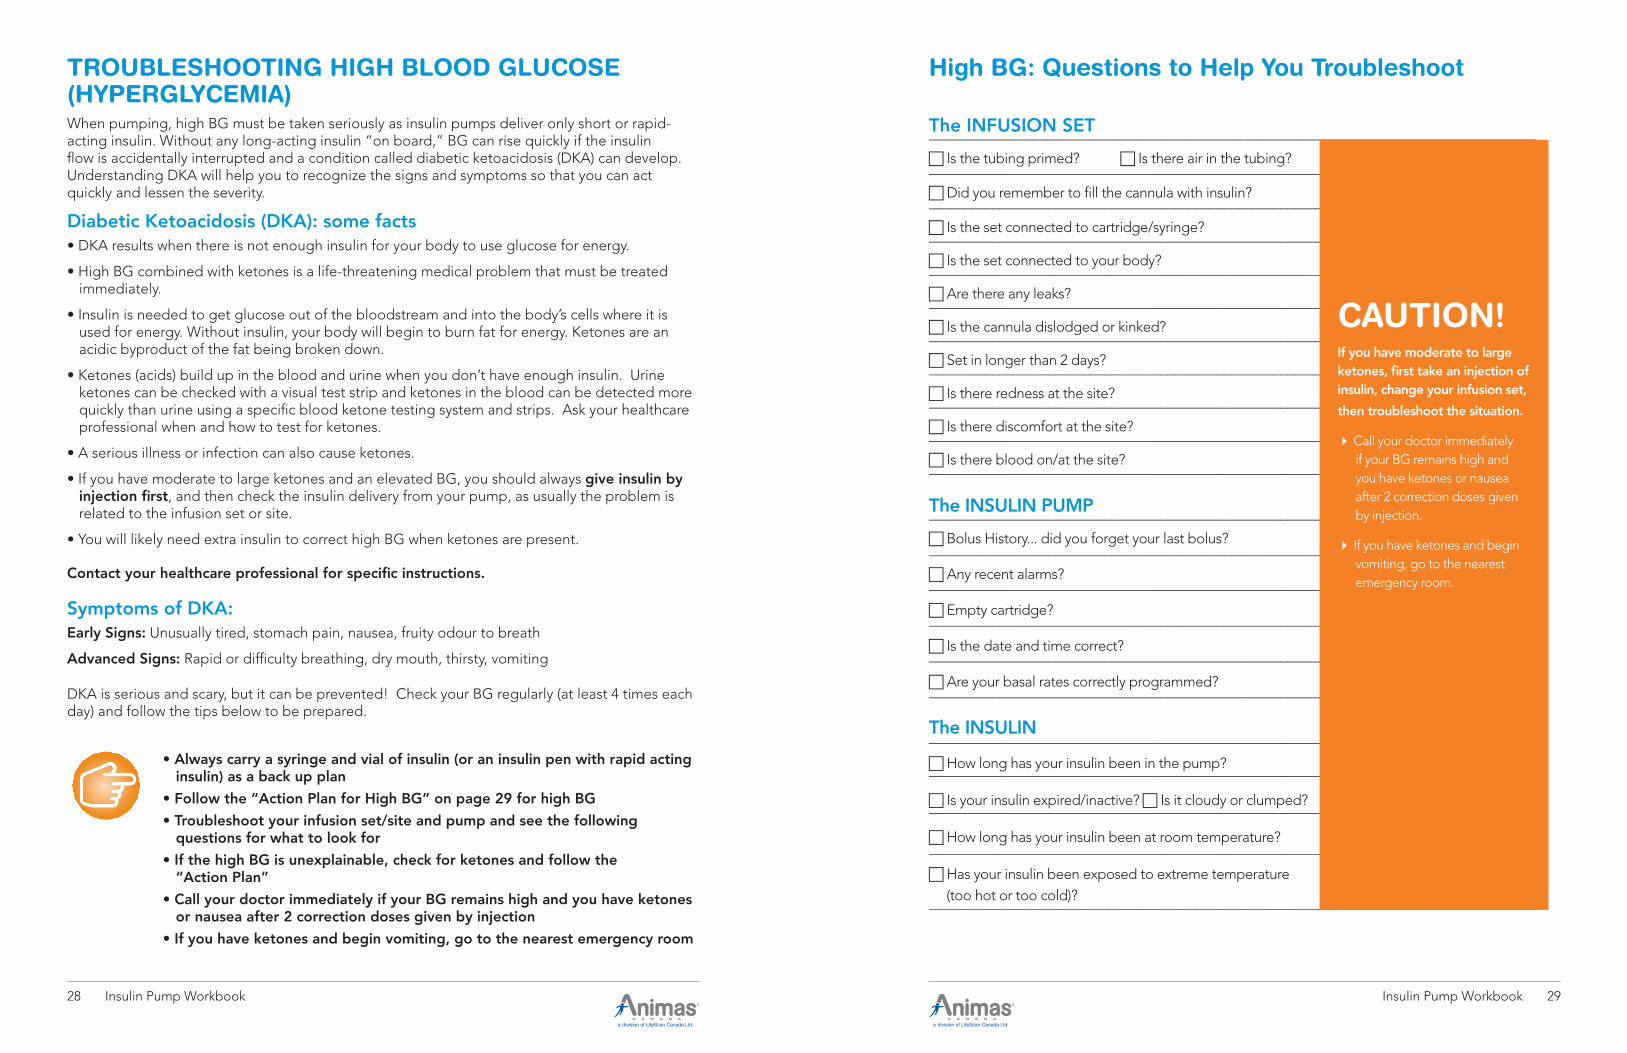
High BG: Questions to Help You Troubleshoot
The INFUSION SET___________________________________________________________________________________
c Is the tubing primed? c Is there air in the tubing?___________________________________________________________________________________
c Did you remember to fill the cannula with insulin?___________________________________________________________________________________
c Is the set connected to cartridge/syringe?___________________________________________________________________________________
c Is the set connected to your body?___________________________________________________________________________________
c Are there any leaks?___________________________________________________________________________________
c Is the cannula dislodged or kinked?___________________________________________________________________________________
c Set in longer than 2 days?___________________________________________________________________________________
c Is there redness at the site?___________________________________________________________________________________
c Is there discomfort at the site?___________________________________________________________________________________
c Is there blood on/at the site?___________________________________________________________________________________
The INSULIN PUMP___________________________________________________________________________________
c Bolus History... did you forget your last bolus?___________________________________________________________________________________
c Any recent alarms? ___________________________________________________________________________________
c Empty cartridge?___________________________________________________________________________________
c Is the date and time correct?___________________________________________________________________________________
c Are your basal rates correctly programmed?___________________________________________________________________________________
The INSULIN___________________________________________________________________________________
c How long has your insulin been in the pump?___________________________________________________________________________________
c Is your insulin expired/inactive? c Is it cloudy or clumped?___________________________________________________________________________________
c How long has your insulin been at room temperature?___________________________________________________________________________________
c Has your insulin been exposed to extreme temperature (too hot or too cold)?___________________________________________________________________________________
CAUTION!If you have moderate to large ketones, first take an injection of insulin, change your infusion set,
then troubleshoot the situation.
4 Call your doctor immediately if your BG remains high and you have ketones or nausea after 2 correction doses given by injection.
4 If you have ketones and begin vomiting, go to the nearest emergency room.

30 Insulin Pump Workbook Insulin Pump Workbook 31
Action Plan for High BG•IfyourBGishigherthan14.0mmol/Ltwiceinarow,checkforketones.Thentroubleshoot your pump, infusion set and site.
•IfyoufindalogicalcauseforthehighBG,takeyournormalcorrectiveaction. Examples of a logical cause include: you forgot your last meal bolus or your infusion set came out. Your action plan will include taking a BG bolus and may also include changing your infusion set/site.
•IfyoucannotfindalogicalcauseforthehighBG,checkforketones.
Negative to Small Ketones Moderate to Large Ketones
•TakeaBGbolus
•RecheckBGin1hour
•TakeyourBGbolusbysyringe(orinsulinpen) immediately. You will likely need more insulin than usual for your correction.Talk to your healthcare professional in advance to get a formula for ketones.
•Changeyourinfusionset,cartridgeandinsulin.
•Begintodrinkplentyofbeverages that are calorie-free; 1 cup every 1/2 hour
•RecheckBGin1hour
If BG is decreasing, that is a good sign, but monitor a bit more closely through-out the day
If BG is NOT decreasing, take another correction by syringe (or insulin pen)
•changeyour infusion set
•continuetomonitor to be sure BG decreases
If BG is decreasing, you must continue to monitor to be sure new set is working
If BG is NOT decreasing,
•ifketonesarestill moderate to large call your doctor
•ifketonesare decreasing, take another correction and continue to monitor closely
For two unexplained BG levels over 14.0 mmol/L, ALWAYS:
• Check for ketones • Take your BG bolus by syringe/insulin pen • Change your infusion set, cartridge and insulin.
Test Your Knowledge
1. Why is an insulin pump wearer at a higher risk of developing DKA? ____________________________________________________________________
2. How should I give a correction bolus if I have moderate to large ketones? ____________________________________________________________________
3. Listed are 4 steps I should take immediately if I have moderate to large ketones: ____________________________________________________________ ____________________________________________________________________
LOW BLOOD GLUCOSE (HYPOGLYCEMIA)As you may know, many factors can cause low BG whether you are on a pump or injections.
The good news is that most people on pumps report less frequent low BG, and less severe ones. It is still important to always be prepared for low BG. Also, keep in mind that over time, your symptoms of low BG may change.
If your BG was consistently high before starting on a pump, you may experience symptoms of a low BG (even if you are not low) as you work to improve your overall glucose control. For example, a BG of 5.6 mmol/L may feel like a very low BG if you are used to consistently having numbers over 16 mmol/L.
In general, the main events that cause low BG are:
•Toolittlefood
•Toomuchinsulin
•Increaseinactivityand/or“lageffect”*fromexercise
•Drinkingalcohol
Treating Low BGNo matter what the cause, it is critical to treat a low BG immediately! Any BG < 4.0 mmol/L must be treated with fast acting carbohydrates.
The standard treatment is often called the “Rule of 15”.
“The Rule of 15”:
• Eat or drink 15 grams of carbohydrate
• Wait 15 minutes
• Recheck your BG
• If it is still less than 4.0 mmol/L, repeat above
Recommended treatments include (each suggestion is 15 grams of carbohydrate):
•Glucosetablets,3-4(dependsonbrand)
•Regularsoftdrink,3/4cup(175 ml)
•Fruitjuice,3/4cup(175 ml)
•Honeyortablesugar,1tbsp.(15 ml)
•Lifesavers®, 6
*ExercisecanexertaBGloweringeffectforupto36hoursafter.

32 Insulin Pump Workbook Insulin Pump Workbook 33
Test Your Knowledge:
1. List 2 good examples of foods/drinks to treat low BG. __________________________________________________________________
__________________________________________________________________
2. When my BG is low, I should eat/drink _____ grams of carbohydrate, then wait _____ minutes and recheck my blood glucose.
3. I should try to determine what caused the low BG once I am feeling better.
c True c False
4. When I don’t feel like eating, I can inject myself with Glucagon to treat my
low BG. c True c False
Preventing Low BGIt is always a good idea to try to determine the cause of your low BG so you can try to prevent it the next time.
Questions a pumper should ask include:
•Ismybasalratetoohigh?(especiallyifyouarehavingfrequentlowBGs)
•Aremybasalratesprogrammedcorrectly?
•DoIneedanadjustmenttomyInsulin-to-CarbRatiosorInsulinSensitivityFactors?
•AremyBGtargetstoolow?
•AmIestimatingmycarbscorrectly?
•AmIdoingthecalculationscorrectlytodeterminemybolusdoses?
•AmItakingBGbolusestoosoon?Aremybolusdosesoverlapping?
•AmIadjustingmyinsulinand/orfoodforactivity?
Talk to your healthcare professional and/or diabetes educator if you need help answering these questions or determining a cause for your low BG. Also, always feel free to call Animas Pump Support (1-877-937-7867) if you want to double check the programming of your pump.
Don’t get frustrated if you cannot figure out the cause of an occasional episode of low BG. Accept that it is the nature of diabetes, that you will deal with both high and low BG and not every episode can be explained!
Glucagon Emergency KitsGlucagon is a hormone that works the opposite of insulin; it raises glucose in the bloodstream. It is recommended that everyone who takes insulin has a Glucagon Emergency Kit (a prescription item). The kit contains a syringe with liquid and a vial of Glucagon. The two must be mixed just before use and injected into a large muscle. Glucagon is used if you are unconscious or having a seizure and unable to safely swallow food or liquid. Family members and/or a friend should know where you keep your Glucagon and be trained in how and when to use it. Talk to your healthcare professional and/or diabetes educator about getting a Glucagon Emergency Kit if you don’t have one already. Make sure you check the expiration date and replace it as needed. Also, some people need a Glucagon Emergency Kit in more than one place, including home, school and work.
HANDLING SICK DAYSIt may be more difficult to maintain good BG control during times of illness, surgery and major stress. Follow the general guidelines below to manage your BG during these times. If you have specific guidelines from your healthcare professional or diabetes educator, follow those instead!
Insulin•Neverstopyourinsulin!Evenifyouareunabletoeat,yourneedforinsulincontinuesandmay even increase due to the illness.
•ContinueyourbasaldoseofinsulinandtakeadditionalcorrectionsusingyourInsulinSensitivity Factors as needed.
•Youmayneedtotemporarilyincreaseordecreaseyourbasalrate(s).Checkwithyourhealthcare professional and/or diabetes educator for specific guidelines. See your Owner’s Booklet for detailed set up instructions if needed.
Blood/Urine Checks•ItisrecommendedthatyoucheckyourBGmorefrequently(every2to4hours)duringillness.
•ContinuetocheckyourBGasusualbeforemealsandsnacks.
•Checkyoururineorbloodforketonesifyourpre-mealBGisgreaterthan14.0mmol/L,oras directed by your healthcare provider and/or diabetes educator.
•Urine/BloodketonetestingwillguideyouindeterminingBGbolusdosesandthemethodof delivery (pump bolus versus injection/insulin pen). See the Action Plan for high BG on page 29.
Fluids/Nutrition•Consume150-200gramsofcarbohydratedaily.
•Trytoconsumeabout15gramsofcarbohydrateeveryhour.
•Consumingadequatefluidsisimportantduringillnesstopreventdehydration.
•Trytodrink1cup(250ml)offluidseveryhouranddrinkfluidsslowly.
•Every3rdhour,consumeasodium-richchoicesuchasbrothifthereareno underlying health issues (congestive heart failure or high blood pressure).
34 Insulin Pump Workbook Insulin Pump Workbook 35
When to Call your Healthcare Professional*:•Illnesscontinueswithoutimprovementformorethan24to48hours.
•Temperaturegreaterthan38°C.
•Vomitingordiarrheacontinueslongerthan4hours.
•Persistentmoderatetolargeketonesarepresentintheurine.
•YourBGlevelsarelessthan4.0mmol/Lorabove13.9mmol/Landnotrespondingtousual corrective action.
•Youhavesignsofketoacidosis,dehydrationorotherseriousproblems,suchasincreased drowsiness, abdominal or chest pain, difficulty breathing, fruity odour to breath and dry cracked lips, mouth or tongue.
•Whenyouareuncertainaboutwhatyouneedtodototakecareofyourself.
*Alwaysfollowyourhealthcareprofessional’srecommendations.
If you are not feeling well, it may be difficult to tell if it is due to illness or because you are not getting your infusion of insulin. You should always check for ketones if your stomach is upset or you feel nauseous.
Test Your Knowledge
1. I am not feeling well and I don’t have any appetite. I should remove my insulin pump. c True c False
2. I should check my BG every ____ hours when I am sick.
PHYSICAL ACTIVITYInsulin needs change during exercise or whenever your activity level is higher than usual. Learning how to think and act like a pancreas is crucial to help you maintain optimal BG control. Using an insulin pump offers you one of the best ways to match your insulin needs during these times. It is important to realize that the same activity can have very different effects on BG from one person to another. There are even times when different activities can result in different effects in the same person!
When you first start on the pump, your healthcare professional and/or diabetes educator may ask you to refrain from doing exercise for a little while. This may be helpful as everyone (including you) is working to get your basal rates on target. If you have a very consistent exercise routine, this becomes less of an issue. Check with your healthcare professional and/or diabetes educator for his or her specific recommendation.
Preventing Hypoglycemia during ActivityIn general, during increased physical activity, BG levels drop and you need less insulin. This is because your body is working harder and uses up glucose for the extra fuel the muscles need. In people without diabetes, the body automatically reduces the level of insulin during exercise. People with diabetes need to either adjust their insulin or eat extra food to compensate. Insulin pumpers have the luxury of being able to spontaneously and precisely adjust their meal bolus insulin as well as their basal insulin.
Adjusting Insulin When Using a PumpWhen using an insulin pump, you may consider a few different strategies to help prevent hypoglycemia:
1. Program a temporary basal rate at least one hour BEFORE your activity level increases (for example you may try at first setting a temporary basal of -50% for 2 hours).
2. Decrease your food (carb) bolus at the meal or snack before you exercise.
3. Do both - decrease your food bolus and decrease your basal insulin using the temporary basal feature. (This is often the preferred method for long activities such as an all day hike or ski)
It is important to know that exercise can actually lower BG for up to 36 hours. This is often called the “lag effect.”
Spontaneous activity may require additional carbohydrates if you have active insulin on board.
Rising BG during ActivityBG levels sometimes rise during exercise. During very high intensity exercise and/or competitive events, stress hormones are released. These hormones trigger stored glucose to be released into the bloodstream. Many times this high glucose will come down to target on its own a short time after the exercise. It is important for you to check with your healthcare professional and/or diabetes educator for specific recommendations. See the next section, General Exercise Tips.
High BG Prior to ActivityIf your BG is high prior to exercise and insulin levels are low, your BG level can rise with the increased activity. The low insulin level will trigger your liver to release stored glucose. Since the insulin level is low, the extra glucose has no way to enter the cells and eventually ketones will be released as your body resorts to breaking down fat to meet the muscles’ need for energy. This is a dangerous situation. Refer to the section on ketoacidosis on page 28.
Physical activity can cause different BG levels in different people. Check BG levels before, during and after exercise to learn what your personal response will be. Keep in mind that your glucose response will also vary based on the type of activity, how strenuous it is and the duration of the activity.
36 Insulin Pump Workbook Insulin Pump Workbook 37
General Exercise TipsFollow these suggested guidelines during exercise or for more active times, like a day of heavy yard work:
•IfyourBGis14.0mmol/Lorgreaterpriortoexercise,checktoseeifyouhaveketones.Treat this problem. Exercise with ketones is not advised.
•Wearmedicalidentification.
•CheckBGbefore,duringandafteractivitytoestablishyourspecificpatterns.Keepwritten records!
•Trythesameexerciseatdifferenttimesofthedaytoseeifyourglucoseresponsediffers depending on the time of day.
•Carryfast-actingcarbohydratestotreatlowBG.
•Drinkplentyofwatertostayproperlyhydrated.
•Beforeyoubeginexercisingwithaninsulinpump,talktoyourhealthcareprofessionaland/or diabetes educator to get help on adjusting your insulin doses.
Insulin Adjustment TipsThese are just some general tips to consider. Remember to consult your own healthcare professional for specific guidelines.
•Ingeneral,exerciselastinglongerthan30minuteswillrequireextracarbsoradecreasein insulin.
•Adjusttheinsulinthathasthegreatesteffectduringtheexercisesession:basalinsulinorthe bolus dose.
•Ifyouareexercisingwithinanhourortwoofabolus,decreasethebolus.
•Ifyourexerciseisnotclosetoabolus,considerabasaladjustmentusingtheTemporary Basal Rate.
•Youmayfindadjustingbothbasalandbolusinsulinisbestwhenexercisingfor long durations.
•Whenadjustingyourbasalinsulin,begin60-90minutesbeforetheincreaseinactivity, if you can.
•Remember,becauseofthe“lageffect”ofexercise,youmayneedtodecreaseinsulinforas long as 24 to 36 hours after the exercise. This is especially true for activities that last for several hours.
Wearing or Disconnecting the Pump During ExerciseMany new pumpers ask if they should disconnect during exercise. It depends on your individual comfort and the specific situation, but consider that a person without diabetes never goes without insulin. You should work with your healthcare team to develop an appropriate plan of action to minimize the impact on BG control for your particular sport or situation when you might be disconnected. Here are some tips:
•Bodyheat,perspiration,moisture,frictionandagitationmayirritatetheinfusionsite.Choosea site that will not be flexed or irritated during the exercise. Wear the pump away from the infusion site to avoid rubbing and friction.
•Rememberthatperspirationmayaffecttheinfusionsettapeaswell.Checkyourinfusionsite and tape carefully. You may want to consider using a skin preparation wipe (SkinPrep® or Skin TacTM) that helps with adhesion.
•Ifyouarehavingdifficultykeepingyourinfusionsetsstucktoyou,talktoyourhealthcare professional or call Animas Pump Support for assistance at 1-877-937-7867.
•Itisusuallyrecommendedtoremovethepumpduringcontactsports.Donotremovethepump for longer than 1-2 hours without a plan for insulin replacement.
•Therearemanycasesandprotectivecoverstokeepyourpumpsafeandcomfortableduring exercise. To order pump supplies, skin preparations or accessories, call Animas Canada Customer Care at 1-866-406-4844.
Test Your Knowledge
1. I usually need less insulin when I increase my activity level.
c True c False
2. Listed are three strategies that I can take to prevent low BG with exercise: __________________________________________________________________
__________________________________________________________________
__________________________________________________________________
3. Physical activity will cause the same results in anybody with diabetes.
c True c False

38 Insulin Pump Workbook Insulin Pump Workbook 39
RECORD KEEPINGDetailed record keeping is very important. For many people, it is also one of the most challenging tasks when starting pump therapy. Without recording the details of your day – every day – it is nearly impossible for you and your healthcare professional to make proper adjustments to your basal rates and bolus dose formulas. Without a doubt, record keeping can be tedious and time consuming, but it is a necessity in order to get the most out of pump therapy.
Make a list of everything you know that can affect your BG.
______________________________________________________________________________________
______________________________________________________________________________________
______________________________________________________________________________________
______________________________________________________________________________________
______________________________________________________________________________________
______________________________________________________________________________________
______________________________________________________________________________________
______________________________________________________________________________________
______________________________________________________________________________________
______________________________________________________________________________________
Now you know what you need to record in your pump records! Your list should include the following:
•BGreadings
•foods/drinksconsumed(andwhetherthemealwasathomeorarestaurant)andnumber of carbs
•bolusdoses(foodandBGcorrections)
•basalrates
•exerciseorothereventsthatincreaseyouractivitylevel
•temporarybasalrates
•menstrualcycle(women)
•alllowBGlevels
•unusualstress
•anyillnessorjustnotfeelingwell
•whenyouchangeyourinfusionset/site
•ketonechecksandresults
•dayoftheweek(thisisimportantsincemanypeoplewillnoticedifferencesinglucoselevels weekdays versus weekends)
•anyschedulechanges
•useofalcohol
•changeinmedication
Reviewing this list should make it obvious that simply downloading your BG meter and/or insulin pump data is probably not adequate… at least at the beginning stages of pumping. Diasend® diabetes management software can help at the beginning, as well as in the future, by supplementing your written records. Diasend® software is available free of charge to Animas® pump users. It is web-based so you can upload your data at home, and your authorized healthcare providers can review it between or during appointments, neatly sorted into charts and graphs on the secure Diasend® website.
There are “pump flowsheets” to help you to organize all this data in a meaningful way. See Appendix 8 at the end of the workbook for some versions you can photocopy. Be sure to check with your healthcare professional and /or diabetes educator as they may have a certain format that they prefer you to use.
In order for records to be useful, you need to be as accurate as possible. For example, if you forget to write down a low BG episode, this can change how you and your healthcare professional interpret the data. Keeping records with you, and keeping notes as things happen, are the best ways to ensure accuracy. Take 5 minutes each evening to review your BG meter and pump history and double check this information against your written records.
As a new pumper, be prepared to keep these detailed records for at least 4-6 weeks. It is a good idea to keep some detailed records from time to time to make sure everything is still okay, or when you need to focus on a certain problem you are having. Discuss with your healthcare professional the type of documentation (paper or download) they prefer for your follow-up appointment.

40 Insulin Pump Workbook Insulin Pump Workbook 41
WEARING THE PUMPAside from actually operating your insulin pump and learning how to use it to manage your diabetes, one worry for many new pumpers is finding the best way to wear it in different situations. Fortunately, you have many options with a long list of accessories! Here are a few ideas to get you started:
Day-to-Day:•Ifyouarewearingpants,shortsoraskirt,clipthepumptoyourwaistbandusingoneofthe accessories that came with your pump.
•Putyourpumpinyourfrontpocket.Ifyouarewearingabelt,youcanputthetubingunderyour belt and then in your pocket. Or, cut a small hole in the fabric of your pocket and put the tubing through from under your clothes so no tubing is visible.
•Manywomenputthepumpintheirbras.Youcanputthepumpintoababysocktohelpwith sweating and irritation.
•Ifyouarewearingadressoralooseshirt,trytheWaist-It™toholdyourpumpunderyour clothing. The Leg-ThingTM or Thigh-ThingTM are also popular choices for sleeping or when wearing tighter fitting clothes, dresses, or skirts.
•Putyourpumpinyoursockforeasyaccess.
Exercise:•Foractivitiesthatarenottoointense,clipthepumponyourwaistbandortryusingWaist-It™ under your althletic clothing.
•Forcontactsports,youshoulddiscussthebeststrategyforyoursportwithyourhealthcare professional. It may be necessary to disconnect for some contact sports.
Sleeping:•Placethepumpnearorunderyourpillow.Somepeoplekeepthepumponthenightstand (which may require longer length tubing).
•Clipthepumptoyourpajamasorputitinapocket.
•TheWaist-It™isalsopopularforsleeping.
Swimming and Showering:•Youcanswimandshowerwithyourpump.Animaspumpsarewaterproofin3.6meters(12feet) of water for 24 hours.
•MakesureyouchangeyourbatterycapasdirectedinyourOwner’sBookletandthattheo-ring on the cap is not dried out, cracked or broken.
•Whileitisokaytoswimorshowerwithyourpump,donotwearitinahottuborhotbath. Extreme temperatures can affect the quality of your insulin.
Intimacy:•Forintimatetimes,youcandisconnectfromyourinsulinpumpforuptoabout1hourwithout worrying about replacing the missed basal insulin.
•Don’tforgettoreconnect!Ifyouareconcernedthatyoumayforgettoreconnect,putyour pump in Suspend mode. While in Suspend mode, your pump will beep or vibrate as a reminder to reconnect.
SECTION 3: ADVANCED PUMPING FEATURES AND TOPICS Now that the basics are behind you, you may feel ready to focus on some advanced pumping topics. You may have already been advised by your healthcare professional and/or diabetes educator to use some of these features or this may be new to you. It often depends on your individual readiness for these features.
This section of the workbook will focus on some of the advanced features in your Animas® insulin pump and offer some tips on how to use the features to help you manage your diabetes.
Features covered include:
•ezCarb
•ezBG
•InsulinOnBoard
•ComboBolus
•TemporaryBasalRates
•MultipleBasalPrograms
•Timeoffthepump
Always check with your healthcare professional before using these features. Refer to your Owner’s Booklet for specific programming steps for activating and using these features.

42 Insulin Pump Workbook Insulin Pump Workbook 43
EZCARBYou already learned how to manually calculate your bolus dose for food based on your I:C ratio. You simply divide the estimated grams of carbs you will eat by your I:C ratio. For example, if your ratio is 1:15 and you are planning to eat 45 grams of carbohydrate, you would bolus 3.0 units (45 grams of carbs divided by 15 {I:C ratio} = 3.0 units of insulin). This was an easy example… you could probably do the math in your head! But it won’t always be this easy.
The great news is that your insulin pump can do this math for you if you use the ezCarb feature!
Simply activate (turn on) this feature in your Advanced Setup menu and program your individual I:C ratio (or ratios) in Advanced Setup. Once activated, you will have access to this feature from the Bolus menu.
See your Owner’s Booklet for details on activating and using the feature, or call Pump Support at 1-877-937-7867. You will notice that you can choose different I:C ratios for different time frames. This is because some people find that they get better glucose results when they use different I:C ratios at different times of the day. Talk to your healthcare professional if you think you would benefit by doing this.
Note that you can edit (change) your ratio right on the ezCarb screen. For example, you are eating breakfast at 9:00 am and you are planning a long walk after you eat. Your usual I:C ratio for this time of day is 1:15, but because you will be taking a long walk, you cut your breakfast bolus by using a ratio of 1:20. You can edit your 1:15 on the ezCarb screen so it will calculate using 1:20 instead of 1:15. Editing your I:C ratio on the ezCarb screen will not change the default values you entered during Advanced Setup. To change your I:C ratio permanently, you would need to reprogram it in the Advanced Setup.
With ezCarb, you can enter grams of carb directly or select from your own customized list of food items. In addition to entering your carbohydrate grams into ezCarb, you can also enter a BG value and your pump will calculate a BG bolus for you. ezCarb will add both bolus values (carb bolus and BG bolus) to give you the suggested total bolus.
BG CORRECT
Main Menu
ActualTarget - = +
ISF 2.0 mmol/LShow Result
mmol/L8.05.03.0
ezCarb Home
Main Menu
Carbs: 30g
I:C 1U: 15g
Add BGShow Result
Bolus Total
Main Menu
CarbBG +IOB -Total =
2.00U1.50U0.00U3.50U
GoType Normal
3.50 U
EZBGYou already know how to manually calculate a bolus to correct a BG. With ezBG you can store your BG targets and ISF’s in Advanced Setup. Enter current BG and your pump will use this information to calculate a recommended BG bolus. If you have the Insulin on Board (IOB) feature activated, your pump will calculate a reduced bolus dose for you based on recent boluses you have taken. (We will go in to more detail on this later.)
With the Advanced Features turned on, ezBG is available from the Bolus menu. To program your individual BG targets and ISF’s, go to the Advanced Setup screens. You can edit your BG target and ISF on the ezBG screen and it will not change the default values you entered during Advanced Setup. To change BG target or ISF permanently, you will need to reprogram them in the Advanced Setup.
The insulin pump will give you an alert message when BG values are entered that are outside a specific range. This is to remind you that special attention must be given to your BG at these extremes. Please refer to your pump’s Owner’s Booklet to confirm the specific high and low alert values. Treat the out of range BG as recommended by your healthcare team.
• Use ezCarb when you are eating carbohydrates, OR when you are eating
carbohydrates, AND checking your BG
• Use ezBG when you are not eating carbohydrates but are just checking your BG
ezBG
Main Menu
ActualTarget - = +ISF 2.0 mmol/L
mmol/L10.0
6.04.0
Show Result
ezBG Total
Main MenuGo
BG +IOB -
Total =
2.0U0.50U
1.50U0.00U1.50U

44 Insulin Pump Workbook Insulin Pump Workbook 45
INSULIN ON BOARD (IOB)Insulin on Board is a feature designed to allow you to safely give a supplemental bolus between meals. It is common for people to forget when they last bolused and will bolus again, leading to a low BG later. It is also common to underestimate a BG bolus when you know that there is insulin on board, fearing a low BG later on.
If IOB is activated in your pump, it will keep track of any bolus doses that you take and will let you know how much of that bolus is still working to lower your BG. You can activate IOB and set your personal IOB duration in the Advanced Set-up Menu. See your Owner’s Booklet for instructions. Your pump will track each bolus over a given period of time. It will use this data to calculate and recommend a reduced bolus dose if you are doing a BG bolus by using ezBG, or if you add a BG to an ezCarb bolus.
Understanding IOB
WHEN BLOOD GLUCOSE IS ABOVE TARGET
In this scenario, the amount of carbohydrate to be eaten was 30 grams and the blood glucose value entered was 10.0 mmol/L. The BG correction is 1.33U, however there is still 1.70U of active insulin on board (IOB). The pump only suggests delivering the amount of insulin needed for the carbohydrate being eaten.
To help illustrate and understand IOB, we have presented three scenarios below. In each of these scenarios, the pump settings are:
I:C Ratio 1U: 10g ISF 1U: 3 mmol/L Target 6.0 mmol/L +/- 1.0 mmol/L
Here is what the Animas® insulin pump will recommend:
WHEN BLOOD GLUCOSE IS IN TARGET
In this scenario, the amount of carbohydrate to be eaten was 30 grams and the blood glucose value entered was 6.2 mmol/L. The pump suggests delivering the full amount of insulin for the carbs to be eaten because the existing IOB is for previously eaten food, or a previously delivered correction bolus.
WHEN BLOOD GLUCOSE IS BELOW TARGET
In this scenario, the amount of carbohydrates to be eaten was 30 grams, and the blood glucose value was 4.5 mmol/L. When BG is below target, the pump will calculate and suggest a negative (-) BG correction. Both the BG and IOB corrections are subtracted from the carbohydrate amount, and therefore the pump suggests a reduced dose of 0.80U.
Note: Subtracting insulin from carbohydrates when BG is below target is a feature unique to Animas® insulin pumps.
Bolus Total
Main Menu
CarbBG +IOB -Total =
3.00U1.33U1.70U3.00U
3.00 UGoType Normal
Bolus Total
Main Menu
CarbBG -IOB -Total =
3.00U0.00U1.70U3.00U
3.00 UGoType Normal
Bolus Total
Main Menu
CarbBG -IOB -Total =
3.00U0.50U1.70U0.80U
0.80 UGoType Normal
Insulin on Board (IOB) Points to Remember: •IOBwilltrackALLbolusdosesyoutakeforagivenamountoftime.
•Youcanfindouthowmuchinsulinisonboardanytimeyouwantbylookinginthestatus feature on your pump.
•YoucancustomizethetimeframethatIOBwilltrackyourbolusdoses,selectedfrom 1.5 hours to 6.5 hours.
•ThisdurationsettingforIOBisthepointatwhichinsulinisfinishedworkinginyourbody. This setting varies from person to person and can be affected by other factors.
•IOBhasnothingtodowithyourbasalinsulin.
•Ifyouchangeyourbattery,anyIOBwillbecleared.Thepumpcannotdetecthowlonga battery is out, so it cannot accurately track how much insulin is still on board.
•Thepumpisgreatatdeliveringinsulinanddoingmathtohelpyoucalculateyourbolus doses, BUT you still need to think for yourself. For example, IOB cannot factor in what type of meal you had last… what if it was high fat? Sometimes, even with a BG in your target range and a significant amount of IOB, you may still see a higher BG later if you ate high-fat foods and/or foods with slower-digesting carbs. The pump also doesn’t know your activity level. COMBO BOLUSBy using the combo bolus feature, you can tailor your bolus delivery to better match your meal content, eating pattern or health needs. Terms associated with combination boluses include:
1. Normal bolus: bolus delivered immediately
2. Extended bolus: bolus delivered slowly over a selected time, from 30 minutes to 12 hours
3. Combo bolus: A normal bolus + an extended bolus
4. Duration: the length of time the extended bolus will be delivered
Spreading out a bolus dose (or part of a bolus dose) can be very useful for matching your insulin bolus to high-fat foods or meals since these foods can delay digestion. Extending a bolus may also help with “grazing” over a few hours and for carbs that are digested more slowly such as high fibre foods. Extending a bolus can also help those who have gastroparesis or delayed digestion.
Combo Boluses are often helpful when eating pizza, Chinese, Indian, Mexican, Italian meals and many meals eaten at restaurants.
For the greatest benefit, people will use this feature according to their individual needs. The same person may use the feature differently for different types of foods/meals. There is really no right or wrong way to use this feature, which does make it difficult to give specific recommendations. By frequently checking your BG after eating, you will see patterns develop. The combo bolus feature will help you better cover these types of meals.
In order to use this feature, you need to activate it in your Advanced Setup menu. If you already turned on Advanced Bolus Features, you will now be able to program a combo bolus. See your Owner’s Booklet for details on programming a Combo Bolus.
Talk to your healthcare professional about when you should try this feature and for specific guidelines on how to start using it. Recording BG levels and a food diary will help you see any patterns which indicate this feature may be useful.

46 Insulin Pump Workbook Insulin Pump Workbook 47
Combo Boluses: Guidelines and Helpful HintsWhen programming a combo bolus, two options must be selected: the “split” of normal vs extended, and the duration or amount of time the bolus will be delivered. There is no perfect combination bolus rule that will work for everyone. Each individual will need to adjust their bolus delivery according to their specific need and their healthcare professional’s recommendations. The following information is intended as a guideline only.
Combo Bolusing Guidelines1. Begin with a 50%/50% split.
a. 50% Normal Bolus
b. 50% Extended Bolus over a 2 hour period
Example: Eating at 6 PM
Meal contains: 60 grams carbohydrate (If using a 1:10 I:C ratio) = 6 units
50% Normal =3 units
50% Extended =3 units
2. Check BG 2 hours after meal.
The purpose of this 2 hour check is to see if the first portion of the bolus (the 50% or Normal Bolus) was the correct amount needed to maintain normal BG levels 2 hours after the meal.
If BG is above target, try 60%/40% split the next time you eat that meal.
Example: Meal contains 60 grams of carb. (If using 1:10 I:C ratio) = 6 units
60% Normal = 3.6 units
40% Extended= 2.4 units
Note: If 2 hour post meal BG is high after trying 60%/40% split – try a 70%/30% split the next time you eat that meal. Continue this until you reach the right combination.
3. Check BG 4 hours after meal. The purpose of this 4 hour check is to see if the 2nd portion of the bolus – the Extended Bolus was the correct amount needed to maintain normal BG levels 4 hours after the meal.
If BG is above target, increase the amount of insulin given over the 2 hour extended bolus the next time you eat this meal.
4. Check BG 6 hours after meal. The purpose of this 6 hour BG check is to see if the 2nd portion of the bolus – the Extended Bolus was the correct amount of insulin needed and the right length of time needed to deliver the extended bolus to maintain normal BG levels 6 hours after the meal.
If the BG was normal at the 4 hour check but high at the 6 hour check – the extended portion of the bolus may need to be increased slightly – and the length of time may need to be extended from 2 hours to 3 or 4 hours.
If the BG was in range at the 4 hour check and at the 6 hour check – CONGRATULATIONS!
TEMPORARY BASAL RATESThe Temporary Basal Rate feature can be very useful for sick days or when your usual activity is different from the norm. Temp Basal allows you to adjust your basal rate temporarily without actually changing your basal program. The duration of temporary rates can be adjusted from 30 minutes to 24 hours in 30 minute intervals and in 10% increments (as low as -90% and as high as high as +200% or you can even set the basal to off). It is best to set the temporary rate 60 to 90 minutes before you really need it. There is always a bit of a lag before the new rate will have an effect in your body.
Experienced pumpers use this feature for the obvious reasons like exercise and the not so obvious reasons like a long car ride or a plane trip.
MULTIPLE BASAL PROGRAMSYour Animas® pump lets you program multiple basal programs. Each program can have multiple basal rate segments throughout the day. Why use different basal programs? Perhaps you have done your basal evaluations but still have some problem areas: your glucose control may be good during the week, but you may experience many low BGs during the weekend. It could be you have a sedentary job, but on the weekends you are much more physically active. This is a perfect example of when using different basal programs would help you.
TIME OFF THE PUMPThere are times when you may want to temporarily disconnect for an hour or so, or even for a few days. Examples of this include intimacy, participation in contact sports, medical procedures, a pump malfunction, or a day at the beach. It is important that you have a good understanding of what you need to do to keep your blood glucose (BG) under control during this time. You need to have a plan to replace both your basal insulin and bolus doses.
Your physician and/or healthcare team will provide you with specific recommendations.
There are many different ways to handle time off the pump when it involves a full day or more.
Plan ahead! Make sure you obtain:
•thenecessaryintermediateorlong-actinginsulin(prescriptionitemsinsomecases) in addition to the rapid-acting insulin you use in your pump
•insulininjectionaids:syringes,insulinpensandpenneedles
•writtencopyoftimeoffpumpplan
Remember, consult your healthcare provider for individualized instructions. Guidelines may differ for the various types of insulin and activity level while disconnected.
48 Insulin Pump Workbook Insulin Pump Workbook 49
SECTION 4: THE FIRST FEW WEEKS TO MONTHSYou have had a lot of information to absorb so far. However, you still have more work and challenges to overcome to make sure your pump experience is the best it can be.
This section of the workbook will focus on how to evaluate your doses (basal rates, I:C ratio, ISF) and to begin working with your healthcare professional to adjust the initial estimates that were made before you started pumping.
Topics covered in this section include:
•TipsforEvaluatingBasalRates
•Fine-TuningBolusDoseFormulas
FINE-TUNING BASAL RATESThe goal for basal insulin is to help keep your BG stable without the need for extra food or insulin. For example, you should be able to skip a meal without having to snack to prevent a low BG.
Basal rates that are accurately set should keep your BG relatively stable in the absence of food, exercise or extra insulin.
Initially, your basal rate(s) is estimated by your healthcare professional. Soon after starting pump therapy, your basal rate will need to be fine-tuned, and other basal rates will likely be added to your basal program. Remember, you can have up to 12 different basal rates in one program.
To evaluate your basal rates and to see where you might need changes, you will need to check BG levels often. You will also need to try to eliminate other factors that may affect your BG levels, including food, bolus doses and increased activity. See the information below for some specific tips to help you evaluate your basal rates.
Tips to Evaluate Basal Rates
Timing:•Itishelpfultodividethedayinto4timeframesandevaluateoneatatime-overnight,morning, afternoon, and evening. Start with overnight.
•Evaluationscanbegin4-5hoursafterthelastbolusdoseandandthelastcarbohydrate food/drink was consumed. You may consume water during testing.
Food:•Duringdaytimeevaluations,youwillneedtoskipameal.
•Themealpriortotheevaluationshouldbeapredictableone.Youshouldbecertainofthe number of carbs.
•Themealpriortotheevaluationshouldbealow-fatmeal.
Time off your pump: Action to take UP TO 3 HOURS:
Actions to take:
1. If BG is within target:
•Beforedisconnecting,givebolustoreplaceanticipatedbasalamountyouwillmiss.
•MonitorBG.
2. If BG is elevated:
•Beforedisconnecting,givecorrectionbolusplusbolustoreplaceanticipatedbasal amount you will miss.
•MonitorBG.
3. If BG is below target or anticipated high activity level:
•Treatlowbloodglucosewithcarbohydrateifrequired.
•Reducedbolusmaybeneededtoreplaceanticipatedbasalamountyouwillmiss.
•MonitorBG.
4. Carbohydrate containing meals and/or snacks:
•Takerapid-actinginsulininjectionorreconnectanddelivercarbbolus.
DAYTIME HOURS:
Actions to take:
•Followactionstepslistedabove.Every3-4hourswhiledisconnected.
•MonitorBGevery1½hourswhiledisconnected.
OVERNIGHT:
Actions to take:
Option 1:
•Injectrapid-actinginsulinevery3-4hourstoreplaceanticipatedbasalamountyouwillmiss.
•IfBGiselevated,addrapid-actinginsulinforcorrection.
•Ifconsumingcarbohydrateformealsand/orsnacks,takerapid-actinginsulinforcoverage.
•MonitorBG.
Option 2:
•Injectintermediate-actinginsulin(NPH)basedonanticipatedbasalamounttobemissed.
•IfBGiselevated,addrapid-actinginsulinforcorrection.
•Ifconsumingcarbohydrateformealsand/orsnacks,takerapid-actinginsulinforcoverage.
Option 3:
•Takeinjectionoflong-actinginsulin(Lantus®, Levemir®) based on 24 hour missed basal amount (check basal history for 24 hour total basal amount).
•IfBGiselevated,takecorrectioninjectionofrapid-actingunsulin.
•Ifconsumingcarbohydrateformealsand/orsnacks,takerapid-actinginsulinforcoverage.
•MonitorBG.
You will need a plan to wean yourself off intermediate or long-acting insulin (options 2&3) before starting on your pump again.
Consult your healthcare provider for specific individualized instructions.

50 Insulin Pump Workbook Insulin Pump Workbook 51
Basal Evaluation LogUse the following charts to help you pull together information from your basal rate evaluations. Begin evaluations if your BG is between _______ mmol/L and ________ mmol/L.
Overnight: Dinner Carb________ Dinner Bolus _______
Date Time:4 hours after
dinnerBedtime 12 AM 3 AM Upon waking
BG day 1
BG day 2
BG day 3
Morning: Date Time: Upon waking hour 1 hour 2 hour 3 hour 4
BG day 1
BG day 2
BG day 3
Afternoon:
Date Time:4 hours after
breakfasthour 1 hour 2 hour 3 hour 4
BG day 1
BG day 2
BG day 3
Evening:
Date Time:4 hours after
lunchhour 1 hour 2 hour 3 hour 4
BG day 1
BG day 2
BG day 3
Blood Glucose:•Generally,yourBGshouldbeinareasonablerangeatthebeginningofanevaluation.Around 5.0 - 8.0 mmol/L is reasonable, but check with your healthcare professional for your personal minimum and maximum range.
•StoptheevaluationifyourBGvaluesgoaboveorbelowyourmaximumororbelowyour minimum range. Treat any low or high BG as usual.
Things to Avoid:•Donotdisconnectfromyourpumpanddonotsetatemporarybasalrate.
•Donotplanabasalrateevaluationduringeventsthatmightaffecttheresults:illness,fatigue, unusual stress or after severe low BG. Also keep in mind that for women, the menstrual cycle may have an effect.
•Duringthedayofabasalrateevaluation,youshouldnotdrinkalcohol.
•Duringthedayofabasalrateevaluation,youmayneedtoavoidexercise.Ifyouexercise consistently (same type of activity, same time every day) then this may not be necessary or even good to do. Check with your diabetes educator and/or healthcare professional.
The chart on the following page will give you specific instructions for completing the different basal rate evaluations.
Time frames and directions When to check BG
Overnight:
1. Eat an early dinner and take your usual meal bolus.2. Eat a predictable meal with a known number of carbohydrate grams.3. Choose a low-fat dinner.4. Do not eat after dinner.5. Begin the evaluation about 4 hours after dinner if your BG is in a reasonable range.
c 4 hours after dinner
c Bedtime
c Midnight
c 2-3 am
c Upon waking
Morning time:
1. Begin the evaluation if your BG is in a reasonable range.2. Skip breakfast.3. Do not eat or drink until lunch.
c Every 1-2 hours upon waking until lunch
Afternoon time:
1. Begin the evaluation if your BG is in a reasonable range 4 hours after breakfast.2. Skip lunch.3. Do not eat or drink until supper.
c 4 hours after breakfast
c Every 1-2 hours until dinner
Evening time:1. Begin the evaluation if your BG is in a reasonable range 4 hours after lunch.2. Skip dinner.
3. End the evaluation at bedtime and have a snack if desired (bolus as usual for your snack).
c 4 hours after lunch
c Every 1-2 hours until bedtime

52 Insulin Pump Workbook Insulin Pump Workbook 53
Last but not least, it is important to know that your basal rate needs are likely to change over time. It is a good idea to repeat basal evaluations if you start to notice your BG is not as well controlled as it has been before. Major life changes such as divorce, graduation, a new job, or a >5 lb weight gain or loss usually requires reevaluating basals. Also, remember that you may need a different set of basal rates depending on different factors such as weekday versus weekend. See the Advanced Features section for more discussion about this on page 41.
Test Your Knowledge:
1. I can have up to ____ different rates programmed into each of the 4 basal
rate programs.
2. If my basal rates are set correctly, I should be able to skip a meal and not
worry about a low BG.
c True c False
3. How long after my last bolus dose should I wait before beginning a basal rate evaluation? _________
4. I need to reprogram my basal rates every day.
c True c False
5. List two important things to consider for the meal prior to doing a basal rate evaluation.
___________________________________________________________________
___________________________________________________________________
Keep in mind that you need to see a repeating trend. This means you should complete each of the evaluations a minimum of two times; three would be best. This may seem like a great deal of work, but the value of having appropriate basal rates will be worth it. You can work your basal rate evaluations into your busy schedule. For example, you may be too busy to stop for lunch one day. Plan to do a few extra BG checks and make it an afternoon evaluation!
Don’t get frustrated! You may keep trying to do a particular evaluation but you can’t because your BG “isn’t cooperating.” For example, each time you attempt an overnight evaluation, your BG after dinner is too high. You are still getting valuable data here … maybe the evening basal is too low, or maybe you need a bigger bolus to cover your dinner. This is something to discuss with your healthcare professional.
Using the Data to Make AdjustmentsThe Basal Evaluation Logs at the end of this section will help you to record the data you collect during your basal evaluations, or you may use Insulin Pump Flowsheets (see Appendix 7) to record the data.
Example of Basal Evaluation Log:___________________________________________________________________________________
Day/Date: Mon, 20/01/14 Event: overnight evaluation___________________________________________________________________________________ Time: 10 pm 12 am 2:45 am 6:10 am___________________________________________________________________________________ BG: 8.3 mmol/L 7.2 mmol/L 4.8 mmol/L 3.4 mmol/L___________________________________________________________________________________ Basal Rate: 0.550 0.550 0.550 0.550___________________________________________________________________________________ Carbs: ------ ------ ------ ------___________________________________________________________________________________ Bolus: ------ ------ ------ ------___________________________________________________________________________________ Comments: Dinner @ 5:30pm Looks like basal may be too high overnight.___________________________________________________________________________________
Once you have done the work of collecting the data from your evaluations, it is time to study and use it to make useful changes. Initially you should check with your physician and/or diabetes educator prior to changing basal rates. You will get to the stage when you and your healthcare professional feel you can make your own basal rate adjustments.
Here are some basic guidelines typically used to adjust basal rates:
•BGchangesofmorethan1.7mmol/Lduringabasalevaluationbetweenreadingsassuggested on the ‘basal evaluation log’ indicate the need to adjust basal rates.
•Itisbesttoseearepeatingtrendonmultipledaysbeforemakingabasalchange.
•Changesaremadeslowly,typically0.025to0.100U/hr,or10%ofyourcurrentbasalrate.
•Thebasalrateshouldbeincreasedordecreased3-4hoursbeforetheBGbeginsitsriseorfall for NovoRapid®, Humalog®, or Apidra®. If you use a different type of insulin, check with your healthcare professional for specifics on timing.
•Makeonechangeatatime.
•Reevaluatethattimeframeafteranychangestothebasalratearemade.
•Yourgoalshouldbetofindthebasalratesthatworkthebestmostofthetime. Don’t expect perfection!

54 Insulin Pump Workbook Insulin Pump Workbook 55
FINE-TUNING YOUR BOLUS DOSE FORMULASYour initial I:C ratios and ISF’s were estimates and may need to be adjusted to work best. Once your basal rates are fine-tuned, it is time to begin evaluating your bolus doses. Does your I:C ratiocoverthecarbsyoueat?DoesyourISFaccuratelycorrecthighorlowBGreadings?Justlikewith evaluating basal rates, there are systematic ways to help you evaluate your bolus doses and determine what adjustments you may need to make.
Evaluating your Insulin-to-Carbohydrate (I:C) Ratio
Directions Blood Glucose Checks
•Basalratesshouldbeevaluatedand adjusted if necessary prior to evaluating your I:C ratio
•BGshouldbeintargetrangebeforemeal you are evaluating. You want to look at the I:C ratio alone
•Choosefoodwithknowncarbamounts such as pre-packaged meals
•Chooselowfatmeals
•Donotevaluateduringtimeofillness, stress or after exercise unless this is your routine
•Evaluateallmealsasyoumayfindthat you have different I:C ratios at different times of the day
c Check BG before meal
c Check BG hourly for the next 4 hours
Example of Bolus Evaluation Log:___________________________________________________________________________________
Day/Date: Mon, 20/01/14 Event: lunch I:C ratio eval ___________________________________________________________________________________
Time: 12 pm 2 pm 3 pm 4:10 pm ___________________________________________________________________________________
BG: 6.2 mmol/L 9.4 mmol/L 5.5 mmol/L 5.3 mmol/L ___________________________________________________________________________________
Basal Rate: 0.550 0.550 0.550 0.550 ___________________________________________________________________________________
Carbs: 57g ------ ------ ------ ___________________________________________________________________________________
Bolus: 4.75 units ------ ------ ------ ___________________________________________________________________________________
Comments: 1:12 ratio. Ate sandwich, milk, fruit cup . Looks good!___________________________________________________________________________________
With any insulin adjustment, you want to see trends first. This means you need to repeat the evaluation two to three times. It is helpful to evaluate meals at different times of the day; you may discover that your ratio doesn’t work the same at different mealtimes.
Basal Evaluation LogUse the following charts to help you pull together information from your basal rate evaluations.
Day/Date: Event:
Time:
BG:
Basal Rate:
Carbs:
Bolus:
Comments:
Day/Date: Event:
Time:
BG:
Basal Rate:
Carbs:
Bolus:
Comments:
Day/Date: Event:
Time:
BG:
Basal Rate:
Carbs:
Bolus:
Comments:
Day/Date: Event:
Time:
BG:
Basal Rate:
Carbs:
Bolus:
Comments:

56 Insulin Pump Workbook Insulin Pump Workbook 57
Example of Bolus Evaluation Log:___________________________________________________________________________________
Day/Date: Mon, 20/01/14 Event: eval ISF ___________________________________________________________________________________
Time: 4 pm 5 pm 6 pm 7:45 pm ___________________________________________________________________________________
BG: 12.7 mmol/L 12.3 mmol/L 6.8 mmol/L 5.3 mmol/L ___________________________________________________________________________________
Basal Rate: 0.550 0.550 0.550 0.550 ___________________________________________________________________________________
Carbs: ------ ------ ------ ------ ___________________________________________________________________________________
Bolus: 2.55 units ------ ------ ------ ___________________________________________________________________________________
Comments: ISF = 2.8; target is 5.6 mmol/L. Lunch was noon. Held supper ‘til 8pm.
Seemed to work well.___________________________________________________________________________________
Evaluating the Results•IfBGreturnstotargetby4hours,yourISFiscorrect.
•IfBGremainshigherthantarget,yourISFneedstobedecreased.
•IfBGbecomeslowerthantarget,yourISFneedstobeincreased.
Adjust your ISF slowly. For example, if you use an ISF of 2.8 and your BG remains higher than target, try using an ISF of 2.5.
You may discover that you will benefit from using a different ISF depending on the time of day or how high your BG is when you need to use it. Many people choose to use a different ISF during bedtime hours to be more cautious with corrections when they are sleeping.
As with any insulin adjustment, check with your healthcare professional and/or diabetes educator before changing your I:C ratios or ISF’s.
Evaluating the Results•Expectyour2hourpost-mealBGtobe2-4mmol/Lhigherthanyourpre-mealBG.
•IfBG4hoursaftermealreturnstotarget,I:Cratiosetcorrectly.
•IfBG4hoursaftermealsisabovetarget,increaseamountofinsulinneededtocoverthecarbs in that meal. (e.g. if on 1:15, change to 1:13)
•IfBG4hoursaftermealisbelowtarget,decreaseamountofinsulinneededtocoverthecarbs in that meal. (e.g. if on 1:14, change to 1:17)
•MakesmalladjustmentstoyourI:Cratio(ie.increaseordecreaseby1-2gatatime)
Evaluating your Insulin Sensitivity Factor(s)Evaluating your ISF is similar to evaluating your I:C ratio. Isolate the effects of your ISF by eliminating other variables. The goal is for your ISF to return high BG to your target range within four hours of a correction bolus. Follow the general guidelines below to evaluate your ISF, and take note of the specific steps.
Directions Blood Glucose Checks
•Basalratesshouldbeevaluatedand adjusted prior to evaluating your ISF
•Start4hoursafterpreviousbolusandwhen you can plan to not eat for 4 hours
•StartwhenBGisatleast2-3mmol/Labove normal target range
•IfBGishigherthan14.0mmol/L,besureto troubleshoot high BG before starting evaluation. If you have ketones, postpone evaluation and treat high BG
•DonotevaluateISFduringtimeofillness, or unusual stress
•Donotevaluateifyouhaveexercisedwithin the past 24 hours, unless this is your usual routine
•CalculateBGbolususingyourformula, then bolus
•IfBGdropsbelow4.0mmol/Lduring evaluation, stop and treat low
•YoumaywanttoevaluateISFatdifferent times of the day
c Check BG prior to taking correction dose
c Check BG hourly for 4 hours

58 Insulin Pump Workbook Insulin Pump Workbook 59
ISFDay/Date: Event:
BG before correction dose
hour 1 hour 2 hour 3 hour 4
Time:
BG:
Carbs:
Bolus correction:
Day/Date: Event:
BG before correction dose
hour 1 hour 2 hour 3 hour 4
Time:
BG:
Carbs:
Bolus correction:
Day/Date: Event:
BG before correction dose
hour 1 hour 2 hour 3 hour 4
Time:
BG:
Carbs:
Bolus correction:
Bolus Dose Evaluation LogsUse the following charts to help you pull together information from your bolus dose evaluations. I:C Ratios
Day/Date: Event:
Before meal hour 1 hour 2 hour 3 hour 4
Time:
BG:
Carbs:
Bolus:
Day/Date: Event:
Before meal hour 1 hour 2 hour 3 hour 4
Time:
BG:
Carbs:
Bolus:
Day/Date: Event:
Before meal hour 1 hour 2 hour 3 hour 4
Time:
BG:
Carbs:
Bolus:

60 Insulin Pump Workbook Insulin Pump Workbook 61
SECTION 5: CONTINUOUS GLUCOSE MONITORING A continuous glucose monitor (CGM) is a device that measures glucose levels throughout the day and night, including while you’re sleeping. The monitor can provide up to 288 glucose measurements every 24 hours, meaning you’re getting a much better idea of how your BG is trending -minute by minute, hour by hour. Compared to a traditional glucose meter test, which is a snapshot in time, CGM is a way to see what is happening between individual BG meter tests. This way, you can observe levels, trends and patterns that may not have been detected before. CGM systems measure glucose in the fluid in between cells rather than glucose in the blood. CGM systems are calibrated regularly using fingerstick readings from your BG meter. Insulin doses and treatment decisions are determined from blood glucose meter readings, not from CGM readings.
A CGM might be helpful for someone who:
•isunawarewhenlowBGlevelsoccur
•tendstorunhigherthandesiredBGlevelsinfearoflowglucose
•experiencesoutofrangeBGlevelsovernight
•desirestighterBGcontrolaroundmeals
•desiresBGinformationaroundthetimeofphysicalactivity
•isinterestedinBGtrendinformation
There are three main components to a CGM system: the sensor, the transmitter and the receiver.
Sensor: The sensor is a small, flexible wire which is placed just beneath the skin with a guide needle. The guide needle is immediately removed after the sensor is placed. Adhesive tape holds the sensor in place.
Transmitter: The transmitter snaps into the sensor pod (small base of the sensor attached to the abdomen that holds the transmitter in place). The transmitter gathers information from the sensor and sends it wirelessly to the receiver.
Receiver: Data is sent to the receiver, either a mobile phone like device or a pump, which collects glucose information from the transmitter. The receiver typically displays the following glucose information: glucose trend-wave, current glucose level, trend arrows which show the direction and speed of glucose change.
How can I benefit from a CGM System?
Traditional blood glucose testing provides a measurement of your blood glucose level at the time of testing. CGMs measure glucose multiple times per hour. A glucose value is only one component of what you need to know about your glucose to make the best diabetes treatment decision. CGMs also provide information about the trend of your glucose level over time.
Trend arrows on the receiver indicate the direction and rate at which your glucose level is changing. Trend graphs show glucose levels over the past 1 to 24 hours.
With proper and frequent use, a CGM may help you:
•reduceyourA1clevelswithoutincreasingthefrequencyoflowglucose
•increasetheamountoftimethatyourglucoseisintargetrange
•increaseyourknowledgerelatedtotheeffectoffood,insulin,stressandphysicalactivityon glucose control
•increaseyourawarenessofglucosetrends,includingarapidincreaseordecreaseinglucose levels
Wearing the CGM
The sensor insertion site must be properly placed and maintained. Clean the insertion site as directed by the manufacturer. The sensor is inserted into the fatty layer just underneath the skin. The abdomen is the most common insertion site but refer to your CGM user guide and healthcare professional for specific instructions. The sensor should be placed at least three inches away from an insulin pump infusion site and away from any scars, tattoos, moles or beltline area where clothing may rub.
The high and low glucose alert settings should be discussed with your healthcare team before you use your device. Being alerted at the same time of day on consecutive days may suggest the need to change insulin doses. Discuss these patterns of high or low glucose alerts with your healthcare professional.
Calibration
Calibration is the process of transferring a fingerstick reading into the CGM device. This process is needed for the CGM device to display continuous glucose readings and trend information. Precise calibration is the key to CGM accuracy. During calibration, the CGM device uses a complex mathematical formula (algorithm) to convert blood glucose readings to CGM readings.
When calibrating the CGM, be sure to use:
•abloodglucosemeterthathasbeenqualitycheckedwithcontrolsolution
•thesamebloodglucosemeterforallcalibrations
•cleanhands-washwithsoapandwateranddrythoroughlypriortoperformingafingerstick
•bloodfromyourfingerasopposedtobloodfromanalternatesite
Calibration is one of the most important skills associated with using a CGM. Even with proper calibration it is common for the glucose values on the CGM and on the blood glucose meter to be slightly different.
Using your CGM Information
Glucose readings from a CGM must not be used to determine treatment or insulin dosing decisions. Glucose readings from a blood glucose meter need to be used to determine insulin doses.
Daily data for up to a 24 hour period can be viewed on the CGM receiver. Weekly, monthly, and quarterly data can be viewed using CGM software on a computer. When interpreting information from the receiver, consider the trend arrow information first, the trend wave information second and the glucose value third. Do not react only to the trend arrows. Remember that glucose levels on your CGM receiver and blood glucose meter may not match exactly.

62 Insulin Pump Workbook Insulin Pump Workbook 63
APPENDIX 1: INSULIN DETAILSInsulins Used in an Animas® Insulin Pump:Rapid Acting
Humalog® (lispro), NovoRapid® (aspart), Apidra® (glulisine)
Only U100 insulin is recommended with an insulin pump. Other insulin can cause significant health risks. Contact your healthcare professional for more information.
Onset, Peak and Duration of Insulin: Onset – when it starts working
Peak – when it is working the hardest
Duration – how long it is continuing to work
Rapid-Acting: Onset Peak Duration ___________________________________________________________________________________
NovoRapid® 10-15 min 1-1.5 hours 3-5 hours
Humalog® 10-15 min 1-2 hours 3.5 - 4.75 hours
Apidra® 10-15 min 1 - 1.5 hours 3-5 hours___________________________________________________________________________________
(Adapted From: McGibbon A, Richardson C, Hernandez C et al. Canadian Diabetes Association Clinical Practice Guidelines Expert Committee. Canadian Diabetes Association 2013 Clinical Practice Guidelines for the Prevention and ManagementofDiabetesinCanada.CanJDiabetes2013;37(suppl1):S56-S60.)
INSULIN STORAGE
It is important to remember that the insulin in your cartridge should be replaced as recommended by the insulin manufacturer. Please refer to your insulin manufacturer’s label for storage recommendations.
With a calibrated CGM device you and your healthcare team can have confidence in the data you are receiving. The CGM software on a computer can be used to review:
•patternsoflowglucose
•patternsofovernightglucosecontrol
•glucosecontrolaroundmeals
•effectsofphysicalactivity
•reactiontostress,illness,medicationand other factors
•successesinglucosecontrol
Some CGM devices allow you to mark times when you eat, exercise, give insulin or even circumstances such as illness or menses. Using these event markers provides valuable information to your healthcare team. Also discuss with your healthcare team how often they would like to review your CGM data. Use your system consistently and over time to maximize its effectiveness as a learning tool.
Test Your Knowledge
1. In order to increase his physical activity, Bob started walking after dinner several evenings a week. He notices that on the evenings he walks the low glucose alert on his CGM device awakens him in the middle of the night. Bob has confirmed these low glucose alerts with his blood glucose meter and treated his low glucose appropriately. What should Bob do now to help prevent lows in the future?
a. Discuss with his healthcare team using the temporary basal rate feature on his pump when physically active
b. Leave his CGM device out of range when sleeping to avoid being awakened by alarms
c. Eat a hearty snack before bedtime
d. Remove his insulin pump before bedtime
2. Sally went out for breakfast and ate scrambled eggs on toast. Two hours after taking her insulin and eating, her CGM reads 12.0 mmol/L. She is concerned about the post meal high glucose and wants to give herself a correction bolus to bring her glucose into target range. What is her next step?
a. Go to the ezBG feature in her smart pump and enter 12.0 mmol/L as her current glucose value.
b. Give herself a quick 2 units of insulin to lower her glucose.
c. Take a fingerstick reading. Enter that reading into the ezBG feature of her smart pump to determine what, if any insulin dose is needed to bring her back down into her target range.
d. Drink a lot of water to help avoid dehydration.
64 Insulin Pump Workbook Insulin Pump Workbook 65
APPENDIX 2: INFECTION PREVENTIONWashing your hands and changing your infusion site and dressing is the best prevention of skin problems and infections. It is best to rotate your site and change your set every 2 to 3 days, or as recommended by your healthcare provider. This will help prevent infections and elevations in your blood glucose readings.
Inspect your site twice daily, once in the morning and once in the evening. Look for signs of infection such as:•Drainage(clear,cloudy,white,yelloworbloody)
•Unpleasantodour
•Rednessorwarmarea
•Feverorchills
•Painordiscomfortatthesite
•Unexplainedhyperglycemia
•Nauseaorvomiting
MAKE SURE TO REPORT ANY OF THESE SYMPTOMS TO YOUR HEALTHCARE PROVIDER AS SOON AS POSSIBLE
Tips for preventing skin problems and infections:•Wash your hands thoroughly with antibacterial soap and water before and after handling pump supplies, site dressings and/or medications.
•When preparing your site, use an antibacterial soap solution. Cleanse the skin in a circular motion, from the inside to the outside. If needed, apply a skin protectant such as Skin Prep®. A 7.5cm (3-inch) diameter area is best. Allow your skin to dry naturally.
•Inspect sterile packages to make sure contents have not been opened or damaged. If the integrity of the package has been damaged, discard and use another one. Contact your diabetes supply company; they may want you to send the damaged package back.
•Prescription medication or antibiotic ointment on discontinued sites may be needed. Consult your healthcare provider if you are having problems with skin irritation or infection.
•Never recap needles used for injections that have been placed under the skin.
APPENDIX 3: PUMPER`S KITBe prepared! Always carry a “kit” with supplies to help you manage your diabetes when away from home. It is wise to carry extra pump supplies, plus a way to take insulin in case there is a mechanical problem with your pump.
Suggested items include:
c Blood glucose monitoring supplies (meter and batteries, test strips, lancets, lancing device)
c Ketone test strips (blood or urine)
c Vial of rapid-acting insulin and insulin syringes or insulin pen
c Animas® insulin pump cartridges and infusion sets (plus extras)
c Site preparation supplies (dressings or adhesives)
c Extra lithium Energizer® AA battery for the insulin pump
c Extra battery cap and cartridge cap for the insulin pump
c Quick-acting source of carbohydrate (glucose tablets or gel, juice, honey, Life Savers®...)
c Glucagon emergency kits for home and travel
c Medical identification
c Emergency contact phone numbers
c Calculator (to help calculate manual bolus doses)
In the event of interruption of pump operations, keep on hand:
c Directions from your healthcare team for dosing of your rapid and long-acting insulin
c An unexpired vial or current prescription for your long-acting insulin
c A list of your current pump settings
Make sure to always check with your physician/healthcare professional for advice on specific treatment of your diabetes.
Contact Animas Pump Support (1 877 937-7867 / 1 610 644-8990) for technical related issues with your pump.
Bring extra pump supplies when travelling outside of Canada; pump supplies and related products may not be available in other countries or may require a prescription to purchase. Animas Canada will only ship pump supplies and pumps within Canada.

66 Insulin Pump Workbook Insulin Pump Workbook 67
APPENDIX 4: TRAVELLING WITH AN INSULIN PUMP Tips to help you be preparedWhen it comes to travelling with Type 1 diabetes, it’s best to follow the Boy Scouts motto: Be Prepared. Detailed planning and preparation are the keys to an enjoyable and relaxing holiday.
Preparing for travel •Scheduleanofficevisitwithyourhealthcareprovideratleast4-6weekspriortodepartureto discuss your travel itinerary and diabetes treatment plan.
•Becomefamiliarwithfoodsofyourdestinationandtheircarbohydrateamounts.
•ReviewyourmedicalinsuranceregardingmedicalcoverageoutsideofCanada.
•Developaback-upplanfortimeoffthepumpincaseofatechnicalemergency.
•Bring2-3timesasmanypumpsuppliesthatyoumayrequire,alongwithlong-actinginsulin, syringes and/or insulin pens – pump supplies and related products may not be available in other countries or or may require a prescription to purchase.
Packing for travel (Travel checklist)
c A back-up vacation loaner pump
c Infusion sets and cartridges
c Insulin (rapid and long-acting)
c Blood glucose monitor and test strips
c Lancing device and lancets
c Skin preparation dressings or adhesive
c Extra batteries for pump/meter
c Extra battery cap and cartridge cap for pump
c Extra pump clip and/or pump case
c A list of current pump settings
Travelling with a pump
•Packmedicationsinoriginalbottlesandpackaging.
•Keepfoodandglucosewithineasyreach.Donotpacktheseinyourcheckedluggageor in overhead bins.
•Beawarethathigheraltitudesandwarmertemperaturesmightdecreaseorincreaseinsulin requirements.
•Monitor, monitor, monitor! Changes in eating, sleeping patterns, and activity levels can affect your blood glucose levels.
c Syringes or insulin pens
c Sharps container
c Ketone test strips
c Hypoglycemia treatment (glucose tabs, Glucagon, etc.)
c Any other medications you require (e.g. Gravol®)
c Copies of all prescriptions
c Copies of physician’s orders for dosing of rapid and long-acting insulin
c Emergency contact numbers
Passing through airport security
•Notifyscreenersifyouarewearinganinsulinpumpandaskiftheywillvisuallyinspectthe pump since it is attached to your person.
•YourpumpshouldnotgothroughtheX-rayscreeningthatisusedforcarry-onorchecked luggage.
•WholeBodyImagingTechnologyisalsoaformofX-rayandyouwillneedtodisconnectfrom the pump at your insertion site if you opt to go through the body scan instead of a manual search.
•AdditionalquestionsrelatedtoinsulinpumpsandX-rayorradiationexposureshould be directed to Animas Pump Support at 1-877-937-7867 (1-610-644-8990 outside of North America).
Living with diabetes can be an adventure of its own. By taking the time to organize all of your required supplies and medical care prior to travelling, you can rest easy and take pleasure in your trip away.
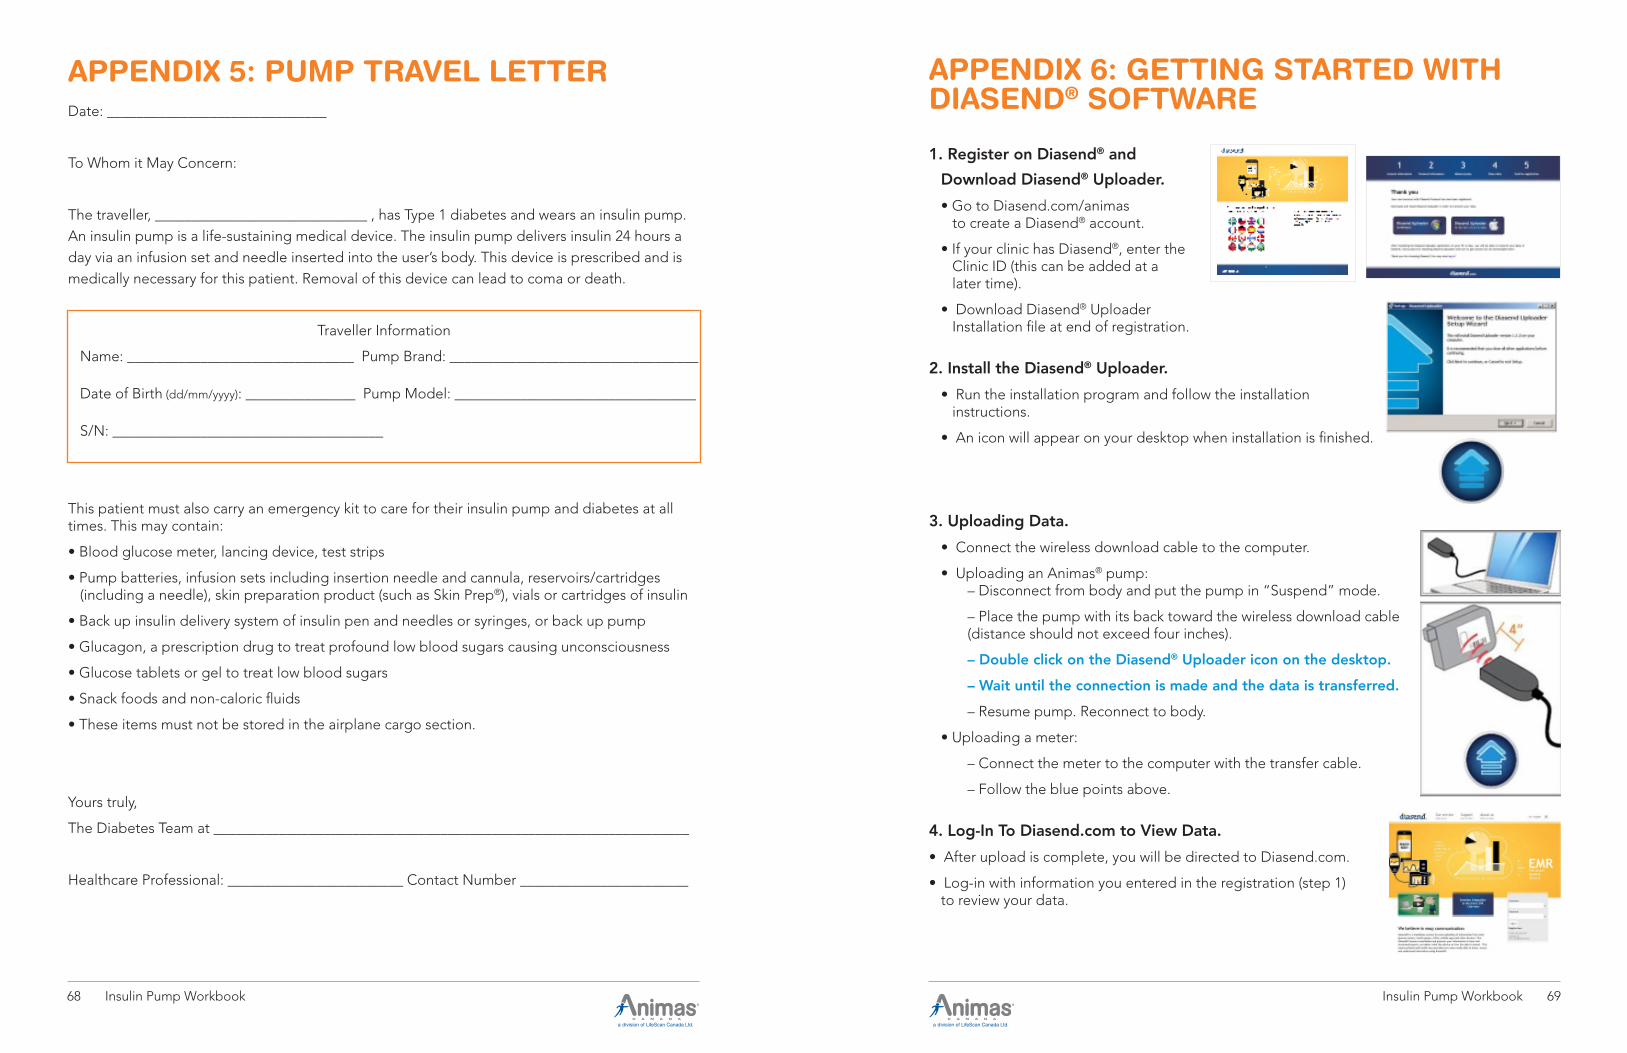
68 Insulin Pump Workbook Insulin Pump Workbook 69
APPENDIX 5: PUMP TRAVEL LETTERDate: ______________________________
To Whom it May Concern:
The traveller, _____________________________ , has Type 1 diabetes and wears an insulin pump. An insulin pump is a life-sustaining medical device. The insulin pump delivers insulin 24 hours a day via an infusion set and needle inserted into the user’s body. This device is prescribed and is medically necessary for this patient. Removal of this device can lead to coma or death.
Traveller Information
Name: _______________________________ Pump Brand: __________________________________
Date of Birth (dd/mm/yyyy): _______________ Pump Model: _________________________________
S/N: _____________________________________
This patient must also carry an emergency kit to care for their insulin pump and diabetes at all times. This may contain:
•Bloodglucosemeter,lancingdevice,teststrips
•Pumpbatteries,infusionsetsincludinginsertionneedleandcannula,reservoirs/cartridges (including a needle), skin preparation product (such as Skin Prep®), vials or cartridges of insulin
•Backupinsulindeliverysystemofinsulinpenandneedlesorsyringes,orbackuppump
•Glucagon,aprescriptiondrugtotreatprofoundlowbloodsugarscausingunconsciousness
•Glucosetabletsorgeltotreatlowbloodsugars
•Snackfoodsandnon-caloricfluids
•Theseitemsmustnotbestoredintheairplanecargosection.
Yours truly,
The Diabetes Team at _________________________________________________________________
Healthcare Professional: ________________________ Contact Number _______________________
APPENDIX 6: GETTING STARTED WITH DIASEND® SOFTWARE
1. Register on Diasend® and
Download Diasend® Uploader.
•GotoDiasend.com/animas to create a Diasend® account.
•IfyourclinichasDiasend®, enter the Clinic ID (this can be added at a later time).
•DownloadDiasend® Uploader Installation file at end of registration.
2. Install the Diasend® Uploader.
•Runtheinstallationprogramandfollowtheinstallation instructions.
•Aniconwillappearonyourdesktopwheninstallationisfinished.
3. Uploading Data.
•Connectthewirelessdownloadcabletothecomputer.
•UploadinganAnimas® pump: – Disconnect from body and put the pump in “Suspend” mode.
– Place the pump with its back toward the wireless download cable (distance should not exceed four inches).
– Double click on the Diasend® Uploader icon on the desktop.
– Wait until the connection is made and the data is transferred.
– Resume pump. Reconnect to body.
•Uploadingameter:
– Connect the meter to the computer with the transfer cable.
– Follow the blue points above.
4. Log-In To Diasend.com to View Data.
•Afteruploadiscomplete,youwillbedirectedtoDiasend.com.
•Log-inwithinformationyouenteredintheregistration(step1) to review your data.

70 Insulin Pump Workbook Insulin Pump Workbook 71
APPENDIX 7: PUMP FLOWSHEETS

72 Insulin Pump Workbook Insulin Pump Workbook 73
74 Insulin Pump Workbook Insulin Pump Workbook 75
APPENDIX 8: ANSWERS TO TEST YOUR KNOWLEDGE QUESTIONS
Page 6
1. True
2. Basal
3. 3-5 hours
4. Bolus
5. 4
Page 8
1. True
2. Exercise (or increased/decreased activity) and sick days
Page 11
1. b
2. a
Page 13
BG = 6.4 mmol/L
Step One: 60 divided by 12 = 5.0 units for carbohydrate bolus
Step Two: BG is within target. No BG bolus needed.
Step Three: No need to do this. BG is within target.
Answer: I need to bolus 5.0 units for lunch.
BG = 11.2 mmol/L
Step One: 60 divided by 12 = 5.0 units for carbohydrate bolus
Step Two: 11.2 mmol/L - 5.6 mmol/L = 5.6 mmol/L
5.6mmol/L divided by 3.3 ISF = 1.7 units for BG bolus
Step Three: 5.0 + 1.70 = 6.70 units for lunch
Answer: I need to bolus 6.70 units for lunch.
BG = 3.9 mmol/L
Step One: 60 divided by 12 = 5.0 units for carbohydrate bolus
Step Two: 3.9 mmol/L - 5.6 mmol/L = -1.7 mmol/L
-1.7 mmol/L divided by 3.3 ISF = -0.5 units for BG bolus
Step Three: 5.0 - 0.5 = 4.5 units.
Answer: I need to bolus 4.5 units for lunch.
Page 20
1. 15 grams
2. 57 - 60 grams
3. True
4. 1 to 1 & 1/2 hours
5. All of the above
Page 23
1. Every 2-3 days, or as directed by your healthcare professional and/or diabetes educator
2. True
3. Stomach Page 30
1. I don’t take any intermediate or long-acting insulin.
2. By a syringe or insulin pen
3. Take insulin by syringe, change infusion set/site, drink calorie free beverages,
continue to monitor BG
Page 32
1. 1/2 cup of apple juice, 4 glucose tablets
2. 15, 15
3. True
4. False
Page 34
1. False
2. Every 2-4 hours
Page 37
1. True
2. Eat a snack, decrease insulin using temp basal, reduce bolus amount with meal or snack
3. False
Page 53
1. 12
2. True
3. 4-5 hours
4. False
5. low-fat meal, easy to figure carb amount
Page 62
1. a
2. c

76 Insulin Pump Workbook Insulin Pump Workbook 77
My Notes:
______________________________________________________________________________________
______________________________________________________________________________________
______________________________________________________________________________________
______________________________________________________________________________________
______________________________________________________________________________________
______________________________________________________________________________________
______________________________________________________________________________________
______________________________________________________________________________________
______________________________________________________________________________________
______________________________________________________________________________________
______________________________________________________________________________________
______________________________________________________________________________________
______________________________________________________________________________________
______________________________________________________________________________________
______________________________________________________________________________________
______________________________________________________________________________________
______________________________________________________________________________________
______________________________________________________________________________________
______________________________________________________________________________________
______________________________________________________________________________________
______________________________________________________________________________________
______________________________________________________________________________________
______________________________________________________________________________________
______________________________________________________________________________________
______________________________________________________________________________________
______________________________________________________________________________________
______________________________________________________________________________________
______________________________________________________________________________________
______________________________________________________________________________________
______________________________________________________________________________________

200 Whitehall DriveMarkham, ON L3R 0T5Phone: 1-866-406-4844
Email: [email protected]
Web: www.Animas.ca
Animas® is a trademark of Animas Corporation and used under license.All other trademarks are property of their respective owners.
© 2013 LifeScan Canada Ltd., Burnaby, BC V5C 6S7 AW102-550A 12/2013
![Welcome. [ ] · PDF fileInsulin Pump Workbook Welcome. Welcome to insulin pump therapy and to the Animas® family! At Animas Canada, we are committed](https://img.dokumen.tips/doc/110x75/5aa11b1a7f8b9ab4208b4ddd/welcome-pump-workbook-welcome-welcome-to-insulin-pump-therapy-and-to-the-animas.jpg)