Embed Size (px)
Citation preview

Quilt Square Coin Purse 1
My Fair Lady Sweet Temptations Coin Purse
5x5 Hoop Fabric Patches: 1 - 4½” x 4½” square 2 - 4½” x 1½” rectangles 2 - 6” x 1½” rectangles Batting: 1 - 6” x 6” square
1. Hoop a piece of cut-away
stabilizer. Sew the place-
ment line on the stabilizer
(color 1).
2. Place the batting over the
stitched outline. It should over-
lap the outline on all edges by at
least ¼ inch.
3. Sew the tackdown line
(color 2).
QUILT SQUARE INSTRUCTIONS Cut one set of patches for each square. Use a size 80/12 sharp embroidery needle and regular sewing thread to sew the patches. The thread you use to sew the patches will not be seen in the final quilt square. Switch to embroidery thread when you get to the embroidered dessert in the quilt square. Both of the quilt squares are pieced the same way. The instructions for the Chocolate Cake square are shown below. The Sundae square is pieced the same way. Please see the color chart on page 6 for the appliqué sections for the Sundae square.
Stabilizer
Placement
Line
Batting
SUPPLY LIST Cut away mesh stabilizer Cotton fabric (pre-shrunk and ironed) for patches Fabric Scraps (pre-shrunk and ironed) for appliqués ⅛ yd fabric for the sashing ¼ yd fabric for the lining 1 - 7” Zipper 80/20 Quilter’s Batting Ruler Rotary cutter 80/12 sharp embroidery needle Embroidery thread, sewing thread, and bobbin thread Embroidery nips (or small scissors)

Quilt Square Coin Purse 2
4. Sew the placement line
for the center patch
(color 3).
5. Place the square fabric patch over
the placement line. Sew the tack-
down line (color 4). The fabric
should overlap the line by at least ⅛
inch. Trim if necessary.
6. Sew the placement line for
the left rectangle (color 5).
Make sure that the presser
foot does not lift the seam
allowance of the first patch.
7. Place one of the short
patches right side down
over the center patch. It
should overlap the rectan-
gle by at least ⅛ inch.
8. Gently hold the patch in
place, and sew the seam
line (color 6).
9. Fold the fabric over the seam line so
that it covers the rectangle. Gently
hold the fabric in place and sew the
tackdown line (color 7). The fabric
should overlap the outside edges of
the quilt square by at least ¼ inch.
Wrong side of
fabric.
10. Sew the placement line for the
right rectangle (color 8).
Make sure that the presser foot
does not lift the seam allow-
ance of the other patches.
11. Place one of the short patches
right side down over the center
patch. It should overlap the
rectangle by at least ⅛ inch.
12. Gently hold the patch in
place, and sew the seam
line (color 9).
Wrong side of
fabric.

Quilt Square Coin Purse 3
13. Fold the patch over the seam
line so that it covers the rec-
tangle. Gently hold the
patch in place, and sew the
tackdown line (color 10).
14. Sew the placement line for the
top rectangle (color 11). Make
sure that the presser foot does
not lift the seam allowance of
the other patches.
15. Place a long rectangular
patch right side down
over the center patch. It
should overlap the rec-
tangle by at least ⅛ inch.
19. Place a long rectangular
patch right side down over
the center patch. It should
overlap the rectangle by at
least ⅛ inch.
20. Gently hold the patch in
place, and sew the seam
line (color 15).
21. Fold the patch over the seam line so that it covers the rectan-gle. Gently hold the patch in place, and sew the tackdown line (color 16).
Wrong side of
fabric.
16. Gently hold the patch in
place, and sew the seam
line (color 12).
17. Fold the patch over the seam line
so that it covers the rectangle.
Gently hold the patch in place,
and sew the tackdown line (color
13).
18. Sew the placement line for the
bottom rectangle (color 14).
Make sure that the presser foot
does not lift the seam allowance
of the other patches.
Wrong side of
fabric.

Quilt Square Coin Purse 4
22. Do not unhoop yet! The following pictures are close-ups - the quilt square is still in the hoop. Embroi-der the placement line for the cake stand (color 17). Use the same thread that you will use for the sat-in finish on the cake stand.
23. Place a piece of fabric over the
placement line. It should com-
pletely cover the stitched line.
24. Gently hold the fabric in
place, and embroider the
cutting line (color 18).
Use the same thread.
28. Place a piece of fabric over
the placement line. It should
completely cover the
stitched line.
29. Gently hold the fabric in
place, and embroider the cut-
ting line (color 21). Use the
same thread.
30. Use small embroidery nips to
trim the fabric around the cut-
ting line. Trim close, but do not
cut the stitches!
25. Use small embroidery
nips to trim the fabric
around the cutting line.
Trim close, but do not
cut the stitches!
26. Embroider the finish for the
plate (color 19). Use the same
thread.
27. Embroider the placement line for the cake (color 20). Use the same thread that you will use for the satin finish on the cake.

Quilt Square Coin Purse 5
32. Embroider the frosting (color 23). 33. Embroider the raspber-
ries (color 24).
31. Embroider the finish for the
cake (color 22).
34. Embroider the stippling
(color 25).
35. After the stippling is finished, remove the quilt square from
the hoop. Use a ruler and rotary cutter to trim the quilt square
so that it has a scant ¼” border from the stitched edge all the
way around. This is the seam allowance.
¼” Seam Allowance
TIME SAVER: After you are familiar with the technique and the placement of the patches, you can skip the placement line
and just sew the seam line and tackdown for each patch.

Quilt Square Coin Purse 6
CHOCOLATE CAKE QUILT SQUARE COLOR CHART 1 Placement line for the batting
2 Tackdown for the batting
3 Placement line for the center square
4 Tackdown for the center square
5 Placement line for the left rectangle
6 Seam line
7 Tackdown
8 Placement line for the right rectangle
9 Seam line
10 Tackdown
11 Placement line for the top rectangle
12 Seam line
13 Tackdown
14 Placement line for the bottom rectangle
15 Seam line
16 Tackdown
17 Placement line for the cake stand
18 Cutting line for the cake stand
19 Pink - Finish for the cake stand
20 Placement line for the cake
21 Cutting line for the cake
22 Dark Brown - Finish for the cake
23 Light Brown - Frosting decorations
24 Red - Raspberries
25 Stippling
SUNDAE QUILT SQUARE COLOR CHART 1 Placement line for the batting 2 Tackdown for the batting 3 Placement line for the center square 4 Tackdown for the center square 5 Placement line for the left rectangle 6 Seam line 7 Tackdown 8 Placement line for the right rectangle 9 Seam line 10 Tackdown 11 Placement line for the top rectangle 12 Seam line 13 Tackdown 14 Placement line for the bottom rectangle 15 Seam line 16 Tackdown
17 Placement line for the left scoop of ice cream 18 Cutting line for the left scoop 19 Dark Pink - Finish for the left scoop 20 Placement line for the right scoop of ice cream 21 Cutting line for the right scoop 22 Mint Green - Finish for the right scoop 23 Placement line for the center scoop of ice cream 24 Cutting line for the center scoop 25 Brown - Finish for the center scoop 26 Placement line for the whip cream 27 Cutting line for the whip cream 28 Cream - Finish for the whip cream 29 Placement line for the cherry 30 Cutting line for the cherry 31 Red - Finish for the cherry 32 Brown - Cherry stem 33 Placement line for the dish 34 Cutting line for the dish 35 Pink - Finish for the dish 36 Light Brown - Nuts 37 Stippling

Quilt Square Coin Purse 7
PURSE ASSEMBLY INSTRUCTIONS
Wrong side
of square
Right side of
sashing
1. Place the Sundae square over
a strip of sashing, right sides
together.
2. Stitch together using ¼” seam al-
lowance.
3. Trim the unused portion of
the sashing so that it is
even with the bottom of the
square.
4. Open the sashing and press.
The seam will naturally open
toward the sashing.
5. Repeat for the other side. 6. Sew sashing along the top and
bottom of the quilt square.
Press the sashing open.
7. Sew sashing to all four sides of
the Chocolate Cake square. 8. Use one of the squares (with
sashing) as your pattern, and
cut two pieces of lining.
9. Sew rick rack around the sides
and bottom of the Sundae
Square.

Quilt Square Coin Purse 8
11. Place one piece of lining fab-
ric right side down over the
zipper.
12. Pin in place.
13. Stitch along the top using a ¼”
seam. If your zipper is too short
to get the zipper pull out of the
way, put the zipper pull in the
middle of the zipper, sew the
first half of the seam, move the
pull to the other side, and sew
the second half of the seam.
14. Open out the lining, and
press the seam towards the
lining.
15. Close the zipper all the
way, and fold the lining so
that it is behind the Sun-
dae square.
16. Place the Chocolate Cake
square right side down
over the purse front so that
it is lined up with the top
of the zipper.
17. Place the second piece of lining fabric
underneath the zipper. The zipper should
be sandwiched between the purse back
and the lining. The rest of the purse will
hang down between them.
18. Pin in place, so that the
quilt squares are lined up.
10.Open the zipper, and place it
right side down along the top
of the Sundae square.
Quilt Square Coin Purse 9
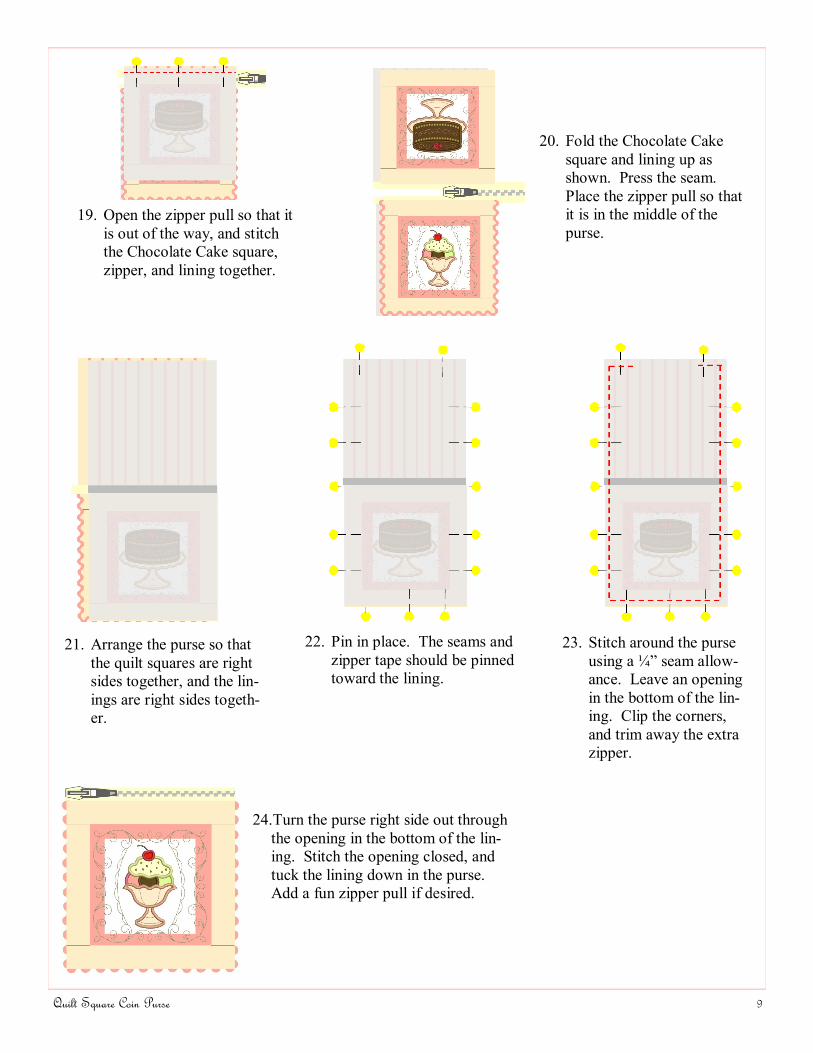
19. Open the zipper pull so that it
is out of the way, and stitch
the Chocolate Cake square,
zipper, and lining together.
20. Fold the Chocolate Cake
square and lining up as
shown. Press the seam.
Place the zipper pull so that
it is in the middle of the
purse.
21. Arrange the purse so that
the quilt squares are right
sides together, and the lin-
ings are right sides togeth-
er.
22. Pin in place. The seams and
zipper tape should be pinned
toward the lining.
23. Stitch around the purse
using a ¼” seam allow-
ance. Leave an opening
in the bottom of the lin-
ing. Clip the corners,
and trim away the extra
zipper.
24.Turn the purse right side out through
the opening in the bottom of the lin-
ing. Stitch the opening closed, and
tuck the lining down in the purse.
Add a fun zipper pull if desired.

Quilt Square Coin Purse 10
WASHING Wash your purse in warm water. Tumble dry on low heat. Remove it from the dryer while it is slightly damp,
and lay it flat to dry.
COPYRIGHT INFORMATION Sharing is Stealing! All digitized designs, instructions, and pictures are copyrighted by My Fair Lady and
are only for use by the person who originally purchased the designs. Digitized designs and instructions
are not to be shared, swapped, duplicated or sold in any way. Designs in their stitched out form can be
used on personal items, gifts and items for resale on a small scale. The digitized design itself remains the
property of My Fair Lady. Please help My Fair Lady continue to offer quality designs at reasonable prices
by following copyright laws.
RESOURCE GUIDE allstitch.net
Cut away stabilizer: Sheer Stitch PolyMesh Stabilizer
505 Adhesive Spray
Embroidery thread
www.abitofstitch.com
Embroidery nips
www.quiltersdreambatting.com
Quilters Dream Batting: Quilters Dream Puff
My Fair Lady Designs www.myfairladydesigns.com