Embed Size (px)
Citation preview

MWMA Bulletin
MWMA 101 | SYSTEM UPDATES | HELPFUL TIPS
Forward
MWMA 101 System Updates Helpful Tips
MWMA 101
Case Manager Assignment
The last bulletin included information that the LOC (Level of Care) Reviewer makes the
LOC determination by marking the LOC “Met”, “Not Met”, or “Pended”. Each of these
determination decisions generates different communications to those involved in the LOC process.
If the LOC Reviewer marks the LOC “Met,” a correspondence is sent to the Individual/Legal
Guardian/Authorized Representative (as appropriate) informing of the LOC status. MWMA works

with benefind to verify that the Individual has Active and Approved Medicaid in a compatible
Medicaid Type of Assistance (TOA). At this point, if the Individual’s Medicaid eligibility is verified to
be Active and Approved in a compatible TOA, MWMA enrolls the Individual in the specific HCBS
Waiver program. Upon enrollment, another correspondence is sent informing of the waiver
enrollment and that a Case Management Agency must be chosen.
For additional information related to correspondences generated through the Level of Care
process, including Level of Care marked “Not Met” or “Pended”, please refer to the Case Manager
Participant Manual.
A Case Supervisor in the chosen Case Management Agency performs the initial Case
Management Assignment by utilizing the Case Manager Assignment link in the Quick Links of
their Dashboard.
Plan Creation
When the Case Supervisor assigns the Individual to a Case Manager’s caseload, the Case
Manager receives the task to “Create and Submit Initial Plan of Care for Newly Assigned
Individual.” The Case Manager may begin entry in both the Accompanying Data and Document
(ADD) module and Plan of Care (Plan) module as soon as the case manager assignment has
taken place. If any of the ADD module is required as part of the Plan, it is most efficient for the
Case Manager to complete the ADD module and then begin entry in the Plan module.
The Plan includes the following screens:
Create Draft Plan
View Plan Details
Goals
Service Details
Non-Waiver Program
Service Summary
Upload Documents
Submit Plan
After the Case Manager clicks “Submit Plan” on the Submit Plan screen, the Plan may go to a
variety of users for review. Let’s review the various scenarios in which the Plan may go to different
reviewers!

Plan Review
If the Plan does not require Case Supervisor or Case Management Administrator review OR when
any necessary review/revision has taken place, the Plan Reviewer receives a task to review the
Plan. The Plan Reviewer gives a prior-authorization decision to each service requested. The
“Pending Plan Reviewer Review” task cannot be closed (and the prior-authorization decisions for
the services cannot be submitted) until each service is reviewed and marked “Approved”, “Not
Approved”, or “Pended”.
If any service within a Plan is marked “Approved,” the service may be provided according
to the date, rates, and units prior-authorized in the Plan by the external Plan Reviewer even
if other services on the Plan are determined to be “Not Approved” or “Pended.”
If any service within a Plan is marked “Not Approved,” it means that the Plan Reviewer
determined that the service or units of service were not appropriate for the Individual’s
situation. If any of the services are marked “Not Approved,” the Case Manager receives a
“Revisions Requested by Plan Reviewer” task.
If any service within a Plan is marked “Pended,” it means that the Plan Reviewer needs
more information. “Pended” services may require follow-up with the Individual, depending
on the situation. If any of the services are marked “Pended,” the Case Manager receives a
“Revisions Requested by Plan Reviewer” task.
If the Plan Reviewer marks the Prior-Authorization on a least one, but not all, services as “Pended”
or “Not Approved”, the Plan Status displays as Partial Current.

If the Plan Reviewer marks the Prior-Authorization on ALL services as “Pended” or “Not Approved”
with a reason other than “LOI” or “CDO Budget”, the Plan Status displays as Revisions Requested
by QIO.
System Updates
There are two changes to Medicaid policy regarding Medicaid application and renewal
processes which require system enhancements. These enhancements will be
effective July 1st. The following table includes brief descriptions.
Helpful Tips
Have you ever wondered how you would update an Individual’s address? Users that are
associated with the Individual’s case or application have the ability to navigate to the
Individual’s benefind Dashboard and update the Individual’s address. Both the residential
address and the mailing address may be updated through benefind. Let’s go over the steps to
update an Individual’s residential address.
Updating a Residential Address

1. Navigate to the Individual’s Individual Summary screen.
2. Click Go to benefind Dashboard.
3. Click Report Change in Circumstance.
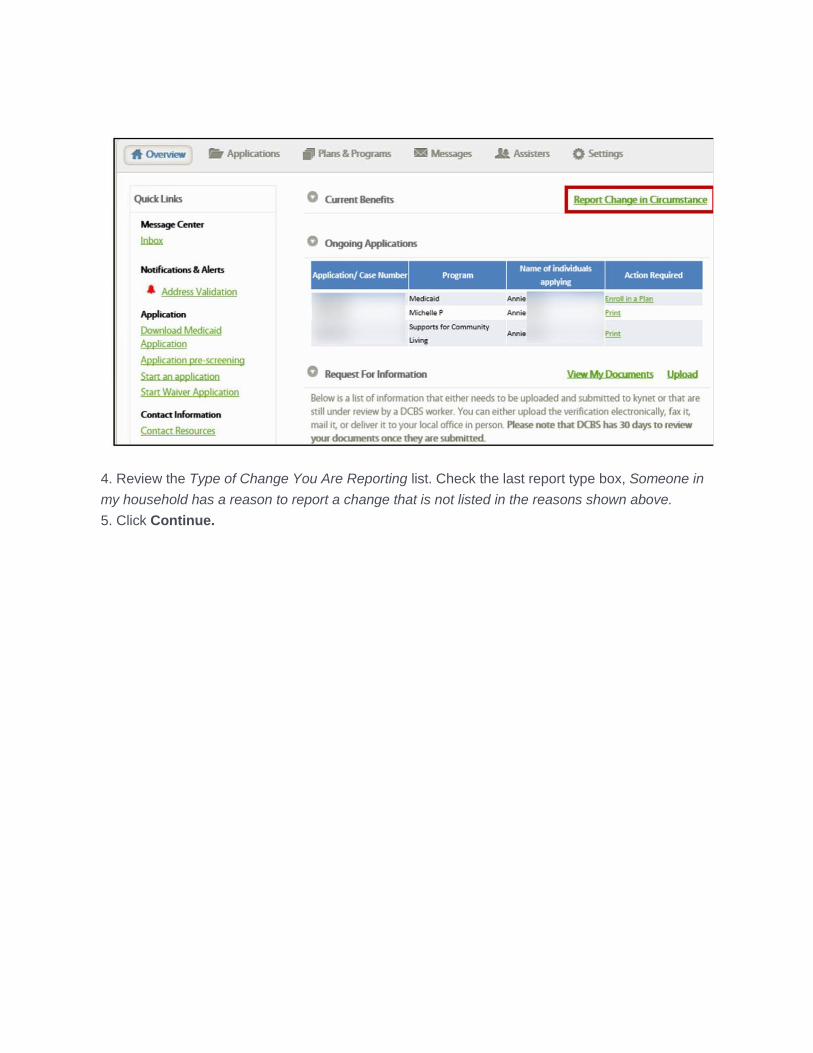
4. Review the Type of Change You Are Reporting list. Check the last report type box, Someone in
my household has a reason to report a change that is not listed in the reasons shown above.
5. Click Continue.

Please Note: The user is able to mark the boxes next to any applicable changes that need to be
made. If the change is not explicitly listed, mark the last box: Someone in my household has a
reason to report a change that is not listed in the reasons shown above.
6. Select the arrow drop-down next to Contact Information.
7. Click the pencil icon under Contact Information to edit the Individual’s address.

8. Enter the new address details.
9. Select the appropriate button on the Possible Address Match pop-up.
10. Click Next.

11. Continue through the end of the Medicaid application, complete the E-signature, and re-submit
the Medicaid application to update the residential address. Please Note: This process replaces the
usage of the MAP – 24 or 24c for address changes. This is only for residential address updates.
There are other address update processes.
This update requires the user to review all information previously captured in the rest of the
Medicaid application. This occurs because any update may cause a downstream impact on
information captured on subsequent screens.
Updating a Mailing Address
Updating an Individual’s mailing address does not involve re-submitting the Medicaid application.
The user is also able to update an Individual’s phone number through the process listed below.
1. Access the Individual’s benefind Dashboard through the Individual Summary screen.
2. Click Settings.
3. Next to the Contact Information section, click Edit.
4. Enter the new address details.
5. Select the appropriate button on the Possible Address Match pop-up.
6. Click Update.
Please Note: Users may also update the “How Else Can We Reach You?” section to indicate
additional contact information.
New and revised documents and web-based trainings will be posted to TRIS soon, including
more information regarding updating addresses.
To get a TRIS account, send an email to [email protected]
TRIS URL: http://tris.eku.edu/MWMA/
Most usernames are firstname.lastname with the password medicaid1
Helpful Resources
Contact Center representatives are available Monday-Friday from 8 a.m. to 5 p.m. ET at 1-800-
635-2570. After the DMS welcome message plays, press 1, 6, and 2 to be transferred directly to
the MWMA Contact Center.
Share this email:
Manage your preferences | Opt out using TrueRemove™ Got this as a forward? Sign up to receive our future emails. View this email online.
2200 Ross Ave. STE 1600 Dallas, TX | 75201 US
This email was sent to [email protected]. To continue receiving our emails, add us to your address book.


![world.toagroup.com...the natural world and is very effective in creating a country style. TOA Prairie TOA TOA TOA 851B TOA C] TOA 12 04 Make you feel like adventures in Africa. with](https://img.dokumen.tips/doc/110x75/5f0a99557e708231d42c6c3c/world-the-natural-world-and-is-very-effective-in-creating-a-country-style.jpg)