Embed Size (px)
Citation preview

Multimedia- Microsoft PowerPoint
ADE100- Computer LiteracyLecture 21
2
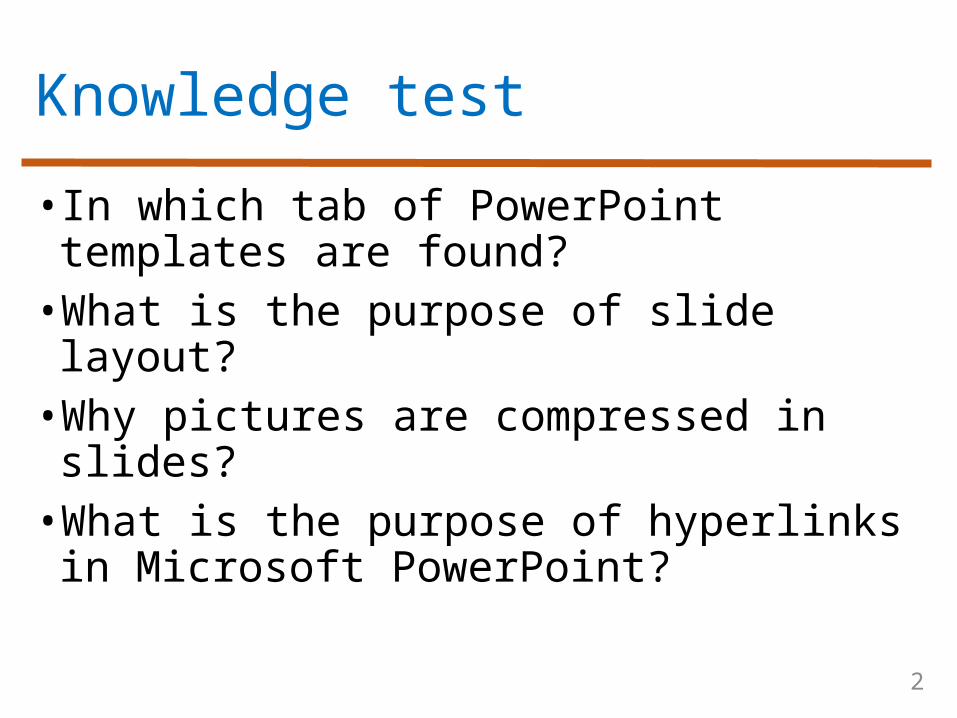
Knowledge test
• In which tab of PowerPoint templates are found?•What is the purpose of slide layout?•Why pictures are compressed in slides?•What is the purpose of hyperlinks in Microsoft PowerPoint?

3
Topics covered
• Adding animations and special effects • Applying slide transition• Adding & customizing animations• Adding action buttons• Turning off animations
• Setting up and playing presentations • Printing presentations• Setting time

4
Slide Animations
• Slide Animations• Allows text transition-
appearance/disappearance of individual text on the slides during presentation• The individual characters, words,
statements or symbols appear on the slide in a beautiful way• Moving and flying text and objects• By default, “No Animation” style is set

5
Adding animations
• Several animations for slide objects are available• Choose Animate from Animations tab• Select an animation effect from the combo box and apply it• Select Apply To All if you want to apply on the whole document

6
Customizing Animations
• Custom animations• Choose Animations>>Custom Animation• When clicked then Custom Animation pane
opens• Click Add Effect button arrow to select a
category and subcategory of animations to apply• Click Slide Show button to see the preview• You can move animations up or down to
change the sequence of animations

7
Custom Animations

8
Slide Transition
• Slide transition• A visual effect given to a slide as it
appears or disappears on the screen• Various slide transitions are available that
can be placed on different slides• By default, no transition is set

9
Applying slide transition
• Transition to This Slide• Go to “Transition to This Slide” from Animations tab• Search and select a style from given styles
in the ribbon• Move cursor over the style to see the effect
on the slide• Choose any one and click once to apply
on the current slide

10
Applying slide transition
• Changing Transition Sound• Select Animations>>Transition Sound• By default, “No Sound” is selected• Click the arrow in the Transition Sound
box and select a sound to play when slide transition occurs
• Changing Transition Speed• Animations>>Transition Speed• By default, Fast is selected• You can change it by clicking arrow of
Transition Speed box to slow or medium

11
Setting time
• Advance Slide• Choose the method that how slides will advance• By default, “On Mouse Click”
• Changing Advance Slide• Check the checkbox before “Automatically After”• Insert the time duration in seconds after which
the slide will move to the next slide
• Apply To All• When you set all transition options• In the end, click “Apply To All” button to apply
the settings on the whole document slides

12
Adding Action buttons
• Action buttons• Allow you to create hyperlinks from slide to slide, to a
specific file/program or a webpage• Activates when you run slide show view
• Inserting an Action button• Choose Shapes from Insert tab• Select the arrow below the icon and choose an action
button you want to insert• Click once the button icon and then draw it on the
slide• Action Settings window will appear• To assign a hyperlink to the button, click “Hyperlink
to” and click the down arrow to direct the link and Click OK

13
Inserting action button
Action button

14
Turning off animations
• Select Animate from Animations tab• Choose “No Animation” from the box in front of Animate option• Choose the default transition style i.e. “No Transition” style from the transition style icons

15
Topics covered
• Adding animations and special effects • Applying slide transition• Adding & customizing animations• Adding action buttons• Turning off animations
• Setting up and playing presentations • Printing presentations• Setting time

16
Playing the presentation
• Click the Slide Show tab• From beginning• Click to run slides from the first slide or press
F5
• From current slide• Click to start slide show from current slide or
press Shift+F5
• Custom slide show• Displays only slides you select• You can have different shows for 30 minutes or
60 minutes from the same presentation

17
Custom slide show
• Creating a custom slide show • Choose Slide Show>>Custom Slide Show• Click the arrow along “Custom Slide Show”
icon• Select “Custom Shows” from the menu to
create a new custom show• “Custom Shows” dialog box appears• If you have already created a slide show then
it appears otherwise create a new show• Click New button in the dialog box

18
Custom slide show contd.
• Creating a Custom Slide Show• Define Custom Show dialog box appears,
select the slides from “Slides in Presentation” box and click “Add” button to shift them to “Slides in Custom Show” box • Enter a “Slide Show name” in the box
and then click OK

19
Custom slide show

20
Setting up presentation
• Set Up Slide Show• Advanced options for slide show
•Hide slide• Hides the current slide from the
presentation• It will not show in slide show view
• Record Narration• Record a narration track using microphone
attached to your computer• It will play with the slide show

21
Setting up presentation
• Rehearse Timings• Launches a full screen show for your
rehearsal• Time spent on each slide will be recorded• You can save these timing to run the show
automatically in future
•Use Rehearsed Timings• Select the check box to use rehearse
timings you created to run slides automatically

22
Printing The Presentation
• Three ways i.e. Print, Quick print and Print preview• Print• Choose File>>Print>>Print• Select “Print” from “File or Office button” • Print dialog box appears• Select the print options and click OK
• Quick Print• Choose File>>Print>>Quick Print• Select this option to send a direct print to the
default printer using default settings without making changes

23
Print dialog box

24
Print Preview
• Print• Click to open print dialog box for setting
printing options
•Options • Change the printing order of slides on the
pages• Change color scheme of slides like
color/grayscale or pure black & white• Scale to fit paper• Apply header and footer

25
Print Preview
•Print what• Slides• Prints the whole slide on one page
•Handouts• Print the slides in the group of
1,2,4,6,9 on each page
•Notes pages• Print just speaker notes
•Outline view• Print just outline of your
presentation

26
Print Preview
•Orientation• Choose Landscape or portrait page
orientation
• Zoom• Used to increase/decrease the size of your
page on the screen
• Fit to Window• Zoom the presentation so that the slide
fills the entire window

27
Print Preview
•Next page• Used to preview the next page
• Previous page• Used to preview the previous page
• Close print preview• Click the icon to close the Print Preview
mode

28
Activity-30 minutes
• Prepare a presentation on any topic of your interesting subject for your class.• Add animations and transitions• Add action buttons• Play the presentation
• View & explore Animations tab options.• Turn OFF animations and transitions• View & explore Slide Show tab options.• View & explore various Print options in PowerPoint.

29
Thanks End of Lecture 21

30
Allah Hafiz