Embed Size (px)
Citation preview

MSRS Biometric
Time Clock Users
Guide
D. Carter V 1.0 10/9/2007

2
Contents
Section Page
1. Introduction to the Time Clock System 1-A Purpose ……………………………………………………………………………..
1-B Security Considerations……………………………………………………………..
1-C System Requirements……………………………………………………………….
3
4
5
2. System Components 2-A The Scanner……………………………………………………................................
2-B The Application…………………………………………………………………......
2-C Internet Connection......……………………………………………………….…......
6
7
8
3. Biometric System Basics 3-A User Registration……………………………………………………………………
3-B Scanning Algorithm…………………………………………………………………
3-C Scanning Modes……………………………………………………………………..
10
10
10
4. System Operation 4-A Checking In…………………………………………………….................................
4-B Checking Out……………………………………………………………………......
4-C Billing System Integration – Checking Your Time……………................................
12
18
22
5. Finger Print Scanning Guide 5-A Best Practices………………………………………………………………………..
25
6. Troubleshooting and Maintenance 6-A Common Errors and Error Resolution………………………………………………
6-B Computer Restart Instructions……………………………………………………….
6-C Modem Restart Instructions…………………………………………………………
28
33
36
7. Time and Attendance Policy 7-A When to Check In/Out………………………………………………………………
7-B Who Should Check In/Out…………………………………………………………..
7-C Meal Periods…………………………………………………………………………
7-D Exceptions Protocol…………………………………………………………………
37
37
37
37
8. Additional Resources 8-A Where to Get Help.………………………………………………………………….
38
***This Document or any part thereof is contingent upon emerging technologies and business policy and is subject to change at any time , without notice.***

3
Introduction to the Time Clock
System
_______________________________________________________________________
1-A Purpose
The intended purpose of the biometric time clock system is to provide a verifiable and
reasonable method to validate employee “time worked” and to establish a method of
accountability in regards to treatments, treatment times, payroll verification and payroll
accounting.
It is further intended to reduce employee workload and paperwork, increase efficiency
and decrease disorganization and wasteful practice. The reduction of wasteful practices
will provide an opportunity for increased productivity, and a more generalized boost to
our quality of care by allowing more time to be spent with the patient, and less time with
a pen and paper.
The choice of a biometric standard was chosen over any other method, as it is more
reliable and accurate in regards to individual identification. When properly implemented
in 1:1 scanning mode, it provides a 100% accuracy rate when matching a particular
individual with a biometric signature, or finger print. Thus, employee attendance can be
adequately verified. Additionally, the surety of identification allows a more intimate
relation between both the time clock system, and the Mid South Rehab Services intranet
and billing system. This creates a more detailed and timely reporting structure for
management and supports more flexible and time-oriented decision making for all levels
of process within the organization.
The accuracy of the time clock system also provides an accountability record of
treatments and treatment times performed within a facility. This audit trail provides a
verifiable history of a given employee, and can thus be called into question at any time to
safeguard the employee or detect fraudulent activity within the system.

4
______________________________________________________________________
1-B Security Considerations
At Mid South Rehab Services, Inc. information privacy and security are standards that
are held in high regard. As with any medical organization, we understand inherently the
importance of information security, and the consequences involved when that security is
breached. We remain vigilant in safeguarding the personal and private information of all
of our affiliates, both patients and employee partners alike, and would never initiate a
procedure, protocol, or system that jeopardizes that information.
When selecting a time clock system, this principal concern for safety was high on our list
of priorities. Upon researching various methods of implementation, we settled on our
current system - largely in response to this security issue.
Our current system, does not in any shape or form contain a copy or reproducible image
of an employee’s print. Neither do we collect within the time clock system any personal
data such as social security numbers or dates of birth. This ensures our employee
partner’s information will be safe from any manner of privacy breaching attempt,
whether it’s an attempted identity theft or hacking operation against our database.
Simply put, if an intruder or malicious individual were to gain access to our biometric
system, they would find in short order that there’s absolutely nothing to gain. No personal
information is stored.
The method by which the biometric system operates, and the algorithm used to scan and
match prints is described in detail later in this publication under Sec. 3B.
In regards to safety and security, your data is safe. We do however, restrict and control
access to the network whenever possible by a varied mix of technologies and control
mechanisms. The reason for this is simple. Even though we don’t capture and maintain
personal information within our time clock database, and though your personal
information is secure… the time clock system still contains critical data that cannot be
directly exposed to harm. Vital payroll data is stored in this database, such as hours
worked, PDO time, etc., and must be maintained with the utmost integrity. As such, we
will continue to introduce control mechanisms on our workstations.

5
_______________________________________________________________________
1-C System Requirements
System Requirements for the biometric clock are a minimum of the following:
1. Computer System more recent than 5 years of age.
2. Windows XP Professional Operating System.
3. 1 Open USB port.
4. Reliable High-Speed, Broadband Internet Connectivity.

6
System Components _______________________________________________________________________
The Biometric system consists of 3 components, in addition to a computer. These are:
1. The biometric scanner
2. The computer application
3. The internet connection
_______________________________________________________________________
2-A The scanner
The biometric scanner.
The Biometric Scanner is the peripheral attached to the computer via USB, and does the
job of scanning your print. The scanner is an optical device, with a clear glass window or
“scanning pad” and is attached to a heavy base. Periodically, and upon use, the scanning
pad will glow with a red light.
The scanner should stay clean, dry and dust free. This is the area where you will scan
your print to be “clocked in” to the system, so it is important to prevent any damage to
the device. Do not drop, or locate the device in an area where it could be dropped. Do
not shake the device. Do not place heavy objects in an area where they can fall on the
device. Excessive shock or force could potentially damage the glass window (“scanning
pad”).
Always use care when working with or around the biometric scanner. Refrain from using
the scanner with overly soiled fingers, or fingers with ANY food residue.

7
Additional Scanner Care Tips
Normal oil, residue or smudges on the fingerprint sensor window will not cause
problems or interfere with capturing fingerprints. The sensor window was designed
to withstand heavy use and extreme conditions, including heat and cold. It does not
have any coatings and is made of a hard, quartz-like material that resists
scratches, etching and damage from environmental elements.
If you wish to clean the surface of the sensor window:
- You may use a cloth or cotton swab soaked with a mild soap solution to
remove stubborn dirt.
- Cleaning agents, like glass cleaners, may be used, without harming the
sensor; however the plastic housing may be adversely affected.
- Do not pour liquids directly onto the sensor or device.
_______________________________________________________________
2-B The Application
The computer application
The computer application is the program which does the job of matching and verifying
your identity with your fingerprint. It encapsulates an advanced biometric algorithm (see
sec. 3-B) and transmits successful time clock punches via the internet. It is an “always
on” application under normal usage conditions. This application is activated on computer
startup, and can only be exited in case of a serious error, or by administrative shutdown.
It is important to NEVER change ANY settings in regards to the clock application.
Changing settings without supervision will likely result in disablement of the clock
system. Purposely circumventing or intentionally disabling the time clock system will
come with severe penalties.
The application interface provides various state indicators for clocking in and out (see
Sec. 4-A, 4-B). The clock application also displays the current time, in two formats; one
analog simulation (left pane) and one digital simulation (right pane) formatted as military
time.

8
It is important to note that the clock time is synchronized with the server time at the
Employee Support Center and may be independent of local system time. This keeps all
facilities on a synchronized schedule, eliminating disparities between facilities and
potential tampering with the clock system. The application time cannot be changed
locally.
The application is sensitive to status changes in the internet connection, and will exhibit
certain symptoms indicating these scenarios. (see Sec. 6-A)
______________________________________________________________________
2-C Internet Connection
The biometric clock system requires a dedicated broadband internet connection. All of
our facilities are equipped with this type of connection (where available). The internet
connection consists of two parts.
1. The computer system
2. The modem
We use a various mix of hardware in our organization. Most facilities are equipped with
a computer system, and a modem. Below is a sample representation of modem types you
may find at your facility:
DSL Modem – From Left: Lucent, Netopia, Westell

9
Cable Modems – Motorola
These devices require little user intervention, short of restarting them. (See Sec. 6-C)
Each type of modem has a specific connection type to the internet.
DSL Modem Connection Type Cable Modem Connection Type
It is important to note that the larger connection on DSL systems is NOT the modem’s
internet connection. The larger connection connects the MODEM to the COMPUTER.
Note the size difference between the internet/phone
connection and the computer connection Known as RJ-11 and RJ-45 Connections, Respectively

10
Biometric System Basics _______________________________________________________________
3-A User Registration
User registration is a 5-10 minute procedure that can be performed at either the Employee
Support Center, onsite by an Administrator, or in some instances, by “guided
walkthrough” via telephone. In many cases, the user registration is performed during the
orientation session in Ridgeland.
_______________________________________________________________
3-B Scanning Algorithm
The biometric clock system uses an advanced fingerprint matching algorithm that
compares an individuals print with a key stored in the database. It is based upon
minutiae, or slight details of an individuals print pattern, and measurements of different
anomalies of an individuals overall print.
Finger Print Cores
When a user is first registered into the system, a record is created in the time clock
database, linked only to their name, and billing system ID. This is the only user
information contained within the time clock database.
Print / Key Generation
When a user’s print is scanned into the system, the application takes initial measurements
of the print features. It then converts the measurements into a mathematical key or
“hash” which is then encrypted and stored in the database. The application does not
photocopy or store the print image. No reproduction can be made from the key stored in
the database.

11
__________________________________________________________
3-C Scanning Modes
The Biometric System can operate in one of two scanning modes:
1. 1:1 Scanning 2. 1:N Continuous Mode Scanning
The two scanning modes can be easily distinguished by a cursory look at the scanner. If
the scanner is blinking red continuously, the clock is in 1:N Continuous Mode. This
mode compares a single user against all users in the system. This method is convenient, a
user does not have to interact with the computer in order to scan their finger. They
simply walk up to the machine and place their finger on the scanner. However, this
method of scanning has several drawbacks. It is inefficient, error-prone, is designed for a
small number of users and the constant scanning introduces more complexity to the
system… often resulting in usb errors. MSRS has discontinued the use of continuous
scanning mode. If your facility is still in this deprecated scanning mode, contact the
MSRS Support Center for assistance.
The currently used method of scanning is 1:1 Scanning Mode. This scanning mode is
slightly less convenient, as it requires user interaction with the system, but is rated at
100% accuracy, produces fewer usb errors, and can accommodate a large number of
users. With this mode of scanning, the user chooses their name from the application list,
and scans their finger. The application compares the scanned image with only their
record in the database. This is much more accurate, as continuous scanning often results
in a “false positive” or misidentification of an individual. 1:1 scanning eliminates the
potential for false positives. With this mode of scanning, the sensor will blink red only
when the user has chosen “check in” and their name from the application screen, and will
remain active only for as much time as required to scan a users print.

12
System Operation _______________________________________________________________
4-A Checking IN
If your system is configured in the deprecated “continuous scanning mode”
(See Sec. 3-C) then these instructions do not apply
1. When preparing to use the MSRS time system, you must first be logged into the
system, and have the time clock application on screen and active.
Fig. 1 - Screen Shot of Desktop with Clock Active
If the time clock screen is active, as shown in Fig. 1, you are now ready to check in.
Proceed to step 3.

13
2. If the time clock application isn’t on screen and active, it will most likely be in the
system tray as demonstrated in Fig. 2. Clicking the icon in the system tray will bring up
the time clock user interface. If the clock is not running on the system or in the system
tray, an error has occurred and the machine must be restarted. (See Sec. 6-B)
If you’ve clicked the icon in the system tray, your screen should look like Fig. 1. If the
clock application failed to load, an error has occurred and you must restart.
(See Sec. 6-B)
Fig. 2 - Screen Shot of Desktop with Clock in System Tray
Once the screen is active, proceed to step 3.

14
3. On the application screen, you will see the “Check In” button as demonstrated in
Fig. 3. Click this button and proceed to step 4.
Fig. 3 – Check In Button

15
4. Once the “Check In” button has been clicked, a selection box will appear. Click the
dropdown arrow and select your name from the list. The list is alphabetized by last
name.
Fig. 4 – Select Your Name
If your name is not on the list, either you are not registered in the system, you are already
clocked in, or an error has occurred. See chapter 6 for troubleshooting, and Sec. 8-A for
assistance. Otherwise, proceed to step 5.

16
5. Once you have selected your name from the list, the scanning window will appear.
Scan your print, following the guidelines in Sec. 5-A, adjusting the brightness as
necessary to get a good scan. Keep your finger on the scanner until you are either
checked in, as demonstrated in step 6, or an error message appears. Do not move your
finger during the scanning interval.
Fig. 5 – Ready For Print Scan
17
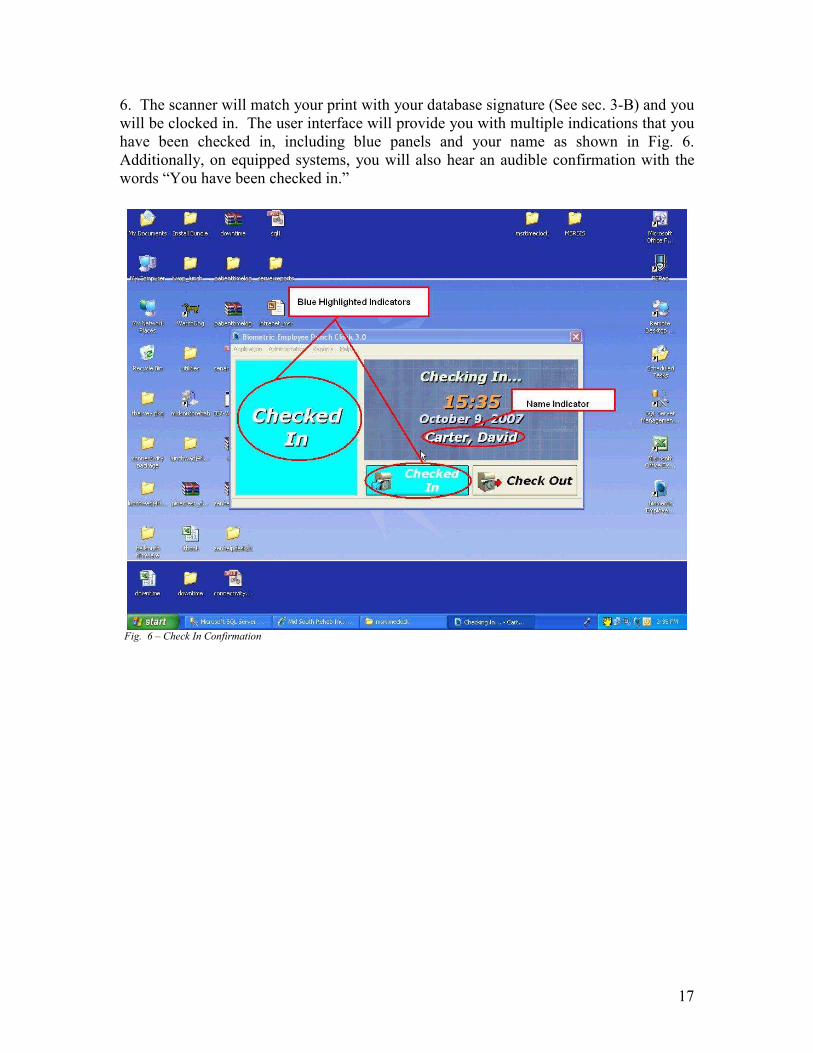
6. The scanner will match your print with your database signature (See sec. 3-B) and you
will be clocked in. The user interface will provide you with multiple indications that you
have been checked in, including blue panels and your name as shown in Fig. 6.
Additionally, on equipped systems, you will also hear an audible confirmation with the
words “You have been checked in.”
Fig. 6 – Check In Confirmation

18
_______________________________________________________________
4-B Checking OUT
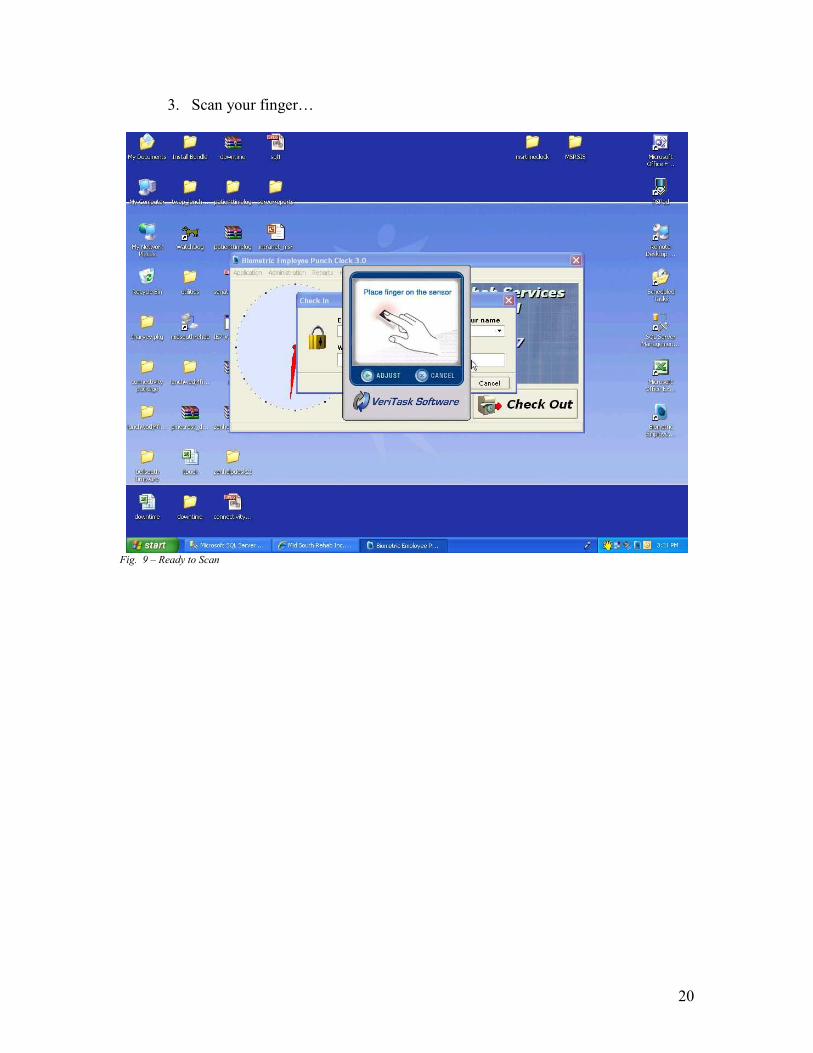
1. Checking out requires a similar procedure. Follow the instructions for
checking in, but at the application screen, click “Check Out” instead of “Check
In”
Fig. 7 – Check Out Button

19
2. Select your name from the list…
Fig. 8 – Select Your Name
20
3. Scan your finger…
Fig. 9 – Ready to Scan

21
4. Note the red-colored indicators. On equipped systems, an audible message
will also be evident indicating a successful Check Out.
Fig. 10 – Check Out Confirmation

22
______________________________________________________________
4-C Billing System Integration – Checking Your Time
1. The biometric time clock is tightly integrated with the MSRS Billing System.
To check your time, view payable / billable hours, and analyze productivity, you
must first log into the billing system as demonstrated in fig. 11-12.
Fig. 11 – Billing System Login
Fig. 12 – Selecting the Billing System

23
2. Once logged in, navigate to “Reports”, “My Reports” and click “Payroll Therapy
Logs for <Your Name>“ (fig. 13). Click the link representing your log type (fig. 14).
This will load your payroll therapy log.
Fig. 13 – Locating the Payroll Therapy Log
Fig. 14 – Select the Logtype

24
Fig. 15 – Time Verification on the Payroll Log
3. Your punch times are located at the top of the payroll therapy log, with each column
representing the corresponding day of the month. The first time in will always be located
at the top, and your final time out will always be located at the bottom (fig. 15). Note
that the final time out will appear to “float” up the list, depending on whether or not it is
your final punch. ONLY the final punch will be on the bottom.
4. View this sheet DAILY to verify your punches. If it is not correct, log the
discrepancy on an exception request form. ALWAYS submit your exception report
weekly or at the pay-period end. (fax this form to accounting or to your RCD)
5. At the end of each pay period, verify and submit your log. NEVER SUBMIT AN
INCORRECT LOG. If your time is not correct, submit an exception report. If the edit is
not applied within 2 days of the end of the pay period, call and check the status of your
exception. DO NOT SUBMIT AN INCORRECT LOG UNDER ANY
CIRCUMSTANCES.

25
Finger Print Scanning Guide _______________________________________________________________
5-A Best Practices
Why is the image quality of fingerprints important?
The fingerprint recognition technology used by Biometric Employee Punch Clock is
based on minutiae, the feature points found in a fingerprint. When a fingerprint
image is captured, a sampling of minutiae is extracted and processed into a
template, which will be used for the biometric software functions of enrollment and
matching. If the captured image is not clear or does not have enough contrast, the
minutiae may be inconsistently sampled, resulting in less accuracy and poor
performance.
Adjusting the Print Image
Certain environments and skin conditions, such as wet, dry, or aged skin, can
initially cause a fingerprint image to appear too light or dark. By adjusting the
image quality for your device, it is possible to overcome the enrollment or matching
problems that have commonly occured with fingers that “don’t seem to work”.
Proper Placement is the key to good results.
The fingerprint matching algorithm is capable of extracting the correct minutiae
even without the benefit of a perfect print. However, the proper placement of your
finger during the fingerprint input can help produce consistent results for any
biometric application. The following tips on usage and care will help you obtain an
optimal fingerprint image quality that ensures better performance and reduces the
chances for failure to enroll and match correctly.

26
Usage Tips
Place the pad of your finger at the center of the sensor.
The pad is the fleshy part of the finger, located near the middle of the first
segment of the finger. Be sure that the pad (not the tip) covers as much of the
window as possible. It is okay to place your finger at an angle of up to 45 degrees
rotated in either direction.
Finger Placement
Apply light pressure
Apply pressure lightly and evenly during the capturing process. You only need to
apply as much pressure as is required to hold a piece of paper between your
fingers. Pressing too hard may result in a overly dark or blurred image.
Keep your finger still
Wait for the red LED to light up, indicating the device is activated, and keep your
finger in place while the fingerprint is captured.
How to find the core of your fingerprint
The fingerprint generally consists of lines (or ridges) that form a pattern. The core
of a fingerprint is defined as the topmost point on the innermost ridge that curves
downward. The core can usually be fount at or just below the center of the first
segment of your finger. The following image shows examples of core points on
different finger patterns.
Finger Print Core Example

27
To avoid problems if you cut or injure your finger
As a preventive measure, we always enroll more than one finger so that if one
finger becomes unavailable for authentication, you will have an alternate finger to
use.
Problematic fingerprints
By following the above guidelines, you should be able to get consistently good
results. Sometimes, however, certain skin conditions or environments may cause
poor fingerprint images. Damp skin may cause fingerprints that are too dark or
smudged, but can be remedied by wiping fingers before input. If your finger is dry,
(especially after washing), you may moisturize it by breathing on it or touching it to
your forehead to pick up surface oil before input. Alternatively, if these problems
are persistent, you can adjust the brightness settings for your device to get the
best contrast and brightness levels.

28
Troubleshooting and Maintenance
_______________________________________________________________
6-A Common Errors and Error Resolution
The Time Clock application is not a flawless system. It relies heavily on a continuous
internet connection. If the connection is broken, intermittent, or distorted, even for a
fraction of a second, the application will experience errors. If finger print scanning is
done incorrectly, the scanner will not properly acknowledge the punch.
For the most part, the time clock system is maintenance free and largely independent of
user intervention. And in most error scenarios a simple sequence of computer/modem
restarts will correct any issues. In the rare cases when these restarts do not correct the
issue, refer to chapter 8 for proper tech support protocols and procedure.
Here are some of the more common errors and their resolutions:

29
1. Error: “Fingerprint scanning has timed out. Try again”
Description: You have waited too long to scan your print.
Resolution: Click “Yes” and try again.
Fig. 16 Fingerprint scanning has timed out…

30
2. Error: “Fingerprint authentication has failed. Password authentication
will be used instead”
Description: Your print was not scanned properly. Either the wrong finger was
scanned, your finger was scanned incorrectly, or the machine has experienced
difficulty while scanning your print (dry skin, cuts, improper placement, etc).
Resolution: MSRS employee partners are not authorized or encouraged to attempt
password authentication. Click “ok”, close the name selection box, and attempt
the check in/ out process again. Try with different fingers if necessary. If this
error continues, refer to chapter 8 for technical assistance.
Fig. 17 Fingerprint authentication has failed…

31
2. Error: “The access to the database is not properly configured…”
Description: Your computer has lost connection to the internet. This generally
occurs during a brief connectivity failure, and upon restart of a non-internet
connected machine.
Resolution: NEVER ATTEMPT TO RECONFIGURE THE DATABASE. Make
sure all cables are connected and snug. Perform both modem and computer
restarts, in that order. (See Sec. 6-B, 6-C) This usually repairs the issue. If this
error continues, refer to chapter 8 for technical assistance.
Fig. 18 The access to the database is not properly configured…

32
3. Error: “The connection to the database has been lost!”
Description: Your computer has lost connection to the internet. This generally
occurs during an extended connectivity failure.
Resolution: Make sure all cables are connected and snug. Perform both modem
and computer restarts, in that order. (See Sec. 6-B, 6-C) This usually repairs the
issue. If this error continues, refer to chapter 8 for technical assistance.
Fig. 19 The connection to the database has been lost…
3. Other unspecified errors:
Resolution: Make sure all cables are connected and snug. Perform both modem
and computer restarts, in that order. (See Sec. 6-B, 6-C) If an error continues,
refer to chapter 8 for technical assistance.

33
_______________________________________________________________
6-B Computer Restart Instructions
There are two types of computer restarts, a “hard” restart and a “soft restart”. Both are
demonstrated here.
1. To perform a soft restart, your computer must be responsive. If your
computer is locked, frozen or hung, skip to the instructions for a hard restart.
Otherwise, click “Start” on the start-bar. (Fig. 20)
Fig. 20 The “Start” button.

34
2. Click “Turn Off Computer” on the popup menu. (Fig. 21)
Fig. 21 Turn Off Computer
2. On the “Turn off computer” menu, select restart (Fig. 22). Click “ok” to any
popup menus, and wait for the computer to restart. If the computer fails to
restart within 2-3 minutes, perform a hard restart.
Fig. 22 Click “Restart”

35
A hard restart can be performed in one of two ways. You can either turn the computer
off with the “off” button, or unplug and plug in the computer.
It is important to note that THE COMPUTER AND MONITOR ARE NOT THE SAME
THING. Below, note the difference between the monitor and the computer.
Fig. 23 Turn off the COMPUTER, not the MONITOR.
To perform a hard restart by using the computer’s power button, press and hold the
button on the front of the machine (Fig. 22). The computer should go off within 5
seconds. To turn the machine on again, simply press the power button one time without
holding.
If all of these methods fail to restart your computer, you can perform a hard restart by
physically unplugging and plugging in the computer. (Fig. 24)
Fig. 24 Unplugging the Computer

36
_______________________________________________________________
6-C Modem Restart Instructions
Whichever modem your facility uses, you will at some point in time, have to restart the
modem. This is accomplished by unplugging, waiting five seconds and plugging in the
modem’s power adapter. This can be performed at the outlet, or on the back of the
machine. It is preferable to unplug it from the rear of the modem.
It is important to note which cable on the modem is actually the power cable. Figure 25
clearly demonstrates the difference between the power and network cables.
Fig 25. Note the difference between the networking and power cables for your modem.
When you have plugged in your modem, allow 2-3 minutes before restarting the
computer. This ensures that the modem will have enough time to “go online” before the
computer is reconnected.

37
Time and Attendance Policies ***Subject to MSRS Policy. Policies in this manual reflect MSRS policies in place at the time of this writing, and may
change without notice. As such, this manual does not serve as a definitive guide to MSRS time and attendance policies. Contact Human Resources for Details.***
_______________________________________________________________
7-A When to Check IN/OUT
All MSRS field employees using the time clock system must clock in when arriving at
their designated workplaces / facilities, and must clock out when leaving the premises.
This includes all errand work, break periods or other time away from the facility. In the
event an employee takes their lunch break within the facility, and does not exceed 30
minutes on that break, it is not mandatory that the employee clock out
_______________________________________________________________
7-B Who Should Check IN/OUT
All MSRS field employees who work for Mid South Rehab Services in any capacity, and
who are deemed to be employed on a routine or constant basis must use the time clock
system. A routine basis is a period of 6 weeks or more. If a therapist, PRN or otherwise,
works for Mid South only one day per week, for 6 weeks or more, then they are
considered employed on a routine or constant basis, and must use the time clock system.
If you are considered a routine or constant MSRS according to this rule, you must contact
the Employee Support Center to make arrangements for registration.
_______________________________________________________________
7-C Meal Periods
MSRS Employees in any capacity are mandated to take meal periods. For each six hour
period worked, a lunch break of 30 minutes must be taken. The time clock system will
automatically deduct either 30 minutes or actual time taken for lunch, whichever is
greater. This is NOT AN OPTIONAL POLICY.
_______________________________________________________________
7-D Exceptions Protocol
All MSRS Employees in any capacity must fill out and return an Exception Request
Form documenting their time clock exceptions. This form is furnished by the Employee
Support Center. This form must be signed and approved by both the DOR of the facility.
The completed form may be faxed to Accounting or Your RCD.

38
Additional Resources _______________________________________________________________
8-A Where to Get Help
The first and best method to receive help is through the MSRS Helpdesk, found in both
the Intranet and Billing System, under the link “HelpDesk.” This ensures your request is
routed in a timely and organized manner to the appropriate service personnel. If the
HelpDesk application is unavailable to you due to network connectivity issues Please
contact the Employee Support Center via phone.
MSRS Helpdesk System

39


![MSRS Silk Road.ppt [ ۮe Ҧ ])](https://img.dokumen.tips/doc/110x75/62080a07c66d7513ad212043/msrs-silk-roadppt-e-.jpg)