Embed Size (px)
Citation preview

MS Music Server
Owner’s Manual and Setup Guide

© Wyred 4 Sound. All rights reserved. MS Music Server Owner’s Manual and Setup Guide v1.4
2
Table of Contents
Section Page
Table of Contents 2
Important Safeguards 3-4
Special Notes 4
Package Contents 5
Design Features 5
Getting Connected 5
Configuring the MS Music Server 6-10
Manually Adding Music Files - PCs 11-12
Manually Adding Music Files - Apple Computers 13
Installing Roon (example of installing an application) 14-16
Installing other popular apps 16-20
Warranty Coverage 21-22
Obtaining Warranty Service 22
Service 22-23

© Wyred 4 Sound. All rights reserved. MS Music Server Owner’s Manual and Setup Guide v1.4
3
Important Safeguards
● All the safety and operating instructions should be read before this product is operated.
● The safety and operating instructions should be retained for future reference.
● All warnings on the appliance and in the operating instructions should be adhered to.
● Follow all instructions.
● The appliance should not be used near water or moisture – for example, in a wet basement or near
a swimming pool, and the like.
● Clean only with soft, dry cloth.
● Do not block any ventilation openings. Install in accordance with the manufacturer’s instructions.
● Do not install near any heat sources such as radiators, heat registers, stoves, or other apparatus
(including amplifiers) that produce heat.
● Do not defeat the safety purpose of the polarized or grounding plug. A polarized plug has two
blades with one wider than the other. A grounding plug has two blades and a third grounding
prong. The wide blade or the third prong is provided for your safety. If the provided plug does not
fit your outlet, consult an electrician for replacement of the obsolete outlet.
● Protect the power cord from being walked on or pinched particularly at the plugs, convenience
receptacles, and at the point where they exit from the apparatus.
● Unplug this apparatus during lightning storms or when unused for long periods of time.
● Refer all servicing to qualified personnel. Servicing is required when the apparatus has been
damaged in any way such as the power cord or plug is damaged. Other damage may occur if liq-
uid or objects have been dropped or spilled into the apparatus. Dropping the apparatus, exposure
to rain, and excessive moisture may cause additional damage.
● Keep the unit in a well ventilated environment. Ensure at least 4” clearance around top and sides.
● CAUTION: These servicing instructions are for use by qualified service personnel only. To re-
duce the risk of electric shock, do not perform any servicing other than that contained in the oper-
ating instructions unless you are qualified to do so.
● WARNING: To reduce the risk of electric shock, do not expose this apparatus to rain or moisture.
The apparatus shall not be exposed to dripping or splashing and that objects filled with liquids,
such as vases, shall not be placed on apparatus.
● WARNING: The mains plug/appliance coupler is used as disconnect device, the disconnect de-
vice shall remain readily operable.
● CAUTION: The lightning flash with arrowhead symbol within an equilateral triangle is intended
to alert the user to the presence of uninsulated “dangerous voltage” within the product's enclosure
that may be of sufficient magnitude to constitute a risk of electric shock.
● No naked flame sources, such as lighted candles, should be placed on the apparatus.
● WARNING: The terminals marked with symbol of “+/-“ may be of sufficient magnitude to con-
stitute a risk of electric shock. The external wiring connected to the terminals requires installation
by an instructed person or the use of ready-made insulated leads or cords.
● Correct Disposal of this product. This marking indicates that this product should not be dis-
posed with other household wastes throughout the EU. To prevent possible harm to the envi-
ronment or human health from uncontrolled waste disposal, recycle it responsibly to promote
the sustainable reuse of material resources. To return your used device, please use the return
and collection systems or contact the retailer where the product was purchased. They can take

© Wyred 4 Sound. All rights reserved. MS Music Server Owner’s Manual and Setup Guide v1.4
4
this product for environmentally safe recycling.
● Keep your packaging! It is custom made for your unit and will effectively protect it for possible
future use.
● Be sure to register your product. It is very important to complete the warranty registration form
located on our website. Complete and submit the form within 30 days of purchase to activate your
warranty.
FCC Warning
This equipment has been tested and found to comply with the limits for a Class B digital device, pursuant
to Part 15 of the FCC Rules. These limits are designed to provide reasonable protection against harmful
interference in a residential installation.
This equipment generates, uses and can radiate radio frequency energy and, if not installed and used in
accordance with the instructions, may cause harmful interference to radio communications. However,
there is no guarantee that interference will not occur in a particular installation. If this equipment does
cause harmful interference to radio or television reception, which can be determined by turning the
equipment off and on, the user is encouraged to try to correct the interference by one or more of the
following measures:
● Reorient or relocate the receiving antenna.
● Increase the separation between the equipment and receiver.
● Connect the equipment into an outlet on a circuit different from that to which the receiver is con-
nected.
● Consult the dealer or an experienced radio/TV technician for help.
This device complies with part 15 of the FCC Rules. Operation is subject to the following two conditions:
(1) This device may not cause harmful interference, and (2) this device must accept any interference
received, including interference that may cause undesired operation.
The device has been evaluated to meet general RF exposure requirement. The device can be used in
portable exposure condition without restriction.
Special Notes
• CDs must be inserted into the server label side up.
• Take Caution to power the server down by a quick press of the power button. Do not unplug
the server while it is powered on or press and hold the power button to shut down.
• We highly recommend backing up your hard drive contents to an external hard drive on a
regular basis to prevent loss of data. Wyred 4 Sound is not responsible for any information lost in
the event of a component failure.
• If the server is not connected to the Internet when ripping CDs it will be unable to locate
tagging information and album artwork.

© Wyred 4 Sound. All rights reserved. MS Music Server Owner’s Manual and Setup Guide v1.4
5
Package Contents
● 1 – Music Server
● 1 – Power Supply
● 1 – Power Cable
● 1 – User Manual
Design Features
• Drag, drop, and easily manage all of your local files
• Stream radio and music from included apps like Squeezebox, Spotify, and Tidal
• Roon Core Server
• AirPlay and DLNA-enabled
• Powerful Intel® Core™ i3 or Intel® Core™ i7 quad core 7th generation processors
• 4 or 16 GB RAM
• Internal SSD for operating system
• Built-in slot drive for easy CD ripping
• Internal hard drive for storage and superior playback (you can also use your NAS)
• USB, I2S, Coax and Optical outputs
• All-aluminum enclosure
Getting Connected
1. Place the Server in the intended location and ensure that it has proper ventilation. We recommend
that if you are placing it in an enclosed cabinet, it is not on or near any other component that
produces excessive heat.
2. Connect the power supply to the wall outlet and then to the Server high current jack on the right
side of the rear panel.
3. Next connect an Ethernet cable from your router to the Ethernet port on the rear panel of the
server. (Alternatively you can use a wireless access point to connect the server to your router)
4. Connect the appropriate digital output to your DAC using the appropriate digital cable. The I²S
output is not a standard HDMI format output and is configured for the Wyred 4 Sound DAC-2v2
5. Power the unit on by pressing the power button located on the right side of the front panel. When
turning the unit off use a quick press of the power button. It will shut down in less than 30
seconds. Do not press and hold the power button to shut it down.
(Power “on” is indicated by blue light directly above the power button)
6. Proceed to the appropriate section for configuring the server for your desired use and enjoy!

© Wyred 4 Sound. All rights reserved. MS Music Server Owner’s Manual and Setup Guide v1.4
6
Configuring the MS Music Server
All setup and software configuration menus for your new server are adjusted by using a computer’s
Internet browser. Type the following address in the browser address bar.
server.wyred4sound.com
The following screen will be displayed…
Click the Manage button and the following menu will be displayed…
The software version number, Music Server Model, IP Address, and MAC address is shown here.
Clicking Home at any time will return to this information screen.

© Wyred 4 Sound. All rights reserved. MS Music Server Owner’s Manual and Setup Guide v1.4
7
Clicking System will give the options to Reboot or Power Down your Music Server.
Clicking Help displays additional information about your server.
Clicking Settings enables adjustments of various settings within the system.
Settings for installed applications can be adjusted from this menu. For example clicking Roon Server
allows for adjusting settings for your Roon Server. Localization allows for setting time zone and
language.
System Settings is used to rename your Music Server; in the above examples our server is titled ms1.
Clicking the Apps link opens the menus for controlling, installing, and removing Applications.

© Wyred 4 Sound. All rights reserved. MS Music Server Owner’s Manual and Setup Guide v1.4
8
Local Storage displays information about the internal SSD drive, available storage space, etc.
Clicking an installed application such as Roon Server, displays information about the application.
Clicking Software Manager is where the software version can be updated. If the Latest SW Version is
different than the Current SW Version clicking the Update button allows for updating the system software.

© Wyred 4 Sound. All rights reserved. MS Music Server Owner’s Manual and Setup Guide v1.4
9
The Installed Apps tab displays the applications that are currently installed on your Music Server with a
brief description of what the software is used for.
Clicking on a particular app gives you the option to Delete application from your server. You must
confirm that you want to delete an app to remove it from your system.
Clicking the Available Apps tab displays various applications that are available to be installed on your
system.

© Wyred 4 Sound. All rights reserved. MS Music Server Owner’s Manual and Setup Guide v1.4
10
Clicking on an available app gives the option to Install the application. In the example below the Storage
backup app is shown. This is the application used to backup your internal local storage SSD drive.
To automatically rip your CDs to FLAC files on the server install the CD Import app. This app will
automatically rip any standard CD that is inserted. You may click on the app and monitor the application
as it performs its magic. The app will also run in the background if you prefer to not monitor the ripping.

© Wyred 4 Sound. All rights reserved. MS Music Server Owner’s Manual and Setup Guide v1.4
11
Manually Adding Music Files - PCs
You can also manually copy files to your server. This is most useful if you
already have CDs that were previously ripped or if you have a collection of
downloaded high resolution files.
The easiest way to locate the MS Music Server on your network is to use
the IP Address listed in on the Home screen of your server. You can use the
address with the Windows Search function as follows;
In the search bar enter \\ followed by the IP Address… i.e. \\192.168.0.127
Alternatively, you can open the Windows System folder from the start button and then click This PC. In
the This PC browser bar you can type the server name, ms1 in our example. This will open the same
window shown below.
This will open the following screen in Windows:
Double clicking storage opens the internal storage drive on your server.
Double clicking the music folder displays to folders and files of the CDs that have already been ripped to
the internal drive.
In this folder you can copy files from your network. You may create additional folders to organize the
types of files have been copied, or you may simply copy the album folders from your network to the
server in the music folder. The server will find and make available any album you copied here.

© Wyred 4 Sound. All rights reserved. MS Music Server Owner’s Manual and Setup Guide v1.4
12
The one critical point is that each CD or Album should be kept in its own folder.
An example of albums is shown below:

© Wyred 4 Sound. All rights reserved. MS Music Server Owner’s Manual and Setup Guide v1.4
13
Manually Adding Music Files – Apple Computers
You can also manually copy files to your server. This is most useful if you already have CDs that were
previously ripped or if you have a collection of downloaded high resolution files.
To access the folder structure of the MS Music Server from a McIntosh computer you would use the
File/Find function.
The MS Music Server will show up in the Shared section. In the above example our server’s name is
ms1. Above we have expanded the folders out to show where the music folders/files are located.
Clicking on ms1 (or the name given to your server) under the Shared location will connect to the server.
Expand the storage folder, then the music folder, and finally the flac folder will display music albums.
You may add additional folders to organize the music collection or simply copy previously ripped CDs or
downloaded high resolution files to this location or sub folders as you desire.

© Wyred 4 Sound. All rights reserved. MS Music Server Owner’s Manual and Setup Guide v1.4
14
Installing Roon on your MS Music Server
Roon is a very popular music application. To demonstrate installing and configuring an application we
are going use Roon as an example.
The first step is to open your new MS Music Server administration page by typing the following address
in your browser’s address bar:
server.wyred4sound.com
And then you will click the Manage button. And then click the Apps
tab. At this point click Software Manager.
Software manager is where you install new applications or con-
figure previous installed apps.
Click the Available Apps tab. You will see various applications
that are available to be installed. Some very useful applications
are as follows:
• CD Importer: Used to rip CDs that you insert into the drive
• Driver Mounter: Used to mount external drives such as a USB drive.
• Storage Backup: Used to backup your music library.
• Roon Server: A very popular music playback application.
• Several more are included.
To install the Roon Server application click on the Roon
Server icon. And then click the Install button.
Be patient, this will take a few minutes. The installer will
tell you when it is Complete.
When complete close the install window and go back to
the Home screen.
One very important step is to go to the Settings tab.

© Wyred 4 Sound. All rights reserved. MS Music Server Owner’s Manual and Setup Guide v1.4
15
It is important to click the Enable local
playback in Roon Server selection box.
At this point go to the System tab and select
reboot. This will take a few minutes.
Next go to your Roon Controller device
(iPAD, Android, PC, etc.). Open the Roon
Controller Application and click Choose Your Core. Click the Manage Audio Devices on the bottom of
the screen. On the Wyred 4 Sound selection click Enable. This is also where you go to adjust Roon con-
figurations.
Alternatively, you can open Settings and then Audio to Enable an audio output device, known as a Zone
within Roon.
You can name the Zone for your convenience
by clicking in the box and typing the name
you prefer. At any point in time you can
click on the Cog Wheels to the right of the
Zone Name and reconfigure the Zone.
On the bottom right side of the Roon Main
Screen the current Zone being used is dis-
played (i.e. Wyred 4 Sound shown below).
You can also Click the Zone icon which will
open a screen showing all of the Zones that
have been configured. On this screen you
can Click the Speaker icon and then the Cog
Wheels to enter the configuration screen.
As can be seen in the above examples, within
Roon there are many ways to achieve the
desired goal.

© Wyred 4 Sound. All rights reserved. MS Music Server Owner’s Manual and Setup Guide v1.4
16
Click Save Settings. At this point you can enter a meaningful zone name, such as Wyred 4 Sound. This
will be the Zone Name for Roon and what you select as the active zoon from your Roon Controller.
Roon – more on configuring Roon
• Download and install the Roon Controller app on the device you are using to control Roon, i.e.
iPad, Android Tablet, Microsoft Surface, Computer, etc.
• Inside the Roon controller app select Settings and connect to the MS1 Roon Core
• Some customers prefer to assign which folders; on an internal drive, from a mounted USB drive,
or from a NAS, that Roon is watching. Under settings to select Storage, you can Add Folder,
Browse and navigate to the folder that you want to add, and then click Select This Folder for any
folder you are going to be storing music in, i.e. mounted drive, NAS, etc. This allows you to con-
trol exactly which folders for Roon to watch if you would like.
• Roon will watch these folders and automatically make available any music that is added
Instructions for installing other popular apps:
CD Import – allows for ripping standard CDs to your music server
• Under Apps, click Software Manager, Click Available Apps, Click CD Import app, Click Install
• Under Settings select CD Import
• Select CD Encoding (compressed or uncompressed)
• Insert CD, label side up
• The CD will make some sounds checking the disk
• The CD will be heard spinning while ripping is in progress
• The rip will take between 5-10 minutes, depending on the inserted disk
• The CD will be ejected when the rip is complete
• The CD rip will be created in a folder on the server
• The path to the folder is Storage/Music/Flac/Title of the CD
Drive Mounter – allows for mounting either a USB external drive or a NAS to the server
• Under Apps, click Software Manager, Click Available Apps, Click Drive Mounter app, Click In-
stall
• Under Settings select Drive Mounter
• Select USB tab
© Wyred 4 Sound. All rights reserved. MS Music Server Owner’s Manual and Setup Guide v1.4
17
• For Drive Device Name use the drop down selector and select the attached USB drive
• Click Save Changes
• When message appears that reconfiguration has been Successful the USB drive is mounted to the
server and available for storage or backing up
• Under SMB is where you map your NAS
• Enter the Network Share path and name
• Leave the Mount Read-Only checked if you want your NAS to be read only
• Enter User Name and Password if required on your Network
• Click Save Changes
• When message appears that reconfiguration has been Successful the NAS is mounted to the serv-
er and available for storage
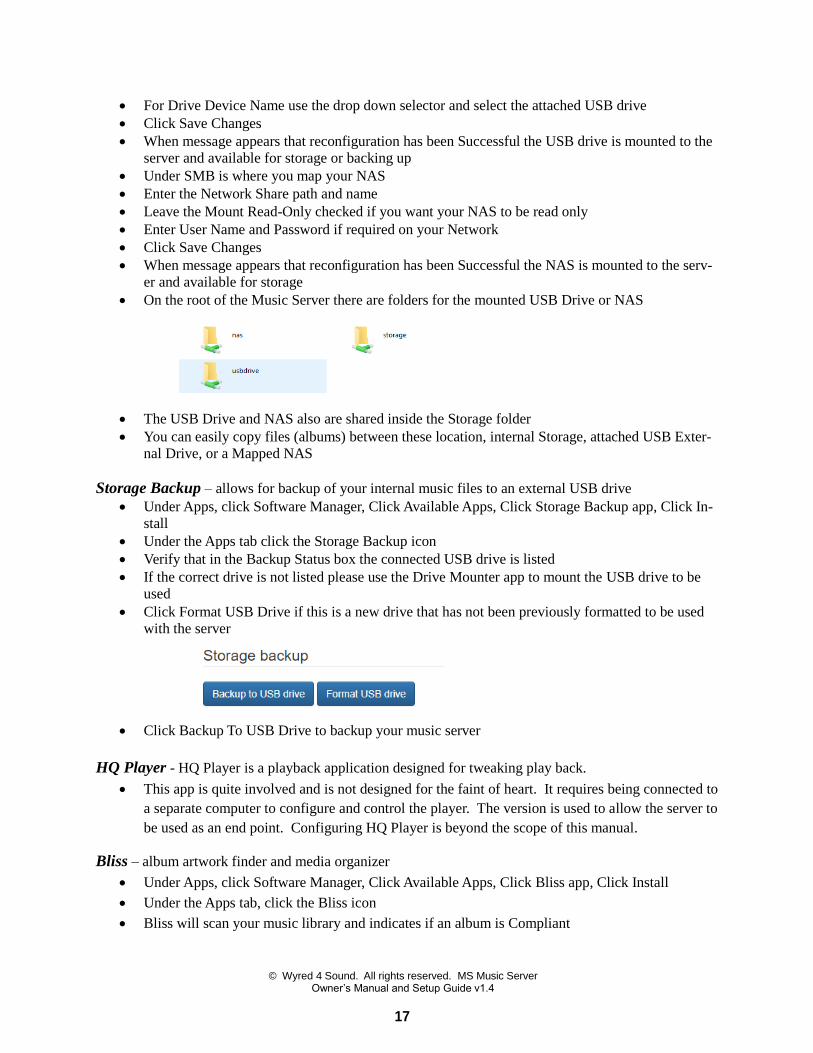
• On the root of the Music Server there are folders for the mounted USB Drive or NAS
• The USB Drive and NAS also are shared inside the Storage folder
• You can easily copy files (albums) between these location, internal Storage, attached USB Exter-
nal Drive, or a Mapped NAS
Storage Backup – allows for backup of your internal music files to an external USB drive
• Under Apps, click Software Manager, Click Available Apps, Click Storage Backup app, Click In-
stall
• Under the Apps tab click the Storage Backup icon
• Verify that in the Backup Status box the connected USB drive is listed
• If the correct drive is not listed please use the Drive Mounter app to mount the USB drive to be
used
• Click Format USB Drive if this is a new drive that has not been previously formatted to be used
with the server
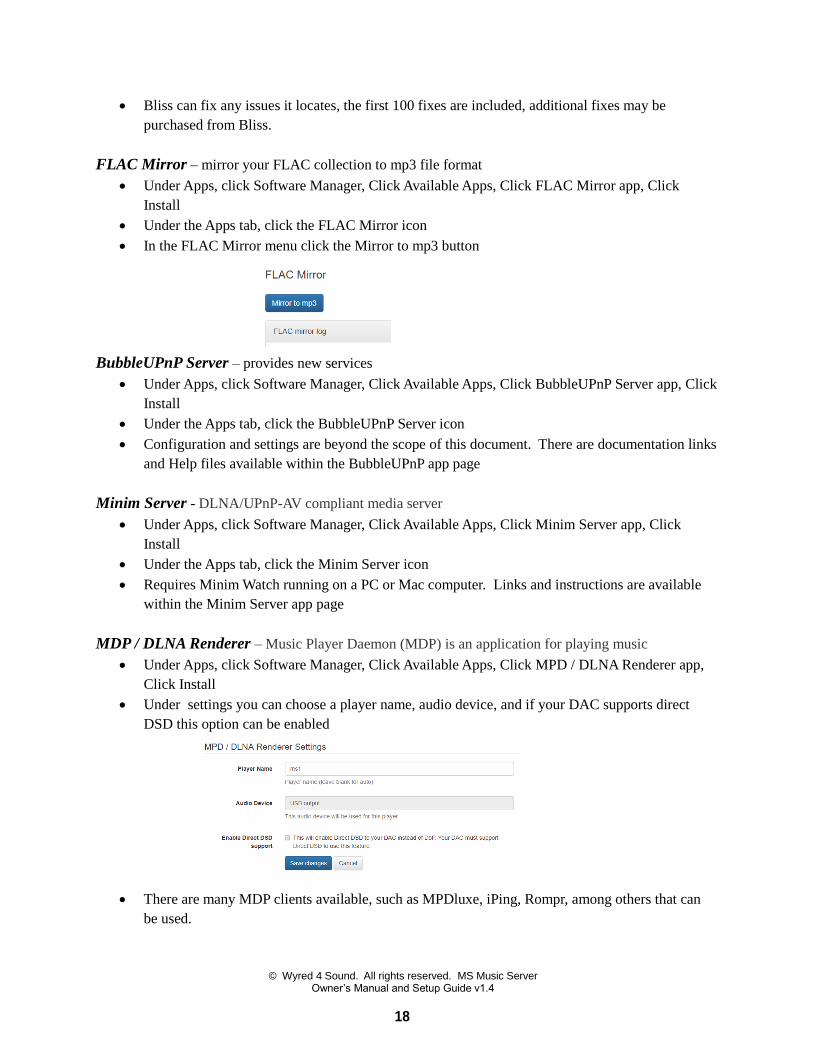
• Click Backup To USB Drive to backup your music server
HQ Player - HQ Player is a playback application designed for tweaking play back.
• This app is quite involved and is not designed for the faint of heart. It requires being connected to
a separate computer to configure and control the player. The version is used to allow the server to
be used as an end point. Configuring HQ Player is beyond the scope of this manual.
Bliss – album artwork finder and media organizer
• Under Apps, click Software Manager, Click Available Apps, Click Bliss app, Click Install
• Under the Apps tab, click the Bliss icon
• Bliss will scan your music library and indicates if an album is Compliant
© Wyred 4 Sound. All rights reserved. MS Music Server Owner’s Manual and Setup Guide v1.4
18
• Bliss can fix any issues it locates, the first 100 fixes are included, additional fixes may be
purchased from Bliss.
FLAC Mirror – mirror your FLAC collection to mp3 file format
• Under Apps, click Software Manager, Click Available Apps, Click FLAC Mirror app, Click
Install
• Under the Apps tab, click the FLAC Mirror icon
• In the FLAC Mirror menu click the Mirror to mp3 button
BubbleUPnP Server – provides new services
• Under Apps, click Software Manager, Click Available Apps, Click BubbleUPnP Server app, Click
Install
• Under the Apps tab, click the BubbleUPnP Server icon
• Configuration and settings are beyond the scope of this document. There are documentation links
and Help files available within the BubbleUPnP app page
Minim Server - DLNA/UPnP-AV compliant media server
• Under Apps, click Software Manager, Click Available Apps, Click Minim Server app, Click
Install
• Under the Apps tab, click the Minim Server icon
• Requires Minim Watch running on a PC or Mac computer. Links and instructions are available
within the Minim Server app page
MDP / DLNA Renderer – Music Player Daemon (MDP) is an application for playing music
• Under Apps, click Software Manager, Click Available Apps, Click MPD / DLNA Renderer app,
Click Install
• Under settings you can choose a player name, audio device, and if your DAC supports direct
DSD this option can be enabled
• There are many MDP clients available, such as MPDluxe, iPing, Rompr, among others that can
be used.

© Wyred 4 Sound. All rights reserved. MS Music Server Owner’s Manual and Setup Guide v1.4
19
Plex Media Server – streams music, pictures, and videos to your Plex Player
• Under Apps, click Software Manager, Click Available Apps, Click Plex Media Server app, Click
Install
• Under the Apps tab, click the Plex Media Server icon; this will open the Plex webpage to sign in
or create an account
• Plex also requires you to install the Plex Player app on the device you would like to use, such as
an iPad, iPhone, Android device, etc.
Shairport – an airplay emulator, allows playing audio from your Apple product to the audio output
• Under Apps, click Software Manager, Click Available Apps, Click Shairport app, Click Install
• Under settings you can choose a player name, audio device
Sonos Auto Configure –
• Under Apps, click Software Manager, Click Available Apps, Click Sonos Auto Configure app,
Click Install
• Under settings you can choose automatically configure your Sonos music library to point to the
server
Spotify Connect – use Spotify app as a remote
• Under Apps, click Software Manager, Click Available Apps, Click Spotify Connect app, Click
Install
• Under settings you can choose a player name, audio device
• Spotify Connect also requires you to install the Spotify app on the device you would like to use,
such as an iPad, iPhone, Android device, etc.

© Wyred 4 Sound. All rights reserved. MS Music Server Owner’s Manual and Setup Guide v1.4
20
Squeezebox Server - powers the Squeezebox and squeezelite network music players
• Under Apps, click Software Manager, Click Available Apps, Click Squeezebox Server app, Click
Install
• Under settings you can restart or clear your Squeezebox Server Database
• There is a link to open the Squeezebox Server Interface by clicking the HERE link, this allows for
configuring your Suqeezebox Server
• Under the Apps tab click the Squeezebox Server icon to open the Squeezebox webpage to login
or create an account.
Squeezelite – zone player for Squeezebox Server
• Under Apps, click Software Manager, Click Available Apps, Click Squeezelite app, Click Install
• Under settings you can choose a player name, audio device, and several other customized
settings
Subsonic – personal media streamer
• Under Apps, click Software Manager, Click Available Apps, Click Subsonic app, Click Install
• Under the Apps tab, click the Subsonic icon; this will open the Subsonic webpage to sign in or
create an account
• You can use a browser or download a phone app to control Subsonic

© Wyred 4 Sound. All rights reserved. MS Music Server Owner’s Manual and Setup Guide v1.4
21
Warranty Coverage
Wyred 4 Sound’s warranty obligations are limited to the terms set forth below:
Wyred 4 Sound, as defined below, warrants this Wyred 4 Sound-branded hardware product against
defects in materials and workmanship under normal use for a period of THREE (3) YEARS for i3
Package and FIVE (5) YEARS for i7 Package from the date of retail purchase by the original end
user purchaser ("Warranty Period"). If the product has been transferred from the original owner
to a second hand owner it has a ONE (1) YEAR warranty, valid from the original date of purchase
by the original owner. If a hardware defect arises and a valid claim is received within the Warranty
Period, at its option, Wyred 4 Sound will either (1) repair the hardware defect at no charge, using new or
refurbished replacement parts, or (2) exchange the product with a product that is new or which has been
manufactured from new or serviceable used parts and is at least functionally equivalent to the original
product. Wyred 4 Sound may opt that the customer replaces defective parts with new or refurbished user-
installable parts that Wyred 4 Sound provides in fulfillment of its warranty obligation. A replacement
product or part, including a user-installable part that has been installed in accordance with instructions
provided by Wyred 4 Sound, assumes the remaining warranty of the original product or ninety (90) days
from the date of replacement or repair, whichever provides longer coverage for the customer. When a
product or part is exchanged, any replacement item becomes property of the customer and the replaced
item becomes Wyred 4 Sound's property. Parts provided by Wyred 4 Sound in fulfillment of its warranty
obligation must be used in products for which warranty service is claimed. When a refund is given, the
product for which the refund is provided must be returned to Wyred 4 Sound and becomes Wyred 4
Sound's property.
EXCLUSIONS AND LIMITATIONS
Wyred 4 Sound does not warrant that the operation of the product will be uninterrupted or error-free.
Wyred 4 Sound is not responsible for damage arising from failure to follow instructions relating to the
product's use. This warranty does not apply: (a) to damage caused by use with non-Wyred 4 Sound
products; (b) to damage caused by accident, abuse, misuse, flood, fire, earthquake or other external
causes; (c) to damage caused by operating the product outside the permitted or intended uses described by
Wyred 4 Sound; (d) to damage caused by service (including upgrades and expansions) performed by
anyone who is not a representative of Wyred 4 Sound or a Wyred 4 Sound Authorized Service Provider;
(e) to a product or part that has been modified to significantly alter functionality or capability without the
written permission of Wyred 4 Sound; (f) if any Wyred 4 Sound serial number has been removed or
defaced.
TO THE EXTENT PERMITTED BY LAW, THIS WARRANTY AND REMEDIES SET FORTH
ABOVE ARE EXCLUSIVE AND IN LIEU OF ALL OTHER WARRANTIES, REMEDIES AND
CONDITIONS, WHETHER ORAL OR WRITTEN, STATUTORY, EXPRESS OR IMPLIED. AS
PERMITTED BY APPLICABLE LAW, WYRED 4 SOUND SPECIFICALLY DISCLAIMS ANY AND
ALL STATUTORY OR IMPLIED WARRANTIES, INCLUDING, AND WITHOUT LIMITATION,
WARRANTIES OF MERCHANTABILITY, FITNESS FOR A PARTICULAR PURPOSE AND
WARRANTIES AGAINST HIDDEN OR LATENT DEFECTS. IF WYRED 4 SOUND CANNOT
LAWFULLY DISCLAIM STATUTORY OR IMPLIED WARRANTIES THEN TO THE EXTENT
PERMITTED BY LAW, ALL SUCH WARRANTIES SHALL BE LIMITED IN DURATION TO THE
DURATION OF THIS EXPRESS WARRANTY AND TO REPAIR OR REPLACEMENT SERVICE AS
DETERMINED BY WYRED 4 SOUND IN ITS SOLE DISCRETION EXCEPT AS PROVIDED IN
THIS WARRANTY AND TO THE EXTENT PERMITTED BY LAW, WYRED 4 SOUND IS NOT
RESPONSIBLE FOR DIRECT, SPECIAL, INCIDENTAL OR CONSEQUENTIAL DAMAGES

© Wyred 4 Sound. All rights reserved. MS Music Server Owner’s Manual and Setup Guide v1.4
22
RESULTING FROM ANY BREACH OF WARRANTY OR CONDITION, OR UNDER ANY OTHER
LEGAL THEORY, INCLUDING BUT NOT LIMITED TO LOSS OF USE; LOSS OF REVENUE;
LOSS OF ACTUAL OR ANTICIPATED PROFITS (INCLUDING LOSS OF PROFITS ON
CONTRACTS); LOSS OF THE USE OF MONEY; LOSS OF ANTICIPATED SAVINGS; LOSS OF
BUSINESS; LOSS OF OPPORTUNITY; LOSS OF GOODWILL; LOSS OF REPUTATION; LOSS OF,
DAMAGE TO OR CORRUPTION OF DATA; OR ANY INDIRECT OR CONSEQUENTIAL LOSS OR
DAMAGE HOWSOEVER CAUSED INCLUDING THE REPLACEMENT OF EQUIPMENT AND
PROPERTY, ANY COSTS OF RECOVERING, PROGRAMMING, OR REPRODUCING ANY
PROGRAM OR DATA STORED OR USED WITH WYRED 4 SOUND PRODUCTS AND ANY
FAILURE TO MAINTAIN THE CONFIDENTIALITY OF DATA STORED ON THE PRODUCT. THE
FOREGOING LIMITATION SHALL NOT APPLY TO DEATH OR PERSONAL INJURY CLAIMS.
WYRED 4 SOUND DISCLAIMS ANY REPRESENTATION THAT IT WILL BE ABLE TO REPAIR
ANY PRODUCT UNDER THIS WARRANTY.
Obtaining Warranty Service
Please access and review the resources referred to in the documentation accompanying this hardware
product before requesting warranty service. If the product is still not functioning properly after making
use of these resources, please contact the Wyred 4 Sound representatives or, if applicable, an Authorized
Service Provider (dealer) using the information provided on the Wyred 4 Sound website. A Wyred 4
Sound representative or an Authorized Service Provider will help determine whether your product
requires service and if it does, they will inform you how Wyred 4 Sound will provide it. Wyred 4 Sound
or its Authorized Service Providers will provide warranty service on products that are tendered or
presented for service during the Warranty Period, as permitted by law. Wyred 4 Sound is not responsible
for freight charges to our facility for warranty repairs. We will cover return freight charges
(domestic only) if the unit is found to be faulty and still within the warranty coverage period.
Additionally we must have a valid warranty registration form on file that was submitted within 30
days of purchase to activate the product warranty. You will be responsible for delivery and return
shipping and handling charges if the product cannot be serviced in the country it is in. In accordance
with applicable law, Wyred 4 Sound may require that you furnish proof of purchase details and/or comply
with registration requirements before receiving warranty service. Please refer to the Service page on the
Wyred 4 Sound website. For more details on this and other matters on obtaining warranty service contact
your dealer. Recovery and reinstallation of system and application software and user data are not covered
under this Limited Warranty.
Service
In the unlikely event there is a problem with your Wyred 4 Sound component, please contact your
dealer, distributor, or Wyred 4 Sound to discuss the problem before you return the component to our
manufacturing facility for repair. Products shipped to the factory will be refused and returned freight
collect if not accompanied by a Wyred 4 Sound Service Department issued return authorization number
(RA Number). Return authorization numbers must be prominently displayed on the outside of the box and
an accompanying letter describing the problem and re-listing the RA number must be inside the box to
qualify for service.
To contact the Wyred 4 Sound Service Department:
Telephone: 805-466-9973
Hours: M/TH 7:00 am to 4:30 pm; Friday 7:00am to 11:00am PST
Fax: 805-462-8962
Email: [email protected]
© Wyred 4 Sound. All rights reserved. MS Music Server Owner’s Manual and Setup Guide v1.4
23
Website: http://www.wyred4sound.com
If you are located in the United States and purchased direct use the following procedure:
1. Fill out the Service form on our website located under the “Service” tab.
2. If service is approved we will issue a Return Authorization Number (R/A number) from the Wyred 4
Sound Service Department. Be sure to confirm the current shipping address.
3. Insure and accept all liability for loss or damage to the product during shipment to the W4S facility and
ensure all freight (shipping) charges are prepaid.
The product may also be hand delivered to the California facility if arrangements with the Service
Department have been made in advance. Proof of purchase from an authorized Wyred 4 Sound dealer,
distributor or agent will be required for warranty validation at the time of hand delivery. Use the original
packaging to ensure the safe transit of the product to the factory, dealer, or distributor. Wyred 4 Sound
may, at its discretion, return a product in new packaging and bill the owner for such packaging if
the product received by Wyred 4 Sound was boxed in nonstandard packaging or if the original
packaging was so damaged to the point it was unusable. If Wyred 4 Sound determines that new
packaging is required, the owner will be notified before the product is returned. To purchase additional
packaging, please contact your authorized Wyred 4 Sound dealer, distributor, or the Wyred 4 Sound
Service Department for assistance.
If you did not purchase the product directly from us and require service please contact your dealer
or distributors’ service department for information regarding service.
If you feel your authorized dealer or distributor is either unwilling or unable to service your Wyred 4
Sound products, please contact our service department [email protected] or the above phone
numbers to discuss and resolve the situation.

© Wyred 4 Sound. All rights reserved. MS Music Server Owner’s Manual and Setup Guide v1.4
24
4235 Traffic Way
Atascadero, CA 93422
USA
Ph: +1 (805) 466-9973
Fax: +1 (805) 462-8962
Website: wyred4sound.com
Email: [email protected]
Be sure to sign up for our newsletter to receive the latest news and updates!
See the “Wyred In” section in the footer of our website.
Follow us on Facebook: facebook.com/wyred4sound
Follow us on Twitter: twitter.com/Wyred4Sound