Embed Size (px)
Citation preview
12
MOVES IN ENGLISH edited by Char/es Vasey
~ ATLANTIC WALL by John Geoffrey Barnard
At long last, we have a monster board game that atlemprs to do justice to a monster undertaking. Atlantic Wall sets out to simulate the Allied Invasion of Europe, June 1944, an event that must be recorded as the most massive single mil itary operation that has ever occurred, and probably the most massive that ever will occur.
\Vhile the game 'is based on the Waehl am Rhein system, there are many changes and additions to reflect the special circumstances of the Normany battles. In ATlantic Wall, each day is divided into fonr turns, namely 4 Yz -hour AM, Midday, and PM turns plus a lOYz-hour Night turn. The hexagons contain about 1 kilometer of terrain, so therefore -five standard SPI mapsheets are required to cover the battle area bounded by Cherbourg in the northwest, Coutances in the southwest, and Caen in the southeasl. A tlantie Waf! covers the period from D-Day on the 6th of June up to and including July 1st , 1944, giving a grand total of 104 game turns in the full Campaign Game.
Seven scenari os are provided in all, of which one represents the whole battle . The other six cover respectively the Uta h Beach area, lhe Omaha Beach area, the Brit ish and Canadian sector, the U.S . advance towards Caumont, the Assault on Cherbourg, and finally Operation Epsom, an intended rigbt hook on Caen . Each of the mini-games is played on a single map-sheet, and while l.he three Invasion scenarios cover t. he operations of onC' day only·, Caumont Gap covers four days, Cherbourg nine days, and Epsom five days. Each of the scenarios has its own set or his torical notes and Victory Condi tions generally based on the capture of speci fied objecti ve hexes.
The th ree Invasion mini-games, and of course the Campaign Game, all starr with the Invasion, and for this there are special Invasion Stage Rules. As these are quite different from [he rest of the basically Waehl am Rhein system, I propose to concentrate heavily upon them. Not only are they different, they are also very interesting in both play and game design terms. Furthermore, they are of vital importance to the game as a whole, as they form the foundation upon which the following 100 game turns are built. If this isn ' t enough, there is something else. As the three Invasion mini-games are short and very one-sided, they are ideal for solitaire play, therefore these scenarios will probably be played a great deal more than the other parts of the game package . In order to cover the Invasion Stage as ful! y as possi-
ble, I propose to follow through D-Day in some detail as seen through the eyes of A tlantic Wall; this will allow me to communicate much 0 f the "feel" of the system and fu r[hermore to make various comments. on the accuracy of the game.
Please note, however, that all my following comments are based upon Atlantic Wall as revised by the Clarifications and Addenda dated October 1978. This makes many important and vital additions and al terations to · the rules and especially to some of the order of banle details , so if you have not got it , get one now. I feel sure, however, that this will not the the first addenda, as I hope certain comments of mine below will be considered in the future.
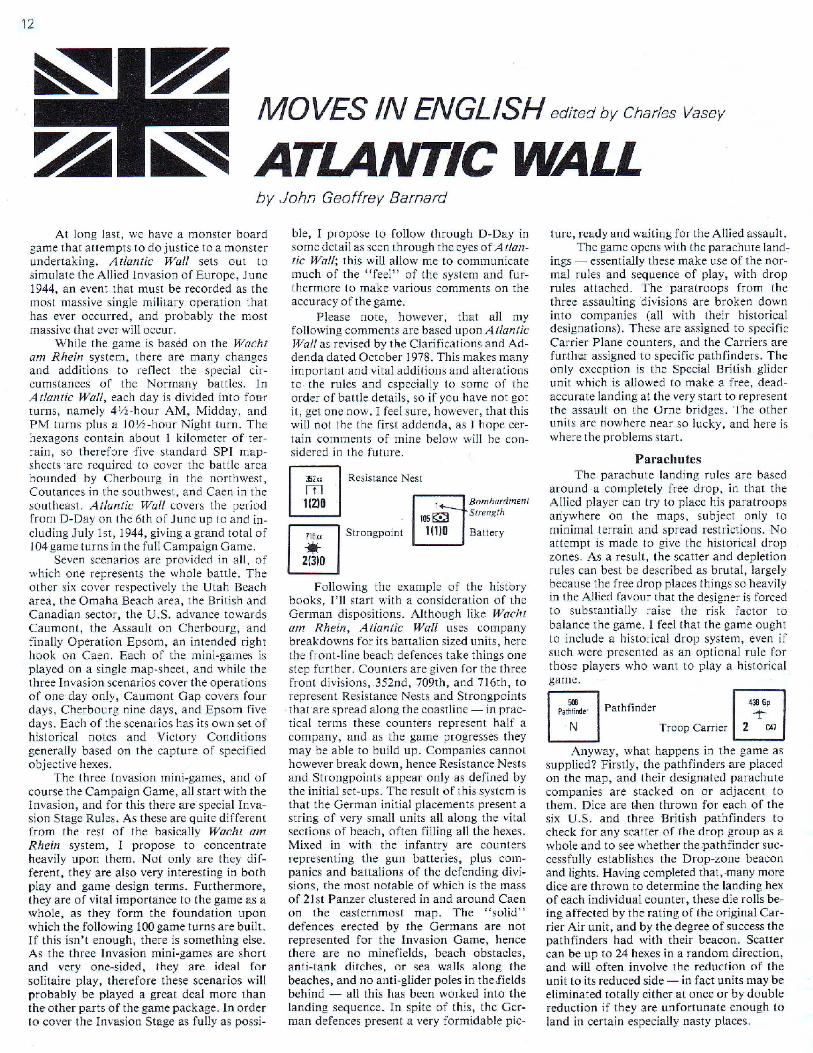
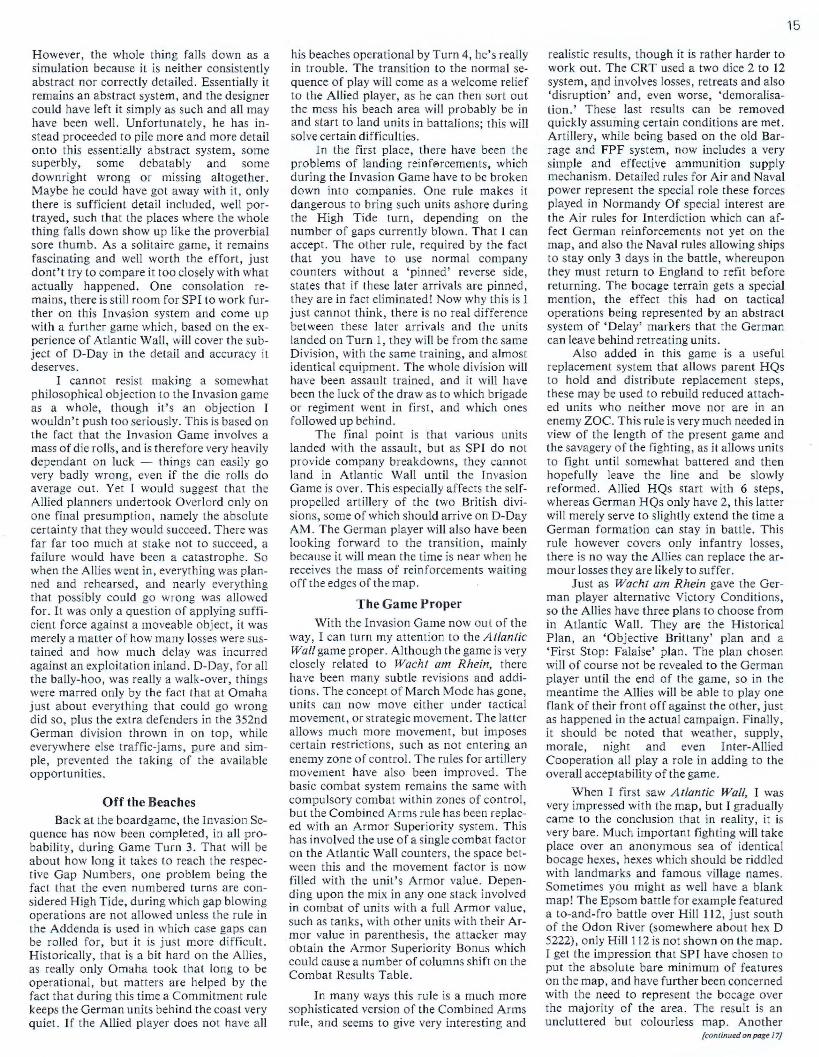
352"
m 1(2)0
716« • 2(3)0
Resistance Nest
1~ Bombardmerl' HI5 ~ Strengrll
Strongpoint 1 (1)0 Battery
Following the example of the his tory books, I'll start wit.h a consideration of the German dispositions. Although like Waehl am Rhein, Atlantic Wall uses company breakdowns for its battalion sized units, here the front- line beach defences take things one step fUrther. Counters are given for the three front divisions , .352nd, 709th, and 716th, to represent Resistance Nests and Strongpoints that are spread along the coastline - in practical terms these counters represent hal f a company, and as the game progresses they may be able to build up. Companies cannol however break down , hence Resistance Nests and Strongpoints appear only as defined by the initial set-ups_ The result of this system is that the German initial placements present a string of very small units all along the vital sections of beach, often filling all the hexes. Mixed in with the infantry a re counters representing the gun batteries, plus companies and battalions of the defending divisions, the most notable of which is the mass of 21 st Panzer clustered in and around Caen on the easternmost map. The "solid" defences erected by the Germans are not represented for the Invasion Game, hence there are no minefields, beach obstacles, anti-tank ditches, or sea walls along the beaches , and no anti-glider poles in the,fields behind - all this has been worked into the landing sequence. In spite of this, the German defences presen t a very form idable p ic-
ture, ready and waiting for the Allied assault. The game opens with the parachute land:
ings - essentially these make use of the normal rules and sequence of play, with drop rules altached _ The paratroops from the three assaulting divisions are broken down into companies (all with their historical designa tions). These are assigned to specific Carrier Plane counters, and the Carriers are furt her assigned to specific pathfinders. The only exception is lhe Special British glider unit which is allowed to make a free, deaclaccurate landing at the very starr to represen t the assault on the Orne bridges. The other uni ts are nowhere near so lucky, and here is where the problems start.
Parachutes The parachute landing rules are based
around a c.omplel.ely free drop, in that the Allied player can try to place his paratroops ariywhere on the maps, subject only to minimal terrain and spread rest.rictions. No at tempt is made to give the historical drop zones. As a resul t , the scatter and depletion rules can best be described as brutal, largely because the free drop places things so heavily in the Allied favour that the designer is forced to substantially raise the risk factor to balance the game. I feel that the game ought to include a historical drop system, even if slich were presented as an optional rule for those players who wanl to playa historica l game.
500 P.thlinder
N L-_-l
p"hnnd" I '+ I Troop Carrier 2 C47
Anyway, what happens in the game as supplied? Firstly, I,he pathfinders are placed on the map , and their designated parachute companies are stacked 011 or adjacent to them. Dice are then thrown for each of the six U.S. and three British pathfinders to check for any scatter .of the drop group as a whole and to see whether the pathfinder successfully establishes the Drop-zone beacon and lights. Having completed that, ·many more dice are thrown to determine the landing hex of each individual counter, these die rolls being affected by the rating of the original Carrier Air unit, and by the degree of success the pathfinders had with their beacon. Scatter can be up to 24 hexes in a random direction, and will often involve the reduction of the unit to its reduced side - in fact units may be eliminated totally either at once or by double reduction if they are unfortunate enough to land in certain especially nasty places .

The effect of all this is quite dramatic; it is almost a game in itself playing this through. All the essential features of a parachute drop are included, even to the point of the way the Carrier Air units are rated according to the historical results, in that some were green and scattered their passengers badly, while others were experienced and so held their course through the clouds and the flak and gave their troops a good chance of being on target. The problem is that the system is just too dramatic to be easily historical. Now I know the drops were very bad, I know that stacks were placed many miles away in all directions, but there is a big difference in the size of the units. The present random system is good, it. just runs into trouble on historical grounds because there is a massive difference between the small number of counters in A tlanlic Wall and the many times larger number of individual sticks in real life.
In order for the Allied player to get a reasonably historical drop he has got to be very, very lucky. If the present system were to be applied to stick-sized units, rather than company-sized units, I feel things would be much improved, although I quite accept that would lead to an unacceptably large number of counters . The present game is still fun, and a couple of extra rules in the addenda do help a great deal, especially the one which goes some small way towards representing the way in which many badly scattered units collected themselves together during the course of June 6th. The system remains rather brutal, and I would hope that if a historical drop rule was added, it would be coupled with a less dramatic drop system.
While the paratroop landing occurs on turn one only, the following Invasion Beach sequence can continue over a number of game turns, although generally it should not last further than three, by which time all the beaches should be won. The Invasion Stage rules are a very formalised simulation of an extremely complex operation, but with certain reservations I would accept that they do follow the flow of the Normandy landings surprisingly closely. I am in fact impressed with the amount of detail that has been included, while at the same time being greatly disappointed by certain problems noted below .
Problems The sequence starts with an Air Bom
bardment which is merely a matter of throwing a specified number or dice for chosen target hexes, a score of" I" and the target is pinned . for some reason the Campaign Game gives J 8 attacks for the whole invasion area, while the three Invasion mini-games give a total of 20 attacks - maybe there is a mystical design reason for that. It doesn't matter though, as the attacks are so realistically ineffective.
2 DD 1 Naval Unit us -OIl!1o
While the Air Bombardment is completely abstract, the Naval Bombardment
stage which follows it is slightly less abstract. Here the Allied player does have stacks of naval counters, one for each ship present, and fire from these may be directed against Resistance Nests, Strongpoints, and Batteries. Rocket-firing LCTs also appear, though they are used once only and are then removed from play. The Allied player must plot all his fire using numbered chits, whereupon he resolves fire against the Batteries only, trying to pin or eliminate them . After this, any unpinned Batteries may return fire, either against the warships, which can be reduced by damage, or against the approaching wave of assault units from which units may be eliminated. Only when that has been completed is the remaining Allied fire against any formerly specified Resistance Nests or Strongpoints thrown for. All this fire is done using simple dice rolls, the quantity of fire applied, subject to limits, determines the score needed, the result being pinned, eliminated, or no effect. Note that all the Invasion Stage counters, namely the various Allied Assault companies and the German defensive counters, are printed with the basic strengths on the front, while on the rear is either "'PIN" or a pinned strength, hence there is no reduction involved.
There is a fair amount of skill required in this fire stage, and the results obtained will have an important bearing on the initial Assault wave. There is not enough firepower to attack all the possible targets, and you really have to try to at least pin some of the more effective Batteries, otherwise they can cause severe damage to assaulting (roops. On the other hand, getting some good results against the beach defenders will give any assault that does get ashore a good start. The other question is whether you spread your fire widely wit.h merely the intention of pinning the enemy, or whether you put more fire-power in so as to give a chance of eliminating the target, as if you succeed in the latter the situation in later rounds of fire looks much brighter. It's a ll a big gamble anyway, as no matter what you try, everything is in the hands of a lot of dice rolls.
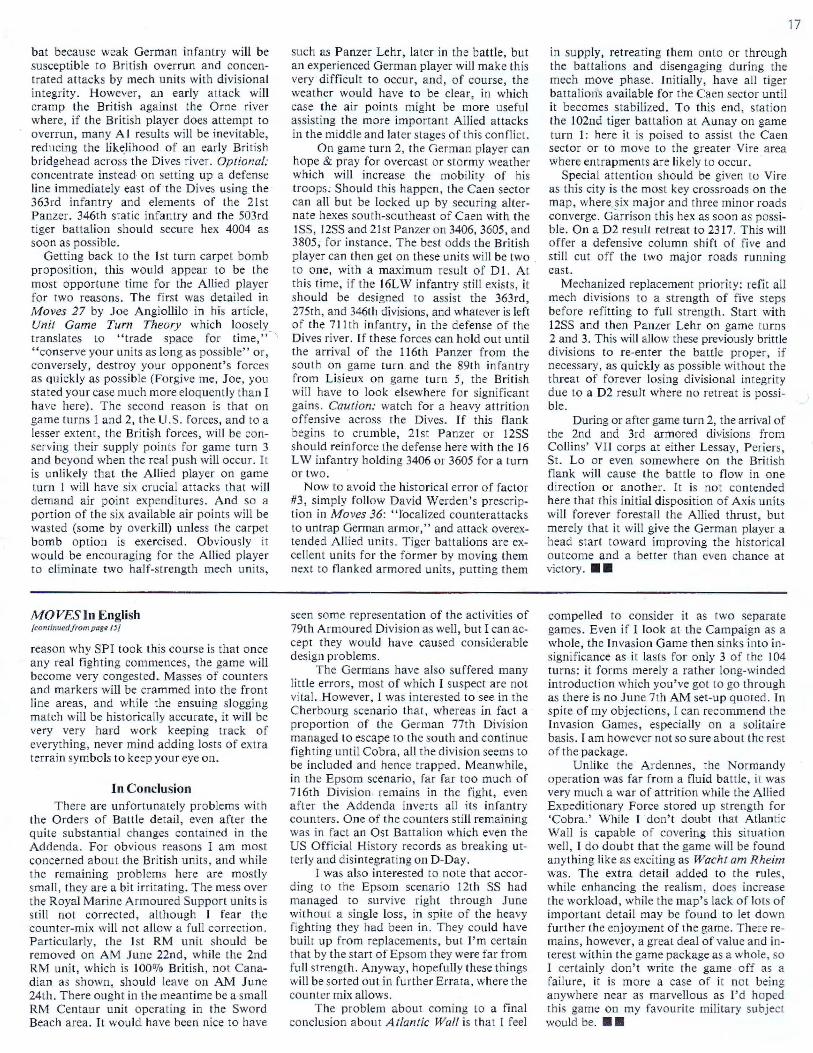
The First Wa,,·e Now comes the real action - the land
ings. Each of the five beach areas is divided up into sub-beaches with historical designations, and each sub-beach has an abstr\l.ct display assigned to it. Three waves of assault troops are set up at the st.art or the game, as the Invasion Sequence, with the exception of the Ai r Bombardment Phase, is repeated three times each game turn . So on the first landing phase of game turn one, those troops in the first wave who have survived any German Battery fire are available to land.
Firstly, any tank units try t.o land, DD tanks being given the option of swimming ashore or landing normally. Each beach area is assigned a Drift Rating and a DD rating; these require a die roll to check if the tanks make it. Normal tanks always land pinned, and jf they drift badly they are eliminated. DD tanks which try to swim ashore are more
likely to be eliminated but, if they do make it, they do not drift and land unpinned . Front Back
13
00 Assault Company (8) ~Dd §Dd (Tank: may be either § 1.3-12 Dd, Flail- F- or 1.1.P
normal)
I accept that the designer wanted to make a distinction between DD tanks that try to swim and DD tanks and normal tanks that land direct from their LeTs onto the beaches, and I would agree that the present system does that very nicely, however I rather feel that it rather exaggerates the difference . Not only is the whole concept of being "pinned" strange in respect to tanks on an open beach, but you have the odd situation of a possible mass of tanks landed dry from an LCT just sitting there, pinned and so useless, while a DD tank which manages to swim ashore can rapidly and effortlessly drop its flotation screen, periscope, and other accoutrements and be ready to leap right into action. In fact it was often the DD tanks that were landed dry that were most effective, and furthermore they arrived no later than planned anyway. The whole possible value of the DD tanks was severely undermined by the rough seas, and even in the British sector where the seas were least rough, many DD LCTs took their passengers all the way to the beach.
Fronl
C8:I Assault Company (AI) OOh
2f1)6 (Infantry)
Back
8WI154151
181 412)6
Anyway, on with the game. T he first wave of infantry are next to arrive, amongst their numbers will be the engineers and also the leaders who will be needed later to try to unpin units. All these are also subject to drift and possible elimination. Those that land all pile up in the beach hexes with the armour already there. Note that each beach hex is allowed to contain up to twelve company counters, although only four are allowed to attack out. Last to arrive in each wave are the abstract Demolition Points. These are numbered chits forming a highly symbolic system of representing the various engineering activities that went on on the beaches during the assault. While they too are subject to drift and possible loss, they are not likely to be pinned and are placed in special boxes on the sub-beach chart rather than on one of the beach hexes. Their purpose is to represent the creation of lanes through the beach obstacles; in fact the other equally vital role of creating the gaps off the beaches to inland is not represented at all. The game however calls this former function "Gap Blowing" and bases the whole Invasion Game on the success of the Demolition forces in reaching a specified "Gap Total," while utterly disregarding the problems of troops and especially vehicles in getting off the beaches so as to proceed with their allo ted missions.
The Invasion Rules are used within each beach area only until that particular beach's "Gap Number" is reached, whereupon the
14
beach instantly moves to the normal game system and avoids all the problems inherent in the landing system. I suppose players should be thankful for what is given; it is just that many facets of the landings have been brushed under the carpeL
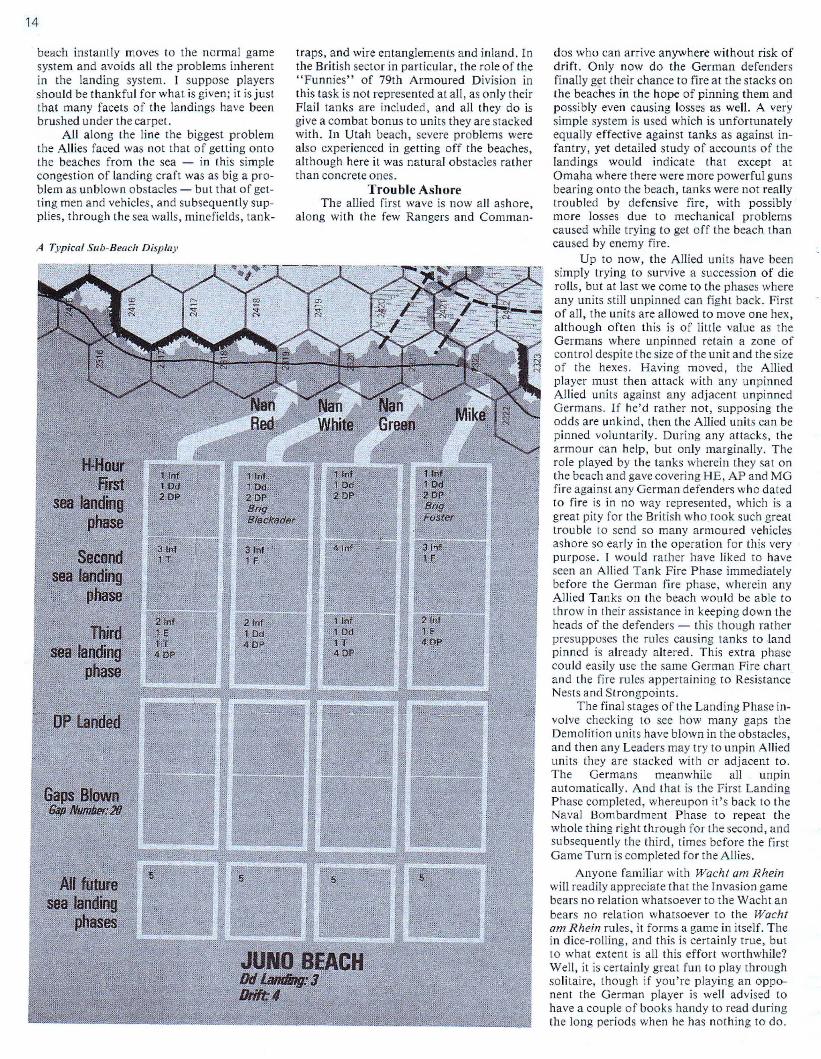
All along the line the biggest problem the Allies faced was not that of getting onto the beaches from the sea - in this simple congestion of landing crart was as big a problem as unblown obstacles - but that of getting men and vehicles, and subsequently supplies, through the sea walls, minefields, tank-
A Typical Sub-Beach Display
traps, and wire entanglements and inland. In the British sector in particular, the role of the "Funnies" of 79th Armoured Division in this task is not represented at all, as only their Flail tanks are included, and all they do is give a combat bonus to units they are stacked with. In Utah beach, severe problems were also experienced in getting off the beaches, although here it was natural obstacles rather than concrete ones.
Trou ble Ash ore The allied first wave is now all ashore,
along with the few Rangers and Comman-
dos who can arrive anywhere without risk of drift. Only now do the German defenders rinaHy get their chance to fire at the stacks on the beaches in the hope of pinning them and possibly even causing losses as welL A very simple system is used which is unfortunately equally effective against tanks as against infantry, yet detailed study of accounts of the landings would indicate that except at Omaha where there were more powerful guns bearing onto the beach, tanks were not really troubled by defensive fire, with possibly more losses due to mechanical problems caused while trying to get off the beach than caused by enemy fire .
Up to now, the Allied units have been simply trying to survive a succession of die rolls, but at last we come to the phases where any units still unpinned can fight back. First of all, the units are allowed to move one hex, although often this is of litt le value as the Germans where unpinned retain a zone of comrol despite the size of the unit and the size of the hexes. Having moved, the Allied player must then attack with any unpinned Allied units against any adjacent unpinned Germans. If he'd rather not , supposing the odds are unkind, then the Allied units can be pinned volun tarily. During any attacks, the armour can help, but only marginally. The role played by the tanks wherein they sa t on the bcach and gave covering HE, AP and MG fire against any German defenders who dated to fire is in no way represented, which is a great pity for the British who .took such great trouble LO send so many armoured vehicles ashore so eady in the operation for this very purpose. I would rather have liked to have seen an Allied Tank Fire Phase immediately before the German fire phase, wherein any Allied Tanks on the beach would be able to throw in their assistance in keeping down the heads of the defenders - this though rather presupposes the rules causing tanks to .Iand pinned is already altered. T his extra phase could easily use the same German Fire cha11 and lhe fire rules appertaining to Resistance Nests and Strongpoints .
The final stages of the Landing Phase involve checking to see how many gaps the Demolition units have blown in the obstacles, and then any Leaders may try to unpin Allied units they are sLacked with or adjacent to. The Germans meamvhile all unpin automatically. And that is the First Landing Phase completed, whereupon it's back to the Naval Bombardment Phase to repeat the whole thing right through for the second, and subsequently the third, times before the rirst Game Turn is completed for the Allies.
Anyone familiar with Waehl am Rhein will readily appreciate that the Invasion game bears no relation whatsoever to the Wacht an bears no relation whatsoever to the Woehl am Rhein rules, it forms a game in itself. The in dice-rolling, and this is certainly true, but to what extent is all this effort worthwhile? Well, it is certainly great fun to play through solitaire, though if you're playing an opponent the German player is well advised Lo have a couple of books handy to read during the long periods when he has nothing to do.
However, the \vhole thing falls down as a simulation because it is neither consistently abstract nor correctly detailed . Essentially it remains an abstract system, and the designer could have left it simply as such and all may have been well. Unfortunately, he has instead proceeded to pile more and more detail onto this essentially abstract system, some superbly, some debatably and some downright wrong or missing altogether. Maybe he could have got away with it, only there is sufficient detail included, well portrayed, such that the places where the whole thing falls down show up like the proverbial SOre thumb. As a solitaire game, it remains fascinating and well worth the effort, just dont't try to compare it too closely with what actually happened. One consolation remains, there is still room for SPI to work further on this Invasion system and come up with a further game which, based on the experience of Atlantic Wall, "Jill cover the subject of D-Day in the detail and accuracy it deserves.
I cannot resist making a somewhat philosophical objection to the Invasion game as a whole, though it's an objection I wouldn't push too seriously. This is based on the fact that the In vasion Game involves a mass of die rolls, and is therefore very heavily dependant on luck - things can easily go very badly wrong, even if the die rolls do average out. Yet I would suggest that the Allied planners undertook Overlord only on one final presumption, namely Lhe absolute certainty that they would succeed. There was far far tOo much at st.ake not to succeed, a failure would have been a catastrophe. So when the Allies went in, everything was planned and rchearsed, and nearly everything that possibly could go wrong was allowed for. It was only a question or applying sufficient force against a moveable object, it was merely a matter of how many losses were susrained and how much delay was incurred against an exploitation inland . D-Day, for all the bally-hoo, was really a walk -over, things were marred only by the fact that at Omaha just about everything that could go wrong did so, plus the extra defenders in the 352nd German division thrown in on top, while everywhere else traffic-jams, p_ure and simple, prevented the taking of the available opportunities.
Off the Beaches Back at the boardgame, the Invasion Se
quence has now been completed, in all probability, during Game Turn 3. That will be about how long it takes to reach the respective Gap Numbers, one problem being the fact that the even numbered turns are considered High Tide, during 'which gap blowing operations are not allowed unless the rule in the Addenda is used in which case gaps can be rolled for, but it is just more difficult. Historically, thaI is a bit hard on the Allies, as really only Omaha took lhat long to be operational, bUl matters are helped by the fact that during this time a Commitment rule keeps the German units behind the coast very quiet. If the Allied player does not have all
his beaches operational by Turn 4, he's really in t.rouble. The transition to the normal sequence of play will come as a welcome relief to the Allied player, as he can then sort out the mess his beach area will probably be in and start to land units in battalions; this 'will solve certain difficulties.
In the first place, there have been the problems of landing rein fercements, ",..hich during the Invasion Game have to be broken down into companies. One rule makes it dangerous to bring such units ashore during the High Tide turn, depending on the number of gaps currently blown . That t can accept. The othcr rule, required by the fact that you have to use normal company counters without a 'pinned' reverse side, states that if these later arrivals are pinned, they are in fact eliminated! Now why this is I just cannot think , there is no real difference between these later arrivals and the units landed on Turn 1, they will be from the same Division, with the same training, and almost identical equipment. The whole division will have been assault trained, and it will have been the luck of the draw as to which brigade or regiment w'ent in fi rst, and which ones follow'ed up behind .
The final point is that various units landed with the assault, but as SPI do not provide company breakdowns, they cannot land in Atlantic Wall until the Invasion Game is over. This especially a ffects the selfpropelled artillery of the two British divisions, some of which should arrive on D-Day AM. The German player will also have been looking forward to the transition, mainly because it will mean the time is near when he receives the mass of reinforcements waiting off the edges of the map.
The Game Proper
With the Invasion Game now out of the way, I can turn my attention to the A tlanlic Wall game proper . Although the game is ve\"y closely related to Wacht am Rhein, there ha'/e been many subtlc revisions and additions . The concept of Mareh Mode has gone, units can now move either under tactical movement, or strategic movement. The latter allows much more movement, but imposes certain restrictions , such as not entering an enemy zone of control. The rules for artillery movement have also been improved. The basic combat system remains the same with compulsory combat within zones of control, but the Combined Arms rule has been replaced with an Armor Superiority system. This has involved the use of a single combat factor on the Atlantic Wall countcrs, the space between this and the movement factor is now filled with the unit's Armor value . Depending upon the mix in anyone stack involved in combat of units with a full Armor value, such as tanks, with other units with their Armor value in parenthesis, the attacker may obtain the Armor Superiority Bonus which could cause a number of columns shift on the Combat Results Table .
In many ways this rule is a much more sophisticated version of the Combined Arms rule, and seems to give very interesting and
realistic results, though it is rather harder to work out. The CRT used a two dice 2 to 12 system, and involves losses, retreats and also 'disruption' and, even worse, 'demoralisation.' These last results can be removed quickly assuming certain conditions are met. Artillery, while being based on the old Barrage and FPF system, now includes a very simple and effective ammunition supply mechanism. Detailed rules for Air and Naval power represent the special role these forces played in Normandy O f special interest are the Air rules for Interdiction which can affect German reinforcements not yet on the map, and also the Naval rules allowing ships to stay only 3 days in the battle , whereupon they must return to England to refit before returning. The bocage terrain gets a special mention, the effect this had on tactical operations being represented by an abstract. system of 'Delay' markers that the German ean leave behind retreating units .
Also added in this gamc is a useful replacement system that allows parent HQs to hold and distribute replacemenl steps, these may be used to rebuild reduced attached units who neither move nor are in an enemy zoe. This rule is very much needed in vie"v of the length of the present game and the savagery of the fighting, as it allows units to fight until somewhat battered and then hopefully leave the line and be slowly reformed . Allied HQs start with 6 steps, whereas German HQs only have 2, this latter will merely serve to slightly extend the time a German formation can stay in battle. This rule however covers only infantry losses, there is no way the Allies can replace the armour losses they are likely to suffer.
Just as Wacht am Rhein gave the German player alternative Victory Conditions, so the Allies have three plans to choose from in Atlantic Wall. They are the Historical Plan, an 'Objective Brittany' plan and a 'First Stop: Falaise' plan. The plan chosen will of course not be revealed to the German player until the end of the game, so in the meantime the Allies will be able to play one flank of their front off against the other, just as happened in the actual campaign . Finally, it should be noted that weather, supply, morale, night and even Inter-Allied Cooperation all playa role in adding to the overall acceptability of the game.
When I first saw Atlantic Wall, I was very impressed with the map, but I gradually came to rhe conclusion that in reality, it is very bare. Much important fighting will take place over an anonymous sea of identical bocage hexes, hexes which should be riddled with landmarks and famous village names . Somelimes you might as well have a blank map! The Epsom battle for example featured a to-and-fro battle over Hill 112, just south of the Odon River (somewhere about hex D 5222), only Hill 112 is not shown on the map. I get the impression that SPI have chosen to put the absolute bare minimum of features on the map, and have further been concerned with the need to represent the bocage over thc majority of the area. The result is an uncluttered but colourless map. Another
[continued on page J 7J
15
bat because weak German infantry will be susceptible to British overrun and concentrated attacks by mech units with divisional integrity. However, an early attack will cramp the British against the Orne river where, if the British player does attempt to overrun, many A I results will be inevitable, reducing the lik~lihood of an early British bridgehead across the Dives river. Optional: concentrate instead· on setting up a defense line immediately east ohhe Dives using the 363rd infantry and elements of the 21st Panzer. 346th static infant.ry and the 503rd tiger battalion should secure hex 4004 as soon as possible.
Getting back to the 1st turn carpet bomb proposition; this would appear to be the most opportune time for tht: Allied player fo r two reasons. The firs t was detailed in Moves 27 by Joe Angiollilo in his article, Untt Game Turn Theory which loosely translates to "trade space for time, ,,"conserve your units as long as possible" or, conversely, destroy your opponent's forces as quickly as possible (Forgive me, Joe, you stated your case much more eloquently than I have here). The second reason is that on game turns I and 2, the U.S . forces, and to a lesser extent, the British forces, will be conserving their sl)pply points for gamc turn 3 and beyond when the real push will occur. It is unlikely that the Allied player on game lurn 1 will have six crucial attacks that will demand air point expenditures. And so a portion of the six available air points will be wasted (some by overkill) unless the carpet bomb option is exercised. Obviously it would be encouraging [or the Allied playe r to eliminate. two half-strength mech units,
MO VES In English {co!1lilluedjrom p(Jge lSi
reason why SPI took this course is that once any real fighting commences, the game will become very congested .. Masses of counters and markers will be crammed into the front line areas, and while the ensuing slogging match will be historica lly accurate, it will be very very hard work keeping t.rack of everything, never mind adding losts of extra terrain symbols to keep your eye on.
In Conclusion There are unfortunately problems with
the Orders of Battle detail, even after the quite substantial changes contained in the Addenda. For obvious reasons I am most concerned about the British units , and while the remaining problems here are mostly small, they are a bit irritating. The mess over the Royal Marine Armoured Support units is still not corrected, although I fear the counter-mix will not allow a full correction. Particularly. the 1 st RM unit should be removed on AM Junc 22nd, while the 2nd Rt .... l unit, which is 100% British, not Canadian as shown, should leave on AM June 24th. There ought in the meantime be a small Rl'vl Centaur unit operating in the Sword Beach area. It would have been nice to have
such as Panzer Lehr, later in the battle, but an experienced German player will make this very difficult to occur, and, of course, the weather would have to be clear, in which case the air points might be more useful assisting the more important Allied attacks in the middle and later stages of this conrlicr.
On game turn 2, the German player can hope & pray for overcast or stormy weather which will increase the mobility of his troops ; Should this happen, the Caen sector can all but be locked up by securing alternate hexes south-southeast of Caen with the ISS, 12SS and 21 st Panzer on 3406, 3605, and 3805, for instance. The best odds the British player can then gel on these units will be two . to one, with a maximum result of D1. At this time, if the J 6L W infantry still exists, it should be designed to assist the 363rd, 275th, and 346th divisions, and whatever is len of the 711 th infantry, in the defense of the Dives river. If these forces can hold out until the arrival of the 1I6th Panzer from the south on game turn . and the 89th infantry from Lisieux on game turn 5, the British will have to look elsewhere for significant gains. Caution: watch for a heavy attrition offensive across the Dives. If this flank begins to crumble, 21st Panzer or 12SS should reinforce the defense here with the 16 LW infantry holding 3406 or 3605 for a turn or two.
Nmv to avoid the historical error of factor #3, simply follow David Werden's prescription in Moves 36: "localized counterattacks to untrap German armor," and attack overextended Allied units . Tiger battalions are excellent units for the former by moving them next to fl ank ed armored units, putting them
seen some representation of the activities of 79th Armoured Division as well, but I can accept they would have caused considerable design problems.
The Gerrtians have also suffered many little errors, most of which I suspect are not vital. However, I was interested to see in the Cherbourg scenario that, whereas in fact a proportion of the German 77th Division managed [0 escape to the south and continue fighting until Cobra, all the division seems to be included and hence trapped. Meanwhile, in the Epsom scenario, far far too much of 716th Division. remains in the fight, even after the Addenda inverts all its infantry counters. One of the counters still remaining was in fact an Ost Battalion which even the US Official History records as breaking utterly and disin tegrat ing on D-Day.
I was also interested to note that according to the Epsom scenario 12th SS had managed to survive right through June without a single loss, in spite of the heavy righting they had been in . They could have built up from replacements, but I'm certain that by the stan of Epsom they were far from full strength. Anyway, hopefully these things will be sorted out in further Errata, where the counter mix allo~'s.
The problem about coming to a final conclusion about A [Ian tic Wall is that I feel
in supply, retreating them onlO or through the battalions and disengaging during the mech move phase. Initially, have all tiger battalions available for the Caen sector until it becomes stabilized. To this end, station the 102nd tiger balla/ion at Aunay on game turn 1: here it is poised to assist the Caen sector Or to move to the greater Vire area where entrapments are likely to occur.
Special attention should be given to Vire as this ci ty is the most key crossroads on the map, where. six major and three minor roads converge. Garrison this hex as soon as possible. On a D2 result retreat to 23 17. This will offer a defensive column shift or five and still cut off the two major roads running east.
Mechanized replacement priority; refit all mech divisions to a strength of five steps before refitting to full strength. Start with 12SS and then Panzer Lehr on game turns 2 and 3. This will allow these previously brittle divisions to re-enter the battle proper, if necessary, as quickly as possible without the threat of forever losing divisional integrity due to a D2 result where no retreat is possible .
During or after game turn 2, the arrival of the 2nd anci 3rd armored divisions from Collins' VII corps at either Lessay, Periers, St. Lo or even somewhere on the British t1ank will cause the battle to flow in one direction or another. It is not contended here that this initial disposition of Axis units will forever forestall the Allied thrust, but merely that it will give the German player a head starl toward improving the historical outcome and a better than even chance at victory . ••
compelled to consider it as two separate games. E ven if I look at the Campaign as a whole, the Invasion Game then sinks into insignificance as it lasts for only 3 of the 104 turns: it forms merely a rat.her long-winded introduction which you've gOt to go through as there is no June 7th AM set-up quoted. In spite of my objections, I can recommend the Invasion Games , especially on a solitaire basis. I am however not so sure about the rest of the package.
Unlikc the Ardennes, the Normandy operation was far from a fluid battle , it was very much a war of attrition while the Allied Expeditionary Force stored up strength fo r 'Cobra.' While Idan't doubt [hat Atlantic Wall is capable of covering this situation well, I do doubt that the game will be found anything like as exciting as Wacht am Rheim was. The extra detail added to the rules . while enhancing the realism, does increase the workload, while the map 's lack of lots of important detail may be found to let down further the enjoyment of the game. There remains, however, a great deal of value and interest within the game package as a whole, so I certainly don't write rhe game off as a railure, it is more a case of it not being anywhere near as marvellous as I'd hoped this game on my favouri te military subjecl would be . ••
17