Embed Size (px)
Citation preview

2014
St. Olaf WLC Page 1 of 13
MOODLE AUDIO ASSIGNMENTS WITH QUICKTIME Instructions for Faculty
Table of Contents
Part 1: Create a grouping with one student per group ............................................... 1
Part 2: Add Forum Activity to course page ..................................................................... 5
Part 3: Review Submissions and Give Feedback Comments ..................................... 8 Part 4: Providing Oral Instructions via embedded audio or video ...................... 11
TROUBLESHOOTING: Deleting and Editing Groups .................................................. 13
Part 1: Create a grouping with one student per group
1. Open the Moodle page for your course. 2. Under Course administration, click on “Users.”
Then, under Users, click on “Groups.”
NOTE: This step only needs to be done once for each course. If you have created this same type of grouping previously (with one student per group), skip to Part 2.
2014
St. Olaf WLC Page 2 of 13
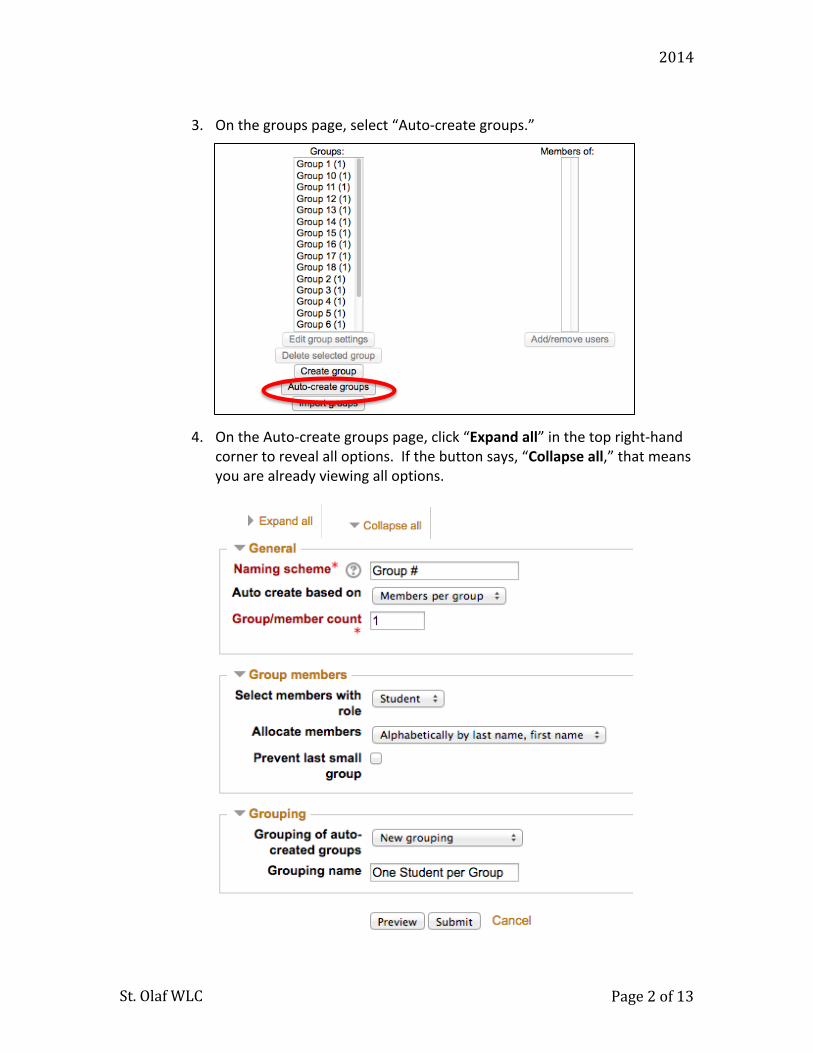
3. On the groups page, select “Auto-‐create groups.”
4. On the Auto-‐create groups page, click “Expand all” in the top right-‐hand corner to reveal all options. If the button says, “Collapse all,” that means you are already viewing all options.

2014
St. Olaf WLC Page 3 of 13
5. Make sure you use the following settings to create a grouping with only
one student in each group: a. Naming scheme: Group # (or, a customized scheme using @ or #;
for more info, see “A note about ‘Naming Scheme’” below) b. Specify: Members per group c. Group/member count: 1 d. Select members from role: Student e. Allocate members: select “Alphabetically by last name, first
name” to have Moodle sort students into groups alphabetically. f. Prevent last small group: leave this box unchecked g. Grouping of auto-‐created groups: New grouping h. Grouping name: give this set of groups a name so you can select it
in the forum activity later. (We use “One Student per Group.”)
6. Click “Submit” when finished configuring settings.
7. Follow the tips on the next page to check your work.
A note about “Naming scheme” The Naming scheme field can be customized to distinguish one type of group from other types of groups. Using a more descriptive Naming scheme can be especially helpful if you plan to utilize multiple group configurations in your course (i.e., some activities with one student per group, some other activities with 3-‐4 students per group). For example, rather than using “Group #,” as we recommend, you could use a more descriptive name, such as “Recording Group #,” or “Tutoring Group @.” Make sure the Naming scheme you choose includes either an “@” symbol or a “#” symbol:
@ -‐ will be replaced with a different letter for each group, using alphabetical order. For example, “Group @” will generate groups named like so: Group A, Group B… Group Z, Group AA, Group AB, etc.
# -‐ will be replaced with a different number for each group. For example, “Group #” will generate groups named like so: Group 1, Group 2, Group 3, etc.

2014
St. Olaf WLC Page 4 of 13
Checking Your New Groups & Grouping 1. Back on the Groups page, you should now see these newly created groups in your
“Groups:” list, with the naming scheme you selected. If you click on one of the newly made groups, you should see just one student name in the “Members of:” box. If you see more than one, your groups were not created correctly.
2. Another method is to click on the “Groupings” tab at the top center of the Groups page.
3. In the table of Groupings, you should see your newly created grouping in the first column followed by a list of the included groups in the second column. If you see “None” in the second column next to your newly created grouping, your groups were not created correctly (see the “3 members per group” grouping below, for example.)

2014
St. Olaf WLC Page 5 of 13
Part 2: Add Forum Activity to course page
1. Open the Moodle page for your course.
2. Turn editing on.
3. Click “Add Activity or Resource” in the appropriate Topic/Week.
4. Select the Forum activity type and click Add.

2014
St. Olaf WLC Page 6 of 13
5. Give your Forum activity a name. For Forum type, select “Each person posts one discussion.” Put instructions for your students in the Forum Introduction box.
6. If you want the instructions to display on the course page make sure to
check the Display description on course page box
and the instructions will display like this:
Other wise if you leave it unchecked the Forum will be displayed like this:
on the course page
7. Set forum type to: Each person posts one discussion.
NOTE: To add Oral Instructions (i.e. audio or video files), read Part 4 before continuing.

2014
St. Olaf WLC Page 7 of 13
8. Set Maximum Attachment Size to 250MB (the largest available size).
9. Under Subscription and tracking change to: Auto subscription.
10. In Common module settings, use the following settings to select your grouping with one student per group.
• Group mode: Separate groups • Grouping: One Student Per Group
(If some settings are hidden, go to the top of the forum creation page and click “Expand all” in the upper right)
11. When finished, click “Save and return to course”
NOTE: By using a grouping with one student per group, we have created a forum where each student’s forum submission is private to them and the course instructor(s). Their submissions and instructor feedback in this forum are hidden from the other students.

2014
St. Olaf WLC Page 8 of 13
Part 3: Review Submissions and Give Feedback Comments
1. Open the Moodle page for your course and click on the Forum activity to view it.
2. When you open the Forum, you will see a list of students’ submissions (called “Discussions” on Moodle).
3. To view a student’s submission, click their Discussion link.
4. On the next page, you will see the student’s post, and you can play their submitted audio assignment with Moodle’s embedded audio player. To listen to their recording, click the play button.
OPTIONAL: To download their audio file to your computer, click on the small blue audio icon next to their post.

2014
St. Olaf WLC Page 9 of 13
5. To add feedback comments about this student’s submission, click “Reply.”
6. On the next page, you will see the student’s post (as above) and also several boxes for adding feedback. Give your reply a subject, then type your feedback comments in the “Message” box.
7. To add Oral comments, click the Insert Moodle media button to embed an audio file in your reply (see instructions in step 4). Or more simply, drag the audio/video file directly in to the attachments box just below the Message box. (If you are not adding oral comments, skip to Step 8)

2014
St. Olaf WLC Page 10 of 13
8. When you are finished, click “Post to forum.”
9. Repeat Steps 3-‐6 of this part for each student, until you have reviewed
and commented on all student submissions.

2014
St. Olaf WLC Page 11 of 13
Part 4: Providing Oral Instructions via embedded audio or video
1. To embed an audio file (or video) with oral instructions for students, click the Insert Moodle media button to embed an audio file in the Forum Introduction.
2. This opens a pop-‐up window to Insert embedded media. Click “Find or upload a sound, video or applet…” and the File picker window will open.
3. In the File picker window, make sure “Upload a file” on the left is highlighted, then click “Browse” and select your audio file from your computer.

2014
St. Olaf WLC Page 12 of 13
4. After you have selected your file, click “Upload this file.” Moodle will take you back to the Insert embedded media window, where you can preview the file.
5. Click “Insert” to finish uploading the file. Moodle will take you back to the main window where you were creating your Forum activity.
6. Continue creating your Forum activity (jump back to Part 2, Step 6 for instructions)

2014
St. Olaf WLC Page 13 of 13
If you accidentally made a mistake during group creation and your groups are not configured the way you wanted…
1. On the Groups page, you will see your erroneously-‐created groups in the “Groups:” list, with the naming scheme you selected. Select ALL groups by clicking the first group, then holding down shift while clicking on the last group.
2. With all groups selected, click “Delete selected groups.”
3. Next, click on the “Groupings” tab at the top center of the Groups page.
4. In the table of Groupings, click the X button to the right of the erroneously created grouping.
5. Return to Part 1, “Create a group,” to remake your groups with the intended settings.
TROUBLESHOOTING: Deleting and Editing Groups