Embed Size (px)
Citation preview

Monkey Talk User Guide
1
Installing MonkeyTalk
1. First, you must install the MonkeyTalkIDE. See the MonkeyTalkIDE Installation Guide for detailed instructions. 2. Next, you'll need to install the MonkeyTalk Agent in your iOS app or Android app or both for cross-platform testing. See the
MonkeyTalk Agent for iOS Installation Guide or the MonkeyTalk Agent for Android Installation Guide depending on your platform.
Install the MonkeyTalk IDE
1. Download the zip file here. This download contains the IDE, the Agents (which you will need for the next step), and sample applications.
2. Unzip it wherever you want, but remember where you put it because you'll need it later. 3. On OS X, move the entire MonkeyTalkIDE folder into your applications folder and double click on MonkeyTalk.app to run. 4. On Windows, move the entire MonkeyTalkIDE folder into your Program Files folder and double click on MonkeyTalk.exe to run.
(Note: If you choose to put MonkeyTalkIDE in your Program Files folder, you will have to choose a different location for your workspace.)
Copy this folder to your ideal destination.
Installing the MonkeyTalk iOS Agent
1. Download and unzip the MonkeyTalk zip file for your OS.
2. Open your application's project in Xcode.
3. Duplicate your application's build target by right-clicking on it and selecting Duplicate from the menu. A new target will be created called YourApp copy.

Monkey Talk User Guide
2
Rename YourApp copy to something like YourAppMonkey.
so it looks like this:
You may also want to rename the Scheme from the Manage Schemes window:
Monkey Talk User Guide
3

Monkey Talk User Guide
4
4. Add the downloaded MonkeyTalk lib to your project File > Add to “YourApp”... from the menu.
5. When the dialog box appears, navigate to the directory where you unzipped the MonkeyTalk zip file, and select the MonkeyTalk iOS lib from pathToMonkeyTalkFolder/agents/iOS.
6. Recursively create groups for any added folders option. Note: It is up to you whether or not you want to Copy items into destination group's folder.
7. In the Add to Targets box, deselect YourApp and select YourAppMonkey.

Monkey Talk User Guide
5
8. Click Add.
9. The MonkeyTalk lib should now be visible in your project.
Configuring Libraries and Build Settings
1. Right-click on the YourAppMonkey build target, and select the Build Phases tab.
2. On the Link Binaries With Libraries tab, you will need to add libsqlite3.dylib CFNetwork.framework and QuartzCore.framework if your application is not already using them. (These frameworks are required by the MonkeyTalk).
3. XCode will have added references to the libMonkeyTalk.a library.
4. On the Build Settings tab, scroll down to the Linking section and add to your Other Linker Flags: -all_load -lstdc++

Monkey Talk User Guide
6
5. Choose your duplicated test target from the Scheme menu in Xcode and Run on the Simulator or Device.
Log output will show that MonkeyTalk has successfully loaded in your app (as seen below)

Monkey Talk User Guide
7
Installing the MonkeyTalk Android Agent
Open your Android Project in Eclipse and follow these instructions.
1. Convert your Android project to AspectJ
2. MonkeyTalk-agent.jar can be found in the "agents" folder in the MonkeyTalk package you downloaded earlier, and can be downloaded here. The exact name of the jar might vary depending on the version, but it should always start with "MonkeyTalk-agent".
3. Create a "libs" folder in your Android project, if you don't already have one. 4. Copy the .jar into the libs folder 5. Right click on MonkeyTalk-agent.jar > AspectJ Tools > Add to Aspectpath.
6. Update your AndroidManifest.xml to include the following two permissions: 1. android.permission.INTERNET 2. android.permission.GET_TASKS
Monkey Talk User Guide
8
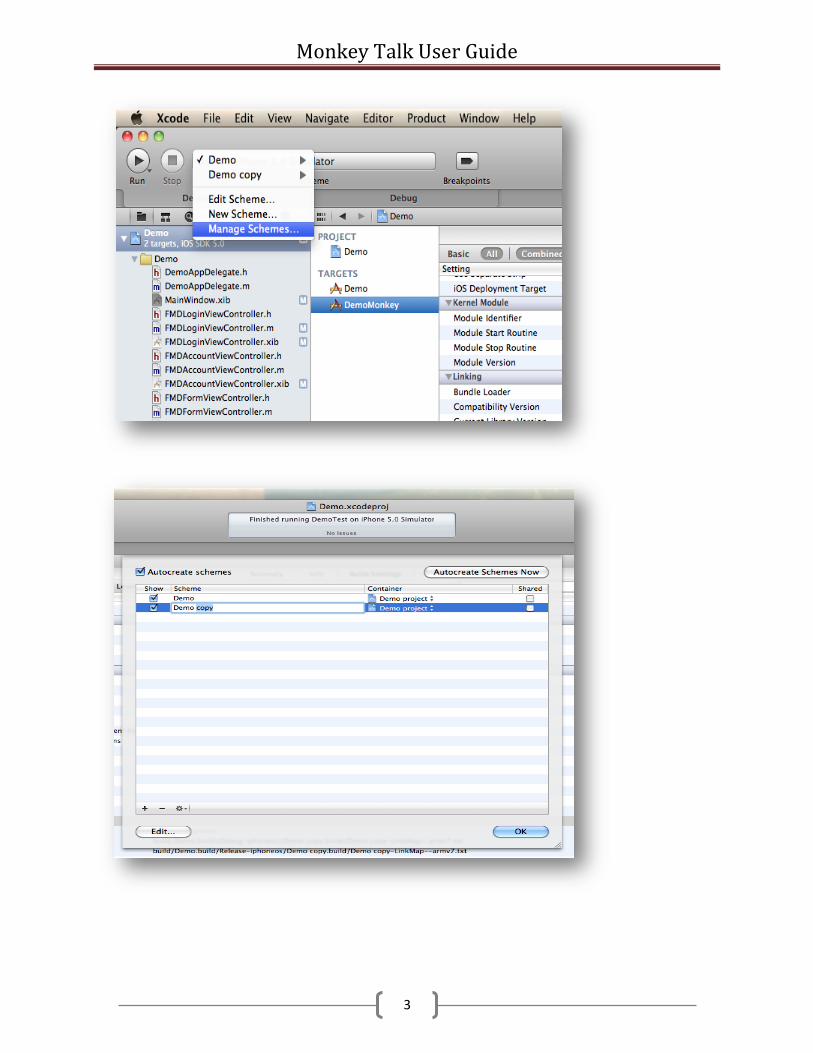
7. Update the project properties (right-click on the project > Properties > Java Build Path), select the Order and Export tab, and check the checkbox next to the AspectJ Runtime Library to export it:
8. Deploy your application to an Android device or emulator.
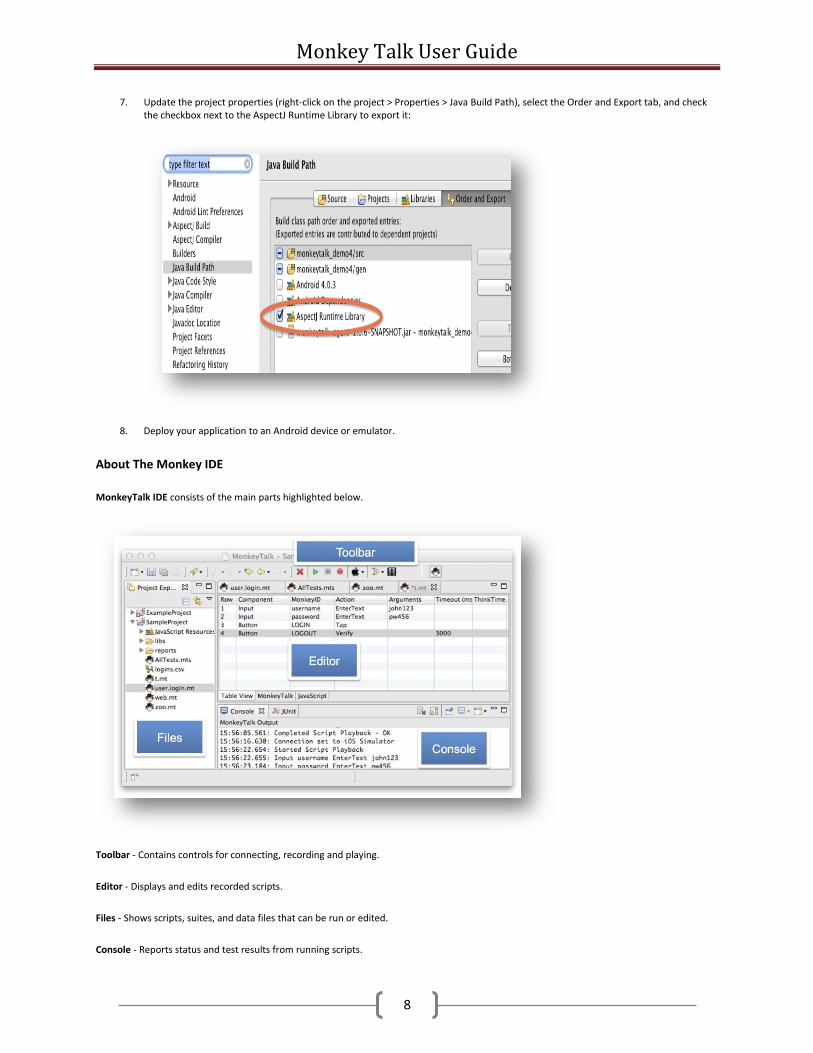
About The Monkey IDE
MonkeyTalk IDE consists of the main parts highlighted below.
Toolbar - Contains controls for connecting, recording and playing.
Editor - Displays and edits recorded scripts.
Files - Shows scripts, suites, and data files that can be run or edited.
Console - Reports status and test results from running scripts.

Monkey Talk User Guide
9
Creating a Test Project
A MonkeyTalk Project is a folder that contains all your test scripts, suites, and reports. A project contains the test suites for an application. You should create separate projects for each application to be tested.
The first time you start MonkeyTalk, the Welcome Page will be displayed.
Tip: You can return to the Welcome Screen by selecting Help > Welcome from the main menu.
Click on the Create Your First Project. The New Project wizard will be displayed.
Enter a name for your project and click Finish. The workbench window will open.

Monkey Talk User Guide
10
To create a test script, right-click on the project folder and select New > Test. The MonkeyTalk test editor will open with a new empty test.

Monkey Talk User Guide
11
Pick a name for your new test.
The script editor will open and the MonkeyTalk toolbar will be displayed.
Assuming you've already linked the MonkeyTalk Agent into the app you want to test, you are now ready to connect and begin recording a test script.
You can create new projects any time by selcting the File > New MonkeyTalk Project menu option.

Monkey Talk User Guide
12
Connecting to Emulator, Simulator, or Hardware
The IDE communicates with the app over HTTP via a USB tether or Wi-Fi connection. You can record and play back tests against apps running on your local computer or network, or remotely over the internet.
Android Emulator / iOS Simulator
1. Open the IDE 2. Start up your Android or iOS emulator/simulator and load it with your MonkeyTalk enabled app. 3. Click on the connection dropdown button on the tool bar (on initial start up it will be the green android icon).

Monkey Talk User Guide
13
4. Choose "Android Emulator" or "iOS Simulator", depending on your platform of choice. 1. If you are connecting to an Android device for the first time, you will be prompted to point the MonkeyTalk IDE to your
local Android SDK. Check the "Include Android Testing?" checkbox and point it to the SDK. You can also set this in your MonkeyTalk Preferences.
5. If connection was successful, a message to that effect should appear in the console.
Android and iOS Hardware
1. Open the IDE 2. Start up your Android or iOS device, connect it to your local wireless network, and load it with your MonkeyTalk enabled app. 3. Click on the connection dropdown button on the tool bar (on initial start up it will be the green android icon). 4. Choose "Networked Android or iOS device...". 5. Enter the IP address of the mobile device. 6. If connection was successful, a message to that effect should appear in the console.
Record a Few Commands
Recording through the MonkeyTalk IDE
1. Connect to your device. 2. Pull up your application on the device. 3. Click “Record” on the MonkeyTalk IDE.

Monkey Talk User Guide
14
4. If thr Record button is disabled, it is because you are not connected. Click the Connect button to initiate a connection.
5. Interact with your application. MonkeyTalk should record each action as a new command in the table. 6. To stop recording, click the “Stop” button.
If the Record button is not lighting up, it may be one of two things:
1. You are not properly connected to a device. To read more on connecting to a device, go here. 2. Your application is not properly set up for MonkeyTalk. To read more on installing the MonkeyTalk agent and setting your app up
correctly, go here.

Monkey Talk User Guide
15
About MonkeyTalk Commands
MonkeyTalk records each user interface action as a Command. Every MonkeyTalk Command has the same, simple format;
ComponentType MonkeyId Action Arguments...
ComponentType is the kind of UI component, for example Button or Input field. ComponentTypes are platform-independent.
MonkeyId identifies which component of the specified ComponentType. For example, the OK Button, or the Cancel Button. Asterisk (*) is a wildcard that matches the first component found of the specified component type.
Action is the UI interaction, for example, Tap or EnterText.
Arguments are any additional values needed to describe the action, for example, the text to enter into an Input field.
The script above is a simple login test the enters a userid and password, taps the login button, and then taps the logout button. The MonkeyTalk Script Editor displays and edits scripts in a Table View.You can also edit scripts using any simple text editor. Clicking on the MonkeyTalk tab in the editor will let you edit the script as text.
A MonkeyTalk command is made up of the values displayed in the columns of the Table View. To specify an empty table cell in a text command, use an asterisk (*).

Monkey Talk User Guide
16
Playing Back a Recorded MonkeyTalk Script
1. Restart your app. (Not essential, but useful for returning to a consistent initial state.) 2. Click the “Play” button to send the recorded commands to your app.
If MonkeyTalk can't find a component during playback, a command will fail. For example, in a login script, the application might take a few seconds to process a login request, and a script may not wait long enough before trying to tap on a button that won't be displayed until the login action has completed.
Failures are logged in red to the console.

Monkey Talk User Guide
17
Editing Scripts
You can currently edit MonkeyTalk script in two different ways: through the table view and through the MonkeyTalk view. The Table View provides assistance with creating MonkeyTalk commands, and is ideal for new users. The MonkeyTalk view is intended for more-experienced users and provides for editing MonkeyTalk commands directly with a text editor.
1. To edit through the table view, right click on the table and choose "Append row." Click in each cell to enter your new command. You can also use the drop down menus to select from a list of options.
2. To edit through the MonkeyTalk view, switch to the MonkeyTalk tab and edit the textual commands directly.
If you wish to know more about MonkeyTalk commands, you can start by reading about the Command Syntax or the User Guide entry for Playback.
Retrying Failed Commands
MonkeyTalk retries every command until it either succeeds or times out. By default, MonkeyTalk retries every command for two seconds before failing. You can specify a timeout on a command to increase or decrease the maximum time MonkeyTalk should retry the command before failing.
You can increase the timeout by entering a value in the Timeout column for any command you want to retry for a longer period of time before failing.

Monkey Talk User Guide
18
Verify
Verification in MonkeyTalk
During script playback, MonkeyTalk verifies that each referenced UI component exists and then executes the associated action. If an expected component doesn't exist, MonkeyTalk will report a script failure. For example, if your script attempts to tap on an OK button, and no OK button is currently displayed, the script will fail.
Additionally, you can use MonkeyTalk's Verify commands to add explicit verification steps to your script to check that expected values match actual ones.
For example,
1. Perform an action through recording or editing the MonkeyTalk script. 2. Check that the action was performed correctly with a verify. This is a very simple example, and you can do much more with creative
verifies. Suppose we have an application where the user can set a value using a Slider control, and there is an associated label that shows the selected value. The following script moves the slider to the value 8000 and then tests that the label has updated.
#set slider to 8000 Slider * Select 8000
#verify that label called "CurrentValue" displays 8000 Label CurrentValue Verify 8000
1. Now run the script as normal by pressing the Play button. The script's success or failure is reported in the console.
You can do more than just Verify for simple values. Read the Test Specification or the User Guide entry for Tests for more information.
Next Steps
Congratulations on learning how to setup your application and how to record, playback, and add verification steps to a test script.
See the MonkeyTalk User Guide to learn about additional MonkeyTalk capabilities including:
Creating test suites
Extending MonkeyTalk with custom commands
Parameterizing scripts to create reusable test components
Data-driving scripts with CSV files
Extending MonkeyTalk with JavaScript
Integrating MonkeyTalk tests into build and continuous integration environments
MonkeyTalk 1.0 Language Reference
MonkeyTalk is a functional testing language composed of a simple set of commands for user interface scripting. It’s easy enough to be used by QA engineers and requirements analysts with little or no programming experience, but can also be extended seamlessly with JavaScript for those requiring a bit more programming power. Scripts can be created from scratch as simple text files, or can be created automatically by recording tools such as the MonkeyTalk IDE.
MonkeyTalk is platform neutral and defines a logical API that can be easily implemented with any standard programming language. MonkeyTalk 1.0 includes a JavaScript language binding.

Monkey Talk User Guide
19
Command Syntax
The syntax has been designed to be easily understood by non-programmers. It’s fairly readable and straightforward to specify manually using a simple text file editor or even a spreadsheet. Additionally, MonkeyTalk has been designed to be displayed and edited within tabular consoles such as the MonkeyTalk IDE.
MonkeyTalk commands are newline terminated and have the following syntax: ComponentType MonkeyId Action Args… Modifiers…
Collectively, ComponentType, MonkeyId, Action, Args, Modifers are known as command parts. Furthermore, ComponentType.Action is known as the command name.
ComponentType (required) – The type of component on which to perform the action. Examples include Button and TextArea. Component types are not case sensitive. ComponentTypes can extend other ComponentTypes, as described below, and inherit any defined actions as well as Arguments. ComponentTypes are typically the logical name of the UI component (like Button rather than UIButton), but can also have platform-specific aliases. All UI components inherit from the View component type, and so specifying View on a command is like specifying a wildcard that will match any component type. For example:
# Tap on any component labeled "OK" View OK Tap
MonkeyId (required) - An identifier that is used to distinguish between components of the same type being displayed simultaneously. MonkeyId can be specified as asterisk (*), which finds the first matching component.
MonkeyId’s can also be specified as a 1-based (not zero-based) index of the form #N. In this case, the MonkeyId identifies the Nth component of the specified type that’s currently displayed. Components are indexed according to upper-left-most position, i.e., by sorting components by (x,y) coordinate.
Action (required) – The action to be performed. Examples include Tap, Select, and EnterText. Actions are not case sensitive.
Arguments/Args (required according to ComponentType and Action) – A space-separated list of one or more arguments. Arguments are assumed to begin at the fourth token. Although always specified as strings, args are interpreted as necessary by the command. If an Argument is required but not specified (left off the end of the list), it takes on a default value. An Arg may be specified as an asterisk (*) to force it to take on it’s default value,
Modifiers… (optional) - A space-separated list of named arguments of the form %name=value, where the % prefix identifies it as a Modifier. There are three system-defined modifiers:
%timeout - how long in ms to continue retrying a command before timing out
%thinktime - how long in ms to wait before executing the command for the first time
%retrydelay - how long in ms to delay between retry attempts
Command Examples
All tokens are space-separated. Values with embedded blanks must be enclosed in quotes. Embedded quotes are escaped with backslash, as is backslash itself.
Tap on the Button with the label “OK”: Button OK Tap
Use a numbered MonkeyId to tap on the first button: Button #1 Tap
No MonkeyId, so it defaults to #1: Button * Tap

Monkey Talk User Guide
20
No ComponentType or MonkeyId, so tap on the first component: * * Tap
With some args and embedded blanks: Input address EnterText “123 Main St.”
MonkeyIds and Args are case-sensitive, but CommandTypes and Actions are not: input address ENTERTEXT “123 Main St.”
Using the timeout Modifier: Input address Verify “123 Main St.” %timeout=5000
Comments can be specified by beginning a line with a #, for example: # this is a comment # another comment Button OK Tap
Newlines are specified as \n, for example: Input shipping EnterText “John Smith\n123 Main St.\nAnytown, USA 12345”
Scripts
Put one or more MonkeyTalk commands in a file and save it with .mt file extension and now you have a MonkeyTalk Script.
For example, a login.mt script might look like this:
# simple script to login as joe Input username EnterText [email protected] Input password EnterText “i like cheese” Button LOGIN Tap
From within another script, we can invoke our login.mt script using the Script command with the file name as the MonkeyId, like this: Script login.mt Run
Variables
Scripts may contain named substitution variables which are written as ${name} and can be specified anywhere in a MonkeyTalk command. They may also contain built-in variables, written as %{var}. The available built-in variable are %{componentType}, %{monkeyId}, %{action}, and any args are %{1}, %{2}, etc. Variables may only be used within a command part, so inside ComponentType, MonkeyId, etc.
For example, a named variable can be used for the Arg: Input username EnterText ${usr}
Or the Arg and the MonkeyId: Input ${foo} EnterText ${bar}
Or even everything: ${foo} ${bar} ${baz}
Variables can be embedded inside some text, but not within another variable, for example: Input username EnterText ${usr}@example.com
But this would be illegal (a variable within a variable): Input username EnterText ${foo${bar}}

Monkey Talk User Guide
21
Parameterized Scripts
Using the Vars.Define command we can specify named variables and their default values for a script. Let’s parameterize our login.mt script like this:
Vars * Define usr="default-at-example.com" pwd Input username EnterText ${usr} Input password EnterText ${pwd} Button LOGIN Tap
We set up two named variables, ${usr} and ${pwd}, and set the default value of ${usr} to default-at-example.com. The default value of ${pwd} is unspecified, so it defaults to <pwd> (the name of the variable surrounded by angle brackets).
We can invoke our parametrized login.mt script like this: Script login.mt Run joe-at-doe.com "i like cheese"
Or leave off the Args to use the default values: Script login.mt Run
Or use just the default value for ${usr} with an asterisk: Script login.mt Run * password1
Also note that variables are limited to the script in which they are defined, so ${usr} and ${pwd} are defined only inside login.mt, unless of course, you use variables when invoking a child script.
Data-driven Scripts
Parametrized scripts are just the beginning, MonkeyTalk allows for full data-driven scripts simply by using the RunWith action instead of Run, and setting a data file as the first Arg.
Using our parametrized login.mt script, we first write a data file, credentials.csv, in CSV format like this:
usr, pwd joe-at-doe.com, "i like cheese" alpha-at-beta.net, password1 charlie-at-dog.org, abc123
Where the first row specifies the variable names (exactly as they are named in the Vars.Define command in login.mt), and the following rows give the values.
Now, we can data-drive our script like this: Script login.mt RunWith credentials.csv
This will run the login.mt script once for each row of data in the data file. So in the case of the above credentials.csv data file, it would invoke login.mt three times, first with usr = joe-at-doe.com and pwd = "i like cheese", second with usr = alpha-at-beta.net and pwd = password1, and third with usr = charlie-at-dog.org and pwd = abc123.
Custom Commands
The MonkeyTalk language can be extended directly by adding new custom commands with custom ComponentTypes and custom Actions. Any script saved with a two-part filename, in the form of <componentType>.<action>.mt, becomes a custom command. For example, if we renamed login.mt to login.perform.mt we would add a new Login component type that has a Perform action.
And we invoke our new custom command in the standard fashion: login * perform

Monkey Talk User Guide
22
And we can pass in arguments, because our command is still parameterized: login * perform [email protected] "i like cheese"
We can still invoke it as a script: Script login.perform.mt Run [email protected] "i like cheese"
And we can still data-drive it: Script login.perform.mt RunWith credentials.csv
This type of script invocation, known as a custom command, is incredibly powerful as it allows MonkeyTalk to be arbitrarily extended. The custom command syntax effectively enables testers to build up a library of application-specific commands.
Tests and Verification
A test is just the invocation of a script with the Test componentType instead of Script. Test results are written to a report file in the standard JUnit-compatible xml report format.
The successful execution of each command verifies the existence of some expected user interface component. In addition, you can explicitly test that actual values of components match expected ones by adding Verify actions to your script. First, we again rewrite login.mt to include some Verify actions like this:
Vars * Define usr="default-at-example.com" pwd name Input username EnterText ${usr} Input password EnterText ${pwd} Button LOGIN Tap Label welcome Verify "Welcome, ${name}!" Button LOGOUT Verify
Now, we can run login.mt as a test like this, but note that we need a third argument since we added a third named variable, ${name}, to help verify a successful login: Test login.mt Run joe-at-doe.com "i like cheese" "Joe Doe"
And we can data-drive our test just as you would expect (again note that we need to add a third column to credentials.csv):
Test login.mt RunWith credentials.csv
Verify
The Verify action exists on all components (except Script and Device) and is used to check if the actual value matches the expected value. In its base form, verify accepts three optional arguments: expectedValue, propPath, and failMessage.
Without any parameters Verify just verifies the existence of the given component:
Button LOGIN Verify
With just an expectedValue, Verify checks the component’s value, where value is just the logical value of the component (value of a Button is its label, value of an Input is its text, value of a CheckBox is "on" or "off", etc.):
Button LOGIN Verify LOGIN
With an expectedValue plus a propPath, Verify checks the given component property. Some propPaths such as value and item are logical MonkeyTalk-specific property paths and are supported cross-platform (they don't begin with a dot). Component-specific propPath's are platform-specific (and always begin with a dot).
Verify the font name on an iOS Button: Button LOGIN Verify Helvetica .font.fontName

Monkey Talk User Guide
23
Verify the total number of stars on an Android RatingBar: RatingBar reviewRating Verify 5 .numStars
And the failMessage just provides extra feedback if the Verify fails: Input username Verify joe-at-doe.com value "bad username!!!"
Learn More in the User Guide
Verification Commands
Suites
Tests only be run from a suite, and only a suite can contain tests. Furthermore, suites must have the .mts file extension to distinguish them from scripts. Suites may only contain Test, Setup, and Teardown component types, and also comments.
For example, the suite, myapp.mts, might look like this:
# setup runs before every test Setup login.mt Run [email protected] “i like cheese”
# teardown runs after every test TearDown logout.mt Run
# the tests... Test add_contact.mt RunWith contacts.csv Test remove_contact.mt RunWith contacts.csv
Here we use Setup and Teardown commands to specify scripts to be run before and after every Test command invocation.
Command Execution
Unless otherwise specified, MonkeyTalk commands are automatically retried until the timeout is reached. The timeout value has a global default value of two seconds, but it can be overridden on a per command basis by using the timeout Modifier.
For example: Button OK Tap %timeout=5000 %thinktime=2000 %retrydelay=123
Which will wait for 2 seconds, before trying to tap the OK button, then retry every 123ms before timeout eventually occurs after 5 seconds (7 total seconds after the command started playback).
Scripting in Javascript
Exporting to Javascript is intended as a tool for introducing common programming contructs into MonkeyTalk. This could include things like loops, control statments, and random numbers.
To export to Javascript, create a MonkeyTalk script and click on the "JavaScript" tab at the bottom of the viewer. There you will find an "Export" button. Click that button and MonkeyTalk will create a .js file with the same name as the .mt file. (E.g. Login.mt -> Login.js).
To execute the new Monkeytalk-Javascript file, run it just like you would a normal MonkeyTalk script, like so:
Script Login.js Run

Monkey Talk User Guide
24
You can also run it without the file extension. Running a script without an extension will always default to running the Javascript, if one exists.
Script Login Run
Once a MonkeyTalk script is exprted to Javascript, the user is free to edit it however they like. For example, here is a script that enters a random username and password if none are provided:
if (typeof Test == "undefined") { load("libs/Test.js"); }; Test.Login.prototype.run = function(usr, pwd) { usr = usr || randStr(); pwd = pwd || randStr(); this.app.input("username").enterText(usr); this.app.input("password").enterText(pwd); this.app.button("LOGIN").tap(); }; function randStr() { var text = ""; var possible = "ABCDEFGHIJKLMNOPQRSTUVWXYZabcdefghijklmnopqrstuvwxyz0123456789"; for( var i=0; i < 5; i++ ) text += possible.charAt(Math.floor(Math.random() * possible.length)); return text; }
Javascript Wrapper Lib
Using The JavaScript API
JavaScript API Reference
JavaScript Wrapper Library
Every time you save an .mt script, MonkryTalk IDE generates a JavaScript wrapper function so that you can call your script cleanly and directly from JavaScript. The generated library is called YourProjectName.js and is stored in your project's generated libs directory. This directory also contains the MonkeyTalk JavaScript API file MonkeyTalkAPI.js.
For example, consider the following script:
# enterName.mt Vars name="foo" Input name EnterText ${name} Button OK Tap
When you save enterName.mt, a function is generated so that from JavaScript you can say:
this.app.enterName().run("bar")
or
this.app.enterName().runWith("somedata.csv")
A "call" function is also generated that explicitly defines the expected arguments (which assists command completion in the IDE) so this.app.enterName().call("foo") works too.

Monkey Talk User Guide
25
Wrappers are similarly generated for custom commands.
// Call user.login.mt this.app.user("ethel").login("secret123");
Using The JavaScript API
You can call JavaScript from MonkryTalk with any Run or RunWith action. MonkeyTalk scripts written in JavaScript must begin by importing the project's generated wrapper library.
load("libs/YourProjectName.js")
Every MonkeyTalk command can thern be called with a JavaScript expression of the following form:
this.app.componentType("monkeyId").action(args...)
Importing the library creates a property called this.app, which is an object that references the application being tested. this.app provides functions to access components by type. For each component type (including user-defined ones) a function is defined whose name is the name of the component in lower-camel notation (eg, "button", "radioButtons"). Calling one of these functions with a monkeyId retrieves the corresponding component.
Examples of finding components:
// The OK Button this.app.button("OK") // The first table this.app.table("#1")
Once you've retrieved a component, you can perform actions on it.
Each component object has functions corresponding to each available action.
// Button OK Tap this.app.button("OK").tap() // Table countries Select France this.table("countries").select("France")
The JavaScript API mirrors MonkeyTalk command syntax.
// Input name EnterText Bob this.app.input("name").enterText("Bob")
Timeout and Thinktime
Timeout and Thinktime are specified as properties on a JavaScript object optionally included after actions string-valued arguments.
this.app.button("ok").tap({timeout:5000})
this.app.input("name").verify("foo", {timeout:5000})

Monkey Talk User Guide
26
Verify Commands
Verify commands are handled just like any other action.
this.app.label("message").verify("Hello")
Calling MonkeyTalk from JavaScript
You can call any script by using its name as a function on this.app.
this.app.scriptName().run(args...)
RunWith is also supported:
this.app.script("scriptName").runWith("somedata.csv");
Calling Custom Commands
Custom commands are called the same way as built-in ones.
// Call user.login.mt // User ethel Login secret123 this.user("ethel").login("secret123")
API Reference
MonkeyTalk JavaScript API Reference
Javascript API Reference
Here is a list of all MonkeyTalk components for Javascript. All components inherit from View and thus inherit all of View's actions too.
In most cases when you export to Javascript, your MonkeyTalk script will have a 1:1 correlation. That is, "Button LOGIN Tap" will convert to "this.app.input("LOGIN").tap();".
Button
o inherited from View
ButtonSelector
o select(value:String):void - Select an item by value.
value - the value of the item to select.
o selectIndex(itemNumber:int):void - Selects an item by index.
itemNumber - the index of the item to select.
o longSelectIndex(itemNumber:int):void - Long press an item by index.
itemNumber - the index of the item to long press.
o inherited from View
CheckBox
o inherited from View
DatePicker
o enterDate(date:String):void - Change the current date value.
date - A date with the format YYYY-MM-DD where YYYY is the year, MM is the month (01-12), and DD is the day (01-31).

Monkey Talk User Guide
27
o inherited from View
Device
o shake():void - Shake the device.
o rotate(direction:String):void - Change the device orientation.
direction - Left or Right (case insensitive)
o back():void - Navigate back. iOS: Pops the current UINavigationItem (if there is one). Android: Presses the hardware device key.
o forward():void - Navigate forward. iOS: Pushes the next UINavigationItem, if there is one. Android: ignored.
o search():void - Press the search key. iOS: ignored. Android: Presses the device search key.
o menu():void - Press the menu key. iOS: ignored. Android: Presses the device menu key.
Doc
o vars(args:String):void - Document the named variables used in the script.
args - the named variables and their doc, in the form of: var='some doc' var2='other doc'
o script(doc:String):void - Document the script itself.
doc - the doc
IndexedSelector
o selectIndex(itemNumber:int):void - Selects an item by index.
itemNumber - the index of the item to select.
o longSelectIndex(itemNumber:int):void - Long press an item by index.
itemNumber - the index of the item to long press.
o inherited from View
Input
o enterText(text:String, hitDone:boolean):void - Enter text into the input field.
text - the text to enter
hitDone - iOS: if true, hit Done key after entering text. Android: ignored.
o clear():void - Clear text from the input field. iOS: Clears the field. Android: ignored.
o inherited from View
ItemSelector
o select(value:String):void - Select an item by value.
value - the value of the item to select.
o selectIndex(itemNumber:int):void - Selects an item by index.
itemNumber - the index of the item to select.
o longSelectIndex(itemNumber:int):void - Long press an item by index.
itemNumber - the index of the item to long press.
o inherited from View
Label
o inherited from View
Menu
o select(value:String):void - Select an item by value.
value - the value of the item to select.
o selectIndex(itemNumber:int):void - Selects an item by index.
itemNumber - the index of the item to select.
o longSelectIndex(itemNumber:int):void - Long press an item by index.
itemNumber - the index of the item to long press.
o inherited from View
NumericSelector
o select(value:float):void - Select a numeric component value
value - the value to select
o inherited from View
RatingBar
o select(value:float):void - Select a numeric component value
value - the value to select
o inherited from View
Script
o run(args:String):String - Run the script with the given args.
args - the arguments
o runWith(args:String):void - Data-drive the test script with the given CSV data file.
args - the arguments (where the first arg is the data file filename)
Scroller

Monkey Talk User Guide
28
o scroll(x:int, y:int):void - Scroll to the specified coordinates.
x - the x-coordinate (horizontal)
y - the y-coordinate (vertical)
o inherited from View
Setup
o run(args:String):String - Run the setup script with the given args.
args - the arguments
o runWith(args:String):void - Data-drive the setup script with the given CSV data file.
args - the arguments (where the first arg is the data file filename)
Slider
o select(value:float):void - Select a numeric component value
value - the value to select
o inherited from View
TabBar
o select(value:String):void - Select an item by value.
value - the value of the item to select.
o selectIndex(itemNumber:int):void - Selects an item by index.
itemNumber - the index of the item to select.
o longSelectIndex(itemNumber:int):void - Long press an item by index.
itemNumber - the index of the item to long press.
o inherited from View
Table
o selectRow(row:int, section:int):void - Select a row.
row - the row to select
section - the section containing the row. (Ignored on Android)
o scrollToRow(row:int, section:int):void - Scroll to a row by row number.
row - the row to select
section - the section containing the row. (Ignored on Android)
o scrollToRow(value:String):void - Scroll to a row by value.
value - the value of the row to scroll to.
o setEditing(enabled:boolean):void - Enable/disable table editing. iOS: Enabled editing mode for table. Android: ignored.
enabled - if true, enable editing, else disable editing.
o insert(row:int, section:int):void - Insert a row into the table. iOS: Inserts a row. Android: Ignored.
row - the index of the row after which to insert a new row.
section - the section containing the row.
o remove(row:int, section:int):void - Remove a row from the table. iOS: Deletes the row. Android: Ignored.
row - the index of the row to be removed.
section - the section containing the row.
o move(from:int, to:int):void - Move a row. iOS: Moves a row. Android: Ignored.
from - the index of the row to be moved.
to - the destination row for the move.
o select(value:String):void - Select an item by value.
value - the value of the item to select.
o selectIndex(itemNumber:int):void - Selects an item by index.
itemNumber - the index of the item to select.
o longSelectIndex(itemNumber:int):void - Long press an item by index.
itemNumber - the index of the item to long press.
o inherited from View
Teardown
o run(args:String):String - Run the teardown script with the given args.
args - the arguments
o runWith(args:String):void - Data-drive the teardown script with the given CSV data file.
args - the arguments (where the first arg is the data file filename)
Test
o run(args:String):String - Run the test script with the given args.
args - the arguments
o runWith(args:String):void - Data-drive the test script with the given CSV data file.
args - the arguments (where the first arg is the data file filename)
TextArea

Monkey Talk User Guide
29
o enterText(text:String, hitDone:boolean):void - Enter text into the input field.
text - the text to enter
hitDone - iOS: if true, hit Done key after entering text. Android: ignored.
o clear():void - Clear text from the input field. iOS: Clears the field. Android: ignored.
o inherited from View
Toggle
o inherited from View
ToolBar
o selectIndex(itemNumber:int):void - Selects an item by index.
itemNumber - the index of the item to select.
o longSelectIndex(itemNumber:int):void - Long press an item by index.
itemNumber - the index of the item to long press.
o inherited from View
Vars
o define(args:String):void - Define the named variables used in the script.
args - the named variables (and optional default value), in the form of: var1 var2=default
VideoPlayer
o play():void - Play the video from the current playback point.
o pause():void - Stop the video at the current playback point.
o stop():void - Stop the video and set playback to the starting point.
o inherited from View
View
o verify(expectedValue:String, propPath:String, failMessage:String):void - Verifies that a property of the component has some expected value.
expectedValue - the expected value of the property. If null, verifies the existence of the component.
propPath - the property name or property path expression (defaults to 'value')
failMessage - the custom failure message
o verifyNot(expectedValue:String, propPath:String, failMessage:String):void - Verifies that a property of the component does not have some value.
expectedValue - the value the component shouldn't have. If null, verifies the non-existence of the component.
propPath - the property name or property path expression (defaults to 'value')
failMessage - the custom failure message
o verifyRegex(regex:String, propPath:String, failMessage:String):void - Verifies that a property of the component matches some regular expression.
regex - the regular expression to match
propPath - the property name or property path expression (defaults to 'value')
failMessage - the custom failure message
o verifyNotRegex(regex:String, propPath:String, failMessage:String):void - Verifies that a property of the component does not have a value matching a regular expression.
regex - the regular expression that should not match.
propPath - the property name or property path expression (defaults to 'value')
failMessage - the custom failure message
o verifyWildcard(wildcard:String, propPath:String, failMessage:String):void - Verifies that a property of the component matches some wildcard expression.
wildcard - the wildcard expression to match
propPath - the property name or property path expression (defaults to 'value')
failMessage - the custom failure message
o verifyNotWildcard(wildcard:String, propPath:String, failMessage:String):void - Verifies that a property of the component does not have a value matching some wildcard expression.
wildcard - the wildcard expression that should not match
propPath - the property name or property path expression (defaults to 'value')
failMessage - the custom failure message
o tap():void - Taps on the component. On Android, plays a 'click'. On iOS, plays a TouchDown/TouchMove/TouchUp sequence.
o longPress():void - Performs a long press on the component. On Android, plays a 'longClick'. On iOS, plays a longPush gesture.
o touchDown(x:int, y:int):void - Start touching the component.
x - x-coordinate of the touch
y - y-coordinate of the touch
o touchMove(coords:int):void - Drag across the component

Monkey Talk User Guide
30
coords - one or more (x,y) coordinate pairs specifying the path of the drag gesture
o touchUp(x:int, y:int):void - Stop touching the component.
x - x-coordinate of where touch is released
y - y-coordinate of where touch is released
o pinch(scale:float, velocity:float):void - Pinch the component.
scale - The scale factor relative to the points of the two touches in screen coordinates
velocity - The velocity of the pinch in scale factor per second (read-only)
o swipe(direction:String):void - Swipe the component.
direction - Left, Right, Up, or Down (case insensitive)
o drag(x1:int, y1:int, x2:int, y2:int):void - Touch down, drag across the component, then up
x1 - starting x-coordinate
y1 - starting y-coordinate
x2 - ending x-coordinate
y2 - ending y-coordinate
o get(variable:String, propPath:String):String - Gets the value of the given property from the component, and set it into the given variable name.
variable - the name of the variable to set
propPath - the property name or path expression (defaults to 'value')
o exec(method:String, args:String):String - Call a method on a component. The method must take zero or more String arguments and return a String result.
method - the method to call
args - the String args to be supplied to the method