Embed Size (px)
Citation preview

Model G121 & G122Guardian 12v Battery Operated Grease Gun
Series “A”
Note: Extra battery only included on Model G122
Form 402106JUNE - 2006
G121
G122
Page Number - 2
Model G121 & G122Guardian 12v Battery Operated Grease Gun
Form 402106
SafetyRead and carefully observe these operating instructions before unpacking and operating grease gun. Operate this tool only after safety instructions and this operation manual are fully understood.
Never operate this tool in explosive atmospheres. Electric power tools can emit sparks that may ignite flammable liquids, dust, or fumes.
Extreme pressure may cause nozzle extension or whip hose to burst. Use only Lincoln approved high pressure hose and follow the whip hose instructions and warnings.
Models and ComponentsSales Models Hose Battery Charger
G121 1230* G915 G920G122 1230* G915 (2ea) G920
*Lincoln brand
Grease gun can develop high pressure – up to 4,000 PSI (276 Bar). Use safety glasses and gloves for protection during operation.Keep hands clear of the exposed rubber portion of hose.
Do not use battery charger in damp or wet locations.
When battery pack is not in use, keep it away from other metal objects like: paper clips, coins, keys, nails, screws, or other small metal objects that can make a connection from one terminal to another. Shorting battery terminals together may cause sparks, burns, or fire.
Use only accessories that are recommended for use with the Guardian Battery Operated Grease gun. Only acces-sories that are capable of 4,000 psi (476 bar) Working Pressure should be used.
PERSONAL SAFETY1. Use only Lincoln branded 1218, 1224, 1230 or 1236 outlet
whip hoses. Grease injection injuries are a very serious injury. Hold the hose only in the area of the spring guard.
2. Avoid accidental starting. Be sure switch is not depressed when inserting battery pack.
3. Do not bend the hose so that it becomes kinked.4. Replace the hose at the first sign of wear, kink or damage
to the outside jacket.
General DescriptionThe Guardian Battery Operated Grease Gun was developed for the purpose of manual lubrication of grease points and in-cludes a pressure relief valve (Item 1 in diagram) to protect the electric motor from excessive pressure (4000 PSI or 276 Bar) and to identify a blocked bearing, fitting or lubrication line.
Appropriate UseThis grease tool was designed to pump and dispense lubricant using 12.0 volt battery power. The maximum specification ratings should not be exceeded. Any other use not in accor-dance with instructions will result in loss of claim for warranty or liability.
SpecificationsOperating Power, Volt 12.0Maximum Operating Pressure, PSIG (bar) 4,000 (276)Grease Reservoir Capacity, oz. (cm³) 14.5 (411)Lubricant (Grease) Up to NLGI #2Weight, Lbs. (Kg) 7.8 (3.5)Accessories:Battery Model G915Output, VDC 12.0Capacity, mAh 1300Battery Charger Model G920Charge time 1 HourInput, VAC 120 V, 60 HzOutlet Hose Model 1230*Hose Pressure Rating, psi (Bar) 7,500 (517)Length of the Hose, In (mm) 30 (760)

Page Number - 3
Model G121 & G122Guardian 12v Battery Operated Grease Gun
Form 402106
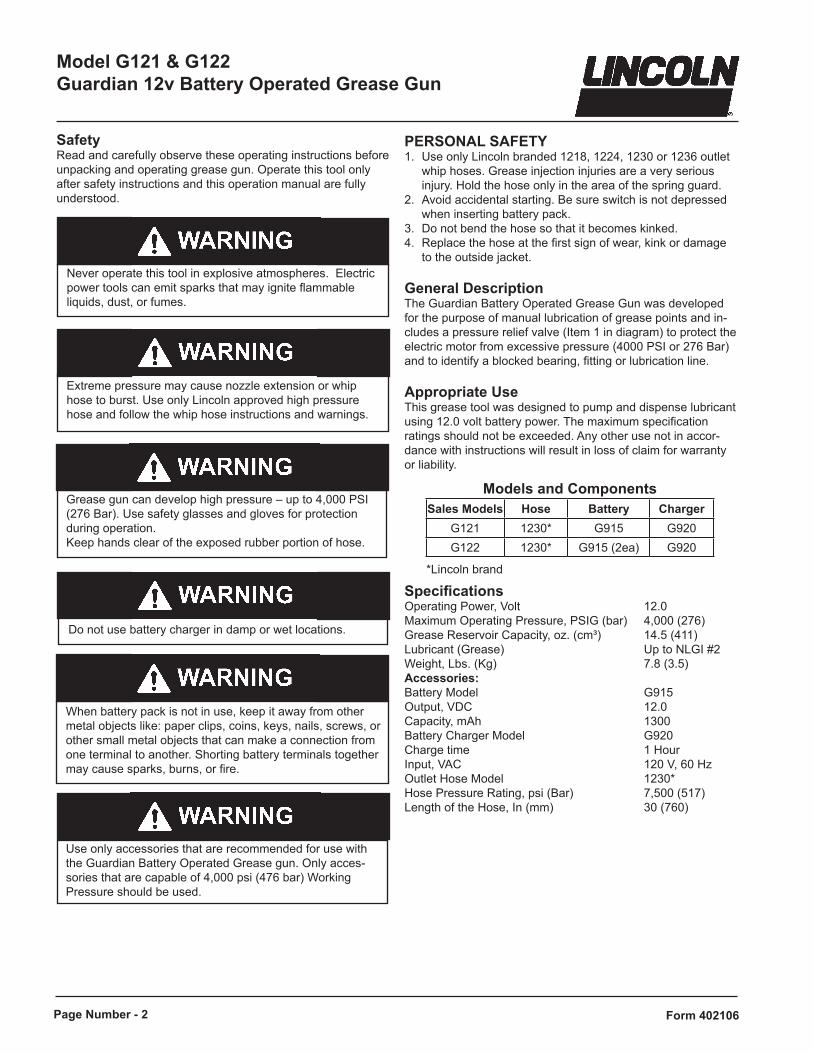
Figure 1Pressure Relief ValvePrevents motor overload if operating pressure exceeds 4,000 PSIG (276 bar). Grease flowing from the valve indicates a stuck or clogged fitting. Correct the blockage and reattached grease gun.
USE AND CAREDo not continue to hold down trigger if grease gun is stalled. This could damage the motor or cause fire.
OPERATIONPrime the grease gun after each refill or grease cartridge change. Prime the gun before using it to lubricate grease points.To prime, operate the gun until grease flows from the hose. Air pockets in the cartridge lubricant will cause the gun to lose its prime.
Installing Grease Cartridge1. Visually check the follower seal lip direction before load-
ing a new cartridge. The follower seal lip must be directed toward the follower handle or rear side for cartridge loading.
(Note: To change the direction of the follower seal, unscrew tube cap from grease tube assembly and pull on the handle to remove follower seal from tube. Flip the follower seal over and re-assemble)
2. Pull back on the follower handle and latch the follower rod groove into the slot on the tube cap.
3. Remove the cap from the grease cartridge and insert car-tridge into the container tube.
4. Remove the pull tab from grease cartridge and screw grease tube assembly into pump assembly.
5. Release follower rod from slot. Purge air from pump. See air purging instructions.
Removing Empty Grease Cartridge1. Pull back on the follower handle until the follower rod is fully
extended and latch the follower rod groove into the slot on the tube cap.
2. Unscrew the grease tube assembly from the power-head.3. Carefully release the follower handle to eject the empty
cartridge from container tube.
TO CONVERT GUN TO ALLOWFILLING FROM BULK CONTAINEROR FILLER PUMP1. Unscrew the grease tube assembly cap from the grease
tube assembly. Pull on the follower handle to extract the follower and spring from the grease tube assembly.
2. Flip the follower lip from the rear to the front side. (Note: The follower resembles a cup. When the gun is as-
sembled for use with bulk lubricant, the cup opens toward the pump assembly)
3. Reassemble follower into grease tube assembly and posi-tion the follower handle so that the grease tube assembly cap can be retightened onto the container tube. Tighten grease tube assembly back onto the pump head.
Ball Check Assembly
Pressure Relief Valve

Page Number - 4
Model G121 & G122Guardian 12v Battery Operated Grease Gun
Form 402106
TO FILL THE GUN WITH A FILLER PUMPThread a filler nipple into the pump head. Engage the follower rod with the follower by rotating the follower handle. Insert the filler nipple into a filler pump socket. Operate the filler pump to fill the container. When the follower rod groove is exposed, the grease tube assembly is filled. The follower rod will be extended approximately 8 inches (20 cm). Disengage the follower rod from the follower by rotating the follower handle. Push the fol-lower rod into the grease tube assembly.
TO FILL THE GUN FROM BULK CONTAINER1. Remove pump assembly from grease tube assembly.2. Pack lubricant into cavity of the pump assembly.3. Insert the open end of the grease tube assembly into lubri-
cant. Slowly pull the follower handle back while pushing the grease tube assembly deeper into the lubricant to prevent air pockets from being pulled into the grease tube assembly.
4. When the follower rod is fully extended, pull it sideways to latch the rod groove into the keyhole slot in the grease tube assembly cap.
5. Loosely assemble the pump assembly to the grease tube assembly. Release the follower rod from the grease tube as-sembly cap and disengage the follower rod from the follower by rotating the follower handle. Push the follower rod into the grease tube assembly.
TO EXPEL AIR POCKETS (Purging Air)1. Withdraw the follower rod from the grease tube assembly
cap and engage it with the follower by rotating the follower handle.
2. While exerting force on the follower handle, pull the trigger in short bursts to operate gun until trapped air is expelled. Disengage the follower rod from the follower by rotating the follower handle. Push the follower rod into the grease tube assembly.
3. If step 2 fails, unscrew the grease tube assembly 1-1/2 turns from the pump assembly.
4. Exert force on the follower handle until lubricant oozes from the grease tube assembly and pump assembly interface.
5. Retighten grease tube assembly into the pump assembly. Disengage the follower rod from the follower by rotating the follower handle. Push the follower rod into the grease tube assembly.
CHARGER OPERATIONFIRST TIME CHARGING OF THE BATTERY PACKMake sure power circuit voltage is the same as that shown on the charger specification plate before connecting to power source.The first battery charge should be for 4 hours before use.1. Plug the charger into an appropriate outlet before inserting
battery pack.2. Insert the battery pack into the charger. The red (charging)
light will come on indicating that the charging process has started.
3. The red light will go out and the green light will come on indicating the battery is fully charged. When the green light comes on the battery charger will be in the trickle charge mode.
4. Keep the battery in the trickle charge mode for a period of 4 hours during the initial charge.
NORMAL CHARGING PROCEDUREMake sure power circuit voltage is the same as that shown on the charger specification plate before connecting to power source.1. Plug the charger into an appropriate outlet before inserting
battery pack.2. Insert the battery pack into the charger. The red (charging)
light will come on indicating that the charging process has started.
3. The red light will go out and the green light will come on indicating the battery is fully charged. When the green light comes on the battery charger will be in the trickle charge mode.
4. The pack is fully charged and may be used at this time.5. The battery pack trickle charge mode is not recommended
for extended periods of time. Batteries life will be shortened if left in the charger for extended periods.
6. Disconnect charger from power source when not in use.
CHARGE INDICATORS The charger is designed to detect certain problems that can arise with battery packs. Problems are indicated by neither the red nor the green light illuminating when the battery is placed in the charger. If this occurs, re-insert battery pack into the charger. If the problem persists, try a different battery pack to determine if the charger is O.K. If the new battery pack charges correctly, then the original pack is defective and should be returned to a service center or other collection site for recycling. If the new battery pack elicits the same trouble indication as the original, have the charger tested at an authorized service center.
NOTE: As a battery pack approaches the discharged state, you will notice a sharp drop in tool performance. When the tool is unable to perform the task at hand, it is time to recharge the battery pack. Recharging the battery pack before this condition is reached will reduce the total work life of the battery. Discharg-ing the battery beyond this point can damage it.
NOTE: Battery temperature will increase during and shortly after use. The battery may not accept a full charge if it is charged immediately after use. Allow the battery pack to cool to room temperature before charging for best results. Longest life and best performance can be obtained if the battery pack is charged when the air temperature is between 65°F and 75°F (18° - 24°C).
CAUTION: Vent slots in top and bottom of charger must not be obstructed. Do not charge battery when temperature is BELOW 32°F (0° C) or ABOVE 104°F (40° C). Do not probe with charging terminal with conductive objects. Danger of electric shock is possible.

Page Number - 5
Model G121 & G122Guardian 12v Battery Operated Grease Gun
Form 402106
Americas:One Lincoln Way
St. Louis, MO 63120-1578USA
Phone +1.314.679.4200Fax +1.800.424.5359
Europe/Africa:Heinrich-Hertz-Str 2-8
D-69183 WalldorfGermany
Phone +49.6227.33.0Fax +49.6227.33.259
Asia/Pacific:51 Changi Business Park
Central 2#09-06 The Signature
Singapore 486066Phone +65.6588.0188
Fax +65.6588.3438
© Copyright 2006Printed in USA
Web site:www.lincolnindustrial.com
TROUBLESHOOTING:
Condition Possible Cause Corrective Action
Motor fails to run: Battery needs charging. Recharge battery
Grease Gun fails to dispense grease: Grease tube assembly Check that grease tube assembly has grease is out of grease. Loss of prime. Repeat priming operation Ball check is contaminated. Remove ball check plug. (Item 2 in diagram) Clean contaminates (old grease, paper from grease tube, etc) from the spring, ball, and ball seat. Reassemble.
Grease gun continues to lose prime: Air may be trapped in several Empty grease tube assembly, refill and repeat locations. priming instructions. Follower may be binding in grease. Check for damaged grease tube and replace.
Battery fails to take a charge: Charger may not have power. Check that receptacle has power. Battery may be bad. Replace battery.