Embed Size (px)
Citation preview

1
Forward this manual to all operators.Failure to operate this equipment asdirected may cause injury or death.
Model RX850 TIRE CHANGER
INSTALLATION AND OPERATION MANUAL
SHIPPING DAMAGE CLAIMSWhen this equipment is shipped, title passes to thepurchaser upon receipt from the carrier.Consequently, claims for the material damaged inshipment must be made by the purchaser against thetransportation company at the time shipment isreceived.
BE SAFEYour new Ranger tire changer was designedand built with safety in mind. However, youroverall safety can be increased by proper train-ing and thoughtful operation on the part of theoperator. DO NOT operate or repair this equip-ment without reading this manual and theimportant safety instructions shown inside.
1645 Lemonwood Dr.Santa Paula, CA. 93060, USA
Tel: 1-805-529-3675Fax: 1-805-529-2909
FOR SERVICING AUTOMOBILE
AND LIGHT TRUCK SINGLE PIECE
TIRES / WHEELS
Keep this operation manual near themachine at all times. Make sure that
ALL USERS read this manual .

This instruction manual has been prepared especially for you. Your new tire changer is the result of over 25 years of continuous research, testing
and development and is the most technically advanced tire changer on the market today.The manner in which you care for and maintain your tire changer will have a
direct effect on it's overall performance and longevity.
READ THIS ENTIRE MANUAL BEFORE OPERATION BEGINS.
RECORD HERE THE FOLLOWING INFORMATION WHICH IS LOCATED
ON THE SERIAL NUMBER DATA PLATE.
Serial No. __________
Model No. __________
Manufacturing date __________
2
Be sure to fill out the warranty registration card before operating thismachine. The warranty registration card must be returned within 30 days
of purchase or the warranty may be voided.
RX850 TIRE CHANGER
WARRANTYYour new tire changer is warranted for one year on equipment structure; one year on all operating components andtooling/accessories, to the original purchaser, to be free of defects in material and workmanship. The manufacturershall repair or replace at their option for this period those parts returned to the factory freight prepaid which proveupon inspection to be defective. The manufacturer will pay labor costs for the first 12 months only on parts returnedas previously described.This warranty does not extend to defects caused by ordinary wear, abuse, misuse, shippingdamage, or lack of required maintenance. This warranty is exclusive and in lieu of all other warranties expressed orimplied. In no event shall the manufacturer be liable for special, consequential or incidental damages for the breachor delay in performance of the warranty. The manufacturer reserves the right to make design changes or addimprovements to its product line without incurring any obligation to make such changes on product sold previously.Warranty adjustments within the above stated policies are based on the model and serial number of the equipment.This data must be furnished with all warranty claims.
THIS SYMBOL POINTS OUT IMPORTANT SAFETY INSTRUCTIONS WHICH IF NOT FOLLOWED COULD ENDANGER THE PERSONAL SAFETY AND/OR PROPERTY OF YOURSELF AND OTHERS AND CAN CAUSE PERSONAL INJURY OR DEATH. READ AND FOLLOW ALL INSTRUCTIONS IN THIS MANUAL BEFORE ATTEMPTING TO OPERATE THIS MACHINE.
1. Carefully remove the crating and packing materials.2. Inspect the machine for any signs of concealed
shipment damage or shortages. Remember to report any shipping damage to the carrier and make a notation on the delivery receipt.
3. Check the voltage, phase and proper amperage
requirements for the motor shown on the motor plate. Wiring should be performed by a certified electrician only
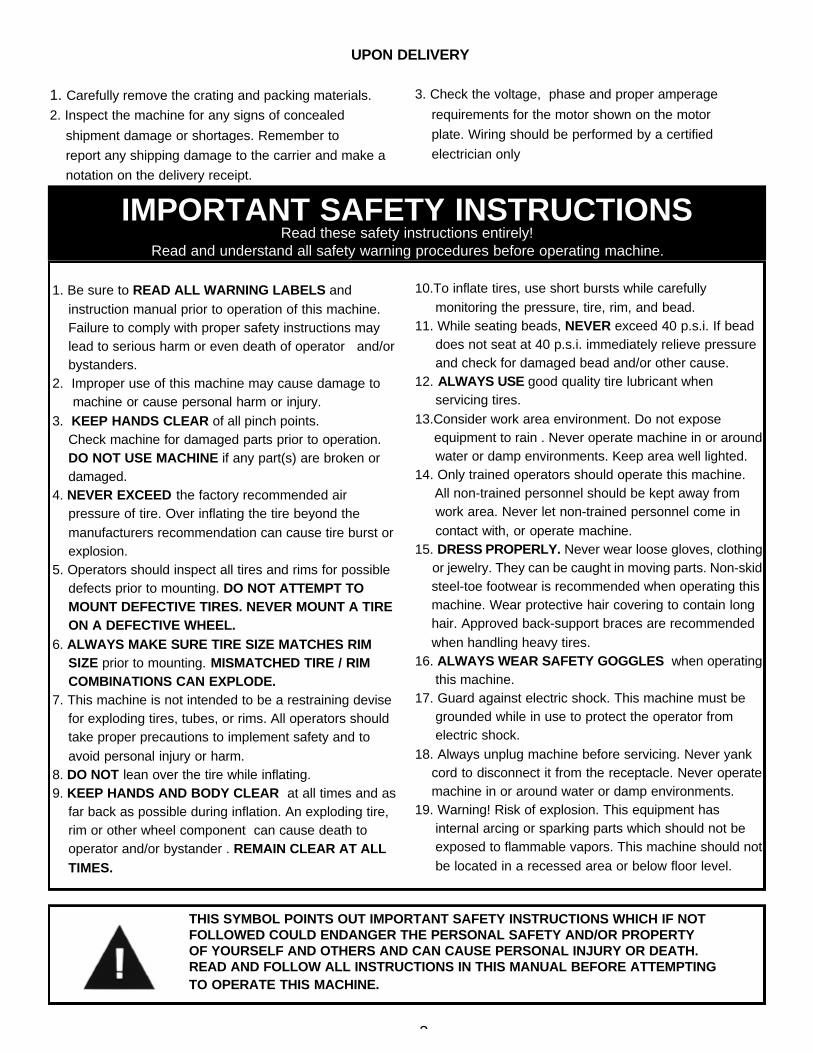
UPON DELIVERY
IMPORTANT SAFETY INSTRUCTIONSRead these safety instructions entirely!
Read and understand all safety warning procedures before operating machine.
1. Be sure to READ ALL WARNING LABELS and instruction manual prior to operation of this machine. Failure to comply with proper safety instructions may lead to serious harm or even death of operator and/or bystanders.
2. Improper use of this machine may cause damage to machine or cause personal harm or injury.
3. KEEP HANDS CLEAR of all pinch points. Check machine for damaged parts prior to operation. DO NOT USE MACHINE if any part(s) are broken or damaged.
4. NEVER EXCEED the factory recommended air pressure of tire. Over inflating the tire beyond the manufacturers recommendation can cause tire burst or explosion.
5. Operators should inspect all tires and rims for possible defects prior to mounting. DO NOT ATTEMPT TO MOUNT DEFECTIVE TIRES. NEVER MOUNT A TIRE ON A DEFECTIVE WHEEL.
6. ALWAYS MAKE SURE TIRE SIZE MATCHES RIM SIZE prior to mounting. MISMATCHED TIRE / RIM COMBINATIONS CAN EXPLODE.
7. This machine is not intended to be a restraining devise for exploding tires, tubes, or rims. All operators should take proper precautions to implement safety and to avoid personal injury or harm.
8. DO NOT lean over the tire while inflating.9. KEEP HANDS AND BODY CLEAR at all times and as
far back as possible during inflation. An exploding tire, rim or other wheel component can cause death to operator and/or bystander . REMAIN CLEAR AT ALL TIMES.
10.To inflate tires, use short bursts while carefully monitoring the pressure, tire, rim, and bead.
11. While seating beads, NEVER exceed 40 p.s.i. If bead does not seat at 40 p.s.i. immediately relieve pressure and check for damaged bead and/or other cause.
12. ALWAYS USE good quality tire lubricant when servicing tires.
13.Consider work area environment. Do not expose equipment to rain . Never operate machine in or around water or damp environments. Keep area well lighted.
14. Only trained operators should operate this machine. All non-trained personnel should be kept away from work area. Never let non-trained personnel come in contact with, or operate machine.
15. DRESS PROPERLY. Never wear loose gloves, clothing or jewelry. They can be caught in moving parts. Non-skid steel-toe footwear is recommended when operating this machine. Wear protective hair covering to contain long hair. Approved back-support braces are recommended when handling heavy tires.
16. ALWAYS WEAR SAFETY GOGGLES when operating this machine.
17. Guard against electric shock. This machine must be grounded while in use to protect the operator from electric shock.
18. Always unplug machine before servicing. Never yank cord to disconnect it from the receptacle. Never operate machine in or around water or damp environments.
19. Warning! Risk of explosion. This equipment has internal arcing or sparking parts which should not be exposed to flammable vapors. This machine should not be located in a recessed area or below floor level.
3

4
DESCRIPTION OF PARTS
1. Vertical Slide
2. Swing Arm
3. Swing Arm Adjustment Knob
4. Vertical Slide Lock Lever
5. Mount / Demount Head
6. Tower
7. Turntable
8. Jaw / Clamp
9. Bead Breaker Arm
10. Bead Breaker Blade
11. Bead breaker Pads
12. Lube Bottle
13. Foot Pedal / Jaw Control
14. Foot Pedal / Bead Breaker
15. Foot Pedal / Turntable Rotation
16. Bead Lifting Bar
17. Jet-Blast Nozzle
18. Air Hose
CONTROL PEDALS UPON DELIVERY1. Carefully remove the crating and packing materials.2. Inspect the machine for any signs of concealed shipmentdamage or shortages. Remember to report any shipping damage tothe carrier and make a notation on the delivery receipt.3. Check the voltage, phase and proper amperage requirements forthe motor shown on the motor plate. Wiring should be performed bya certified electrician only.
IMPORTANT NOTE:YOUR MACHINE HAS A DUAL VOLTAGE MOTOR and can be run oneither 110 or 220 volts. STANDARD WIRING IS 110 VOLTS. See belowbefore connecting 220 volts to your machine or serious damage to themotor/electronics will result. The connector plugs shown below are locat-ed inside the machine and can be accessed by removing the side cover.

5
OPERATING INSTRUCTIONSSTEP ONE
( BEAD LOOSENING AND DEMOUNTING )
NOTE: When first operating this machine it is recommended thatyou use a steel wheel and a used tire to familiarizeyourself with the operation and use of controls. REMOVEALL WEIGHTS before servicing tire. Weights left on thewheel can cause unlevel clamping and may damagewheel and/or machine.
1. Deflate the tire by removing the valve core. Allow ALL AIR TO ESCAPE. DO NOT try breaking the bead until the air has completely deflated from tire. ( See Fig. 1 )
2. Before loosening the bead, lube the bead area with clean tire soap/lube.
NOTE:To prevent damage to machine and/or wheel, make
sure the turntable jaws are retracted before operatingthe bead breaker.
3. Position the wheel/tire next to the bead breaker blade making sure to first demount the shallowest side of thewheel first. Be sure to position the valve stem in the3-’clock position. ( See Fig.2 )
NOTE:All mounting and demounting operations should beperformed on the shallow side of the wheel. The shallowside of the wheel is the side closest to the inner hub.
4. With the tire/wheel in position, place the bead breakerblade directly on the bead as close to the rim aspossible, paying close attention to not contact thesidewall or wheel itself.
NOTE:If the blade is improperly positioned, damage to the tire
or wheel can occur. If the sidewall starts to collapseduring the bead breaking process, STOP and reposition
the blade.
5. Depress the middle pedal ( BLADE CONTROL) to actuate the blade and loosen the bead. Slowly apply pressure until the bead is unseated from the rim. ( See Fig.3 )
6. Rotate the wheel by 1/3 and repeat the process on the same side of the wheel. Rotate the wheel another 1/3and repeat the process until the entire bead is loosenedfrom the wheel.
7. Turn the wheel around and repeat the process on the other side of the wheel. ( This should be the deepestside and is the side that will be placed face down on theturntable clamps. )
NOTE:It is easier to clamp the wheel on the turntable clamps
when the bead on the deep side of the wheel is loosenedlast. This tends to push the tire upward and leaves the bare
wheel exposed.
STEP TWO( CLAMPING WHEEL TO TURNTABLE )
1. Prior to mounting the wheel on the turntable, lube the rim edges and exposed bead area with an approved tirelubricant. Make sure that the brush is clean and that nocontaminant’s come in contact with bead area. ( See Fig.4 )
ATTEMPTING TO BREAK BEADS ON PARTIALLYOR FULLY INFLATED TIRES IS UNSAFE AND CANCAUSE HARM TO MACHINE AND/OR OPERATOR.
Fig. 1
Fig. 2
Fig. 3
Fig. 4

6
2. Place the wheel/tire on the turntable making sure the shallow side of the wheel is facing up. ( See Fig.5 )
3. Depress the left front pedal ( WHEEL CLAMPCONTROL ) to activate the clamps and secure thewheel. STEEL WHEELS should be clamped from theinside. (Clamps will move outward to grip wheel.) CUS-TOM / ALLOY WHEELS should be clamped from theoutside. (Clamps will move inward to grip wheel.) SeeFig. 6.
STEP THREE( POSITIONING THE MOUNT/DEMOUNT HEAD )
1. After the wheel is secured to the turntable, pull theoverhead swing arm into position so that themount/demount head is directly over the edge of the rim.Push down on the vertical slide until the mount/demounthead comes in contact with the edge of the rim. Push upon the locking handle to lock the slide into position. Asthe locking handle is pushed upwards themount/demount head will raise approximately 1/8” fromthe rim edge. ( See Fig. 7 )
2. The mount/demount head roller that is now making contact with the wheel should be properly positioned 1/8”from the rim edge by turning the swing arm adjustingknob.
3. The mount/demount head should be properly positionedwithin 1/8” - 3/16” from both the top and side of the wheelat all times. Once set it will be maintained as long as thelocking handle and adjusting knob are not changed.With the head set in the proper position the user maymove the swing arm in and out of the way (assuming thesame tires and wheels are being serviced ) without hav-ing to worry about repositioning the head. See Fig. 8 forproper head position.
IMPORTANT NOTE:Regularly check the head for proper clearance even whenservicing the same tire and wheel combination. Improper
clearance can result in damage to wheel and/or tire.
STEP FOUR( REMOVING TIRES )
1. Position the bead lifting bar over the front end of the mount/demount head and insert the smooth curved endjust below the upper bead of the tire. To ease ininstallation of the tool bar, it helps to use your free handto press the opposite side of the tire into the droppedcenter of the wheel. ( See Fig. 9. )
2. With the tool bar in position, push down towards the wheel to lift up the tire bead over the finger portion of themount/demount head. Hold the tool bar and bead in thisposition. Remember to hold the tool bar firmly down onthe surface of the wheel. ( See Fig. 10 )
Fig. 5
Fig. 6
Fig. 9
Fig. 10
Fig. 7

7
3. Depress the right front pedal ( TURNTABLE ROTATION CONTROL ) to rotate the turntable clockwise.The mount/demount head will guide the tire bead over theedge of the wheel as the turntable rotates. It is importantthat the bead lifting tool remains in the down position atthis time. Press down on the tire directly across the toolhead during this process to force the offside part of thetire into the drop-center portion of the wheel. This willrelieve the tension pressure on the tire as it is pulled overthe rim edge. Rotate turntable until the upper bead iscompletely demounted. ( See Fig. 11 )
FOR TUBE TYPE TIRES REMOVE INNER TUBEAFTER DEMOUNTING UPPER BEAD.
4. To demount the lower bead do not remove the wheel from the turntable. Raise the tire near the tool head whileat the same time forcing the lower bead opposite the toolhead down into the dropped center of the wheel. Insertthe smooth curved end of the bead lifting bar just underthe lower bead of the tire and position over the front endof the mount / demount head. ( See Fig. 12 )
5. Depress the right front pedal to rotate the turntable and guide the lower tire bead up over the edge of thewheel. It is important that the bead lifting tool remains inthe down position. NOTE: Press down on the tiredirectly across the tool head during this process to forcethe offside part of the tire into the drop-center portion ofthe wheel. Rotate turntable until the lower bead is com-pletely demounted. ( See Fig. 13 )
DURING THE DEMOUNTING PROCEDURE THEMOUNTING HEAD AND BEAD LIFTING TOOL MAYENCOUNTER RESISTANCE AND BECOMEOBSTRUCTED. AT THIS TIME IT IS IMPORTANT THATTHE BEAD LIFTING TOOL IS HELD FIRMLY DOWN.THE BEAD LIFTING TOOL CAN BE PROPELLEDOUTWARD IF RELEASED UNDER PRESSURE. IF THEMOUNT/DEMOUNT HEAD BECOMES JAMMED,CAREFULLY REVERSE THE TURNTABLE BY LIFTINGUP ON THE CONTROL PEDAL.
NOTE:To reverse the turntable in a counter-clockwise direction
lift up on the turntable rotation control pedal.
STEP SIX( MOUNTING TIRES )
Be sure to READ ALL WARNING LABELS andinstruction manual prior to operation. Failure to complywith proper safety instructions may lead to serious harmor even death of operator and/or bystanders. Keep allunnecessary person(s) and bystanders out of servicearea.
Inspect all tires and rims for possible defects prior tomounting. ALWAYS MAKE SURE TIRE SIZE MATCH-ES RIM SIZE prior to mounting. MISMATCHED TIRESCAN EXPLODE.
Be extremely cautious when mounting all tires. Nevermount a tire or tire/wheel combination that is handed toyou by another employee or customer without inspectingit thoroughly. DO NOT ATTEMPT TO MOUNTDEFECTIVE TIRES. Never mount a tire on a defectivewheel.
Modular wheels should be inspected closely to makesure that the center section fasteners are in place andproperly secured prior to mounting of tire(s).
IF A TIRE BECOMES DAMAGED during the mountingprocess, DO NOT ATTEMPT TO FINISH MOUNTING.Remove from service area and properly mark the tire asDAMAGED.
Fig. 11
Fig. 12
Fig. 13

8
1. Inspect all wheels closely for damage and/or defectsprior to mounting tire. Remove any burrs and light corro-sion with a wire brush or small file. DO NOT ATTEMPTTO SERVICE HEAVILY CORRODED WHEELS. Cleanbead area thoroughly. ( See Fig. 14 )
2. Inspect all tires for damage and/or defects. Pay closeattention to sidewall and bead areas. ALWAYS MAKESURE TIRE SIZE MATCHES RIM SIZE prior tomounting. DO NOT ATTEMPT TO MOUNT DEFECTIVETIRES. Clean bead area thoroughly. After cleaning andinspecting the bead area, lubricate thoroughly with cleantire soap/lube. ( See Fig. 15 )
4. Place the wheel on the turntable following theprocedures outlined in STEP TWO. Move the swing arminto position so that the mount/demount head is properlypositioned within 1/8” - 3/16” from both the top and sideof the wheel. Place the tire over the wheel at an angle sothat the lower bead is resting on top of the rear extensionof the mount/demount head and below the frontextension. ( See Fig. 16 )
5. Depress the right front pedal to rotate the turntable and guide the lower bead down over the edge of thewheel. To ease in installation, continue forcing the beadof the tire into the drop-center portion of the wheel duringthe mounting process. Slowly rotate the turntable untilthe lower bead is completely mounted.
NOTE:For tube-type tires, install inner tube
at this time.
6. To mount the top bead, rotate the turntable so that thevalve stem is located directly across the mount/demounthead ( or at the 7-o’clock position.) Lift the upper beadover the rear extension of the mount/demount head. Toease in installation, continue forcing the bead of the tireinto the drop-center portion of the wheel during themounting process. Slowly rotate the turntable until theupper bead is completely mounted. ( See Fig. 17 )
NOTE:During the mounting procedure, the mounting head may
encounter resistance and become jammed. If theturntable stalls, slowly reverse the turntable rotation by
lifting up on the turntable rotation control pedal.Reposition the tire and mounting head then continue.
STEP SEVEN( INFLATION PROCEDURE )
Be sure to READ ALL WARNING LABELS andinstruction manual prior to inflation of tire. Failure to com-ply with proper safety instructions may lead to seriousharm or even death of operator and/or bystanders.
This machine is not intended to be a restraining devisefor exploding tires, tubes, or rims. KEEP HANDS ANDBODY CLEAR at all times and as far back as possibleduring inflation. DO NOT lean over the tire while inflating.An exploding tire, rim or other wheel component cancause death to operator and/or bystander . REMAINCLEAR AT ALL TIMES.
While seating beads, NEVER exceed 40 p.s.i. If bead does not seat at 40 p.s.i. immediately relieve pressure and check for damaged bead and/or other cause.NEVER EXCEED the factory recommended air pressureof tire. Over inflating the tire beyond the manufacturersrecommendation can cause tire burst or explosion.
Fig. 14
Fig. 15
Fig. 16
Fig. 17

9
1. Connect the inflation hose to the tire valve stem mak-ing sure that the hose clip is properly secure. ( See Fig. 18 )
2. Hold the tire up to position the upper bead against theupper edge of the rim. Make sure that the top beadclears the bottom of the valve stem to prevent air fromescaping during inflation. ( See fig. 19 )
3. Pull the trigger on the inflation hose to begin inflatingthe tire. If necessary, depress the “Jet-Blast” inflationpedal to help seal the beads. You should only have tohold the “Jet-Blast” inflation pedal down for a couple ofseconds before the beads seal allowing the tire to inflateproperly. ( See Fig. 20 )
DO NOT depress the “Jet-Blast” inflation pedal unless atire/wheel is in place on the turntable. If the “Jet-Blast”inflation pedal is depressed without a tire/wheel in place,dirt or other debris could be blown upward with extremepressure causing injury to the operator or bystanders.
NOTE:If the bead refuses to seal after one or more attempts,you may wish to remove the valve stem core to assist inthe bead sealing process. Once the bead is seated,remove the inflation hose and re-install the valve stemcore.
4. Once the bead is sealed and the tire begins toinflate, step away. During the bead seating and inflationprocess STAND BACK AND KEEP HANDS ANDENTIRE BODY CLEAR. ( See fig. 21 )
KEEP HANDS AND BODY CLEAR at all times and asfar back as possible during inflation. DO NOT lean overthe tire while inflating. An exploding tire, rim or otherwheel component can cause death to operator and/orbystander . REMAIN CLEAR AT ALL TIMES.
5. As the pressure in the tire increases, the beads willmove outward on the wheel and “pop” when they seatcompletely. If the beads refuse to seat during inflationrelieve the pressure immediately and check for possiblecauses.
While seating beads, NEVER exceed 40 p.s.i. If bead does not seat at 40 p.s.i. immediately relieve pressure and check for damaged bead and/or other cause.
NOTE:To release air pressure with the inflation hose attached tothe tire, press the pressure release valve button attachedto the inflation hose. ( See fig. 22 )
NEVER EXCEED the factory recommended air pressureof tire. Over inflating the tire beyond the manufacturersrecommendation can cause tire burst or explosion.
Fig. 18
Fig. 21
Fig. 19
Fig. 20
Fig. 22