Embed Size (px)
Citation preview

OPERATING INSTRUCTION
To use this product properly and safely, please read this manual carefully before use. If you have
any question about the product and its operations, please contact your nearest distributor or
TOHNICHI MFG. CO., LTD.
MODEL CEM3-G
CEM3-G CEM3-G Model
CEM100N3X15D-G
CEM3-G取扱説明書.indd 1CEM3-G取扱説明書.indd 1 2016/07/14 11:24:402016/07/14 11:24:40
1
DIG
ITAL TO
RQ
UE W
REN
CH
“DA
TA TO
RK” M
OD
EL CEM3-G
To the user
Read these operating instructions carefully before use. For any questions, contact a Tohnichi
authorized distributor or Tohnichi office. Keep these instructions for future use.
Cautions on Safety
(1) Use only the official Tohnichi charger and battery.
Do not use any other chargers or batteries not designated in this manual.
(2) Charge in the appropriate manner.
Use this charger only to the rated power source.
• Doing otherwise may cause abnormal generation of heat, which may result in fire.
Do not charge the battery in conditions outside of the 0-40 degree Celsius temperature range.
• Doing so may cause them to burst and cause a fire.
Do not wrap the charger or battery with a cloth,etc.
• Doing so may cause them to burst and cause a fire.
When it is not in use, remove the plug from the power source.
• Doing otherwise may cause an electric shock or a fire.
Warnings
Safety symbol
This symbol indicates attention is required for your safety. When this symbol appears in
these instructions, pay particular attention for your safety concerns. Take preventative
measures according to the written message for appropriate operation and management.
Signal Words
A signal word accompanies the safety symbol, which indicates the level of cautions on safety of
people and the appropriate use of the equipment. Signal words are classified into 3 levels:
"danger", "warning " and "cautions" by the degree of risk.
Danger: Imminent danger which may cause serious damage.
Warnings: Potential danger which may cause serious damage.
Cautions: Potential danger which may hinder ordinary operation but may not lead to
serious damage.
CEM3-G取扱説明書.indd 2CEM3-G取扱説明書.indd 2 2016/07/14 11:24:412016/07/14 11:24:41

2
DIG
ITAL TO
RQ
UE W
REN
CH
“DA
TA TO
RK” M
OD
EL CEM3-G
(3) Pay attention to the condition of your workplace.
Do not use the charger or storage battery in the rain or other wet conditions.
• Doing so may cause an electric shock and/or damage to the product.
Keep the workplace brightly lit.
• Working in dark place may cause an accident.
Do not use or charge the product in such place where flammable liquid or gas exist.
• It may cause explosion, fire and other accidents.
(4) Use only the authorized designated accessories and optional equipment.
Do not use any other accessories or optional equipment other than those designated in this
manual.
• It may cause accident or injuries.
(5) Do not throw the battery into a fire.
• It may explode and/or generate hazardous substances.
(6) Do not disassemble or try to modify the product.
• Doing so may endanger safety of the product, damage the product performance, life,
and/or cause product failure.
(7) Make sure to switch the ratchet lever completely in direction according to your usage
requirements (QH interchangeable head).
• Failing to do so may cause accident, injuries and/or product failure.
(8) Do not extend the handle of the torque wrench with a pipe, etc.
• Doing so may cause product failure and accuracy error.
(9) When using it in high place,take appropriate measures to prevent the product from falling.
• Falling products or sockets may cause accidents, injuries and/or product failures.
(1) Always keep the workplace clean and uncluttered.
• Untidy place or work stand may lead to accidents.
(2) Keep away from children.
Do not let young people touch the product or the cable of the charger.
• It may cause injuries.
Keep other people away from the workplace.
• It may cause injuries.
(3) When not in use, take proper care to store it.
Keep it in dry conditions and lock it so children cannot reach it.
• Failing to do so may lead to accidents.
Cautions
CEM3-G取扱説明書.indd 3CEM3-G取扱説明書.indd 3 2016/07/14 11:24:432016/07/14 11:24:43
3
DIG
ITAL TO
RQ
UE W
REN
CH
“DA
TA TO
RK” M
OD
EL CEM3-G
Do not keep the product or the battery in such condition where the temperature may rise as
high as 50 degrees Celsius.
• Doing so may damage the battery performance and cause smoke and/or fire.
(4) Do not use the product beyond its capacity.
In order to use the product safely and effectively, set the torque within the product capacity.
• Using the product beyond its capacity may cause accidents or product failure.
(5) Choose the product that fits the required operation.
Do not use the product for purposes other than those specifically designated in this manual.
• Doing so may cause injuries.
(6) Do not handle the charger cable roughly.
Do not carry tool by the charging cable. When pulling out the plug, do not pull from back
along the cable.
Keep the cable away from heat, oil, and do not force it against sharp corners to avoid
physical damage to the cable.
Carefully choose the place for charging so that the cable is not subject to any external damage.
• It may cause an electric shock and/or fire.
(7) Keep your posture in natural and firm position.
Keep your feet on the ground firmly and maintain your balance.
• Failing to do so may cause injuries.
(8) Take good care of the product.
To change accessories, follow the instruction manuals.
• Doing otherwise may cause injuries.
Check the cable of the charger periodically, and contact the nearest distributor or Tohnichi
for repair.
• Doing otherwise may cause an electric shock and/or a fire.
When using an extension cord, conduct a periodic check and change with a new one if
there is any damage.
• Otherwise it may cause an electric shock and/or a fire.
Keep the handle dry and clean, keep it from oil or grease.
• Otherwise it may cause injuries.
(9) Check if there is any damage to parts of the product.
Before use, check the case and other parts to make sure they are functioning properly.
Check everything that may affect the ordinary operation.
Do not use the charger with damaged plug or damaged cable or ones with any physical damage.
• Otherwise it may cause an electric shock, short-circuit and/or a fire.
CEM3-G取扱説明書.indd 4CEM3-G取扱説明書.indd 4 2016/07/14 11:24:452016/07/14 11:24:45

(1) Use only the accompanying charger for charging the battery.
(2) Only use the battery designated in this manual.
(3) Use the product only within the operating environment specified in this manual.
(4) Do not disassemble the product.
(5) Check the functions and settings before use.
(6) Be careful not to expose the product to water or oil as it may cause malfunction.
(7) Do not drop the product or hit it against other objects as it may cause product failures.
(8) Do not use the product beyond its capacity specified in this manual.
(9) Make sure to conduct daily inspection as well as periodic inspection.
(10) Push clear and make sure the display shows zero (zero adjustment) before measuring.
(11) For accurate measurement, hold the center of the effective length line and apply force in
right angle against the handle.
(12) Connect the torque wrench and the interchangeable head firmly.
If there is strange smell or fire on usage, stop use.
Move this instrument to a safety place, and contact Tohnichi.
* For handling of used battery *
Nickel metal hydrogen battery is used on this product.
We appreciate your utmost efforts to recycle it to save the resources.
Ask the distributors or Tohnichi Japan or overseas facility.
4
DIG
ITAL TO
RQ
UE W
REN
CH
“DA
TA TO
RK” M
OD
EL CEM3-G
Notes
CEM3-G取扱説明書.indd 5CEM3-G取扱説明書.indd 5 2016/07/14 11:24:462016/07/14 11:24:46

DIG
ITAL TO
RQ
UE W
REN
CH
“DA
TA TO
RK” M
OD
EL CEM3-G
5
1. Outline ............................................................................ 62. Features.......................................................................... 63. Composition ................................................................... 64. Components................................................................... 75. Explanation of each mode............................................. 9
(1) Memory mode• M-3 mode• M-2 mode (CEM2 compatible mode)
(2) Display mode• Dual display mode• LCD display mode (Power saving mode)
(3) Measurement mode• MODE-M (Inspection mode)• MODE-T (Tightening mode)
(4) Data sampling mode
6. Usage (Delivery condition from Tohnichi) .....................107. Explanation of functions ................................................118. Operation examples.......................................................13
(1) Inspection mode measurement (Without judgment OK/NG)....................13(2) Inspection mode measurement (With judgment OK/NG) ....................14(3) Tightening mode measurement ....................................................15(4) Measurement data readout...........................................................16(5) Calculation function ......................................................................17(6) Output data at a time (PC, printer output) .....................................18(7) Output data at a time (infrared output) ..........................................19(8) Measurement data memory clear .................................................20
9. External output format...................................................2110. Settings...........................................................................2211. How to transfer data to software through USB cable......2712. Battery ............................................................................2713. Charging .........................................................................2814. Options ...........................................................................2915. Specifications.................................................................30
Contents
CEM3-G取扱説明書.indd 6CEM3-G取扱説明書.indd 6 2016/07/14 11:24:482016/07/14 11:24:48
6
DIG
ITAL TO
RQ
UE W
REN
CH
“DA
TA TO
RK” M
OD
EL CEM3-G
CEM3-G series is the digital torque wrench designed for "Retightening torque measurement"
"Loosening torque measurement" as well as for precision tightening.
1 Outline
1) Body ............................................................................1pc.
2) Accessories
Battery pack BP-5 ........................................................1pc.
Interchangeable head QH (Suitable ratchet head) .........1pc.
Charger BC-3-G...........................................................1pc.
3) Orerating instructions....................................................1pc.
3 Composition
(1) Manages measured value and data
Can trace measured date and time.
(2) Dual display
Dual display LED and LCD (liquid crystal) adopted.
Torque value is displayed on bright, easy-to-see 7 segment LED, and other function is
displayed on LCD.
(3) Tightening completion alarm, judgment OK/NG function
Tightening completion is informed by LED and buzzer.
Measured torque is judged OK/NG.
(4) Expanded data capacity
Max 999 data can be saved.
(5) Solidity of the display unit
Aluminum case applied to increase solidity.
(6) Nickel hydrogen battery
Environment-friendly Nickel hydrogen battery is used.
(7) Extension of continuous usage time
Max 30-hour continuous usage by LCD mode and 20 hour by dual mode.
(1 hour charge: 8 hour continuous use in dual mode.)
(8) Residual battery indicator
4-step battery indicator help to see the remaining battery amount.
(9) Less possibility of over-torquing
Designed to prevent over-torquing by adjusting the handle shape and effective length.
(10) Former data file system can be used without change.
Former communication software can be used with CEM3-G in M-2 mode.
2 Features
CEM3-G取扱説明書.indd 7CEM3-G取扱説明書.indd 7 2016/07/14 11:24:502016/07/14 11:24:50
7
DIG
ITAL TO
RQ
UE W
REN
CH
“DA
TA TO
RK” M
OD
EL CEM3-G
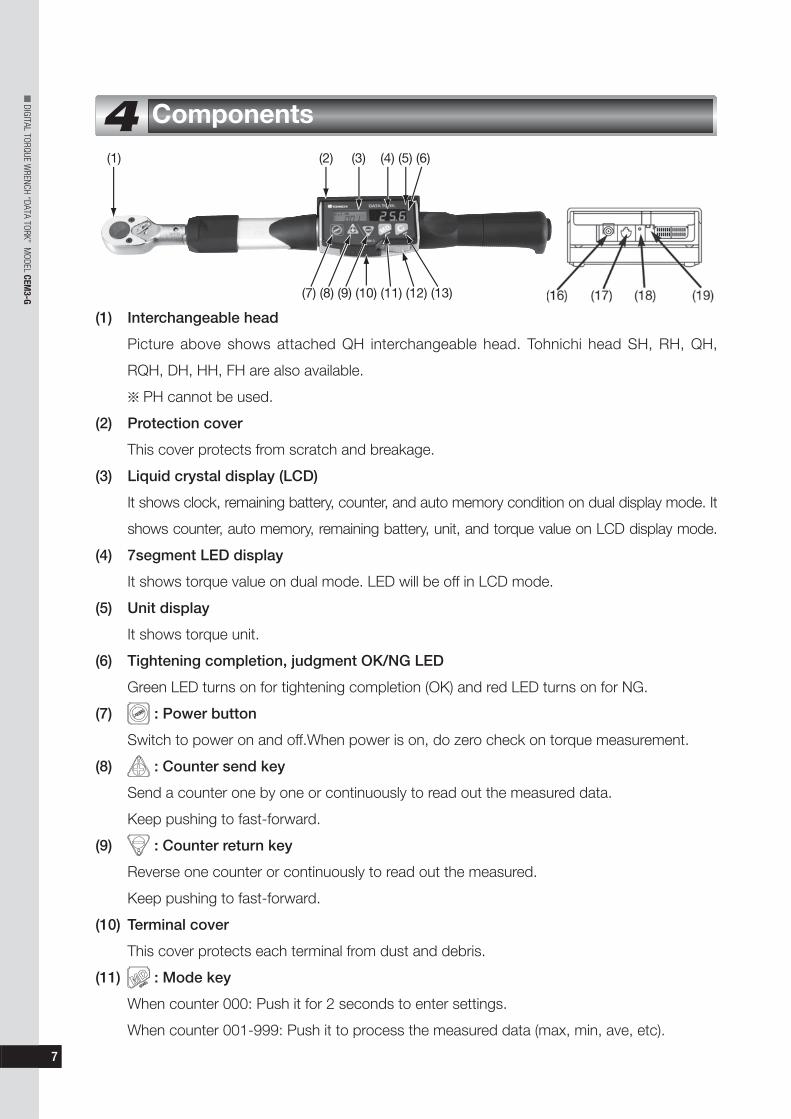
(1) Interchangeable head
Picture above shows attached QH interchangeable head. Tohnichi head SH, RH, QH,
RQH, DH, HH, FH are also available.
PH cannot be used.
(2) Protection cover
This cover protects from scratch and breakage.
(3) Liquid crystal display (LCD)
It shows clock, remaining battery, counter, and auto memory condition on dual display mode. It
shows counter, auto memory, remaining battery, unit, and torque value on LCD display mode.
(4) 7segment LED display
It shows torque value on dual mode. LED will be off in LCD mode.
(5) Unit display
It shows torque unit.
(6) Tightening completion, judgment OK/NG LED
Green LED turns on for tightening completion (OK) and red LED turns on for NG.
(7) : Power button
Switch to power on and off.When power is on, do zero check on torque measurement.
(8) : Counter send key
Send a counter one by one or continuously to read out the measured data.
Keep pushing to fast-forward.
(9) : Counter return key
Reverse one counter or continuously to read out the measured.
Keep pushing to fast-forward.
(10) Terminal cover
This cover protects each terminal from dust and debris.
(11) : Mode key
When counter 000: Push it for 2 seconds to enter settings.
When counter 001-999: Push it to process the measured data (max, min, ave, etc).
4 Components
(1) (2) (3) (4) (5) (6)
(7) (8) (9) (10) (11) (12) (13)
CEM3-G取扱説明書.indd 8CEM3-G取扱説明書.indd 8 2016/07/14 11:24:512016/07/14 11:24:51

8
DIG
ITAL TO
RQ
UE W
REN
CH
“DA
TA TO
RK” M
OD
EL CEM3-G
(12) : Memory key
Saves the measured data and proceed to the next counter. Transfers the data to external device.
(13) : Clear key
Clear saved measurement data (measurement value,date). On run mode do auto zero
adjustment.
(14) Grip
Battery pack (BP-5) is stored inside.
(15) Cap
Remove this cap when exchanging batteries (counter clockwise).
(16) Charge jack
Connect BC-3-G charger to this jack for charging.
(17) External output terminal
Connect USB cable (No. 584) to this terminal.
(18) Infrared output window
Terminal to transfer data to Tohnichi infrared data receiver R-DT999.
(19) Reset button
Push reset button display error or malfunction happens.
No need to push every time after charging.
• LCD display mode (Power saving mode)
[Display details]
• Dual display mode (Delivery condition)
12 : 45 N·m
120_
LCD display LED displayAuto memory ON TorqueCounter
Clock display(T:M:S)
Battery remaining UnitDisplay of measurement
100.0120_ N·m
12:45:50Clock display (T:M:S)
CounterBattery remainingLCD on memory read out
7 segment LED
120_ N·m
100.0
LCD display LED displayTorque
Auto memory ON
CounterBattery remaining Unit
CEM3-G取扱説明書.indd 9CEM3-G取扱説明書.indd 9 2016/07/14 11:24:532016/07/14 11:24:53

9
DIG
ITAL TO
RQ
UE W
REN
CH
“DA
TA TO
RK” M
OD
EL CEM3-G
5 Explanation of each mode
CEM3 basic functions are categorized in the following "MODE".
(1) Memory mode
M-3 mode: M-3 is set as delivery setting. M-3 mode can save max.999 pc of data and the
measured time. However, M-3 mode is not compatible with Tohnichi data filing software
(DFS).
M-2 mode: M-2 is compatible with the old CEM2 model. M-2 mode can save only 99pc of
data (same as CEM2). However, M-2 mode is compatible with the same Tohnichi data filing
software (DFS) which was used by CEM2.
(2) Display mode
Dual mode: Dual mode is set as delivery setting. It uses 2 displays (LCD and LED) to
display torque value, counter, measured time, etc.
LCD mode (Power saving mode): Only LCD display is used and LED is turned off to save
electricity.
(3) Measurement mode
MODE-M (Inspection mode): MODE-M is set as delivery condition. This mode is used for
retightening and loosening inspection.
MODE-T (Tightening mode): This mode is used for tightening operation. When it reaches
the lower limit torque value, green LED lamp turns on and the alarm goes off.
(4) Data sampling mode
Run mode: When the counter is 000(M-3 mode) or 00 (M-2 mode), it is in Run mode. In
Run mode, the display shows the torque value being applied at the moment
and returns to zero when torque is released.
Peak mode: When the counter is 001-999 (M-3 mode) or 01-99(M-2 mode), it is in Peak
mode. In Peak mode, the maximum torque will be captured and the display
hold this maximum torque value.
For detailed setting, refer to 10. Settings.
CEM3-G取扱説明書.indd 10CEM3-G取扱説明書.indd 10 2016/07/14 11:24:552016/07/14 11:24:55
10
DIG
ITAL TO
RQ
UE W
REN
CH
“DA
TA TO
RK” M
OD
EL CEM3-G
6 Usage (Delivery condition from Tohnichi)
N·m
0.0
LED
09 : 30
000
This chapter explains simple usage on Tohnichi delivery condition (Dual display mode).
(1) Install attached interchangeable head QH and socket (options).
(2) Push power button.
Do not apply force to the socket at this time.
(3) Display shows as left.
The counter is 000 (RUN mode).
As you apply torque, torque value on LED increases
and returns to zero as you release torque.
(4) Push once and counter turns to 001.
Now it is in PEAK mode.
As you apply torque, the peak value will be kept on
the LED display.
(5) Push once and sounds "Pl".
Measured value 100N.m on display is saved as 001
measurement.
(6) Check 001 measured value.
Push once, LCD display shows counter 001 at
upper left corner and measured time 09:30:01 in
center for 1 second before it returns to normal display.
(7) To delete data, use to select the data to delete,
and push to delete.
N·m
0.009 : 30
001N·m
100.009 : 30
001
N·m
0.009 : 30
002
N·m
100.0001
09:30:01N·m
100.009 : 30
001
N·m
0.009 : 30
0014
LCD
CEM3-G取扱説明書.indd 11CEM3-G取扱説明書.indd 11 2016/07/14 11:24:572016/07/14 11:24:57

11
DIG
ITAL TO
RQ
UE W
REN
CH
“DA
TA TO
RK” M
OD
EL CEM3-G
7 Explanation of functions
CEM3 has several other functions in addition to "mode" functions.
(1) Auto zero function
In RUN mode, push key, and auto zero adjustment works.
If the displayed torque is more than 7.5% of the max capacity torque, the display shows "Err9".
<Display shows Err9>
Push key without torque.
If Err9 disappears, this instrument can be used normally.
If Err9 does not disappear, push reset key and push key once again.
• If Err9 still remains, it may be a sensor or circuit problem.
(2) Error message
Key check and memory check will be conducted when you push or the reset button.
<Err1: Condition key is continuously pushed.>
<Err2: Condition key is continuously pushed.>
<Err3: Condition key is continuously pushed.>
<Err4: Condition key is continuously pushed.>
<Err5: Condition key is continuously pushed.>
<Err8: Malfunction of data memory.>
<Err9: Malfunction of the torque sensor or circuit board.>
Refer to the table on error message at 13. Charging.
(3) Auto memory/reset
Automatically saves the measured data after the set timing. To turn off auto memory
function, set it to 00.
(4) Judgment function
Set the torque range and it judges whether the measured torque is within the range or not.
After measuring push to give judgment.
• Green lamp: OK, Red lamp: NG
(5) Mute function
Set buzzer alarm "OFF". Mute buzzer sound on key operation.
However, the alarm sound on over-torquing, tightening completion and judgment cannot be
cancelled.
CEM3-G取扱説明書.indd 12CEM3-G取扱説明書.indd 12 2016/07/14 11:24:582016/07/14 11:24:58
12
DIG
ITAL TO
RQ
UE W
REN
CH
“DA
TA TO
RK” M
OD
EL CEM3-G
(6) Power saving function
If not used for 1 minute, 7-segment LED darkens to save power. Touch any key then it returns.
(7) Auto power off function
If not used for 3 minutes, it automatically turns off.
(8) Residual battery indication
Battery condition is indicated on LDC by the following 4-step indicator.
Enough battery remains.
About half the battery is gone.
It is time to charge battery.
"LoBATT" alarm condition
No battery. Charge immediately.
No key operation works, and it automatically turns off in 1 minute.
(Saved data will not be deleted)
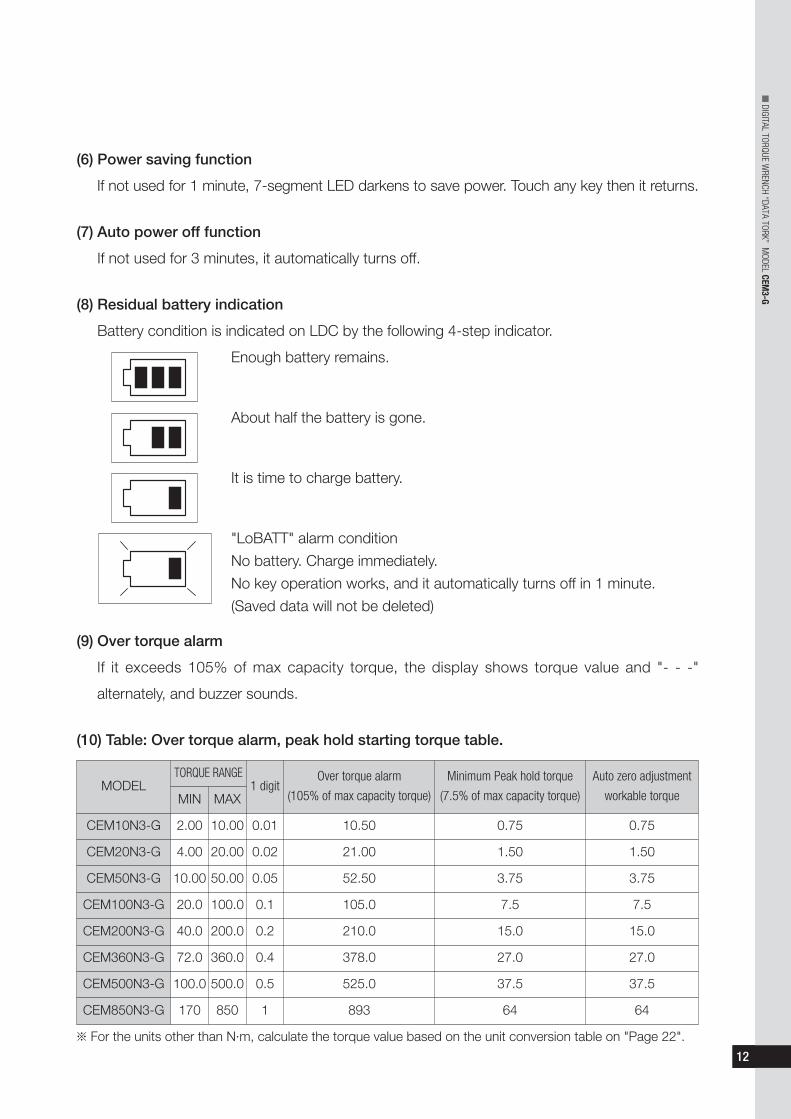
(9) Over torque alarm
If it exceeds 105% of max capacity torque, the display shows torque value and "- - -"
alternately, and buzzer sounds.
(10) Table: Over torque alarm, peak hold starting torque table.
MODELTORQUE RANGE
1 digitOver torque alarm Minimum Peak hold torque Auto zero adjustment
MIN MAX (105% of max capacity torque) (7.5% of max capacity torque) workable torque
CEM10N3-G 2.00 10.00 0.01 10.50 0.75 0.75
CEM20N3-G 4.00 20.00 0.02 21.00 1.50 1.50
CEM50N3-G 10.00 50.00 0.05 52.50 3.75 3.75
CEM100N3-G 20.0 100.0 0.1 105.0 7.5 7.5
CEM200N3-G 40.0 200.0 0.2 210.0 15.0 15.0
CEM360N3-G 72.0 360.0 0.4 378.0 27.0 27.0
CEM500N3-G 100.0 500.0 0.5 525.0 37.5 37.5
CEM850N3-G 170 850 1 893 64 64
For the units other than N·m, calculate the torque value based on the unit conversion table on "Page 22".
CEM3-G取扱説明書.indd 13CEM3-G取扱説明書.indd 13 2016/07/14 11:24:592016/07/14 11:24:59
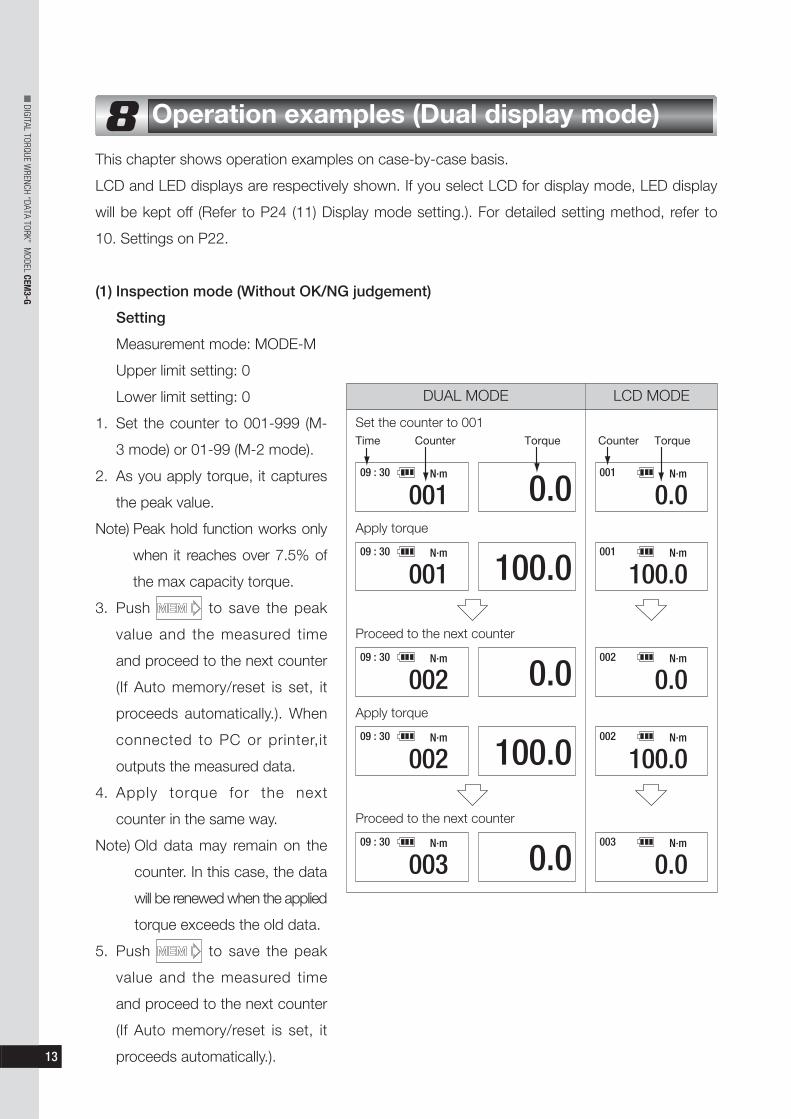
This chapter shows operation examples on case-by-case basis.
LCD and LED displays are respectively shown. If you select LCD for display mode, LED display
will be kept off (Refer to P24 (11) Display mode setting.). For detailed setting method, refer to
10. Settings on P22.
(1) Inspection mode (Without OK/NG judgement)
Setting
Measurement mode: MODE-M
DUAL MODE LCD MODE
13
DIG
ITAL TO
RQ
UE W
REN
CH
“DA
TA TO
RK” M
OD
EL CEM3-G
8 Operation examples (Dual display mode)
N·m
0.009 : 30
001N·m001
0.0
Set the counter to 001
N·m
100.009 : 30
001N·m001
100.0
Apply torque
N·m
0.009 : 30
002N·m002
0.0
Proceed to the next counter
N·m
100.009 : 30
002N·m002
100.0
Apply torque
Proceed to the next counter
N·m
0.009 : 30
003N·m003
0.0
Upper limit setting: 0
Lower limit setting: 0
1. Set the counter to 001-999 (M-
3 mode) or 01-99 (M-2 mode).
2. As you apply torque, it captures
the peak value.
Note) Peak hold function works only
when it reaches over 7.5% of
the max capacity torque.
3. Push to save the peak
value and the measured time
and proceed to the next counter
(If Auto memory/reset is set, it
proceeds automatically.). When
connected to PC or printer,it
outputs the measured data.
4. Apply torque for the next
counter in the same way.
Note) Old data may remain on the
counter. In this case, the data
will be renewed when the applied
torque exceeds the old data.
5. Push to save the peak
value and the measured time
and proceed to the next counter
(If Auto memory/reset is set, it
proceeds automatically.).
Time Counter Torque Counter Torque
CEM3-G取扱説明書.indd 14CEM3-G取扱説明書.indd 14 2016/07/14 11:25:002016/07/14 11:25:00
14
DIG
ITAL TO
RQ
UE W
REN
CH
“DA
TA TO
RK” M
OD
EL CEM3-G
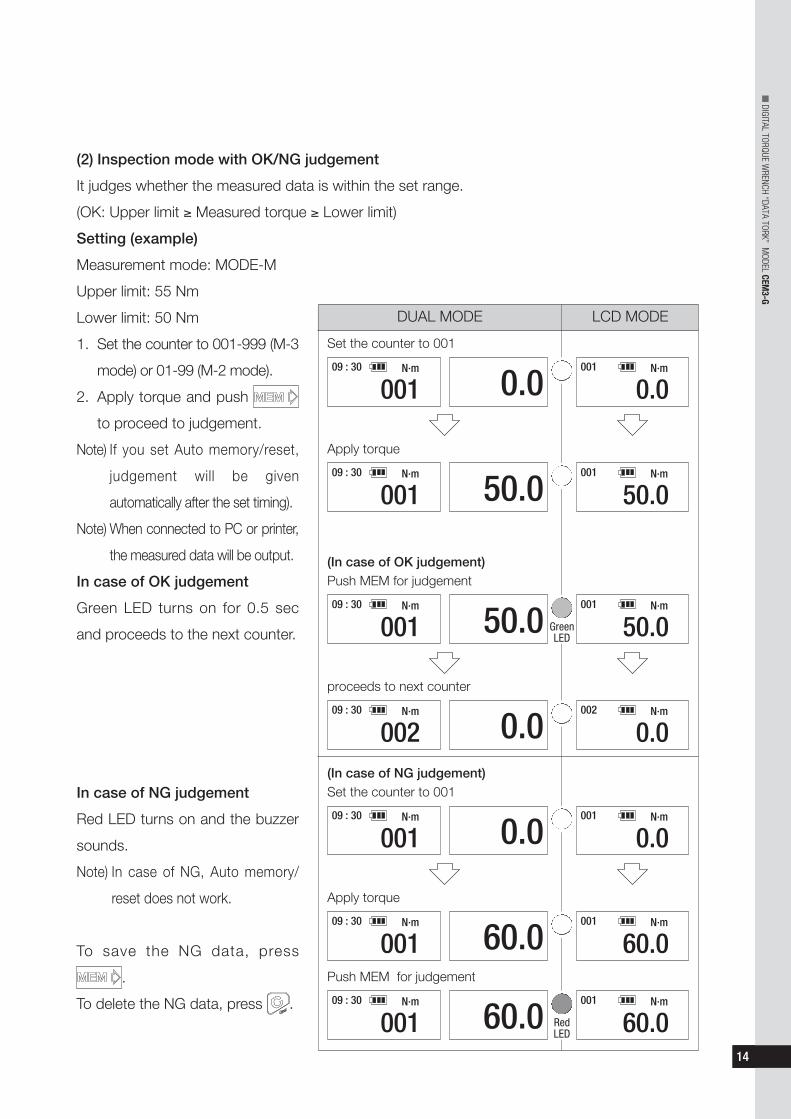
(2) Inspection mode with OK/NG judgement
It judges whether the measured data is within the set range.
(OK: Upper limit Measured torque Lower limit)
Setting (example)
Measurement mode: MODE-M
Upper limit: 55 Nm
Lower limit: 50 Nm DUAL MODE LCD MODE
N·m
0.009 : 30
001N·m001
0.0
Set the counter to 001
N·m
50.009 : 30
001N·m001
50.0
Apply torque
1. Set the counter to 001-999 (M-3
mode) or 01-99 (M-2 mode).
2. Apply torque and push
to proceed to judgement.
Note) If you set Auto memory/reset,
judgement will be given
automatically after the set timing).
Note) When connected to PC or printer,
the measured data will be output.
In case of OK judgement
Green LED turns on for 0.5 sec
and proceeds to the next counter.
In case of NG judgement
Red LED turns on and the buzzer
sounds.
Note) In case of NG, Auto memory/
reset does not work.
To save the NG data, press
.
To delete the NG data, press .
N·m
50.009 : 30
001N·m001
50.0
(In case of OK judgement)Push MEM for judgement
N·m
0.009 : 30
002N·m002
0.0
proceeds to next counter
GreenLED
N·m
0.009 : 30
001N·m001
0.0
(In case of NG judgement)Set the counter to 001
N·m
60.009 : 30
001N·m001
60.0
Apply torque
N·m
60.009 : 30
001N·m001
60.0
Push MEM for judgement
RedLED
CEM3-G取扱説明書.indd 15CEM3-G取扱説明書.indd 15 2016/07/14 11:25:012016/07/14 11:25:01

15
DIG
ITAL TO
RQ
UE W
REN
CH
“DA
TA TO
RK” M
OD
EL CEM3-G
(3) Tightening mode measurement
It informs when torque reaches the target range by buzzer and LED, and alarms when it is out
of the range by another buzzer.
(OK: Upper limit Measured torque Lower limit NG: Measured torque > Upper limit,
Lower limit > Measured torque)
Setting (example):
Measurement mode: MODE-T
Upper limit: 55 N·m
Lower limit: 50 N·m
DUAL MODE LCD MODE
N·m
0.009 : 30
001N·m001
0.0
Apply torque
N·m
50.009 : 30
001N·m001
50.0
1. Set the counter to 001-999 (M-3
mode) or 01-99 (M-2 mode).
2. When the applied torque
reaches the lower limit, the
buzzer goes off and green LED
turns on. Release torque
before it reaches the upper
limit and push .
In case of OK
Green LED turns on for 0.5 sec.
Note) If Auto memory/reset is set,judgement will be givenautomatically after the set timing.
Note) When connected to PC or printer,the measured data will be output.
In case of NG
When the applied torque reaches
the lower limit, green LED turns on.
As it exceeds the upper limit, red
LED turns on to alarm the applied
torque is out of range. As you
push , buzzer goes off to
give NG judgement.
To save the NG data, press .
To delete the NG data, press .
BlueLED
N·m
50.009 : 30
001N·m001
50.0
Release torque
N·m
50.009 : 30
001N·m001
50.0
(In case of OK judgement)Push MEM for judgement
N·m
60.009 : 30
001N·m001
60.0
(In case of NG judgement)When it exceeds the upper limit
BlueLED
N·m
60.009 : 30
001N·m001
60.0
RedLED
RedLED
When it reaches the lower limit (Buzzer sounds for 0.5 sec)
Push MEM key to give judgement (Buzzer keeps sounding)
CEM3-G取扱説明書.indd 16CEM3-G取扱説明書.indd 16 2016/07/14 11:25:022016/07/14 11:25:02
16
DIG
ITAL TO
RQ
UE W
REN
CH
“DA
TA TO
RK” M
OD
EL CEM3-G
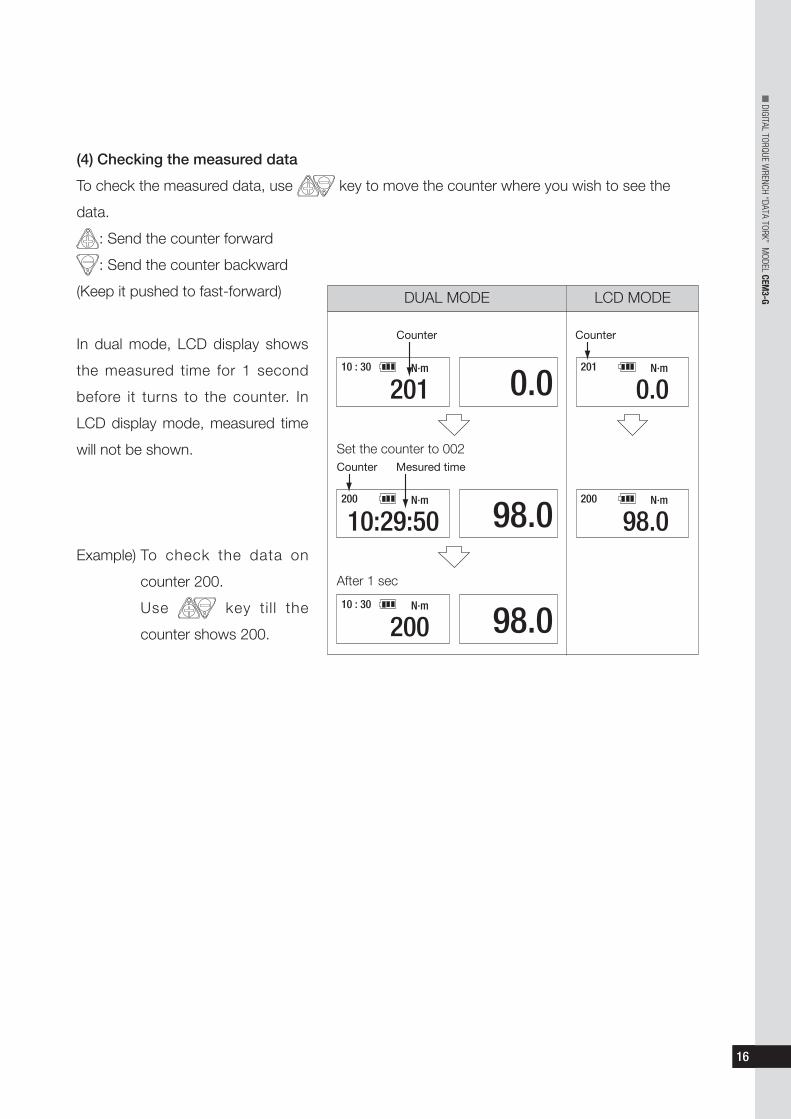
(4) Checking the measured data
To check the measured data, use key to move the counter where you wish to see the
data.
: Send the counter forward
: Send the counter backward
(Keep it pushed to fast-forward) DUAL MODE LCD MODE
N·m
0.010 : 30
201N·m201
0.0
N·m
98.0200
10:29:50N·m200
98.0
Set the counter to 002Counter Mesured time
N·m
98.010 : 30
200
After 1 sec
In dual mode, LCD display shows
the measured time for 1 second
before it turns to the counter. In
LCD display mode, measured time
will not be shown.
Example) To check the data on
counter 200.
Use key ti l l the
counter shows 200.
Counter Counter
CEM3-G取扱説明書.indd 17CEM3-G取扱説明書.indd 17 2016/07/14 11:25:032016/07/14 11:25:03
17
DIG
ITAL TO
RQ
UE W
REN
CH
“DA
TA TO
RK” M
OD
EL CEM3-G
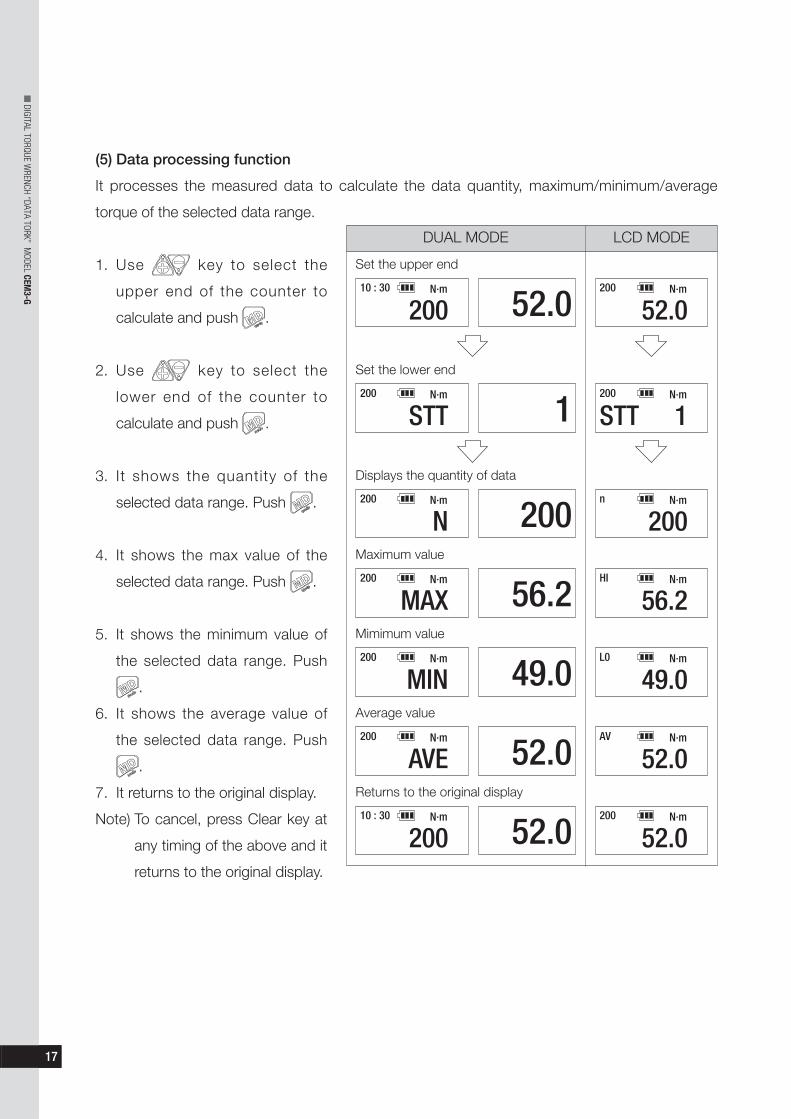
(5) Data processing function
It processes the measured data to calculate the data quantity, maximum/minimum/average
torque of the selected data range.
DUAL MODE LCD MODE
N·m
52.010 : 30
200N·m200
52.0
Set the upper end
N·m
1200
STTN·m200
STT 1
Set the lower end
N·m
200200
NN·mn
200
Displays the quantity of data
N·m
56.2200
MAXN·mHI
56.2
Maximum value
N·m
49.0200
MINN·mL0
49.0
Mimimum value
N·m
52.0200
AVEN·mAV
52.0
Average value
N·m
52.010 : 30
200N·m200
52.0
Returns to the original display
1. Use key to select the
upper end of the counter to
calculate and push .
2. Use key to select the
lower end of the counter to
calculate and push .
3. It shows the quantity of the
selected data range. Push .
4. It shows the max value of the
selected data range. Push .
5. It shows the minimum value of
the selected data range. Push
.
6. It shows the average value of
the selected data range. Push
.
7. It returns to the original display.
Note) To cancel, press Clear key at
any timing of the above and it
returns to the original display.
CEM3-G取扱説明書.indd 18CEM3-G取扱説明書.indd 18 2016/07/14 11:25:042016/07/14 11:25:04

18
DIG
ITAL TO
RQ
UE W
REN
CH
“DA
TA TO
RK” M
OD
EL CEM3-G
(6) Output data at a time (PC, Printer)
Outputs the selected range of measured data (measured value/measured time) to an external
device at a time. According to the external device, select the communication settings as follows
(Refer to P23 (8) Communication mode setting).
To PC through RS232C (No.575): select "PC"
To use USB cable (No.584): select "USB"
To printer (EPP16M2): select "PRN"
Note) Make sure to set the output baud rate in advance (Refer to P24 (9) Communication baud
rate setting). DUAL MODE LCD MODE
N·m
52.010 : 30
200N·m200
30.0
Set the upper end of data
N·m
1200
STTN·m200
STT 1
Set the lower end of data
N·m
200200
NN·mn
200
N·mn
200
The number of data to output
Push to start output
N·m200
N
N·m
200200
N
1. Use key to set to the
upper end of the data to output
and push .
2. Use key to set to the
lower end of the data to output
and push .
Example 1) To output the data 001-200:
Set the counter to 200 and push . Check
STT shows 1 and push to confirm.
Example 2) To output the data 101-200:
Set the counter to 200 and push . Then
set STT to 101 and push to confirm.
3. Push to output the
measured data to the external
device.
Note) To cancel the operation, push
key during the above
process. (You cannot cancel
when the data is being
output.)
Data to output start
Printing Sample
CEM3-G取扱説明書.indd 19CEM3-G取扱説明書.indd 19 2016/07/14 11:25:052016/07/14 11:25:05

19
DIG
ITAL TO
RQ
UE W
REN
CH
“DA
TA TO
RK” M
OD
EL CEM3-G
(7) Output data at a time (Infrared output)
Transfer the selected range of measured data to R-DT999 Data Tank.
Set the communication setting to "IFR" (Refer to P23 (8) Communication setting).
DUAL MODE LCD MODE
N·m
52.010 : 30
200N·m200
52.0
Set the upper end (Counter 200)
N·m
1200
STTN·m001
STT 1
Set the lower end (Counter 1)
N·m
200200
NN·mn
200
Number of data to output
N·m200
NN·m200
52.0
Data transfer complcfe
N·m
200200
NN·mn
200
1. Use key to set to the
upper end of the counter to
output and push .
The example shows the counter
200.
2. Use key to set to the
lower end of the counter to
output and push .
Note) In M-2 mode, lower end can
only be set to 1 (STT1).
Example 1) To output the data 001-200:
Set the counter to 200 and push . Check
STT shows 1 and push to confirm.
Example 2) To output the data 101-200:
Set the counter to 200 and push . Then
set STT to 101 and push MD to confirm.
3. Set R-DT999 ready for receiving
data, and place its input in line
with CEM3 output.
Push to output the
measured data to R-DT999.
Note) To cancel the operation, push
key. (You cannot cancel
when the data is being
output.)
Push MEM key to start output
CEM3-G取扱説明書.indd 20CEM3-G取扱説明書.indd 20 2016/07/14 11:25:072016/07/14 11:25:07
20
DIG
ITAL TO
RQ
UE W
REN
CH
“DA
TA TO
RK” M
OD
EL CEM3-G
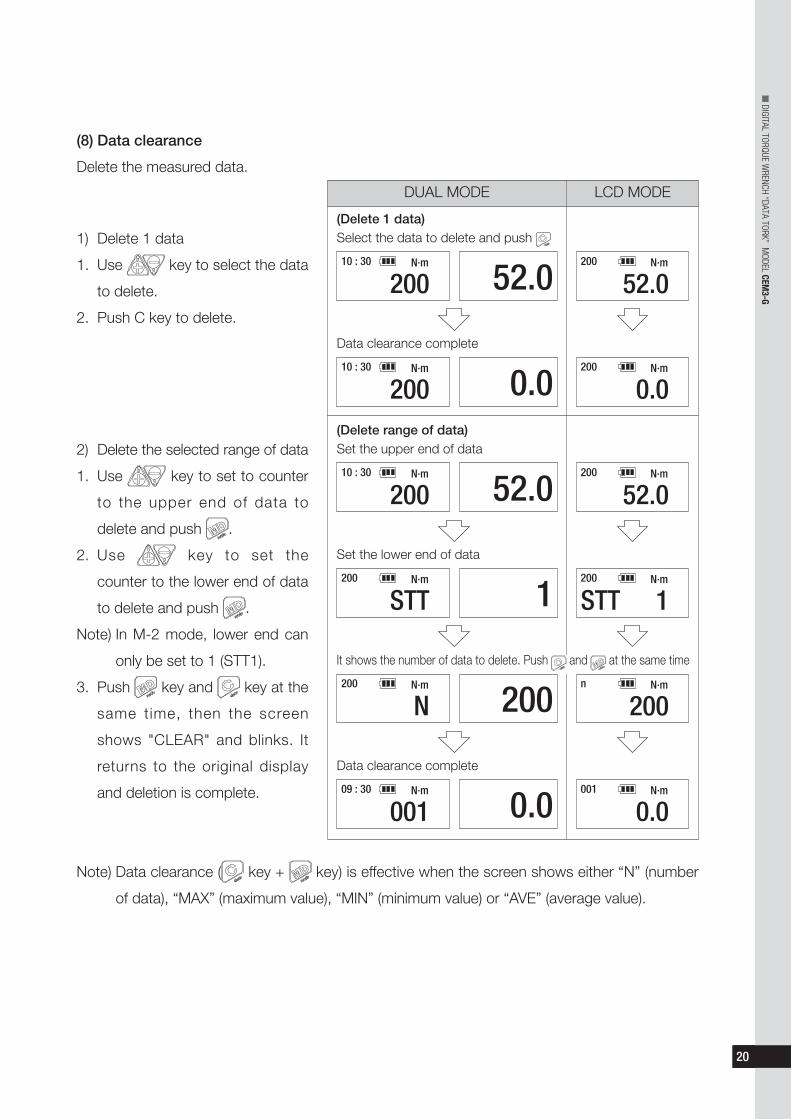
(8) Data clearance
Delete the measured data.
DUAL MODE LCD MODE
N·m
52.010 : 30
200N·m200
52.0
(Delete 1 data)Select the data to delete and push
N·m
0.010 : 30
200N·m200
0.0
Data clearance complete
N·m
52.010 : 30
200N·m200
52.0
(Delete range of data)Set the upper end of data
N·m
1200
STTN·m200
STT 1
Set the lower end of data
N·m
200200
NN·mn
200
N·m
0.009 : 30
001N·m001
0.0
Data clearance complete
1) Delete 1 data
1. Use key to select the data
to delete.
2. Push C key to delete.
2) Delete the selected range of data
1. Use key to set to counter
to the upper end of data to
delete and push .
2. Use key to set the
counter to the lower end of data
to delete and push .
Note) In M-2 mode, lower end can
only be set to 1 (STT1).
3. Push key and key at the
same time, then the screen
shows "CLEAR" and blinks. It
returns to the original display
and deletion is complete.
It shows the number of data to delete. Push and at the same time
Note) Data clearance ( key + key) is effective when the screen shows either “N” (number
of data), “MAX” (maximum value), “MIN” (minimum value) or “AVE” (average value).
CEM3-G取扱説明書.indd 21CEM3-G取扱説明書.indd 21 2016/07/14 11:25:092016/07/14 11:25:09
21
DIG
ITAL TO
RQ
UE W
REN
CH
“DA
TA TO
RK” M
OD
EL CEM3-G
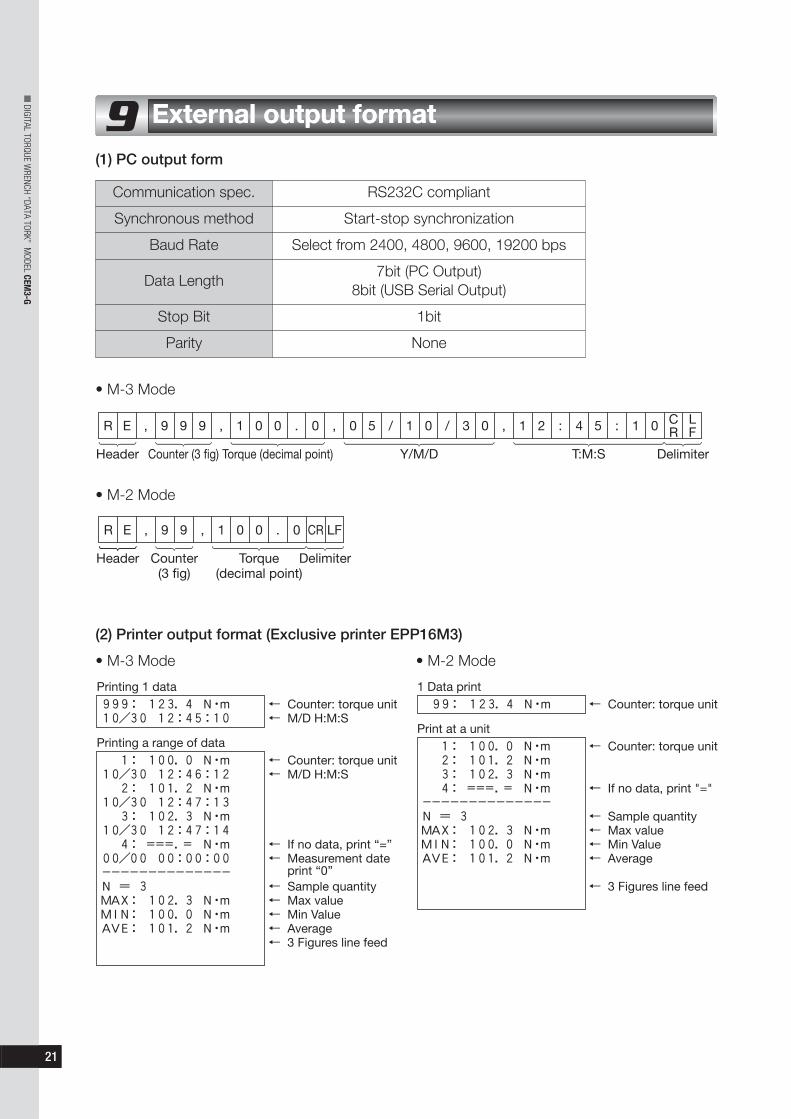
External output format
(1) PC output form
Communication spec. RS232C compliant
Synchronous method Start-stop synchronization
Baud Rate Select from 2400, 4800, 9600, 19200 bps
Data Length7bit (PC Output)
8bit (USB Serial Output)
Stop Bit 1bit
Parity None
• M-3 Mode
R E , 9 9 9 , 1 0 0 . 0 , 0 5 / 1 0 / 3 0 , 1 2 : 4 5 : 1 0R F
DelimiterHeader Counter (3 fig) Torque (decimal point) S:M:TD/M/Y
• M-2 Mode
R E , 9 9 , 1 0 0 . 0 CR LF
(2) Printer output format (Exclusive printer
• M-3 Mode • M-2 Mode
EPP16M3)
CEM3-G取扱説明書.indd 22CEM3-G取扱説明書.indd 22 2016/07/14 11:25:102016/07/14 11:25:10

22
DIG
ITAL TO
RQ
UE W
REN
CH
“DA
TA TO
RK” M
OD
EL CEM3-G
10 Settings
This chapter explains settings of various types of modes and functions.
(Sample displays shown below are all LCD (left) display.)
N·m10 : 30
000N·m000
0.0
DualMode
LCDMode
1. Set the counter to 000 (M-3 mode) or 00 (M-2 mode).
2. Push for 2 seconds till it enters measurement mode.
N·mSEL
MODE-MN·mSEL
MODE-T
(1) Measurement mode setting
Use key to select "MODE-M" for inspection mode and
"MODE-T" for tightening mode.
Push to confirm.
N·mUSEL
UNIT
(2) Measurement unit setting (Default: N·m)
Select the torque unit (N·m / kgf·cm / kgf·m / lbf·in / lbf·ft).
The measured torque and the set torque will be converted into the
selected torque unit.
Use key to select the torque unit and press key to
save and proceed to the next.
Note) "kgf·cm" and "lbf·in" units are not included in CEM850N3X32D-G.
N·mHI
000.0N·mHI
050.0
(3) Upper limit setting
Use key to set the upper limit value and push to
confirm.
Selected torque unitblinks (N·m / kgf·cm/ kgf·m / lbf·in / lbf·ft)
Conversion factors
N·m kgf·cm 10.1972
N·m kgf·m 0.101972
N·m lbf·in 8.8508
N·m lbf·ft 0.73756
Unit conversion tableRounding of the converted figures
100.0 [N·m] x 0.73756 = 73.756 73.8 [lbf·ft]73.8 [lbf·ft] ÷ 0.73756 = 100.05 100.1 [N·m]Converted figures are rounded as above.Accordingly, the resulted figures may have a margin of errors.Unit conversion is made based on N·m values with the aboveconversion factors.
All the saved data and torque setting values will be converted when making a unit change.
Next setting
Counter
Counter
CEM3-G取扱説明書.indd 23CEM3-G取扱説明書.indd 23 2016/07/14 11:25:122016/07/14 11:25:12
23
DIG
ITAL TO
RQ
UE W
REN
CH
“DA
TA TO
RK” M
OD
EL CEM3-G
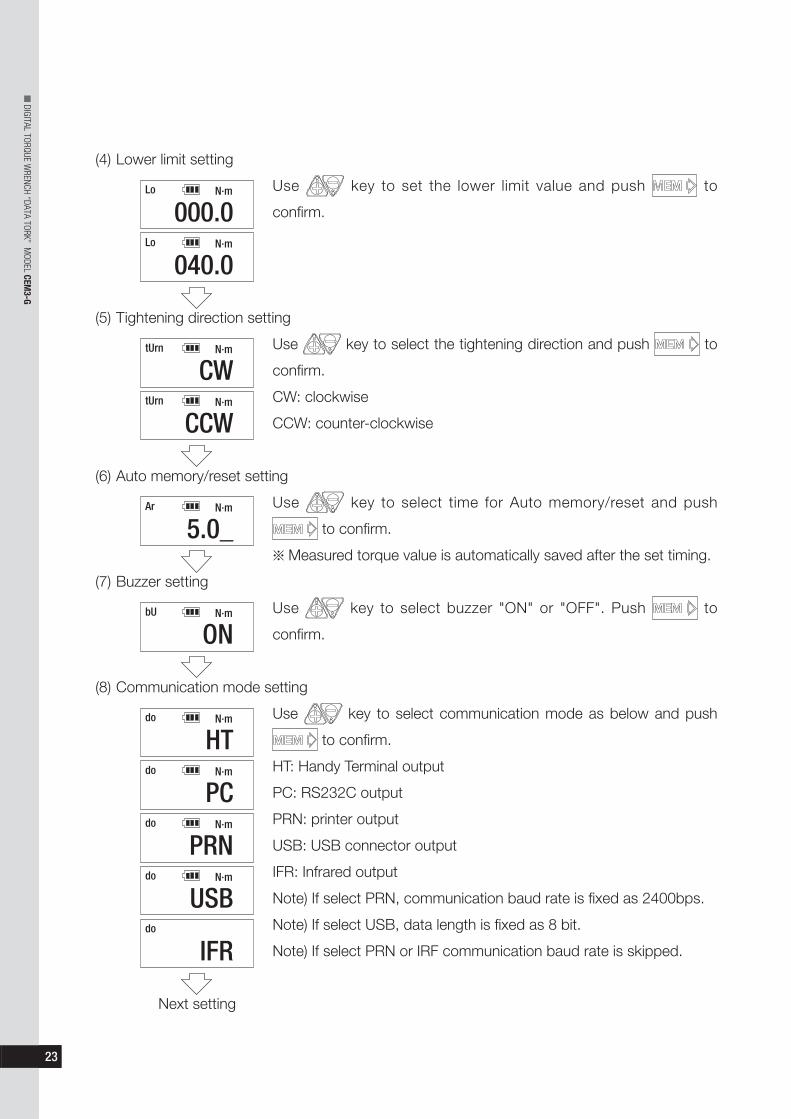
N·mLo
000.0N·mLo
040.0
(4) Lower limit setting
Use key to set the lower limit value and push to
confirm.
N·mtUrn
CWN·mtUrn
CCW
(5) Tightening direction setting
Use key to select the tightening direction and push to
confirm.
CW: clockwise
CCW: counter-clockwise
N·mAr
5.0_
(6) Auto memory/reset setting
Use key to select time for Auto memory/reset and push
to confirm.
Measured torque value is automatically saved after the set timing.
N·mbU
ON
(7) Buzzer setting
Use key to select buzzer "ON" or "OFF". Push to
confirm.
N·mdo
HTN·mdo
PC
do
IFR
N·mdo
PRNN·mdo
USB
(8) Communication mode setting
Use key to select communication mode as below and push
to confirm.
HT: Handy Terminal output
PC: RS232C output
PRN: printer output
USB: USB connector output
IFR: Infrared output
Note) If select PRN, communication baud rate is fixed as 2400bps.
Note) If select USB, data length is fixed as 8 bit.
Note) If select PRN or IRF communication baud rate is skipped.
Next setting
CEM3-G取扱説明書.indd 24CEM3-G取扱説明書.indd 24 2016/07/14 11:25:152016/07/14 11:25:15
24
DIG
ITAL TO
RQ
UE W
REN
CH
“DA
TA TO
RK” M
OD
EL CEM3-G
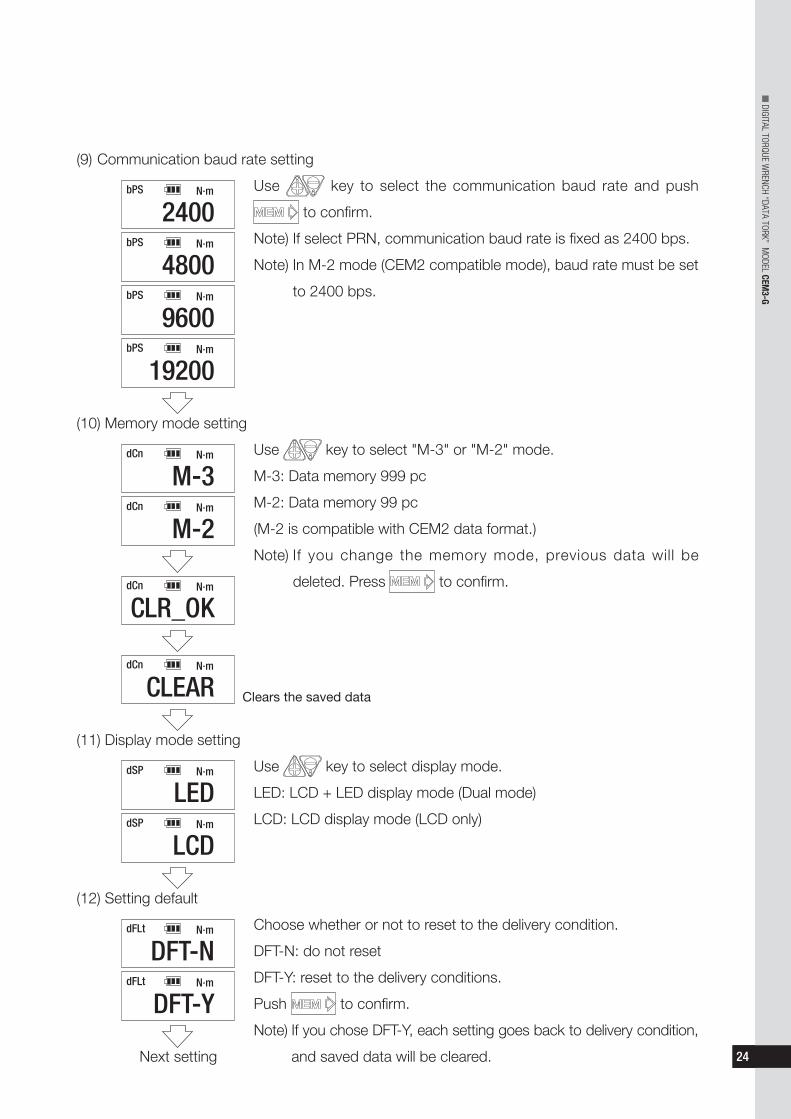
N·mbPS
2400
N·mbPS
19200
N·mbPS
9600
N·mbPS
4800
(9) Communication baud rate setting
Use key to select the communication baud rate and push
to confirm.
Note) If select PRN, communication baud rate is fixed as 2400 bps.
Note) In M-2 mode (CEM2 compatible mode), baud rate must be set
to 2400 bps.
N·mdCn
M-3N·mdCn
M-2
(10) Memory mode setting
Use key to select "M-3" or "M-2" mode.
M-3: Data memory 999 pc
M-2: Data memory 99 pc
(M-2 is compatible with CEM2 data format.)
Note) If you change the memory mode, previous data will be
deleted. Press to confirm.N·mdCn
CLR_OK
N·mdCn
CLEAR
N·mdSP
LEDN·mdSP
LCD
(11) Display mode setting
Use key to select display mode.
LED: LCD + LED display mode (Dual mode)
LCD: LCD display mode (LCD only)
N·mdFLt
DFT-NN·mdFLt
DFT-Y
(12) Setting default
Choose whether or not to reset to the delivery condition.
DFT-N: do not reset
DFT-Y: reset to the delivery conditions.
Push to confirm.
Note) If you chose DFT-Y, each setting goes back to delivery condition,
and saved data will be cleared.
Clears the saved data
Next setting
CEM3-G取扱説明書.indd 25CEM3-G取扱説明書.indd 25 2016/07/14 11:25:172016/07/14 11:25:17
25
DIG
ITAL TO
RQ
UE W
REN
CH
“DA
TA TO
RK” M
OD
EL CEM3-G
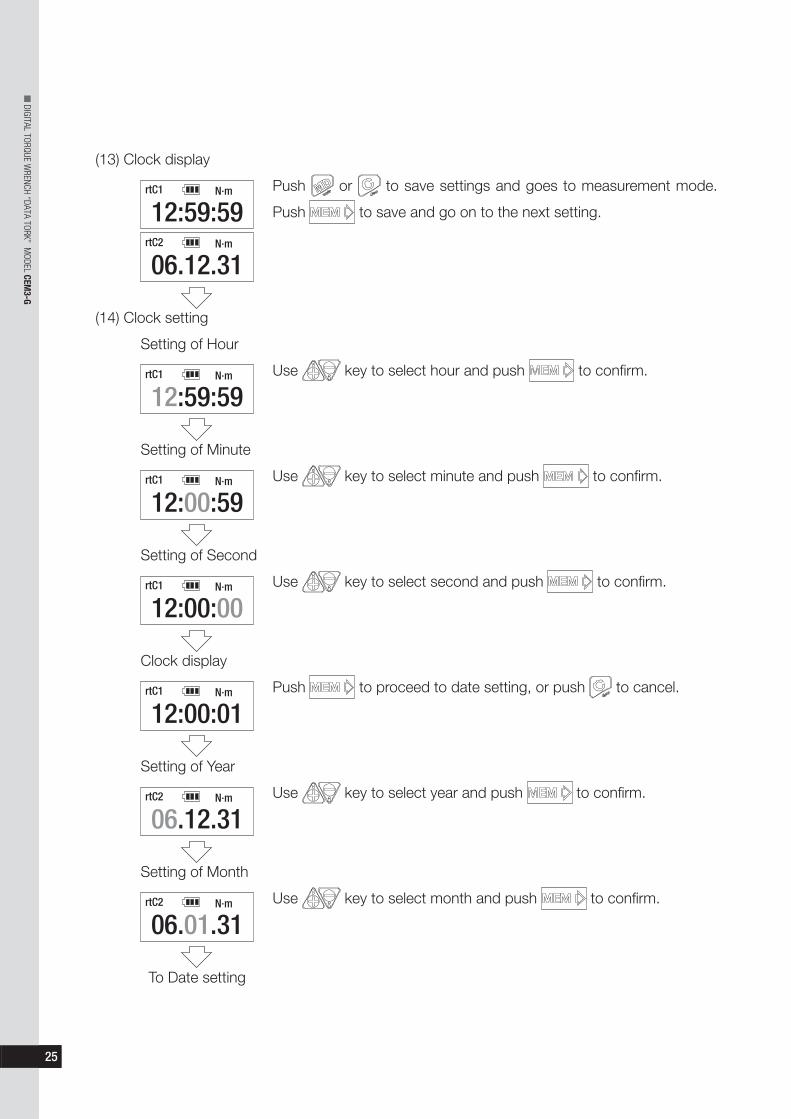
N·mrtC1
12:59:59N·mrtC2
06.12.31
(13) Clock display
Push or to save settings and goes to measurement mode.
Push to save and go on to the next setting.
N·mrtC1
12:59:59
(14) Clock setting
Use key to select hour and push to confirm.
Setting of Hour
N·mrtC1
12:00:59Use key to select minute and push to confirm.
Setting of Minute
N·mrtC1
12:00:00Use key to select second and push to confirm.
Setting of Second
N·mrtC1
12:00:01Push to proceed to date setting, or push to cancel.
Clock display
N·mrtC2
06.12.31Use key to select year and push to confirm.
Setting of Year
N·mrtC2
06.01.31Use key to select month and push to confirm.
Setting of Month
To Date setting
CEM3-G取扱説明書.indd 26CEM3-G取扱説明書.indd 26 2016/07/14 11:25:192016/07/14 11:25:19
26
DIG
ITAL TO
RQ
UE W
REN
CH
“DA
TA TO
RK” M
OD
EL CEM3-G
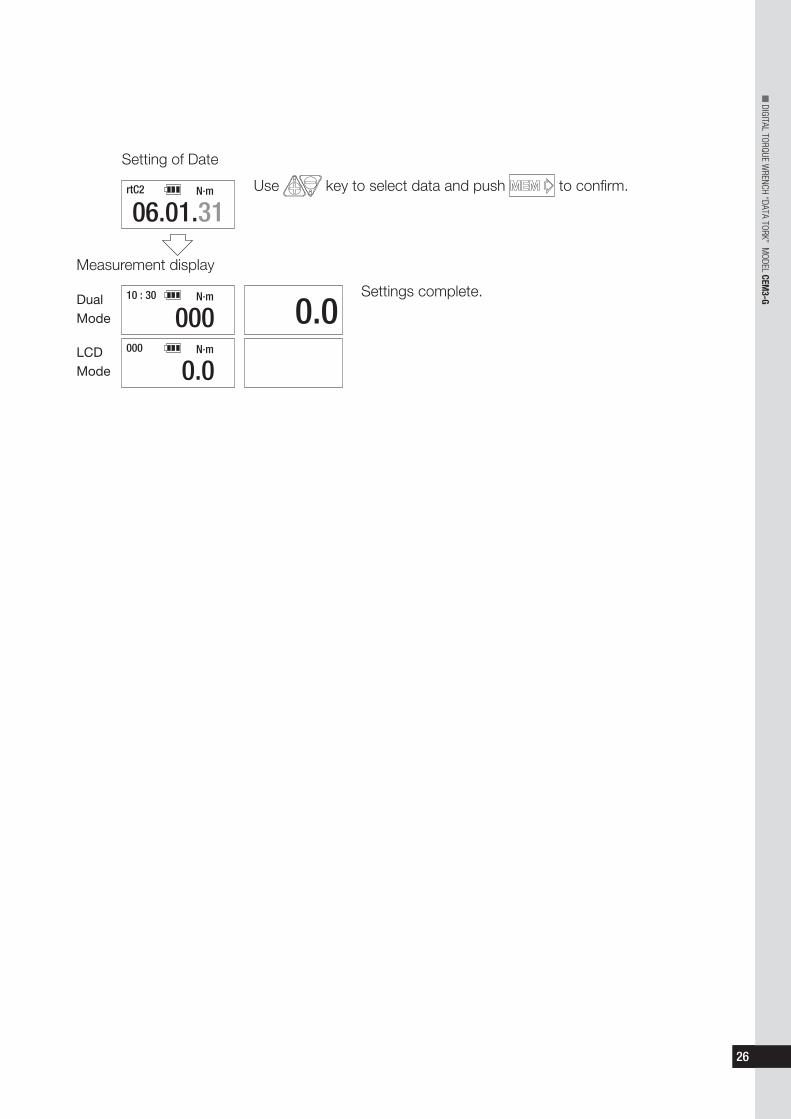
N·mrtC2
06.01.31Use key to select data and push to confirm.
N·m
0.010 : 30
000N·m000
0.0
Measurement display
DualMode
LCDMode
Settings complete.
Setting of Date
CEM3-G取扱説明書.indd 27CEM3-G取扱説明書.indd 27 2016/07/14 11:25:212016/07/14 11:25:21
27
DIG
ITAL TO
RQ
UE W
REN
CH
“DA
TA TO
RK” M
OD
EL CEM3-G
12 Battery
• Setting on PC
(1) Install the driver accompanying No.584 USB cable.
(2) Set the communication port and baud rate.
• Setting on CEM3-G
(3) Set "USB" on communication mode setting, and select the baud rate in line with PC setting.
• Communication
(4) Connect No.584 USB cable to CEM3-G and PC.
(5) Start the software on PC.
Note) No.584 USB cable must be connected before starting the software. Otherwise,
communication error may occur.
Note) CEM3-G can be connected to PC on 1-on-1 basis only.
• Data output
After measuring (tightening), press MEM key to output the data to the software.
To output a range of data at one time, refer to 8. (6) on P18.
Battery life
BP-5 battery can be recharged about 500 times depending on conditions before it dies.
When it is old, replace it with a new one (BP-5).
At the delivery condition, BP-5 battery is empty. Make sure to charge it before use.
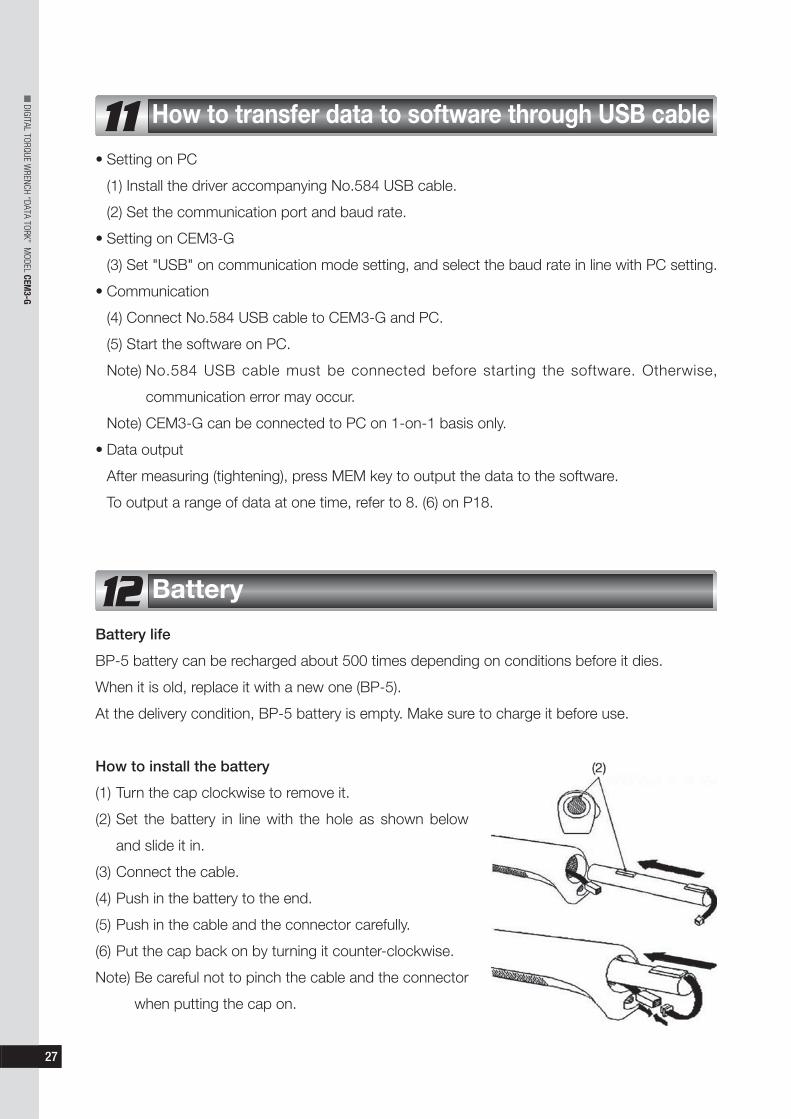
How to install the battery
(1) Turn the cap clockwise to remove it.
(2) Set the battery in line with the hole as shown below
and slide it in.
(3) Connect the cable.
(4) Push in the battery to the end.
(5) Push in the cable and the connector carefully.
(6) Put the cap back on by turning it counter-clockwise.
Note) Be careful not to pinch the cable and the connector
when putting the cap on.
11 How to transfer data to software through USB cable
CEM3-G取扱説明書.indd 28CEM3-G取扱説明書.indd 28 2016/07/14 11:25:232016/07/14 11:25:23
28
DIG
ITAL TO
RQ
UE W
REN
CH
“DA
TA TO
RK” M
OD
EL CEM3-G
Connect the BC-3-G charger to the CEM3 charge jack. Make sure BC-3-G charger
is connected to the power source. Green lamp on BC-3-G turns on when charging is complete
(it takes about 3.5 hours from the empty condition).
(1) Check the voltage on the charger and use the appropriate power source.
(2) Stop charging as soon as the green lamp on the charger turns on. Excessive charging may
shorten the battery life.
(3) The product cannot operate when it is connected to the charger.
(4) If the green lamp on the charger turns on and the red lamp starts to blink, it indicates an
error. Stop using it immediately, and contact Tohnichi or nearest Tohnichi distributor.
(5) Temperature must be kept within 0-40 degree Celsius range when charging.
(6) If it should emit some abnormal smell or generates abnormal heat, stop using it immediately
and move it to a safe place. Contact Tohnichi or nearest Tohnichi distributor.
(7) When not in use for a long time, charge it to full, and remove the battery to keep it. It is
recommended that it should be charged at least once every half a year.
After charging, there is no need to push the reset button.
13 Charging
Warnings
Error Message Indication
Err1 key is continuously pushed.
Err2 key is continuously pushed.
Err3 key is continuously pushed.
Err4 key is continuously pushed.
Err5 key is continuously pushed.
Error Message
Turn off the once and turn it on without touching
any other keys.
If Err disappears, it should work properly.
If Error does not disappear, it needs to be repaired.
Please contact TOHNICHI or your nearest distributor.
Solution
It needs to be repaired. Please contact TOHNICHI
or your nearest distributor.
Malfunction of the torque sensor or circuit board.
Push key at no loading condition.
If Err 9 disappears, it should work properly.
If Err 9 remains, it needs to be repaired. Please
contact TOHNICHI or your nearest distributors.
Err9
Err8
CEM3-G取扱説明書.indd 29CEM3-G取扱説明書.indd 29 2016/07/14 11:25:242016/07/14 11:25:24

29
DIG
ITAL TO
RQ
UE W
REN
CH
“DA
TA TO
RK” M
OD
EL CEM3-G
: Usable
: Not usable
: Usable in M-2 mode
(1) Battery pack (BP-5)
(2) Charger (100-240V) (BC-3-G)
(3) Interchangeable head (SH, RH, QH, RQH, DH, HH, FH)
PH of interchangeable head can not be used.
(4) Communication cord
• CEM3-PC (D-SUB 9 pin female) (Catalogue No.575)
• CEM3-PC (USB A type) (Catalogue No.584)
(5) Exclusive printer
(6) Infrared DATA TANK (R-DT999)
(7) Handy DATA FILE SYSTEM (DFS)
(8) Handy Terminal (HT-10)
• Comparison Table with CEM option
Options
Name Model CEM3-G CEM2
Battery pack BP-5
Battery pack BP-3
Charger (100-240V) BC-3-G
Charger (100V) QC-1
Charger (200V) QC-2
Interchangeable Head SH,RH,QH,RQH,DH,HH,FH
Exclusive printer
No.572
No.573PC connection cord
No.574
No.575
PC connection cord (USB) Nl.584
Infrared data receiver R-DT999
Infrared data receiver R-DT100-3
Handy data file system DFS
Handy terminal HT-10
Handy terminal HT-9000
displaydelivery
conditionselect
1 Measurement Mode SEL MODE-M MODE-T
2 Torque Unit USEL N·m kgf·cm/kgf·m/lbf·in/lbf·ft
3 Upper limit HI 0 0
4 Lower limit Lo 0 0
5 Tightening direction tUrn CW CCW
6 Auto memory reset Ar 0.0 0.1-5.0
7 Buzzer output bU ON OFF
8 Communication mode do HT PC/PRN/USB/IFR
9 Baud rate bPS 2400 4800/9600/19200
10 Memory mode dCn M-3 M-2
11 Display mode dSP LED LCD
12 Setting default dFLt DFT-N DFT-Y
13 H:M:S rtC1 NON -
14 Y:M:D rtC2 NON -
CEM3-G
(EPP16M3)
EPP16M3
CEM3-G取扱説明書.indd 30CEM3-G取扱説明書.indd 30 2016/07/14 11:25:262016/07/14 11:25:26

30
DIG
ITAL TO
RQ
UE W
REN
CH
“DA
TA TO
RK” M
OD
EL CEM3-G
15 SpecificationsA
pp
rox
46A
pp
rox
57
100
I2
Effective length L
Overall length L'
I1
h1
P
CEM100N3X15D-G
Capacity MaxNewton Metric American Hand
Min. Max. 1digit Min. Max. 1digit Min. Max. 1digit Power
[N·m] [N·m] [kgf·cm] [kgf·cm] [lbf·in] [lbf·in] P [N]
CEM10N3X8D-G 2-10 0.01 20-100 0.1 20-90 0.1 48.1
CEM20N3X10D-G 4-20 0.02 40-200 0.2 36-180 0.2 92.2
CEM50N3X12D-G 10-50 0.05 100-500 0.5 100-450 0.5 196.9
CEM100N3X15D-G 20-100 0.1 200-1000 1 200-900 1 275.5
[lbf·ft] [lbf·ft]CEM200N3X19D-G 40-200 0.2 400-2000 2
30-150 0.2428.3
CEM360N3X22D-G 72-360 0.4 720-3600 4 52-260 0.4 498.6
[kgf·m] [kgf·m]CEM500N3X22D-G 100-500 0.5
10-50 0.0572-360 0.5 549.5
CEM850N3X32D-G 170-850 1 17-87 0.1 124-620 1 608
Torque Range
Dimension
Effective OverallHandle Handle
HeightWeight Accessory
Interchangeable HeadsLength Width Provided
L [mm] L' [mm] l1 [mm] l2 [mm] h1 [mm] [kg]
CEM10N3X8D-G 208 212 63.5 35.6 49.5 0.46 QH8D (SH,RH,QH,HH) 8D
CEM20N3X10D-G 217 214 63.5 35.6 49.5 0.47 QH10D (SH,RH,QH,DH,HH) 10D
CEM50N3X12D-G 254 282 130 36.4 59 0.58 QH12D Battery (SH,RH,QH,RQH,DH,HH) 12D
CEM100N3X15D-G 363 384 130 36.4 59 0.63 QH15D pack (SH,RH,QH,RQH,DH,HH) 15D
CEM200N3X19D-G 467 475 130 36.4 59 0.78 QH19D (BP-5) (SH,RH,QH,RQH,DH,HH) 19D
CEM360N3X22D-G 722 713 130 36.4 59 1.13QH22D
CHARGER
(SH,RH,QH,RQH,DH,HH) 22DCEM500N3X22D-G 910 949 230 30 46 4
CEM850N3X32D-G 1398 1387 230 30 46 5.14 QH32D (SH,RH,QH) 32D
Dimensions
CEM3-G取扱説明書.indd 31CEM3-G取扱説明書.indd 31 2016/07/14 11:25:282016/07/14 11:25:28
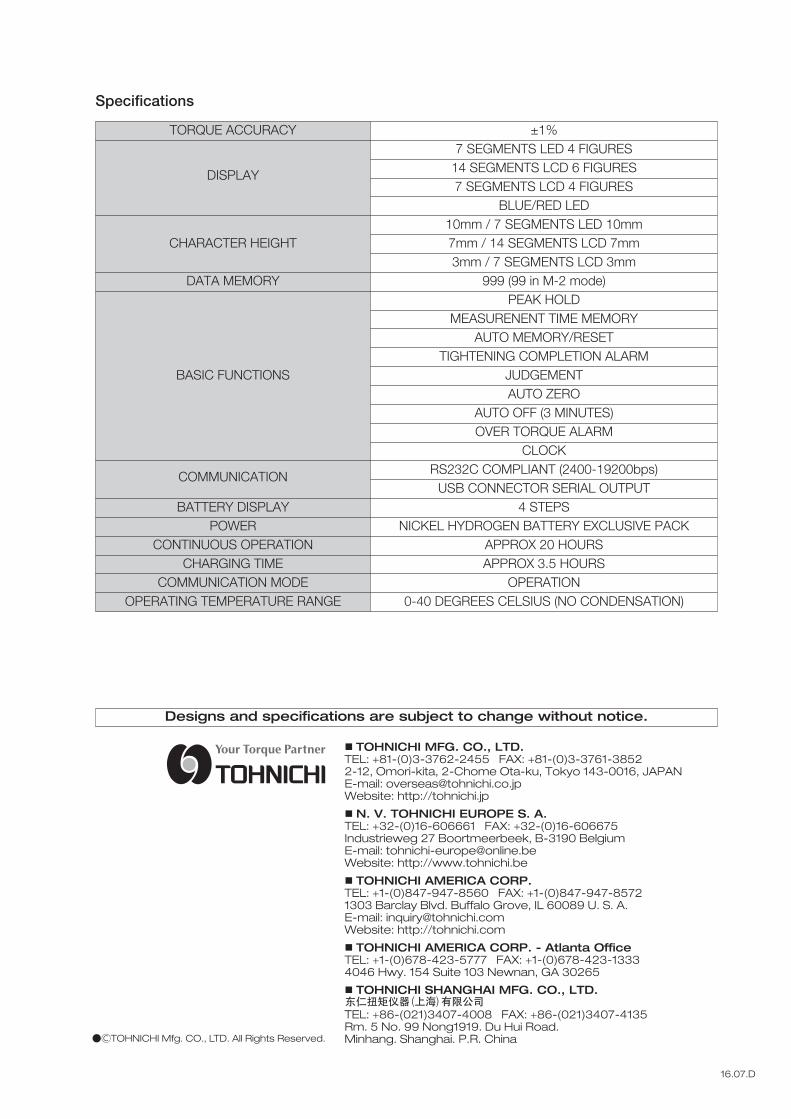
TORQUE ACCURACY ±1%7 SEGMENTS LED 4 FIGURES
14 SEGMENTS LCD 6 FIGURESDISPLAY7 SEGMENTS LCD 4 FIGURES
BLUE/RED LED10mm / 7 SEGMENTS LED 10mm
CHARACTER HEIGHT 7mm / 14 SEGMENTS LCD 7mm3mm / 7 SEGMENTS LCD 3mm
DATA MEMORY 999 (99 in M-2 mode)PEAK HOLD
MEASURENENT TIME MEMORYAUTO MEMORY/RESET
TIGHTENING COMPLETION ALARMBASIC FUNCTIONS JUDGEMENT
AUTO ZEROAUTO OFF (3 MINUTES)OVER TORQUE ALARM
CLOCKRS232C COMPLIANT (2400-19200bps)COMMUNICATION
USB CONNECTOR SERIAL OUTPUTBATTERY DISPLAY 4 STEPS
POWER NICKEL HYDROGEN BATTERY EXCLUSIVE PACKCONTINUOUS OPERATION APPROX 20 HOURS
CHARGING TIME APPROX 3.5 HOURSCOMMUNICATION MODE OPERATION
OPERATING TEMPERATURE RANGE 0-40 DEGREES CELSIUS (NO CONDENSATION)
Specifications
TOHNICHI MFG. CO., LTD.TEL: +81-(0)3-3762-2455 FAX: +81-(0)3-3761-38522-12, Omori-kita, 2-Chome Ota-ku, Tokyo 143-0016, JAPANE-mail: [email protected]: http://tohnichi.jp
N. V. TOHNICHI EUROPE S. A.TEL: +32-(0)16-606661 FAX: +32-(0)16-606675Industrieweg 27 Boortmeerbeek, B-3190 BelgiumE-mail: [email protected]: http://www.tohnichi.be
TOHNICHI AMERICA CORP.TEL: +1-(0)847-947-8560 FAX: +1-(0)847-947-85721303 Barclay Blvd. Buffalo Grove, IL 60089 U. S. A.E-mail: [email protected]: http://tohnichi.com
TOHNICHI AMERICA CORP. - Atlanta OfficeTEL: +1-(0)678-423-5777 FAX: +1-(0)678-423-13334046 Hwy. 154 Suite 103 Newnan, GA 30265
TOHNICHI SHANGHAI MFG. CO., LTD.
TEL: +86-(021)3407-4008 FAX: +86-(021)3407-4135Rm. 5 No. 99 Nong1919. Du Hui Road. Minhang. Shanghai. P.R. China
Designs and specifications are subject to change without notice.
14.04.L16.07.D
●ⒸTOHNICHI Mfg. CO., LTD. All Rights Reserved.
CEM3-G取扱説明書.indd 32CEM3-G取扱説明書.indd 32 2016/07/14 11:25:302016/07/14 11:25:30