Embed Size (px)
Citation preview
The HiRes Video Company
Firmware UpdateEN
03/
13w
ww
.mob
otix
.com HiRes Video Innovations
The German company MOBOTIX AG is known as the leading pioneer in network camera technology since
its founding in 1999, and its decentralized concept has made high-resolution video systems cost efficient.
MOBOTIX AG • D-67722 Langmeil, Germany • Tel.: +49 6302 9816-130 • Fax: +49 6302 9816-190 • [email protected]
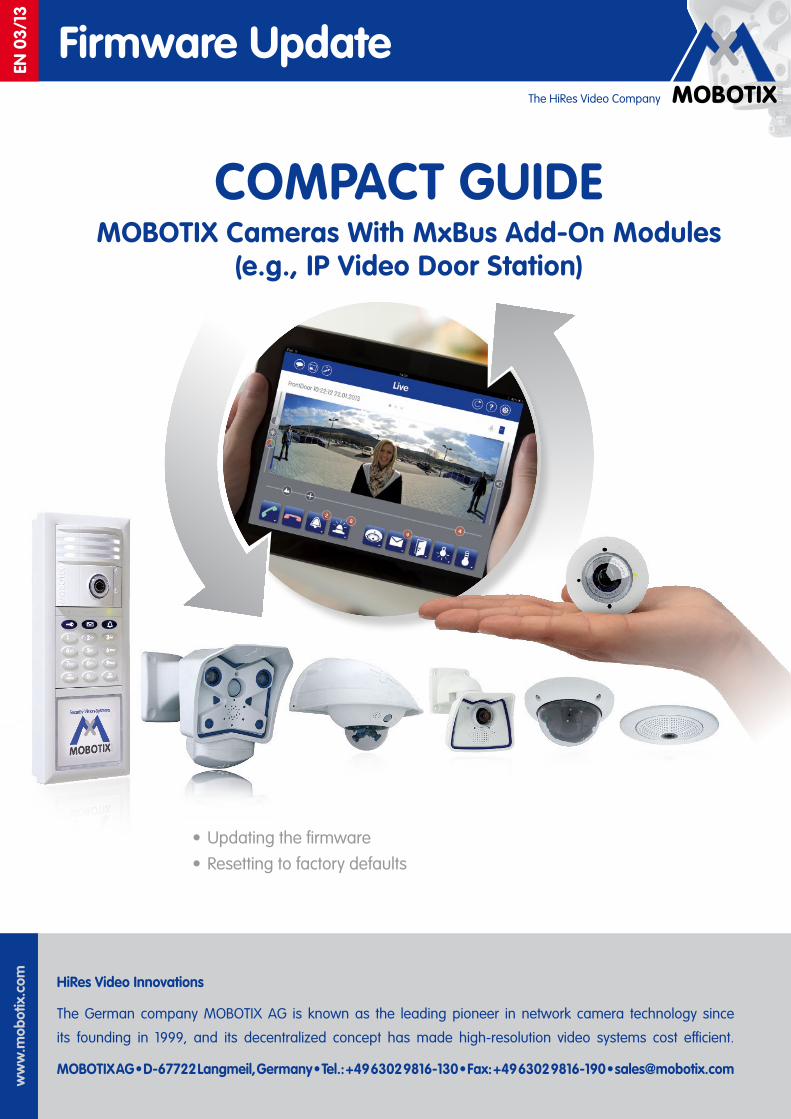
• Updating the firmware• Resetting to factory defaults
COMPACT GUIDEMOBOTIX Cameras With MxBus Add-On Modules
(e.g., IP Video Door Station)

ww
w.m
obot
ix.c
om
2
FW U
pdat
e
Systems With Add-On Modules
SYSTEM WITH MXBUS MODULES FOR ENHANCED FEATURES
An MxBus module is a MOBOTIX accessory that can be connected directly to a MOBOTIX camera and
powered by it via a simple two-wire cable. Series T24, D14 and S14 cameras support the direct connection
of MxBus modules.
MOBOTIX camera Add-on modules for camera-integrated MxBus connection
T24 KeypadRFID, info module, DoorMaster, MX-GPS-Box, MX-232-IO-Box
D14 Sec MX-GPS-Box, MX-232-IO-Box
S14M, S14D MX-GPS-Box, MX-232-IO-Box
Remaining camera models No MxBus connection available
Multiple MxBus modules can be operated on a single camera (provided the system voltage is sufficient) as it
is also possible to directly connect MxBus modules with one another. One such application example is a fully
equipped IP Video Door Station including T24 door camera, RFID access module (KeypadRFID), info module
and Security Door Opener (DoorMaster).
Firmware Update For Cameras And Modules
MOBOTIX cameras and MxBus modules contain a built-in firmware that provides functions accessed by the
MOBOTIX remote stations MxControlCenter, MxEasy and the MOBOTIX App. The firmware also needs to be
updated to make available newly integrated functions, just like the video management software. For example,
when using a device whose firmware is older than release 4.1.4.70, the App can only call up live images with
sound.
The firmware version of the camera must be compatible with the firmware version of the connected MxBus
modules. For this reason, updating the camera firmware may also require updating the firmware of the included
MxBus modules. The latest firmware version for the MxBus modules is always an integral part of the up-to-
date camera firmware package (*.mpl file). When either performing an update or resetting devices to factory
defaults, please follow the step-by-step instructions provided in this Compact Guide. For a description of how
to start up a device, see the corresponding manual at (www.mobotix.com > Support > Manuals).
Note that the MOBOTIX camera and Door Station including all add-on modules need to be fully installed,
connected and operational before they can be integrated into the App. The firmware update can be performed
before or after the integration. The App will show a prompt if new firmware is available.

ww
w.m
obot
ix.c
om
3
The HiRes Video Company
1 UPDATING THE FIRMWARE 4
Step 1: Downloading the latest firmware version from the MOBOTIX website 4
Step 2: Connecting the video system with the computer 4
Step 3: Opening the firmware user interface in the web browser 4
Step 4: Creating a system backup (not mandatory) 5
Step 5: Updating the camera's firmware 7
Step 6: Updating the MxBus modules' firmware 8
2 RESETTING TO FACTORY DEFAULTS 9
Resetting Video System And MxBus Modules Via A Web Browser 9
Resetting The Grandstream IP Video Phone To The Factory Defaults 10
Deleting All Camera Recordings (Formatting The SD Memory Card) 10
Resetting MxBus Modules Via Hardware Reset 10

ww
w.m
obot
ix.c
om
4
FW U
pdat
e
Systems With Add-On Modules
1 UPDATING THE FIRMWARE
Step 1: Downloading the latest firmware version from the MOBOTIX website
You can download the current MOBOTIX camera firmware from the MOBOTIX website free of charge. For this, you
need a computer (Windows, Apple or Linux system) with an Internet connection. Proceed as follows:
1. Open www.mobotix.com and log in using your user ID and password. Only registered users logged into
the website can download software, so you will need to register first if you have not done so already.
Neither registration nor the software download is subject to any fees or purchase obligations.
2. In the “Support“ section, click “Software Downloads“. The latest firmware version is located at the top
below MX System Release. Click the “x.x.x.x“ release number.
3. To start the download process, click “MPL” at the very bottom of the page that is displayed.
4. Accept the MOBOTIX software conditions of usage and then click “Send form“. You can now save the
firmware file (with the extension *.mpl) to the download folder of your computer.
Step 2: Connecting the video system with the computer
If you have not done so already, you must now connect your MOBOTIX video system (camera or Door Station
including the modules) to the computer where you have stored the firmware you wish to install. This does not
require your computer to be connected to the Internet, but you do need an installed web browser (for example,
Internet Explorer, Safari or Firefox).
For information on how to connect a MOBOTIX camera or Door Station to the computer via a MOBOTIX PoE adapter
or switch, please consult the corresponding camera manual (for example, T24 System Manual Part 1, Section 2.2,
Remote Stations And Network Connection).
Step 3: Opening the firmware user interface in the web browser
In order to be able to perform this step, you need the current IP address of the camera or Door Station, as well
as the access data; in other words, you require administrator privileges.
Cameras operated in standalone mode without being connected to a network can be accessed via their factory
IP address (see the sticker on the back of the camera).
Now enter the IP address of the video source into the address bar of your web browser. Next, enter “admin“
as the user name and enter the valid admin password. “meinsm“ is the factory default password for any
MOBOTIX camera. The password of a Door Station corresponds with the Super PIN assigned when first starting
up the system.
Online help: The online help provides detailed information on the firmware's individual functions; click the question
mark icon to access it.

ww
w.m
obot
ix.c
om
5
The HiRes Video Company
Step 4: Creating a system backup (not mandatory)
MOBOTIX recommends creating a backup of the current system configuration of the camera and all add-on
modules in the camera flash memory (SD card) before updating the firmware. This will allow you to quickly restore
the previous system state in the event that a problem occurs in the transfer of the configuration when updating
the firmware. Proceed as follows:
1. Open the Admin Menu.
2. In the “Configuration” section, click “System Backup and Restore.“ If the camera is not equipped with
a flash memory (SD card has been removed, is unusable or, if it is new, has not yet been formatted), it is
not possible to create a system backup.
3. Click “Start Backup.“
4. A Super PIN is required for backup. This PIN is used for authentication before importing the backup to
the system (security level!).
5. In the case of a T24 Door Station that was already assigned a Super PIN upon startup, the data is
immediately saved. Continue with Number 11.
6. For all other MOBOTIX cameras, click “Please set the Super PIN“ in the dialog box highlighted in yellow.
This step is only required for the very first backup.

ww
w.m
obot
ix.c
om
6
FW U
pdat
e
Systems With Add-On Modules
7. In the new dialog box, enter a Super PIN (8 to 16 digits) of your choice two times. Next, click “Change.“
8. In the event your camera is still using the “meinsm“ factory default admin password, this will automatically be replaced with the new Super PIN (important note: write down the password and store it in a safe location!). Click “OK“ on the screen prompt.
Note that if the camera owner loses the access information, the camera can only be reset at MOBOTIX for a service fee. This is necessary since any other arrangement would harbor the danger of allowing unauthorized parties access to a stolen camera after it has been reset.
9. Click “Set“ and then “Close.“
10. Open the Admin Menu again, go to the ”Configuration” section and click “System Backup and Restore“
and then “Start Backup.“
11. Complete the storage procedure by clicking “OK“ in the new dialog box that opens. You have now created
a backup for the current date on the camera's SD card. The Admin Menu section provides information on
how to import this backup after entering the Super PIN.

ww
w.m
obot
ix.c
om
7
The HiRes Video Company
Step 5: Updating the camera's firmware
1. Open the Admin Menu.
2. In the ”System Update” section, click “Update System Software“.
3. Click “Browse“ and then open the *.mpl file downloaded in step 1.
4. Click “Start Software Update“. A new screen displays the progress of the loading procedure.
5. On this screen, click “Reboot“ and then click “Reboot now“. You are returned to the main page with the
live image. The camera's firmware has been successfully updated.
If there are additional firmware updates for any connected MxBus modules, you will receive a corresponding
text message directly in the camera's live image (“MxBus Module: Software Update is available“). Now, continue
with step 6.
If no message is shown, the newly imported firmware release does not contain any updates for your MxBus
modules. The process for updating the video system (camera and MxBus modules) is now finished.

ww
w.m
obot
ix.c
om
8
FW U
pdat
e
Systems With Add-On Modules
Step 6: Updating the MxBus modules' firmware
1. Open the Admin Menu.
2. In the Hardware Configuration section, click “Manage MxBus Modules.“
3. The ”Devices” section lists all MxBus modules connected to the camera. The “Update SW“ button is
enabled for each MxBus module for which a firmware update exists. If there are updates for multiple
modules, you must perform the update for each module one at a time.
4. Click the “Update SW“ button. The update process can take up to several minutes.
5. After you have updated all MxBus modules, click “Set“ and then “Close.“ The firmware of your video
system is now fully up-to-date.
ww
w.m
obot
ix.c
om
9
The HiRes Video Company
2 RESETTING TO FACTORY DEFAULTS
Note that the process of resetting the system is independent of performing a firmware update as described above.
Resetting Video System And MxBus Modules Via A Web Browser
You must reset the camera and all connected add-on modules to the factory defaults before you can perform
a new system startup.
MxBus modules you want to disconnect from a camera in order to use them with another camera must be
reset to the factory settings before removal.
We recommend resetting all components of a T24 IP Video Door Station, for example, if it changes into the
hands of a new owner, if the door camera is replaced or when adding an access module (KeypadRFID). If you
are unsure about how to proceed, please get in touch with your MOBOTIX dealer before changing the hardware
of your video system.
When resetting a video system with MxBus add-on modules, it is imperative to adhere to the order explained
in this manual, that is, first the MxBus modules and then the camera. If you reset the camera before the MxBus
modules, the camera will no longer be able to access the MxBus modules, requiring you to perform a hardware
reset.
Proceed as follows:
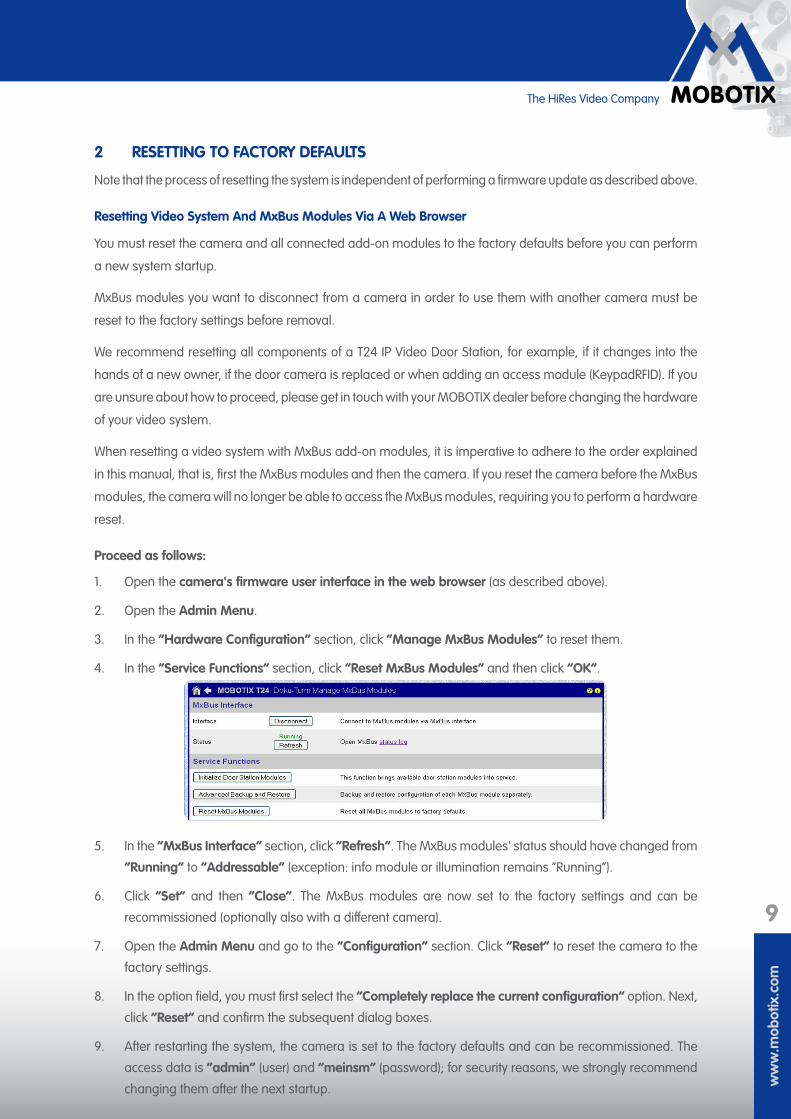
1. Open the camera's firmware user interface in the web browser (as described above).
2. Open the Admin Menu.
3. In the ”Hardware Configuration” section, click “Manage MxBus Modules“ to reset them.
4. In the “Service Functions” section, click “Reset MxBus Modules“ and then click “OK“.
5. In the “MxBus Interface“ section, click “Refresh“. The MxBus modules' status should have changed from
“Running“ to “Addressable“ (exception: info module or illumination remains “Running“).
6. Click “Set“ and then “Close“. The MxBus modules are now set to the factory settings and can be
recommissioned (optionally also with a different camera).
7. Open the Admin Menu and go to the ”Configuration” section. Click “Reset“ to reset the camera to the
factory settings.
8. In the option field, you must first select the “Completely replace the current configuration“ option. Next,
click “Reset“ and confirm the subsequent dialog boxes.
9. After restarting the system, the camera is set to the factory defaults and can be recommissioned. The
access data is “admin“ (user) and “meinsm“ (password); for security reasons, we strongly recommend
changing them after the next startup.

ww
w.m
obot
ix.c
om
10
FW U
pdat
e
Systems With Add-On Modules
Resetting The Grandstream IP Video Phone To The Factory Defaults
In the case of a Door Station, before performing a new auto configuration (after interrupting the power supply
for a short time), you must first reset the Grandstream video phones to the factory settings. To do so, navigate
to the path shown below in the device menu (called up via the phone display):
• Menu > Settings > Maintenance > Upgrade > Full Reset > Reset
Deleting All Camera Recordings (Formatting The SD Memory Card)
For example, when selling a camera or Door Station, it is in your best interest to ensure that the system contains
no recorded information (images, videos, voice mailbox). You should therefore reformat the flash memory, for
example, the SD memory card inserted into the camera.
This can also be done via the firmware user interface of the camera. Open the Admin Menu, go to the “Storage”
section, and click “Storage on External File Server / Flash Device.“ Then follow the instructions provided in
the dialog box.
Resetting MxBus Modules Via Hardware Reset
Once an MxBus module has been in operation, it must be reset to the factory settings before it can be used
with another camera (exception: info module of a Door Station). If an MxBus module is disconnected without
previously resetting it as described above (MxBus status LED flashes red after connection, indicating an invalid
MxBus encryption), a hardware reset must be performed for the MxBus module to restore the factory settings.
This can only be done if the module is correctly connected to the camera and a power supply.
Proceed as follows:
1. Remove the cap or housing of the MxBus module to gain access to the circuit board located in the device.
2. Bridge the contact surfaces, for example, with a screwdriver, to perform the factory reset. The contact
surfaces are positioned differently depending on the device in question (see figures).
3. Keep the surfaces bridged until both LEDs of the module flash green at regular intervals, indicating that
the process is complete.
4. Put on the cap or housing again and connect the MxBus module to the camera.

ww
w.m
obot
ix.c
om
11
The HiRes Video Company
Fig. KeypadRFID
Fig. DoorMaster
Fig. GPS-Box and 232-IO-Box
KeypadRFID