Embed Size (px)
Citation preview

1
m!kabriefing
book
2 3
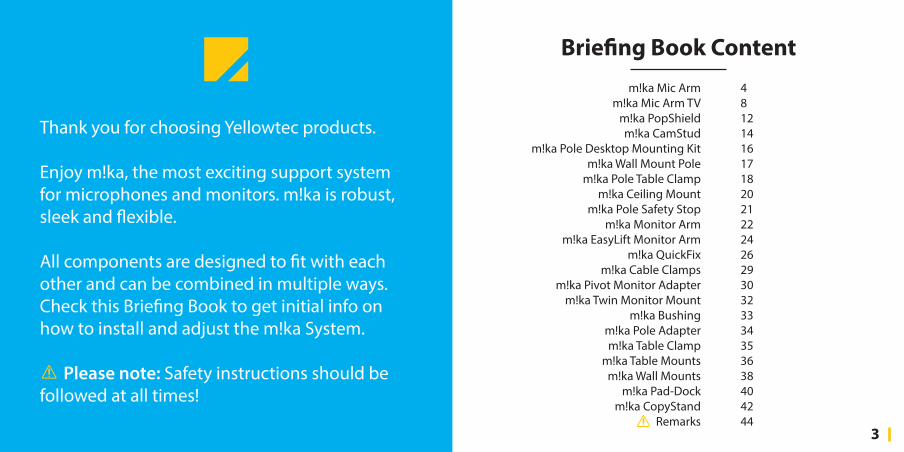
Thank you for choosing Yellowtec products.
Enjoy m!ka, the most exciting support system for microphones and monitors. m!ka is robust, sleek and flexible.
All components are designed to fit with each other and can be combined in multiple ways. Check this Briefing Book to get initial info on how to install and adjust the m!ka System.
Please note: Safety instructions should be followed at all times!
Briefing Book Contentm!ka Mic Arm
m!ka Mic Arm TVm!ka PopShieldm!ka CamStud
m!ka Pole Desktop Mounting Kitm!ka Wall Mount Pole
m!ka Pole Table Clampm!ka Ceiling Mount
m!ka Pole Safety Stopm!ka Monitor Arm
m!ka EasyLift Monitor Armm!ka QuickFix
m!ka Cable Clampsm!ka Pivot Monitor Adapter
m!ka Twin Monitor Mountm!ka Bushing
m!ka Pole Adapterm!ka Table Clamp
m!ka Table Mountsm!ka Wall Mounts
m!ka Pad-Dockm!ka CopyStand
Remarks
48 121416171820212224262930323334353638404244

4 5
m!ka Mic Arm On Air
RED = High
RED = High
Audio Shield
Audio Shield
BLU = Low
BLU = Low
N/C N/C
YEL = LED Indicator Remarks
RED = High
RED = High
Audio Shield
Audio Shield
BLU = Low
BLU = Low
m!ka Mic Arm
5/8“
Remarks
5/8“
BLK = LED Indicator
For RED light connect BLK = 0 V YEL = +12-24VDC
For WHITE light connectBLK = +12-24VDC YEL = 0 V
or toggle polarity for dual use
Cut Off !

6 7
Remarks
m!ka Mic Arm m!ka Mic Arm
Remarks
8 9
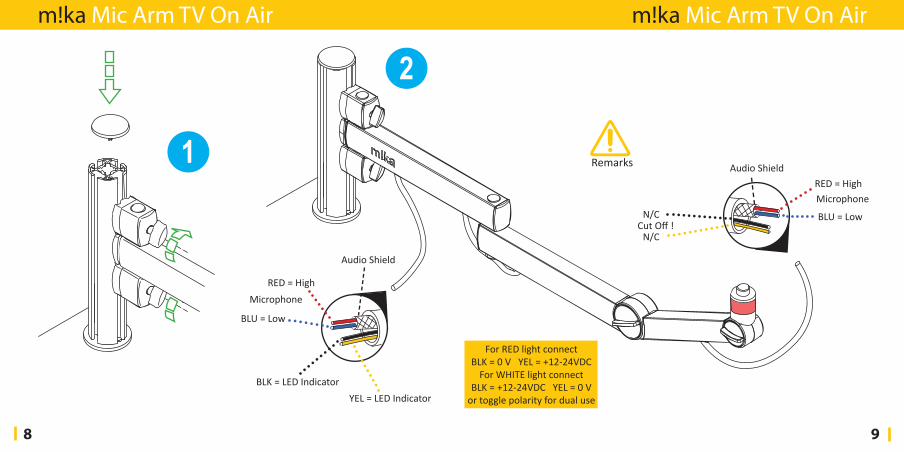
RED = High
Audio Shield
BLU = Low
RED = HighAudio Shield
BLU = LowCut Off !
N/C
N/C
Remarks
m!ka Mic Arm TV On Air m!ka Mic Arm TV On Air
For RED light connect BLK = 0 V YEL = +12-24VDC
For WHITE light connectBLK = +12-24VDC YEL = 0 V
or toggle polarity for dual use
BLK = LED IndicatorYEL = LED Indicator
Microphone
Microphone
10 11
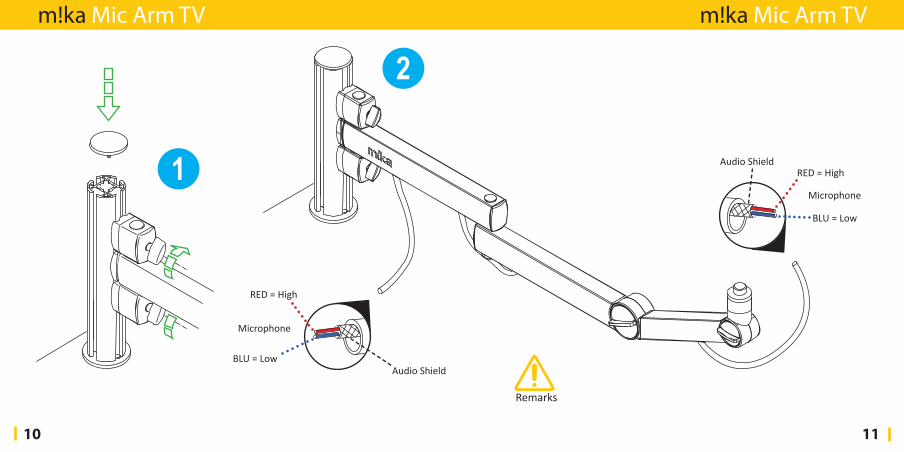
m!ka Mic Arm TV m!ka Mic Arm TV
RED = High
Audio ShieldBLU = Low
RED = HighAudio Shield
BLU = Low
Remarks
Microphone
Microphone
12 13
Remarks
m!ka PopShield m!ka PopShield
14 15
M14
1/4“
5/8“
Adapter Mounting Sting
Adapter Mic Arm
Remarks
m!ka CamStud m!ka CamStud
16 17
Remarks
m!ka Pole Desktop Mounting Kit
C
m!ka Wall Mount Pole
Remarks

18 19
m!ka System Pole Table Clamp m!ka System Pole Table Clamp
Remarks
6
5max 40mm

20 21
Remarks
m!ka Ceiling Mount m!ka Pole Safety Stop
STOP
Remarks
22 23
3
4 Remarks
m!ka Monitor Arm
Remarks
m!ka Monitor Arm
24 25
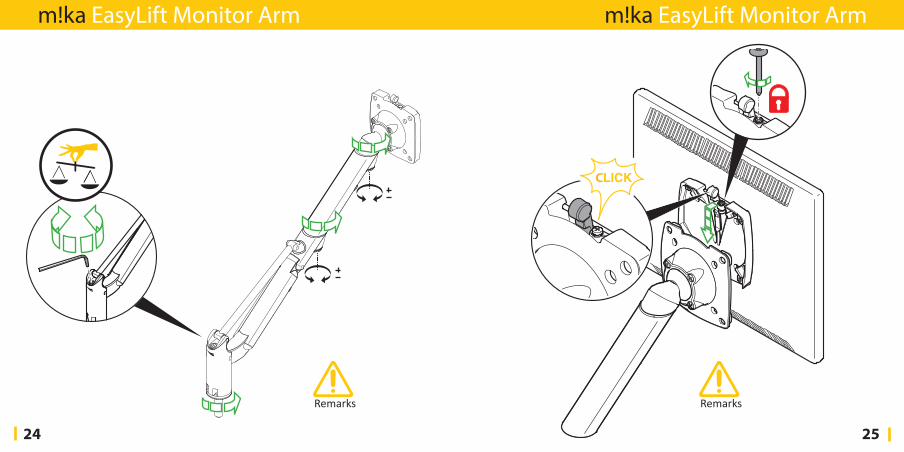
m!ka EasyLift Monitor Arm m!ka EasyLift Monitor Arm
Remarks Remarks
26 27
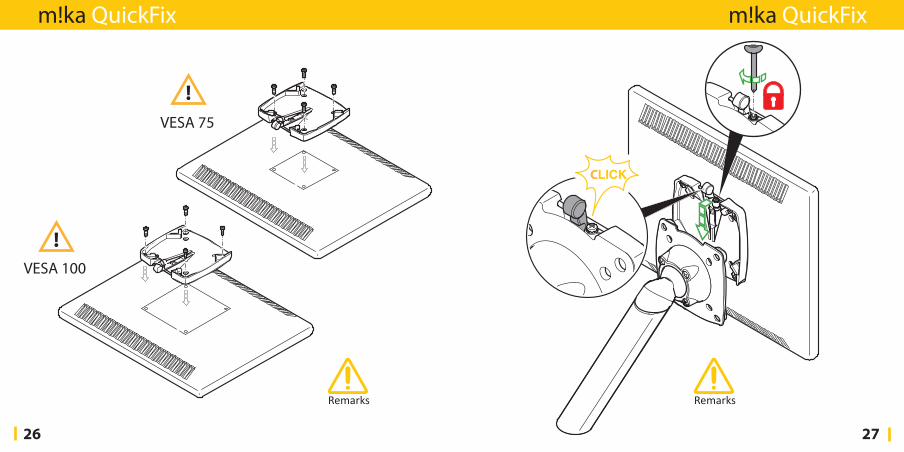
m!ka QuickFix
Remarks
m!ka QuickFix
Remarks
28 29
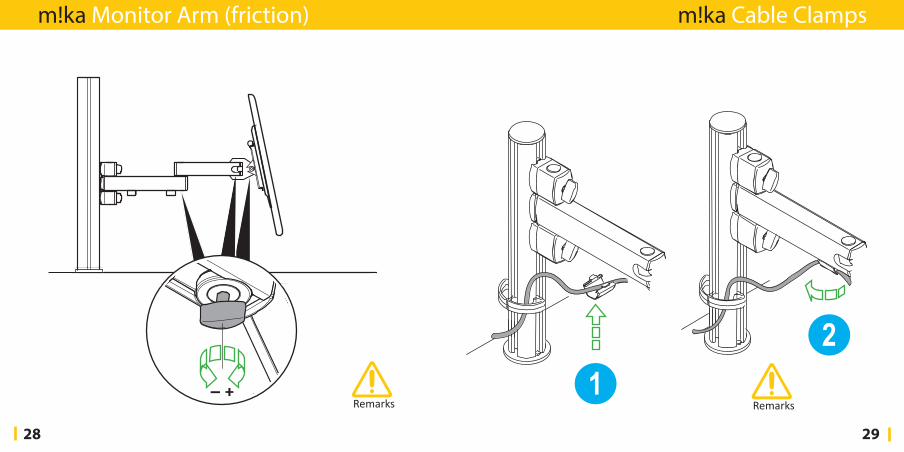
m!ka Monitor Arm (friction) m!ka Cable Clamps
Remarks Remarks
30 31
Remarks
180°
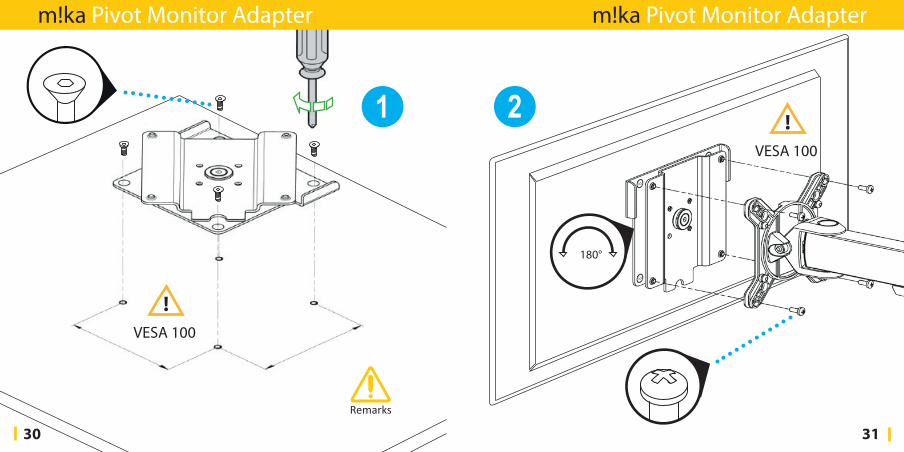
m!ka Pivot Monitor Adapter m!ka Pivot Monitor Adapter

32 33
m!ka Twin Monitor Mount
Remarks
22 mm
m!ka Bushing
Remarks

34 35
3
m!ka Pole Adapter
Remarks
Remarks
m!ka Table Clamp

36 37
m!ka Table Through Mount
Remarks
m!ka Table Top Mount
38 39
Remarks
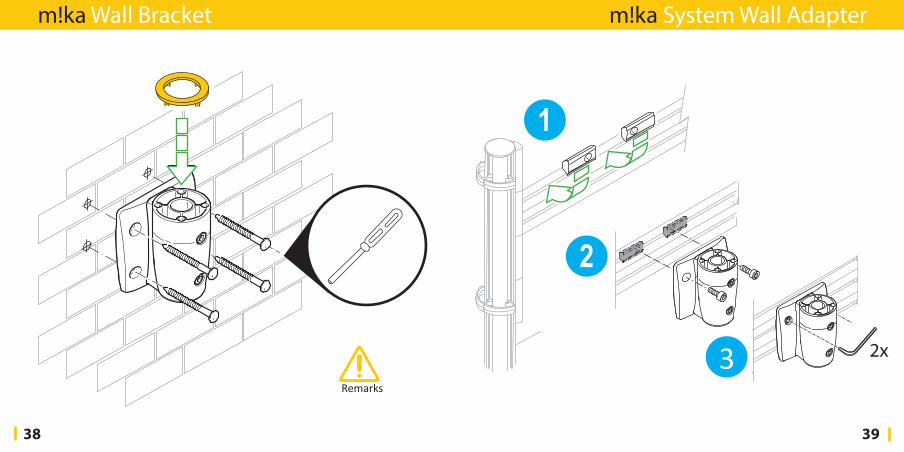
m!ka Wall Bracket
3
m!ka System Wall Adapter

40 41
Remarks
m!ka Pad-Dock
min 160mmmax 300mm
Remarks
m!ka Pad-Dock

42 43
m!ka CopyStand
Remarks Remarks
m!ka CopyStand

44 45
Page 4, 9- We suggest using XLR-5 pin connectors for microphone signal and on air light feed onlower end of cable and XLR-3 type connectors for microphone on upper end of cable.- When installing the connector on upper end, cut off the black and yellow wires. Theyare not connected and do not carry any voltage.- Always make sure to leave adequate cable lengths before you cut the cable to fit. It isnot possible to install a new cable loom inside the arm.
Page 5, 11- We suggest using XLR-3 type connectors on both ends of the loom.- Always make sure to leave adequate cable lengths before you cut the cable to fit. It isnot possible to install a new cable loom inside the arm.
Page 6- Make sure the bolt at the bottom of your m!ka Mic Arm has its black plastic sleeveon. The sleeve is needed to fit the arm smoothly to the various mounting devices.- Make sure that each mounting device has a yellow spacer installed.- No yellow spacer will be needed when using the metal bushing.
Page 7- Balance your m!ka Mic Arm properly with the weight of your microphone.Follow these simple steps:- Mount your microphone to the m!ka Mic Arm first.- Make sure all three toggle screws are set loose.- (1) Use the Allen Screw at the bottom to adjust the tension of the spring. You got itright when your microphone levitates in an upright and 90 degree angled position.- (2)Then fasten the three toggle screws to adjust the retardation just enough to holdthe microphone in the position wherever you pull it.
m!ka Remarks
- Do not pull the toggle screws too tight. They may break and the joints may squeak.- If joints still squeak, apply Teflon Spray. Instead readjust the tension screw.-> See picture (1).- Some extreme positions my need readjustments.- Note that extreme positions may reduce the specified maximum load capacity of them!ka Mic Arm.
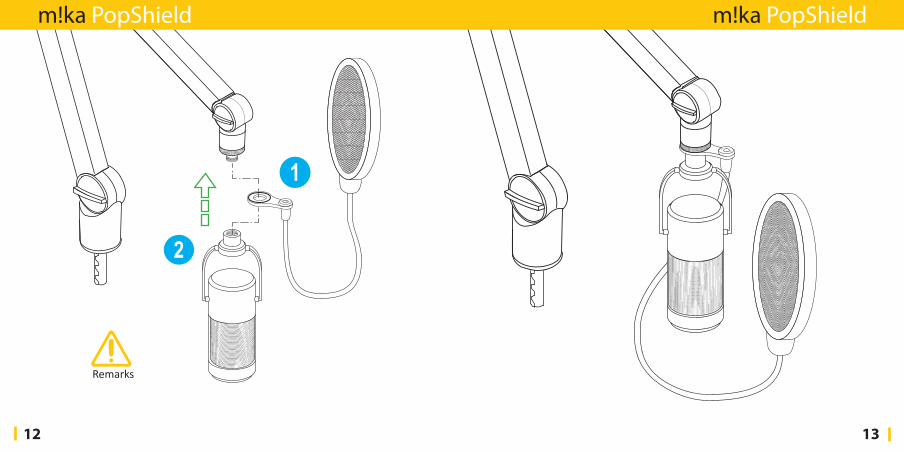
Page 12- (1): Attach the m!ka PopShield to the m!ka Mic Arm of your choice.- (2): Then affix your microphone to the 5/8“ thread and screw it onto your m!ka Mic Arm‘s adapter. Thereby, you also fix the PopShield.
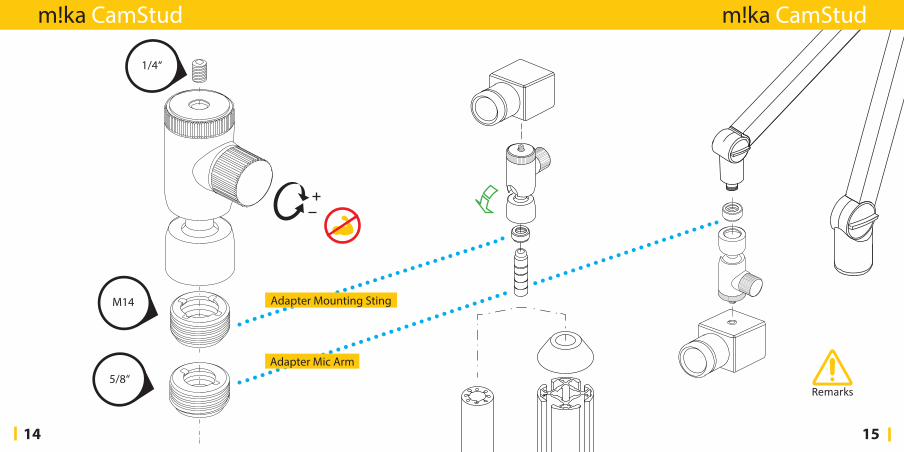
Page 15- To mount your m!ka CamStud to a m!ka System Pole or litt Riser, choose the included M14 adapter.- To mount your CamStud to a m!ka Mic Arm, choose the included 5/8“ adapter. - Attach your camera to the CamStud via 1/4“ thread.
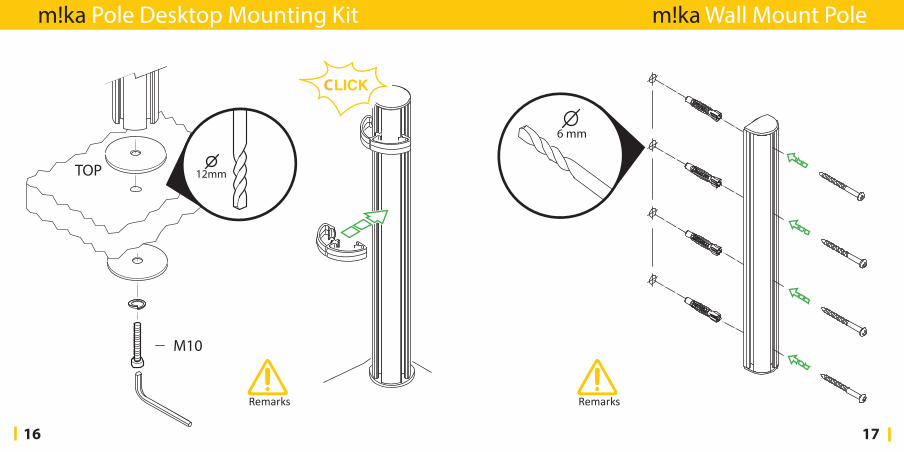
Page 16- To secure proper upright mounting of the m!ka System Pole, we suggest drilling aminimum hole of 12mm diameter for the m!ka PDM Kit.- According to your choice, choose the black or silver washer to be visible on top, but always use one washer on both sides of the table!- If you need to use your own threaded bolt, make sure you use a M10 metric thread.- The cable organizer clip will help to tidy your wiring.
Page 17- When installing the m!ka Wall Mount Pole it is your obligation to verify that your wall and your fasteners are suitable to hold the load.
46 47
Page 19 - To prevent slip, attach the self-adhesive rubber pad to the upper inside of the clamp.- (1) Bolt the m!ka System Pole to the clamp by using the size 5 Allen Key.- (2) Then use the size 6 Allen Key to secure a proper fit to your table.- The m!ka Pole Table Clamp is suitable for a panel thickness of 14-40mm.
Page 20- When installing the m!ka System Pole Ceiling Mounting Kit it is your obligation toverify that your ceiling and your fasteners are suitable to hold the load.
Page 21- To secure a minimum vertical position of your monitor insert the Safety Stop nut intothe m!ka Pole. Use an Allen Key and fasten it properly.
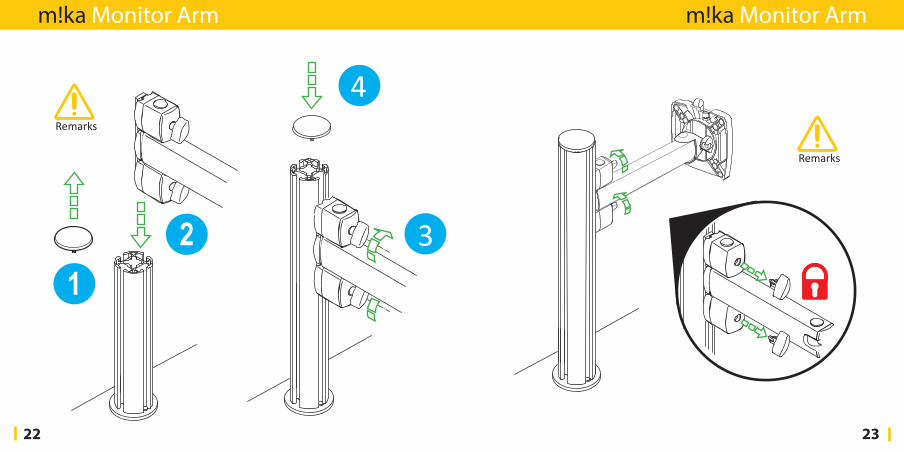
Page 22- Make sure you have checked the max. payload of your m!ka Monitor Arm. Theinformation is printed on the product label on the rear side of its QuickFix.- See Page 21 for how to secure a minimum headroom under your monitor.
Page 23- In order to prevent unintended changes to the height position, simply remove thethumbscrews by pulling them out. Before you remove the screws, make sure they areall properly tightened.
Page 24- Use an Allen Key to adjust EasyLift‘s pneumatic spring to your monitor‘s weight.- Use the knurled screws at the rotating joints to adjust the retardation of the joints.
m!ka Remarks
Page 25- You can deactivate the QuickFix function for security reasons. Turn in the screw nextto the release lever in order to disengage its function.
Page 26- The m!ka QuickFix adapter is suitable to be used with VESA 75 and VESA 100.- Make sure that you use the correct screw size and length. Too long screws willdamage your flat panel!
Page 27- You can deactivate the QuickFix function for security reasons. Turn in the screw nextto the release lever in order to disengage its function.
Page 28- Use the knurled screws to de- or increase the retardation of your m!ka Monitor Arm‘sjoints.
Page 29- (1) Insert the cable organizer clip into the bottom profile of the m!ka Monitor Arm. - (2) Then turn it 90° to fix it.
Page 30- Use the m!ka Pivot Monitor Adapter to rotate your monitor up to 90° clockwise or90° anti-clockwise. Within this range the adapter is infinitely adjustable.- Only use the attached screws to fix the m!ka Pivot Monitor Adapter to your m!kaMonitor Arm.- Mounting is possible via VESA 100 mount only!- With m!ka Pivot Monitor Adapter installed you cannot use QuickFix.- (1) Use the 4 hex screws to mount the adapter to your monitor via VESA 100.- (2) Use the 4 cross screws to attach the adapter to a m!ka Mic Arm via VESA 100.
48 49
m!ka Remarks
Page 32- The total weight of the m!ka Twin Monitor Mount and the weight of your two monitors has to meet the maximum load capacity of your m!ka Monitor Arm.
Page 33- To secure proper upright positioning of the m!ka Bushing drill a hole with aminimum diameter of 22 mm.- The thread of the bushing is metric. Should you ever need to replace the nut makesure you use the correct M20x1,5 thread.
Page 34- Use an Allen Key to fix the m!ka Pole Adapter properly.- Use a yellow spacer with the m!ka Pole Adapter.
Page 35- Never use the m!ka Table Clamp on curved surfaces - it may slip off!
Page 37- You do not need to drill a central hole when you use a m!ka Table Top Mount.- Make sure you have suitable screws for the type of panel you install the base ring to.
Page 38- When installing the m!ka Wall Bracket it is your obligation to verify that your wall andyour fasteners are suitable to hold the load.- Always use a yellow spacer.
Page 40- Make sure the m!ka Pad-Dock is properly oriented to support the tablet.
- In order to hold the tablet properly, its size needs to be min 160mm and max 300mm.- Tablets will fit at both landscape and upright orientation.
Page 41- An audible “click“ signals that the m!ka Pad-Dock is securely locked into position.
Page 42- The Perspex® Panel for your m!ka CopyStand holds and aligns by integrated magnets.- Make sure the magnets face each other.- Follow cleaning instructions. Never use detergents or alcohol.- For daily care use micro fiber cloth supplied with m!ka CopyStand.
Page 43- You can deactivate the QuickFix function for security reasons. Turn in the screw nextto the release lever in order to disengage its function.

50 51
m!ka Remarks

52
m!ka BB v7
Manufactured by Yellowtec as a brand of Thum + Mahr GmbH, Heinrich-Hertz-Str. 3, 40789 Monheim, Germany
shop.yellowtec.comwww.yellowtec.com/mika