Embed Size (px)
Citation preview

Z:\HPA MOTORSPORTS INC\PRODUCTS\Intake Manifold 2.0 TSI FSI\I Sheets\TSI\2.0T TSI Intake Manifold iSheet (v1).pdf 2/16/2017
Installation Instructions 2.0T TSI Intake Manifold:
Featuring better flow, higher boost capacity, 40% larger plenum volume, and integrated flapper delete; this product will take your 2.0L VW TSI to the next level. A direct replacement for your OEM plastic intake manifold.
Once installed, running OEM PCV and not aftermarket catch can, you can trim your engine cover to fit. The finished result should resemble this;
PLEASE NOTE:
• Disconnect battery negative terminal before installation. • Cool down the engine before installation.

Z:\HPA MOTORSPORTS INC\PRODUCTS\Intake Manifold 2.0 TSI FSI\I Sheets\TSI\2.0T TSI Intake Manifold iSheet (v1).pdf 2/16/2017
• Note placement of parts and bolts during removal. • We highly recommend purchasing 4 x injector O-ring kit from your local dealer prior to
installation. Part number: 06J 998 907B.
INSTRUCTIONS:
2) Removing air filter
• Pull cover off air duct (release clips on sides) -arrows-.
1) Removing engine cover panel
• Pull engine cover off upwards at securing points -arrows-.

Z:\HPA MOTORSPORTS INC\PRODUCTS\Intake Manifold 2.0 TSI FSI\I Sheets\TSI\2.0T TSI Intake Manifold iSheet (v1).pdf 2/16/2017
• Unclip air duct at the bottom by
releasing clips -arrows-.
• Detach air duct at bottom together
with air hose. • Engine code CBFA:
• Pull hose to secondary air pump
motor -V101- from air filter housing.
3)
• Remove bolt -arrow A- and pull air filter housing upwards out of mounting.
• Remove air filter housing together with
air mass meter and connecting pipe.

Z:\HPA MOTORSPORTS INC\PRODUCTS\Intake Manifold 2.0 TSI FSI\I Sheets\TSI\2.0T TSI Intake Manifold iSheet (v1).pdf 2/16/2017
4) Remove Catch Can Hoses, OEM PCV Hose, and/or Boost Tap:
5) Remove Connectors On Valve Cover:

Z:\HPA MOTORSPORTS INC\PRODUCTS\Intake Manifold 2.0 TSI FSI\I Sheets\TSI\2.0T TSI Intake Manifold iSheet (v1).pdf 2/16/2017
6) Remove Throttle Body Coupler:

Z:\HPA MOTORSPORTS INC\PRODUCTS\Intake Manifold 2.0 TSI FSI\I Sheets\TSI\2.0T TSI Intake Manifold iSheet (v1).pdf 2/16/2017
7) Remove Throttle Body Connectors:

Z:\HPA MOTORSPORTS INC\PRODUCTS\Intake Manifold 2.0 TSI FSI\I Sheets\TSI\2.0T TSI Intake Manifold iSheet (v1).pdf 2/16/2017
8) Remove EVAP Connector:

Z:\HPA MOTORSPORTS INC\PRODUCTS\Intake Manifold 2.0 TSI FSI\I Sheets\TSI\2.0T TSI Intake Manifold iSheet (v1).pdf 2/16/2017
9) Remove Vacuum Line Bracket:
10) Remove Lower Bolt from Manifold Brace & Remove Brace (not to be re-used, silver bolt left of throttle body):

Z:\HPA MOTORSPORTS INC\PRODUCTS\Intake Manifold 2.0 TSI FSI\I Sheets\TSI\2.0T TSI Intake Manifold iSheet (v1).pdf 2/16/2017
11) Remove Fuel Hard Line Bracket:

Z:\HPA MOTORSPORTS INC\PRODUCTS\Intake Manifold 2.0 TSI FSI\I Sheets\TSI\2.0T TSI Intake Manifold iSheet (v1).pdf 2/16/2017
12) Remove Fuel Hard Line Connection at HPFP (slowly as this is under pressure and some fuel will drip, place absorbent rag underneath to soak up spilled fuel):
Z:\HPA MOTORSPORTS INC\PRODUCTS\Intake Manifold 2.0 TSI FSI\I Sheets\TSI\2.0T TSI Intake Manifold iSheet (v1).pdf 2/16/2017
13) Remove Fuel Hard Line Connection Under Manifold at Fuel Rail (place absorbent rag underneath
to soak up spilled fuel):
14) Remove Large Rubber Hose From Straight Bracket:

Z:\HPA MOTORSPORTS INC\PRODUCTS\Intake Manifold 2.0 TSI FSI\I Sheets\TSI\2.0T TSI Intake Manifold iSheet (v1).pdf 2/16/2017
15) Unbolt Bracket (two bolts right of throttle body):
16) Remove Nut Holding Fuel Rail Behind Bracket:

Z:\HPA MOTORSPORTS INC\PRODUCTS\Intake Manifold 2.0 TSI FSI\I Sheets\TSI\2.0T TSI Intake Manifold iSheet (v1).pdf 2/16/2017
17) Remove Nut Holding Fuel Rail Under Manifold:
18) Remove Silver Bolts Holding Manifold to Cylinder Head:
Z:\HPA MOTORSPORTS INC\PRODUCTS\Intake Manifold 2.0 TSI FSI\I Sheets\TSI\2.0T TSI Intake Manifold iSheet (v1).pdf 2/16/2017
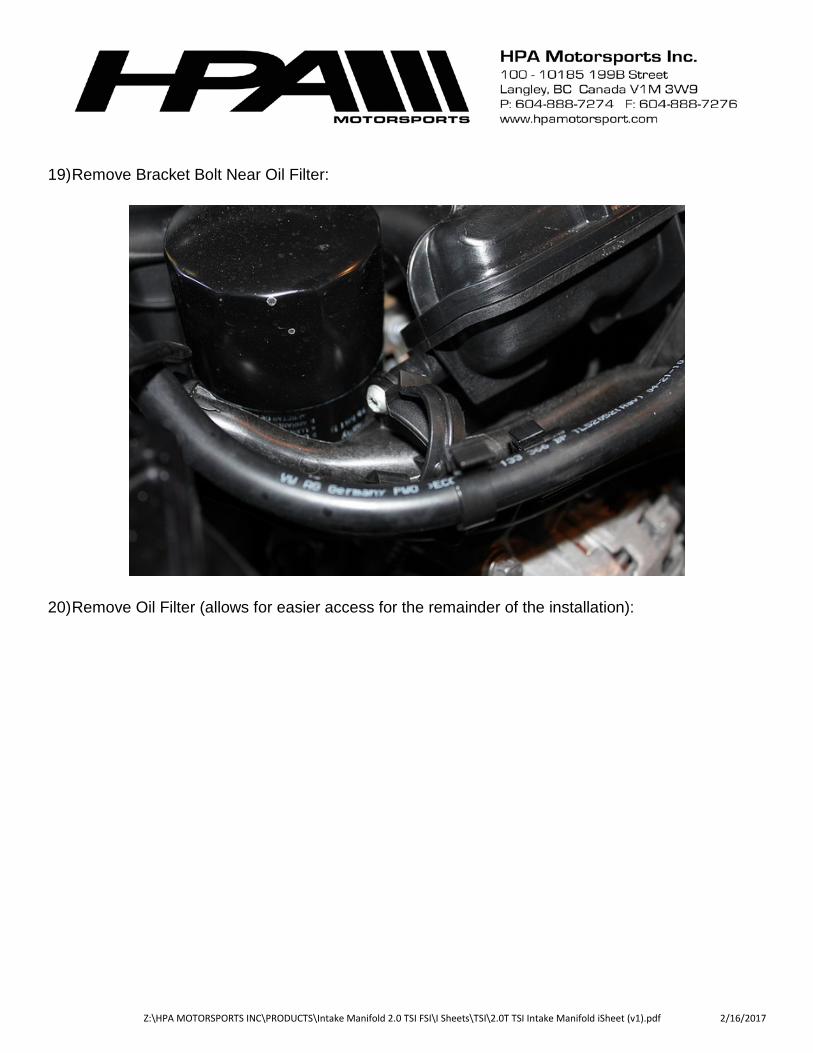
19) Remove Bracket Bolt Near Oil Filter:
20) Remove Oil Filter (allows for easier access for the remainder of the installation):

Z:\HPA MOTORSPORTS INC\PRODUCTS\Intake Manifold 2.0 TSI FSI\I Sheets\TSI\2.0T TSI Intake Manifold iSheet (v1).pdf 2/16/2017
21) Carefully Remove Manifold, Disconnect Fuel Injectors, Remove Fuel Rail & Injectors From
Cylinder Head:

Z:\HPA MOTORSPORTS INC\PRODUCTS\Intake Manifold 2.0 TSI FSI\I Sheets\TSI\2.0T TSI Intake Manifold iSheet (v1).pdf 2/16/2017
22) Manifold & Fueling Fully Removed:
NOTE: Carbon Buildup (5,000 miles on new engine):

Z:\HPA MOTORSPORTS INC\PRODUCTS\Intake Manifold 2.0 TSI FSI\I Sheets\TSI\2.0T TSI Intake Manifold iSheet (v1).pdf 2/16/2017
23) Clean Fuel Injectors with Combustion Cleaner:

Z:\HPA MOTORSPORTS INC\PRODUCTS\Intake Manifold 2.0 TSI FSI\I Sheets\TSI\2.0T TSI Intake Manifold iSheet (v1).pdf 2/16/2017
NOTE: Build-up Right / Cleaned Left (dirty fuel injector had 12,000 miles):
24) Replace Fuel Injector O-Rings with OEM Fuel Injector Service Kit:
NOTE: While in the removal process, you may damage the O-rings on the injectors. We highly recommend purchasing 4 x injector O-ring kit from your local dealer. Part number: 06J 998 907B.

Z:\HPA MOTORSPORTS INC\PRODUCTS\Intake Manifold 2.0 TSI FSI\I Sheets\TSI\2.0T TSI Intake Manifold iSheet (v1).pdf 2/16/2017
25) Perform Carbon Cleaning With Combustion Cleaner & Clean Cylinder Head Surface With Brake Clean: NOTE: While the manifold is off, it is a great time to do a carbon clean up if you haven’t done so.

Z:\HPA MOTORSPORTS INC\PRODUCTS\Intake Manifold 2.0 TSI FSI\I Sheets\TSI\2.0T TSI Intake Manifold iSheet (v1).pdf 2/16/2017
26) Clean Air Diverter Plates & File Down Guide Pins Until Flush:
27) Reinstall Air Diverter Plates & Fuel Injectors:

Z:\HPA MOTORSPORTS INC\PRODUCTS\Intake Manifold 2.0 TSI FSI\I Sheets\TSI\2.0T TSI Intake Manifold iSheet (v1).pdf 2/16/2017
28) Apply 2-3MM Bead Of Included Ultra Black RTV Sealant To Throttle Body and Install On Manifold With Included Bolts & Washers:
29) Complete Throttle Body Connection, Reassemble Fuel Rail & Vacuum Lines:
NOTE: Once you have the OEM factory plastic intake manifold off, you will need to transfer everything over. Install the supplied PCV fittings; if the fittings do not start right away and seem tight please ensure they are threaded in straight before tightening.

Z:\HPA MOTORSPORTS INC\PRODUCTS\Intake Manifold 2.0 TSI FSI\I Sheets\TSI\2.0T TSI Intake Manifold iSheet (v1).pdf 2/16/2017
30) Reconnect Previously Removed Fuel Lines, PCV Lines, Vacuum Lines, Breather Lines:
NOTE: If you have a boost tap, it is no longer needed as the HPA intake manifold provides an extra 1/8 NPT fitting and plug for boost tap purposes.

Z:\HPA MOTORSPORTS INC\PRODUCTS\Intake Manifold 2.0 TSI FSI\I Sheets\TSI\2.0T TSI Intake Manifold iSheet (v1).pdf 2/16/2017
31) Plug Vacuum Line for OEM Intake Manifold Flapper
Motor:
NOTE: The OEM flapper delete motor will no longer be used; the electrical connectors can be taped up and zipped tide away. You will also see the vacuum canister with a vacuum line attached; follow this line to the rear of the engine to a TEE. You can disconnect this line and plug it with a vacuum cap.

Z:\HPA MOTORSPORTS INC\PRODUCTS\Intake Manifold 2.0 TSI FSI\I Sheets\TSI\2.0T TSI Intake Manifold iSheet (v1).pdf 2/16/2017
Finished Installation Should Look Like This:
Z:\HPA MOTORSPORTS INC\PRODUCTS\Intake Manifold 2.0 TSI FSI\I Sheets\TSI\2.0T TSI Intake Manifold iSheet (v1).pdf 2/16/2017
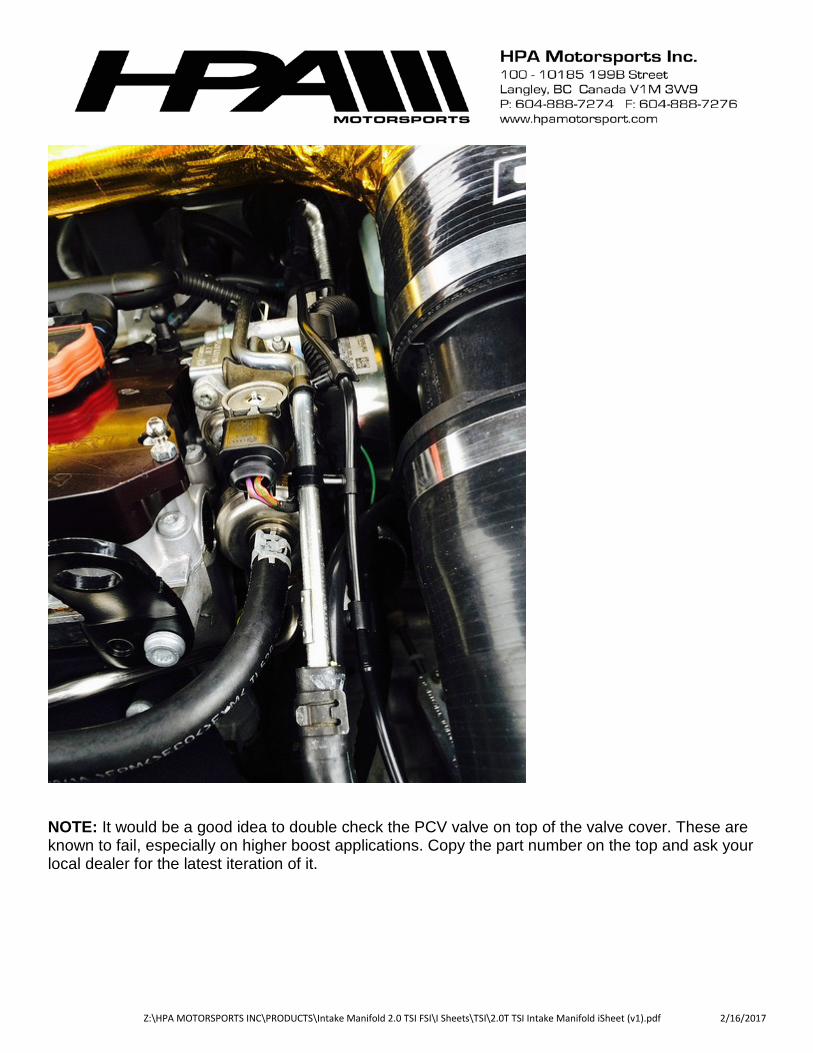
NOTE: It would be a good idea to double check the PCV valve on top of the valve cover. These are known to fail, especially on higher boost applications. Copy the part number on the top and ask your local dealer for the latest iteration of it.

Z:\HPA MOTORSPORTS INC\PRODUCTS\Intake Manifold 2.0 TSI FSI\I Sheets\TSI\2.0T TSI Intake Manifold iSheet (v1).pdf 2/16/2017
NOTES: