Embed Size (px)
Citation preview
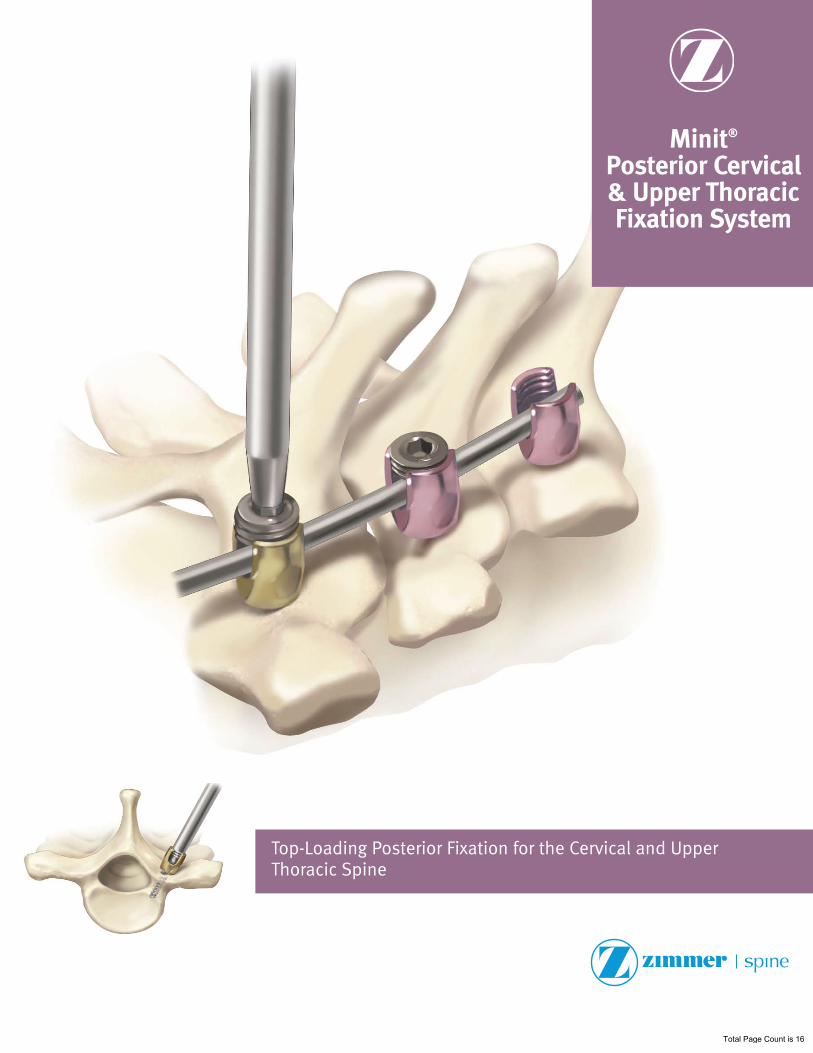
Minit® Posterior Cervical & Upper Thoracic Fixation System
Top-Loading Posterior Fixation for the Cervical and Upper Thoracic Spine
Total Page Count is 16
2 Minit® Posterior Cervical & Upper Thoracic Fixation System Surgical Technique
Forward
The Minit® Posterior Cervical and Upper Thoracic Fixation System is designed for both minimally invasive and open surgery. Part of Zimmer®’s innovative family of Minimally Invasive Solutions™ (MIS), the Minit system provides a top-loading, simple and secure system for rigid fixation.
The Minit system includes instrumentation and spinal implants for posterior spinal fixation in the C1-T3 vertebral levels in the cervical and upper levels of the thoracic spine.
Features:
Top-loading polyaxial screws with •friction heads enable quick and simple construct assembly
Triple self-tapping flute centers •screw for easy insertion
Low profile screw head•
Hooks for secure lamina fixation•
Pre-cut and pre-contoured rods •eliminate the need to cut and contour rods in the operating room
Instrumentation designed for •both MIS and open procedures
*When intended to promote fusion of the cervical spine and the thoracic spine, (C1-T3), the Minit Posterior Cervical and Upper Thoracic Fixation System is indicated for the following: DDD (neck pain of discogenic origin with degeneration of the disc confirmed by history and radiographic studies), spondylolisthesis, spinal stenosis, fracture, dislocation, failed previous fusion and/or tumors.
Hooks and RodsThe hooks and rods are also intended to provide stabilization to promote fusion following reduction of fracture/dislocation or trauma in the cervical/upper thoracic (C1-T3) spine.
Screws/ConnectorsThe use of screws is limited to placement in the T1-T3 in treating thoracic conditions only. Screws are not intended to be placed in the cervical spine.
Axial and Offset Rod ConnectorsThe Minit Posterior Cervical and Upper Thoracic Fixation System can also be linked to the TiTLE® and TiTLE® 2 Poly Axial Spinal Systems offered by Zimmer Spine using the Axial Rod Connectors, Dual Rod Connectors and The Tri Screw Dual Rod Connectors.
Total Page Count is 16
3Minit® Posterior Cervical & Upper Thoracic Fixation System Surgical Technique
Surgical Technique
Minit Posterior Cervical & Upper Thoracic Fixation System
Table of Contents
Forward . . . . . . . . . . . . . . . . . . . . . . . . . . . . . . . . . . . . . . . . . . . . .2
Minit System Kit Trays . . . . . . . . . . . . . . . . . . . . . . . . . . . . . . . . .4
Minit Screw and Hook Options . . . . . . . . . . . . . . . . . . . . . . . . . .4
Patient Positioning . . . . . . . . . . . . . . . . . . . . . . . . . . . . . . . . . . .5
Establishing Access . . . . . . . . . . . . . . . . . . . . . . . . . . . . . . . . . . .5
Bone Hole Preparation . . . . . . . . . . . . . . . . . . . . . . . . . . . . . . . . .6
Tapping . . . . . . . . . . . . . . . . . . . . . . . . . . . . . . . . . . . . . . . . . . . . .7
Screw Driver Assembly and Screw Insertion . . . . . . . . . . . . . . .7
Hook Insertion . . . . . . . . . . . . . . . . . . . . . . . . . . . . . . . . . . . . . . .9
Screw Head Alignment . . . . . . . . . . . . . . . . . . . . . . . . . . . . . . . .9
Contouring the Rod . . . . . . . . . . . . . . . . . . . . . . . . . . . . . . . . . . .9
Cutting the Rod . . . . . . . . . . . . . . . . . . . . . . . . . . . . . . . . . . . . .10
Rod Placement . . . . . . . . . . . . . . . . . . . . . . . . . . . . . . . . . . . . . .10
Rod Manipulation . . . . . . . . . . . . . . . . . . . . . . . . . . . . . . . . . . . .11
Cap Screw Insertion . . . . . . . . . . . . . . . . . . . . . . . . . . . . . . . . . .12
Final Tightening . . . . . . . . . . . . . . . . . . . . . . . . . . . . . . . . . . . . .13
Rod Connectors . . . . . . . . . . . . . . . . . . . . . . . . . . . . . . . . . . . . .13
Extracting the Cap Screw . . . . . . . . . . . . . . . . . . . . . . . . . . . . .13
Removing Rod-to-Rod Connectors . . . . . . . . . . . . . . . . . . . . . .14
Bone Screw Removal . . . . . . . . . . . . . . . . . . . . . . . . . . . . . . . . .14
Instructions for Use . . . . . . . . . . . . . . . . . . . . . . . . . . . . . . . . . .15
Total Page Count is 16
4 Minit® Posterior Cervical & Upper Thoracic Fixation System Surgical Technique
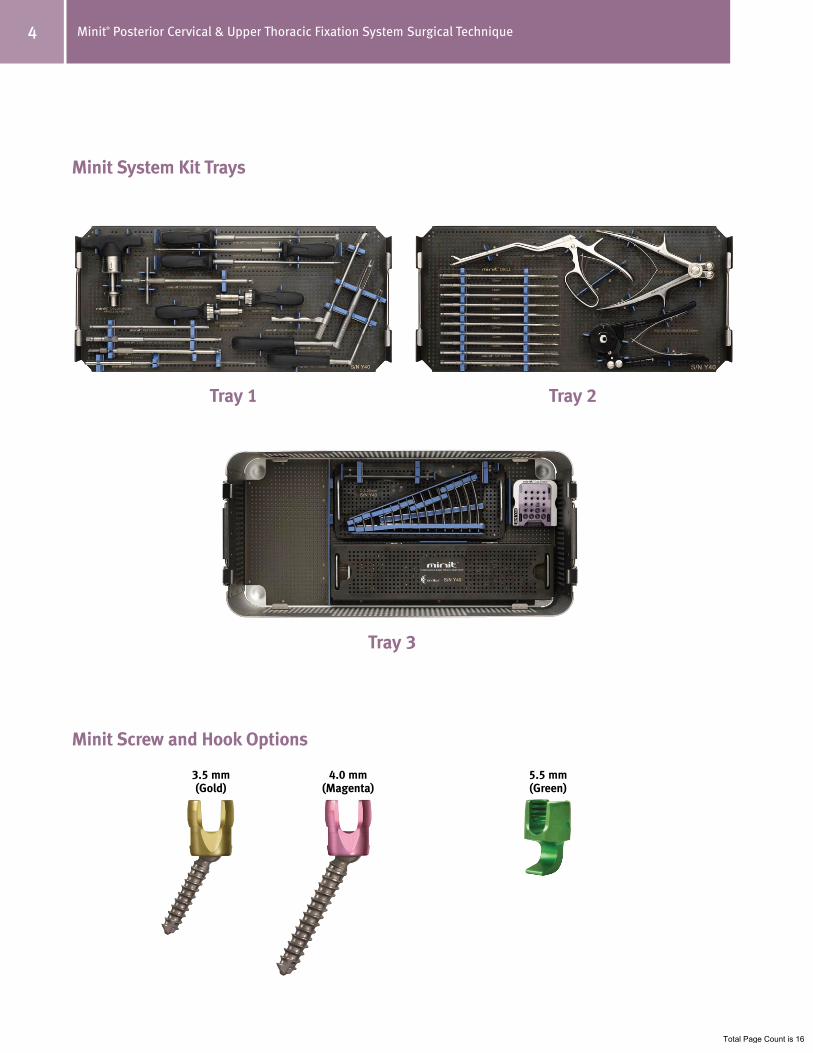
Minit System Kit Trays
Tray 1 Tray 2
Tray 3
3 .5 mm(Gold)
Minit Screw and Hook Options
4 .0 mm(Magenta)
5 .5 mm(Green)
Total Page Count is 16
5Minit® Posterior Cervical & Upper Thoracic Fixation System Surgical Technique
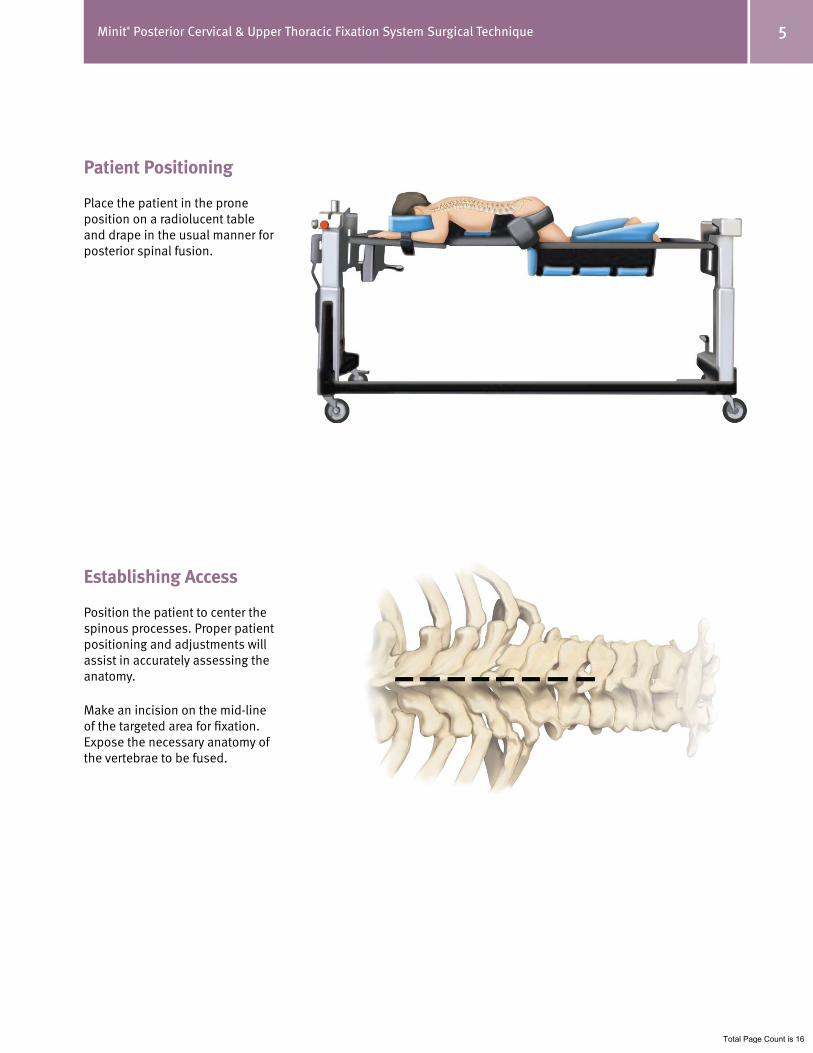
Patient Positioning
Place the patient in the prone position on a radiolucent table and drape in the usual manner for posterior spinal fusion.
Establishing Access
Position the patient to center the spinous processes. Proper patient positioning and adjustments will assist in accurately assessing the anatomy.
Make an incision on the mid-line of the targeted area for fixation. Expose the necessary anatomy of the vertebrae to be fused.
Total Page Count is 16
6 Minit® Posterior Cervical & Upper Thoracic Fixation System Surgical Technique
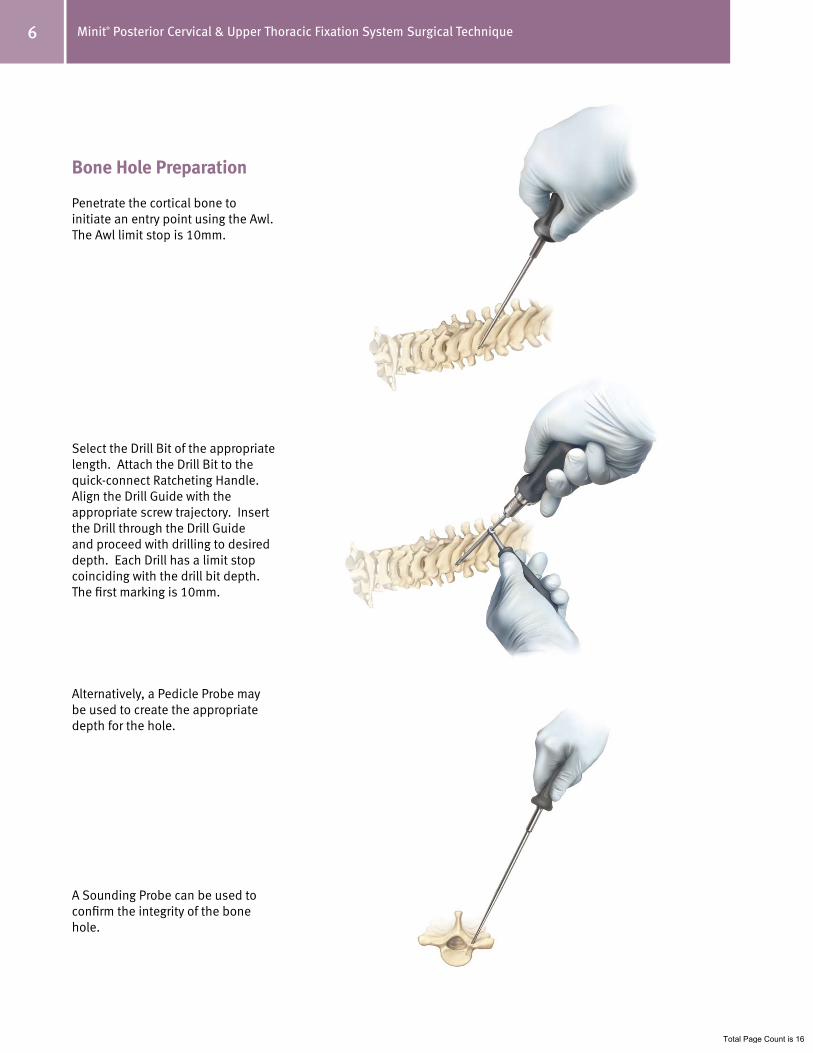
Bone Hole Preparation
Penetrate the cortical bone to initiate an entry point using the Awl. The Awl limit stop is 10mm.
Select the Drill Bit of the appropriate length. Attach the Drill Bit to the quick-connect Ratcheting Handle. Align the Drill Guide with the appropriate screw trajectory. Insert the Drill through the Drill Guide and proceed with drilling to desired depth. Each Drill has a limit stop coinciding with the drill bit depth. The first marking is 10mm.
Alternatively, a Pedicle Probe may be used to create the appropriate depth for the hole.
A Sounding Probe can be used to confirm the integrity of the bone hole.
Total Page Count is 16
7Minit® Posterior Cervical & Upper Thoracic Fixation System Surgical Technique
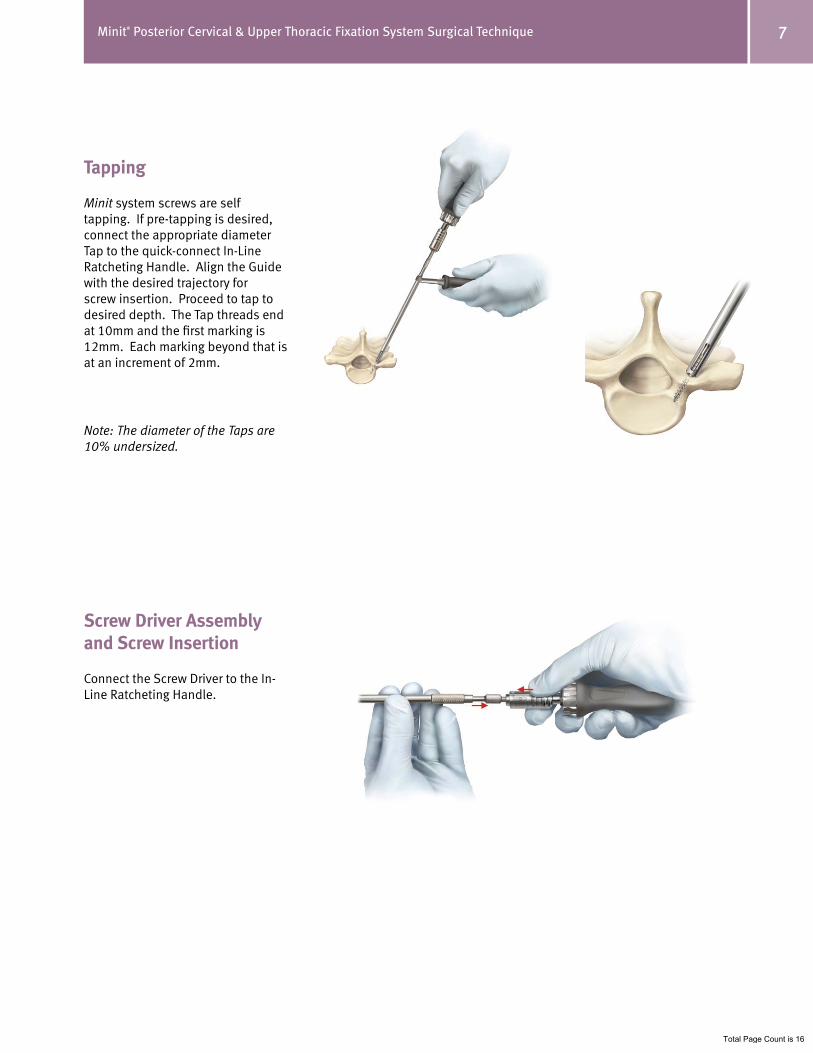
Tapping
Minit system screws are self tapping. If pre-tapping is desired, connect the appropriate diameter Tap to the quick-connect In-Line Ratcheting Handle. Align the Guide with the desired trajectory for screw insertion. Proceed to tap to desired depth. The Tap threads end at 10mm and the first marking is 12mm. Each marking beyond that is at an increment of 2mm.
Note: The diameter of the Taps are 10% undersized.
Screw Driver Assembly and Screw Insertion
Connect the Screw Driver to the In-Line Ratcheting Handle.
Total Page Count is 16
8 Minit® Posterior Cervical & Upper Thoracic Fixation System Surgical Technique
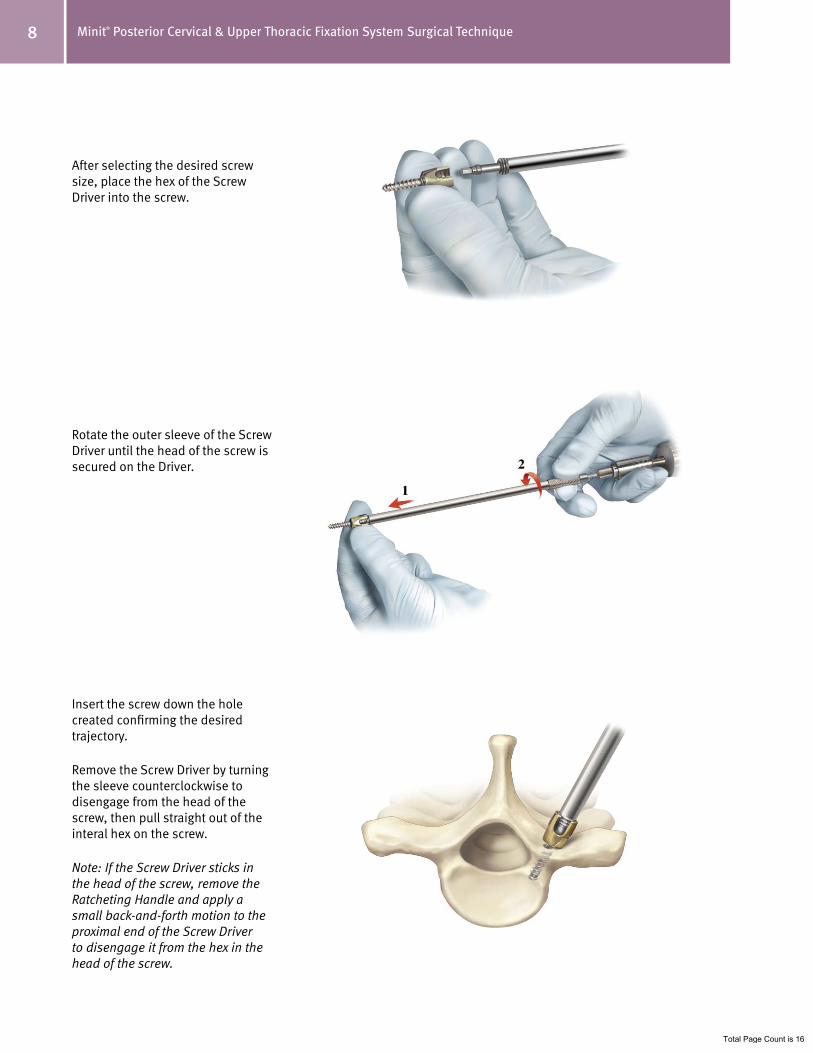
After selecting the desired screw size, place the hex of the Screw Driver into the screw.
Rotate the outer sleeve of the Screw Driver until the head of the screw is secured on the Driver.
Insert the screw down the hole created confirming the desired trajectory.
Remove the Screw Driver by turning the sleeve counterclockwise to disengage from the head of the screw, then pull straight out of the interal hex on the screw.
Note: If the Screw Driver sticks in the head of the screw, remove the Ratcheting Handle and apply a small back-and-forth motion to the proximal end of the Screw Driver to disengage it from the hex in the head of the screw.
Total Page Count is 16
9Minit® Posterior Cervical & Upper Thoracic Fixation System Surgical Technique
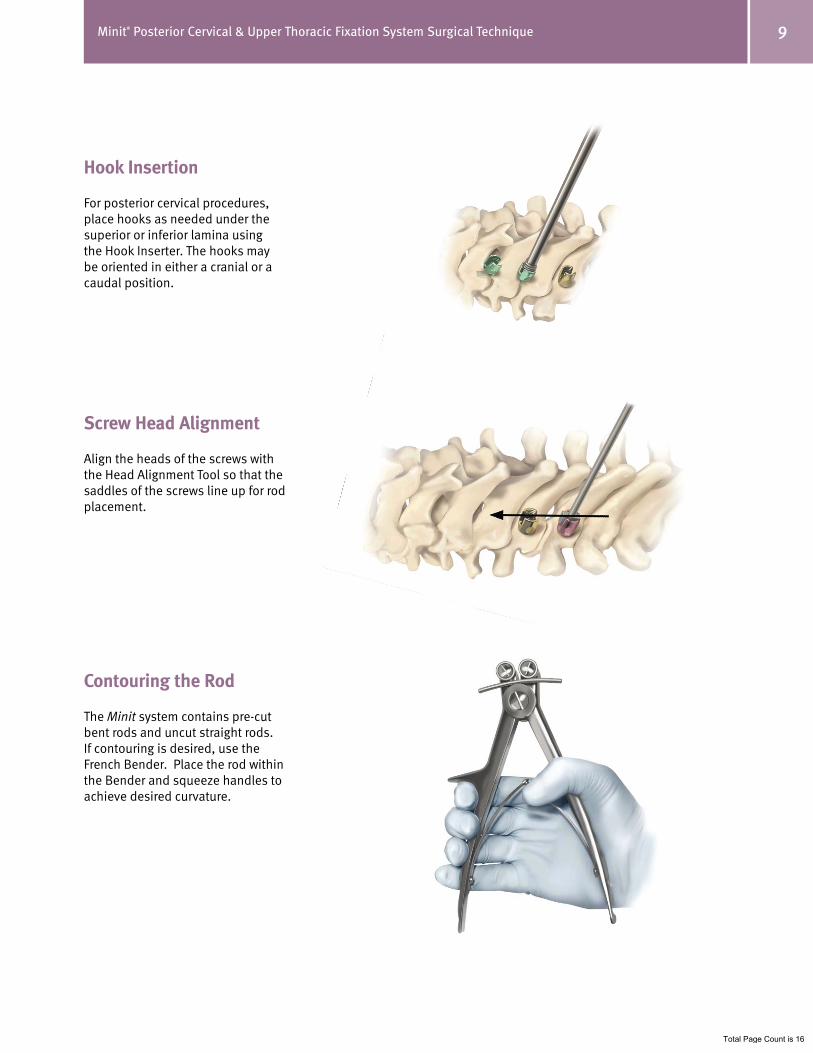
Hook Insertion
For posterior cervical procedures, place hooks as needed under the superior or inferior lamina using the Hook Inserter. The hooks may be oriented in either a cranial or a caudal position.
Screw Head Alignment
Align the heads of the screws with the Head Alignment Tool so that the saddles of the screws line up for rod placement.
Contouring the Rod
The Minit system contains pre-cut bent rods and uncut straight rods. If contouring is desired, use the French Bender. Place the rod within the Bender and squeeze handles to achieve desired curvature.
Total Page Count is 16
10 Minit® Posterior Cervical & Upper Thoracic Fixation System Surgical Technique
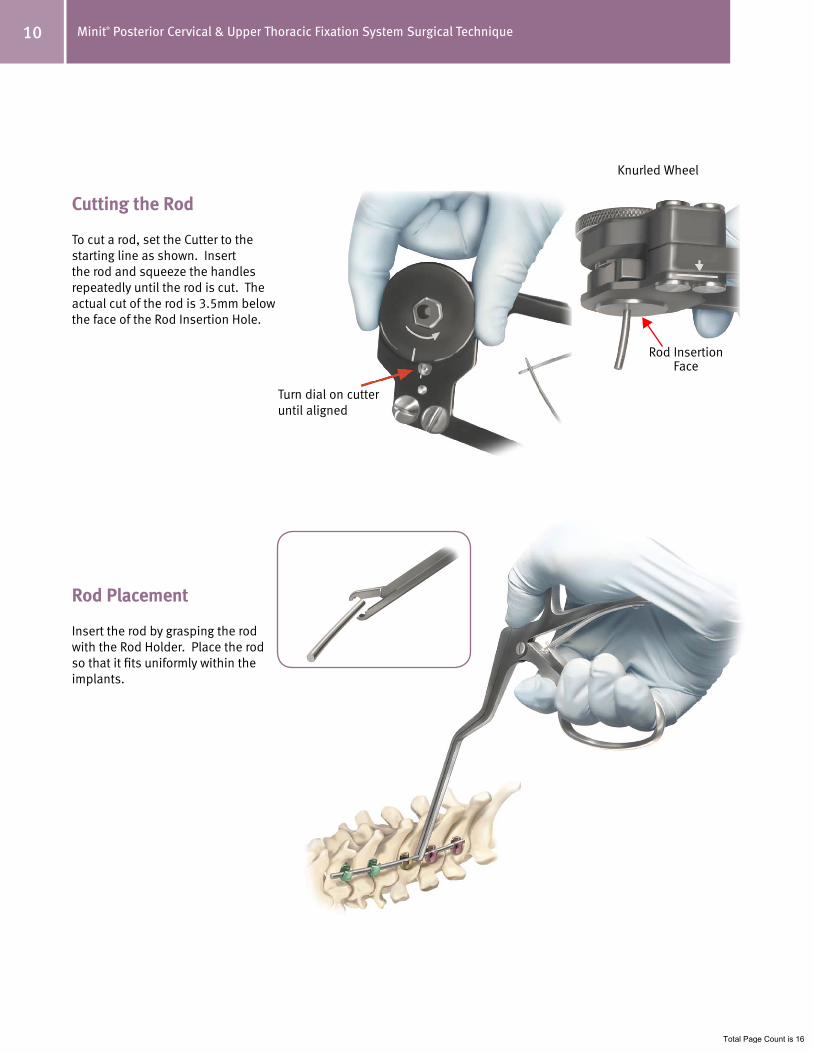
Cutting the Rod
To cut a rod, set the Cutter to the starting line as shown. Insert the rod and squeeze the handles repeatedly until the rod is cut. The actual cut of the rod is 3.5mm below the face of the Rod Insertion Hole.
Rod Placement
Insert the rod by grasping the rod with the Rod Holder. Place the rod so that it fits uniformly within the implants.
Knurled Wheel
Rod InsertionFace
Turn dial on cutter until aligned
Total Page Count is 16
11Minit® Posterior Cervical & Upper Thoracic Fixation System Surgical Technique
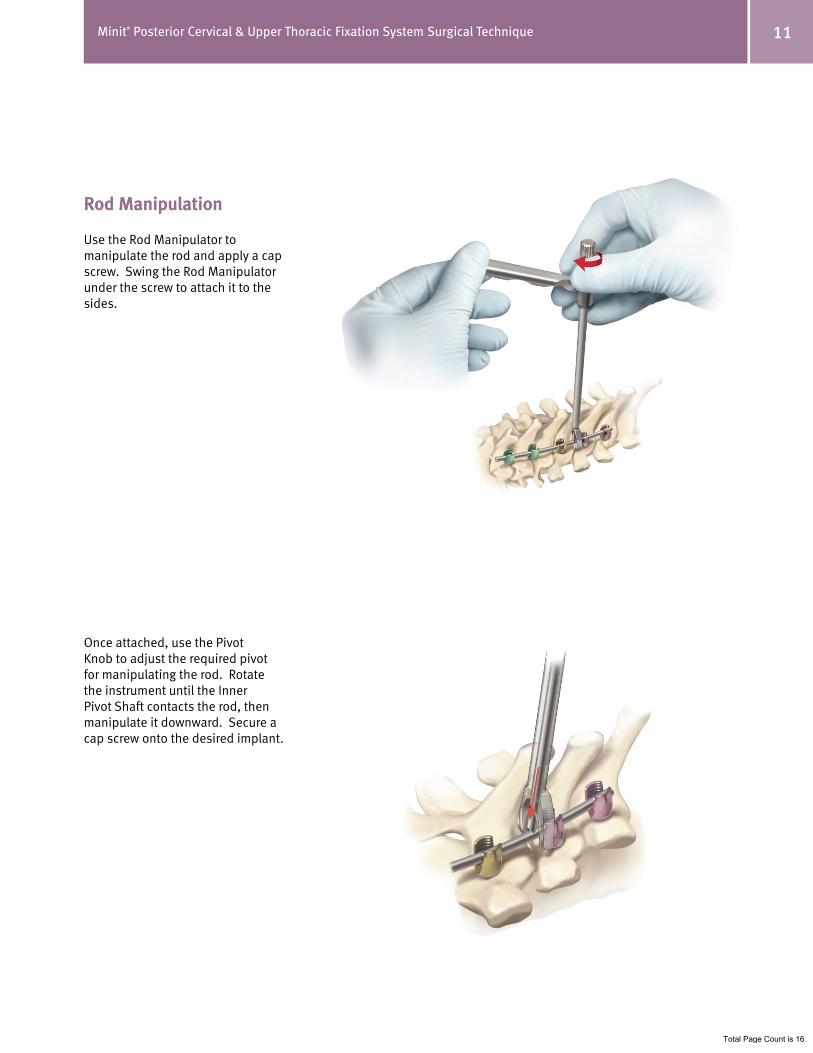
Rod Manipulation
Use the Rod Manipulator to manipulate the rod and apply a cap screw. Swing the Rod Manipulator under the screw to attach it to the sides.
Once attached, use the Pivot Knob to adjust the required pivot for manipulating the rod. Rotate the instrument until the Inner Pivot Shaft contacts the rod, then manipulate it downward. Secure a cap screw onto the desired implant.
Total Page Count is 16
12 Minit® Posterior Cervical & Upper Thoracic Fixation System Surgical Technique
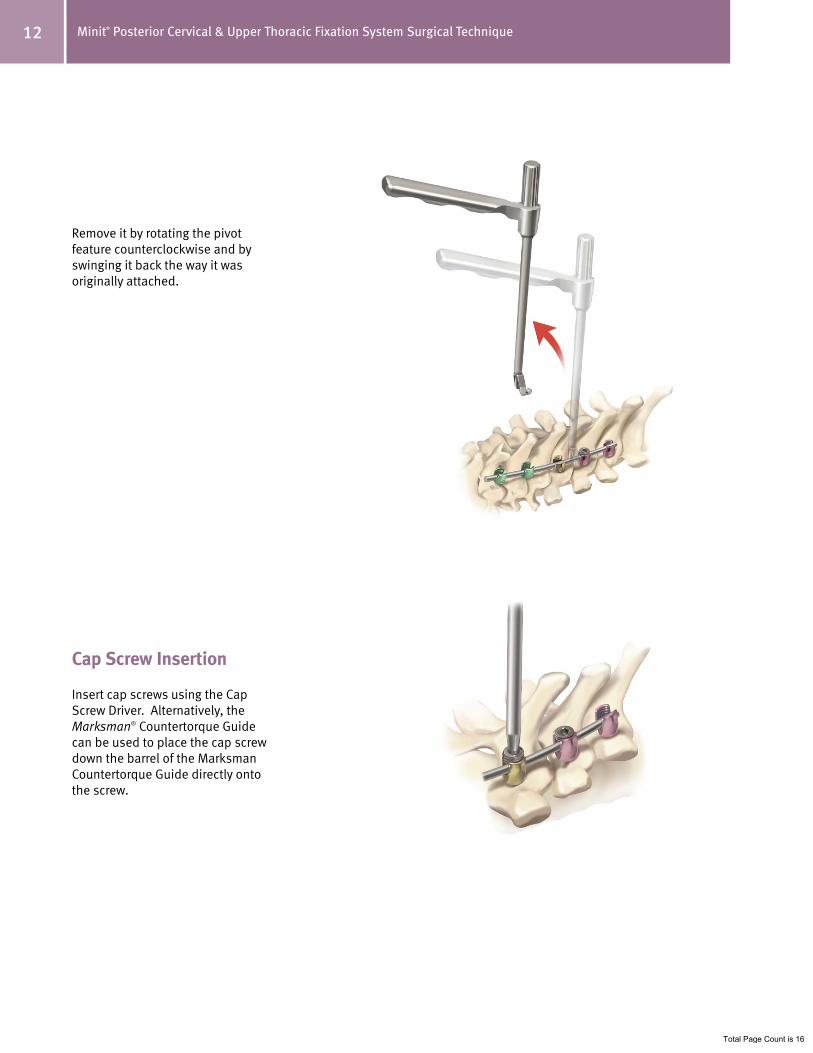
Remove it by rotating the pivot feature counterclockwise and by swinging it back the way it was originally attached.
Cap Screw Insertion
Insert cap screws using the Cap Screw Driver. Alternatively, the Marksman® Countertorque Guide can be used to place the cap screw down the barrel of the Marksman Countertorque Guide directly onto the screw.
Total Page Count is 16
13Minit® Posterior Cervical & Upper Thoracic Fixation System Surgical Technique
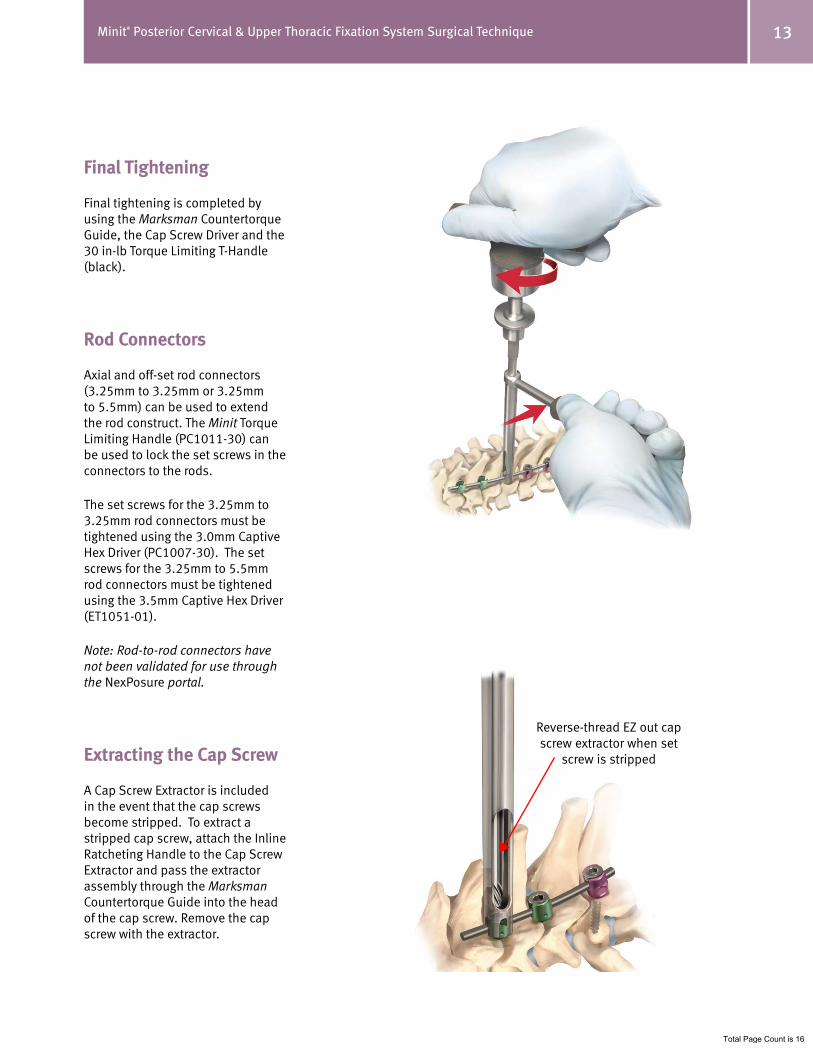
Final Tightening
Final tightening is completed by using the Marksman Countertorque Guide, the Cap Screw Driver and the 30 in-lb Torque Limiting T-Handle (black).
Rod Connectors
Axial and off-set rod connectors (3.25mm to 3.25mm or 3.25mm to 5.5mm) can be used to extend the rod construct. The Minit Torque Limiting Handle (PC1011-30) can be used to lock the set screws in the connectors to the rods.
The set screws for the 3.25mm to 3.25mm rod connectors must be tightened using the 3.0mm Captive Hex Driver (PC1007-30). The set screws for the 3.25mm to 5.5mm rod connectors must be tightened using the 3.5mm Captive Hex Driver (ET1051-01).
Note: Rod-to-rod connectors have not been validated for use through the NexPosure portal.
Extracting the Cap Screw
A Cap Screw Extractor is included in the event that the cap screws become stripped. To extract a stripped cap screw, attach the Inline Ratcheting Handle to the Cap Screw Extractor and pass the extractor assembly through the Marksman Countertorque Guide into the head of the cap screw. Remove the cap screw with the extractor.
Reverse-thread EZ out cap screw extractor when set
screw is stripped
Total Page Count is 16
14 Minit® Posterior Cervical & Upper Thoracic Fixation System Surgical Technique
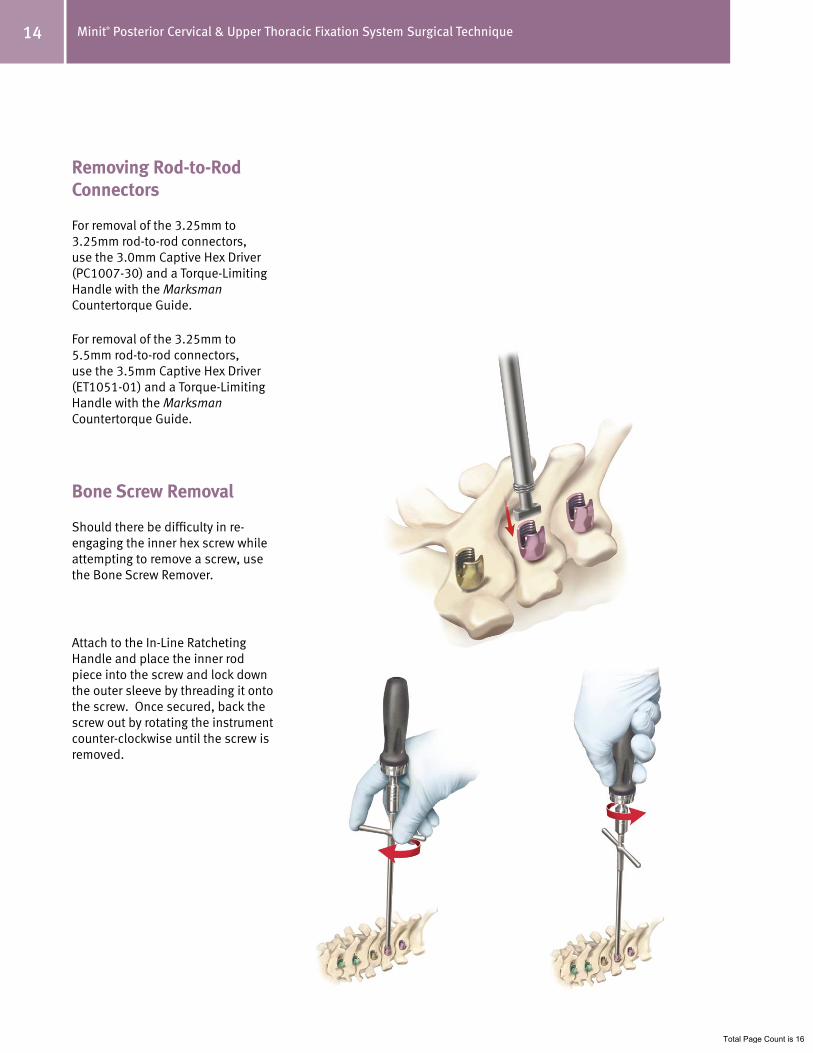
Removing Rod-to-Rod Connectors
For removal of the 3.25mm to 3.25mm rod-to-rod connectors, use the 3.0mm Captive Hex Driver (PC1007-30) and a Torque-Limiting Handle with the Marksman Countertorque Guide.
For removal of the 3.25mm to 5.5mm rod-to-rod connectors, use the 3.5mm Captive Hex Driver (ET1051-01) and a Torque-Limiting Handle with the Marksman Countertorque Guide.
Bone Screw Removal
Should there be difficulty in re-engaging the inner hex screw while attempting to remove a screw, use the Bone Screw Remover.
Attach to the In-Line Ratcheting Handle and place the inner rod piece into the screw and lock down the outer sleeve by threading it onto the screw. Once secured, back the screw out by rotating the instrument counter-clockwise until the screw is removed.
Total Page Count is 16
15Minit® Posterior Cervical & Upper Thoracic Fixation System Surgical Technique
Instructions for UseMinit® Posterior CerviCal & UPPer thoraCiC Fixation systeM
Before using a product placed on the market by Zimmer, the operating surgeon should study carefully the following recommendations, warnings and instructions, as well as the available product-specific information (e.g., product literature, written surgical technique). Zimmer is not liable for complications arising from the use of the device outside of its indicated uses, surgical technique or judgment, product selection, and similar matters outside the control of Zimmer.
Compatibility between all Zimmer Spine product lines, including acquisitions of pre-existing product lines, has not been established. Only authorized combinations of products should be used. Only use as indicated in the Instructions for Use (Package Insert) and/or the Surgical Technique.
DesCriPtionThe Minit ® Posterior Cervical and Upper Thoracic Fixation System Implants are intended to be used as a temporary construct that assists in normal healing and are not intended to replace normal body structures. The system is intended to stabilize the spinal operative site during posterior fusion procedures, attaching to the spine by means of hooks and screws joined with spinal rods and should be removed after fusion. The components of the system are manufactured from Titanium that complies with ASTM F136 Standard for Ti 6Al-4V ELI. Refer to the Surgical Technique Manual for additional information on how to use these devices.
The System is equipped with components which are provided non-sterile. iMPlants are ProviDeD Clean anD MUst Be sterilZeD Prior to Use. instrUMents shoUlD Be CleaneD anD steriliZeD Prior to Use.
inDiCations When intended to promote fusion of the cervical spine and the thoracic spine, (C1-T3), the Minit Posterior Cervical and Upper Thoracic Fixation System is indicated for the following: DDD (neck pain of discogenic origin with degeneration of the disc confirmed by history and radiographic studies), spondylolisthesis, spinal stenosis, fracture, dislocation, failed previous fusion and/or tumors.
Hooks and RodsThe hooks and rods are also intended to provide stabilization to promote fusion following reduction of fracture/dislocation or trauma in the cervical/upper thoracic (C1-T3) spine.
Screws/ConnectorsThe use of screws is limited to placement in the T1-T3 in treating thoracic conditions only. Screws are not intended to be placed in the cervical spine.
Axial and Offset Rod ConnectorsThe Minit Posterior Cervical and Upper Thoracic Fixation System can also be linked to the TiTLE® and TiTLE® 2 Poly Axial Spinal Systems offered by Zimmer Spine using the Axial Rod Connectors, Dual Rod Connectors and The Tri Screw Dual Rod Connectors.
ContrainDiCationsContraindications include but are not limited to:
History of recent infection, systemic, spinal, or localized• Morbid Obesity• Mental Illness• Alcoholism or drug abuse• Fever or Leukocytes• Pregnancy• Metal sensitivity/ allergies to implant materials • Severe Osteopenia • Presence of congenital abnormalities, vague spinal anatomy, • tumors, or any other condition which may prevent secure implant screw fixation and/or decrease the useful life of the device
Any condition where the device will interfere with anatomical • structures or physiological performance, including inadequate tissue coverage over the operational site Patients unwilling or unable to follow post-operative care • instructionsAny circumstances not described under the heading, • inDiCations
WarninGs the FDa has placed labeling limitations on this device. • This device is not intended for screw attachment or fixation to the posterior elements (pedicles) of the cervical spine.Potential risks identified with the use of this device system, which • may require additional surgery, include: device component fracture, loss of fixation, non-union, fracture of the vertebrae, neurological injury, and vascular or visceral injury. The implantation of the • Minit System should be performed only by experienced spinal surgeons with specific training in the use of cervical-thoracic spinal systems because this is a technically demanding procedure presenting a risk of serious injury to the patient. This device system is not intended to be the sole means of • support. Its use without bone graft or in cases that develop into a non-union will not be successful. No spinal implant can withstand the loads of the body without maturation of a solid fusion mass, and in this case, bending loosening or fracture of the implant will eventually occur.
PreCaUtionsMixing of dissimilar metals can accelerate the corrosion • process. Stainless Steel and Titanium components must NOT be used together in building a construct. No components of the • Minit Posterior Cervical and Upper Thoracic Fixation System should be used with components from any other system or manufacturer, unless otherwise noted in the inDiCations section. The Delivery Instrumentation should be used to implant and connect the devices. The use of any other drivers, taps, or other instrumentation may compromise the integrity of the construct. As with all orthopedic implants, none of the • Minit Posterior Cervical and Upper Thoracic Fixation System components should ever be reused under any circumstances. Based on the fatigue testing results, the physician/surgeon • should consider the levels of implantation, patient weight, patient activity level, and other patient conditions, etc. which may impact the performance of the system.
The proper selection and compliance of the patient will ◦greatly affect the results. Patients who smoke have been shown to have an increased incidence of non-union. These patients should be advised of this fact and warned of the consequences. Other poor candidates for spine fusion include obese, malnourished, poor muscle or bone quality, and nerve paralysis patients.
Pre-oPerative instrUCtions Only those patients who meet the criteria of one or more of • the indications and did not have any conditions included in the ContrainDiCations should be selected for implantation. The implant components should be handled and stored carefully, • protected from any damage, including corrosive environments. The surgeon must confirm that all necessary implants and • instruments are on hand for the planned surgical construct. Components from other manufacturers should not be combined with components from the Minit Posterior Cervical and Upper Thoracic Fixation System.All implants and instruments must be unpacked, inspected for • damage, cleaned and sterilized prior to use in the operative field. Instruments requiring sharp tips and / or edges to function should be inspected prior to use.
If such instruments have dulled and will not function optimally, they should be returned to Zimmer Spine for replacement.
intra-oPerative instrUCtions The • Minit Posterior Cervical and Upper Thoracic Fixation System Surgical Guide should be carefully followed. Extreme caution should be used around the spinal cord and • nerve roots, especially when inserting the screws.Breakage, slippage, misuse, or mishandling of the instruments • or implant components may cause injury to the patient or hospital personnel.The implants must be handled and contoured carefully to avoid • notching or scratching the surface.Before closing the soft tissues, all of the cap screws should be • tightened firmly according to the operative technique. Ex-planted implants must never be reused. • During construct assembly do not cross thread cap screws. • Rotate cap screws counter clock wise for 1 to 2 revolutions in screw head before attempting to thread cap screw into screw head.
Post-oPerative instrUCtions The surgeon must consider removing the implant after healing, • as implants can loosen, fracture, or corrode even after fusion has occurred. The risks and benefits of a second surgery must be carefully evaluated. The patient should be instructed in the proper use of crutches, • canes, and external braces, or any other weight bearing or assist devices that may be required. In addition, the patient should be instructed to limit those physical activities that would place excessive stresses on the implants or delay the healing process.The patient should also be instructed in the proper methods • to ambulate, climb stairs, get in and out of bed, and perform activities of daily living, while minimizing rotational and bending stresses.
PossiBle aDverse eFFeCts Pre-operatively, the patient should be made aware of the possible adverse effects of spinal implant surgery. Additional surgery may be necessary to correct some of these effects.
Bending, loosening, or fracture of the implants or instruments. • Metal sensitivity to a foreign body, including possible tumor • formation. Skin or muscle sensitivity in patients with inadequate tissue • coverage at the operative site, which may result in skin breakdown and or wound complications. Non-union or delayed union. • Infection. • Nerve or vascular damage due to surgical trauma, including loss • of neurological function, dural tears, radiculopathy, paralysis, and cerebral spinal fluid leakage. Gastrointestinal, urological, and/or reproductive system • compromise, including impotency, and or loss of consortium.Pain or discomfort. • Bone loss due to re-sorption or stress shielding, or bone • fracture, above or below the level of surgery. Hemorrhage of blood vessels and/or hematomas. • Mal-alignment of anatomical structures including loss of proper • spinal curvature, correction, reduction, and/or height.Bursitis. • Bone graft donor site pain. • Inability to resume activities of normal daily living. • Death.•
NOTE: The Minit Posterior Cervical and Upper Thoracic Fixation System Surgical Guide should be carefully followed. It supplies important additional information on the proper usage of the implants and instruments.
07.01380.001 Rev. B
Total Page Count is 16

Contact your Zimmer Spine representative or visit us at www.zimmerspine.com
www.zimmerspine.com
L142
3 Re
v. E
©20
09 Z
imm
er S
pine
, Inc
. (85
1S-1
00
1-0
0)
Zimmer Spine, Inc.
7375 Bush Lake Road
Minneapolis, MN 55439-2027
U.S.A.
Telephone 952.832.5600
or 800.655.2614
Fax 952.832.5620
Total Page Count is 16