Embed Size (px)
Citation preview

USER MANUAL
VER 1 .0.9
ELECTRONIC DRUM MODULEMIMP24B

2
1
OVERVIEW- MimicProisapowerful,moderndrummoduledesignedforincrediblesoundand
performance.- ItfeaturestheStevenSlateDrums5samplelibrary-24-bitmulti-channelsamples.Each
instrumentsupportsadjustmentofAttack,Sustain,Release,Tune,Pan,Volume(includingseparatevolumeforclose,overheadandroommics),DynamicsResponseandVelocityCurve.Separatevelocityandvolumeadjustmentforeacharticulationinsideinstruments(crossstick,etc.),easilycustomizablearticulationsforeachzoneonconnectedpads.
- Itfeaturesmorethan120instrumentswithseveralvelocitiesandround-robinhits.60easilycustomizabledrumkits.Youcancreatenewinstrumentswithkickandsnarelayeringandindividualeffectsforeachinstrument(Eq/Compressor).UsetheUSBflashdrivetoimportcustomsamplesandsongs.
- Thereare16triggerinputs-compatiblewithPearlTru-TracPadsandmostotherpads.AllthecymbalandauxinputshaveChokefunction.ItsupportsdualandtriplezonecymbalsaswellasdualzoneHi-Hat.
- The16balancedlineoutputsandstereoheadphonesmixedindependently-Twoseparatemixersforheadphoneandlineoutsallowingthedrummerapersonalmixthatdoesnotaffectmasteroutordirectoutputs.
- 120GBSolidStateDriveforinstrumentstorageplusUSBflashdriveforremovablestorage.
- MIDIinandoutforexternaltriggeringandmidirecording.- 7”IPSTouchscreen.- Additionalfeaturesinclude:Built-inmetronome.
- PlaybackingtracksusingUSBflashdriveorAUXinput.RecordandstoreperformancestoFlashdrive.

3
5
FROMTHEDESIGNTEAM
PearlMimicProisarevolutionarynewbreedofelectronicdrumsoundmodule.Forthefirsttimeinelectronicdrumsthemodulehasfullresolution,multimicrophone,and24-bitsamples.Adjustableroutingtothe16outputsallowsforincredibleflexibility.Forquickandeasyoperation,MimicProhasanIPSLCDtouchscreenandapushbuttonDataWheel(encoder).MimicProhastwomixers–headphonesandmastermix-forperfectmonitoringandperfectsoundatFOH.MimicProhasmorethan120instrumentsinthefactorylibraryanda120GBSSDdrivetoexpandyoursoundwithnewsamplepacks.MimicProevenallowsyoutoimportcustomsamples!
FROMTHESSDTEAMThesoundsinsideMimicProarethebestdrumsamplesevercreated.TheyarecalledStevenSlateDrumsorSSD.MimicPro’sfactorysoundlibraryhasthenewestSSD5Deluxe2drumsampleslibraryandasabonusitalsohascomponentsfromtheSSD4Deluxe1drumsamplelibrary.Theseareallfullresolutionmultimic24-bitsampleswithvelocitylayers.Theyhavealternativehitspereachvelocitylayerwhichisalsocalledround-robin.AnotherfeatureofMimicProisarticulations,theareaonadrumwherethedrummerstrikesitorcharacteristicsofacertainplayingtechnique.MimicPro’sfactorylibraryhasupto28velocitylayerswithupto12roundrobinhitspereachvelocitylayer(thatisanequivalentof336velocitylayersin“linear”layout)Thesehitsincombinationwiththeamountofchannelsinthesamplesplustheamountofarticulations,givestheuserupto3000samplesperinstrument.WithapowerfulphysicalmodelingengineMimicProsupportsupto4096velocities,soevenifaninstrumenthas28velocities,itwillstillhave4096levelsofdynamics,orvolume.Thisgivesusersthousandsofsoundnuancesoneachinstrument,somethingneverpossibleinelectronicdrumsbeforePearl’sMimicPro.

4
6
WARNINGSANDIMPORTANTNOTES
- MimicProandallaccessoriesneedcarefulhandling.- MakesurethatDataWheel(encoderknob)isprotectedwhileMimicProisbeing
transported.- DonotapplyunduepressureontheDataWheel(encoderknob).- DonotapplyphantompowertoMimicProlineoutputs.- MakesurethattheLCDscreenisprotectedduringtransportation.- MakesurenothingabrasivecontactsMimicPro’sLCDscreenduringtransportation.- Donottwistorstretchpowersupplycable.Handlewithcare.- DonotconnectMimicProtoanoutletthat’sbeingusedwithanairconditioner,
refrigerator,welder,washingmachine,microwaveoven–anythingthathasamotororinverter.Thismaycausenoise,improperfunction,orevenhardwaredamage.
- Trytoavoidusingtheunitnearstrongelectromagneticemittingdevices(bigtransformers,satellitetransmitters,etc)aswellashighpowerwirelesshardware.
- Makesuretoturnoffthepowerbeforemakinganyconnections.- NeverswitchoffMimicProimmediatelyafteranoperationisfinished,suchascopying
toorfromaUSBstick.Alwayswaitatleast5-10seconds.- UseonlyadrysoftclothtocleanMimicPro.NeveruseanychemicalstocleanMimic
Pro.- Youcanuseaprotectivefilm(likeusedonsmartphones)toprolongtheLCDscreenlife
andprotectitfrompossibledamage.- Ifthereisamalfunction,alldataonMimicPro’sinternalstorage(solidstatedrive)may
belost,ordamaged.Pleasebackupyourdata.- DonotexposeMimicProtohighvibrationlevels.- DonotbendanddropMimicPro.- DonotexposeMimicProtohighhumidity.- DonotuseMimicProintemperaturesbelow0°Celsius,32°Fahrenheit.- DonotkeepMimicProanditsaccessoriesunderdirectsunlight.- DonotdisassembleMimicProanddonottouchthecontactpointsonconnectors
(especiallyUSB).- KeepMimicProawayfromdustandliquids.

5
TABLE OF CONTENTS
Overview, From the Design Team, and From the SSD TeamWarnings and Important NotesTable of ContentsConnectionsHome ScreenSetting UpOperation / Touch ScreenData WheelSetupTriggeringCalibrating the Hi-HatHi-Hat Pedal CurveDynamicsTrigger Settings ThresholdTrigger Settings Rimshot Threshold and Head / Rim BalanceAdvanced Triggered SettingsTriggering Input SettingsTriggering Settings Kit Instrument AssignTriggering Settings Zone VolumeTriggering Settings Curves MIDI / Triggering Settings Crosstalk SuppressionTriggering Settings Split Ride / Triggering Settings MIDI Root NoteTriggering Settings Saving Pad Settings As PresetSetting Up a Pad and Piezo/Piezo/Switch Ride with the Mimic ProEdit KitMixerPhones Mix and Master MixMic, Mic FX, Mod, Reverb in Kit PresetsMetronomeSetlistPlayerRecorderSettingsInstruments ListSpecsCreditsDeclarations of ConformityChange Log
2 - 345
6 - 78 - 1011 - 1213 - 1414 - 1516 - 1718 - 2121 - 27
2728 - 2929 - 3030 - 3232 - 34
3435 - 3636 - 3738 - 3940 - 4343 - 4445 - 4647 - 4849 - 5657 - 60
60 62 - 77
7879 - 8080 - 8282 - 8384 - 9192 - 94
9596
97 - 9899 - 100

6
CONNECTIONS
Pic 01. Connections
1. TRIGGER INPUTS – Connect the triggers of your drum pads and cymbals to the
appropriate inputs. Use only standard 1⁄4” TRS cables for multi zone or TS cables for
single zone connectors and high quality, shielded cables to connect to Mimic Pro.
2. EXT & USB – Use a standard USB cable or thumb drive to connect to the module and add
additional sounds. The EXT RJ45 connection is of future expansion.
3. MIDI IN/OUT – Use a standard five-pin MIDI cable to transfer MIDI data to and from an
external MIDI source.
4. LINE OUT 1 – 6 – Six balanced TRS outputs.
5. HEADPHONE JACK – Connection for a pair of stereo headphones or in ears device.
6. POWER IN – Connect the DC power supply to this terminal. Secure the power cable to
the cable clip to prevent accidental unplugging.
7. AUX IN – Use a standard TRS cable to connect Mimic Pro to an external analog signal
source.
8. LINE OUT 7–14 –Use a DB25 cable to access channels 7–14.
You must turn off the 48 Volt Phantom Power in your mixing console before connecting the DB-25 connector.

7
Pic 02. Schematics
Pic 03. Mimic Side View
1. POWER – Press to turn power ON and OFF.
2. BOOT – For use with software updates.
3. SD CARD SLOT – for mp3 / wav song files, presets and backups import and export.

8
HOME SCREEN
Pic 04. Home Screen
The volume control adjustments on the Home screen only affect the headphone levels.
Windows that contain two squares in the upper right corner require a double tap to enter.
1. KIT DISPLAY SCREEN / HEADPHONES VOLUME SLIDER – This window displays the name
of the kit that is currently loaded and a headphones volume slider..
You can:
- Adjust the volume level of the headphones output by dragging your finger to the
desired setting.
- Double tap to open a drumkit selection dialog.
Note: you can turn data wheel to control the headphones volume and push the
data wheel to open kit selection dialog.

9
10
Note:youcanturndatawheeltocontroltheheadphonesvolumeandpushthedatawheeltoopenkitselectiondialog.
2. AUXINPUTTOHP–Adjustthevolumelevelofanexternalsoundsource(inheadphones)bydraggingyourfingertothedesiredsettingordoubletaptheAuxInputwindowtoactivatetheDataWheel.PresstheDataWheeltolockinyoursetting.
3. CLICKTRACK–Adjustthevolumeleveloftheclicktrack(inheadphones)bydraggingyourfingertothedesiredsettingordoubletaptheClickTrackwindowtoactivatetheDataWheel.PresstheDataWheeltolockinyoursetting.
Note:ClickTrackisnotametronome-it’sanaudiotrack(similartoyourwav/mp3songfiles)thatisplayedinsyncwithyoursong.Formoreinfopleasereviewsongplayersection.
4. PLAYER–Adjustthevolumelevelofyoursongplayback(inheadphones)bydraggingyourfingertothedesiredsettingordoubletapthePlayerwindowtoactivatetheDataWheel.PresstheDataWheeltolockinyoursetting.
5. PLAYLIST-DoubletaptoaccessthePlaylistwindow.6. PLAY/FASTFORWARD/REWIND–Navigateyourplaybackwiththesetouchscreen
buttons.7. KITSCROLLBUTTONS–NavigateforwardandbackwardthroughMimicPro’skits.8. SETLIST/STATUSWindow-Showsyourcurrentsetliststatus:
- “MainKitList”ifnocustomsetlistisloadedandKITSCROLLBUTTONSareselectingthekitsfromthemainkitlist.
- “ITEMNFROM[SETLISTNAME]”ifyouhaveacustomsetlistloadedandactive,withitemNcurrentlyselected.
Note:doubletaptobuild/load/saveasetlistofkitsinperformancesequencewithassignedtemposettingsforeachkit.
9. TEMPO/METRONOMEVOLUME–AdjustthemetronometimesignatureandBPM.DoubletaptoaccesstheTempowindow.
Dragyourfingertoadjustmetronomevolume.
10. SONGPLAYERSTATUS-Showsyourcurrentsongplaybackposition/length.- Dragyourfingertoadjustsongposition.- DoubletaptosetLOOPSTART/ENDpositionsforloopplaybackmode.

10
Pic 05. Player Timeline Settings
Brown bar shows your current song position. You can rewind your song position dragging this
bar left/right with your finger.
A / B flags show your start and end loop points. You can set your loop point dragging these
flags with your finger.
Alternatively, you can use Set A / Set B buttons to set your A/B positions - start the song
playback and press Set A / Set B at the moments where you want your A /B loop points to be
placed
11.LOOP PLAYBACK ENABLE - enable player loop mode.
12.VOLUME FADERS – Independently adjust the volume for the Kicks, Snares, Toms, Hihat,
Ride, Overhead, Room in the headphones mix.
TOP NAVIGATION BUTTONS:
Note: you can adjust the navigation buttons order in SETTINGS/USER INTERFACE/”TOP
BAR SETUP” dialog.
13.RECORDER – Access the Mimic Pro’s RECORDER.
14.SETTINGS – Access your Mimic Pro’s SETTINGS.
15.TRIGGER – Access the Trigger settings menu.
16.EDIT KIT– Build your custom kit
17.MIXER – Access your Mimic Pro’s MIXER
18.HOME – Press the Home icon in any screen to return to the HOME SCREEN.

11
SETTING UP CAREFULLY UNPACK THE MODULE. If mounting the module on the Pearl RDMM Module
Mount, follow the steps below. If using without a module mount, move to “Plug in your pads”.
1. Carefully turn the module upside down.
2. Be sure to protect the screen and Data Wheel/encoder from damage.
3. Install the mount ONLY with the included 10-32 screws.
4. Screws that are too long will damage the unit.
PLUG IN YOUR PADS.
1. Using the diagram in the “Connections” section, plug appropriate pads into each 1⁄4”
jack.
2. Dress cables neatly and away from AC sources to avoid crosstalk.
3. Do not use unshielded cables.
4. Additional information on editing and tweaking your pads is included in the Trigger
section.
5. The default settings are for Pearl Tru-Trac pads.
CONNECT YOUR HEADPHONES.
1. Plug in headphones to the 1⁄4” headphone jack on the back of the unit. The volume is
controlled digitally via the encoder & touchscreen.
2. Be sure to lower the volume before you start playing, and slowly raise to a comfortable
level later.
3. The headphone output has it’s own mixer,
where each instrument can be adjusted independently.
CONNECT TO OTHER AUDIO EQUIPMENT .
1. Line Out 1-2 carry the Master Mix (balanced line outputs).
Mimic Pro has a dedicated MASTER MIX mixer that controls the instrument volumes
independently for your Master Mix.
If you need a mono signal on master outs, you can use Mixer/Monitor&Settings/Mixer
Settings/ “Force Master Out To Mono” function.
13
CAREFULLYUNPACKTHEMODULE.IfmountingthemoduleonthePearlPEMMModuleMount,followthestepsbelow.Ifusingwithoutamodulemount,moveto“Pluginyourpads”.
1. Carefullyturnthemoduleupsidedown.2. BesuretoprotectthescreenandDataWheel/encoderfromdamage.3. InstallthemountONLYwiththeincluded10-32screws.4. Screwsthataretoolongwilldamagetheunit.
PLUGINYOURPADS.
1. Usingthediagraminthe“Connections”section,plugappropriatepadsintoeach1⁄4”jack.
2. DresscablesneatlyandawayfromACsourcestoavoidcrosstalk.3. Donotuseunshieldedcables.4. AdditionalinformationoneditingandtweakingyourpadsisincludedintheTrigger
section.5. ThedefaultsettingsareforPearlTru-Tracpads.
CONNECTYOURHEADPHONES.
1. Pluginheadphonestothe1⁄4”headphonejackonthebackoftheunit.Thevolumeiscontrolleddigitallyviatheencoder&touchscreen.
2. Besuretolowerthevolumebeforeyoustartplaying,andslowlyraisetoacomfortablelevellater.
3. Theheadphoneoutputhasit’sownmixer,
whereeachinstrumentcanbeadjustedindependently.
CONNECTTOOTHERAUDIOEQUIPMENT.
1. LineOut1-2carrytheMasterMix(balancedlineoutputs).
MimicProhasadedicatedMASTERMIXmixerthatcontrolstheinstrumentvolumesindependentlyforyourMasterMix.
Ifyouneedamonosignalonmasterouts,youcanuseMixer/Monitor&Settings/MixerSettings/“ForceMasterOutToMono”function.

12
2. Line Out 3-14 are assignable inside Mimic Pro (balanced line outputs). Typical use would
be a direct-out for individual instruments to feed a mixer or audio interface. You can
assign individual instruments to line outs 3-14 in SETTINGS/ROUTING dialog.
3. It is recommended to use DB25 to Jack cables, not DB25 to XLR cable. Mimic Pro
outputs are line level outputs, thus these should not be connected to your mixer or
sound card microphone inputs. 4. The AUX IN (stereo line input) can be used to input pre-recorded music, a monitor mix,
or other reference source.
5. If you only use master outputs (for example - if you only use Mimic Pro through PA) -
you can use Mixer/Monitor&Settings/Mixer Settings/ “Send HP Mix To Master Out” to
make clone your HP output to Mimic Pro master out. This way you can control your PA
from home screen.
WARNING: Be sure to NOT apply phantom power to the Mimic Pro line outs, this can
damage your module.
CONNECTING THE POWER SUPPLY.
1. Select an AC outlet that is safe from foot traffic, dry, and has at least 3 amps of current
to spare. This specifically pertains to live stage performance environments where
voltages could vary.
2. Ensure that this outlet is closely related electrically to any other equipment that Mimic
Pro will be connected to.
3. Connect the AC cable to the power supply and then your local mains AC.
4. Connect the DC cable to the Mimic Pro.
5. Turn the power switch located on the left side to the “I” (ON) position.
You are ready to begin!

13
OPERATION
Pic 06. Mimic Front Panel
1. DATA WHEEL.
2. 7” LCD TOUCH SCREEN.
TOUCH SCREEN Mimic Pro is operated primarily through a touch screen interface. Most operations are done
by tapping the screen, double tapping and dragging.
Tap on the screen to press buttons, open menus and choose positions in menus. Tap and drag
to adjust faders and other continuous controls.
There are also areas on Mimic Pro’s user interface that accept a double tap, they are usually
have double square pictagram in the right top corner. For instance, on the Home Screen,
double tap on the Headphones Fader and it will open the Load Kit menu.
Pic 07. Mimic Top Bar

14
Note: You don’t have to tap in the exact point on the fader. You can tap at any place inside
fader frame and make adjustments. This is especially useful if your fader becomes hidden
outside of the screen’s visible area.
DATA WHEEL
Pic 08. Mimic Front View and Data Wheel
Mimic Pro also has a Data Wheel (encoder) which can be rotated as well as pressed to input
values during some operations.
By default, rotating the Data Wheel adjusts the headphone volume fader. If controls in Edit
Mode are selected, or if menus are not opened, then rotating the Data Wheel will adjust the
selected fader.
When on the Home Screen, pressing the Data Wheel will open the Load Kit menu. By rotating
the Data Wheel, you can scroll through the presets selections and press the Data Wheel to
load the chosen kit preset.

15
If you double tap on a fader, a red blinking frame around the fader will appear, (see Pic 09).
This means that the fader is in Edit Mode and can be adjusted using the Data Wheel. To exit
Edit Mode, push the Data Wheel, or tap on any free space on the screen.
Pic 09. Fader Edit Mode
When you open any menu, you can navigate in that menu by rotating the Data Wheel and
then select the menu item by pressing the Data Wheel.
Note: Double tapping any window with two squares in the right top corner of the box (see Pic
10) will open the corresponding menu.
Pic 10. Doubleclick Box
Note: Double tap on any fader to activate the Data Wheel Edit Mode.

16
17
SETUPMOUNTINGMIMICONTHESTANDCarefullyturnMimicupsidedown,ensuringthatMimicPro’sdisplayandDataWheelareprotected.Onceturnedover,screwthemountingplatetoMimicPro’sbase.Donotovertighten,usegentleforceonly.Ifthescrewisnotthreadingproperly,thentheremaybeaproblemwiththescrew(toolong,ortoobig).UseONLYthescrewsthatcomewiththemounttopreventdamagetointernalcomponents.UseonlyPearl’sPEMMModuleMount.AfterthemountisattachedtoMimicProyoucanattachthemoduletoastandusingasuitableall-purposeclamp.
CONNECTINGTHEPADSMimicProsupportsallpopularelectronicdrumpadsandcymbalsfromdifferentmanufacturers.Inmostcases,padsmustbeconnectedtoMimicusing1/4”(6.3mm)TRS(TipRingSleeve),balanced/stereocables.Therearealsounbalanced/monocableswhicharethesamesize,calledTR(TipRing),mono-thesearenotrecommendedforusewithMimicPro.Itisrecommendedtoalwaysusebalanced/stereoconnectorsforpadsthatyouareconnectingtoMimicPro.
Pic 11. Connector Types

17
Most drum pads and cymbals connect via a single TRS cable except Hi-Hat and many Ride
cymbals (there are some ride cymbals on the market that use single cable connection). Hi-Hat
uses two cables, because it has a pad jack and controller (device which reads Hi-Hat pedal
movement) jack. Ride cymbals use two cables to send to Mimic Pro signals from Bow/Edge
zone and from bell zone separately.
Connect pads to corresponding Mimic Pro input jacks. The names of each input is printed on
the back panel. MAKE SURE MIMIC PRO IS TURNED OFF BEFORE CONNECTING COMPONENTS.
After all components are connected, turn Mimic Pro ON. Make sure you have headphones
plugged into the HP output, or a PA system plugged into outputs 1 and 2 to be able to hear
sound when testing.
Since Mimic Pro is designed to work with many different brands of pads, it is recommended
that when you first turn it on you should choose between pad presets and set the triggering
sensitivity. This is the most important step in getting the best triggering and dynamic response.
Visit the next sections, “Example Setups” and “Getting Started” for Quick Start instructions.
Visit the “Detailed Instructions” section for more information on how to tweak the advanced
triggering and mixing options featured inside Mimic Pro.

18
TRIGGERING When you power up the Mimic Pro for the first time you will see the Home Screen, (Pic 12).
Pic 12. Triggering Button
To begin triggering, you will need to address 3 things on the Home Screen.
1. Make sure you turn the headphones fader down to protect your ears and headphones.
You can do this on the touch screen with your finger, or simply by turning the Data
Wheel.
2. Double tap on the headphones fader to open the Kit Loading menu and load the first Kit
Preset in the list by selecting it and pressing the Load button.
3. Press the Trigger button to open the Trigger Settings menu.
Step 3 will take you to the Triggers Setting screen (Pic 13).
Note: Trigger lock screen can be disabled in Settings/User Interface.

19
20
Pic13.TriggeringSettings
UnderstandingthisscreenisthemostimportantpartofgettingtheMimicPrototriggerdrumscorrectlywithyourplayingstyle.Onthepicture,therearetwomenus(numbered1and2inPic13).
1. ThisistheTriggerInputChannelthatiscurrentlybeingadjusted.Taponthemenuandchoosethedesiredinputchanneltoadjust.
Pic14.InputChannel
Note:MIDIPADisa“virtual”midipad.YoucanuseittoextendthetriggerinputscountofyourMimicProwithsomeexternalmidigearlikemidikeyboardoranotherdrummoduleconnectedwithaMIDIcable.Youcanassignthedesiredmidinotesforthese“virtualpads”intriggersettingsandthusmakeyourMimicProrespondtoanexternalmidievent.

20
2. This is the Trigger Pad Preset Selector for the selected Trigger Input Channel, which
contains presets for most pad models by major manufacturers.
Pic 15. Pad Presets
To start setting up the triggering, choose your Trigger Input Channel and see if the pad
connected to that trigger input is in the Trigger Pad Preset Selector list. If it’s not in the preset
list, select the closest pad to your pad (judging by the used technology and materials). If your
pads are in the list and they are all in good condition, then you’re almost set after selecting the
right pad presets. The only things left to do after setting the pad presets are calibrating the
Hi-Hat pad, and adjusting dynamics to your taste.
Note : If your pad is not in the preset list (or if your pad is in the preset list, but dynamic
response is off and can’t be adjusted with Top Velocity as described below) go to the section
Advanced Triggering Settings.
Note: The trigger input meter should never go red as seen here (Pic 16). If it’s going red during
normal playing, then you need to lower the input gain setting. Read about that below in the
section Advanced Triggering Settings.

21
Pic 16. Input Meter Overload
CALIBRATING THE HI-HAT
Pic 17. Hi-Hat Calibration
Install the Hi-Hat pad onto a stand according to your Hi-Hat pad’s manual. Hi-Hats may be
single zone or dual/multi zone and they always have a controller of some type. It can be a
device inside the bottom, or top hat, or a pedal with a built-in controller. The controller reads
the pedal movement and translates the data into Mimic Pro.

22
First of all, make sure that the correct controller output cable goes into the Hi-Hat controller
input in Mimic Pro. Reminder - the cables must be 1⁄4” TRS and not a 1⁄4” mono connection.
Next select the Hi-Hat from your trigger instrument window shown in (Pic 14). Then select the
correct Hi- Hat preset in the Mimic Pro’s triggering settings window (Pic 15). Then proceed to
TRIGGER-HH Control- HH Pos tab to calibrate your Hi-Hat (Pic 17).
Make sure that your Hi-Hat is in the fully open position. If a controller is built into the pedal,
fully open means not applying any pressure on it. If the controller is on a Hi-Hat stand, the top
hat must barely touch the controller’s contact point without applying any pressure on it (Pic
18).
Pic 18. Hi-Hat Controller Contact Point
Note: Like all other cables for Mimic Pro, the Hi-Hat control cable must be a TRS cable. Do not
assume an existing wiring harness from another e-kit uses a TRS cable for Hi-Hat control. Many
do not! Without a TRS cable from the Mimic Pro to your controller, your Hi-Hat will not
calibrate or function properly.
On the left side of the HH Control-HH Pos window there is a grey meter with three strips on it
(number 1 on Pic 13). Strips are red, yellow and blue. Make sure that the Hi-Hat controller
cable is connected to the correct input by applying pressure to the pedal. If the grey meter
moves then the connections are correct.
HERE ARE STEPS TO CALIBRATE THE HI-HAT:
1. Select proper preset for your hi-hat pad. The names of presets are pretty much self
explanatory.
2. With the closed hi-hat dial the Input Gain according to the on-screen text, see (Pic 19).

23
Pic 19. Hi-Hat Input Settings
3. With the closed hi-hat use the Capture Top Velocity function for Bow and Edge (if pad
preset has edge zone) tabs, see (Pic 20) and (Pic 21).
Pic 20. Hi-Hat Top Velocity Bow

24
Pic 21. Hi-Hat Top Velocity Bow
4. On this step the controller calibrations starts. Go to “HatControl-HH Pos” tab, see (Pic
22).
Pic 22. Hi-Hat Control Settings
5. Use “Capture Close/Open Position” function to dial your tight closed and full open
settings, see (Pic 23). It is also possible to set these parameters manually using Full Open

25
and Extra Tight Closed faders, but using the “Capture Close/Open Position” function is
strongly recommended.
Pic 23. Hi-Hat Control Settings Capture
6. Dial the “Close/Open Border Threshold” fader manually, see (Pic 24). This fader is
represented by yellow line on the bar on left from faders. Basically this parameter is the
position of controller where chick sound is generated, so the hi-hat stops being open
and begin being closed, but does not actually closed yet. There are few typical way to
set it up. Most people prefer double-tap the fader and move the yellow line with the
Data-Wheel from bottom to top direction while playing some chick patterns and some
“hi-open-hat-then- close-it-with-pedal” patterns. You’ll find a position, where the hi-hat
response is good for your playing style.

26
Pic 24. Hi-Hat Close/Open Border
7. For further calibration, go to Setting tab for Hi-Hat pad, see (Pic 25). First parameter on
this tab is Footsplash Sensitivity. Dial this fader to your playing style. Keep in mind that it
always better to have right balance. High values will make hi-hat splashing all the time,
so keep this parameter value as low as possible for comfortable footsplashing.
Pic 25. Hi-Hat Calibration Settings
8. Close To Open Transition Sensitivity is the time that Mimic Pro waits for the hi-hat
transition from closed to open after closed hat hit. For accurate and fast players it’s ok

27
to have this parameter in 5-10 range. Slow or less accurate playing style works better
with 20-40 values.
9. Hat Move Denoise is a parameter that filters unwanted noise from the Hi-Hat stand or
trigger pad. Higher values may affect the actual top hi-hat pad signal, so it is
recommended to use values from 0 to 10. The lower value the better.
Note : After Hi-Hat setting up and calibration is done, it is recommended to save your custom
Hi-Hat pad preset by pressing Settings button on the right side of preset name bar and using
SAVE PAD SETTINGS AS A PRESET function. Read more on that below.
HI-HAT PEDAL CURVE Mimic Pro has a tool to adjust the controller behavior to your taste even more. It’s called
Hi-Hat Control Curve, see (Pic 26). It has fixed points on Extra Tight Closed, Max Open and
Close/Open Border levels, but it is possible to adjust controller behavior in-between these
points. It is strongly recommended to use this feature after you consider yourself an advanced
Mimic Pro user.
Pic 26. Hi-Hat Pedal Curve
Note: Some Hi-Hats, for instance, Pearl E-Pro EHH 2 may work better if you apply just a little bit
of pressure on the controller contact point to pre-load the spring. To do that, loosen the clamp,
put a small amount of pressure on the top hat, it will press down the spring a little, then
tighten the clutch back. Make sure that grey meter moved down just a little bit. If it went down
too much, then there is too much pressure.

28
29
putasmallamountofpressureonthetophat,itwillpressdownthespringalittle,thentightentheclutchback.Makesurethatgreymetermoveddownjustalittlebit.Ifitwentdowntoomuch,thenthereistoomuchpressure.
ADJUSTINGTHEDYNAMICSWITHTOPVELOCITYFADER
Whyadjustthedynamics?Theanswerissimple.Mostpadsareusingpiezosensorstopickupanaudiosignal,whichisgoingintotheMimicProtriggerinputs.Allpiezosensorshavedifferentcharacteristics.Eventhesamepiezomodelmadeinonebatchinthesamedaycouldhavedifferentcharacteristics.Thedifferenceisnothuge,butitmaybeenoughtofeel.Inthiscaseyoucanadjustthetriggeringdynamicsandplayabilityinaquickandconvenientway.
Toquicklyadjustdynamicresponsefromthepad,useTopVelocityfunction.Youcanadjustfaderautomaticallybypressing“CaptureTopVelocity”button,whichisrecommended,see(Pic27).Also,youcanadjustitmanuallybyreadingbelowandunderstandinghowitworks.
Pic27.TopVelocityAdjustment
TomanuallyadjusttheTopVelocityfader,youneedtounderstandhowthisparameterworks.Basically,itmakesitharder,oreasiertoreachtopvelocityontheloadeddrumsampleinstruments.ThehigheryousettheTopVelocityvalue,theharderitistoreachthetopvelocity,youhavetohitreallyhardtogetthetopvelocity.ThelowerTopVelocity,theeasierit

29
30
istoreachthetopvelocity.Youdon’tneedtohitithardatallandyoureachthehighestvelocity.WhenareyouadjustingtheTopVelocityfadertheredstripinthemeterontherightsidefromthatfadermovesalongwiththetopedgeofTopVelocityfader.
TopVelocityadjustmentisavailableforeachzoneoftheconnecteddrumpad.IfyougetagreatresponseontheCenterzoneofyoursnaredrumpad,butyouhavetohittheRimzonereallyhardtogettheneededdynamicresponse,tryadjustingitfortheRimzone.Samewillworkviceversa–ifyouarenothittingreallyhardandgettingtheloudestvelocitythensettingtheTopVelocityfadertoahighervalueshouldhelp.
Itishelpfulwhenyouneedtoevenoutthedynamicresponseofdifferentzonesonbigpadssuchascrashandridecymbals.UsuallytheyhaveonepiezointheBowzoneandswitchesintheEdgeandBellzones.Thesezonesareusuallyplayedwithdifferentplayingtechniqueslikehittingwithtipofthestick,orwithshankofthestick.Thismakesthedynamicresponseveryuneven.UseTopVelocitytoadjustthedynamicresponseofdifferentzonesonyourdrumpadforanevenplayingfeel.
Note:Whyisthepadconditionimportant?Old,wornpadstendtohavedifferentpiezosensorcharacteristics.Wornpadsmayhavelowoutputlevelsfromthepiezosensors.Ifyouareusingsomewell-wornpads,youmayneedtomakeextensivechangestotheexistingpreset(evenifthepresetinMimicPromatchesyourpadmodel)toplaythepadwiththecorrecttriggeringanddynamics.
Note:SettingTopVelocityeventolowvaluesdoesnotaffectdynamicrangeinanyway.Itjustmakesiteasierforthedrummertoplayormakesamorenaturaldynamicresponse.
TRIGGERSETTINGSTHRESHOLDTheThresholdparameter(seePic21)setstheborderthatcontrolstheflowofaudiobeingsenttothetrigger.It’sveryimportanttounderstandhowitworksandhowtouseit.
Pic28.TriggeringSettingsThreshold
WhenyouadjusttheThresholdthereisacorrespondingbluestripmovingalongwiththefaderintheTriggerinputmeter,see(Pic27).

30
31
IftheMimicProisconnectedtoabadpowersource,itcancauseahuminMimicPro’striggerinputs.Also,ifthereissomethingvibrating,orverynoisylocatednearyourelectronicdrumkit,forinstance,aloudbassguitarcabinet,thismaycreatenoiseinyourpadsensors.Allthishumandnoisemaycausemisfires.Forinstance,ifyouhearrandomghostnotestriggeringonthesnare,tom,oranyotherdruminput,thismeansthatthereissomeaudiosignal(hum,noise)goingtothattriggerinput.YoucanfilterthisoutbyincreasingtheThresholdvalue.
Apartfromnoisedescribedabove,thereisonemorekindofnoisethatmaycausefalsetriggering.Itoccurswhenyouarehittingoneofthepadsonyourdrumkitandittriggersoneoftheotherpads.ThisiscalledCrosstalk.Youwouldhavetohaveaseparatestandforeverydrumtoavoidthis.Butconditionsarealmostneverperfect.Usuallycrosstalkhappenswhenpadsaremountedonthesamestand,sowhenyouhitonepad,theenergyfromthehitgoestothestandandreachesotherpadscausingfalsetriggers.MimicProhastheAdvancedCrosstalkEliminationSystem,youcanreadaboutthisbelowintheCrosstalkEliminationsection.EventhoughMimicProhastheCrosstalkEliminationSystem,insomecases,youcanjustusetheThresholdfaderinstead.Especiallyifcrosstalkisveryminorandyoudon’thavetoincrease30-45value.
Note:InsomeveryrareconditionsyoumayneedtosetThresholdparametertoveryhighvalues–100,orevenmore.Thismayhappenif,forinstance,yourdrumkitislocatedonabigsubwoofer.Thisseemsextreme,butsometimesdrummershavetoworkintheseconditions.
Note:It’sveryimportanttounderstandthatThresholddoesn’tfilteruselesssignalsandonlyallowstheactualsignalfromyourdrumpads.ThresholdfilterseverythingthatcomesintoMimicPro’striggerinput.So,thehigherThresholdvaluethelesssofthitscanbetriggeredbyMimicPro.IfyousetThresholdto50onyoursnaredrumyouprobablywon’tbeabletoplayghostnotes,becausetheywillbefilteredbyThreshold.AlwaysuseThresholdcarefullyandincreaseitinsmallstepscheckingtriggeringwithsofthits.
RIMSHOTTHRESHOLDANDHEAD/RIMBALANCEUnlikeThresholdfaderthisparameterhasnothingtodowithfilteringunwantedaudiosignal.UsingRimshotThresholdallowsyoutoadjusthowhard,orhoweasyitistoplayarimshotarticulation.IfyourpadhasapiezoincenterandaswitchontherimlikePearlTruTracpads,theRimshotThresholdmustbesetontheCenterzonetabonly.Ifyourpadhastwopiezosensors(centerandrim)likeatypicalmeshheadelectronicdrumpad,itmustbesetonboth-Centerzonetabandrimzonetab.

31
32
WhenyouareadjustingtheRimshotThresholdthecorrespondingyellowstripontriggerinputmeter(seePic20)willmovealongwiththefader.
Pic29.TriggeringSettingsRimshotThreshold
Ifyouuseadrumpadwithtwopiezosensors–oneonthecenterandoneontherim,liketypicalmeshheadpadsthenbothzonetabshaveaRimshotThresholdfader–CenterandRim.ThismakessettingtheRimshotThresholdmorecomplicated,butifsetupcorrectly,youcanhavefulldynamicrangeofrimarticulation(rimclick,orsidestick)withtheabilitytoplayrimshots.ThereareafewstepstosetuptheRimshotThresholdonsuchdrumpads:
1. WhileontheCenter-Piezotab,hittherimzonewithyourtypicalhardesthit,butdon’thititharderthanyouwouldnormallyplaythehardesthits.SettheCenterRimshotThresholdvalue(yellowlineonmeter)justabovethemetergreybar,see(Pic30).
Pic30.CenterPiezoRimshotSetup
2. WhileontheRim-Piezotab,hitthecenterzonewithyourtypicalhardesthit,butdon’thititharderthanyouwouldnormallyplaythehardesthits.SettheRimRimshotThresholdvalue(yellowlineonmeter)justabovethemetergreybar,see(Pic31).

32
33
Pic31.RimPiezoRimshotSetup
Afterthesetwostepsarecompletedyoushouldhavefulldynamicrangeofrimarticulationavailableforplayingaswellasbeingabletoplayrimshots.Ifrimshotsareveryeasytoplay,youmayneedtoincreaseRimshotThresholdforRimPiezo,orforbothpiezos.Ifrimshotsaretoohardtoplay,youmayneedtolowertheRimshotThresholdonsomeofthepiezos,orbothpiezos.
Ifyouareworkingwithpad,whichhastwopiezos,liketypicalmeshheadpad,thenyoucanseeHead/RimBalancefader.Withthissettingyoucanadjustthebalanceintriggeringbetweentheheadandrimzones.Insomecases,youcanhittherimandgotcenterzonetriggeredandviceversa.Usingthissettinghelpsinsuchsituations.
ADVANCEDTRIGGERINGSETTINGSADVANCEDSETTINGSincludeparametersthatallowtheusertosetuporadjustapad,whichisnotcurrentlyinpadpresetlist.Itisalsopossiblethatyoumightneedtoadjustthesesettingswhenapadiswornoroutdated.Thecharacteristicsofthepiezoarechangingwithageanditsperformancecoulddiminish.

33
34
Pic32.AdvancedTriggeringSettings
WhenyoupresstheAdvancedSettingsbutton,youwillseemoreparametersthanjustThreshold.ThereisalsoanInputSettingsbutton.Bypressingityoucansetuptheactualtriggerinputamplificationandsensitivity.Let’stakeacloserlookattheseparameters.
DETECTTIMEfadersetstheamountoftimethatthetriggeringenginemayhavetoanalyzethesignal.Bydefaultit’s3ms.Bysettingitloweronallpadsyoucanmakelatencylower,butitactuallywon’tbenoticeable.Whilethequalityoftriggeringmaybecomeworseifyousetitreallylow,thetriggeringenginewon’thaveenoughtimetoanalyzethesignal.Butallthisdoesn’tmeanthatsettingittohighervaluesitwillproducebettertriggering.Firstofall,youwillmakelatencyhigherbysettingittohighervalues.Rarelyareanyusefulinfoissenttothetriggeringengineafter3-4ms.So,3msworksfineonmostpads.
RETRIGGERCANCELadjuststhetriggeringengine’sabilitytoavoidmisleadingpartsofthesignalandnottriggerthem.Itusuallyhappensonacousticdrumtriggeringwhenthedrumshaverealheads.Theymayperforminanunpredictablemannerproducingspikesandotherflawsinthesoundwavesafteryouhitthedrum.Experimentingwiththisparametermayhelpinthissituation.
MASKTIMEsetstheminimumamountoftimebetweentwohits.Bydefault,it’s10mswhichisusuallyenoughforfastrollsandswells.10msmeansthatifyoumakeahitandthenafter
33
Pic31.RimPiezoRimshotSetup
Afterthesetwostepsarecompletedyoushouldhavefulldynamicrangeofrimarticulationavailableforplayingaswellasbeingabletoplayrimshots.Ifrimshotsareveryeasytoplay,youmayneedtoincreaseRimshotThresholdforRimPiezo,orforbothpiezos.Ifrimshotsaretoohardtoplay,youmayneedtolowertheRimshotThresholdonsomeofthepiezos,orbothpiezos.
Ifyouareworkingwithpad,whichhastwopiezos,liketypicalmeshheadpad,thenyoucanseeHead/RimBalancefader.Withthissettingyoucanadjustthebalanceintriggeringbetweentheheadandrimzones.Insomecases,youcanhittherimandgotcenterzonetriggeredandviceversa.Usingthissettinghelpsinsuchsituations.
ADVANCEDTRIGGERINGSETTINGSADVANCEDSETTINGSincludeparametersthatallowtheusertosetuporadjustapad,whichisnotcurrentlyinpadpresetlist.Itisalsopossiblethatyoumightneedtoadjustthesesettingswhenapadiswornoroutdated.Thecharacteristicsofthepiezoarechangingwithageanditsperformancecoulddiminish.

34
35
15-20ms,forexample,yournexthit-itwillbetriggered.Butifyoumakethenexthitinlessthan10ms(whichisnottypical)like5-6msthenthisnexthitwon’tbetriggered.Ifyousetthemasktimetoreallylowvalues,youcangetsomefalsetriggersbecauseinsomesituationsthetriggeringenginemaythinkthatonehitisactuallymultiplehitsandmaytriggermultiplehits.Sogenerally,it’srecommendedinmostcasestokeeptheMasktimearound6-10msandevenmore,upto20msforinstrumentslikekickdrum.
TRIGGERINGINPUTSETTINGS
Pic33.TriggeringInputSettings
INPUTGAINadjuststhesensitivityofthetriggerinput.Itvariesfrom0to17.Andit’sprettyeasytosetitup.Therearecoupleofnuancesthough.First-youneedtoavoidoverload.Ifthereisoverload,theinputmeterontherightofTopVelocityfaderwillturnred.Second-youneedtocheckThresholdvaluebeforesettinguptheInputGain.IdeallyThresholdmustbesetto0,oratleast10,orlower.
34
Pic32.AdvancedTriggeringSettings
WhenyoupresstheAdvancedSettingsbutton,youwillseemoreparametersthanjustThreshold.ThereisalsoanInputSettingsbutton.Bypressingityoucansetuptheactualtriggerinputamplificationandsensitivity.Let’stakeacloserlookattheseparameters.
DETECTTIMEfadersetstheamountoftimethatthetriggeringenginemayhavetoanalyzethesignal.Bydefaultit’s3ms.Bysettingitloweronallpadsyoucanmakelatencylower,butitactuallywon’tbenoticeable.Whilethequalityoftriggeringmaybecomeworseifyousetitreallylow,thetriggeringenginewon’thaveenoughtimetoanalyzethesignal.Butallthisdoesn’tmeanthatsettingittohighervaluesitwillproducebettertriggering.Firstofall,youwillmakelatencyhigherbysettingittohighervalues.Rarelyareanyusefulinfoissenttothetriggeringengineafter3-4ms.So,3msworksfineonmostpads.
RETRIGGERCANCELadjuststhetriggeringengine’sabilitytoavoidmisleadingpartsofthesignalandnottriggerthem.Itusuallyhappensonacousticdrumtriggeringwhenthedrumshaverealheads.Theymayperforminanunpredictablemannerproducingspikesandotherflawsinthesoundwavesafteryouhitthedrum.Experimentingwiththisparametermayhelpinthissituation.
MASKTIMEsetstheminimumamountoftimebetweentwohits.Bydefault,it’s10mswhichisusuallyenoughforfastrollsandswells.10msmeansthatifyoumakeahitandthenafter

35
36
TRIGGERINGSETTINGS-KITINSTRUMENTASSIGNThispartofthetriggeringsettingsisveryimportant,becauseitissavedwiththekitpreset.So,itcanbeuniqueforeverykit.Hereyoucanassigndifferentarticulationsfordifferentzonesonthedrumpad.Therearemanybrandsofpadsavailableandtheyalldifferinthetypeandnumberofzones.Likebow,orbelloncymbalsandhead,orrimonshells.
Onthekickandsnaredrumtherearetwolayerstoassignarticulationstothezones.Thisfeaturegivesyoumanypossibilities.Youcanjustmixtwosnaredrumstogetauniquesound,oryoucanturnoffthesidestickonrimzoneinLayer1andturnoffallarticulationsexceptsidestickinLayer2.ThiswayyoucangetuniquesidesticksoundsjustbyswitchingdrumsinSnareLayercell.Youcandothesameadjustmentforanyotherarticulation.
Pic34.TriggeringSettingsInstrumentsAssign

36
37
Pic35.TriggeringSettings-LayerInstrumentAssign
Ontheremainingtriggerinputstherearenolayers,sotherearemanyoptionsforcreatinguniquehybridkits.Forinstance,youcanputanysoundsyouwant(clap,tambourine,cowbell)ontomrims.Sincethissettingsaveswiththekitpreset,itcanbedifferentforeachkit.
TRIGGERINGSETTINGS-ZONEVOLUMEUnderthistabyoucanfurtheradjustdynamicsofdifferentzone/articulationbyincreasingordecreasingthevolumeofwholezone/articulation.Itisrecommendedtomakechangeshereafteryou’resurethatthepadhasbeenproperlysetupandyoujustneedtoadjustnuancestoyourtaste.
38
Pic36.TriggeringSettings-ZoneVolume
ZONEVOLUMEADJUSTMENTisavolumeadjustmentforthezone/articulation.Typicalexample-youwanttherimshotonthesnaretobequieterorlouder.AnotherexamplewouldbethechickontheHi-Hat.Thissettingdoesnotchangetriggerinputsensitivityordynamics.Itjustmakeszone/articulationofinstrumentlouder,orquieter.
TRIGGERINGSETTINGS-ZONEVELOMODUnderthistabyoucanfurtheradjustdynamicsofdifferentzone/articulationbyshiftingallvelocityvalueshigherorlower.
Pic37.TriggeringSettings-ZoneVelocityMod
ZONEVELOCITYADJUSTMENTshiftsvelocityvaluesforeachzonehigherorlower.Itisstronglyrecommendedtonotusethissettinginnormalsituations.Therearefewexampleswhenthissettingmaybeused.Forinstance,whentheheadofthepadhasapiezoandtherimisaswitchandthepadisverybiginsize.Inthissituationyoucanhittherimzoneandgetveryquiethit.ThesolutionisloweringtheTopVelocityfader,butinthatparticularsituation

37
38
Pic36.TriggeringSettings-ZoneVolume
ZONEVOLUMEADJUSTMENTisavolumeadjustmentforthezone/articulation.Typicalexample-youwanttherimshotonthesnaretobequieterorlouder.AnotherexamplewouldbethechickontheHi-Hat.Thissettingdoesnotchangetriggerinputsensitivityordynamics.Itjustmakeszone/articulationofinstrumentlouder,orquieter.
TRIGGERINGSETTINGS-ZONEVELOMODUnderthistabyoucanfurtheradjustdynamicsofdifferentzone/articulationbyshiftingallvelocityvalueshigherorlower.
Pic37.TriggeringSettings-ZoneVelocityMod
ZONEVELOCITYADJUSTMENTshiftsvelocityvaluesforeachzonehigherorlower.Itisstronglyrecommendedtonotusethissettinginnormalsituations.Therearefewexampleswhenthissettingmaybeused.Forinstance,whentheheadofthepadhasapiezoandtherimisaswitchandthepadisverybiginsize.Inthissituationyoucanhittherimzoneandgetveryquiethit.ThesolutionisloweringtheTopVelocityfader,butinthatparticularsituation
39
loweringtheTopVelocityfadermaynotfullyresolvetheproblemandthatiswheretheZoneVelocityadjustmentscomesintoplay.
TRIGGERINGSETTINGS-CURVESThistabcontainstwoamazingtoolstoadjustdynamicstoyourplayingstyle.Makesureyourpadhasbeenproperlysetupandthengotothistab.
DYNAMICSfaderadjuststhedynamicsofsamples,butunlikeVolumeAmp,whichadjustthevolumeofthewholezonetheDynamicsfaderadjuststhevolumeofthedifferentvelocities.Ifyousetthisfadertolowvalues,thenyouwillhavelessdynamicrange.Thismeansthatsofthitswillstillbesofthitsintermsofvelocitylayerplaying,buttheywillsoundlouder.Ifyousetthisfadertohighervalues,thesofthitswillalsobesofthitsintermsofvelocitylayer,buttheywillsoundquieter.
Pic38.TriggeringSettings-Curves
VELOCITYCURVEadjustsvelocities(velocitylayers)toyourplayingstyle.Ifyoudragthedotinleftbottomcornerup,thiswillmakesofthitsonthepadtriggermediumvelocitylayersininstrument.UnlikeDynamicsfadersthiscurvechangesactualsamplevelocitiesaccordingtocurvethatwasdrawn.Andyoubasicallycandrawwithyourfingerthousandsofvariationsofthecurve.

38
39
loweringtheTopVelocityfadermaynotfullyresolvetheproblemandthatiswheretheZoneVelocityadjustmentscomesintoplay.
TRIGGERINGSETTINGS-CURVESThistabcontainstwoamazingtoolstoadjustdynamicstoyourplayingstyle.Makesureyourpadhasbeenproperlysetupandthengotothistab.
DYNAMICSfaderadjuststhedynamicsofsamples,butunlikeVolumeAmp,whichadjustthevolumeofthewholezonetheDynamicsfaderadjuststhevolumeofthedifferentvelocities.Ifyousetthisfadertolowvalues,thenyouwillhavelessdynamicrange.Thismeansthatsofthitswillstillbesofthitsintermsofvelocitylayerplaying,buttheywillsoundlouder.Ifyousetthisfadertohighervalues,thesofthitswillalsobesofthitsintermsofvelocitylayer,buttheywillsoundquieter.
Pic38.TriggeringSettings-Curves
VELOCITYCURVEadjustsvelocities(velocitylayers)toyourplayingstyle.Ifyoudragthedotinleftbottomcornerup,thiswillmakesofthitsonthepadtriggermediumvelocitylayersininstrument.UnlikeDynamicsfadersthiscurvechangesactualsamplevelocitiesaccordingtocurvethatwasdrawn.Andyoubasicallycandrawwithyourfingerthousandsofvariationsofthecurve.
40
Youcanselectavelocitycurvefromalistoffactorypresets.ToresetVelocityCurvetodefaultsettings,choose”Linear”factorypreset.
Pic39.Triggering-VelocityCurvePresets
Youcansave/deleteyourowncustompresets.Onceyoudialsomecustomcurve-“savepreset”buttonwillappear.Pressitandsaveyourcustomnamedpreset.

39
40
Youcanselectavelocitycurvefromalistoffactorypresets.ToresetVelocityCurvetodefaultsettings,choose”Linear”factorypreset.
Pic39.Triggering-VelocityCurvePresets
Youcansave/deleteyourowncustompresets.Onceyoudialsomecustomcurve-“savepreset”buttonwillappear.Pressitandsaveyourcustomnamedpreset.
41
Pic40.Triggering-VelocityCurve:SavingPreset
Todeleteyourcustompreset-selectitfromthepresetslistandpress“DeletePreset”
MIDIInthistabyoucansetupMIDInotesandchannelsforyourpadzones.YoucaneditMIDIInputandMIDIOutputnotesandchannelsindependentlyfromeachother,ortogetherbypressingtheLinkEditbuttoninthebottomleftcornerofthescreen.

40
42
Pic41.Triggering-MidiSettings
YoucanalsousetheMidiLearnfunctiontospeeduptheprocessofsettingupmidinotes.PresstheMidiLearnbuttonfordesiredzoneandhitthenoteonthedeviceconnectedtoMidiInput.
TRIGGERINGSETTINGS-CROSSTALKSUPPRESSIONInTriggeringSettingsmainscreenthereisabuttonnearthePadPresetmenucalledSettings.Afteryoupressit,you’llseethemenuthatoffersCaptureCrosstalkandsomeothersettings.
41
Pic40.Triggering-VelocityCurve:SavingPreset
Todeleteyourcustompreset-selectitfromthepresetslistandpress“DeletePreset”
MIDIInthistabyoucansetupMIDInotesandchannelsforyourpadzones.YoucaneditMIDIInputandMIDIOutputnotesandchannelsindependentlyfromeachother,ortogetherbypressingtheLinkEditbuttoninthebottomleftcornerofthescreen.

41
42
Pic41.Triggering-MidiSettings
YoucanalsousetheMidiLearnfunctiontospeeduptheprocessofsettingupmidinotes.PresstheMidiLearnbuttonfordesiredzoneandhitthenoteonthedeviceconnectedtoMidiInput.
TRIGGERINGSETTINGS-CROSSTALKSUPPRESSIONInTriggeringSettingsmainscreenthereisabuttonnearthePadPresetmenucalledSettings.Afteryoupressit,you’llseethemenuthatoffersCaptureCrosstalkandsomeothersettings.
43
Pic42.Triggering-MoreSettings
Crosstalkcaptureallowsyoutoeliminatecrosstalkthat’shappeninginsidethekit.Forinstance,ifyouuseadrumrackthathoststheentiredrumkit,therewillbealotofcrosstalk.Whenyouhitonepadthevibrationandenergygothroughthewholedrumracktoalltheotherpads.So,whenyouhitatompadyoucangetthecrashcymbaltriggeringaswell.Itwillbealmostinaudible,becauseitwillbetriggeredwithfairlylowvelocity,butitwillbetriggered.Allelectronicdrumshavecrosstalkinsidethekit,andyoumayhavesomefalsetriggersthatmaketheplayingexperiencefarfromperfect.Forinstance,youwanttohitatomandcrashatthesametime.Youhitthematthesametime,butthetomhitwas1msearlierthanthecrashhitandthetomhittriggeredthecymbal(crosstalk),thismeansthatyouractualhitoncymbalmaynotbetriggered.Remember,itjustwastriggered1msbeforeandevenifitwastriggeredonaverylowvelocityitstillwastriggered.ConsideringthatMaskTimeis10ms,thetwohitswithlessthan10msbetweenthemmaynotbetriggeredcorrectly.That’swhycrosstalkeliminationisimportant.
IfyouhavetoplayinconditionswhenallyourdrumsareonthesamedrumstandandyouhavealotofcrosstalkyoucanstillrelyonMimicsmartCrosstalk(XTalk)Suppression.
TousetheXTalkSuppressionfunction,presstheCaptureCrosstalkbuttonintheSettingsmenuwithintheTriggeringSettingsscreenanditwilltakeyoutothescreen,whichyoucanseeon(Pic43).

42
43
Pic42.Triggering-MoreSettings
Crosstalkcaptureallowsyoutoeliminatecrosstalkthat’shappeninginsidethekit.Forinstance,ifyouuseadrumrackthathoststheentiredrumkit,therewillbealotofcrosstalk.Whenyouhitonepadthevibrationandenergygothroughthewholedrumracktoalltheotherpads.So,whenyouhitatompadyoucangetthecrashcymbaltriggeringaswell.Itwillbealmostinaudible,becauseitwillbetriggeredwithfairlylowvelocity,butitwillbetriggered.Allelectronicdrumshavecrosstalkinsidethekit,andyoumayhavesomefalsetriggersthatmaketheplayingexperiencefarfromperfect.Forinstance,youwanttohitatomandcrashatthesametime.Youhitthematthesametime,butthetomhitwas1msearlierthanthecrashhitandthetomhittriggeredthecymbal(crosstalk),thismeansthatyouractualhitoncymbalmaynotbetriggered.Remember,itjustwastriggered1msbeforeandevenifitwastriggeredonaverylowvelocityitstillwastriggered.ConsideringthatMaskTimeis10ms,thetwohitswithlessthan10msbetweenthemmaynotbetriggeredcorrectly.That’swhycrosstalkeliminationisimportant.
IfyouhavetoplayinconditionswhenallyourdrumsareonthesamedrumstandandyouhavealotofcrosstalkyoucanstillrelyonMimicsmartCrosstalk(XTalk)Suppression.
TousetheXTalkSuppressionfunction,presstheCaptureCrosstalkbuttonintheSettingsmenuwithintheTriggeringSettingsscreenanditwilltakeyoutothescreen,whichyoucanseeon(Pic43).
44
Pic43.XTalkSuppression
Onceyou’reintheXTalkSuppressionscreen,presstheEnableXTalkSuppressionbuttonsoitwilllightorangecolor.NowyouneedtogothroughtheXTalkLearnProcedure.SelectapadandpressStartCapturebutton,thenfollowtheinstructionsonthescreen.Forinstance,youneedtocaptureHeadandRimsignalfortheSnaredrum.PresstheStartCaptureHeadbutton,hitthesnareheadwith5highvelocitystrokes,andthenpresstheStorebutton.RepeattheprocessfortheSnareRim.Afteryou’vedonethisforRimzone,youhavetwooptions.First-StoreandExit,whichtakesyoubacktoXTalkscreen.Second-StoreandGotoNextPad,whichtakesyoutonextpad,soyoucancapturethecrosstalkfortheremainingpads.MakeitahabittoapplytheXTalkSuppressionfunctiontoallyourpadsbeforeaperformance.
Pic44.SnareXTalkSuppressionSetup

43
44
Pic43.XTalkSuppression
Onceyou’reintheXTalkSuppressionscreen,presstheEnableXTalkSuppressionbuttonsoitwilllightorangecolor.NowyouneedtogothroughtheXTalkLearnProcedure.SelectapadandpressStartCapturebutton,thenfollowtheinstructionsonthescreen.Forinstance,youneedtocaptureHeadandRimsignalfortheSnaredrum.PresstheStartCaptureHeadbutton,hitthesnareheadwith5highvelocitystrokes,andthenpresstheStorebutton.RepeattheprocessfortheSnareRim.Afteryou’vedonethisforRimzone,youhavetwooptions.First-StoreandExit,whichtakesyoubacktoXTalkscreen.Second-StoreandGotoNextPad,whichtakesyoutonextpad,soyoucancapturethecrosstalkfortheremainingpads.MakeitahabittoapplytheXTalkSuppressionfunctiontoallyourpadsbeforeaperformance.
Pic44.SnareXTalkSuppressionSetup
45
TRIGGERINGSETTINGS-SPLITRIDESincemostridecymbalsusetwoinputstheMimicProhastwoinputsfor3-zoneridecymbalpads,buttherearealsoridecymbalsonthemarketthathave3zonesusingonlyoneinput.IfyouturnontheSplitmodeforrideinputyoucanconnecttworidecymbals,whichuseoneinputpercymbal.Todothis,presstheSettingsbuttononTriggeringSettingsscreen,thenpresstheSPLIT2-WIRERIDEINPUTTOTWO1-WIRERIDEINPUTSbutton,whichyoucanseeon(Pic45).
Pic45.Triggering-SplitRideButton

44
46
TRIGGERINGSETTINGS-MIDIROOTNOTEDifferentaudiohardwareandDAWsfromvariousdevelopersoftendisplaydissimilarnamesforthesamenotenumbers.Forinstance,CubaseshowsC2fornotenumber36,whileProToolsdisplaysC1forthesamenote.TosetupmidinoterootnumberintheMimicPro,presstheSettingsbuttononTriggeringSettingsscreen.ThenPressSHOWMIDDLEC(60)NOTEASbutton,whichyoucanseeonPic46.Thiswillopenupthemenu,whereyoucanselectC3,C4orC5asrootnote.IfyouselectC3,theMimicwillshowC1asthenotenamefornumber36.
Pic46.Triggering-MidiRootNoteButton
TRIGGERINGSETTINGS-SAVINGPADSETTINGSASPRESET
MimicProhastheoptiontosaveUserPadPresetsandmanagethembyexportingandimportingthemfromaUSBstick.

45
47
Tosaveapadpreset,presstheSettingsbuttonintheTriggeringSettingsscreen.ThenpressSAVE[SELECTEDINPUT]PADSETTINGSASPRESETbutton,whichyoucanseeon(Pic47).
The[selectedinput]willindicateyourselectionwhenyouarereadytosaveapadpreset.Forinstance,ifit’sKickInput,itwilldisplayKICK.
Pic47.Triggering-SavePadSettingsButton
Afteryoupressthisbutton,themenuwillappearsaying“SelectKitPresetGroup.”Therearefouroptions:DRUM,CRASH,RIDE,HAT.Selectthecorrectoptionforyourpad.ThentypethenameforthepresetandpressEnter.
Nowyoucanseeyounewcustom-namedpresetinthelistoffactorypadpresets-Pic48,49
46
TRIGGERINGSETTINGS-MIDIROOTNOTEDifferentaudiohardwareandDAWsfromvariousdevelopersoftendisplaydissimilarnamesforthesamenotenumbers.Forinstance,CubaseshowsC2fornotenumber36,whileProToolsdisplaysC1forthesamenote.TosetupmidinoterootnumberintheMimicPro,presstheSettingsbuttononTriggeringSettingsscreen.ThenPressSHOWMIDDLEC(60)NOTEASbutton,whichyoucanseeonPic46.Thiswillopenupthemenu,whereyoucanselectC3,C4orC5asrootnote.IfyouselectC3,theMimicwillshowC1asthenotenamefornumber36.
Pic46.Triggering-MidiRootNoteButton
TRIGGERINGSETTINGS-SAVINGPADSETTINGSASPRESET
MimicProhastheoptiontosaveUserPadPresetsandmanagethembyexportingandimportingthemfromaUSBstick.

46
48
Pic48.OpenTriggerPresetList
Pic49.PadPresetsList:custompreset
48
Pic48.OpenTriggerPresetList
Pic49.PadPresetsList:custompreset
49
Note:ThepresetwillbesavedintheMimicProinternalstorageas*.mppfile.Youcanbackupyourcustomtriggerpresetsorexportthesetousbflashdriveandsendtoothercustomers.
YoucandothatinSettings/Backup/”ManageUserPresets”
SETTINGUPAPADWITHTHEMIMICPRO1. Choosethepadfrompresetlist.Ifit’snotlisted,thenchoosetheone,whichisclosestto
yourpadintermsoftechnologyused.Forinstance,ifyouhaveameshheadpadwithtwopiezos,thenchosesomethinglikeR-PD-125asastartingpoint.Youcanlearnabouttechnologyusedinyourpadinyourpadmanual,oronline.
2. Ifit’stwopianospad,likeatypicalmeshhead,thensetInputGainforRimzoneto0beforesettingsupCenterzoneInputGain.Ifthepadisasinglepiezo,likePearlTru-TracthenjustsetCenterzoneInputGain.ToaccessInputGainsettingpresstheInputSettingbutton.InputGainhason-screenhelp.Foronepiezopadafterthisstepgotostep5.
3. Fortwopiezospad,afterstep2gotoRimzoneInputSettingsandsetInputGainforRimzone.
4. Fortwopiezospadhitthesideoftheheadnearrimandhitrimforfewtimes.IfthereisfalsezonetriggeringthenadjusttheHead/RimBalancefaderonRimzonetabuntilzonesstarttriggeringincorrectway.
5. GotoCenterzonetabandusetheCaptureTopVelocityfunctiontosetuptheTopVelocityforthezone.
6. GotoRimzonetabandusetheCaptureTopVelocityfunctiontosetuptheTopVelocityforthezone.
7. SettheRimshotThreshold.Readchapteraboveabouthowtodothis.8. AdjusttheThreshold.Ifyousetitclosetozerobefore,thensetitto5-20.Tryplaying
thedrumwithoccasionalghostnotesandadjustThresholdtothevaluewheretheghostnotesarestillthere.

47
49
Note:ThepresetwillbesavedintheMimicProinternalstorageas*.mppfile.Youcanbackupyourcustomtriggerpresetsorexportthesetousbflashdriveandsendtoothercustomers.
YoucandothatinSettings/Backup/”ManageUserPresets”
SETTINGUPAPADWITHTHEMIMICPRO1. Choosethepadfrompresetlist.Ifit’snotlisted,thenchoosetheone,whichisclosestto
yourpadintermsoftechnologyused.Forinstance,ifyouhaveameshheadpadwithtwopiezos,thenchosesomethinglikeR-PD-125asastartingpoint.Youcanlearnabouttechnologyusedinyourpadinyourpadmanual,oronline.
2. Ifit’stwopianospad,likeatypicalmeshhead,thensetInputGainforRimzoneto0beforesettingsupCenterzoneInputGain.Ifthepadisasinglepiezo,likePearlTru-TracthenjustsetCenterzoneInputGain.ToaccessInputGainsettingpresstheInputSettingbutton.InputGainhason-screenhelp.Foronepiezopadafterthisstepgotostep5.
3. Fortwopiezospad,afterstep2gotoRimzoneInputSettingsandsetInputGainforRimzone.
4. Fortwopiezospadhitthesideoftheheadnearrimandhitrimforfewtimes.IfthereisfalsezonetriggeringthenadjusttheHead/RimBalancefaderonRimzonetabuntilzonesstarttriggeringincorrectway.
5. GotoCenterzonetabandusetheCaptureTopVelocityfunctiontosetuptheTopVelocityforthezone.
6. GotoRimzonetabandusetheCaptureTopVelocityfunctiontosetuptheTopVelocityforthezone.
7. SettheRimshotThreshold.Readchapteraboveabouthowtodothis.8. AdjusttheThreshold.Ifyousetitclosetozerobefore,thensetitto5-20.Tryplaying
thedrumwithoccasionalghostnotesandadjustThresholdtothevaluewheretheghostnotesarestillthere.

48
50
SETTINGUPAPIEZO/PIEZO/SWITCHRIDEWITHTHEMIMICPRO
MostoftheDIYorcustom-mademetalridecymbalpadsuseapiezo/piezo/switchdesign.Mimicprohasaspecialtriggerpresetforsuchpads-“piezo/piezo/switch”
Pleasedon’tforgettouncheckthe“split2wirerideinputtotwo1-wirerideinputs”ifyouaregoingtousethatpresetforyourmimicproride1/ride2inputs.Thisoptionislocatedin[TRIGGER]->[Settings]
1. Choosea“piezo/piezo/switch”presetforyourrideinput.2. Connectyourridebowcabletoride1triggerinput3. Connectyourridebellcabletoride2triggerinput.4. gotoBowPiezotab,dialproperinputgain(sothatbothbowandbellaredetected-at
thisstagebellhitcantriggerbowsound)
5. gotoBell-Piezotabandset"bow/Bellbalance”to50anddialinputgaintogetgoodseparationbetweenbowandbellhits
6. Tofinetunethebow/bellseparation-use"bow/bellbalance"slider
7. use"capturetopvelocity"foreverytab(bow,bell,crash)todialproperdynamics
EDITKITTheEditKitscreenhastwopageswithcellstoloadinstrumentsinthem.Itiseasytoload,modify,andcreatenewkits.
EachcellrepresentsaMimicProtriggerinput(e.g.Kick,Snare,etc).ThereisalsoExtratypeofcells(e.g.Extra1).ThesecellscanbeusedwithanexternalMIDIcontroller,keyboard,multi-padtotriggerinstrumentsfromanotherdevice.UseXtracellstocreateuniquehybridkitsbyloadingvariousinstrumentsandassigningthemtodifferentpadzones.Forinstance,youcanloadclaps,tambourines,orevensmallpartsofyourtracksandassignthemtothetom’srims.

49
51
ItisimportanttorememberthatanychangesmadetotheUserKitpresetwillbeautomaticallysavedtothemodule.IfyouwanttoexperimentwithaUserKitpresetthatyouloveandyoudon’twanttoloseitbychanginganythinginthekit,don’tmakechangesinthatpreset,becauseitwillalterthekit.Ifyouwanttoexperimentwithsettingsinthekitpreset,cloneitfirst(checkNewKitsectionbelow).
EditKitscreencontrols:
Pic50.EditKitScreen
ASSIGNTOPADASSIGNTOPADbuttonallowsyoutoeasilyassignanyarticulationintheloadedinstrumenttoanyzoneonanypad-Pic51.
50
SETTINGUPAPIEZO/PIEZO/SWITCHRIDEWITHTHEMIMICPRO
MostoftheDIYorcustom-mademetalridecymbalpadsuseapiezo/piezo/switchdesign.Mimicprohasaspecialtriggerpresetforsuchpads-“piezo/piezo/switch”
Pleasedon’tforgettouncheckthe“split2wirerideinputtotwo1-wirerideinputs”ifyouaregoingtousethatpresetforyourmimicproride1/ride2inputs.Thisoptionislocatedin[TRIGGER]->[Settings]
1. Choosea“piezo/piezo/switch”presetforyourrideinput.2. Connectyourridebowcabletoride1triggerinput3. Connectyourridebellcabletoride2triggerinput.4. gotoBowPiezotab,dialproperinputgain(sothatbothbowandbellaredetected-at
thisstagebellhitcantriggerbowsound)
5. gotoBell-Piezotabandset"bow/Bellbalance”to50anddialinputgaintogetgoodseparationbetweenbowandbellhits
6. Tofinetunethebow/bellseparation-use"bow/bellbalance"slider
7. use"capturetopvelocity"foreverytab(bow,bell,crash)todialproperdynamics
EDITKITTheEditKitscreenhastwopageswithcellstoloadinstrumentsinthem.Itiseasytoload,modify,andcreatenewkits.
EachcellrepresentsaMimicProtriggerinput(e.g.Kick,Snare,etc).ThereisalsoExtratypeofcells(e.g.Extra1).ThesecellscanbeusedwithanexternalMIDIcontroller,keyboard,multi-padtotriggerinstrumentsfromanotherdevice.UseXtracellstocreateuniquehybridkitsbyloadingvariousinstrumentsandassigningthemtodifferentpadzones.Forinstance,youcanloadclaps,tambourines,orevensmallpartsofyourtracksandassignthemtothetom’srims.

5052
Pic51.AssigntoPadPage
Example1-AssignacowbelltoSnareRim
Toassignanadditionalsoundyouneedtoloaditfirst.UsuallyXtra1-Xtra8instrumentslotsareusedforthispurpose.
- Tapon“PageII”toaccessXtra1-Xtra8instrumentslots(1)- TaponXtra1Slot(2)- Tapon“LoadInst”(3)
51
ItisimportanttorememberthatanychangesmadetotheUserKitpresetwillbeautomaticallysavedtothemodule.IfyouwanttoexperimentwithaUserKitpresetthatyouloveandyoudon’twanttoloseitbychanginganythinginthekit,don’tmakechangesinthatpreset,becauseitwillalterthekit.Ifyouwanttoexperimentwithsettingsinthekitpreset,cloneitfirst(checkNewKitsectionbelow).
EditKitscreencontrols:
Pic50.EditKitScreen
ASSIGNTOPADASSIGNTOPADbuttonallowsyoutoeasilyassignanyarticulationintheloadedinstrumenttoanyzoneonanypad-Pic51.

51
53
- Thenselecttheinstrumenttypeyouwanttoload-tapon“InstType”(1)- Select“Percussion”(2)
- Loadcowbell(taponcowbellpicture)- Select“Save&Exit”- NowyouhaveCowbellloadedtoXtra1instrumentslot.
52
54
Nowyoucanassignthiscowbelltoanyzoneofanypad.
Let’sassignittosnarerim:
- Goto“AssigntoPad”- SelectSnarePadonthetop- SelectXtra1(Cowbell)forSnare-RimunderPadZone/AssignedInstrumentlist

53
55
Example2-AssignawavefiletoSnareRim
Toassignawavefile,youneedtoimportyourwavefiletoyourMimicProfirst.YoucandothatinSettings/SoundLib/”ImportOneShotWaveFiles”orinSettings/Backup/”ManageUserPresets”
Afterthat,youcanassignwavefilestheverysamewayasdescribedinExample1,justselect“WAVE”duringinstrumentloadtoshowyourwavefiles.
AUTOSELECTAUTOSELECTbuttonislocatedintherightbottomcorner.Whenit’sturnedon,youcanselectacellbyhittingthecorrespondingpad.
PLAYONSELECTPLAYONSELECTbuttonislocatednexttoAutoSelect.Whenit’sturnedon,youcanauditionalreadyloadedinstrumentsbytappingonthecellonthescreen.

54
56
PAGEIandPAGEIIPAGEIandPAGEIIbuttonswitchpages.Therearetwopageswithcells.
NEWKITNEWKITbuttonletsyoucreatenewkitpresets.Whenyoupressthisbutton,you’llseeadialogasking,“CloneCurrentKit?”.IfyoupressYES,thenthecurrentlyloadedkitpresetwillbeduplicatedandyoucansaveitunderdifferentname,experimentwithsettings,orchangeanyinstrument.IfyoupressNO,thenanewemptykitwillbecreated.Allcellswillbeempty,FXsandmixbalancewillbereset.Thisisthecorrectwaytocreatekitsfromthebeginning.
LOADKITLOADKITbuttontakesyoutotheLoadKitmenu,see(Pic51).YoucanselectakitbytappingonthenameandloadakitbypressingtheLoadKitbuttoninthatmenu.Todeletekitpreset,presstheDeleteKitbutton.YoucanalsorenameauserkitpresetbypressingtheRenamekitbutton.ToexitfromthatmenutotheEditKitscreen,presstheExitbuttoninthebottomrightcorner.
57
Pic51.LoadKitMenu
SAVEINSTRPRESETSAVEINSTRPRESETbuttonallowsyoutosaveyourcustomnamedinstrumentpresets.Youcanusethatfunctiontobuildyourowninstrumentpresetscollection,ortocopyyourcustomdialedinstrumentsbetweenkits.
Aftersaving,youcanfindyourcustominstrumentpresetsattheendoftheinstrumentlistunder“LOADINSTRUMENT”button.
Inaddition,youcanshareyourinstrumentpresetswithotherdrummersviaexporting/importingtotheUSBflashdrive.Youcanfindexport/importfunctioninSettings/Backup/”ManageUserPresets”
CLEARINSTRUMENTCLEARINSTbuttonletsyoucleartheselectedcell.Theloadedinstrumentwillberemoved,andthecellwillbeempty.Usethisifyouwanttoremoveaninstrumentfromthecell.
LOADINSTRUMENTLoadInstbuttonletsyouloadinstrumentsinaselectedcell.Whenyoupressthisbutton,ittakesyoutotheInstrumentLoadingmenu.
Dependingonhowmanyinstrumentsyouhave,theremaymultiplepages.IntheInstrumentLoadingmenu,youcanseecellswithinstrumentpictures,names,andlibrarynames.FactoryInstrumentsconsistoftwolibraries;theStevenSlateSSD5andSSD4.SSD4wasrecordedearlierthanSSD5andmayhavemorenoise.Sincebothlibrarieswererecordedontapeusingvintageconsoles,preampsandmics,someofthesamplesmayhaveaudiblenoiseonsoftervelocitiesifyouhaveDynamicsfaderinTriggeringSettingsCurvestabsettolowvalues.Thenoiseisnotconsideredaproblem.It’stypicalofsamplesrecordedontapebecauseofthenatureoftheprocess.It’spartoftheanalogvibeandwarmthinaninstrument’ssound.
Toloadaninstrument,you’llneedtotapontheinstrumentcell.Aninstrumentwillloadwhenyoutapthecellforthefirsttime.InstrumentsthatcontainmultiplesampleslikeHi-Hatsmaytake1-2secondstoload.Tapthecellagaintoauditiontheloadedinstrument.Thismakesiteasytodecidewhichinstrumenttoloadinyourkitpreset.Makenotethatcellshavetobe

55
57
Pic51.LoadKitMenu
SAVEINSTRPRESETSAVEINSTRPRESETbuttonallowsyoutosaveyourcustomnamedinstrumentpresets.Youcanusethatfunctiontobuildyourowninstrumentpresetscollection,ortocopyyourcustomdialedinstrumentsbetweenkits.
Aftersaving,youcanfindyourcustominstrumentpresetsattheendoftheinstrumentlistunder“LOADINSTRUMENT”button.
Inaddition,youcanshareyourinstrumentpresetswithotherdrummersviaexporting/importingtotheUSBflashdrive.Youcanfindexport/importfunctioninSettings/Backup/”ManageUserPresets”
CLEARINSTRUMENTCLEARINSTbuttonletsyoucleartheselectedcell.Theloadedinstrumentwillberemoved,andthecellwillbeempty.Usethisifyouwanttoremoveaninstrumentfromthecell.
LOADINSTRUMENTLoadInstbuttonletsyouloadinstrumentsinaselectedcell.Whenyoupressthisbutton,ittakesyoutotheInstrumentLoadingmenu.
Dependingonhowmanyinstrumentsyouhave,theremaymultiplepages.IntheInstrumentLoadingmenu,youcanseecellswithinstrumentpictures,names,andlibrarynames.FactoryInstrumentsconsistoftwolibraries;theStevenSlateSSD5andSSD4.SSD4wasrecordedearlierthanSSD5andmayhavemorenoise.Sincebothlibrarieswererecordedontapeusingvintageconsoles,preampsandmics,someofthesamplesmayhaveaudiblenoiseonsoftervelocitiesifyouhaveDynamicsfaderinTriggeringSettingsCurvestabsettolowvalues.Thenoiseisnotconsideredaproblem.It’stypicalofsamplesrecordedontapebecauseofthenatureoftheprocess.It’spartoftheanalogvibeandwarmthinaninstrument’ssound.
Toloadaninstrument,you’llneedtotapontheinstrumentcell.Aninstrumentwillloadwhenyoutapthecellforthefirsttime.InstrumentsthatcontainmultiplesampleslikeHi-Hatsmaytake1-2secondstoload.Tapthecellagaintoauditiontheloadedinstrument.Thismakesiteasytodecidewhichinstrumenttoloadinyourkitpreset.Makenotethatcellshavetobe

56
58
populatedwithcorrespondingtypesofinstruments,likekicksinkickcellandsnaresinsnarecell.ThereisalsoaAUXtriggerinputandXtracells.Inthesecells,choosethetypeofinstrumentyouwanttoloadandbrowsethroughtheinstrumentsbeforeloadingthem.WhentheAUXorXtracellsareselected,theINSTRTYPEbuttonwillappearinthebottomleftcorner.Pressittoselectthetypeofinstrumentyouwanttoloadinthatcell.
TheMimicProsupportsone-shot(singlesample)WAVfilestouseasinstruments.YoucanimportWAVfilesintheMimicPro(readaboutthisintheSettingssection)andloadthemintotheAUXorXtraCellafterchoosingWaveastheINSTRTYPEforthecell.WAVfilesshouldbe16-bitor24-bitandhave44100Hzsamplerate.Themaxlengthis20secondsbuttheendofa20secondWAVwillbeshapedbytheASR’sReleaseparameter(readaboutthisintheModandWorkingonKitPresetsection).
ToexitfromtheInstrumentloadingmenu,presstheCancelbuttonifyoudon’twanttostoreyourinstrumentselectiontothecurrentkit.OtherwisepressSave&Exitbutton.
Note:ifyouwanttoloadnewinstrumentandretainyourdialedcustomsettingslikeEQ,Tune,etc-besuretohave“KeepInstSettings”buttonturnedONbeforeloadinganyinstrument.
Ifyouwanttoloadrawinstrumentwithoutanycustomeditingapplied,turn“KeepInstrSettings”off.

57
59
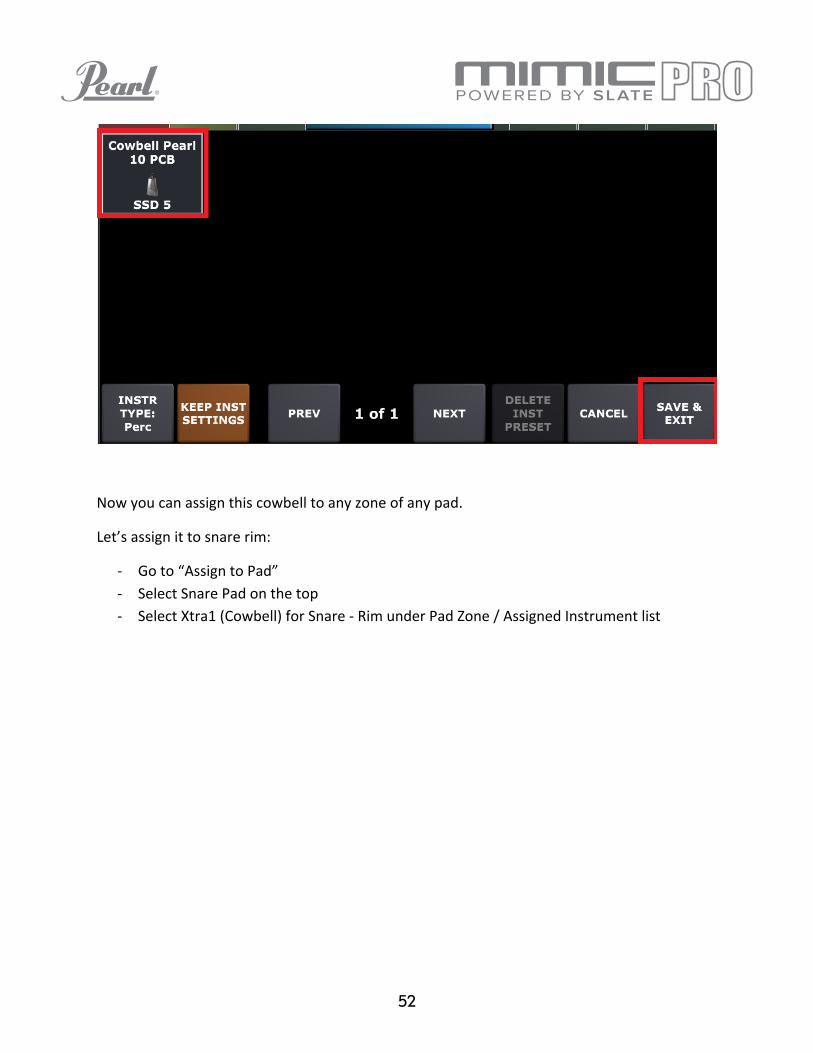
MIXERTheMimicProMixerisakeyfeatureofthemoduleandofferspowerfulsoundeditingcapabilities.Regardlessofthedepthandcomplexityofthegivenparameters,it’ssimpletounderstandandeasytocustomizeandcreateuniquesounds.
ToaccesstheMixer,startfromtheHomeScreenthenpressonthebuttonwithmixericonlocatedatthebottomleftofthetouchscreen.
Pic52.MixerScreen

58
60
OnceattheMixerthereareeightsubgroupsofeditingfunctionslocatedatthebottomoftheMixerscreen.
1. PHONESMIX(Headphoneonlymix)2. MASTERMIX(Masteroutputsmix)3. MIC(Specificmicrophonevolumeadjustmentsforinstrumentbalancewithinkit
presets)4. MICFX(Effectsforkitpresets)5. MOD(Modificationofinstrumentswithinthekitpresets)6. REVERB(Reverbsettingsforkitpresets)7. KITFX(Effectappliedonwholekit)8. MONITOR&SETTINGS(Containsvarioussettingsrelatedtomixingandsound)
Toactivateyourchoice,simplytouchthedesiredtabtoseetherespectivemenu.Oncethetabisactivateditwilllightup.Example:PHONESMIX.
TheMimicProMixerofferssimilarfunctionalityandcontroltothatfoundintheprofessionalstudiorecordingworld.Unlikeotherelectronicdrummodules,MimicProallowsyoutoedityoursoundbyadjustingtheactualmicrophonesusedduringtherecordingsession.Youcanindependentlyadjustthevolumeofthedirect,roomandoverheadmicsusedtorecordthedrumkit.
Toaddtotherealismofthisfeature,thecrashandsplashcymbalgainsarecontrolledbytheoverheadandroommicrophonechannelsofthemixerinthesamewaytheyareinaprofessionalrecording/mixingsessionforacousticdrums.Theyarealsochanneledthroughtheoverheadandroomoutputsonthemoduleandmayberoutedtotheoutputofyourchoice.
EXCEPTION:TherideandHi-Hatcymbalsusedirectmicrophonesandmayalsobeindividuallyroutedtotheoutputofyourchoice.Formoreinformationonrouting,checktheroutingsectionofthemanual.
COLORCODINGTheInstrumentnameheaderstripsonthemixerscreenarecolorcodedforeasyreference.
- Redindicatesasubgroupofinstrumentswitha“SHOW”or“HIDE”guide.Example:Thered“Toms”groupmaycontainfourtomstripsinsidethegroup.Eachstriprepresentsanindividualtom.Toaccessthesubgroup,youwillnoticetheword“SHOW”under

59
61
“TOMS,”tapontheredheadertoexpandthegroup.Toretract,tapontheredheaderthatnowreads“TOMSHIDE.”Youcanadjustthefader(volume)ofthewholegroupinadditiontoeachinstrumentseparately.
- Greenindicatesthedirectmicrophone(s)ontheinstrument.- Yellowindicatestheambientmicrophonesusedontheinstruments.Thesearethe
Overheads(OH)andRoommicsnotlocatedclosetotheinstrument.Becauseofthistheycapturethesoundoftheroomandareconsideredambientmics.MostofthecymbalsoundsareintheOHandRoommixerchannels.
- DarkBlueindicatestheReverbandMasterchannels.
TheverticalstripfadersforPhonesMixandMasterMixarealsocolorcodedforeasyidentification.
Phonesmixsectionhasbluefaders.
Pic53.PhonesMixer
Mastermixsectionhasgreenfaders.

60
62
Pic54.MasterMix
ReverbandMasterfadershavedarkrosecolorinbothmixers.
PHONESMIXANDMASTERMIXTheMimicProhastwoseparateindependentmixers:PHONESMIXandMASTERMIX.Theirfunctionsallowyoutoadjusttheinstrumentvolumefortherespectiveoutputs.Thisisaglobalsettingandisnotprogrammablefortheindividualkitpresets.ThePHONESMIXandMASTERMIXdonotsavetooneuniquekitpresetVSanother.AnychangesmadeaffectALLkitpresetsandautomaticallysave/remain.ThisprovidesconsistentoutputlevelsregardlessoftheKitPresetinuseandisperfectforperformancesthatrequiremultiplekitchanges.
Forexample,duringaliveperformanceifthefronthousesoundengineerneedsyourkickdrumvolumelower,yousimplylowerthe“Kicks”fader,nowregardlessoftheKitpresetusedthelevelyousendhimisconstant.
Toadjustthevolumefaderofanychannelsimplyuseyourfingertomovethefaderupordown.ForfinerincrementaladjustmentstheDataWheelworksbest.Tousethismethodsimplydoubletaponthefadercolumnanditwillgointoeditmodewiththefadercolumnhighlightedinred.NextadjustitwithDataWheel,turnclockwisetoincreaseandcounterclockwisetodecrease,oncesetpushtheDataWheelin(shouldclick),ortaponanyemptyspaceontouchscreentoexiteditmodeandsavechanges.

61
63
MIC,MICFX,MOD,REVERBINKITPRESETSAsnoted,thePHONESMIXandMASTERMIXareglobalvolumecontrolsanddonotaffecttheindividualkitpresets.
FromtheMIXERScreenindividualKitPresetscanbeadjustedfromthefourmainmenusbelowthatallowyoutotweakeachKittomakeitunique.
Pic55.MixingKitPresets
1. MIC2. MICFX3. MOD4. REVERB
Inthissection,we’llexplaineachofthesetoolsandtheoptionstheyprovide.

62
64
MICADJUSTMENTSWITHINKITPRESETSAfteryouhaveassembledavirtualdrumkitintheEditKitscreen,thefirstthingtodoistocreatetherightvolumebalancebetweendifferentdrumkitpiecesanddifferentchannels(OH,Room,etc.)TodothisyoumustaccesstheMICtools.FromtheHomescreentapontheMIXERmenu,thentaponMICtoaccesstheavailableoptions.
FromtheMICmenu,ontherightsideofthescreenyoucanseetheInstrumentVolumefader.Thisfaderadjuststhevolumeofthewholeinstrumentafteritwasprocessedandmicsinsidethatinstrumentwerebalancedinadesiredway.Ifyouonlywanttochangethevolumeoftheinstrumentthisisthedesiredfader.
Note:SomemixerchannelssuchasOHandRoomhaveonlythisfaderandnothingmore.Thisisbecausetheirsoundsarefromalotofdifferentsources.Kicks,snares,cymbals-theyallhaveoverheadsandroommics,sowhenyou’replayingdrums,theyallsoundinthesechannelsiftheyhavecorrespondingmics.ThismeansthatyoustillcanadjustOHandRoomforeachdrumseparatelyfortheKitPreset,butthosechangesmustbedoneinthatdrummicsection.ChangesmadetotheOH,RoomandReverbvolumefromthePHONESorMIXmenuaffectthewholechannelregardlessofKitPreset.
Ontheleftsidedependingoninstrumentsyoumayseedifferentsetsofparameters.UsuallythereareDirectmicfaders,OverheadmicfaderandRoommicfader.
IftheinstrumenthastwodirectmicssuchasaSnareTopandSnareBottom,orKickInandKickOut,thentherearetwomethodsofworkingwiththem:
1. COMBINEDMODE.(recommendedonlyforeveryone)Thismodeissetbydefault.Inthismode,youwillseeVolumefaderandBalancefader.Volumeadjuststhevolumeofcombineddirectmics.Balanceadjustsbalancebetweentwodirectmicsbeforetheyaremixedtogether.Thebenefitofcombinedmodeistobeabletoprocessthedirectmicwiththeeffects(compressor,EQ)asonepiece.Thisisaneasyandeffectivemethod.
2. SPLITMODE.(recommendedonlyforadvancedusers)PressSplitbuttoninthemiddleofthescreentoactivatethismode.Thedirectmicsareseparated,andyouwillseefadersforthemrespectively.Forexample,itmaybeSnareTopandSnareBottom,orKickinandKickOut.Insplitmodeeachdirectmicisprocessedseparatelywitheffects,soyoucanapplyFXon,forinstance,SnareTopandSnareBottommicsindividually.

63
65
BelowthedirectmicfadersthereareOHandRoomfaders.Iftheinstrumentsshowthedirectmics,thenOHandRoomfaderswillbetheonlyfadersontheleftsideofthescreen.
ThePanfader(s)allowyoutochangethepanofeachmictotheleft,orrightsideofastereofield.
TheReverbSendfaders(readmoreaboutReverbeffectintheReverbsection).Reverbisanadditionalambientmicchannel,butunliketherecordedOHandRoomchannels,itisavirtualmic.YourchoiceofmicsineachinstrumentcanbesenttotheReverbeffectinanydesiredproportions.ThesoundoftheReverbeffectcanbemodifiedREVERBsectionoftheMixer.Thiscombinationoffersalotofcreativepossibilities.Inaddition,thesoundofReverbwillalsovarydependingonthemicsitisappliedto.Forexample,thesnaredrumhasaDirect,OHandRoommicsandeachofthesehavetheirownuniquesoundwhensenttoreverb.YoucanthenapplyReverbtooneofthesemicsindividually,orinvariousproportionstocreateliterallythousandsofvariations.
MICFXADJUSTMENTSWITHINKITPRESETSTheMICFXtoolsoftheMimicProareverypowerfulandprovidemanysoundpossibilitiesandvariationsthatallowyoutocreateuniquesoundingdrumkits.Inthissection,wewillidentifytheMICFXtoolsandexplainhowtousethem.
ThetwoFXs(effects)are:
1. COMPRESSOR2. EQ(SOUNDFREQUENCYEQUALIZER)
COMPRESSORisaneffectthattypicallyreducesthevolumeofloudsoundsoramplifiesquietsoundsbynarrowingorcompressinganaudiosignaldynamicrange.

64
66
Pic56.MicFX
Compressioniscommonlyusedinrecordingandforlivesound.Theeffectthecompressionhasonthesoundofinstrumentsvariesgreatlydependingonthecontrolsettingsused.Itcouldrangefrombeinghardlynoticeable,todrasticallychangingthetonalcharacter.It’strulyapowerfultoolforsoundshapinganddesign.TheCompressortoolonMimicProisreferredtoas“COMP”andisonlyavailablefortheindividualinstruments(directmics)andonthemainOHandRoomchannels.Inaddition,the“COMP”featureisalsoavailablefortheentirekitasaKITFX.Toproperlysetupthecompressoror“COMP”weneedtoreviewthecontrolsavailableandwhattheyshouldoffer:
Thresholdcontrolshowloudasignalmustbebeforeanycompressionisapplied.The“COMP”reducesthelevelofanaudiosignalifitsamplitudeexceedsacertainthreshold.ItiscommonlysetindecibelsdB,wherealowerthreshold,forinstance-30dBmeansalargerportionofthesignalistreatedcomparedtoahigherthresholdof,forinstance-10dB.
Ratioistheamountofgainreduction.Forexample,aratioof4:1meansthatiftheinputlevelis4dBoverthethreshold,theoutputsignallevelis1dBoverthethreshold.Thegain,orsignallevelhasbeenreducedby3dB.Itisimportanttounderstand,thatwhenthecompressorisloweringthesignaltothedesiredratiothatitisloweringtheentiresignal,sothatthecompressorisstillworkingevenaftertheinputsignalhasfallenbelowthethreshold,foranamountoftimedeterminedbytherelease.

65
67
Attackistheperiodwhenthe“COMP”isdecreasinggaintoreachthelevelthatisdeterminedbytheratio.
Releaseistheperiodwhenthe“COMPisincreasinggaintotheleveldeterminedbytheratio,ortozerodBoncethelevelhasfallenbelowthethreshold.
Outputisthevolumeofthewholesignalafterthecompressor.Becausethecompressorisreducingthegain,orlevelofthesignal,theabilitytoaddafixedamountofoutputgainisprovidedinMimicPro“COMP”sothatanoptimumvolumelevelcanbeused.
SCHPFisahighpassfilter.Whenyouarecompressingthesignalthe“COMP”reactsmoretolowfrequencies,becausetheyareusuallylouder.SCHPFletsyouignoresomepartofthelowfrequencies.It’seasytohearthiseffectwhenthecompressionisappliedtothewholemix.Thekickdrumtherewillhaveslightlymorecompressionthanthesnaredrum.ToeventhingsouttrytosetSCHPFto40Hz,or60Hz.
Clipisaclipperaftertheoutputgain.Usuallywhenyoucompressthesignal,itgetsquieter,soyouevenitoutwithOutputfader,butdependingonAttacksettingsomeofthepeaksarenotgettinganygainreduction,sotheyalsogetlouderbytheamountofdBsetontheOutputfader.Thismayleadtoclipping,oroverload(themeterbecomesred).Toavoidtheoverload(clipping)usetheClipbutton.Clippermaydistortthesignalslightlyoralotdependingonhowmuchoverloadedsignalisgoingintoit.
Therearepresetsavailableforthe“COMP”categorizedbythetypeofsignaltheywerecreatedfor.Presetsareagoodstartingpointtomakechanges.

66
68
Pic57.CompressorPresets
EverythingdescribedabovemaybedifficulttounderstandifyouhaveneverusedaCompressor.Tohelpwithunderstandingbelowaresometypicalstepstosetup“COMP”:
1. TurnONthe“COMP.”2. SetThresholdto0dB,Ratioto2:1,Attackto8-15ms,Releaseto60-120ms,Outputto0
dB,SCHPFto40Hz,turnontheClip.3. StarttodecreaseThresholduntilyouseethegreenmeterontheleftside(gain
reductionmeter,orGRmeter)movingalittle.Whenit’smovingthegainreduction,orGRishappening.ThelowerThresholdthehigherGainReduction.Youprobablywillhearthesoundchanging.Theonlywaytosetupeffectsisbyusingyourears.Trytoexperimentandlistentothesound.
4. AfteryouconfirmthatGainReductionishappeningtrytoexperimentwithRatio,Attack,andReleasevalues.
5. Usuallytheaudiosignalgetsquieteraftercompression,sotrytocompensateforitbyincreasingtheOutputfader.

67
69
6. ExperimentwithSCHPF,ifyouthinkthattheeffectontheinstrument(s)isnotneeded,thensimplyturnitoff.Again,useyourearstoshapethesoundyoulike.
7. TrytoturnClipoffandseeifthereissignaloverloadonhardhits.Ifthereisnosignaloverload,thenit’ssafetoleavetheClipturnedoff.
EQ(Equalization)istheprocessofadjustingthebalancebetweenfrequencycomponentswithinanelectronicsignal.EQisaveryusefultoolinsounddesign.Youcanchangethespectrumofaudiosignalbyadjustingfrequencies(boostingorcuttingthem).Thisgivesyouthousandsofsoundvariationsofthesameinstrument.TheEQinMimicProhasfivebands.ThismeansthatyouhavefiveEQfiltersthatcanworkatthesametime.
Youcanadjustthebandintwodifferentways:
1.TaponthebandpointanddragitontheEQdisplay.
2.TaponthefrequencyordBtextatthebottom-theselecteditemshouldbecomehighlighted,andyoucanusedatawheeltodialthevalue.
Toresetthebands,tapandholdontheHoldtoResetbuttononthetopofEQdisplay.
ThereisaspecialLinkEditbuttonthatenablesthesimultaneouseditingofallthemicrophones.
70
Pic58a.EQ-LinkEditModeOn
Incaseifyouneedper-microphoneEQ,turnofftheLinkEditfunction-Pic58b.
InthatmodeyoucanuseMicSolofunctiontolistentoindividualmicrophoneswhiledialingtheEQ.
Pic58b.EQ-LinkEditModeOff
Bands1and5areshelffiltertypes.Thismeansthatitcanbeusedtoreduceorincreasesignalaboveorbelowasetfrequency.
Otherbandsarebells,eachwithabitdifferentQ(bandwidth).Bellmeansthatitcanbeusedtoreduceorincreasethesignalaroundasetfrequency.
StepstosetupEQ:
1. TurnitON.2. Adjustthebands.

68
70
Pic58a.EQ-LinkEditModeOn
Incaseifyouneedper-microphoneEQ,turnofftheLinkEditfunction-Pic58b.
InthatmodeyoucanuseMicSolofunctiontolistentoindividualmicrophoneswhiledialingtheEQ.
Pic58b.EQ-LinkEditModeOff
Bands1and5areshelffiltertypes.Thismeansthatitcanbeusedtoreduceorincreasesignalaboveorbelowasetfrequency.
Otherbandsarebells,eachwithabitdifferentQ(bandwidth).Bellmeansthatitcanbeusedtoreduceorincreasethesignalaroundasetfrequency.
StepstosetupEQ:
1. TurnitON.2. Adjustthebands.

69
71
TheonlywaytosetupEQistouseyourears.Sculptthesounduntilyougetyourdesiredresult.Havefunandexperiment!
MODADJUSTMENTSWITHINKITPRESETSMODsectionintheMimicProMixerscreenisanotherimportantpartofworkingonakitpreset.Itgivesuserthepossibilitytotuneandshapeinstrumentsaswellastakesomevelocitylayersoutoftheinstrument.
OntheleftsideoftheMODsectionyoucansee:
- Dampenfader.Useittoshortentheringofthetomorsnareorreducethetailofanyotherinstrument.
- ASRcurvefaders.
ASRstandsforAttack,Sustain,Release.PayattentionthatASRispresentedforeachmicfortherespectiveinstrument.
Pic59.Mod
Attackistheinitialpartofthesample.Basically,it’safade-inforthesample.Whenyouincreaseattack,itsmoothsoutthebeginning(transient)endofthesampleandprovides

70
72
optionsforsounddesignpurposes.Forexample,addingattacktotheridecymbalprovidessmoothnesstothesound,thisisapplicabletomanyotherinstruments.
Sustainisthemiddlepartofthesample.ThephaseofsustainstartsrightaftertheAttack.Theamountofsustaindefineshowmuchtimethesamplewillsoundunchanged.
Releaseistheendofthesample.Basically,it’safade-outforthesample.Thelongerreleasethelongerthefadeoutwillbe.Itworksgreatfortamingthetailsofsamples.Ifyouwanttomakeashortpop,orfunksnare,youcanshortentheSustainto150-200ms,andsetreleasetoarangeof150-200.You’llgetashortsnaredrum,whichmostlikelywillsounddifferentfromtheoriginalinstrumentbecauseoftheshaping.
UseLINKEDITbuttontoeditallthemicrophonessimultaneously.
Incaseifyoudon’tneedanyDampen/ASRshapingapplied,turnyoucanturnthatsectionOff.
TuneandRangeparametersarelocatedontherightsideoftheMODsection.
Tuneallowsyoutopitchtheinstrumenthigherorlower.Pleasenoteincreasinganddecreasingtunetoextremevaluesmayproducesomeartifactsinthesound.Thatisthenatureoftuninganaudiosignal.
Rangeallowsyoutoremovesomeofthevelocitylayers.Iftheuserwantstocreateasoftsoundingkit,thenusingtheRangeparametermayhelp.WhendecreasingtheRange,itvirtuallyremovesthehighvelocitylayers(thosepunchyhardhits)makingtheinstrumentsoundsofterandmoremellow.However,decreasingtheRangedoesn’taffectthedynamicrange.Youstillhavefulldynamicrange.WhentopvelocitiesaretakenoutbydecreasingtheRangefader,theothervelocitiesaregettingvirtuallyremappedacrosstheentiredynamicrange.
Swellallowsyoutodialintheneededamountofdynamicswellmodellingforyourcymbals.Mimicprohasasophisticatedswellmodellingenginethatdynamicallyalternatesspectralcontentoftheinstrument,preservingthecymbalattackdefinitionandgleaningthesoundintoalushsoundscape.
FortheinstrumentslikeSnare,Toms,Rides,theRimClick(Bell)buttonwillappearonthetoprightofthepage.ThiswayyoucandialyourMODparametersindependentlyforSnareHeadandRim(orRideBellandBow).Forexample,sometimesitisreasonabletoapplytuneonlytothecenterofthesnare,etc.
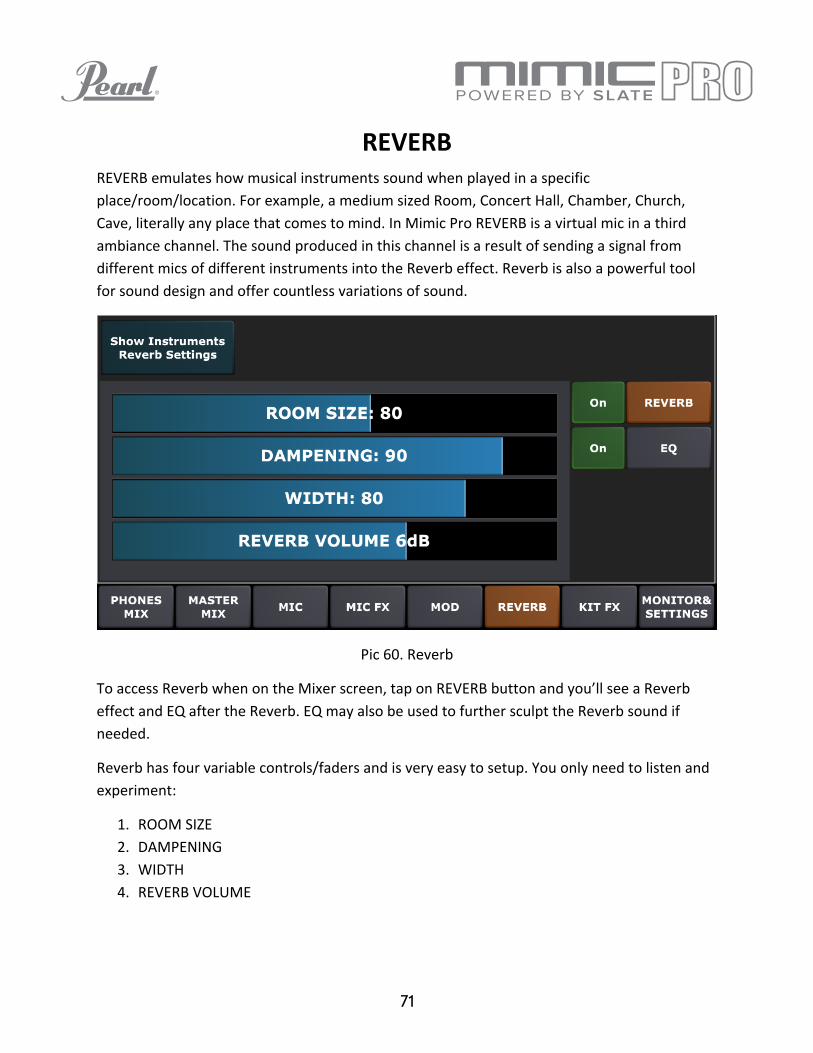
71
73
REVERBREVERBemulateshowmusicalinstrumentssoundwhenplayedinaspecificplace/room/location.Forexample,amediumsizedRoom,ConcertHall,Chamber,Church,Cave,literallyanyplacethatcomestomind.InMimicProREVERBisavirtualmicinathirdambiancechannel.ThesoundproducedinthischannelisaresultofsendingasignalfromdifferentmicsofdifferentinstrumentsintotheReverbeffect.Reverbisalsoapowerfultoolforsounddesignandoffercountlessvariationsofsound.
Pic60.Reverb
ToaccessReverbwhenontheMixerscreen,taponREVERBbuttonandyou’llseeaReverbeffectandEQaftertheReverb.EQmayalsobeusedtofurthersculpttheReverbsoundifneeded.
Reverbhasfourvariablecontrols/fadersandisveryeasytosetup.Youonlyneedtolistenandexperiment:
1. ROOMSIZE2. DAMPENING3. WIDTH4. REVERBVOLUME

72
74
RoomSizeisthesizeofavirtualroom.
Dampeningishowfasthighfrequenciesfadeout.Simplyput,loweringtheDampeningvaluesmeansthattheroomhasnothinginsideandit’sonlyaroomwithbarestonewallsandthesoundisringing,resonantandharsh.HigherDampeningvaluesmeansthatroomisnotempty.ThehighertheDampeningthemorethingsinthatvirtualroomthatabsorbthesoundmakingitsofterandmoremellow.
Widthishowfarapartthevirtualmicsarelocated/placedinthatvirtualroominrelationtotheinstrumentplacementinthatvirtualroom.
ReverbVolumeissimplyavolumeofreverbeffect.
HowtosetupReverb:
1. IntheMixertaptheREVERBbutton.ThenturntheReverbonbytappingthe“On”button(youhavetheoptiontoturnon/off).
2. Nextgoto“ShowInstrumentsReverbSettings”.Hereyoucanadjustreverbsettingsforallinstruments/microphones.
Pic61.InstrumentsReverbSettings

73
75
3. NowyoushouldhaveinstrumentssenttoReverb.Playthemtoensureyoucanhearreverbapplied.BesuretoalsocheckthattheReverbfaderoftheMixerisupandnotturnedofforsetverylow.
4. IfneededgobacktotheREVERBsectionandtrytoadjusttheReverbsettings.5. ApplyandadjusttheEQaftertheReverbifneeded.6. Trytoexperimentwithhowmuchsignalyousendfromdifferentinstrumentstothe
Reverbchannel.DifferentcombinationsofmicssentintoReverbwithdifferentlevelswillgreatlyvarythesoundoftheinstrument.WhenusedinjustthiswayitwillproducecountlesssoundvariationswithoutevenchangingtheReverbeffectsettingssuchasroomsize,etc.
KITFXMimicProalsohastheabilitytoapplyeffectsonthewholekitandsavethesesettingswiththekitpreset.Carefullyapplyingeffectssuchascompressortoawholekitmayaddalotofcharactertothesoundofakit.Itmaysoundlikeit’sbreathingandmovingwithalotofvibeandenergy.
Pic62.KitFX

74
76
KITVOLUMEallowsyoutomakefastadjustmentofthewholekitvolumetobalanceoutdifferentkitsinasetforexample.
TherearetwoeffectsavailableinKITFXsection:
1. Compressor2. EQ
Readaboveabouthowtosetuptheseeffects.TheonlyadviceforsettingupKITFXeffectsisgoingwithmellowsoftsettings.Extremesettingsmaydistortthesoundofthekitandmakedynamicsworsewhilesoftandcarefulsettingmayimprovethesoundofthekitalot.
MONITOR&SETTINGSTheMONITOR&SETTINGSsectionofMimicProMixerallowsyoutosetupvariouspartsofMimic’ssoundsystem.ThissectionhasHeadphonesEQtab,MasterOutEQtab,Misc.SoundSrcAuxVoltab,MixerSettingstabandDirectsOutMixertab.
HeadphonesEQtabhastheEQeffect,whichisglobalfortheheadphonesoutput.EQisusefulforheadphonesfrequencycorrectionassomeheadphoneshaveharshhighfrequenciesandhypedlowfrequencies.
77
Pic63.MixerMonitorandSettings
MasterOutEQtabisprettymuchthesametoheadphonesone.IthastheEQeffect,whichisglobalforthemasteroutputs.EQonMasterOutisusefulformakingfrequencycorrection,forinstance,insomeparticularsituationslikeliveshowwithveryharshspeakers,orspeakerswithtoomuchlowfrequencies.
Misc.SoundSrcAuxVoltaballowstoadjustvariousthings.WithMimicPro,inadditiontoheadphones,youcanrouteyourmetronome,songplayer,clicktracktoanyoutput.Bydefault,thesesourcesareroutedtomasteroutput(lineouts1/2).
Pic64.Misc.SoundSrcAuxVol
UseMetronomeAux,SongPlayerAux,andClickTrackAuxvolumestodialdesiredvolumelevels.
AuxInputtoMasterOutVolumecontrolstheamountofauxinputsignal(fromyourexternalaudioplayeretc)routedtomimicpromasterout.
Note:YoucanadjusttheroutinginSETTINGS/Routingtab
MixerSettingstaballowsyoutocontrolthefollowingfunctions:

75
77
Pic63.MixerMonitorandSettings
MasterOutEQtabisprettymuchthesametoheadphonesone.IthastheEQeffect,whichisglobalforthemasteroutputs.EQonMasterOutisusefulformakingfrequencycorrection,forinstance,insomeparticularsituationslikeliveshowwithveryharshspeakers,orspeakerswithtoomuchlowfrequencies.
Misc.SoundSrcAuxVoltaballowstoadjustvariousthings.WithMimicPro,inadditiontoheadphones,youcanrouteyourmetronome,songplayer,clicktracktoanyoutput.Bydefault,thesesourcesareroutedtomasteroutput(lineouts1/2).
Pic64.Misc.SoundSrcAuxVol
UseMetronomeAux,SongPlayerAux,andClickTrackAuxvolumestodialdesiredvolumelevels.
AuxInputtoMasterOutVolumecontrolstheamountofauxinputsignal(fromyourexternalaudioplayeretc)routedtomimicpromasterout.
Note:YoucanadjusttheroutinginSETTINGS/Routingtab
MixerSettingstaballowsyoutocontrolthefollowingfunctions:

76
78
1. ForceMasterOuttoMono-convertsyourmimicpromasterout(lineout1/2)toMONO,
2. ResetHP/MasterMixertoDefault-resetsyourmimicprohp.mastermixervolumestoadefaultvalues.Thisfunctionisveryusefulifyouwanttohearfactoryorcustomkitpresetsinadefaultstate.
3. HeadphonesVolumeBoost-boostsyourmimicproheadphonesoutputvolume.Note:excessivevolumelevelsmayleadtodistortionorhearingdamage.
Pic65.MixerSettings
4. SendHPMixToMasterOut&DisableMasterMixer-thisfunctionmakesyourmimicpromasterouttobeafullcloneofyourheadphonesout(includingallthevolumecontrolslikeauxinput,songplayeretc)ThatisusefulifyouprefertouseyourPAconnectedtomasteroutinsteadofheadphones.WiththisfunctionenabledyoucancontrolyourPAvolumewithdatawheelknobanduseallotherhomepagecontrols.

77
79
DirectOutsMixertaballowsyoutocontroltheinstrumentlevelssentbyyourMimicProdirectouts.Thissettingisper-kit,soyoucanadjustyourdirectoutputslevelsforeverykitindividually.
METRONOMETheMetronomesettingsarecontrolledthroughtheTempomenu.
- OntheHomeScreendoubletaptheTempofadertoaccessthemenu.- Tochangemetronomevolume-dragyourfingerleft/rightontheTEMPOscreen.

78
80
Pic66.TempoFader
PressStarttobeginandagaintoendtheclicktrack.TheMetronomeONbuttonontheHomeScreenwillalsoperformthisfunction.
Pic67.MetronomeTempoMenu
Tochangethetempo/BPM,pressorpressandholdthe+/-toincreaseordecreasethebeatsperminute.Tochangethetimesignature,pressorpressandholdthe+/-toincreaseordecreasethetopandbottomnumbersinthetimesignature.
AtthebottomoftheMetronomemenuyoucanchoosefromfoursoundeffects;Square,Click,Sticks,orCowbell.Tapthewindowtochoosethedesiredsound.
79
DirectOutsMixertaballowsyoutocontroltheinstrumentlevelssentbyyourMimicProdirectouts.Thissettingisper-kit,soyoucanadjustyourdirectoutputslevelsforeverykitindividually.
METRONOMETheMetronomesettingsarecontrolledthroughtheTempomenu.
- OntheHomeScreendoubletaptheTempofadertoaccessthemenu.- Tochangemetronomevolume-dragyourfingerleft/rightontheTEMPOscreen.

79
81
SETLISTTheSetlistfunctionalityinMimicProisanamazingnewfeature.TheSetlistislikeaplaylistofkitsandyoucanassignaspecifictempotoeachkit.ASetlistcanbecreatedforanyperformancesituation,forexample,ifyouhaveashowwhereyouaresupposedtoplay12songsusingonlyonekit,butin12differenttempos,youcanbuildthisintheSetlist.
Pic68.Setlist
TheSetlistmenucontains8windowsperscreenwhereyouloadthekitandtempo.EachSetlistcancontainupto128kits.
1. BeginbyselectingtheNewSetlistbox.2. YouwillbegivenanoptiontoCloneCurrentSetlist,selectYesorNo.3. SelectNotocreateanewSetlistthennameandenteryourlist.4. ChooseyournewSetlistfromtheLoadSetlistmenuthenExit.5. Youarereadytoloadkits.Selectwindow#1whichwilltakeyoutotheTemposcreen,
thenchooseSelectKit.6. ChoosefromthelibraryofkitsthenselectLoadKit.7. NextyouwillsetthetimesignatureandBPMthenchooseExit.8. Thenameofthekitchosen,andthetempowillappearinwindow#1.

80
82
9. RepeatthisprocessforallthekitsinyourSetlist.10. UsethePrevPageandNextPagebuttonstonavigatethroughlongSetlists.
TheUseKitTempobuttonwillactivateordeactivatethetempo.
Note:youcanswitchkitsfromasetlistwithMimicProMidiInput.Forthisyoushouldhaveanactivesetlist.Thenusestandardprogramchangemidimessagetoselectaparticularkitformyoursetlist.
PLAYER
TheplayerinMimicProallowsyoutoplayaudiobackingtracks,createplaylistswiththetracksandassignacustomclicktracktoeachofyourbackingtracks.
Pic69.Player
Theformatofyouraudiofilesshouldbemonoorstereo16bit,or24-bitWAVsorMP3fileswith44100Hzsamplerate.AllfilesmustbeonaUSBflashdriveorSDcard.
81
83
Tobeginworkingwithyourtracks,turnMimicProOFF.InsertaUSBstickorSDcardwithWAV/MP3filesandturnMimicON.OntheHomeScreendoubletapthePlaylistwindowtoopenthePlaylistmenu.
ThePlaylistmenufeaturesthePlay/pause,PreviousandNextcontrolsforyourtracks.
1. PressAddSongtoaddasongtothePlaylist.Note:thisdoesnotcopythesongtotheMimicPro,theplaybackisperformeddirectlyfromtheUSBStick/SDcard,sopleasekeepyourmediaconnected.
2. UsetheMovetheSongUporMovetheSongDownbuttonstochangethelocationofasonginthePlaylist.
3. UsetheRemoveSongbuttontodeleteasongfromthePlaylist.4. UseSpeedbuttontochangeplaybackspeed.5. UseSetLoopbuttontosetA/Blooppointstothecurrentsong.
Pic70.PlayerPlaylistMenu
AftersongshavebeenaddedtothePlaylist,selectCTbuttontoassignacustomclicktracktoanyofyoursongs.

82
84
TheClickTrack(CT)isawaveormp3trackthatwouldbeplayedsimultaneouslyandinsyncwithyoursong.ThevolumeofClickTrackcanbechangedfromhomescreen.
Thismaybeusefulforbackingtrackswithchangingtempos,oryoucanloadaguidetrackasasongandabasstrackasClicktrackanddialthebalancebetweenthesetracksonthefly.
Note:inadditiontoheadphones,clicktrackcanberoutedtoanyMimicProlineoutputsinSettings/Routing/ClickTrackauxbus.
YoucanchangeClickTrackAuxBusvolumeinMixer/MonitorSettings/Misc.SoundSrcAuxVoltab
RECORDERTheRecorderinMimicProallowstorecordyourperformancealongwithotheraudiosourcesandplayitbackloopedandindifferentspeeds.
Pic71.Recorder
RECORDSOURCEisselectedinSetup.Itispossibleto:
- Recordsomemusicfromexternalsource(usingMimicProAUXIN)andjamwithit.

83
85
- Recorddrumsonly.- RecordexternalsourceplusMimicProDrums.- RecordexternalsourceplusMimicProDrumsandonboardsongplayer.
MaximumlengthoftherecordinginthecurrentversionofMimicProsoftwareis10minutes.
RECORDERCONTROLBUTTONS:
- LOOPenablestheloopmode.- GRIDSNAPenablesthesnaptogridmode(forplaypositioncursormovement,leftand
rightlooplocatormovements).- RETURNTOSTARTmakestheplaypositioncursorreturntotheplaybackstartposition
afterstopping.- FOLLOWmakesthewavefollowtheplaypositioncursormovement.- METRturnsontheMetronome.
OthercontrolsincludeRecord,Play,Clear,andSetup.
BUTTONSONTHERIGHTSIDEAREABITDIFFERENTFROMOTHERS.Theirfunctionsareenabledbyholdingthebuttondownandturningthedatawheelwhileholding:
- LOOPSTARTsetsthepositionoftheloopstartlocator(redverticalline).- LOOPENDsamefortheloopendlocator(blueverticalline).- ZOOMzoomsthewavein/out.- MOVEmovesthewavestartposition.Useitforaligningthewavetothetempogrid.- BPMiscurrentmetronometempovalueadjustment.- SPEEDisplaybackspeedadjustment,whichisgreatforpractice(slowingdownthe
records).- VOLisplaybackvolume.
YoucansaveyourrecordingtoaUSBflashdrive.
Tostartanewrecordingfirstsaveyourcurrentone,thengotothestartoftheplaybackandrecordovertheexistingrecording.

84
86
SETTINGSSettingsscreenintheMimicProhasmanytabs,buttons,andfunctions.Seethedescriptionsbelow.
SoundLibThistabcontainsfunctionstoworkwithMimicProSoundLibrary.
Pic72.SettingsFiles
- IMPORTINSTRUMENTSFROMUSBSTICKletsyouimportinstrumentsfromaUSBstickintoMimicPro.Theyaresupposedtocomeinfoldersendingwith“.lib”Insidethefoldershouldbetwofoldersnamed“instruments”and“kits.”
- IMPORTONESHOTWAVEFILESFROMUSBSTICKletsyouimportyourWAVfilesandusethemasinstruments.WAVsmustbe16bit,or24bitandhave44100Hzsamplerate.
- CHECKINSTRUMENTLIBRARYINTEGRITYchecksiftheMimicPro’sfactorylibraryisOK.

85
87
BackupThistabcontainsfunctionsforMimicProbackup.
- EXPORTMIMICBACKUPTOUSBSTICKsavestheMimicPro’sbackuptoUSBstick.
Backupcontains:mixersettings,triggersettings,allotherusersettings,userkits,instrumentpresets,importedoneshotwavefiles.Basically,backupcontainseverythingbuttheFactoryInstrumentLibrary(duetothefactthatlibrarysizeisbig,it’snotpartofbackup).Usethisfunctiontostoreallmimicsettingsinonearchiveforafast-simplesettingrestoreincaseofanyissues.Inaddition,youcansendthebackuparchivetoothercustomersifyouwanttotransfer100%ofyourMimicProsettings.
Thiswillcreateacustomnamed*.mbadirectorythatcontainsallyourmimicprosettings.
- IMPORTMIMICBACKUPFROMUSBSTICKimportspreviouslysavedMimicPro’sconfigfromaUSBstick.Pleaseselectadesired*.mbamimicbackupdirectoryforimportandpress“SelectMimicBackup”

86
88
- EXPORTMIMICCONFIGTOUSBSTICKsavestheMimicPro’ssettingstoUSBstick.
Thisfunctionwillexportonlytheparametersdialedbyuser:Mixertriggersettings,headphones/mastermixerfaders,songplayerplaylistetc.
Thisfunctionisusefulifyouwanttoperformfastswitchbetweentwotriggerpadconfigurations(ifyouuseyourmimicwithseveraldifferenteDrumkits)
Thiswillcreateacustomnamed*.mcadirectorythatcontainsyourmimicprosettings.
- IMPORTMIMICCONFIGFROMUSBSTICKimportspreviouslysavedMimicPro’sconfigfromaUSBstick.Pleaseselectadesired*.mcamimicconfigdirectoryforimportandpress“SelectMimicConfig”
- MANAGEUSERPRESETSletsyouimport/exportallthepresetsyoucreatedonyourmimicpro.Itisusefulforpresetbackupandforsharingyourpresetswithothercustomers.
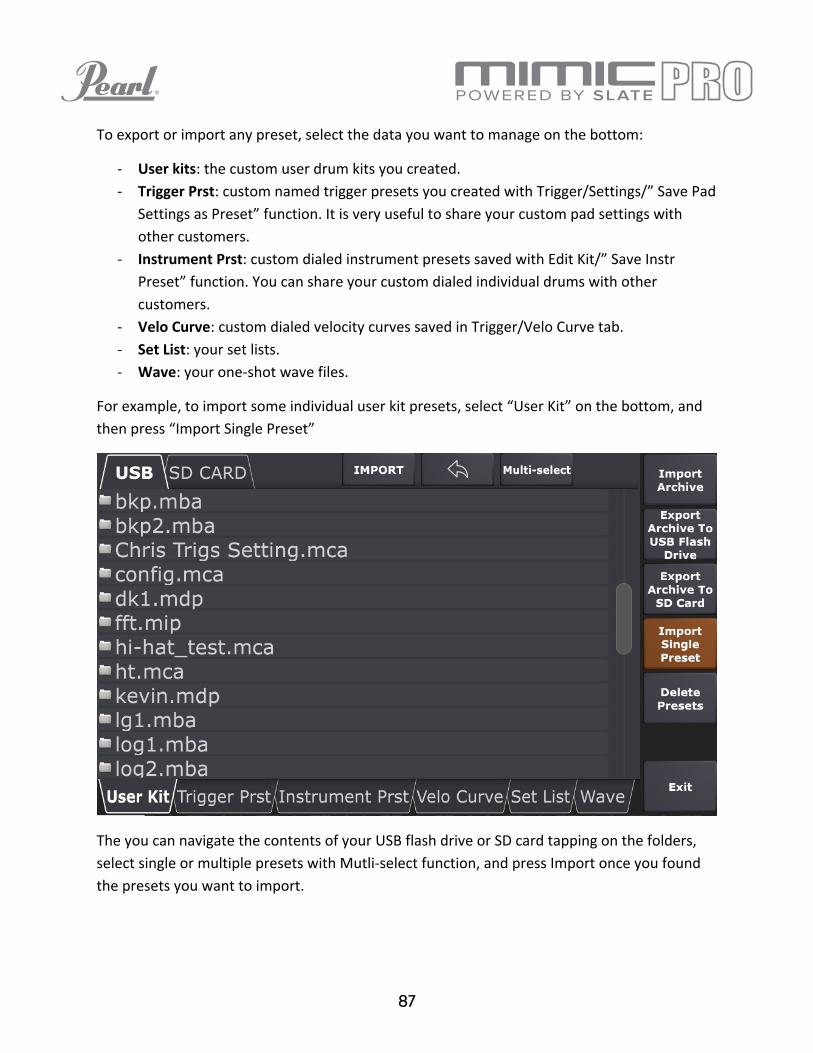
87
89
Toexportorimportanypreset,selectthedatayouwanttomanageonthebottom:
- Userkits:thecustomuserdrumkitsyoucreated.- TriggerPrst:customnamedtriggerpresetsyoucreatedwithTrigger/Settings/”SavePad
SettingsasPreset”function.Itisveryusefultoshareyourcustompadsettingswithothercustomers.
- InstrumentPrst:customdialedinstrumentpresetssavedwithEditKit/”SaveInstrPreset”function.Youcanshareyourcustomdialedindividualdrumswithothercustomers.
- VeloCurve:customdialedvelocitycurvessavedinTrigger/VeloCurvetab.- SetList:yoursetlists.- Wave:yourone-shotwavefiles.
Forexample,toimportsomeindividualuserkitpresets,select“UserKit”onthebottom,andthenpress“ImportSinglePreset”
TheyoucannavigatethecontentsofyourUSBflashdriveorSDcardtappingonthefolders,selectsingleormultiplepresetswithMutli-selectfunction,andpressImportonceyoufoundthepresetsyouwanttoimport.

88
90
Alternatively,youcanimportthewholepresetarchiveofselectedtypewithImportArchivebutton.
DeletepresetallowsyoutocleanupyourMimicProfrompresetsthatyoudon’tneedanymore.
Note:itisreasonabletoperformfullmimicprobackupbeforemanagingthepresets,thusyoucanrestoreanydeleteddataincaseofoccasionalunwanteddeletions.
ROUTINGOnthistabyoucanchangetheaudioroutinginMimicPro.Routingisthepathofanaudiosignal.IfyouwantyourkickdrumtogooutthroughOutput6,youcandothisaswellaschangeittoanyotheroutput.MimicProistheonlyelectronicdrummodulethathasthiscapability.
91
Pic73.SettingsRouting
OntheleftsideoftheRoutingtabyouwillseeInstrumentsTypeandTriggerInputname.InstrumentTypeistherebecause,forinstanceAUXcanbekick,tom,orcymbals,soyoudon’thavetomemorizeitwhenyouaresettinguprouting.
OntherightsideyoucanselecttheOutput.Itcanbemono,orstereo.Ifyouareroutingasignal,thatispanned,liketoms,orride,youwilllosethepanifyouroutetheinstrumenttothemonoout(it’sobvious,becausethesignalbeforemonocan’tbepannedtotherightandkeepsoundingontheright,becausemonoisasinglechannel).So,ifyouchoose,forinstance,4tomstokeeptheirpanningthenrouteallofthemintostereoout.
ToseeliveviewoftheRoutingScreen,clickthelinkbelow
https://youtu.be/mkV3nD8dEVY
SYSOnthistabyoucanresetMimicProtothefactorysettings,applysoftwareupdates,deleteuserkitpresetsandformatSDcardsandUSBdrives.
Pic74.SettingsSys

89
91
Pic73.SettingsRouting
OntheleftsideoftheRoutingtabyouwillseeInstrumentsTypeandTriggerInputname.InstrumentTypeistherebecause,forinstanceAUXcanbekick,tom,orcymbals,soyoudon’thavetomemorizeitwhenyouaresettinguprouting.
OntherightsideyoucanselecttheOutput.Itcanbemono,orstereo.Ifyouareroutingasignal,thatispanned,liketoms,orride,youwilllosethepanifyouroutetheinstrumenttothemonoout(it’sobvious,becausethesignalbeforemonocan’tbepannedtotherightandkeepsoundingontheright,becausemonoisasinglechannel).So,ifyouchoose,forinstance,4tomstokeeptheirpanningthenrouteallofthemintostereoout.
ToseeliveviewoftheRoutingScreen,clickthelinkbelow
https://youtu.be/mkV3nD8dEVY
SYSOnthistabyoucanresetMimicProtothefactorysettings,applysoftwareupdates,deleteuserkitpresetsandformatSDcardsandUSBdrives.
Pic74.SettingsSys

90
92
ThebuttonlabeledApplySoftwareUpdateletsyouupdateMimicPro’ssoftware.Detailedinstructionsabouthowtoapplysoftwareupdatewillcomewitheverysoftwareupdateindividually.
IfyoupresstheResetbuttonitwillresetMimicPro.YouwillneedtorebootMimicProafterresetting.
DeleteAllUserDataperforms100%cleanupofyourMimicPro.Thisdeletesalluserkits,alluserpresets,importedwavefilesetc.
USERINTERFACEOnthistabyoucandialyourmimicprouserinterfaceparameters.
Pic75.SettingsUserInterface
1. Brightness/ContrastcontrolsallowstoadjustyourLCDbrightnessandcontrastvalues.2. TopBarSetupallowsyoutodialyourpreferredtopbarconfiguration.

91
93
Pic76.UserInterfaceTopBarSetup
YoucanselectpredefinedDefault1/Default2layoutpresetsormakeyourownlayout.ForthatselectthebuttonnameatthetopanduseMoveLeft/MoveRightfunctionstorepositionselectedbutton.
3. ScreenSaverSetupenablesMimicProscreensaverandsetthedesiredscreensavertimeout.
Pic77.UserInterfaceScreensaverSetup
94
4. TurnLockScreensOff-disableslockscreenfunctioninTrigger/Settingsscreens.
INSTRUMENTSLISTWithfutureupdates,additionalinstrumentswillbeprovided.
ChinaRSbn19AXT
ChinaRSlt22CST
ChinaRSlt22VTG
CowbellPearl10PCB
CrashLPst18PWC
CrashLPst19PWC
CrashLSlt16EXR
CrashLSlt17EXR
CrashLSlt17VTG
CrashLSlt18EXR
CrashLSlt18VTG
CrashLSlt20CST
CrashLSlt20VTG
CrashLZld18ACU
CrashLZld19ACU
CrashRPst18PWC
CrashRPst19PWC
CrashRSlt16EXR
CrashRSlt17EXR
CrashRSlt17VTG
CrashRSlt18EXR
CrashRSlt18VTG
CrashRSlt20CST
CrashRSlt20VTG
CrashRZld18ACU
CrashRZld19ACU
CrashRZld20ACU
CrashXZld19ACU
CrashXZld20ACU
Hi-HatSbn14AAM
Hi-HatSbn14HHV
Hi-HatSlt14VOS
Hi-HatSlt14VTG

92
94
4. TurnLockScreensOff-disableslockscreenfunctioninTrigger/Settingsscreens.
INSTRUMENTSLISTWithfutureupdates,additionalinstrumentswillbeprovided.
ChinaRSbn19AXT
ChinaRSlt22CST
ChinaRSlt22VTG
CowbellPearl10PCB
CrashLPst18PWC
CrashLPst19PWC
CrashLSlt16EXR
CrashLSlt17EXR
CrashLSlt17VTG
CrashLSlt18EXR
CrashLSlt18VTG
CrashLSlt20CST
CrashLSlt20VTG
CrashLZld18ACU
CrashLZld19ACU
CrashRPst18PWC
CrashRPst19PWC
CrashRSlt16EXR
CrashRSlt17EXR
CrashRSlt17VTG
CrashRSlt18EXR
CrashRSlt18VTG
CrashRSlt20CST
CrashRSlt20VTG
CrashRZld18ACU
CrashRZld19ACU
CrashRZld20ACU
CrashXZld19ACU
CrashXZld20ACU
Hi-HatSbn14AAM
Hi-HatSbn14HHV
Hi-HatSlt14VOS
Hi-HatSlt14VTG

93
95
Hi-HatZld13KCU
Hi-HatZld14KCU
KickDrw22CLH
KickDrw22CLS
KickDrw22MPL
KickGth18CAT
KickGth18JZY
KickGth20BYN
KickLwg20KEY
KickLwg22VSL
KickLwg24HRD
KickLwg24SFT
KickLwg26LGC
KickPearl22BRH
KickPearl22BRS
KickPearl22HRD
KickPearl22MHX
KickPearl22RFP
KickPearl22SFT
KickPearl22WRH
KickPearl22WRS
KickSnr22PLS
KickSnr22SQB
KickTma24SCM
KickYha22HRD
KickYha22SFT
RidePst22PWR
RideSbn20AAE
RideSbn21PTR
RideSlt21CST
RideSlt22VTG
RideZld21SWR
SnareBrd6.5SLK
SnareBrush6JZY
SnareDnt6.5STL
SnareDnt6.5STT
SnareGth5GSS
SnareHur7CSL
SnareHur7CST
SnareLwg5BLA
SnareLwg5LBR
SnareLwg6.5BLB
SnareLwg6.5BLD
SnareNac6ALD
SnareNac6ALO
SnarePearl5CSM
SnarePearl6.5MHX
SnarePearl6.5RBD
SnarePearl6.5RBR
SnarePearl6.5SEN
SnarePmr6VTG
SnarePmr6VTT
SnareSnr6ART
SnareSnr6PLS
SnareTma6BBD
SnareTma6BBR
SnareTma6.5SCM
SnareYha6JZY
SplashLSbn09AXM
SplashLSlt08CST
SplashLSlt10CST
SplashLZld12ACU
SplashXSbn09AXM
SplashXZld12ACU
TomBrushJZY08
TomBrushJZY10
TomBrushJZY14
TomDrwCLT08
TomDrwCLT10

94
96
TomDrwCLT12
TomDrwCLT14
TomDrwCLT16
TomDrwMPL10
TomDrwMPL12
TomDrwMPL14
TomDrwMPL16
TomGthJZY08
TomGthJZY10
TomGthJZY14
TomLwgMAP13
TomLwgMAP16
TomLwgVSL10
TomLwgVSL12
TomLwgVSL14
TomLwgVSL16
TomPearlBRC10
TomPearlBRC12
TomPearlBRC16
TomPearlMHX10
TomPearlMHX12
TomPearlMHX16
TomPearlMHX18
TomPearlMPE10
TomPearlMPE12
TomPearlMPE14
TomPearlMPE16
TomPearlREF08
TomPearlREF10
TomPearlREF14
TomPearlREF16

95
SPECS - System
1. 14 Balanced Analog Outputs:
1a. 6 ¼” TRS Balanced Line Level Outputs
1b. 8 Balanced Line Level through DB25
2. ¼” TRS Stereo headphone out
3. ¼” TRS Stereo Aux Line Input
4. 16 ¼” TRS Trigger Pad Inputs, Designed to use with Dual-Zone and Triple Zone Pads
5. SD Card Slot
6. USB 2.0 Slot
7. RJ45 Extension Port
8. MIDI I/O - Standard 5-pin DIN MIDI connectors
9. Power - DC Input Voltage 12 VDC / 3A , 2.1mm Center-Positive Coaxial DC plug
- Mechanical Dimensions & Weight
1. Width 12.5”
2. Height 6.5”
3. Depth, Chassis Only 2.75”
4. Depth, Including Knob & Jack Protrusions 3.0”
5. Shipping Box (Width x Depth x Height) 19” x 10.25” x 4.125”
6. Shipping Weight (with box & accessories) 8.55 lbs
7. Weight (bare unit) 5.5 lbs

96
CREDITS Andrey Shetov - System Software Engineer
Alex Arbuzov - System Software Engineer
Alex Semichev - GUI / Sound Engineer
Sergey Danilov - DSP Code / Software Engineer
Oleg Pikhotskiy - Electronic Designer
Bob Sabellico - Pearl Product Manager Electronic Percussion
Erika Earl - Hardware Manager
Jesse Honig - Hardware Manager
Rich Spindel - Industrial Designer

97
99
DECLARATIONSOFCONFORMITYFCCComplianceFederalCommunicationsCommissionUnitedStatesClassBManualStatementThisequipmenthasbeentestedandfoundtocomplywiththelimitsforaClassBdigitaldevice,pursuanttopart15Section15.107&15.109oftheFCCRules.
Theselimitsaredesignedtoprovidereasonableprotectionagainstharmfulinterferenceinaresidentialinstallation.Thisequipmentgenerates,usesandcanradiateradiofrequencyenergyand,ifnotinstalledandusedinaccordancewiththeinstructions,maycauseharmfulinterferencetoradiocommunications.However,thereisnoguaranteethatinterferencewillnotoccurinaparticularinstallation.Ifthisequipmentdoescauseharmfulinterferencetoradioortelevisionreception,whichcanbedeterminedbyturningtheequipmentoffandon,theuserisencouragedtotrytocorrecttheinterferencebyoneormoreofthefollowingmeasures:
- Reorientorrelocatethereceivingantenna.- Increasetheseparationbetweentheequipmentandreceiver.- Connecttheequipmentintoanoutletonacircuitdifferentfromthattowhichthe
receiverisconnected.- Consultthedealeroranexperiencedradio/TVtechnicianforhelp.
EuropeanCommissionCompliance
Weherebydeclareunderoursoleresponsibilitythattheproducthereinidentified,towhichthisdeclarationrelates,isinconformitywiththeessentialrequirementsandotherrelevantrequirementsoftheEuropeanParliament,EuropeanCouncil,andmeetsallrequirementsoftheCanadianInterference-CausingEquipmentRegulations.(CetappareilnumériquedelaclasseBrespectetouteslecsexigencesduRèglementsurlematérialbrouilleurduCanada),:EN55032(2012)+AC1,EN61000-3-2(2014),EN61000-3-3(2013)andEN55103-2(2009)KN32(2015)andKN35(2015)InaccordancewithRRANotice2016-24(2016.12.07)RRANotice2016-26(2016.12.19)RRANotice2016-79(2016.12.19)VCCICISPR32(2016)
KC&PSEcertificationsarepending
TradeName:PEARLCorporation
Model:MimicPro

98
100
Description:ElectronicDrumModule
Informationiscontainedinareportby:CKCLaboratories,Inc
Dated:May3,2017
99
DECLARATIONSOFCONFORMITYFCCComplianceFederalCommunicationsCommissionUnitedStatesClassBManualStatementThisequipmenthasbeentestedandfoundtocomplywiththelimitsforaClassBdigitaldevice,pursuanttopart15Section15.107&15.109oftheFCCRules.
Theselimitsaredesignedtoprovidereasonableprotectionagainstharmfulinterferenceinaresidentialinstallation.Thisequipmentgenerates,usesandcanradiateradiofrequencyenergyand,ifnotinstalledandusedinaccordancewiththeinstructions,maycauseharmfulinterferencetoradiocommunications.However,thereisnoguaranteethatinterferencewillnotoccurinaparticularinstallation.Ifthisequipmentdoescauseharmfulinterferencetoradioortelevisionreception,whichcanbedeterminedbyturningtheequipmentoffandon,theuserisencouragedtotrytocorrecttheinterferencebyoneormoreofthefollowingmeasures:
- Reorientorrelocatethereceivingantenna.- Increasetheseparationbetweentheequipmentandreceiver.- Connecttheequipmentintoanoutletonacircuitdifferentfromthattowhichthe
receiverisconnected.- Consultthedealeroranexperiencedradio/TVtechnicianforhelp.
EuropeanCommissionCompliance
Weherebydeclareunderoursoleresponsibilitythattheproducthereinidentified,towhichthisdeclarationrelates,isinconformitywiththeessentialrequirementsandotherrelevantrequirementsoftheEuropeanParliament,EuropeanCouncil,andmeetsallrequirementsoftheCanadianInterference-CausingEquipmentRegulations.(CetappareilnumériquedelaclasseBrespectetouteslecsexigencesduRèglementsurlematérialbrouilleurduCanada),:EN55032(2012)+AC1,EN61000-3-2(2014),EN61000-3-3(2013)andEN55103-2(2009)KN32(2015)andKN35(2015)InaccordancewithRRANotice2016-24(2016.12.07)RRANotice2016-26(2016.12.19)RRANotice2016-79(2016.12.19)VCCICISPR32(2016)
KC&PSEcertificationsarepending
TradeName:PEARLCorporation
Model:MimicPro

99
101
ChangeLogVer1.0.9
-The“Kitload”timehasbeenimproved.-“Seamlesskitload”featurehasbeenaddedwithnosounddropout.-ATVHiHatfalsetriggeringofbowsoundwhileplayingaChickhasbeeneliminated.-TriggerEnginehasbeenupgradedforincreasedaccuracy.-Spuriousencoderincrementatstartuphasbeeneliminated.Theerroneousvolumechanges-havebeenrepaired.-Themetronometempoisrestoredafterpoweroff.-Setlist“editdialog”cellincludes"clearkit"button-DeleteandRenamebuttonsareremovedfromKitloaddialoginsetlistcelledit.-AudioplayerloopscorrectlywhenBpointissetattheveryendofthesong.-AuxInputnoisehasbeenfixed.-One-shotwavestimehasbeenextended.-NumerousUserInterfaceupdates.-Triggerengineupdate:-Kickandsnarehitstriggeredwiththewrongvelocityhavebeenrepaired.-Ride/Crashrandomsoundchokerepaired.-Kickdrumfalsetriggeringrepaired.-Occasionalclicksoundglitchremovedonfasttomrolls.-Mixer/Modnowhasadedicatedrim-bellsettingspage.-Mixer/Modpaneaddition-Dampenparameternowincluded.-Mixer/Modpaneaddition-Solomicadded.-Datastorageisstable.Corruptfileissueshavebeenaddressed.-SoloMicimplemented.-LinkeditforEQincluded.-RecorderChanges.-Homepagemixer.Rideinputsplitmodehasbeenrepaired.-Vastlyimprovedone-shotwavedynamics.-Theonboardsongplayerisnowroutedtotherecorder.-SongPlayerupdated.-Songplayerplaybackspeedfunctionisadded.

100
102
-Userbrightnesssettingsareloadedonstartup.-Mixeradditions:overhead/roomstripsoloadded.-Sdcardsupportisaddedforthesongplayer.-Lockscreendisablefunctionisaddedtotheuserinterfacesettings.-Settingsmenuupdate,"Files"tabsaredividedinto"SoundLib"and"Backup".-BackupExport/Importfunctionadded,anditsavesallsettings,presets,kitsandwaves.-DeleteuserkitshasbeenchangedtoDeletealluserdataandisacompletemodulecleanup.-Manageuserpresetsfunctionadded.-It'sanewfeaturethathelpstoimport/exportanddeletealltypesofinternaluserdataina=-singleinterface.-Thisincludesthemultiplefileselectionforimportinganddeletion.-Setlisteditinghasbeenoptimized.-RandomASRenvelopeclicksrepaired.-R-BT1triggerpresetcrosstalksuppressionupdated.-"Managetriggerpadpresets"hasbeenremoved.-ManageUserPresetsfunctionisanewfunction.-TheScreensaverautomaticallyturnsoffwhenyoustarttoplay.-USBflashdrive/Sdcardformatfunctionhasbeenrepaired.-Newimport/exporterrorsplashscreenshavebeenadded.-NewEditKit/AssigntoPaddialoghasbeenimplemented.-NoneedtousetheTriggertabtomakecustominstrumentassignments.-“Newkit”buttonnowcreatesanemptykit.(Deletesfxsettingsfromtheoldkit)-"ContactPearlSupportToReplaceSSD"isnowdisplayedontheSettings/Systabincaseofa-failingSSD.-A/Blayersarenowsynchronizedacrossmic/fxandmodtabsinthemixer.


![OpenVPN and Remote Desktop Connection · Allow VPN connection to frederick.ac.cy? Conne More details.. u] Don't ask again 3/10/2014 Computer RecýdIe8in Mozilla Conne Co nnect OPEN](https://img.dokumen.tips/doc/110x75/5f76779c1cbc515fb565e3ca/openvpn-and-remote-desktop-allow-vpn-connection-to-frederickaccy-conne-more-details.jpg)


![[Drum] Bob Moses - Drum Wisdom](https://img.dokumen.tips/doc/110x75/577cbfd31a28aba7118e36ec/drum-bob-moses-drum-wisdom.jpg)