Embed Size (px)
Citation preview

MikroTik RouterOS IPsec VPN with RADIUS client &Windows 2016 Server NPS backend
M I K R OT I K U S E R M E E T I N GB U C H A R E S T – R O M A N I A , O C TO B E R 2 9 , 20 1 8
P R E S E N T E D B Y:D A N I E L T U R E A N - M I K R O T R A I N I N G S R L
https://www.mikrotraining.ro
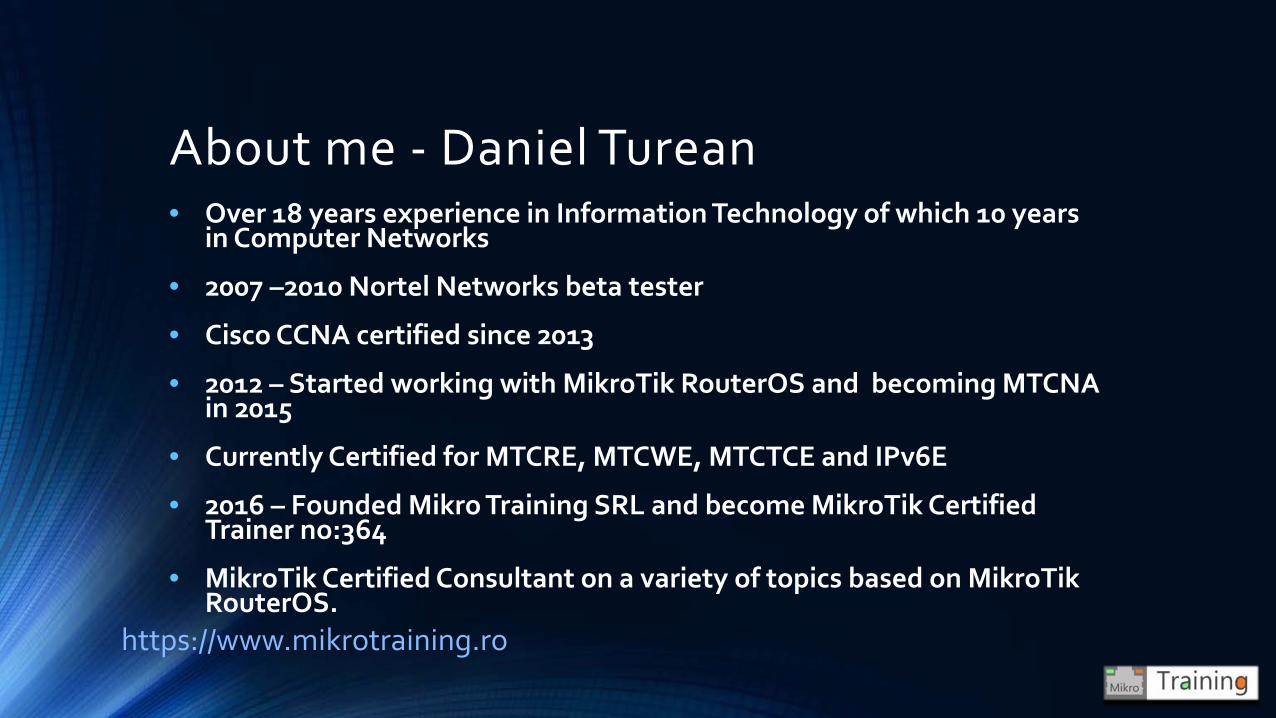
About me - Daniel Turean• Over 18 years experience in Information Technology of which 10 years
in Computer Networks
• 2007 –2010 Nortel Networks beta tester
• Cisco CCNA certified since 2013
• 2012 – Started working with MikroTik RouterOS and becoming MTCNA in 2015
• Currently Certified for MTCRE, MTCWE, MTCTCE and IPv6E
• 2016 – Founded Mikro Training SRL and become MikroTik Certified Trainer no:364
• MikroTik Certified Consultant on a variety of topics based on MikroTikRouterOS.
https://www.mikrotraining.ro
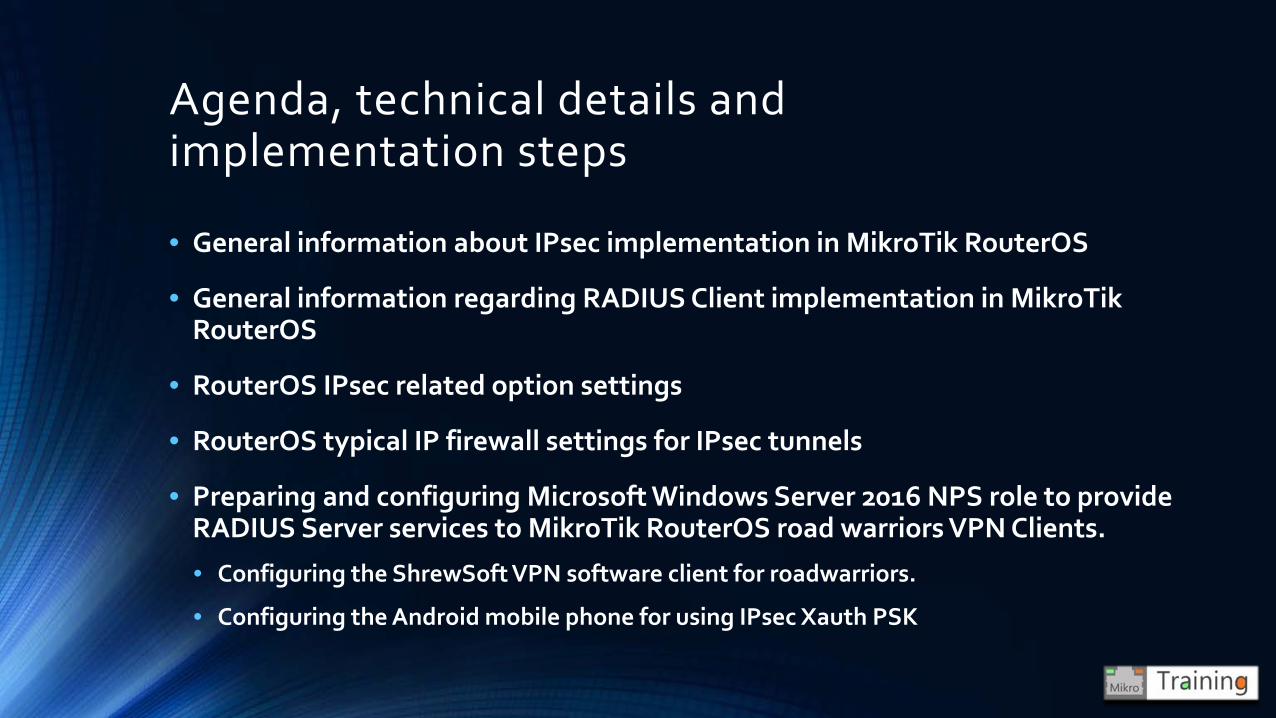
Agenda, technical details and implementation steps
• General information about IPsec implementation in MikroTik RouterOS
• General information regarding RADIUS Client implementation in MikroTikRouterOS
• RouterOS IPsec related option settings
• RouterOS typical IP firewall settings for IPsec tunnels
• Preparing and configuring Microsoft Windows Server 2016 NPS role to provide RADIUS Server services to MikroTik RouterOS road warriors VPN Clients.
• Configuring the ShrewSoft VPN software client for roadwarriors.
• Configuring the Android mobile phone for using IPsec Xauth PSK
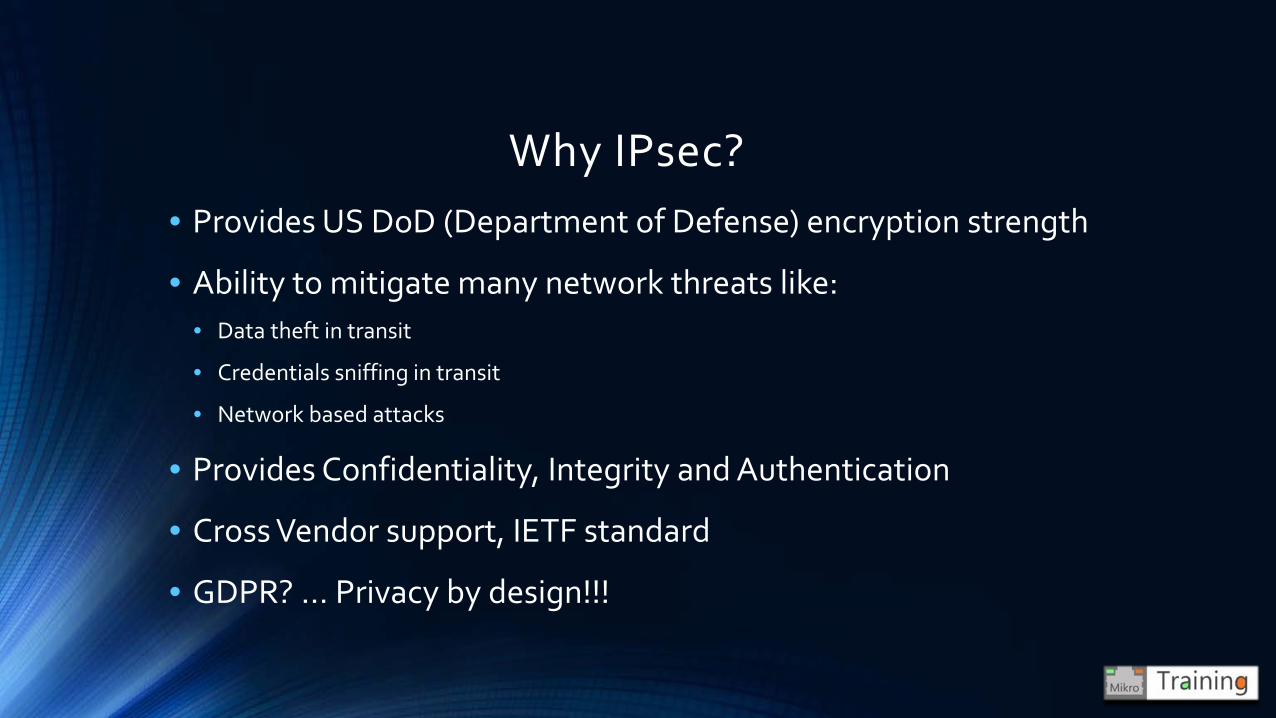
Why IPsec? • Provides US DoD (Department of Defense) encryption strength
• Ability to mitigate many network threats like:• Data theft in transit
• Credentials sniffing in transit
• Network based attacks
• Provides Confidentiality, Integrity and Authentication
• Cross Vendor support, IETF standard
• GDPR? … Privacy by design!!!
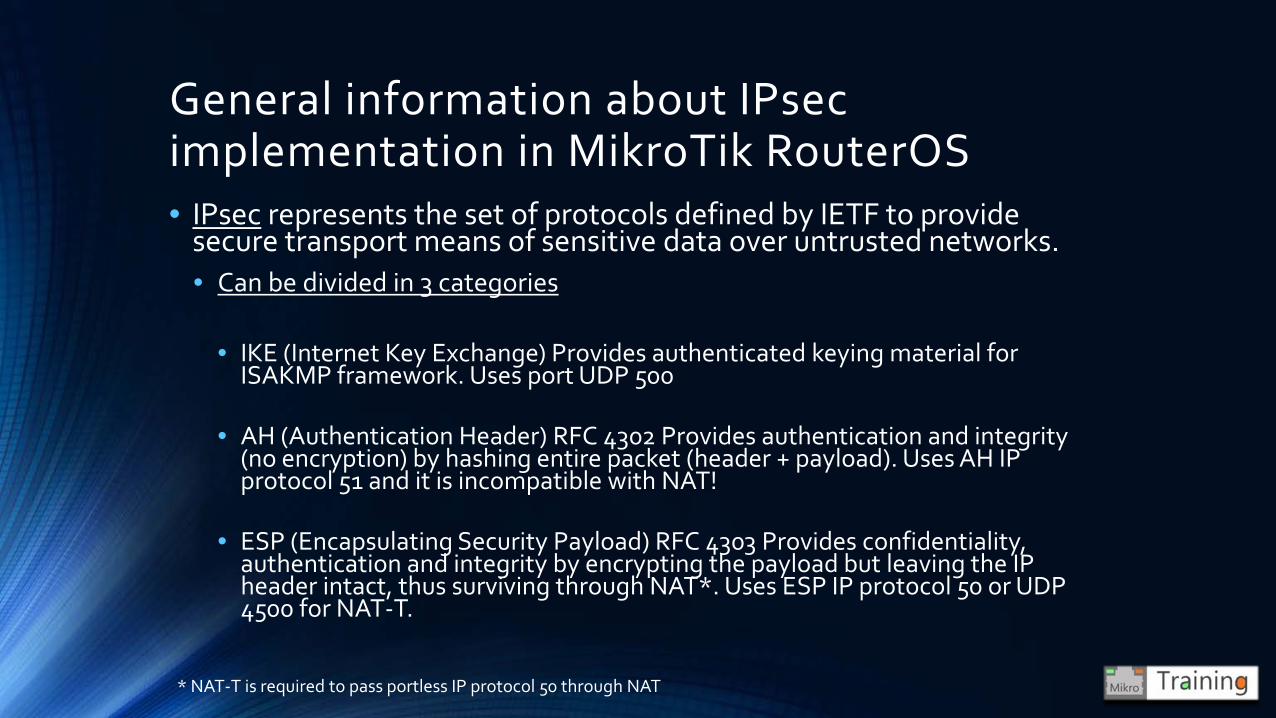
General information about IPsec implementation in MikroTik RouterOS• IPsec represents the set of protocols defined by IETF to provide
secure transport means of sensitive data over untrusted networks. • Can be divided in 3 categories
• IKE (Internet Key Exchange) Provides authenticated keying material for ISAKMP framework. Uses port UDP 500
• AH (Authentication Header) RFC 4302 Provides authentication and integrity (no encryption) by hashing entire packet (header + payload). Uses AH IP protocol 51 and it is incompatible with NAT!
• ESP (Encapsulating Security Payload) RFC 4303 Provides confidentiality, authentication and integrity by encrypting the payload but leaving the IP header intact, thus surviving through NAT*. Uses ESP IP protocol 50 or UDP 4500 for NAT-T.
* NAT-T is required to pass portless IP protocol 50 through NAT
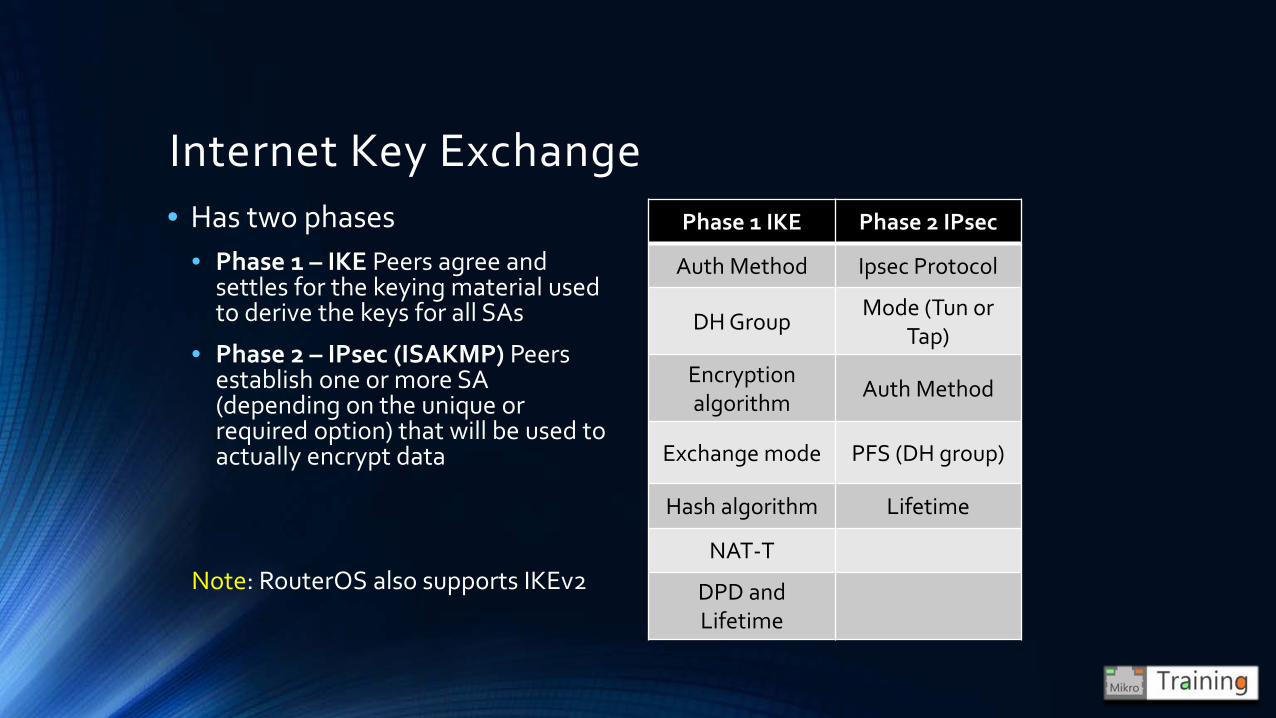
Internet Key Exchange• Has two phases
• Phase 1 – IKE Peers agree and settles for the keying material used to derive the keys for all SAs
• Phase 2 – IPsec (ISAKMP) Peers establish one or more SA (depending on the unique or required option) that will be used to actually encrypt data
Note: RouterOS also supports IKEv2
Phase 1 IKE Phase 2 IPsec
Auth Method Ipsec Protocol
DH GroupMode (Tun or
Tap)
Encryption algorithm
Auth Method
Exchange mode PFS (DH group)
Hash algorithm Lifetime
NAT-T
DPD and Lifetime
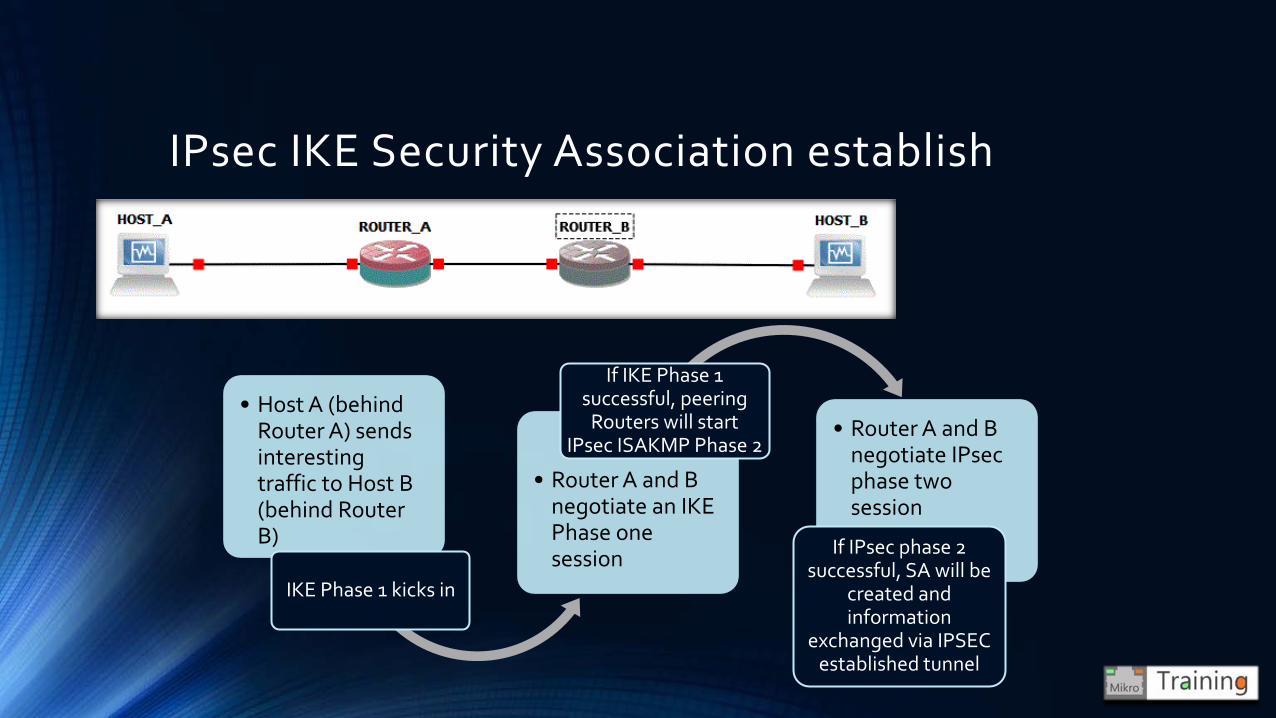
IPsec IKE Security Association establish
• Host A (behind Router A) sends interesting traffic to Host B (behind Router B)
IKE Phase 1 kicks in
• Router A and B negotiate an IKE Phase one session
If IKE Phase 1 successful, peering
Routers will start IPsec ISAKMP Phase 2
• Router A and B negotiate IPsec phase two session
If IPsec phase 2 successful, SA will be
created and information
exchanged via IPSEC established tunnel

Encapsulating Security Payload
USE S SHA RE D KE YS F OR PROVIDIN G E NCRY PTION
ESP Header/TRANSPORT Mode – existing between Original IP header and Payload data.
ESP Header/TUNNEL Mode – Changes the position compared to TRANSPORT Mode, providing confidentiality to Original IP header as well.
Initial IP Header
ESP Header
PAYLOAD ESP Trailer ESP Authentication Data
New IP Header
ESP Header
PAYLOAD ESP TrailerESP Authentication
DataInitial IP Header
Encryption
Encryption
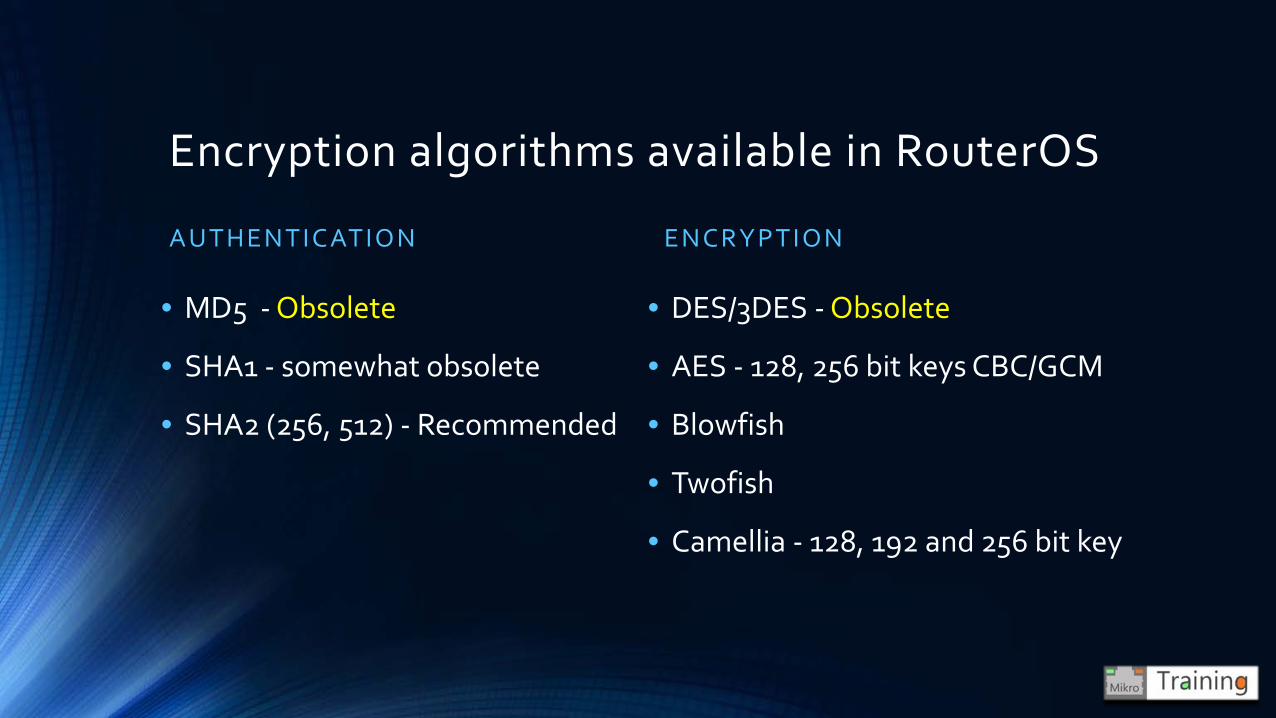
Encryption algorithms available in RouterOS
A UTHE NTICAT ION
• MD5 - Obsolete
• SHA1 - somewhat obsolete
• SHA2 (256, 512) - Recommended
E NCRY PTION
• DES/3DES - Obsolete
• AES - 128, 256 bit keys CBC/GCM
• Blowfish
• Twofish
• Camellia - 128, 192 and 256 bit key
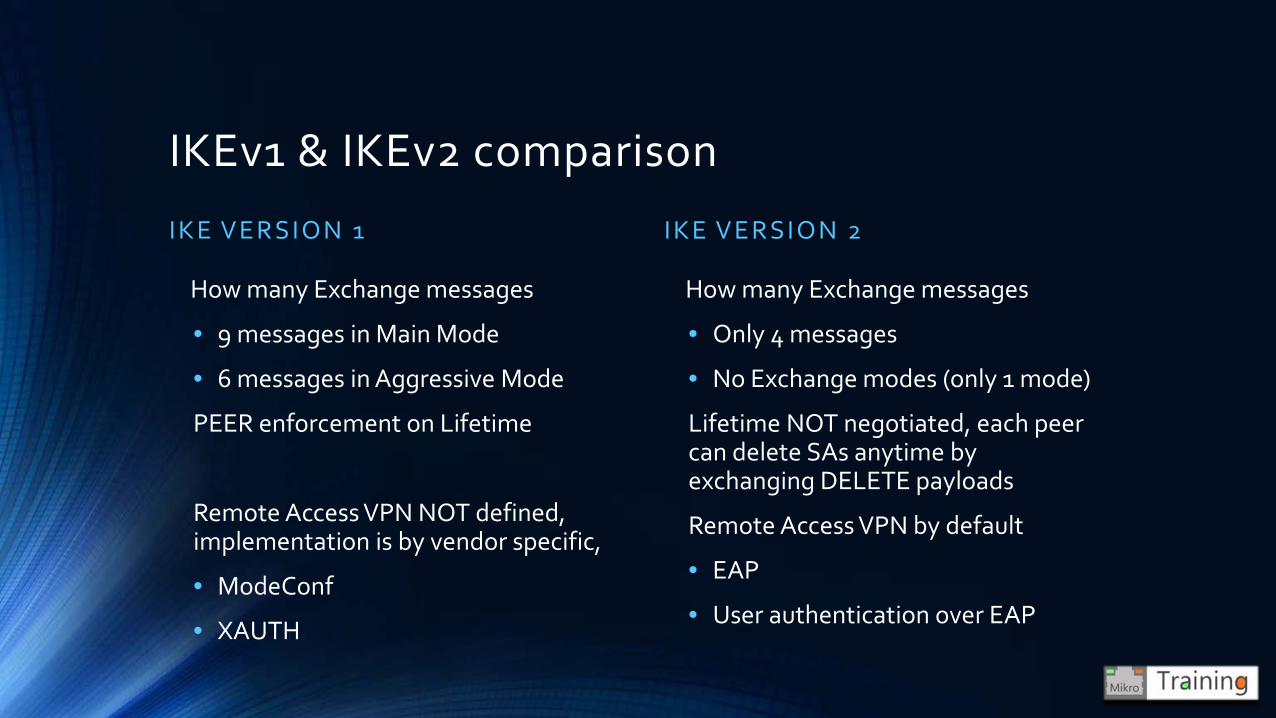
IKEv1 & IKEv2 comparison
IKE VE RSION 1
How many Exchange messages
• 9 messages in Main Mode
• 6 messages in Aggressive Mode
PEER enforcement on Lifetime
Remote Access VPN NOT defined, implementation is by vendor specific,
• ModeConf
• XAUTH
IKE VE RS ION 2
How many Exchange messages
• Only 4 messages
• No Exchange modes (only 1 mode)
Lifetime NOT negotiated, each peer can delete SAs anytime by exchanging DELETE payloads
Remote Access VPN by default
• EAP
• User authentication over EAP
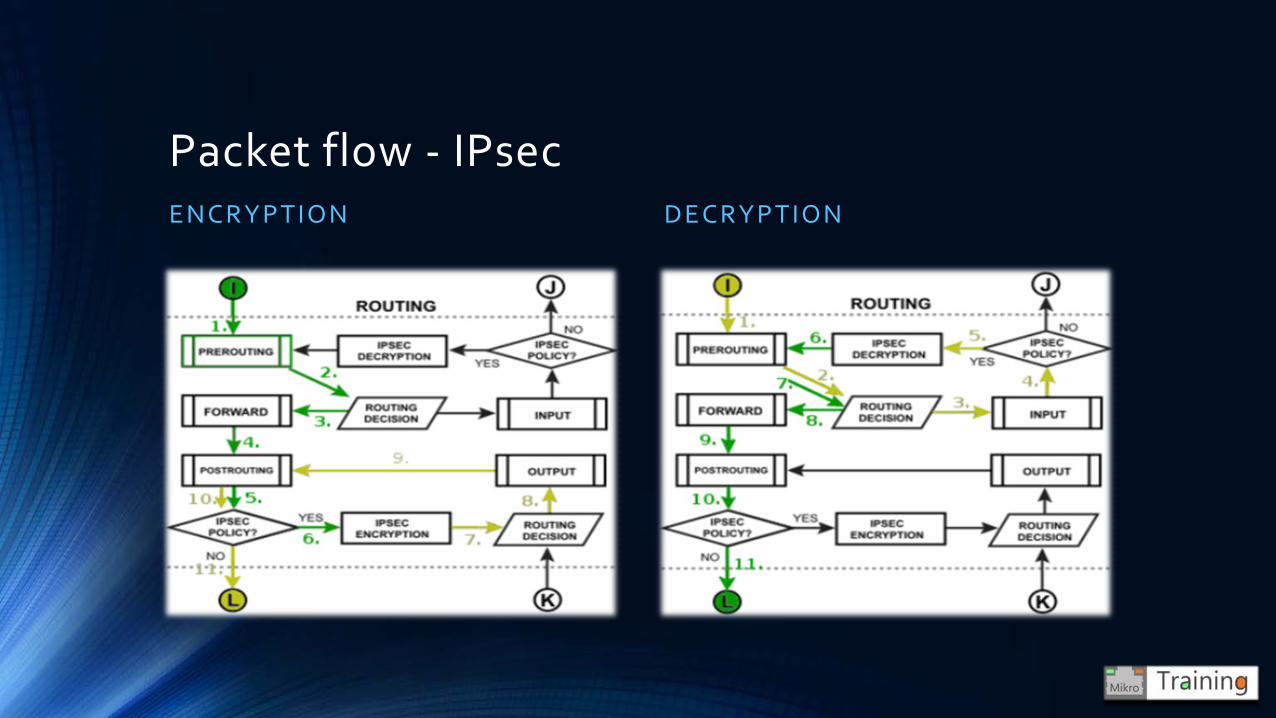
Packet flow - IPsecE NCRYPTION DE CRYPTION
MikroTik RouterOS RADIUS Client
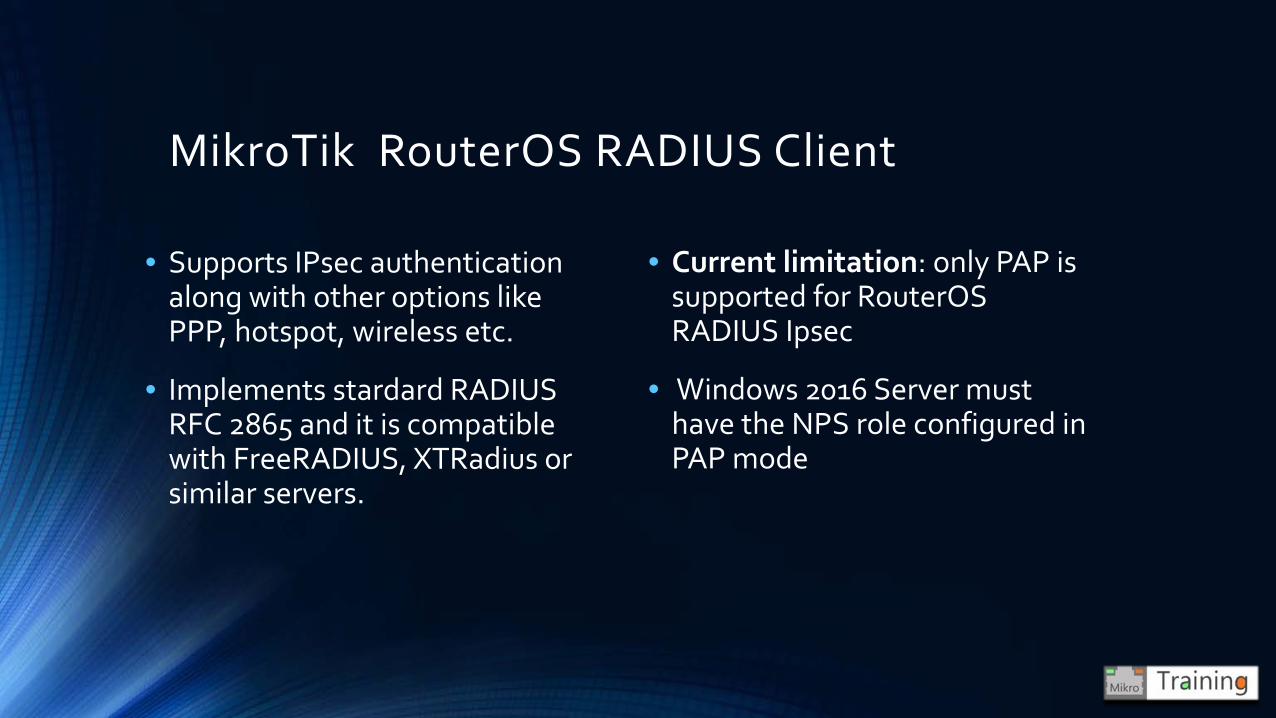
• Supports IPsec authentication along with other options like PPP, hotspot, wireless etc.
• Implements stardard RADIUS RFC 2865 and it is compatible with FreeRADIUS, XTRadius or similar servers.
• Current limitation: only PAP is supported for RouterOSRADIUS Ipsec
• Windows 2016 Server must have the NPS role configured in PAP mode
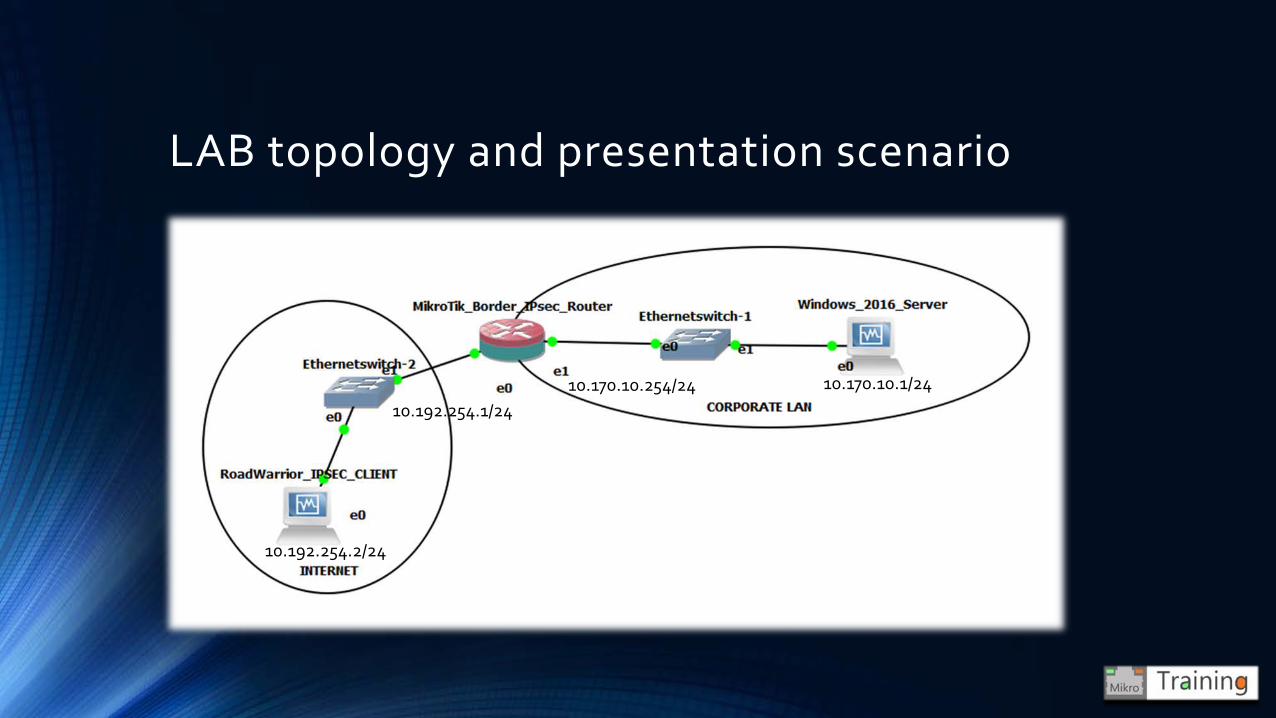
LAB topology and presentation scenario
10.170.10.1/2410.170.10.254/2410.192.254.1/24
10.192.254.2/24
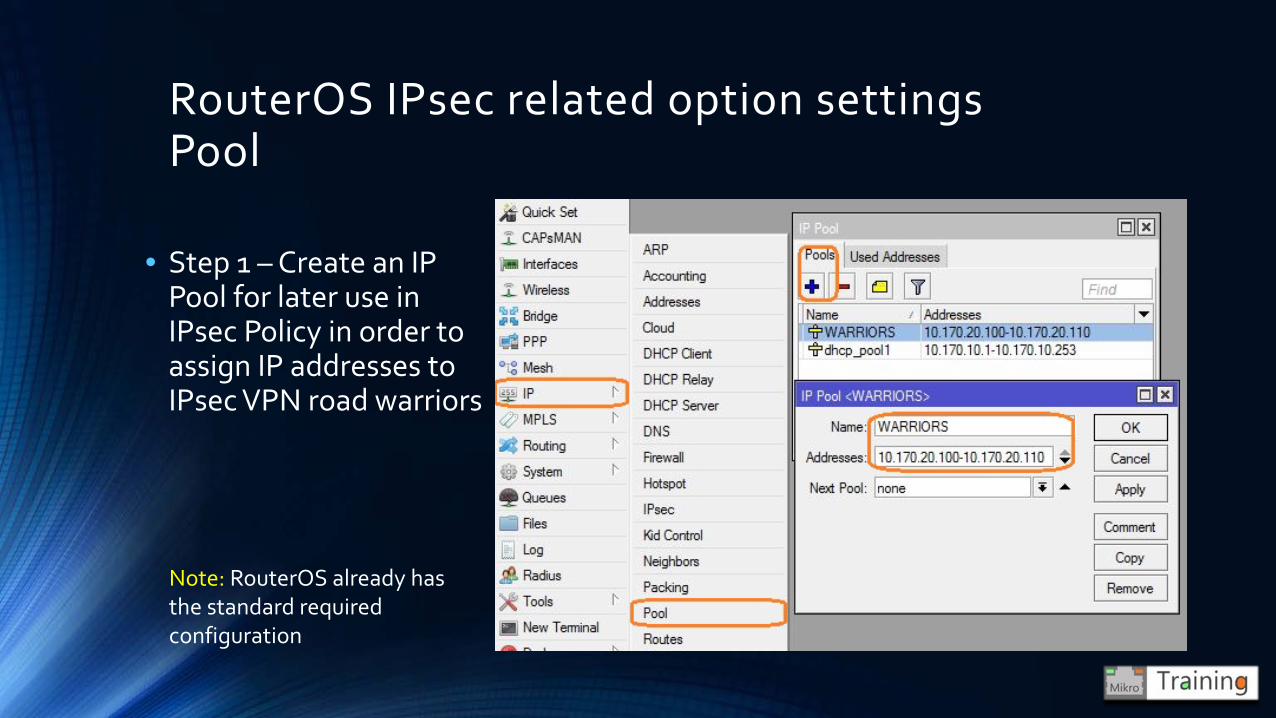
RouterOS IPsec related option settings Pool
• Step 1 – Create an IP Pool for later use in IPsec Policy in order to assign IP addresses to IPsec VPN road warriors
Note: RouterOS already has the standard required configuration
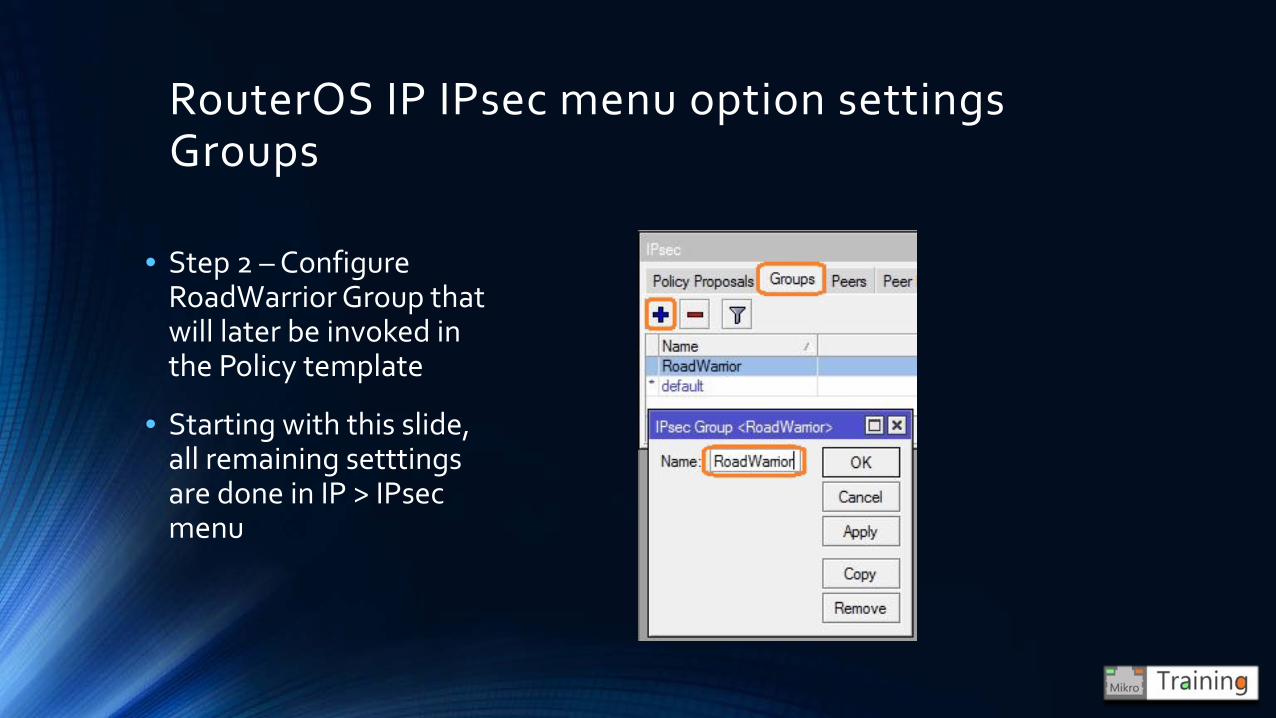
RouterOS IP IPsec menu option settings Groups
• Step 2 – Configure RoadWarrior Group that will later be invoked in the Policy template
• Starting with this slide, all remaining setttingsare done in IP > IPsec menu

RouterOS IP IPsec menu related option settings Policies General
• Step 3 – Policies configuration in Template mode, Src Address representing the local subnet and Dst. Address, the remote roadwarriorsubnet
• We need Template option enabled because we do not know the public IP that the client will use to initiate the IKE session
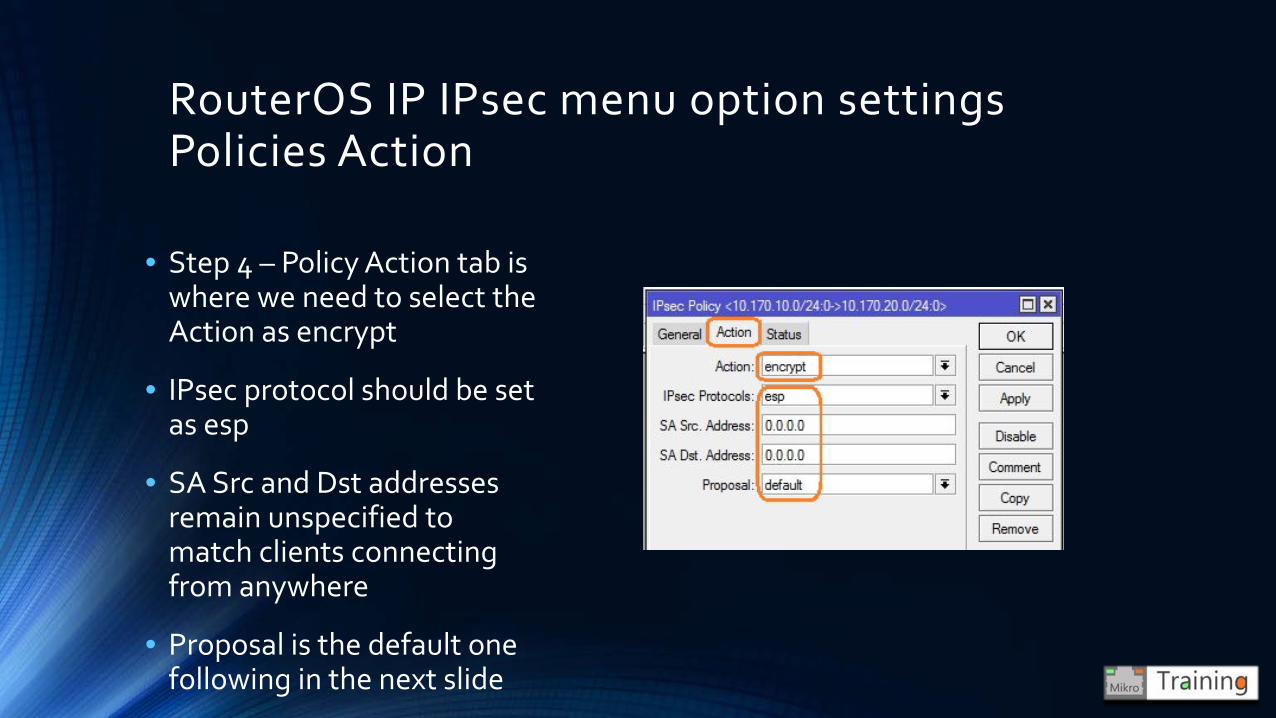
RouterOS IP IPsec menu option settings Policies Action
• Step 4 – Policy Action tab is where we need to select the Action as encrypt
• IPsec protocol should be set as esp
• SA Src and Dst addresses remain unspecified to match clients connecting from anywhere
• Proposal is the default one following in the next slide
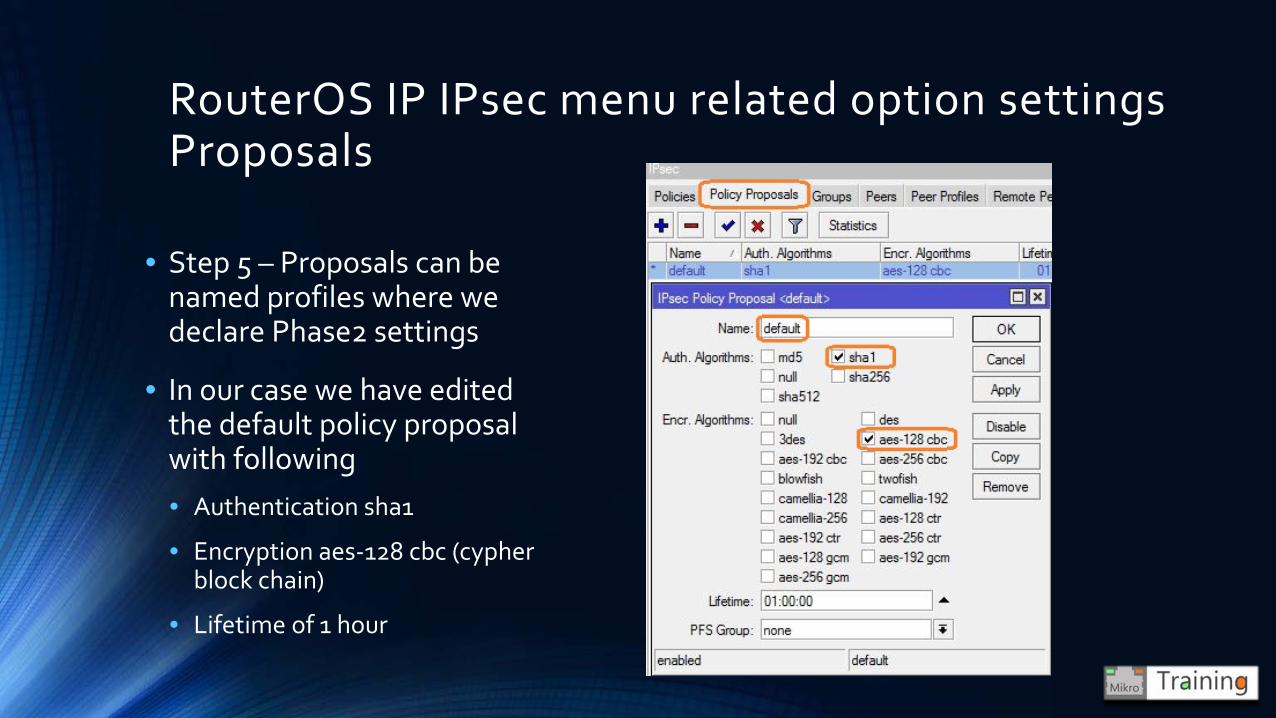
RouterOS IP IPsec menu related option settings Proposals
• Step 5 – Proposals can be named profiles where we declare Phase2 settings
• In our case we have edited the default policy proposal with following• Authentication sha1
• Encryption aes-128 cbc (cypher block chain)
• Lifetime of 1 hour
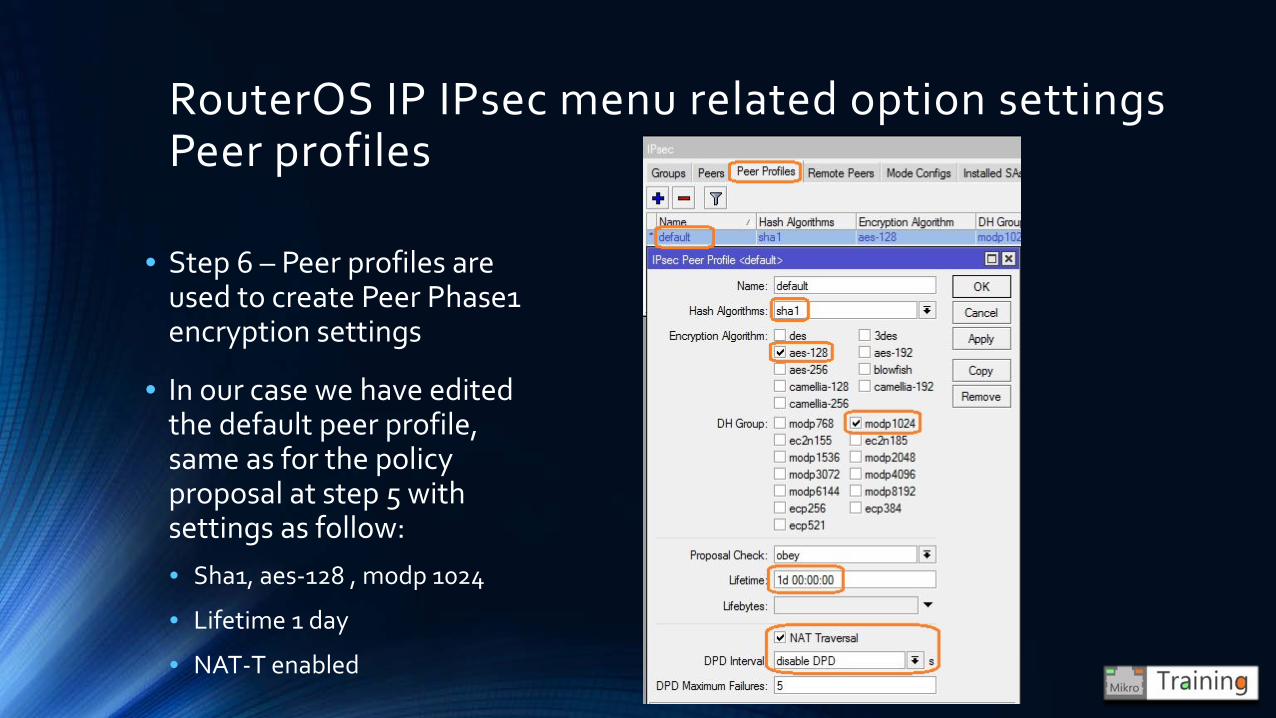
RouterOS IP IPsec menu related option settings Peer profiles
• Step 6 – Peer profiles are used to create Peer Phase1 encryption settings
• In our case we have edited the default peer profile, same as for the policy proposal at step 5 with settings as follow:• Sha1, aes-128 , modp 1024
• Lifetime 1 day
• NAT-T enabled
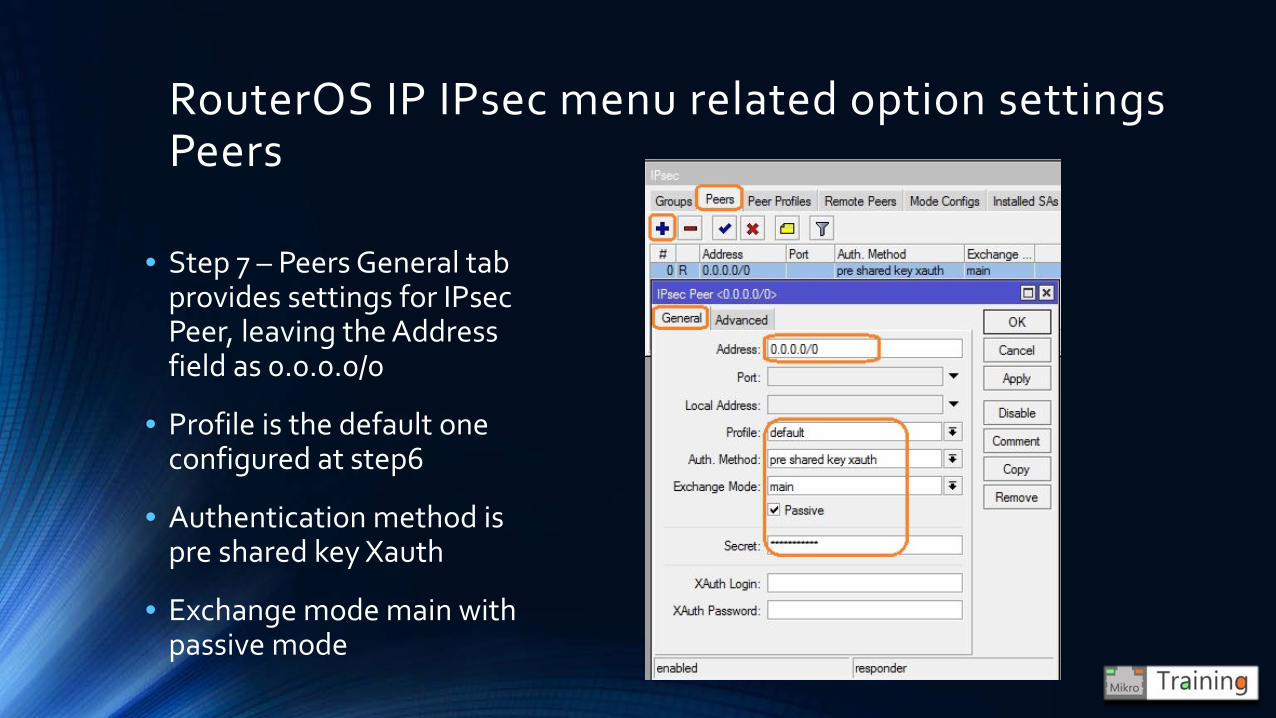
RouterOS IP IPsec menu related option settings Peers
• Step 7 – Peers General tab provides settings for IPsec Peer, leaving the Address field as 0.0.0.0/0
• Profile is the default one configured at step6
• Authentication method is pre shared key Xauth
• Exchange mode main with passive mode
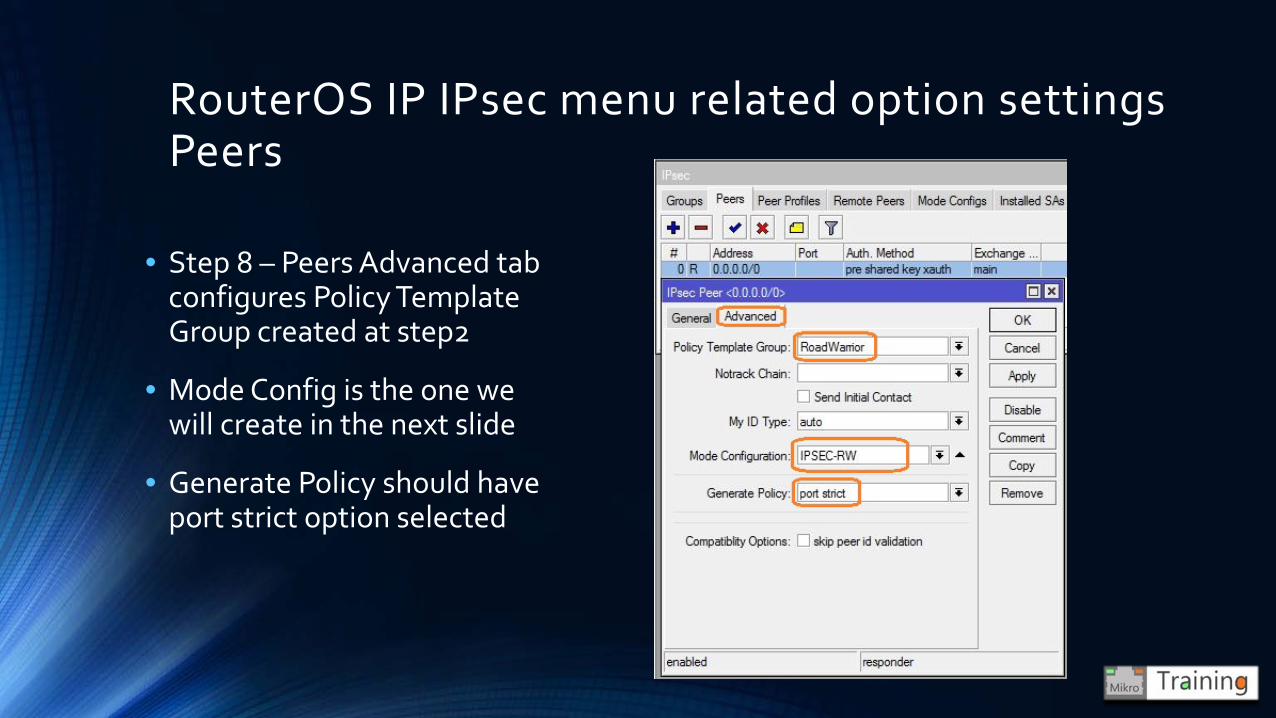
RouterOS IP IPsec menu related option settings Peers
• Step 8 – Peers Advanced tab configures Policy Template Group created at step2
• Mode Config is the one we will create in the next slide
• Generate Policy should have port strict option selected
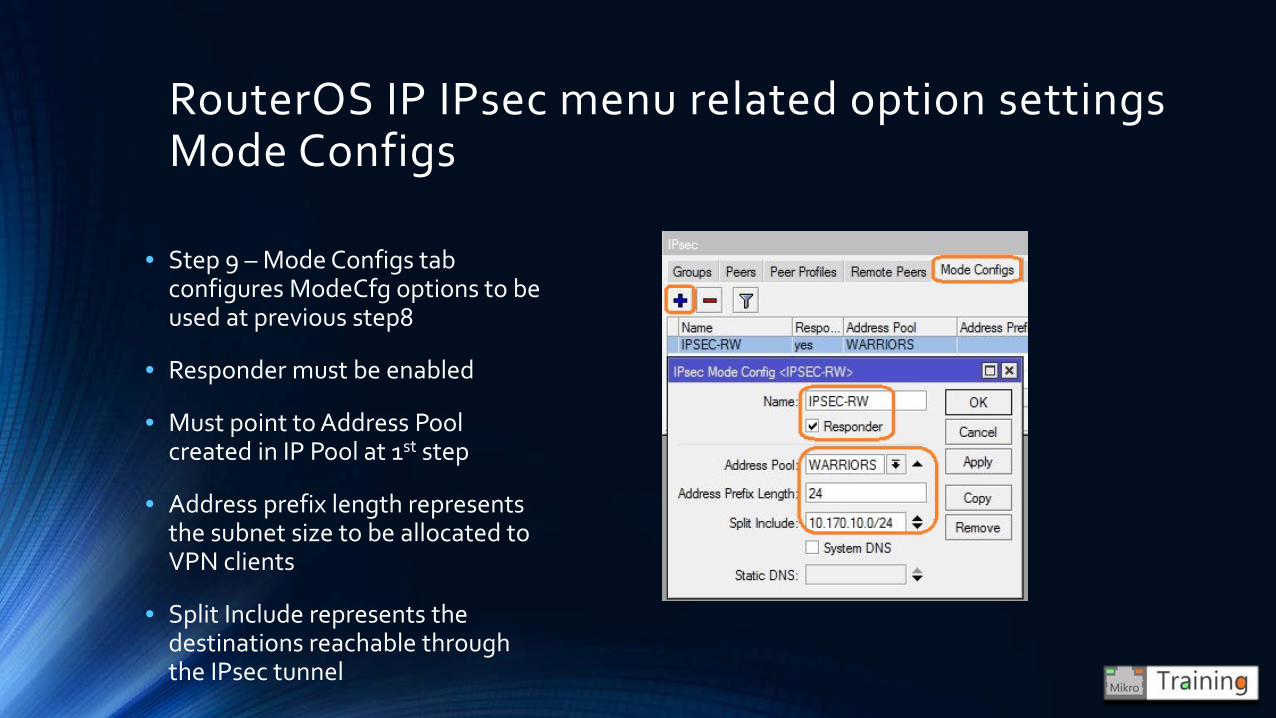
RouterOS IP IPsec menu related option settings Mode Configs
• Step 9 – Mode Configs tab configures ModeCfg options to be used at previous step8
• Responder must be enabled
• Must point to Address Pool created in IP Pool at 1st step
• Address prefix length represents the subnet size to be allocated to VPN clients
• Split Include represents the destinations reachable through the IPsec tunnel

RouterOS IP IPsec menu related option settingsUsers
• Step 10 – Our last step in IPsec settings is the Users Tab, where we can manually create users for Extended Authentication mode but, we are not going to!
• Instead, we will enable XauthUse RADIUS option in the Settings button in order to query the Microsoft Active Directory database for username and credentials

RouterOS RADIUS Client related settings
• Step 11 - Last step is to actually configure the RADIUS Client used to query Active Directory for user credentials
• We need to enable the ipsecservice for the configured RADIUS client and mention the IP address where RADIUS Server can be reached (Active Directory in our case), and also the shared secret
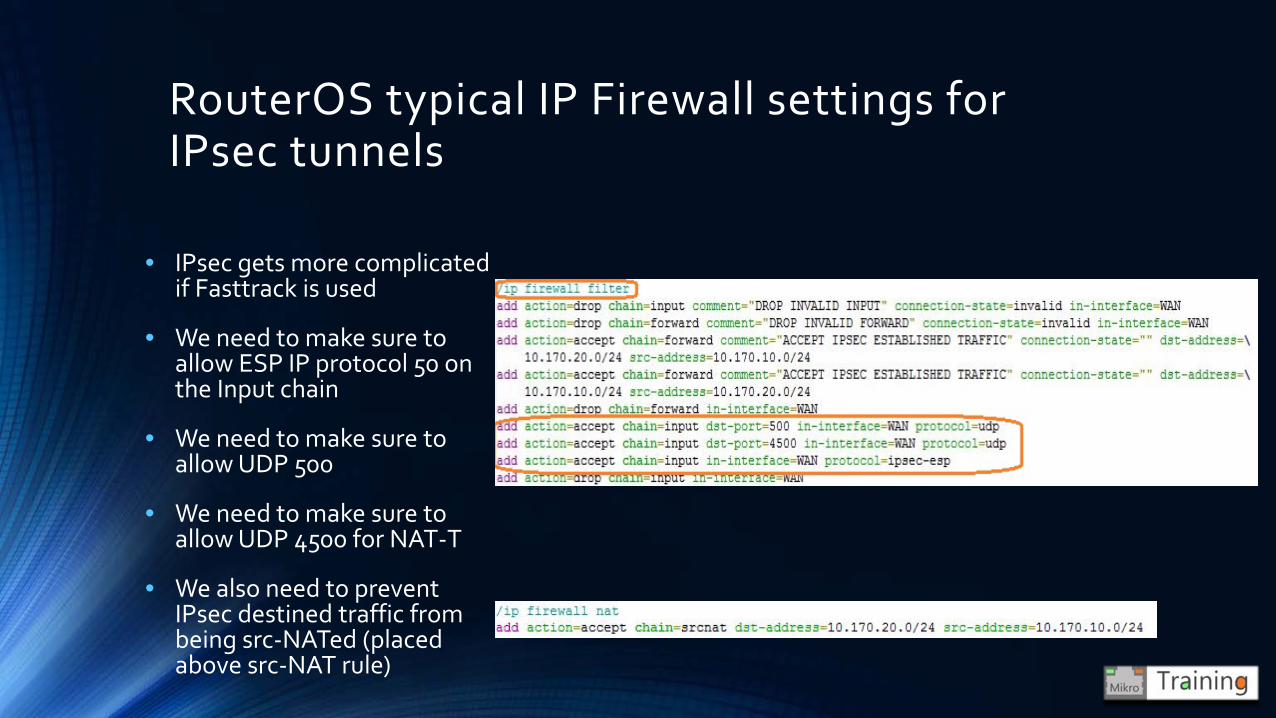
RouterOS typical IP Firewall settings for IPsec tunnels
• IPsec gets more complicated if Fasttrack is used
• We need to make sure to allow ESP IP protocol 50 on the Input chain
• We need to make sure to allow UDP 500
• We need to make sure to allow UDP 4500 for NAT-T
• We also need to prevent IPsec destined traffic from being src-NATed (placed above src-NAT rule)

Preparing and configuring Microsoft Windows Server 2016 – Network Policy Server role
• One easy way to access the Add Roles and Features servlet is using the Server Manager in Windows Server 2016
• We will use it to add the Network Policy Server role detailed in the next slides
Note: Active Directory role is considered as already installed

Preparing and configuring Microsoft Windows Server 2016 – Network Policy Server role
• We should select Role-based or feature-based installation and select Next
Preparing and configuring Microsoft Windows Server 2016 – Network Policy Server role
• We should leave the selection as default and go to Next menu

Preparing and configuring Microsoft Windows Server 2016 – Network Policy Server role
• We should select Network Policy and Access Services and continue with Next menu

Preparing and configuring Microsoft Windows Server 2016 – Network Policy Server role
• We have no option to select on the Features part of the configuration so we just go with Next on this one
• On the next configuration menu we only need to review and click the Install button to actually start the NPS role installation.
Preparing and configuring Microsoft Windows Server 2016 – Group Policy Management
• Using Group Policy Management from Server Manager, we need to enable Store password using reversible encryption
• On Default Domain Policy we need to right click and select Edit.
• Group Policy Management Editor we need to edit the Password Policy to store in reversible encryption as enabled
Preparing and configuring Microsoft Windows Server 2016 – Active Directory VPN Group
• In ADUC (Active Directory Users and Computers) console we need to create a Global Security Group
• Right click on the Users container and select New>Group
Preparing and configuring Microsoft Windows Server 2016 – Active Directory VPN Group
• In ADUC console new Object Group we should name the group VPN_Users and keep it as Global scope and Security type, then click OK
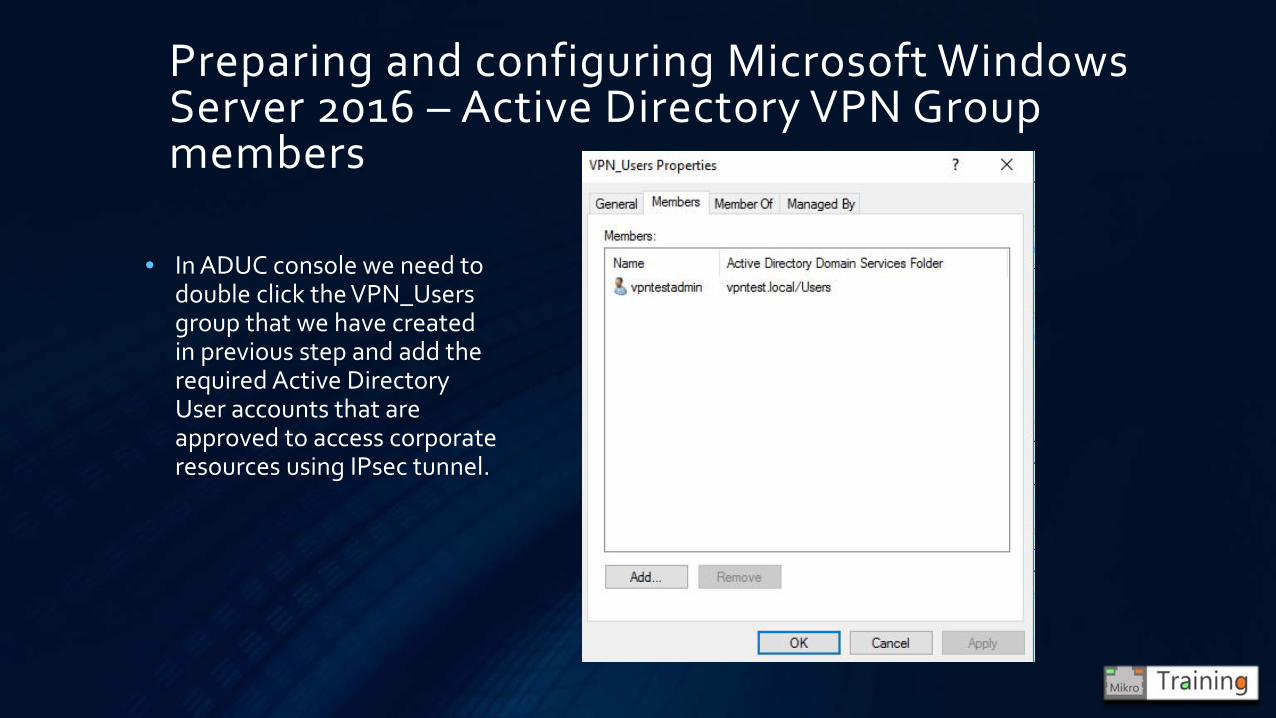
• In ADUC console we need to double click the VPN_Usersgroup that we have created in previous step and add the required Active Directory User accounts that are approved to access corporate resources using IPsec tunnel.
Preparing and configuring Microsoft Windows Server 2016 – Active Directory VPN Group members
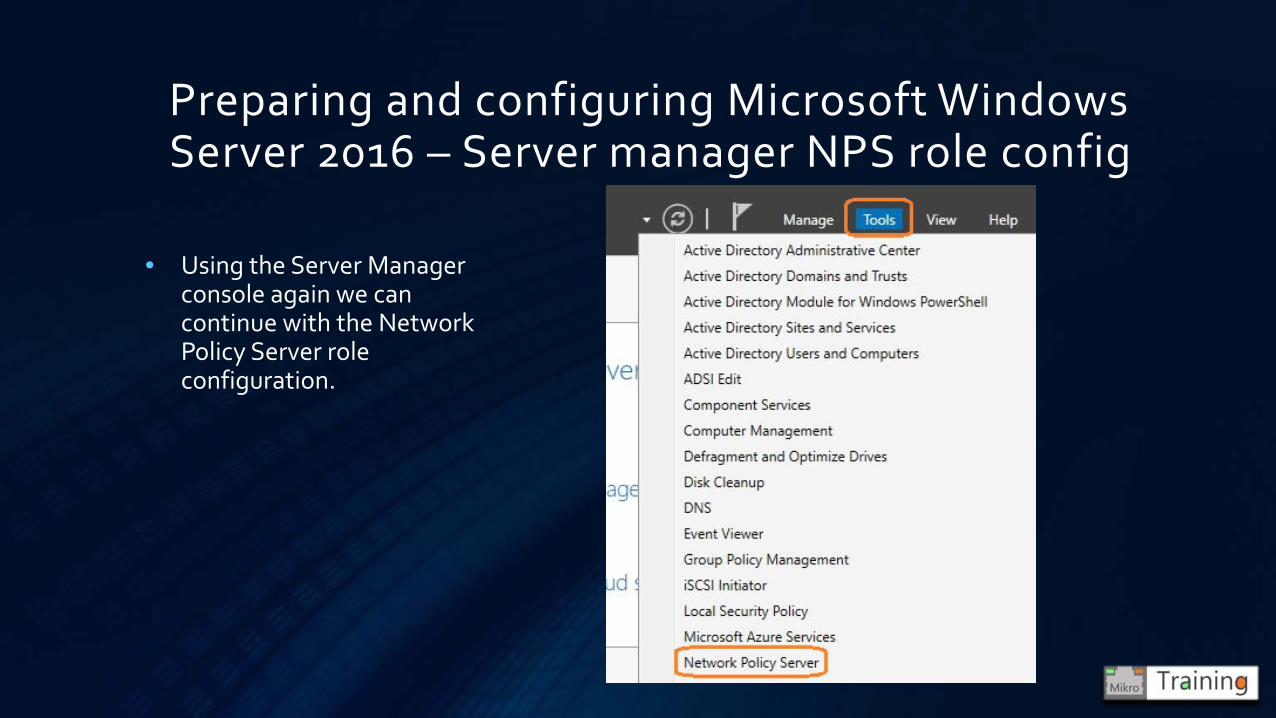
• Using the Server Manager console again we can continue with the Network Policy Server role configuration.
Preparing and configuring Microsoft Windows Server 2016 – Server manager NPS role config
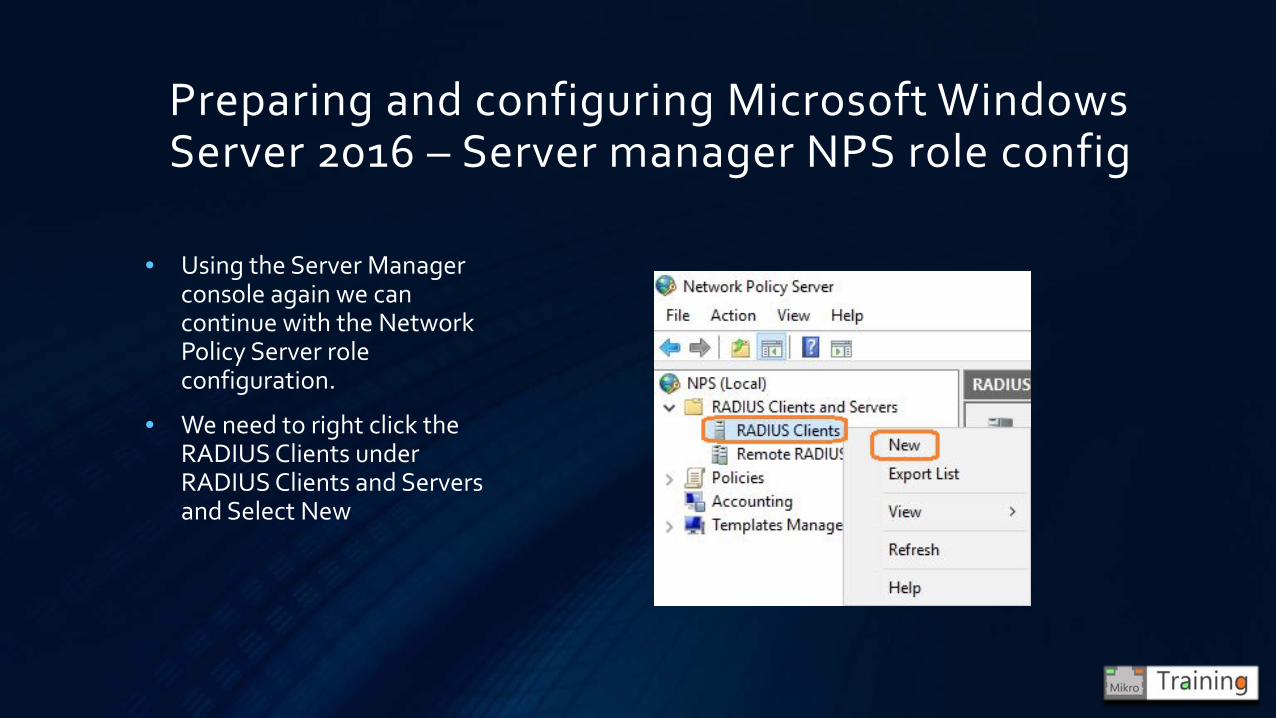
• Using the Server Manager console again we can continue with the Network Policy Server role configuration.
• We need to right click the RADIUS Clients under RADIUS Clients and Servers and Select New
Preparing and configuring Microsoft Windows Server 2016 – Server manager NPS role config
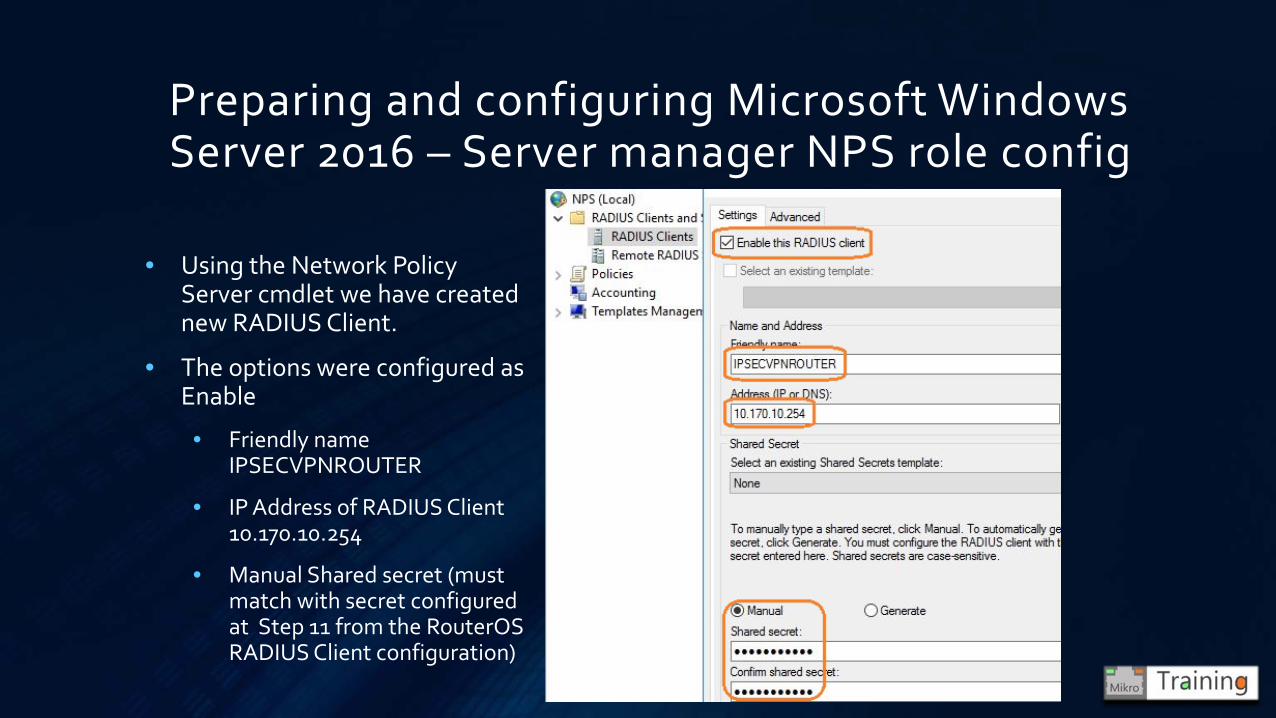
• Using the Network Policy Server cmdlet we have created new RADIUS Client.
• The options were configured as Enable
• Friendly name IPSECVPNROUTER
• IP Address of RADIUS Client 10.170.10.254
• Manual Shared secret (must match with secret configured at Step 11 from the RouterOSRADIUS Client configuration)
Preparing and configuring Microsoft Windows Server 2016 – Server manager NPS role config

• Using the Network Policy Server cmdlet we need to right click Network Policies under Policies menu and select New.
Preparing and configuring Microsoft Windows Server 2016 – NPS > Network Policies

• Using the New Network Policy setup dialog we should name the policy as IPSEC for future reference and click Next.
Preparing and configuring Microsoft Windows Server 2016 – NPS > Network Policies
Note: New Network Policy dialog has multiple pages so we can use Previous button in case we need to adjust some settings

• On the Specify Conditions page we should add the VPN_Users Active Directory security group created earlier.
• This will ensure that only VPN_Usersgroup members are allowed to connect through VPN tunnel
Preparing and configuring Microsoft Windows Server 2016 – NPS > Network Policies
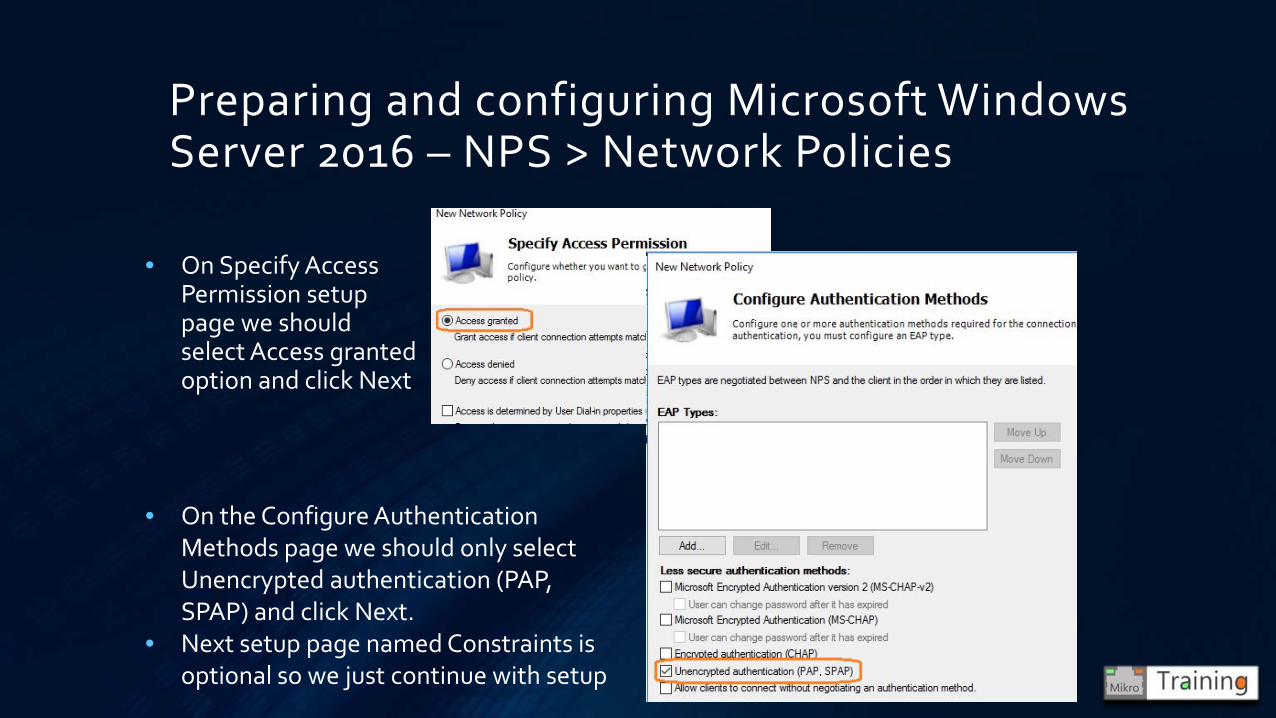
• On Specify Access Permission setup page we should select Access granted option and click Next
Preparing and configuring Microsoft Windows Server 2016 – NPS > Network Policies
• On the Configure Authentication Methods page we should only select Unencrypted authentication (PAP, SPAP) and click Next.
• Next setup page named Constraints is optional so we just continue with setup
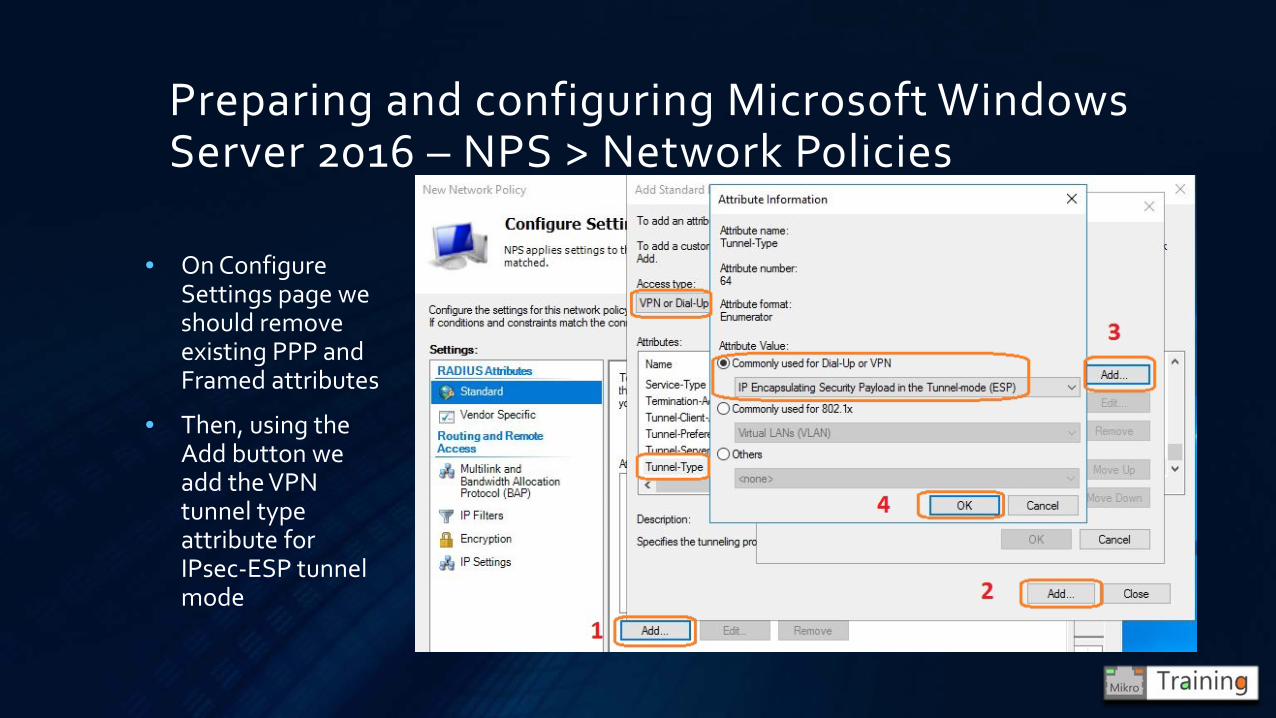
• On Configure Settings page we should remove existing PPP and Framed attributes
• Then, using the Add button we add the VPN tunnel type attribute for IPsec-ESP tunnel mode
Preparing and configuring Microsoft Windows Server 2016 – NPS > Network Policies
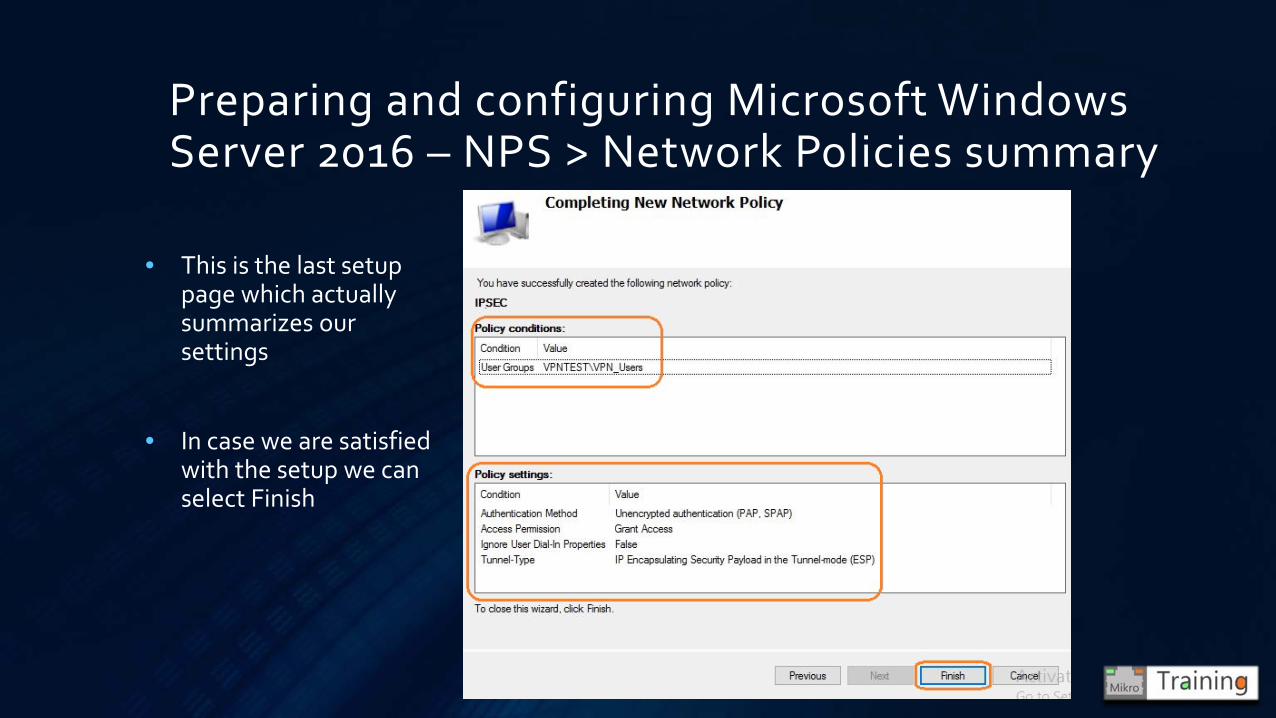
• This is the last setup page which actually summarizes our settings
• In case we are satisfied with the setup we can select Finish
Preparing and configuring Microsoft Windows Server 2016 – NPS > Network Policies summary
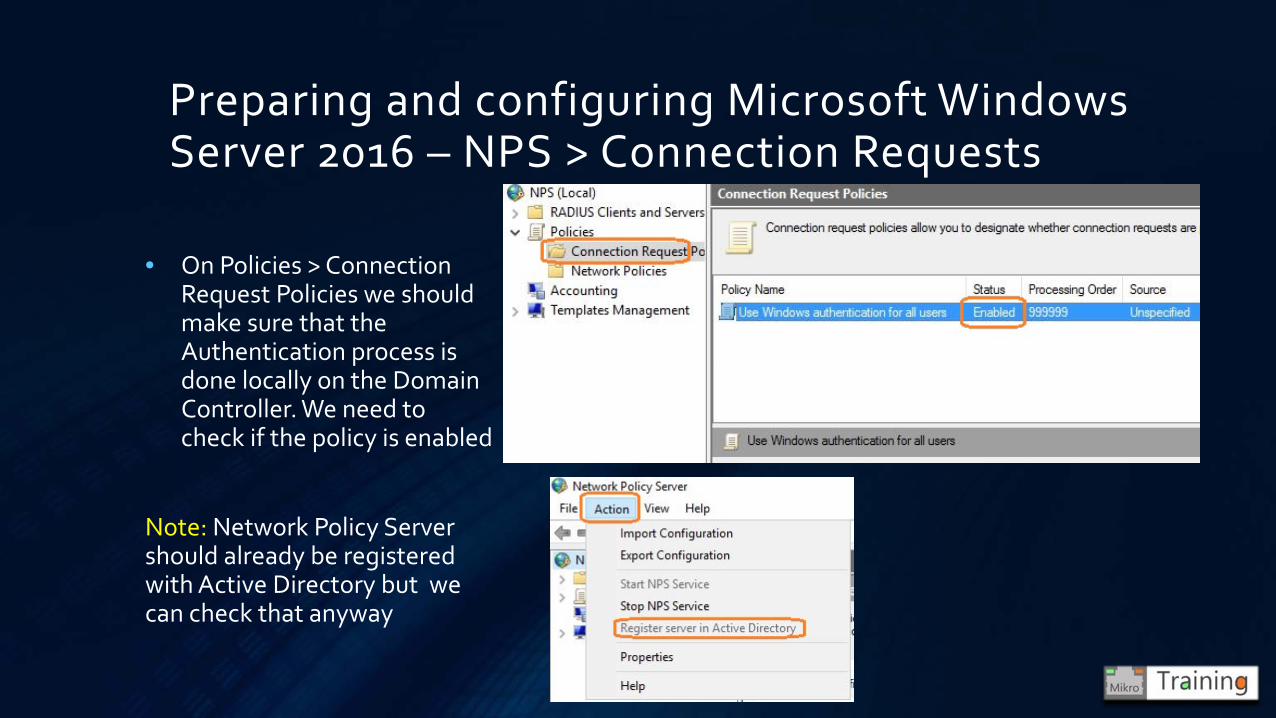
• On Policies > Connection Request Policies we should make sure that the Authentication process is done locally on the Domain Controller. We need to check if the policy is enabled
Note: Network Policy Server should already be registered with Active Directory but we can check that anyway
Preparing and configuring Microsoft Windows Server 2016 – NPS > Connection Requests

• The ShrewSoft Installer works in:
• Professional (paid license)
• Standard (free license)
Preparing and configuring Microsoft Windows Client running ShrewSoft VPN software
Note: Always run the installer as admin privilege rights
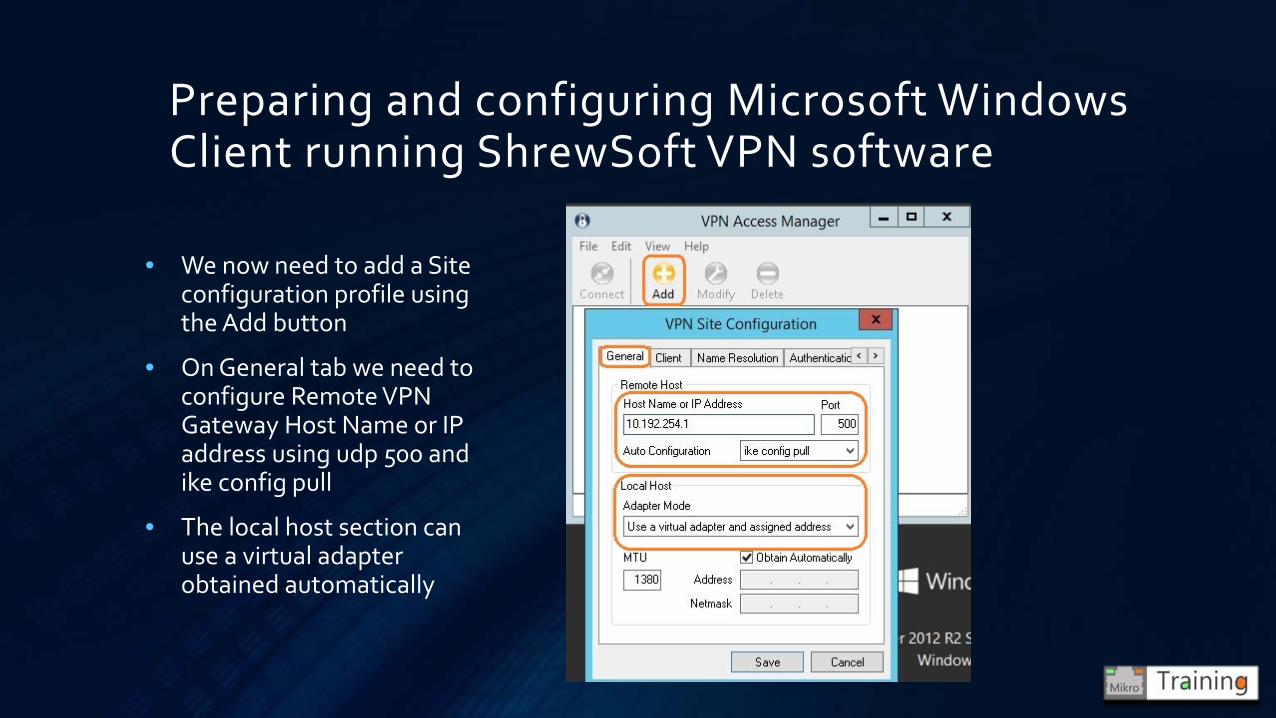
• We now need to add a Site configuration profile using the Add button
• On General tab we need to configure Remote VPN Gateway Host Name or IP address using udp 500 and ike config pull
• The local host section can use a virtual adapter obtained automatically
Preparing and configuring Microsoft Windows Client running ShrewSoft VPN software

• On the Client tab need to enable NAT-T mode
• Also we should disable IKE fragmentation
Preparing and configuring Microsoft Windows Client running ShrewSoft VPN software
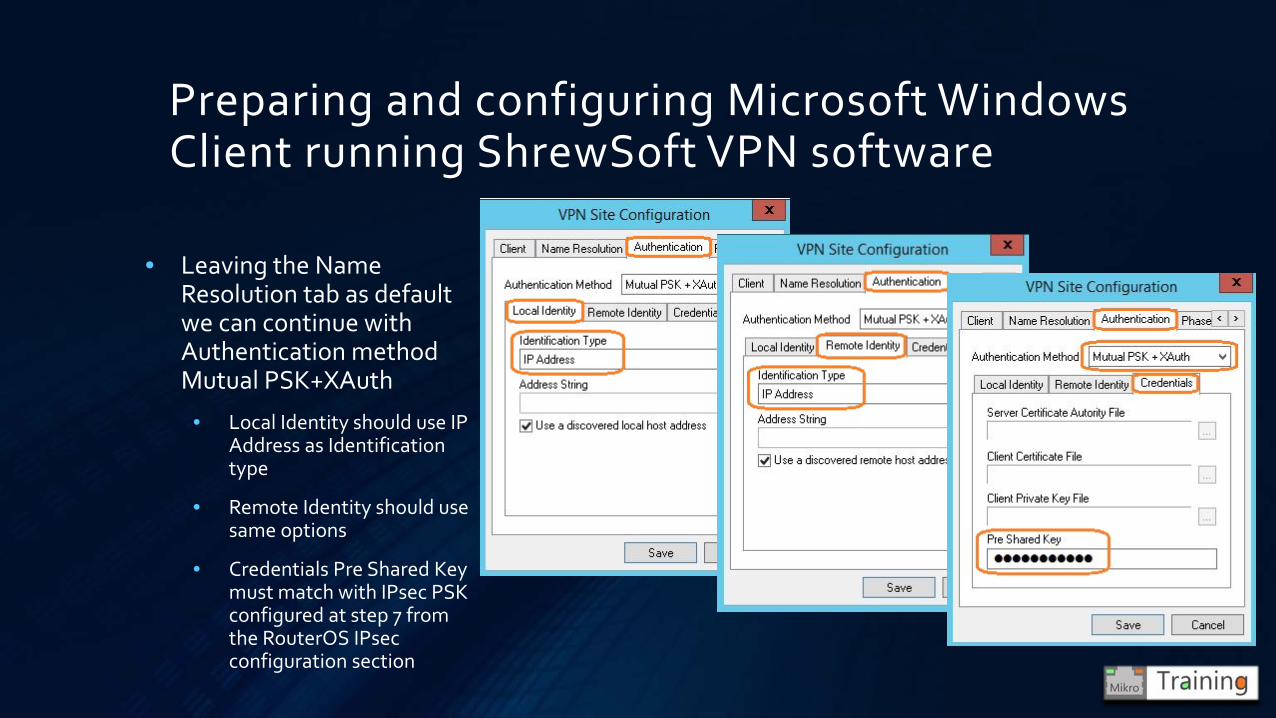
• Leaving the Name Resolution tab as default we can continue with Authentication method Mutual PSK+XAuth
• Local Identity should use IP Address as Identification type
• Remote Identity should use same options
• Credentials Pre Shared Key must match with IPsec PSK configured at step 7 from the RouterOS IPsec configuration section
Preparing and configuring Microsoft Windows Client running ShrewSoft VPN software

• Phase 1 menu options must match with Peer profiles setting at step 6 from RouterOS IPsec configuration section
• Sha1, aes-128 , modp 1024
• Lifetime 1 day
• NAT-T enabled
• Phase 2 menu options should match with Policy proposals at step 5 from RouterOS IPsec configuration section
• Authentication sha1
• Encryption aes-128 cbc (cypher block chain)
• Lifetime of 1 hour
Preparing and configuring Microsoft Windows Client running ShrewSoft VPN software

• Policy configuration menu is where we configure the policy generation level
• Auto (Cisco Vendor-ID format)
• Require
• Unique
• Shared
• MikroTik RouterOS can work with Require or Unique options
Preparing and configuring Microsoft Windows Client running ShrewSoft VPN software

• On ANDROID mobile you need to open Settings menu
• On Settings menu we need to open VPN
• On VPN we add VPN profile
• On edit VPN profile we add Server address, Xauth PSK mode and Pre Shared Key
Preparing and configuring ANDROID mobile IPsec VPN client
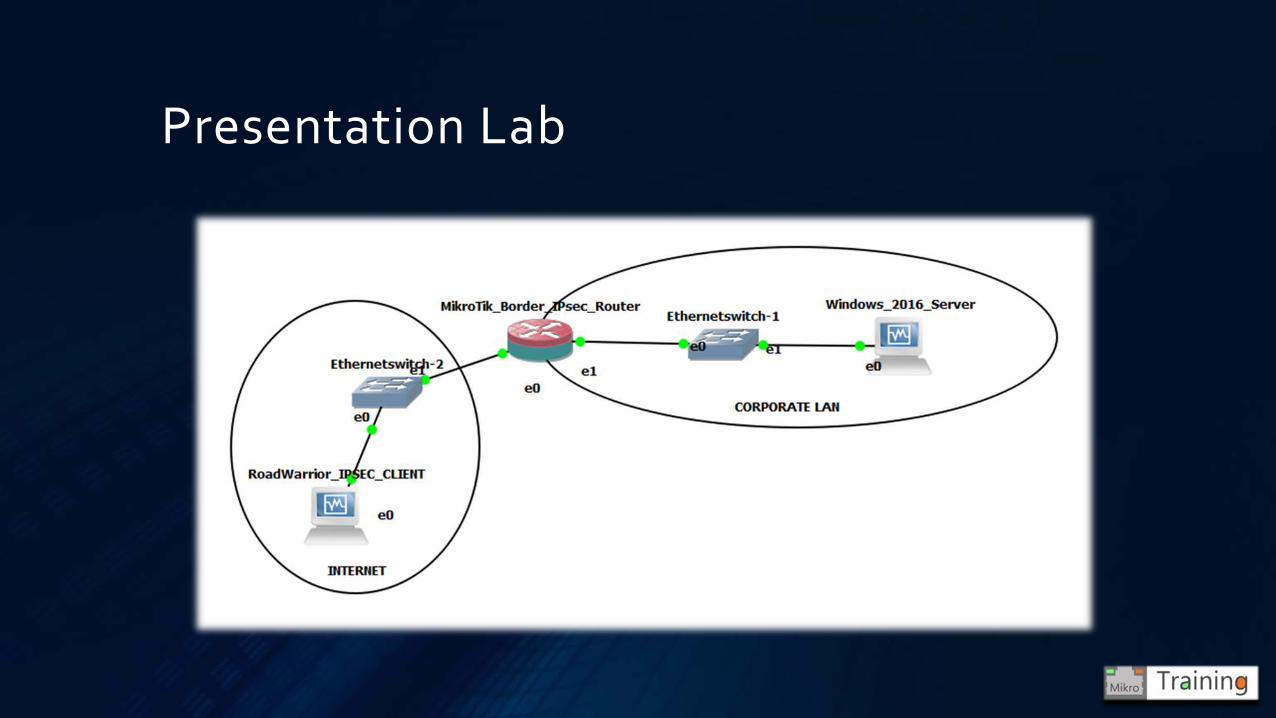
Presentation Lab

Thank you!
Questions?
https://www.mikrotraining.ro