Embed Size (px)
Citation preview

55
Chapter 5
Getting Started
Designing a Deployment Environment. . . . . . . . . . . . . . . . . . . . . . . . . . . . . . 55
Creating Your Deployment Environment . . . . . . . . . . . . . . . . . . . . . . . . . . . . 72
Installing Windows. . . . . . . . . . . . . . . . . . . . . . . . . . . . . . . . . . . . . . . . . . . . . . . 91
Troubleshooting Installations . . . . . . . . . . . . . . . . . . . . . . . . . . . . . . . . . . . . . . 98
Summary . . . . . . . . . . . . . . . . . . . . . . . . . . . . . . . . . . . . . . . . . . . . . . . . . . . . . .103
The first four chapters of the book have dealt with abstract planning. This chapter delvesinto the specific details of planning and implementing a deployment of Microsoft Win-dows Server 2003 R2, or any other recent version of the Microsoft Windows operatingsystem.
Installing Windows manually is a time-consuming task on a single system; deploying it toa group of computers is a mind-numbing experience unless you automate the process.Fortunately, there are numerous ways to automate the deployment of Windows. Thesemethods range from using simple answer files that run Windows Setup in unattendedmode from CD-ROM on a single system to methods that deploy disk images of com-pletely configured systems over the network to any number of target computers.
This chapter discusses how to design a deployment environment suitable to your organi-zation’s needs, how to create an automated deployment environment (if you choose toautomate the deployment process), and how to install Windows manually or using anautomated method.
Designing a Deployment EnvironmentIt is helpful to design a deployment environment that allows you to deploy Windows effi-ciently to the client and server systems in your organization. This section discusses howto design a deployment environment that provides the deployment speed and controlyou need while maintaining an acceptable level of complexity—regardless of whether youwant to manually install Windows on a single system or mass deploy it to thousands ofcomputers.
56 Part II Installation and Configuration
Under the Hood Setup in Windows Server 2003 R2 and Windows XP Tablet PC Edition 2005
Windows Server 2003 R2 and Windows XP Tablet PC Edition 2005 include twoCDs. The first CD is a normal Windows Server 2003 with Service Pack 1 CD (in thecase of Windows Server 2003 R2), or a normal Windows XP Professional with Ser-vice Pack 2 CD (in the case of Windows XP Tablet PC Edition 2005). The secondCD contains a \Cmpnents folder that holds the files that distinguish WindowsServer 2003 R2 or Windows XP Tablet PC Edition 2005 from a normal version ofWindows Server 2003 or Windows XP Professional.
If you use a Windows Server 2003 R2 product key during installation, WindowsServer 2003 with Service Pack 1 Setup installs Windows Server 2003 R2 (but nooptional components) after Windows Setup (Winnt32.exe or Winnt.exe) is completeby launching Windows Server 2003 R2 Setup (Setup2.exe) from the \Cmpnents\R2folder of the second CD. If you use a Windows XP Tablet PC Edition 2005 productkey during installation, Windows XP Professional with Service Pack 2 Setupinstalls Windows XP Tablet PC Edition 2005 by installing additional files from theCmpnents\TabletPC folder on the second CD.
This affects you in four ways:
■ You need to use the correct Windows Server 2003 R2 or Windows XP TabletPC Edition 2005 product key.
■ When performing a manual installation, Windows Setup (Winnt32.exe orWinnt.exe) prompts you to insert the second CD during Setup (for WindowsXP Tablet PC Edition 2005) the first time an administrator logs in after Setupcompletes (for Windows Server 2003 R2). You can click Cancel if you wantthe server to run Windows Server 2003 with Service Pack 1 instead of Win-dows Server 2003 R2.
■ When performing an automated installation of Windows Server 2003 R2,you must include the \Cmpnents folder in your installation source, andinclude a reference to Setup2.exe in the answer file. For more information, seethe “Using Unattended Setup with Windows Server 2003 R2” section of thischapter.
■ To install optional Windows Server 2003 R2 components such as the newFile Server Management console, you must be able to access the \Cmpnentsfolder and \i386 or \amd64 folders, either locally, on a network share, or onthe Windows Server 2003 R2 Disc 2.

Chapter 5 Getting Started 57
Choosing an Installation MethodWindows installation methods fall into one of two broad categories—Setup-based meth-ods and image-based methods. Setup-based methods use Windows Setup (Winnt32.exeor Winnt.exe) to install Windows on the target computer. Image-based methods copy adisk image of a reference computer with Windows already installed on it to the targetcomputer, which must use hardware that is similar to the reference computer.
Choosing a Setup-Based Installation MethodSetup-based installation methods are relatively simple to use, and you can use them onany hardware configuration, making them ideal for organizations with heterogeneoushardware configurations. The following list describes the three different Setup-basedinstallation methods. Table 5-1 lists the key attributes of each method.
■ Manual installation Performing a manual installation from the Windows CD-ROM or a network share is the simplest way to install Microsoft Windows. Use thismethod when installing on a single computer and none of the other installationmethods are convenient.
■ Unattended installation using an answer file This method automates the instal-lation of Windows from a CD-ROM, local source, or network share (called a distri-bution share) by using a text file called an answer file that provides the answers toeach question in Windows Setup. Use an answer file to automate Windows Setupand exert more control over Windows default settings than can be provided by amanual installation.
■ Remote Installation Services (RIS) A Windows server service that enables users toboot a computer over the network from the RIS server and automatically run Win-dows Setup in unattended mode. Use RIS to automate Setup on any computer thatsupports booting from the network via Preboot Execution Environment (PXE); toallow users to easily install or reinstall Windows; and to provide central controlover the Setup process. For more information about RIS, see Chapter 28.
Note You can increase the number of simultaneous clients that the server host-ing the distribution share can handle by copying the installation files from the dis-tribution folder to the target computer’s hard drive and then running Setup locally instead of across the network. Although copying the installation files puts a greater load on the server at first, after Windows finishes downloading the files, no additional load is placed on the server, freeing it to service other clients.

58 Part II Installation and Configuration
Choosing an Image-Based Installation MethodImage-based installation methods are the fastest methods of installing Microsoft Win-dows; however, they work best when there is a high degree of hardware similaritybetween the target computer and the reference computer from which you created thedisk image. Too much variation between systems can lead to a multitude of disk imagesor longer install times when installing additional drivers during Sysprep Mini-Setup.(Sysprep Mini-Setup is an abbreviated version of Windows Setup that runs on the firstboot after using Sysprep to reseal a computer for disk imaging.) Finding and maintain-ing the proper drivers for a disparate set of systems can also be a challenge, which iswhy many organizations deploy only a few model lines of computers from the samemanufacturer.
These characteristics make image-based installation methods ideal for organizations thatneed to deploy the Windows operating system and applications to large numbers of similar
Table 5-1 Manual setup, unattended setup, and RIS attributes
Attribute Manual Setup Unattended Setup RIS
Speed Slow Medium Medium
Boot method Windows CD or Windows operating system
Windows CD, Windows operating system, or boot floppy
PXE boot from net-work, or network boot using RIS boot disk
Install source CD, file share, or hard drive
CD, file share, or hard drive
RIS Server
Supported operating systems
All versions All versions Windows Server 2003*; Windows XP Professional*; Win-dows 2000
Hardware similarity requirements
None None None
Maximum simultaneous clients
1 Scales with hardware 75 per server
Configuration information
Manual entry Unattend.txt Active Directory and *.sif answer file
* RIS also supports Windows XP Tablet PC Edition and x64 editions of both Windows Server 2003 and Windows XP Professional.

Chapter 5 Getting Started 59
systems that use the same hardware abstraction layer (HAL). The following list discussesthe image-based setup methods that are currently available; Table 5-2 lists the keyattributes of each method.
■ Sysprep with disk imaging Creates an exact copy or “image” of a Windows instal-lation, which can then be copied onto the hard disk of another computer with sim-ilar hardware. Use disk imaging in conjunction with the Sysprep tool to rapidlydeploy Windows and applications to a large number of computers that use thesame HAL and similar hardware devices.
■ RIS with Remote Installation Preparation (RIPrep) images Boots a computer overthe network from the RIS server and automatically installs a disk image. This Win-dows server service starts the target computer across the network, downloads aRIPrep disk image from the RIS server, and performs a full Plug and Play (PnP)detection pass. Use RIS with RIPrep images to quickly deploy Windows and applica-tions to any computer that supports starting from the network via Preboot ExecutionEnvironment (PXE). For more information about RIPrep, see Chapter 28.
■ Automated Deployment Services (ADS) Enables administrators to rapidlydeploy Windows Server in a data center. This Windows server service allows theadministrator to remotely start a computer over the network and install or reinstalla Windows Server disk image on the computer. Use ADS to centrally manage thedeployment of Windows Server in a data center. For more information about ADS,see the Microsoft Web site at http://www.microsoft.com/windowsserver2003/technol-ogies/management/ads/default.mspx.
■ SMS 2003 Operating System Deployment Feature Pack Enables administratorsto centrally manage the deployment of client and server disk images on a network.Using Systems Management Server (SMS), you can advertise an operating systempackage that SMS installs automatically on targeted systems that already have theSMS client installed. You can also install the operating system package by startingWindows Preinstallation Environment (Windows PE) and connecting to the SMSserver. (Windows PE is included with the SMS 2003 Operating System Deploy-ment Feature Pack.) Use the SMS 2003 Operating System Deployment FeaturePack to centrally manage the deployment of Windows on a network that uses SMSto manage systems. For more information about SMS, see the Microsoft Web site athttp://www.microsoft.com/smserver/.

60 Part II Installation and Configuration
Note You can add support for mass storage devices not included in a refer-ence image by adding the drivers to the Sysprep folder on the target system and using the SysprepMassStorage section of Sysprep.inf. For more information, see the Microsoft Windows Corporate Deployment Tools User’s Guide.
Table 5-2 RIPrep, ADS, and SMS attributes
AttributeSysprep and Disk Imaging RIPrep ADS SMS
Speed Fastest Fast Fastest Fastest
Boot method Windows operating system, Windows PE, or disk-imaging boot floppy
PXE boot from network, or net-work boot using RIS boot disk
PXE boot from network
Windows operating system, or Windows PE via RIS or CD-ROM
Install source Disk image on net-work share or CD
Disk image on RIS server
Disk image on ADS server
SMS package on SMS server or CD-ROM
Supported operating systems
All versions Windows Server 2003*; Windows XP Professional*; Windows 2000
Windows Server 2003; Windows 2000 Server with Service Pack 3 or later
Windows Server 2003; Windows XP; Windows 2000
Hardware similarity requirements with reference computer
Same HAL (alterna-tive mass storage drivers must be added manually)
Same HAL Same HAL (alternative mass storage drivers must be added manually)
Same HAL (alternative mass storage drivers must be added manually)
Maximum simultaneous clients
Scales with hard-ware
75 per server 128 per server Dependent on SMS infrastructure
Configuration information
Disk image and Sysprep.inf answer file
Disk image, Active Directory, and *.sif answer file
Disk image and Microsoft SQL Server data-base or Microsoft SQL Server Desktop Edition (MSDE) database
Disk image and Microsoft SQL Server database
* RIPrep also supports Windows XP Tablet PC Edition and x64 editions of both Windows Server 2003 and Windows XP Professional.

Chapter 5 Getting Started 61
Choosing a Preinstallation EnvironmentBefore you can install Microsoft Windows, you must boot the computer into a suitableoperating system (referred to as the preinstallation environment). You can use any of thefollowing methods of booting a computer to install Windows:
■ Boot from a Windows CD-ROM directly into Windows Setup.
■ Boot from a Windows 98– or MS-DOS-based boot disk, and launch 16-bit WindowsSetup (Winnt.exe) from a local or network source.
■ Boot from an existing operating system such as a “safe OS” installation of Windowscreated for installation and recovery purposes, and launch 32-bit Windows Setup(Winnt32.exe) from a local or network source.
■ Perform a Preinstallation Execution Environment (PXE) boot from the networkinto Windows Setup via RIS or ADS (or use a RIS boot disk to start from the net-work).
■ Boot Windows PE from a CD-ROM or RIS server and then launch 32-bit WindowsSetup (Winnt32.exe) from a local or network source, copy a disk image from a fileshare, or connect to an SMS server with the SMS 2003 Operating System Deploy-ment Feature Pack.
Important Each operating system installation that belongs to a workgroup or Windows domain must have a unique computer name, even if the installations are on the same computer in a dual-boot or a virtual machine configuration.
Choosing a Software Update SolutionTo keep your network secure, you must update every Windows installation on your net-work in a timely manner with the latest software updates. This is especially true for freshinstallations of Windows versions earlier than Windows XP with Service Pack 2 or Win-dows Server 2003 with Service Pack 1; earlier versions of Windows are potential targetsfor viruses before you can install antivirus software and the latest software updates, evenif you enable the Internet Connection Firewall.
This vulnerability highlights the need to select a software update solution when youdesign your Windows deployment environment, if you have not already. Selecting a soft-ware update solution before you create your deployment environment makes it easier foryou to integrate important software updates into your deployment process.

62 Part II Installation and Configuration
There are a number of software update solutions that you can use to install the latest soft-ware updates on computers running Microsoft Windows:
■ Install updates manually using Microsoft Update or Windows Update.
■ Install updates automatically using Automatic Updates, with or without WindowsServer Update Services (WSUS) for central control.
■ Install updates automatically using SMS for central control.
■ Use a third-party patch management program.
■ Add updates to the Windows installation process.
Most organizations use more than one of these methods. For example, a common prac-tice when installing Microsoft Windows is to install Windows from a distribution shareor disk image with the latest service pack, and script the installation of any critical soft-ware updates into the end of the installation process using an answer file. After Setupcompletes, you can manually run Microsoft Update and enable Automatic Updates, oruse SMS or a third-party patch management program to perform future software updates.
For more information on managing software updates, see Chapter 28.
Choosing an Application Deployment SolutionA computer is of minimal value in an organization unless it has the applications the userof the computer needs to perform her or his job. You can install applications, drivers, andservices during the Windows installation process, or you can install them afterwards.The following list describes a number of methods that you can use to deploy applications:
■ Manual installation Performing a manual installation is the simplest way toinstall an application. Use this method when installing on a single computer andnone of the other installation methods are convenient.
■ Group Policy Using Group Policy to deploy applications is an efficient way todeploy applications to a large number of computers in an Active Directory environ-ment. To install applications automatically using Group Policy, the applicationsmust use Microsoft Installer .MSI packages; otherwise, you can publish any appli-cation setup program for manual or semi-automated installation by the user. Usethis method when installing applications on many computers in an Active Direc-tory environment, when central management capability is important, and when ini-tial setup time, scheduled installations, managed bandwidth and error reportingare not critical. See Chapter 28 for more information about using Group Policy todeploy applications.

Chapter 5 Getting Started 63
■ SMS Using SMS to deploy applications provides the highest level of control andreporting when deploying applications to a large number of computers. Use thismethod on large, complex networks, or when you need the highest level of con-trol over the deployment process and the added complexity and cost of SMS isacceptable.
■ Install or stage applications during Windows Setup Installing applications via asilent install immediately following Windows Setup, or staging applications bycopying the installation files to the target computer’s hard drive for installationlater, is a simple method of quickly making applications available to users. Use thismethod with applications that support unattended installation, and when quickand simple unattended installation of Windows and key applications is moreimportant than central management ability.
■ Install applications prior to disk imaging Installing applications on the referencecomputer before using disk-imaging software to duplicate it is the fastest way todeploy a common set of applications. Use this method when you want to minimizethe initial setup time for a common set of applications. If you want to manage theseapplications centrally, install the applications using your chosen applicationdeployment method (for example, SMS).
Understanding Licensing and Product ActivationThere are two licensing issues that administrators must understand with WindowsServer 2003—licensing modes and product activation.
Licensing ModesThere are two types of licensing modes for Windows servers: Per Server licensing and PerDevice Or Per User licensing (formerly called Per Seat). With Per Device Or Per Userlicensing, each client that accesses the server needs its own Client Access License (CAL).You can purchase CALs for users, for devices, or for a mix of the two. Purchase user CALsfor users who connect to servers with more than one device (for example, a user with adesktop, a laptop, and a PDA), and purchase device CALs for devices that are used bymore than one user (for example, a kiosk computer). Clients with a CAL can connect toany number of servers, making this method the most common licensing method for com-panies with more than one Windows server.
Per Server licensing requires the server to have a CAL for each concurrent connection. Forexample, if you choose the Per Server licensing mode with 50 concurrent connections,the server can support a maximum of 50 simultaneous client connections. This licensingmode works well for companies that use a single Windows server.

64 Part II Installation and Configuration
If you are unsure which licensing mode to use, visit the Microsoft Web site at http://www.microsoft.com/windowsserver2003/howtobuy/licensing/default.mspx or contact yourlocal Value Added Reseller (VAR) or Microsoft account representative. You can alsochoose Per Server and switch later to Per Device Or Per User if you made a mistake. Youcan switch from Per Server to Per Device Or Per User once (without additional cost), butnot from Per Device Or Per User to Per Server.
Note In Control Panel, click the License icon to keep track of the license pur-chases and holdings, or to switch licensing modes.
Real World Licensing for Terminal Servers and External Users
You must use Per Device Or Per User mode on Terminal Servers, and you must pur-chase additional Terminal Services CALs for users or devices (though these users ordevices do not require a separate Windows CAL unless they also access the serverfrom Windows). Windows 2000 users cannot access Windows Server 2003 Termi-nal Servers without a CAL, unlike with Windows 2000 Server.
There are three types of Terminal Services CALs: a TS Device CAL, a TS User CAL,and a TS External Connector CAL (for qualified external users who the organiza-tion does not employ in any way). For more information about Terminal Serverl icensing, see the Microsoft Web s i te at http://www.microsof t . com/windowsserver2003/howtobuy/licensing/ts2003.mspx.
All users that authenticate with the server in any way (or access the server afterauthenticating) require a CAL—even authenticated Web site users (except in somecases when using Windows Server 2003 Web Edition). You can purchase an Exter-nal Connector License for servers that external users access. For example, if a Website user logs on to a front-end Web site for a SharePoint site hosted on anotherserver, you need either a CAL for the user, or an External Connector license for theWeb server, and the SharePoint server. The External Connector License replaces theWindows 2000 Server Internet Connector License.
Product ActivationWhen you install Windows Server 2003, Windows XP, or a variety of other Microsoft pro-grams from retail media, you have 30 days to activate the product. After the grace period,you cannot log on until the product is properly activated (though the computer will rununtil you restart it). If you change the hardware enough to require activation (which usu-ally entails a motherboard change plus a couple of other devices), Windows gives youthree days before it stops working (unless you are using Windows XP without any servicepacks, in which case you must activate the product immediately).

Chapter 5 Getting Started 65
This is a real pain if you mass deploy systems, because you need a different product keyfor every computer and must activate each computer separately. Owning a license foreach copy is not enough.
To eliminate the hassle of product activation, purchase volume licenses for Windows andMicrosoft Office, because copies of Windows and Office bought in volume do not requireproduct activation. Note that volume licenses are less expensive than retail copies, andthey are available for as few as five total Office and Windows products—for example, twocopies of Windows and three copies of Office. Some volume license agreements also giveyou access to Windows PE—an invaluable tool for deploying Windows.
More Info For more information about volume licensing, see the Microsoft Licensing Web site at http://www.microsoft.com/licensing.
Designing a Test LabA test lab provides a safe location in the organization to create and test Windows instal-lations before deploying them to the network at large, and it is an integral component ofa medium- or large-sized Windows deployment.
Large organizations that do not already have a test lab should consider creating a dedi-cated network for testing that closely matches the production network. You can use thedeployment test lab for testing a variety of Windows deployment and management sce-narios, such as software updates and line of business applications, or you can create sep-arate labs for each of these testing tasks.
Smaller organizations can often use test systems on the production network or use aMicrosoft Virtual PC or Microsoft Virtual Server environment for testing. However, whenusing a virtual test environment it is important to validate against real hardware that isrepresentative of the production environment. You cannot test display card drivers on avirtual machine, for example.
An ideal test lab has the following characteristics:
■ Contains test computers that closely represent the computers in the productionenvironment to which you want to deploy Windows.
■ Uses the same server configurations as the production network.
■ Mirrors the production network environment with respect to network topology,devices, and settings.
■ If load testing a server is important, uses similar hardware configurations for thetest server and production servers, and provides a method of simulating the typicaland maximum loads you expect the servers to encounter during deployment.

66 Part II Installation and Configuration
■ Is isolated from the production network sufficiently to prevent the lab from affect-ing the running network.
■ Is well documented and easy to roll back to the reference state after testing a change.
More Info For more information about creating test labs, see “Planning, Test-ing, and Piloting Deployment Projects” in the Windows Server 2003 Deployment Guide at http://www.microsoft.com/resources/documentation/WindowsServ/2003/all/deployguide/en-us/Default.asp.
Planning Server ConfigurationsIf the deployment method you select makes use of one or more servers, it is important toplan the server configurations to provide sufficient performance and support the neces-sary services for the deployment. You must also plan the configurations of any serversthat you are deploying to your production network.
Planning Server RolesThe server role has a major impact on the rest of the server configuration. Decide whatrole a server will play before planning other aspects of the server configuration. Thenassess the server’s system requirements, partition layout, and security needs accordingly.Heavily used database servers, for example, usually require extra random access memory(RAM) and fast disk subsystems. RIS servers require multiple partitions, and Web servershave the strictest security requirements.
When creating a deployment environment for Windows, ensure that you fill the follow-ing server roles on the deployment network:
■ File server If you are using a distribution share to install Windows or store diskimages, you need a file server with sufficient capacity to store all files and providesatisfactory performance for the peak number of simultaneous clients you expect todeploy.
You can also use multiple servers to service clients and replicate the distributionshare (or other shares) between the servers using Distributed File System (DFS) orthe Windows Server 2003 R2 Distributed File Replication Service (DFRS).
■ Domain controller If you are using an Active Directory environment for thedeployment environment, you need at least one domain controller to service logonrequests.

Chapter 5 Getting Started 67
■ DHCP server You need one or more DHCP servers to provide dynamic IPaddresses to client systems, both during and after deployment, unless you chooseto use static IP addresses (which is not recommended).
■ DNS server One or more DNS servers are required to provide adequate ActiveDirectory functionality and make name resolution more convenient.
■ WINS server If your preinstallation environment is MS-DOS based and you havemultiple subnets, you need a WINS server to ensure proper NetBIOS name resolu-tion.
■ RIS, ADS, and SMS servers If you are using RIS, ADS, or SMS to deploy Windows,set up these servers and size them properly to handle the anticipated load.
■ SQL Servers If your deployment environment stores configuration data in a SQLServer database, set up these servers and size them properly to handle the antici-pated load.
Note Take a few moments to think about naming conventions before you com-mit yourself to a naming scheme. Sometimes system administrators devise arbi-trary schemes based on algorithms known only to them, or they attempt to insert charm into the process of computer naming. Block those impulses! It is easy for you to keep a map of what and where the different clients and servers are on the network, but if you make life hard on users, you will pay in the end.
Note Usually, short names that indicate the function of the computer or the owner of the computer (for client systems) are best. For example, “Legal_Files” is a good name for a file server in the Legal department.
Assessing System RequirementsMake sure that the servers are powerful enough to handle the anticipated load duringdeployment while providing an adequate response time.
Table 5-3 lists the minimum system requirements for Windows Server 2003 along withsome more practical recommendations for the minimum necessary hardware. Before youbuy server hardware, check the Windows Server Catalog on the Microsoft Web site(http://www.microsoft.com/windows/catalog/server).
Note The late Duchess of Windsor was fond of saying that you can never be too rich or too thin. Now you can add the axiom that you can never have too much processing power, RAM, or hard disk space on a server. The only restriction is economic. Get the most powerful server you can afford.

68 Part II Installation and Configuration
Note Yes, the name of the specification is indeed El Torito. The engineers who developed the standard named it after the restaurant where they had held many, presumably happy, collaborative meetings.
Planning PartitionsBefore installing Windows, determine how you want to partition the hard drives. A singlepartition works nicely for client installations but is generally unsuitable for servers. Onecommon practice is to create a 6- to 10-GB partition for the operating system, and anotherpartition with the remaining space. In this way, the operating system is separate fromapplications and data (especially the Internet Information Services \Inetpub folder), andyou can install services that cannot be installed on the system partition, such as RIS. Cre-ating a 6- to 10-GB system partition and a second data and application partition alsoworks well for most servers that use a redundant array of independent disks (RAID)because a hardware RAID appears to the operating system as a single drive.
Note Some administrators like to place the Windows page file on a dedicated partition to reduce page file fragmentation; however, there are easier ways to prevent page file fragmentation, as discussed in Chapter 7.
Windows Setup does not support dynamic volumes well, which can lead to problemswhen recovering from a serious error or upgrading the operating system. For this reason,
Table 5-3 Minimum requirements for achieving adequate performance
Minimum Recommended Minimum
x86: Intel Pentium 133
x64: 1.4-GHz processor
One or more Intel Pentium III 1-GHz or faster micro-processors (or compatible processors)
x86: 128 MB of RAM
x64: 512 MB of RAM
512 MB of RAM or more
VGA monitor Super VGA monitor capable of at least 800-by-600 resolution
Keyboard and mouse or other point-ing device
Keyboard and mouse or other pointing device
x86: 1.5 GB of free hard disk space
x64: 4 GB of free hard disk space
10 GB of free disk space on a 7200-rpm or faster hard disk
Bootable CD-ROM Bootable 12x or faster CD-ROM or DVD-ROM drive (El Torito–compatible)
No floppy disk 1.44-MB floppy disk
One or more network adapters One or more Peripheral Component Interconnect (PCI), PCI-X, or PCI Express–based Fast Ethernet or Gigabit Ethernet network adapters with PXE support
Chapter 5 Getting Started 69
when using dynamic volumes (including software RAID sets), consider leaving the sys-tem partition a basic disk and creating dynamic volumes for data and applications only.You can also install a “safe OS” copy of Windows on a basic partition—you can use the“safe OS” copy to restore from backup in case of a disaster. If you install a “safe OS” (orparallel installation, usually of Windows XP), it is important to lock down this installa-tion, because you cannot install software updates without restarting into the installation.You also need a separate license and computer name for this installation.
Note You cannot perform a clean install on a dynamic volume unless the dynamic volume is “hard-linked.” Only dynamic volumes that you upgraded from basic volumes are hard-linked.
Real World Just Say “NTFS”
Although FAT16 and FAT32 had their places in the past, there is no place for themanymore on the hard drives of today’s Windows clients and servers. Simply put,NTFS is more reliable, secure, and efficient than FAT and FAT32. With WindowsServer 2003, NTFS is also every bit as fast. (FAT previously maintained a slightspeed advantage for some tasks.)
If you absolutely must use a legacy version of Microsoft Windows 95, Windows 98,or Windows Me, you can use FAT partitions to perform a dual boot. However, amore powerful, not to mention more secure, solution is to use Microsoft Virtual PCor Virtual Server to run these operating systems in a virtual machine on a systemrunning Windows XP or Windows Server 2003.
Planning Server SecurityIt is important to ensure adequate security for the servers in the deployment environmentas well as the servers you deploy into the production network. Take the following mea-sures to secure the deployment network:
■ Create a dedicated user account just for installations that is a member of a newgroup named Install Users (or something similar). Limit the permissions given tothe account, and consider setting the NTFS permissions for this account to Denyon all folders except the distribution share and subfolders.
To deny the account dial-in rights, right-click the account in Active Directory UsersAnd Computers, click Properties, click the Dial-In tab, and then select the DenyAccess check box.
■ Set the permissions on the distribution share to grant Read and Execute permissionsto the Install Users group. Check the NTFS permissions on your folders to ensurethat members of the Install Users group do not have access to any other folders.

70 Part II Installation and Configuration
To secure the servers you deploy, follow these recommendations:
■ Unplug the server from the Internet during Windows Setup, even if it is destinedfor life as a Web server.
■ Install Windows to an NTFS partition.
■ Create a strong local administrator password during Setup. (Microsoft WindowsServer 2003 prompts you automatically for a different password if the one youchoose is too simple.) One common practice is to join the computer to a Windowsdomain, set a random local Administrator password, and then use the domainadministrator accounts for all administration tasks.
■ Carefully guard any answer files that contain user names and passwords (asdescribed in the “Using Setup Manager” section of this chapter).
■ Physically secure the computer as appropriate for its role and contents:
❑ Place servers in a locked server room. Give the key or combination only topeople with a demonstrated need for it. Create a system that tracks whoenters the room and when.
❑ Use case locks and do not leave the keys in them.
❑ Remove the floppy disk drive if it is not necessary; otherwise, consider floppydisk locks.
❑ After you install Windows, set the boot order in the Basic Input Output Sys-tem (BIOS) to boot only from the hard drive. This prevents someone fromusing special boot disks or CD-ROMs to access the contents of the hard driveand reset the local administrator password.
❑ Set a BIOS password to prevent unauthorized access to the BIOS.
❑ Change the operating system selection timeout period to 0 so that Windowsboots automatically.
Security Alert All versions of Microsoft Windows prior to Windows XP with Service Pack 2 or Windows Server 2003 with Service Pack 1 are vulnerable to viruses during the period between the completion of Setup and the installation of antivirus software, even if you enable the Internet Connection Firewall. This can be a problem even if the computer is behind a corporate firewall because many private networks have viruses circulating on them. The new Windows Firewall can protect a system until you can install antivirus software and the latest software updates.

Chapter 5 Getting Started 71
Real World Password Security
To make the system as secure as possible, always assign a password to the admin-istrator account, preferably a password at least seven characters long and consistingof mixed letters and special characters, uppercase letters, and lowercase letters. Useacronyms for phrases that are meaningful to you, easy to remember, and unlikely tobe meaningful or memorable to anyone else, such as Uk,Ur?Ue! (which stands for“You know, you are what you eat!”).
Clear the logon history after installing Windows so that would-be hackers must fig-ure out both the password and the user name. To do this on a standalone server,click Start, choose Administrative Tools, and then choose Local Security Policy.Select Local Policies, select Security Options, double-click Interactive Logon: DoNot Display Last User Name, choose Enabled, and then click OK. Use Group Policyto control this on a member server or domain controller.
Because it is possible to disable any administrator account, including the built-inAdministrator account, it is wise to have a backup account. Use the built-in Admin-istrator account to make a second account with full administrative privileges, stashthe password and user name somewhere safe, and then relegate that account tosemiretirement. For extra credit, rename the built-in Administrator account andthen create a decoy account named Administrator. Give the decoy account no per-missions and disable it. The hackers can pound away at this account as long as theylike but it won’t do them any good.
Creating Your Deployment PlanBefore you create your deployment environment and begin the deployment process, it isimportant to create a deployment plan. This is a document or series of documents thatserves as a road map for the deployment process. The deployment plan should includethe following items:
■ A budget Determine the level of funding available for the project, and keep it upto date as the project progresses.
■ A schedule Create a timeline of when to perform each phase of the deployment,and update it as you achieve (or delay) each milestone.
■ A test plan Document specific steps that you can perform to verify that an instal-lation performed in your test lab or in a pilot deployment is fully functional.

72 Part II Installation and Configuration
■ List of configurations Create a list of configurations that you need to deploy andthe answer files or disk images that support these configurations.
■ Deployment steps Document the exact steps that administrators must performto deploy Windows to your network. Use these steps as the basis for the test plan,and update it with results from testing and pilot deployments.
More Info For information about performing a pilot deployment, see “Design-ing a Pilot Project” in the Windows Server 2003 Deployment Guide at http://www.microsoft.com/technet/prodtechnol/windowsserver2003/library/DepKit/d2ff1315-1712-48e4-acdc-8cae1b593eb1.mspx.
Creating Your Deployment EnvironmentThis section discusses how to perform common tasks involved with creating a deploy-ment environment, such as using Setup Manager to create answer files and distributionfolders for unattended Setup, using unattended Setup with Windows Server 2003 R2,and using Sysprep with disk imaging. For information on using RIS, see Chapter 28.
To perform a manual installation of Windows, go to the “Installing Windows” section ofthis chapter.
Using Setup ManagerSetup Manager is a Windows program that provides a wizard-driven interface for creatingor modifying answer files and distribution folders. This is the fastest, easiest, and leasterror-prone way to create answer files and distribution folders.
Setup Manager can create the following types of answer files:
■ Unattend.txt answer files for automating Windows Setup from a distribution shareor a Windows CD-ROM.
■ Sysprep.inf answer files for automating Mini-Setup, the abbreviated WindowsSetup process that runs the next time the computer starts after using Sysprep toreseal a computer for imaging.
■ A RIS .sif answer file for automating the Client Installation Wizard when installingWindows using RIS. (See Chapter 28 for more information about RIS.)
Note Original equipment manufacturers (OEMs) should use the version of Setup Manager that ships with the OEM Preinstallation Kit (OPK).

Chapter 5 Getting Started 73
To use Setup Manager to create an answer file, and optionally a distribution folder, followthese steps:
1. Insert the CD-ROM with the most up-to-date version of the Windows Server 2003Support Tools available, or download updated Support Tools from the MicrosoftWeb site. (Microsoft usually updates the Support Tools with each Service Pack. Donot use the original Windows XP Setup Manager to deploy Windows Server 2003.)
2. Navigate to the \Support\Tools folder, and extract the contents of the Deploy.cabfile to a location on the hard drive of the file server on which you want to create thedistribution share.
3. Launch Setupmgr.exe from the location on the hard drive to which you copied thecontents of the Deploy.cab file. If you want to create a distribution share, launchSetup Manager from the server on which you want to create the distribution share.
4. On the New Or Existing Answer File page, choose Create New to create a newanswer file.
5. On the Type of Setup page (shown in Figure 5-1), choose the type of setup forwhich you want to create an answer file.
Figure 5-1 The Type Of Setup page
6. On the Product page, choose the edition of Windows for which you want to auto-mate Setup. To automate Windows Server 2003 R2 Setup, choose the correspond-ing Windows Server 2003 edition.

74 Part II Installation and Configuration
7. On the User Interaction page, choose the level of user input you want to allow dur-ing Setup. (See Figure 5-2.) Choose Fully Automated to prevent Setup from stop-ping for user input. See the sidebar “Choosing an Interaction Level” for moreinformation.
Figure 5-2 The User Interaction page
8. On the Distribution Share page, choose whether to create a distribution share, mod-ify an existing distribution share, or create an answer file for use with a WindowsCD-ROM. If you chose Set Up From A CD, skip to step 11.
To create a distribution share for Windows Server 2003 R2, you must perform addi-tional steps after using Setup Manager, as discussed in the “Using UnattendedSetup with Windows Server 2003 R2” section of this chapter.
9. On the Location Of Setup Files page, choose On The CD to copy the installationfiles from a Windows CD-ROM that matches the edition of Windows you want todeploy, or choose In The Following Folder and then specify the location of the\i386 or \amd64 folder.
10. On the Distribution Share Location page, specify the location for the distributionfolder and the share name.
11. On the License Agreement page that appears if you chose to fully automate Setup,select the I Accept The Terms Of The License Agreement option to agree to theterms of the End-User License Agreement (EULA) on behalf of the end-user.

Chapter 5 Getting Started 75
12. Use the Setup Manager window (shown in Figure 5-3) to specify additional set-tings. You do not have to fill out every setting; however, you must use the Name AndOrganization, Time Zone, Product Key, and Computer Names pages when creatinga fully automated answer file.
Figure 5-3 The Setup Manager window
The following pages are noteworthy:
❑ Computer Names Use this page to create or import a list of computernames to use for your systems. Setup Manager takes the names (if you havetwo or more) and creates a uniqueness database file (UDF) that Setup thenqueries for computer names, using each name only once. Use computernames that are both DNS-compatible and NetBIOS-compatible if pre–Win-dows 2000 clients connect to these computers over the network.
❑ Administrator Password Use this page to specify the local Administratoraccount passwords for the systems. If you choose to specify a password now,select the Encrypt The Administrator Password In The Answer File check box.If you do not select this check box, the password is stored in plain text for any-one with Notepad to read.
❑ Workgroup or Domain Use this page to specify the domain or workgroupthe computers are to join. To join the computers to the domain, choose theDomain option and then type the Windows Server domain name in the textbox provided. Windows prompts the user for a valid domain user accountand password when he or she logs on to the domain after Setup completes.
76 Part II Installation and Configuration
Important Although Windows Setup Manager can encrypt the administrator password, it cannot encrypt the user name and pass-word you specify for creating the computer accounts. Because of this serious security flaw, avoid using answer files to create computer accounts. Instead, create the computer accounts beforehand on the server. See Microsoft Knowledge Base Article 315273 for information about scripting the creation of computer accounts. If you feel you must use an answer file to create computer accounts, guard the file carefully until after installation is completed. (Setup deletes the user name and password from the answer file during the setup process.)
❑ Run Once Use this page to specify commands to run the first time a userlogs on. You can use this page, which corresponds to the [GUIRunOnce] sec-tion of the Unattend.txt, to automate Windows Server 2003 R2 Setup(Setup2.exe), or the Active Directory Installation Wizard (as discussed inChapter 14). You can also use this page to install applications that can besilently installed from a command prompt (and that do not require a reboot).When using this page to install applications, use the When A DestinationComputer Starts, Automatically Log On As Administrator check box on theAdministrator Password page to force the applications to install during theautomated setup process rather than the first time an actual user logs on.
❑ Additional Commands Use this page to specify commands to run near theend of GUI-mode Setup, before the computer reboots and the $OEM$ folder isdeleted. You can use this page to run an application or command that does notrequire network connectivity, Windows installer support, or a locally logged-inuser. Setup Manager ignores this page unless you are creating a new distribu-tion share or modifying an existing one. This page creates a Cmdlines.txt file inthe \i386\$OEM$ or \amd64\$OEM$ folder of the distribution share.
More Info For more information about the [GUIRunOnce] section and the Cmdlines.txt file, see the “Using Cmdlines.txt” topic in the Windows XP Resource Kit at http://www.microsoft.com/resources/documentation/Windows/XP/all/reskit/en-us/Default.asp?url=/resources/documentation/Windows/XP/all/reskit/en-us/prbc_cai_jteq.asp.
13. On the Additional Commands page, click Finish, type the name and location for theanswer file, and then click OK.
Setup Manager creates the distribution folder (if you chose to create a new distributionfolder) and creates the answer file. It also creates a batch file that starts Setup(Winnt32.exe) in unattended mode using the answer file you created. You can use thisbatch file or launch Setup with the appropriate parameters, including the parameterpointing to the answer file. (See Tables 5-3 and 5-4 for the appropriate parameters.)

Chapter 5 Getting Started 77
14. If you are creating an answer file for a CD-ROM–based installation, rename theUnattend.txt file Winnt.sif, place it on a floppy disk or USB Flash Device (UFD),and insert the disk or UFD immediately after the computer starts from the Win-dows CD-ROM.
15. If you plan to start Windows Setup from an MS-DOS environment such as a Win-dows 98 Startup Disk, modify the batch file that Setup Manager creates to use the16-bit Setup (Winnt.exe) file by deleting the 32 from the third-to-last line of the file.Also change the /unattend: parameter in the second-to-last line to /u:.
Real World Choosing an Interaction Level
The level of user interaction you require determines how much the person runningthe installation needs to attend to the process. Here is a more detailed explanationof the interaction levels:
■ User Controlled Uses the information in the answer file as default answers during the Windows installation. The user must confirm the defaults or make changes as the installation progresses. (Nothing is automated.)
■ Fully Automated Completely automates Setup by using the settings you specify in the answer file. This option is best for quickly setting up multiple systems with identical configurations. If any settings do not work properly (such as might happen if the answer file provides a computer name that is already in use), the installation fails.
■ Hidden Pages Automates the parts of Setup for which you provide informa-tion, and prompts the user to supply any information you did not include in the answer file. Use this option to set up a system in a specific way, while still allowing the user some limited customization options. (The user sees only the parts of Setup that the answer file does not cover.)
■ Read Only Hides the pages for which you provide information, just like the Hidden Pages option. However, if the answer file does not provide informa-tion for all settings on a page, Setup displays the page and prompts the user to complete the unanswered portion of the page. You cannot change settings provided in the answer file during installation.
■ GUI Attended Automates the text-mode portion of Setup. The person run-ning Setup supplies answers for the Windows Setup Wizard. Use this option when you want to automate the text-mode portion of Setup and allow the per-son running the installation to provide the settings during the graphical user interface (GUI) portion.
78 Part II Installation and Configuration
Note If you create the system partition in a preinstallation environment without restarting the computer, add the /syspart and /tempdrive parameters to the Winnt32.exe command in the Unattend.bat batch file or the command that you use to start Setup.
Using Unattended Setup with Windows Server 2003 R2To automate Windows Server 2003 R2 Setup using an answer file, you must add the\Cmpnents folder from Windows Server 2003 R2 Disc 2 to the distribution share or RISimage, and add commands to the answer file to launch Windows Server 2003 R2 Setup(Setup2.exe). If you do not perform these additional steps, Windows Setup stops afterinstalling Windows Server 2003 with Service Pack 1, and prompts you to insert the sec-ond CD-ROM to continue Windows Setup.
To prepare the distribution share for Windows Server 2003 R2, copy the \Cmpnents folderfrom the Windows Server 2003 Disc 2 CD-ROM into a Windows Server 2003 with ServicePack 1 distribution share, at the same level as the \i386 or \amd64 folder. For example, ifthe path to the \i386 folder on the distribution share is \\srv2\windist\winsrv2003\i386,copy the \Cmpnents folder to \\srv2\windist\winsrv2003\Cmpnents.
Note To prepare a RIS image for Windows Server 2003 R2, copy the \Cmpnents folder into the image at the same level as the \i386 or \amd64 folder, associate a new RIS .sif answer file to the Windows Server 2003 with Service Pack 1 image, and then modify the answer as discussed in this section. See Chapter 28 for infor-mation about associating answer files to RIS images.
To launch Windows Server 2003 R2 Setup from an Unattend.txt, Sysprep.inf or RIS .sifanswer file, follow these steps:
1. Open the appropriate answer file in Setup Manager and then navigate to the RunOnce page.
2. If you are running Windows Setup from a distribution share, type the followingcommand in the Command To Add box and then click Add.
"cmd /c net use \\srv2.example.office\windist /user:EXAMPLE\Install Password"
This command connects to the distribution share and authenticates with theserver, if necessary. Replace \\srv2.example.office\windist with the UNC name of thedistribution share. Replace EXAMPLE\Install with the domain (or computer forworkgroup environments) and username of a limited-rights user account with per-mission to access the share, and Password with the password for the user account.
Chapter 5 Getting Started 79
3. If you are creating an Unattend.txt file for installation from a distribution share orlocal source other than a CD-ROM or DVD-ROM, and you need to copy files fromthe $OEM$ folder and subfolders during Setup, type the following commands inthe Command To Add box. Click Add after each line, and replace source_path withthe path to the location of the \i386 or \amd64 and \cmpnents folders:
"cmd /c reg add HKLM\Software\Microsoft\Windows\CurrentVersion\Setup/v SourcePath /t REG_SZ /d source_path /f"
"cmd /c reg add HKLM\Software\Microsoft\Windows\CurrentVersion\Setup/v ServicePackSourcePath /t REG_SZ /d source_path /f"
These commands ensure that the SourcePath and ServicePackSourcePath registrykeys are set to the location of the \Cmpnents and \i386 (or \amd64) folders whenWindows Server 2003 R2 Setup runs during the [GUIRunOnce] processing and forsubsequent installations of Windows Server 2003 components (including Win-dows Server 2003 R2 components). Otherwise, the SourcePath and ServicePack-SourcePath keys are reset to the drive letter of the CD-ROM drive (usually D).
4. Type the following command in the Command To Add box, and then click Add.This command launches Windows Server 2003 R2 Setup from the [GUIRunOnce]section of the Unattend.txt, Sysprep.inf or .sif answer file.
"\\srv2.example.office\windist\cmpnents\r2\setup2.exe /q /a"
5. If you want to automate the installation of Windows Server 2003 R2 optional com-ponents, type the following command in the Command To Add box, and then clickAdd.
"%WINDIR%\system32\sysocmgr.exe /i:%WINDIR%\inf\sysoc.inf /u:\\srv2.example.office\windist\Sysocmgr.ini"
This command launches Sysocmgr.exe in unattended mode using the Sysocmgr.inianswer file you specify (as described later in this chapter).
6. If you are creating an Unattend.txt file for installation from a distribution share orlocal source and you do not need to copy files from the $OEM$ folder and subfold-ers during Setup, open the Unattend.txt file in Notepad or another text editor andchange OEMPreinstall = Yes in the [Unattended] section to OEMPreinstall = No.
Doing so prevents Setup from resetting the SourcePath and ServicePackSourcePathregistry keys to the drive letter of the first CD-ROM drive (usually D:\).
Note If you are using the [OEMRunOnce] section of Winbom.ini to install Win-dows Server 2003 R2 during Sysprep factory mode, you can use the SourcePath entry in Winbom.ini to set the SourcePath and ServicePackSourcePath registry keys during Sysprep factory mode.

80 Part II Installation and Configuration
Installing Optional Components During Unattended Setup
You can install most optional Windows components during unattended Setup byusing the [Components] section of the Unattend.txt file. You cannot install Win-dows Server 2003 R2 components (or Message Queuing) during Windows Setup,but you can install them automatically after Setup completes by using Sysoc-mgr.exe and an answer file (Sysocmgr.ini). You can also use Sysocmgr.exe with ananswer file to install or uninstall any Windows component at any time after Setupcompletes.
To install Windows components automatically using Sysocmgr.exe, create a textfile named Sysocmgr.ini (or any other name) that includes a listing of the compo-nents that you want to install using the following syntax:
[Components]
DFSFRSUI = On
DFSR = On
Netfx20 = On
Then run the Sysocmgr.exe command with the Sysocmgr.ini file you created, asdescribed in Step 5 of this section. For more information about Sysocmgr.exe andSysocmgr.ini, see the Microsoft Windows Corporate Deployment Tools User’sGuide (Deploy.chm and Ref.chm) on Windows Server 2003 Disc 2 or at theMicrosoft Download Center (http://www.microsoft.com/downloads/).
Creating and Modifying a Distribution ShareA distribution share is a shared folder on a server from which you can install Microsoft Win-dows. The distribution share must contain the Windows installation files: the \i386 or\amd64 folder from the Windows CD-ROM, the \Cmpnents folder (when installing Win-dows Server 2003 R2), and any device drivers or other files that you want to include dur-ing Windows Setup.
This section discusses how to create a distribution share manually, and how to modify adistribution share or RIS image by adding drivers, software updates, and service packs.
Creating a Distribution ShareThe easiest way to create a distribution share is to use Setup Manager, as described earlierin this chapter. To create a distribution share for RIS, use the Remote Installation ServicesSetup Wizard, as described in Chapter 28. However, you can also create a distributionshare manually or modify the files contained within it. To do so, follow these steps:

Chapter 5 Getting Started 81
1. Create a folder on the server named \Windist (for example), and share it on the net-work with the proper share name and permissions. (Keep the share name to eightcharacters or fewer if it needs to be accessible from an MS-DOS–based or Windows98–based boot disk.)
Give Administrators Full Access, and give other users Read and Execute permis-sions.
2. Create a descriptively named subfolder (such as W2K3), and copy the \i386 or\amd64 folder from the Windows CD-ROM into the subfolder.
3. If you are creating a distribution share for Windows Server 2003 R2, copy the\Cmpnents folder from Windows Server 2003 R2 Disc 2 into the same folder inwhich you copied the \i386 or \amd64 folder.
4. Create a subfolder named $OEM$ in the \i386 or \amd64 folder (or at the samelevel as the \i386 or \amd64 folder for RIS installations) for any additional driversor programs that you want to preinstall. Setup copies all files and folders in thisfolder into the temporary setup folder during installation, and then deletes themnear the end of GUI-mode Setup.
You can also place the \$OEM$ folder outside the distribution share if you placethe path (file or UNC) to the \$OEM$ folder after the OEMFilesPath key in theanswer file.
5. Create any additional subfolders needed for the installations. Table 5-4 describesthe special folders that you can create for use by Setup.
Note If you are using Winnt.exe to launch Windows Setup, all files and folders that you create in the distribution share must have short (8.3) file names. To convert files with short filenames back to long filenames during Setup, see the “Convert-ing Short Filenames Back to Long Filenames” section of this chapter.
Table 5-4 Subfolders you can create to store extra files
Folder Description
\$OEM$\$1 The folder in which you place files that you want Setup to copy to the drive on which it installs Windows. Equivalent to the %systemdrive% envi-ronment variable, you can use the \$OEM$\$1 folder to change drive let-ters without causing problems for applications that point to a hard-coded drive letter. You can also create subfolders here for the files; Setup copies the entire folder structure to the system drive.
If you use the \$OEM$\$1 folder, set OEMPreinstall = Yes in the [Unat-tended] section of the Unattend.txt answer file.

82 Part II Installation and Configuration
Note Windows Server 2003, Windows XP, and Windows 2000 do not use the \$OEM$\Display and \$OEM$\Net subfolders that Windows NT 4 Setup used.
Applying Service Packs to a Distribution ShareYou can apply a service pack to a distribution share or standard (non-RIPrep) RIS imageso that subsequent installations of Windows are “integrated” installations of Windowsthat include the latest service pack. To perform this procedure, follow these steps:
1. Make a copy of the distribution share or RIS image so that you do not affect existingclients when you upgrade the distribution share.
Existing clients that do not have the latest service pack installed might access the dis-tribution share to install optional Windows components, and they must receive theversion of the components that corresponds to the service pack level of the client.
\$OEM$\$1\Sysprep The folder in which you place the files required to run Sysprep, if you want to run Sysprep at the end of unattended installation to reseal the com-puter or install additional applications using Sysprep Factory mode.
\$OEM$\$$ The folder that holds any new system files or files that replace existing sys-tem files. Setup copies these files into the various subdirectories of the Windows system folder (\Windows).
This folder must match exactly the structure of the Windows system sub-folders for those folders in which you want to add or replace system files. For example, to copy new or replacement files into the \%windir%\System32 folder, create an \$OEM$\$$\System32 folder.
\$OEM$\$Progs The folder that holds any files that you want to copy to the %PROGRAM FILES% folder during Setup.
\$OEM$\textmode The folder in which you place any hardware-dependent files for use while loading Windows Setup and during the text-mode phase of Setup. These files include updated SCSI, keyboard, video, and pointing device drivers.
Include the Txtsetup.oem file in this folder to control the loading and installation of these files. To create the Txtsetup.oem file, create a normal text file and list the filenames of all files in this folder. List the Txtsetup.oem file and all files mentioned in the Unattend.txt file, under the [OEMBoot-Files] section.
\$OEM$\drive_letter The folder that specifies additional files and folders that you want Setup to copy into the root folder of the named drive. Create one entry for each drive to which you want to copy files. For example, Setup copies the files located in the \$OEM$\C folder into the root folder of the C: drive during the text-mode phase of Setup. Setup also copies any subfolders of the \$OEM$\C folder.
Table 5-4 Subfolders you can create to store extra files
Folder Description
Chapter 5 Getting Started 83
2. If the Windows install files are not located in the \i386 or \amd64 folder, movethem there before applying the service pack.
3. Open a command prompt, switch to the folder storing the service pack, and thenapply the service pack to the distribution share or RIS image.
To do this for Windows Server 2003 Service Pack 1, type WindowsServer2003-KB889101-SP1-x86-ENU.exe /integrate:path, where path is the path to the distri-bution share you want to update (for example, e:\windist\winsrv03sp1). Theparameters vary depending on the service pack—consult the service pack documen-tation for further information.
When you run the Update.exe file to update a Windows distribution share with the latestservice pack, it creates a Svcpack.log file in the %systemroot% of the computer from whichyou ran Update.exe. If you want to perform more service pack installations from the samecomputer, rename this log file before performing them.
Installing Software Updates with an Answer FileMost organizations choose to deploy software updates after Setup completes using theirchosen software update management solution. However, you might want to apply someupdates during Setup. For example, you might want to deploy Windows Server 2003 R2with a set of tested and approved security updates to maximize the security of the serverfrom the moment Setup is complete. This is particularly important when there are viruseson your internal network that can infect new systems before you can install antivirus soft-ware and the latest security updates. See Chapter 23 for more information about softwareupdates.
Important Install software updates released only after the service pack version you are deploying. For example, if you are deploying Windows Server 2003 R2 (which is based on Windows Server 2003 with Service Pack 1), add only hotfixes that are labeled sp2 (which means they are post–Service Pack 1).
The most flexible method of installing software updates during Setup is to use the follow-ing steps to copy the updates into the distribution share and add them to an answer file.
1. Copy the update executable file into the $OEM$ folder.
2. On the Additional Commands page in Setup Manager, type the filename of theupdate followed by the quiet (/q) and unattended (/u or /m, depending on theupdate version) parameters. (This adds the commands to the Cmdlines.txt file.)For example, type KB123456.exe /q /u.
Some updates use different parameters—to view the parameters supported by anupdate, type the filename followed by the /? parameter.

84 Part II Installation and Configuration
To suppress a reboot when installing an update that requires a reboot, add the /z param-eter to the software update command. (Not all updates support or require this parameter.)
You can apply software updates to a distribution share in the same way as you apply a ser-vice pack: run the update with the /integrate parameter. However, you cannot uninstallsoftware updates applied to a distribution share, so most organizations prefer to add soft-ware updates to an answer file or install the updates using the organization’s chosen soft-ware update solution after Setup completes.
Note Hotfix chaining (that is, installing multiple software updates with a single restart) is supported in Windows Server 2003, Windows XP, and Windows 2000 Service Pack 3 and later. Previously, you had to restart after each software update installation, or run the Qchain.exe tool after installing the updates before restart-ing. Install software updates in order by date or Knowledge Base article number when possible.
Installing Plug and Play Drivers in the Distribution ShareTo add Plug and Play (PnP) drivers to a distribution share or RIS image, follow thesesteps:
1. Create a subfolder in the \$OEM$\$1 folder with a name containing no more thaneight characters. This folder remains on the destination computer’s hard drive afterSetup completes. If you want to protect these drivers from accidental deletion byend users, instead create it in the \$OEM$\$$ folder, which Setup copies to the\Windows folder.
If you are adding drivers to a RIS image, create the \$OEM$\ folder at the samelevel as the \i386 or \amd64 folder.
2. Inside the subfolder you created, you can make additional subfolders to categorizethe devices. For example, you might have the following directories:
\$OEM$\$1\Drivers\Net
\$OEM$\$1\Drivers\Video
\$OEM$\$1\Drivers\Sound
3. Copy the drivers and .INF files into the appropriate subfolder.
If you are installing a network driver for a RIS image, copy the driver files into the\i386 or \amd64 folder in addition to the subfolder you created. If this driverreplaces an existing driver in the \i386 or \amd64 folder, delete the existingdriver’s .pnf file.

Chapter 5 Getting Started 85
4. Add the appropriate lines to the answer files:
❑ Standard answer file users Add each subfolder to the OEMPnPDriversPathentry of the [Unattended] section of the answer file (Unattend.txt orSysprep.inf), separating each folder reference by a semicolon. For example:
OEMPnPDriversPath = Drivers\Nic;Drivers\Video;Drivers\Sound
❑ Remote Installation Services (RIS) users Modify the following lines or addthem to the [Unattended] section of the default template for the desired image(Ristndrd.sif):
OemPreinstall = Yes
OEMPnPDriversPath = Drivers\Nic;Drivers\Video;Drivers\Sound
Note Leave the drive letter out of the paths. Setup automatically adds the system drive to the paths.
If you are installing new drivers for a RIS-based operating system image,restart the BINL (Boot Information Negotiation Layer) service on the RISserver after copying the files into the distribution folder. To do so, type the fol-lowing commands at a command prompt:
net stop "boot information negotiation layer"
net start "boot information negotiation layer"
Note Sysprep and RIS installations postpone installing devices with unsigned drivers until an administrator logs on to the computer. To avoid this (at your own peril), add the DriverSigningPolicy = Ignore line to the [Unattended] section of the answer file.
Installing OEM Drivers in Remote Installation Preparation ImagesAlthough it is tempting to add OEM drivers to a Remote Installation Preparation(RIPrep)-based image by installing them on the source computer before running theRIPrep program on it, this does not work because RIPrep images need to be able to adaptto a wide variety of hardware. Therefore, follow these steps to add drivers to RIPrep-basedimages:
1. Before running the RIPrep process (described in Chapter 28), create a folder namedSysprep on the C:\ drive of the source computer.
2. Create a C:\Drivers folder to hold OEM drivers, and create any necessary subfold-ers, such as C:\Drivers\Video or C:\Drivers\Sound.
3. Create a Sysprep.inf file, and place it in the Sysprep folder.
86 Part II Installation and Configuration
4. Add the following lines to the Sysprep.inf file:
[Unattended]
OEMPnPDriversPath = Drivers\Nic;Drivers\Video;Drivers\Sound
5. Use Device Manager to remove any devices for which you are installing updated ornew drivers. Also, remove any unknown devices.
6. If you are adding mass storage drivers that Windows requires to start, use the“Installing Mass Storage Drivers” section of this chapter to add the drivers to theappropriate RISetup image (a flat RIS image created using Risetup.exe or theRemote Installation Services Setup Wizard). Add the drivers to the RISetup imagethat matches the operating system version (not including service packs) of theRIPrep image and whose folder name is listed first alphabetically.
For example, when adding mass storage drivers to a Windows Server 2003 R2RIPrep image on a Windows Server 2003 RIS server that contains RISetup imagesin the \Win2K3 and \Win2K3R2 folders, add the drivers to the RISetup imagelocated in the \Win2K3 folder, because \Win2K3 comes before \Win2K3R2 alpha-betically.
7. Run Riprep.exe from the RIS server’s network share, as described in Chapter 28.
8. Stop and restart the BINL service on the RIS server by typing the following com-mands:
net stop "boot information negotiation layer"
net start "boot information negotiation layer"
Under the Hood Why RIPrep Images Need RISetup Images
A RIPrep image does not have a fully populated critical device database, so it usesthe critical device database from a matching RISetup image until the client can loadWindows and perform its own enumeration of devices. This is why you must addmass storage drivers to both the RIPrep image and the matching RISetup image.
RIS determines which RISetup image to use for a given RIPrep image at runtime bylooking at the operating system version and folder name, so the image RIS selectscould change if you add or rename image folders.

Chapter 5 Getting Started 87
Installing Mass Storage DriversIf the hard drive or installation source is attached to a device for which Windows does nothave drivers, such as a new network adapter or Serial ATA (SATA) controller, you have aproblem. When performing a manual installation, you can always press F6 at the begin-ning of text-mode setup to install new mass storage drivers from a floppy disk, but thisoption is cumbersome with unattended installations. To get around this, follow thesesteps to copy mass storage drivers that are required at boot time to the distribution shareor RIS image:
1. Create a folder named \$OEM$\Textmode in the \i386 or \amd64 folder of thedistribution share. (This step is unnecessary for a RIS image.)
2. Copy the storage drivers into the \$OEM$\Textmode folder (or the \i386 or\amd64 folder for a RIS image) as well as the folder specified in the OEMPnPDriv-ersPath entry of the answer file (for example, \$OEM$\$1\Drivers\Storage).These files should include at least one .SYS file and the Txtsetup.oem file.
3. In the answer file, add the following lines (refer to the Txtsetup.oem file for theexact syntax):
[MassStorageDrivers]
"scsi controller string from txtsetup.oem" = "OEM"
For example:
[MassStorageDrivers]
"DELL PERC 2/3/4 RAID Controller Driver" = "OEM"
To enable client computers to start from a device connected to an IDE controllerfor which Windows provides drivers, add the following line to the [MassStorage-Drivers] section:
"IDE CD-ROM (ATAPI 1.2)/PCI IDE Controller" = "RETAIL"
4. Add or modify the [Unattended] section of the answer file to include the followingline:
OemPreinstall = Yes
5. Add or modify the [OEMBootFiles] section of the answer file to include a listing ofall files in the $OEM$\Textmode folder. For example:
[OEMBootFiles]
mraid35x.cat
nodev.inf
Oemsetup.inf
mraid35x.sys
txtsetup.oem

88 Part II Installation and Configuration
6. Open the Txtsetup.oem file using Notepad. In the [Disks] section, remove anyfloppy disk references or other path references, and type a backslash (\) at the endof the line (or a period if installing on a FAT partition). For example, change the fol-lowing line:
d1 = "Windows Server 2003 Driver Set 1.01", \w23dsk1, \
7. Verify that the Txtsetup.oem file contains a section named [HardwareIds.Scsi.device_service_name], where device_service_name is the device service name. If thissection does not exist, create it using the following syntax, where device_identifier isthe device identifier:
[HardwareIds.scsi.device_service_name]
id = "device_identifier", "device_service_name"
For example, for a Dell PERC RAID controller, use the following lines:
[HardwareIds.scsi.DELLPERC]
id = "PCI\VEN_1000&DEV_0407&SUBSYS_05311028", "mraid35x"
Converting Short Filenames Back to Long FilenamesIf you start Windows Setup using the Winnt.exe setup program, or if you use MS-DOS tocopy the distribution share to a local source, all files included in the distribution sharemust have MS-DOS–compliant short names. This is because MS-DOS and Winnt.exe willdiscard long filenames when copying files. However, you can convert the short filenamesback to long filenames during Setup by creating a renaming file for each folder in whichthere are files you want to convert.
The easiest way to create a renaming file ($$Rename.txt) is to copy your files into the$OEM$ folder (or a subfolder), open the answer file in Setup Manager that correspondsto the distribution share, and then save the answer file. Setup Manager automatically cre-ates the necessary $$Rename.txt files for you. You do not need to rename files with longfilenames because Setup Manager lists the short names of each file as MS-DOS would seethem.
To create a renaming file manually, follow these steps:
1. Open Notepad, type the path to the subfolder containing the files you want torename, and enclose the path in brackets (by leaving a blank or using the backslashcharacter [\] for the root folder).
2. Underneath the bracketed heading, type each short filename you want to rename(not enclosing it in quotes) followed by an equals sign and then the long filenamein quotes.

Chapter 5 Getting Started 89
3. Repeat step 2 with any additional subfolders in which you have files or folders thatyou want to rename. A sample renaming file is shown below:
[media]
filenm1.txt = "Your long filename here.txt"
ding.wav = "Really loud and annoying ding.wav"
whiz.mpg = "Whizbang Deluxe Video.mpg"
[images]
desktp1.bmp = "corporate logo.bmp"
desktp2.bmp = "division logo.bmp"
4. Save the file as $$Rename.txt in the folder of the distribution share that containsthe files that you want to convert.
Using Sysprep with Disk ImagingOne way to increase the speed of the setup process is to create a disk image of an existingreference system and then apply that image to the target system. Installing a disk imagecreated with Sysprep and disk-imaging software usually takes 45 to 60 minutes less timethan an unattended Setup-based installation.
More Info For in-depth information about Sysprep, see the Microsoft Corpo-rate Deployment Tools User’s Guide (Deploy.chm).
Disk imaging works like this: first, install Windows and all the applications you need ona single machine that is identical or very similar to the many machines on which you wantto deploy Windows. Then prepare this system for imaging by using the reseal function-ality of Sysprep (which is available on the Windows CD-ROM in the Deploy.cab file) toclear out the SID and other computer identity information. Image the configuration usinga disk-imaging program, such as PowerQuest Drive Image or Norton Ghost, which copiesand compresses the disk image to a network share. You can then start a blank system byusing Windows PE or the floppy disk created by the disk-imaging program, copy anduncompress the disk image onto the new system, and be up and running in far less timethan is required to perform a fully automated Setup-based installation.
However, this solution has some problems. First, the systems must be similar for the diskimages to work on them. The computers do not have to be identical because Windowsuses Plug and Play (PnP) to detect changes to most system components. However, thesystems must share the same HAL—no mixing ACPI systems with non-ACPI systems. Ifthe systems use different mass storage controllers, you must add the drivers to the imageby adding the drivers to the \Sysprep folder on the target system and using the [Sysprep-MassStorage] section of Sysprep.inf. In addition, this process does not work for Clusterservice servers, Certificate Server servers, or domain controllers (unless you script theDCPROMO process into the disk image).

90 Part II Installation and Configuration
Note Because you cannot install a Sysprep-created operating system image on a disk partition smaller than that on which you created the image, install Windows into a partition just large enough for Windows and any necessary applications. The disk-imaging software usually partitions the target computer’s hard disk to the same size as the reference computer’s partition, but you can use the ExtendOemPartition entry in the Sysprep.inf file to extend the destination computer’s system partition to fill the hard disk.
Covering in detail how to use Sysprep and disk-imaging tools to mass deploy computersis outside the scope of this book; however, the following steps summarize how to createa disk image of a reference system and apply it to a target system:
1. Install and customize Windows on the reference system.
2. Install and customize any applications you want to deploy to all systems using thisdrive image.
3. Copy Sysprep.exe, Factory.exe, and Setupcl.exe from the Deploy.cab file that shipswith the version of Windows that you are imaging into the C:\Sysprep folder.
To automate Mini-Setup, copy a Sysprep.inf answer file you created with SetupManager to the C:\Sysprep folder. To use Sysprep factory mode to customize aninstallation after applying the reference image to the target computer, create a Win-bom.ini file and copy it to the C:\Sysprep folder.
4. Launch Sysprep, and click Reseal to remove all identity information from the system.
5. Restart the computer into your preinstallation environment and then use a disk-imaging program to save the disk image to the desired network share.
Note After using Sysprep to reseal a reference system for imaging, you must restart the computer and run through Mini-Setup (described in step 8) before you can perform additional customizations or use it as a normal system.
6. Boot the target system with Windows PE or a network floppy disk and then con-nect to the network share containing the drive image.
7. Use the imaging software client tools to expand the image file onto the target sys-tem’s hard drive.
8. Restart the target system. Mini-Setup runs, detects any additional PnP devices andhides any missing devices. The wizard generates a new SID, and the system is thenfully functional. (To force Mini-Setup to perform a full PnP detection process toeliminate rather than hide any missing devices, run Sysprep with the /PnP switch.)

Chapter 5 Getting Started 91
Important Thoroughly test your disk images before using them to deploy Windows in a production environment.
Installing WindowsThe process of manually installing Windows or automating the installation of Windowsafter creating your deployment environment is straightforward. First, you prepare the sys-tem for installation. Then you install Windows, either manually, with an answer file, orvia Setup command-line parameters.
Preparing the SystemBefore you install Windows, several physical tasks remain:
■ Back up any existing data on all the drives for which the server is responsible.
■ Disable any disk mirroring for the duration of the setup process.
■ Disconnect any serial connections to an uninterruptible power supply (UPS). UPSequipment can interfere with the setup program’s ability to detect devices con-nected to serial ports.
■ Upgrade the system BIOS to the latest version available. If the BIOS does not meetWindows’ Advanced Configuration Power Interface (ACPI) standards, set the Plugand Play (PnP) OS setting to NO in the BIOS.
■ Change the boot settings in the BIOS to start the computer from the proper loca-tion (usually a CD-ROM or PXE-based network boot).
■ Locate any mass storage drivers or custom hardware abstraction layer (HAL) filesnecessary for the system.
■ If setting up a headless server without a monitor or any means of input, connect theserver to the appropriate terminal concentrator. Before setting up a headless server,refer to Chapter 40 for information about Emergency Management Services (EMS).
Performing a Manual Installation of WindowsThe most basic way of installing Windows is to install it manually from the Windows CDor a network share. This method is fine when doing a few installations or when learningthe installation process. However, it is a tedious and slow method of deploying systemsen masse; so for multiple installations, automate the process using answer files, Sysprep,or RIS.

92 Part II Installation and Configuration
The Phases of Setup
The Windows Setup process consists of several phases that vary depending on howyou initiate the installation.
■ Preinstallation This optional phase runs if you launch Setup from a version of the Windows operating system, Windows PE, or an MS-DOS-based boot disk. During this phase, Setup gathers information (if Setup is run from Win-dows or Windows PE), and then copies the files necessary to boot the com-puter into text-mode Setup.
■ Text-mode Setup During this phase, you select a disk partition and Setup copies the files necessary to start into the graphical user interface (GUI)-based Windows Setup Wizard.
■ GUI-mode Setup (Windows Setup Wizard) During this phase, Setup collects more information, installs devices, finishes copying files, processes the Cmd-lines.txt file, and then deletes the $OEM$ folder and subfolders from the tar-get computer’s hard drive.
■ First boot This is the first boot of Windows after Setup completes, and it is when Setup processes the [GUIRunOnce] section of the Unattend.txt file, fol-lowed by the Winbom.ini file if you choose to use Sysprep Factory mode.
To perform a manual installation of Windows, start the computer from the WindowsCD-ROM and then follow the instructions on the screen. Following is a list of noteworthysteps:
1. To load mass storage drivers not included with Windows—such as drivers for aSmall Computer System Interface [SCSI] or RAID controller—press F6 when thecomputer starts in Windows Setup. To specify a different HAL manually, press F5.
2. After selecting or creating a hard disk partition, specify whether Setup should con-vert the partition to NTFS (because it is not an NTFS partition already), format thepartition (and perform a Quick NTFS format if there is no existing data on the par-tition), or leave the disk alone (if there is an existing file system).
Chapter 5 Getting Started 93
3. If you are installing Windows Server 2003 R2, type your Windows Server 2003 R2product key in the Product Key boxes on the Your Product Key page of the Win-dows Setup Wizard. Typing a Windows Server 2003 R2 product key instead of aWindows Server 2003 with Service Pack 1 product key during Windows Setupeliminates the need to type a Windows Server 2003 R2 product key during Win-dows Server 2003 R2 Setup.
Note Press Shift+F10 at any time during the Windows Setup Wizard to open a command prompt from which you can do various things, such as inspect log files or launch a screen capture program.
4. If you need to specify a static IP address, or change networking settings from thedefaults during Setup, choose Custom Settings on the Networking Settings page ofthe Windows Setup Wizard.
If you don’t have a DHCP server and don’t assign an Internet Protocol (IP) addressto the computer, Windows assigns the computer an automatic private IP address inthe 169.254.0.0-169.254.255.255 range with a subnet mask of 255.255.0.0. Formore information, see Microsoft Knowledge Base Article 220874 at http://support.microsoft.com/kb/q220874/.
5. Use the Workgroup Or Computer Domain page of the Windows Setup Wizard tojoin a workgroup or Windows domain. To create a new domain, join a workgroupor an existing domain during Setup and create the new domain later, as discussedin Chapter 7 and Chapter 14.
6. If you are installing Windows Server 2003 R2, Setup prompts you for the WindowsServer CD2 the first time an administrator logs in after Setup completes. Insert theCD, or type the location of the \Cmpnents folder. To initiate Windows Server 2003R2 Setup later, launch Setup2.exe from the \Cmpnents\R2 folder of the installationsource.
7. After Setup completes on systems running Windows Server 2003 R2 or WindowsServer 2003 with Service Pack 1, the Windows Server Post-Setup Security Updateswindow appears. Use this window to install the latest software updates and config-ure Automatic Updates before allowing inbound connections. For more informa-tion, see Chapter 7.

94 Part II Installation and Configuration
Initiating Windows Setup Using an Answer FileTo perform an unattended installation of Windows from a distribution share, followthese steps:
1. Start the computer using the preinstallation environment you chose (an MS-DOSboot disk, Windows operating system, or Windows PE).
2. Create an installation partition if there is not one already, mark it active, assign it adrive letter, and format it using the NTFS file system. For example, when usingWindows PE or Windows as your preinstallation environment, use the followingdiskpart.exe commands to erase all data on the first physical drive (and note thatyou don’t do this on the drive from which you are running Windows), and create asingle partition of the maximum size:
Select disk 0
Clean
Create partition primary
Select partition 1
Active
Assign letter=c
Exit
Format c: /fs:ntfs /q
When using an MS-DOS-based preinstallation environment, you must format thepartition using the FAT32 or FAT16 file system. However, you can convert the par-tition to NTFS and extend the size during Setup. (For more information, see theMicrosoft Windows Corporate Deployment Tools User’s Guide.)
3. Connect to the distribution share, and then launch Windows Setup (Winnt32.exeor Winnt.exe) using the batch file created by Setup Manager or via Setup command-line parameters (as discussed in the next section).
Note If you create the system partition in a preinstallation environment without restarting the computer, add the /syspart and /tempdrive parameters to the Winnt32.exe command in the Unattend.bat batch file or the command that you use to start Setup.
To perform an automated installation of Windows from the Windows CD-ROM, followthese steps:
1. Start the computer from the Windows CD-ROM.
2. Immediately insert the floppy disk that contains the Unattend.txt file (renamed toWinnt.sif).
If the BIOS boot order lists the CD-ROM before the floppy disk drive, you can insertthe floppy disk before starting the computer.

Chapter 5 Getting Started 95
Note Windows Setup does not support loading mass storage drivers or answer files from USB Flash Devices (such as USB sticks or thumb-drives). If the system BIOS supports floppy emulation, you might be able to use USB Flash Devices to load mass storage drivers or answer files, though the most reliable method is to use a real floppy disk.
Initiating Setup Using Command-Line ParametersYou can streamline the setup process on a single machine by launching Windows Setupusing command-line parameters; you can also use command-line parameters to specifyan answer file to automate Setup completely.
To use a command-line parameter on a computer with Windows, boot the computer inWindows and open a command prompt window. Then type [path]\winnt32.exe[para-meter], substituting [path] with the location of the Windows setup files, and replacing[parameter] with the appropriate parameter or parameters you want to use. Table 5-5shows the available parameters for Winnt32.exe, the 32-bit version of Setup.
Note If you have access to Windows PE, you can boot from a CD-ROM to a streamlined version of Windows XP or Windows Server 2003, which you can then use to prepare the computer and launch Setup. Original equipment manufacturers (OEMs) can create customized Windows PE CD-ROMs using the OEM Preinstallation Kit (OPK); enterprise users can use the Windows PE For Corporations Toolkit, available from your account manager.
Table 5-5 Parameters for the Winnt32.exe command
Parameter Function
/checkupgradeonly Runs a compatibility test on the computer to see whether it has any problems that might interfere with upgrading the operating system. It saves a Winnt32.log report in the installation folder for Windows NT upgrades, or an Upgrade.txt report in the Windows folder for Windows 98/Windows Me upgrades.
/cmd:[command] Runs the command following the /cmd: parameter after the Win-dows Setup Wizard completes.
/cmdcons Enables the use of the Recovery Mode Console at boot time for repairing failed installations. You can use this parameter only after installing Windows.
/copydir:[folder name] Names an additional folder you want Setup to copy into the folder in which it installs Windows (\Windows for Windows Server 2003 and Windows XP, and \WINNT for Windows 2000 and Windows NT). The folder remains after Setup completes, and you can copy additional folders by using the parameter multiple times. The folder might con-tain drivers or other files needed after setup. For example, create an extra_drivers folder in the \i386 or \amd64 source folder and use the copydir:i386\extra_drivers\ parameter.

96 Part II Installation and Configuration
/copysource:[folder name]
Names an additional folder you want Setup to copy into the folder in which you install Windows. Setup deletes the folder near the end of GUI-mode Setup.
/debug[level:filename] Creates a debug log file with the specified level. The default creates a log file named C:\Windows\Winnt32.log with the level set to 2 (Warning).
/dudisable=yes Disables dynamic update during setup, even if an answer file speci-fies dynamic update locations.
/duprepare:[folder name]
Extracts any Dynamic Update packages downloaded from the Win-dows Update Web site that reside in the specified folder, and pre-pares it for use as a local Dynamic Updates source for clients.
/dushare:[folder name] Specifies the location for Setup to search for Dynamic Update files. To create such a share, download and extract Dynamic Update pack-ages from the Windows Update Catalog and then run the /dupre-pare command on the folder.
/ems-baudrate:[baudrate]
Specifies the baud rate to use with the EMS serial port. Valid rates are 9600 (default), 19200, 57600, and 115200.
/emsport:[comport] Specifies the communications port (COM port) EMS must use for remote troubleshooting. (See Chapter 40 for more information.) Replace comport with com1, com2, off, or usebiossettings. (Com1 and Com2 work only with x86 systems.)
/m:[folder name] Specifies the location of a folder containing system file replace-ments. Setup checks this folder first for files to copy and then checks the installation folder.
/makelocalsource Tells Setup to copy all installation files to the local hard disk so that the files are available later during the installation if the Windows CD-ROM or network share is inaccessible.
/noreboot Tells Setup not to restart after the initial Windows file copy phase of Setup is complete. This allows you to run additional commands before continuing.
/s:[sourcepath] Specifies the location of the Windows Setup files. (The default is the current folder.) This must be a full path—for example, X:\path or \\server\share\path. To specify multiple paths for Setup to search for needed files, use multiple /s: parameters. (You can speed transfers by specifying the path to multiple servers that host the same source files.) Setup fails if the first server is not available.
Table 5-5 Parameters for the Winnt32.exe command
Parameter Function
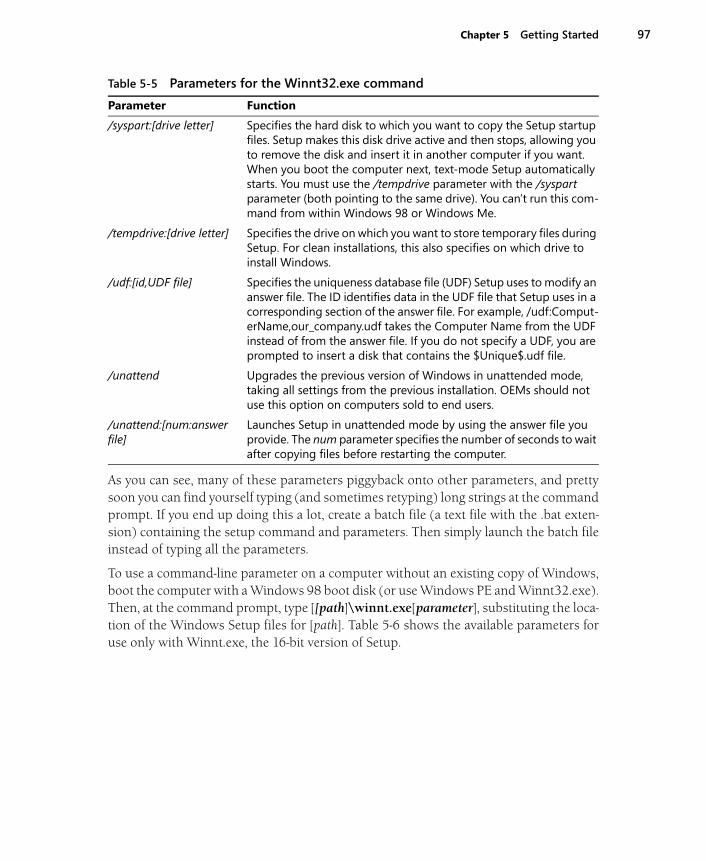
Chapter 5 Getting Started 97
As you can see, many of these parameters piggyback onto other parameters, and prettysoon you can find yourself typing (and sometimes retyping) long strings at the commandprompt. If you end up doing this a lot, create a batch file (a text file with the .bat exten-sion) containing the setup command and parameters. Then simply launch the batch fileinstead of typing all the parameters.
To use a command-line parameter on a computer without an existing copy of Windows,boot the computer with a Windows 98 boot disk (or use Windows PE and Winnt32.exe).Then, at the command prompt, type [[path]\winnt.exe[parameter], substituting the loca-tion of the Windows Setup files for [path]. Table 5-6 shows the available parameters foruse only with Winnt.exe, the 16-bit version of Setup.
/syspart:[drive letter] Specifies the hard disk to which you want to copy the Setup startup files. Setup makes this disk drive active and then stops, allowing you to remove the disk and insert it in another computer if you want. When you boot the computer next, text-mode Setup automatically starts. You must use the /tempdrive parameter with the /syspart parameter (both pointing to the same drive). You can’t run this com-mand from within Windows 98 or Windows Me.
/tempdrive:[drive letter] Specifies the drive on which you want to store temporary files during Setup. For clean installations, this also specifies on which drive to install Windows.
/udf:[id,UDF file] Specifies the uniqueness database file (UDF) Setup uses to modify an answer file. The ID identifies data in the UDF file that Setup uses in a corresponding section of the answer file. For example, /udf:Comput-erName,our_company.udf takes the Computer Name from the UDF instead of from the answer file. If you do not specify a UDF, you are prompted to insert a disk that contains the $Unique$.udf file.
/unattend Upgrades the previous version of Windows in unattended mode, taking all settings from the previous installation. OEMs should not use this option on computers sold to end users.
/unattend:[num:answer file]
Launches Setup in unattended mode by using the answer file you provide. The num parameter specifies the number of seconds to wait after copying files before restarting the computer.
Table 5-5 Parameters for the Winnt32.exe command
Parameter Function

98 Part II Installation and Configuration
Troubleshooting InstallationsInstalling Windows is a relatively painless process; however, when Setup fails for somereason or another, life gets more difficult. Fortunately, you can easily solve most installa-tion problems. The follow sections cover the most common problems; you can find addi-tional troubleshooting procedures in Chapter 40.
More Info You can find additional troubleshooting help either in the Windows Help System’s troubleshooters (which is, admittedly, not much good unless you have access to a functioning Windows 2000, Windows XP, or Windows Server 2003 machine) or in the Microsoft Knowledge Base, available at http://support.microsoft.com.
Table 5-6 Parameters for the Winnt.exe command
Parameter Function
/a Enables Accessibility functionality during Windows Setup.
/e:[command] Runs the command following the /e: parameter after the Windows Setup Wizard completes.
/r:[folder] Names an additional folder you want Setup to copy into the folder in which it installs Windows. The folder remains after Setup completes, and you can copy additional folders by using multiple /r: parameters.
/rx:[folder] Names an additional folder you want Setup to copy into the folder in which you install Windows. Setup deletes this folder after Setup com-pletes.
/s:[sourcepath] Specifies the location of the Windows Setup files. (The default is the current folder.) This must be a full path, such as X:\path or \\server\share\path. To specify multiple paths for Setup to search for needed files, use multiple /s: parameters.
/t:[drive letter] Specifies the drive on which you want to install Windows and store temporary files during Setup.
/u:[answer file] Launches Setup in unattended mode using the answer file you pro-vide. You must use the /s: switch to specify the location of the answer file.
/udf:[id,UDF file] Specifies a UDF you want Setup to use to modify an answer file. The ID identifies data in the UDF file for it to use in a corresponding section of the answer file. For example, / udf:ComputerName,our_company.udf takes the Computer Name from the UDF instead of from the answer file. If you do not specify a UDF, you are prompted to insert a disk that contains the $Unique$.udf file.

Chapter 5 Getting Started 99
Setup Freezes or Locks UpSometimes Windows Setup inexplicably locks up during the installation process. If youreceive a Stop Error message, write it down and consult either the Stop Errors trouble-shooter in Windows Help or Microsoft technical support.
In general, these failures are intermittent and do not come with anything as helpful as anerror message. First, restart the system by pressing Ctrl+Alt+Del. Do this repeatedly, if nec-essary. If you get no response, press the Reset button on the computer or turn the systemoff, wait 10 seconds, and then turn it back on. If you see a Boot menu, choose the Win-dows Setup option to allow Windows Setup to attempt to continue with its installation. Ifno Boot menu appears, launch Setup again. In either case, do not choose to repair theinstallation, but instead choose to continue with Setup.
Setup usually detects that an error occurred with its last attempt to install Windows andcompensates by using a safer method of installation. If Setup hangs or stops respondingagain, repeat this process. Sometimes, Setup hangs multiple times before it finishesinstalling Windows, so be persistent. If installation freezes at a particular part of Setup,try choosing simpler setup options, if applicable.
Other procedures you can use to fix setup problems are as follows:
■ Disable the system cache (processor cache) in the BIOS, and then run Setup again.Consult the hardware documentation for information about the correct procedureto do this. After Setup is complete, enable the cache again to avoid a significant per-formance loss.
■ Try adding a wait state to the RAM in the system BIOS. This can help with partiallyfaulty RAM chips. (However, if this server is important, plan on replacing that iffyRAM before doing any critical work on the machine.)
■ Verify that the same company manufactures the RAM modules and are of the samespeed and type. Although this is not a necessity, it can often eliminate problems.
■ Switch the order of the RAM modules, or remove some modules and try installingthem again.
■ Test the RAM modules for faulty RAM chips with a third-party software program.Replace any faulty modules and run Setup again.
■ Check the computer for a Master Boot Record (MBR) virus by booting it from afloppy disk that you have checked for viruses, and then run a virus-checking pro-gram and scan the drives for any viruses. If you find any viruses, clean them fromthe system and run Setup again.

100 Part II Installation and Configuration
Real World ACPI BIOS Compatibility Problems
If Setup consistently freezes during the Windows-based Setup Wizard and the sys-tem has an ACPI-compatible BIOS dated January 1, 2000 or earlier, the BIOS mightnot function in ACPI mode with Windows. The freezes can happen at any time dur-ing the Setup Wizard, although they most frequently happen during the device-detection phase. If you suspect the BIOS is not working properly with Windows,download the latest version from the system vendor.
If you still have trouble or if no updated BIOS is available, try disabling ACPI duringSetup by pressing F5 at the beginning of the text-mode phase of Setup, right afterit prompts you to press F6 to install third-party storage drivers. If this does not solvethe setup problems, you do not have a problem with the ACPI support in the BIOS.(ACPI support can be added back only by reinstalling Windows, usually by per-forming a same-version upgrade.)
You can also manually enable or disable ACPI support after the file copy phase ofSetup completes, right before the computer restarts in the Windows Setup Wizard.(Sometimes you can do this after the system freezes during the Setup Wizard.) Toforce Windows to enable or disable ACPI support, follow these steps:
After the text-mode phase of Setup completes but before Windows restarts in theSetup Wizard, go to a command prompt and follow these steps:
1. Type attrib –r –s –h c:\txtsetup.sif at the command prompt.
2. Open the c:\Txtsetup.sif file by using the edit command or another text edi-tor, and search for “ACPIEnable=.”
3. To force ACPI support to be enabled, which sometimes fixes setup problems,change the ACPIEnable= value to 1.
4. To disable ACPI support, change the ACPIEnable= value to 0.
5. Save the file, and restart in the Windows Setup Wizard.
Again, if any steps you take reveal questionable hardware, replace the hardware beforeyou rely on the computer to store important data or provide critical functions to users.
Setup Stops During File CopyingIf Setup locks up while copying files, you might have a problem with Integrated DeviceElectronics (IDE) drive configuration. Try one of the following solutions.
Reboot the machine by using Ctrl+Alt+Del or Reset, and go into the system BIOS. Verifythat the IDE controllers are enabled and configured properly. Make sure that the BIOS

Chapter 5 Getting Started 101
detects any IDE hard disks or CD-ROMs properly. (You might have to restart the systemand watch the display to verify this because often the BIOS does not display drives insidethe BIOS.) After doing this, one or more of the following tasks might be useful:
■ Check the physical jumper settings on the drives to make sure they are properlyconfigured to have one master and a maximum of one slave per IDE channel.
■ If the CD-ROM drive is on the same channel as the hard disk, move it to the second-ary channel and configure it to be the master.
■ Try lowering the data transfer rate for the drives; for example, configure the drivesto use PIO mode 2 instead of Ultra DMA mode or Ultra 66 transfer mode.
■ Check to make sure that the drives are cabled correctly and that the cables are notfaulty.
■ Check the hardware settings to make sure the hard disk controller is not conflictingwith another device. Try removing all cards from the computer except for the dis-play card and SCSI adapter (if you are using a SCSI drive), and run Setup again. IfSetup succeeds, add the cards one by one after installation, and use the HardwareWizard in Windows 2000 to configure the devices and troubleshoot any hardwareconflicts you encounter.
Note Windows Server 2003 provides a variety of tools you can use to boot a system that does not want to start, including the Safe Mode and Last Known Good Boot options, as well as the Recovery Mode Console, which allows you command-line access to an NTFS or FAT drive that will not boot. (See Chapter 40 for more information.)
If none of this helps, try the recommendations in the previous section or consult theMicrosoft Knowledge Base.
Previous Operating System Will Not BootWhen you install Windows on a computer that’s already using an operating system andyou choose not to upgrade, Setup creates a dual boot so that you can select which oper-ating system you want to use at boot time.
If the computer never displays the Windows Loader menu that allows you to choose theprevious operating system, the problem is most likely one of two issues: either theBoot.ini file has a timeout set to 0 (and thus doesn’t display the Boot menu), or the MBRwas overwritten during Setup, preventing you from starting the previous operating sys-tem even if you have the proper entry in the Boot.ini file.
102 Part II Installation and Configuration
Changing the Default Operating System and Boot TimesTo change which operating system Windows boots by default, as well as to control howlong Windows displays a choice of operating systems at boot time, follow these steps:
1. Click Start, choose Control Panel, and then choose System.
2. Click the Advanced tab, and then click the Settings button in the Startup AndRecovery section.
3. Select the operating system you want to boot by default from the Default OperatingSystem list.
4. Select the Time To Display List Of Operating Systems check box, and specify thenumber of seconds you want the Boot menu displayed.
You can also do this by manually changing the timeout value in the Boot.ini file to a valuehigher than 0. To do this, click the Edit button in the System Startup section of the StartupAnd Recovery dialog box (described in step 4), or to edit the file from a commandprompt, type bootcfg /timeout N, where N is the number of seconds you want the Bootmenu displayed. (For more information about the Boot.ini file, see Chapter 40.)
Note You can force the Windows Boot menu to display at startup by holding down the spacebar after the BIOS displays the power-on self test (POST) screens. This displays the Hardware Profile/Configuration Recovery screen. Press F3 to dis-play the Windows Loader screen with no timeout value.
Restoring the MBR of the Previous Operating SystemIf the previous operating system still does not boot properly, you might need to re-createthe MBR for the operating system that you previously installed. This is risky business, somake sure you have the time to reinstall your operating system and restore a backup ifyou run into trouble.
Note If your previous operating system is Windows NT, Windows 2000, or Win-dows XP, see the startup troubleshooting section of Chapter 40.
To re-create the MBR for a version of Windows 95, Windows 98, or Windows Me, use thefollowing steps:
1. To restore a version of Windows 95, Windows 98, or Windows Me, boot your com-puter with a boot disk for the operating system you are unable to boot. (Verify thatthe disk contains the Sys.com file.)
2. Type A:\sys c: at the command prompt to transfer the system files from the floppydisk to the hard disk.

Chapter 5 Getting Started 103
3. Remove your floppy disk and restart your computer. Verify that the operating sys-tem you wanted to repair boots properly before performing the next step.
4. Boot using the Windows CD-ROM for your current version of Windows.
5. When Windows Setup launches, press Enter to begin, and then press R to displaythe Windows Recovery Console.
6. Choose the Windows installation to log on to and then type the administrator pass-word.
7. Type fixmbr to write a valid MBR for your system.
8. Type bootcfg /list to display which operating systems the Boot.ini file lists. If theBoot.ini does not list an operating system, type bootcfg /rebuild to add operatingsystems back to the list.
9. Restart your computer, and choose the appropriate operating system from the Win-dows Loader menu.
10. If the Windows Loader menu still is not available or your current version of Win-dows still does not boot, return to the Recovery Console (covered in steps 4through 6) and type fixboot c: (where c: is the system drive for your current versionof Windows). Restart your system, and boot it in the desired operating system.
SummaryDeploying Windows to clients and servers is an essential task on most networks. You cansave time by choosing an installation method that provides the best compromisebetween speed, control, and complexity. You can perform small deployments quicklyand easily using the Windows CD-ROM and an answer file you create using Setup Man-ager. For larger deployments, you can create a deployment environment that allows youto automate virtually the entire installation process by using distribution shares, RIS,ADS, SMS, or disk imaging.