Embed Size (px)
Citation preview

Microsoft Windows 7 -Illustrated
Unit PManaging Hardware

• Understand Windows hardware• Install a printer• View printer properties• Share a printer• Manage printers and print jobs
2Microsoft Windows 7 – Illustrated
Objectives
• Install hardware devices• View system hardware• Remove hardware devices• Change Windows Update driver
settings
3Microsoft Windows 7 – Illustrated
Objectives

Unit Introduction
• A hardware device is any physical device that you plug into and that is controlled by your computer such as a printer or digital camera, or an internal network or sound card
• Windows 7 makes it easy to install and manage your hardware, using wizards and plug and play support, which means that you plug the device in and Windows sets it to work with your existing hardware and system
• You can view hardware properties with Device Manager
• Windows 7 assists in removing hardware that is no longer needed
4Microsoft Windows 7 – Illustrated

Understanding Windows Hardware• Windows uses plug and play for hardware,
making it easy to install and uninstall devices• When you install a hardware device, Windows
installs related software, known as a driver, which allows the hardware to communicate with Windows and other software applications
• Plug and play matches up physical hardware with software device drivers and establishes necessary communication between them
• Devices you install on your computer will work properly with your computer because of plug and play
5Microsoft Windows 7 – Illustrated

Understanding Windows Hardware (cont.)• Windows automatically notifies all other devices
of the new device to eliminate conflicts and also manages the power requirements
• When working in another when you install or uninstall a device, plug and play lets you know that it is about to change your computer configuration and prompts you to save your work
• If Windows doesn’t recognize the new hardware device, the device might be an older hardware device, known as a legacy device, which is no longer compatible
6Microsoft Windows 7 – Illustrated
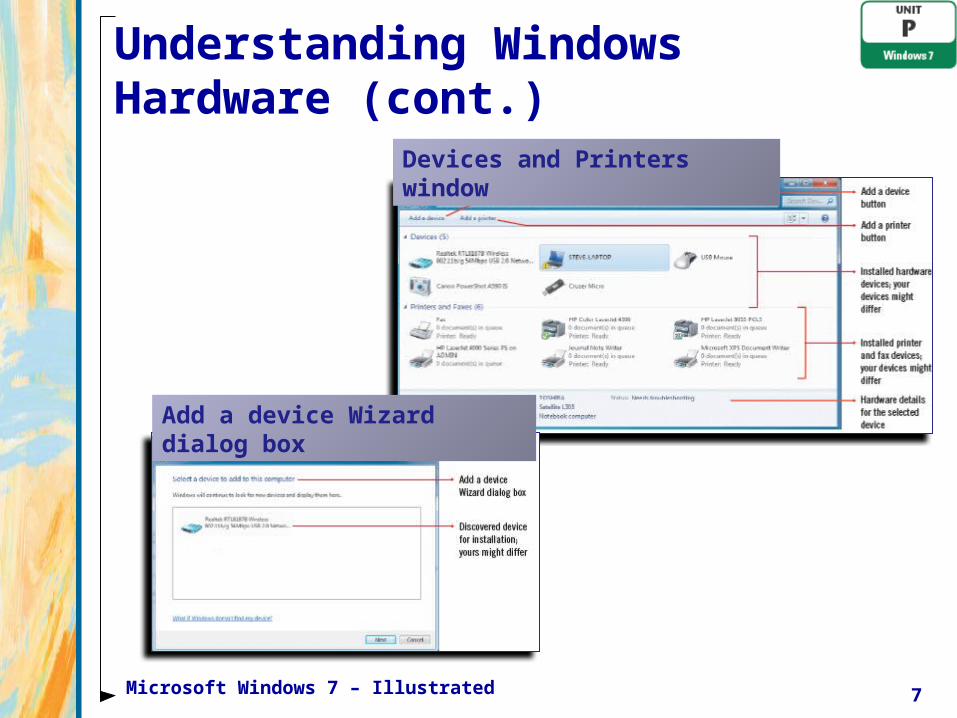
Understanding Windows Hardware (cont.)
7Microsoft Windows 7 – Illustrated
Devices and Printers window
Add a device Wizard dialog box

Understanding printers
• The two main printer types are:
• Ink-jet, which sprays ionized ink onto paper
• less expensive, but slower
• Laser, which uses a laser beam to produce an image on a drum, which is rolled through toner and transferred to paper through heat and pressure
• faster and higher-quality, but more expensive
8Microsoft Windows 7 – Illustrated

Understanding printers (cont.)
• Two main printer characteristics:
• resolution, which is the sharpness of the printed page
• indicated by the dpi (number of dots per inch)
• speed, which is measured by pages per minute (ppm)
• speed depends on the page’s contents – graphics take longer to print than text
9Microsoft Windows 7 – Illustrated

Installing a Printer• To install a printer, you do not need to turn off
your computer; attach the printer cable to the connector on your computer and plug in the printer power cord
• If you have a USB port, location where you connect the printer cable, Windows automatically detects the device, and installs it
• Otherwise, you may need to use the Add Printer Wizard which asks you a series of questions to install either a network or local printer• a local printer is directly connected to your computer• Network, wireless, or a Bluetooth printer is connected
to either a wired or wireless network to which you have access; Bluetooth is a wireless short-range radio connection
• Default printer is the one used most often
10Microsoft Windows 7 – Illustrated

Installing a Printer (cont.)
11Microsoft Windows 7 – Illustrated
Devices and Printers window
Add Printer Wizard
Devices and Printers with new printer
Understanding USB ports
• A printer port is called a parallel port, which sends more than one byte simultaneously
• A communications port is called a serial port, which sends information one byte at a time
• A USB port is new technology that will replace both port types• USB (Universal Serial Bus) ports are external hardware
interfaces that allow you to connect up to 127 peripheral devices such as mice or modems
• USBs support data transfers of 480 Mb per second
• in addition to plug and play, USBs support hot plugging, which is the ability to add and remove hardware while the computer is running and without running a wizard
12Microsoft Windows 7 – Illustrated

Viewing Printer Properties
• Once a printer is installed, it appears in the Devices and Printers window and is accessible in the Print dialog box • you can change settings for all documents you print
to the printer which is known as the default settings • use the Print dialog box to make changes only for that
document
• Viewing properties gives you information on personal preferences, network locations, installed fonts, and more
13Microsoft Windows 7 – Illustrated

Viewing Printer Properties (cont.)
• Spooling, also known as background printing, is the process of storing a temporary copy of the file on a hard disk and then sending it to the printer• this allows you to work with a file while it is awaiting
printing
• You can also view and change personal printer preferences, such as orientation, page order, pages per sheet, and more
14Microsoft Windows 7 – Illustrated

Viewing Printer Properties (cont.)
15Microsoft Windows 7 – Illustrated
Devices and Printers window
Printer with General tab displayed
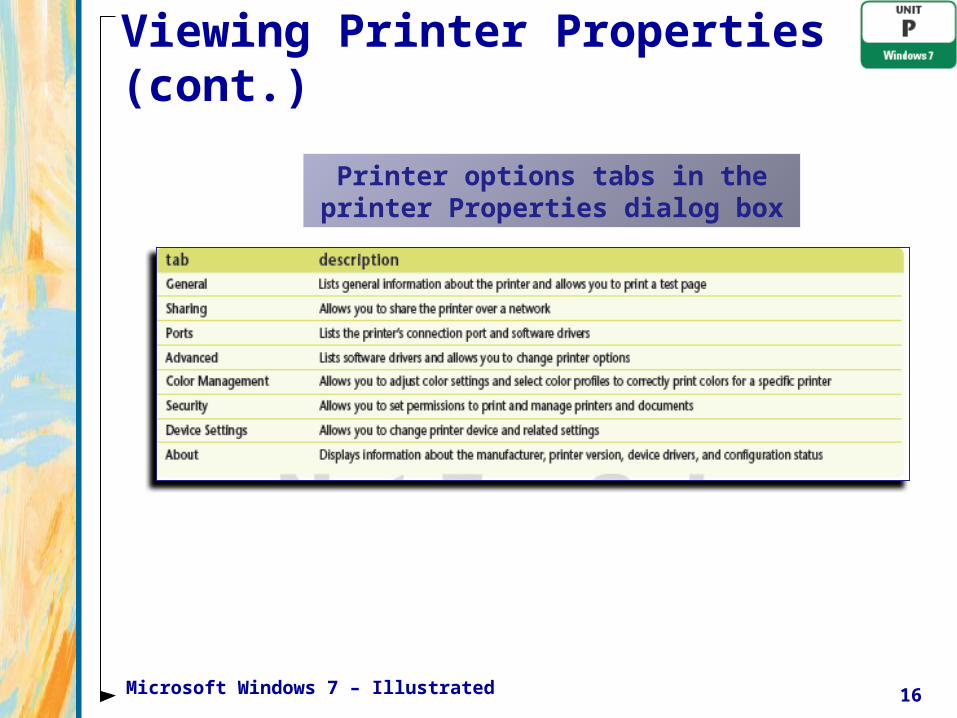
Viewing Printer Properties (cont.)
16Microsoft Windows 7 – Illustrated
Printer options tabs in the printer Properties dialog box

Sharing a Printer• If you have a printer connected to your computer
and your computer is connected to a network, you can share your printer, known as a shared printer, with other network users
• Before you can share a printer, you need to turn on printer sharing in the Network and Sharing Center window, which you can accomplish by using the Sharing tab in the printer Properties dialog box• a shared printer is indicated by an icon of two heads
attached to the printer icon in the Devices and Printers window
• For security purposes, if Windows Firewall is enabled (the default setting) on the computer with the shared printer, you need to select the File and Printer Sharing check box on the Exceptions tab in Windows Firewall before others can use
17Microsoft Windows 7 – Illustrated

Sharing a Printer (cont.)
18Microsoft Windows 7 – Illustrated
Printer with Sharing tab
Advanced sharing settings window
Printer sharing options

Managing Printers and Print Jobs
• You can check the status of a print job after sending it to the printer
• The print queue shows the list of files to be printed• You can use this window to cancel, pause, or
defer print jobs, or view printer properties• Deferred printing means that you can send print
jobs to the printer, but they won’t print until you manually turn off the pause printing feature
19Microsoft Windows 7 – Illustrated

Managing Printers and Print Jobs (cont.)
20Microsoft Windows 7 – Illustrated
Printing a file to a paused printer
Window with paused print jobs

Adding a separator page to print jobs
• When you work on a network where many users share a printer, adding a separator or banner page can separate print jobs• Banners can list the name, author, date, and time of a
print job
• An administrator’s permission is needed to add and set up a separator page
• The separator files provided by Windows might not work with some printers
21Microsoft Windows 7 – Illustrated

Installing Hardware Devices
• Before you install hardware, read the product documentation and installation guide provided by the manufacturer
• If the hardware comes with its own install CD or DVD, use it as it is recommended that you do not use the Add a device Wizard provided by Windows 7
• If the documentation instructs you to perform a typical plug-and-play installation, physically connect your hardware to your computer• in most cases, windows automatically detects your new
hardware device and installs its related device driver software
22Microsoft Windows 7 – Illustrated

Installing Hardware Devices (cont.)
• If Windows does not detect your new hardware device, you can start the Add a device Wizard in the Devices and Printers window and select the new hardware device
• the Wizard detects the hardware attached to your computer
• the Wizard asks a series of questions to help you set up the software for the new hardware device
23Microsoft Windows 7 – Illustrated

Installing Hardware Devices (cont.)
24Microsoft Windows 7 – Illustrated
Windows 7 detects and installs devices
Add a device Wizard

Creating and viewing an XPS document• If you have ever used Adobe Reader to view a
document or create a PDF document you can accomplish the same using Microsoft’s XPS (XML Paper Specification)
• With XPS you can share files with other even if your software programs are different
• You can set permissions and add digital signatures to protect a document from unauthorized viewing and printing
• You can create an XPS document by printing a file using the Microsoft XPS Document Writer printer
25Microsoft Windows 7 – Illustrated

Viewing System Hardware• It is important to make sure you are using the
latest software drivers with your hardware• if your drivers aren’t updated, your hardware devices
might not work to full capacity
• The Device Manager organizes all the hardware devices attached to your computer by hardware types, also known as hardware classes • if an exclamation point within a yellow triangle icon
appears next to a specific device, it indicates a conflict with another device
• to fix the conflict you can try to uninstall and reinstall the device or seek technical support from the device manufacturer
• using Device Manager you can determine the software driver versions, update the software driver with a newer version, or roll back to previous version
• after viewing driver versions, you can visit the manufacturer’s Web site or call them to determine the latest versions
26Microsoft Windows 7 – Illustrated

Viewing System Hardware (cont.)
27Microsoft Windows 7 – Illustrated
Device Manager window
Display Adapter Properties

Getting System Information
• If you have a system problem, you may need to give information about the error to a technician
• The System Information window in Windows 7 can quickly collect and display your system configuration data to provide to a support technician
28Microsoft Windows 7 – Illustrated
System Information window

Removing Hardware Devices
• If you no longer need a device or you want to upgrade to a newer device, you need to remove the hardware device driver and related software before removing the physical hardware
• With Device Manager, you can quickly and easily remove any related device drivers
• if you have a USB device, you can remove it by simply unplugging it when the device is not actively in use
• You can also use the windows specific to a hardware device to remove that device
29Microsoft Windows 7 – Illustrated

Removing Hardware Devices (cont.)
30Microsoft Windows 7 – Illustrated
Device Manager window
Devices and Printers

Changing Windows Update Driver Settings
• When you connect a new device to your computer, you can specify how you want Windows Update to find a software driver for the device
• The default is to automatically check for a driver on your computer or online from the Microsoft Windows Update Web site
• However, if you want more control over the process, you can change the system properties to have Windows ask you each time you connect a new device before to check for drivers or never check for drivers
31Microsoft Windows 7 – Illustrated

Changing Windows Update Driver Settings (cont.)
32Microsoft Windows 7 – Illustrated
Systems Properties
Device Installation settings dialog box

Summary
• Windows 7 makes it easy to install and manage your hardware
• Windows uses plug and play for hardware, making it easy to install and uninstall devices
• Windows automatically notifies all other devices of the new device to eliminate conflicts
• USBs support both plug-and-play and hot plugging, which is the ability to add and remove hardware while the computer is running and without running a wizard
• Once a printer is installed, it appears in the Devices and Printers window and is accessible
33Microsoft Windows 7 – Illustrated

Summary
• You can view and change personal printer preferences
• A separator page can be useful if a printer is connected on a network
• It is important to make sure you are using the latest software drivers with your hardware
• If Windows does not detect your new hardware device, you can start the Add a device Wizard in the Devices and Printers window and select the new hardware device
34Microsoft Windows 7 – Illustrated