Embed Size (px)
Citation preview

The Development Team at B.E. Publishing and Emilie Mendillo
Hands-on Lessons and Assessments
Publisher2013
MicrosoftLevel 1

This preview contains only some of the content of the actual textbook.
This sample cannot be printed, copied or extracted in any manner. Use of this preview version in the classroom is strictly prohibited. Doing so is a violation of Federal Copyright Law.
You may order a free sample copy or purchase this textbook from B.E. Publishing at www.bepublishing.com or by calling Customer Service at 888-781-6921.
Thank you for previewing our resources.
B.E. Publishing

www.bepublishing.com©2015 B.E. Publishing, Inc. All rights reserved.
Student TextbookLevel 1
The Development Team at B.E. Publishing and Emilie Mendillo
Hands-on Lessons and Assessments
Microsoft
Publisher 2013
Sample

B
Learn-by-Doing: Microsoft Publisher 2013 Student TextbookISBN: 978-1-626890-54-1Copyright ©2015 by B.E. Publishing
All Rights Reserved. No part of this work covered by copyright hereon may be reproduced or used in any form or by any means—including but not limited to graphic, electronic, or mechanical, including photocop-ying, recording, taping, Web distribution, or information storage and retrieval systems—without the expressed written permission of the publisher.
AuthorThe Development Team at B.E. Publishing and Emilie Mendillo
EditorKathleen Hicks
ReviewersDiane SilviaLinda Viveiros
Graphic DesignFernando BotelhoMark Drake
PermissionsTo use materials from this text, please contact us:
B.E. Publishing, Inc.P.O. Box 8558Warwick, RI 02888U.S.A.
Tel: 888.781.6921Fax: 401.781.7608E-mail: [email protected]
All references made to specific software applications and/or companies used within this book are registered trademarks of their respective companies.
Printed in the U.S.A.
PUBLISHED BY
Student TextbookLevel 1
Hands-on Lessons and Assessments
Microsoft
Publisher 2013
Learn-by-Doing: Microsoft Publisher 2013
Sample

iTable of Contents
Table of ContentsCurriculum Guide ............................................................................. ii
Introduction ....................................................................................... v
Standards .....................................................................................................v
How to Use This Book ............................................................................vi
Assessments ............................................................................................ vii
Unit 1: Publication Basics ...................................................... 1
1.1 Getting StartedNavigating Publisher .........................................................................2
1.2 Spirit Week Working with Text ..............................................................................6
1.3 Spirit Week (Part 2)Formatting Text ...................................................................................9
1.4 Cyber Tips PosterAligning Text ......................................................................................13
1.5 Bulletin Board AnnouncementWorking with Shapes ......................................................................17
1.6 Community Service FlyerWorking with Pictures ....................................................................22
1.7 CupCakery MenuWorking with Tables ........................................................................27
1.8 Talent Show AnnouncementMaking Working in Publisher Easier ..........................................32
Unit 2 : Enhancing Objects and Text ..................................37
2.1 Cyberbullying PosterEnhancing Shapes ...........................................................................38
2.2 T-Shirt Order FormAligning and Grouping Objects ..................................................43
2.3 Prom FlyerUsing Shape Effects .........................................................................48
2.4 Restaurant ReviewsEnhancing Pictures ..........................................................................53
2.5 Earth Day InsertUsing Wrap Text and Creating Columns ..................................59
2.6 Midnight Madness Floor PlanFormatting Text and Images ........................................................64
Unit 3: Working with Master Pages ...................................71
3.1 Personalized NotepadResizing and Duplicating Pages .................................................72
3.2 FBLA Tent CardsWorking with Master Pages ..........................................................77
3.3 Summer ScrapbookWorking with Headers and Footers ...........................................81
3.4 Progress ReportsReinforcement Lesson ....................................................................88
Unit 4 : Designing Professional Publications ...................93
4.1 Design Tips PosterCreating a Poster ..............................................................................94
4.2 Bumper StickerCreating a Bumper Sticker ............................................................96
4.3 Vacation PostcardCreating a Postcard .........................................................................98
4.4 Doorknob HangerCreating a Doorknob Hanger ....................................................100
4.5 School BrochureCreating a Three-Panel Brochure..............................................102
4.6 Flyer MakeoverRedesigning a Flyer .......................................................................105
Unit 5: Working with Templates .......................................109
5.1 Business CardCreating a Business Card .............................................................110
5.2 Address LabelsCreating Photo Address Labels .................................................112
5.3 Thank You CardCreating a Greeting Card .............................................................114
5.4 Email NewsletterCreating an Email Newsletter ....................................................116
Sample

ii
Curriculum GuideLesson New Skills
Unit 1: Publication Basics
1.1 Getting Started Navigating Publisher Opening a Blank Publication Identifying Ribbons, Tabs, and Groups Understanding Backstage View Using the Zoom Adjustment Tool Closing Publisher
1.2 Spirit Week Working with Text Creating and Saving a Publication Inserting, Resizing, and Moving Text Boxes
1.3 Spirit Week (Part 2) Formatting Text Opening an Existing/Recent Publication Using Save As Changing Font Increasing/Decreasing Font Size Changing Font Color Applying Bold, Italic, and Underline Changing Case Changing Character Spacing Printing a Publication
1.4 Cyber Tips Poster Aligning Text Creating Numbered and Bulleted Lists Changing Line Spacing Changing Text Alignment
1.5 Bulletin Board Announcement
Working with Shapes Inserting, Resizing, and Moving Shapes Using Copy and Paste
1.6 Community Service Flyer Working with Pictures Inserting, Resizing, and Moving Pictures Creating a Blank 11 x 8.5” Publication
1.7 CupCakery Menu Working with Tables Inserting a Table Adding Borders Changing Line Color and Line Weight Changing Cell Fill
1.8 Talent Show Announcement Making Working in Publisher Easier Customizing the Quick Access Toolbar Using Undo and Redo Using Find and Replace Using Print Preview
Unit 1 Assessments Performance and Written Assessments are located on the Instructor’s Resource CD.
Unit 2: Enhancing Objects and Text
2.1 Cyberbullying Poster Enhancing Shapes Changing Shape Fill Changing Shape Outline Adding Text to a Shape Changing Shape Size Aligning Text in a Shape Rotating a Shape
2.2 T-Shirt Order Form Aligning and Grouping Objects Changing Image Size Grouping Objects Aligning Objects
2.3 Prom Flyer Using Shape Effects Using Glow Using WordArt Arranging Objects
2.4 Restaurant Reviews Enhancing Pictures Using Picture Borders, Effects, and Styles Using Horizontal and Vertical Guides Inserting Symbols Inserting Date & Time
2.5 Earth Day Insert Using Wrap Text and Creating Columns
Using Wrap Text Inserting Columns
2.6 Midnight Madness Floor Plan Formatting Text and Images Cropping an Image Rotating and Flipping an Image Setting Transparent Color Using Text Fit
Unit 2 Assessments Performance and Written Assessments are located on the Instructor’s Resource CD.
Learn-by-Doing: Microsoft Publisher 2013
Sample

iiiCurriculum Guide
Curriculum GuideLesson New Skills
Unit 3: Working with Master Pages
3.1 Personalized Notepad Resizing and Duplicating Pages Changing Page Margins Changing Page Size Duplicating Pages Changing Page Background Recoloring an Image Adding Crop Marks
3.2 FBLA Tent Cards Working with Master Pages Adding Master Pages Adding Elements to a Master Page Editing a Master Page Deleting a Page Inserting a Page
3.3 Summer Scrapbook Working with Headers and Footers Working with Headers and Footers Inserting Page Numbers Inserting a Picture as a Page Background Inserting a Texture as a Page Background
3.4 Progress Reports Reinforcement Lesson There are no new skills being introduced in this lesson.
Unit 3 Assessments Performance and Written Assessments are located on the Instructor’s Resource CD.
Unit 4: Designing Professional Publications
4.1 Design Tips Poster Creating a Poster Creating a Poster
4.2 Bumper Sticker Creating a Bumper Sticker Creating a Bumper Sticker
4.3 Vacation Postcard Creating a Postcard Creating a Postcard
4.4 Doorknob Hanger Creating a Doorknob Hanger Creating a Doorknob Hanger
4.5 School Brochure Creating a Three-Panel Brochure Creating a Three-Panel Brochure Setting Column Guides
4.6 Flyer Makeover Redesigning a Flyer Redesigning a Flyer
Unit 4 Assessment Performance Assessment is located on the Instructor’s Resource CD.
Unit 5: Working with Templates
5.1 Business Card Creating a Business Card Creating a Business Card
5.2 Address Labels Creating Photo Address Labels Creating Photo Address Labels
5.3 Thank You Card Creating a Greeting Card Creating a Greeting Card
5.4 Email Newsletter Creating an Email Newsletter Creating an Email Newsletter
Unit 5 Assessment Performance Assessment is located on the Instructor’s Resource CD.Sample

Sample

vIntroduction
Introduction
IntroductionLearn-by-Doing Series for Microsoft Office 2013 (Level 1)
As the name implies, the Learn-by-Doing Series gets students learning Microsoft Office 2013 by using its applications to do what is needed to communicate and share information in the real world of work and life. Designed for today’s interactive, visual learner, this series consists of graphical hands-on lessons that get students instantly engaged in applying Microsoft Office 2013 skills.
Learn-by-Doing: Microsoft Publisher 2013This book uses school and workplace themes to introduce students to the basics of Microsoft Publisher 2013. The powerful features and interface of Microsoft Publisher 2013 are clearly explained in step-by-step, illustrated instructions.
Who should use this book?Learn-by-Doing: Microsoft Publisher 2013 is designed to be used by students enrolled in a computer applications course that includes digital publishing in its curriculum. Students should have a basic familiarity with working on a computer.
The lessons in this book build upon one another. Skills and features are presented in an order ranging from basic to intermediate. Therefore, lessons should be completed in the order presented.
Requirements•• Microsoft Publisher 2013 for Windows
•• Learn-by-Doing: Microsoft Publisher 2013 Student Textbook
•• Learn-by-Doing: Microsoft Publisher 2013 Instructor’s Resource CD, which includes:
•• Lesson Solutions
•• Unit Performance Assessments and Solutions
•• Unit Written Assessments and Solutions (Units 1-3 only)
StandardsSince National Educational Standards are updated over time, the latest standards with which this text is aligned can be accessed on our website at www.bepublishing.com
At press time, the standards aligned with this book are:•• Common Core Standards for Reading and Literacy•• Common Career Technical Standards•• International Society for Technology in Education (ISTE)
Visit www.bepublishing.com for details.
Organizing and Saving Your Lesson Files
It is important that lesson files are named properly and saved in the correct folder on your hard drive or network.
You will create a folder named My Publisher Projects in which to save your files.
You will be instructed in each lesson on what to name the lesson files.
Using Microsoft Publisher 2013 for Windows
Learn-by-Doing: Microsoft Publisher 2013 is intended for use with Windows-based systems since Microsoft Office 2013 applications are not designed for Macintosh-based systems.
Sample

vi
37
Unit 2Enhancing Objects and Text
2.1 Cyberbullying PosterEnhancing Shapes
�� Changing Shape Fill�� Changing Shape Outline�� Adding Text to a Shape�� Changing Shape Size�� Aligning Text in a Shape�� Rotating a Shape
2.2 T-Shirt Order Form Aligning and Grouping Objects
�� Changing Image Size�� Grouping Objects�� Aligning Objects
2.3 Prom FlyerUsing Shape Effects
�� Using Glow�� Using WordArt�� Arranging Objects
2.4 Restaurant ReviewsEnhancing Pictures
�� Using Picture Borders, Effects, and Styles�� Using Horizontal and Vertical Guides�� Inserting Symbols�� Inserting Date & Time
2.5 Earth Day InsertUsing Wrap Text and Creating Columns
�� Using Wrap Text�� Inserting Columns
2.6 Midnight Madness Floor PlanFormatting Text and Images
�� Cropping an Image�� Rotating and Flipping an Image�� Setting Transparent Color �� Using Text Fit
Unit 2 Assessments Performance and Written Assessments are located on the Instructor’s Resource CD.
53Unit 2: Enhancing Objects and Text
Tools & Terms You’ll UseReview the following tools and terms that you will practice in this lesson, as you may be required to take a written assessment test after completing this unit.
Horizontal and Verti cal Guides: Use layout guides to help you align objects in your publicati on.
Symbols: Use this drop-down menu to insert symbols onto your publicati on.
Date and Time: Use this icon to quickly add the date and ti me to your publicati on.
Picture Border: Use this drop-down menu to pick the color, width, and line style for the outline of your picture.
Picture Styles: Use this icon to add a style to the background of your picture.
Picture Eff ects: Use this drop-down menu to apply a visual eff ect to a picture such as a shadow, glow, refl ecti on, or 3D rotati on.
Lesson OverviewThe Cranston Chamber of Commerce features a section in their monthly newsletter called “Dining Out” where they rate and review local eateries. As an intern for the Chamber of Commerce, one of your duties is to prepare this page for the newsletter.
In this lesson, you will work with guides and enhance pictures to create a page for the monthly newsletter.
Lesson 2.4
New Skills Using Picture Borders, E� ects, and Styles
Using Horizontal and Vertical Guides
Inserting Symbols
Inserting Date & Time
Unit 2: Enhancing Objects and Text
Restaurant ReviewsEnhancing Pictures
54
1. Using Microsoft Publisher 2013, create a new Blank 8.5 x 11” publicati on.
2. Save the fi le as 2.4 Restaurant Reviews in your My Publisher Projects folder.
3. In this lesson, you will be working with guides. Before you begin, your Ruler and Guides must be visible. If they are not, do the following:
a. From the VIEW tab, Show group, click on the Rulers box and the Guides box (shown above) to make your rulers and guides visible
4. Move your cursor randomly around your page. Noti ce how your verti cal and horizontal positi on is indicated on each ruler by a black line. These lines will be used to positi on guides accurately on your page.
5. Hover your cursor over the Horizontal Ruler unti l it turns into the arrow shown.
6. Click and drag a green horizontal guide onto your page, and place it at 2.75” as shown in 2.4 Source Doc. A.
7. Repeat this process and place horizontal guides at 3”, 5.25”, 5.5”, 7.75”, and 8” as shown in 2.4 Source Doc. A.
8. Hover your cursor over the Verti cal Ruler unti l it turns into the arrow shown.
9. Click and drag two green verti cal guides onto your page, and place them at 3.25” and 3.5” as shown in 2.4 Source Doc. A.
10. Using diff erent text boxes, key the text as shown in 2.4 Source Doc. A.
Hint: Be sure that your text boxes are placed between the margins and guides as shown in 2.4 Source Doc. A.
11. Center align the text in text box 1, change the font to Broadway, and the font size to 64.
12. Center align the text in text box 2, and change the font size to 24.
13. Justi fy the text in text boxes 3, 4, and 5. Change the font size of the restaurant names to 16, and apply bold.
14. Change the font size of the body text to 11.
15. Above the horizontal guide at 2.75”, insert a text box, and key the text [Cranston Chamber of Commerce]. Place the text box as shown in 2.4 Source Doc. B.
4.
6.
5.
8.
Learn-by-Doing: Microsoft Publisher 2013
Instructions
Enhancing PicturesLesson 2.4
3a.
How to Use This BookThis book is divided into five units, each containing individual lessons pertaining to the different ribbons in Microsoft Publisher 2013. Lessons in this book have been organized into an easy-to-read, self-guided, visual format where you will practice new skills and learn by doing.
Review this section carefully to become familiar with all of the parts of the lessons and the steps necessary to complete each lesson.
Step 1: Review the Lesson Introduction•• Read the Lesson Overview and note the New Skills that you will practice
in the lesson.
•• Review the Tools & Terms needed to complete the lesson successfully. Familiarize yourself with these terms, icons, and descriptions, as you may be required to take a written assessment test upon completion of each unit.
Step 2: Follow Step-by-Step Instructions•• Follow the numbered instructions to complete each step in the lesson.
•• References in the instructions that correlate to the tools on the Ribbon are indicated by a red # icon. It is important that you refer to this icon as you follow the instructions.
•• The primary Microsoft Publisher Ribbon being presented in each lesson is displayed at the top of the Instructions page.
54
1. Using Microsoft Publisher 2013, create a new Blank 8.5 x 11” publicati on.
2. Save the fi le as 2.4 Restaurant Reviews in your My Publisher Projects folder.
3. In this lesson, you will be working with guides. Before you begin, your Ruler and Guides must be visible. If they are not, do the following:
a. From the VIEW tab, Show group, click on the Rulers box and the Guides box (shown above) to make your rulers and guides visible
4. Move your cursor randomly around your page. Noti ce how your verti cal and horizontal positi on is indicated on each ruler by a black line. These lines will be used to positi on guides accurately on your page.
5. Hover your cursor over the Horizontal Ruler unti l it turns into the arrow shown.
6. Click and drag a green horizontal guide onto your page, and place it at 2.75” as shown in 2.4 Source Doc. A.
7. Repeat this process and place horizontal guides at 3”, 5.25”, 5.5”, 7.75”, and 8” as shown in 2.4 Source Doc. A.
8. Hover your cursor over the Verti cal Ruler unti l it turns into the arrow shown.
9. Click and drag two green verti cal guides onto your page, and place them at 3.25” and 3.5” as shown in 2.4 Source Doc. A.
10. Using diff erent text boxes, key the text as shown in 2.4 Source Doc. A.
Hint: Be sure that your text boxes are placed between the margins and guides as shown in 2.4 Source Doc. A.
11. Center align the text in text box 1, change the font to Broadway, and the font size to 64.
12. Center align the text in text box 2, and change the font size to 24.
13. Justi fy the text in text boxes 3, 4, and 5. Change the font size of the restaurant names to 16, and apply bold.
14. Change the font size of the body text to 11.
15. Above the horizontal guide at 2.75”, insert a text box, and key the text [Cranston Chamber of Commerce]. Place the text box as shown in 2.4 Source Doc. B.
4.
6.
5.
8.
Learn-by-Doing: Microsoft Publisher 2013
Instructions
Enhancing PicturesLesson 2.4
3a.
Unit Cover Page
Lesson Introduction Page
Instructions Page
Note: Once a new skill has been presented, visual step-by-step instructions for that skill are no longer provided in subsequent lessons.
Introduction
Learn-by-Doing: Microsoft Publisher 2013
Sample

viiIntroduction
57
Dining Out
Blue Moon
If quality Japanese cuisine is what you’re looking for, be sure to make a trip to Blue Moon Japanese Restaurant in Woodland Park. Here you will nd pleas-ant waitstaff serving up excep�onal cuisine in an upscale se�ng.
The interior is extravagantly decorated, and the menu is quite lengthy. Sea-food, chicken, vegetable, beef, and sushi op�ons are offered and are all avail-able without MSG. The prices are a bit higher than expected; however, the regulars say you'll be glad you spent the money.
The Leaning Tower of Pizza
The Leaning Tower of Pizza is a quaint pub style restaurant located at 2635 Park Street. They are known for their bo�om-toasted, thin-crust pizza topped with quality fresh mozzarella, crushed tomatoes, and basil. If you add a couple of classic toppings to that, you can't go wrong.
This upbeat eatery has taken the staple food of Queens, NY, and made it a culinary treat that's hard to beat. You will not be disappointed by a pizza lunch or dinner. The price is right, the service is dependable, and the taste will be something you will soon return for.
Sandwich Sensa�ons
This small shop has been in the area for over 30 years, which proves that Sandwich Sensa�ons lives up to its name. This shop makes excellent sand-wiches that are hard to nish because they are huge! They are known for their special garlic and herb sauce included on most of their sandwiches that makes any plain sandwich into an incredible delight. We recommend the tur-key and Swiss with the Apple Salad!
The only downfall to this spot is the long line that develops each weekday between the hours of 11am and 1pm. Unfortunately, they do not take call-ahead orders. If you go, be prepared to wait, but if you have the �me, you will nd it is worth it.
Your Local Restaurant Guide
2.4 Source Doc. A
1
2
3
4
5
Unit 2: Enhancing Objects and Text
Enhancing Pictures Lesson 2.4
58
Dining Out
© Cranston Chamber of Commerce
Blue Moon If quality Japanese cuisine is what you’re looking for, be sure to make a trip to Blue Moon Japanese Restaurant in Woodland Park. Here you will nd pleasant waitstaff serving up excep�onal cuisine in an upscale se�ng.
The interior is extravagantly decorated, and the menu is quite lengthy. Seafood, chicken, vegetable, beef, and sushi op�ons are offered and are all available without MSG. The prices are a bit higher than ex-pected, however; the regulars say you'll be glad you spent the money.
The Leaning Tower of Pizza The Leaning Tower of Pizza is a quaint pub style restaurant located at 2635 Park Street. They are known for their bo�om-toasted, thin-crust pizza topped with quality fresh mozzarella, crushed tomatoes, and bas-il. If you add a couple of classic toppings to that, you can't go wrong.
This upbeat eatery has taken the staple food of Queens, NY, and made it a culinary treat that's hard to beat. You will not be disappointed by a pizza lunch or dinner. The price is right, the service is dependable, and the taste will be something you will soon return for.
Sandwich Sensa�ons This small shop has been in the area for over 30 years, which proves that Sandwich Sensa�ons lives up to its name. This shop makes excel-lent sandwiches that are hard to nish because they are huge! They are known for their special garlic and herb sauce included on most of their sandwiches that makes any plain sandwich into an incredible de-light. We recommend the turkey and Swiss with the Apple Salad!
The only downfall to this spot is the long line that develops each week-day between the hours of 11am and 1pm. Unfortunately, they do not take call-ahead orders. If you go, be prepared to wait, but if you have the �me, you will nd it is worth it.
Your Local Restaurant Guide February 17, 20XX
2.4 Source Doc. B
Learn-by-Doing: Microsoft Publisher 2013
Enhancing PicturesLesson 2.4
Learn‐by‐Doing: Microsoft Publisher 2013 Page 1 of 1 ©2014 B.E. Publishing, Inc. All rights reserved.
Unit 2: Performance Assessment Covers Lessons 2.1 – 2.6
Read the Overview In an effort to promote cyber literacy in your school, you’ve been given the task of creating an insert to be placed in the school newspaper. The topic you’ve been assigned is focused on social media and its associated risks.
In this assessment, you will use some of the skills you learned in Unit 2 to design your newspaper insert.
Instructions 1. Using Microsoft Publisher 2013, create a new Blank 8.5 x 11” publication.
2. Save the file as Unit 2 Performance Assessment in your My Publisher Projects folder.
3. Insert two horizontal guides at the following: 1.5” and 8”.
4. Insert two vertical guides at the following: 1.75” and 2”.
5. Using different text boxes, key the text and place each text box in the approximate position shown in Unit 2 Performance Assessment Source Doc.
6. Make the following formatting changes:
a. Center align the text in text box 1, change the font to Eras Bold ITC, and the font size to 36
b. Justify the text in text box 2 and change the font size to 11
c. In text box 2, change the number of columns to 2 and the column spacing to .25”
d. In text box 3, change the font size to 22, and change the font of the text [Risks of Social Media] to Eras Bold ITC
7. Insert a 1.25” high by 10” wide rectangle and key the text [Staying Connected].
8. Change the fill color and shape outline of the rectangle to red.
9. Align center and apply all caps to the text [Staying Connected].
10. Change the font color of the text [Staying Connected] to white and the font size to 58.
11. Rotate the rectangle left 90 degrees and align it with the top left corner of your margin.
12. Insert an image of a cell phone and place it in the center of text box 2.
13. Resize the image to 3.5” high by 2” wide, and crop the image if necessary.
Hint: Be sure that all of your text is visible and does not fall below the 8” horizontal guide.
14. To the right of text box 3, insert an image that best illustrates the bulleted list. Format and enhance your image using a Picture style, effect, or border. Size and position your image as you see fit.
15. Proofread your publication for accuracy and format, then resave the file.
16. Preview your publication and print a copy if required.
Step 3: Create Publication as Instructed•• Follow the instructions and enter the content in each lesson.
•• When provided, use the finished formatted Source Document as a visual reference to check your work.
Step 4: Complete Unit Performance and Written AssessmentsYour instructor may require you to:
•• Complete a hands-on Unit Performance Assessment which will measure your ability to demonstrate the skills in each unit.
•• Complete a Unit Written Assessment (Units 1-3 only) which will measure your comprehension of the tools, terms, and features presented in each unit.
Note: Performance and Written Assessments are provided on the Instructor’s Resource CD.
Student Name
Learn‐by‐Doing: Microsoft Publisher 2013 Page 1 of 1 ©2015 B.E. Publishing, Inc. All rights reserved.
Unit 2: Written Assessment Covers Lessons 2.1 – 2.6
Matching: Write the letter of the correct match in the space below.
______ 1. Use this icon to add artistic flair to text.
______ 2. This icon can be used to fill a selected shape with a color, gradient, or picture.
______ 3. Use this handle to rotate a shape to a desired orientation.
______ 4. Use these fields to change the size of a shape using exact dimensions.
Multiple Choice: Choose the answer that best fits each statement below.
______ 5. Use these to create a set of layout grids that will help you align objects in your publication.
A. Picture Effects B. Wrap Text C. Guides D. Columns
______ 6. Effects that can be added to a picture include the following except:
A. Align B. Shadow C. Glow D. 3‐D Rotation
______ 7. Use this icon to make several objects become one object.
A. Guides B. Align C. Group D. None of the Above
True/False: Answer True or False for each statement below.
______ 8. The tools that allow you to bring objects in front of or behind other objects at different levels are called vertical guides.
______ 9. The column drop‐down menu is capable of splitting your text into 2 columns only.
______ 10. The rotate tool can be used to rotate a shape around its own center.
A.
B.
C.
D.
E.
D.
Source Documents
Written Assessment
Performance Assessment
Introduction
Sample

Sample

1
1.1 Getting StartedNavigating Publisher
•� Opening a Blank Publication•� Identifying Ribbons, Tabs, and Groups•� Understanding Backstage View•� Using the Zoom Adjustment Tool•� Closing Publisher
1.2 Spirit Week Working with Text
•� Creating and Saving a Publication•� Inserting, Resizing, and Moving Text Boxes
1.3 Spirit Week (Part 2) Formatting Text
•� Opening an Existing/Recent Publication•� Using Save As•� Changing Font•� Increasing/Decreasing Font Size•� Changing Font Color•� Applying Bold, Italic, and Underline•� Changing Case•� Changing Character Spacing•� Printing a Publication
1.4 Cyber Tips PosterAligning Text
•� Creating Numbered and Bulleted Lists•� Changing Line Spacing•� Changing Text Alignment
1.5 Bulletin Board AnnouncementWorking with Shapes
•� Inserting, Resizing, and Moving Shapes•� Using Copy and Paste
1.6 Community Service Flyer Working with Pictures
•� Inserting, Resizing, and Moving Pictures•� Creating a Blank 11 x 8.5” Publication
1.7 CupCakery Menu Working with Tables
•� Inserting a Table•� Adding Borders•� Changing Line Color and Line Weight•� Changing Cell Fill
1.8 Talent Show Announcement Making Working in Publisher Easier
•� Customizing the Quick Access Toolbar•� Using Undo and Redo•� Using Find and Replace•� Using Print Preview
Unit 1 Assessments Performance and Written Assessments are located on the Instructor’s Resource CD.
Unit 1Publication Basics
Sample

2
Lesson 1.1
Start ScreenWhen Microsoft Publisher opens, the first thing you see is the Start Screen. From the Start Screen you can open existing publications from a list of recent files or create a new file using a blank publication or new publication template. You also can look for more templates online using the Start Screen search tool.
Launching Publisher & Working with Files
Lesson OverviewMicrosoft Publisher is one of the most commonly used desktop publishing applications. It enables you to create professional-looking publications quickly and easily, such as newsletters, postcards, flyers, brochures, business cards, and more. Publisher has tools that allow you to format and enhance text, add and edit shapes and graphics, and define page layout and design.
In this lesson, you will become familiar with the Publisher application interface. This is the only lesson that you will not be required to save. However, you may be responsible for the material presented in this lesson on the Unit 1 Written Assessment.
Unit 1: Publication Basics
Getting StartedNavigating Publisher
Backstage ViewLocated by clicking the File tab, the Backstage View is the central place for managing your publications. Actions such as saving, printing, or opening a previously saved file can also be done here. Different options appear depending on your selection. For example, when you select Open, your computer’s file folders appear on screen.
The Publisher program icon launches Microsoft Publisher 2013 from the Windows Start Menu or Start Screen.
New Skills•� Opening a Blank Publication
•� Identifying Ribbons, Tabs, and Groups
•� Understanding Backstage View
•� Using the Zoom Adjustment Tool
•� Closing Publisher
Clicking on the back arrow returns you to the open publication.
Learn-by-Doing: Microsoft Publisher 2013
Sample

3Unit 1: Publication Basics
Lesson 1.1
Application WindowThe Publisher application window displays the working area of your publication and provides access to the tools needed to enter, edit, and format text and other content.
Navigating Publisher
D
G
Application Window Key
A Quick Access Toolbar Commonly used commands at the top
of the application window
B Ribbon Groups of related tools organized
within a set of tabs
C Program Window Controls Allow you to move, resize, and close
the application window
D Page The space where text, images, and
content are entered and positioned for on-screen viewing or printing
E Scratch Area An area to work or place content that
is yet to be added to your page
F Page Navigation Pane Displays page thumbnails and allows
you to add, move, or delete pages as well as move from page to page
G View Controls Adjust zooming in and out of a page
as well as selecting page view options
Ribbon PartsThe Publisher ribbon user interface keeps related tools organized and easily accessible.
Tools are organized within tabs which contain groups of related features and commands. Graphical icons or menu items control the editing and formatting of a Publisher publication. Some tools or groups have additional options accessible from a drop-down menu or dialog box launcher.
ED
A
A CB
B
C
Ribbon Parts Key
A Tab Contains related groups of different
tools and commands to perform the most common tasks
B Group Contains related features and tools
organized within a ribbon’s tab
C Drop-down Menu Allows you to choose a command
from a list of options
D Icon An interactive tool that activates its
feature when clicked
E Dialog Box Launcher Opens a small window with
information and options about a particular tool or group
Quick Access Toolbar Ribbon
Page
Program Window Controls
View Controls
Tab
Group Icon Dialog Box Launcher
Drop-down Menu
F Page Navigation Pane
E Scratch Area
Sample

4
Lesson 1.1
PageThe Publisher page is where text, images, and other content are entered, edited, and formatted. Pages have margins where content is aligned.
Page Key
A Horizontal Ruler Helps determine the position of
content and margins from left to right on a page
B Page Margins Blank space that is set around the
edges of the page
C Page The space where text, images and
content are entered and positioned for on-screen viewing or printing
D Vertical Ruler Helps determine the position of
content and margins from top to bottom on a page
D
A
C
View ControlsThe controls at the bottom right of the window adjust zoom and present different page view options.
View Controls Key
A Page View Options Allow you to select single-page or
two-page spread options
B Zoom Adjustment Adjusts zooming in and out of a
page
C Whole Page View Allows you to view the entire page
B
Navigating Publisher
Horizontal Ruler
Vertical Ruler
Page
A
Zoom Adjustment
Page View Options
B Page Margins
C Whole Page View
Learn-by-Doing: Microsoft Publisher 2013
Sample

5Unit 1: Publication Basics
1. Locate the Publisher program icon and launch Microsoft Publisher 2013.
2. From the Start screen, select Blank 8.5 x 11”.
3. Go to the Backstage View of Microsoft Publisher by clicking on the File tab. Notice the saving and printing options available.
4. Now, click on the Arrow to return to your open publication.
5. To begin placing content on your page, simply type your name. You should notice that a text box appears as you key the first letter.
Note: In order to continue with the following instructions, this text box must first be selected.
6. Practice getting to know the Ribbons and their parts by clicking some of the Tabs such as INSERT, PAGE DESIGN, etc. (shown below).
7. While exploring the ribbons, notice the different tool options by clicking on a few of the Dialog Box Launchers.
8. Click on a few of the Drop-down Menus and notice the different tool options.
9. Using the View Controls in the bottom right-hand corner of the window, use the slider to increase and decrease the zoom setting (shown below).
10. Again, using the View Controls, click on the Show Whole Page
option to view your entire page.
11. Close Microsoft Publisher by clicking on the X icon in the top right-hand corner of the window.
Note: Do not save your publication.12. You are now ready to move on to Lesson 1.2 where you will begin learning the
many powerful features of Microsoft Publisher.
Lesson 1.1Navigating Publisher
InstructionsNow that you have reviewed the Publisher application interface, let’s continue with a brief exercise that will familiarize you with its working parts.
Note: This is the only lesson that you will not be required to save. However, you may be responsible for the material presented in this lesson on the Unit 1 Written Assessment.
2.
8.
3.
7.
Sample

6
Tools & Terms You’ll UseReview the following tools and terms that you will practice in this lesson, as you may be required to take a written assessment test after completing this unit.
Close the Publication: Use the Backstage View to Close the publication you are working in.
Blank 8.5 x 11”: Allows you to begin using a new blank publication.
Lesson OverviewThe week before Homecoming, the Student Council hosts Spirit Week. Each day of the week, students are encouraged to dress up according to a theme designated for each day. As Student Council secretary, one of your jobs is to create a flyer to publicize Spirit Week.
In this lesson, you will create a new publication and key text using different text boxes. This publication will be saved so that it can be edited for later use.
New Skills•� Creating and Saving a Publication
•� Inserting, Resizing, and Moving Text Boxes
Unit 1: Publication Basics
Spirit Week Working with Text
Lesson 1.2
Save: Use the Backstage View to Save your publication for the first time.
Note: You will be prompted to give the publication a file name the first time you are saving.
Browse: In the Backstage View, you can Browse the different places where your publication can be saved.
Alternatively, a quick way to Save is to use the Save icon located on the Quick Access Toolbar.
Text Box: Use this icon to insert a text box anywhere on your publication.
Note: You can use the move arrows to reposition a text box and the resizing handles to resize a text box when necessary.
Learn-by-Doing: Microsoft Publisher 2013
Sample

7
5b.
5d.
3.
4.
8.
4a.
Instructions
Unit 1: Publication Basics
Lesson 1.2Working with Text
1. Before you begin working in Publisher, create a folder on your hard drive or network and name it My Publisher Projects.
Note: All of the files that you create will be saved to this folder.
2. Launch Microsoft Publisher 2013.
3. From the Start screen, select Blank 8.5 x 11”.
4. From the FILE tab, click Save and do the following:
a. Click the Browse button and locate the folder named My Publisher Projects
b. Name the file 1.2 Spirit Week and click save
5. From the HOME tab, Objects group, do the following:
a. Click the Draw Text Box icon
b. At the top left-hand corner, drag the cross-shaped cursor diagonally on your page until vertical and horizontal margin guides appear
c. Within the text box, where the insertion point is blinking, key the text as shown in text box 1 in 1.2 Source Doc.
d. Notice that the text box is surrounded by resizing handles, which are used to make your text box bigger or smaller. Practice making your text box bigger or smaller by clicking, holding, and dragging the bottom right-hand corner handle to the right margin.
e. Create 6 more text boxes, and key the remaining text as shown in text boxes 2-7 in 1.2 Source Doc.
f. To move each text box to its approximate placement on the page, hover your mouse over any edge of the text box. Your mouse cursor will become a four-sided arrow (move arrows). Click to move each text box to its approximate place on your page as shown in 1.2 Source Doc.
6. Proofread your publication for accuracy and format.
7. Resave the file using the Save icon on the Quick Access Toolbar.
8. From the FILE tab, click Close.
9. Close Publisher by clicking on the X in the top right-hand corner of the screen.
4. 5.
Sample

8
1.2 Source Doc.
Lesson 1.2
Spirit Week
Day 1: Mismatch Day
Your clothes don’t have to match on this day.
Day 2: Pajama Day
Break out the annels and bunny slippers!
Day 3: Twin Day
Grab your best friend and plan matching ou�its.
Day 4: Cultural Day
Dress in the clothing your ancestors wore.
Day 5: School Color Day
Show school spirit and wear blue and white today!
Week of Nov 15‐19, 20XX
Sponsored by the Student Council
Working with Text
1
2
3
4
5
6
7
Learn-by-Doing: Microsoft Publisher 2013
Sample

9Unit 1: Publication Basics
Tools & Terms You’ll UseReview the following tools and terms that you will practice in this lesson, as you may be required to take a written assessment test after completing this unit.
Print a Publication: From the File Tab, use the Backstage View to print your publication. The printer options and page setup can also be determined at this point. Alternatively, you can use the Print icon located on the Quick Access Toolbar.
Open an Existing Publication: From the Start screen, you can retrieve a previously saved publication by clicking Open Other Publications.
Save As: From the File tab, use the Backstage View to save an existing publication with a new name.
Lesson OverviewAfter showing your Spirit Week flyer to the Student Council Advisor, he suggests that you add formatting to make it more visually appealing so that all students will notice it.
In this lesson, you will open an existing publication and make formatting changes to the text to make it more visually appealing.
New Skills•� Opening an Existing/Recent Publication
•� Using Save As
•� Changing Font
•� Increasing/Decreasing Font Size
•� Changing Font Color
•� Applying Bold, Italic, and Underline
•� Changing Case
•� Changing Character Spacing
•� Printing a Publication
Unit 1: Publication Basics
Spirit Week (Part 2)Formatting Text
Lesson 1.3
Font: Use this drop-down menu to select a new font for your text.
Font Size: Use this drop-down menu to change the size of your text.
Font Color: Use this drop-down menu to change the color of your text.
Bold: Use this icon to make your text bold for emphasis.
Italic: Use this icon to italicize your text.
Underline: Use this icon to underline your text.
Increase Font Size: Use this icon to make your text bigger in point size.
Decrease Font Size: Use this icon to make your text smaller in point size.
Change Case: Use this drop-down menu to change the selected text to uppercase, lowercase, or other common capitalizations.
Character Spacing: Use this drop-down menu to adjust the space between characters.Sample
10
2a.
3.
2b.
Learn-by-Doing: Microsoft Publisher 2013
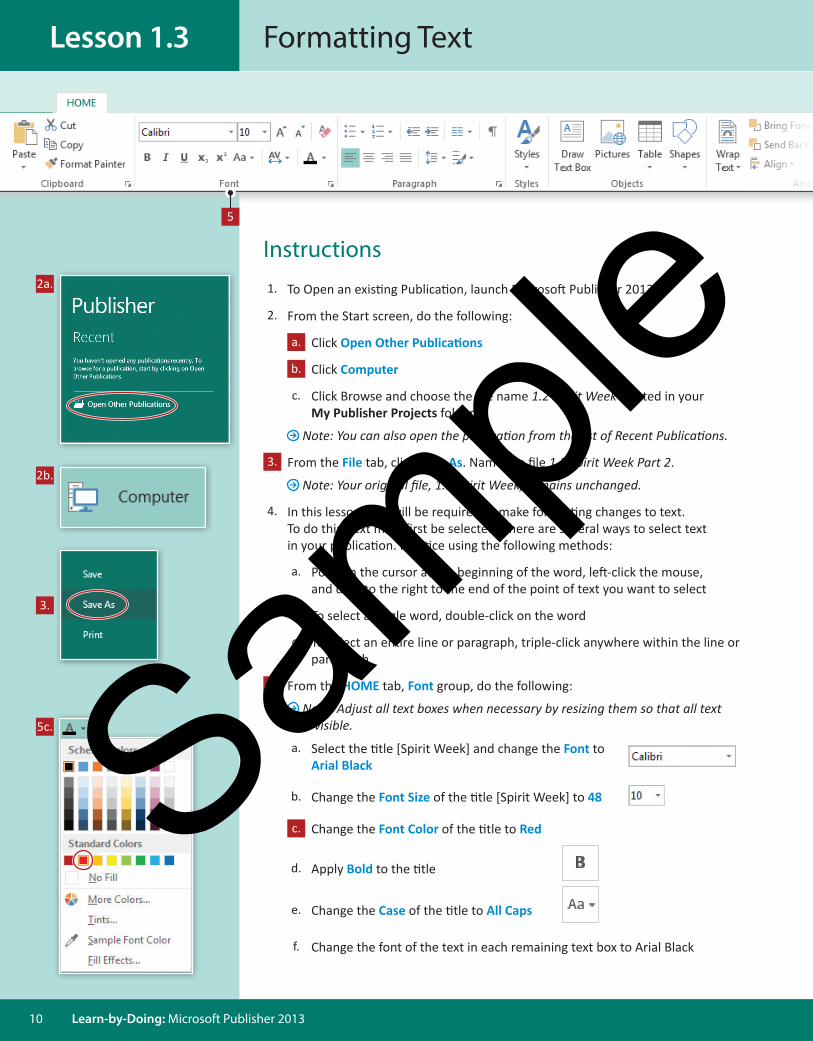
Instructions1. To Open an existing Publication, launch Microsoft Publisher 2013.
2. From the Start screen, do the following:
a. Click Open Other Publications
b. Click Computer
c. Click Browse and choose the file name 1.2 Spirit Week located in your My Publisher Projects folder
Note: You can also open the publication from the list of Recent Publications.
3. From the File tab, click Save As. Name the file 1.3 Spirit Week Part 2.
Note: Your original file, 1.2 Spirit Week, remains unchanged.
4. In this lesson, you will be required to make formatting changes to text. To do this, text must first be selected. There are several ways to select text in your publication. Practice using the following methods:
a. Position the cursor at the beginning of the word, left-click the mouse, and drag to the right to the end of the point of text you want to select
b. To select a single word, double-click on the word
c. To select an entire line or paragraph, triple-click anywhere within the line or paragraph
5. From the HOME tab, Font group, do the following:
Note: Adjust all text boxes when necessary by resizing them so that all text is visible.
a. Select the title [Spirit Week] and change the Font to Arial Black
b. Change the Font Size of the title [Spirit Week] to 48
c. Change the Font Color of the title to Red
d. Apply Bold to the title
e. Change the Case of the title to All Caps
f. Change the font of the text in each remaining text box to Arial Black
Formatting TextLesson 1.3
5c.
5
Sample

11
8.
Formatting Text
Unit 1: Publication Basics
Lesson 1.3
g. Change the Character Spacing of the title to Loose
h. Select the text [Week of Nov 15-19, 20XX/Sponsored by the Student Council] and change the font size to 12
i. Select each Day title [Day 1:, Day 2:, Day 3:, …], and Increase Font Size to 28
j. Change the font size of each dress theme title [Mismatch Day, Pajama Day, Twin Day…] to 36 and apply Italic
k. Change the font size of each dress theme tag line [Your clothes don’t have to match on this day, Break out the flannels and bunny slippers…] to 16 and apply Underline
l. Change each dress theme title and tag line to the colors listed below.
Hint: These colors are located in the Standard Colors section of the font color menu. Hover the cursor over the color options to see color names.
Mismatch Day - Blue
Pajama Day - Green
Twin Day - Dark Red
Cultural Day - Orange
School Color Day - Light Blue
6. Proofread your publication for accuracy and format, then resave the file.
7. When complete, your publication should look similar to 1.3 Source Doc.
8. From the FILE tab, click Print.
Note: Publisher lets you preview the publication on screen before printing.
5g.
5l.
Sample

12
1.3 Source Doc.
SPIRIT WEEK
Day 1: Mismatch DayYour clothes don’t have to match on this day.
Day 2: Pajama DayBreak out the flannels and bunny slippers!
Day 3: Twin DayGrab your best friend and plan matching outfits.
Day 4: Cultural DayDress in the clothing your ancestors wore.
Day 5: School Color DayShow school spirit and wear blue and white today!
Week of Nov 15-19, 20XX
Sponsored by the Student Council
Learn-by-Doing: Microsoft Publisher 2013
Formatting TextLesson 1.3
Sample

13Unit 1: Publication Basics
Tools & Terms You’ll UseReview the following tools and terms that you will practice in this lesson, as you may be required to take a written assessment test after completing this unit.
Center: Use this icon to horizontally center content.
Align Left: Use this icon to align content to the left.
Align Right: Use this icon to align content to the right.
Line Spacing: Use this drop-down menu to choose how much space appears between lines of text.
Bullets: Use this drop-down menu to create a Bulleted List.
Using the drop-down menu allows for selection of different bullet options from the Bullet Library.
Numbering: Use this drop-down menu to create a Numbered List.
Using the drop-down menu allows for selection of different numbering formats from the Numbering Library.
Lesson OverviewCyber Awareness is an important part of technology education at your school. The technology teacher has asked for your help in designing a poster that outlines some “Cyber Tips” to be displayed in the school showcase.
In this lesson, you will create a poster that will include lists outlining important cyber tips.
New Skills•� Creating Numbered and Bulleted Lists
•� Changing Line Spacing
•� Changing Text Alignment
Unit 1: Publication Basics
Cyber Tips PosterAligning Text
Lesson 1.4
Justify: Use this icon to distribute your text evenly to form a straight edge on the left and right sides of your text box. Sample

14 Learn-by-Doing: Microsoft Publisher 2013
Instructions
Aligning TextLesson 1.4
1. Using Microsoft Publisher 2013, create a new Blank 8.5 x 11” publication.
2. Save the file as 1.4 Cyber Tips Poster in your My Publisher Projects folder.
3. Using different text boxes, key the text as shown in 1.4 Source Doc. A.
Note: Resize and place each text box in the approximate position shown in 1.4 Source Doc. A.
4. From the HOME tab, Paragraph group, do the following:
a. Center align the text in text box 1
b. Justify all of the text in text boxes 2 and 4
c. In text box 3, create a Bulleted List using large bullets
Hint: Hover the cursor over the bullet options to see bullet style names.
d. In text box 5, create a Numbered List
Hint: Hover the cursor over the numbering options to see numbering style names.
e. Change the Line Spacing of text boxes 2 and 4 to 1.0
f. Change the line spacing of text boxes 3 and 5 to 1.5
5. Make the following formatting changes:
Note: As you make formatting changes throughout this textbook, you may need to resize your text boxes so that all text is visible.
a. Change the font of the text in text box 1 to Arial Black, the font size to 48, and the font color to dark red
b. Change the font of the text in text boxes 2 and 4 to Arial Black, and the font size to 16
c. Change the font of the text in text boxes 3 and 5 to Arial, the font size to 14, and the font color to dark red
d. Apply underline to the text [Cyberbullying] in text box 2 and the text [Text Message Safety] in text box 4
6. Proofread your publication for accuracy and format, then resave the file.
7. When complete, your publication should look similar to 1.4 Source Doc. B.
8. Print a copy if required.
4e.
4c.
4.
4d.
Sample

15
1.4 Source Doc. A
Cyber Tips
Cyberbullying can be a dangerous situa�on. When faced with this kind of situa�on, it can be temp�ng to bully back. However, seeking revenge will only make condi�ons worse. Here are ve be�er strategies to deal with cyberbullying:
Tell a trusted adult who can help you deal with what’s happening.
Don’t seek revenge; don’t be a bully yourself!
Report the incident to the service provider, such as Facebook or Twi�er.
Block communica�on from the bully.
Maintain posi�ve online safety habits, like using strong passwords and avoiding sharing personal informa�on.
Text Message Safety is another important factor in our cyber world. Tex�ng is a great communica�on tool, but just as with any tool or technology, there are rules for tex�ng safely:
Never text while driving.
Give your number only to people you know and trust.
Don’t reply to a text if you don’t know or can’t tell who it is from.
Keep your texts or calling history private, and think twice before allowing someone to use your phone.
Never send inappropriate messages or take or share compromising photos.
1
2
3
4
5
Unit 1: Publication Basics
Aligning Text Lesson 1.4
Sample

16
1.4 Source Doc. B
Cyber Tips Cyberbullying can be a dangerous situation. When faced with this kind of situation, it can be tempting to bully back. However, seeking revenge will only make conditions worse. Here are five better strategies to deal with cyberbullying:
Tell a trusted adult who can help you deal with what’s happening.
Don’t seek revenge; don’t be a bully yourself!
Report the incident to the service provider, such as Facebook or Twitter.
Block communication from the bully.
Maintain positive online safety habits, like using strong passwords and avoiding
sharing personal information.
Text Message Safety is another important factor in our cyber world. Texting is a great communication tool, but just as with any tool or technology, there are rules for texting safely:
1. Never text while driving.
2. Give your number only to people you know and trust.
3. Don’t reply to a text if you don’t know or can’t tell who it is from.
4. Keep your texts or calling history private, and think twice before allowing someone
to use your phone.
5. Never send inappropriate messages or take or share compromising photos.
Learn-by-Doing: Microsoft Publisher 2013
Aligning TextLesson 1.4
Sample

This textbook uses school and workplace-themed lessons to introduce students to the powerful tools and features of Microsoft Publisher 2013. Each new set of Publisher 2013 skills are clearly explained using a step-by-step, illustrated format that makes learning come to life for the student.
Learn-by-Doing: Microsoft Publisher 2013 (Level 1) is designed to be used by students enrolled in a computer applications course that includes desktop publishing in its curriculum. The lessons in this book build upon one another. Skills and features are presented in an order ranging from basic to intermediate.
Features • Aligned to Common Core Standards• Designed and formatted for today’s interactive, visual learner• Teaches students basic to intermediate Microsoft Publisher 2013 skills• Lesson content is customized with school and workplace themes• Includes 25+ easy-to-follow lessons• Includes a comprehensive Curriculum Guide for mapping skills• Written and Performance Unit Assessments included on the Instructor’s Resource CD
Hands-on Lessons and Assessments
Microsoft
Publisher 2013
Learn-by-Doing: Microsoft Office 2013 SeriesOther titles included in the series:
As the name implies, the Learn-by-Doing Series gets students learning Microsoft O�ce 2013 by using its applications to do what is needed to communicate and share information in the real world of work and life.
Each title in the series is segmented into graphical, hands-on lessons that instantly engage today’s interactive, visual learner.
PowerPoint 2013Excel 2013 Access 2013
Available ResourcesStudent Textbook eBook Edition (PDF format)
Instructor’s Resource CD (Required)• Lesson Solutions• Unit Performance
Assessments and Solutions
• Unit Written Assessments and Solutions
Level 1
Word 2013
www.bepublishing.comISBN: 978-1-626890-54-1