Embed Size (px)
Citation preview

Tips & Tricks Microsoft® Office 2010 (Level 100)
You are the master of all you do
Microsoft® Office 2010 is a complete set of desktop programs, server software, and services that can help streamline the way you do
business. This latest release offers significant new capabilities to make it even easier to inspire people and capture their attention. Stay
connected to your team and your files, whether you’re heading home for the evening or to a hotel room on the other side of the
continent. Learn more about the Microsoft® Office 2010 at http://office.microsoft.com
The Ribbon at a glance
The Ribbon was designed to help make the Office applications easier to work with, and help users discover the rich
features and capabilities of Office. The menus and toolbars had expanded over the Years making it difficult for users to
find the commands they needed quickly and easily.
Find commands quickly
Traditional menus and toolbars have been replaced with tabs which group related commands together making it easier to
find and use features when creating or editing a document. Contextual tabs appear only when you are working on a
specific task, such as adding a graphic or formatting a table. These tabs provide quick access to rich formatting capabilities
in a few clicks.
The File Tab provides one location for all the things you can do with a file: save, share, print, and publish your files with
just a few clicks. And, with the improved Ribbon in Office 2010, you can access your favorite commands even more quickly
by customizing tabs or creating your own to personalize the experience to your work style.
Quick Access Toolbar Tabs Minimize
Ribbon Help Contextual
Tab
Dialog Box Launcher Group
Gallery

Key ribbon features and benefits
Ribbon: Displays the commands and tools you need to
perform various tasks. The Ribbon can also be minimized
and customized to fit your work style.
• Tabs: Display the commands you can use in a
Microsoft Office program. Click a tab to view its
commands.
• Contextual Tabs: Display commands for a selected
object.
• Dialog Box Launcher: Click to open a dialog box or
task pane.
• Group: Related commands that appear under each
tab.
• Gallery: A list of options and additional choices
displayed as thumbnail previews so you can see
results before making a choice.
• Quick Access Toolbar: Provides quick access to the
commands you use most frequently. The Save, Undo,
and Redo/Repeat buttons appear on the Quick
Access Toolbar by default.
• To Minimize the Ribbon: Click the Minimize
Ribbon button on the Ribbon. Or, press <Ctrl> +
<F1>. Or, double-click a tab on the Ribbon. Or,
right-click a tab and select Minimize Ribbon from
the contextual menu.
• To Customize the Ribbon: Right-click a tab and
select Customize the Ribbon from the contextual
menu. Or, click the File tab, select Options, and click
Customize Ribbon. Use the controls in the dialog
box to rename and rearrange tabs, and to rearrange
tab commands.
Click the New Tab button to create a new tab
on the Ribbon.
Click the New Group button to create a new
group in a tab on the Ribbon.
• To Add a Command to the Quick Access Toolbar:
Click the Customize Quick Access Toolbar button
and select a command from the menu. Click More
Commands to select from a longer list of
commands.
• Get Help: Click the Help button. Or, press <F1>. Or,
click the File tab and select Help from the menu.
Boost your productivity with
easy-to-use tools.
Enhancements in Office 2010 help you accomplish your work more intuitively so you can
focus on the task at hand and produce better results.
Office 2010 simplifies how you find
and use features. The new Microsoft
Office Backstage™ view replaces the
traditional File menu to give you
centralized and easy access to
operations like save and send, print,
and publish. With the improved
Ribbon, you can access more
commands quickly and customize it to
fit your work style.
The new Paste with Live Preview
feature, available in many Office 2010
programs, enables you to preview your
Paste Options before you paste.

• Info: Set permissions to control who can open or
change the document; prepare the file for sharing by
removing metadata and other personal information;
and view and manage autosaved versions of the
document.
• Recent: Displays documents most recently opened
in the program.
• New: Create a new blank document or create a
document from a template. Browse templates with
the preview feature in Backstage view.
• Print: Preview the document and select print
settings at the same time. The right pane displays a
preview of the file; the center pane displays print
options.
• Share: Share the file and change file type. There are
four ways to share a document:
1. Send Using E-mail: Send the document as an
attachment, a link, a PDF or XPS, or fax.
2. Save to SkyDrive: Save to a SkyDrive folder
through your Windows Live account.
3. Save to SharePoint: Saves to a SharePoint
workspace on your computer.
4. Publish: Publish the document to a service or
blog.

Key Microsoft Word 2010 Features and Benefits
Save time and
simplify your work
Word 2010 provides tools that make it easier to focus on your content, not the tasks
associated with creating and managing documents.
Browse and organize long documents with ease
The improved Navigation Pane (formerly called the
Document Map) gives you a visual representation of the
headings in your document.
Browse headings to quickly find your place within a
document and just click to go to that location.
Drag and drop headings to easily rearrange those
headings and the content beneath them.
To open the Navigation Pane: On the View tab, in the
Show group, select Navigation Pane.
Find what you need, when you need it
The improved Find experience is now seamlessly
integrated in the Navigation Pane. Word 2010
automatically searches as you type the term you need.
Just start typing a search term in the search box at the
top of the Navigation pane. The headings view in that
pane highlights the areas in the document in which
results appear, as you see here.
The thumbnails view filters to show you just the set of
pages that contain a search result.
The new results view shows a quick preview of all search
matches—click any preview to jump to that point in the
document.
Tip: The familiar Find and Replace dialog box is still
available for more advanced searches and Replace tasks.
To access this dialog box, in the Navigation Pane, click
the arrow that appears on the right side of the search
box. Or, press Ctrl+H.
Recover work you thought was lost
Recovered unsaved versions are automatically deleted after four days.
You can now recover documents after you accidentally close without saving, even if you had never saved the document.
Tor recover drafts of documents that were never saved, click the File tab on the Ribbon to open the new Microsoft Office
Backstage™ view. Then, on the Info tab, click Manage Versions.

Access up to the last five autosave versions of your previously saved active document from the Info tab in Backstage view.
By default, the last autosave version remains available temporarily if you close the document without saving.
Note: Recovering available unsaved documents and autosave versions requires you elect to save AutoRecover
information. To keep an autosave version until your next editing session you must also elect to keep the last autosaved
version when you close without saving. To access these options, in Backstage view click Options and then click Save.
Give your text the power to
jump off the page
When you need your text to be as powerful as your images, Word 2010 offers flexible
and easy-to-use tools that give new life to your words.
Text effects
Apply impressive effects directly to
the text in your document, as easily
as applying bold or underline.
Edit and even spell-check text that
uses effects just like any document
text.
Add text effects to styles, such as
to add impact to a heading style.
To apply text effects:
Select text.
On the Home tab of the Ribbon, in the Font
group, click the Text Effects button for
the option to select from one of several
preset text effect styles. Or, to select or
customize Outline, Shadow, Reflection, or
Glow effects.
Tip: Get more options for customizing text effects, including adding soft edges, 3-D bevels, and gradient outlines, in the Format
Text Effects dialog box. To access this dialog box, on the Home tab, in the Font group, click the dialog box launcher to open the
Font dialog box (or press Ctrl+D) and then, at the bottom of that dialog box, click Text Effects.
Keyboard shortcut tips: Select keyboard shortcuts for formatting:
Press the Alt key to view KeyTips. KeyTips appear on the Ribbon as letter or
number combinations that you press sequentially on the keyboard to
execute commands. Press a KeyTip to activate a Ribbon tab and then
press the KeyTip for your desired command. KeyTips are also available
for the Quick Access Toolbar and Backstage view.
Hover your mouse pointer on Ribbon commands and find keyboard
shortcuts in the ScreenTips. (Note not all commands have shortcuts.)
Many common commands use Ctrl + the first letter of the command. Here
are some examples:
New: Ctrl + N ● Open: Ctrl + O ● Save: Ctrl + S ● Print: Ctrl + P
Copy and paste formatting for text or objects. Copy formatting and then
paste as many times as needed during your current Word session:
Copy formatting: Ctrl + Shift + C ● Paste formatting: Ctrl + Shift + V
Open the Styles pane: Ctrl + Shift + Alt + S
Paste Special (to select from all paste options for your copied content): Ctrl
+ Alt + V
New shortcuts for working with a selected shape:
Resize: Shift + arrow keys ● Rotate: Alt + right or left arrow keys
Tip: To resize or rotate in smaller increments, add Ctrl to these key
combinations.
Key Microsoft PowerPoint 2010 Features and Benefits
Make the media fit the
message
Embed and edit videos right in PowerPoint 2010. Trim your video, add fades,
formatting effects, and bookmark scenes for the perfect multimedia experience.
Video you insert from your files is now embedded in your presentation by default, so you don’t have to manage multiple
files when sharing with others.
To insert a video onto a slide, on the Insert tab, in the Media group, click Video and then click Video from File.
Or, click the video icon in the center of any content placeholder. The Video Tools Format and Playback tabs
appear automatically when a video is selected.
Explore some of the tools available for formatting and editing the videos you insert from your files:
On the Video Tools Format tab, in the Adjust group,
click Poster Frame to select a frame from the video or a
picture from your files to fill the video area on your slide
while the video is not playing. Use your slide area to tell
your story more effectively and avoid solid black
rectangles that are difficult to print.
Also on the Video Tools Format tab, in the Video Styles
group, apply a wide range of formatting styles and effects
that include shapes, shadows, reflections, bevels, 3-D
rotation and more. The formatting you apply is retained
while your video plays.
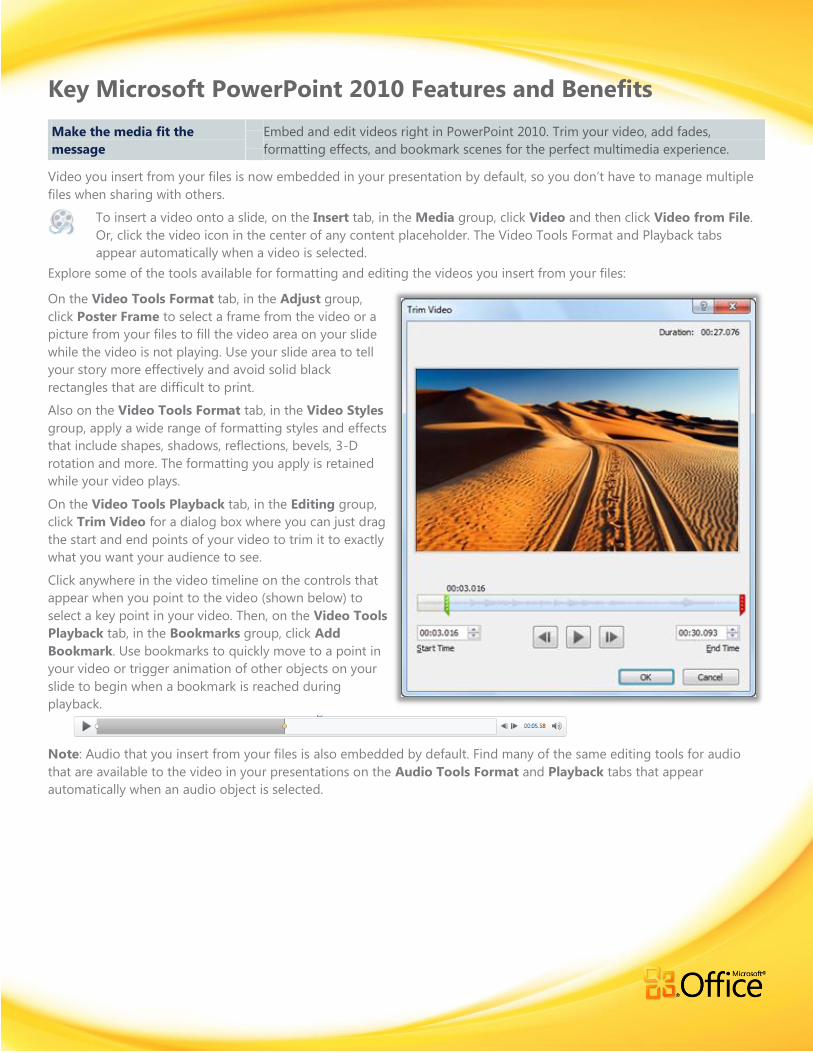
On the Video Tools Playback tab, in the Editing group,
click Trim Video for a dialog box where you can just drag
the start and end points of your video to trim it to exactly
what you want your audience to see.
Click anywhere in the video timeline on the controls that
appear when you point to the video (shown below) to
select a key point in your video. Then, on the Video Tools
Playback tab, in the Bookmarks group, click Add
Bookmark. Use bookmarks to quickly move to a point in
your video or trigger animation of other objects on your
slide to begin when a bookmark is reached during
playback.
Note: Audio that you insert from your files is also embedded by default. Find many of the same editing tools for audio
that are available to the video in your presentations on the Audio Tools Format and Playback tabs that appear
automatically when an audio object is selected.

Add impact to your images Fine-tune the pictures in your presentations without the need for additional photo-
editing programs.
Turn your images into works of art
Use new and improved picture editing tools in PowerPoint 2010 to get just
the right image for your story every time. Apply professional-quality artistic
effects, such as the Glow Edges, Cutout, and Glass effects shown here
clockwise from right. Use a new Remove Background tool and share only
what you want your audience to see, as shown top-left. Or use new and
improved color and correction tools to adjust the image to suit your
specific needs, such as for use as a slide background as you see here.
1. Select a picture. The Picture Tools Format tab automatically displays.
2. In the Adjust group, click Artistic Effects to preview a wide range of
effects that you can apply to your picture. Also in the Adjust group,
explore Color and Correct options as well as a new Remove
Background tool.
Note: At the bottom of the Artistic Effects, Color and Corrections galleries,
find an Options command that opens a dialog box where you can further
customize formatting and effects.
Get the perfect picture every time
With improved cropping, available on the
Picture Tools Format tab in the Size
group, you see the entire image while
making your adjustments. You can also
move and resize the image within the crop
area to easily show exactly the image you
want. Or, expand the Crop menu as shown
here for the options to crop to a shape, to a
specific aspect ratio, or to instantly fill or fit
your image proportionally within the crop
area.
Tip: Positioning pictures and media
objects on your slides is easier than ever
with new Smart Guides. As you drag a
shape, picture, or media object on a
slide (other than those in placeholders)
guides appear automatically to show
when alignment is precise.

Create dynamic, animated
presentations
Add new and improved transitions and more realistic animations to grab your
audience’s attention.
Guide your audience in
3-D
Slide transitions can help
your presentations look
more polished, flow more
smoothly, and emphasize
key talking points. Choose
from an array of new and
improved transition effects,
including many high-quality
3-D transitions. On the new
Transitions tab of the
Ribbon, point to a
transition—such as the new
Gallery transition shown
here—to instantly see a
preview on your active slide.
Paint a story with animation
After you take the time to customize an
animation sequence, do you have to start all
over again when you need the same
animation settings for other objects in your
presentation? Not anymore. The new
Animation Painter works very much like the
popular Format Painter tool available in
several Microsoft Office programs for
copying the formatting of text and objects.
Select the object that contains the set of
animations you want to copy and then, on
the Animations tab, in the Advanced
Animation group, click Animation Painter.
Then, just click the object to which you want
to apply the copied animation.
Tip: Double-click the Animation Painter command to lock it in the on position and then apply selected
animation to as many objects as you need, on other slides and even in other presentations.
Keyboard shortcut tips: Select keyboard shortcuts for formatting:
Press the Alt key to view KeyTips. KeyTips appear on the Ribbon as letter or
number combinations that you press sequentially on the keyboard to
execute commands. Press a KeyTip to activate a Ribbon tab and then
press the KeyTip for your desired command. KeyTips are also available
for the Quick Access Toolbar and Backstage view.
Hover your mouse pointer on Ribbon commands and find keyboard
shortcuts in the ScreenTips. (Note not all commands have shortcuts.)
While in Slide Show view, press F1 for a dialog box containing many
keyboard shortcuts for use while presenting, including several new
shortcuts for working with video and audio objects.
Many common commands use Ctrl + the first letter of the command. Here
are some examples:
New: Ctrl + N ● Open: Ctrl + O ● Save: Ctrl + S ● Print: Ctrl + P
Copy and paste formatting for text or objects. Copy formatting and then
paste as often as needed during your active PowerPoint session:
Copy formatting: Ctrl + Shift + C ● Paste formatting: Ctrl + Shift + V
Clear formatting of the selected text (or all text within the selected text box):
Ctrl + Spacebar
Use the new Animation Painter to copy the animation settings of the
selected object: Alt + Shift + C. Then, just click the object to which you
want to apply the copied animation.
New shortcuts for working with a selected shape:
Resize: Shift + arrow keys ● Rotate: Alt + right or left arrow keys
Tip: To resize or rotate in smaller increments, add Ctrl to these key
combinations.

Key Microsoft Excel 2010 Features and Benefits
Turn complexity into clarity: Make your work stand out
New visualization and analysis tools help you analyze your information more
effectively and create compelling visualizations.
Create powerful data insights and
visuals
The Sparklines feature in Excel 2010
enables you to present a clear and
compact visual of your data in small
charts within a worksheet cell.
1. Select the cells in which you would
like to place Sparklines.
2. On the Insert tab, in the Sparklines
group, click Line, Column, or
Win/Loss.
3. In the Create Sparklines dialog box, select the associated values
from which to create Sparklines. (Do not include data labels when
selecting associated values.)
To customize your Sparklines: Select cells containing Sparklines. On
the Sparkline Tools Design tab, which displays automatically, find
options to change the Sparkline type, style, and more. Use the Clear
options to remove Sparklines.
Illustrate important trends and highlight data
exceptions
New styles,
icons, and data
bar options help
you quickly
visualize and
comprehend
data.
1. Select a range
of values.
2. On the Home tab, in the Styles group, click
Conditional Formatting.
3. Select a conditional format from an available
gallery.
Tip: Use the More Rules option at the bottom of
a gallery to further customize your conditional
formatting.
SLICERS
Slicers are visual controls that let you quickly filter data
in a PivotTable in an interactive, intuitive way. If you
insert a slicer, you can use buttons to quickly segment
and filter the data to display just what you need. In
addition, when you apply more than one filter to your
PivotTable, you no longer have to open a list to see
which filters are applied to the data. Instead, it is shown
there on the screen in the slicer. You can make slicers
match your workbook formatting and easily reuse them
in other PivotTables, PivotCharts, and cube functions.

IMPROVED CONDITIONAL FORMATTING
Conditional formatting makes it easy to highlight interesting cells or ranges of cells, emphasize unusual values, and
visualize data by using data bars, color scales, and icon sets. Excel 2010 includes even greater formatting flexibility:
New icon sets First introduced in Office Excel 2007,
icon sets let you display icons for different categories
of data, based on whatever threshold you determine.
For example, you can use a green up arrow to
represent higher values, a yellow sideways arrow to
represent middle values, and a red down arrow to
represent lower values. In Excel 2010, you have access
to more icon sets, including triangles, stars, and boxes.
You can also mix and match icons from different sets
and more easily hide icons from view—for example,
you might choose to show icons only for high profit
values and omit them for middle and lower values.
More options for data bars Excel 2010 comes with
new formatting options for data bars. You can apply
solid fills or borders to the data bar, or set the bar
direction from right-to-left instead of left-to-right. In
addition, data bars for negative values appear on the
opposite side of an axis from positive values, as shown
here.
Other improvements When specifying criteria for
conditional or data validation rules, it's now possible
to refer to values in other worksheets in your
workbook.
Keyboard shortcut tips Miscellaneous keyboard shortcuts
Press the Alt key to view KeyTips. KeyTips appear on the Ribbon with letter
or number combinations you press sequentially on the keyboard to
execute commands. Press a KeyTip to activate a Ribbon tab and then
press the KeyTip for your desired command.
Note: KeyTips are also available for the Quick Access Toolbar and
Backstage view.
Hover your mouse pointer on Ribbon commands and find keyboard
shortcuts in the ScreenTips. (Note not all commands have shortcuts.)
Many common commands use Ctrl + the first letter of the command. Here
are a few examples:
New: Ctrl + N ● Open: Ctrl + O ● Save: Ctrl + S ● Print: Ctrl + P
Below is a sampling of the many keyboard shortcuts Excel has to offer. To
find additional keyboard shortcuts: Press F1 to open Help and then
search for Keyboard Shortcuts.
To insert the AutoSum function: Press Alt + =
To start a new line in the same cell: Press Alt + Enter
To select the current region: Press Ctrl + Shift + Spacebar
To toggle the size of the Excel formula bar: Press Ctrl + Shift + U
New shortcuts for working with shapes:
Resize: Shift + arrow keys ● Rotate: Alt + right or left arrow keys
Tip: To resize or rotate in smaller increments, add Ctrl to these key
combinations.

Key Microsoft Outlook 2010 Features and Benefits
Get straight to the facts: View only the relevant details
New e-mail management features in Outlook 2010 help you reduce information
overload and keep your inbox under control.
Conversation management in Outlook 2010
Conversation View helps reduce information overload
and manage large amounts of e-mail with ease. Entire e-
mail conversations can be cleaned up, categorized, or
even ignored, with a few simple clicks.
Easily view the entire conversation: Click the arrow to
the left of a selected e-mail to expand the
conversation and reveal all messages in the
conversation thread.
Remove redundant messages and save valuable
inbox space: On the Home tab, in the Delete group,
click Clean Up and find options to clean up the
selected conversation or all conversations in the
active folder or subfolders.
Ignore a Conversation: On the Home tab, in the
Delete group, click Ignore. Outlook 2010 will move
those messages, and future messages in the
conversation, to your Deleted Items folder.
Start harnessing the power of Conversation View!
1. On the View tab, in the Conversations group, select
Show as Conversations.
2. Choose to turn on Conversation View for the current
folder or all folders.
To modify your Conversation View preferences:
1. On the View tab, in the Conversations group, click
Conversation Settings.
2. Select or deselect the various options in the list to
modify your settings.

Locate your vital
information more efficiently
Use contextual Search Tools to help you quickly narrow your search and build
advanced search criteria.
Let Outlook do your searching for you
Instantly sort through high volumes of data and find
what you need when you need it. Click in an Instant
Search box, type your search string, add additional
criteria, and let Outlook do the rest.
To use Instant Search and the contextual Search Tools:
1. Place your insertion point in an Instant Search box,
available in all of your Outlook views. The Search
Tools automatically display.
2. Type your search string. You can also use the
following:
Place quotes around your search string to search
for an exact phrase.
Use AND to include all search terms. (Note: This
is the default behavior.)
Use OR to match either of your search terms.
Use NOT to exclude a search term.
Note: Boolean operators (AND, OR, NOT) must be
typed in uppercase.
3. Outlook will instantly preform your search and
highlight your search results.
4. Narrow your results. On the Search Tools Search
tab, use the options the Refine group to add
additional criteria. For example, click From and type
all or part of a person’s name or click the More
button to search on other properties.
5. If your search is not found, try broadening your
search using the options available in the Scope
group.
Note: The options available in the Refine group change
based on your Outlook view.
Tip: When you type in a Search box, AutoComplete suggestions will dynamically display to help refine
your search. To use a suggestion, click an item in the list or press your Down arrow key to highlight the
suggestion and then press Enter.
Flexible calendar sharing: Share your schedule with ease
If you’re new to Outlook, or wondering what you may have missed, check out these
calendar sharing options that enable you to share your schedule with others.
E-mail a snapshot of your calendar
It’s easy to share your calendar with those outside of
your organization. You can e-mail your calendar so it
can be viewed by others even if they don’t have
Outlook installed.
To send your calendar via e-mail:
1. View your Outlook calendar. On the Home tab, in
the Share group, click E-Mail Calendar.
2. In the Send a Calendar via E-mail dialog box, specify
your sharing options, such as date range and level
of calendar details you wish to display, and click OK.
3. Verify your calendar details in the resulting e-mail,
add e-mail recipients, and then send your e-mail.

Invite other Microsoft Exchange users to share your
calendar
When you use a Microsoft Exchange Server account,
you can share your Exchange calendar with others in
your organization.
To send an invitation for calendar sharing:
1. View your Outlook calendar. On the Home tab, in
the Share group, click Share Calendar.
2. In the resulting e-mail, add an e-mail recipient,
specify the level of calendar details you wish to
share, and then send the invitation.
Sharing permissions are read-only by default. To modify
your calendar sharing permissions:
View your Outlook calendar and on the Home tab, in the
Share group, click Calendar Permissions.
Make scheduling a breeze: Switch to a new view
Outlook 2010 introduces Schedule View for viewing multiple calendars and helps
simplify viewing availability and scheduling meetings.
Schedule your meetings more intuitively
The new Schedule View slices a group of calendars
horizontally and streamlines their display. The combined
timeline at the top of the view makes it easy to find an
available time for your next meeting.
To switch to Schedule View:
1. View your Outlook calendar. On the Home tab, in
the Arrange group, click Schedule View.
2. To open another calendar, such as a shared
Exchange calendar or a calendar published on
Office.com, do one of the following:
3. In the Calendar Navigation pane, select additional
calendars.
4. On the Home tab, in the Manage Calendars group,
click Open Calendar and make a selection.
To create a meeting request with all group members, do
one of the following:
1. On the combined timeline at the top of the view,
select an available time slot. On the Home tab, in
the New group, click New Meeting, and then click
New Meeting with All.
2. On the combined timeline at the top of the view,
double-click an available time slot.
Your calendar view will change automatically depending
on the number of calendars you choose to display.
By default, when you select five or more calendars, your
view will automatically switch to Schedule View. To
modify the threshold for automatic view switching:
1. Click the File tab to open Backstage view. Click
Options, and then click Calendar.
2. Find options for your Schedule View preferences
below the Display Options heading.
Tip: If you’re an Exchange user, select your Team calendar group in the Calendar Navigation Pane and
the calendars for your entire team will instantly display.

Accomplish your tasks with
fewer steps
New scheduling tools in Outlook 2010 help you schedule your resources faster and
save time by reviewing your calendar as you take action on a meeting request.
Schedule your conference room with ease
If you’re an Exchange user, you can schedule a room for
your meeting directly from a new meeting request. Just
choose a group of rooms, or building, for your meeting
and the new Room Finder will show you all rooms that
are free at that given time.
To display the Room Finder:
1. Create a new meeting request.
2. On the Meeting tab, in the Options group, click
Room Finder.
Note: Microsoft Exchange Server 2010 is required.
View your meeting request and your calendar at the
same time
Handling a meeting request usually involves three steps:
1. Reading the meeting request
2. Checking your calendar
3. Responding to the request
Now when you receive a meeting request, the new
calendar preview helps you better understand how it
affects your calendar without leaving your inbox.
The new Calendar preview automatically appears when
you receive a meeting request.
Keyboard shortcut tips New keyboard shortcuts
Press the Alt key to view KeyTips. KeyTips appear on the Ribbon with letter
or number combinations you press sequentially on the keyboard to
execute commands. Press a KeyTip to activate a Ribbon tab and then
press the KeyTip for your desired command. KeyTips are also available
for the Quick Access Toolbar and Backstage view.
Hover your mouse pointer on Ribbon commands and find keyboard
shortcuts in the ScreenTips. (Note not all commands have shortcuts.)
Many common commands use Ctrl + the first letter of the command. Here
are a few examples:
New: Ctrl + N ● Open: Ctrl + O ● Save: Ctrl + S ● Print: Ctrl + P
Conversation management tools in Outlook:
To Clean up a selected conversation: Press Alt + Delete
To Ignore a selected conversation: Press Ctrl + Delete
Switch to Schedule View:
In Calendar view, press Ctrl + Alt + 5

Resources
Online Training
Office Online – Everything you need to know about the Microsoft® Office 2010.
http://office.microsoft.com/en-us/default.aspx
Office Online Getting Started Page – Helpful resources to help you ramp-up on the new release.
http://office.microsoft.com/en-us/support/getting-started-with-office-2010-FX101822272.aspx
Get Quick Office Tips – The latest tips and tricks for the new Microsoft® Office 2010.
http://www.microsoft.com/office/greattips
Tips and Tricks by Product – Quick product reference to help you simplify everyday tasks.
http://www.microsoft.com/office/greattips/products.mspx
2003-2010 Command Reference Guides – Find the commands you’re looking for…fast!
http://office.microsoft.com/en-us/support/learn-where-menu-and-toolbar-commands-are-in-office-2010-and-
related-products-HA101794130.aspx
Other Resources
Microsoft® Office Labs
http://office.microsoft.com/en-us/office-labs/office-labs-FX100996049.aspx?CTT=97
Official Microsoft® E-Learning
http://learning.microsoft.com
http://microsoft.com/learning/en/us/training/offi ce.aspx
Microsoft Press® Books
http://microsoft.com/mspress